Mathematics 9709/22 — October/November 2024
Cambridge AS Level · Pure Mathematics 2 · worked solutions for every part, with the mark scheme
Topics Logarithmic and Exponential Functions · Differentiation · Integration · Algebra · Trigonometry · Numerical Solution of Equations
Use logarithms to show that the equation can be expressed in the form . Give the value of the constant correct to 3 significant figures.
Approach
Take natural logarithms of both sides so that the powers can be brought down using the power law of logarithms. Then rearrange the resulting linear equation to isolate as a multiple of , and identify the constant .
Working
Take logarithms of both sides:
Apply the power law :
Divide both sides by to make the subject:
Hence the equation is of the form , where
Answer
k = 0.974 (3 s.f.)
Walkthrough
The unknown appears in the exponents, so logarithms are the natural tool. Taking logarithms of both sides of
gives
Any consistent base may be used; natural logarithms are standard. Using the power law, the exponents can be brought down:
This is now a linear equation in and . To write it in the form , divide both sides by :
Therefore . Evaluating this constant gives approximately , so the original equation can be expressed as
correct to 3 significant figures.
Key Takeaways
- Logarithms convert equations with unknown exponents into linear equations.
- The power law is the key step.
- The value of is independent of the base of logarithm chosen.
- The final form has no constant term, so the graph is a straight line through the origin.
Common Mistakes
- Taking logarithms of individual terms instead of both whole sides.
- Forgetting to divide by the full coefficient when isolating .
- Rounding intermediate values too early, which can change the third significant figure.
- Writing instead of ; three significant figures require three digits.
Things to Be Careful About
- Keep the coefficients in the correct places: belongs with and belongs with .
- Use the same logarithmic base on both sides of the equation.
- The exact answer is acceptable, and the decimal answer should be given to 3 significant figures as .
- The mark scheme allows different bases, but the final constant must be the same.
Let .
Approach
Differentiate using the chain rule, then substitute to evaluate the derivative at that point.
Working
Differentiate using the chain rule. Let , so :
Using the double angle identity , this can also be written as:
Now substitute :
Since and :
Answer
-12
Walkthrough
We are asked to differentiate and evaluate the derivative at .
The function is a composite function. Breaking it down: we first compute , then take the sine of that, then square the result, then multiply by 4. To differentiate a composite function, we use the chain rule, working from the outside in.
The outermost operation is multiplication by 4 (a constant, which just carries through). Inside that, we have the square of . The chain rule says: differentiate the square first (bringing down the power 2 and reducing it by 1), then multiply by the derivative of , which is (the derivative of sine is cosine, and the chain rule on gives the factor of 3).
So: .
An equivalent form uses the double-angle identity , giving . Both forms are accepted by the mark scheme.
Next, substitute . The argument becomes . We need and . The angle is in the second quadrant, where sine is positive and cosine is negative. The reference angle is , so and .
Multiplying: .
Key Takeaways
- The chain rule is the fundamental tool for differentiating composite functions like . You must differentiate each "layer" in turn and multiply the results.
- The double-angle identity can simplify derivative expressions and is often useful for checking answers.
- Exact trigonometric values for standard angles (multiples of , , etc.) must be known. Remember the signs in each quadrant: in the second quadrant, sine is positive but cosine and tangent are negative.
Common Mistakes
- Forgetting the factor of 3 from differentiating inside the sine. The derivative of is , not .
- Forgetting the factor of 2 from differentiating the square. The derivative of is .
- Sign errors: is negative, so the final answer is negative.
- Substituting into incorrectly — the argument becomes , not .
Things to Be Careful About
- The mark scheme requires showing the differentiation step (M1) before the final answer — an unsupported answer would not earn full marks.
- When using the alternative form , at we get , which matches.
- Make sure your calculator (if used) is in radian mode, since the question uses .
Approach
Use the double-angle identity to rewrite the integrand in a form that can be integrated directly.
Working
Apply the identity with :
Now integrate term by term:
Answer
2x - (1/3)sin 6x + C
Walkthrough
We need to find the indefinite integral of .
The integrand cannot be integrated directly in its current form. The standard technique is to rewrite it using a trigonometric identity. The double-angle identity for cosine, , can be rearranged to give .
Applying this with :
.
Now the integrand is a sum of two terms, each of which can be integrated using standard results:
The general rule used here is . Here , so we divide by 6.
Combining the two results (and adding the constant of integration):
.
Key Takeaways
- To integrate or terms, always use the double-angle identities to convert them into linear combinations of or .
- When integrating or , remember to divide by the coefficient .
- Always include the constant of integration for indefinite integrals.
Common Mistakes
- Forgetting to divide by 6 when integrating . The integral of is , not .
- Incorrectly applying the identity: , not . The factor of 4 divided by 2 gives 2.
- Omitting the constant of integration — this would lose a mark.
- Confusing the identity: , not (that's for ).
Things to Be Careful About
- The mark scheme requires showing the identity step (M1) before integrating — you must demonstrate that you rewrote the integrand.
- The final answer can be written in equivalent forms, but is the standard form.
- Check your answer by differentiating: , which matches the rewritten integrand.
A curve has equation .
Find the gradient of the curve at the point .
Approach
Differentiate the equation implicitly with respect to , using the product rule for . Then collect the terms containing , make the subject, and substitute , .
Working
Differentiating each term with respect to :
So the differentiated equation is:
Collect the terms:
Therefore:
At the point , we have and .
Substitute:
Answer
Equivalently, .
5/2
Walkthrough
The curve is defined implicitly because is not written as a function of ; it appears inside multiplied by an -dependent factor. To find the gradient , differentiate every term of the equation with respect to , remembering that is a function of , so any term involving must include .
The first term is a product of and . Since both factors depend on (the second through ), use the product rule. The derivative of is , and the derivative of with respect to is . This gives .
Then differentiates to , differentiates to , and the constant differentiates to .
Now collect all terms containing on one side and all other terms on the other. Factor out and divide to obtain the formula for the gradient. Finally substitute and . Use and to simplify, giving .
Key Takeaways
This question tests implicit differentiation, the product rule, and careful substitution using logarithm and exponential properties. It shows how to differentiate an equation where is not isolated, and how to evaluate the resulting derivative at a specific point.
Common Mistakes
- Forgetting the factor when differentiating : , not .
- Differentiating the constant as instead of ; the mark scheme specifically disallows including in the derivative of .
- Incorrectly applying the product rule to , such as differentiating both factors completely instead of using one factor times the derivative of the other.
- Making an algebraic sign error when collecting the terms.
Things to Be Careful About
- The derivative of is ; the minus sign is easy to lose.
- At , , not ; use .
- The mark scheme requires at least one from implicit differentiation to be present; an answer with an incorrect term scores no method mark for rearrangement.
- Both numerator and denominator are negative at the point, so the gradient is positive .
Approach
Sketch the two graphs on the same axes. The curve is an increasing exponential curve with horizontal asymptote ; it passes through . The graph is V-shaped with vertex at , using the lines for and for . The two graphs meet once, at , on the left branch of the modulus graph.
Working
The exponential curve lies above for all and increases rapidly as increases.
The modulus graph has its vertex at and crosses the -axis at .
There is exactly one intersection point , with , on the branch .
Answer
A sketch showing the increasing exponential curve , the V-shaped graph , and their single intersection point .
Sketch with one intersection point P
Walkthrough
Start by sketching the exponential graph. The basic curve has as and passes through . Adding shifts it up, so the asymptote becomes and the curve passes through . It is always above and increases without bound as increases.
Next sketch the modulus graph. For , , a line of slope ; for , , a line of slope . This gives a V shape with vertex and -intercept .
The exponential curve starts near on the left and rises; the modulus graph starts at and falls until . Because the exponential value at is and the modulus value at is , while at the exponential value is huge and the modulus value is , the two curves cross exactly once between and .
Key Takeaways
Recognise the standard shapes of exponential and modulus graphs. An exponential of the form has a horizontal asymptote at . A modulus graph is V-shaped with vertex at .
Common Mistakes
- Drawing the exponential graph below or without its horizontal asymptote.
- Drawing the modulus vertex at instead of .
- Showing more than one intersection, or placing the intersection on the wrong branch.
Things to Be Careful About
The exponential curve must stay above its asymptote . The modulus graph must be V-shaped and symmetric about , crossing the -axis at . The single intersection lies on the decreasing branch .
The two graphs meet at the point .
Show that the -coordinate of satisfies the equation .
Approach
At the intersection , the two -values are equal. Since lies on the left branch of the modulus graph, for this intersection. Equate the two expressions and rearrange using logarithms.
Working
At :
Because is on the branch , , so
Subtract from both sides:
Take natural logarithms of both sides:
Divide by :
Answer
x = 1/2 ln(3 - x)
Walkthrough
At the intersection point , the two graphs have the same -coordinate, so we equate their equations. The modulus graph has two branches: for and for . From the sketch, lies between and , so we use the left branch .
This gives . Subtract to isolate the exponential term: . Taking natural logarithms uses the fact that and are inverse functions, so . Finally divide by to obtain the required form.
Key Takeaways
To solve an equation involving a modulus, first decide which branch applies. To solve an exponential equation, isolate the exponential term before taking logarithms. The identity is essential.
Common Mistakes
- Using instead of for the intersection.
- Taking logarithms before isolating the exponential term, e.g. writing and not simplifying.
- Forgetting to divide by at the end.
- Not showing enough working for a 'show that' question.
Things to Be Careful About
Because this is an AG (answer given) question, every step must be shown clearly. The logarithm is only defined when , which is true at the intersection. Use , not or similar.
Use an iterative formula, based on the equation in part (b), to find the -coordinate of correct to 3 significant figures. Use an initial value of 0.45 and give the result of each iteration to 5 significant figures.
Approach
Use the iteration
starting from . Apply the formula repeatedly, keeping each result to 5 significant figures, until consecutive values agree to the required accuracy.
Working
First iteration:
Continuing:
| (5 sf) | |
|---|---|
| 0 | 0.45000 |
| 1 | 0.46805 |
| 2 | 0.46450 |
| 3 | 0.46520 |
| 4 | 0.46506 |
| 5 | 0.46509 |
| 6 | 0.46508 |
| 7 | 0.46508 |
The iterates settle at , which lies in the interval , so it rounds to to 3 significant figures.
Answer
0.465
Walkthrough
The equation from part (b) is . To use iteration, write it as . Start with and substitute repeatedly.
For example, to 5 significant figures. Repeating gives the table of values. The values move from down to about , then settle near . Since and are both to 5 significant figures, the sequence has converged enough. Because lies between and , the root is correct to 3 significant figures.
Key Takeaways
An equation of the form can be solved numerically by repeated substitution. Keep enough accuracy during iteration and round only when reporting. To justify a final answer to 3 significant figures, show iterations until consecutive values agree within the required interval.
Common Mistakes
- Using without the factor .
- Rounding each iteration to too few figures, which can change the convergence.
- Stopping after one or two iterations.
- Giving the final answer as instead of rounding to 3 significant figures.
- Not showing enough iterations to justify the 3 significant figure answer.
Things to Be Careful About
Use the initial value exactly. Report each iteration to 5 significant figures as requested. The final answer must be to 3 significant figures, so is correct, not . The interval is the range of values that round to .
The polynomial is defined by
where and are constants. It is given that is a factor of , and that the remainder is 24 when is divided by .
Approach
Use the factor theorem: since is a factor of , we have . Use the remainder theorem: the remainder when is divided by is . This gives two linear equations in and , which we solve simultaneously.
Working
Since is a factor of , by the factor theorem:
Substitute into :
So the first equation is:
The remainder when dividing by is . Substitute :
So:
Now solve the system:
Adding the two equations eliminates :
Substitute into :
Answer
a = 2, b = 1
Walkthrough
The factor theorem states that is a factor of a polynomial if and only if . Here the factor is , which we write as , so and we must have . Substituting into gives , and setting this equal to zero produces the first linear equation in and .
The remainder theorem states that the remainder when is divided by equals . Here we divide by , so the remainder is , which is given as 24. Substituting gives , and equating this to 24 gives the second equation .
We now have two linear equations. Adding them eliminates because the coefficients of are and ; this directly yields . Substituting back into either equation gives . These are the required values.
Key Takeaways
- The factor theorem: is a factor of iff .
- The remainder theorem: the remainder of is .
- Setting up and solving simultaneous linear equations from polynomial conditions.
Common Mistakes
- Sign errors when substituting : note , , and .
- Equating to 0 instead of to the given remainder 24.
- Arithmetic slips when collecting like terms in each substitution.
Things to Be Careful About
- The mark scheme awards M1 for each substitution step, so show both and explicitly.
- The A1 marks require the simplified equations and (or equivalent).
- Check your final values by verifying both original conditions are satisfied.
Approach
Substitute the found values of and to write explicitly, then divide by the known factor to obtain the quadratic factor. Finally examine the discriminant of the quadratic to show it has no real roots, so the only real root of is .
Working
With and :
Divide by :
Therefore:
The quadratic has discriminant:
Since , the quadratic factor has no real roots. The only real root of therefore comes from , giving . Hence has exactly one real root.
Answer
The equation has exactly one real root, .
p(x) = (x+2)(2x^2 - 3x + 4); exactly one real root, x = -2
Walkthrough
First substitute the found values , into to obtain the explicit cubic . Since is a known factor, we divide the cubic by it. The division is performed term by term: ; multiplying back by gives , which we subtract, leaving . Then , and subtracting leaves . Finally , and subtracting leaves remainder 0. The quotient is , confirming the factorisation .
To show there is exactly one real root, examine the quadratic factor. A quadratic has real roots only when its discriminant . Here the discriminant is , so has no real roots. Therefore the only real root of comes from , i.e. . Hence the equation has exactly one real root.
Key Takeaways
- Polynomial division by a linear factor, using the known factor to simplify the cubic.
- The discriminant determines whether a quadratic has real roots.
- A cubic factorised as (linear)(quadratic) has real roots exactly where its factors do; if the quadratic has none, the cubic has exactly one.
Common Mistakes
- Sign errors when subtracting during polynomial division.
- Omitting the discriminant calculation and simply asserting the quadratic has no real roots.
- Forgetting to state that the root from the linear factor is .
Things to Be Careful About
- The mark scheme awards M1 for dividing at least as far as the term; show the division steps.
- A1 is for obtaining .
- The final A1 requires reference to the root AND the discriminant with the conclusion that there is no further real root.
Approach
From part (b), the only real root of is . So we set , rearrange using , and solve within the given range.
Working
The only real root is , so:
Multiply through by 2:
Since :
For , sine is strictly increasing, so there is exactly one solution:
Answer
theta = -14.5 degrees (or -14.48 degrees)
Walkthrough
From part (b), the only real root of is . The equation therefore requires the argument to equal the root, so . Multiplying through by 2 gives .
Recall the identity . Inverting gives . Within the range , sine is strictly increasing from to , so there is exactly one solution: . The mark scheme accepts or greater accuracy (). No other angles satisfy the equation in this range.
Key Takeaways
- .
- Solving a trigonometric equation within a restricted range using the inverse sine function.
- Using the monotonicity of sine on to know there is exactly one solution.
Common Mistakes
- Forgetting that the only real root is and trying to solve the quadratic factor instead.
- Confusing with (which is impossible).
- Giving both : only the negative value satisfies ; the positive value would give .
Things to Be Careful About
- The mark scheme awards B1 for stating (or ), M1 for attempting at least one value of , and A1 for only with no others in the range.
- The range is open () and lies within it.
- Ensure the final answer is negative, since must be negative.
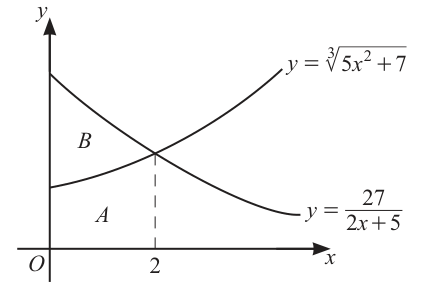
The diagram shows the curves with equations and for .
The curves meet at the point .
Region is bounded by the curve and the straight lines , and .
Region is bounded by the two curves and the straight line .
Use the trapezium rule with two intervals to find an approximation to the area of region . Give your answer correct to 3 significant figures.
Approach
The trapezium rule with two intervals of width approximates the area under the curve from to (region A). The y-values at the endpoints and midpoint of each interval are calculated and then combined using the trapezium rule formula.
Working
With two intervals across the interval width is . The y-values on the curve are:
Applying the trapezium rule:
Answer
4.75
Walkthrough
The trapezium rule estimates the area under a curve by dividing the region into trapezia of equal width and summing their areas. With two intervals between and , the width of each trapezium is .
The y-values at the three x-positions are first calculated. At , . At , . At , . The middle y-value is weighted by 2 in the formula because it forms the top of two adjacent trapezia.
The trapezium rule formula is . Substituting the values:
Rounded to 3 significant figures this is .
Key Takeaways
- The trapezium rule estimates the area under a curve using trapezia of equal width.
- With intervals, the formula is .
- The accuracy of the approximation depends on the number of intervals and on the shape of the curve.
Common Mistakes
- Forgetting to double-count the middle y-values.
- Using the wrong interval width (e.g. forgetting to divide by the number of intervals).
- Rounding individual y-values too early, which introduces unnecessary error.
Things to Be Careful About
- The trapezium rule over-estimates area under a concave-up curve and under-estimates under a concave-down curve; this matters in part (d).
- '3 significant figures' means three non-zero leading digits (e.g. 4.75, not 4.7 or 4.746).
Find the exact total area of regions and . Give your answer in the form , where and are constants.
Approach
Regions A and B together fill the area under the curve from to , because the reciprocal curve forms the upper boundary of both regions and the cube root curve is an internal boundary that separates them. Integrating this single function gives the total area of A and B.
Working
Integrate using the standard form :
Apply the limits and :
Using :
Answer
, so and .
(27/2)ln(9/5)
Walkthrough
The first step is to recognise what the combined area of regions A and B looks like geometrically. Region A is the area under the cube root curve, and region B is the area between the cube root curve and the reciprocal curve. Together, they fill the area under the reciprocal curve from to , bounded by the y-axis and the x-axis. This is the geometric insight that lets us write the combined area as a single integral rather than two separate ones.
The integral of uses the standard pattern , which is the chain rule for logarithms in reverse. The constant 27 stays outside as a multiplier, and the factor of 2 in the denominator of produces a factor of in the antiderivative.
Applying the limits 0 and 2 gives . The logarithm law combines these into a single logarithm . The cube root curve never enters the calculation.
Key Takeaways
- The integral of is .
- The combination of regions A and B can be computed by integrating just one boundary curve when they share another.
- The logarithm law is essential for simplifying the final form.
Common Mistakes
- Forgetting the factor of 27 in front of the logarithm.
- Forgetting the factor of in the antiderivative.
- Treating as when simplifying, instead of using the law correctly.
Things to Be Careful About
- The required form is , so the final answer must be a single logarithm; use to combine.
- The argument of the logarithm must be positive, which it is for since .
- The cube root curve is not integrated here, so the calculation is much simpler than it might first appear.
Deduce an approximation to the area of region . Give your answer correct to 3 significant figures.
Approach
The area of region B equals the total area of A and B (from part b) minus the approximate area of A (from part a, using the trapezium rule).
Working
Answer
3.19
Walkthrough
The total area of regions A and B was found in part (b) to be . Since region B is what remains when you remove region A from this total:
Using the trapezium rule estimate from part (a) for the area of A, we get:
Computing the numerical value: . Subtracting 4.75 gives , which rounds to to 3 significant figures.
Key Takeaways
- When the exact value of one part is known and another is estimated, the third can be deduced by subtraction.
- The B1FT mark in the mark scheme indicates that the answer to (c) follows through from previous answers, even if those are incorrect.
Common Mistakes
- Subtracting in the wrong order (giving a negative answer).
- Rounding before subtracting (use full precision until the final rounding step).
- Forgetting to convert to a numerical value before subtracting.
Things to Be Careful About
- The answer is described as an approximation because the area of A is itself an approximation from the trapezium rule.
- The 'FT' (follow-through) mark in the marking scheme means that a mark can be awarded if the answer is correctly derived from the student's previous (possibly incorrect) answers.
State, with a reason, whether your answer to part (c) is an over-estimate or an under-estimate of the area of region .
Approach
Determine whether the trapezium rule over- or under-estimates the area of region A by examining the concavity of the curve, then use the relationship to deduce the direction of the error for B.
Working
The curve is concave up on (it bends upward). For a concave-up curve, the straight tops of the trapezia lie above the curve, so the trapezium rule over-estimates the area of region A.
Since the area of B is computed as , and we subtracted an over-estimate of A from the exact total, the result is an under-estimate of B.
Answer
Under-estimate, because the curve is concave up so the tops of the trapezia lie above the curve; the trapezium rule therefore over-estimates the area of region A, and subtracting an over-estimate from the exact total gives an under-estimate of region B.
Under-estimate, because the curve is concave up so the trapezium rule over-estimates area A; subtracting an over-estimate of A gives an under-estimate of B.
Walkthrough
The trapezium rule gives a more accurate answer when the curve is straight. When the curve bends away from the chord, the trapezia either cover more area or less area than the actual region.
For the curve , the second derivative is positive on , which means the curve is concave up (it bends upward, like the right half of a parabola opening upward). This means the straight tops of the trapezia lie above the curve, so the trapezium rule over-estimates the area of region A.
The area of region B is computed as the total area (which is exact, since it comes from integration) minus the area of A (which is an over-estimate from the trapezium rule). Subtracting too much gives an answer that is smaller than the true value, i.e. an under-estimate of B.
Key Takeaways
- The trapezium rule over-estimates for concave-up curves and under-estimates for concave-down curves.
- The accuracy of a result obtained by combining estimates depends on the direction of each estimate.
- A useful heuristic: subtracting an over-estimate from an exact value gives an under-estimate; subtracting an under-estimate gives an over-estimate.
Common Mistakes
- Stating 'over-estimate' without a reason (the mark scheme requires a justification).
- Saying the tops of the trapezia are 'below' the curve when the curve is concave up (in fact they are above).
- Confusing the direction: the trapezium rule is over-estimating A, not B.
Things to Be Careful About
- The 'deduce' in part (c) is a strong hint that part (d) should be answered by reasoning about parts (a), (b), (c) rather than by direct estimation.
- The mark scheme specifically looks for the phrase 'tops of trapezia lie above the curve' (or an equivalent description) to award the second mark.
Approach
Use the compound-angle expansion for , then convert and into double-angle terms. Finally express in the form by comparing coefficients.
Working
Expand :
Multiply by :
Use double-angle identities:
So:
Write in expanded form:
Compare with :
The constant term gives . Then:
and
Therefore:
Answer
a = 1, R = 2, alpha = 30 degrees, expression = 1 + 2 sin(2 theta - 30 degrees)
Walkthrough
We start with . The first step is to expand using the compound-angle formula. This gives a product involving and .
Then convert these into double-angle terms. The identity turns the term into a constant plus a cosine term, and turns the product into a sine term. This is what produces the form .
Next, we want the form . Expand using the compound-angle formula for sine: . Compare the coefficients of and with . This gives and . The constant term is .
Finally, use to find , and to find .
Key Takeaways
- Compound-angle expansion lets you rewrite products like .
- Double-angle identities convert and into terms involving .
- The form is found by comparing coefficients after expanding .
- is the magnitude of the vector , and is found from .
Common Mistakes
- Forgetting to multiply the expansion by : the correct expansion is .
- Using incorrectly; multiplying by gives .
- Mixing up which coefficient is and which is when comparing with .
- Not stating ; the constant term must be identified.
Things to Be Careful About
- The angle must be in the correct quadrant. Since both and are positive, is acute, so , not .
- The final answer must be written as , with the plus sign before the term.
- The mark scheme requires the simplified expansion before using double angles; show this intermediate line.
Approach
Substitute the result from part (a) into the equation, isolate , solve the trigonometric equation for general solutions, then choose the smallest positive .
Working
Given:
Using part (a), :
Let . Then .
The principal value is:
General solutions:
Since and we need :
- For : , not positive.
- For : , positive.
The next candidate from gives , which is larger. Hence the smallest positive value is:
Answer
theta = 123.4 degrees
Walkthrough
Substitute the expression from part (a) into the equation. The equation becomes , so . Solving gives .
Let . We need . The principal value is . But sine is also negative in the third quadrant, so the other solution in to is . Add multiples of to get all solutions.
Since , test the candidates. gives a negative , so discard it. gives , which is positive. The next larger positive candidate comes from , giving , so the smallest positive is .
Key Takeaways
- The R-form expression from part (a) can be substituted directly into the equation.
- A sine equation has two solution families in each period.
- To find the smallest positive value, check all candidate general solutions and choose the smallest positive .
Common Mistakes
- Forgetting to include the constant from part (a), giving instead of .
- Only using the principal value and not considering the third-quadrant solution .
- Failing to test whether the candidate is positive; the principal branch gives a negative here.
- Giving the answer in radians instead of degrees, since the question uses degrees.
Things to Be Careful About
- The mark scheme expects (or ) before solving.
- When adding , remember to convert back to by adding and dividing by .
- The final answer should be given to at least one decimal place; is the accepted value.