Physics 9702/31 — October/November 2025
Cambridge AS Level · Advanced Practical Skills · worked solutions for every part, with the mark scheme
Topics Manipulation, Measurement and Observation · Presentation of Data and Observations · Analysis, Conclusions and Evaluation
In this experiment, you will investigate oscillations.
You have been provided with a double spring and two single springs.
• Slide the double spring and the two single springs onto the longer wooden rod.
• Set up the apparatus as shown in Fig. 1.1.
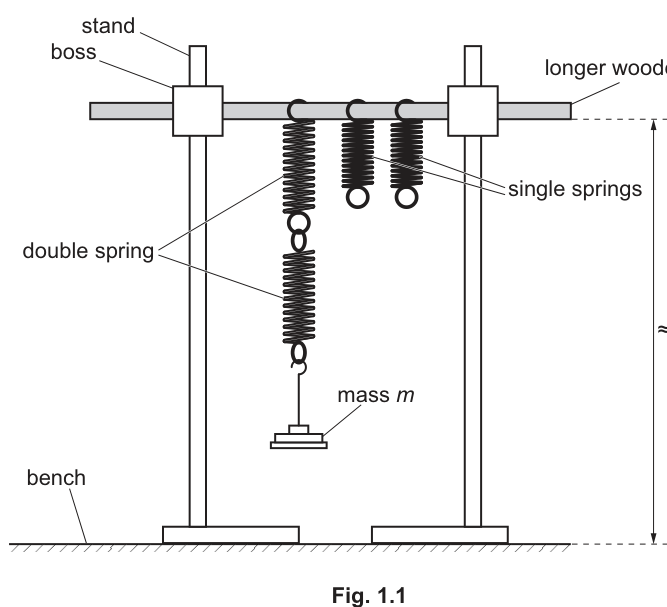
• Use the bosses to fix the wooden rod approximately above the bench and parallel to the bench.
• Hang a total mass of from the double spring.
• The mass hanging from the double spring is .
Record .
= ______
Answer
0.270 kg
Background Concept
In practical work you must record measured (or stated) quantities clearly with:
- the correct unit
- an appropriate number of significant figures (usually matching what is given or what the instrument can justify).
Mass is measured in (SI unit), though values are often provided in and can be converted.
Understanding the Question
You are told to hang a total mass of from the double spring, and that this hanging mass is called . The task is simply to record .
Approach
Use the given total mass and write it as with a unit (either or ). Converting to SI () is usually preferred.
Step-by-Step Reasoning
- Given total mass .
- Convert to kg:
- Record with unit.
Key Takeaways
- Record mass clearly with unit.
- Convert to by dividing by .
Common Mistakes
- Writing with no unit.
- Writing (incorrect conversion).
- Over-rounding (e.g. ) without justification.
Things to Be Careful About
- Keep track of factors of between grams and kilograms.
- Match significant figures to the given data (here, supports ).
• Gently pull the mass down through a short distance. When released, the mass will oscillate.
• Take measurements to determine the period of the oscillations.
= ______
• Remove the mass from the double spring.
Working
Time oscillations and divide by .
Example:
Answer
T1 ≈ 1.25 s
Background Concept
The period of an oscillation is the time for one complete cycle. For a mass oscillating vertically on a spring, each cycle is short enough that reaction time becomes a significant fraction of the time if you try to time just one oscillation.
A standard practical method is therefore:
- time oscillations (with , typically or more), measuring a total time
- calculate the period using
Repeating the measurement and averaging reduces random error.
Understanding the Question
You are asked to “take measurements to determine the period ”. This means you must decide a sensible timing method and then produce a value for in seconds.
Approach
- Displace the mass slightly and release so the motion is steady and approximately simple harmonic.
- Choose a fixed reference point (e.g. equilibrium position) and always count oscillations at the same point in the cycle.
- Measure the time for complete oscillations.
- Divide by to obtain .
- Repeat and average.
Step-by-Step Reasoning
- Start oscillations with a small amplitude (large amplitudes can make the motion less regular).
- Decide oscillations (large enough to reduce percentage timing uncertainty).
- Use a stopwatch to measure , the time for 10 complete oscillations.
- Calculate:
- Repeat timing (e.g. three values of ) and use the mean to get the best estimate:
(Any sensible repeat scheme would earn credit in the practical.)
Key Takeaways
- Always time multiple oscillations: .
- Repeat and average to improve reliability.
- Use a consistent reference point to count cycles.
Common Mistakes
- Timing one oscillation only (too much reaction-time error).
- Counting half-oscillations incorrectly.
- Starting/stopping the stopwatch at different points in the cycle each time.
Things to Be Careful About
- Make sure you time complete oscillations (same position and same direction of motion).
- Keep amplitude small and avoid sideways swinging.
- Quote to a sensible precision consistent with stopwatch resolution and repeats.
• Using the shorter wooden rod, hang mass as shown in Fig. 1.2.
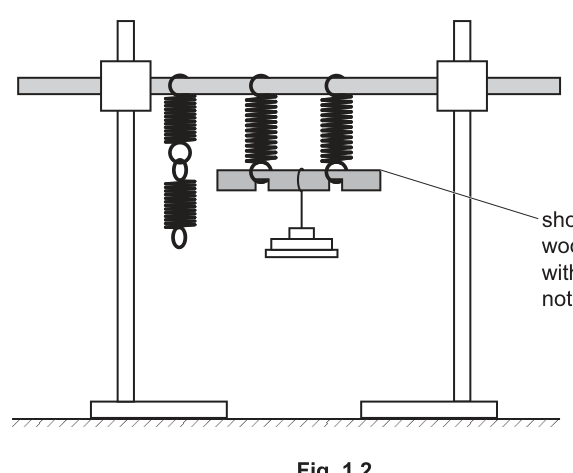
• Gently place the hook of the mass hanger near the centre of the shorter rod.
• Carefully adjust the position of the mass hanger until the shorter rod is approximately parallel to the bench, as shown in Fig. 1.2.
• Gently pull the mass down through a short distance. When released, the mass will oscillate.
• Take measurements to determine the period of the oscillations.
= ______
• Remove the mass.
Working
Time oscillations and divide by .
Example:
Answer
T2 ≈ 1.07 s
Background Concept
For oscillations you determine the period the same way regardless of the exact spring arrangement:
The additional practical skill here is setting up the system so it starts from a well-defined equilibrium (rod approximately horizontal), which makes the oscillations repeatable.
Understanding the Question
You must:
- attach mass to the shorter rod (suspended by the two single springs)
- slide the mass hanger hook until the rod is approximately parallel to the bench (equilibrium)
- then measure the oscillation period .
Approach
- Adjust the hanger position so the rod is horizontal (net turning effect about the support is zero).
- Displace the rod/mass slightly and release.
- Measure time for oscillations and divide by .
- Repeat and average.
Step-by-Step Reasoning
- With the mass not at the centre, the rod would tilt because the weight produces a turning effect; sliding the hanger until the rod is horizontal ensures a steady equilibrium position.
- Start oscillations with a small amplitude.
- Measure for 10 oscillations, then:
- Repeat timing to reduce random error.
Key Takeaways
- Achieving a good equilibrium position improves repeatability.
- Timing many oscillations reduces percentage uncertainty.
Common Mistakes
- Not making the rod horizontal before timing (motion becomes irregular).
- Allowing sideways swinging/twisting as well as vertical oscillations.
- Counting oscillations inconsistently.
Things to Be Careful About
- Keep oscillations small.
- Ensure the support rod and springs are not rubbing against stands/bosses.
- Start timing after the motion becomes steady (not during an initial wobble).
Vary . For each value of , determine and . Repeat until you have five sets of values of , and . Do not use values of less than .
Record your results in a table. Include values of and in your table.
Answer
Record at least five sets with in one table, including calculated and (units ).
Example of a correctly set out table:
| 0.200 | 1.00 | 0.903 | 1.000 | 0.950 |
| 0.240 | 1.10 | 0.988 | 1.049 | 0.994 |
| 0.280 | 1.20 | 1.07 | 1.095 | 1.036 |
| 0.320 | 1.30 | 1.16 | 1.140 | 1.076 |
| 0.360 | 1.40 | 1.24 | 1.183 | 1.115 |
Single clear table with m, T1, T2, √T1, √T2 (≥5 sets; m ≥ 200 g).
Background Concept
In Paper 3, marks are awarded for the quality of your data and how you present it.
A good results table should:
- be a single table containing all raw and calculated data
- have headings that include the quantity and unit (e.g. )
- use consistent decimal places within each column
- include a suitable range and at least five values of the independent variable
Here, you must also calculate and . Since is in seconds, has unit .
Understanding the Question
You must vary the mass (but not below ), and for each mass measure both periods and . You then need five sets of and you must include and in your table.
Approach
- Choose five (or more) masses with a sensible spacing, all .
- For each :
- measure by timing oscillations and dividing by (repeat and average)
- measure similarly
- Calculate and for each row.
- Present all values in one well-formatted table.
Step-by-Step Reasoning
- Select masses, e.g. (any sensible set is fine).
- For each mass, you could do:
- time oscillations twice or three times
- average
- compute
- After obtaining and , calculate:
For example, if then:
- Record the calculated values to a consistent precision (often 3 s.f. is reasonable for square roots).
Key Takeaways
- Collect enough data: at least five sets and a good range.
- Period measurements should be averaged and based on multiple oscillations.
- A good table has units in headings and consistent formatting.
Common Mistakes
- Using masses below .
- Splitting results into multiple tables.
- Missing units in headings.
- Inconsistent decimal places (e.g. mixing and in the same column with no reason).
- Calculating but forgetting the unit .
Things to Be Careful About
- When you take square roots, your significant figures should reflect the precision of .
- Keep the oscillations small and consistent between trials.
- Check you are not mixing seconds and milliseconds in calculations.
Answer
Plot on the -axis against on the -axis.
Axis labels:
- -axis:
- -axis:
Use a suitable linear scale (at least half the grid) and plot all points with small crosses.
Graph of √T2 (y) against √T1 (x) with correct labels/units and accurately plotted points.
Background Concept
Graph marks in Paper 3 come from clear communication:
- correct choice of variables on each axis
- correct units in axis labels
- a sensible scale (not cramped and not awkward like 3 squares = 1 unit)
- accurate plotting (small, neat crosses or dots)
Here you are plotting transformed variables: and . Both have units .
Understanding the Question
You must use your table values of and and plot a graph with:
- horizontal axis:
- vertical axis:
Approach
- Decide the range of your and values.
- Choose scales so the plotted data spans a large area of the grid.
- Label axes as “” and “”.
- Plot each pair as a small cross.
Step-by-Step Reasoning
- Suppose your values range from about to , then set an -axis range such as to .
- Similarly choose a -axis range to fit all values.
- Mark each axis with evenly spaced numbers.
- Plot points carefully by reading across from the value then up to the value.
Key Takeaways
- Labels must include both the quantity and the unit.
- Scale choice matters: large spread improves gradient accuracy.
Common Mistakes
- Swapping axes (plotting on ).
- Missing units or writing just “” without .
- Using a scale that uses only a small part of the grid.
Things to Be Careful About
- Both axes are square-root time, so both units are .
- Plotting accuracy: avoid large blobs; use small crosses so the best-fit line can be judged.
Answer
Draw one straight line of best fit through the plotted points (balanced with roughly equal scatter above and below).
Straight line of best fit drawn.
Background Concept
A best-fit line represents the underlying trend when data have random scatter. For a linear relationship, you draw a single straight line that:
- follows the general trend
- has roughly equal numbers of points above and below (not necessarily through every point)
Understanding the Question
After plotting against , you must draw the straight line that best represents the data.
Approach
Use a ruler to draw a straight line that passes centrally through the cluster of points.
Step-by-Step Reasoning
- Visually judge the overall linear trend.
- Place a ruler so that the line passes as close as possible to all points.
- Ensure the line is not forced through an outlier.
Key Takeaways
- Best-fit means “most representative”, not “join-the-dots”.
Common Mistakes
- Drawing a line segment between points instead of one straight line.
- Forcing the line through the origin without evidence.
- Making the line pass through every point by bending it.
Things to Be Careful About
- If one point is clearly anomalous, the best-fit line should reflect the majority trend.
- Use a sharp pencil and a ruler for a thin line (helps later when reading gradient/intercept).
Determine the gradient and -intercept of this line.
gradient = ______
-intercept = ______
Working
Choose two well-separated points on the best-fit line.
Example points on line: and (units ).
-intercept from the line at :
Answer
gradient
-intercept
gradient ≈ 0.89; y-intercept ≈ 0.05 s^{1/2}
Background Concept
For a straight-line graph, the gradient and intercept summarise the relationship.
If you plot against and obtain a straight line, then:
where:
- is the gradient (slope)
- is the -intercept (value of when )
From a plotted best-fit line:
Using a large triangle (widely separated points) reduces percentage reading error.
Understanding the Question
You have a graph of (vertical) against (horizontal). You must determine:
- the gradient of your best-fit line
- the -intercept of your best-fit line
Units:
- both and are in
- so the gradient is dimensionless (because units cancel)
- the -intercept has unit
Approach
- Draw a large triangle on the best-fit line and read two points on the line (not necessarily data points).
- Compute gradient using .
- Extend the line (if needed) to read the intercept at .
Step-by-Step Reasoning
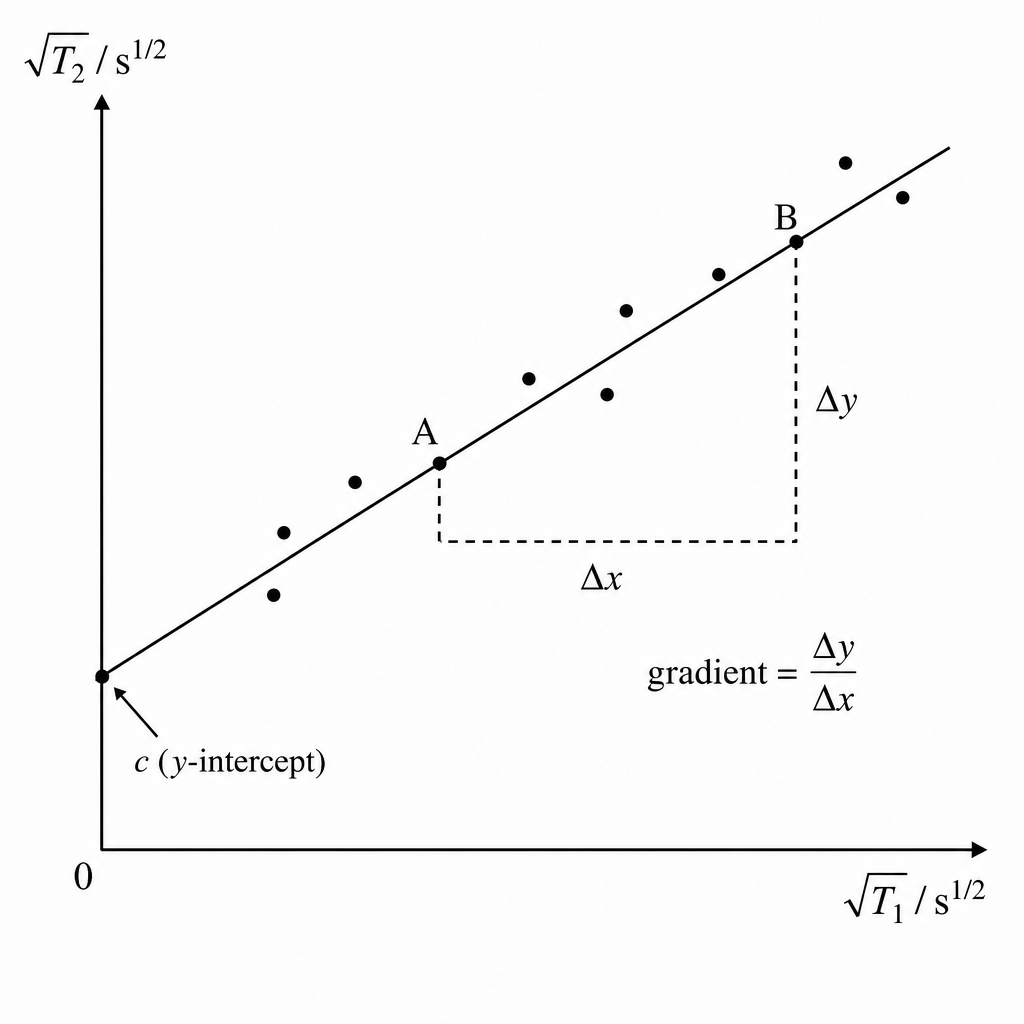
- Pick two points far apart on the line, e.g. where the line crosses convenient grid intersections.
- Read coordinates and .
- Calculate changes:
- Gradient:
- Intercept: find where the line crosses the -axis (at ), and read off .
Notes that examiners expect:
- a triangle large enough to use much of the graph
- correct use of (not inverted)
- intercept read from the best-fit line, not from a single point.
Key Takeaways
- Use a large triangle for accurate gradients.
- Gradient uses .
- Intercept is from the line at .
Common Mistakes
- Using two adjacent points (small triangle) giving a poor gradient.
- Calculating by mistake.
- Using two plotted points that are not on the best-fit line.
- Giving a unit for the gradient here (it is dimensionless).
Things to Be Careful About
- Read values to the precision allowed by the graph scale.
- If the line does not reach the -axis on the drawn region, extend it carefully with a ruler before reading the intercept.
- Keep consistent units: both axes are , so the intercept must be .
It is suggested that the quantities and are related by the equation
where and are constants.
Using your answers in (d)(iii), determine the values of and . Give appropriate units.
= ______
= ______
Working
Given
Comparing with for the graph of against :
Units: is dimensionless and has unit .
Answer
(no unit)
P ≈ 0.89 (dimensionless), Q ≈ 0.05 s^{1/2}
Background Concept
When experimental data give a straight-line graph, you can identify constants by comparing the line equation with:
Here:
- (gradient) multiplies
- is the value of when
Unit check:
- If and have the same units, then the gradient is dimensionless.
- The intercept has the same units as .
Understanding the Question
You are told that:
and you have already found the gradient and -intercept from your graph of (y-axis) vs (x-axis). You must use those to state and , including units.
Approach
Match each symbol to the straight-line form:
- corresponds to the gradient
- corresponds to the intercept
Then assign units from the plotted quantities.
Step-by-Step Reasoning
Let:
Then the suggested equation becomes:
Comparing with :
Units:
- both and have unit , so is dimensionless.
- has unit .
Key Takeaways
- The constant multiplying the x-variable is the gradient.
- The constant added is the intercept.
- Use units of the axes to infer units of constants.
Common Mistakes
- Giving the unit (it should have no unit here).
- Writing with unit instead of .
- Swapping and .
Things to Be Careful About
- Make sure you are using the gradient/intercept from the correct graph ( vs , not vs ).
- State units explicitly for and explicitly state “no unit” (or omit units) for .
In this experiment, you will investigate the deformation of paper cylinders.
You have been provided with two pieces of paper.
The width of a piece of paper is the length of the shorter side, as shown in Fig. 2.1.

• Select the smaller piece of paper.
• Measure and record .
= ______
• Roll the paper into a cylinder and use two paper clips to hold the paper in place, as shown in Fig. 2.2.
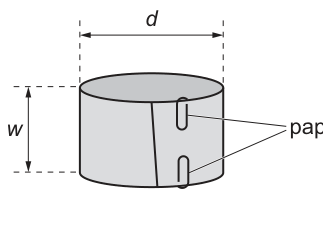
• The diameter of the cylinder is , as shown in Fig. 2.2.
Adjust the paper and paper clips until is as close as possible to .
• Measure and record .
= ______
Answer
(Example readings, measured with a ruler to the nearest )
Adjusted cylinder so , then measured:
w = 14.8 cm, d = 7.0 cm (example)
Background Concept
In Paper 3 practical questions, marks are often awarded for making and recording measurements correctly. A length measured using a ruler should normally be recorded to the nearest millimetre (i.e. nearest ), and written with a unit.
Here you measure:
- : the width (shorter side) of the chosen sheet of paper.
- : the cylinder diameter after adjusting it to be as close as possible to .
Understanding the Question
You are told to:
- Choose the smaller sheet.
- Measure and record its width .
- Roll it into a cylinder, secure with paper clips, adjust until the diameter is close to .
- Measure and record the cylinder diameter .
The key skill is careful measurement and clear recording.
Approach
- Use a ruler to measure directly across the shorter edge.
- Form the cylinder and adjust overlap until the diameter is about .
- Measure across the widest part of the circular cross-section (straight across the centre), and record to the same precision.
Step-by-Step Reasoning
- Place the ruler along the short side of the smaller sheet and read with your eye directly above the scale to avoid parallax.
- Roll the sheet and hold it with two paper clips so the cylinder keeps its shape.
- Adjust the overlap until the cylinder is close to the target diameter (). The target value is given to , so recording to is appropriate.
- Measure the diameter across the cylinder through the centre (not along the curved surface) and record.
Key Takeaways
- Record length measurements with appropriate precision (typically ) and units.
- For a diameter, measure straight across the circle through the centre.
Common Mistakes
- Recording or with no unit.
- Recording with inconsistent precision (e.g. instead of when using a mm ruler).
- Measuring around the curved surface (circumference) instead of the diameter.
- Parallax error from viewing the scale at an angle.
Things to Be Careful About
- Ensure the ruler is aligned with the edge being measured (not skewed).
- Make sure the cylinder cross-section is as circular as possible when measuring .
- Take the diameter at the middle of the cylinder (where it is most uniform).
• Set up the apparatus as shown in Fig. 2.3.
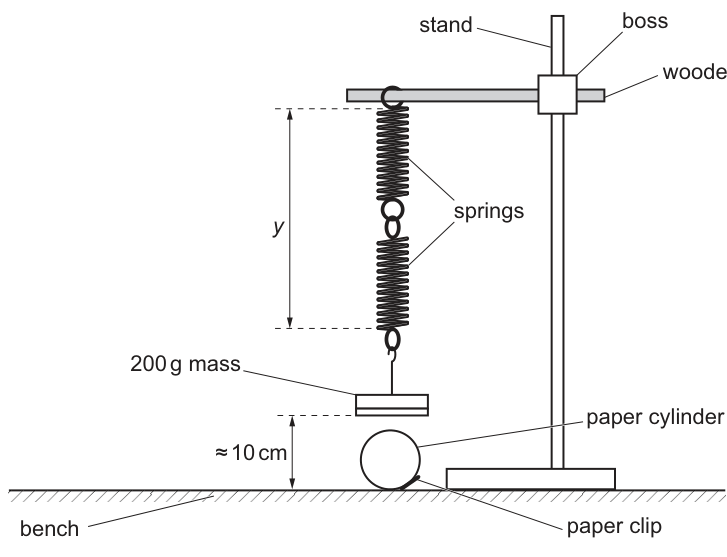
• Slide the loop of the upper spring onto the wooden rod.
• Hang a mass of from the lower spring.
• Adjust the height of the boss until the bottom of the mass is approximately above the bench.
• Place the paper cylinder so that the middle of the cylinder is under the mass, as shown in Fig. 2.3.
• The length of the springs is , as shown in Fig. 2.3.
Measure and record .
= ______
Answer
(Example reading)
y = 32.0 cm (example)
Background Concept
When measuring the length of an extended spring (or springs in series), the main issues are reading the scale accurately and defining clearly what points you measure between.
The experiment defines as the length of the springs as shown in the diagram, so you should measure the same endpoints consistently each time.
Understanding the Question
You are instructed to:
- Assemble the springs and mass as in Fig. 2.3.
- Set the boss height so the bottom of the mass is about above the bench.
- Place the paper cylinder under the mass.
- Measure and record the spring length .
This value will later be compared with a new length when the cylinder supports part of the mass.
Approach
- After setting the geometry, use a ruler to measure the total spring length indicated as .
- Record the reading to a sensible precision (typically nearest with a mm ruler).
Step-by-Step Reasoning
- Assemble the two springs in series and hang the mass.
- Adjust the boss so the mass is safely above the bench (about ) to allow later movement.
- Wait for any oscillations to die down so the spring length is steady.
- Hold a ruler close to the springs and read the length between the points indicated in the figure.
- Record with unit.
Key Takeaways
- In experiments, the reliability of later calculations depends on careful and consistent length measurements.
Common Mistakes
- Measuring from different reference points each time.
- Reading while the mass is still bouncing.
- Estimating to an over-precise value not supported by the ruler scale.
Things to Be Careful About
- Keep the ruler parallel to the spring length you are measuring.
- Read at eye level to reduce parallax.
- Make sure the cylinder does not touch the mass at this stage (it should be under the mass, not supporting it).
Estimate the percentage uncertainty in your value of . Show your working.
percentage uncertainty = ______
Working
Ruler resolution .
Answer
0.31 %
Background Concept
An uncertainty is an estimate of the range within which the true value probably lies.
For a ruler:
- The smallest division is typically .
- A common estimate for the absolute uncertainty in a single ruler reading is (or sometimes depending on the mark scheme and how the reading is taken).
Percentage uncertainty is:
Understanding the Question
You must estimate the percentage uncertainty in your measured and show working. So you need:
- an absolute uncertainty (from the ruler), and
- your measured value of .
Approach
- Decide based on the ruler resolution.
- Substitute into .
- Round sensibly.
Step-by-Step Reasoning
- If the ruler has divisions, take .
- Divide by the measured value (example ) and multiply by :
- Quoting is appropriate; the uncertainty estimate is itself not exact, so giving many digits would be misleading.
Key Takeaways
- Convert instrument resolution into an absolute uncertainty.
- Percentage uncertainty is a ratio, then multiplied by .
Common Mistakes
- Using for a mm ruler (wrong conversion).
- Forgetting to multiply by .
- Writing the uncertainty as a decimal (e.g. ) but labelling it as a percentage.
Things to Be Careful About
- If is found from two ruler readings (difference of two positions), the absolute uncertainty is usually larger (often the sum of the two reading uncertainties). Here the question implies a direct measurement of as a length, so a single-reading estimate is typically used.
- Keep units consistent (cm with cm) before forming the ratio.
• By adjusting the height of the boss, lower the mass to squash the middle of the paper cylinder until the bottom of the mass is above the bench, as shown in Fig. 2.4.
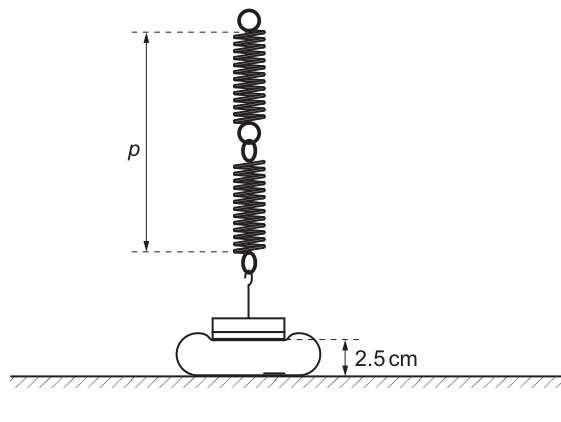
• The length of the springs is , as shown in Fig. 2.4.
Measure and record .
= ______
Answer
(Example reading)
p = 28.4 cm (example)
Background Concept
When the mass presses on (and deforms) the paper cylinder, some of the weight can be supported by the cylinder rather than the springs. This changes the spring extension, so the spring length changes from to .
Measuring accurately is essential because later you will calculate , which depends on both readings.
Understanding the Question
You are told to lower the mass until the bottom is above the bench (so the cylinder is squashed). Then you measure the new spring length .
Approach
- Adjust the boss height until the bottom of the mass is at the specified height.
- Ensure the system is at rest.
- Measure the spring length in the same way you measured .
Step-by-Step Reasoning
- Lower the boss carefully so the mass begins to compress the cylinder.
- Stop when the bottom of the mass is above the bench.
- Wait for motion to stop.
- Measure the spring length using the same reference points as for .
- Record to the nearest .
Key Takeaways
- Consistency of measurement method between and is crucial.
Common Mistakes
- Measuring from different endpoints than for .
- Not setting the bottom of the mass to above the bench.
- Taking the reading while the springs are still oscillating.
Things to Be Careful About
- Ensure the cylinder is centred under the mass; if it is off-centre, the deformation and support force may be different.
- Do not press the cylinder by hand; only adjust using the boss height so the load condition is consistent.
Working
Answer
3.6 cm
Background Concept
A derived quantity is often formed by combining measurements. Here, is the change in spring length between the unloaded-cylinder situation and the squashed-cylinder situation.
Because both and are lengths in cm, their difference is also in cm.
Understanding the Question
You have already measured and then measured after squashing. You are asked to calculate .
Approach
Subtract from carefully, keeping the same unit (cm) and a consistent number of decimal places that matches the measurements.
Step-by-Step Reasoning
Using example values and :
The result is given to one decimal place because each measured value was recorded to .
Key Takeaways
- Keep units consistent when subtracting.
- Match decimal places to the precision of the measurements.
Common Mistakes
- Calculating instead of (wrong sign).
- Forgetting the unit for the calculated value.
- Rounding to an inappropriate precision.
Things to Be Careful About
- If and are close together, can have a relatively large percentage uncertainty; this matters later when calculating .
Using the larger sheet of paper, repeat (a), (b)(i), (c)(i) and (c)(ii).
= ______
= ______
= ______
= ______
= ______
Answer
(Example readings for larger sheet)
w = 21.0 cm, d = 7.0 cm, y = 32.0 cm, p = 27.0 cm, (y − p) = 5.0 cm (example)
Background Concept
Repeating measurements for a second condition (here, using a larger sheet) is how practical experiments test relationships: you need at least two data sets to compare.
The key is to keep the method the same so any changes in results are due to the changed variable (the paper width ), not due to a different measuring technique.
Understanding the Question
You must repeat parts (a), (b)(i), (c)(i) and (c)(ii) with the larger paper:
- measure for the larger sheet,
- make a cylinder with and measure ,
- measure in the initial position,
- squash to above the bench and measure ,
- calculate .
Approach
- Use the same ruler and the same precision.
- Adjust the cylinder to the same target diameter (as close to as possible) so the only deliberate difference is .
- Measure and using the same reference points as before.
Step-by-Step Reasoning
- Measure the width of the larger sheet to .
- Roll into a cylinder, clip it, adjust overlap until the diameter is close to , then measure .
- Set the apparatus with the mass about above the bench and measure .
- Lower the mass until it is above the bench (cylinder squashed) and measure .
- Compute and record with the correct unit.
Key Takeaways
- Repeats should be carried out with consistent method and precision.
- Derived quantities like should match the precision of the original measurements.
Common Mistakes
- Forgetting to re-adjust the cylinder diameter to .
- Recording inconsistent decimal places across the two trials.
- Not recalculating for the larger sheet.
Things to Be Careful About
- Ensure the mass contacts the middle of the cylinder in both trials; otherwise the deformation (and ) may not be comparable.
- Keep the same mass () for both trials.
It is suggested that the relationship between , and is
where is a constant.
Using your data, calculate two values of .
first value of = ______
second value of = ______
Working
From ,
Small sheet:
Large sheet:
Answer
first value of
second value of
k ≈ 4.1 and 4.2 (example)
Background Concept
If two quantities are related by
then the constant of proportionality is found by rearranging:
In a practical, you often calculate more than once (from different trials). If the relationship is correct and random uncertainties are not too large, the values of should be similar.
Understanding the Question
Using your two sets of measurements (small sheet and large sheet), you must calculate two values of .
You already have, for each sheet:
- (paper width)
- (change in spring length)
Approach
- Rearrange to .
- Substitute the measured values from each trial separately.
- Quote each value of to a sensible number of significant figures (this is discussed in part (e)(ii)).
Step-by-Step Reasoning
- Start with the given relationship:
- Divide both sides by :
- Use the small-sheet readings to compute .
- Use the large-sheet readings to compute .
- Compare whether and are close.
Key Takeaways
- Rearranging a linear proportionality lets you calculate a constant from measured values.
- Two trials give two estimates to check consistency.
Common Mistakes
- Using (inverted).
- Forgetting that must be calculated for each trial before using it.
- Rounding too aggressively (losing meaningful comparison) or giving too many digits (false precision).
Things to Be Careful About
- If is small, its percentage uncertainty can be large; this strongly affects .
- Ensure you use consistent units (here cm cancels, so is dimensionless).
Answer
is calculated from .
is measured to , and and are each measured to , so
For example, if then percentage uncertainty is
So quoting to s.f. (e.g. , ) is justified.
k to 2 s.f.
Background Concept
Significant figures (s.f.) should reflect the precision of the data. A calculated result cannot be more precise than the measurements used to obtain it.
A key point here is that is a difference of two measured lengths. When you subtract, the absolute uncertainties add (worst-case estimate):
Then for a quotient like , the fractional (percentage) uncertainty in is approximately the sum of the fractional uncertainties in and .
Understanding the Question
You are not asked to calculate the uncertainty in here; you are asked to justify the number of significant figures used for .
So you should explain which measurement limits the precision, and show that the uncertainty is at the level of a few percent (so 2 s.f. is appropriate).
Approach
- Identify measurement precision: ruler readings for , , .
- Find the absolute uncertainty in by adding the absolute uncertainties in and .
- Turn that into a percentage uncertainty for a typical .
- Decide s.f. from that scale of uncertainty.
Step-by-Step Reasoning
- Suppose the ruler reads to , so each length has about uncertainty.
- Since uses two measurements, a worst-case absolute uncertainty is:
- For a typical value , this is about:
- That means is uncertain by several percent, so quoting to s.f. is sensible. Writing would imply about precision (about ), which is far better than the measurements justify.
Key Takeaways
- Differences amplify uncertainty: absolute uncertainties add.
- Significant figures should match the realistic uncertainty (often a few percent in practical work).
Common Mistakes
- Choosing s.f. based only on and ignoring that is a subtraction.
- Giving too many digits because a calculator shows them.
- Rounding inconsistently between the two calculated values.
Things to Be Careful About
- If your measured is smaller than in the example, the percentage uncertainty becomes even larger, making fewer s.f. appropriate.
- The mark scheme typically accepts sensible justification; it does not require an exact uncertainty propagation, but it must be logically linked to measurement precision.
It is suggested that the percentage uncertainty in the values of is .
Using this uncertainty, explain whether your results support the relationship in (e).
Working
Using and .
Mean
Percentage difference
Since , the two values of agree within the stated uncertainty.
Answer
Yes, the results support the relationship because the values of are consistent within .
Supports relationship (values consistent within 10%)
Background Concept
Experimental results rarely match perfectly because of uncertainty. A common way to test whether two values are consistent is to see whether their difference is small compared with the allowed uncertainty.
If the percentage uncertainty in is , then values that differ by only a few percent are considered consistent, supporting the proposed relationship.
Understanding the Question
You have two calculated values of (from the two cylinders). You are told to assume the percentage uncertainty in is and then decide whether your results support .
Approach
- Compare and .
- Compute a percentage difference (often difference divided by mean, expressed as a percentage).
- If this percentage difference is less than (or comparable to) , conclude the results support the relationship.
Step-by-Step Reasoning
- Find the absolute difference .
- Convert it to a percentage of a representative value (the mean is commonly used):
- Compare with .
- Make a clear statement: either “consistent within uncertainty” (supports) or “not consistent” (does not support).
Key Takeaways
- A relationship is supported when repeated estimates of a constant agree within experimental uncertainty.
Common Mistakes
- Saying “supports” just because the numbers look similar, without referencing the .
- Dividing by the wrong reference (e.g. dividing by the smaller value without stating what you are doing).
- Forgetting to express the comparison as a percentage.
Things to Be Careful About
- If your two values differ by around , the conclusion may be borderline; you should then say something like “difference is comparable to uncertainty, so results are consistent (or only just consistent)”.
- Use your own measured and in the exam; the numbers here are examples.
Describe four sources of uncertainty or limitations of the procedure for this experiment.
For any uncertainties in measurement that you describe, you should state the quantity being measured and a reason for the uncertainty.
Answer
- Uncertainty in measuring and : difficult to judge the exact endpoints of the spring length (spring loops/thickness) and possible parallax when reading the ruler.
- Uncertainty in setting the bottom of the mass to and above the bench: the reference point (bottom of mass) is not sharp and reading the vertical height can have parallax.
- Cylinder not perfectly circular / diameter not exactly : overlap and paper clips can distort the shape, changing how the cylinder deforms.
- Load may not be applied centrally: if the mass is not directly above the middle of the cylinder, the cylinder squashes unevenly and the support force (hence and ) changes.
Four valid uncertainties/limitations listed
Background Concept
In practical work, limitations come from:
- instrument resolution (e.g. mm ruler),
- reading technique (parallax, unclear reference points),
- difficulty controlling variables (e.g. keeping diameter fixed),
- physical behaviour of the system (paper may deform non-uniformly).
Good answers:
- identify the quantity affected,
- explain the reason for uncertainty,
- explain the consequence (how it could change results).
Understanding the Question
You must give four sources of uncertainty or limitations in this procedure. For any measurement uncertainty, you must name the measured quantity and why it is uncertain.
The main measurements are , , , and the set heights (10 cm and 2.5 cm above the bench).
Approach
Think through each stage:
- Making the cylinder and measuring and .
- Measuring and (spring lengths).
- Ensuring the geometry is correct (mass height, central loading).
Select four distinct points (not repeats of the same idea) and write each as: quantity + reason + effect.
Step-by-Step Reasoning
Examples of creditworthy limitations:
- Spring length readings (, ): endpoints are not perfectly defined (loops, thickness of coils); ruler may not be exactly alongside the spring; eye-level error gives parallax. This changes the calculated .
- Setting height of the mass above the bench (10 cm, 2.5 cm): difficult to judge the exact bottom point of the mass and read the height accurately. If the mass is not at the intended height, the amount of squashing changes, altering .
- Cylinder diameter control (): paper clips and overlap cause the cylinder to be slightly oval, and may vary with orientation. Since deformation depends on geometry, this affects how much load is transferred from springs to cylinder.
- Central loading and alignment: if the mass is not directly above the centre of the cylinder, the cylinder deforms asymmetrically; friction/tilting changes the support force and hence the spring length .
Key Takeaways
- Limitations should be specific and linked to quantities you measure.
- Geometry/alignment issues are often major sources of scatter in mechanics-based practicals.
Common Mistakes
- Writing vague statements like “human error” without naming a quantity.
- Repeating the same idea four times (e.g. parallax for every point) without variety.
- Giving improvements instead of limitations (those belong in part (g)(ii)).
Things to Be Careful About
- Try to include both measurement uncertainties (ruler readings) and procedural/physical limitations (cylinder shape, alignment).
- Make sure each of the four points is clearly distinct and explained.
Describe four improvements that could be made to this experiment. You may suggest the use of other apparatus or different procedures.
Answer
- Clamp a ruler beside the springs and use a fixed reference pointer (or set square) to read and at eye level, reducing parallax and improving repeatability.
- Use a set square / metre rule fixed vertically to set the mass heights (10 cm and 2.5 cm above bench) more accurately.
- Improve cylinder geometry: mark a fixed overlap line and use more clips (or tape) to keep the cylinder truly circular and keep close to ; check in two perpendicular directions.
- Ensure central loading: add a guide (e.g. a vertical rod/frame) so the mass always contacts the centre of the cylinder; repeat and average readings to reduce random scatter.
Four valid improvements listed
Background Concept
Improvements aim to reduce uncertainty and improve reliability by:
- using better measurement techniques (fixed scales, eye-level readings),
- improving control of variables (constant diameter and alignment),
- increasing repeatability (repeats and averaging).
Understanding the Question
You must give four improvements. These can include using different apparatus or changing procedure.
A strong set of improvements should clearly address the limitations identified in part (g)(i).
Approach
For each improvement:
- state what you would change,
- state what uncertainty/limitation it reduces and how.
Step-by-Step Reasoning
Examples of good improvements:
- Reduce parallax / unclear endpoints for and : Clamp a ruler next to the springs and attach a small pointer at the endpoint so readings are consistent; read at eye level.
- Set heights more accurately: Use a vertical metre rule fixed to the stand and a set square to check the bottom of the mass is at exactly and .
- Control cylinder diameter more reliably: Mark the overlap position on the paper, use tape rather than clips, and measure in two directions to ensure the cross-section is circular.
- Improve alignment / central loading and reliability: Use a guide so the mass is always above the centre of the cylinder; take multiple trials for each sheet and average to reduce random uncertainty.
Key Takeaways
- Improvements should be practical, specific, and clearly linked to reduced uncertainty.
- Repeats and better alignment often give big gains in reliability.
Common Mistakes
- Giving the limitation again without proposing a change.
- Suggesting unrealistic equipment without explaining how it helps.
- Writing fewer than four distinct improvements.
Things to Be Careful About
- Ensure each improvement is a real change to the method or apparatus.
- Where you suggest repeats, state what you would repeat (e.g. measure several times) and that you would average the results.