Physics 9702/24 — October/November 2025
Cambridge AS Level · AS Level Structured Questions · worked solutions for every part, with the mark scheme
Topics Physical Quantities and Units · Kinematics · Dynamics · Forces, Density and Pressure · Deformation of Solids · Work, Energy and Power · +5 more
A child kicks a ball so that it leaves horizontal ground with a velocity of at an angle of to the horizontal, as shown in Fig. 1.1.
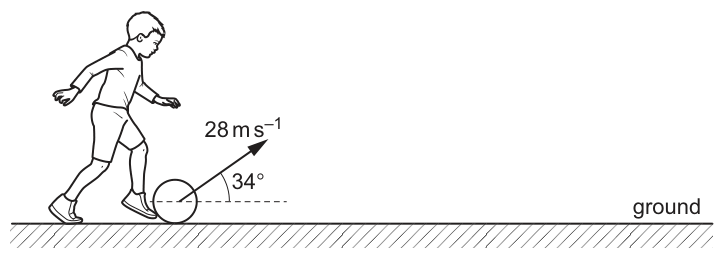
Air resistance is negligible. The ball leaves the ground at time .
Calculate the horizontal component and the vertical component of the velocity of the ball immediately after it has left the ground.
= ______
= ______
Working
Answer
v_H = 23.2 m s^-1, v_V = 15.7 m s^-1
Background Concept
A velocity is a vector, so it has both magnitude and direction. When a vector makes an angle to the horizontal, it can be resolved into perpendicular components:
- horizontal component:
- vertical component:
These come from right-triangle trigonometry, where the velocity vector is the hypotenuse.
Understanding the Question
The ball leaves the ground at speed at an angle of above the horizontal. You are asked for:
- the horizontal component immediately after launch
- the vertical component immediately after launch
Approach
Treat the velocity vector as the hypotenuse of a right triangle.
- Use cosine for the adjacent (horizontal) side.
- Use sine for the opposite (vertical) side.
Then substitute the given values.
Step-by-Step Reasoning
Horizontal component:
Vertical component:
Key Takeaways
- Resolve vectors using for the component next to the angle and for the component opposite the angle.
- Components must be in the correct directions (horizontal and vertical here).
Common Mistakes
- Swapping sine and cosine (giving ).
- Using the wrong angle (e.g. measuring from the vertical instead of the horizontal).
- Rounding too early so later parts (like time to maximum height) do not match.
Things to Be Careful About
- The given angle is to the horizontal, so uses and uses .
- Keep enough significant figures so that subsequent calculations (e.g. showing ) work cleanly.
Working
At maximum height, .
Answer
1.6 s
Background Concept
For vertical projectile motion (air resistance negligible), acceleration is constant and downward:
Using upward as positive, the kinematics equation
applies, where is initial velocity component, is velocity at time .
At the maximum height of a projectile, the vertical velocity becomes zero momentarily before reversing direction.
Understanding the Question
You are told the ball is launched and air resistance is negligible. The question asks you to show that the time when it reaches maximum height is . From part (a)(i), the initial vertical velocity is .
Approach
Consider only the vertical motion:
- Initial vertical velocity is known.
- Vertical acceleration is .
- At maximum height, the vertical velocity .
Use and solve for .
Step-by-Step Reasoning
Take upward as positive.
At maximum height:
Use the kinematics equation:
Substitute and :
Rearrange:
So to 2 s.f., .
Key Takeaways
- Maximum height occurs when vertical velocity is zero.
- Vertical motion is uniformly accelerated with acceleration .
Common Mistakes
- Using the total speed instead of the vertical component.
- Taking when upward is defined as positive.
- Forgetting that only the vertical component changes; horizontal motion is separate.
Things to Be Careful About
- Sign convention: if upward is positive, then must be negative.
- Use a consistent value of ; small rounding differences can change the final time slightly.
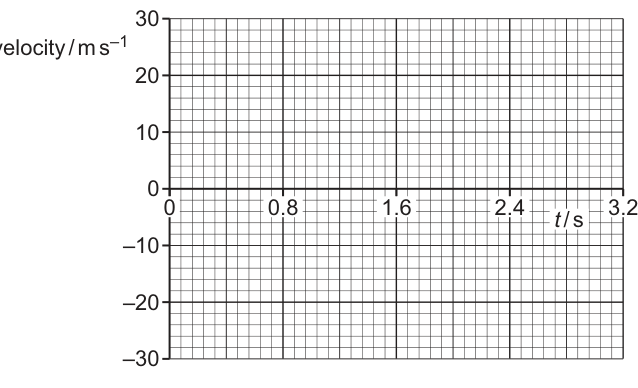
Since air resistance is negligible, horizontal acceleration is , so is constant at .
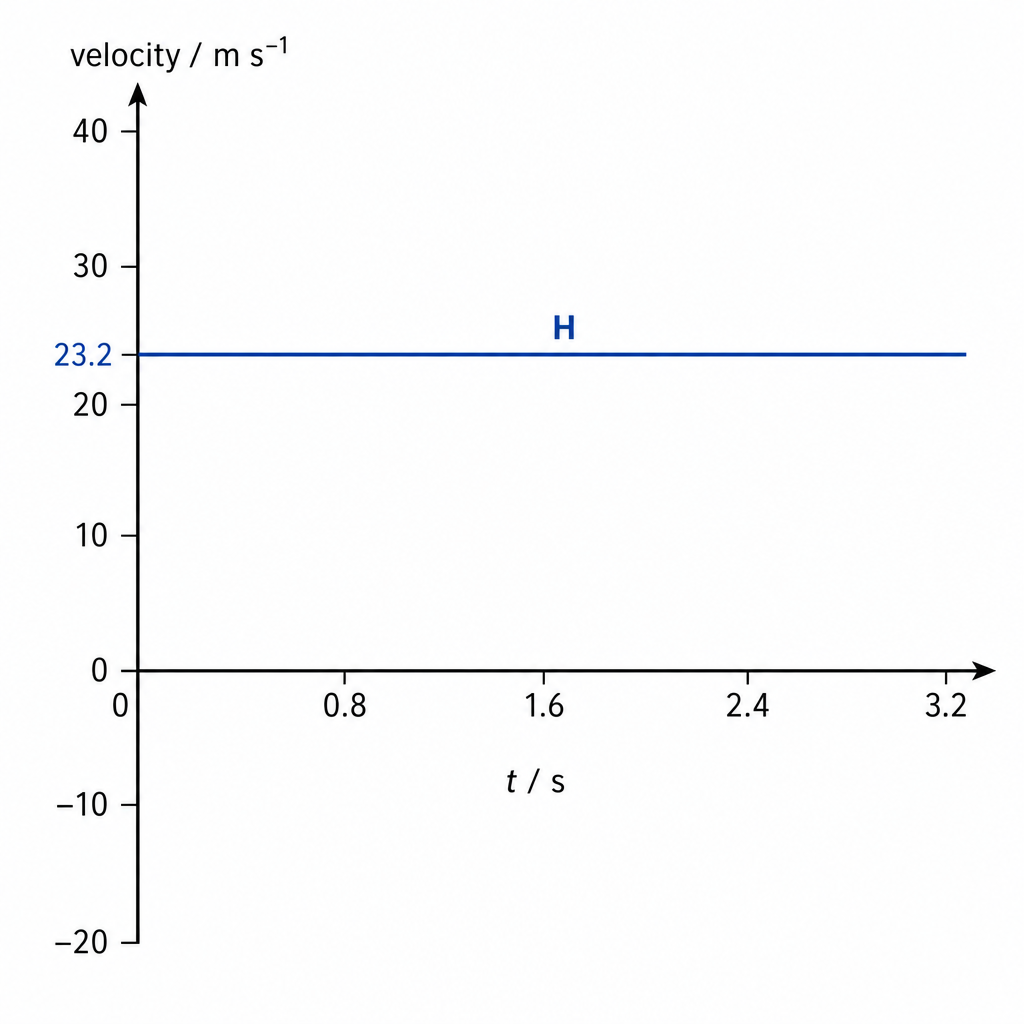
Horizontal line at v_H = 23.2 m s^-1 from t = 0 to 3.2 s (label H).
Background Concept
In projectile motion with negligible air resistance:
- There is no horizontal force.
- Therefore horizontal acceleration .
So the horizontal velocity component remains constant throughout the flight.
On a velocity–time graph, constant velocity is shown by a horizontal straight line.
Understanding the Question
You must sketch against time from to . From part (a)(i), immediately after launch. With no air resistance, nothing changes this horizontal component.
Approach
- Start the graph at with .
- Keep it constant up to .
- Label the line as H.
Step-by-Step Reasoning
Because the only significant force is weight, and weight acts vertically, the horizontal resultant force is zero:
Hence does not change with time:
So the sketch is a horizontal line at between and .
Key Takeaways
- With no air resistance, horizontal velocity stays constant in projectile motion.
- On a – graph, constant velocity is a horizontal straight line.
Common Mistakes
- Drawing a decreasing (that would require air resistance).
- Starting at instead of the horizontal component.
- Drawing the line through the origin (incorrect intercept).
Things to Be Careful About
- The value is positive and constant for the whole time interval.
- Make sure the line is clearly labelled H and spans the full time to .
On Fig. 1.2, sketch the variation of with time between and . Assume that velocity in the upward direction is positive. Label your line V.
Vertical acceleration .
Initial at .
At maximum height at .
At , .
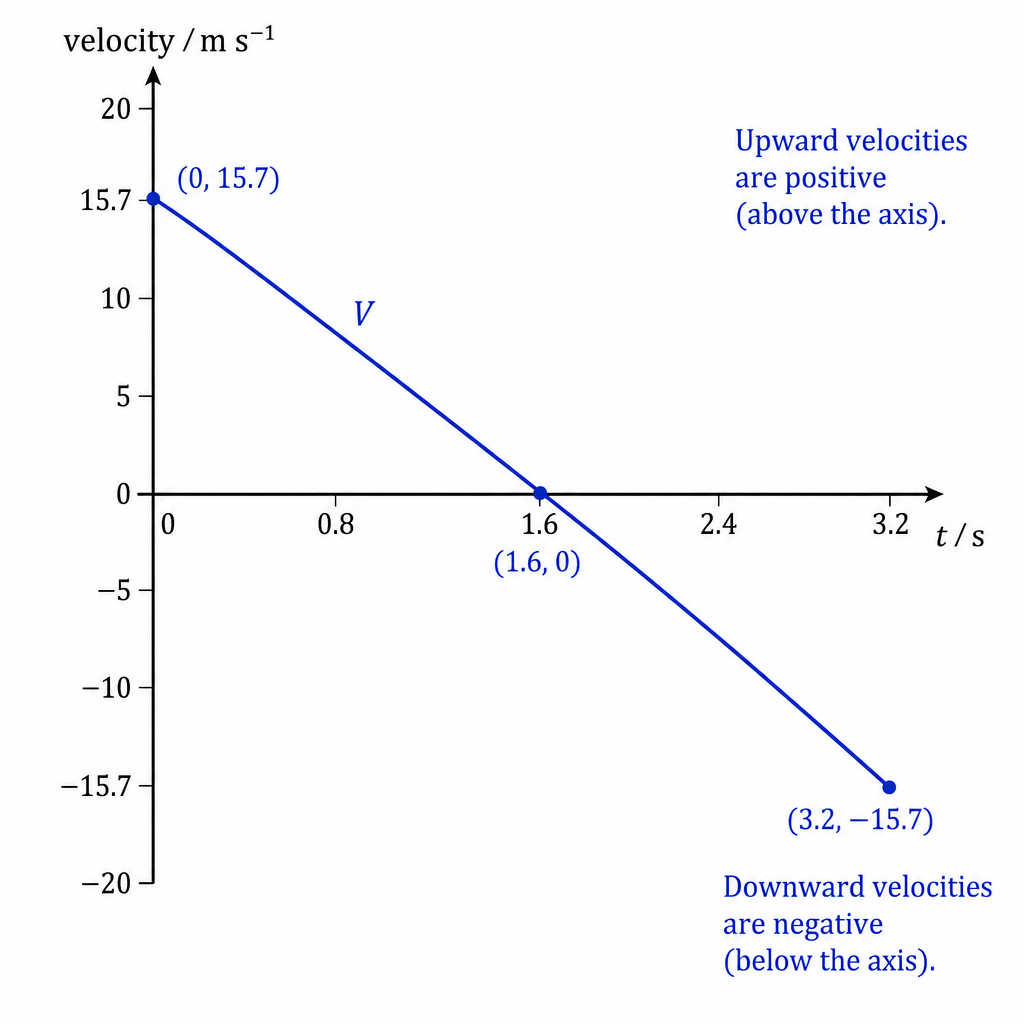
Straight line with gradient −9.81 from +15.7 m s^-1 at t=0 to 0 at t=1.6 s to −15.7 m s^-1 at t=3.2 s (label V).
Background Concept
In projectile motion without air resistance, the only acceleration is due to gravity, which is constant and downward:
If upward is defined as positive, then is negative in the kinematics equations.
The vertical velocity changes uniformly with time:
On a velocity–time graph, uniform acceleration corresponds to a straight line whose gradient equals the acceleration.
Understanding the Question
You must sketch against time from to , taking upward velocity as positive. From earlier parts:
- initial vertical velocity at
- at maximum height (at ),
Because the ball lands at (same height as launch), the vertical velocity at landing should be the negative of the initial vertical velocity.
Approach
Use the fact that acceleration is constant:
- The graph must be a straight line.
- Its gradient is .
Mark key points: , , and , then draw the straight line through them and label it V.
Step-by-Step Reasoning
Start with the vertical kinematics equation:
Here and , so:
Key points:
- At :
- At maximum height, occurs when (already shown).
- At :
So the sketch is a straight line decreasing from at , crossing at , and reaching at .
Key Takeaways
- Vertical velocity changes uniformly with time because acceleration is constant.
- The gradient of a – graph equals acceleration.
- At the same launch and landing height (no air resistance), the landing vertical velocity is equal in magnitude and opposite in direction to the initial vertical velocity.
Common Mistakes
- Drawing a curve instead of a straight line (would imply changing acceleration).
- Keeping positive for the whole motion (forgetting it becomes downward after the peak).
- Using as the gradient even though upward is defined as positive.
Things to Be Careful About
- Sign convention: upward positive means the line must slope downwards (negative gradient).
- Make sure the line is correctly labelled V and extends exactly from to .
The total change in momentum of the ball between leaving the ground at and landing on the ground at is .
Answer
Momentum is the product of mass and velocity:
p = mv
Background Concept
Linear momentum is a measure of how difficult it is to stop or change the motion of a moving object. It is defined as
where:
- is mass (a scalar)
- is velocity (a vector)
So momentum is also a vector and has the same direction as the velocity.
Understanding the Question
The question simply asks for the definition of momentum. A full-mark definition must state what momentum equals and should include the correct symbol relationship.
Approach
State the definition concisely, ideally with the equation.
Step-by-Step Reasoning
Write:
and, if using words: momentum equals mass times velocity.
Key Takeaways
- Momentum is a vector quantity.
- is the required defining relationship.
Common Mistakes
- Writing or confusing momentum with force.
- Describing momentum as “mass times speed” (speed is scalar; velocity is the correct vector quantity).
Things to Be Careful About
- Use velocity, not speed, in the definition.
- Ensure the equation is written clearly and correctly.
Working
Average force:
(downward)
Answer
downward
4.1 N downward
Background Concept
Newton’s second law can be written in momentum form:
This gives the resultant (average) force over a time interval if the change in momentum over that interval is known.
If air resistance is negligible for a projectile, the only force while in the air is the weight , acting vertically downward. So the change in momentum is consistent with a downward force.
Understanding the Question
You are told the total change in momentum of the ball from (leaving the ground) to (landing) is . You are asked to calculate the force acting on the ball while in the air.
Because air resistance is negligible, this force is essentially the weight, and it acts downward.
Approach
Use the momentum form of Newton’s second law to find the average force:
- Take .
- Take .
- Compute and state the direction.
Step-by-Step Reasoning
Apply:
Substitute:
The momentum change is due to gravity, so the resultant force is downward.
Rounding suitably gives downward.
Key Takeaways
- Resultant force equals rate of change of momentum.
- With negligible air resistance, the force on the projectile in flight is its weight.
Common Mistakes
- Using directly without having (this part is designed to avoid needing yet).
- Forgetting units: divided by gives .
- Not stating direction when the force is clearly vertical.
Things to Be Careful About
- This calculation gives the average resultant force over the whole flight time.
- Ensure you divide by (not ).
Working
Weight .
Answer
0.41 kg
Background Concept
For an object in a gravitational field, its weight is
If air resistance is negligible and the ball is in flight, the only force on it is its weight (downward). Therefore the force found from should equal .
Understanding the Question
From part (b)(ii), the force acting on the ball while it is in the air is about downward. You are asked to determine the ball’s mass.
Approach
Assume the force is the weight:
Rearrange to and substitute.
Step-by-Step Reasoning
Use:
So:
Substitute and :
Rounded suitably:
Key Takeaways
- With negligible air resistance, the force on a projectile is its weight.
- Mass can be found from .
Common Mistakes
- Using without consistency (can shift the final mass).
- Forgetting that the force in (ii) is downward, consistent with weight.
- Giving mass in newtons (confusing force with mass).
Things to Be Careful About
- Use consistent significant figures: the given data ( and ) suggests about 2 s.f. for the mass.
- Ensure you use in so that units reduce correctly to kg.
Fig. 2.1 shows a square metal sheet of non-uniform density, with a thin wooden rod fixed at its centre. One of the corners of the sheet is labelled X.
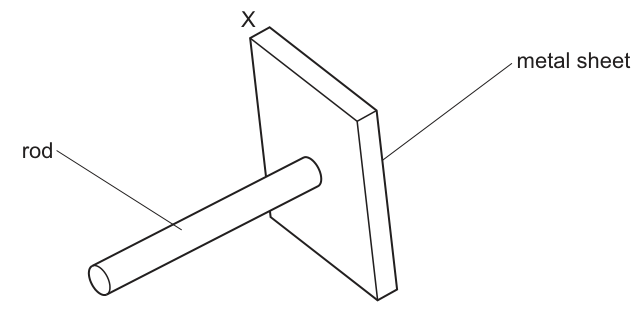
The rod has negligible mass. The mass of the metal sheet is .
The rod is supported so that the rod is horizontal and the metal sheet is vertical.
Answer
A couple consists of two equal and opposite parallel forces separated by a perpendicular distance.
The torque (moment) of the couple is
where is the perpendicular separation of the forces (independent of the point about which moments are taken).
for two equal and opposite parallel forces separated by perpendicular distance .
Background Concept
A couple is a special kind of force system: two forces of equal magnitude, opposite direction, and parallel lines of action, separated by a perpendicular distance. The net force is zero, so a couple produces rotation without translation.
The torque (moment) of a couple is the turning effect produced, and its magnitude is given by
where is the magnitude of either force in the couple and is the perpendicular separation between their lines of action.
A key property is that the torque of a couple is the same about any point (because shifting the origin changes both moments equally and oppositely).
Understanding the Question
You are asked to define torque of a couple, so the answer must include:
- what a couple is (equal/opposite/parallel forces, separation), and
- the expression for its torque in terms of force and separation.
Approach
State the defining features of a couple, then write the standard expression for its torque using the perpendicular separation.
Step-by-Step Reasoning
- Identify what makes a couple: two forces, same size, opposite directions, parallel, separated.
- The turning effect is the moment of one force about the line of action of the other, giving magnitude .
- Emphasise that must be the perpendicular separation.
Key Takeaways
- A couple produces rotation only (no resultant force).
- Torque of a couple: , with the perpendicular separation.
Common Mistakes
- Using without specifying is the perpendicular distance.
- Forgetting to mention the forces are equal and opposite.
- Giving (counting both forces) instead of the correct .
Things to Be Careful About
- Always say perpendicular separation.
- Torque direction can be clockwise/anticlockwise, but for a definition the magnitude and the correct force system are essential.
When the rod is supported in such a way that it can rotate freely within its support, the sheet hangs in equilibrium with point X vertically above the rod, as shown in Fig. 2.2.
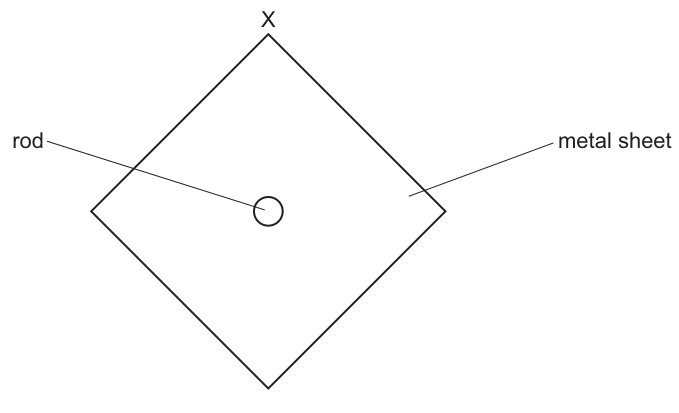
On Fig. 2.2, draw a line to indicate the range of possible positions for the centre of gravity of the metal sheet.
Answer
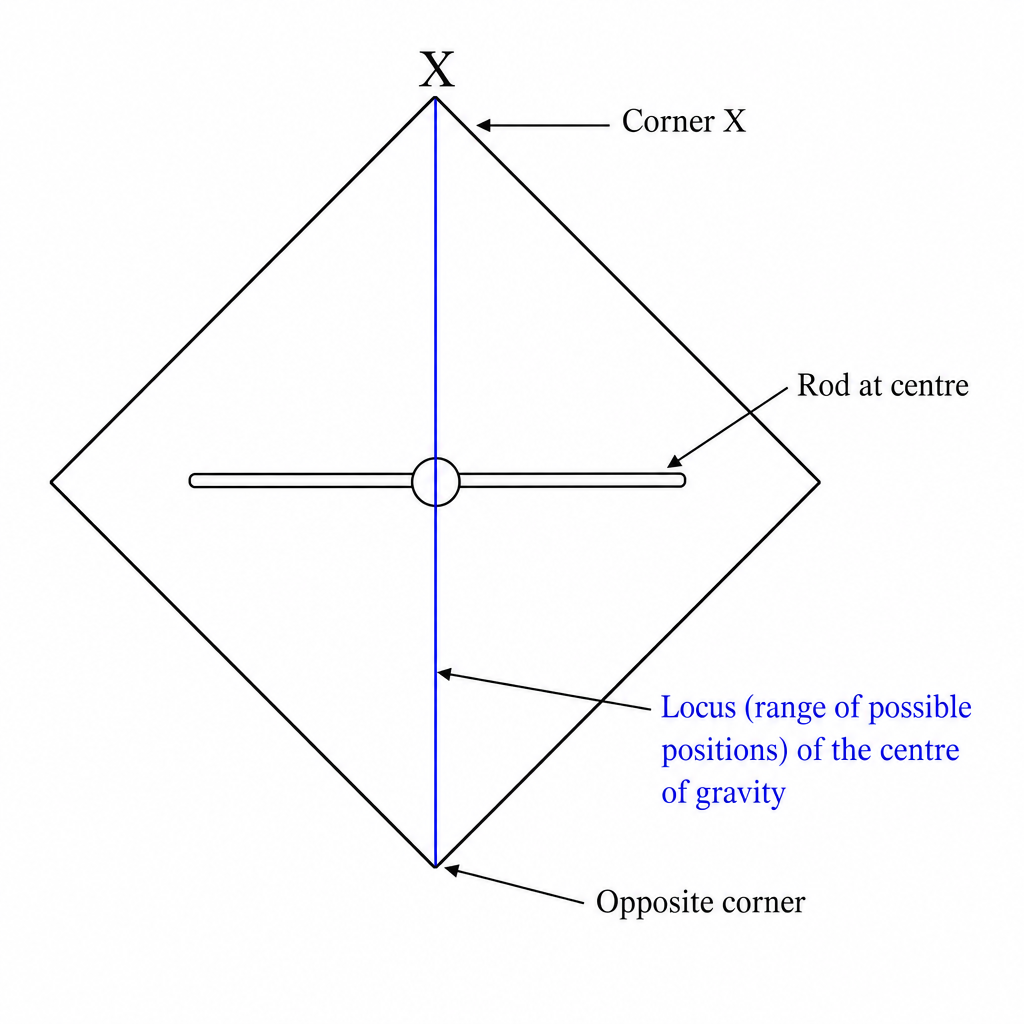
Draw a straight line along the diagonal through and the rod (centre), extending below the rod towards the opposite corner.
Line along the diagonal through X and the rod (towards the opposite corner).
Background Concept
For an object suspended and free to rotate, it settles in equilibrium when its centre of gravity (CoG) is vertically below the point of support (so the line of action of weight passes through the pivot). If it were not, the weight would produce a moment about the support and the object would rotate.
Understanding the Question
The sheet can rotate freely about the rod. In the shown equilibrium position (Fig. 2.2), corner is vertically above the rod. The question asks you to indicate the range of possible positions of the CoG consistent with that orientation.
Because the rod is the effective pivot, the weight must act through the rod; therefore the CoG must lie on the vertical line through the rod. Since is vertically above the rod in this equilibrium, that vertical line coincides with the diagonal of the square passing through and the centre.
Approach
Use the condition for rotational equilibrium of a hanging object:
- line of action of passes through the support.
Then map that onto the diagram: draw the corresponding line on the sheet.
Step-by-Step Reasoning
- Pivot is at the rod through the sheet’s centre.
- For no turning effect about the rod, the moment of the weight about the rod must be zero.
- Moment is zero when the perpendicular distance from the rod to the line of action of weight is zero, i.e. the line of action passes through the rod.
- The line of action of weight is vertical through the CoG.
- Therefore the CoG must be on the vertical line through the rod.
- In Fig. 2.2, the vertical line through the rod also passes through (since is vertically above the rod), so this line is exactly the diagonal from through the centre to the opposite corner.
Key Takeaways
- A freely suspended object rotates until its CoG is vertically below the support.
- Therefore the CoG lies somewhere on the vertical line through the support (pivot).
Common Mistakes
- Drawing a horizontal line through the rod (wrong direction for the weight’s line of action).
- Marking a single point instead of a line (the question asks for a range/locus).
- Drawing the other diagonal (the one not passing through ).
Things to Be Careful About
- The CoG must lie on the correct diagonal because the figure tells you which corner is vertically above the rod.
- Even though physically stable equilibrium implies the CoG is below the rod, mark schemes for “range of possible positions” often credit the full correct line through the rod and .
When a torque of is applied to the rod, the sheet is held in equilibrium with two of its edges horizontal, as shown in Fig. 2.3. Point X is at the top-left corner.
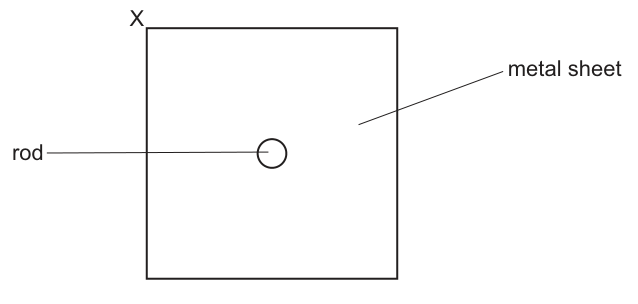
Explain whether the torque applied to the rod to hold the sheet in equilibrium is clockwise or anticlockwise.
Answer
The centre of gravity is to the right of the rod, so the weight produces a clockwise moment about the rod.
Therefore the applied torque must be anticlockwise to hold the sheet in equilibrium.
Anticlockwise.
Background Concept
A force causes a turning effect (moment/torque) about a pivot if its line of action does not pass through the pivot. For a force acting at perpendicular distance from the pivot,
The direction of the torque (clockwise/anticlockwise in the plane of the page) depends on where the force acts relative to the pivot.
In equilibrium, the net torque about the pivot is zero, so any applied torque must balance the torque due to weight.
Understanding the Question
In Fig. 2.3 the sheet is held with edges horizontal. Because the sheet’s density is non-uniform, its CoG is not at the rod. From part (b), the CoG lies along a diagonal; in this orientation that diagonal places the CoG down-and-right of the rod. The question asks whether the external torque applied to the rod is clockwise or anticlockwise.
Approach
- Decide which side of the rod the CoG lies on in Fig. 2.3.
- Use the direction of the weight’s turning effect about the rod.
- The applied torque must be opposite to balance it.
Step-by-Step Reasoning
- In Fig. 2.3, the CoG is horizontally displaced to the right of the rod.
- The weight acts vertically downward through the CoG.
- A downward force acting to the right of a pivot tends to pull the right side down and lift the left side up, which is a clockwise rotation.
- To keep the sheet stationary, the applied torque must oppose this clockwise moment.
Therefore, the applied torque is anticlockwise.
Key Takeaways
- Determine torque direction by imagining which side would go down/up.
- In equilibrium, applied torque must oppose the torque caused by weight.
Common Mistakes
- Guessing clockwise/anticlockwise without linking it to where the CoG lies.
- Reversing the direction because of viewing the sheet from the wrong side.
Things to Be Careful About
- Always state torque direction about the pivot (the rod).
- Be consistent about the viewing direction (front view of Fig. 2.3).
Show that the centre of gravity of the sheet has a horizontal displacement of from the rod.
Working
For equilibrium about the rod,
Answer
Horizontal displacement .
0.12 m
Background Concept
If a rigid body is in rotational equilibrium about a pivot, the net torque about that pivot is zero. Here, the sheet experiences:
- an applied torque from the rod, and
- a torque due to its weight acting at the centre of gravity.
If the horizontal (perpendicular) distance from the pivot to the line of action of the weight is , then the magnitude of the gravitational torque is
Understanding the Question
You are told that an applied torque of holds the sheet in equilibrium in the orientation of Fig. 2.3. Because the sheet is not uniform, its weight acts at a point horizontally displaced from the rod. The question asks you to show that this horizontal displacement is .
Given:
- take
Unknown: .
Approach
Equate the applied torque to the gravitational moment about the rod:
Then rearrange for and substitute values.
Step-by-Step Reasoning
- Write equilibrium of moments about the rod:
- Rearrange:
- Substitute:
- Calculate:
Key Takeaways
- Torque from weight about a pivot is times the perpendicular distance to its line of action.
- In equilibrium, applied torque balances gravitational torque.
Common Mistakes
- Using the diagonal distance to the CoG instead of the perpendicular (horizontal) distance .
- Using and then not matching the stated value.
- Dropping units for torque or distance.
Things to Be Careful About
- here is the horizontal displacement because the weight is vertical.
- Quote the final value to sensible significant figures (here ).
The square metal sheet has an average density of and a uniform thickness of .
Show that the side length of the sheet is .
Working
Thickness
Area
For a square, :
Answer
Side length .
0.48 m
Background Concept
Density is defined as
so the volume is
For a sheet of uniform thickness , the volume is also
where is the area of the face. For a square of side length ,
so
Understanding the Question
You are given:
- mass
- average density
- thickness (must convert to metres)
You must show the side length is .
Approach
- Use to find the sheet volume.
- Use to find the face area.
- Use for a square.
Step-by-Step Reasoning
- Find volume:
- Convert thickness to SI:
- Find area:
- Side length of square:
Rounded appropriately:
Key Takeaways
- Density links mass and volume.
- For a uniform sheet: .
- Square side length comes from .
Common Mistakes
- Forgetting to convert into metres.
- Using instead of .
- Rounding too early (can distort the final square root).
Things to Be Careful About
- Keep SI units throughout so that in is consistent.
- Check plausibility: half-side would be , reasonable for a 2.8 kg metal sheet of this thickness and density.
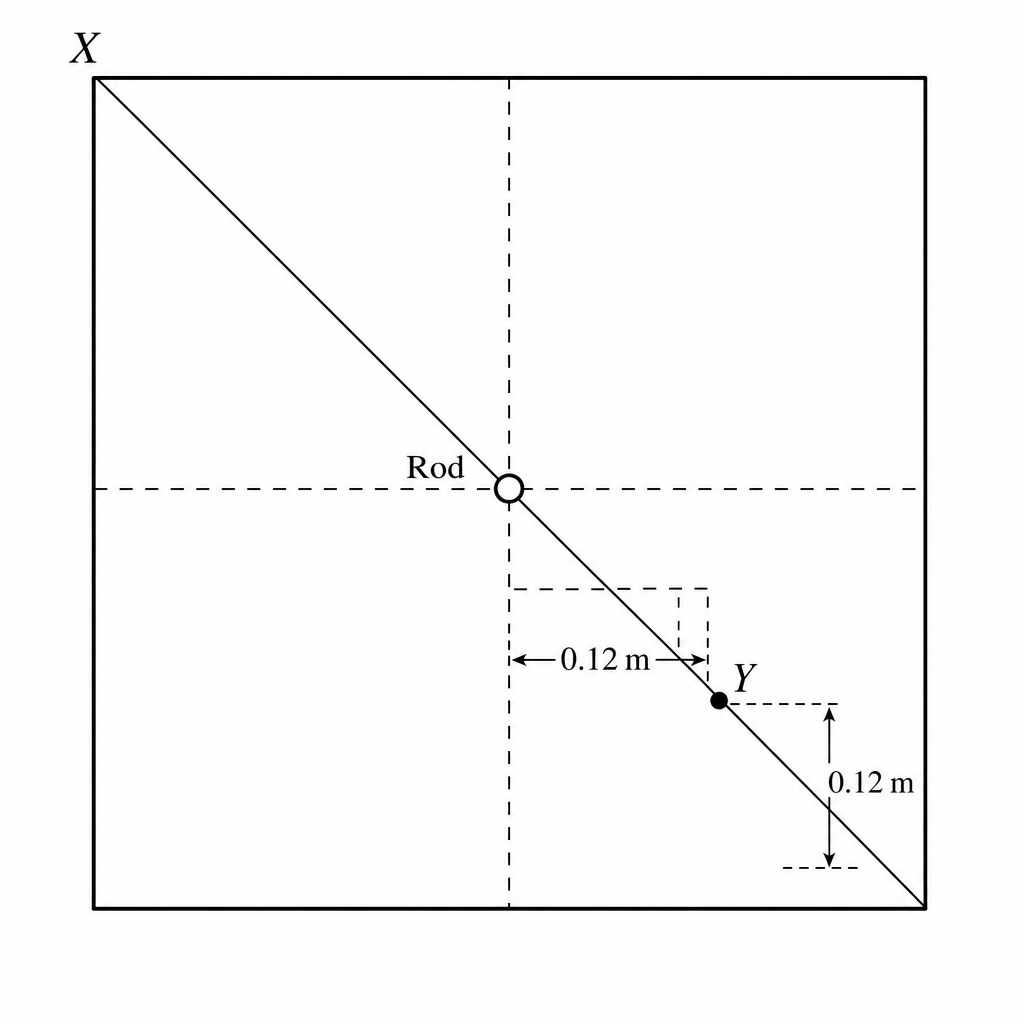
Use the answer in (b) and the information in (c) and (d) to determine the position of the centre of gravity of the sheet. Indicate this position on Fig. 2.3 with a point labelled Y.
Working
From (b), the centre of gravity lies on the diagonal through and the rod (towards the opposite corner).
In Fig. 2.3, this diagonal is at to the horizontal, so horizontal and vertical displacements from the rod are equal.
Given the horizontal displacement is , the centre of gravity is to the right and below the rod.
(With , this is in each direction, so it lies within the sheet.)
Answer
Point is on the diagonal from to the opposite corner, at from the rod (right and down).
On the X-to-opposite-corner diagonal, 0.12 m right and 0.12 m down from the rod.
Background Concept
Two ideas combine here:
-
Hanging equilibrium: when an object is free to rotate about a pivot, it settles so that its CoG lies somewhere on the vertical line through the pivot.
-
Torque from weight: if, in some orientation, the object is held by an applied torque, the weight produces a moment where is the perpendicular distance from the pivot to the weight’s line of action.
Also, in a square, a diagonal makes to the horizontal/vertical, so moving along a diagonal changes horizontal and vertical coordinates equally in magnitude.
Understanding the Question
You must locate the CoG on Fig. 2.3 using:
- (b) the CoG lies along a particular diagonal (because in the free-hanging position, that diagonal is vertical),
- (c) the horizontal displacement from the rod is in the held orientation,
- (d) the side length is , letting you judge whether the point is inside the sheet and how far it is relative to the square.
Approach
- Transfer the result of (b): the CoG is on the diagonal through and the centre.
- Use (c): the CoG must be horizontally from the centre (to the right in Fig. 2.3).
- Because the CoG is on a diagonal, set vertical displacement magnitude equal to horizontal displacement.
- Mark the point on Fig. 2.3.
Step-by-Step Reasoning
- From (b), the CoG is somewhere on the diagonal joining corner to the opposite corner, passing through the rod at the centre.
- In Fig. 2.3, that diagonal slopes downwards to the right (from at top-left towards bottom-right).
- From (c)(ii), the horizontal displacement of the CoG from the rod is
and since the torque direction showed the CoG is to the right, take horizontally.
4. Any point on a diagonal has equal horizontal and vertical offsets from the centre in magnitude. Therefore the vertical displacement must be downward.
So relative to the rod (centre), the CoG is at
- Use (d) to check scale: side length , so from the centre to an edge is . Since , the point is inside the sheet and roughly halfway from centre to the right-hand edge and halfway from centre to the bottom edge.
Key Takeaways
- The CoG must lie on a line fixed by the hanging equilibrium orientation.
- The moment from weight gives a perpendicular (here horizontal) displacement.
- On a square diagonal, horizontal and vertical displacements are equal.
Common Mistakes
- Placing the CoG on the wrong diagonal (not the one through ).
- Using the diagonal distance from the centre instead of the horizontal displacement.
- Putting above the centre: the CoG must be below the pivot for stable hanging.
Things to Be Careful About
- The from (c)(ii) is a horizontal displacement because the force is vertical.
- In Fig. 2.3, “right and down” corresponds to moving along the diagonal from towards the opposite corner.
- Use to keep the plotted point realistic (not outside the square).
A bungee jumper of mass secures one end of an elastic rope to a bridge. The other end is attached to the bungee jumper. The jumper falls from rest from the bridge and descends into the valley below, as shown in Fig. 3.1.
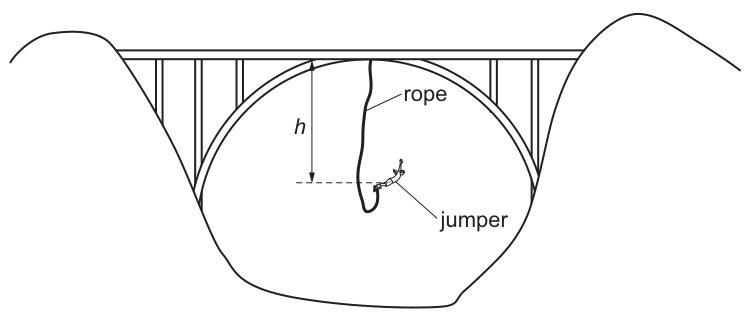
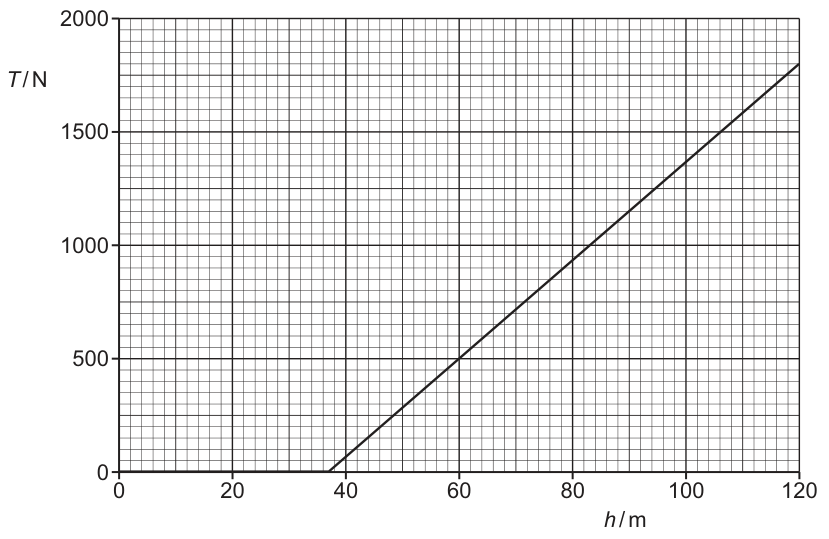
Fig. 3.2 shows the variation of the tension in the rope with the vertical distance of the jumper below the level of the bridge.
Answer
Hooke’s law: the extension is proportional to the applied force (tension) provided the elastic limit is not exceeded.
Extension is proportional to applied force, provided the elastic limit is not exceeded.
Background Concept
For an ideal spring (or elastic material) in its elastic region, the restoring force increases linearly with extension. This is written as
where:
- is the tension (force) in the spring/rope,
- is the extension beyond the natural (unstretched) length,
- is the spring constant.
The relationship only holds while the material behaves elastically (i.e. below the limit of proportionality / elastic limit). Beyond that, is no longer proportional to .
Understanding the Question
You are told the bungee rope obeys Hooke’s law, and you are asked simply to state what Hooke’s law is. To gain the mark you must include both (i) the proportionality and (ii) the condition.
Approach
Write the standard statement: “extension is proportional to force” and add the condition “provided the elastic limit is not exceeded”.
Step-by-Step Reasoning
- Identify the two relevant quantities: tension and extension .
- State the proportionality: .
- Add the condition: only valid within the elastic region (elastic limit not exceeded).
Key Takeaways
- Hooke’s law is a linear force-extension relationship.
- Always state the condition (elastic limit / limit of proportionality).
Common Mistakes
- Omitting the condition (elastic limit not exceeded).
- Saying “length is proportional to force” instead of “extension is proportional to force”.
- Mixing up proportionality and equality without defining .
Things to Be Careful About
- Use “extension” (change in length), not “length”.
- “Elastic limit not exceeded” (or equivalent) must be present for full credit.
Working
From the graph, up to , so the rope is unstretched until .
Answer
40 m
Background Concept
A bungee rope only becomes taut (and starts to stretch) after the jumper has fallen a distance equal to the rope’s natural (unstretched) length. Before that point the rope is slack, so the tension is zero.
Understanding the Question
The graph shows tension against the vertical distance fallen . The unstretched length is the value of at which the tension first starts to increase above zero.
Approach
Look for the point on the -axis where the graph leaves . That value is the rope’s natural length.
Step-by-Step Reasoning
- From to , the graph is along so the rope is slack.
- At , tension starts to rise, meaning the rope has just become taut.
- Therefore the natural (unstretched) length is .
Key Takeaways
- Zero tension implies the rope is slack (no extension).
- The natural length is found where tension first becomes non-zero.
Common Mistakes
- Reading the value at maximum tension (e.g. ) instead of where tension first starts.
- Confusing with extension (extension is only after the rope is taut).
Things to Be Careful About
- Ensure you read from the correct axis: is on the horizontal axis.
- If the graph has thickness, take the transition point consistently (usually where the straight-line rise begins).
Working
For , extension .
From the graph at , , so .
Answer
24 N m^-1
Background Concept
In the Hooke’s law region,
So a graph of against is a straight line through the origin with gradient .
Here the graph is against (distance below the bridge), not directly against extension. The extension starts only after the rope becomes taut.
Understanding the Question
You must find the spring constant from the straight-line part of the tension-distance graph. The rope is slack up to the unstretched length; after that, any additional distance fallen produces extension.
Approach
- Use part (b)(i) to identify the natural length .
- Convert a chosen value to extension using .
- Use (equivalently, the gradient of the straight-line section).
Step-by-Step Reasoning
- From the graph, tension becomes non-zero at . Hence .
- Pick a clear point on the straight-line region: at , read .
- Compute extension at that point:
- Apply Hooke’s law:
(Using two points and calculating gradient gives the same result.)
Key Takeaways
- The spring constant is the gradient of a vs graph.
- When given vs position, you must first convert position into extension using the natural length.
Common Mistakes
- Using directly as the extension (forgetting that ).
- Using the wrong part of the graph (including the flat region where ).
- Forgetting units: is in .
Things to Be Careful About
- Read the tension value from the graph as accurately as possible.
- Use the straight-line region only (where Hooke’s law applies).
For the position of the bungee jumper at a distance of below the bridge:
Working
Answer
75 kJ
Background Concept
The change in gravitational potential energy (GPE) for a mass moving vertically through height in a uniform gravitational field is
A downward movement reduces GPE; the “loss of GPE” is the magnitude .
Understanding the Question
At below the bridge, the jumper has descended vertically by . You are asked to show the energy lost from the gravitational store is .
Approach
Use with , , , then convert J to kJ.
Step-by-Step Reasoning
- Substitute values:
- Calculate:
- Convert to kJ using :
Key Takeaways
- GPE change depends only on vertical displacement: .
- “Loss” usually means the positive magnitude of the decrease.
Common Mistakes
- Using (confusing with extension) instead of the full drop.
- Forgetting the factor when converting J to kJ.
- Using the wrong unit for .
Things to Be Careful About
- The height change here is the full distance below the bridge, not the rope extension.
- Quote the final result to a sensible number of significant figures consistent with the data (here, ).
Working
At , extension .
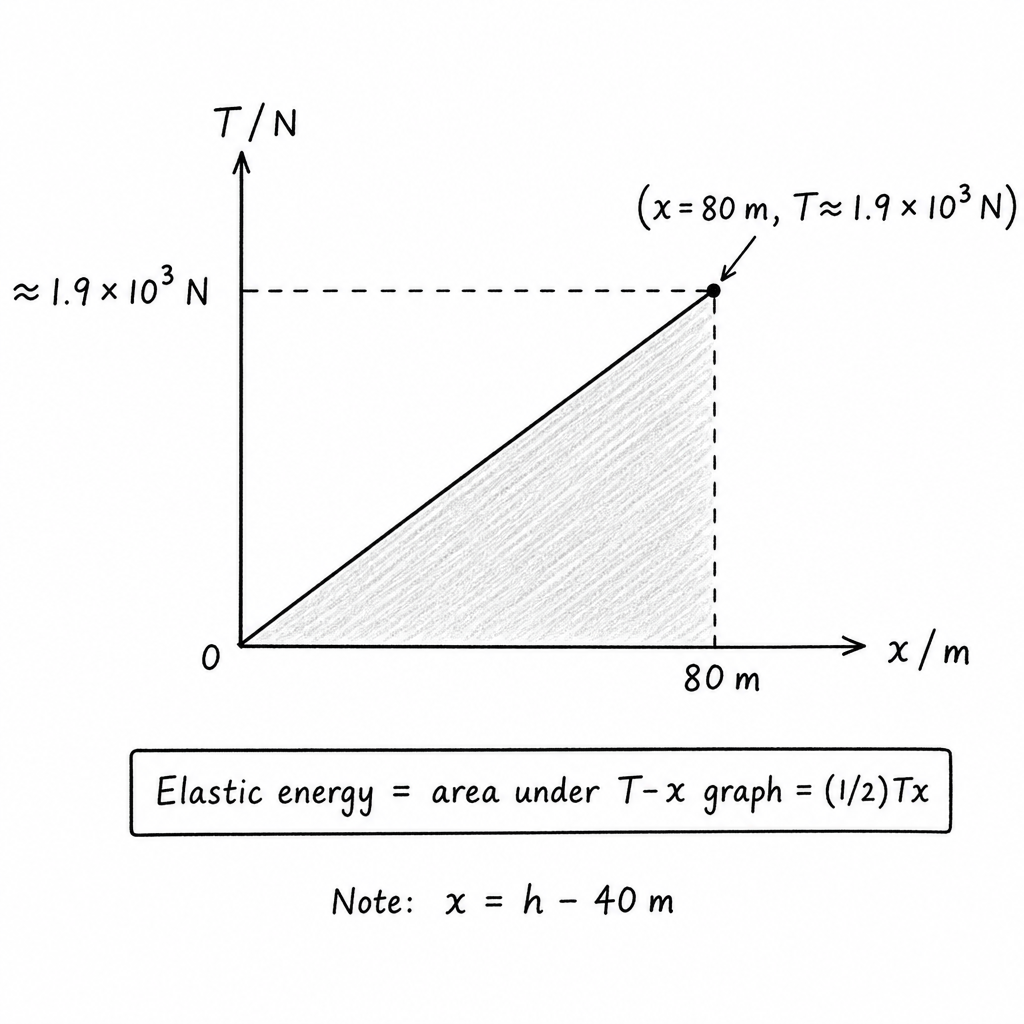
Elastic potential energy = area under – graph:
Answer
75 kJ
Background Concept
Elastic potential energy stored in a spring/elastic rope equals the work done to stretch it. Work done by a variable force is the area under a force-extension graph:
If Hooke’s law applies (), the force increases linearly from to , so the area is a triangle:
Understanding the Question
You must find the elastic energy stored in the rope when the jumper is below the bridge. The graph gives against , and the rope only starts stretching after .
Approach
- Find the extension at using .
- Read the corresponding tension from the graph.
- Since the line is straight (Hooke’s law), use the triangle area under the vs graph: .
Step-by-Step Reasoning
- Natural length from the flat part is , so at :
-
From the graph at , .
-
Because increases linearly with (Hooke’s law), the – graph is a straight line from the origin to , so the elastic energy is the triangular area:
Key Takeaways
- Elastic energy is the area under a force-extension graph.
- When a force varies linearly, use the triangle area .
- Extension starts only after the rope becomes taut.
Common Mistakes
- Using as the extension instead of .
- Using (rectangle) instead of (triangle).
- Taking the area under the entire vs graph including the slack region incorrectly; the slack region contributes zero anyway because .
Things to Be Careful About
- Make sure the base of the triangle is the extension, not the total drop.
- Read from the graph at the correct value and use an appropriate number of significant figures.
- Keep units consistent: .
Explain what can be deduced from the information in (c) about the speed of the bungee jumper when at a distance of below the bridge.
Answer
From (c), loss of GPE and elastic energy gained , so no energy remains as kinetic energy.
Hence the bungee jumper’s speed at is (momentarily at rest).
0 m s^-1 (momentarily at rest)
Background Concept
Energy conservation for this situation (ignoring any energy losses such as air resistance) is:
Kinetic energy is
So if the kinetic energy is zero, the speed must be zero.
Understanding the Question
In part (c), you found that by the time the jumper is below the bridge, the gravitational potential energy lost is and the elastic potential energy stored in the rope is also . You are asked what this implies about the jumper’s speed at that point.
Approach
Use the energy balance. If all the lost GPE has been transferred into elastic energy, then there is none left to be kinetic energy. Then use to deduce the speed.
Step-by-Step Reasoning
- Energy transferred from gravity: .
- Energy stored elastically: .
- Therefore the kinetic energy at that instant is
- With , if then .
Physically, this means is the lowest point of the motion (turning point): the jumper is momentarily at rest before moving upward.
Key Takeaways
- Compare energy changes to determine whether an object is moving.
- Equal loss of GPE and gain of elastic energy implies zero kinetic energy at that moment.
- A turning point corresponds to .
Common Mistakes
- Saying “speed is maximum” because the drop is largest; actually at the lowest point the speed is zero.
- Forgetting kinetic energy exists and concluding incorrectly without an energy balance.
- Assuming air resistance must be included when the question’s deduction is clearly based on the equality in (c).
Things to Be Careful About
- The conclusion follows if we treat the energy changes in (c) as exact (i.e. negligible losses). In a real jump, some energy would be dissipated, but the exam deduction uses the given results.
- Make it clear this is an instantaneous statement: “momentarily at rest” at .
Answer
When two or more waves overlap, the resultant displacement at any point is the algebraic (vector) sum of the displacements due to the individual waves at that point (at that instant).
When two or more waves overlap, the resultant displacement at any point is the algebraic sum of the individual displacements at that point.
Background Concept
The principle of superposition is the key rule for adding waves. For a wave quantity such as displacement (or electric field for an electromagnetic wave), the medium responds linearly, so overlapping disturbances simply add.
In symbols, if two waves produce displacements (or field values) and at the same place and time, then the resultant is
Understanding the Question
You are asked to state the superposition principle. This is a definition-mark question, so you need a precise statement using the words “resultant”, “at a point” and “algebraic sum”.
Approach
Recall the standard definition used for interference and stationary waves: the total displacement (or field) is the sum of the individual displacements (or fields) at the same point and at the same instant.
Step-by-Step Reasoning
- Identify the relevant quantity being added: displacement (for mechanical waves) or field (for EM waves).
- State that when waves overlap, you add their instantaneous values.
- Emphasise that it is the algebraic sum (so signs / directions matter).
Key Takeaways
- Superposition is the rule that allows interference patterns and stationary waves.
- You add instantaneous displacements/fields at the same point.
Common Mistakes
- Saying “amplitudes add” (it is the instantaneous displacement/field that adds, not always the amplitudes).
- Missing “at that point” and “at that instant”.
Things to Be Careful About
- Use “algebraic sum” (or “vector sum” where appropriate).
- Keep it general: it applies to two or more waves.
An electromagnetic wave of wavelength in free space is incident normally on an aluminium sheet, as shown in Fig. 4.1.
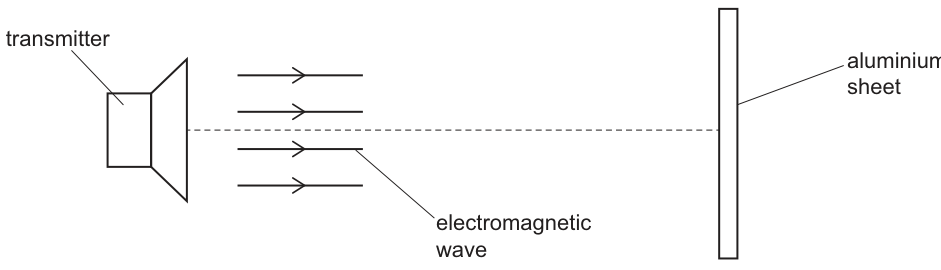
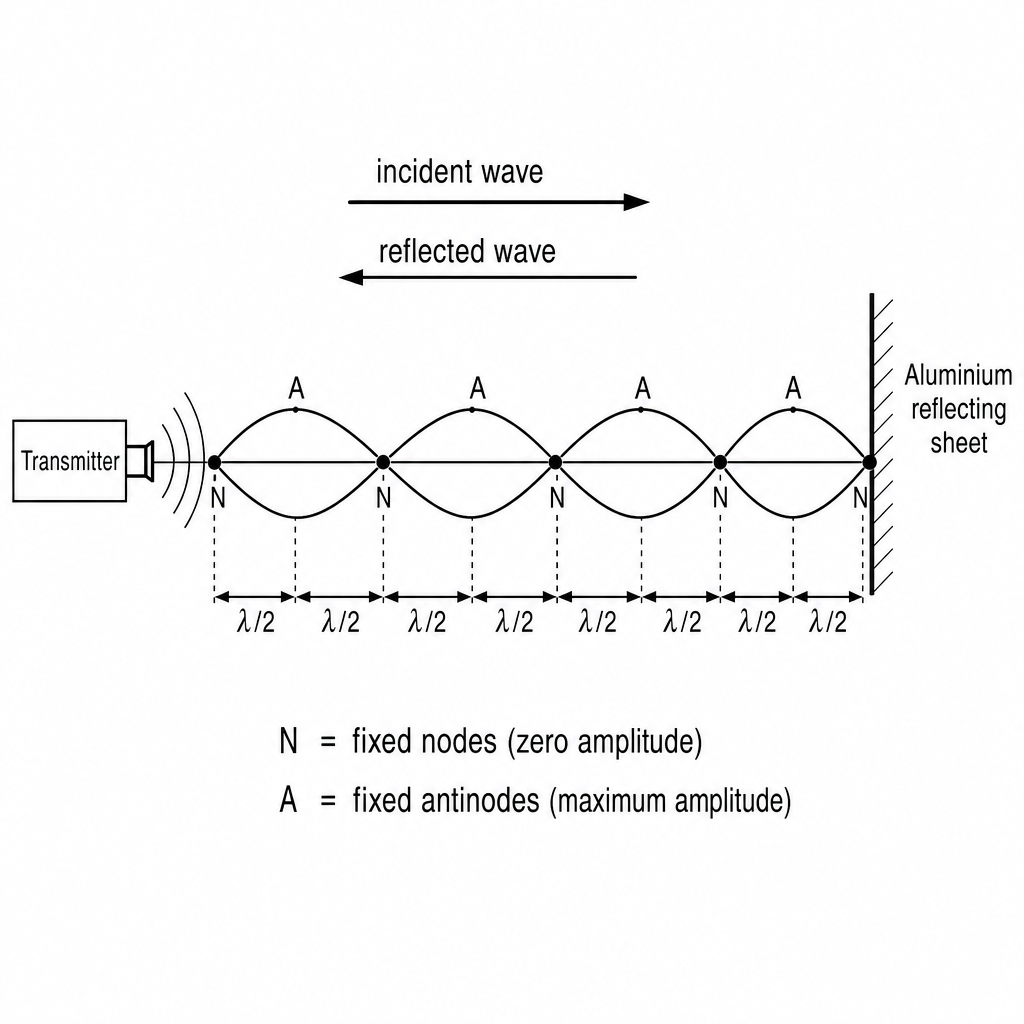
The wave reflects at the aluminium sheet and a stationary wave is formed in the region between the transmitter and the sheet.
Answer
The incident wave reflects from the aluminium sheet, producing a reflected wave of the same frequency (and wavelength) travelling in the opposite direction.
The incident and reflected waves superpose. At positions where they are always in antiphase, destructive interference occurs giving nodes of zero amplitude. At positions where they are always in phase, constructive interference occurs giving antinodes of maximum amplitude. These node and antinode positions are fixed, so a stationary wave is formed.
Incident and reflected waves of the same frequency travel in opposite directions and superpose; fixed points of destructive interference give nodes (zero amplitude) and fixed points of constructive interference give antinodes (maximum amplitude), forming a stationary wave.
Background Concept
A stationary (standing) wave is formed when two progressive waves of the same frequency and wavelength (and usually similar amplitudes) travel in opposite directions along the same line and interfere.
Using superposition, the resultant displacement/field at each point is the sum of the two wave contributions. Because the phase difference between the two waves depends on position, some positions always cancel (nodes) and some always reinforce (antinodes).
- Node: resultant amplitude is always zero (complete destructive interference at all times).
- Antinode: resultant amplitude is maximum (complete constructive interference at some instants).
Understanding the Question
An electromagnetic wave is sent normally towards an aluminium sheet. Aluminium is a good conductor, so it reflects the electromagnetic wave strongly. You are asked to explain how the reflected wave combines with the incident wave to produce a stationary wave pattern between the transmitter and the sheet, and to describe nodes and antinodes.
Approach
- State that reflection produces a second wave travelling back towards the transmitter.
- Note that the two waves have the same and but travel in opposite directions.
- Apply superposition: interference produces fixed nodes (destructive) and antinodes (constructive), creating a stationary pattern.
Step-by-Step Reasoning
- The transmitter produces an incident electromagnetic wave travelling towards the sheet.
- At the aluminium sheet, the wave is reflected, so a second wave travels back in the opposite direction.
- Both waves occupy the same region between transmitter and sheet at the same time.
- By superposition, the resultant field/displacement at a point is the sum of the two contributions.
- At certain positions, the waves are always out of phase (path difference corresponds to an odd multiple of ), so the sum is always zero: these are nodes.
- Halfway between nodes, the waves are in phase (path difference an integer multiple of ), so the resultant amplitude is largest: these are antinodes.
- Because the phase difference depends only on position, the nodes and antinodes stay at fixed positions: that fixed pattern is the stationary wave.
Key Takeaways
- A standing wave requires two waves of same and travelling in opposite directions.
- Nodes are permanent points of zero amplitude; antinodes are permanent points of maximum amplitude.
Common Mistakes
- Saying “reflection changes the frequency” (it does not; the reflected wave has the same frequency).
- Confusing nodes with points that are “momentarily zero” (nodes are zero at all times).
- Forgetting to mention superposition/interference.
Things to Be Careful About
- Use the terms constructive/destructive interference correctly.
- Make it clear the pattern is fixed in space (unlike a progressive wave).
Working
For an electromagnetic wave in free space, .
Answer
1.15 × 10^10 Hz
Background Concept
For any wave,
where is wave speed, is frequency, and is wavelength. For electromagnetic waves in free space (vacuum/air to a very good approximation),
Understanding the Question
You are given the wavelength in free space: . You are asked to find the frequency. Since it is in free space, use speed .
Approach
Rearrange to , then substitute and the given .
Step-by-Step Reasoning
- Start with
- Rearrange for frequency:
- Use for an EM wave in free space:
- Calculate:
- Quote to 3 s.f.:
Key Takeaways
- For EM waves in free space, always use .
- Frequency is found from .
Common Mistakes
- Using (that is for sound, not EM waves).
- Converting incorrectly (it is already in metres).
- Forgetting standard form or missing the unit Hz.
Things to Be Careful About
- Check powers of ten: dividing by increases the result by .
- Significant figures: follow the data (here typically 2–3 s.f.).
State the principal region of the electromagnetic spectrum to which the wave belongs.
Answer
Microwaves.
Microwaves
Background Concept
The electromagnetic spectrum is commonly divided by wavelength (or frequency) into regions: radio, microwave, infrared, visible, ultraviolet, X-rays, gamma rays.
Typical microwave wavelengths are approximately to (millimetres to tens of centimetres).
Understanding the Question
You are given . You must name the principal region of the spectrum corresponding to this wavelength.
Approach
Convert to a familiar unit (cm or mm) and compare to the standard wavelength bands.
Step-by-Step Reasoning
- .
- A few centimetres lies in the microwave region (used for radar and microwave communication).
Key Takeaways
- Wavelength of a few cm corresponds to microwaves.
Common Mistakes
- Saying “radio waves” (too broad; microwaves are a distinct principal region in exam classification).
- Confusing microwaves with infrared (infrared is typically micrometres, much shorter wavelength).
Things to Be Careful About
- The question asks for the principal region (so “microwaves”, not a specific application like “radar”).
Working
In a stationary wave, distance from a node to the adjacent antinode is .
Answer
6.5 × 10^-3 m
Background Concept
In a stationary wave, adjacent nodes are separated by . Antinodes lie midway between nodes. Therefore:
- node to next node:
- node to adjacent antinode:
This comes from the fact that the phase changes steadily along the wave: going from full cancellation (node) to full reinforcement (antinode) is a quarter of a cycle in space.
Understanding the Question
The wavelength is . You are asked for the distance between a node and the nearest antinode in the stationary wave pattern.
Approach
Use the standing-wave spacing rule: node-to-antinode is and substitute the given wavelength.
Step-by-Step Reasoning
- Write the relation:
- Substitute :
- In standard form:
Key Takeaways
- Memorise: node-to-node , node-to-antinode .
Common Mistakes
- Using (that is node-to-node or antinode-to-antinode, not node-to-antinode).
- Giving without units.
Things to Be Careful About
- Keep the wavelength in metres (already in SI here).
- Quote the distance with an appropriate number of significant figures.
A student uses a circuit containing an ammeter, a voltmeter and a cell to take measurements to determine the resistance of a length of nichrome wire.
Answer
Resistance is the ratio of potential difference across a component to the current through it:
Resistance is defined by .
Background Concept
Resistance describes how strongly a component opposes the flow of charge. When a potential difference is applied across a component, a current flows.
The resistance is defined by the relationship
where:
- is the potential difference across the component (in ),
- is the current through the component (in ),
- is in ohms, .
Understanding the Question
You are asked to define resistance. For 1 mark, the key is to give the correct defining relationship between , and .
Approach
Use the standard definition of resistance as a ratio of potential difference to current.
Step-by-Step Reasoning
Write the definition directly:
This states that if you measure across the wire and through the wire, their ratio gives the resistance.
Key Takeaways
- Resistance is defined by .
- Units: .
Common Mistakes
- Writing (incorrect).
- Defining resistance using resistivity () instead of resistance ().
Things to Be Careful About
- This is a definition, so the simplest correct statement/equation is sufficient.
- If extra words are added (e.g. “constant temperature”), they must not make the definition incorrect.
Draw a circuit diagram to show how the components should be connected. Use the symbol for a resistor to represent the nichrome wire.
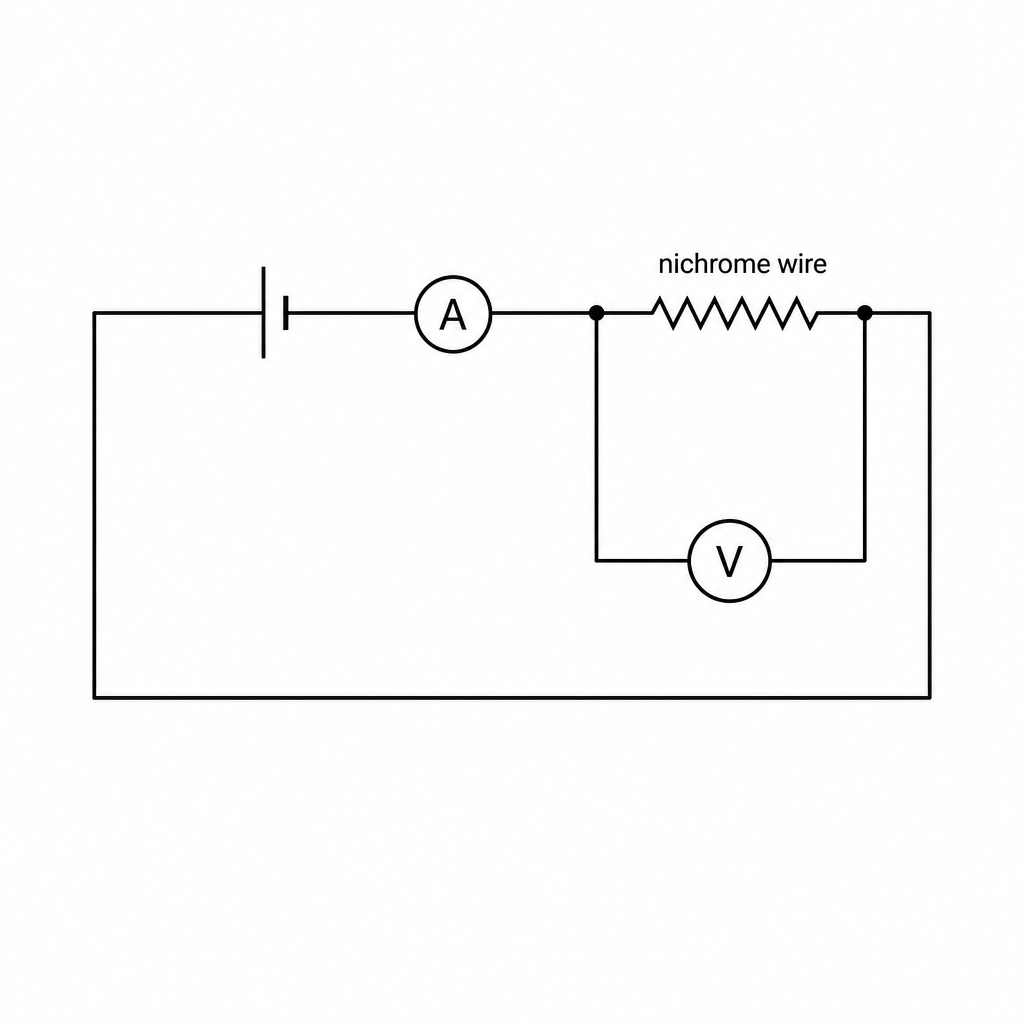
Ammeter in series with the nichrome wire; voltmeter in parallel across the wire.
Background Concept
To measure resistance using , you must measure:
- the current through the wire (ammeter),
- the potential difference across the wire (voltmeter).
Meter connection rules:
- An ammeter has very low resistance, so it must be placed in series so that the same current as the wire passes through it.
- A voltmeter has very high resistance, so it must be placed in parallel across the wire so it measures the p.d. across the wire without significantly changing the current.
Understanding the Question
You have a cell, an ammeter, a voltmeter, and a length of nichrome wire (to be drawn as a resistor symbol). The task is to draw the correct circuit diagram to measure across and through the wire.
Approach
Draw a simple series loop containing the cell, ammeter, and the resistor (wire). Then connect the voltmeter across the resistor only.
Step-by-Step Reasoning
- Put the ammeter in the main loop so current must pass through it and then through the nichrome wire.
- Connect the voltmeter across the nichrome wire (one lead to each end of the resistor symbol).
This arrangement allows you to use with the measured values.
Key Takeaways
- Ammeter: series.
- Voltmeter: parallel (across the component of interest).
- Use the resistor symbol to represent the nichrome wire.
Common Mistakes
- Putting the voltmeter in series (would give very small current / disrupt circuit).
- Putting the ammeter in parallel (could short-circuit and damage the meter).
- Connecting the voltmeter across the cell instead of across the wire (measures supply voltage, not the p.d. across the wire).
Things to Be Careful About
- The voltmeter must be across only the nichrome wire (resistor symbol), not across the ammeter as well.
- Use correct circuit symbols and clear junctions (dots) where wires join.
The student also measures the length and the diameter of the wire. Table 5.1 shows the measurements recorded for each quantity.
Table 5.1
| quantity | measurement |
|---|---|
| length | |
| diameter | |
| voltmeter reading | |
| ammeter reading |
Working
Answer
5.00 Ω
Background Concept
For any component, resistance is defined by
So if you measure the potential difference across it and the current through it, their ratio gives the resistance.
Understanding the Question
You are given:
- voltmeter reading ,
- ammeter reading .
You must show that the resistance of the wire is .
Approach
Use and substitute the given readings.
Step-by-Step Reasoning
Substitute directly:
Calculate:
Units check: .
Key Takeaways
- Measuring across and through a wire allows to be found from .
Common Mistakes
- Using (inverting the ratio).
- Rounding too early and losing the stated .
Things to Be Careful About
- Keep enough significant figures during division so you can present as required.
Working
Diameter
Using ,
Answer
1.12 × 10^-6 Ωm
Background Concept
Resistivity is a material property relating resistance to the dimensions of a uniform wire:
where:
- is resistance (),
- is length (m),
- is cross-sectional area (),
- is resistivity ().
Rearranging gives:
For a circular wire, area is
Understanding the Question
Given (from the table):
- ,
- diameter (must convert to m),
- and from part (i) .
You must calculate to three significant figures.
Approach
- Convert from mm to m.
- Use .
- Substitute into .
Step-by-Step Reasoning
- Unit conversion:
- Radius and area:
- Resistivity:
The unit is because is , multiplied by , divided by m.
Key Takeaways
- Resistivity is found using .
- Always convert mm to m before using area in SI.
- Diameter must be squared (through the area), which matters later for uncertainty.
Common Mistakes
- Forgetting to convert to (gives wrong by a factor of ).
- Using instead of (factor of 4 error).
- Using instead of .
Things to Be Careful About
- Keep at least 3 s.f. in intermediate steps (especially area) so the final value rounds correctly to three significant figures.
- Ensure the final power of ten is sensible for a metal/alloy (nichrome is typically around ).
Working
Answer
2.73 %
Background Concept
When a quantity is found by multiplying/dividing measured values, the percentage uncertainties add.
If
then approximately
In percentage form:
If a measured quantity is raised to a power, e.g. , then its percentage uncertainty is multiplied by 2.
Understanding the Question
You have measured , , , and each with an uncertainty. You calculated
and since and , the uncertainty in depends on all four measurements. The question asks for the percentage uncertainty in .
Approach
- Express in terms of the measured quantities .
- Identify whether each is multiplied/divided and whether any are squared.
- Calculate each percentage uncertainty and add them.
Step-by-Step Reasoning
Write in terms of :
So . Therefore
Now compute each:
- Voltmeter:
- Ammeter:
- Diameter (then multiply by 2 because of ):
- Length:
Add them:
Key Takeaways
- For products/quotients, percentage uncertainties add.
- If , the diameter’s percentage uncertainty is doubled.
Common Mistakes
- Forgetting the factor of 2 from .
- Subtracting uncertainties because a quantity is in the denominator (you still add percentage uncertainties).
- Using absolute uncertainties directly without converting to percentage first.
Things to Be Careful About
- Be consistent: use the measured value in the denominator for each percentage calculation.
- Keep enough significant figures during the uncertainty calculation, then round the final percentage sensibly (often to 2–3 s.f.).
Working
Answer
3.1 × 10^-8 Ωm
Background Concept
Percentage uncertainty tells you the size of the uncertainty relative to the value:
So
This converts a percentage uncertainty into an absolute uncertainty (in the units of ).
Understanding the Question
From part (ii),
From part (iii), the percentage uncertainty is . You must find the absolute uncertainty in .
Approach
Convert into a fraction by dividing by 100, then multiply by .
Step-by-Step Reasoning
Fractional uncertainty:
Absolute uncertainty:
Round the uncertainty sensibly (typically to 2 s.f.):
Key Takeaways
- Absolute uncertainty .
- Absolute uncertainty has the same unit as the quantity.
Common Mistakes
- Forgetting to divide by 100 (giving an answer 100 times too large).
- Quoting the absolute uncertainty with mismatched units.
Things to Be Careful About
- Round uncertainties appropriately (often 1 or 2 significant figures), then quote the final value of the quantity to match the decimal place if required.
Fig. 6.1 shows four alpha particles W, X, Y and Z moving towards a gold nucleus that is in thin gold foil.
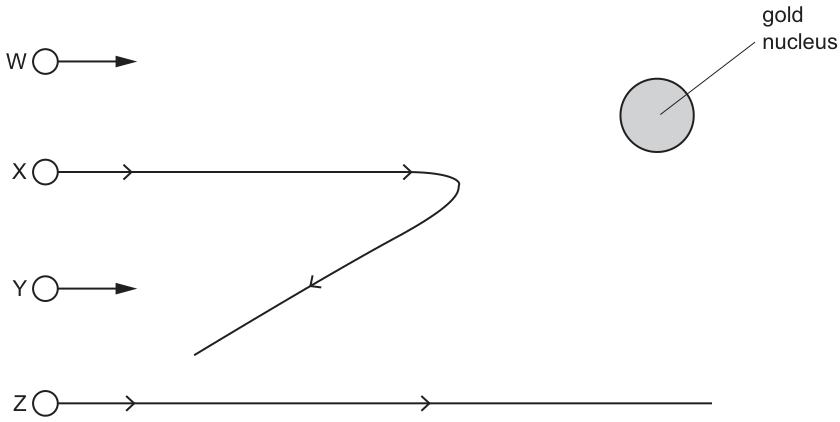
The paths of particles X and Z are shown.
Complete Fig. 6.1 to show possible paths for particles W and Y.
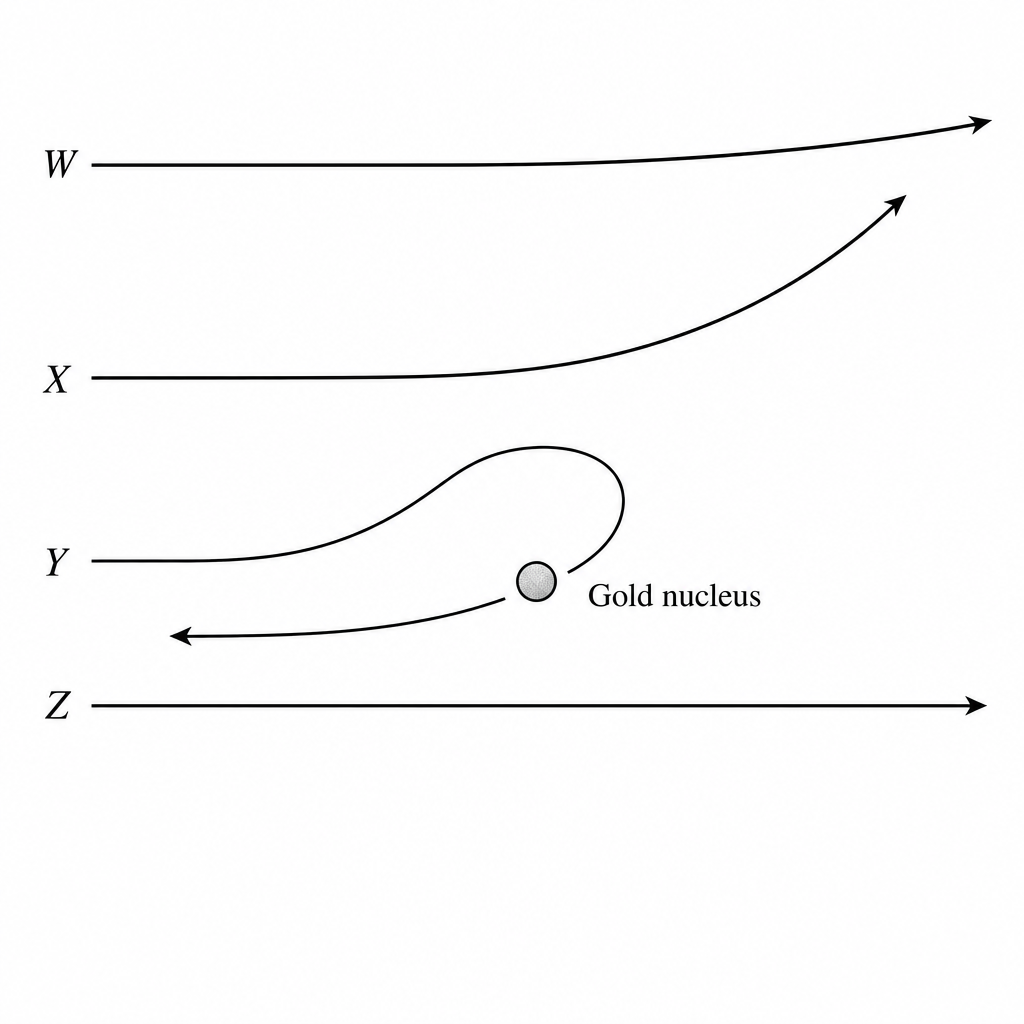
Answer
passes essentially straight (at most a very small deflection).
is deflected through a very large angle (may be back-scattered, i.e. turned back).
W: approximately straight; Y: large-angle deflection/back-scatter.
Background Concept
In Rutherford (alpha-particle) scattering, an alpha particle () experiences an electrostatic repulsive force from the positively charged nucleus. The force increases very strongly as separation decreases.
- If the alpha particle passes far from the nucleus, the force is small, so the path is almost a straight line.
- If it passes close to the nucleus, the force becomes large, so the direction changes significantly and it can even be scattered backwards.
Understanding the Question
The diagram shows four alpha particles aimed at a gold nucleus. Two trajectories are already drawn:
- goes far from the nucleus and is not deflected (straight line).
- passes nearer and is deflected away.
You must complete the diagram with reasonable paths for:
- (far from the nucleus)
- (aimed very close to the nucleus)
Approach
Use the idea that the closer the alpha particle goes to the nucleus (smaller impact parameter), the larger the repulsive force and hence the larger the change in direction (scattering angle).
So:
- should resemble (little or no deflection).
- should show the most dramatic deflection (large angle, possibly back-scattering).
Step-by-Step Reasoning
- Identify that is far from the nucleus (like ). Because the electric field is weaker far away, the sideways force component is tiny, so the path remains almost straight.
- Identify that would pass very close to the nucleus. Here the electric field is much stronger, producing a large repulsive force for a short time, so the particle’s momentum direction changes by a large angle.
- Therefore draw bending sharply away from the nucleus; for an extremely close approach it can turn through nearly (back-scatter).
Key Takeaways
- Large scattering angles occur only for close approaches to the nucleus.
- Most distant passes give negligible deflection.
- A sketch should show a smooth curve (not a kink), because the force acts continuously.
Common Mistakes
- Drawing deflected more than even though is further away.
- Drawing as a straight line despite being aimed close to the nucleus.
- Drawing a trajectory that curves towards the nucleus (would imply attraction, not repulsion for alpha particles and a positive nucleus).
Things to Be Careful About
- The nucleus is positive, so alpha particles are repelled.
- Paths should be smooth curves with the deflection greatest near the nucleus.
- A “possible path” for includes very large deflections, including back-scattering.
Describe what may be inferred about the structure of an atom from the path of particle X.
Answer
Particle is repelled, so the atom contains a small, positively charged nucleus (where most of the mass is concentrated).
Presence of a small positively charged nucleus.
Background Concept
Alpha particles are positively charged. In the Rutherford model, the nucleus is also positively charged. Like charges repel, so a close pass produces a sideways force and hence a curved path.
Understanding the Question
Particle is shown being deflected away from the gold nucleus. The question asks what this tells you about atomic structure.
Approach
Connect the sign of the interaction to the observed deflection: deflection away implies repulsion, which implies a positive region in the atom concentrated enough to cause noticeable scattering.
Step-by-Step Reasoning
- Because curves away from the nucleus, the force on it must be repulsive.
- Since alpha particles are , the repelling object must be positively charged.
- The deflection occurs only when near the centre, implying the positive charge is concentrated in a small region: the nucleus (which also contains most of the mass).
Key Takeaways
- Deflection away from the centre implies a repulsive interaction.
- Repulsion of alpha particles indicates a positively charged nucleus.
Common Mistakes
- Saying the nucleus is negative (would attract alpha particles).
- Concluding “atom is positive” rather than “positive charge concentrated in a nucleus”.
Things to Be Careful About
- The observation is about where charge is located (concentrated), not just that charge exists.
- The wording “from the path of particle X” points specifically to the deflection near the nucleus.
When a beam containing many alpha particles is incident on thin gold foil, nearly all of the alpha particles follow paths that are similar to the path of particle Z.
Describe what may be inferred from this about the structure of an atom.
Answer
Nearly all follow path (no deflection), so most of the atom is empty space and the nucleus occupies a very small volume compared with the atom.
Atom is mostly empty space; nucleus is very small.
Background Concept
In scattering experiments, significant deflections occur only when the projectile passes close enough for a strong interaction. If most projectiles are not deflected, then most of the target’s volume must not produce a strong force.
Understanding the Question
A beam of many alpha particles hits thin gold foil. Nearly all follow paths like , i.e. straight through with negligible deflection. You are asked what this implies about atomic structure.
Approach
Interpret “nearly all undeflected” as “most alpha particles do not come close to the concentrated charged region”. That leads to the conclusion that the charged/massive part of the atom is tiny, so the rest is mostly empty space.
Step-by-Step Reasoning
- If the atom were filled with spread-out positive charge, many alpha particles would feel a force and be deflected.
- The observation that almost all go straight means that, for almost all trajectories, the alpha particle experiences negligible force.
- Therefore the region that produces strong repulsion (the nucleus) must occupy only a tiny fraction of the atomic volume.
- Hence most of the atom is empty space.
Key Takeaways
- “Most undeflected” (\Rightarrow) interaction region is very small.
- Supports the nuclear model: tiny nucleus, large empty space.
Common Mistakes
- Claiming “there is no nucleus” because most go straight (incorrect; rare large deflections show the nucleus exists).
- Saying “electrons cause the scattering” (electrons are too light to cause large deflections of alpha particles).
Things to Be Careful About
- The inference is about volume/size: the nucleus is tiny relative to the atom.
- Thin foil matters: alpha particles typically meet at most one nucleus, making the interpretation clearer.
State the mass and the charge, in terms of the atomic mass unit and the elementary charge , of an alpha particle.
mass = ______
charge = ______
Answer
mass
charge
mass = 4u, charge = +2e
Background Concept
An alpha particle is the nucleus of a helium-4 atom. It contains:
- 2 protons and 2 neutrons.
Charge comes from protons (each ). Neutrons are uncharged.
Mass in atomic mass units is approximately the total number of nucleons (protons + neutrons), i.e. the mass number.
Understanding the Question
You are asked to state the mass and charge of an alpha particle specifically in terms of and .
Approach
Use the composition (2 protons + 2 neutrons):
- charge =
- mass (\approx) (since there are 4 nucleons)
Step-by-Step Reasoning
- Charge: two protons give
so the alpha particle has charge .
- Mass: four nucleons gives mass approximately .
Key Takeaways
- Alpha particle = helium nucleus.
- Charge depends on number of protons; mass in tracks nucleon count.
Common Mistakes
- Writing charge as (wrong sign).
- Giving mass as (confusing with number of protons only).
Things to Be Careful About
- The question explicitly asks “in terms of and ”, so do not convert to kilograms or coulombs.
- Include the plus sign for the charge.
There are two types of hadron.
The hadrons that are in alpha particles are each composed of three quarks.
Answer
Baryon.
Baryon
Background Concept
Hadrons are particles that feel the strong nuclear force. They come in two main families:
- Baryons: made of three quarks (e.g. proton, neutron).
- Mesons: made of a quark and an antiquark.
Understanding the Question
The question states that the hadrons in alpha particles are each composed of three quarks, and asks for the name of this type of hadron.
Approach
Use the defining property: three-quark hadron (\Rightarrow) baryon.
Step-by-Step Reasoning
- Since each hadron is composed of three quarks, it matches the definition of a baryon.
Key Takeaways
- 3 quarks = baryon.
- quark + antiquark = meson.
Common Mistakes
- Answering “proton” or “neutron” (these are examples of baryons, not the type).
- Answering “meson” (incorrect quark structure).
Things to Be Careful About
- The question asks for the type of hadron, not a specific particle name.
Show, by reference to their constituent quarks, that the hadrons in an alpha particle have charges of either zero or .
Working
Up quark charge , down quark charge .
Proton :
Neutron :
Answer
Charges are (neutron) or (proton).
Proton: +1e; neutron: 0.
Background Concept
Quarks have fractional charges:
- up quark :
- down quark :
Baryons are made of three quarks. The proton and neutron (the nucleons found in atomic nuclei, including alpha particles) have quark compositions:
- proton:
- neutron:
The total charge of a baryon is the sum of the charges of its constituent quarks.
Understanding the Question
An alpha particle contains nucleons (protons and neutrons). You must show, using quark compositions, that these hadrons have charges either or .
Approach
- Write the quark charge values.
- Write the quark compositions of proton and neutron.
- Add the three quark charges for each and simplify in units of .
Step-by-Step Reasoning
First list quark charges:
- :
- :
Proton has quarks :
Factor out and add fractions:
Neutron has quarks :
So
Therefore, the hadrons present (protons and neutrons) have charges of either or .
Key Takeaways
- Remember , .
- Proton .
- Neutron .
Common Mistakes
- Swapping quark charges (e.g. using ).
- Using the wrong compositions (e.g. proton as ).
- Arithmetic error with fractions, especially signs.
Things to Be Careful About
- Always keep the factor outside the bracket until the end; it reduces errors.
- The question asks for charges of the hadrons in an alpha particle: those are protons and neutrons, not the alpha particle’s overall charge.