Physics 9702/13 — October/November 2025
Cambridge AS Level · Multiple Choice (AS Level) · answer key with instant marking and worked solutions
Topics Physical Quantities and Units · Dynamics · Deformation of Solids · Forces, Density and Pressure · Waves · Superposition · +5 more
Tap an option under each question to check it — your score builds as you go.
The table shows some physical quantities.
Which row correctly identifies the quantities as scalars or vectors?
Options
| acceleration | charge | kinetic energy | wavelength | |
|---|---|---|---|---|
| A | scalar | vector | vector | scalar |
| B | vector | vector | scalar | scalar |
| C | scalar | scalar | scalar | vector |
| D | vector | scalar | scalar | scalar |
Working
Acceleration has magnitude and direction, so it is a vector.
Charge has no direction, so it is a scalar.
Kinetic energy has no direction, so it is a scalar.
Wavelength has no direction, so it is a scalar.
Answer
D
D
Background Concept
A scalar quantity is completely described by its magnitude (size) alone (e.g. ).
A vector quantity requires both magnitude and direction to be fully specified (e.g. to the east).
A quick test is: if changing direction changes the physical meaning, it is a vector; if direction is irrelevant, it is a scalar.
Understanding the Question
You are given four physical quantities (acceleration, charge, kinetic energy, wavelength) and four possible rows (A–D) that label each as scalar or vector. The task is to choose the row where all four classifications are correct.
Approach
Go through each quantity one by one:
- Decide whether it needs a direction to be fully described.
- Mark it as vector (direction needed) or scalar (direction not needed).
- Compare with the options and pick the matching row.
Step-by-Step Reasoning
-
Acceleration: defined as rate of change of velocity. Since velocity is a vector, acceleration also has direction (it points in the direction of the change in velocity).
Therefore acceleration is a vector.
-
Charge: electric charge can be positive or negative, but it does not have a spatial direction associated with it.
Therefore charge is a scalar.
-
Kinetic energy: given by
Energy is not described by a direction; it is just a magnitude.
Therefore kinetic energy is a scalar.
-
Wavelength: a wavelength is a length (distance between successive points in phase). Length does not require direction for its description in this context.
Therefore wavelength is a scalar.
So the correct row is: acceleration vector, charge scalar, kinetic energy scalar, wavelength scalar, which corresponds to D.
Key Takeaways
- Vectors require direction; scalars do not.
- Acceleration is a vector because it relates to velocity (a vector).
- Charge, energy, and wavelength are scalars.
Common Mistakes
- Calling charge a vector because it can be positive/negative (sign is not the same as direction).
- Calling wavelength a vector because waves travel in a direction (wavelength is a distance, not a direction-dependent quantity).
- Confusing energy with momentum/force (momentum and force are vectors; energy is scalar).
Things to Be Careful About
- A negative value (e.g. negative charge) does not automatically mean “vector”; vectors need directional information in space.
- Some quantities are vectors because they are defined from vectors (e.g. acceleration from velocity), so using definitions can help when unsure.
Two quantities are measured.
and are related to by the equation shown.
What is the calculated value and uncertainty of ?
Options
A
B
C
D
Working
Fractional uncertainty:
Answer
D
D
Background Concept
When quantities are combined by multiplication/division and powers, the percentage (fractional) uncertainties add.
If
then (taking maximum uncertainty propagation, as used in many A Level questions)
The factor of 2 appears because the uncertainty in a power is multiplied by the power.
After finding the fractional uncertainty, convert back to an absolute uncertainty using
Understanding the Question
You are given measured values (with uncertainties):
and the relationship
You must calculate:
- the best estimate of using the central values of and ;
- the uncertainty in produced by the uncertainties in and ;
then choose the matching option.
Approach
- Calculate directly from the formula using and .
- Use fractional-uncertainty rules: since and ,
- Convert fractional uncertainty to absolute uncertainty in and round appropriately.
Step-by-Step Reasoning
1) Calculate
Compute :
Also,
So
(Units: .)
2) Fractional uncertainty in
Because :
Because :
Add them:
3) Absolute uncertainty in
So
which matches option D.
Key Takeaways
- For products/divisions, add fractional uncertainties.
- For powers, multiply the fractional uncertainty by the power (here gives a factor of 2).
- Convert back to absolute uncertainty with .
- Round uncertainty (typically 1 s.f.) and round the value to the same decimal place.
Common Mistakes
- Forgetting the factor of 2 from .
- Subtracting uncertainties because of division (you still add fractional uncertainties).
- Mixing absolute and percentage uncertainties (you must use fractional/percentage first here).
- Giving without appropriate rounding to match the options.
Things to Be Careful About
- The constant is exact, so it contributes no uncertainty.
- Use consistent significant figures: once the uncertainty rounds to , the value should be quoted as (not ) to match the precision.
- Ensure units follow from the formula: in and in gives in .
What are the SI base units of the watt?
Options
A
B
C
D
Working
Power , so .
Answer
B
B
Background Concept
The watt (W) is the SI unit of power. Power is the rate of transfer of energy (or the rate of doing work):
So a watt can be written in terms of joules and seconds as:
To get SI base units, we must rewrite the joule (J) using base units (kg, m, s, A, K, mol, cd). One joule is one newton-metre:
and one newton is:
Understanding the Question
You are given four possible unit expressions and asked which one is the watt written purely in SI base units. That means the final unit should contain only kg, m, s (and/or other base units if needed), but not derived units like J or N.
Approach
- Start from the definition .
- Convert into base units using and .
- Simplify the powers of seconds.
- Match the result to the options.
Step-by-Step Reasoning
From the definition of power:
Convert joule to newton-metre:
Convert newton to base units:
So:
Now divide by seconds to get watts:
This matches option B.
Key Takeaways
- because power is energy per unit time.
- Convert derived units stepwise: and .
- Combine powers carefully: .
Common Mistakes
- Stopping at (option A) even though it is not in SI base units.
- Converting incorrectly (e.g. missing the ).
- Making an index error when combining seconds, giving or instead of .
Things to Be Careful About
- “SI base units” means only base symbols (kg, m, s, A, K, mol, cd) should remain.
- Check that multiplication by reduces the time unit correctly: dividing by time always decreases the power of seconds by 1 (more negative).
The diagram shows two forces of acting on an object. The angle between the lines of action of the two forces is .
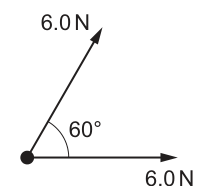
What is the magnitude of the resultant force?
Options
A
B
C
D
Working
Using cosine rule for two forces at :
Answer
C
C
Background Concept
A force is a vector, so when two forces act at a point the overall (resultant) force is found by vector addition, not by simply adding magnitudes unless they act in the same direction.
For two vectors and with an angle between them, the magnitude of the resultant can be found using the cosine rule on the vector triangle:
This works because the two force vectors form two sides of a triangle, with the included angle equal to the angle between their directions.
Understanding the Question
Two forces, each of magnitude , act from the same point. The angle between their lines of action is . You are asked for the magnitude (size) of the resultant force.
So the known values are:
- included angle
- unknown:
Approach
Treat the two forces as two sides of a triangle (or equivalently, use the parallelogram method). Because you know both magnitudes and the included angle, the quickest method is the cosine rule to find the third side, which is the resultant magnitude.
Step-by-Step Reasoning
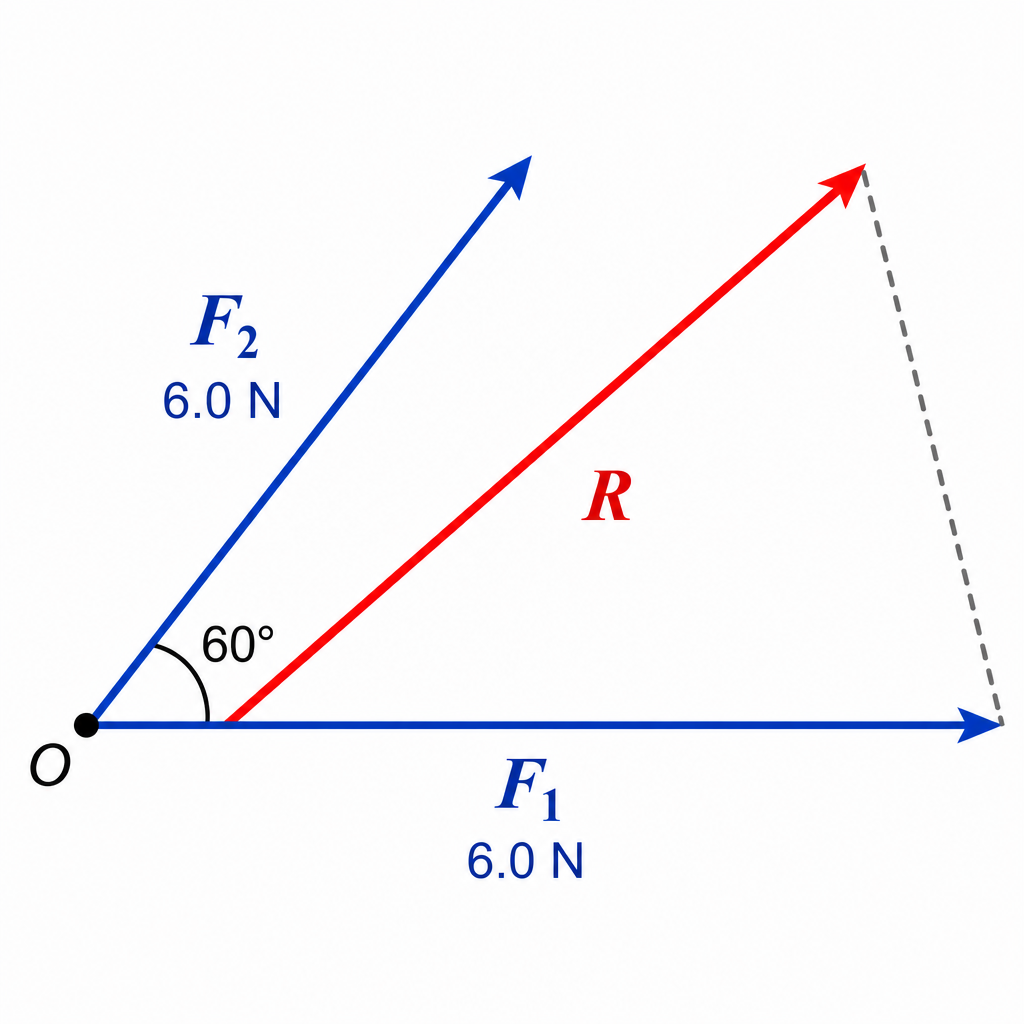
- Write the cosine-rule relationship for the resultant magnitude:
- Evaluate and simplify:
- Take the square root:
- Match to the given options: rounds to , so the correct choice is C.
Key Takeaways
- Forces add as vectors, so the angle between them matters.
- When two vector magnitudes and their included angle are given, the cosine rule is the most direct method.
- For equal forces, the resultant lies between them and is larger than each individual force when the angle is less than .
Common Mistakes
- Adding magnitudes directly to get (only valid if the forces are parallel in the same direction).
- Using instead of in the cosine rule.
- Using the wrong angle (must be the included angle between the two force directions).
- Rounding too early (e.g. rounding incorrectly).
Things to Be Careful About
- Keep the included angle as exactly; do not halve/double it.
- Check that your answer is sensible: with a angle, the resultant should be between and , so an answer near is reasonable.
- For MCQ, choose the closest listed option consistent with appropriate rounding.
A goods train passes through a station at a constant speed of at time . An express train is at rest at the station. The express train leaves the station with a uniform acceleration of just as the goods train goes past. Both trains move in the same direction on straight, parallel tracks.
At which time does the express train overtake the goods train?
Options
A
B
C
D
Working
Goods train (constant speed):
Express train (from rest, uniform acceleration):
Overtake when :
Answer
D
D
Background Concept
Overtaking means both objects are at the same position at the same time (measured from the same origin).
For motion with:
- constant speed , displacement is
- uniform acceleration , displacement is
where is the initial speed at .
Understanding the Question
At :
- the goods train passes the station moving at constant speed .
- the express train is at the station (so it starts at the same position) and begins moving from rest with uniform acceleration .
We want the time (after ) when the express train catches up, i.e. when their displacements from the station are equal.
Approach
- Write an expression for displacement of the goods train as a function of .
- Write an expression for displacement of the express train as a function of .
- Set them equal to find the overtaking time.
- Reject the trivial solution (they are together at the start but that is not “overtaking”).
Step-by-Step Reasoning
1) Goods train (constant speed ):
2) Express train (starts from rest, so , acceleration ):
3) Overtaking condition :
Divide/factor out :
So or
We take because is just the starting moment.
Therefore the correct option is D.
Key Takeaways
- Overtaking problems are solved by setting displacements equal.
- Use for constant speed and for uniform acceleration.
- If you get as a solution, it is usually the trivial “start together” case and should be rejected.
Common Mistakes
- Using instead of a displacement equation (you need positions to decide overtaking).
- Forgetting that the express train starts from rest ().
- Not rejecting and choosing the wrong option.
Things to Be Careful About
- Both trains share the same starting position at the station at , so displacements must be measured from that point.
- Keep units consistent: in , in , so comes out in seconds.
- The accelerating train’s displacement grows as , so it will eventually catch up even if it starts slower.
A ball is held above the ground and released. It falls to the ground and bounces several times.
The graph shows the variation with time of the velocity of the ball.
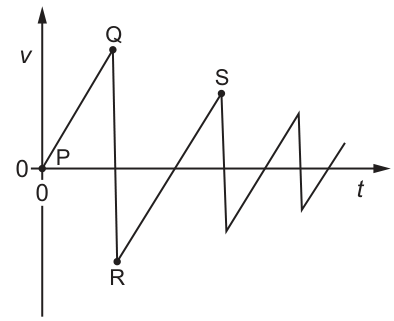
Four points on the graph are labelled , , and .
Which statement is not correct?
Options
A The area under line represents the initial height of the ball.
B The collisions of the ball with the ground are inelastic.
C The gradient of the line represents the acceleration due to free fall.
D The maximum upwards velocity of the ball is reached at point .
Working
From the graph, at point the ball has (it is released from rest), so it is not moving upwards at .
The maximum upwards speed occurs just after a bounce, i.e. at the most negative velocity (point ), not at .
Answer
D
D
Background Concept
For a velocity–time (-) graph:
- The gradient is the acceleration:
- The area under the graph between two times is the displacement:
The sign of indicates direction (positive one way, negative the opposite).
For collisions with the ground:
- If the rebound speed is smaller than the impact speed, kinetic energy has decreased, so the collision is inelastic.
Understanding the Question
A ball is released, falls, hits the ground, and bounces repeatedly. The given - graph shows straight sloping sections (constant acceleration under gravity) and vertical jumps (very short collision time where velocity changes rapidly).
Points are marked. We must choose which statement (A–D) is not correct.
Approach
Check each statement using standard - graph interpretations:
- Use area under a section to judge a displacement/height.
- Use gradient of a sloping section to identify the acceleration.
- Use the pattern of decreasing speeds after each bounce to decide if collisions are elastic/inelastic.
- Use the sign and magnitude of at labelled points to see where the maximum upward velocity occurs.
Step-by-Step Reasoning
A: Line is the initial fall from release to first impact. The area under is the displacement during this time. Since the ball starts above the ground and reaches the ground, this displacement corresponds to the initial height (with sign depending on the direction chosen). So A is correct.
B: After each bounce, the magnitude of the velocity just after impact is smaller than just before impact (the vertical jumps get smaller). That means the ball loses kinetic energy in each collision, so the collisions are inelastic. So B is correct.
C: Segment is straight, so acceleration is constant. During free flight the only significant force is weight, giving acceleration (with sign depending on the chosen positive direction). Therefore the gradient of represents the acceleration due to free fall. So C is correct.
D: At the ball is released from rest, so at . The maximum upward velocity occurs immediately after a bounce, where the velocity is upward (opposite sign to the downward motion). On the graph that is at the most negative value just after a collision, e.g. at , not at . Therefore D is not correct.
So the incorrect statement is D.
Key Takeaways
- Area under a - graph gives displacement.
- Gradient of a - graph gives acceleration.
- Repeatedly decreasing rebound speeds indicate inelastic collisions.
- The maximum upward velocity is at the point with greatest magnitude in the upward direction (not necessarily the first labelled point).
Common Mistakes
- Thinking the area under - is distance regardless of sign; it is displacement (sign matters).
- Confusing a vertical jump on a - graph with acceleration due to gravity; it represents the collision, not free fall.
- Assuming point is the maximum of something because it is the start; here it is clearly .
Things to Be Careful About
- Decide which direction is taken as positive by looking at which way the velocity is plotted during the initial fall.
- Maximum upward velocity means the largest speed in the upward direction, i.e. the most negative if downward is taken as positive.
- Inelastic vs elastic: look for loss of speed/energy from one bounce to the next (decreasing amplitude).
An object is projected horizontally. The object falls a vertical distance and travels a horizontal distance before landing on the ground.
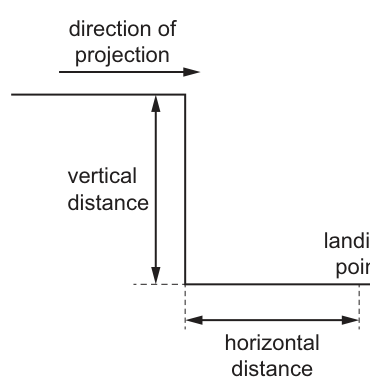
A second object is projected horizontally with the same initial velocity and falls a vertical distance before landing on the ground.
Assume that air resistance is negligible.
Which horizontal distance does the second object travel?
Options
A
B
C
D
Working
Vertical motion (initial vertical velocity ):
So .
For the second object:
Horizontal motion: and (same ), hence
Answer
B
B
Background Concept
In projectile motion with negligible air resistance, the horizontal and vertical motions are independent:
- Horizontally there is no acceleration, so the horizontal velocity stays constant at the initial value .
- Vertically the object accelerates downward at constant acceleration .
For an object projected horizontally, the initial vertical component of velocity is zero, so the vertical displacement after time is
The horizontal displacement in the same time is
Understanding the Question
The first object falls a vertical distance and travels a horizontal distance before hitting the ground.
A second object is projected horizontally with the same initial horizontal speed , but it falls a vertical distance before landing. The question asks how the horizontal distance changes.
Because air resistance is negligible, the only acceleration is vertical (), so the key is how the time of flight depends on the vertical drop.
Approach
- Use vertical motion to express the time of flight in terms of the vertical drop .
- Replace by to find the new time of flight .
- Use horizontal motion to scale the horizontal distance with time.
Step-by-Step Reasoning
- For the first object, vertical motion starts from rest vertically (), so
Rearranging gives
So time of flight is proportional to .
- For the second object the drop is :
Compare with the first equation (or solve explicitly):
So the time of flight doubles.
- Horizontally, the speed is constant and the same for both objects (). Therefore
Substitute :
So the second object travels twice the horizontal distance.
Key Takeaways
- Treat projectile motion as two independent 1D motions.
- For horizontal projection, vertical displacement obeys , so .
- With constant horizontal speed, horizontal distance is directly proportional to time.
Common Mistakes
- Assuming horizontal distance scales like vertical distance (choosing ) instead of scaling with through time.
- Using (missing the factor ) and then making inconsistent comparisons.
- Forgetting that the horizontal speed is constant only if air resistance is negligible.
Things to Be Careful About
- The initial vertical velocity is zero only because the projection is horizontal.
- The factor of in vertical distance leads to a factor of in time, not .
- Keep clear which equation applies to which direction: vertical uses constant acceleration , horizontal uses .
A sphere falls from rest through the air. The graph shows the variation with time of the sphere’s velocity.
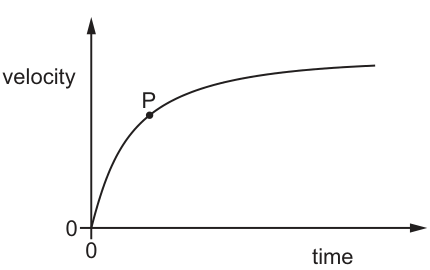
Which diagram shows the forces acting on the sphere when it is at the velocity corresponding to point on the graph?
Options
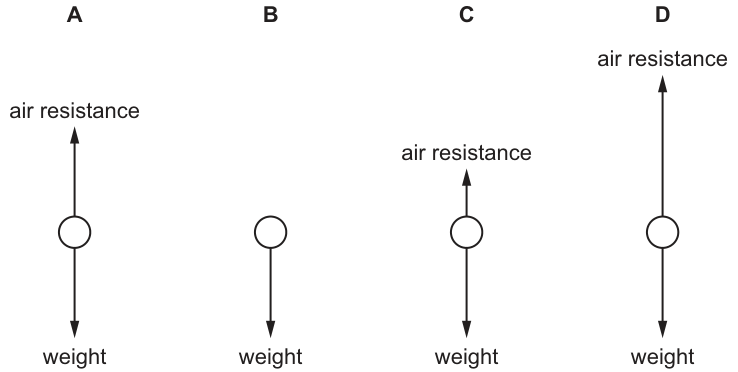
Working
At point , the velocity–time graph is still rising, so gradient and the sphere is accelerating downwards.
So resultant force is downwards: .
Answer
C
C
Background Concept
When an object falls through air, two main vertical forces act:
- Weight acting downwards (approximately constant).
- Air resistance (drag) acting upwards (increases with speed).
Newton's second law links forces and motion:
So the direction of the acceleration is the same as the direction of the resultant (net) force.
On a velocity–time graph, the acceleration is the gradient:
Terminal velocity occurs when acceleration is zero (horizontal part of the graph), meaning the resultant force is zero and the two forces balance.
Understanding the Question
The sphere starts from rest and its velocity increases then levels off. Point is on the rising part of the velocity–time curve, before it becomes horizontal.
You are asked which force diagram matches the situation at that instant (at the speed corresponding to ).
Approach
- Use the velocity–time graph at to decide whether acceleration is zero or non-zero, and its direction.
- Use Newton's second law to deduce the direction of the resultant force.
- Compare weight and drag to match the correct diagram.
Step-by-Step Reasoning
-
At point , the curve is still rising with time, so the gradient is positive.
- That means in the direction of increasing velocity.
- Since the sphere is falling, increasing velocity means accelerating downwards.
-
If the sphere accelerates downwards, the resultant force must be downwards:
So:
- Therefore the correct force diagram must show both forces present, with the downward weight arrow longer than the upward drag arrow.
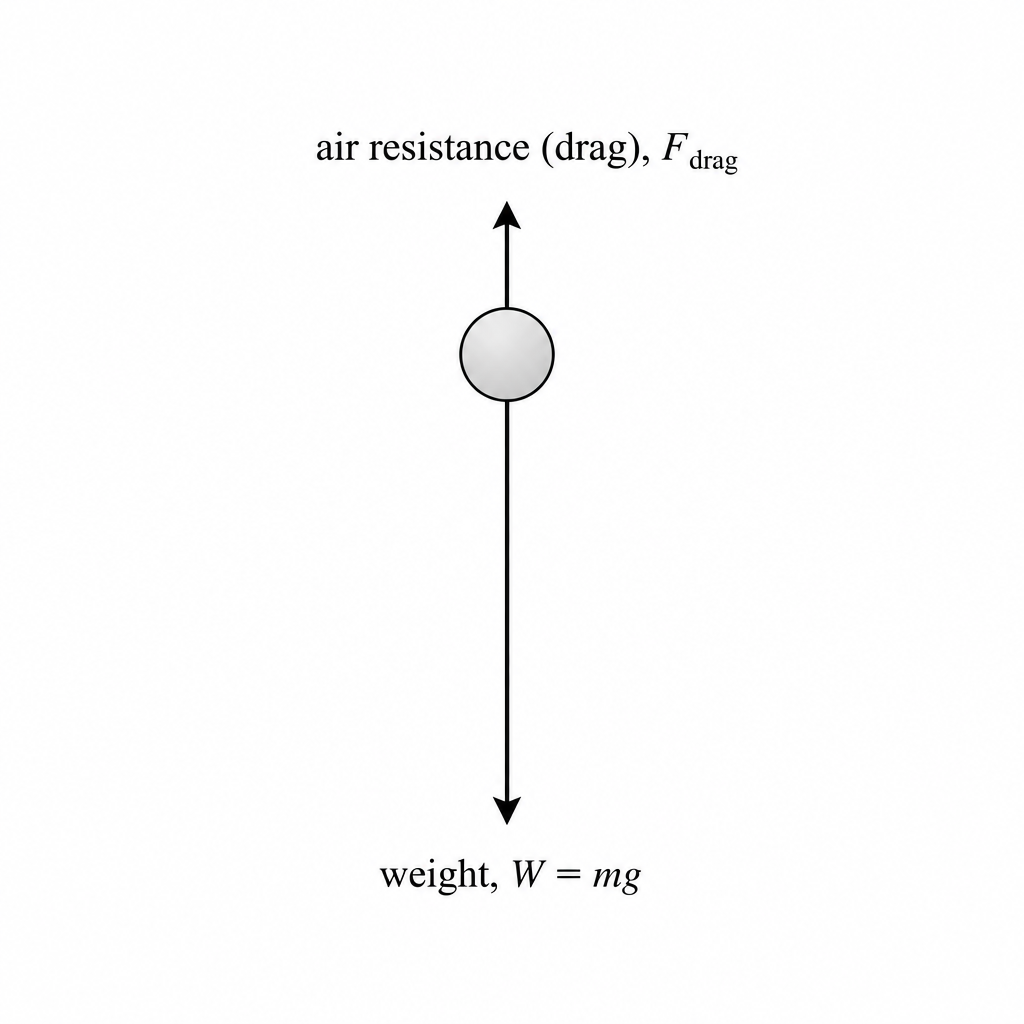
This corresponds to option C.
Key Takeaways
- Acceleration is the gradient of a – graph.
- Non-zero acceleration means forces are unbalanced.
- For a falling object before terminal velocity: .
Common Mistakes
- Choosing the balanced-forces diagram (terminal velocity) even though is not on the horizontal section.
- Thinking air resistance is always equal to weight during a fall.
- Using the value of velocity at instead of the gradient at .
Things to Be Careful About
- Terminal velocity is identified by zero gradient (horizontal line), not merely by “large” velocity.
- Drag acts opposite to motion, so for a falling object it acts upwards.
- The sign/direction convention: focus on whether speed is still increasing (gradient) to infer the net force direction.
In which situation is total linear momentum always conserved?
Options
A in all collisions between two objects
B in collisions between two objects moving at equal and opposite velocity
C in collisions between two objects that form an isolated system
D in collisions between two objects with the same mass
Total linear momentum is conserved when the system is isolated, i.e. the resultant external force is zero.
Answer
C
C
Background Concept
Linear momentum is defined as
For a system of particles,
So if the resultant external force on the system is zero, then
and therefore is constant: total linear momentum is conserved. This is true for all interactions within the system (including all types of collision: elastic or inelastic), provided the system is isolated.
Understanding the Question
The question asks which collision situation always guarantees conservation of total linear momentum. The word “always” means we need a condition that is sufficient regardless of the details of the collision (masses, speeds, whether the collision is elastic/inelastic, etc.).
Approach
Use the conservation condition: momentum is conserved when there is no resultant external force on the two-object system. Then check each option to see whether it guarantees an isolated system.
Step-by-Step Reasoning
- Option C: “two objects that form an isolated system.” By definition, an isolated system has zero resultant external force. Therefore total momentum is conserved. So C is correct.
Why the others are not “always” true:
- A: Not all collisions occur in isolation; external forces (friction with the ground, air resistance, a hand holding one object, etc.) can act, so total momentum of the two-object system may change.
- B: Equal and opposite velocities do not guarantee isolation; external forces can still act. (This condition relates to the initial momentum possibly being zero, not to whether it is conserved.)
- D: Same mass also does not guarantee isolation; external forces can still act. Mass equality is irrelevant to whether momentum is conserved.
Key Takeaways
- Momentum conservation is guaranteed by zero resultant external force on the system.
- “Isolated system” is the key phrase that encodes this condition.
- Conditions about equal masses or special initial velocities do not ensure conservation unless the system is isolated.
Common Mistakes
- Thinking momentum is conserved in all collisions without checking for external forces.
- Confusing “initial total momentum is zero” (e.g. equal/opposite velocities with equal masses) with “total momentum is conserved.”
- Choosing options based on symmetry (same mass, opposite velocities) rather than the isolation condition.
Things to Be Careful About
- Conservation of momentum applies to the chosen system: if you exclude external agents (e.g. Earth providing friction), momentum of just the two objects need not be conserved.
- In exam wording, “isolated system” or “no external force” are the reliable indicators for momentum conservation.
An object of mass moving with velocity has a head-on elastic collision with a stationary object of mass .
After the collision, both objects are moving. No external forces act on the system.
What is the velocity of the object of mass after the collision?
Options
A
B
C
D
Working
Let the final velocities be for mass and for mass .
Momentum:
Kinetic energy (elastic):
From :
Since both move after collision, , so .
Answer
D
D
Background Concept
In a closed system with no external forces, linear momentum is conserved:
For 1D motion, momentum is with a sign depending on direction.
For an elastic collision, kinetic energy is also conserved:
where .
In a head-on (1D) collision, these two conservation equations are enough to determine the two unknown final velocities.
Understanding the Question
- Object 1: mass , initial velocity .
- Object 2: mass , initially stationary, so .
- Collision is head-on elastic and no external forces act, so momentum is conserved; “elastic” tells us kinetic energy is conserved.
- We are asked for the final velocity of the object of mass (call it ).
Approach
- Write conservation of momentum for the system to relate and .
- Write conservation of kinetic energy (because elastic collision) to give a second equation.
- Solve the two simultaneous equations; reject any solution that contradicts “after the collision, both objects are moving”.
- Match the computed value to the options.
Step-by-Step Reasoning
Let the final velocities be (mass ) and (mass ).
1) Momentum conservation
Initial momentum:
Final momentum:
Set equal:
So
2) Kinetic energy conservation (elastic)
Initial kinetic energy:
Final kinetic energy:
So:
Divide by :
3) Substitute from momentum equation
Expand:
Subtract :
So:
But the question states both objects are moving after the collision, so .
Hence:
Positive means it moves in the original direction of the mass.
This corresponds to option D.
Key Takeaways
- “No external forces” (\Rightarrow) total momentum conserved.
- “Elastic collision” (\Rightarrow) total kinetic energy conserved as well.
- In 1D elastic collisions, use two conservation equations to solve for two unknown final velocities.
Common Mistakes
- Using momentum conservation alone (insufficient to determine both final velocities).
- Forgetting that elastic collisions conserve kinetic energy (not just momentum).
- Sign errors: treating velocity as always positive rather than using direction.
- Choosing the root even though the question explicitly says both objects move after collision.
Things to Be Careful About
- Cancel the factor only after writing the full momentum/energy equations correctly.
- Keep velocities as signed quantities throughout.
- Check that the selected root is consistent with the physical statement given (here: both objects moving).
The graph shows how the momentum of a motorcycle changes with time.
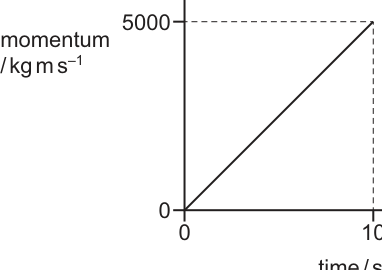
What is the resultant force on the motorcycle?
Options
A
B
C
D
Working
Resultant force:
From the graph, increases from to in :
Answer
A
A
Background Concept
Momentum is defined as
The resultant (net) force is the rate of change of momentum:
So on a momentum–time graph, the resultant force is given by the gradient (slope).
Unit check: momentum has unit . Dividing by time () gives , so the gradient directly gives force in newtons.
Understanding the Question
You are given a straight-line graph of momentum against time for a motorcycle. The line goes from the origin to the point , .
The question asks for the resultant force on the motorcycle, which is the rate at which its momentum is changing.
Approach
- Use the relationship (gradient of a – graph).
- Read two points on the straight line (best is the endpoints).
- Compute the gradient and then choose the matching option.
Step-by-Step Reasoning
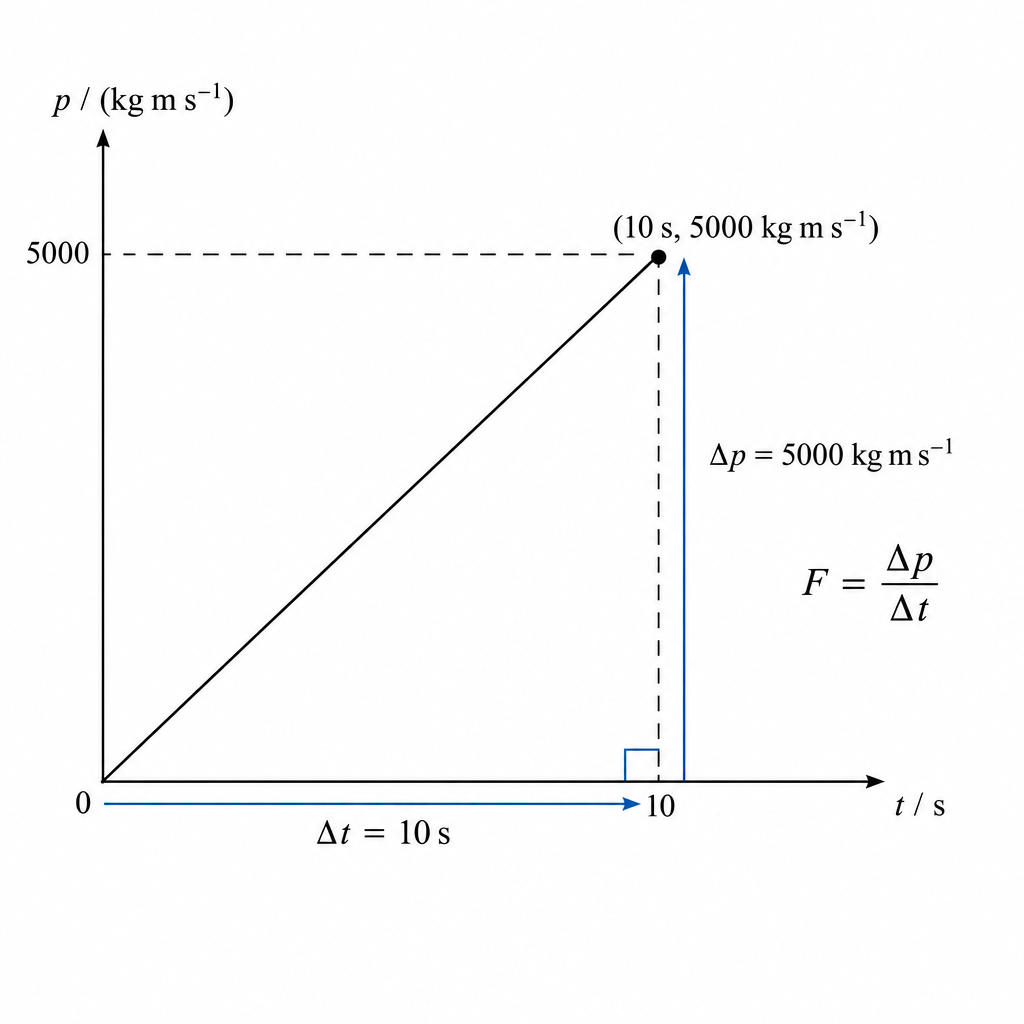
-
Take two convenient points on the straight line:
- At ,
- At ,
-
Calculate the gradient:
- Compare with the options: corresponds to option A.
Key Takeaways
- On a momentum–time graph, gradient = resultant force.
- Use for a straight line (constant force).
- Always check units: .
Common Mistakes
- Using without taking a change (only works here because it starts from the origin; in general you need ).
- Mixing up axes and calculating (the reciprocal), giving a tiny number.
- Reading the momentum value incorrectly (e.g. instead of ) and picking an option 10 times too large.
Things to Be Careful About
- Always take the slope as “rise over run”: (vertical) divided by (horizontal).
- Use two well-separated points to reduce reading error; for a straight line, endpoints are best.
- Include the unit newton () or show the unit conversion implicitly via the gradient.
A rocket has a weight of and an initial acceleration of as the rocket leaves the ground vertically. The acceleration of free fall is .
Which expression gives the initial upward force exerted on the rocket due to the engine?
Options
A
B
C
D
Working
Weight .
Upward thrust and downward weight :
Answer
A
A
Background Concept
For motion in a straight line, Newton's second law states that the resultant force in the direction chosen equals mass (m) times acceleration (a):
Weight is the gravitational force on a mass:
So if a question gives weight (W) rather than mass, you can replace (m) by (W/g).
Understanding the Question
The rocket rises vertically as it leaves the ground. There is an upward force from the engine (thrust) and a downward force due to weight (W). The rocket's initial acceleration is upward with magnitude (a). We need an expression for the engine thrust in terms of (W), (a), and (g).
Approach
- Take upward as positive.
- Write the resultant force: thrust (F) (up) minus weight (W) (down).
- Apply (F - W = ma).
- Replace (m) using (W = mg\Rightarrow m = W/g).
- Simplify and compare with the options.
Step-by-Step Reasoning
Upward is positive. Forces:
- Upward thrust = (F)
- Downward weight = (W)
Newton's second law:
But (W = mg), so:
Substitute into (F - W = ma):
Add (W) to both sides:
This matches option A.
Key Takeaways
- Always use resultant force: thrust is not equal to (ma) because weight is also acting.
- Convert between weight and mass using (W = mg).
- Choose a sign convention and stick to it.
Common Mistakes
- Writing (F = ma) instead of (F - W = ma), forgetting weight contributes to the resultant.
- Using (m = W) (mixing up mass and weight).
- Incorrect sign: using (F + W = ma) when upward is taken as positive.
Things to Be Careful About
- The acceleration (a) is upward; if you had chosen downward as positive, you would need (-a) and would still end with the same thrust after rearranging.
- Option D ((Wa + W)) is dimensionally inconsistent because (Wa) has units (\text{N},\text{m s}^{-2}), not (\text{N}). The conversion (m = W/g) is essential to keep units consistent.
A uniform rod of weight is supported at one end by force .
The rod is in equilibrium and attached to a frictionless hinge at end .
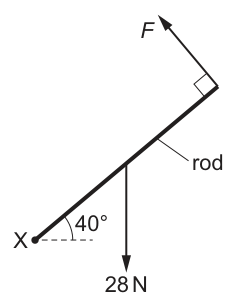
What is the magnitude of ?
Options
A
B
C
D
Working
Take moments about hinge at .
Moment of about :
(since is perpendicular to the rod).
Moment of weight about :
(horizontal distance of midpoint from is ).
Equilibrium:
Answer
B
B
Background Concept
For a rigid body in equilibrium:
- The resultant force is zero.
- The resultant moment (torque) about any point is zero.
The moment of a force about a point is
where is the perpendicular distance from the point (pivot) to the force’s line of action. Equivalently, if the force acts at position vector from the pivot,
where is the angle between and .
Understanding the Question
A uniform rod (weight ) is hinged at end and held in equilibrium by a force applied at the other end. The rod makes an angle of to the horizontal, and the force is perpendicular to the rod. The weight acts vertically downward at the midpoint (uniform rod).
We are asked for the magnitude of .
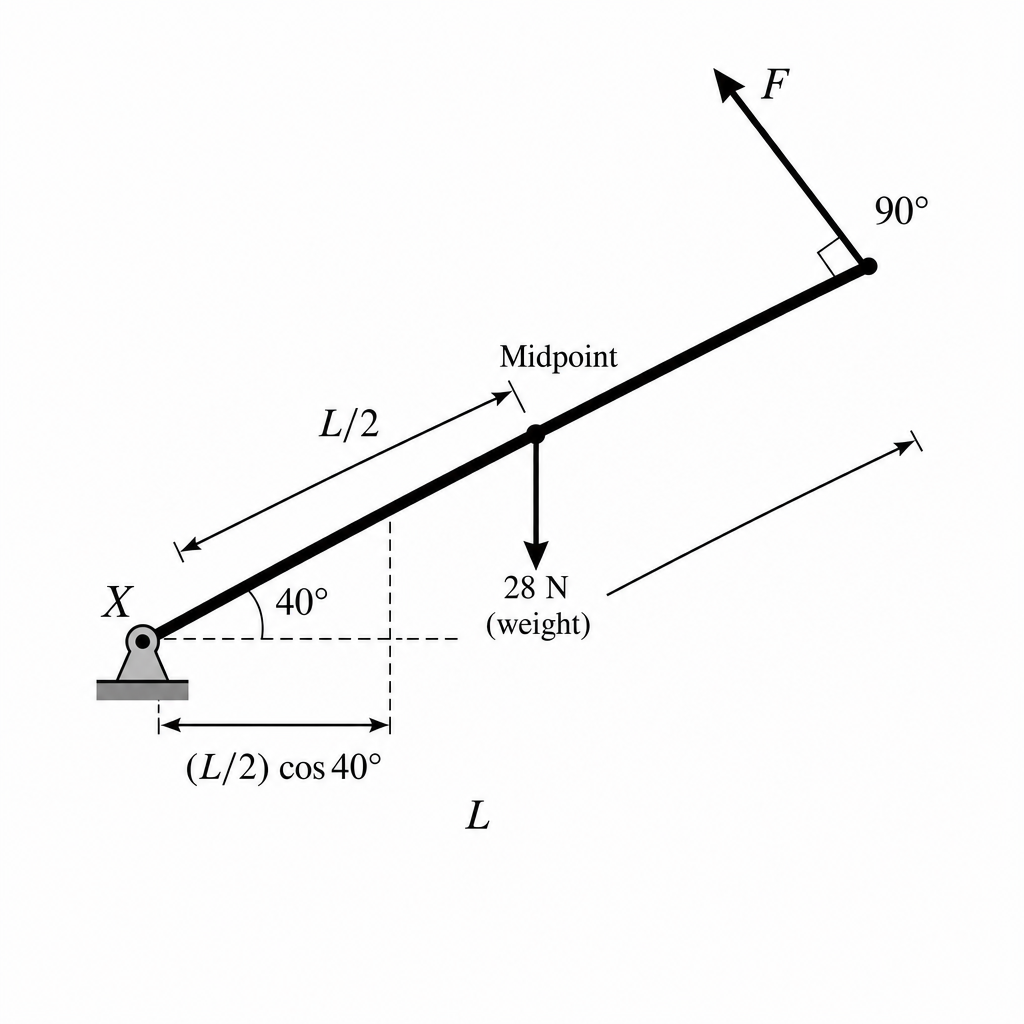
Approach
Choose the hinge at as the point to take moments about. This removes the unknown hinge reaction forces from the moment equation (they pass through so produce zero moment about ).
Then:
- Calculate the anticlockwise moment due to .
- Calculate the clockwise moment due to the weight .
- Set them equal (equilibrium) and solve for .
Step-by-Step Reasoning
- Moment from about
The force is applied at the end of the rod, a distance from the hinge, and is perpendicular to the rod. That means the angle between the position vector along the rod and the force is , so
So the magnitude of the moment from is simply .
- Moment from the weight about
The weight acts at the midpoint, so its distance along the rod from the hinge is .
Because the weight is vertical, the perpendicular distance from to the vertical line of action of the weight is the horizontal component of the midpoint position:
Therefore the moment from the weight is
- Equilibrium condition
Set anticlockwise moment = clockwise moment:
Cancel :
Numerically,
So the correct option is B.
Key Takeaways
- In equilibrium, the sum of moments about any point is zero.
- Taking moments about the hinge is powerful because hinge forces produce no moment about that point.
- The lever arm for a vertical force is the horizontal distance to its line of action.
- If a force is perpendicular to the rod, its moment is simply (rod length).
Common Mistakes
- Using for the weight’s lever arm (that would be the vertical distance, not the perpendicular distance to a vertical line of action).
- Forgetting the rod is uniform and so placing the weight at the end instead of the midpoint.
- Not recognising that being perpendicular makes its moment (and unnecessarily introducing extra trig).
- Equating forces instead of moments (force balance alone is not enough here).
Things to Be Careful About
- Always use the perpendicular distance to the line of action, not the distance along the rod.
- Check the angle you use: the rod is at to the horizontal, so the horizontal component is multiplied by .
- Quote the final answer to an appropriate precision matching the options (here ).
Two forces, each of magnitude , act in opposite directions on a rod.
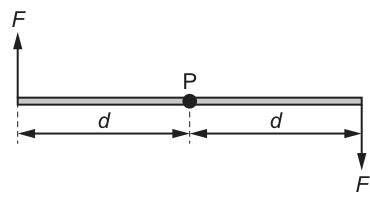
Each force acts on the rod at a distance from the pivot .
What is the torque of this couple about ?
Options
A
B
C
D
Working
Moment about from left force .
Moment about from right force (same sense).
Total torque of the couple:
Answer
C
C
Background Concept
The moment (torque) of a force about a pivot is
where is the perpendicular distance from the pivot to the line of action of the force.
A couple is formed by two equal, opposite, parallel forces with different lines of action. A couple produces a turning effect but no resultant force. The torque (moment) of a couple is
where is the perpendicular separation between the two lines of action.
Understanding the Question
Two forces of magnitude act vertically on a horizontal rod, one upwards on the left and one downwards on the right. The pivot is at the centre, and each force is applied a distance from . You are asked for the torque of the couple about .
Approach
Find the moment of each force about using (here the perpendicular distance is for each force). Then add the two moments, noting that they produce rotation in the same sense (both tend to turn the rod the same way).
Equivalently, treat it as a couple: the separation between the lines of action is , so the couple moment is .
Step-by-Step Reasoning
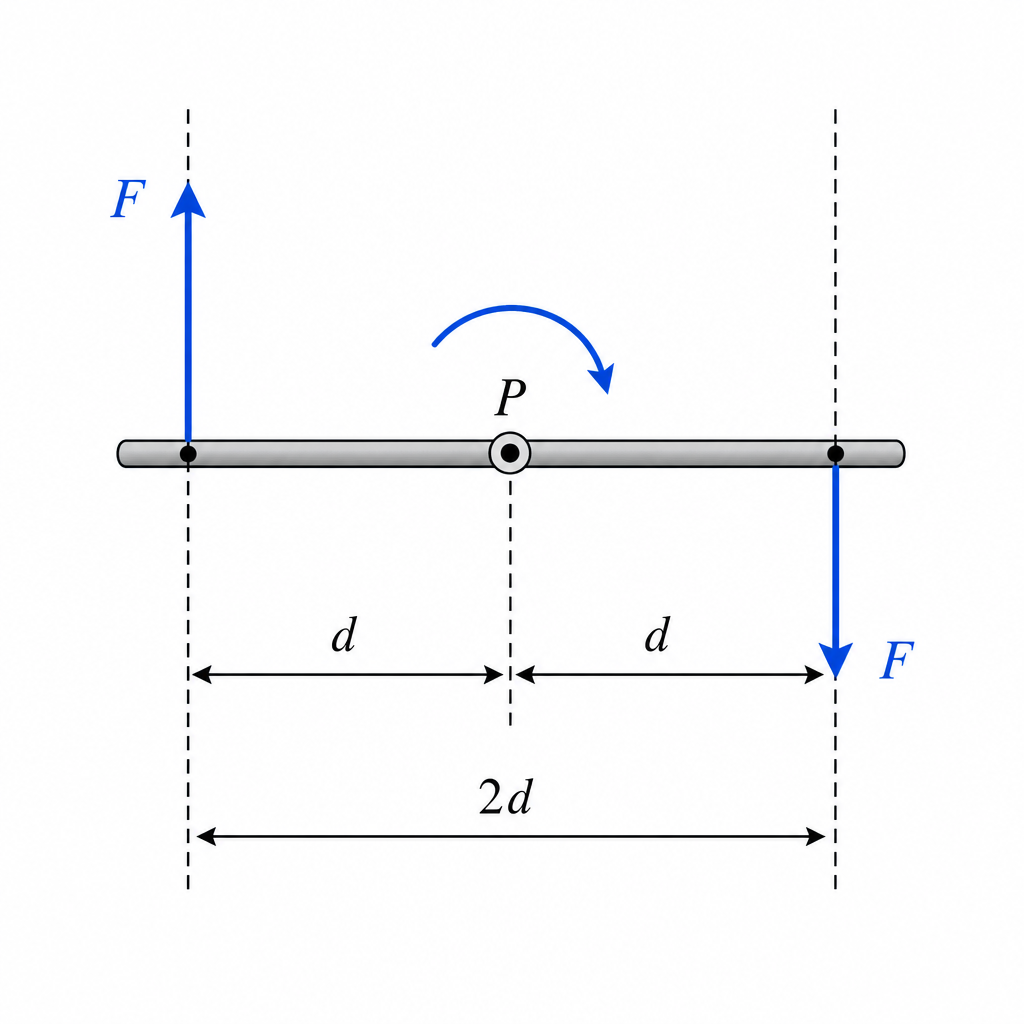
- Left force: Its line of action is a vertical line through the left application point. The perpendicular distance from to this line is .
- Right force: Similarly, its perpendicular distance from is also .
- Sense of rotation: Although the forces are opposite directions, they act on opposite sides of the pivot, so they both cause rotation in the same sense about . Therefore, the torques add:
So the correct option is , i.e. C.
(Quick couple method: separation between forces , so .)
Key Takeaways
- Torque about a point uses the perpendicular distance to the line of action.
- In a couple, the two moments add to give .
- The moment of a couple is independent of the pivot position (as long as you sum both moments correctly).
Common Mistakes
- Using as the separation between the forces instead of .
- Thinking the torques cancel because the forces are opposite; for a couple, the forces cancel but the moments add.
- Using distance to the point of application instead of perpendicular distance to the line of action (important in non-right-angle cases).
Things to Be Careful About
- Check the sense (clockwise/anticlockwise) of each torque about the pivot before adding.
- Do not multiply by ; the couple moment is not found by replacing the two forces with a single force at some distance.
- Here the lever arm is exactly for each force because the force is perpendicular to the rod; in general you may need .
A man of weight stands with both feet flat on the ground.
What is a reasonable estimate of the pressure exerted on the ground by the weight of the man?
Options
A
B
C
D
Working
Pressure .
Estimate area of both feet on ground:
Closest option is .
Answer
C
C
Background Concept
Pressure is defined as the normal (perpendicular) force per unit area:
- is pressure in pascals (Pa), where .
- is the force pressing on the surface (here, the man’s weight).
- is the contact area over which that force is distributed.
A key idea for “reasonable estimate” questions is that we do not need an exact foot area; we only need the correct order of magnitude.
Understanding the Question
We are told the man’s weight is . He is standing with both feet flat on the ground, so the ground supports a total downward force of .
We must estimate the pressure on the ground, so we need a reasonable estimate of the total area of contact of both feet, then compute and choose the closest power of ten from the options.
Approach
- Use .
- Estimate the area of one foot using typical dimensions (length (\sim 0.2\text{ m}), width (\sim 0.1\text{ m})).
- Multiply by 2 for both feet.
- Calculate and compare with the options.
Step-by-Step Reasoning
Take a typical footprint size:
- length (\approx 0.20\text{ m})
- width (\approx 0.10\text{ m})
So area of one foot:
Both feet:
Now calculate the pressure:
This is closest to , which corresponds to option C.
Key Takeaways
- Use for pressure problems.
- In estimation questions, pick sensible everyday dimensions and aim for the correct power of ten.
- Remember .
Common Mistakes
- Forgetting to use both feet (using area of one foot only gives about twice the pressure).
- Using unrealistic areas (e.g. gives ; far too large for feet).
- Unit errors, especially mixing with without converting.
Things to Be Careful About
- The contact area is much smaller than the whole shoe outline if someone stands on heels, but the question states “both feet flat”, so using the full sole area is appropriate.
- Converting areas: . A typical footprint of a few hundred corresponds to a few .
The formula for the upthrust on a block of wood partially submerged in water is shown.
What do the symbols and represent?
Options
| A | density of water | volume of whole block |
| B | density of water | volume of block below surface of water |
| C | density of wood | volume of whole block |
| D | density of wood | volume of block below surface of water |
Working
Upthrust equals the weight of displaced water:
For a partially submerged block, is the volume of the block below the water surface.
Answer
B
B
Background Concept
Upthrust (buoyant force) on an object in a fluid is given by Archimedes' principle: the upthrust equals the weight of the fluid displaced by the object.
If a volume of fluid of density is displaced, the mass of that displaced fluid is , so its weight is . Therefore the buoyant force is
Here, must be the density of the fluid providing the buoyant force (the surrounding liquid or gas), and must be the displaced volume of that fluid.
Understanding the Question
A block of wood is partially submerged in water. The question gives the standard upthrust formula
and asks what the symbols and represent. Since the fluid is water and the block is only partially submerged, the displaced volume is only the submerged part.
Approach
- Use Archimedes' principle: upthrust is the weight of displaced fluid.
- Identify which substance’s density appears in the formula (the displaced fluid, not the object).
- For a partially submerged object, identify as the volume of the object below the water surface (the displaced water volume).
Step-by-Step Reasoning
- The buoyant force depends on the properties of the fluid being displaced, because it is that fluid whose weight is being “replaced” by an upward force.
- Therefore is the density of water (not the density of wood).
- The volume of water displaced equals the volume of the object that is actually underwater.
- If the block is partially submerged, only the submerged part displaces water.
- So is the volume of the block below the surface of the water.
- This matches option B.
Key Takeaways
- In for upthrust, is the density of the surrounding fluid.
- is the displaced volume of fluid, which equals the submerged volume of the object.
- Partial submergence means is not the whole object volume.
Common Mistakes
- Using the density of the object (wood) instead of the density of the fluid (water).
- Taking as the total volume of the block even when it is only partially submerged.
Things to Be Careful About
- The formula always refers to the displaced fluid: and belong to the displaced fluid, not to the object.
- The displaced volume equals the submerged volume only when the object is in a single fluid and the part above the surface does not displace any fluid.
An object with a mass of falls a vertical distance of .
What is the change in the gravitational potential energy of the object?
Options
A
B
C
D
Working
Mass .
Change in gravitational potential energy:
Answer
B
B
Background Concept
For an object in a uniform gravitational field near Earth’s surface, the change in gravitational potential energy is
where:
- is the mass in ,
- is the gravitational field strength (about ),
- is the change in vertical height in .
If an object falls, its height decreases, so is negative and is negative (it loses GPE). In multiple-choice questions, they often want the magnitude of the change.
Understanding the Question
The object has mass and falls a vertical distance of . You are asked for the change in its gravitational potential energy. The options are numerical values in joules, so we calculate and choose the closest.
Approach
- Convert the mass from grams to kilograms.
- Use with (falling) or use if taking the magnitude.
- Compare the magnitude with the answer choices.
Step-by-Step Reasoning
- Convert mass:
- Compute the change in GPE (magnitude):
- rounds to , which corresponds to option B.
(If including sign: because the object loses gravitational potential energy as it falls.)
Key Takeaways
- Use for vertical height changes near Earth.
- Always convert to SI units before substituting.
- Falling means a decrease in GPE (negative change), but MCQs may effectively ask for the magnitude.
Common Mistakes
- Using or (forgetting to convert grams to kilograms).
- Forgetting the factor of and doing .
- Choosing by multiplying and missing .
Things to Be Careful About
- Units: must be in and in to get joules.
- Sign convention: for a fall, so ; check whether the question/options are using magnitude.
A bungee jumper jumps from a platform and is decelerated by an elastic bungee cord, as shown.
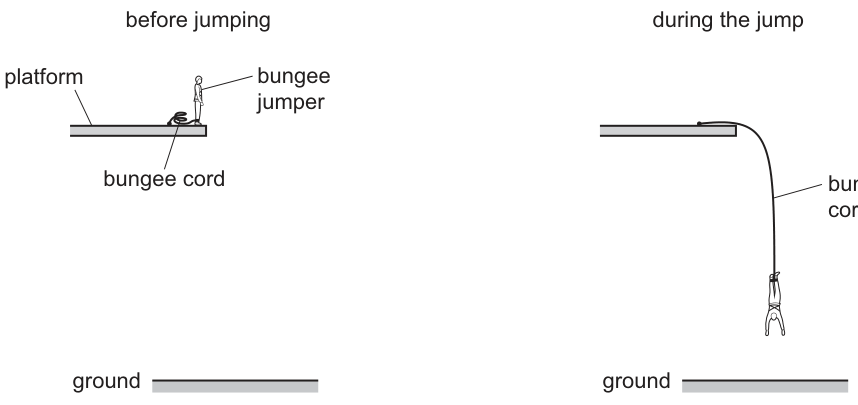
When the jumper makes the jump, his initial gravitational potential energy relative to the ground is converted into his kinetic energy and into elastic potential energy in the cord.
At which part of the jump are all three types of energy non-zero?
Options
A on the platform before the jump
B on the way down before the cord has started to extend
C on the way down as he decelerates
D at the bottom of the jump when he is stationary
Gravitational potential energy is non-zero whenever the jumper is above the ground.
Kinetic energy is non-zero when the jumper is moving.
Elastic potential energy is non-zero only when the cord is stretched (extending).
All three are non-zero while the cord is stretching and the jumper is still moving downward (decelerating).
Answer
C
C
Background Concept
Gravitational potential energy (GPE) is energy due to height in a gravitational field:
Kinetic energy (KE) is energy due to motion:
Elastic potential energy (EPE) is energy stored when an elastic cord (or spring) is stretched. It is zero when the cord is slack (not extended) and becomes non-zero once the cord starts to stretch.
In a bungee jump, energy is transferred from the gravitational store into kinetic and elastic stores as the jumper falls and the cord extends.
Understanding the Question
You are told that the jumper’s initial GPE (relative to the ground) is converted into KE and into EPE in the cord.
The question asks: at which stage of the jump are all three of these energies simultaneously non-zero?
So we need a stage where:
- the jumper is still above the ground (so ),
- the jumper is moving (so ),
- the cord is stretched (so elastic energy ).
Approach
Check each option by matching it to the physical conditions:
- Is the jumper moving? (controls KE)
- Is the cord stretched? (controls EPE)
- Is the jumper above the ground? (controls GPE)
The only stage that can have all three is when the jumper is moving and the cord has started to extend.
Step-by-Step Reasoning
-
A: on the platform before the jump
- Jumper is stationary .
- Cord is slack (not stretched) EPE .
- Not all three are non-zero.
-
B: on the way down before the cord has started to extend
- Jumper is moving .
- But cord has not started to extend EPE .
- Not all three are non-zero.
-
C: on the way down as he decelerates
- Decelerating while moving downward means the speed is not yet zero .
- Deceleration is caused by the cord stretching, so the cord is extended EPE .
- The jumper is still above the ground .
- Therefore all three are non-zero here.
-
D: at the bottom of the jump when he is stationary
- Stationary .
- Even though the cord is maximally stretched (EPE non-zero) and height above ground is still non-zero, KE is zero.
So the correct option is C.
Key Takeaways
- is non-zero only when an object is moving.
- Elastic potential energy is non-zero only when an elastic object is stretched (or compressed).
- During bungee deceleration, the jumper is still moving while the cord is stretching, so both and elastic energy exist together (and GPE is still present).
Common Mistakes
- Thinking that “decelerating” implies the speed is zero; it only means speed is decreasing.
- Saying elastic potential energy exists before the cord starts to stretch (a slack cord stores no elastic energy).
- Choosing the bottom point (stationary) and forgetting that KE is then zero.
Things to Be Careful About
- The question defines GPE relative to the ground: unless the jumper is at ground level, is still non-zero.
- Distinguish between “cord taut but not stretched” and “cord stretched”: elastic energy requires extension beyond the natural length.
- “All three non-zero” forces you to find an interval where the jumper is both moving and stretching the cord, not a starting/ending instant.
A sailboat is pushed by the wind at a constant velocity across a lake.
The force of the wind and the velocity of the sailboat are in the same direction.
Which additional information is required to determine the work done per unit time by the wind acting on the sailboat?
Options
A the force exerted by the wind
B the distance travelled by the sailboat per unit time
C the total energy input to the sailboat by the wind
D the weight of the sailboat
Working
Work done per unit time is power:
For a constant force in the same direction as the velocity,
The speed is already given, so we need .
Answer
A
A
Background Concept
Power is the rate at which work is done (or energy is transferred):
When a force causes an object to move with velocity , the instantaneous power delivered by the force is
where is the angle between the force and the velocity. If the force and velocity are in the same direction, so and
Understanding the Question
A sailboat moves at constant velocity across a lake. The wind exerts a force on the boat in the same direction as the boat’s velocity. The question asks what additional piece of information is needed to determine the work done per unit time by the wind, i.e. the power delivered by the wind.
Given: direction of is the same as , and the magnitude of velocity is .
Unknown: power .
Approach
Use the power relation for a force acting along the direction of motion:
Then decide which quantity in this expression is missing from the information given.
Step-by-Step Reasoning
Because force and velocity are in the same direction,
The question already tells us the boat’s speed is (distance travelled per unit time is exactly the speed), so is not the missing information.
To calculate numerically we still need the value of the wind force .
Therefore the required additional information is: the force exerted by the wind (Option A).
Key Takeaways
- “Work done per unit time” means power.
- For a force parallel to motion, power is .
- If is already known, the missing quantity is the force .
Common Mistakes
- Choosing “distance travelled per unit time” (Option B): this is just the speed , which is already given.
- Thinking the weight matters directly: weight acts vertically and does not determine the power delivered by a horizontal wind force.
- Using but then trying to find from irrelevant energy information rather than using .
Things to Be Careful About
- The formula only applies when the component of force along the velocity is used; more generally .
- “Constant velocity” does not mean no forces act; it means the resultant force is zero. The wind force can still be doing work while resistive forces balance it.
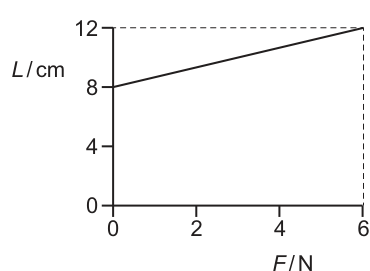
A spring is fixed at one end. The length of the spring is increased by applying a tensile force to the other end.
The graph shows the variation of with .
What is the elastic potential energy of the spring when is ?
Options
A
B
C
D
Working
From the graph, at the spring length .
At , .
Extension:
Elastic potential energy (area under - graph):
Answer
A
A
Background Concept
For a spring obeying Hooke's law, the force is proportional to extension:
The elastic potential energy stored in the spring is the work done in stretching it from to some extension . On a force–extension graph, this equals the area under the graph:
For a Hooke's-law spring, the – graph is a straight line from the origin, so the area is a triangle:
Understanding the Question
You are given a graph of spring length (in cm) against applied force (in N). At you must find the elastic potential energy stored.
The key point is that energy depends on the extension , not the total length . So you must first find the natural length (length at zero force) and then calculate the extension at .
Approach
- Read the spring length at to get the natural length .
- Read the spring length at to get .
- Compute the extension and convert to metres.
- Use to find the elastic potential energy.
- Match the numerical result to the options.
Step-by-Step Reasoning
-
From the graph:
- When , .
- When , .
-
Extension is the increase in length:
Convert to SI units:
- Elastic potential energy is the work done in stretching. For a linear spring this is
Substitute and :
- The option that matches is A.
Key Takeaways
- Elastic potential energy in a spring equals the work done stretching it.
- For a Hooke's-law spring, (triangle area under an – graph).
- If a graph gives length rather than extension , first find .
- Always convert cm to m when calculating energy in joules.
Common Mistakes
- Using instead of extension in .
- Forgetting to subtract the natural length at .
- Not converting to , giving an answer 100 times too large.
- Using (rectangle area) instead of for a linear spring.
Things to Be Careful About
- The graph is vs , but the energy relation requires vs ; here is found from the change in .
- Units: , so extension must be in metres.
- Reading the intercept correctly: the value at is the spring's natural length.
A wire has an unstretched length of .
A stress of is applied to the wire, and the new length of the wire is .
The wire obeys Hooke’s law.
What is the Young modulus of the wire?
Options
A
B
C
D
Working
Strain:
Young modulus:
Answer
D
D
Background Concept
For a wire that obeys Hooke's law, stress is proportional to strain (as long as the wire is within its limit of proportionality).
- Stress is force per unit cross-sectional area:
- Strain is fractional extension (no units):
- Young modulus relates stress to strain:
It is a measure of stiffness: a larger means a smaller strain for the same applied stress.
Understanding the Question
You are given:
- Original (unstretched) length
- New length , so extension
- Applied stress
You need to calculate the Young modulus and choose the matching option A–D.
Approach
- Find the strain using .
- Use .
- Compare the calculated value with the listed options.
Step-by-Step Reasoning
- Calculate extension:
- Calculate strain:
This is dimensionless (no unit).
- Calculate Young modulus:
Dividing by is multiplying by :
This corresponds to option D.
Key Takeaways
- Strain is a fractional extension: .
- Young modulus is stress per strain: .
- Strain has no units; Young modulus has the same units as stress (Pa).
Common Mistakes
- Using instead of for strain.
- Forgetting that strain is dimensionless and incorrectly adding units.
- Subtracting lengths incorrectly (e.g. using and losing the sign).
- Matching the wrong option due to an arithmetic slip when dividing by .
Things to Be Careful About
- Keep enough significant figures during intermediate steps; here is important (not ).
- Ensure the final unit is for Young modulus.
- Hooke’s law condition signals that the linear relationship (and hence constant ) is valid for the data given.
What are the SI base units of stress?
Options
A
B
C
D
Working
Stress .
Unit of force .
So
Answer
B
B
Background Concept
Stress is defined as the force distributed over an area:
It is a derived quantity, so its SI unit must be built from SI base units. The SI unit of force is the newton (N), and from Newton’s second law we can express it in base units:
Understanding the Question
You are asked for the SI base units of stress (not just the named unit). The options all have the form , so the task is to start from and simplify.
Approach
- Write stress as .
- Replace by its base units ().
- Divide by area () and combine powers of .
Step-by-Step Reasoning
Start with the definition:
Base units:
- Force: has unit .
- Area: has unit .
So the unit of stress is:
Divide by (subtract indices of ):
This corresponds to option B.
Key Takeaways
- Stress is force per unit area: .
- Convert derived units to base units using definitions (here ).
- When dividing quantities with the same base unit, subtract the powers.
Common Mistakes
- Using (that is force per length, not per area).
- Forgetting that area is and only dividing by .
- Leaving the answer as when asked specifically for SI base units.
Things to Be Careful About
- The phrase “SI base units” means the answer must be in , , (not N or Pa), even though stress is commonly measured in pascals, .
- Combine powers correctly: .
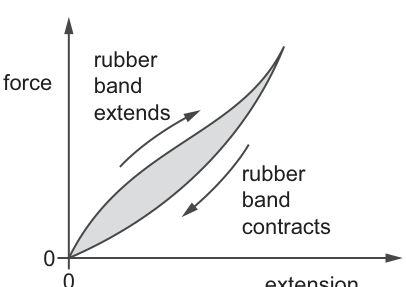
The diagram shows a force–extension graph for a rubber band as the band is extended and then the stretching force is decreased to zero.
What can be deduced from the graph?
Options
A The rubber band does not return to its original length when the force is decreased to zero.
B The rubber band obeys Hooke’s law for the extensions shown.
C The rubber band remains elastic for the extensions shown.
D The shaded area represents the work done in extending the rubber band.
The unloading curve returns to the origin, so when the force is reduced to zero the extension is zero (original length recovered) (\Rightarrow) elastic behaviour.
The graph is not a straight line so Hooke’s law is not obeyed, and the shaded area is not the work done in extending (that is the area under the loading curve).
Answer
(\boxed{\text{C}})
C
Background Concept
An object is elastic over a given range if it returns to its original dimensions when the applied force is removed. If, after unloading to zero force, there is still a non-zero extension, then the object has undergone plastic deformation.
Hooke’s law applies when force is proportional to extension:
This shows up on a force–extension graph as a straight line through the origin.
The work done (energy transferred) in stretching a material from extension (0) to (x) is the area under the loading curve:
If the loading and unloading curves are different (a hysteresis loop), the area enclosed between them represents energy dissipated (often as heating) in one loading–unloading cycle.
Understanding the Question
The graph shows two different curves: one for extending the rubber band (loading) and one for contracting it (unloading) back to zero force. The enclosed region is shaded.
You must decide which statement A–D is definitely supported by what the graph shows.
Approach
- Check whether the unloading curve ends at the origin: that tells you whether the band returns to its original length when the force is removed (elastic vs plastic).
- Check whether the loading curve is a straight line through the origin: that tells you whether Hooke’s law is obeyed.
- Use the “area under curve” idea to decide what the shaded area represents.
Step-by-Step Reasoning
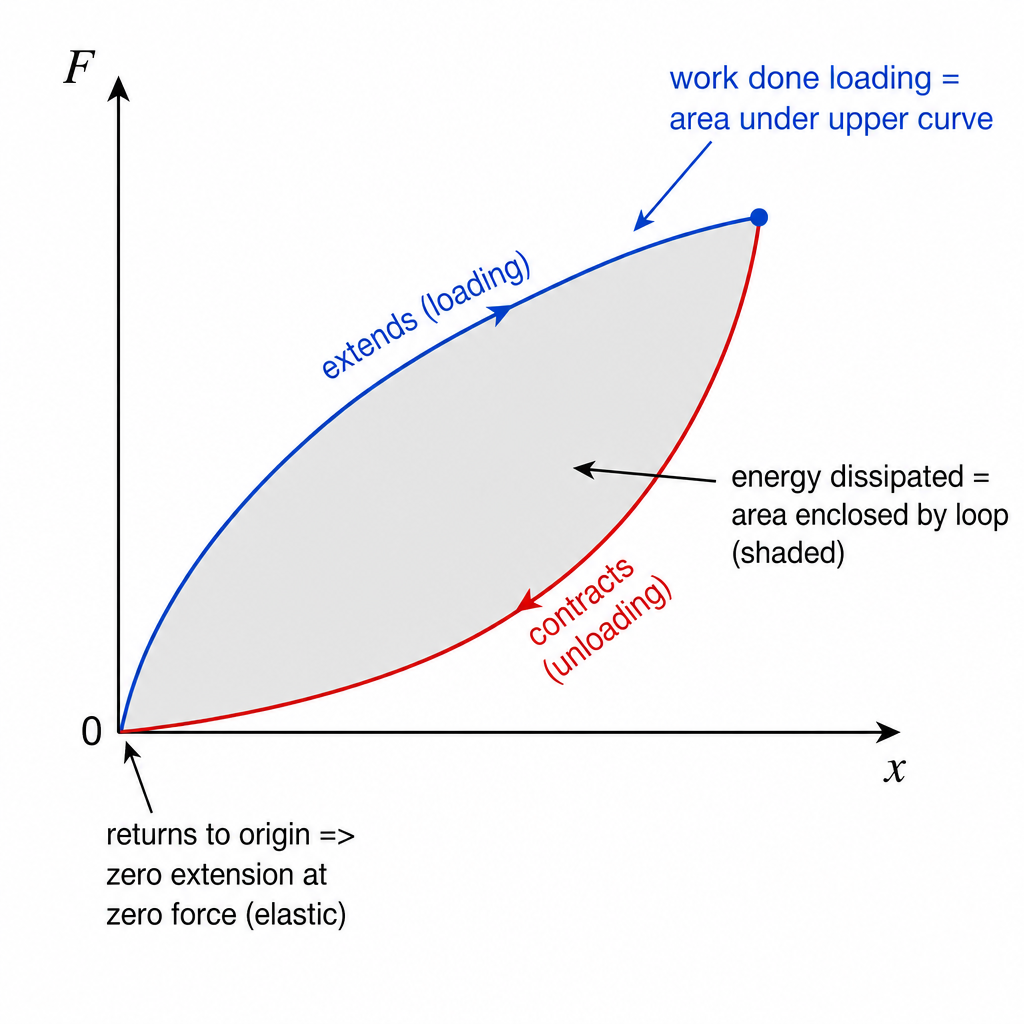
-
The unloading (contracting) curve returns to (F=0) at (x=0). Therefore, when the force is reduced to zero, the extension is zero: the rubber band returns to its original length. That is the definition of elastic behaviour, so statement C is true.
-
Statement A would require the unloading curve to reach (F=0) at some (x>0) (a permanent extension). The graph does not show this; it returns to (x=0). So A is not supported.
-
Statement B (Hooke’s law) would require a straight line relationship (F = kx). The loading curve is clearly curved, so Hooke’s law is not obeyed over the extensions shown.
-
Statement D is incorrect because:
- Work done in extending is the area under the loading curve (from (x=0) to the maximum extension).
- The shaded enclosed area between loading and unloading curves is the difference between work done loading and energy returned unloading, i.e. the energy dissipated.
Therefore the only correct deduction is C.
Key Takeaways
- Elastic material returns to original length when force is removed (graph returns to origin).
- Hooke’s law corresponds to a straight line through the origin on an (F)-(x) graph.
- Area under an (F)-(x) curve is work done; area of a hysteresis loop is energy dissipated.
Common Mistakes
- Assuming “rubber is not Hookean” without checking the graph shape; marks come from the graph evidence (non-linear curve).
- Thinking the shaded loop area is the work done in extending; it is the energy lost in the cycle.
- Confusing “elastic” with “obeys Hooke’s law”: an object can be elastic but not Hookean.
Things to Be Careful About
- For statement A, you must look specifically at the extension when (F=0) on unloading.
- For Hooke’s law, the key feature is linearity (straight line), not merely “passes through origin”.
- Always distinguish:
- area under loading curve = work done to stretch,
- area under unloading curve = energy returned,
- enclosed area = energy dissipated.
Which row is correct for sound waves?
Options
| can travel in a vacuum | can be polarised | can diffract through a gap | |
|---|---|---|---|
| A | no | no | yes |
| B | yes | no | no |
| C | no | yes | no |
| D | no | yes | yes |
Working
Sound is a mechanical wave, so it cannot travel in a vacuum.
Sound in air is longitudinal, so it cannot be polarised.
All waves diffract when passing through a gap (especially when gap size is comparable to wavelength), so sound can diffract.
Answer
A
A
Background Concept
Sound waves (in air and most fluids) are mechanical waves: they are vibrations of particles in the medium. This means they need matter to transmit the disturbance.
Sound in air is also longitudinal: particle oscillations are parallel to the direction the wave travels (compressions and rarefactions).
Polarisation is a property of transverse waves only: it means restricting the direction of oscillation to a particular plane/direction perpendicular to the direction of travel.
Diffraction is the spreading of a wave as it passes through a gap or around an obstacle. Any wave can diffract; it is most noticeable when the gap size is similar to the wavelength.
Understanding the Question
The table asks which statements are correct for sound waves:
- Can sound travel in a vacuum?
- Can sound be polarised?
- Can sound diffract through a gap?
You must choose the row that matches the correct yes/no pattern for all three.
Approach
Decide each property from the nature of sound:
- Mechanical wave (\Rightarrow) needs a medium (\Rightarrow) no vacuum propagation.
- Longitudinal (in air) (\Rightarrow) cannot be polarised.
- Waves spread at gaps (\Rightarrow) diffraction is possible.
Step-by-Step Reasoning
-
Vacuum travel: Sound needs particles to vibrate, so in a vacuum there are no particles to pass on the oscillation. Therefore: cannot travel in a vacuum (\Rightarrow) no.
-
Polarisation: To be polarised, the oscillations must be able to be confined to one direction perpendicular to travel. Longitudinal oscillations are along the direction of travel, so there is no transverse oscillation direction to “select”. Therefore: cannot be polarised (\Rightarrow) no.
-
Diffraction: Sound has a wavelength, so when it passes through a gap it can spread out into the region beyond the gap. Therefore: can diffract through a gap (\Rightarrow) yes.
So the correct row is no, no, yes, which is A.
Key Takeaways
- Sound in air is a mechanical longitudinal wave.
- Mechanical waves do not travel in a vacuum.
- Only transverse waves can be polarised.
- Diffraction is a general wave property (not restricted to light).
Common Mistakes
- Thinking “all waves can be polarised” (false: only transverse waves).
- Confusing diffraction with interference; diffraction is spreading at a gap/edge (though it can be explained using superposition).
- Assuming diffraction only applies to light; it applies to sound as well.
Things to Be Careful About
- The question is about sound waves (typically in air): treat them as longitudinal.
- Diffraction is always possible in principle; it becomes significant when gap size (\sim \lambda).
A source emits a progressive sound wave in the horizontal direction. The wave travels away from the source in a direction towards the right.
The graph shows the variation of the displacement of the particles from their equilibrium positions with distance from the source at a particular instant in time. Displacements to the right of the equilibrium positions are shown as positive.
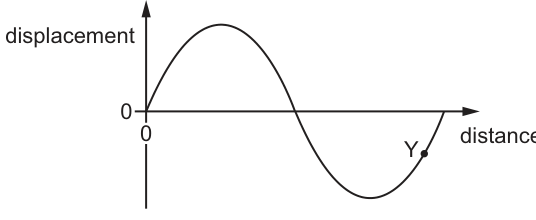
Position represents the displacement of a particle in the sound wave at a particular distance from the source at this instant.
Which statement about the motion of this particle is correct?
Options
A The particle is moving away from the source.
B The particle is moving towards the source.
C The particle is moving upwards.
D The particle is moving downwards.
Working
For a wave travelling to the right, displacement , so
At the displacement–distance graph is rising, so .
Hence , meaning the particle velocity is to the left (towards the source).
Answer
B
B
Background Concept
In a progressive longitudinal sound wave, particles of the medium oscillate back-and-forth along the same line that the wave travels.
A key idea is that the wave travels, but individual particles only oscillate about their equilibrium positions.
For a wave travelling to the right with speed , the displacement can be written as
Differentiating gives the particle velocity (the speed/direction the particle itself is moving at that instant):
So, for a right-travelling wave:
- if the graph of against has positive slope (), then the particle velocity is negative (),
- if the slope is negative, the particle velocity is positive.
Understanding the Question
You are given a snapshot graph of displacement vs distance at one instant.
- The wave is travelling to the right.
- Positive displacement means the particle is displaced to the right of equilibrium.
- Point lies on the rising part of the curve after a trough, still below the axis.
The question asks: at that instant, is the particle at moving left/right (towards/away from the source) or up/down?
Because this is a sound wave in the horizontal direction, “upwards/downwards” should already feel suspicious: particle motion is horizontal.
Approach
- Use the fact the wave travels to the right to connect particle velocity to the slope of the snapshot .
- Read the sign of the slope at .
- Convert the sign of into a physical direction using the question’s sign convention.
Step-by-Step Reasoning
At point , the curve is rising as increases, so
For a right-travelling wave,
Since and , it follows that
A negative means the displacement is becoming more negative with time: the particle is moving in the negative direction.
The question states positive displacement is to the right, so negative velocity means the particle is moving to the left, i.e. towards the source.
Therefore, the correct statement is B.
Key Takeaways
- Sound waves are longitudinal: particle motion is along the direction of wave travel.
- A snapshot vs graph does not directly show particle direction of motion, but its slope does when combined with the travel direction.
- For a right-travelling wave: (opposite signs).
Common Mistakes
- Saying the particle moves right because the wave travels right (confusing wave propagation with particle motion).
- Using the sign of displacement at (below axis) to decide direction of motion; displacement sign is not the same as velocity sign.
- Choosing C or D (up/down), forgetting a sound wave’s particle oscillations are along the direction of propagation.
Things to Be Careful About
- The graph is displacement vs distance, not displacement vs time. Motion direction comes from , not directly from the shape alone.
- Always use the given sign convention: here, “positive” means “to the right”.
- The relation is specifically for a wave travelling to the right; travelling left would reverse the sign.
Two polarising filters are placed next to each other so that their planes are parallel.
The first polarising filter has its transmission axis at an angle of to the vertical.
The second polarising filter has its transmission axis at an angle of to the vertical. The angle between the transmission axes of the two polarising filters is .
A beam of vertically polarised light of intensity is incident normally on the first polarising filter.
What is the intensity of the light that is transmitted from the second polarising filter?
Options
A zero
B
C
D
Working
For the first polariser, angle to vertical (incident polarisation) is :
Angle between the two transmission axes is :
Answer
(B)
B
Background Concept
A polarising filter (polariser) only transmits the component of the electric field parallel to its transmission axis. For plane-polarised light incident on a polariser, the transmitted intensity is given by Malus's law:
where:
- is the incident intensity,
- is the transmitted intensity,
- is the angle between the incident light's plane of polarisation and the polariser's transmission axis.
When light passes through a first polariser, the transmitted light becomes polarised along the first polariser's axis. A second polariser then further reduces intensity depending on the angle between the two polariser axes.
Understanding the Question
- The incident light is vertically polarised with intensity .
- First polariser axis is at to the vertical, so the incident polarisation is at to its axis.
- Second polariser axis is at to the vertical, so the angle between axes is (also stated).
- We want the intensity after the second polariser.
Approach
- Use Malus's law for transmission through the first polariser using .
- After the first polariser, the light is polarised along the first axis.
- Use Malus's law again for the second polariser using the angle between axes, .
Step-by-Step Reasoning
1) Through the first polariser
The incoming polarisation is vertical. The first transmission axis is to vertical, so .
Calculate:
So:
2) Through the second polariser
After the first polariser, the transmitted light is polarised along the first axis. The angle between the two axes is .
Since and :
This matches option B.
Key Takeaways
- Use Malus's law for polarised light through a polariser.
- After the first polariser, the polarisation direction becomes aligned with the first polariser's axis.
- For multiple polarisers, apply Malus's law successively using the relevant angles.
Common Mistakes
- Using for the first polariser instead of (the first polariser compares to the incident vertical polarisation).
- Forgetting to apply Malus's law twice (stopping after the first polariser).
- Using instead of .
- Treating intensities as adding or subtracting rather than multiplying by the factors.
Things to Be Careful About
- Always identify what the angle is between (polarisation direction vs transmission axis).
- Keep track that the first polariser sets the new polarisation direction.
- Ensure the final value is quoted with appropriate rounding to match the options.
A dolphin is swimming at a speed of directly towards a stationary underwater microphone.
The dolphin emits a sound of frequency . The speed of sound in water is .
What is the frequency of sound detected by the microphone?
Options
A
B
C
D
Working
For a source moving towards a stationary detector:
Answer
D
D
Background Concept
The Doppler effect is the change in observed frequency when there is relative motion between a wave source and an observer.
For sound in a medium (water here), the wave speed in the medium is . If the source moves towards a stationary observer, successive wavefronts are emitted from positions closer and closer to the observer, so the wavelength in front of the source decreases and the observed frequency increases.
For a moving source and stationary observer:
where:
- is the emitted frequency,
- is the detected frequency,
- is the speed of sound in the medium,
- is the speed of the source towards the observer.
Understanding the Question
- The dolphin (source) swims directly towards the microphone (observer).
- Microphone is stationary.
- Given: , , speed of sound .
- Need: the detected frequency .
Because the dolphin is moving towards the microphone, the detected frequency must be slightly higher than .
Approach
Use the Doppler formula for a moving source and stationary observer. Substitute the given values, compute the factor , and then choose the option that matches the calculated frequency.
Step-by-Step Reasoning
Start with:
Substitute , , :
Compute the denominator:
So:
The ratio is slightly bigger than 1:
Thus:
Rounded to the nearest kHz (as in the options): , which is option D.
Key Takeaways
- For a source moving towards a stationary detector, frequency increases: use .
- Always check the direction: towards means higher , away means lower .
- A quick reasonableness check helps: here , so the shift is small (about 1%).
Common Mistakes
- Using the wrong sign: writing in the denominator gives a smaller frequency (that would correspond to moving away).
- Using the formula for a moving observer instead of a moving source.
- Unit confusion: mixing Hz and kHz or choosing the 1300 Hz options, which are the wrong order of magnitude.
Things to Be Careful About
- The source speed must be along the line joining source and detector (it is: “directly towards”).
- Keep and in the same units (both are in here).
- When matching options, round appropriately: corresponds to in the list.
A student carries out a double-slit experiment using a laser emitting red light of wavelength of . The light is incident normally on a double slit.
The diagram shows part of the pattern of bright fringes visible on a screen at a distance of from the slits. The distance across five bright fringes is measured as .
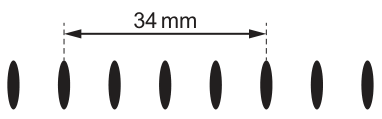
What is the slit separation?
Options
A
B
C
D
Working
Distance from 1st to 5th bright fringe is , i.e. fringe spacings.
Double-slit:
Answer
C
C
Background Concept
In a double-slit experiment, the bright fringes are equally spaced (for small angles). The spacing between adjacent bright fringes on a screen a distance away is related to the slit separation and wavelength by
This comes from the condition for maxima (constructive interference) and the small-angle approximations with .
Understanding the Question
You are given:
- wavelength ,
- screen distance ,
- the measured distance across five bright fringes is (the diagram indicates this is from the 1st to the 5th bright fringe).
The unknown is the slit separation .
Approach
- Convert the “distance across five bright fringes” into the spacing between adjacent bright fringes.
- Convert all quantities to SI units.
- Use and rearrange to find .
- Match the numerical result to one of the options.
Step-by-Step Reasoning
1) Interpret the 34 mm measurement
From the 1st to the 5th bright fringe there are 4 equal gaps (spacings):
Convert to metres:
2) Convert wavelength to metres
3) Use the double-slit relation
Rearrange:
Substitute:
Rounded to the options, this is , which corresponds to C.
Key Takeaways
- For double-slit interference, fringe spacing satisfies .
- A measurement “from the 1st to the 5th fringe” represents 4 spacings, not 5.
- Always convert nm and mm into metres before substitution.
Common Mistakes
- Taking as instead of .
- Forgetting unit conversions (e.g. using instead of ).
- Rearranging incorrectly (e.g. instead of ).
Things to Be Careful About
- The wording/diagram matters: “across five bright fringes” can be ambiguous, but the diagram here indicates from the 1st to the 5th fringe, i.e. 4 intervals.
- Keep consistent SI units so the final comes out in metres.
- Use appropriate significant figures to match the options (here, 2 s.f.).
The diagram shows a stationary wave on a stretched spring at an instant in time.
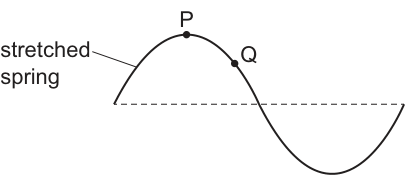
Two particles on the spring, and , are shown.
Which statement about the vibrations of and is correct?
Options
A They have different frequencies.
B They have the same amplitudes.
C They have different periods.
D They are always in phase.
In a stationary wave, all particles oscillate with the same frequency (so same period), but with amplitudes that depend on position.
Points within the same segment between adjacent nodes oscillate in phase.
and are on the same loop (same side of a node), so they are always in phase.
Answer
D
D
Background Concept
A stationary wave is formed by the superposition of two progressive waves of the same frequency and amplitude travelling in opposite directions.
Key properties:
- Every point on the medium oscillates with the same frequency (therefore the same period ).
- The amplitude depends on position: it is zero at nodes and maximum at antinodes.
- All points between the same two adjacent nodes oscillate in phase (reach maxima, minima, and cross equilibrium together). Points in neighbouring loops (separated by a node) are in antiphase.
Understanding the Question
You are shown a snapshot of a stationary wave on a stretched spring. Two points are marked:
- is at the top of a crest (an antinode position, maximum displacement in that loop at this instant).
- is on the side of the same crest, above the equilibrium line.
The question asks which statement about their vibrations is correct (frequency/period/amplitude/phase).
Approach
Use the standard stationary-wave rules:
- Decide whether and are in the same loop (same region between two nodes) or separated by a node.
- Use that to decide the phase relationship.
- Use stationary-wave facts to eliminate options about frequency/period/amplitude.
Step-by-Step Reasoning
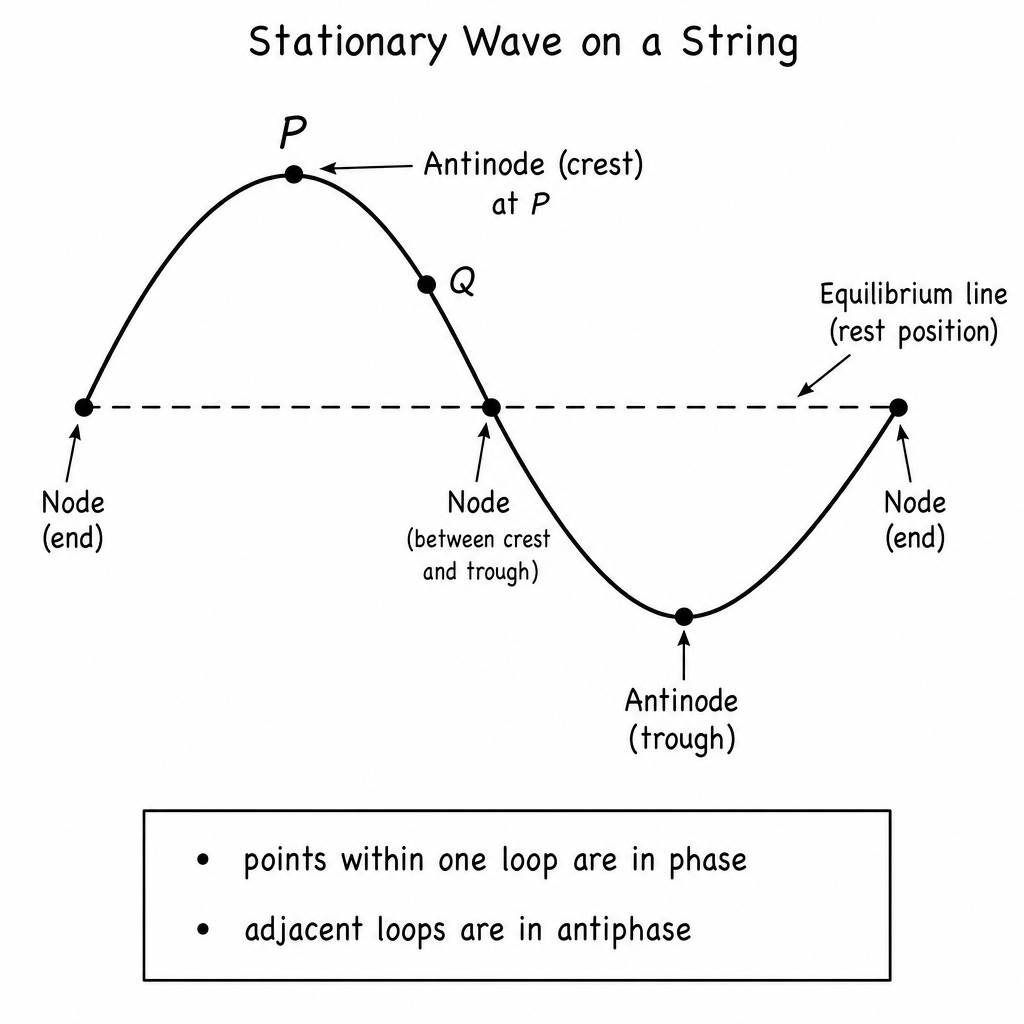
- Frequency/period: In a stationary wave, the entire pattern is produced by waves of one frequency, so every particle oscillates with the same and hence the same period .
- So A (different frequencies) is false.
- So C (different periods) is false.
- Amplitude: Amplitude varies with position. is at the crest (an antinode position) so it has a larger amplitude than a point like that is closer to a node than the antinode.
- So B (same amplitudes) is false.
- Phase: Points between the same pair of nodes are always in phase. Since and are on the same crest (same loop), they oscillate together.
- Therefore D is correct.
Key Takeaways
- In stationary waves, all points have the same frequency (and period).
- Amplitude depends on position: node zero amplitude, antinode maximum amplitude.
- Phase is constant within one loop: same loop in phase, adjacent loops in antiphase.
Common Mistakes
- Thinking the snapshot displacement tells you the amplitude directly (amplitude is the maximum possible displacement over time, not the displacement in one instant).
- Saying points with different amplitudes must have different frequencies/periods (they do not in a stationary wave).
- Mixing up “in phase” with “same displacement”: points can be in phase even when their instantaneous displacements differ.
Things to Be Careful About
- Check whether the two points lie on the same side of a node. A node is where the stationary-wave curve crosses the equilibrium line and stays at zero amplitude.
- Remember: in-phase means same stage of motion (maxima/minima/zero crossings at the same time), not necessarily equal displacement at every instant.
Green laser light passes through a diffraction grating and forms an interference pattern.
The diffraction grating contains lines per mm.
The wavelength of the laser light is .
What is the highest order diffraction maximum produced by the grating?
Options
A
B
C
D
Working
Lines per metre:
Grating spacing:
Using
Maximum order when :
So .
Answer
A
A
Background Concept
A diffraction grating produces bright maxima (principal maxima) when light from adjacent slits arrives in phase. The condition for the th order maximum is
where:
- is the slit spacing (grating spacing),
- is the angle to the maximum (from the normal),
- is the order number (),
- is the wavelength.
A key physical constraint is that cannot exceed 1, so there is a largest possible integer value of .
Understanding the Question
You are told:
- grating has lines per mm (this is the line density),
- wavelength .
You must find the highest order maximum that can exist. That means: compute from the line density, then find the largest integer such that .
Approach
- Convert the line density into lines per metre.
- Use .
- Use and the limit to find .
- Take the greatest integer not exceeding and match it to the options.
Step-by-Step Reasoning
Convert to per metre:
So the spacing between adjacent lines is
The grating equation gives
For a real angle , we must have , so
Substitute :
must be an integer, so the highest possible order is
This corresponds to option A.
Key Takeaways
- Convert line density to spacing using (with in lines per metre).
- Highest observable order is limited by , giving .
Common Mistakes
- Not converting to (missing the factor of ).
- Using or similar incorrect inversions.
- Rounding up to (cannot, because that would require ).
Things to Be Careful About
- Keep powers of ten consistent: .
- The maximum order is the largest integer that keeps , so always round down.
There is a potential difference across a resistor of resistance . The current in the resistor is .
Which equation gives the power dissipated by the resistor?
Options
A
B
C
D
Working
Using
and .
So
Answer
D
D
Background Concept
Electrical power is the rate at which electrical energy is transferred (or dissipated as thermal energy in a resistor). For a component with potential difference across it and current through it:
For an ohmic resistor (constant resistance ), Ohm's law applies:
These two equations can be combined to express power in different equivalent forms, depending on which quantities (, , ) are known.
Understanding the Question
We are told there is a potential difference across a resistor of resistance , with current in the resistor. The question asks which expression gives the power dissipated by the resistor, and the options are written using with either or .
So we want a correct formula for in terms of and (since most options involve and either or ).
Approach
Start from the fundamental power relationship . Then use Ohm’s law to eliminate the variable that you don’t want (here, eliminate to obtain an expression in and ). Finally, compare the result to the options.
Step-by-Step Reasoning
- Use the definition of electrical power:
- From Ohm’s law for the resistor:
- Substitute this into the power equation:
- Simplify:
This matches option D.
Key Takeaways
- Use as the starting point for power in circuits.
- Use to rewrite power in alternative forms:
- Check that the final expression uses the variables asked for.
Common Mistakes
- Choosing (option A): power is not proportional to and together.
- Mixing up substitutions, e.g. using instead of .
- Writing (option C): this has the wrong dependence on (increasing at fixed should reduce current and hence reduce power).
Things to Be Careful About
- The forms and come specifically from combining with Ohm’s law; they apply to an ohmic resistor.
- Dimensional check can help: has units , consistent with power.
What is a possible charge on a particle?
Options
A
B
C
D
Working
Charge must be an integer multiple of .
For option C:
This is an integer, so it is possible.
Answer
C
C
Background Concept
Electric charge is quantised: any isolated particle’s charge must be an integer multiple of the elementary charge .
where and is an integer (can be positive or negative). So to test whether a charge value is possible, check whether is an integer.
Understanding the Question
You are given four numerical values of charge. The question asks which one could be the charge on a particle, i.e. which one matches for some integer .
Approach
For each option, divide the given charge by . The only acceptable option is the one that gives an integer (to appropriate precision).
Step-by-Step Reasoning
Test option C:
Handle numbers and powers of ten separately:
Since is an integer, is a possible charge value.
So the correct option is C.
Key Takeaways
- Charge values occur in discrete steps of .
- A “possible” charge must satisfy is an integer.
Common Mistakes
- Using the wrong value of (should be ).
- Forgetting to check the power of ten when dividing.
- Accepting non-integer multiples (e.g. ) as valid.
Things to Be Careful About
- Rounding: an answer should be clearly an integer given the stated significant figures.
- The sign of charge is not specified here; the test is about the magnitude being an integer multiple of (the charge could also be negative).
The graphs show possible current–voltage (–) characteristics for a filament lamp and for a semiconductor diode.
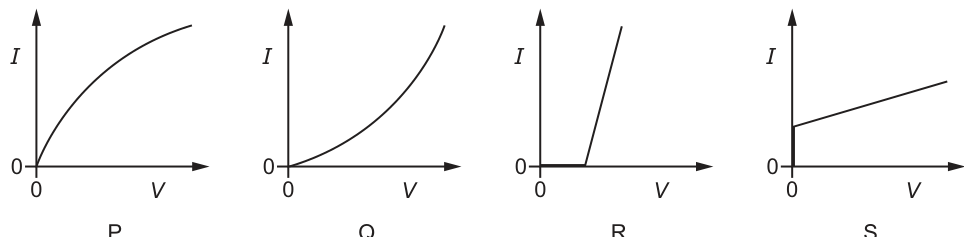
Which row identifies the – graphs for the lamp and for the diode?
Options
| filament lamp | semiconductor diode | |
|---|---|---|
| A | P | R |
| B | P | S |
| C | Q | R |
| D | Q | S |
Working
- Filament lamp: as increases the filament heats up, increases, so the gradient decreases (curve becomes less steep) (\to) graph .
- Diode: negligible current until a threshold forward voltage, then a rapid rise (\to) graph .
Answer
A
A
Background Concept
An – characteristic shows how the current through a component depends on the potential difference across it.
- The gradient at any point is
This is the conductance. A smaller gradient means a larger resistance.
-
Filament lamp (non-ohmic): as current increases, the filament temperature rises. For a metal filament, resistivity increases with temperature, so the resistance increases as and increase. That means the graph becomes less steep at higher .
-
Semiconductor diode: in forward bias, current is very small until a “knee” (threshold) voltage is reached, after which the current rises very rapidly. (In reverse bias, current is approximately zero for ordinary supply voltages.)
Understanding the Question
You are shown four possible – graphs labelled and must decide which one matches a filament lamp and which one matches a diode.
From the description:
- : starts at the origin and rises with decreasing gradient (concave down).
- : starts at the origin and rises with increasing gradient (concave up).
- : zero current initially for positive , then a steep rise after a threshold.
- : straight line but with non-zero current at (not typical for either component).
Approach
- Identify the filament lamp by looking for a curve that becomes less steep as increases (resistance increasing with temperature).
- Identify the diode by looking for a threshold/knee: almost no current at small forward voltages, then a sharp rise.
- Match these to the option table.
Step-by-Step Reasoning
Filament lamp:
- At low , the filament is cooler, so resistance is lower and current rises relatively easily.
- As increases, increases and the filament heats.
- Heating increases resistivity and hence resistance, so each additional volt produces a smaller increase in current.
- Therefore, the – curve should bend over: gradient decreases with .
- This matches graph .
Diode:
- In forward bias, current is tiny for small .
- Once the forward voltage reaches the knee value, current increases very rapidly.
- This matches graph , which shows near-zero current until a threshold, then a steep rise.
So the correct row is filament lamp and diode , which is option A.
Key Takeaways
- The gradient of an – graph indicates how the resistance is changing.
- Filament lamp: resistance increases as it heats up, so the curve becomes less steep at higher .
- Diode: has a forward threshold (“knee”) then a rapid current rise.
Common Mistakes
- Choosing the concave-up curve () for a filament lamp: that would imply resistance decreases as it heats, which is not the usual behaviour for a metal filament.
- Choosing a straight line through the origin for the filament lamp: that would be an ohmic resistor, not a filament lamp.
- Choosing for the diode: a non-zero current at does not represent a passive diode characteristic.
Things to Be Careful About
- Remember: decreasing gradient with increasing means increasing resistance.
- A diode’s key feature is the threshold/knee in forward bias; it is not a straight line.
- Some exam graphs only show the first quadrant; in reality, a filament lamp characteristic would be roughly symmetric for positive and negative .
The diagram shows a circuit containing a battery and cells with negligible internal resistance.
Some values of current, electromotive force (e.m.f.) and resistance are shown.
One resistor is labelled .
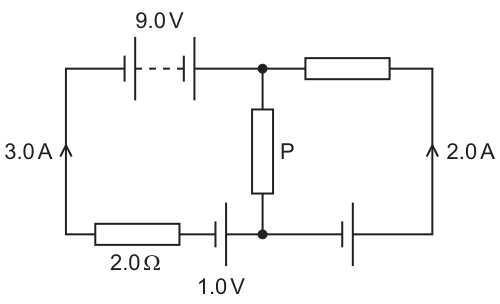
What is the resistance of resistor ?
Options
A
B
C
D
Working
At the top junction, the currents combine, so current in is
In the left loop, the source is opposed by the cell, so net e.m.f. is . The p.d. across the resistor is
Hence p.d. across :
So
Answer
A
A
Background Concept
In a d.c. circuit with negligible internal resistance, two key rules are used:
- Kirchhoff’s first law (junction rule): the total current entering a junction equals the total current leaving it.
- Kirchhoff’s second law (loop rule): around any closed loop, the sum of the e.m.f.s equals the sum of the potential drops ((IR) terms), taking account of whether sources aid or oppose each other.
Also, for a resistor:
where (V) is the potential difference across it and (I) is the current through it.
Understanding the Question
You are given a circuit containing a (9.0\ \text{V}) battery, a (2.0\ \Omega) resistor, and cells (one labelled (1.0\ \text{V})), plus an unknown resistor (P). The currents in the left and right vertical sides are (3.0\ \text{A}) and (2.0\ \text{A}) (in the directions shown).
You must find the resistance of (P) by determining:
- the current through (P), and
- the potential difference across (P).
Approach
- Use the given branch currents and KCL at the junction connected to (P) to find (I_P).
- Choose a loop that contains known sources and known resistor(s) and (P). Apply KVL to find the p.d. across (P).
- Use (R_P = V_P/I_P) and match to the multiple-choice options.
Step-by-Step Reasoning
1) Current through (P)
At the top junction, the (3.0\ \text{A}) and (2.0\ \text{A}) currents both feed into the junction (as drawn), so the current that must leave via the only other branch (through (P)) is their sum:
2) Potential difference across (P)
Take the left-hand loop containing the (9.0\ \text{V}) battery, the (1.0\ \text{V}) cell and the (2.0\ \Omega) resistor, plus (P).
From the diagram, the (1.0\ \text{V}) cell is opposing the (9.0\ \text{V}) battery in that loop, so the net e.m.f. driving the loop is:
The p.d. across the (2.0\ \Omega) resistor (carrying (3.0\ \text{A})) is:
The remaining p.d. in the loop must be across (P):
3) Resistance of (P)
Finally,
So the correct option is A.
Key Takeaways
- Use KCL first to find unknown branch currents.
- Use KVL to relate sources and resistor drops to find an unknown p.d.
- Opposing sources subtract: (\mathcal{E}_\text{net} = \mathcal{E}_1 - \mathcal{E}_2) when they act in opposite directions around the chosen loop.
Common Mistakes
- Subtracting currents instead of adding them at the junction when both are directed into (or out of) the junction.
- Adding e.m.f.s that oppose each other, instead of subtracting.
- Using (V=IR) with the wrong current (e.g. using (5.0\ \text{A}) through the (2.0\ \Omega) resistor when it actually has (3.0\ \text{A})).
Things to Be Careful About
- Keep track of the direction you traverse a loop: crossing a source from (-) to (+) is a rise, and from (+) to (-) is a drop.
- Ensure the current used in (V=IR) is the current through that specific resistor.
- Quote the final resistance to a sensible number of significant figures matching the data (here, (0.40\ \Omega)).
The diagram shows a circuit with a battery connected to a resistor . The battery has an internal resistance represented by resistor .
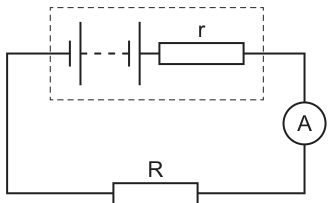
A second resistor, identical to , is connected in parallel with .
Which row describes the changes to the potential difference (p.d.) across and the current shown on the ammeter when the second resistor is connected?
Options
| p.d. across | current shown on ammeter | |
|---|---|---|
| A | decreases | decreases |
| B | decreases | increases |
| C | increases | decreases |
| D | increases | increases |
Working
Initially total resistance so current
With a second identical resistor in parallel, external resistance
Total resistance so
p.d. across internal resistance:
So as increases, increases.
Answer
D
D
Background Concept
A real battery can be modelled as an ideal source of electromotive force (e.m.f.) in series with an internal resistance . When a current flows, there is a “lost volts” p.d. across the internal resistance:
The current in the circuit is set by the total series resistance:
When resistors are connected in parallel, the equivalent resistance decreases. For two identical resistors in parallel:
Understanding the Question
Initially, the battery (with internal resistance ) is in series with an external resistor and an ammeter. Then a second resistor, identical to , is added in parallel with the first .
The question asks how two quantities change:
- the p.d. across the internal resistor (inside the battery model), and
- the current reading on the ammeter (the total current supplied by the battery).
Approach
- Work out how the external load resistance changes when the second is connected in parallel.
- Use to decide whether the total current increases or decreases.
- Use to decide how the p.d. across changes when the current changes.
Step-by-Step Reasoning
1. Before adding the second resistor
External resistance is , so total resistance is:
Current:
2. After adding the second identical resistor in parallel
Two identical resistors in parallel give:
So the new total resistance is:
Since , the total resistance has decreased, so the total current increases:
Therefore the ammeter reading increases.
3. p.d. across the internal resistance
The p.d. across is:
Because is constant and increases, increases.
So both quantities increase: option D.
Key Takeaways
- Adding a parallel resistor reduces the external resistance, so the total circuit current increases.
- The p.d. across the internal resistance is , so it increases when the current increases.
Common Mistakes
- Thinking the p.d. across must decrease because the terminal p.d. across the external circuit decreases; in fact, the “lost volts” increases when current increases.
- Treating the two resistors as series instead of parallel (giving instead of ).
Things to Be Careful About
- Distinguish between terminal p.d. across the external load and p.d. across internal resistance: they change in opposite directions when current changes.
- The ammeter reads the total current supplied by the battery (the current through ), not the current in just one parallel branch.
Two identical wires and , each of length and radius , are connected in parallel as shown.
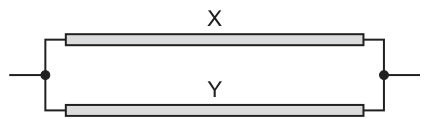
The total resistance of this combination is .
Wire is replaced with a wire of the same material with length and radius .
The total resistance of the new combination is .
What is the ratio ?
Options
A
B
C
D
Working
For each original wire,
Two identical wires in parallel:
Replacement wire has radius so area is :
New parallel combination:
Hence
Answer
D
D
Background Concept
For a uniform wire of resistivity , length and cross-sectional area , the resistance is
For a circular wire, , so for fixed material () and fixed length (), the resistance varies as
When two resistors are connected in parallel, the potential difference across each is the same and the currents add. The equivalent resistance satisfies
For two equal resistors in parallel, this gives .
Understanding the Question
Initially, wires and are identical (same , same , same material), and connected in parallel, so the combination has total resistance .
Then wire is replaced by a wire of the same material and length, but with radius . This changes only its cross-sectional area, hence its resistance. The new parallel combination has total resistance .
We are asked for the ratio and must pick the matching option.
Approach
- Write the resistance of one original wire using .
- Find for two identical resistors in parallel.
- Find the new resistance of wire after doubling its radius (area increases by a factor of 4, so resistance decreases by a factor of 4).
- Combine the new resistance in parallel with the unchanged resistance to get .
- Take the ratio and match to the options.
Step-by-Step Reasoning
Let the resistance of each original wire be .
Because the wires have the same material and length,
Initial combination (two identical wires in parallel):
For two equal resistances in parallel,
After replacing wire (radius ):
The new cross-sectional area of is
So its resistance becomes
Wire is unchanged, so it still has resistance .
New parallel combination:
Using the product-over-sum form for two resistors in parallel,
Compute:
Ratio:
So the correct option is D.
Key Takeaways
- For fixed and , wire resistance varies as .
- Doubling a wire’s radius quarters its resistance.
- Two equal resistors in parallel give half the resistance.
- Parallel combinations are often easiest using either reciprocal addition or product-over-sum.
Common Mistakes
- Treating resistance as proportional to instead of (forgetting area is ).
- Combining parallel resistances by adding them directly (that is for series, not parallel).
- Correctly finding and but inverting the ratio to get .
Things to Be Careful About
- The resistivity and length do not change, so only the area change affects resistance.
- Keep track of factors of 4 carefully when the radius doubles.
- For a 1-mark MCQ, the method should be clean enough to avoid arithmetic slips: simplify symbolically (in terms of ) before calculating the ratio.
The diagram shows the currents in part of an electric circuit.
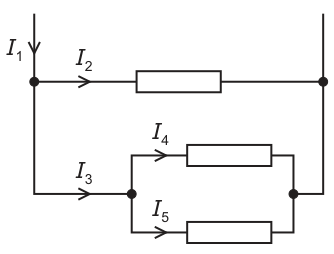
The resistors are identical.
Which equation is not correct?
Options
A
B
C
D
Working
At the left junction,
At the lower-left junction,
So (A correct), and (B correct), and (D correct).
Option C would give
which is not generally true.
Answer
C
C
Background Concept
Kirchhoff’s first law (KCL) states that at any junction (node) in a circuit, the total current flowing into the junction equals the total current flowing out.
In equation form, if currents into the node are taken as positive and currents out as negative (or vice versa), then
This is a direct consequence of conservation of charge: charge cannot build up at a junction in a steady d.c. circuit.
Understanding the Question
You are given a circuit section with currents labelled . The question asks which proposed equation is not correct.
The key idea is: ignore the resistor values at first; to check these equations, you only need current conservation at the junctions where currents split or recombine.
Approach
- Identify each junction where one current splits into two (or more) currents.
- Apply KCL at each junction to write true relationships between the currents.
- Compare each option with these relationships (and any simple substitutions between them) to see which one contradicts KCL.
Step-by-Step Reasoning
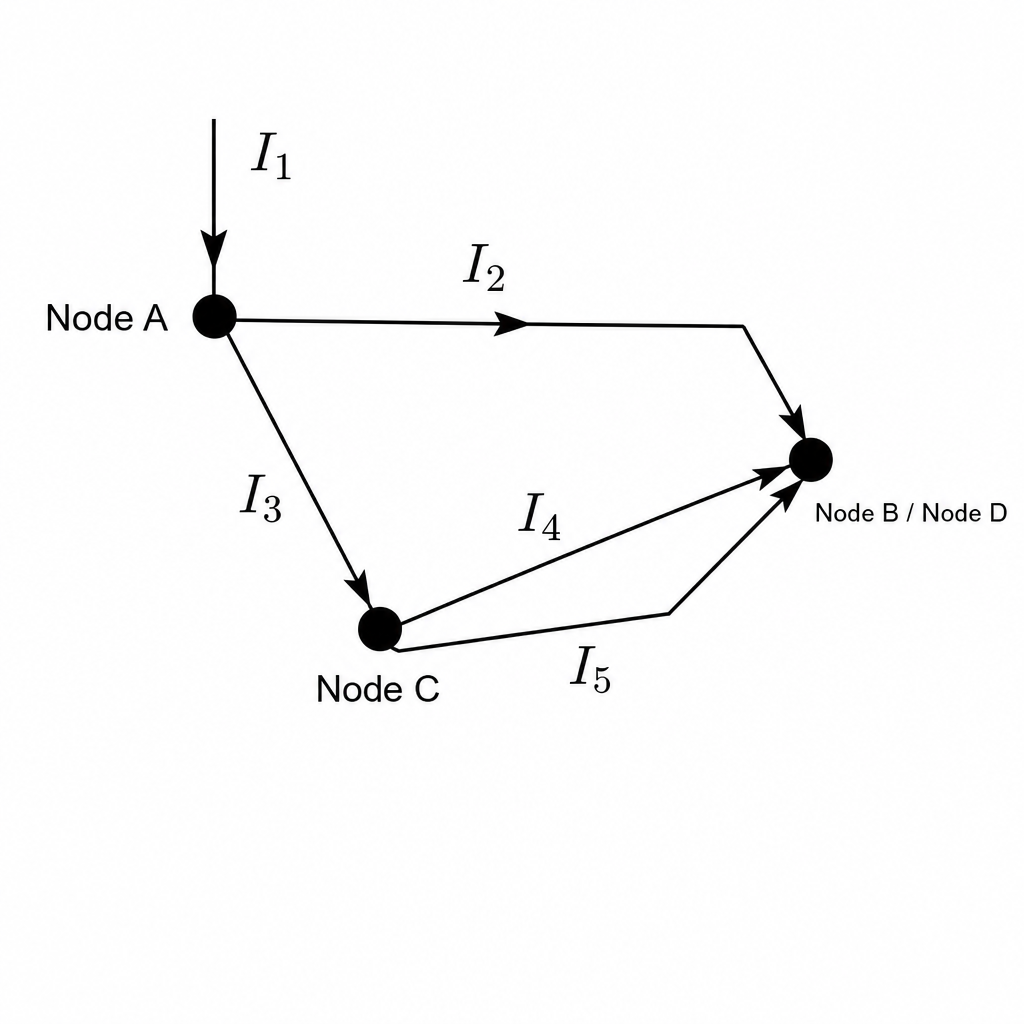
- At the left junction, current arrives and splits into the top branch current and the lower branch current .
So by KCL:
Rearranging gives:
So option B is correct.
- At the lower-left junction, current splits into the two parallel currents and .
So by KCL:
Rearranging gives:
So option D is correct.
- Substitute into the left-junction equation:
So:
So option A is correct.
- Now test option C:
But since , then
So option C claims , which is not required by any junction rule and will not be true in general.
Therefore, C is the incorrect equation.
Key Takeaways
- Use Kirchhoff’s first law at every junction: current in = current out.
- You can often decide MCQs about currents without using resistor values at all.
- When multiple junction equations exist, substitute between them to simplify and test statements.
Common Mistakes
- Writing directly without first justifying that .
- Mixing up which currents meet at which junction (using KCL on the wrong node).
- Assuming equal resistors means equal currents everywhere; equal resistors only imply equal currents if they have the same potential difference across them.
Things to Be Careful About
- KCL must be applied at a specific junction; always identify the node first.
- Be consistent with directions: here the equations use magnitudes with the directions already shown by the arrows.
- An equation can look plausible but still be wrong if it effectively “double counts” a branch current (as in option C, which includes as well as its components and ).
The diagram shows a sequence of radioactive decays involving three -particles and a particle.

What is nuclide ?
Options
A
B
C
D
Working
For decay: , .
For decay: unchanged, .
Start:
After : , .
After : , .
After : , .
After : , .
So .
Answer
A
A
Background Concept
In nuclear equations, two numbers must balance:
- Nucleon (mass) number : total number of protons + neutrons.
- Proton (atomic) number : number of protons (this identifies the element).
For common decays:
- Alpha decay emits an particle , so the nucleus loses 2 protons and 2 neutrons:
- Beta-minus decay emits an electron (). A neutron turns into a proton (plus an electron and an antineutrino), so:
- unchanged
Understanding the Question
You are given a decay sequence starting from and proceeding through four steps:
- to
- to
- to
- to
The task is to find the nuclide (its , , and hence its element symbol), then match it to the options.
Approach
Track and through the chain step-by-step:
- Subtract from for each .
- Add to for the .
Finally, convert the final into the element name (here, corresponds to radium, Ra).
Step-by-Step Reasoning
Start with neptunium:
- After first decay:
So is (protactinium), though you don’t actually need the symbol.
- After decay:
So is .
- After next decay:
So is .
- After final decay:
So
Comparing with the options, this is option A.
Key Takeaways
- decay changes by .
- decay changes by .
- Following a decay chain is usually just careful bookkeeping of and .
Common Mistakes
- Treating decay as decreasing (it increases by 1).
- Changing during decay (it must stay the same).
- Forgetting that each decay reduces by 2 (not by 1).
- Identifying the wrong element for a given (e.g. confusing Ra with Th).
Things to Be Careful About
- Apply the decay steps in the correct order; don’t combine them incorrectly.
- Keep track of both and at every step.
- For MCQ, the final check is matching the final pair to the listed nuclides exactly.
The number of electrons in a neutral atom of an isotope of plutonium, , is changed to produce a charged atom (ion) .
has an overall charge of .
How many protons, neutrons and electrons are in ?
Options
| protons | neutrons | electrons | |
|---|---|---|---|
| A | 94 | 145 | 93 |
| B | 94 | 145 | 95 |
| C | 238 | 94 | 239 |
| D | 239 | 94 | 238 |
Working
For :
- protons
- neutrons
Charge on is , so it has lost electron.
Electrons .
Answer
A
A
Background Concept
In nuclide notation :
- is the proton number (number of protons).
- is the nucleon number (total number of protons + neutrons).
So the neutron number is
A neutral atom has equal numbers of protons and electrons, so its net charge is zero. If an atom becomes an ion with charge , it must have fewer electrons than protons (it has lost electrons). The smallest possible charge magnitude is the elementary charge
Understanding the Question
The atom is an isotope of plutonium . We change the number of electrons only (protons and neutrons in the nucleus stay the same) to form an ion with overall charge .
We must find how many protons, neutrons, and electrons the ion has, then match to the table.
Approach
- Read directly as the number of protons.
- Compute neutrons using .
- Use the given ion charge and the value of to decide how many electrons were removed from the neutral atom.
Step-by-Step Reasoning
-
From :
- Proton number , so protons .
- Nucleon number .
-
Neutrons:
- Electrons:
- A neutral plutonium atom would have electrons (to balance the protons).
- The ion has charge , meaning it is missing one electron compared to neutral.
So electrons in :
This corresponds to option A: protons, neutrons, electrons.
Key Takeaways
- In , protons and neutrons .
- Ionisation changes electrons only, not protons or neutrons.
- A ion has one fewer electron than the neutral atom.
Common Mistakes
- Swapping and and claiming protons .
- Changing the number of protons to account for charge (charge changes here are due to electron loss/gain).
- Forgetting that corresponds to exactly one elementary charge.
Things to Be Careful About
- Always compute neutrons using , not .
- A positive ion means electrons have been removed (electron count smaller than proton count).
- The charge given is already in coulombs, so compare directly with to find the number of electrons lost.
Which particle is a lepton?
Options
A meson
B positron
C proton
D quark
Mesons and protons are hadrons, and a quark is a constituent of hadrons.
A positron is the antiparticle of the electron, and electrons/positrons are leptons.
Answer
B
B
Background Concept
Particles are grouped into broad families.
- Leptons are fundamental particles that do not experience the strong interaction. Examples: electron , muon , tau , and their neutrinos, plus their antiparticles (e.g. positron ).
- Hadrons are particles that do experience the strong interaction and are made of quarks. There are two main types:
- Baryons (three quarks), e.g. proton.
- Mesons (a quark and an antiquark), e.g. pions/kaons.
- Quarks are fundamental particles, but they are not leptons; they are a different family of fundamental particles.
Understanding the Question
We must choose which option is a lepton. The options include a hadron type (meson), a specific antiparticle (positron), a specific baryon (proton), and a fundamental particle type (quark). Only one belongs to the lepton family.
Approach
Classify each option:
- decide whether it is a lepton, hadron, or quark,
- use known examples (electron/positron are leptons; proton/meson are hadrons).
Step-by-Step Reasoning
- A meson: a hadron made of a quark–antiquark pair, so not a lepton.
- B positron: this is , the antiparticle of the electron. Electrons and positrons are leptons, so this is a lepton.
- C proton: a baryon (hadron) made of three quarks (), so not a lepton.
- D quark: a fundamental particle, but it belongs to the quark family and participates in the strong interaction, so not a lepton.
Therefore the lepton is the positron.
Key Takeaways
- Leptons include and (and neutrinos, muons, taus and their antiparticles).
- Protons and mesons are hadrons (made of quarks).
- Quarks are fundamental but are not leptons.
Common Mistakes
- Thinking “fundamental particle” automatically means “lepton” (quarks are fundamental but not leptons).
- Forgetting that antiparticles belong to the same family as their particles (positron is a lepton like the electron).
- Confusing mesons with leptons because both can be short-lived (mesons are hadrons).
Things to Be Careful About
- Particle family classification is about interactions/composition: hadrons are composite (quarks), leptons are not.
- The proton is specifically a baryon, while “meson” is a category—both are hadrons and therefore not leptons.
Your score so far
Answer a question to start scoring
Your marks add up here as you work through the paper.