Physics 9702/13 — May/June 2025
Cambridge AS Level · Multiple Choice (AS Level) · answer key with instant marking and worked solutions
Topics Physical Quantities and Units · Electricity · Work, Energy and Power · Waves · Dynamics · Forces, Density and Pressure · +5 more
Tap an option under each question to check it — your score builds as you go.
What represents a vector quantity?
Options
A upwards
B decrease
C cooler
D later
A vector has magnitude and direction.
Only A gives a magnitude () and a direction (upwards).
Answer
A
A
Background Concept
A vector quantity has both magnitude and direction (e.g. displacement, velocity, acceleration, force, momentum).
A scalar quantity has magnitude only (e.g. mass, time, temperature, energy). Words like “increase/decrease”, “cooler”, or “later” may describe a change in a scalar, but they do not give a physical direction in space.
Understanding the Question
We must choose which option represents a vector quantity. So we look for an expression that includes:
- a numerical size with a unit (magnitude), and
- a spatial direction (e.g. up/down/left/right, at an angle, north, etc.).
Approach
Check each option for whether it contains both magnitude and direction.
Step-by-Step Reasoning
- A: upwards. Newton () is the unit of force, and “upwards” gives a direction. Force is a vector, so this is a vector quantity.
- B: decrease. Kilogram is mass (a scalar). “Decrease” indicates change, not a direction in space.
- C: cooler. Kelvin is temperature (a scalar). “Cooler” indicates a decrease in temperature.
- D: later. Seconds are time (a scalar). “Later” is not a spatial direction.
Therefore, the only vector quantity given is option A.
Key Takeaways
- Vectors require magnitude + direction.
- Scalars can increase/decrease, but that does not make them vectors.
- Force (in newtons) is a standard example of a vector.
Common Mistakes
- Treating words like “decrease” or “later” as directions.
- Thinking any “change” implies a vector.
- Forgetting that temperature and mass are scalars.
Things to Be Careful About
- A vector direction must be a geometric direction (upwards, east, at to the horizontal, etc.), not merely “more/less”.
- Some quantities (like “velocity”) are vectors even if a direction is not explicitly written; but in this question you must pick the option that clearly includes direction in its statement.
What is a reasonable estimate of the current in an electric kettle that is in use?
Options
A
B
C
D
Working
A kettle typically has power and operates at .
Closest option is .
Answer
C
C
Background Concept
For an electrical appliance, the rate of energy transfer (power) is related to the potential difference across it and the current through it by
where is in watts (W), in volts (V) and in amperes (A). For domestic resistive heating appliances (kettles, toasters), the power is usually in the kilowatt range because heating water quickly needs a large energy transfer per second.
Understanding the Question
We are asked for a reasonable estimate of the current drawn by an electric kettle while it is operating. The options span from microamps to kiloamps, so the key skill is order-of-magnitude estimation.
Given information is not explicit, so we use typical mains voltage () and typical kettle power ().
Approach
- Recall a typical kettle power rating (a few kilowatts).
- Use with .
- Compare the resulting current with the options.
Step-by-Step Reasoning
Take a typical kettle: .
Using :
This is of order .
- and are far too small (typical of sensors / small electronics, not heaters).
- is far too large (would correspond to megawatts at mains voltage and would trip protection instantly).
So the reasonable estimate is , option C.
Key Takeaways
- Domestic heating appliances typically operate at kilowatt power levels.
- Use to connect a power estimate and mains voltage to an estimated current.
- Correct order of magnitude here is amperes (around ), not mA or kA.
Common Mistakes
- Confusing prefixes: mixing up and , or and .
- Forgetting that a kettle is a high-power device and assuming it draws “small electronics” currents.
- Using without knowing , leading to guesswork.
Things to Be Careful About
- Convert to correctly: .
- Use a sensible mains voltage (around for many Cambridge contexts).
- Estimation questions reward the correct scale: here, a few to ~10 amperes is the realistic range.
Which statement about errors in measurements is correct?
Options
A An accurate set of measurements always has a small random error.
B A precise set of measurements always has a small systematic error.
C A random error can be reduced by taking an average of several measurements.
D A systematic error creates a random set of measurements spread out about the true value.
Random errors cause scatter in repeated readings and can be reduced by repeating measurements and taking the mean.
Therefore the correct statement is C.
Answer
C
C
Background Concept
Measurement errors are usually grouped into:
- Random errors: unpredictable variations between repeated readings (e.g. reaction time, reading a scale). They cause scatter about the mean value. If you repeat and average, positive and negative deviations tend to cancel, so the uncertainty in the mean decreases.
- Systematic errors: a consistent bias in the same direction (e.g. zero error, miscalibration). They shift all readings away from the true value by about the same amount. Repeating and averaging does not remove this bias.
Precision describes how close repeated readings are to each other (small scatter). Accuracy describes how close the result is to the true value (small systematic error and small random uncertainty overall).
Understanding the Question
You are given four statements about errors, accuracy and precision. You must choose the single statement that correctly matches the standard physics definitions.
Approach
Check each option against the definitions:
- Does it confuse accuracy with random error?
- Does it confuse precision with systematic error?
- Does it correctly describe how averaging affects random scatter?
- Does it correctly describe the effect of systematic error on the distribution of readings?
Step-by-Step Reasoning
- Option A: Accuracy does not “always” imply small random error; you could have small random scatter but a large systematic offset (precise but inaccurate), or large random error but the mean happens to be close to true by chance. So A is false.
- Option B: Precision is about small random scatter, not about systematic error. A set can be very precise and have either small or large systematic error. So B is false.
- Option C: Random errors vary from reading to reading. Taking many readings and calculating the mean reduces the effect of random fluctuations (uncertainty in the mean decreases). This is correct.
- Option D: A systematic error does not create a “random set spread out about the true value”; it shifts readings away from the true value (they may still be tightly clustered, just around the wrong value). So D is false.
Hence the correct option is C.
Key Takeaways
- Random error (\rightarrow) scatter; reduced by repeats and averaging.
- Systematic error (\rightarrow) consistent bias; not reduced by repeats.
- Precision relates to random scatter; accuracy relates to closeness to the true value.
Common Mistakes
- Saying “accurate means small random error” (accuracy is about closeness to true value, strongly affected by systematic error).
- Saying “precise means small systematic error” (precision is mainly about random scatter).
- Claiming averaging removes systematic error (it does not).
Things to Be Careful About
- In exam wording, “always” is a strong claim: accuracy/precision do not guarantee a particular type of error is small.
- Averaging improves the estimate of the mean for random error, but the best method still requires checking for zero errors/calibration to address systematic error.
A sample of material has cross-sectional area and length . The temperatures at the two sides of the sample are and . Thermal energy is transferred through the sample in time .
These quantities are related by
where is a constant.
What are the SI base units of ?
Options
A
B
C
D
Working
From
is power, so
Also , , and .
Hence
Answer
B
B
Background Concept
In any physically correct equation, the units on the left-hand side must match the units on the right-hand side (homogeneity of units). This lets you find the units of an unknown constant by treating each quantity as a unit “symbol” and rearranging.
Here, the equation is a form of Fourier’s law of heat conduction:
where is the rate of energy transfer (power), is area, is thickness/length, and is a temperature difference. In SI, temperature differences are measured in kelvin (K). (A change of equals a change of in size, but the SI base unit is K.)
Understanding the Question
You are given a relationship linking to , geometry (, ), and temperature difference . The task is to find the SI base units of and choose the correct option.
Known SI units:
- is energy in joules (J)
- in seconds (s)
- in
- in m
- in K
Approach
- Rearrange the given equation to make the subject.
- Replace each quantity with its SI units.
- Reduce everything to SI base units and compare with the options (noting that K is the SI temperature unit).
Step-by-Step Reasoning
Start with
Rearrange:
Now work out units:
- is energy per time = power.
Convert joule to base units:
So
Other units:
Substitute into :
Cancel one factor of m:
This matches option B.
Key Takeaways
- Use unit homogeneity to find the units of a constant.
- Convert derived units carefully: and .
- In SI, temperature is measured in kelvin, so the unit should be .
Common Mistakes
- Using in the final unit even though the question asks for SI base units.
- Forgetting that is power and not energy.
- Converting incorrectly (e.g. missing a factor of m).
Things to Be Careful About
- A temperature difference has the same numerical size in and K, but the SI base unit is still K, so choose .
- Track powers of metres: the factor contributes , which must be cancelled correctly when isolating .
The graph shows the variation of velocity with time of an object moving in a straight line.
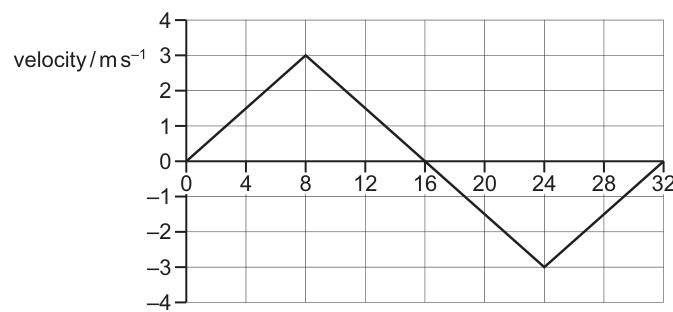
At , the displacement of the object is zero.
What is the displacement of the object at ?
Options
A
B
C
D
Working
Displacement at is the area under the – graph from to .
From to (two triangles):
From to : velocity changes linearly from at to at , so trapezium area
Total displacement at :
Answer
B
B
Background Concept
On a velocity–time graph, the displacement over a time interval is the signed area under the graph:
- If is positive (graph above the time axis), the area contributes a positive displacement.
- If is negative (graph below the time axis), the area contributes a negative displacement (the object moves in the opposite direction).
Mathematically,
For straight-line segments, you can find the integral by simple geometry (triangles/trapezia).
Understanding the Question
You are given a piecewise straight-line – graph starting at . The question states that at the displacement is zero, so the displacement at is just the net signed area between the graph and the time axis from to .
Key read-offs from the graph:
- At , .
- At , .
- From to , decreases linearly to , so at (halfway in time) .
Approach
- Split the interval to into regions where the graph shape is simple.
- Compute areas of triangles for and .
- Compute the signed area from as a trapezium (since velocity changes linearly).
- Add the areas, remembering the negative sign for the part below the axis.
Step-by-Step Reasoning
1) Area from to
This is a triangle with base and height .
2) Area from to
Another triangle above the axis with base and height .
So by ,
3) Area from to
From to the graph goes linearly from to . At (4 seconds after 16, i.e. halfway to 24), velocity is halfway to :
The region from to is a trapezium with parallel sides and and width .
Negative sign indicates displacement in the negative direction.
4) Total displacement at
This matches option B.
Key Takeaways
- Displacement from a – graph is the signed area under the curve.
- Break complicated shapes into triangles/trapezia.
- When the graph is below the time axis, the area is negative.
Common Mistakes
- Adding areas below the axis as positive (forgetting that negative velocity gives negative displacement).
- Using the gradient (acceleration) instead of the area.
- Using total distance travelled instead of displacement (distance would add the magnitude of the negative part).
Things to Be Careful About
- Read values at the correct times: here lies on the downward sloping section, so you must interpolate to get .
- Keep units consistent: for area under a – graph.
- Use the signed area because the question asks for displacement, not distance.
A science museum designs an experiment to show the fall of a feather in a vertical glass vacuum tube.
The time of fall from rest in the vacuum is to be close to .
Which length of tube is required?
Options
A
B
C
D
Working
From rest in vacuum:
Answer
A
A
Background Concept
In a vacuum, a falling object experiences negligible air resistance, so it undergoes free fall with (approximately) constant acceleration equal to the gravitational field strength, . For motion with constant acceleration, the displacement after time is related to initial velocity by
For a drop “from rest”, , and for free fall .
Understanding the Question
A feather is dropped from rest in a vertical evacuated tube, so we treat it as free fall. The museum wants the time of fall to be close to . We must find the tube length (the distance fallen in that time) and choose the closest option.
Given:
Unknown:
- (the required tube length)
Approach
Use the constant-acceleration displacement equation for motion from rest:
Compute for and then compare with the listed tube lengths.
Step-by-Step Reasoning
Start from
With and :
Substitute and :
Calculate :
This is , which corresponds to option A.
Key Takeaways
- In vacuum, falling motion is modelled as constant acceleration .
- For a drop from rest, displacement after time is .
- Always compare your computed value to the options (round appropriately).
Common Mistakes
- Using (missing the factor ), which would give and wrongly suggest option B.
- Forgetting that “from rest” means .
- Using without checking closeness (it would give , still closest to A, but accuracy matters).
Things to Be Careful About
- Keep units consistent: in , in gives in .
- Squaring the time is essential: a small change in changes significantly because of .
- Choose the closest option; here rounds naturally to .
Two coins are projected from a horizontal table at the same initial speed .
Coin X is projected horizontally.
Coin Y is projected upwards at an angle of to the horizontal.
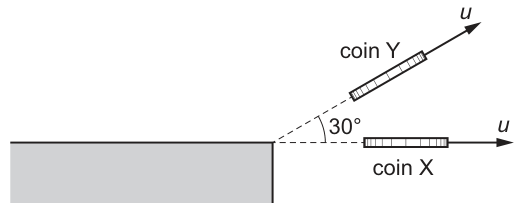
Both coins hit the horizontal ground without bouncing.
Assume the air resistance on each coin is negligible.
Which statement about the motion of the coins is correct?
Options
A Both coins hit the ground with the same speed.
B Both coins travel the same vertical distance.
C Coin Y hits the ground before coin X.
D Coin Y has a smaller vertical acceleration.
Working
Air resistance negligible so mechanical energy is conserved.
Both coins start with the same speed and from the same height (table to ground drop ), so
This gives the same impact speed for both coins.
Answer
A
A
Background Concept
For projectile motion with negligible air resistance:
- The horizontal and vertical motions are independent.
- The vertical acceleration is constant and equal to downward for any projectile, regardless of how it is launched.
- Mechanical energy is conserved: loss of gravitational potential energy becomes gain in kinetic energy.
A very powerful result (when air resistance is negligible) is that the speed at a given height depends only on:
- the initial speed, and
- the change in height,
not on the launch direction.
Understanding the Question
Two coins leave the same point at the edge of a horizontal table:
- Coin X is launched horizontally with speed .
- Coin Y is launched with the same speed but at above the horizontal.
Both land on the horizontal ground below the table. We must choose which statement A–D is correct.
Key given information:
- Same initial speed .
- Same initial height above the ground (same table).
- Air resistance negligible.
Approach
Check each option using the physics of projectiles:
- Use conservation of mechanical energy to compare the impact speeds.
- Use vertical-motion ideas to compare vertical distance travelled, time of flight, and vertical acceleration.
Energy is the quickest way to decide option A.
Step-by-Step Reasoning
Option A: same impact speed?
Let the table height above the ground be .
Initial mechanical energy for each coin (taking ground as zero potential):
- Kinetic:
- Potential:
At impact, potential energy is and kinetic is .
Conservation of energy gives
so
This expression contains no launch angle, so both coins have the same impact speed. Hence A is correct.
Why the others are wrong (briefly)
B (same vertical distance): Coin X falls straight down a vertical distance . Coin Y first rises then falls to the ground, so its total vertical distance travelled is greater than .
C (Y hits ground before X): Coin Y has an initial upward vertical component , so it spends extra time going up and then coming back down; it therefore lands after coin X.
D (Y has smaller vertical acceleration): In projectile motion without air resistance, vertical acceleration is always downward for both coins, so it is the same, not smaller.
Key Takeaways
- With negligible air resistance, the impact speed depends only on initial speed and vertical drop: .
- Launch angle changes the components of velocity and the time of flight, but not the gravitational acceleration (always downward).
Common Mistakes
- Thinking a projectile launched upward must hit the ground faster/slower in speed because it “uses up” speed going up (it changes vertical component during flight, but total energy is conserved).
- Saying vertical acceleration depends on initial velocity or direction; it does not (ignoring air resistance).
- Interpreting “vertical distance travelled” as “vertical displacement” (here the distance for coin Y includes up and down segments).
Things to Be Careful About
- Conservation of energy applies because air resistance is stated negligible; with air resistance, impact speeds would differ.
- Distinguish between speed (magnitude of velocity) and velocity components; the components at impact differ, but the resultant speed is the same.
- Time to hit the ground depends on vertical motion (initial vertical component), not on horizontal speed.
Two spheres are released from rest at equal heights above the ground.
Both spheres reach terminal velocity.
One sphere has a larger density than the other sphere.
Both spheres have equal volumes.
Which statement is correct while both spheres are at terminal velocity?
Options
A The drag forces on the spheres are equal.
B The resultant forces on the spheres are equal.
C The velocities of the spheres are equal.
D The weights of the spheres are equal.
Working
At terminal velocity, , so resultant force on each sphere is
Hence the resultant forces on the two spheres are equal (both zero).
Answer
B
B
Background Concept
Terminal velocity occurs when an object falls through a fluid and the forces balance so that its acceleration becomes zero. The main forces are:
- weight (downwards)
- drag force (upwards, increases with speed)
Newton's second law gives
At terminal velocity, the speed is constant, so and therefore . This also implies the forces are balanced, so (taking upwards as positive)
Understanding the Question
Two spheres are dropped from the same height and both reach terminal velocity. They have equal volumes, but one sphere has a larger density (so it has a larger mass and weight). We must decide which statement (A–D) is correct while both spheres are at terminal velocity.
Approach
Use the defining feature of terminal velocity: constant velocity implies zero acceleration, so the resultant force must be zero for each sphere. Then quickly check each option using:
- resultant force at terminal velocity
- relationship between weight and density when volume is fixed.
Step-by-Step Reasoning
- At terminal velocity, each sphere moves with constant velocity, so
- From Newton's second law,
So the resultant force on each sphere is zero; therefore the resultant forces are equal. This matches option B.
- Check why others are wrong:
- A (drag forces equal): at terminal velocity, for each sphere. With equal volume but different density, masses are different:
So the denser sphere has larger and larger , hence larger drag at terminal velocity. So drag forces are not equal.
- C (velocities equal): the denser sphere needs a larger drag to balance its larger weight, which generally requires a higher speed (drag increases with speed), so terminal speeds are not equal.
- D (weights equal): equal volume but different density means different mass, so weights are not equal.
Key Takeaways
- Terminal velocity means and hence resultant force is zero.
- At terminal velocity, drag equals weight: .
- For fixed volume, weight depends on density via .
Common Mistakes
- Thinking “terminal velocity” means “maximum velocity” but not applying .
- Claiming drag forces are equal because the spheres have the same size; drag depends on speed and must match each sphere’s weight at terminal velocity.
- Forgetting that equal volume does not imply equal mass when densities differ.
Things to Be Careful About
- The question asks about the situation while both are at terminal velocity, not during the initial acceleration.
- “Resultant forces are equal” here means both are zero, not that the individual forces (weight or drag) are equal.
- Use consistent sign convention if writing or ; the conclusion is the key point.
Which statement defines force?
Options
A When a force acts on a body that is free to move, the force is the product of the mass of the body and its acceleration.
B When a force acts on a body that is free to move, the force is the rate of change of momentum of the body.
C When a force acts on a body that is free to move, the force is the work done by the force divided by the distance moved by the body.
D When a force acts on a lever and causes a moment, the force is the moment divided by the perpendicular distance of the force from the pivot.
Force is defined by Newton's second law as the rate of change of momentum:
So the correct statement is B.
Answer
B
B
Background Concept
A force is defined (Newton's second law) as the time rate of change of momentum of a body.
Momentum is
and the resultant force is
If the mass is constant, then
So is a useful special case, but the more general defining form is .
Understanding the Question
You are asked which option gives the definition of force. The options offer different equations involving force:
- (only true when mass is constant)
- (general definition)
- (related to work done)
- (rearrangement of the definition of moment)
The correct definition must be the general law, not a rearranged result from another definition.
Approach
Choose the statement that matches Newton's second law in its defining (momentum) form. Then check the others are either special cases or definitions of other quantities (work, moment).
Step-by-Step Reasoning
- Newton's second law states that the resultant force is the rate of change of momentum:
This is exactly option B.
-
Option A uses , which follows from only if is constant; it is not the defining statement in full generality.
-
Option C rearranges the work done relation (for constant force in the direction of motion). This is not a definition of force.
-
Option D rearranges the moment relation (definition of moment), again not a definition of force.
Therefore the correct choice is B.
Key Takeaways
- The defining statement of force is
- is a special case for constant mass.
- Equations involving work or moment do not define force; they define work and moment.
Common Mistakes
- Choosing as the definition without recognising it assumes constant mass.
- Confusing a rearranged formula (e.g. ) with a definition.
- Forgetting that moment is defined by , so is not a force definition.
Things to Be Careful About
- In A-Level mark schemes, the most general and accepted defining form is .
- Conditions hidden in formulas: needs constant force and motion along the force; needs constant mass.
- The question asks for a definition, so prefer the fundamental law over derived/special-case relationships.
Four forces, all in the same plane, act on an object.
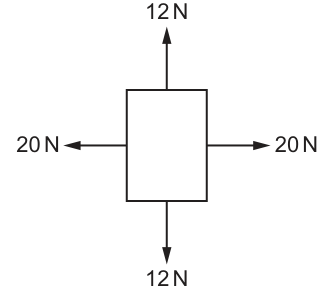
What could describe the motion of the object?
Options
A It is accelerating.
B It is moving in a straight line.
C It is moving with decreasing speed.
D It is moving with increasing momentum.
Working
Vertical forces: up and down cancel.
Horizontal forces: left and right cancel.
So resultant force and hence .
With zero acceleration, the object can move with constant velocity in a straight line.
Answer
B
B
Background Concept
Newton's second law links the resultant (net) force on an object to its motion:
- If , then .
- Zero acceleration means the velocity is constant (could be zero, i.e. at rest, or a constant non-zero velocity in a straight line).
Also, in momentum form:
So if , momentum does not change.
Understanding the Question
The diagram shows four coplanar forces acting through the object:
- upwards and downwards
- to the left and to the right
You are asked which statement (A–D) could describe the object's motion.
Approach
- Find the resultant force by cancelling equal and opposite force pairs.
- Use (or ) to deduce what happens to acceleration (and therefore velocity and momentum).
- Choose the option consistent with that conclusion.
Step-by-Step Reasoning
- Vertical direction: the upward force is and the downward force is , so the resultant vertical force is .
- Horizontal direction: the rightward force is and the leftward force is , so the resultant horizontal force is .
Therefore the overall resultant force is:
From Newton's second law:
So the object is not accelerating; its velocity is constant. That means it could be moving in a straight line at constant speed (or be stationary).
Now compare to options:
- A (accelerating): false because .
- B (moving in a straight line): true for constant velocity motion.
- C (decreasing speed): would require acceleration opposite to motion, so .
- D (increasing momentum): would require , so .
Hence option B.
Key Takeaways
- Equal and opposite forces give zero resultant force.
- Zero resultant force implies zero acceleration.
- With zero acceleration, velocity is constant (straight-line motion at constant speed, or rest).
- Increasing/decreasing speed or momentum requires a non-zero resultant force.
Common Mistakes
- Thinking “forces are present so it must accelerate”: acceleration depends on the resultant force, not on the existence of forces.
- Choosing D because forces look “large”: momentum only changes if the resultant force is not zero.
- Assuming the object must be stationary: it can also move with constant velocity.
Things to Be Careful About
- Resultant force is a vector sum: cancel forces separately in perpendicular directions.
- Options C and D both imply a change in velocity/momentum, which requires .
- The diagram also shows no resultant turning effect (pairs act symmetrically), but for this question the key point is the zero resultant force and hence no linear acceleration.
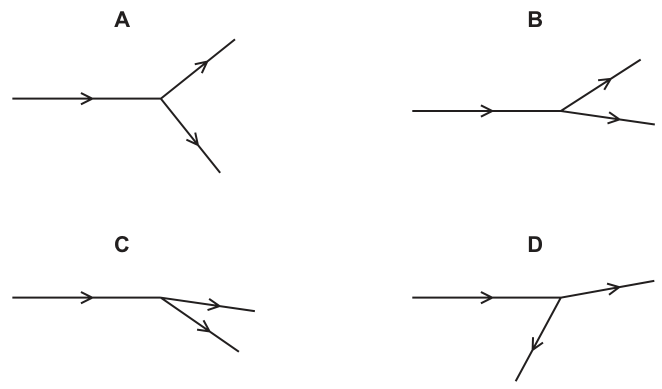
A nucleus collides with a stationary nucleus in a vacuum. The diagrams show the paths of the nuclei before and after the collision.
No other particles are involved in the collision.
Which diagram is not possible?
Options
Working
In vacuum with only two nuclei involved, total momentum is conserved.
Initial momentum is horizontal, so initial and hence final .
In option C, both nuclei move downwards after the collision, so both have and the total final cannot be zero.
Answer
C
C
Background Concept
In an isolated system (no external forces), the total momentum vector is conserved:
Momentum is a vector quantity, so conservation must hold separately in perpendicular directions (e.g. and ):
Here the collision occurs in a vacuum and the question states that no other particles are involved, so the two nuclei form an isolated system during the collision.
Understanding the Question
One nucleus is moving horizontally towards a stationary nucleus. After collision, exactly two nuclei move away along the shown paths.
Because the incoming nucleus moves purely horizontally, the initial total momentum has:
- a positive -component (to the right)
- zero -component (no up/down component)
So any physically possible outgoing paths must allow the two final momentum vectors to add to a resultant that points purely to the right.
Approach
Use momentum conservation in the vertical direction:
- compute (qualitatively) the sign of the final components from each diagram
- reject any diagram where the final total cannot equal the initial total
This avoids needing any masses or speeds.
Step-by-Step Reasoning
-
Initial momentum:
- stationary target nucleus has
- incoming nucleus has momentum to the right only
Therefore:
- Apply conservation of momentum in the direction:
- Inspect each option qualitatively:
- A: one nucleus goes up-right and the other down-right, so one has and the other has . These can cancel (with suitable speeds), so A can be possible.
- B: similarly one goes slightly up-right and one slightly down-right, so can cancel. Possible.
- C: both outgoing paths are down-right, so both nuclei have .
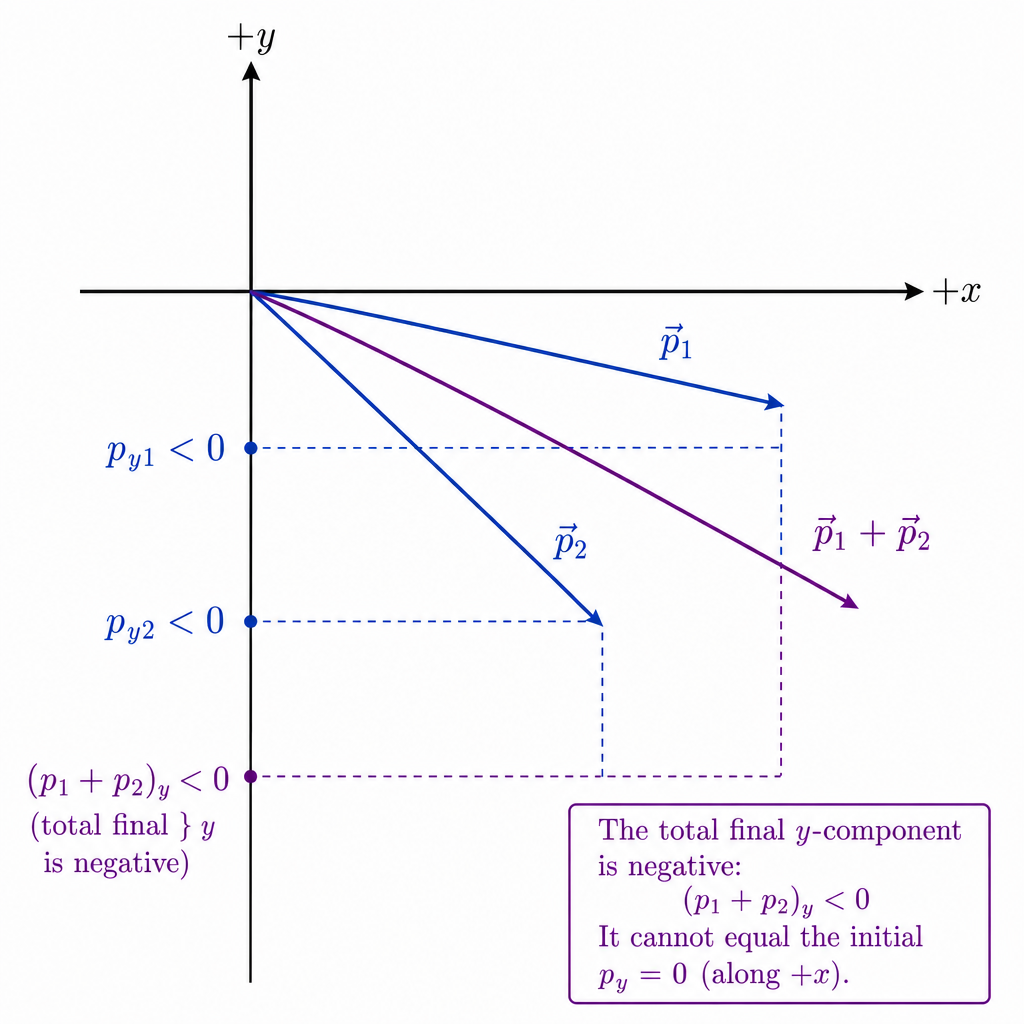
Then the total final -momentum is negative:
which cannot equal . So C is not possible.
- D: one nucleus goes up-right (), the other down-left (). The -components can cancel, and the total -momentum can still be to the right if the rightward is larger in magnitude than the leftward . So D can be possible.
Therefore, the only impossible diagram is C.
Key Takeaways
- Momentum is conserved as a vector in an isolated collision.
- If the initial momentum has zero component in some direction (here ), the final total momentum component in that direction must also be zero.
- Two vectors that both have negative -components cannot sum to give zero -component.
Common Mistakes
- Treating momentum as a scalar and only considering “total speed” rather than direction.
- Forgetting that conservation must hold in both and directions separately.
- Assuming any pair of outgoing directions is possible without checking the initial transverse momentum.
Things to Be Careful About
- The statement “No other particles are involved” is crucial: it means there are only two final momentum vectors to add.
- The target nucleus is initially stationary, so the initial momentum is entirely from the incoming nucleus.
- A diagram with one particle going backwards (like D) can still be possible as long as the other particle has enough forward momentum to keep the total -momentum positive.
A non-uniform bar has length and weight .
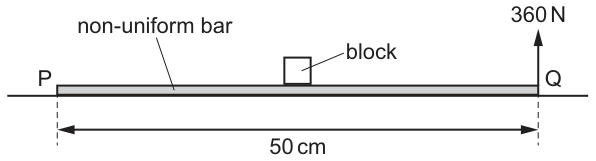
A block of weight is attached to the top of the bar at its centre. The bar rests on horizontal ground.
A vertical force of is now exerted upwards on the bar at end and is just sufficient to lift end from the ground.
What is the distance from the centre of gravity of the bar to end ?
Options
A
B
C
D
Working
When end is just lifted, the bar pivots about .
Taking moments about :
Answer
D
D
Background Concept
The moment (turning effect) of a force about a point is
where is the force and is the perpendicular distance from the pivot to the force’s line of action.
For equilibrium (no angular acceleration) about a chosen pivot,
A very useful trick is to choose the pivot at a point where an unknown force acts (e.g. a contact force), because its moment about that point is zero.
Understanding the Question
The bar of length lies on the ground. A block is attached at the centre of the bar (so its weight acts at from end ). The bar itself weighs , acting at its centre of gravity, a distance from end (this is what we want).
An upward force of is applied at end . It is “just sufficient to lift end ”, meaning the contact force (reaction) at has just fallen to zero and the bar is about to pivot about .
Approach
At the instant just lifts:
- Treat as the pivot point.
- Set the anticlockwise moment from the applied upward force at equal to the clockwise moments from the two weights (block and bar).
- Solve for .
Step-by-Step Reasoning
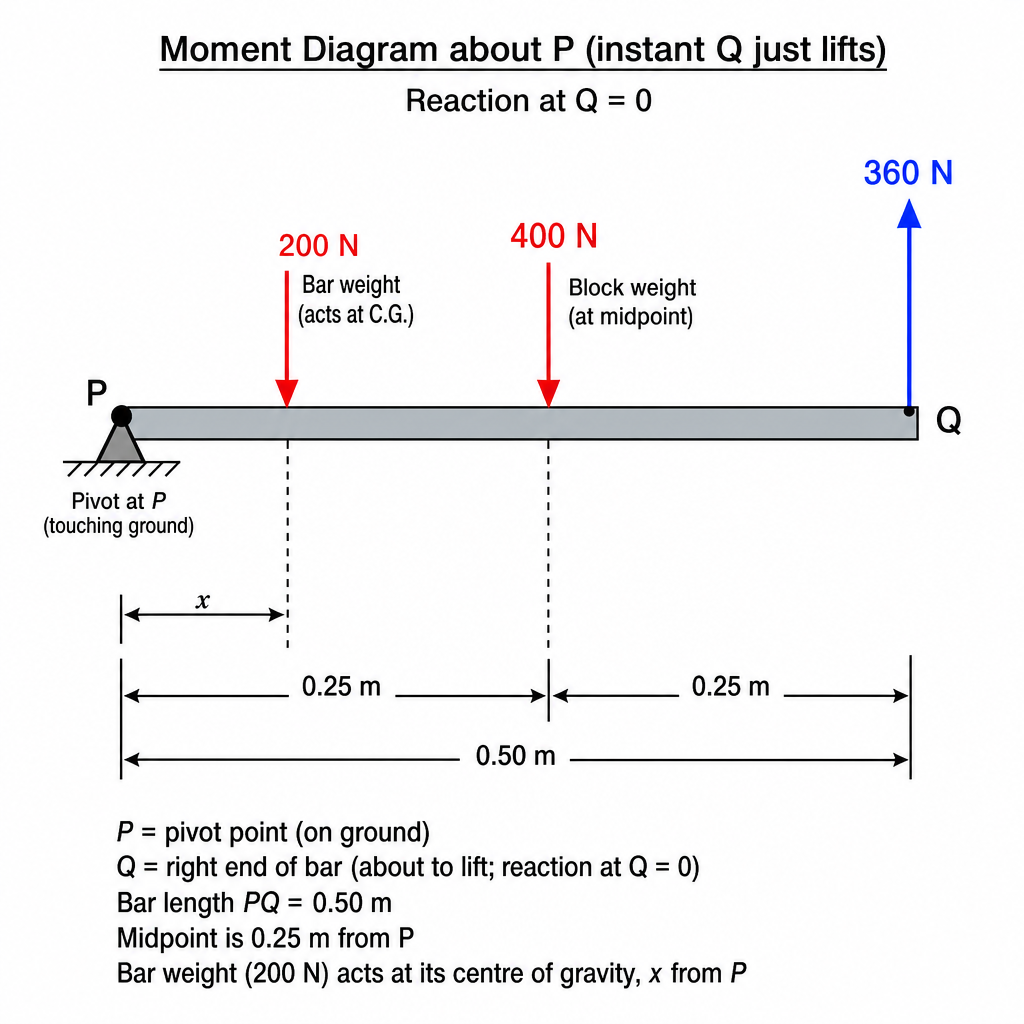
-
Distances from pivot :
- End is from .
- The block acts at the centre: from .
- The bar’s weight acts at its centre of gravity: from .
-
Take moments about (reaction at gives zero moment because it acts through the pivot).
- Anticlockwise moment from the upward force at :
- Clockwise moments from the weights:
and
- Equate clockwise and anticlockwise moments:
So the centre of gravity of the bar is from end .
Key Takeaways
- “Just lifts” implies the reaction at the lifted end is zero and the bar pivots about the other end.
- Use the principle of moments about the pivot to avoid unknown reactions.
- Convert cm to m before calculating moments so units are consistent.
Common Mistakes
- Taking moments about the wrong point (e.g. about the centre instead of about at the tipping point).
- Forgetting that the block is at from (centre of a bar).
- Leaving lengths in cm, leading to moments in \text{N cm} and numerical confusion.
Things to Be Careful About
- The applied force is upward at , so it produces the opposite sense of rotation to the downward weights.
- The distance for each moment must be the perpendicular distance to the force line of action (here all forces are vertical, so the perpendicular distance is just the horizontal distance along the bar).
- The answer requested is distance from the bar’s centre of gravity to end (this is , not the distance to ).
What is the definition of density?
Options
A mass of one cubic metre
B mass of a unit volume
C mass per cubic metre
D mass per unit volume
Working
Density is defined as mass per unit volume:
This corresponds to “mass per unit volume”.
Answer
D
D
Background Concept
Density, symbol , describes how much mass is contained in a given volume. It is defined by the relationship
where is mass and is volume. The SI unit is (kilograms per cubic metre).
Understanding the Question
The question asks for the definition of density in words. You must choose the option that matches .
Approach
- Recall the formula for density: .
- Translate this into words: “mass per unit volume”.
- Match that wording to the options given.
Step-by-Step Reasoning
From the definition,
This reads as “density equals mass divided by volume”, i.e. mass per unit volume.
- Option D states “mass per unit volume”, which is exactly .
- Option C (“mass per cubic metre”) is a specific unit description ( per ), not the general definition.
- Option A (“mass of one cubic metre”) is missing the idea of “per unit volume” as a ratio definition.
- Option B (“mass of a unit volume”) is close in meaning, but the standard definition is expressed as “mass per unit volume”, matching D.
Therefore the correct choice is D.
Key Takeaways
- Density is defined by .
- In words: density is mass per unit volume.
- Definitions are best matched to the general ratio form, not to a particular unit size (like ).
Common Mistakes
- Choosing “mass per cubic metre” as a definition: that describes the SI unit rather than stating the general relationship.
- Confusing “mass of one cubic metre” with the definition: that is a special case (), not the definition itself.
Things to Be Careful About
- A definition should work for any volume, so it should be phrased as “per unit volume” (a ratio), not tied to a specific volume such as .
- Remember the SI unit follows from the definition: since is in and in , is in .
A block is in equilibrium on a slope.
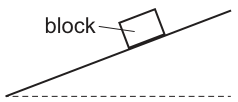
Which vector triangle represents the three forces acting on the block?
Options
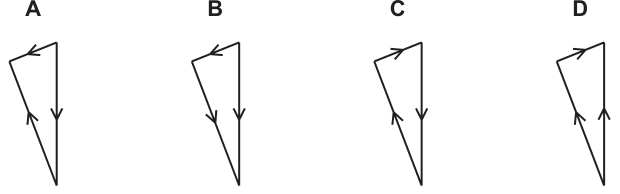
Working
For equilibrium, the three forces form a closed triangle.
Weight acts vertically downward.
Normal reaction acts perpendicular to the slope (up and left).
Friction acts up the slope (to the right).
Only option C shows these three directions forming a closed vector triangle.
Answer
C
C
Background Concept
For an object in equilibrium under three forces, the resultant force is zero:
Graphically, this means that if you draw the three force vectors head-to-tail in any order (without changing their directions), they must form a closed triangle (a “vector triangle”).
A block on a rough slope typically has three forces:
- Weight vertically downward.
- Normal contact force perpendicular to the plane.
- Friction parallel to the plane, opposing the direction the block would otherwise slide.
Understanding the Question
The block is at rest on a slope rising to the right. You must choose which of the four given vector triangles correctly represents the directions of the three forces on the block in equilibrium.
So you need:
- The correct directions of , , and .
- A triangle where these three vectors, drawn head-to-tail, close.
Approach
- Decide the direction of each force from the geometry of the slope.
- Eliminate options with an incorrect direction for any force.
- For the remaining option(s), check that the friction direction is consistent (up the slope) and the three vectors can form a closed triangle.
Step-by-Step Reasoning
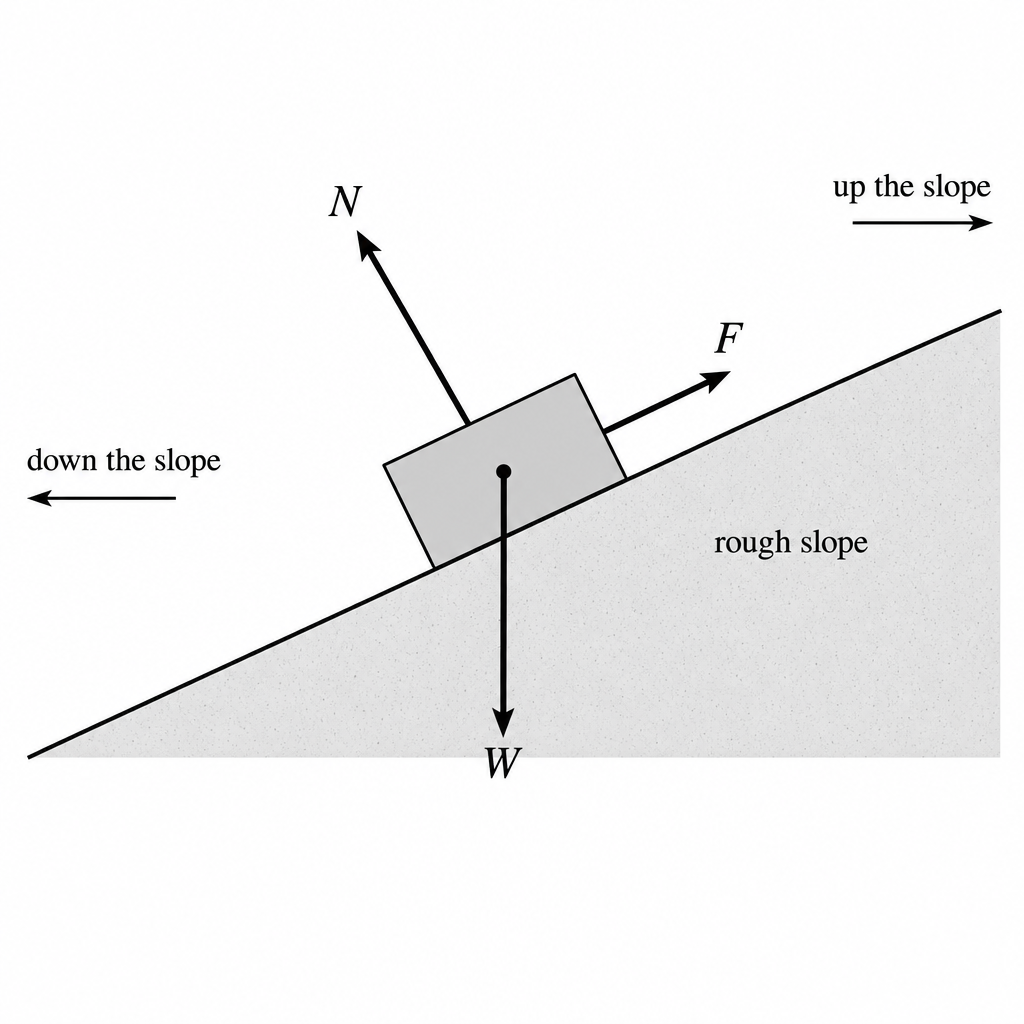
-
Weight is always vertically downward.
- So the weight vector in the triangle must point straight down. Options with an upward vertical vector are incorrect.
-
Normal reaction is perpendicular to the slope.
- Since the slope rises to the right, the perpendicular outward normal points upwards and to the left.
- So the normal vector should be a slanted vector pointing up-left.
-
Friction acts parallel to the slope and opposes the tendency to slide.
- With the plane rising to the right, “down the slope” is towards the left.
- Without friction, the block would tend to slide down the slope (left), so friction must act up the slope (to the right).
-
Comparing with the options:
- Eliminate any triangle where the vertical force points up (not weight).
- Eliminate any triangle where the sloping force points down-right/down-left (wrong for the normal here).
- Between the remaining ones, choose the one where the third force points to the right (friction up the slope).
This matches option C.
Key Takeaways
- For equilibrium under three forces, the vectors form a closed triangle.
- On an incline: is vertical, is perpendicular to the plane, friction is parallel to the plane and opposite to impending motion.
Common Mistakes
- Drawing friction down the slope (it must oppose the tendency to slide).
- Taking the normal force to be vertical (it is perpendicular to the surface, not to the ground).
- Forgetting that a force triangle must be drawn head-to-tail and must close for equilibrium.
Things to Be Careful About
- Directions matter, not where the vectors are drawn: in a vector triangle you may translate a vector, but you must not rotate it.
- The slope rising to the right means the component of weight down the slope is to the left, so friction is to the right (up the slope).
A measuring cylinder contains of a liquid.
The pressure due to the liquid at the mark is .
What is the pressure due to the liquid at the base of the measuring cylinder?
Options
A
B
C
D
Working
Pressure due to a liquid is proportional to depth .
At the mark, depth below the surface:
At the base, depth below the surface:
So
Answer
D
D
Background Concept
In a liquid at rest, the (gauge) pressure due to the liquid above a point is
where:
- is the density of the liquid,
- is gravitational field strength,
- is the vertical depth below the free surface.
For the same liquid and same , pressure is directly proportional to depth: .
Understanding the Question
The cylinder contains of liquid, so the free surface is at the mark.
We are told the pressure due to the liquid at the mark is . That pressure is caused only by the liquid column between the surface (at ) and that mark (at ).
We want the pressure due to the liquid at the base (the bottom of the cylinder, i.e. below the mark), which corresponds to the full depth of the liquid from down to .
Approach
Because , we can compare pressures using a ratio of depths:
We are not given actual heights, only volume marks. In a measuring cylinder (assumed uniform cross-sectional area ), volume and height are related by , so height is proportional to volume.
Thus, the depth between two marks is proportional to the difference in their volume readings.
Step-by-Step Reasoning
Let the cylinder have constant cross-sectional area .
- Depth below the surface at the mark:
- Surface at .
- Volume of liquid above the mark is .
Convert that volume difference to height:
(We do not need numerically.)
- Depth below the surface at the base:
- Volume of liquid above the base corresponds to .
So
- Use proportionality of pressure to depth:
- Calculate base pressure:
So the correct option is D.
Key Takeaways
- Hydrostatic pressure in a liquid at rest increases linearly with depth: .
- In a uniform measuring cylinder, volume markings are proportional to height, so you can use volume differences to compare depths.
- Pressure at a point depends on the liquid column above that point (difference between the surface mark and the point’s mark).
Common Mistakes
- Using as the depth below the surface instead of the correct difference .
- Assuming pressure is proportional to the volume below the point rather than the liquid above it.
- Forgetting that the surface is at (since that is the amount of liquid in the cylinder).
Things to Be Careful About
- The method relies on the cylinder having constant cross-sectional area; that is implied by a standard measuring cylinder with uniform scale.
- The question asks for “pressure due to the liquid” (gauge pressure), not including atmospheric pressure.
- Keep the proportional reasoning clear: use differences in readings to represent the depth of liquid above the point.
Four identical uniform blocks are spread on a table. Each block has mass and thickness .
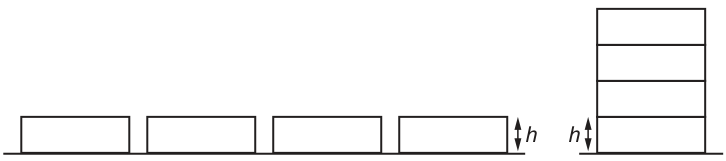
The acceleration of free fall is .
How much work is done on the blocks in stacking them on top of one another?
Options
A
B
C
D
Working
Initial height of each block's centre of mass above the table: .
Final centre-of-mass heights in a 4-block stack: , , , .
Increases in height: , , , .
Total work done (increase in GPE):
Answer
B
B
Background Concept
When you lift an object slowly at constant speed, the work you do against gravity becomes an increase in the object's gravitational potential energy (GPE).
For an object of mass , raising its centre of mass by a vertical height change increases GPE by
For several objects, the total work done is the sum of the increases in GPE of each object (because energy is a scalar and adds).
Understanding the Question
There are four identical blocks, each of mass and thickness .
- Initially they are all separate and lying on the table.
- Finally they are stacked into a tower of four blocks.
The question asks for the work done on the blocks during stacking. The only energy change is the increase in gravitational potential energy due to raising some blocks.
Approach
- Use the fact that each block’s GPE depends on the height of its centre of mass.
- Find the initial height of each centre of mass.
- Find the final heights of the centres of mass in the stack.
- Compute for each block and sum .
A quick way: only the top three blocks are lifted; the bottom one stays at the same height.
Step-by-Step Reasoning
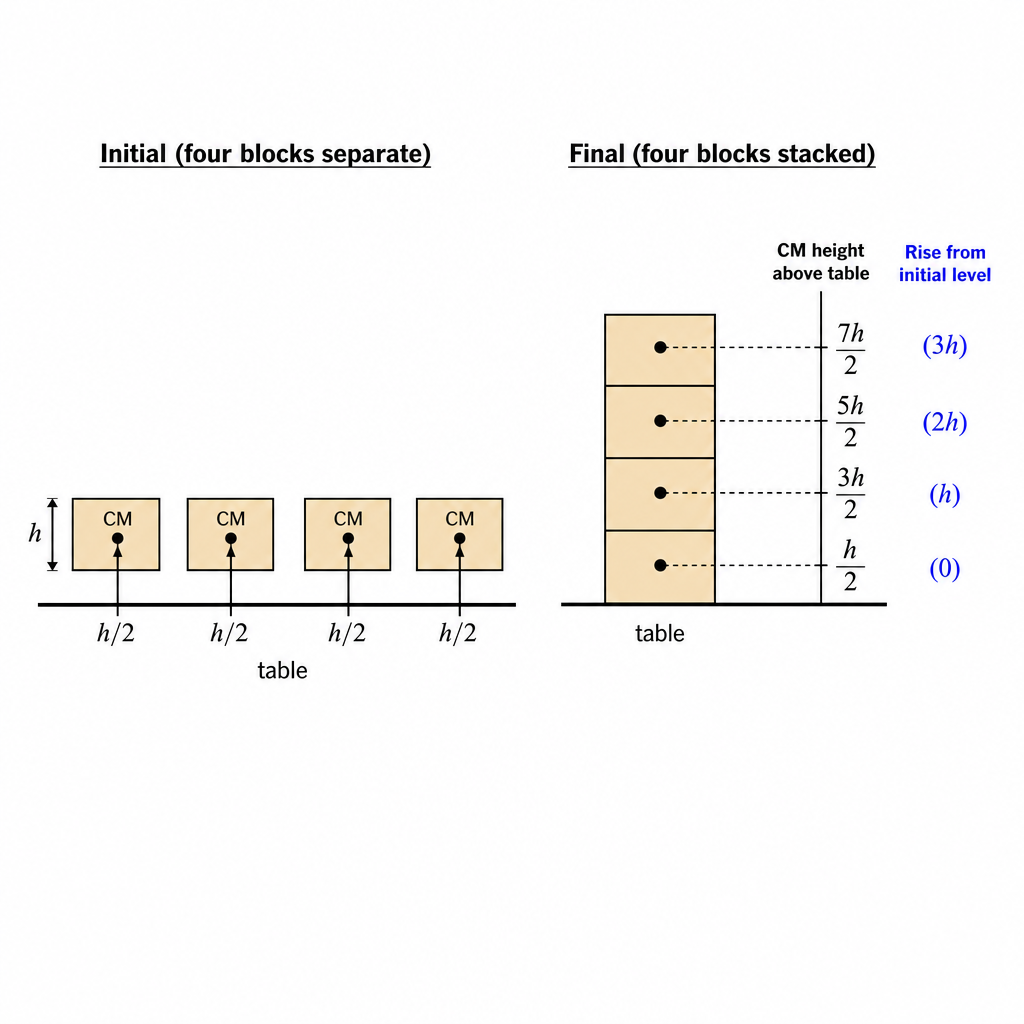
- Initially, each block rests on the table. Its centre of mass is halfway up its thickness, so for each block:
-
After stacking, measure the centre-of-mass height of each block from the table:
- Bottom block: centre at
- Second block: its bottom is at height , so centre at
- Third block: centre at
- Top block: centre at
-
Height increases relative to :
- Total increase in GPE (work done):
So the correct option is B.
Key Takeaways
- Work done in stacking equals total increase in gravitational potential energy.
- Use centre-of-mass heights: for a uniform block of thickness , the centre is at from its base.
- Sum the individual height rises: here .
Common Mistakes
- Using the top of each block instead of the centre of mass (GPE uses the centre of mass height).
- Counting the bottom block as lifted (it is not: its centre stays at ).
- Multiplying by 4 incorrectly (e.g. assuming each block rises the full ).
Things to Be Careful About
- The reference level (the table) cancels out if you use changes in height, but you must be consistent.
- Make sure you calculate changes in centre-of-mass height, not the absolute heights.
- Keep symbolic unless a numerical value is given; final expression should be in terms of , , and .
An electric motor uses of power when operating normally.
The efficiency of the motor is .
What is the useful output power of the motor?
Options
A
B
C
D
Working
Efficiency:
Answer
B
B
Background Concept
Efficiency tells you what fraction of the input energy (or power) is converted into useful output.
For power, efficiency is defined by
where:
- is the electrical input power to the motor,
- is the mechanical output power delivered usefully,
- is efficiency (a number between and , or a percentage).
Understanding the Question
The motor takes in of power when running normally. Only of this becomes useful output; the rest is wasted (e.g. heating, sound).
We are asked for the useful output power, and then to choose the matching option.
Approach
- Convert into a decimal efficiency: .
- Use .
- Multiply and compare with the options.
Step-by-Step Reasoning
Convert the efficiency:
Use the efficiency definition:
Substitute values:
Round to match the options / appropriate significant figures:
This corresponds to option B.
Key Takeaways
- Efficiency links useful output power to input power: .
- Always convert percentage efficiency into a decimal before substituting.
Common Mistakes
- Using instead of (forgetting to divide by ).
- Inverting the ratio and calculating .
- Choosing an option larger than the input power (useful power must be less than since efficiency is less than ).
Things to Be Careful About
- Units: since efficiency is dimensionless, the output power stays in if the input is in .
- Reasonableness check: with , output should be a bit over half of (about ), so is sensible.
A ball is released from rest and falls vertically to the ground.
The kinetic energy of the ball varies as the height of the ball above the ground changes.
Air resistance is negligible.
Which graph shows the variation of with ?
Options
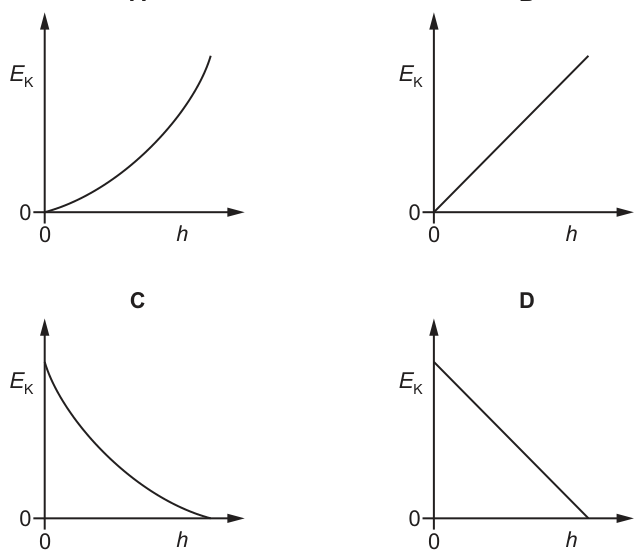
Working
Let the release height be above the ground. Initially, at .
With negligible air resistance, loss of GPE = gain in KE:
So decreases linearly with , with at and at .
Answer
D
D
Background Concept
With negligible air resistance, the mechanical energy of the ball is conserved.
- Gravitational potential energy (taking the ground as zero level) is
- Kinetic energy is
Conservation of mechanical energy means
So as the ball falls (smaller ), decreases and increases by exactly the same amount.
Understanding the Question
A ball is released from rest at some height above the ground, then falls vertically. You are asked how the kinetic energy changes as the height above the ground changes.
Key points from the stem:
- Released from rest (\Rightarrow) initial kinetic energy is zero.
- Air resistance negligible (\Rightarrow) total mechanical energy is conserved.
- Axes on the graphs are (vertical) against (horizontal), with at the ground.
Approach
- Define the release height as .
- Use energy conservation between a general height and the release point.
- Rearrange to get as a function of .
- Use intercepts and the shape (linear/non-linear) to pick the matching graph.
Step-by-Step Reasoning
At release: height and the ball is at rest, so
At some later time when the ball is at height , conservation of energy gives
Rearrange:
This tells us:
- depends on linearly (it is of the form ).
- When , (so the line crosses the -axis at a positive value ).
- When (ground),
which is a positive value, so the graph must have a positive intercept at .
Among the options, the only straight line that starts at positive when and decreases to at some positive is D.
Key Takeaways
- With no energy losses, .
- Using , you get a linear relation .
- Check key points ( and ) to identify the correct graph quickly.
Common Mistakes
- Drawing increasing with (wrong sign): as increases, the ball is higher and has fallen less, so it has less kinetic energy.
- Assuming the graph must pass through the origin: at the ball is moving fastest, so is not zero.
- Choosing a curved graph: with constant and negligible air resistance, the energy relation with height is linear even though is not linear in time.
Things to Be Careful About
- is “height above the ground”, not “distance fallen”. The distance fallen is .
- The linearity comes from ; if air resistance were present, the vs graph would not be a straight line because some energy would be dissipated.
- Ensure you use the correct intercepts: at the release height, not at the ground.
An object travelling with a speed of has kinetic energy of .
The speed of the object is increased to .
What is the new kinetic energy of the object?
Options
A
B
C
D
Working
Kinetic energy .
Answer
C
C
Background Concept
The kinetic energy of an object of mass moving at speed is
For the same object, the mass does not change, so kinetic energy is proportional to the square of the speed:
This means if the speed changes by a factor, the kinetic energy changes by the square of that factor.
Understanding the Question
We are told an object has speed and kinetic energy . The speed is increased to . We must find the new kinetic energy and choose the correct option.
The key point is that the object is the same, so its mass is constant.
Approach
Use the proportional relationship from :
- Form the ratio .
- Calculate the speed ratio and square it.
- Multiply the original kinetic energy by this factor to get the new kinetic energy.
- Match to the given options.
Step-by-Step Reasoning
From
for the same mass :
Substitute and :
So the kinetic energy increases by a factor of :
This corresponds to option C ().
Key Takeaways
- Kinetic energy depends on the square of speed: doubling speed makes four times larger.
- For the same object, you can use ratios to avoid calculating the mass.
- Always check whether a quantity (like mass) remains constant before using proportional reasoning.
Common Mistakes
- Increasing kinetic energy in the same ratio as speed (using instead of ).
- Squaring the wrong factor (e.g. doing and forgetting to invert).
- Arithmetic slip: incorrectly taken as or .
Things to Be Careful About
- The factor change is , not .
- Keep units consistent (here both speeds are already in ).
- In MCQs, match the final numerical value to the nearest listed option: here exactly matches option C.
What are the units of stress, strain and the Young modulus?
Options
| stress | strain | Young modulus | |
|---|---|---|---|
| A | newton | metre | pascal |
| B | newton | no unit | newton |
| C | pascal | metre | newton |
| D | pascal | no unit | pascal |
Working
Stress:
Units .
Strain:
Units cancel no unit.
Young modulus:
So units .
Answer
D
D
Background Concept
For a stretched (or compressed) material:
- Stress is force per unit cross-sectional area:
- Strain is fractional change in length:
- Young modulus is the ratio of stress to strain (within the limit of proportionality):
A useful idea: if a quantity is a ratio of two lengths, its unit cancels and it is dimensionless.
Understanding the Question
You must pick the option that correctly gives the units of:
- stress, 2) strain, 3) Young modulus.
The table offers combinations involving (\text{N}), (\text{m}), “no unit”, and (\text{Pa}).
Approach
- Write the defining equations for stress and strain.
- Deduce their units from SI base/derived units.
- Use (E = \text{stress}/\text{strain}) to get the units of Young modulus.
- Match to the options.
Step-by-Step Reasoning
1) Stress
Force has unit (\text{N}) and area has unit (\text{m}^2), so
The derived SI unit (\text{N m}^{-2}) is the pascal (Pa).
2) Strain
Both (\Delta L) and (L) are lengths measured in metres, so the metres cancel:
So strain has no unit.
3) Young modulus
Strain is dimensionless, so Young modulus has the same unit as stress:
Therefore the correct row is: stress = pascal, strain = no unit, Young modulus = pascal, which is option D.
Key Takeaways
- Stress is (F/A) so its unit is (\text{N m}^{-2} = \text{Pa}).
- Strain is (\Delta L/L) so it is dimensionless.
- Young modulus is stress/strain so it has unit (\text{Pa}).
Common Mistakes
- Thinking stress has unit (\text{N}) (forgetting to divide by area).
- Giving strain the unit (\text{m}) (forgetting it is a ratio of lengths).
- Giving Young modulus unit (\text{N}) (it is not a force; it is a pressure-like quantity).
Things to Be Careful About
- (\text{Pa}) is exactly (\text{N m}^{-2}); recognising this equivalence helps eliminate options quickly.
- Strain is often written as a decimal or percentage; even as a percentage it still has no unit (it is a scaled dimensionless number).
The force–extension graph for a metal wire is shown.
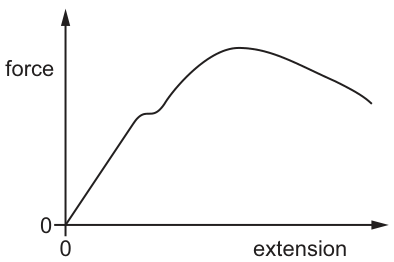
Which quantity is represented by the area under the graph?
Options
A power transferred to the wire
B temperature increase in the wire
C time taken for the wire to extend
D work done on the wire
Working
For an extension , the work done is
So the area under an –extension graph equals the work done on the wire.
Answer
D
D
Background Concept
Work done by a force is the energy transferred when a force causes a displacement in the direction of the force.
For a constant force moving through distance :
If the force is not constant (as in stretching a real wire), we add up the small amounts of work across the extension:
Graphically, this integral is the area under a force–extension (force–displacement) graph.
Understanding the Question
You are given a graph of force (vertical axis) against extension (horizontal axis) for a metal wire. The force changes as the wire extends (it is not a single constant value).
The question asks what physical quantity the area under this graph represents.
Approach
- Recognise that the horizontal axis is a displacement/extension .
- Use the definition .
- Conclude that the total work done is the integral of with respect to , i.e. the area under the curve.
Step-by-Step Reasoning
- Take a small extension . During this tiny stretch, the force is approximately constant at .
- Work done in that small stretch is:
- Adding (integrating) from to the final extension gives:
- On the force–extension graph, is the height of the curve and is a small width; summing is exactly the area under the curve.
Therefore the area represents the work done on the wire (energy transferred to it), so the correct option is D.
Why the others are not correct:
- A power transferred: power is and requires time information, which a force–extension graph does not provide.
- B temperature increase: heating depends on how much of the work becomes thermal energy (and on mass and specific heat capacity); the graph alone does not give a temperature rise.
- C time taken: time does not appear in a force–extension graph.
Key Takeaways
- Area under an – graph gives work done:
- For a straight-line (Hooke’s law) region, the area is a triangle giving elastic energy at that point.
Common Mistakes
- Confusing area under an – graph (work) with area under a – graph (displacement) or – graph (change in velocity).
- Choosing power (option A) because “energy transfer” is mentioned, forgetting power needs time.
- Saying it is always “elastic potential energy”: once the wire is beyond the elastic limit, not all work is stored elastically (some becomes internal/thermal energy). The safe, always-correct quantity is work done on the wire.
Things to Be Careful About
- Ensure the axes are identified correctly: it must be force vs extension/displacement for area to represent work.
- Remember this is an MCQ about interpretation: no numerical calculation is needed.
- For non-linear or plastic behaviour, the area is still work done, even though the energy is not fully recoverable as elastic potential energy.
A wire of length is attached at one end to a fixed point. A tensile force is applied to the other end so that the wire extends and has a new length .
What is the strain of the wire?
Options
A
B
C
D
Working
Strain .
Answer
A
A
Background Concept
Strain is a measure of deformation and is defined as the fractional change in length:
where is the original (unstretched) length and is the extension. Strain has no unit (it is dimensionless) because it is a ratio of two lengths.
Understanding the Question
The wire starts with length . After a tensile force is applied, its new length is . The question asks for the strain in terms of and , and you must choose the correct expression from the options.
Approach
- Write extension as .
- Use the definition .
- Simplify the expression to see which option matches.
Step-by-Step Reasoning
Extension:
Strain:
Split the fraction:
This matches option A.
Key Takeaways
- Strain is the extension divided by the original length: .
- With final length , extension is .
- Strain is dimensionless.
Common Mistakes
- Giving (option B): that is extension, not strain.
- Adding (option C): incorrect algebra; it should be after dividing by .
- Adding lengths (option D): not a definition used in deformation.
Things to Be Careful About
- Always divide by the original length , not the final length.
- Check that your final quantity is dimensionless (no units).
A wire of length is stretched to determine its limit of proportionality.
The graph shows the variation of the extension with the force applied to the wire.
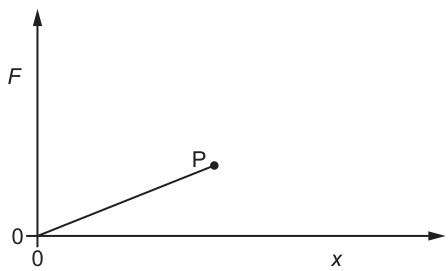
The limit of proportionality is shown by point on the graph.
The experiment is repeated with another wire of length but of the same material and same diameter as the first wire.
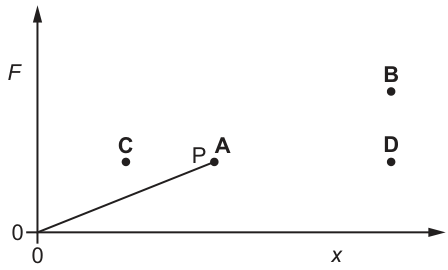
Which point on the graph shows the limit of proportionality for the new wire?
Options
A point
B point
C point
D point
Working
The limit of proportionality is defined by a maximum stress that the material can withstand while obeying Hooke's law.
Since the new wire is made of the same material and has the same diameter (same cross-sectional area ), the force at the limit of proportionality is unchanged. The new point must have the same -coordinate as .
From the definition of Young's modulus , the extension at the limit of proportionality is .
For the same force and material (), the extension is directly proportional to the length . Doubling the length to doubles the extension at the limit of proportionality to .
The new point is therefore at , which corresponds to point on the graph (same force as , but twice the extension).
Answer
D
D
Background Concept
Hooke's law states that the extension of an elastic material is directly proportional to the applied force, provided the limit of proportionality is not exceeded. This is expressed as , where is the stiffness constant.
For a wire, it is more fundamental to use stress and strain. Stress is (force per unit cross-sectional area) and strain is (extension per unit original length). Young's modulus is defined as the ratio of stress to strain in the linear region:
The limit of proportionality is a property of the material, not the specific object. It is defined by a critical stress value beyond which the stress-strain relationship is no longer linear. Because it is a stress limit, the force at this limit depends on the cross-sectional area: .
Understanding the Question
We are given a graph of force versus extension for a wire of length . Point marks the limit of proportionality, with coordinates .
The experiment is repeated with a new wire of length , but the same material and same diameter. We need to find the new coordinates for the limit of proportionality and identify which point (, , , or ) on the second graph represents it.
Approach
- Determine how the force at the limit of proportionality changes. Since the limit is defined by a material stress and the area is unchanged, the force should remain the same.
- Determine how the extension at the limit of proportionality changes. Use the Young's modulus equation to relate extension to length for a constant force.
- Combine these to find the new coordinates and match them to the points on the graph.
Step-by-Step Reasoning
Step 1: Force at the limit of proportionality
The limit of proportionality is reached when the stress reaches a critical value characteristic of the material.
Since the new wire has the same material ( is unchanged) and the same diameter (so is unchanged), the force at the limit of proportionality is unchanged:
This means the new point must lie on the same horizontal line as on the - graph.
Step 2: Extension at the limit of proportionality
Rearranging the Young's modulus equation for extension:
At the limit of proportionality, and the material is the same ( is constant). Thus, for a given force, the extension is directly proportional to the original length :
When the length is doubled (), the extension at the limit of proportionality also doubles:
Step 3: Identifying the point
The new limit of proportionality is at coordinates . Looking at Fig. 2:
- Point is at .
- Point is at the same vertical level as (same force ) but at a larger extension. Specifically, if point is at , then point is directly below it at .
- This matches our derived coordinates .
Therefore, point represents the new limit of proportionality.
Key Takeaways
- The limit of proportionality is a material property defined by a critical stress, not a critical force. For objects of the same material and cross-sectional area, the force at this limit is the same.
- Extension is proportional to original length for a given stress (). Doubling the length doubles the extension at any given point on the stress-strain curve.
- When analyzing - graphs for wires, remember that the gradient changes with length, but the limit of proportionality in terms of force does not change if the area is constant.
Common Mistakes
- Confusing force and stress: Assuming that because the wire is longer, it requires more force to reach the limit of proportionality. This is incorrect; the limit is defined by stress (), and since is constant, is constant.
- Assuming the gradient determines the limit: The gradient of the - graph is . For the new wire, is halved, so the initial linear portion of the graph is less steep. However, the limit of proportionality is not determined by the gradient alone, but by the material's stress limit.
- Thinking extension is unchanged: Forgetting that . A longer wire will stretch more under the same stress.
Things to Be Careful About
- Graph axes: The graph plots against , not stress against strain. Always convert to stress and strain mentally to apply material properties correctly, then convert back to and for the final answer.
- Significant figures and coordinates: When reading points off a graph like Fig. 2, recognize that is positioned at exactly twice the extension of while maintaining the same force level. Point is only slightly to the right of , which would correspond to a small increase in length, not a doubling.
- Material vs. object properties: Always ask yourself: "Is this property intrinsic to the material (like Young's modulus, density, limit of proportionality stress) or dependent on the object's dimensions (like stiffness , total extension for a given force)?"
The graph shows the variation with distance along the wave of the displacement of water particles at a particular instant in time for a transverse water wave.
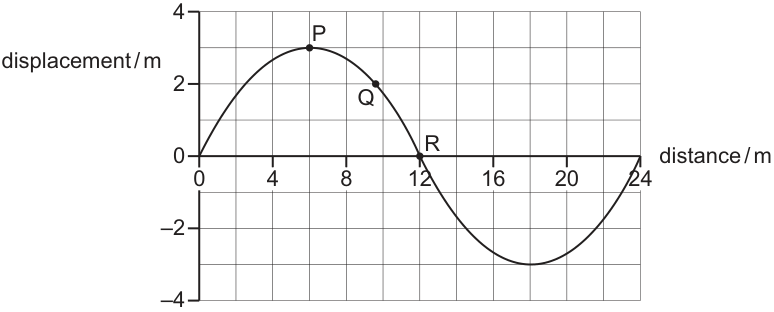
, and show the positions of three water particles in the wave.
Which particle has the greatest speed at the instant shown?
Options
A all have the same speed
B particle
C particle
D particle
Working
For a progressive sinusoidal wave,
Particle speed is
So is maximum when , i.e. when (zero displacement).
From the graph, particle is at zero displacement.
Answer
D
D
Background Concept
In a transverse progressive wave on water, each water particle oscillates up and down about its equilibrium position while the wave pattern travels along.
For a sinusoidal wave,
- is the amplitude (maximum displacement).
- is the wave number.
- is the angular frequency.
The speed of a particle (up/down speed) is the time rate of change of its displacement:
This is exactly the same idea as simple harmonic motion (SHM): particle speed is zero at maximum displacement and maximum at zero displacement.
Understanding the Question
You are given a displacement–distance graph at one instant in time. Points , , and are three different particles (three different positions ) on the same wave at that same instant.
The question asks: which of these particles is moving fastest at that instant.
Key observation: at a fixed instant, different particles can have different displacements, and in SHM the instantaneous speed depends on how far the particle is from equilibrium.
Approach
- Write the wave as a sinusoidal function of and .
- Differentiate with respect to to get the particle velocity.
- Identify where this speed is greatest (in terms of displacement).
- Use the graph to see which labelled particle has that displacement.
Step-by-Step Reasoning
Start with
Differentiate with respect to (treat as constant for one particular particle):
So the magnitude of the speed is
The factor has a maximum value of , so the greatest possible particle speed is .
When does that happen? It happens when
and at those instants the sine is zero, meaning
So particle speed is greatest when the particle is passing through the equilibrium position (zero displacement).
From the displacement–distance graph, is at a crest (maximum positive displacement) so it is momentarily at rest (). is between crest and the axis so it has some speed but not maximum. is at the zero crossing (), so it has the greatest speed.
Therefore, the correct option is D (particle ).
Key Takeaways
- A displacement–distance graph at one instant tells you each particle’s displacement at that instant.
- For a sinusoidal wave, each particle executes SHM: speed is maximum at and zero at .
- The particle at the equilibrium position has the greatest instantaneous speed.
Common Mistakes
- Choosing the point with the steepest spatial slope on the graph because it “looks fastest”: steepness here is , not .
- Thinking the crest particle moves fastest because it is “highest”: in SHM, the crest/trough is where the particle turns around, so its speed is zero.
- Assuming all particles have the same speed: they have the same frequency but not the same instantaneous speed.
Things to Be Careful About
- The graph is displacement vs distance at fixed time, so it does not directly give velocity; you must use the SHM link between displacement and speed.
- “Greatest speed” refers to the magnitude of vertical particle velocity, not the wave speed along the surface.
- The maximum particle speed occurs at the equilibrium line (), not necessarily at the midpoint in .
Which phenomenon is only associated with transverse waves?
Options
A diffraction
B interference
C polarisation
D reflection
Polarisation requires the oscillations to be in one plane, which is only possible for transverse waves.
Answer
C
C
Background Concept
Polarisation is a property of waves where the oscillations (vibrations) are restricted to one direction (or one plane) perpendicular to the direction of wave travel.
- In a transverse wave, the oscillations are perpendicular to the direction of propagation, so there are infinitely many possible planes of vibration. This allows a polariser to select one plane.
- In a longitudinal wave, the oscillations are parallel to the direction of propagation, so there is no “plane of vibration” to select; hence longitudinal waves cannot be polarised.
Diffraction, interference and reflection are general wave phenomena and can occur for both transverse and longitudinal waves.
Understanding the Question
You are asked to identify which listed phenomenon occurs only for transverse waves. The options are diffraction, interference, polarisation, and reflection.
So we need the phenomenon that cannot happen for longitudinal waves.
Approach
Check each option and ask: “Can this occur for longitudinal waves (e.g. sound in air)?”
- If yes, it is not unique to transverse waves.
- If no, it must be the required answer.
Step-by-Step Reasoning
- Diffraction: sound waves diffract around doorways and obstacles, so diffraction occurs for longitudinal waves too.
- Interference: sound waves can form constructive/destructive interference, so interference occurs for longitudinal waves too.
- Reflection: sound reflects from walls (echoes), so reflection occurs for longitudinal waves too.
- Polarisation: not possible for longitudinal waves, because their oscillations are along the direction of travel and cannot be restricted to one transverse plane.
Therefore the phenomenon only associated with transverse waves is polarisation.
Key Takeaways
- Polarisation is only possible for transverse waves.
- Diffraction, interference and reflection are wave properties that apply to both transverse and longitudinal waves.
Common Mistakes
- Choosing diffraction or interference because they are often demonstrated with light; both also occur with sound.
- Thinking “electromagnetic waves” rather than “transverse waves”: polarisation is about the geometry of oscillations, not the type of wave medium.
Things to Be Careful About
- The question says only associated with transverse waves (unique property), not “commonly seen with”.
- Remember that sound in air is longitudinal and still reflects, diffracts and interferes, so those cannot be correct.
A wave is displayed on an oscilloscope.
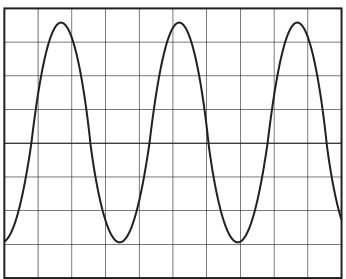
The oscilloscope settings are:
time–base:
y-gain: .
What is the frequency of the wave?
Options
A
B
C
D
Working
One cycle occupies about horizontal divisions.
Time-base
Answer
B
B
Background Concept
An oscilloscope displays voltage (vertical axis) against time (horizontal axis). The time-base setting tells you how much time corresponds to one horizontal division on the screen.
For a repeating wave:
- The period is the time for one complete cycle.
- The frequency is the number of cycles per second.
They are related by:
Understanding the Question
You are given an oscilloscope trace of a sinusoidal wave and the time-base setting . You must find the wave’s frequency.
So you need to:
- Read how many horizontal divisions correspond to one full cycle (peak-to-peak or trough-to-trough).
- Convert that into a period using the time-base.
- Calculate .
Approach
- Choose two identical points on successive cycles (e.g. peak to next peak).
- Count the number of divisions between them (here it is about divisions).
- Multiply by to get in seconds.
- Take the reciprocal to find .
Step-by-Step Reasoning
- From the trace, one cycle spans approximately horizontal divisions.
- Use the time-base to convert divisions to time:
- Convert microseconds to seconds:
- Frequency is the reciprocal of the period:
This matches option B.
Key Takeaways
- On an oscilloscope, the horizontal axis is time; time-base gives time per division.
- Measure the period from peak-to-peak (or any identical repeating point).
- Convert units carefully () and use .
Common Mistakes
- Measuring less than a full cycle (e.g. peak to trough gives half a period).
- Forgetting to convert to seconds before taking the reciprocal.
- Using the y-gain (vertical scale) instead of the time-base for period.
Things to Be Careful About
- Use two clear identical points (peak-to-peak is usually easiest).
- Read the divisions as accurately as possible (estimate to about half a small division if needed).
- Keep powers of ten consistent: per division.
An electromagnetic wave travelling in free space is not visible to the human eye.
What is a possible wavelength of the wave?
Options
A
B
C
D
Working
Visible light has wavelength about to .
Convert option C:
This is much smaller than visible wavelengths (ultraviolet), so it is not visible.
Answer
C
C
Background Concept
Electromagnetic (EM) waves are classified by wavelength (or frequency). The human eye only detects a narrow band called visible light, with wavelengths roughly
Wavelengths shorter than this are ultraviolet (UV), X-rays, gamma rays; wavelengths longer are infrared (IR), microwaves, radio waves. To decide whether something is visible, you compare its wavelength with the visible range.
Understanding the Question
We are told the EM wave is travelling in free space and is not visible to the human eye. We must choose an option whose wavelength lies outside the visible range. The options are given in mixed units (km, m, cm, mm), so they must be converted into the same unit (best: metres) before comparing.
Approach
- Recall/quote the approximate visible wavelength range in metres.
- Convert each option into metres.
- Identify which option is outside the visible range; that is a possible wavelength for a non-visible EM wave.
Step-by-Step Reasoning
First, take the visible band as about m to m.
Now check the options by converting to metres.
- A:
This is within the visible range (around ), so it would be visible.
-
B: is directly in metres and lies within the visible range (around ), so visible.
-
C:
This is m , which is much shorter than , so it is ultraviolet and not visible.
- D:
This is about , still within the visible range (violet), so visible.
Therefore only option C is definitely not visible.
Key Takeaways
- Visible wavelengths are about m to m.
- Always convert to a common unit (metres) before comparing.
- UV has shorter wavelengths than visible light; IR has longer wavelengths.
Common Mistakes
- Forgetting that , which can shift the answer by .
- Converting cm or mm the wrong way round (e.g. using instead of for cm to m).
- Thinking “not visible” means “not in free space” (it doesn’t; all EM waves travel in free space).
Things to Be Careful About
- Keep powers of ten consistent: write each conversion step explicitly.
- Compare to the full visible range; values near m (violet) and m (red) are still visible.
- Don’t mix up wavelength units: and differ by a factor of .
Electromagnetic waves of equal wavelengths are emitted from two sources, and . The waves are emitted from and with a phase difference of .
A detector moves along a path that is parallel to the line and detects a pattern of intensity maxima and minima.
The diagram shows the arrangement of the sources and the path of the detector.
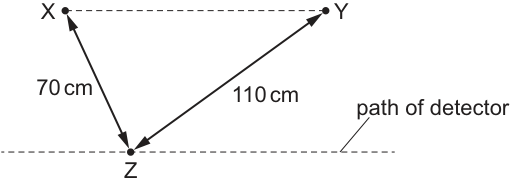
An intensity maximum is detected at point . Length is and length is .
What is a possible wavelength of the waves?
Options
A
B
C
D
Working
Path difference at :
Sources are out of phase, so for a maximum:
So
Try :
So is possible.
Answer
B
B
Background Concept
For two coherent sources, the interference at a point depends on the phase difference between the arriving waves.
The phase difference at the detector comes from:
- any initial phase difference between the sources, and
- the path difference between the two routes, which adds a phase shift of .
A maximum (constructive interference) occurs when the total phase difference is an integer multiple of .
If the sources are in phase initially, maxima occur when .
If the sources are out of phase initially (i.e. phase difference ), then to get a maximum the path difference must supply an extra half-wavelength to cancel this:
Understanding the Question
At point the distances from the two sources are given:
The sources emit waves with a phase difference of , and the detector registers an intensity maximum at .
So we must:
- find the path difference at ;
- use the correct maximum condition for antiphase sources;
- see which option wavelength fits.
Approach
Compute
Then apply
and test the options by checking whether equals a half-integer (e.g. ).
Step-by-Step Reasoning
- Path difference at :
- Because the sources are out of phase, maxima require a half-integer number of wavelengths in path difference:
- Check each option by computing :
- If , then (an integer, would correspond to in-phase maximum, not antiphase).
- If , then
This matches with , so it is valid.
- If , then (integer, not valid for antiphase maximum).
- If , then (integer, not valid for antiphase maximum).
Therefore the only possible wavelength given is (option B).
Key Takeaways
- Path difference is found from the difference in source-to-point distances: .
- For sources out of phase, maxima occur at half-integer path differences: .
- A quick check is whether is a half-integer.
Common Mistakes
- Using the in-phase condition even though the sources are out of phase.
- Forgetting the absolute value and getting a negative path difference (only the magnitude matters).
- Thinking “maximum means integer wavelengths” without considering the initial phase difference.
Things to Be Careful About
- Always incorporate any stated phase difference at the sources before applying interference conditions.
- Ensure consistent units (here both distances are in cm, so comes out in cm).
- For antiphase sources: maxima at and minima at (the opposite of the in-phase case).
Two waves of the same type overlap.
When does the principle of superposition apply?
Options
A always
B only when the waves have the same amplitude
C only when the waves travel in opposite directions
D only when the waves have the same frequency
Working
The principle of superposition states that when waves overlap, the resultant displacement at any point is the vector (algebraic) sum of the individual displacements. It does not require equal amplitudes, opposite directions, or equal frequencies.
Answer
A
A
Background Concept
The principle of superposition for waves states:
- When two (or more) waves overlap in the same region of space, the resultant displacement at any point is the algebraic (vector) sum of the displacements due to each wave.
This is a property of linear wave behaviour (the kind assumed throughout AS wave superposition and interference questions). In such situations, waves pass through each other and continue unchanged after overlapping.
Understanding the Question
You are told that two waves of the same type overlap. The question asks when the principle of superposition applies, and gives four possible conditions (always / same amplitude / opposite directions / same frequency).
So you need to recall whether superposition needs any special matching conditions between the waves.
Approach
- State the definition of superposition: resultant displacement = sum of individual displacements during overlap.
- Check each option: does superposition require that extra condition?
Step-by-Step Reasoning
- Superposition is defined to apply whenever waves overlap (in the linear regime).
- There is no requirement that:
- the amplitudes are equal (waves of different amplitudes still add),
- the waves travel in opposite directions (waves travelling in the same direction also add),
- the frequencies are the same (different-frequency waves still add; the resultant just varies more complicatedly in time).
Therefore the correct choice is always.
Key Takeaways
- Superposition means: overlap ⇒ add displacements point-by-point.
- Equal amplitude, opposite directions, and equal frequency are not conditions for superposition (though some of them may be relevant for specific phenomena like stationary waves or stable interference patterns).
Common Mistakes
- Confusing superposition with interference patterns: stable interference fringes require coherence/same frequency, but superposition itself does not.
- Thinking stationary waves are the only case of superposition: stationary waves are one application (often opposite directions and same frequency), not the condition for superposition.
Things to Be Careful About
- In A-Level questions, superposition is assumed valid for ordinary wave amplitudes in typical media (i.e. linear behaviour). Unless the question mentions non-linear effects, the correct condition is simply: whenever they overlap.
A ripple tank contains water at a constant depth.
A water wave of constant frequency travels towards a gap in a barrier placed in the ripple tank.
The gap is made smaller.
Which diagram represents the wave before and after the barrier?
Options
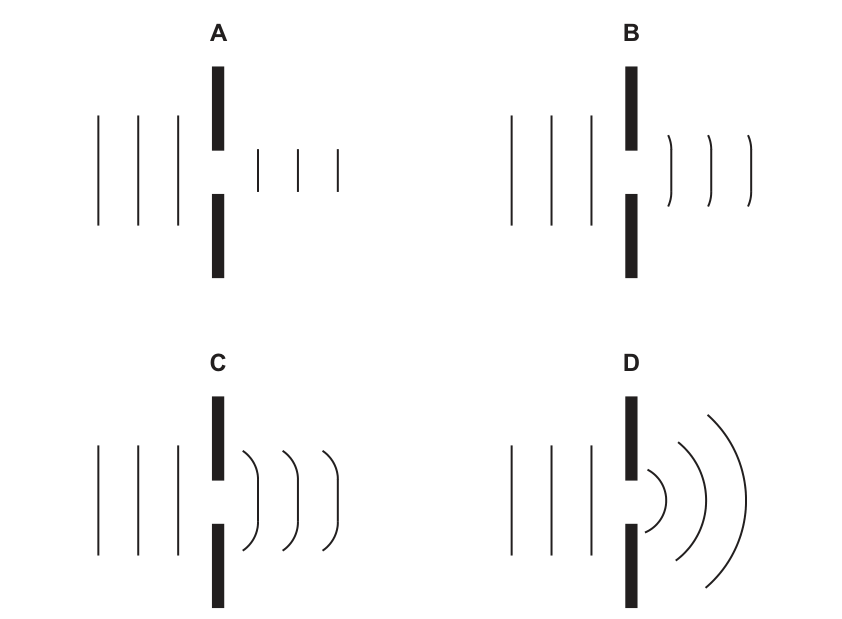
Working
Water depth is constant (\Rightarrow) wave speed (v) is constant. Frequency (f) is constant, so
Hence (\lambda) (wavefront spacing) is unchanged.
Making the gap smaller increases diffraction, so the wavefronts spread out more after the gap.
Answer
D
D
Background Concept
Diffraction is the spreading of a wave as it passes through a gap or around an obstacle. The amount of diffraction depends mainly on how the gap width compares with the wavelength (\lambda):
- gap (\gg \lambda): little diffraction (wavefronts remain almost straight)
- gap (\approx \lambda) or smaller: strong diffraction (wavefronts become strongly curved and spread out)
In a ripple tank, for water of a fixed depth, the wave speed (v) is (approximately) constant. For a wave of fixed frequency (f), the wavelength is set by the wave equation
So if (v) and (f) are constant, then (\lambda) must also remain constant.
Understanding the Question
Before the barrier, plane wavefronts travel towards a gap. Then the gap is made smaller. You must choose the diagram that correctly shows:
- what happens to wavelength (spacing of wavefronts) before vs after, and
- what happens to the shape/spreading of the wavefronts after the gap.
The key information is:
- water depth constant (\Rightarrow v) constant
- frequency constant (\Rightarrow f) constant
- the gap is made smaller (\Rightarrow) diffraction increases.
Approach
- Use (v = f\lambda) to decide whether (\lambda) changes.
- Use the qualitative diffraction rule (smaller gap (\Rightarrow) more spreading) to decide the wavefront shape after the barrier.
- Pick the option that shows unchanged spacing but increased curvature/spreading.
Step-by-Step Reasoning
- Since the water depth is constant, the wave speed does not change.
- Frequency is given as constant.
- From
with constant (v) and constant (f), the wavelength (\lambda) is constant. So the spacing between adjacent wavefronts should be the same before and after the barrier.
4) Making the gap smaller makes the gap size closer to (or smaller than) (\lambda). Diffraction therefore becomes more significant: the wavefronts emerging from the gap become more curved and spread out more widely.
5) The correct diagram must therefore show:
- same wavefront spacing on both sides of the barrier, and
- stronger spreading/curvature after the gap.
Option D shows the strongest diffraction from the smaller gap while keeping the wavefront spacing unchanged, so it is correct.
Key Takeaways
- In a ripple tank with constant depth, wave speed is (approximately) fixed.
- With constant frequency, wavelength stays constant: (\lambda = v/f).
- Reducing the gap width increases diffraction, giving more spreading and more curved wavefronts.
Common Mistakes
- Thinking that making the gap smaller changes the wavelength: the barrier affects direction/spreading, not (f) or (v) here.
- Choosing a diagram where the wavefront spacing changes after the gap (implying a different (\lambda) without a change in (v) or (f)).
- Confusing diffraction with refraction: refraction (and wavelength change) happens when wave speed changes (e.g. depth changes), which is not the case here.
Things to Be Careful About
- The wavelength is judged by the spacing between successive wavefront lines in the diagram.
- “More diffraction” means more spreading (more nearly semicircular wavefronts), not “faster” waves.
- Constant depth is the clue that wave speed is unchanged; if depth were changed, then wavelength could change too.
Light of a single frequency from two coherent sources interferes to produce a pattern of bright and dark fringes on a screen.
Which change results in a larger fringe separation?
Options
A increasing the distance between the sources and the screen
B increasing the distance between the two sources
C increasing the frequency of the light
D increasing the intensity of the light
Working
For two coherent sources,
A larger requires larger or , or smaller .
Option A increases , so increases.
Answer
A
A
Background Concept
Two coherent sources (or a double slit) produce an interference pattern of alternating bright and dark fringes. The separation of adjacent bright fringes (fringe spacing) on a distant screen is
where:
- is the fringe spacing,
- is the wavelength of the light,
- is the distance from the sources (slits) to the screen,
- is the separation of the two sources (slits).
For light in air, wavelength and frequency are related by
so increasing frequency decreases wavelength.
Understanding the Question
You are told there are two coherent sources of single-frequency light producing bright and dark fringes on a screen. The question asks which change makes the fringes further apart (larger fringe separation ).
The options change one of: , , , or the intensity.
Approach
Use the standard relation and consider whether each suggested change makes increase or decrease:
- increasing increases ,
- increasing decreases ,
- increasing decreases and so decreases ,
- intensity affects brightness, not spacing.
Step-by-Step Reasoning
Start with
Check each option:
A increasing distance between sources and screen: increases, so
B increasing distance between the two sources: increases, so
C increasing frequency: since , increasing makes smaller, so decreases.
D increasing intensity: intensity changes the brightness (contrast) of fringes but does not change the geometry/path difference conditions, so is unchanged.
Therefore only A produces a larger fringe separation.
Key Takeaways
- Fringe spacing for two-source interference is
- To increase spacing: increase or , or decrease .
- Intensity affects how bright fringes are, not how far apart they are.
Common Mistakes
- Thinking that increasing slit separation spreads fringes out; it actually makes them closer together.
- Forgetting that increasing frequency reduces wavelength because .
- Confusing fringe spacing with fringe brightness (intensity).
Things to Be Careful About
- Use the correct proportionalities: is directly proportional to and , but inversely proportional to .
- “Single frequency” implies is fixed unless frequency is changed.
- The formula assumes small angles and a screen far enough away for the usual double-slit approximation.
The current in a metallic conductor of cross-sectional area is given by
where is the elementary charge and is the mean drift velocity of the conduction electrons.
What is represented by the letter in the equation?
Options
A density of conduction electrons
B number of conduction electrons per unit time
C number of conduction electrons per unit volume
D volume of conduction electrons
Working
In , the factor must describe how many charge carriers are present in the conductor per unit volume (number density), so that is the number of electrons passing a cross-section per second.
Answer
C
C
Background Concept
Electric current is the rate of flow of charge:
In a metal, conduction electrons drift through the lattice with a small mean drift speed . If the conductor has cross-sectional area and the number density of free electrons is (electrons per unit volume), then in time the electrons in a cylinder of length and cross-section pass through the cross-section.
The volume of this cylinder is , so the number of electrons in it is , and the total charge that passes is . Hence:
Understanding the Question
You are given the equation:
and asked what physical quantity represents. The options include several plausible-sounding “number of electrons ...” statements, so you must pick the one consistent with the derivation/meaning of the drift-current equation.
Approach
Recall (or reconstruct) how is formed: current equals (number of charge carriers crossing per second) multiplied by (charge per carrier). Identify what quantity must multiply and to give “number per second”, which points to a number per unit volume.
Step-by-Step Reasoning
- In time , electrons drift a distance .
- The slab of conductor that moves past a cross-section has volume:
- If is the number of electrons per unit volume, then the number of electrons in that volume is:
- Total charge passing is:
- Therefore:
So must be the number of conduction electrons per unit volume.
Therefore the correct option is C.
Key Takeaways
- The drift current equation is .
- is a number density (per unit volume), not a total number and not a rate.
- The factor corresponds to “number of charge carriers crossing per second”.
Common Mistakes
- Choosing A (“density of conduction electrons”) because “density” is vague: in physics, density might mean mass density, but here we need number density explicitly (per unit volume).
- Choosing B (number per unit time): that would already be a rate, but in the rate comes from (volume per unit time) multiplied by .
- Thinking is the total number of electrons in the wire; it is not, because it does not depend on the wire’s length.
Things to Be Careful About
- Wording: “density” must be interpreted carefully; the precise mark-scheme meaning here is number per unit volume.
- Units check: should have units so that has units and multiplying by gives current in .
What cannot be the charge on a charge carrier?
Options
A
B
C
D
Working
Charge on a carrier must be an integer multiple of .
Check option C:
Not an integer, so this charge is not possible.
Answer
C
C
Background Concept
Electric charge is quantised: any isolated charge you measure is made up of whole numbers of the elementary charge.
The elementary charge has magnitude
So the charge on a charge carrier must be
where is an integer (). For example, an electron has charge and a proton has charge . A carrier could also be an ion with charge , , etc.
Understanding the Question
You are given four possible values for the charge on a single charge carrier. The question asks which one cannot be a charge on a carrier.
So you test whether each option is an integer multiple of .
Approach
For each option, compute
- If the result is an integer, that charge is possible.
- If the result is not an integer, that charge is not possible.
Step-by-Step Reasoning
Option A:
Integer possible ().
Option B:
Integer possible ().
Option C:
Not an integer not possible for a single carrier.
Option D:
Integer possible ().
Therefore the charge that cannot be on a charge carrier is option C.
Key Takeaways
- Charge comes in discrete packets: .
- Testing whether a proposed charge is possible is done by checking whether is an integer.
Common Mistakes
- Thinking any multiple of is acceptable: it must be a multiple of specifically.
- Forgetting that both positive and negative integer multiples are allowed (ions can be positive; electrons are negative).
Things to Be Careful About
- Cancel the powers of ten correctly: the factors cancel when you divide by .
- The sign does not affect “integer multiple” status; is just as invalid as .
A steel wire with a length of is connected to a battery as shown.
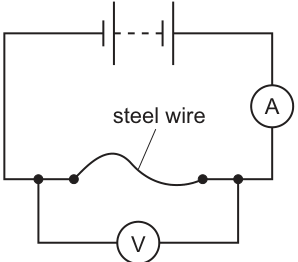
The reading on the voltmeter is and the reading on the ammeter is .
The resistivity of steel is .
What is the diameter of the steel wire?
Options
A
B
C
D
Working
Resistance of wire:
Using
For a circular wire, :
Answer
D
D
Background Concept
The resistance of a uniform wire depends on its material and dimensions:
where:
- is the resistivity of the material (in ),
- is the length of the wire (in ),
- is the cross-sectional area (in ).
The circuit measurements give the potential difference across the wire and the current through it, so (for an ohmic conductor under steady conditions):
Once is known, the diameter follows from the circular area formula:
Understanding the Question
You are told:
- ,
- voltmeter reading across the steel wire: ,
- ammeter reading in series: ,
- steel resistivity: .
The question asks for the wire diameter , and provides four options.
Approach
- Use to get the wire’s resistance.
- Rearrange to find .
- Convert area to diameter using .
- Choose the option matching the calculated diameter.
Step-by-Step Reasoning
- Find the resistance of the steel wire from the meter readings:
- Use the resistivity relation and rearrange for :
Substitute values:
First multiply the numerator:
Then divide:
- Convert area to diameter. For a circular cross-section:
- Compare with options: corresponds to D.
Key Takeaways
- Use to obtain resistance from voltmeter and ammeter readings.
- Use to link resistance to the wire’s geometry.
- Diameter comes from the circular area relation .
Common Mistakes
- Using instead of .
- Forgetting that is in and mixing units (e.g. using in cm).
- Using instead of (missing the factor of 4).
- Giving radius instead of diameter.
Things to Be Careful About
- Keep enough significant figures during intermediate steps so rounding does not shift you to a neighbouring option.
- Ensure the voltmeter is across the steel wire (so is the p.d. for that wire only), which is consistent with the diagram description.
- Check powers of ten when taking the square root: , so the diameter should come out in the mm range, matching option D.
Two resistors of resistance and two resistors of resistance are connected to a cell of e.m.f. as shown.
The cell has negligible internal resistance.
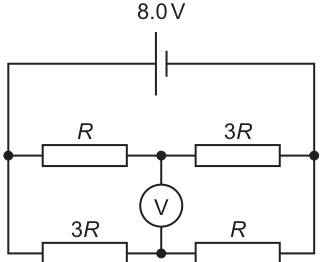
What is the reading on the voltmeter?
Options
A
B
C
D
Working
Each branch has total resistance , so each branch is a potential divider across .
Top midpoint potential (from left):
Bottom midpoint potential (from left):
Voltmeter reading:
Answer
C
C
Background Concept
A pair of resistors in series connected across a supply forms a potential divider. If a supply of e.m.f. is applied across two series resistors and , then the potential difference from the lower-potential end up to the junction is
This works because in a series circuit the same current flows through both resistors, so the voltage drops are proportional to their resistances.
A voltmeter connected between two junctions measures the potential difference between those two points (node voltages), i.e. the difference in their potentials.
Understanding the Question
The circuit has two branches in parallel across an cell (internal resistance negligible so the full is across each branch).
- Upper branch: then (junction in the middle).
- Lower branch: then (junction in the middle).
A voltmeter is connected between the two middle junctions. We must find the potential at each junction (relative to the same reference end) and subtract.
Approach
- Treat each branch separately as a series potential divider across .
- Find the potential of the midpoint of each branch measured from the same end (e.g. from the left-hand rail).
- The voltmeter reading is the magnitude of the difference between these two midpoint potentials.
Step-by-Step Reasoning
1. Confirm each branch sees .
Because the branches are connected in parallel between the same two supply rails, the p.d. across each branch equals the cell e.m.f. ().
2. Upper branch midpoint potential.
Upper branch resistors in series: and so total .
The midpoint is after the first resistor from the left rail. Using the divider fraction:
3. Lower branch midpoint potential.
Lower branch resistors: then , again total .
The midpoint is after from the left rail:
4. Voltmeter reading.
The voltmeter measures the potential difference between these two nodes:
So the correct option is C.
Key Takeaways
- In parallel, each branch has the same supply p.d.
- In series, voltage divides in proportion to resistance.
- A voltmeter reads the difference between node potentials, not the drop across a single named resistor (unless it is connected across it).
Common Mistakes
- Adding the resistances of the two branches together as if they were in series with each other.
- Assuming the midpoints are at the same potential because the layout looks symmetrical (the resistor values are swapped, so the junction potentials are not equal).
- Taking the voltmeter reading as or (these are node potentials relative to one rail, not the p.d. between the two midpoints).
Things to Be Careful About
- Use the same reference end (left rail or right rail) for both junction potentials before subtracting.
- The voltmeter reads a magnitude; the sign depends on which lead is connected to which junction, but the reading is the absolute p.d.
- Keep the divider ratio correct: it is the resistance from the reference rail to the junction divided by the total series resistance in that branch.
A battery has an e.m.f. and internal resistance . The battery delivers a current to a variable resistor and the p.d. across its terminals is .
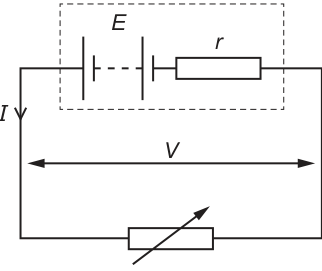
The variable resistor is adjusted so that increases.
Why does decrease?
Options
A The e.m.f. decreases.
B The internal resistance increases.
C The p.d. across increases.
D The resistance of the variable resistor increases.
Working
For a cell with internal resistance ,
When increases, the lost p.d. across increases, so decreases.
Answer
C
C
Background Concept
A real battery can be modelled as an ideal source of e.m.f. in series with an internal resistance . When current flows, there is a voltage drop across the internal resistance of magnitude .
The terminal potential difference (the p.d. measured across the battery's external terminals) is then
So is less than whenever the battery is delivering current.
Understanding the Question
The variable resistor in the external circuit is adjusted so that the current drawn from the battery increases.
The question asks why the terminal p.d. across the battery terminals decreases as increases.
Approach
Use the internal resistance model and the equation relating , , and . Then examine what happens to when increases (assuming and are properties of the battery and do not change in this simple model).
Step-by-Step Reasoning
- Write the terminal p.d. equation:
-
Increasing the current increases the product (since is constant for the model).
-
The term is the p.d. “lost” inside the battery across its internal resistance.
-
Since , a larger value of means a smaller value of .
Therefore decreases because the p.d. across increases.
Key Takeaways
- Terminal p.d. when delivering current: .
- As current increases, the internal voltage drop increases, reducing the terminal p.d.
Common Mistakes
- Thinking decreases just because the load changes (in this model is constant).
- Choosing “ increases”: internal resistance is usually treated as constant in these questions.
- Choosing “variable resistor increases”: if increases, the external resistance must have decreased, not increased.
Things to Be Careful About
- Distinguish clearly between e.m.f. (energy per unit charge supplied by the source) and terminal p.d. (energy per unit charge delivered to the external circuit).
- Remember that the internal resistance drop is , so it grows directly with .
An electrical device of fixed resistance is connected in series with a variable resistor and a battery of e.m.f. and negligible internal resistance.
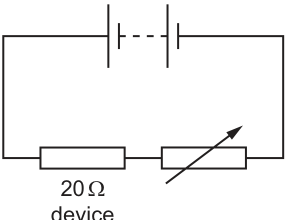
The power dissipated in the electrical device is .
What is the resistance of the variable resistor?
Options
A
B
C
D
Working
For the device,
Total resistance:
Variable resistor:
Answer
A
A
Background Concept
In a series circuit, the same current flows through every component. The potential difference from the supply is shared between the components, and the total resistance is the sum:
For a resistor, the electrical power converted to heat is
Which form you use depends on what you know. Here, we are told the power in a known resistor, so is the quickest way to find the current.
Understanding the Question
A device is in series with an unknown variable resistor, connected to an ideal battery (negligible internal resistance). The device alone dissipates . We need the resistance of the variable resistor (choose A–D).
Key consequence of “in series”: once we find the current from the device’s power, that current is also the current drawn from the battery.
Approach
- Use on the device to calculate the circuit current .
- Use for the whole circuit to find .
- Subtract the fixed to get the variable resistor value.
Step-by-Step Reasoning
- Power in the resistor is :
- The battery provides across the entire series combination, so
- In series,
So
This matches option A.
Key Takeaways
- In series circuits, the current is the same through each component.
- Knowing the power in one resistor can let you find the circuit current using .
- Total series resistance is found from , then subtract known resistances.
Common Mistakes
- Using with for the device: is across the whole circuit, not just the resistor.
- Adding resistances incorrectly (e.g. using a parallel formula).
- Forgetting to subtract the and giving instead of the variable resistor.
Things to Be Careful About
- Ensure you interpret the given power as for the device only.
- Use consistent units (here all are already in SI units).
- Rounding: rounds to , matching the available options.
A nucleus decays by emitting a particle.
Which particle must also be emitted from the nucleus?
Options
A antineutrino
B particle
C -particle
D neutrino
Working
In (\beta^{+}) decay, a proton in the nucleus changes to a neutron:
So a neutrino must also be emitted.
Answer
D
D
Background Concept
In nuclear (\beta) decays, the nucleus changes its proton/neutron composition while keeping the nucleon (mass) number (A) the same.
For (\beta^{+}) decay (positron emission), a proton in the nucleus is converted into a neutron. To satisfy conservation laws, an additional particle is emitted along with the positron.
Key conservation laws:
- Nucleon number (A) is conserved in (\beta) decay.
- Charge is conserved.
- Lepton number is conserved. Electrons and neutrinos have lepton number (+1); positrons and antineutrinos have lepton number (-1).
Understanding the Question
You are told a nucleus emits a (\beta^{+}) particle (a positron). The question asks which other particle must also be emitted at the same time from the nucleus.
The options include neutrino vs antineutrino, and unrelated emissions like (\beta^{-}) and (\alpha).
Approach
Write the standard (\beta^{+}) decay equation and use conservation of charge and lepton number to identify the required accompanying particle.
Step-by-Step Reasoning
A (\beta^{+}) particle is a positron (e^{+}). In (\beta^{+}) decay inside the nucleus:
- A proton changes into a neutron.
- A positron is emitted.
- A neutrino is emitted.
At the nucleon level the reaction is:
Check conservation:
- Charge: left side (+1). Right side: neutron (0) + positron (+1) + neutrino (0) gives (+1). OK.
- Lepton number: initially (0). Positron has lepton number (-1), so to keep total at (0), the neutrino must have lepton number (+1). Therefore it must be a neutrino (not an antineutrino).
So the correct option is neutrino, which is option D.
Key Takeaways
- (\beta^{+}) decay is positron emission and changes (Z \rightarrow Z-1) while (A) stays constant.
- (\beta^{+}) decay must emit a neutrino to conserve lepton number.
Common Mistakes
- Choosing antineutrino by confusing (\beta^{+}) with (\beta^{-}) decay ((\beta^{-}) emission is accompanied by an antineutrino).
- Thinking an (\alpha)-particle must be emitted: (\alpha) decay is a completely different process ((A) decreases by 4 and (Z) decreases by 2).
- Selecting (\beta^{-}) as an additional emission: nuclei do not need to emit both (\beta^{+}) and (\beta^{-}) together.
Things to Be Careful About
- Distinguish neutrino vs antineutrino using lepton number:
- (\beta^{-}): (n \rightarrow p + e^{-} + \bar{\nu})
- (\beta^{+}): (p \rightarrow n + e^{+} + \nu)
- Remember (\beta) decay leaves (A) unchanged; only (Z) changes by (\pm 1).
What are the charges on an antidown quark and on an antistrange quark?
Options
| antidown quark | antistrange quark | |
|---|---|---|
| A | ||
| B | ||
| C | ||
| D |
Working
Down-type quarks (, ) have charge .
So antidown and antistrange have charge .
Answer
A
A
Background Concept
Quarks come in different “flavours” and each flavour has a fixed electric charge (a fraction of the elementary charge ).
- Up-type quarks (, , ) have charge .
- Down-type quarks (, , ) have charge .
For every quark there is a corresponding antiquark. An antiquark has the same magnitude of charge but the opposite sign.
Understanding the Question
You are asked for the charges (in terms of ) of:
- an antidown quark ()
- an antistrange quark ()
Then you must choose the option A–D whose pair of charges matches.
Approach
- Recall whether and are up-type or down-type quarks.
- Use the known charge for that type.
- Reverse the sign to get the antiquark charge.
- Compare with the table of options.
Step-by-Step Reasoning
- Both down () and strange () are down-type quarks.
- Therefore each has charge:
- For the corresponding antiquarks, the charge changes sign:
- The option with for both antidown and antistrange is A.
Key Takeaways
- Memorise the quark charge pattern: up-type , down-type .
- Antiquarks have charges of equal magnitude and opposite sign to their quarks.
Common Mistakes
- Mixing up up-type and down-type charges (writing for or ).
- Forgetting to reverse the sign for an antiquark.
- Assuming different down-type quarks ( and ) have different charges (they do not).
Things to Be Careful About
- The question is specifically about antidown and antistrange (antiquarks), so a sign change is essential.
- Keep the factor of and the fraction exactly as given (do not convert to coulombs here).
The nucleus of a radioactive isotope of an element emits an -particle. The daughter nucleus then emits a particle and then the daughter nucleus of that reaction emits another particle.
Which statement describes the final nuclide that is formed?
Options
A It is a different isotope of the original element.
B It is a nuclide of a different element of higher proton number.
C It is a nuclide of the same element but with different proton number.
D It is identical to the original nuclide.
Working
decay: , .
Each decay: unchanged, .
Two decays: .
Net change: : (same element), : (different isotope).
Answer
A
A
Background Concept
A nuclide is identified by:
- proton number (this determines the element), and
- nucleon number (protons + neutrons; this determines the isotope for a fixed ).
Radioactive decays change and/or in standard ways:
- decay: the nucleus emits a helium nucleus . So
- decay: a neutron turns into a proton (plus an electron and an antineutrino). So
Understanding the Question
The decay chain is:
- original nucleus emits an particle,
- the daughter emits a particle,
- the next daughter emits another particle.
We must decide what the final nuclide is, in terms of whether it is the same element or a different one, and whether it is the same isotope.
Approach
Track changes to and step-by-step:
- Apply the change to and .
- Apply two successive changes (each increases by 1 and leaves unchanged).
- Compare final and to the original: same means same element; different means different isotope.
Step-by-Step Reasoning
Let the original nuclide be .
- After emission:
So decreases by 4 and decreases by 2.
- After the first emission:
stays ; increases by 1.
- After the second emission:
Again unchanged, and increases by 1.
So overall:
- net change: (\Rightarrow) final has the same proton number as the original (\Rightarrow) same element.
- net change: (\Rightarrow) final has a different nucleon number (\Rightarrow) different isotope of that element.
Therefore the correct statement is: a different isotope of the original element (Option A).
Key Takeaways
- Element identity is fixed by proton number .
- decay: , .
- decay: unchanged, .
- In decay chains, add the changes to and to find the final nuclide.
Common Mistakes
- Thinking decay changes (it does not).
- Forgetting there are two decays, so increases by 2 after the step.
- Concluding “same element” means “identical nuclide”: same but different means a different isotope.
Things to Be Careful About
- Keep (nucleon number) and (proton number) separate; only determines the element name.
- Net effect here is a useful pattern: followed by two returns to its original value but leaves reduced by 4, so you must choose an option describing a different isotope of the original element.
Your score so far
Answer a question to start scoring
Your marks add up here as you work through the paper.