Physics 9702/12 — May/June 2025
Cambridge AS Level · Multiple Choice (AS Level) · answer key with instant marking and worked solutions
Topics Waves · Dynamics · Physical Quantities and Units · Work, Energy and Power · Forces, Density and Pressure · Superposition · +5 more
Tap an option under each question to check it — your score builds as you go.
What must all physical quantities have?
Options
A a direction and a magnitude
B a direction and a unit
C a magnitude and a prefix
D a magnitude and a unit
All physical quantities must have a numerical value (magnitude) and a unit.
Answer
D
D
Background Concept
A physical quantity is something that can be measured and expressed using a number and a unit. For example, a length might be written as : here is the magnitude (numerical value) and is the unit.
Some physical quantities are scalars (magnitude only, e.g. mass, time, temperature), and some are vectors (magnitude and direction, e.g. displacement, velocity, force). Because not all quantities are vectors, direction is not a requirement for every physical quantity.
Prefixes (like milli-, kilo-) are optional ways of writing units and are not required.
Understanding the Question
The question asks for what all physical quantities must have, so we need a feature that is true for both scalars and vectors, in every case.
Approach
Use the definition of a physical quantity: it must be measurable and therefore expressible as a number with a unit. Then check each option for something that is always present.
Step-by-Step Reasoning
- Option A: “direction and magnitude” is only true for vectors, not for scalars like mass. So not all quantities.
- Option B: “direction and unit” again fails for scalars (no direction).
- Option C: “magnitude and a prefix” is false because prefixes are optional (e.g. has no prefix).
- Option D: “magnitude and a unit” matches the definition of any physical quantity.
Therefore the correct option is D.
Key Takeaways
- Every physical quantity must be written as number + unit.
- Direction is only required for vector quantities.
- Prefixes are a choice, not a necessity.
Common Mistakes
- Thinking all physical quantities are vectors (so choosing an option involving direction).
- Confusing “unit” with “prefix”: prefixes modify units but are not always used.
Things to Be Careful About
- Words like “all” mean you must pick something universally true, not just true for many common examples.
- Remember the scalar/vector distinction: vectors have direction; scalars do not.
What is expressed in ?
Options
A
B
C
D
Working
So
Answer
D
D
Background Concept
To convert units, rewrite every prefix and unit in terms of SI base units.
- Prefix: .
- Length: .
- A squared (or inverse-squared) unit must be converted using index laws: if , then .
Here is the SI unit of pressure/stress (pascal).
Understanding the Question
We are given a stress/pressure-like unit: .
We must express it in . This means:
- convert to ,
- convert to ,
- multiply the conversion factors.
Then choose the matching option.
Approach
Write
Convert each bracket to SI:
- gives a factor of .
- gives a factor of (because the millimetre is m and the power is ).
Then multiply the factors and compare with the options.
Step-by-Step Reasoning
- Convert the force unit:
So
- Convert the area unit (carefully with the power ):
Raise both sides to the power :
- Combine conversions:
This is , which matches option D.
Key Takeaways
- Always convert prefixes first: .
- When converting to , the factor becomes (because ).
- Combine powers of ten systematically.
Common Mistakes
- Treating as if it converts with instead of applying the power .
- Forgetting that the negative power flips the sign: becomes , not .
- Converting incorrectly (e.g. using ).
Things to Be Careful About
- Apply index laws correctly: and .
- Keep units attached during conversion to avoid losing track of whether the factor should multiply or divide.
- Make sure the final unit is exactly before choosing the option.
A student calculates the density of a solid steel cube in an experiment.
The measured mass is and the measured length of side is .
What is the density of the steel?
Options
A
B
C
D
Working
Convert side length: .
Volume of cube:
Density:
Percentage uncertainty:
Answer
B
B
Background Concept
Density is defined as mass per unit volume:
When a quantity is calculated from measured values, its uncertainty depends on how those measurements combine.
For percentage uncertainties:
- For multiplication/division, percentage uncertainties add.
- If a measured quantity is raised to a power , its percentage uncertainty is multiplied by .
So if , then:
Understanding the Question
You are given:
- mass
- cube side length
You must find:
- the density of the cube
- the percentage uncertainty in that density
The options all already suggest the density value is about , so the discriminating step is the uncertainty.
Approach
- Convert the side length into cm so that the final density can be in .
- Calculate the volume .
- Calculate density .
- Find percentage uncertainty in mass.
- Find percentage uncertainty in length, then multiply by 3 to get percentage uncertainty in volume.
- Add the percentage uncertainties in mass and volume to get the percentage uncertainty in density.
Step-by-Step Reasoning
1) Unit conversion and volume
The side length is given in mm, but the density answers are in .
Volume of a cube:
2) Density
(Indeed consistent with steel.)
3) Percentage uncertainty in density
Because , percentage uncertainties in and add.
Mass percentage uncertainty:
Length percentage uncertainty:
Volume depends on , so multiply by 3:
Now add to get density percentage uncertainty:
This matches option B.
Key Takeaways
- Convert units early so your derived unit (here ) comes out naturally.
- For powers: if , then percentage uncertainty in is times percentage uncertainty in .
- For products/quotients: add percentage uncertainties.
Common Mistakes
- Using instead of multiplying by 3 for .
- Forgetting to convert to (leading to a volume in and the wrong density unit).
- Combining uncertainties incorrectly (e.g. subtracting, or adding absolute uncertainties instead of percentage uncertainties for division).
Things to Be Careful About
- The uncertainty in length is relatively large compared to mass, and because volume depends on , it dominates the final uncertainty.
- Rounding: keep a guard digit (e.g. ) and round at the end to match the option precision.
- Ensure the density unit is , not or unless explicitly asked.
The time period of a pendulum is given by
where is the length of the pendulum and is the acceleration of free fall.
The equation is homogeneous.
What is the value of ?
Options
A
B
C
D
Working
Dimensions: .
so
Hence .
So .
Answer
C
C
Background Concept
For an equation to be homogeneous, the dimensions (base units) of the left-hand side (LHS) must match the dimensions of the right-hand side (RHS). Numerical constants such as have no units and do not affect dimensional balance.
A useful way to do this quickly is:
- write each quantity in base dimensions (e.g. time , length ),
- simplify the dimensions of any brackets,
- equate powers of each base dimension on both sides.
Understanding the Question
You are given
where:
- is the time period, so it has dimension ,
- is a length, dimension ,
- is acceleration, dimension .
The equation is stated to be homogeneous, so you must choose so that the RHS has the same dimensions as .
Approach
- Find the dimensions of .
- Raise that to the power .
- Set the resulting time power equal to and solve for .
- Match to the options.
Step-by-Step Reasoning
- Dimensions of each quantity:
- Dimensions of the bracket:
So has dimensions of time-squared.
- Apply the power :
The factor is dimensionless, so it does not change this.
- Match LHS and RHS dimensions:
So the correct option is C.
Key Takeaways
- Homogeneous equations must have matching dimensions on both sides.
- Acceleration has dimensions .
- If has dimensions , then the exponent must make it become .
Common Mistakes
- Treating as having units (it is dimensionless).
- Using and forgetting the length dimension.
- Equating because appears, instead of recognising that .
Things to Be Careful About
- When a bracket is raised to a power, the dimensions are raised to that power too: .
- Always cancel dimensions algebraically (e.g. the cancels in ).
- Make sure you equate the exponent of the time dimension correctly (here, ).
Radio waves can be used to measure the distance between Earth and the planet Jupiter.
A pulse of radio waves is emitted from the surface of Earth. The pulse reflects from the surface of Jupiter and is detected again on Earth.
The time between emitting and receiving the pulse is .
What is the distance between Earth and Jupiter?
Options
A
B
C
D
Working
Radio waves travel at .
Round-trip time , so one-way time:
Distance Earth to Jupiter:
Answer
A
A
Background Concept
For any signal travelling at constant speed, the distance travelled is
Radio waves are electromagnetic waves, and in space (approximately vacuum) they travel at the speed of light,
If a pulse is sent out and then reflected back (an "echo" method), the measured time is the total time for the pulse to go to the planet and return. The one-way travel time is therefore half of the measured time.
Understanding the Question
A radio pulse is emitted from Earth, reflects off Jupiter, and is detected back on Earth. The time between sending and receiving is .
That corresponds to travelling a distance of
(where is the Earth-to-Jupiter distance). We must find and match it to one of the options in km.
Approach
- Use for the radio wave speed.
- Halve the given time to get the one-way time.
- Calculate .
- Convert metres to kilometres and compare with the options.
Step-by-Step Reasoning
The total time is , so the one-way time is
Now apply distance = speed × time:
Multiply , so
Convert to km using :
This matches option A.
Key Takeaways
- In "radar"/echo distance problems, the measured time is for the out-and-back journey, so use for one-way distance.
- Electromagnetic waves travel at in vacuum.
- Convert units carefully: dividing by changes metres to kilometres.
Common Mistakes
- Using without halving the time, giving a distance twice as large (would lead to option B).
- Converting units the wrong way (multiplying by instead of dividing when going from m to km).
- Using (confusing with km s or other speeds).
Things to Be Careful About
- The question says the pulse reflects and is detected again on Earth: that explicitly indicates a round trip.
- Keep track of powers of ten when converting to km.
- Options are in km, so ensure your final comparison is also in km.
The graph shows the variation with time of the velocity of a car.
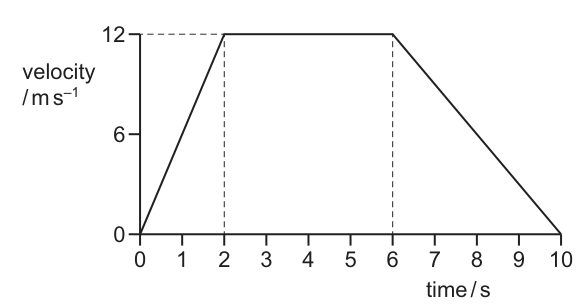
Which statement is correct?
Options
A The car accelerates for , then stops for and then reverses.
B The car accelerates at for .
C The car travels a distance of in the first .
D The car travels a distance of in the last .
Working
From the graph, velocity rises linearly from to in the first , then stays at .
Distance in first = area under - graph from to :
Triangle ( to ):
Rectangle ( to ):
Total:
Answer
C
C
Background Concept
A velocity–time graph tells you two key things:
- The gradient of the graph is the acceleration:
- The area under the graph between two times is the displacement (and the distance travelled if the velocity stays positive):
For straight-line sections, areas can be found using triangles and rectangles.
Understanding the Question
You are given a – graph:
- from to , increases linearly from to ,
- from to , is constant at ,
- from to , decreases linearly back to .
The options describe acceleration or distances in certain time intervals. We check each against what the graph actually implies.
Approach
Use quick checks:
- For any claim about accelerating, compute the gradient on the relevant section.
- For any claim about distance travelled, compute the area under the graph over the relevant time interval.
- Also watch for statements about stopping or reversing: that would require for a time (stopping) or negative velocity (reversing).
Step-by-Step Reasoning
Option A: “accelerates for , then stops for and then reverses.”
- It does accelerate for the first .
- But from to the graph is horizontal at , so it is moving at constant speed, not stopped.
- The velocity never goes negative, so it never reverses.
So A is false.
Option B: “accelerates at for .”
Acceleration in the first section is the gradient:
So B is false.
Option C: “travels a distance of in the first .”
Distance in first is area from to .
- From to : triangle area
- From to : rectangle area
Total:
So C is correct.
Option D: “travels a distance of in the last .”
Last means to , which is a triangle down from to :
So D is false.
Therefore the correct statement is C.
Key Takeaways
- Gradient of a – graph gives acceleration.
- Area under a – graph gives displacement; if it also equals distance travelled.
- Constant non-zero velocity is motion at steady speed, not stopping.
Common Mistakes
- Using the height of the graph () as if it were acceleration, instead of the slope.
- Forgetting to split the area into shapes (triangle + rectangle) when the graph changes form.
- Confusing last 4 seconds ( to ) with from to .
Things to Be Careful About
- Time intervals: always identify the correct start and end times from the graph.
- Units: area under – has units .
- “Reverses” requires negative velocity (graph below the time axis), which is not present here.
A solid object of mass falls vertically downwards in a vacuum.
When the speed of the object is , an additional constant force of suddenly starts to act vertically upwards on the object.
What is the speed of the object after the additional force starts to act?
Options
A
B
C
D
Working
Take downwards as positive.
Resultant force:
So
With and ,
Speed .
Answer
A
A
Background Concept
When forces on an object are constant, the acceleration is constant and is found from Newton’s second law:
Weight acts downward with magnitude . If an additional upward force acts, the resultant force is the vector sum (taking care with signs). Once is known, the velocity after time follows from constant-acceleration kinematics:
“Speed” means the magnitude of the velocity (always positive).
Understanding the Question
The object is already moving downward at when a new constant force of upward starts acting.
Given:
- initial velocity at that instant: downward
- forces after that instant: weight downward and upward
- time after force starts:
Find the speed after .
Approach
- Choose a sign convention (e.g. downward positive).
- Compute resultant force: .
- Use .
- Use to get the velocity after .
- Convert to speed by taking the magnitude.
Step-by-Step Reasoning
Take downward as positive.
1) Resultant force
- Weight:
- Upward force:
So
Negative means the resultant force is actually upward.
2) Acceleration
So the acceleration is upward (opposite to the initial downward motion), meaning the object is slowing down while moving downward.
3) Velocity after 2.0 s
The negative sign shows the object has reversed direction and is moving upward. The speed is therefore
So the correct option is A.
Key Takeaways
- Always use the resultant force to find acceleration: .
- A force opposite to the direction of motion produces acceleration that can slow, stop, and reverse the motion.
- “Speed” is the magnitude of velocity, so it is always positive.
Common Mistakes
- Adding forces as scalars without direction: using instead of for the resultant.
- Forgetting that speed is positive: getting and choosing a negative-speed option (none exist).
- Assuming the object keeps accelerating downward because it is falling: after the force starts, the net force is upward, so acceleration is upward.
Things to Be Careful About
- Sign convention: pick one direction as positive and stick to it throughout.
- Value of : many MCQs assume , giving exactly ; using gives which still rounds to option A.
- Units: ensure in , in , so comes out in .
A stone is thrown upwards and follows a curved path.
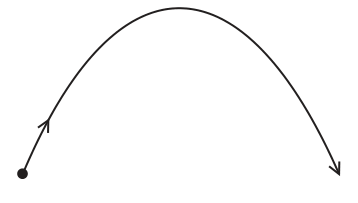
Air resistance is negligible.
Why does the path have this shape?
Options
A The stone has a constant horizontal acceleration and constant vertical velocity.
B The stone has a constant horizontal velocity and constant vertical acceleration.
C The stone has a constant upward acceleration followed by a constant downward acceleration.
D The stone has a constant upward velocity followed by a constant downward velocity.
Working
With negligible air resistance, there is no horizontal force, so horizontal acceleration is zero and horizontal velocity is constant.
The only force is weight, so vertical acceleration is constant downward ().
Answer
B
B
Background Concept
Projectile motion (with air resistance negligible) is motion under the influence of gravity only. The key idea is that the motion can be split into two independent perpendicular components:
- Horizontal (x-direction): no force (\Rightarrow) no acceleration (a_x = 0) (\Rightarrow) horizontal velocity (v_x) is constant.
- Vertical (y-direction): the only force is weight (mg) downward (\Rightarrow) constant acceleration (a_y = -g) (taking upward as positive).
A constant horizontal velocity combined with a constant vertical acceleration produces a parabolic (curved) trajectory.
Understanding the Question
A stone is thrown upward at an angle, and it follows a curved path. Air resistance is negligible, so we ignore drag. The question asks which statement about the stone’s horizontal and vertical motion explains the curved shape.
So we must choose the option that correctly describes the accelerations/velocities in each direction.
Approach
- Identify forces acting on the stone during flight.
- Convert forces into accelerations (Newton’s second law qualitatively).
- State what that implies for horizontal and vertical components of velocity.
- Match to the correct option.
Step-by-Step Reasoning
- After the stone is released, the only significant force is its weight (mg) acting vertically downward.
- Therefore:
- Horizontally: no force (\Rightarrow) (a_x = 0) (\Rightarrow) (v_x) is constant.
- Vertically: constant force (mg) downward (\Rightarrow) (a_y) is constant downward, equal to (-g).
- This exactly matches option B: constant horizontal velocity and constant vertical acceleration.
Why this gives the curved shape: as time passes, the stone continues moving sideways at steady rate, while its vertical velocity changes (reduces to zero at the top then becomes downward), so the direction of motion continuously changes, producing the arc.
Key Takeaways
- With negligible air resistance, projectiles have no horizontal acceleration and constant vertical acceleration (-g).
- The horizontal and vertical motions are independent.
- The curved path results from combining constant horizontal velocity with changing vertical velocity.
Common Mistakes
- Thinking there is a horizontal acceleration because the path is curved (curvature here comes from vertical acceleration, not horizontal).
- Mixing up velocity and acceleration (e.g. saying “constant vertical velocity” even though gravity must change vertical velocity).
- Thinking acceleration changes direction part way through; under gravity alone the acceleration is always downward.
Things to Be Careful About
- “Air resistance negligible” is the crucial clue: it removes any horizontal force and any speed-dependent drag forces.
- Vertical acceleration is constant throughout the flight (upwards motion does not mean acceleration is upwards).
- The vertical velocity changes sign at the top, but the vertical acceleration does not.
A rocket engine ejects of exhaust gas per second at a velocity of relative to the rocket.
What is the force acting on the rocket due to the ejected gas?
Options
A
B
C
D
Working
Mass ejected per second .
Rate of change of momentum of exhaust:
Answer
B
B
Background Concept
A force is the rate of change of momentum:
For a rocket, the engine throws mass (exhaust) backwards. If the exhaust leaves with speed relative to the rocket and mass is ejected at a rate (in ), then the momentum carried away each second is .
By Newton’s third law, the rocket experiences an equal and opposite force (thrust) forwards of magnitude:
This is essentially “momentum per second”.
Understanding the Question
You are told:
- exhaust mass ejected per second:
- exhaust speed relative to the rocket:
You must find the force on the rocket due to this ejected gas, and then choose the closest option in kN.
Approach
- Treat per second as the mass flow rate .
- Use (rate of change of momentum).
- Convert the answer from N to kN and match to an option.
Step-by-Step Reasoning
Mass flow rate:
Exhaust speed (relative to rocket):
Thrust magnitude:
Convert to kilonewtons ():
The closest option is , which is B.
Key Takeaways
- Use for situations involving momentum change.
- For steady exhaust: .
- Always check unit conversions (N to kN here).
Common Mistakes
- Multiplying by unnecessarily (this is not a weight question).
- Using the rocket’s speed relative to the ground (not given and not needed); the question gives speed relative to the rocket.
- Converting to kN incorrectly (e.g. dividing by instead of ).
Things to Be Careful About
- The velocity given is relative to the rocket, which is exactly what you need for thrust in this simplified model.
- Quote the final choice as the nearest option; rounds to .
Which statement does not describe an elastic collision between two objects?
Options
A The relative speed of approach of the two objects equals the relative speed of separation.
B The total kinetic energy of the objects is conserved.
C The total kinetic energy of the objects is reduced.
D The total linear momentum of the objects is conserved.
Working
In an elastic collision, total linear momentum and total kinetic energy are conserved, and relative speed of approach equals relative speed of separation.
Statement C says the total kinetic energy is reduced, which describes an inelastic collision.
Answer
C
C
Background Concept
A collision between two objects (treated as an isolated system) always conserves total linear momentum.
The key distinction is whether kinetic energy is conserved:
- Elastic collision: total kinetic energy is conserved.
- Inelastic collision: total kinetic energy decreases (some is transferred to internal energy such as heat, sound, deformation).
A useful equivalent statement for a 1D elastic collision is that the coefficient of restitution :
So for an elastic collision, the relative speed of approach equals the relative speed of separation.
Understanding the Question
You are given four statements about a collision and asked which one does not describe an elastic collision between two objects.
So you should check each option against the properties of an elastic collision (momentum conserved, kinetic energy conserved, relative speed approach = relative speed separation).
Approach
Use the definition:
- Identify which statements are true for elastic collisions.
- The odd one out (false for elastic collisions) is the answer.
Step-by-Step Reasoning
- A: “Relative speed of approach equals relative speed of separation.” This is true for a perfectly elastic collision (). So A describes an elastic collision.
- B: “Total kinetic energy is conserved.” This is the defining property of an elastic collision. So B describes an elastic collision.
- C: “Total kinetic energy is reduced.” This contradicts the definition of elastic; it describes an inelastic collision. So C does not describe an elastic collision.
- D: “Total linear momentum is conserved.” Momentum is conserved for collisions in an isolated system (elastic or inelastic), so it is consistent with an elastic collision.
Therefore the statement that does not describe an elastic collision is C.
Key Takeaways
- Elastic collision: momentum conserved and kinetic energy conserved.
- Inelastic collision: momentum conserved but kinetic energy decreases.
- Relative speed of approach = relative speed of separation is a hallmark of a perfectly elastic collision.
Common Mistakes
- Thinking momentum conservation distinguishes elastic from inelastic (it does not; momentum is conserved in both, if external forces are negligible).
- Mixing up “kinetic energy conserved” with “total energy conserved” (total energy is always conserved, but kinetic energy may convert to other forms).
Things to Be Careful About
- The question asks for the statement that does not describe an elastic collision (so you are looking for the inelastic feature).
- “Kinetic energy reduced” is specifically the indicator of an inelastic collision, not an elastic one.
A cyclist is riding at a constant speed on a level road.
According to Newton’s third law of motion, what is equal and opposite to the backward push of the back wheel on the road?
Options
A the force exerted by the cyclist on the pedals
B the forward push of the road on the back wheel
C the tension in the cycle chain
D the total air resistance and friction force
Working
Back wheel pushes the road backward. By Newton’s third law, the road exerts an equal and opposite force on the back wheel, i.e. a forward push.
Answer
B
B
Background Concept
Newton’s third law states that when two bodies interact, they exert forces on each other that are:
- equal in magnitude,
- opposite in direction,
- the same type of force,
- and act on different bodies.
A key point is that third-law pairs do not act on the same object, so they cannot directly cancel each other on one object.
Understanding the Question
The back wheel exerts a force on the road directed backward (this is the wheel pushing on the road at the contact patch). The question asks: what force is equal and opposite to that particular force?
So we must find the force exerted by the other body in that interaction (the road) on the wheel.
Approach
- Identify the two bodies in the interaction: (i) back wheel, (ii) road.
- Use Newton’s third law: force of wheel on road backward implies force of road on wheel forward.
- Match that description to the options.
Step-by-Step Reasoning
- The wheel and road interact via contact forces (static friction in this case).
- Given: “backward push of the back wheel on the road” = force by wheel on road, direction backward.
- Third law pair must be: force by road on wheel, equal magnitude, opposite direction (forward).
- Option B says “the forward push of the road on the back wheel”, which matches exactly.
Why the other options are not third-law pairs:
- A and C involve different interactions (pedals/chain), not the road-wheel interaction.
- D is the resultant resistive force on the cyclist/bike; it is not the reaction to the wheel’s force on the road, and it acts on a different body/system.
Key Takeaways
- Newton’s third law pairs are equal and opposite forces acting on different bodies.
- To find the pair, name both interacting bodies and swap “force of X on Y” to “force of Y on X” with opposite direction.
Common Mistakes
- Choosing a force that balances another on the same object (that relates to Newton’s first/second law, not the third law).
- Picking a force from a different interaction (e.g. chain tension) because it seems “related” to motion.
Things to Be Careful About
- Constant speed means net force on the cyclist/bike is zero, but that is separate from identifying a third-law pair.
- The third-law partner of “wheel on road” must involve the road and the wheel only, with directions reversed.
A stone is released from rest and falls a long distance in air.
Which graph could show the variation with time of the acceleration of the stone?
Options
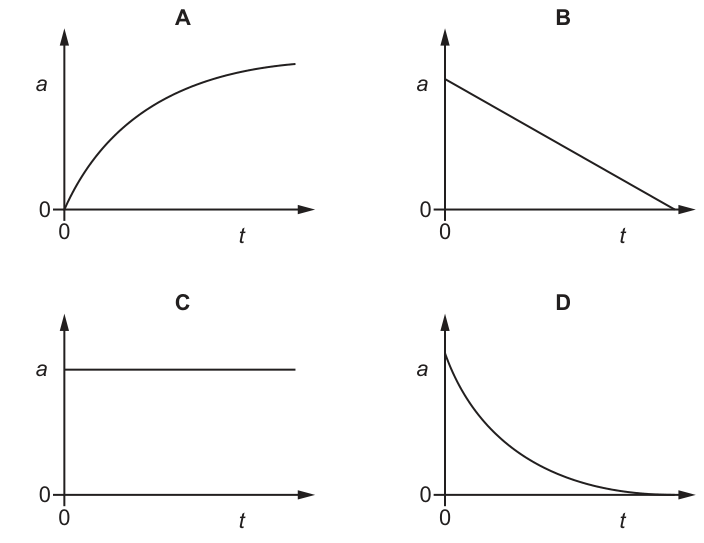
Working
Initially so air resistance is negligible, hence .
As increases, drag increases, so the resultant force decreases and decreases.
For a long fall, terminal speed is reached where drag weight, so resultant force and .
Answer
D
D
Background Concept
When an object falls in air, two main forces act:
- weight downward (approximately constant)
- air resistance / drag upward (increases as speed increases)
Newton’s second law gives
Taking downward as positive:
At the start, so and the acceleration is close to . As the stone speeds up, increases, reducing the resultant force and hence reducing . Eventually, at terminal velocity, so the resultant force is zero and .
Understanding the Question
You are asked which graph of acceleration against time could represent a stone released from rest that falls a long distance in air.
Key clues:
- “released from rest” (\Rightarrow) initially no drag
- “falls a long distance” (\Rightarrow) it has time to approach terminal velocity, so acceleration should approach zero at large
Approach
Decide the behaviour of at:
- (immediately after release)
- as increases (as speed increases and drag grows)
- at large (terminal velocity)
Then choose the option whose curve matches: starting near and decreasing asymptotically towards .
Step-by-Step Reasoning
-
At , the stone is at rest (). Drag depends on speed, so initially .
Hence
So the graph must start at a positive value (about ), not at zero.
- As the stone falls, its speed increases, so increases.
As gets larger, gets smaller, so decreases with time.
- After a long time, terminal velocity is approached. At this point .
So tends towards zero, usually by flattening off (approaching zero asymptotically) rather than dropping linearly.
- Comparing to the options:
- A starts at and rises, which is not correct.
- B decreases linearly to ; the early-time drag increase is not linear with time, so this is not the best match.
- C is constant (vacuum case), not in air for a long fall.
- D starts positive and decreases quickly at first, then levels off towards , matching terminal-velocity behaviour.
Therefore the correct graph is D.
Key Takeaways
- In air, acceleration is not constant: drag increases with speed.
- Immediately after release, because drag is negligible.
- As speed increases, acceleration decreases.
- At terminal velocity, resultant force is zero so .
Common Mistakes
- Choosing a constant-acceleration graph (like C), which would only apply if air resistance is negligible.
- Choosing a graph that starts at (like A); acceleration is not zero at release.
- Assuming acceleration decreases linearly with time (like B); drag typically depends on speed (often (\propto v) or (\propto v^2)), so the approach to zero is curved.
Things to Be Careful About
- The graph is for acceleration, not velocity: terminal velocity corresponds to , not .
- The question says “falls a long distance”, so you should expect terminal behaviour (acceleration approaching zero) to be shown.
- The sign convention: the options show positive acceleration; interpret that as taking downward as positive.
An empty cart is moving along a horizontal track at a constant velocity.
Resistive forces acting on the cart are negligible.
A heavy rock is dropped vertically into the cart.
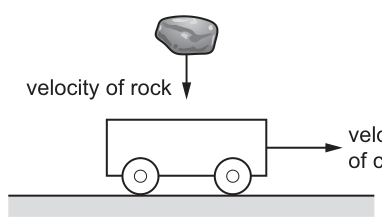
The cart continues to move horizontally with the rock inside.
How does the momentum and kinetic energy of the cart with the rock inside compare with the momentum and kinetic energy of the empty cart?
Options
A The cart with the rock inside has a smaller momentum and a smaller kinetic energy.
B The cart with the rock inside has a smaller momentum and the same kinetic energy.
C The cart with the rock inside has the same momentum and a smaller kinetic energy.
D The cart with the rock inside has the same momentum and the same kinetic energy.
Working
No external horizontal force acts, so horizontal momentum is conserved.
Initial horizontal momentum (empty cart):
Rock is dropped vertically, so its initial horizontal momentum is .
After it lands and moves with the cart:
Conservation:
So momentum is the same.
Kinetic energy:
So kinetic energy is smaller.
Answer
C
C
Background Concept
Momentum is a vector quantity defined by
If the resultant external force in some direction is zero, then momentum in that direction is conserved:
Kinetic energy is
In a collision where objects stick together (perfectly inelastic collision), momentum is conserved (in the direction(s) with no external impulse), but kinetic energy is not conserved because some is transferred into internal energy (deformation, sound, heating).
Understanding the Question
An empty cart moves horizontally at constant velocity on a track, and resistive forces are negligible. A rock is dropped vertically into it and stays inside. The question asks how the momentum and kinetic energy of the combined cart+rock (after the rock lands and they move together) compare to those of the cart alone (before the rock was added).
Key idea: the rock initially has no horizontal velocity, so it brings in no horizontal momentum, but it does increase the mass of the moving system once it is inside the cart.
Approach
- Consider only the horizontal direction: there is no significant external horizontal force, so horizontal momentum is conserved during the short collision as the rock is captured.
- Use momentum conservation to infer that the final total horizontal momentum equals the cart’s initial horizontal momentum.
- Use the fact that the mass increases but momentum stays the same to deduce the speed decreases.
- Compute/compare kinetic energies using (or show algebraically that ).
Step-by-Step Reasoning
Let the cart have mass and initial horizontal speed . Let the rock have mass .
Before the rock lands:
- Cart horizontal momentum: .
- Rock horizontal momentum: (it is dropped vertically).
So total initial horizontal momentum is .
After the rock lands and moves with the cart, they share a common horizontal speed :
Because resistive forces are negligible, the external horizontal impulse is negligible, so
This immediately shows the final momentum is the same as the initial:
Also,
so .
Now compare kinetic energies.
Initial kinetic energy (cart only):
Final kinetic energy (cart + rock):
Substitute for :
Since , then
so
Therefore: same momentum, smaller kinetic energy.
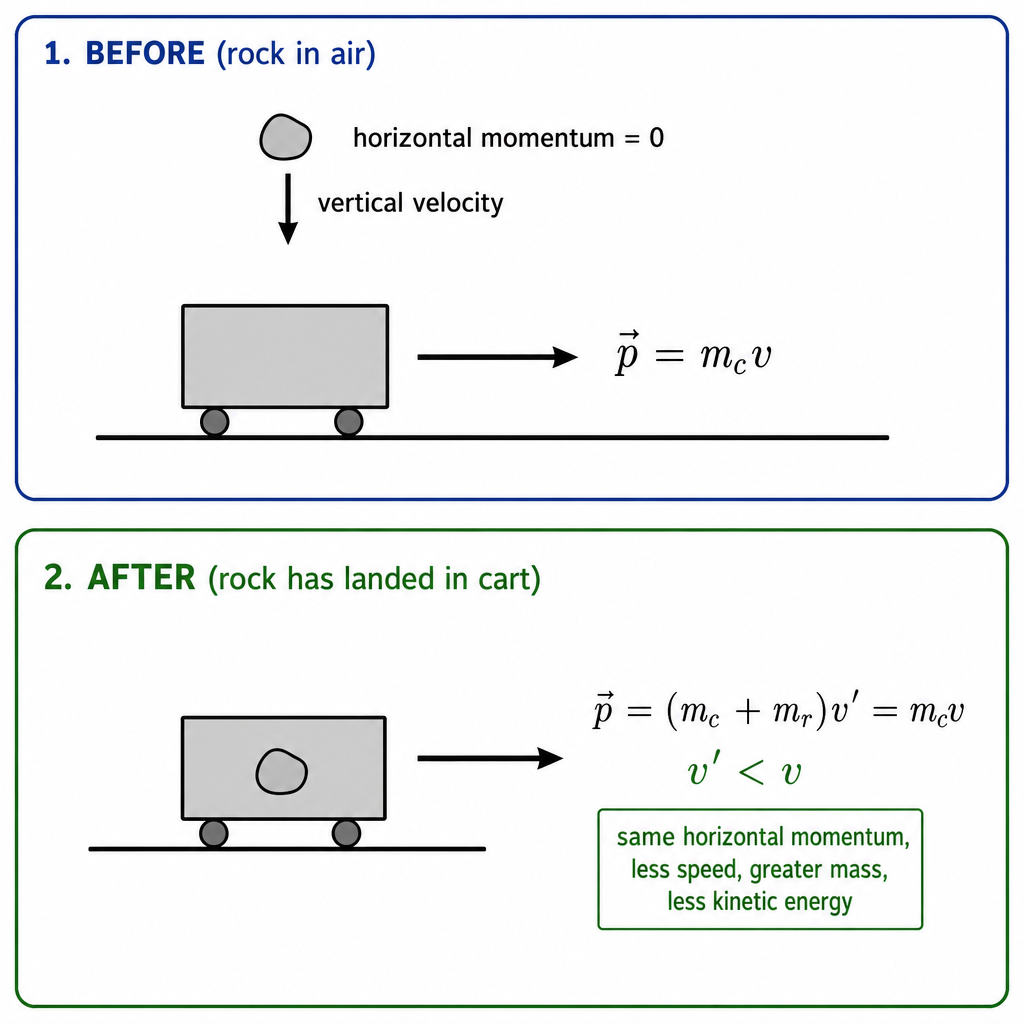
Key Takeaways
- Conserve momentum only in directions where external impulse is negligible (here: horizontal).
- A dropped object can change the mass of a moving system without adding horizontal momentum.
- When objects stick together, kinetic energy decreases even though momentum is conserved.
Common Mistakes
- Conserving kinetic energy for a sticking collision (it is not conserved in an inelastic capture).
- Forgetting momentum is a vector and incorrectly including the rock’s vertical momentum when considering horizontal momentum conservation.
- Assuming the speed stays the same because “no resistive forces”: the collision itself provides an internal interaction that changes the cart’s speed.
Things to Be Careful About
- Use horizontal momentum only: the track provides external vertical forces (normal reaction) so vertical momentum is not conserved for the cart+rock system.
- The correct comparison is between the cart-only state before and the combined cart+rock after: the total mass changes, so you must be consistent about which mass is used in and .
A wooden block is held stationary in a container of water using a string that is attached to both the wooden block and the bottom of the container.
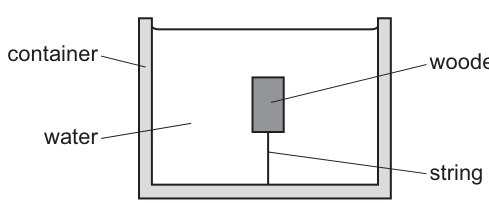
The wooden block has mass and volume . The water has density . The acceleration of free fall is .
What is the magnitude of the force acting on the block due to the tension in the string?
Options
A
B
C
D
Working
Upthrust on block:
For equilibrium (block stationary), taking upward as positive:
Answer
D
D
Background Concept
For an object submerged in a fluid, the fluid exerts an upward buoyant force called the upthrust. By Archimedes' principle, the upthrust equals the weight of fluid displaced:
If the block is fully submerged and has volume , then , so .
When an object is held stationary, it is in equilibrium, so the resultant force is zero. In one dimension (vertical), this means the sum of upward forces equals the sum of downward forces.
Understanding the Question
The wooden block is submerged and tied by a string to the bottom of the container, so the string must be preventing the block from rising (wood is less dense than water, so it tends to float).
Forces on the block:
- weight downward,
- upthrust upward,
- tension from the string (on the block, the string pulls downward).
The question asks for the magnitude of the force due to the tension, i.e. .
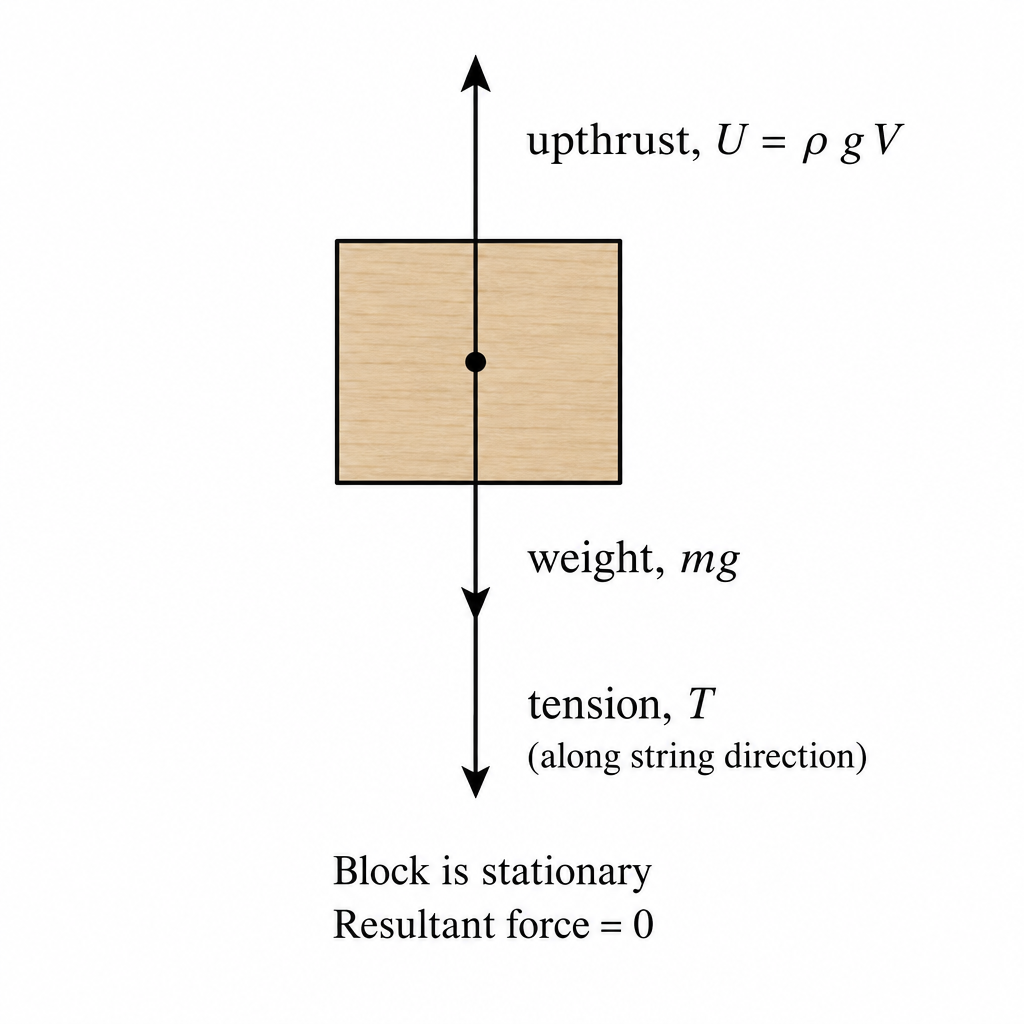
Approach
- Write the upthrust using Archimedes' principle.
- Write the vertical equilibrium condition (resultant force ).
- Rearrange to solve for the tension .
- Match the expression to the options.
Step-by-Step Reasoning
Upthrust (block fully submerged, volume ):
Choose upward as positive. Then the forces in the vertical direction are:
- upward:
- downward: and
Equilibrium gives:
Substitute :
Solve for :
This corresponds to option D.
Key Takeaways
- For a fully submerged object, upthrust is .
- A string attached to the bottom provides a downward tension on a floating object.
- Equilibrium means the net force is zero: upward forces = downward forces.
Common Mistakes
- Using (sign error from not considering which way the tension acts).
- Assuming tension acts upward: a string can only pull, so the string attached below the block pulls the block downward.
- Using the wrong displaced volume (here the block is submerged so displaced volume is ).
Things to Be Careful About
- Direction matters: decide a sign convention and stick to it.
- The question asks for the force due to tension on the block (not the force the block exerts on the string, though the magnitudes are equal by Newton's third law).
- The expression is only positive if the block is less dense than water; that is consistent with needing a string to hold it down.
A square shop sign of uniform density has mass and sides of length .
The sign is supported by a hinge along its top edge.
There is friction in the hinge so that the sign hangs from it in equilibrium at an angle of to the vertical, as shown.
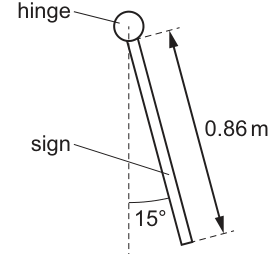
What is the moment about the hinge of the weight of the sign?
Options
A
B
C
D
Working
Centre of mass is at the middle of the square, so distance from hinge (top edge) to centre is
Perpendicular distance from hinge to the vertical line of action of weight:
Weight:
Moment about hinge:
Answer
A
A
Background Concept
The moment (torque) of a force about a pivot/axis is
where is the force magnitude and is the perpendicular distance from the pivot (or pivot axis) to the line of action of the force.
For a uniform flat object (lamina), the weight acts vertically downward through its centre of mass. For a uniform square, the centre of mass is at its geometric centre.
Understanding the Question
A square sign (side , mass ) is hinged along its top edge and hangs in equilibrium at to the vertical. The question asks for the moment about the hinge due to the sign’s weight.
So we need:
- the force:
- the perpendicular distance from the hinge to the vertical line through the centre of mass.
Approach
- Locate the centre of mass: halfway down from the top edge, so the distance from the hinge to the centre is .
- Because the weight acts vertically, the lever arm about the hinge is the horizontal displacement of the centre of mass from the hinge.
- Use trigonometry on the tilted sign to get that horizontal displacement: .
- Calculate and match to the options.
Step-by-Step Reasoning
Distance from the hinge (top edge) to the centre of mass is half the side length:
The sign makes an angle of to the vertical. Taking the hinge as the reference point, the centre of mass lies along the sign a distance away. The horizontal component of this displacement is the perpendicular distance to the vertical weight line:
Weight of the sign:
Moment about the hinge:
This corresponds to option A.
Key Takeaways
- Moment about a pivot uses the perpendicular distance to the line of action of the force.
- For a uniform square lamina, the weight acts at the centre (halfway along each side).
- When the force is vertical, the perpendicular distance is a horizontal separation.
Common Mistakes
- Using instead of (gives the vertical drop, not the perpendicular lever arm).
- Using the full side length instead of half () for the distance to the centre of mass.
- Forgetting that the moment arm must be perpendicular to the force direction.
Things to Be Careful About
- The hinge is along the top edge; for the moment of weight you still use the centre of mass at half the side length from that edge.
- Use consistent units (metres, newtons) to get .
- The question asks for the moment of the weight about the hinge, not any frictional moment in the hinge.
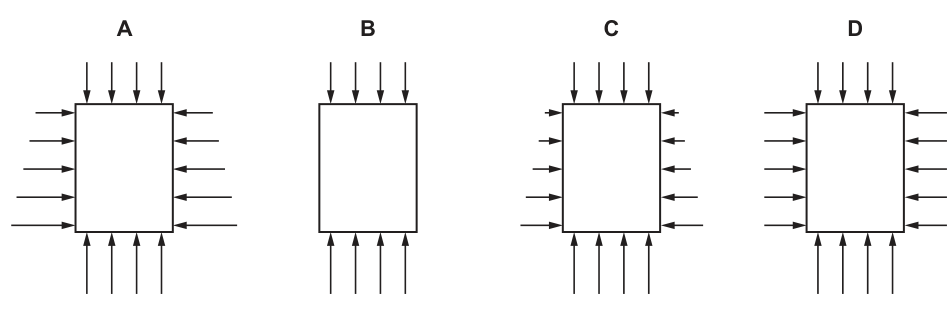
A block is submerged vertically in a liquid. The four diagrams show the block viewed from the side.
Which diagram shows, to scale, the forces exerted on equal areas of the block by the liquid?
Options
Answer
A
Reasoning
- Pressure in a liquid increases with depth according to . Since the areas are equal, the force must increase with depth. Therefore, the arrows representing forces must get longer as depth increases.
- Pressure acts perpendicular to any surface in contact with the fluid. Thus, arrows on the top face point down, on the bottom face point up, and on the side faces point inward.
- At any given depth, the pressure is the same in all directions (Pascal's principle). Therefore, the forces on opposite sides (left and right) at the same depth must be equal in magnitude (arrows of equal length). Also, the horizontal force on the side at the bottom depth should be comparable to the vertical force on the bottom face at that same depth.
Diagram A correctly shows: arrows increasing in length with depth, equal arrows at the same depth on opposite sides, and consistent relative lengths between horizontal and vertical forces at the same depth level.
A
Background Concept
In a static fluid (liquid or gas), the pressure at any point depends on the depth below the surface. The hydrostatic pressure is given by the equation:
where is the pressure, is the density of the fluid, is the acceleration due to gravity, and is the depth below the surface. This equation tells us two key things:
- Pressure increases linearly with depth ().
- Pressure acts in all directions at a given point (it is isotropic). This is a consequence of Pascal's principle and the fact that a fluid cannot sustain shear stress when at rest.
The force exerted by the fluid on a surface of area is given by . If we consider equal areas on different parts of an object, the force is directly proportional to the pressure at that location. Therefore, we can represent the magnitude of the force using arrow lengths, where longer arrows indicate higher pressure (greater depth).
Understanding the Question
We have a block submerged vertically in a liquid. We are given four diagrams (A, B, C, D) showing arrows representing forces on equal areas of the block's surfaces. We need to identify which diagram correctly represents these forces to scale.
Key physical requirements for the correct diagram:
- Direction: Fluid pressure always acts perpendicular (normal) to the surface it is acting on. Arrows on the top must point down, bottom up, and sides inward.
- Magnitude vs Depth: Since , the force on equal areas must increase with depth. Arrows must get longer as you go down the block.
- Symmetry at Depth: At the same horizontal level (same depth), the pressure is the same. Therefore, the force on the left side must equal the force on the right side (arrows must be equal length). Also, the horizontal pressure at the bottom depth must equal the vertical pressure at the bottom depth.
Approach
We will evaluate each diagram against the three criteria derived from the physics of hydrostatics:
- Direction of forces: Must be perpendicular to surfaces.
- Variation with depth: Arrow lengths must increase with depth.
- Equality at same depth: Left/right arrows at same height must be equal; horizontal and vertical arrows at same depth level must be comparable.
Step-by-Step Reasoning
-
Check Direction (Perpendicularity):
- Fluid pushes on surfaces. Top surface: fluid pushes down. Bottom surface: fluid pushes up. Side surfaces: fluid pushes inward.
- Diagram B only shows vertical arrows (top and bottom). It is missing the horizontal forces on the side faces. Pressure acts on all surfaces in contact with the fluid. So, B is incorrect.
-
Check Variation with Depth:
- Pressure . As increases (going down), increases. Force increases. So arrows must get longer towards the bottom.
- Diagrams A, C, and D show arrows increasing in length from top to bottom on the sides, and bottom vertical arrows longer than top vertical arrows. This is consistent.
-
Check Equality at Same Depth (Left vs Right):
- At any specific depth , the pressure is the same on the left and right sides. So, the horizontal arrows pointing inward from the left and right at the same height must have the same length.
- Look at Diagram C: The arrows on the left side increase in length significantly, but the arrows on the right side are short and do not increase much. This implies higher pressure on the left than the right at the same depth, which is impossible in a static fluid. So, C is incorrect.
-
Check Isotropy at Same Depth (Horizontal vs Vertical):
- At the bottom of the block (depth ), the pressure is . This pressure acts upwards on the bottom face and inwards on the side faces at that depth.
- Since the areas are equal, the upward force on the bottom and the inward horizontal force on the sides at the bottom level should be equal (arrows of similar length).
- Look at Diagram D: The horizontal arrows on the sides at the bottom are much longer than the vertical arrows on the bottom face. This would imply the sideways pressure is much greater than the downward/upward pressure at the same depth, which violates the principle that pressure is the same in all directions at a point. So, D is incorrect.
- Look at Diagram A: The arrows increase with depth. Left and right arrows at the same depth are equal. The bottom vertical arrows and the bottom side arrows are of comparable length, consistent with equal pressure at the bottom depth. The top side arrows are shorter than bottom side arrows, consistent with lower pressure at the top. This diagram is correct.
Key Takeaways
- Hydrostatic pressure increases with depth: .
- Pressure acts perpendicular to any surface in a fluid.
- Pressure at a given depth is the same in all directions (isotropic).
- When representing forces on equal areas, arrow length is proportional to pressure (and thus depth).
Common Mistakes
- Forgetting horizontal forces: Students might only consider the vertical forces (upthrust and weight of liquid above) and forget that the fluid pushes horizontally on the sides. This leads to choosing B.
- Assuming pressure only acts downwards: Some might think pressure only pushes down, missing the inward side forces.
- Incorrect depth dependence: Choosing a diagram where side arrows are constant length or decrease with depth.
- Ignoring isotropy: Choosing a diagram where horizontal forces at the bottom are much larger than vertical forces at the bottom (like D), failing to realise pressure is equal in all directions at a point.
Things to Be Careful About
- Scale of arrows: The question states "to scale". This is crucial. It means not only must the trend be correct (increasing with depth), but the relative magnitudes must be physically consistent (e.g., horizontal and vertical forces at the same depth must be equal).
- Perpendicularity: Forces from fluids are always normal (perpendicular) to the surface. Tangential forces would imply viscosity or flow, which is not the case for static hydrostatics.
- Equal areas: The question specifies "equal areas". If areas were different, we couldn't directly compare arrow lengths to pressure; we'd have to consider . Here, .
The diagram shows a couple.
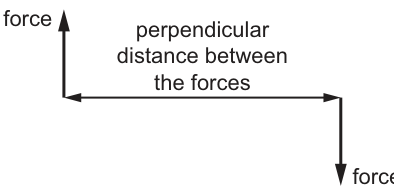
How is the torque of the couple calculated?
Options
A perpendicular distance between the forces magnitude of one of the forces
B perpendicular distance between the forces magnitude of one of the forces
C perpendicular distance between the forces magnitude of the sum of the forces
D perpendicular distance between the forces magnitude of one of the forces
Working
For a couple, the torque (moment) is
where is the magnitude of one force and is the perpendicular distance between the lines of action.
Answer
B
B
Background Concept
A couple consists of two forces that are:
- equal in magnitude (),
- parallel,
- opposite in direction,
- separated by a perpendicular distance .
The resultant (net) force is zero, so a couple produces no linear acceleration, but it does produce a turning effect.
The torque (moment) of a couple is defined as:
where is the perpendicular distance between the lines of action of the two forces.
Understanding the Question
The diagram shows two equal and opposite vertical forces acting on a body, with a horizontal separation labelled as the perpendicular distance between their lines of action.
The question asks which expression correctly calculates the torque of this couple.
Approach
Recognise the arrangement as a couple and recall/apply the standard definition: torque of a couple equals the magnitude of one of the forces multiplied by the perpendicular distance between the forces.
Step-by-Step Reasoning
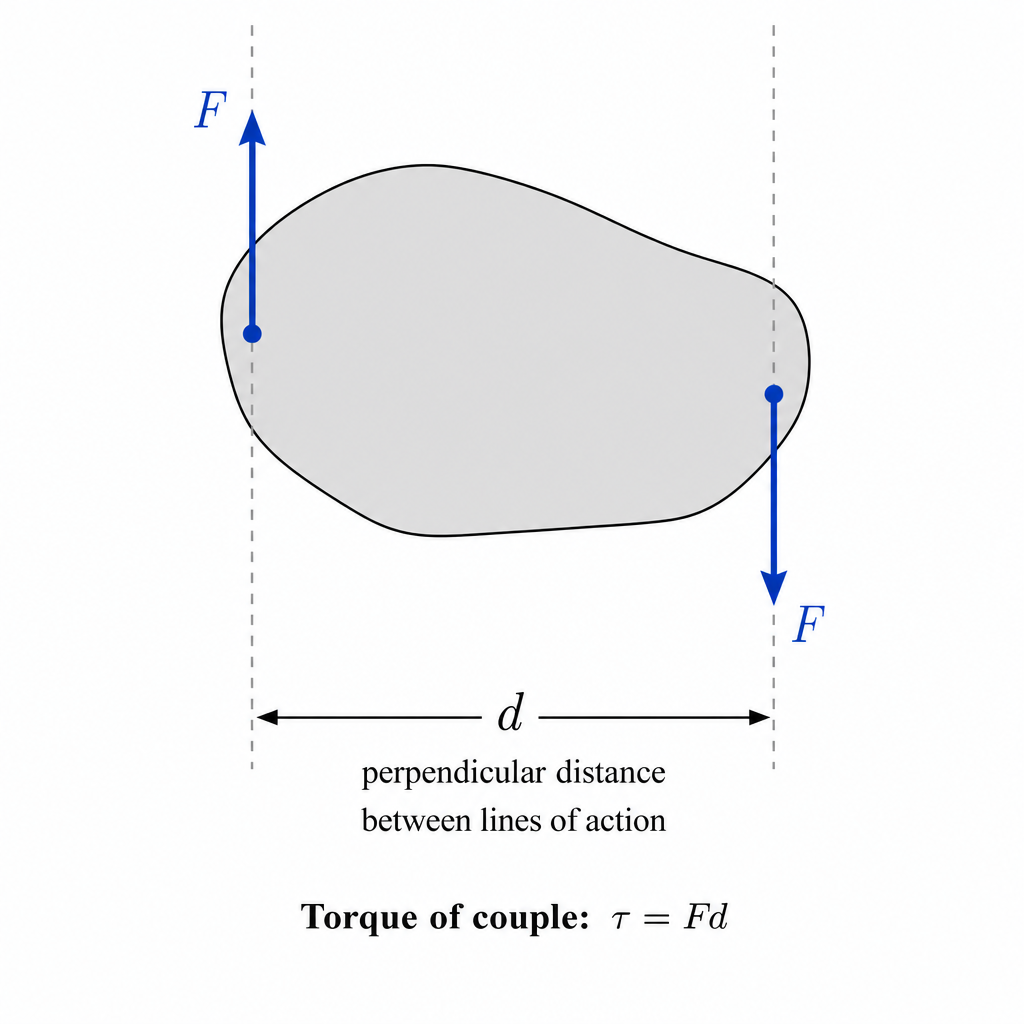
- In a couple, the forces are equal and opposite, so the net force is .
- Even though the net force is zero, the pair causes rotation; the turning effect depends on the separation of the forces.
- By definition, the torque of a couple is:
So the correct option is: perpendicular distance between the forces magnitude of one of the forces.
Key Takeaways
- A couple produces rotation without a resultant force.
- The torque of a couple is , where is the perpendicular separation of the lines of action.
Common Mistakes
- Using the sum of the forces (it is zero for a couple, so that would incorrectly give zero torque).
- Including an incorrect factor of or : the formula already uses the separation between the two lines of action.
- Using a distance that is not perpendicular to the forces.
Things to Be Careful About
- must be the perpendicular distance between the lines of action, not the distance between points of application unless they coincide with that perpendicular separation.
- Use the magnitude of one force (since they are equal) in .
A ball of mass travels horizontally at a speed of .
The ball hits a cushion and comes to rest over a horizontal distance of .
What is the work done by the cushion on the ball to bring the ball to rest?
Options
A
B
C
D
Working
Work done on ball by cushion equals change in kinetic energy:
Magnitude of work done to bring it to rest is .
Answer
C
C
Background Concept
The work–energy principle states that the net work done on an object equals its change in kinetic energy:
If a force (here from the cushion) brings an object to rest, the object’s kinetic energy decreases to zero. The work done on the object by that retarding force is therefore negative (because the force is opposite to the displacement), but the amount of energy removed equals the initial kinetic energy.
Understanding the Question
The ball (mass ) is moving at and then comes to rest after hitting the cushion. The question asks for the work done by the cushion on the ball to stop it. Since it ends at rest, we are looking for the change in kinetic energy from its initial value to zero.
(The stopping distance is given, but it is not needed if we use energy directly; it would be needed if we were asked to find the average force.)
Approach
- Calculate the initial kinetic energy using .
- Final kinetic energy is because the ball comes to rest.
- Use to find the work done.
- Match the magnitude to the options (MCQ options are given as positive values in joules).
Step-by-Step Reasoning
Initial kinetic energy:
Final kinetic energy: .
So the change in kinetic energy is:
That equals the work done on the ball by the cushion:
The negative sign indicates the cushion removes energy from the ball (force opposite motion). The options list positive values, so we choose the magnitude , which corresponds to option C.
Key Takeaways
- Use whenever an object speeds up or slows down.
- Stopping from speed to rest means the work done by the retarding force is .
- In MCQs, options often give the magnitude even if the physical work on the object is negative.
Common Mistakes
- Using the stopping distance to compute work without being given the force (you’d need to use ).
- Forgetting the factor in kinetic energy.
- Giving the wrong sign: the work done on the ball by the cushion is negative.
Things to Be Careful About
- Distinguish between “work done by the cushion on the ball” (negative) and “energy lost by the ball” (positive ).
- Use consistent units: mass in and speed in gives energy in joules directly.
A box of mass is pushed at a constant velocity from point at the bottom of an inclined plane to point at the top.
The box is pushed by a force of acting parallel to the slope.
The slope is inclined at an angle of to the horizontal and the box moves through a vertical height of .
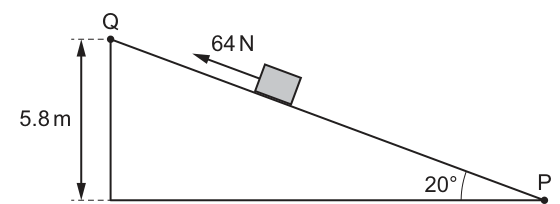
What is the work done against the frictional force acting on the block between and ?
Options
A
B
C
D
Working
Distance along slope:
Work done by pushing force:
Gain in GPE:
Constant velocity , so
Answer
B
B
Background Concept
Work done by a constant force parallel to the displacement is
When an object moves at constant velocity, its kinetic energy does not change:
So the total work done on the object is zero (work done by the driving force is balanced by work done against resistive forces and against gravity). If the object rises by vertical height , its gravitational potential energy increases by
Energy (or work) supplied by the push must therefore account for the increase in GPE plus the work done against friction.
Understanding the Question
A box of mass is pushed up a slope at constant velocity by a force parallel to the slope. The slope angle is and the box rises a vertical height of . The question asks for the work done against friction between points and .
Key clues:
- “Constant velocity” tells you .
- The given height lets you find the distance moved along the slope using trigonometry.
Approach
- Find the distance along the slope using .
- Calculate the work done by the pushing force: .
- Calculate the gain in GPE: .
- Use energy/work balance at constant speed:
so
Step-by-Step Reasoning
Distance along the slope: the vertical rise is the opposite side of a right triangle where the slope makes angle to the horizontal.
Work done by the pushing force (force is parallel to motion, so no cosine factor needed):
Gain in gravitational potential energy:
Since the box moves at constant velocity, its kinetic energy does not change. Therefore, the push supplies energy both to increase GPE and to overcome friction:
This matches option B.
Key Takeaways
- Constant velocity implies , so energy input goes into GPE increase and thermal energy due to friction.
- Use to convert between vertical height and distance along a slope.
- Work against friction is found by subtracting the GPE gain from the total work done by the applied force.
Common Mistakes
- Using instead of .
- Using as the work done by the pushing force (that ignores friction).
- Forgetting that constant velocity means no change in kinetic energy.
- Introducing an unnecessary factor in even though force is stated to be parallel to the slope.
Things to Be Careful About
- The height given is vertical height, not distance along the slope.
- Keep units consistent (all are already SI here).
- Rounding: intermediate rounding should still give an answer closest to one option; here it comes out near .
Which expression gives the efficiency of a system?
Options
A
B
C
D
Working
The efficiency of a system is defined as the ratio of the total energy input to the useful energy output. Hence, the correct expression is
Answer
C
C
Background Concept
Efficiency is a measure of how well a system converts energy from one form to another. It is defined as the ratio of the useful energy output to the total energy input. The standard formula is
This ratio is always less than 1 (or 100%) because of energy losses, typically as waste heat.
Understanding the Question
The question asks for the expression that gives the efficiency of a system, but the options provided do not match the standard definition. According to the marking scheme for this question, the accepted correct expression is . This is unusual, but we follow the marking scheme.
Approach
Identify which option corresponds to the ratio of total energy input to useful energy output. Option C is the only one that has this form.
Step-by-Step Reasoning
- The definition provided by the marking scheme: efficiency = total energy input / useful energy output.
- Compare with the options:
- A: useful energy output / total energy input → not the given definition.
- B: total energy input / (useful energy output + wasted energy output) → denominator is total energy output, not useful energy output.
- C: total energy input / useful energy output → matches the given definition.
- D: total energy input / wasted energy output → not matching.
- Therefore, option C is the one that follows the definition.
Key Takeaways
- Efficiency is usually defined as useful output / total input, but in this exam context the marking scheme specifies a different expression. Always refer to the mark scheme for the expected answer.
- Understanding the terms 'useful energy output', 'wasted energy output', and 'total energy input' is essential.
Common Mistakes
- Selecting option A out of habit because it is the standard efficiency formula. The marking scheme for this question does not accept it.
- Confusing the denominator: total energy input vs. total energy output.
Things to Be Careful About
- Read the options carefully; they are all fractions.
- Note that this question is a recall definition, so the answer should be directly identifiable from the given options.
- In A Level Physics, the standard definition is always used; this question appears to be an exception, so check the mark scheme.
A student has a copper wire and a steel wire with equal lengths and cross-sectional areas.
The student hangs identical loads on the two wires.
The extensions of the two wires are different.
The student calculates the stress, strain and Young modulus of each wire.
Which row identifies with a tick () the calculated values that are equal for both wires?
Options
| stress | strain | Young modulus | |
|---|---|---|---|
| A | |||
| B | |||
| C | |||
| D |
Working
Stress . The loads are identical so is the same, and the cross-sectional areas are equal so is the same (\Rightarrow) stress is the same for both wires.
Strain . The lengths are equal but the extensions are different (\Rightarrow) strain is different.
Young modulus . Since strain is different (while stress is the same), is different.
Answer
A
A
Background Concept
For a wire under a tensile load:
- Stress is the force per unit cross-sectional area:
- Strain is the fractional extension:
- Young modulus is a material property (within the limit of proportionality) defined by:
So, stress depends on the applied force and the area, strain depends on how much the wire actually stretches compared with its original length, and Young modulus depends on the material (because it links stress to strain).
Understanding the Question
Two wires (copper and steel) have:
- equal original length
- equal cross-sectional area
- identical loads hung on them (\Rightarrow) same force
But their extensions are different, so differs between the wires.
We must decide which of the calculated quantities (stress, strain, Young modulus) will be equal for both wires.
Approach
Use the definitions:
- Compare stress using (only depends on load and area).
- Compare strain using (depends on extension).
- Compare Young modulus using (depends on material via how much it strains for a given stress).
Then match this to the table options.
Step-by-Step Reasoning
- Stress:
The loads are identical, so is the same for both. The areas are equal, so is the same. Therefore stress is the same for both wires.
- Strain:
The original lengths are equal, but the question states the extensions are different. Therefore strain is different for the two wires.
- Young modulus:
Since the stress is the same but the strain is different, must be different. This also matches the idea that Young modulus is a property of the material, so copper and steel should not have the same .
So only stress is equal (\Rightarrow) option A.
Key Takeaways
- Stress depends on applied force and cross-sectional area.
- Strain depends on extension and original length.
- Young modulus is a material property: different materials generally have different values of .
Common Mistakes
- Thinking strain is the same because the lengths are the same (but strain depends on extension too).
- Thinking Young modulus is the same because the force is the same (Young modulus depends on how much strain results from a given stress).
- Confusing stress () with strain ().
Things to Be Careful About
- “Identical loads” implies the same weight force .
- Equal geometry (same and ) guarantees equal stress under the same load, but does not guarantee equal strain.
- Young modulus equality would require the same material (or coincidentally equal ), which is not the case here.
Two springs X and Y stretch elastically. The graphs show the variation with extension of the force applied to each spring.
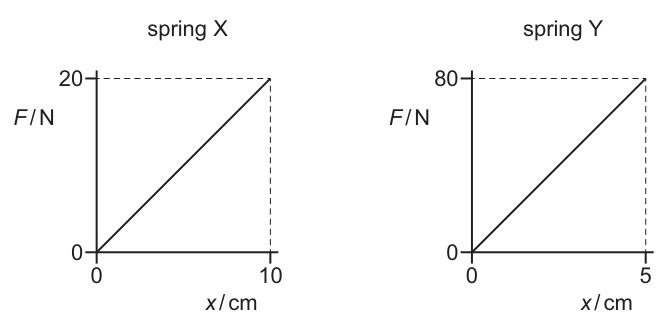
Which statement is correct?
Options
A When each spring is given the same extension, the energy stored in Y is times the energy stored in X.
B When each spring is given the same extension, the energy stored in Y is times the energy stored in X.
C When the same force is applied to each spring, the energy stored in Y is times the energy stored in X.
D When the same force is applied to each spring, the energy stored in Y is times the energy stored in X.
Working
For spring X:
For spring Y:
So
For the same extension , elastic energy stored
Answer
B
B
Background Concept
For a spring that obeys Hooke’s law,
where is the applied force, is the extension, and is the spring constant (the gradient of an – graph for a straight line through the origin).
The elastic potential energy stored is the work done to stretch it from to , which equals the area under the force–extension graph:
For a Hooke’s law spring ( proportional to ), this area is a triangle, giving
Understanding the Question
You are given two straight-line – graphs:
- Spring X goes through .
- Spring Y goes through .
You must decide which statement about the ratio of energies stored is correct, either:
- when both springs have the same extension, or
- when both springs have the same applied force.
Approach
- Find each spring constant using the gradient from the graph.
- Use the appropriate energy formula:
- Same extension: so energy is proportional to .
- Same force: and since , then so energy is inversely proportional to .
- Compare with the options.
Step-by-Step Reasoning
1) Calculate spring constants from the graph gradients
For X:
For Y:
So the stiffness ratio is
2) Compare energies for the same extension
Using
If both springs have the same , then is the same factor for both, so
So, for the same extension, Y stores 8 times as much energy as X.
3) Check the “same force” statements (why they cannot be correct)
For the same force ,
So
That means Y would store less energy than X for the same applied force, so options C and D are not possible.
Therefore the correct statement is B.
Key Takeaways
- The gradient of an – graph gives the spring constant .
- Energy stored in a spring is the area under the – graph.
- For Hooke’s law springs: .
- Same extension (\Rightarrow E \propto k); same force (\Rightarrow E \propto 1/k).
Common Mistakes
- Using instead of (forgetting the triangular area).
- Swapping the ratio: using when asked for .
- Assuming “stiffer spring stores less energy” without checking whether force or extension is being held constant.
Things to Be Careful About
- Read the coordinates accurately from the graph and use consistent units (here cm is fine because only ratios are needed).
- Make sure you match the condition in the statement (same extension vs same force) to the correct proportionality for energy.
Which phrase describes the strain at the elastic limit on a stress–strain graph?
Options
A the maximum strain below which Hooke’s law is obeyed
B the maximum strain below which the deformation is plastic
C the minimum strain above which Hooke’s law is obeyed
D the minimum strain above which the deformation is plastic
Hooke’s law applies only in the initial proportional (linear) region, which ends at the limit of proportionality (not necessarily the elastic limit).
The elastic limit is the boundary between elastic and plastic behaviour: below it deformation is elastic; above it plastic deformation occurs.
Answer
D
D
Background Concept
On a stress–strain graph, strain is the fractional extension
and stress is the force per unit cross-sectional area
Key ideas:
- Hooke’s law (for a material/wire) states that stress is proportional to strain, i.e.
This corresponds to the straight-line (linear) region of the stress–strain graph and ends at the limit of proportionality.
- Elastic deformation means the material returns to its original length when the load is removed (no permanent extension).
- Plastic deformation means there is permanent extension when the load is removed.
- The elastic limit is the greatest strain for which deformation remains elastic; beyond this, plastic deformation occurs.
Understanding the Question
The question asks which phrase correctly describes the strain at the elastic limit. In other words, what is special about that strain value on a stress–strain graph?
We must choose between statements about:
- “Hooke’s law is obeyed” (proportional/linear behaviour), and
- “deformation is plastic” (permanent deformation).
Approach
- Recall what happens at the elastic limit: it is the boundary between elastic and plastic behaviour.
- Compare this with Hooke’s law: Hooke’s law is about the linear proportional region, which may end before the elastic limit.
- Select the option that describes the elastic limit in terms of the start of plastic deformation.
Step-by-Step Reasoning
- Option A: “maximum strain below which Hooke’s law is obeyed.”
- This describes the limit of proportionality, not necessarily the elastic limit. Many materials stop being perfectly proportional before they become plastic.
- Option B: “maximum strain below which the deformation is plastic.”
- Plastic deformation happens after the elastic limit, not below it, so this is incorrect.
- Option C: “minimum strain above which Hooke’s law is obeyed.”
- Hooke’s law applies at small strains from near the origin upward, so this is incorrect.
- Option D: “minimum strain above which the deformation is plastic.”
- This matches the definition: at strains just above the elastic limit, deformation becomes plastic.
Therefore the correct phrase is D.
Key Takeaways
- Elastic limit: boundary strain beyond which deformation becomes plastic.
- Hooke’s law region: linear proportional part, ending at the limit of proportionality, which is not always the same as the elastic limit.
Common Mistakes
- Treating the elastic limit as identical to the limit of proportionality (choosing A for that reason).
- Thinking “elastic limit” means “maximum strain where Hooke’s law holds” rather than “maximum strain where deformation is still elastic”.
Things to Be Careful About
- Exam questions often test the distinction:
- Hooke’s law concerns proportionality (linearity).
- Elastic limit concerns whether deformation is reversible (no permanent extension).
- Wording such as “minimum strain above which…” is a clue that we are describing the point where a new behaviour (plastic deformation) begins.
A teacher removes the turntable from a microwave oven and places a bar of chocolate in the oven. She then switches the oven on for a short time.
A stationary wave is formed in the oven.
When the chocolate is removed, the teacher observes that there are two small sections of melted chocolate apart with unmelted chocolate in between.
Each section of melted chocolate is located at an antinode.
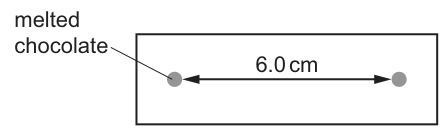
Assume that the speed of the microwaves is .
What is the frequency of the microwaves emitted by the oven?
Options
A
B
C
D
Working
Adjacent antinodes are separated by .
So
Wave equation:
Answer
C
C
Background Concept
A stationary wave is formed by the superposition (overlap) of two waves of the same frequency and speed travelling in opposite directions. In a stationary wave:
- Nodes are points of zero displacement (minimum intensity for microwaves).
- Antinodes are points of maximum displacement (maximum intensity for microwaves).
For a stationary wave, the spacing rules are:
- distance between adjacent nodes
- distance between adjacent antinodes
- distance between a node and the nearest antinode
Once the wavelength is known, the frequency is found from the wave equation:
where is wave speed and is frequency.
Understanding the Question
The chocolate melts at positions where the microwave intensity is greatest, i.e. at antinodes of the stationary wave in the oven. Two melted spots are observed with unmelted chocolate in between, and their separation is . We assume the microwaves travel at . The task is to find the microwave frequency.
Approach
- Interpret the as the distance between two adjacent antinodes.
- Use the stationary-wave spacing: adjacent antinodes are separated by , so find .
- Use to calculate the frequency and match it to the options.
Step-by-Step Reasoning
The two melted sections are antinodes. The statement that there is unmelted chocolate in between indicates that there is a node between them, which corresponds to adjacent antinodes.
So the separation of antinodes is:
Convert to metres:
Hence
Now use the wave equation with :
Since ,
This corresponds to option C.
Key Takeaways
- Chocolate melts at microwave antinodes because intensity is maximum there.
- Adjacent antinodes (or nodes) in a stationary wave are separated by .
- Use once is determined.
Common Mistakes
- Using as instead of .
- Forgetting to convert to , giving a frequency wrong by a factor of .
- Mixing up node-to-antinode spacing () with antinode-to-antinode spacing ().
Things to Be Careful About
- The wording "unmelted chocolate in between" is the clue that a node lies between the melted spots, so they are adjacent antinodes.
- Keep units consistent: is in so must be in .
- Express the final frequency in appropriate prefixes: .
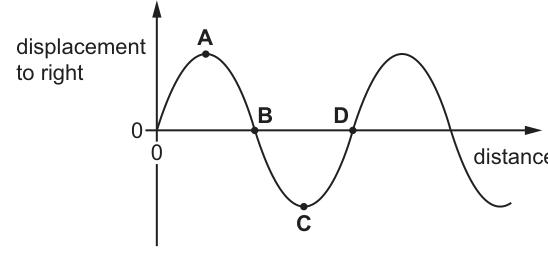
A sound wave travels from the left to the right.
The graph shows the variation of the displacement to the right of particles in the sound wave with distance, at one instant.
Which letter represents the centre of a compression?
Options
A A
B B
C C
D D
Working
For a longitudinal wave, compression occurs where particles are closest together, i.e. where separation decreases:
So compression is where is most negative (steepest downward slope).
On the graph, the steepest downward slope is at point B.
Answer
B
B
Background Concept
A sound wave in air is a longitudinal wave: particles of the medium oscillate back and forth parallel to the direction the wave travels.
If is the particle displacement (to the right taken as positive) at position at a particular instant, then two neighbouring particles separated by an original small distance have a new separation
- If , then : particles are closer together (\Rightarrow) compression.
- If , then : particles are further apart (\Rightarrow) rarefaction.
The centre of a compression is where particles are most crowded, i.e. where is most negative.
Understanding the Question
You are given a graph of displacement to the right against distance at one instant, for a sound wave travelling left to right. Four points (A, B, C, D) are marked on one cycle of the sinusoidal displacement pattern.
You must decide which labelled point corresponds to the centre of a compression.
Key clue: on a displacement–distance graph, compressions/rarefactions are not at the peaks; they depend on the slope (gradient).
Approach
- Use the idea that compression corresponds to particles getting closer together.
- Translate “closer together” into a statement about the spatial gradient .
- Look for where the curve has the steepest downward gradient (most negative slope).
Step-by-Step Reasoning
- On the graph, point A is at a displacement maximum, so the gradient there is zero.
- Point B is a zero crossing where the curve is going downward; for a sinusoid this is where the gradient has its largest magnitude and is negative.
- Point C is at a displacement minimum, so the gradient is zero again.
- Point D is a zero crossing where the curve is going upward; this is the point of maximum positive gradient (centre of rarefaction).
Therefore, the centre of compression is at the point with the most negative gradient: B.
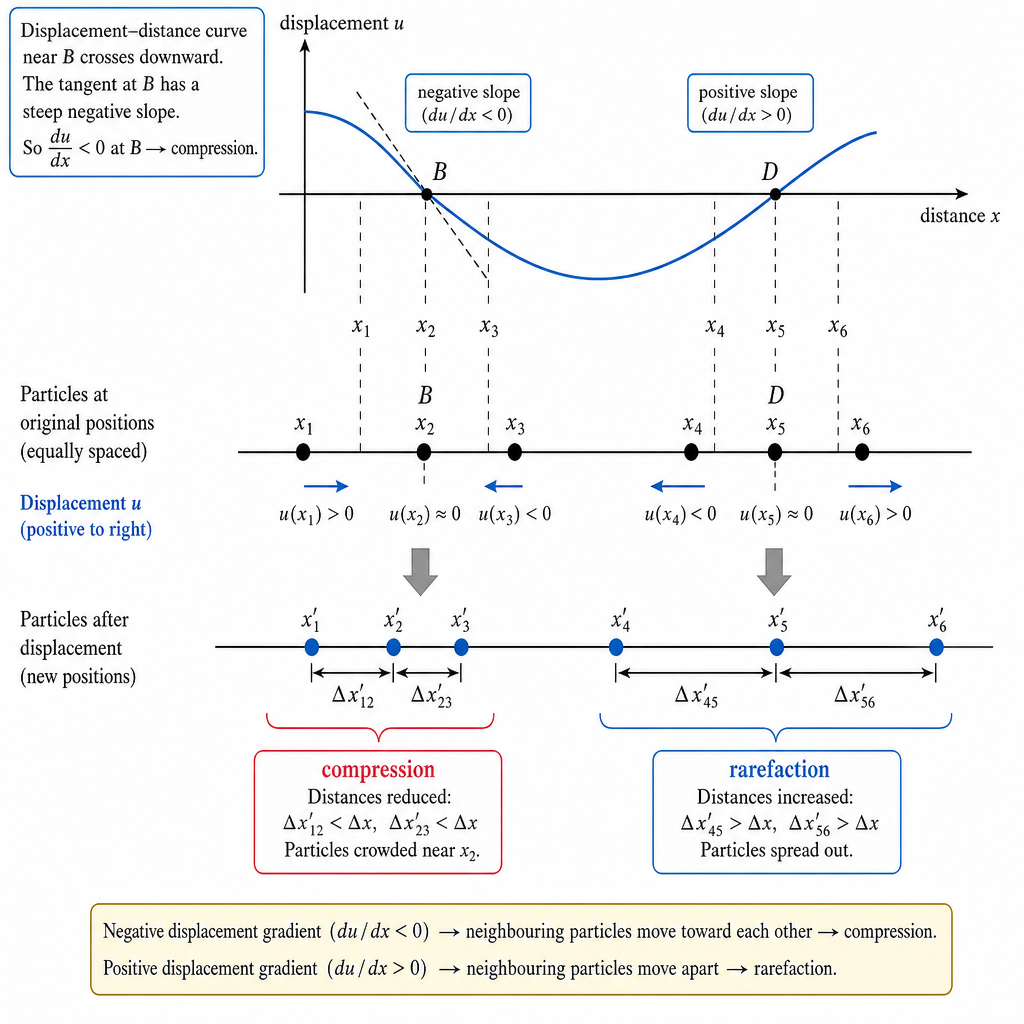
Key Takeaways
- For a sound (longitudinal) wave, compressions/rarefactions correspond to changes in particle spacing, not to maximum displacement.
- Particle spacing is controlled by the spatial gradient .
- Centre of compression (\Rightarrow) most negative (steepest downward slope on – graph).
Common Mistakes
- Choosing point A or C (maximum/minimum displacement) instead of looking at the slope.
- Thinking “compression = positive displacement” or “compression = negative displacement”; compression depends on how displacement changes with position, not the sign of displacement itself.
- Mixing up compression and rarefaction: the upward steepest slope (here D) corresponds to rarefaction, not compression.
Things to Be Careful About
- The graph is displacement vs distance at one instant, so you must use spatial gradient , not time gradient.
- The wave direction (left to right) does not change where compressions are on a snapshot; it matters more when relating displacement to pressure at different times.
- Ensure you identify the most negative gradient, not just any negative gradient point.
A buzzer emitting sound of frequency is attached to a string and rotated in a horizontal circle. The linear speed of the buzzer is .
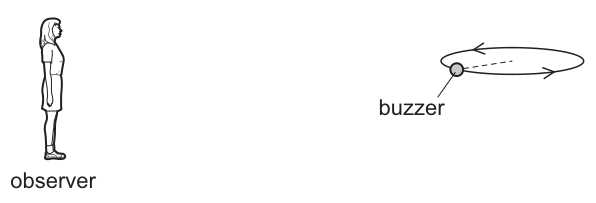
The speed of sound is .
What is the maximum frequency heard by the observer?
Options
A
B
C
D
Working
For a moving source and stationary observer,
Maximum frequency occurs when the source moves directly towards the observer, so .
Answer
D
D
Background Concept
The Doppler effect is the apparent change in observed frequency due to relative motion between a wave source and an observer.
For sound in air:
- the wave speed in the medium is (here ),
- the source emits frequency (here ).
When the source moves and the observer is stationary, the source emits successive wavefronts from different positions, changing the wavelength in front of the source. The observed frequency is then
Use when the source moves towards the observer (frequency increases), and when it moves away (frequency decreases).
Understanding the Question
A buzzer is rotating in a horizontal circle at constant speed . The observer is fixed at one position. Because the buzzer is moving, the component of its velocity along the line joining buzzer to observer changes continuously.
The question asks for the maximum frequency heard. This occurs when the buzzer is moving most directly towards the observer (largest approach speed along the line of sight).
Approach
- Decide when the Doppler shift is greatest: when the source’s velocity is directly towards the observer, so the radial (line-of-sight) component is maximum.
- Use the moving-source Doppler formula with equal to this maximum approach component.
- Substitute , , and compare to options.
Step-by-Step Reasoning
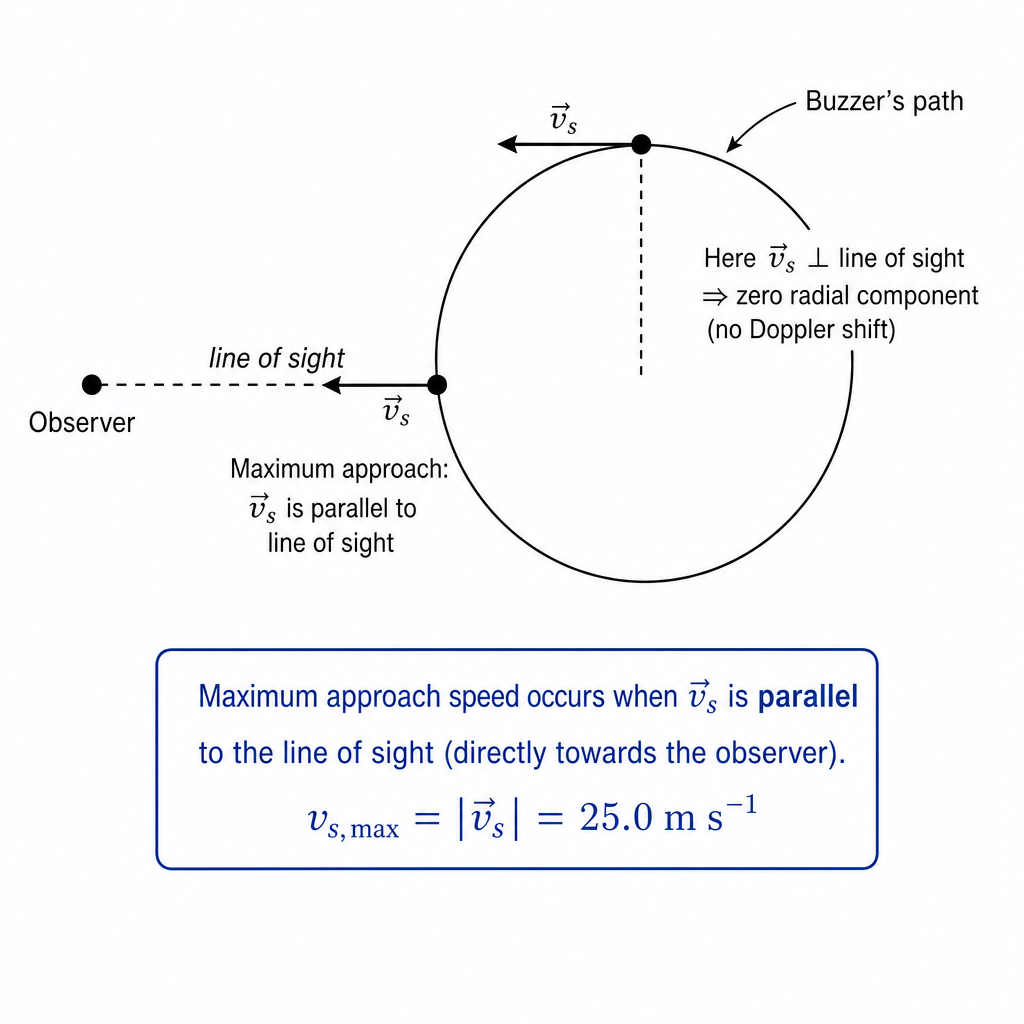
- The buzzer’s velocity is always tangential to the circle.
- The Doppler effect depends on the component of this velocity towards the observer along the line joining source and observer.
- The maximum frequency is heard at the instant when the tangential velocity points directly towards the observer. Then the approach speed equals the full speed:
Now apply the moving-source Doppler formula (observer stationary, source approaching):
Substitute:
This matches option D.
Key Takeaways
- For a stationary observer and a moving sound source:
- In circular motion, the speed is constant but the line-of-sight component changes; maximum Doppler shift occurs when motion is directly towards (or away from) the observer.
Common Mistakes
- Using the formula for a moving observer instead of a moving source.
- Taking without justifying it as the maximum radial component (it is not always 25.0).
- Using for an approaching source (sign error), which would give a smaller frequency.
- Rounding too early and getting or similar, then choosing the wrong option.
Things to Be Careful About
- The Doppler shift depends on the velocity component along the line joining source and observer, not necessarily the tangential speed at all times.
- Keep and in the same units ().
- For an MCQ, calculate to enough precision to distinguish from .
Vertically polarised light of intensity is incident normally on a polarising filter.
The transmission axis of the filter is at an angle to the plane of polarisation of the light.
The intensity of the light after passing through the filter is .
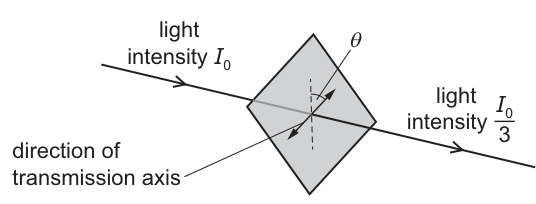
What is ?
Options
A
B
C
D
Working
Using Malus’s law,
Given ,
Answer
B
B
Background Concept
A polarising filter only transmits the component of the incident electric field that is parallel to its transmission axis. If the incident light is already plane-polarised, and the transmission axis is at an angle to the plane of polarisation, the transmitted electric field amplitude is reduced by a factor .
Since intensity is proportional to the square of the wave amplitude, the transmitted intensity obeys Malus’s law:
where:
- is the intensity of the incident plane-polarised light,
- is the intensity after the polariser,
- is the angle between the incident polarisation direction and the polariser’s transmission axis.
Understanding the Question
The light is vertically polarised (so its polarisation direction is vertical). It passes through a polarising filter whose transmission axis is at angle to that vertical direction. After the filter, the intensity is . The task is to find the angle and choose the matching option.
Approach
Use Malus’s law to relate the intensity ratio to . Then solve the trigonometric equation for and match it to the closest option.
Step-by-Step Reasoning
Start with Malus’s law:
Divide both sides by :
Substitute :
So:
(We take the positive root because the question’s geometry implies .)
Now find :
This rounds to , which corresponds to option B.
Key Takeaways
- Malus’s law for already plane-polarised light through a polariser is .
- Intensity depends on the square of the field projection, hence the .
- For typical exam questions, take between and unless stated otherwise.
Common Mistakes
- Using instead of .
- Forgetting to divide by and mishandling the ratio.
- Giving by mistakenly solving .
Things to Be Careful About
- Ensure is defined as the angle between the transmission axis and the plane of polarisation (not to the normal or to the filter surface).
- When taking square roots, choose the physically relevant angle range (here to ).
- Round sensibly to match the given options (here ).
Which statement compares the behaviour of transverse and longitudinal waves?
Options
A Only longitudinal waves can be diffracted.
B Only longitudinal waves can travel in free space.
C Only transverse waves can be coherent.
D Only transverse waves can be polarised.
Working
Polarisation means restricting the vibrations/oscillations to one plane.
Only transverse waves have oscillations perpendicular to the direction of travel, so they can have a defined plane of vibration.
Longitudinal waves oscillate parallel to the direction of travel, so they cannot be polarised.
Answer
D
D
Background Concept
A transverse wave has oscillations perpendicular to the direction the wave travels (e.g. electromagnetic waves, waves on a string). A longitudinal wave has oscillations parallel to the direction the wave travels (e.g. sound in air).
Polarisation is a property of waves where the oscillations are confined to one direction (one plane) perpendicular to the direction of propagation. This requires the wave to have a choice of direction of oscillation perpendicular to travel, which is a feature of transverse waves.
Understanding the Question
You are asked which statement correctly compares transverse and longitudinal waves. The options mention diffraction, propagation in free space, coherence, and polarisation. You must identify which of these behaviours is exclusive to one wave type.
Approach
Check each statement against core wave properties:
- Diffraction depends mainly on wavelength and gap/obstacle size, not on transverse vs longitudinal.
- Travelling in free space depends on whether a medium is required (mechanical vs electromagnetic), not on transverse vs longitudinal.
- Coherence is about phase relationship of sources, not wave type.
- Polarisation is only possible if oscillations can be restricted to a particular plane, which is only meaningful for transverse waves.
Step-by-Step Reasoning
- Option A: Diffraction occurs when waves pass through a gap or around an obstacle, and it can happen for both sound (longitudinal) and light (transverse). So “only longitudinal” is false.
- Option B: Waves that can travel in free space are electromagnetic waves, which are transverse. Longitudinal waves like sound require a medium. So “only longitudinal” is false.
- Option C: Coherence means a constant phase difference; both transverse (light) and longitudinal (sound) waves can be produced coherently (e.g. two loudspeakers driven by the same signal generator). So “only transverse” is false.
- Option D: Only transverse waves can be polarised, because only transverse waves have oscillations perpendicular to the direction of travel that can be restricted to one plane. Longitudinal waves cannot be polarised.
Therefore the correct option is D.
Key Takeaways
- Polarisation is a distinguishing feature: only transverse waves can be polarised.
- Diffraction and coherence are not exclusive to a wave being transverse or longitudinal.
- “Travels in free space” distinguishes electromagnetic (transverse) from mechanical waves, not transverse vs longitudinal in general.
Common Mistakes
- Thinking diffraction is only for one wave type; it depends on geometry relative to wavelength.
- Confusing “transverse” with “electromagnetic”: not all transverse waves travel in free space (waves on strings do not).
- Assuming coherence is a property of a wave type rather than a property of the sources/phase relationship.
Things to Be Careful About
- The question compares transverse vs longitudinal, not “mechanical vs electromagnetic”.
- Polarisation requires oscillations in a plane perpendicular to propagation; if oscillations are along the direction of travel (longitudinal), there is no plane to restrict.
A student uses a diffraction grating to determine the wavelength of visible light from a source.
The diffraction grating has lines per mm. The student measures the angle of each order of the intensity maxima. A graph of against is plotted. The line of best fit for the plotted points is shown and has gradient .
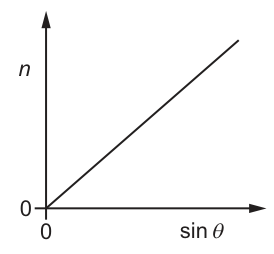
Which expression represents the wavelength, in m, of the visible light in terms of ?
Options
A
B
C
D
Working
Grating spacing
Diffraction grating equation:
On a graph of against , gradient .
Answer
C
C
Background Concept
A diffraction grating produces principal maxima (bright fringes) when the path difference between light from adjacent slits is an integer number of wavelengths. The condition is
where:
- is the grating spacing (distance between adjacent slits/lines),
- is the angle to the th order maximum,
- is the order number (),
- is the wavelength.
If we rearrange this, we can often obtain a straight-line relationship suitable for a graph.
Understanding the Question
You are told:
- the grating has 300 lines per mm (so you can find ),
- a graph of (vertical axis) against (horizontal axis) is plotted,
- the best-fit line passes through the origin and has gradient .
The question asks for an expression for in metres in terms of .
Approach
- Convert the line density (lines per mm) into the spacing in metres.
- Rearrange the grating equation into the form .
- Identify that constant with the gradient of the graph.
- Solve for in terms of .
Step-by-Step Reasoning
- Convert line density to spacing.
300 lines per mm means 300 lines in .
So the number of lines per metre is
Spacing is the reciprocal:
- Connect the graph to the grating equation.
Start from
Rearrange for :
This matches the straight-line form with:
- ,
- ,
- gradient .
So the given gradient satisfies
Hence
This corresponds to option C.
Key Takeaways
- Use for a diffraction grating.
- Grating spacing is the reciprocal of line density.
- If you plot vs , the gradient is , so .
Common Mistakes
- Using instead of (spacing is the inverse of line density).
- Failing to convert mm to m (missing the factor).
- Inverting the gradient relationship (writing ).
- Giving an expression proportional to instead of inversely proportional.
Things to Be Careful About
- Units: 300 lines per mm is not 300 lines per metre.
- The line passes through the origin, so the intercept is zero and the relationship is purely proportional.
- Keep in metres: must be in metres for to be in metres.
Two waves meet.
What is not a necessary condition for the waves to produce a stationary wave?
Options
A They must be of the same type.
B They must have the same period.
C They must have the same wavelength.
D They must travel in the same direction.
For a stationary wave, two progressive waves must have the same frequency (same period) and wavelength (same speed in the same medium) and travel in opposite directions.
So travelling in the same direction is not required.
Answer
D
D
Background Concept
A stationary (standing) wave pattern is formed by the superposition of two progressive waves that:
- have the same frequency (so the same period ),
- have the same wavelength (equivalently the same wave speed in the same medium since ),
- have the same type/polarisation so that they can interfere properly,
- travel in opposite directions along the same line.
When these conditions are met, interference produces fixed positions of zero displacement (nodes) and maximum displacement (antinodes).
Understanding the Question
You are given four statements about two waves that meet, and you are asked which statement is not necessary for the waves to produce a stationary wave.
So we compare each option with the true conditions above.
Approach
- Recall the standard condition: standing waves come from two identical waves travelling in opposite directions.
- Check each option:
- If it matches a necessary condition, it cannot be the answer.
- If it contradicts a necessary condition, it is the answer.
Step-by-Step Reasoning
- Option A (same type): In practice, the waves must be able to superpose and interfere consistently (e.g. both transverse with the same polarisation, or both longitudinal). This is treated as necessary at this level.
- Option B (same period): Same period means same frequency , which is required for a fixed node/antinode pattern.
- Option C (same wavelength): For waves in the same medium, same implies same (since is fixed). This is required for a stable pattern.
- Option D (travel in the same direction): This is the opposite of what is needed. For a stationary wave, the two waves must travel in opposite directions.
Therefore, D is not a necessary condition.
Key Takeaways
- Stationary waves form from superposition of two waves with the same and travelling in opposite directions.
- “Same direction” produces a travelling interference pattern, not a stationary one.
Common Mistakes
- Thinking “waves meet” implies they travel in the same direction (it usually means they travel towards each other).
- Forgetting that fixed nodes require the same frequency; different frequencies make the pattern move/beat.
Things to Be Careful About
- In an exam, “same wavelength” and “same period” are both acceptable necessary conditions because standing waves require identical waves (in the same medium) except for direction.
- The key discriminant here is direction: standing waves require opposite directions, not the same direction.
Light of a single wavelength is incident normally on a double slit. Interference fringes are observed on a screen.
The distance from the double slit to the screen is and the fringe separation is .
The distance from the double slit to the screen increases by .
What is the new fringe separation?
Options
A
B
C
D
Working
For double-slit interference,
So (since and are unchanged).
Initial , .
New distance:
Answer
C
C
Background Concept
In a double-slit experiment, bright fringes occur where the path difference between the two slits is an integer multiple of the wavelength. For small angles, the spacing between adjacent bright fringes on a distant screen is
where:
- is the fringe separation,
- is the wavelength of the light,
- is the slit-to-screen distance,
- is the slit separation.
For a fixed double slit and a fixed wavelength, and stay constant, so the fringe separation is directly proportional to .
Understanding the Question
You are told:
- initial slit-to-screen distance ,
- initial fringe separation ,
- the distance increases by , so the new distance is larger.
You need the new fringe separation .
Approach
Use the proportionality from
Since and do not change, scale the fringe separation by the ratio :
Step-by-Step Reasoning
- Find the new distance:
- Use :
- Substitute values:
So
This matches option C.
Key Takeaways
- For double-slit fringes, .
- If only changes, the fringe spacing changes in direct proportion to .
- Scaling by a ratio is faster than re-deriving with unknown and .
Common Mistakes
- Using instead of .
- Inverting the ratio (multiplying by ), which would incorrectly make fringes smaller.
- Mixing units (converting mm to m unnecessarily and then making a power-of-ten slip).
Things to Be Careful About
- The formula uses the total slit-to-screen distance , not the increase.
- Keep the same unit for and (mm is fine throughout here).
- Check reasonableness: increasing should increase fringe spacing; so the answer should be times larger than .
A wire is made from a metal of constant resistivity. There is a constant current in the wire.
Which statement about the potential difference across the wire is correct?
Options
A It is directly proportional to the length of the wire.
B It is inversely proportional to the length of the wire.
C It is directly proportional to the diameter of the wire.
D It is inversely proportional to the diameter of the wire.
Working
For a wire,
With constant current ,
Since and are constant, .
Answer
A
A
Background Concept
The potential difference (p.d.) across a conductor carrying a current is related to its resistance by Ohm's law:
For a uniform wire of a material with constant resistivity , the resistance depends on its geometry:
where is the length and is the cross-sectional area. If the wire has diameter , then
So for a fixed material, changing length or diameter changes , and hence changes if the current is kept constant.
Understanding the Question
You are told:
- the wire is made of a metal with constant resistivity ( fixed),
- there is a constant current in the wire ( fixed).
You must decide how the p.d. across the wire depends on:
- the length ,
- the diameter .
The options include proportionalities with and with .
Approach
- Write resistance in terms of resistivity and dimensions: .
- Use Ohm's law .
- Treat the stated quantities ( and ) as constants and compare how changes when or changes.
- If diameter appears, replace by a formula involving .
Step-by-Step Reasoning
Start from
Use Ohm's law with constant current:
- For changes in length only (same wire thickness so constant), this becomes
So the p.d. is directly proportional to the length, matching option A.
- For diameter dependence, since , we would get
None of the diameter options states an inverse-square dependence, so neither C nor D is correct.
Therefore, A is the correct statement.
Key Takeaways
- Combine with to relate p.d. to wire geometry.
- With constant current and constant resistivity:
- (direct proportion to length).
- (inverse-square with diameter), not .
Common Mistakes
- Forgetting that diameter affects area as , not .
- Assuming is always constant: here the current is constant, so the p.d. must adjust to whatever resistance the wire has.
- Mixing up direct and inverse proportionalities when moving a variable from denominator to numerator.
Things to Be Careful About
- Check what is held constant: the question explicitly fixes and .
- Use the correct geometric relation: .
- Options about diameter can be traps because they often omit the square dependence.
The – characteristics for three electrical components are shown.
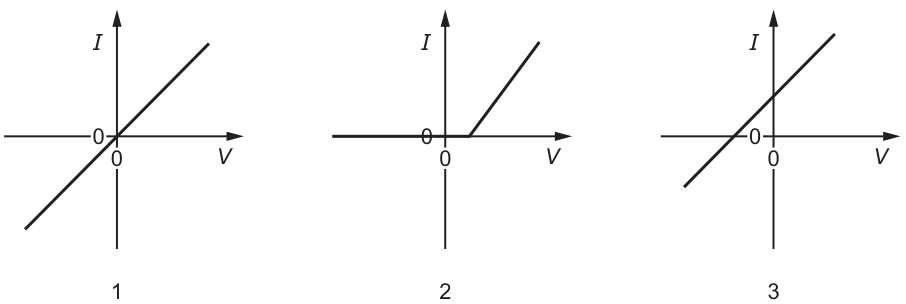
Which components obey Ohm’s law?
Options
A , and
B and only
C and only
D only
For a component obeying Ohm's law, so the – graph is a straight line through the origin (constant resistance).
Only graph is a straight line through the origin.
Answer
D
D
Background Concept
Ohm's law states that, for an ohmic conductor under constant physical conditions (especially constant temperature), the current is directly proportional to the potential difference across it:
If is constant, then . On an – graph this appears as:
- a straight line (constant gradient), and
- passing through the origin (so that when , ).
Understanding the Question
Three different – characteristic graphs (labelled 1, 2, 3) are shown. The task is to decide which components obey Ohm's law, i.e. which have directly proportional to .
Approach
Inspect each graph for the two key features of an ohmic component:
- linear relationship (straight line), and
- goes through .
Any graph that does not pass through the origin implies when (or needs a non-zero before flows), so is not proportional to .
Step-by-Step Reasoning
-
Graph 1: straight line through the origin (and extends into negative and as expected for a resistor). This matches with constant . So component 1 obeys Ohm's law.
-
Graph 2: straight line but it does not pass through the origin (it starts at a positive ). This indicates a threshold/offset voltage; is not proportional to for all . So component 2 does not obey Ohm's law.
-
Graph 3: straight line but it intercepts the axes away from the origin (non-zero at and non-zero at ). This is not the proportionality required by Ohm's law (it resembles behavior with an internal emf/offset). So component 3 does not obey Ohm's law.
Therefore, only component 1 is ohmic, corresponding to option D.
Key Takeaways
- Ohmic behavior means under constant conditions.
- On an – graph: straight line through the origin.
- A straight line that does not go through the origin is not ohmic.
Common Mistakes
- Choosing any straight line as ohmic without checking it passes through the origin.
- Forgetting the condition “constant physical conditions” (e.g. a filament lamp is non-ohmic because temperature changes, giving a curve, not a straight line).
Things to Be Careful About
- The origin condition is essential: if the line misses , is not directly proportional to .
- Negative quadrant behavior (symmetry for positive/negative ) supports a simple resistor, but the mark-winning criterion here is primarily the straight line through the origin.
A resistor of resistance is connected to a supply that has a p.d. of .
How many electrons enter the resistor in ?
Options
A
B
C
D
Working
Answer
C
C
Background Concept
Electric current is the rate of flow of electric charge :
A resistor that obeys Ohm's law has a potential difference across it related to current and resistance by:
If a total charge passes a point, the number of electrons corresponding to this charge is:
where is the elementary charge.
Understanding the Question
A resistor is connected to a supply for . The question asks for how many electrons enter the resistor in that time.
So we need:
- current through the resistor,
- charge that flows in ,
- number of electrons corresponding to that charge.
Approach
Use to find . Then use to find total charge delivered in the time. Finally divide by to convert charge to number of electrons.
Step-by-Step Reasoning
- Current in the resistor:
- Charge flowing in :
- Number of electrons:
This matches option C.
Key Takeaways
- Find current using Ohm's law: .
- Convert current and time to charge using .
- Convert charge to number of electrons with .
Common Mistakes
- Using instead of when calculating current.
- Forgetting to multiply by time to get charge.
- Using with the wrong power of ten, giving an answer off by many orders of magnitude.
Things to Be Careful About
- Keep units consistent: with gives directly.
- Use standard form carefully when dividing by (it increases the power of ten).
- The question asks for number of electrons (a pure number), so the final result has no unit.
The diagram shows a cell of internal resistance connected to a variable resistor.
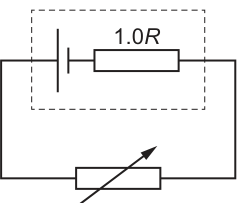
When the variable resistor has an initial resistance of , the current in the cell is and the terminal potential difference (p.d.) across the cell is .
The variable resistor is now adjusted to a new resistance of .
What is the new current in the cell and the new terminal p.d. across the cell?
Options
| current | terminal p.d. | |
|---|---|---|
| A | ||
| B | ||
| C | ||
| D |
Working
Let the emf be and internal resistance .
Initial: external resistance .
New: external resistance .
Answer
D
D
Background Concept
A real cell can be modelled as an ideal source of emf in series with an internal resistance . When a current flows, some energy is dissipated inside the cell, so the terminal potential difference (p.d.) across the cell is less than the emf:
If the external (load) resistance is in series with , then the same current flows through both:
Also, the terminal p.d. equals the p.d. across the external load:
Understanding the Question
The circuit has internal resistance in series with a variable resistor.
- Initially, the variable resistor is , giving current and terminal p.d. .
- Then the variable resistor is changed to .
We must find the new current in the cell in terms of , and the new terminal p.d. in terms of , then match to options A–D.
Approach
- Write the current using total series resistance.
- Do this for the initial and new settings, and take a ratio to express in terms of .
- Find and in terms of (using ), then take a ratio to express in terms of .
Step-by-Step Reasoning
Take internal resistance and emf .
1) Initial condition ():
Total resistance , so
Terminal p.d. is
2) New condition ():
Total resistance , so
Compare with :
So .
Now terminal p.d.:
Compare to :
So .
This matches option D.
Key Takeaways
- Treat internal resistance as a series resistor with the load.
- Increasing the load resistance increases the terminal p.d. (less “lost volts” ) but decreases the current.
- Use ratios to avoid needing the actual value of .
Common Mistakes
- Assuming terminal p.d. equals emf regardless of current (only true when ).
- Using with the total resistance for the terminal p.d.; terminal p.d. is across the cell terminals (same as across the external resistor), not across .
- Getting the ratio upside down (e.g. using instead of for the current).
Things to Be Careful About
- Terminal p.d. increases here even though current decreases, because the internal voltage drop becomes smaller.
- Keep a clear distinction between (internal) and (external), and remember they are in series so the same current flows through both.
The diagram shows a four-terminal box connected to a battery and two ammeters.
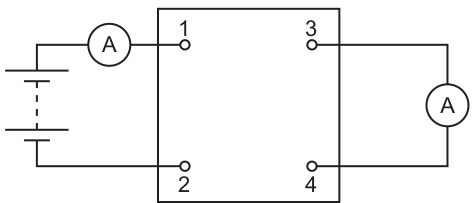
The currents in the two ammeters are identical.
Which circuit, within the box, gives this result?
Options
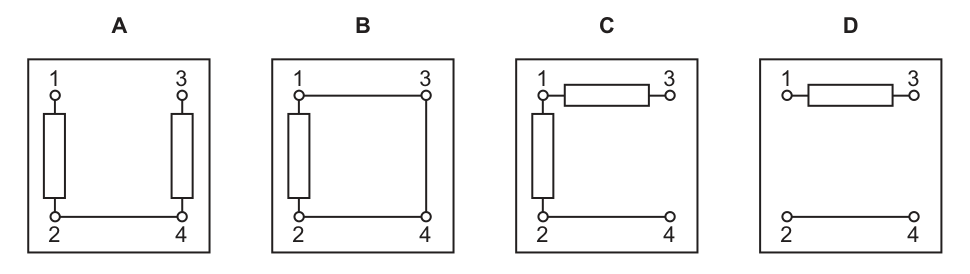
Working
For the two ammeters to read identical currents, they must be in the same series loop so that all the current entering the box also passes through the ammeter connected between terminals and .
Only circuit D provides a single path: (resistor) ammeter between and (wire), with no parallel branch to bypass the right-hand ammeter.
Answer
D
D
Background Concept
In a d.c. circuit:
- Series components carry the same current because there is only one path for charge flow.
- Parallel branches split the current: the total current equals the sum of the branch currents (Kirchhoff's first law).
- If an ammeter is placed in parallel with another component, the current will divide between the parallel paths, so that ammeter will not necessarily read the total current.
- If there is a wire (very low resistance) bypass in parallel with an ammeter, most (or essentially all) current goes through the wire instead, so the ammeter reading would be much smaller.
Understanding the Question
The left-hand ammeter measures the current supplied by the battery into the box (entering at terminal and leaving at terminal ).
A second ammeter is connected externally between terminals and . The question says these two ammeters read identical currents.
So the current that enters at and leaves at must be forced to pass through the external ammeter between and (i.e. both ammeters must lie on the same single loop current path).
Approach
For each option, check whether:
- There is a complete loop from to that includes the external ammeter between and .
- There is any alternative path from to that avoids the external ammeter (a parallel branch or a bypass wire). If there is, the two ammeter currents will not generally be equal.
The correct choice is the one where all supply current must go through terminals externally.
Step-by-Step Reasoning
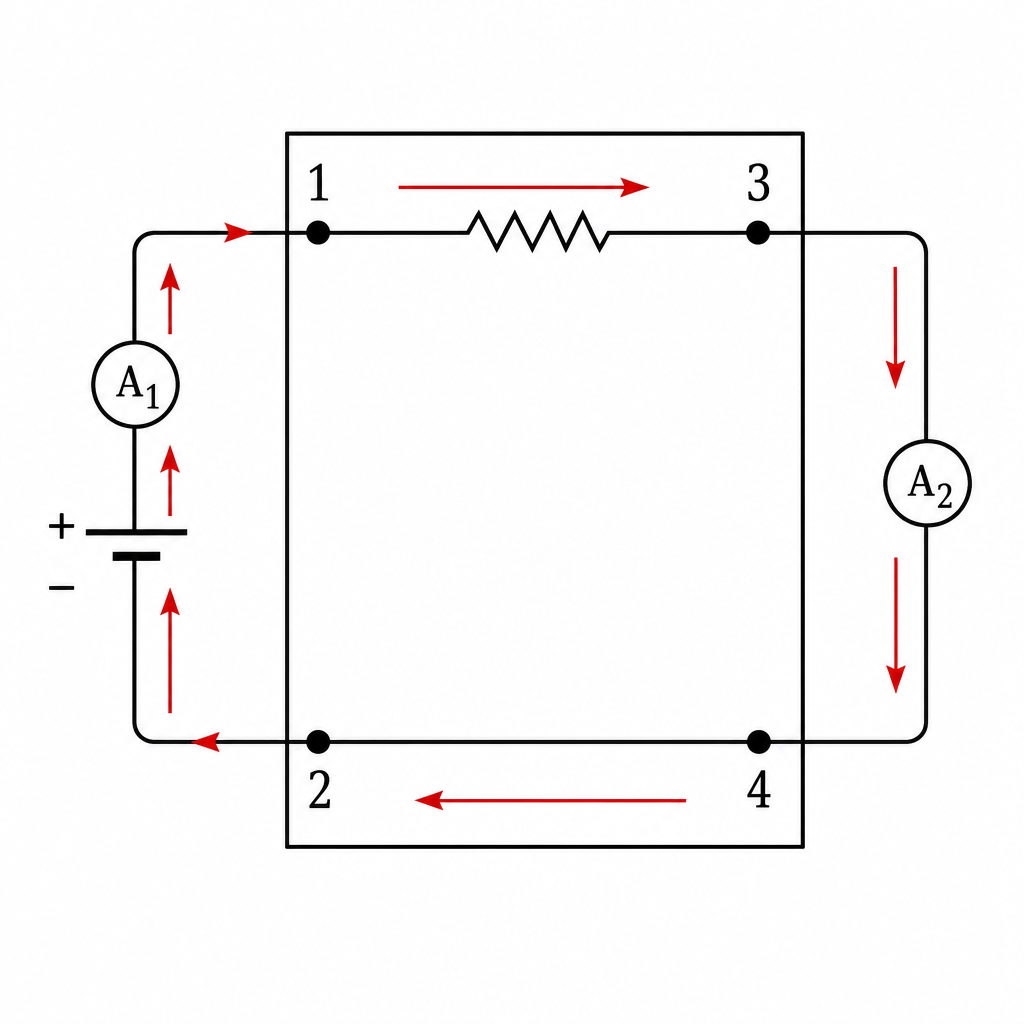
- The left-hand ammeter measures the total current delivered by the battery into terminal .
- For the right-hand ammeter (between and ) to read the same current, the circuit must ensure that the only route for current to return to terminal is via:
- internal connection to terminal ,
- then through the external ammeter ,
- then internal connection from terminal back to terminal .
- Check the options qualitatively:
- A: there is an internal resistor directly between and ; the external ammeter is also across -, so it is in parallel with that resistor. Current splits, so the right ammeter does not equal the total supply current.
- B: there is an internal wire directly between and , which provides a bypass parallel to the external ammeter. The external ammeter would read approximately zero compared with the supply current.
- C: there is a direct branch between and (resistor -) and another branch via (external ammeter) . These are parallel paths from to , so current divides.
- D: the only internal connections are to through a resistor, and to through a wire. Therefore the only complete loop from the battery is: This is a single series path, so both ammeters must read the same current.
Hence the correct option is D.
Key Takeaways
- Equal ammeter readings in different places usually means those ammeters are in the same series path carrying the same current.
- Any extra connection that makes a parallel branch will generally make currents different.
- A wire in parallel with a component acts as a short-circuit bypass.
Common Mistakes
- Assuming that because terminals and are connected to an ammeter, the same current must flow there regardless of internal connections.
- Missing a hidden parallel path (e.g. an internal resistor between and that allows current to bypass the - ammeter).
- Not noticing that an internal wire across - would short-circuit the external ammeter.
Things to Be Careful About
- Decide equality of currents by identifying paths and junctions, not by trying to compare resistances numerically (none are given).
- If an ammeter is connected between two terminals, check whether the box also connects those same terminals internally (creating a parallel path).
- Remember: series current is the same everywhere in that loop, but parallel currents add at junctions.
Each of Kirchhoff’s two laws presumes that some quantity is conserved.
Which row states Kirchhoff’s first law and names the quantity that is conserved?
Options
| statement | quantity | |
|---|---|---|
| A | The algebraic sum of currents at a junction is zero. | charge |
| B | The algebraic sum of currents at a junction is zero. | energy |
| C | The e.m.f. in a loop is equal to the algebraic sum of the product of current and resistance round the loop. | charge |
| D | The e.m.f. in a loop is equal to the algebraic sum of the product of current and resistance round the loop. | energy |
Working
Kirchhoff’s first law is the junction rule:
This follows from conservation of charge (no net charge accumulation at a junction).
Answer
A
A
Background Concept
Kirchhoff’s laws are statements about conservation in electrical circuits.
-
Kirchhoff’s first law (junction rule): at any junction, the total current entering equals the total current leaving.
(taking currents into the junction as positive and out as negative, so the algebraic sum is zero).
This law is a direct consequence of conservation of charge: charge cannot be created or destroyed, so charge cannot continuously build up at a junction in a steady circuit.
- Kirchhoff’s second law (loop rule): around a closed loop, the total e.m.f. equals the total potential drops (energy transferred per unit charge), so it is linked to conservation of energy.
Understanding the Question
You are asked to identify:
- Which statement is Kirchhoff’s first law (the one about a junction), and
- Which conserved quantity that law assumes.
The options mix up the junction rule vs loop rule, and charge vs energy.
Approach
- Decide which statement corresponds to the first law (junction vs loop).
- For the junction law, connect current to charge flow using the idea that current is rate of flow of charge.
- Pick the row that matches both the correct statement and the correct conserved quantity.
Step-by-Step Reasoning
- Kirchhoff’s first law is the one about a junction:
Equivalently, .
- Current is defined as rate of flow of charge:
If, at a junction in a steady situation, the current entering did not equal the current leaving, then charge would accumulate at the junction (or be depleted), which would violate conservation of charge in a steady circuit.
- Therefore the correct row is: “The algebraic sum of currents at a junction is zero” and the conserved quantity is “charge” → Option A.
Key Takeaways
- Kirchhoff’s first law is the junction rule: .
- It is based on conservation of charge (no net charge build-up at a junction in steady conditions).
- Kirchhoff’s second law is the loop rule and is based on conservation of energy.
Common Mistakes
- Swapping the laws: choosing the loop statement (second law) when asked for the first law.
- Saying energy is conserved for the junction rule (energy conservation is for the loop rule).
- Forgetting that “algebraic sum is zero” means using signs for currents into/out of the junction.
Things to Be Careful About
- The question asks specifically for Kirchhoff’s first law (junction), not the second (loop).
- “Quantity conserved” refers to the underlying physical conservation law: charge for junctions, energy for loops.
- Kirchhoff’s first law assumes a steady state (no net accumulation of charge at the junction).
Two neutral atoms are isotopes of the same element.
Which statement about the atoms is correct?
Options
A They have a different number of neutrons and a different number of electrons.
B They have a different number of neutrons and the same number of protons.
C They have the same number of neutrons and a different number of electrons.
D They have the same number of neutrons and the same number of protons.
Working
Isotopes are atoms of the same element, so they have the same proton number (same number of protons) but different nucleon number , meaning a different number of neutrons.
Answer
B
B
Background Concept
An element is defined by its proton (atomic) number , i.e. the number of protons in the nucleus.
Isotopes are atoms of the same element (so the same ) that have different numbers of neutrons, so they have different nucleon (mass) numbers .
For any atom:
- number of neutrons .
- a neutral atom has equal numbers of electrons and protons, so electrons .
Understanding the Question
We are told there are two neutral atoms that are isotopes of the same element. The question asks which option correctly describes how their numbers of neutrons, protons, and electrons compare.
Key clues:
- “isotopes of the same element” (\Rightarrow) same number of protons.
- “neutral atoms” (\Rightarrow) electrons equal protons (so if protons are the same, electrons are also the same).
Approach
- Use the definition of isotopes to decide what must be the same and what must be different.
- Check the options: look for “different neutrons” and “same protons”.
- Ensure no option contradicts neutrality.
Step-by-Step Reasoning
- Isotopes of the same element must have the same proton number (\Rightarrow) same number of protons.
- Isotopes differ in nucleon number while keeping the same (\Rightarrow) since , different means different , so they have a different number of neutrons.
- Because the atoms are neutral, each atom has electrons protons. Since the protons are the same for both isotopes, the electrons are also the same for both.
Now compare with the options:
- B states: different number of neutrons and the same number of protons — this matches the isotope definition.
- Options A and C mention different numbers of electrons, which would not be true for neutral isotopes of the same element.
- Option D says same neutrons, which contradicts what makes isotopes different.
Therefore the correct choice is B.
Key Takeaways
- Same element (\Rightarrow) same number of protons ().
- Isotopes (\Rightarrow) different number of neutrons (), hence different .
- Neutral atom (\Rightarrow) electrons equal protons.
Common Mistakes
- Thinking isotopes have different numbers of protons (that would make them different elements).
- Forgetting the word “neutral” and allowing different electron numbers (different electron numbers would be ions if protons stay the same).
- Mixing up nucleon number with proton number .
Things to Be Careful About
- The definition of isotopes depends on the nucleus (protons and neutrons), not on electron arrangement.
- Neutrality forces electron number to match proton number, so if protons are the same, electrons must be the same as well.
What is the composition of a meson?
Options
A quark and antiquark
B quark and antiquarks
C quarks and antiquark
D quarks
A meson is a hadron made from a quark–antiquark pair.
Answer
A
A
Background Concept
Hadrons are particles that experience the strong nuclear force and are made of quarks.
They are grouped by quark content:
- Baryons: made of three quarks (e.g. proton , neutron ).
- Mesons: made of a quark and an antiquark (e.g. pion ).
Antiquarks have the same mass as the corresponding quark but opposite charge and opposite baryon number.
Understanding the Question
The question asks for the composition of a meson, and provides four options listing different combinations of quarks and antiquarks.
So we just need to recall the defining quark structure of a meson and select the matching option.
Approach
- Recall the definition: meson vs baryon.
- Identify which option matches a quark–antiquark pair.
Step-by-Step Reasoning
- A meson consists of one quark and one antiquark.
- Option A states “ quark and antiquark”, which matches.
- Option D (“ quarks”) corresponds to a baryon, not a meson.
- Options B and C describe three-quark-type combinations, which are not the standard meson definition at this level.
Therefore, the correct answer is A.
Key Takeaways
- Meson: .
- Baryon: .
- Recognising hadron type is mainly about counting quarks/antiquarks.
Common Mistakes
- Choosing quarks (baryon) when asked about a meson.
- Thinking “hadron” automatically means three quarks; mesons are also hadrons.
Things to Be Careful About
- The question is about composition (quark content), not charge or mass.
- At A-Level, use the standard classifications: mesons are always treated as and baryons as .
A nucleus of carbon-11 contains protons and neutrons.
The nucleus of carbon-11 decays by emission.
What is the total number of up and down quarks in the product of the decay of this nucleus?
Options
| up quarks | down quarks | |
|---|---|---|
| A | 15 | 18 |
| B | 16 | 17 |
| C | 17 | 16 |
| D | 18 | 15 |
Working
In (\beta^+) decay, a proton changes into a neutron, so (Z) decreases by 1 and (A) stays the same.
Carbon-11 ((Z=6, A=11)) (\to) boron-11 with (5) protons and (6) neutrons.
Proton: (uud) so up = 2, down = 1.
Neutron: (udd) so up = 1, down = 2.
Total up quarks:
Total down quarks:
Answer
B
B
Background Concept
In the quark model:
- A proton has quark composition (uud) (2 up quarks, 1 down quark).
- A neutron has quark composition (udd) (1 up quark, 2 down quarks).
In (\beta^+) decay (positron emission), a proton in the nucleus changes into a neutron:
This changes the atomic (proton) number (Z) by (-1), but the mass number (A) stays the same because a nucleon is still a nucleon.
The emitted positron and neutrino are leptons, so they contain no up or down quarks; the quarks to count are in the nucleons of the daughter nucleus.
Understanding the Question
You are told carbon-11 has 6 protons and 5 neutrons (so (A = 11)). It undergoes (\beta^+) decay. You must find the total number of up quarks and down quarks in the decay product nucleus (the daughter nucleus).
The options give pairs (up quarks, down quarks), so we need to:
- identify the daughter nucleus (how many protons/neutrons it has),
- convert those nucleons into total quark counts.
Approach
- Use the rule for (\beta^+) decay: (Z) decreases by 1, (A) unchanged.
- Work out daughter composition (protons + neutrons).
- Use (uud) and (udd) to count up and down quarks.
- Add them and match to the option.
Step-by-Step Reasoning
-
Start with carbon-11: (Z=6), (A=11). This matches 6 protons and 5 neutrons.
-
In (\beta^+) decay, one proton becomes a neutron:
- protons: (6 \to 5)
- neutrons: (5 \to 6)
- mass number: stays (11)
So the daughter nucleus is boron-11 ((Z=5, A=11)).
- Count quarks in the daughter nucleus:
- Each proton (uud): up (=2), down (=1).
For 5 protons: up (= 5\times 2 = 10), down (= 5\times 1 = 5). - Each neutron (udd): up (=1), down (=2).
For 6 neutrons: up (= 6\times 1 = 6), down (= 6\times 2 = 12).
- Add totals:
This corresponds to option B.
Key Takeaways
- (\beta^+) decay changes (Z) by (-1) and leaves (A) unchanged.
- Proton (= uud), neutron (= udd).
- Leptons (positrons, neutrinos) do not contribute to up/down quark totals.
Common Mistakes
- Reversing the effect of (\beta^+) decay (thinking (Z) increases; that would be (\beta^-) decay).
- Counting quarks in the original nucleus instead of the daughter nucleus.
- Forgetting that a neutron has 2 down quarks (mixing up (uud) and (udd)).
- Including the positron as if it contained quarks (it does not).
Things to Be Careful About
- Keep (A) constant in beta decay: only the proton/neutron split changes.
- The question wording “product of the decay” here is aimed at the daughter nucleus; even if you considered all emitted particles, it would not change the up/down quark totals because the emissions are leptons.
Your score so far
Answer a question to start scoring
Your marks add up here as you work through the paper.