Physics 9702/35 — May/June 2018
Cambridge AS Level · Advanced Practical Skills · worked solutions for every part, with the mark scheme
Topics Manipulation, Measurement and Observation · Presentation of Data and Observations · Analysis, Conclusions and Evaluation
In this experiment, you will investigate the equilibrium of a metre rule.
You have been provided with some masses.
Set up the apparatus as shown in Fig. 1.1.
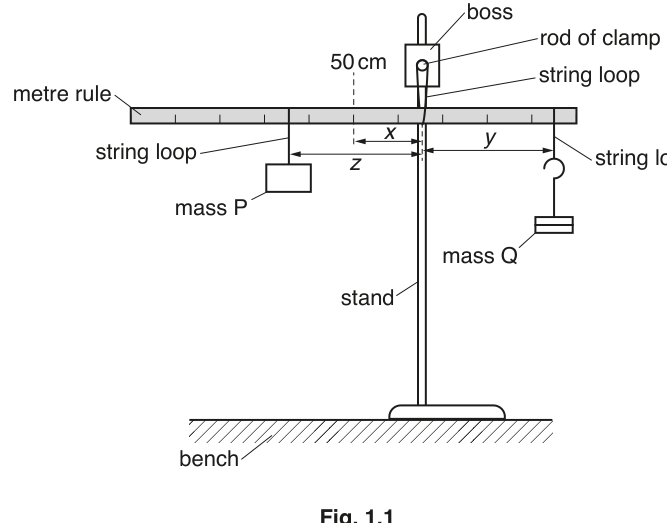
• Mass Q should be .
• The distance between the mark on the rule and the string loop supporting the rule is . Adjust the position of the metre rule so that is approximately .
• The distance between the string loop supporting mass P and the string loop supporting the rule is . Adjust the position of mass P so that is approximately .
• The distance between the string loop supporting the rule and the string loop supporting mass Q is . Adjust the position of mass Q until the rule is balanced.
• Measure and record .
= ______
Answer
Measure (distance between the two string loops for the rule and mass ) on the metre rule.
Example (to nearest ):
z = 30.0 cm (example)
Background Concept
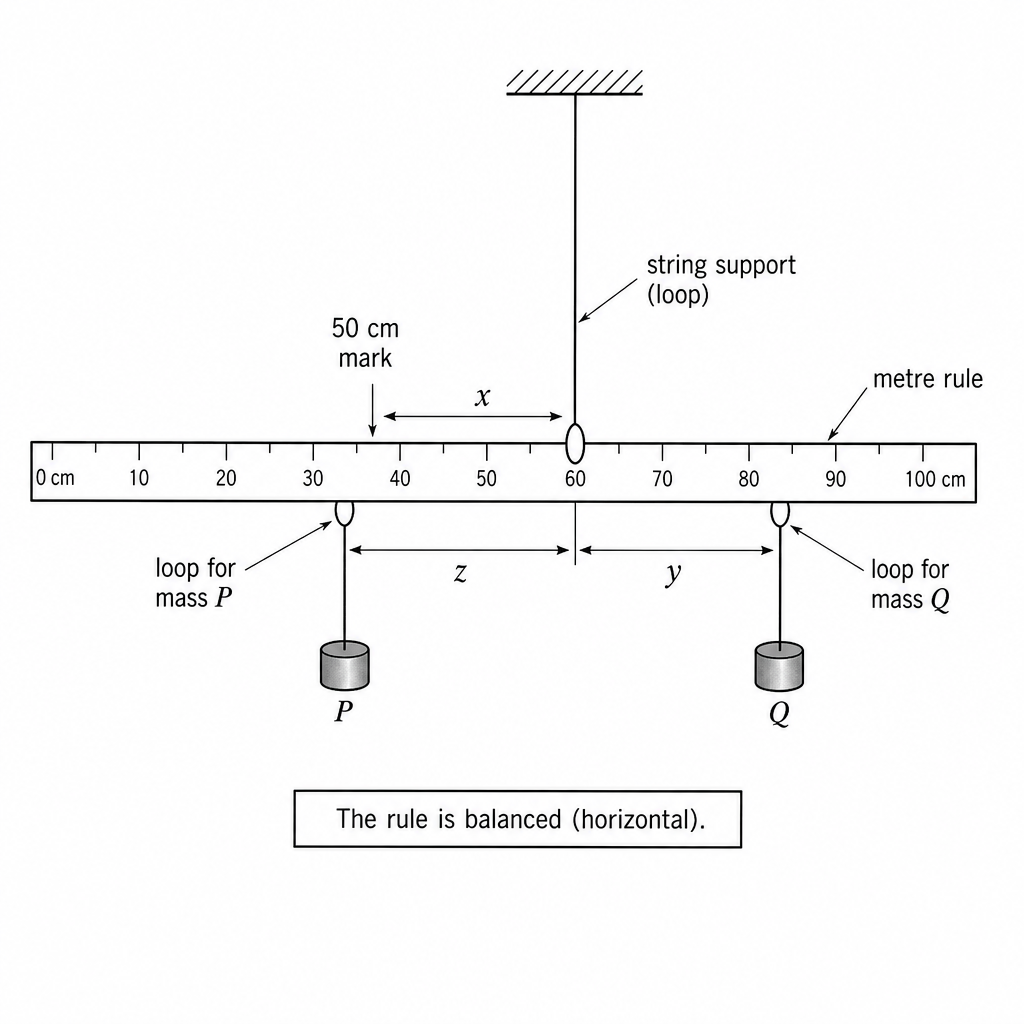
In equilibrium, the metre rule is balanced (no turning effect overall). In this practical, you adjust positions until the rule is horizontal and steady, then you measure distances along the rule.
A distance such as is read directly from the scale on the rule by taking the difference between the two scale readings at the relevant points (here, the positions of the two string loops).
Understanding the Question
You are given the apparatus shown: a metre rule supported by a string loop (near the 50 cm region) with two hanging masses and . You are instructed to:
- choose ,
- set ,
- set ,
- then adjust until the rule is balanced,
- and finally measure and record .
So the mark is for a clear, sensible measurement and recording of .
Approach
- Identify the two points that define (the loop supporting the rule and the loop supporting mass ).
- Read their positions on the metre rule scale.
- Calculate as the difference (or read directly if you can align one at a known mark).
- Record with a sensible precision (typically to the nearest mm or ).
Step-by-Step Reasoning
- Ensure the rule is steady and horizontal.
- Look straight down at the scale to avoid parallax.
- Note the scale position of the support loop for the rule (call it ).
- Note the scale position of the support loop for mass (call it ).
- Compute
- Record with unit.
A typical value consistent with the instruction “approximately ” is .
Key Takeaways
- Identify precisely which two points define the distance.
- Read a metre rule correctly (eye normal to scale).
- Record to appropriate precision with units.
Common Mistakes
- Measuring from the wrong reference point (e.g. from the 50 cm mark instead of between the two loops).
- Parallax error from viewing the scale at an angle.
- Writing no unit, or recording an over-precise value (e.g. many decimal places) inconsistent with a metre rule.
Things to Be Careful About
- Make sure is the separation between the two loops, not the position of one loop.
- If the loops are thick, decide a consistent reference (e.g. centre of the loop) each time.
- Keep the rule steady before reading.
• Measure and record .
= ______
• Measure and record .
= ______
Answer
Measure (from the mark to the rule support loop) and (from the rule support loop to the mass loop).
Example values (to nearest ):
x = 15.0 cm, y = 33.8 cm (example)
Background Concept
and are distances along the metre rule defined relative to specific points:
- is measured from the 50 cm mark to the rule’s support loop.
- is measured from the rule’s support loop to the loop holding mass .
In Paper 3, marks are typically for correct identification of what to measure, sensible precision, and clear recording with units.
Understanding the Question
You are asked to:
- measure and record after setting up the apparatus,
- then measure and record when the rule is balanced.
The instruction earlier says make , so your measured value should be around this.
Approach
- Locate the 50 cm mark and the support loop position on the rule.
- Read their scale positions to get .
- Locate the loop holding and the support loop position.
- Read their positions to get .
- Record each value with consistent precision and units.
Step-by-Step Reasoning
- For :
- Read the scale at the support loop position: .
- Use the 50 cm mark as .
If the support is to the right of 50 cm, is positive.
- For :
- Read the scale at the mass loop position: .
- Record with unit. A typical consistent set might be and (after balancing) .
Key Takeaways
- Use the correct reference points (50 cm mark and loop positions).
- Use a consistent sign convention (important later when can be negative).
- Record with appropriate precision and units.
Common Mistakes
- Measuring from the end of the rule instead of from the 50 cm mark.
- Forgetting that is measured from the support loop (not from the 50 cm mark).
- Omitting units.
Things to Be Careful About
- If the support is left of 50 cm in later readings, must be recorded as negative.
- Avoid parallax: eye directly above the scale mark being read.
- Use the same reference point on each loop (e.g. centre of the loop) each time.
• Write down your value of from (a)(i).
= ______
• Keeping constant, change and adjust until the rule is balanced. Repeat until you have six sets of values of and . Record your results in a table.
You may include readings where is measured to the left of the mark. In such cases has a negative value.
Answer
Write the previously measured constant value of .
Example: (kept constant).
Record six sets of corresponding and balanced values in one table (with units in headings and consistent dp).
Example table:
| / | / |
|---|---|
z constant; 6 (x, y) readings recorded in a table (student-dependent)
Background Concept
To test a relationship between two quantities experimentally, you must:
- vary the independent variable over a useful range,
- keep other relevant variables constant,
- measure the dependent variable for each setting,
- present results clearly.
Here, you keep constant, change , and each time adjust until the rule is in equilibrium (balanced). Each balanced position gives a paired data point .
Understanding the Question
You must:
- Copy your value of from (a)(i).
- Keep constant throughout.
- Change and, for each , adjust until the rule balances.
- Repeat until you have six pairs of .
- Record in a table.
You are allowed to take readings with the support point to the left of the 50 cm mark; then is negative.
Approach
- Choose values of that span a reasonable range (including possibly negative ).
- For each chosen , adjust mass position until the metre rule is level and stationary.
- Measure once balanced.
- Record all results in one clearly laid-out table with headings of the form “quantity / unit”.
Step-by-Step Reasoning
- Set to your chosen fixed value (around ) and do not move mass relative to the rule support loop.
- Move the support point (or rule position) so that changes; measure from the 50 cm mark:
- Slide mass until the rule balances (horizontal, not rotating).
- Measure between the rule support loop and the loop:
- Repeat until six sets are collected.
A good table has:
- two columns ( and ),
- units in the headings,
- consistent decimal places down each column,
- values that vary across a range.
Key Takeaways
- Control variables: keep constant.
- Collect enough data (six points) with a good spread.
- Present results in a properly formatted table.
Common Mistakes
- Fewer than six sets of readings.
- Changing accidentally while changing .
- Missing units in headings, or putting units in every cell instead of the heading.
- Inconsistent precision (e.g. mixing and when using a metre rule).
Things to Be Careful About
- Sign convention: if the support is left of 50 cm, must be negative (do not write a positive number).
- Ensure the rule is truly balanced before reading (wait for oscillations to die out).
- Read positions at eye level to reduce parallax.
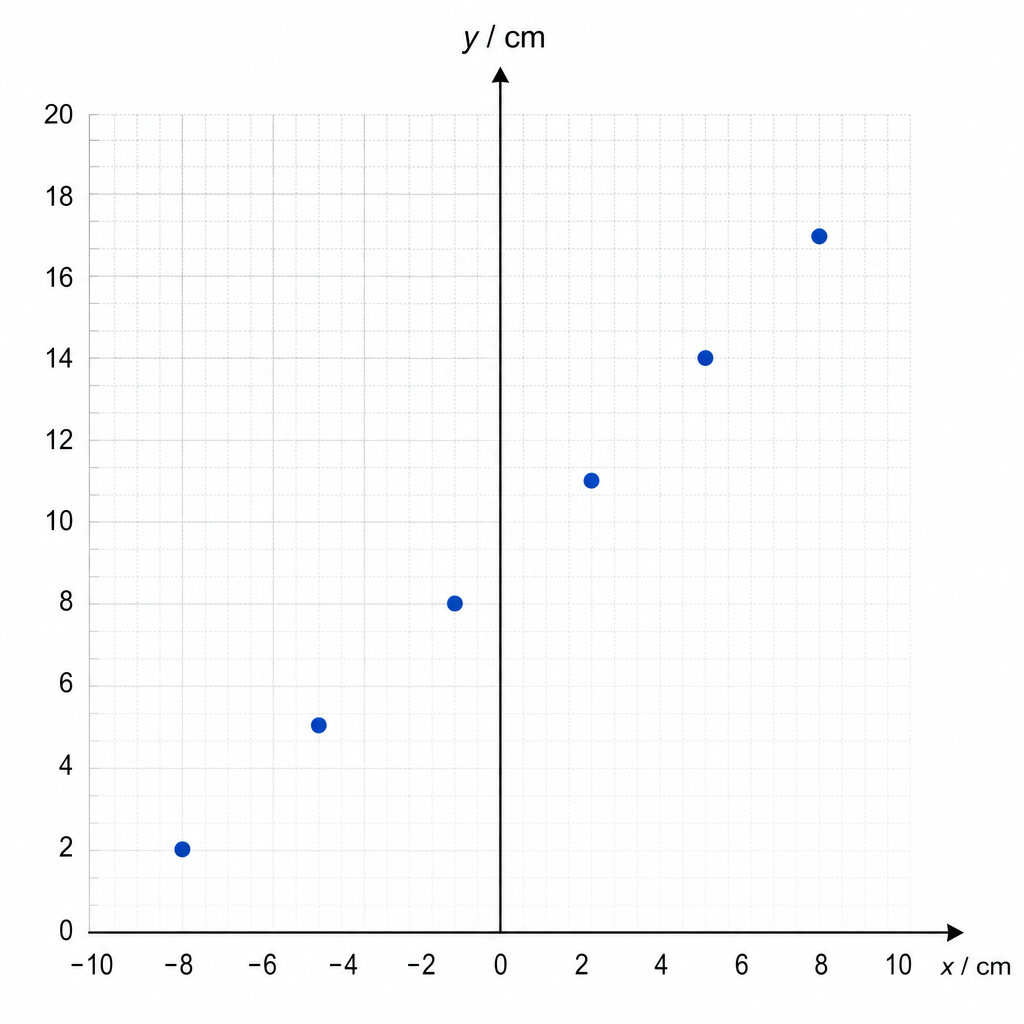
Plot a graph of on the -axis against on the -axis.
Answer
Plot on the -axis against on the -axis.
- Axes labelled and .
- Use a sensible scale (at least half the graph paper).
- Plot all six points accurately.
See graph
Background Concept
A graph is used to reveal whether two measured quantities are related linearly. If depends on , plotting (dependent variable) against (independent variable) is the standard way to test whether a straight-line relationship is plausible.
Understanding the Question
You have collected six pairs of values. You are asked to plot on the vertical axis and on the horizontal axis. This is the standard “ against ” convention.
Approach
- Put on the horizontal axis and on the vertical axis.
- Choose scales that fit all your data and spread points out (avoid cramped plots).
- Label axes correctly, including units.
- Plot points with small, neat crosses.
Step-by-Step Reasoning
- Determine the minimum and maximum values of and from your table.
- Choose axis limits slightly beyond these extremes.
- Choose a scale such as on paper representing or of measured value, so the plotted range uses most of the available grid.
- Label axes as:
- horizontal:
- vertical:
- Plot each point carefully using the scale.
Key Takeaways
- Independent variable on -axis; dependent variable on -axis.
- Axes must have quantity and unit.
- Good scales and accurate plotting earn marks.
Common Mistakes
- Swapping axes (plotting against ).
- Missing units on axes.
- Using awkward scales (e.g. 3 squares = 2 cm) that make plotting inaccurate.
Things to Be Careful About
- Include negative values if you took them (do not force the axis to start at zero if it wastes space).
- Plot crosses, not blobs; ensure each cross is centred at the correct coordinate.
Draw the straight line of best fit.
Answer
Draw one straight line of best fit (not dot-to-dot) through the plotted points, with roughly equal scatter about the line.
See graph (best-fit line drawn)
Background Concept
A best-fit line represents the overall trend of the data when random uncertainties cause scatter. For a proposed linear relationship, the best-fit line should be straight and placed so that points are distributed approximately evenly above and below it.
Understanding the Question
You have already plotted against . Now you must draw the straight line that best represents the relationship suggested by the data.
Approach
- Use a ruler.
- Draw one straight line.
- Do not force the line through every point.
- Aim for balanced residuals (similar scatter on both sides).
Step-by-Step Reasoning
- Visually judge the trend of the points.
- Place a ruler so that the line passes through the “middle” of the scatter.
- Check that no single outlier dominates the line placement.
- Draw the line clearly across the full range of the data.
Key Takeaways
- Best-fit line is about trend, not connecting points.
- A good best-fit line is crucial because gradient and intercept come from it.
Common Mistakes
- Joining points dot-to-dot.
- Drawing a line that goes through the origin without justification.
- Drawing the line only between two middle points instead of extending across the range.
Things to Be Careful About
- If you have an obvious outlier, you still draw the best-fit line for the main trend (unless instructed otherwise).
- Use a sharp pencil so the line is thin and readings from it are accurate.
Determine the gradient and -intercept of this line.
gradient = ______
-intercept = ______
Working
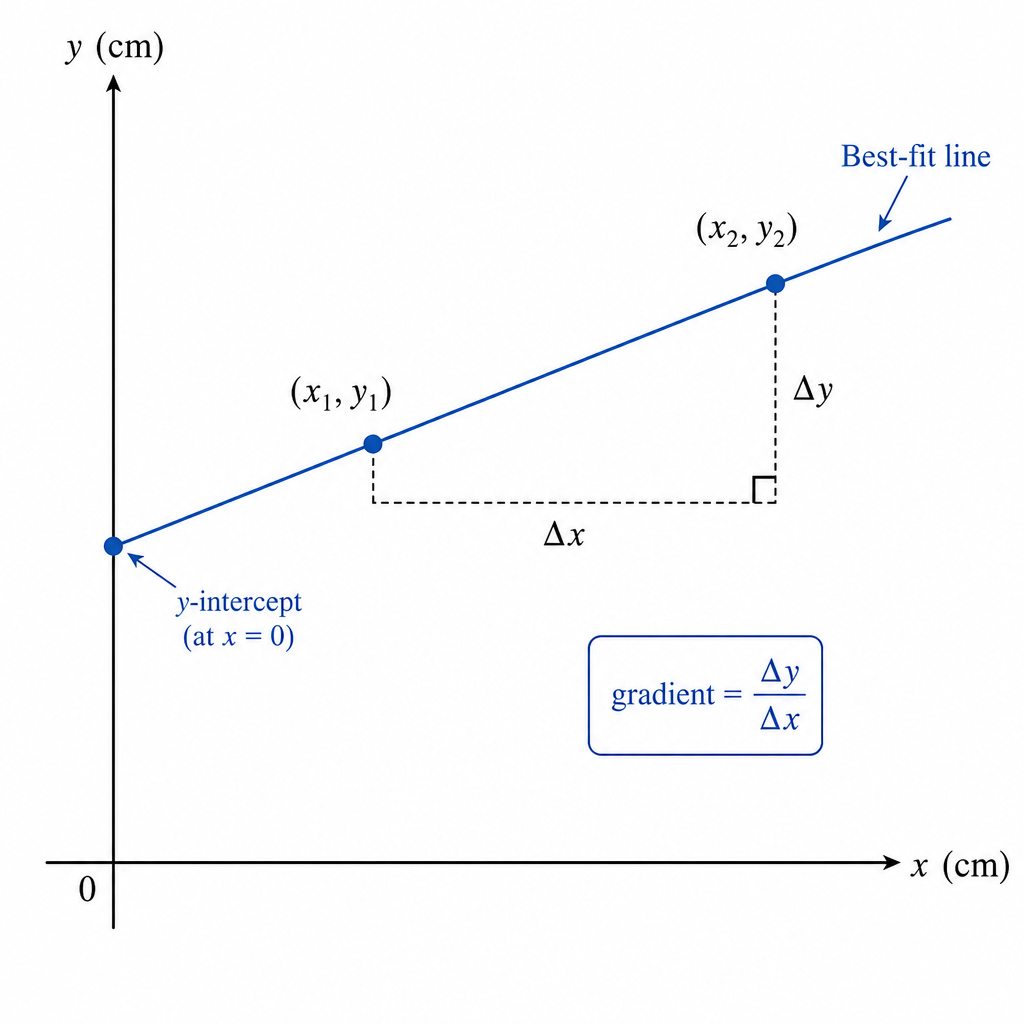
Use two well-separated points on the best-fit line, e.g.
and .
At ,
Answer
gradient
y-intercept
gradient = 0.75; y-intercept = 22.5 cm (example)
Background Concept
For a straight-line graph,
- is the gradient (slope):
- is the -intercept: the value of when .
If both axes are lengths in cm, the gradient has units , so it is dimensionless.
Understanding the Question
After drawing a straight line of best fit on your vs graph, you must:
- determine the gradient of the line,
- determine the -intercept.
These must be taken from the best-fit line, not by joining two data points at random.
Approach
- Choose two points on the best-fit line that are far apart to reduce percentage reading uncertainty.
- Compute gradient using .
- Find the intercept by reading where the line crosses the -axis (at ).
Step-by-Step Reasoning
- Pick two widely separated points on the drawn line (they do not need to be actual plotted data points).
- Read their coordinates carefully from the axes.
- Calculate differences:
- Calculate gradient:
- For the intercept, set and read where the line crosses the vertical axis.
Using the example values shown:
and -intercept .
Key Takeaways
- Always use a large triangle for gradient.
- Gradient is , not .
- Intercept is read at .
Common Mistakes
- Using two nearby points, giving a very uncertain gradient.
- Calculating (inverting the gradient).
- Using two raw data points rather than points on the best-fit line.
- Forgetting units for the intercept.
Things to Be Careful About
- Use consistent units: if axes are in cm, keep readings in cm.
- If your best-fit line does not cross the -axis within the plotted area, extend it carefully with a ruler.
- Quote gradient to sensible significant figures (typically 2–3 sf).
It is suggested that the quantities and are related by the equation
where and are constants.
Using your answers in (c)(iii), determine the values of and . Give appropriate units.
= ______
= ______
Working
Given
Comparing with :
Using (c)(iii):
Answer
A = gradient; B = y-intercept (with units)
Background Concept
A straight line has equation
- is the gradient.
- is the -intercept.
If an experiment suggests
then plays the role of and plays the role of .
Units come from the axes:
- If is in cm and is in cm, then has units (dimensionless), and has units of (cm).
Understanding the Question
You have already found the gradient and the -intercept from your graph. This part simply asks you to use these to state and (with appropriate units).
Approach
- Recognise the direct correspondence: and .
- Transfer the numerical values.
- Attach correct units: none for (here), cm for .
Step-by-Step Reasoning
From (c)(iii), suppose your results are:
- gradient
- -intercept
Then
and
Key Takeaways
- Constants in a linear relationship come directly from the graph.
- Intercept has the same unit as .
Common Mistakes
- Swapping and .
- Giving a unit to when and have the same unit.
- Forgetting units for .
Things to Be Careful About
- If you plotted in metres instead of cm, your numerical values for and would change accordingly; always use consistent units with your graph axes.
The mass of P is . The mass of Q is , where .
The constants and are related to , and by
Calculate .
= ______
Working
Given
so
With and :
Answer
0.150 kg
Background Concept
You are given relationships linking the straight-line constant to the masses:
This is a direct proportionality: for fixed , the gradient-related constant tells you the unknown mass .
Understanding the Question
- Mass of is known: .
- You have already determined from the graph.
- You must calculate the mass of , .
Approach
Rearrange the given equation for to make the subject, then substitute your values for and .
Step-by-Step Reasoning
Starting with
Multiply both sides by :
Substitute (example from the graph) and :
Key Takeaways
- Gradient/intercept constants can be used to determine physical quantities.
- Rearranging simple algebraic relationships is a common Paper 3 skill.
Common Mistakes
- Using without converting to kg when the answer is required in kg.
- Dividing instead of multiplying (writing ).
Things to Be Careful About
- Keep mass units consistent: since is given in kg and the answer requires kg, use kg throughout.
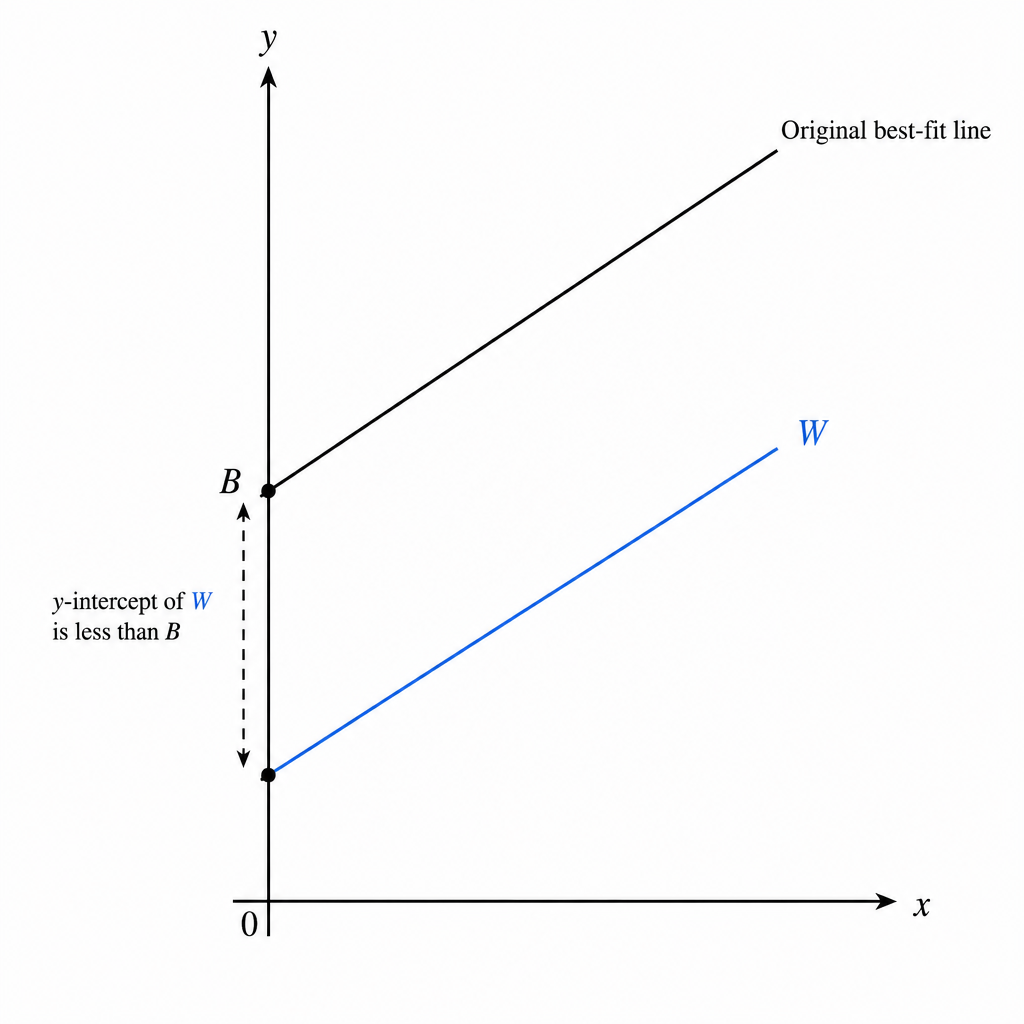
The experiment is repeated using the same equipment but a smaller value of . For this experiment, draw a second line on the graph to show the expected results. Label this line W.
Answer
For smaller , is unchanged and decreases, so draw line parallel to the original best-fit line but with a smaller -intercept (shifted downward).
Line W: same gradient, smaller y-intercept
Background Concept
The straight-line form is
and you are given
If you repeat the experiment with the same equipment and masses and unchanged, then:
- stays the same (so the gradient is unchanged),
- depends on , so reducing reduces (so the intercept decreases).
Understanding the Question
You must add a second predicted line on the same vs graph for an experiment where is smaller than before. This is not new data; it is a prediction based on how the linear relationship changes.
Approach
- Keep the same gradient as the original line.
- Move the line down so it crosses the -axis at a smaller value.
- Label this new line clearly as .
Step-by-Step Reasoning
- Recognise that smaller means smaller :
- Recognise that does not contain , so is unchanged.
- On the graph, draw a new straight line with the same slope as the original (parallel).
- Ensure it crosses the -axis below the original intercept.
- Label it .
Key Takeaways
- Changing a parameter that appears only in the intercept shifts the line up/down without changing slope.
- Parallel lines correspond to the same gradient.
Common Mistakes
- Drawing a line with a different gradient.
- Shifting the line upward (would correspond to larger , not smaller).
- Forgetting to label the line .
Things to Be Careful About
- The line must remain straight and parallel; do not pivot it around a point.
- The predicted line should be drawn over the same -range as the data for clear comparison.
The rest of this paper
1 more questions- Q2Manipulation, Measurement and Observation · Presentation of Data and Observations · Analysis, Conclusions and Evaluation20M