Physics 9702/44 — October/November 2025
Cambridge A-Level · A Level Structured Questions · worked solutions for every part, with the mark scheme
Topics Ideal Gases · Motion in a Circle · Gravitational Fields · Thermodynamics · Oscillations · Electric Fields · +7 more
Answer
The gravitational force between two point masses is attractive, acts along the line joining their centres, and has magnitude
where is the separation of the masses.
Attractive force along line joining centres: F = G m1 m2 / r^2.
Background Concept
Newton’s law of gravitation describes the mutual force between two point masses (or spherically symmetric masses treated as if their mass were concentrated at their centres). The magnitude of the force depends on:
- the product of the masses (bigger masses give a bigger force), and
- the inverse square of their separation (doubling makes the force four times smaller).
The law is written as
where is the gravitational constant.
Understanding the Question
You are asked to state Newton’s law, so you need the relationship in words and/or the equation. For full credit you should include that the force acts along the line joining the masses and is attractive.
Approach
Write the standard inverse-square formula and add the direction/attractive nature, since the question asks for the law (not just the equation).
Step-by-Step Reasoning
- Identify the interacting objects: two masses and separated by distance .
- State the magnitude of the force using the inverse-square relationship:
- State the direction: the force on each mass is towards the other mass, along the line joining their centres.
Key Takeaways
- Gravitational force is always attractive.
- Magnitude follows an inverse-square law with separation.
- For spherical bodies, use centre-to-centre separation.
Common Mistakes
- Omitting the in the denominator.
- Forgetting to mention that the force is attractive / along the line joining the centres.
- Using diameter or radius instead of the centre-to-centre separation.
Things to Be Careful About
- is the distance between the centres of mass.
- The force on each mass has the same magnitude (Newton’s third law pair) but opposite direction.
A binary star consists of star A, of mass , and star B, of mass , separated by a distance of . The stars are both in circular orbit around their common centre of gravity X, as shown in Fig. 1.1.
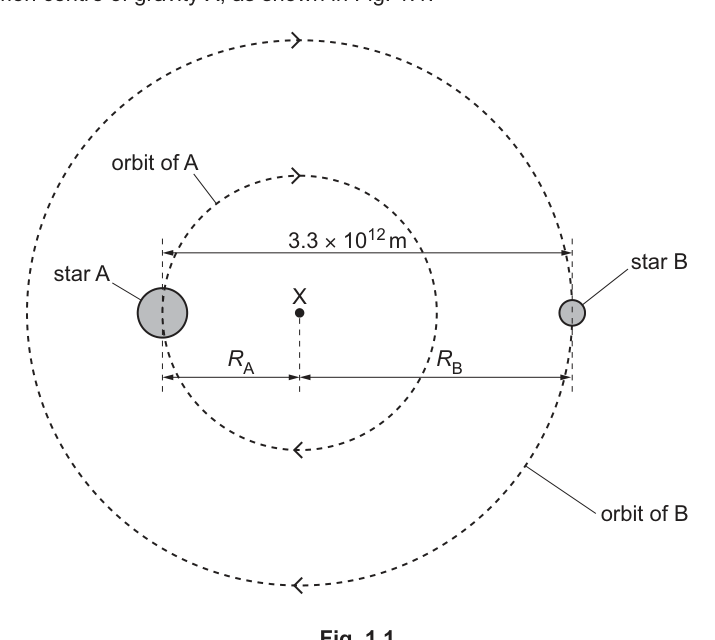
The radius of the orbit of star B is double the radius of the orbit of star A.
Use Newton’s law of gravitation to calculate the magnitude of the gravitational force exerted by each star on the other.
force = ______
Working
Answer
4.9 × 10^25 N
Background Concept
For two masses and separated by distance , the magnitude of the gravitational force is
This is the same force magnitude on each star (equal and opposite forces).
Understanding the Question
You are given:
- separation
You must calculate the gravitational force that each exerts on the other, i.e. the single magnitude .
Approach
Use Newton’s law of gravitation directly with the given centre-to-centre distance. Substitute carefully in standard form, then round to an appropriate number of significant figures.
Step-by-Step Reasoning
Start with
Compute the product of masses:
Square the separation:
Now substitute:
Combine powers of ten:
So numerator is . Then
Key Takeaways
- Use centre-to-centre separation.
- Inverse-square dependence means is crucial.
- Equal magnitude forces act on both stars.
Common Mistakes
- Forgetting to square .
- Squaring incorrectly (especially the power of ten).
- Giving units other than newtons.
Things to Be Careful About
- Keep significant figures consistent (here typically 2 s.f. is fine: ).
- Don’t confuse (distance between stars) with orbital radii and (distance from centre of mass).
Working
For star A, gravitational force provides centripetal force:
Answer
1.2 × 10^-5 m s^-2
Background Concept
In uniform circular motion, an object moving in a circle of radius needs a centripetal (inward) acceleration
This acceleration is caused by a net inward force:
In an orbit, the centripetal force is provided by gravity.
Understanding the Question
You have already found the gravitational force between the two stars. That same force acts on star A towards the centre of its orbit (towards the other star / towards the centre of mass), so it is the centripetal force for star A. The question asks for the centripetal acceleration of star A.
Known:
- from part (b)(i)
Unknown:
Approach
Use for star A, rearrange to , and substitute.
Step-by-Step Reasoning
- Centripetal force on star A is the gravitational force:
- Rearrange:
- Substitute values:
Rounded to 2 s.f.:
Key Takeaways
- In orbits, gravity provides the centripetal force.
- Once you know the force on a body, its centripetal acceleration is simply .
Common Mistakes
- Dividing by the wrong mass (using instead of ).
- Thinking the force is different on each star (it is the same magnitude).
- Missing the unit .
Things to Be Careful About
- This acceleration is the acceleration of star A towards the centre of its circular path (radially inward), not tangential acceleration (speed is constant).
Use your answer in (b)(ii) to determine the period of the orbit of star A.
period = ______
Working
Given and separation :
For star A,
and , so
Answer
1.9 × 10^9 s
Background Concept
For uniform circular motion:
and angular speed is related to period by
Combining these gives
So if you know and , you can find .
In a two-body system orbiting a common centre of mass, the separation of the bodies is the sum of their orbital radii about the centre of mass.
Understanding the Question
You are told the stars are separated by and that . The diagram indicates and are the radii of the circular orbits about the common centre of gravity .
You must use the centripetal acceleration of star A from (b)(ii) and its orbital radius to find the period .
Approach
- Use the geometry: separation , and the given ratio , to find .
- Use to find (or directly combine into ).
- Substitute values and calculate.
Step-by-Step Reasoning
1) Find from the separation and ratio
Given:
Separation between stars:
Substitute :
So
2) Relate acceleration to period
Use
and :
Rearrange for :
3) Substitute numbers
With and :
Compute the inside:
Square root:
Multiply by :
Rounded:
Key Takeaways
- For circular motion: and .
- In a binary system: separation .
- Use consistent SI units throughout.
Common Mistakes
- Using the full separation as .
- Forgetting the square root when rearranging for .
- Using without relating to correctly.
Things to Be Careful About
- Ensure is found correctly: here is one third of the separation because .
- Keep track of powers of ten when dividing by (it increases the power by 5).
By placing a tick (✓) in each row, complete Table 1.1 to show how the quantities indicated for star B compare with the same quantities for star A.
Table 1.1
| B less than A | B equal to A | B greater than A | |
|---|---|---|---|
| centripetal acceleration | |||
| linear speed | |||
| period |
Answer
Both stars have the same angular speed, so the periods are equal.
Since and with the same and :
- centripetal acceleration: B greater than A
- linear speed: B greater than A
- period: B equal to A
a_B > a_A, v_B > v_A, T_B = T_A
Background Concept
In uniform circular motion for an object at radius with angular speed :
The period is related to by
In a binary system orbiting a common centre of mass, both objects rotate with the same angular speed (they stay on opposite sides of the centre of mass, so they must complete each revolution together).
Understanding the Question
You are told is double :
The question asks you to compare for star B versus star A:
- centripetal acceleration
- linear speed
- period
No calculation is required; it is about how these quantities scale with radius when angular speed is the same.
Approach
- Use the fact that both stars share the same period (and so the same ).
- Compare using .
- Compare using .
Step-by-Step Reasoning
1) Period
If both stars rotate about the centre of mass together, they complete one orbit in the same time, so
2) Centripetal acceleration
Since is the same for both stars, .
With :
So is greater than .
3) Linear speed
Again with the same , . Therefore:
So is greater than .
Key Takeaways
- In a two-body orbit, both bodies share the same angular speed and period.
- With the same , both and increase in proportion to orbital radius .
Common Mistakes
- Saying the periods are different because the radii are different (they must orbit together).
- Using and then incorrectly concluding that larger gives smaller without accounting for the change in .
Things to Be Careful About
- The relationship is always true, but here is not the same for both stars.
- Always decide first whether (or ) is common to both bodies in the situation described.
The equation of state for an ideal gas may be expressed as
State the meaning of each of the symbols in this equation.
: ______
: ______
: ______
: ______
: ______
Answer
: pressure of the gas
: volume of the gas
: number of molecules (particles) in the gas
: Boltzmann constant
: thermodynamic temperature (in kelvin)
p: pressure; V: volume; N: number of molecules; k: Boltzmann constant; T: thermodynamic temperature (K)
Background Concept
The ideal gas equation can be written in different but equivalent forms. In A Level, two common versions are
and
Here, is the amount of gas in moles, is the molar gas constant, is the number of molecules (or atoms) and is the Boltzmann constant. They are related by and , where is the Avogadro constant.
Understanding the Question
You are given
and asked to state what each symbol represents. No calculation is required; you just need the correct physical meaning of each letter.
Approach
List each symbol in turn and write its meaning, being careful that:
- is a count of molecules/particles (not moles),
- is absolute temperature (kelvin), not degrees Celsius.
Step-by-Step Reasoning
- is the pressure exerted by the gas on the container walls.
- is the volume occupied by the gas.
- counts how many molecules (or particles) are present.
- is the Boltzmann constant, the microscopic equivalent of .
- is thermodynamic (absolute) temperature measured in kelvin.
Key Takeaways
- uses particle number , not moles.
- Temperature must be on the kelvin scale.
- links microscopic particle descriptions to macroscopic measurements.
Common Mistakes
- Writing as “number of moles” (that is ).
- Giving in instead of kelvin.
- Confusing (Boltzmann constant) with (molar gas constant).
Things to Be Careful About
- If units are mentioned: in , in , in .
- is dimensionless (a pure count).
Using the equation of state, derive an expression for the average translational kinetic energy of a particle in the gas in terms of some or all of , and .
= ______
Working
From kinetic theory,
Given ,
Average translational kinetic energy per particle:
Answer
E_K = (3/2) kT
Background Concept
The kinetic theory of gases relates macroscopic pressure to microscopic molecular motion. For an ideal gas,
Also, kinetic theory gives
where is the mass of one molecule and is the mean of the squared molecular speeds. The root-mean-square speed is .
The average translational kinetic energy per molecule is
Understanding the Question
You are asked to use the equation of state to derive an expression for the average translational kinetic energy of one particle (molecule) in the gas, in terms of , , and (though will cancel).
Approach
Use the fact that there are two valid expressions for for an ideal gas:
- from the equation of state:
- from kinetic theory:
Equate them, cancel , and then rewrite in terms of .
Step-by-Step Reasoning
Start with the kinetic theory form:
The equation of state says for the same gas sample:
Because both equal , set them equal:
Cancel (because it is the same number of molecules on each side):
Multiply both sides by :
Recognise the right-hand side as the average translational kinetic energy per molecule:
So,
This result is important: for an ideal gas, average translational kinetic energy depends only on absolute temperature, not on the type of gas.
Key Takeaways
- Combine with .
- The particle number cancels, so depends only on .
- The standard result is (per molecule, translational only).
Common Mistakes
- Forgetting the factor in the kinetic theory equation.
- Using but mixing up and (they are equal, but you must treat them consistently).
- Leaving an in the final expression (it should cancel).
Things to Be Careful About
- must be in kelvin.
- This is translational kinetic energy only; real molecules may also have rotational/vibrational energy, but the question explicitly asks for translational kinetic energy as used in this syllabus result.
A molecule of hydrogen gas consists of two hydrogen atoms, each of nucleon number 1. A molecule of oxygen gas consists of two oxygen atoms, each of nucleon number 16.
Assume that hydrogen and oxygen both behave as ideal gases.
A sample of hydrogen gas is at the same temperature as a sample of oxygen gas.
For the two samples, determine the ratio
ratio = ______
Working
For an ideal gas,
So
: nucleon number ; : nucleon number .
Answer
ratio
4
Background Concept
For an ideal gas, the r.m.s. speed is connected to temperature by
so
At the same temperature , the only difference between gases is the mass of a molecule: heavier molecules move more slowly on average, with speed proportional to .
Understanding the Question
Hydrogen gas is (two hydrogen atoms). Each hydrogen atom has nucleon number , so the molecule has total nucleon number .
Oxygen gas is (two oxygen atoms). Each oxygen atom has nucleon number , so the molecule has total nucleon number .
You need the ratio:
with both samples at the same temperature.
Approach
- Use .
- Form the ratio so cancels.
- Use nucleon number to take the ratio of molecular masses (mass (\propto) nucleon number).
Step-by-Step Reasoning
Start with
Form the ratio at the same :
Now compare molecular masses using nucleon numbers:
So
This makes sense physically: hydrogen molecules are much lighter, so they move faster at the same temperature.
Key Takeaways
- For equal , .
- Ratios are easiest because constants () cancel.
- Use molecular mass (for and ), not atomic mass.
Common Mistakes
- Using atomic masses (1 and 16) instead of molecular masses (2 and 32), giving coincidentally here if done inconsistently, but it can fail in other questions.
- Inverting the ratio: writing would give .
- Forgetting the square root relationship and using .
Things to Be Careful About
- Make sure both gases are stated to be at the same temperature; otherwise would not cancel.
- Nucleon number is a proxy for relative mass; electron masses are negligible at this level, so the approximation is valid.
With reference to molecular kinetic energy and molecular potential energy, explain what is meant by the internal energy of an ideal gas.
Answer
Internal energy is the sum of the random molecular kinetic energy and the molecular potential energy.
For an ideal gas, intermolecular forces are negligible so the molecular potential energy is constant (taken as zero), hence the internal energy is due only to the random kinetic energy of the molecules.
Internal energy is the total random molecular kinetic + potential energies; for an ideal gas the potential energy is negligible/constant so internal energy is just the total random kinetic energy.
Background Concept
The internal energy of a substance is the energy stored microscopically in its particles. For a gas this consists of:
- random molecular kinetic energy (translational, and possibly rotational/vibrational in more detailed models), and
- molecular potential energy due to intermolecular forces (attraction/repulsion between molecules).
An ideal gas is modelled as molecules that:
- occupy negligible volume, and
- exert negligible intermolecular forces on each other (except during collisions).
Because the forces are negligible, there is essentially no intermolecular potential energy change as the gas changes state, so we treat the potential energy contribution as constant (often taken as zero).
Understanding the Question
You are asked to explain what “internal energy of an ideal gas” means, explicitly referring to:
- molecular kinetic energy, and
- molecular potential energy.
So you must (i) state that internal energy is a sum of these, and (ii) link the ideal gas assumption to the potential energy term.
Approach
- Give the definition: is total (random) molecular kinetic energy + molecular potential energy.
- Apply the ideal-gas model: negligible intermolecular forces potential energy contribution is constant/negligible.
- Conclude: for an ideal gas, internal energy depends only on molecular kinetic energy (and hence only on temperature).
Step-by-Step Reasoning
- Internal energy is not about the motion of the gas as a whole; it is about the energies of molecules within it.
- Molecules have random kinetic energy because they move in all directions.
- If there are forces between molecules, separating/bringing them together changes potential energy.
- For an ideal gas, we assume those forces are negligible, so there is no significant molecular potential energy term (or it does not change).
- Therefore, the internal energy of an ideal gas is the total random kinetic energy of its molecules.
Key Takeaways
- Internal energy is microscopic energy: kinetic + potential at molecular level.
- For an ideal gas, potential energy is negligible/constant, so is due to kinetic energy only.
Common Mistakes
- Saying internal energy is “heat energy” (heat is energy in transfer, not stored).
- Forgetting to mention potential energy at all (the question explicitly asks for both).
- Saying the potential energy is zero “because pressure is zero” or other unrelated statements.
Things to Be Careful About
- Use the phrase random molecular kinetic energy.
- Link “ideal” directly to negligible intermolecular forces, not to “no collisions” (collisions still occur).
A sample of an ideal gas is initially in state A, at a pressure of and with a volume of , as shown in Fig. 3.1.
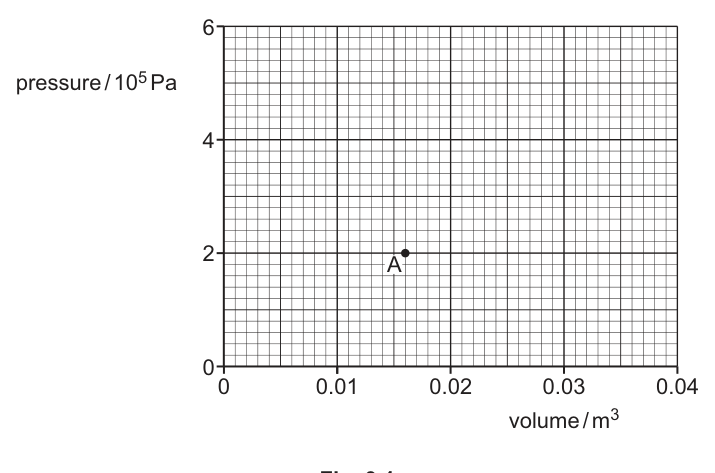
In state A, the temperature of the gas is .
The gas undergoes two successive changes X and Y.
In change X, it is heated at constant volume to a pressure of . At the end of change X, the gas is in state B.
In change Y, it is then allowed to expand at constant temperature back to its original pressure. At the end of change Y, the gas is in state C.
Working
For an ideal gas,
Answer
4.8 × 10^3 J
Background Concept
For an ideal gas, internal energy depends only on temperature. In the simplest model used at this level (ideal monatomic gas),
Using the equation of state,
we can also write
This is useful because and are often given directly.
Understanding the Question
State A has:
- pressure
- volume
- temperature
You are asked to find the internal energy of the gas in state A.
Approach
Use the ideal-gas internal energy formula. Since and are given, the quickest route is:
Then substitute the state A values.
Step-by-Step Reasoning
Start from
Calculate first:
Now multiply by :
Check units: .
Key Takeaways
- For an ideal gas (at this level), can be found using .
- naturally has joule units.
Common Mistakes
- Using instead of .
- Forgetting that must be in pascals and in .
- Giving in units of or instead of joules.
Things to Be Careful About
- Keep powers of ten clear: , not .
- Quote the final answer to a sensible number of significant figures (here 2 s.f. matches the data).
Working
At constant volume, .
Answer
800 K
Background Concept
From the ideal gas equation , if the amount of gas is fixed and the volume is constant, then
So doubling the absolute temperature doubles the pressure (and vice versa).
Understanding the Question
Change X takes the gas from state A to state B:
- volume stays at
- pressure increases from to
- initial temperature is
You must find the temperature in state B.
Approach
Use the constant-volume form of the ideal-gas law:
and rearrange for .
Step-by-Step Reasoning
Write
Rearrange:
Substitute values:
Key Takeaways
- At constant volume for a fixed mass of gas: is constant.
- Use ratios to avoid unnecessary calculation of .
Common Mistakes
- Using (that is for constant temperature, not constant volume).
- Using degrees Celsius instead of kelvin in proportional relationships.
Things to Be Careful About
- Temperature must be in kelvin for .
- Check that the process is explicitly “constant volume” before using constant.
Working
Change Y is at constant temperature, so
Answer
0.032 m^3
Background Concept
For a fixed mass of ideal gas at constant temperature (isothermal process), the ideal gas equation gives
So
This is Boyle’s law.
Understanding the Question
State B is reached after change X:
Change Y is then an isothermal expansion from state B until the pressure returns to its original value:
You must find the volume .
Approach
Because temperature is constant during change Y, use
Solve for .
Step-by-Step Reasoning
Start with the isothermal condition:
Rearrange:
Substitute values:
The ratio , so
Key Takeaways
- Isothermal change constant.
- If pressure halves, volume doubles (for isothermal conditions).
Common Mistakes
- Using constant (that is for constant volume, not constant temperature).
- Using state A temperature () in calculations for change Y; only the constancy of temperature matters here.
Things to Be Careful About
- Make sure you use the correct states: the isothermal starts at B and ends at C.
- Keep units consistent (Pa and ).
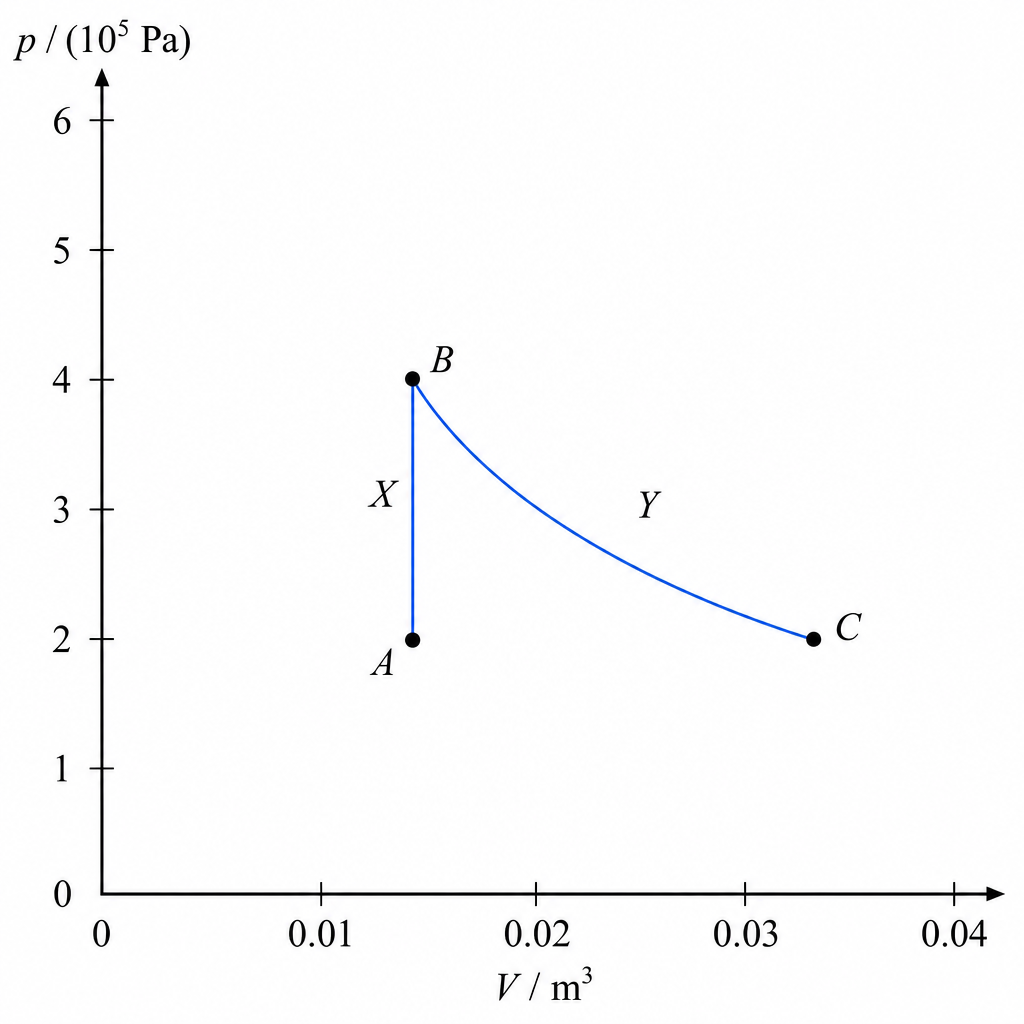
On Fig. 3.1, draw two lines, one to represent change X and one to represent change Y. Label your lines X and Y respectively.
Answer
X: vertical line at from to .
Y: isothermal curve (rectangular hyperbola) from B to C ending at and .
X: vertical isochore at V = 0.016 m^3 from 2.0×10^5 Pa to 4.0×10^5 Pa; Y: isothermal curve from B to C ending at (2.0×10^5 Pa, 0.032 m^3).
Background Concept
On a pressure–volume (–) graph for a fixed mass of ideal gas:
- Constant volume (isochoric): fixed, so the graph is a vertical line.
- Constant temperature (isothermal): , so the graph is a rectangular hyperbola; as increases, decreases.
Understanding the Question
You start at state A: .
Change X: heated at constant volume to reach state B at pressure .
Change Y: then expands at constant temperature until pressure returns to , reaching state C.
You must draw the two lines on the given – axes and label them X and Y.
Approach
- Plot/identify point B directly above A at the same volume (because X is constant volume).
- Draw change X as a vertical line from A to B.
- For change Y, use starting from B. Find (it is from part (iii)).
- Draw a smooth decreasing hyperbola from B to C and label it Y.
Step-by-Step Reasoning
- Change X: volume does not change, so you move straight up (pressure increases) at until you reach . That endpoint is B.
- Change Y: temperature stays constant, so stays constant. Starting at B, falls back to while increases to keep constant. The endpoint is C at .
- The shape for an isotherm is a curve (not a straight line) that flattens as increases.
Key Takeaways
- Isochoric process vertical line on a – graph.
- Isothermal process hyperbola () on a – graph.
Common Mistakes
- Drawing the isothermal as a straight line.
- Drawing change X as horizontal (horizontal would mean constant pressure, not constant volume).
- Making Y end at the wrong pressure or not matching the correct final volume.
Things to Be Careful About
- Label both lines clearly with X and Y as requested.
- Ensure the isothermal curve goes through the correct endpoints (B and C).
- Keep the curve smooth and decreasing; it should not dip below the final point or turn upward.
Answer
Frequency is the number of complete oscillations per unit time (equal to ).
Number of complete oscillations per unit time (f = 1/T).
Background Concept
In oscillations, the motion repeats itself in time. Two key timing quantities are:
- The period : time for one complete oscillation.
- The frequency : number of complete oscillations per second.
They are related by
Understanding the Question
You are asked to state what is meant by frequency for an oscillating object. This is a definition question: no calculations are required.
Approach
Give the standard physics definition: “complete cycles per unit time”, and you may add the link to period.
Step-by-Step Reasoning
- “Frequency” counts how many full repeats of the motion occur.
- “Per unit time” means per second (unit is hertz, Hz).
- Since one oscillation takes time , in 1 second the number is , so .
Key Takeaways
- Frequency measures how often the oscillation repeats.
- and are reciprocals.
Common Mistakes
- Saying “time for one oscillation” (that is the period, not frequency).
- Missing the word complete (must be a full cycle).
Things to Be Careful About
- Frequency has unit or Hz; period has unit s.
- Frequency is a scalar (no direction).
An object is oscillating.
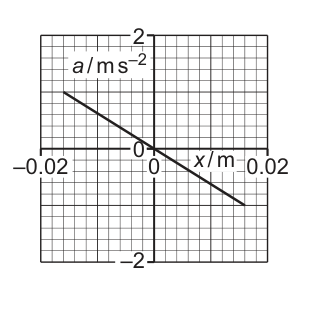
Fig. 4.1 shows the variation of the acceleration of the object with its displacement from the equilibrium position.
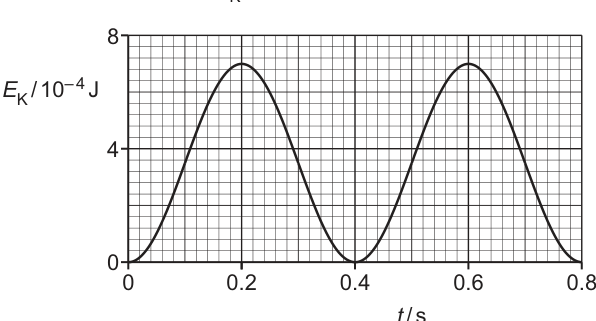
Fig. 4.2 shows the variation of the kinetic energy of the object with time .
Answer
Successive maxima of are at and , so the period of the graph is . Since has two maxima per oscillation, the oscillation period is .
Maxima of EK are 0.4 s apart; EK repeats twice per cycle, so T = 0.80 s.
Background Concept
For simple harmonic motion, speed (and hence kinetic energy) varies during the motion:
- Kinetic energy is
- In SHM, the object passes through equilibrium twice per cycle (once in each direction) and is at a turning point twice per cycle.
- Therefore (and so ) has two identical peaks per oscillation, meaning the kinetic-energy graph has half the period of the displacement (or velocity) graph.
Understanding the Question
You are shown a graph of against . The question asks how this graph indicates that the oscillation period (time for one full back-and-forth motion) is .
Approach
- Read the time between repeated features on the graph (e.g. peak-to-peak).
- Recognise that this time corresponds to half an oscillation period because peaks twice per oscillation.
- Double the time found in step 1.
Step-by-Step Reasoning
- From Fig. 4.2, successive maxima occur at and .
- These peaks correspond to the object passing through equilibrium with maximum speed; it does that twice per oscillation.
- Hence is half the oscillation period:
Key Takeaways
- , so it is always positive and repeats twice per cycle.
- Peak-to-peak time on an graph corresponds to for SHM.
Common Mistakes
- Taking the peak-to-peak time as the oscillation period (forgetting the “twice per cycle” idea).
- Using zero-to-zero spacing incorrectly without checking whether the zeros repeat every half-cycle.
Things to Be Careful About
- Make sure you compare same features (peak-to-peak or zero-to-zero).
- State explicitly why doubling is needed: has two maxima in one oscillation.
Working
Answer
7.9 rad s^-1
Background Concept
Angular frequency describes how quickly the phase of an oscillation changes.
For periodic motion:
and since
we get the useful form
Units: is in .
Understanding the Question
You have already established the oscillation period is . The task is to calculate .
Approach
Use
and substitute .
Step-by-Step Reasoning
Substitute:
Calculate:
Rounding appropriately (typically 2 s.f. to match ):
Key Takeaways
- is directly related to period: larger means smaller .
- Always include unit .
Common Mistakes
- Using instead of .
- Giving units as instead of .
Things to Be Careful About
- Significant figures: suggests 2 s.f., so should be given to about 2 s.f.
- Do not omit the factor of (common error).
Apart from the period, frequency and angular frequency of the oscillations, determine three other conclusions about the object and its oscillations that may be drawn from Fig. 4.1 and Fig. 4.2. The conclusions may be qualitative or quantitative. Use the space below for any working.
1 ______
2 ______
3 ______
Answer
-
Fig. 4.1 shows (straight line through origin with negative gradient), so the motion is simple harmonic with acceleration always towards equilibrium.
-
From Fig. 4.2, the maximum kinetic energy is (so the total energy is ).
-
From Fig. 4.2, at so the object is at turning points (speed zero) at these times, and is maximum at and so it passes through equilibrium with maximum speed at these times.
- a ∝ −x so SHM with restoring acceleration; 2) EK,max = 7.0×10^-4 J (total energy same); 3) EK=0 at turning points and EK max at equilibrium (times read from graph).
Background Concept
Two key SHM ideas connect to the given graphs:
- Acceleration–displacement relation
For SHM,
So a graph of against is a straight line through the origin with negative gradient. The negative sign means acceleration is always directed back towards equilibrium.
- Energy in SHM
- Kinetic energy:
- Potential energy (for SHM system) is greatest at extreme displacement, least at equilibrium.
- Total energy is constant (ignoring damping):
Understanding the Question
You must give three different conclusions (not including period/frequency/angular frequency) that can be read from:
- Fig. 4.1: vs .
- Fig. 4.2: vs .
Conclusions can be qualitative (what kind of motion, where acceleration points) or quantitative (a maximum energy value, specific times when something happens).
Approach
Pick distinct information sources:
- Use the shape/sign of the – graph to identify SHM and the direction of acceleration.
- Use the peaks/zeros on the – graph to infer when the object is at equilibrium vs turning points.
- Read a numerical maximum from the graph (this gives total energy too).
Step-by-Step Reasoning
Conclusion 1 (from Fig. 4.1): SHM and restoring acceleration
- The graph is a straight line through the origin with negative gradient.
- This matches .
- Therefore acceleration is proportional to displacement and opposite in direction, i.e. always towards equilibrium.
Conclusion 2 (from Fig. 4.2): maximum kinetic energy (and total energy)
- The highest point on the graph is .
- In SHM without damping, total energy is constant and equals the maximum kinetic energy (because at equilibrium the potential energy is minimum).
- So .
Conclusion 3 (from Fig. 4.2): where the object is in its cycle at certain times
- When , then (since ), which happens at turning points (maximum displacement).
- The graph shows at , so those are turning points.
- When is maximum, speed is maximum, which occurs at equilibrium position. The maxima occur at and , so the object passes through equilibrium then.
Key Takeaways
- A straight-line – graph with negative gradient is the signature of SHM.
- means speed is zero (turning points).
- maximum occurs at equilibrium; its maximum value equals total energy (if no damping).
Common Mistakes
- Saying “negative acceleration” rather than “acceleration opposite to displacement” (sign depends on which side of equilibrium the object is on).
- Forgetting that being maximum implies equilibrium (not maximum displacement).
- Using the peak spacing to restate the period (the question excludes period/frequency/).
Things to Be Careful About
- Keep the three conclusions distinct; do not repeat the same idea in different words.
- When quoting numerical values from graphs, include the correct power of ten from the axis label (here ).
- If mentioning “total energy”, it is only constant if damping is negligible (the graph here suggests no decay in peak height).
Describe the interchange between kinetic energy and potential energy during the oscillations. Numerical values are not required.
Answer
At the equilibrium position, speed is maximum so kinetic energy is maximum and potential energy is minimum.
As the object moves away from equilibrium, kinetic energy decreases and is converted into potential energy.
At the extreme displacement (turning points), speed is zero so kinetic energy is zero and potential energy is maximum; on returning, potential energy is converted back into kinetic energy. Total energy remains constant (neglecting damping).
KE max at equilibrium and PE min; moving away KE converts to PE; at extremes KE=0 and PE max, then PE converts back to KE (total energy constant).
Background Concept
In SHM (with negligible damping), mechanical energy continually swaps between:
- Kinetic energy
- Potential energy of the system (e.g. elastic potential energy for a spring)
Total energy stays constant:
Key physical links:
- Speed is greatest at equilibrium, zero at turning points.
- Displacement magnitude is greatest at turning points, zero at equilibrium.
Understanding the Question
You must describe (no numbers needed) how kinetic and potential energy change during one oscillation: what happens at equilibrium, as it moves outwards, at the turning point, and as it returns.
Approach
Describe the energy changes over a cycle using the two special positions:
- equilibrium ()
- turning points ()
and state the conversion between energies as the object moves.
Step-by-Step Reasoning
-
At equilibrium (): the object is moving fastest, so is maximum.
Therefore is maximum. At the same moment, the potential energy of the oscillating system is minimum. -
Moving away from equilibrium: the restoring acceleration slows it down, so decreases. Hence decreases. The object is moving to larger , so the system stores more potential energy; increases. This is energy conversion from kinetic to potential.
-
At a turning point (): the object momentarily stops before reversing direction, so and . The displacement is maximum, so the potential energy is maximum.
-
Returning towards equilibrium: the restoring force accelerates it back, increasing . So decreases and is converted back into .
-
Over the whole oscillation, if there is no damping, the total mechanical energy remains constant.
Key Takeaways
- Equilibrium: maximum, minimum.
- Turning points: , maximum.
- Energy is transferred back and forth while the total stays constant (undamped).
Common Mistakes
- Saying both and are maximum at the same time.
- Claiming is zero at equilibrium in all cases (it is minimum there, but not necessarily zero depending on choice of reference).
- Forgetting to mention that the object stops briefly at the turning points ().
Things to Be Careful About
- Use the words converted or transferred between and .
- If you mention conservation of energy, implicitly assume damping is negligible; otherwise total energy would decrease with time.
Answer
Electric potential at a point is the work done per unit positive charge in bringing a test charge from infinity.
Near a proton, a positive test charge is repelled, so external work must be done against the repulsive force.
Hence the work done per unit charge is positive, so the potential is positive (equivalently and ).
Electric potential is positive because bringing a positive test charge from infinity requires positive work against repulsion from the proton (Q>0).
Background Concept
Electric potential at a point is defined as the work done per unit positive test charge by an external agent in bringing the test charge from infinity to that point (with no change in kinetic energy).
Mathematically, for a point charge ,
The sign of matches the sign of (because and the constant is positive). Electric potential energy of a charge at potential is .
Understanding the Question
You are asked specifically about the region near an isolated proton (a single positive charge). The task is to justify why the potential there is positive, using the meaning of potential (work done per unit charge) or the standard expression for .
Approach
Use either (or both) of these equivalent arguments:
- Definition argument: decide whether bringing a positive test charge from infinity requires positive or negative external work.
- Formula argument: quote and use .
Step-by-Step Reasoning
- A proton has charge , so it creates an electric field pointing radially outward.
- Consider a positive test charge brought from infinity towards the proton.
- The electric force on is repulsive (it acts outward), so to move the charge inward slowly an external force must pull inward.
- Because the external force is in the same direction as the displacement (both inward), the external work done is positive.
- Potential is work done per unit positive charge, so is positive.
Equivalently, substituting into shows for any finite .
Key Takeaways
- Electric potential is tied to work done per unit positive charge.
- Near a positive source charge, a positive test charge must be pushed against repulsion, so is positive.
- The expression is a fast sign check: sign of equals sign of .
Common Mistakes
- Saying “the potential is positive because the charge is positive” with no link to definition (often loses explanation marks).
- Confusing electric potential with electric field (field has direction; potential does not).
- Discussing potential energy instead of potential (they are related but not the same).
Things to Be Careful About
- The definition uses a positive test charge; the sign conclusion depends on that convention.
- “Work done by the field” would be negative here; the definition typically refers to work done by an external agent (or minus the work done by the field). State your wording clearly.
An isolated metal sphere is positively charged and has radius , as shown in Fig. 5.1.
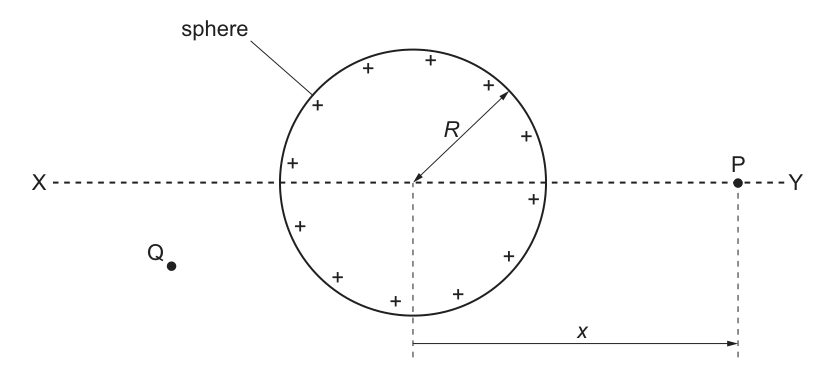
Line XY passes through the centre of the sphere.
Point P lies on line XY at a variable displacement from the centre of the sphere.
Point Q is at a fixed position that is not on line XY.
The electric field strength at the surface of the sphere is .
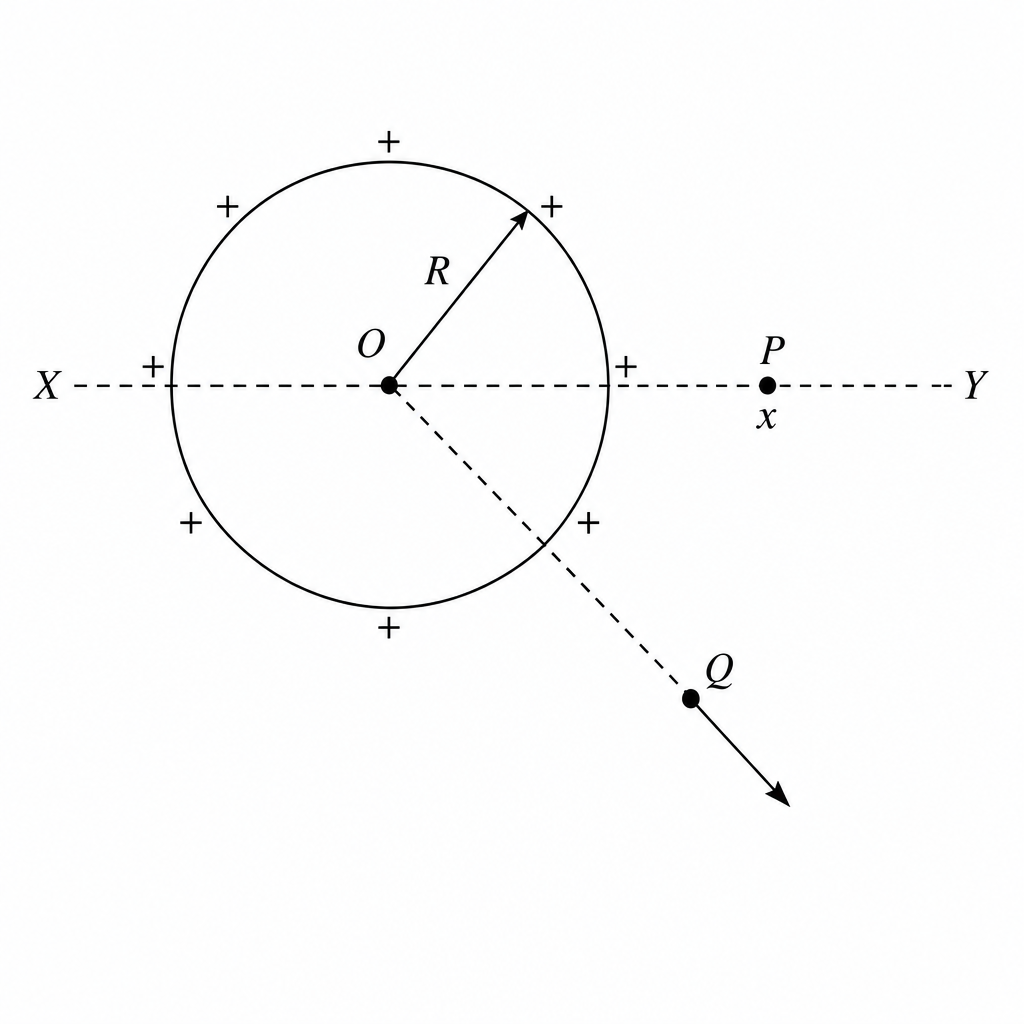
On Fig. 5.1, draw an arrow at point Q to show the direction of the electric field at that point.
Answer
At , the electric field is directed radially away from the centre of the positively charged sphere (arrow pointing away from the sphere along the line joining the centre to ).
Radially outward from the sphere’s centre at Q.
Background Concept
The electric field direction at a point is defined as the direction of the force on a positive test charge placed at that point.
For a spherically symmetric charge distribution (such as an isolated charged conducting sphere), the field outside behaves as if all charge were concentrated at the centre, so field lines are radial.
Understanding the Question
A metal sphere is positively charged. Point is somewhere outside the sphere but not on the marked diameter line. You must show the direction of at by drawing an arrow.
Approach
Use symmetry: outside a charged sphere, points along the radius line through the centre and the observation point. Since the sphere is positively charged, the field points away from the centre.
Step-by-Step Reasoning
- Imagine placing a tiny positive test charge at .
- A positively charged sphere repels a positive test charge.
- Therefore the force (and hence ) at is away from the sphere.
- Because of spherical symmetry, “away from the sphere” means along the line from the centre of the sphere through .
So the arrow at must point directly away from the centre.
Key Takeaways
- direction = force on a positive test charge.
- Outside a charged sphere: field is radial.
- Positive charge: field points outward.
Common Mistakes
- Drawing the arrow tangent to the sphere (that would suggest circular field lines, not electrostatic).
- Drawing the arrow “away from the surface” but not aligned with the centre-to- line.
- Reversing direction (inward) which would correspond to a negative sphere.
Things to Be Careful About
- The arrow must be at point (not on the surface).
- Direction is radial from the centre, not necessarily horizontal/vertical on the page.
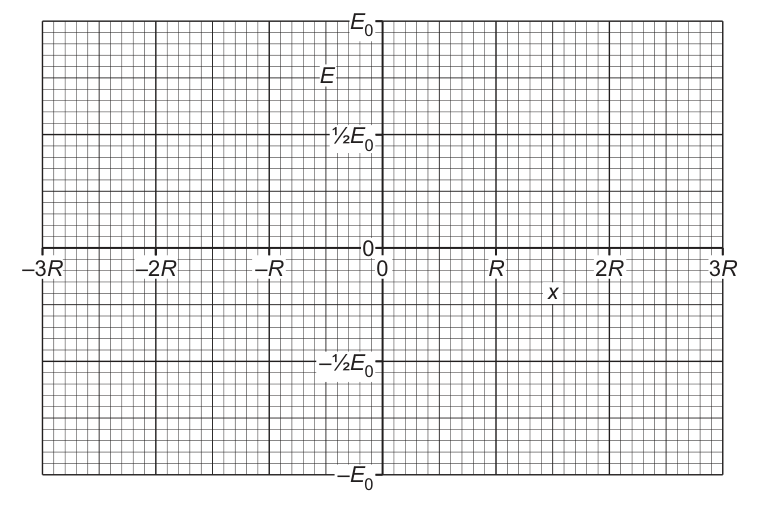
On Fig. 5.2, sketch the variation of the electric field at point P with for values of between and . Do not include the region inside the sphere between and .
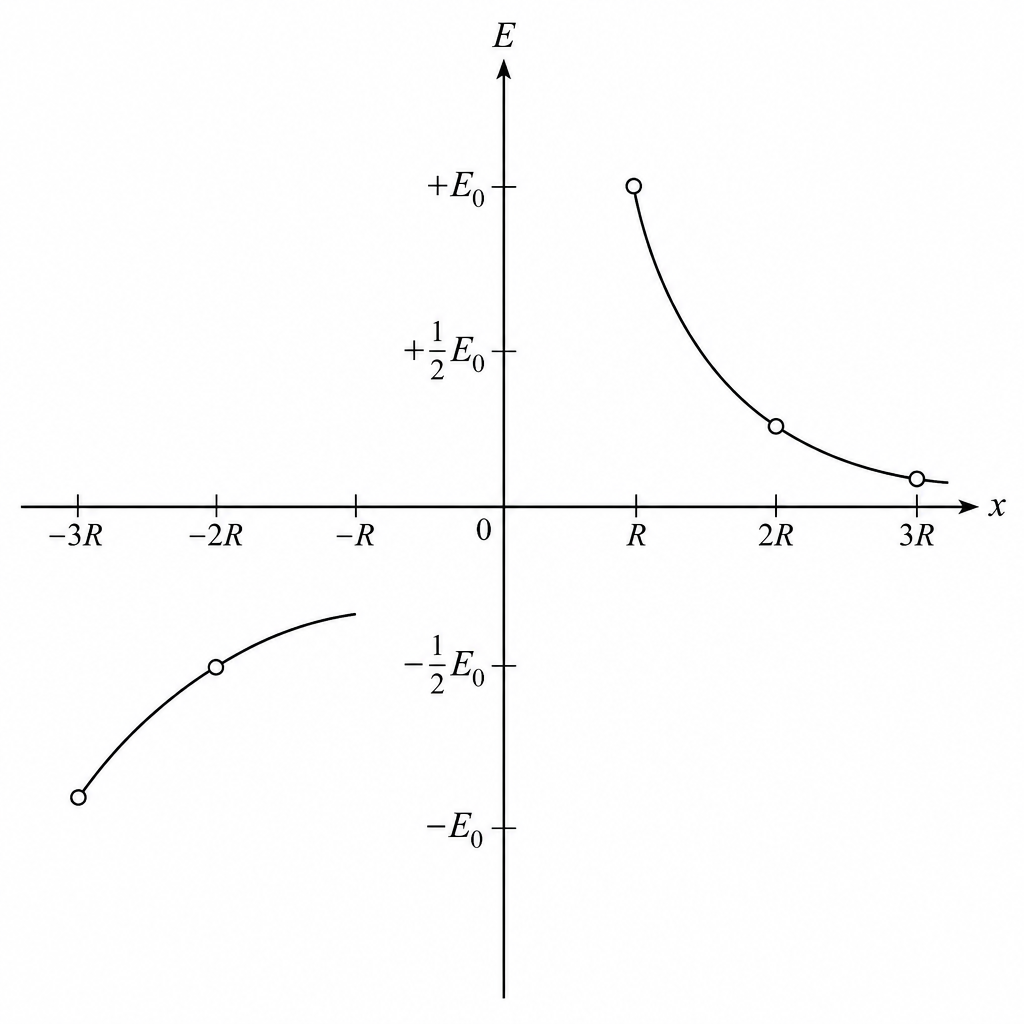
Answer
For , the field is as for a point charge at the centre so .
At , and decreases towards as increases (e.g. at , ; at , ).
At , and increases towards from below as becomes more negative (e.g. at , ; at , ).
No graph drawn for (region inside the sphere omitted).
Two inverse-square curves: negative from x = −3R to −R reaching −E0 at −R; positive from x = R to 3R starting at +E0 at R and decreasing towards 0.
Background Concept
For an isolated charged conducting sphere:
- All excess charge resides on the surface.
- The electric field inside the conducting material (and throughout the interior cavity, for a symmetrical isolated sphere) is zero in electrostatic equilibrium.
- Outside the sphere, the field is the same as that of a point charge at the centre:
The direction is radial. If we choose an -axis through the centre, the sign of depends on whether the field points in the or direction.
Understanding the Question
Point lies on the diameter line XY at displacement from the centre. You must sketch against from to , but you must omit the inside region .
You are told the field at the surface has magnitude . So at , (to the right, outward), and at , (to the left, outward which is the negative direction).
Approach
- Use the “point charge at centre” model for the outside region, giving an inverse-square dependence on distance from the centre.
- Put the correct signs:
- For the field points to the right (positive).
- For the field points to the left (negative).
- Anchor the sketch using the given reference value at , then show the curve approaching as increases.
Step-by-Step Reasoning
- Outside the sphere, distance from centre is along the line XY.
- Since , you can write relative to the surface value:
- Now include direction (sign). For a positive sphere, the field is always outward:
- At positions on the right (), outward is toward , so is positive.
- At positions on the left (), outward is toward , so is negative.
So a compact signed form for the sketch is:
(Here the second line works because is positive but we explicitly place the minus sign.)
-
Use key points to shape the curve:
- At , .
- At , .
- At , .
- At , .
- At , .
- At , .
-
Since the question says “Do not include the region inside the sphere”, you leave a gap between and (no line drawn there).
Key Takeaways
- Outside a charged sphere, like a point charge at the centre.
- The sign of on an axis comes from direction relative to the chosen positive axis.
- Electrostatic conductors have no electric field inside (but here you are told to omit that region anyway).
Common Mistakes
- Drawing as constant outside the sphere (confusing with a uniform field between plates).
- Putting the same sign on both sides (forgetting that outward on the left is the negative direction).
- Making the graph linear in instead of inverse-square curvature.
- Drawing a line through the interior region when instructed not to.
Things to Be Careful About
- At the magnitude is exactly (your curve should meet those axis markings).
- As increases, must approach (never increase in magnitude).
- The curve should be smooth and asymptotic toward for large within the plotted range.
The proton and the electron in a hydrogen atom are separated by a distance of .
Calculate the electric potential energy of the proton and the electron.
electric potential energy = ______
Working
Answer
-4.3 × 10^-18 J
Background Concept
The electric potential energy of two point charges separated by distance (taking at infinite separation) is
- If (like charges), then is positive (you must do work to bring them together).
- If (unlike charges), then is negative (energy is released when they come together).
Understanding the Question
A hydrogen atom has a proton () and an electron () separated by . You must calculate their electric potential energy using the point-charge formula and give the answer in joules.
Approach
- Use with .
- Substitute and , so the product is negative.
- Compute the magnitude and attach the negative sign.
Step-by-Step Reasoning
- Identify charges:
- Proton:
- Electron:
- Separation:
- Use the formula:
- Multiply charges:
- Multiply by :
- Divide by :
- Put the sign back (opposite charges):
Key Takeaways
- Use for two point charges.
- Opposite charges give negative potential energy.
- Always check powers of ten carefully when dealing with atomic distances.
Common Mistakes
- Forgetting the negative sign (very common).
- Using instead of (that would be for force/field, not potential energy).
- Mixing units (distance must be in metres, charge in coulombs).
Things to Be Careful About
- Give the final answer to a sensible number of significant figures (limited by , typically 2 s.f.).
- Do not confuse electric potential energy (J) with electric potential (V).
Fig. 6.1 shows part of a bridge rectifier circuit that can be used for rectification of an alternating input voltage .
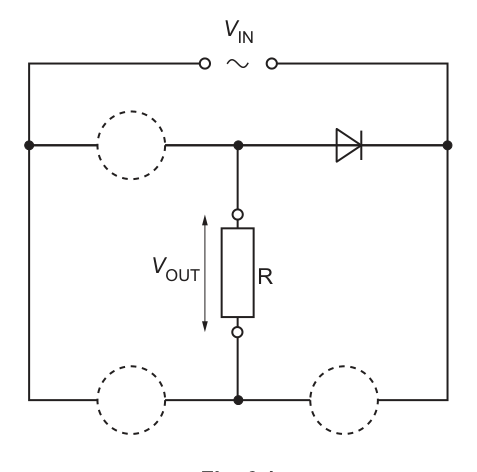
The circuit contains four diodes, one of which is shown.
The rectified output voltage is applied across load resistor R.
Answer
Rectification is the process of converting an alternating voltage (a.c.) into a unidirectional (d.c./pulsating d.c.) voltage.
Conversion of an a.c. voltage into a unidirectional (d.c./pulsating d.c.) voltage.
Background Concept
In an a.c. supply, the potential difference reverses polarity each half-cycle, so the current would reverse direction in a simple resistor. A diode conducts (ideally) in only one direction, so circuits using diodes can make the load current flow in one direction only.
Rectification means using diodes to turn an alternating input into an output that does not change sign (it may still vary in magnitude with time).
Understanding the Question
You are asked for the meaning of “rectification” in the context of a bridge rectifier circuit. No calculation is required; this is a definition.
Approach
State the change in the nature of the voltage/current: from alternating (changes sign) to unidirectional (one polarity only).
Step-by-Step Reasoning
- Identify that the input is an alternating voltage.
- Rectification describes what the circuit does to that input.
- The output becomes a voltage of one polarity only (d.c. or pulsating d.c.).
Key Takeaways
- Rectification: a.c. (\rightarrow) unidirectional output.
- The output after rectification can still be varying; “d.c.” here often means “pulsating d.c.” unless smoothed.
Common Mistakes
- Saying “rectification makes the voltage constant”: that is smoothing, not rectification.
- Defining it as “increasing the voltage” or “changing frequency”.
Things to Be Careful About
- Use the word unidirectional or “one polarity only”.
- Do not confuse rectification with filtering/smoothing by a capacitor.
Answer
Full-wave rectification.
Full-wave rectification.
Background Concept
Rectifiers can be:
- Half-wave: only one half-cycle appears across the load (the other half-cycle is blocked).
- Full-wave: both half-cycles are made to produce the same polarity across the load (so the output never goes negative).
A bridge rectifier uses four diodes arranged so that whichever way the a.c. input polarity is at a given instant, current through the load always has the same direction.
Understanding the Question
You are told explicitly that the circuit is a bridge rectifier. The question asks for the name of the type of rectification it produces.
Approach
Recall the standard fact: bridge rectifier (\rightarrow) full-wave rectification.
Step-by-Step Reasoning
- A bridge has four diodes.
- On the positive half-cycle, one pair conducts; on the negative half-cycle, the other pair conducts.
- In both cases, the load sees the same polarity.
Key Takeaways
- Bridge rectifier produces full-wave rectified output.
Common Mistakes
- Writing “half-wave rectification” (that corresponds to a single-diode rectifier).
Things to Be Careful About
- The output is full-wave but still pulsating unless a smoothing capacitor is added.
Complete the circuit in Fig. 6.1 by drawing the three missing diodes inside the dashed circles.
Answer
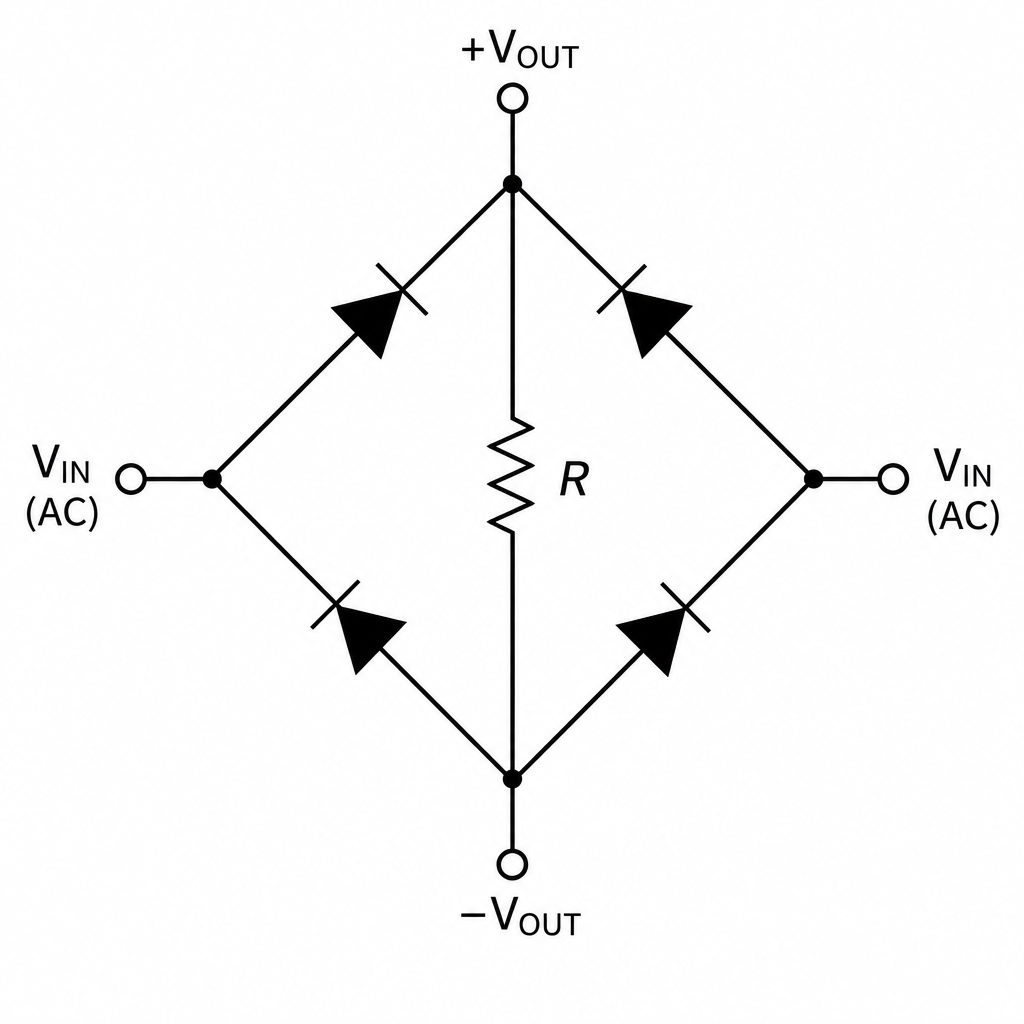
Draw the three missing diodes so that the two diodes connected to the positive output node have their cathodes at the positive node, and the two diodes connected to the negative output node have their anodes at the negative node (bridge rectifier).
Three diodes added to form a standard bridge: cathodes meet at +VOUT, anodes meet at −VOUT.
Background Concept
A diode conducts (ideally) only when it is forward biased (anode at a higher potential than cathode). A bridge rectifier uses four diodes so that:
- when one input terminal is positive, one pair of diodes conducts and drives current through the load in one direction;
- when the input reverses, the other pair conducts, but the load current direction stays the same.
A good way to remember the bridge arrangement:
- At the positive output node, the cathodes of two diodes meet (so current can flow into the + node from either a.c. terminal).
- At the negative output node, the anodes of two diodes meet (so current can flow out of the − node to either a.c. terminal).
Understanding the Question
The diagram shows the bridge layout with one diode already drawn and three dashed circles where the other diodes must be added. The load resistor (R) is across (V_{OUT}). You must orient the remaining diodes so that (V_{OUT}) has the same polarity for both halves of (V_{IN}).
Approach
Think about the two half-cycles:
- Left input terminal positive relative to right.
- Right input terminal positive relative to left.
In each case, choose a path through two forward-biased diodes and (R) that makes the same end of (R) positive.
Step-by-Step Reasoning
- Label the bridge nodes: left and right are the a.c. input terminals; top is (+V_{OUT}) and bottom is (-V_{OUT}).
- Ensure there is a diode from each a.c. terminal to the + output node that conducts when that terminal is positive (anode at the a.c. terminal, cathode at + output).
- Ensure there is a diode from the − output node to each a.c. terminal that conducts to complete the circuit (anode at − output, cathode at the a.c. terminal).
This guarantees current through the load is always from + output to − output.
Key Takeaways
- Bridge rectifier: two diodes conduct each half-cycle.
- Cathodes join at the + output; anodes join at the − output.
Common Mistakes
- Reversing one diode so that one half-cycle produces a negative output.
- Drawing a diode so that both halves are blocked (no conduction path).
Things to Be Careful About
- Diode symbol direction: conventional current flows from anode to cathode when forward biased.
- Make sure the output is taken across the correct diagonal of the bridge (across (R)).
The input voltage varies with time according to the equation
where is in V and is in s.
Working
Given
so angular frequency
Answer
0.35 s
Background Concept
A sinusoidal voltage can be written as
where:
- (V_0) is the peak (maximum) voltage,
- (\omega) is the angular frequency in (\text{rad s}^{-1}),
- (t) is time.
The period (T) is related to (\omega) by
Understanding the Question
You are given (V_{IN} = 34\sin(18t)). The coefficient of (t) inside the sine function is (\omega). You must calculate the time for one complete cycle and show it is (0.35\ \text{s}).
Approach
- Read (\omega) directly from the expression.
- Use (T = 2\pi/\omega).
- Round to (0.35\ \text{s}) as required.
Step-by-Step Reasoning
- Compare (34\sin(18t)) with (V_0\sin(\omega t)). Therefore (\omega = 18\ \text{rad s}^{-1}).
- Substitute into the period formula:
- Calculate:
- Rounding to two decimal places gives (0.35\ \text{s}), matching the value to be shown.
Key Takeaways
- In (\sin(\omega t)), the coefficient of (t) is (\omega).
- Convert between (\omega) and (T) using (\omega = 2\pi/T).
Common Mistakes
- Treating (18) as the frequency (f) in hertz (it is angular frequency).
- Using (T = 1/18) (wrong because (18 \neq f)).
Things to Be Careful About
- (\omega) is in (\text{rad s}^{-1}), not (\text{Hz}).
- Keep enough significant figures during calculation before rounding.
Working
Peak voltage (V_0 = 34\ \text{V}).
Answer
(24\ \text{V})
24 V
Background Concept
For a sinusoidal voltage
the root-mean-square (r.m.s.) value is the steady d.c. voltage that would produce the same mean power in a resistor as the a.c. voltage. For a pure sine wave,
Understanding the Question
The input voltage has amplitude (peak) (34\ \text{V}). You are asked to calculate the r.m.s. value.
Approach
Read the peak value (V_0) from the equation and divide by (\sqrt{2}).
Step-by-Step Reasoning
- From (V_{IN} = 34\sin(18t)), the peak voltage is (V_0 = 34\ \text{V}).
- Apply the sine-wave relation:
Key Takeaways
- For a sine wave, (V_{\text{rms}} = V_0/\sqrt{2}).
Common Mistakes
- Using (V_{\text{rms}} = V_0/2) (that is not correct for a sine wave).
- Confusing peak-to-peak value with peak value.
Things to Be Careful About
- The coefficient 34 is the peak value (not peak-to-peak).
- Quote the answer with unit (\text{V}).
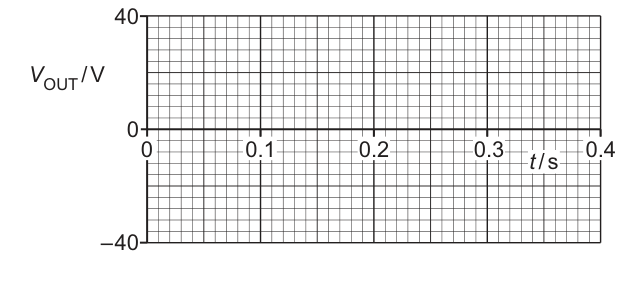
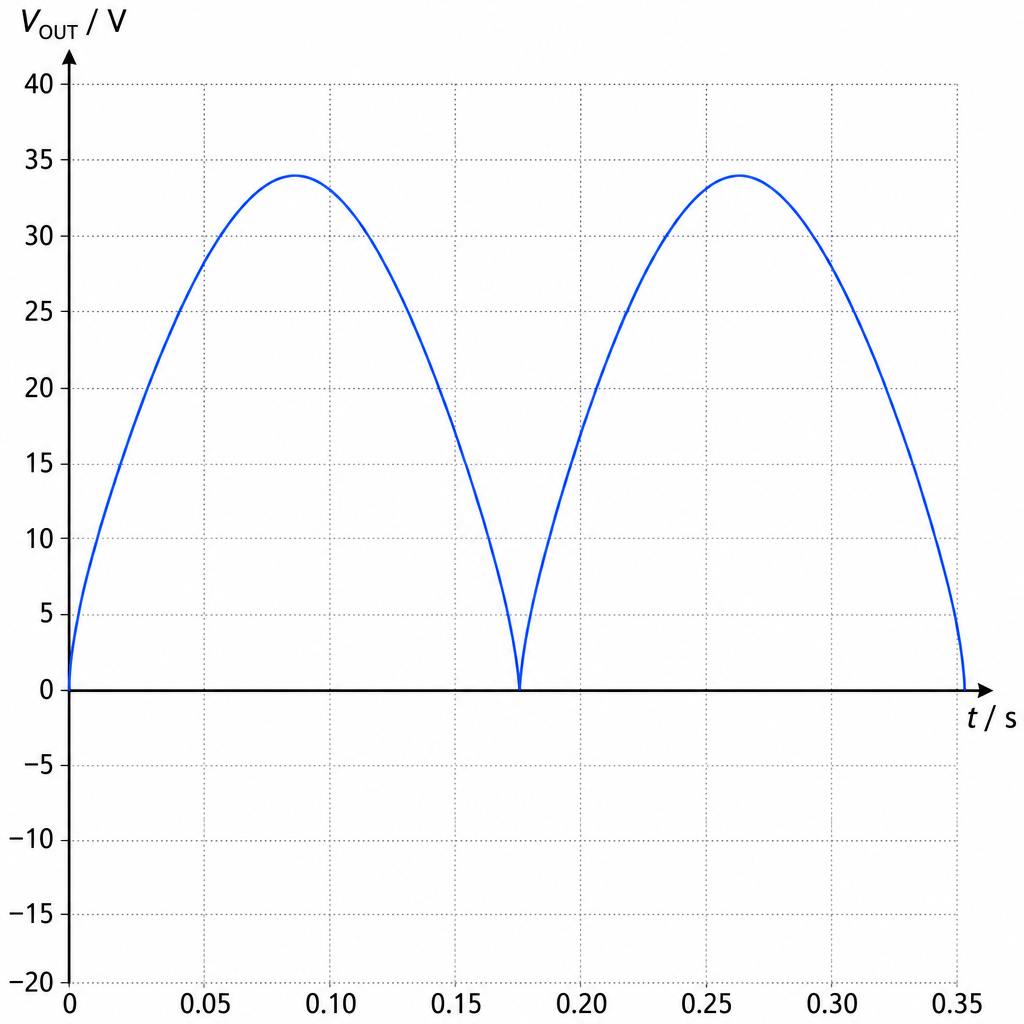
Answer
Sketch (V_{OUT}) as a full-wave rectified sine wave (all positive), with peak (34\ \text{V}); zeros at (t=0), (0.175\ \text{s}) and (0.35\ \text{s}); peaks at (t=0.0875\ \text{s}) and (0.2625\ \text{s}).
Full-wave rectified sine: VOUT = |34 sin(18t)| from 0 to 0.35 s.
Background Concept
A bridge rectifier produces full-wave rectification, meaning the output voltage across the load is the magnitude of the input (ideal diodes assumed):
So the negative half-cycles are inverted to become positive. This also means the output waveform repeats every half input period.
Understanding the Question
You are given (V_{IN} = 34\sin(18t)) and you must sketch (V_{OUT}) from (t=0) to (t=0.35\ \text{s}) (one full input cycle). Because the circuit is a bridge rectifier, the output is always (\ge 0) (ignoring diode drops).
Approach
- Identify key times in one cycle of the sine wave: zeros at (0), (T/2), (T); maxima at (T/4) and (3T/4).
- Apply full-wave rectification: reflect the negative half-cycle above the time axis.
- Keep the amplitude at (34\ \text{V}) and ensure the output is never negative.
Step-by-Step Reasoning
- From part (b)(i), (T = 0.35\ \text{s}).
- For (\sin) wave:
- Zero crossings occur at (t = 0), (T/2), (T):
- Positive peak occurs at (t = T/4 = 0.0875\ \text{s}) with value (+34\ \text{V}).
- Negative peak occurs at (t = 3T/4 = 0.2625\ \text{s}) with value (-34\ \text{V}).
- Full-wave rectification makes that negative peak into (+34\ \text{V}).
So the output consists of two identical positive “humps” between 0 and 0.35 s.
Key Takeaways
- Bridge rectifier output is the absolute value of the input (ideal).
- Output frequency is doubled (period halved).
Common Mistakes
- Sketching half-wave rectification (output zero for half the time).
- Keeping the negative half-cycle negative.
- Using the wrong peak value or wrong timing of peaks.
Things to Be Careful About
- The sketch is only from 0 to 0.35 s, so you should show exactly two peaks.
- If diode drops were considered, peaks would be slightly less than 34 V, but unless stated, assume ideal diodes.
Resistor R has a resistance of . A capacitor of capacitance is connected into the circuit of Fig. 6.1 in order to smooth the output voltage.
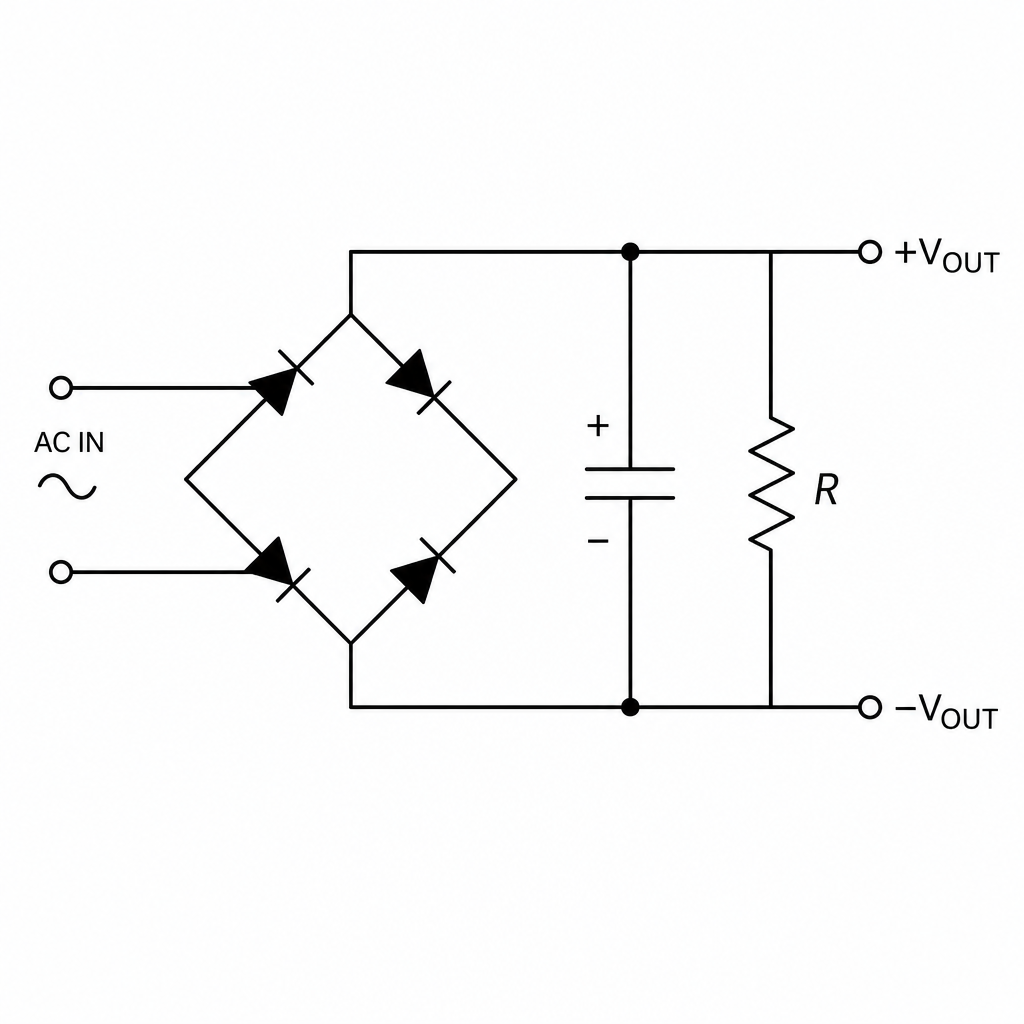
Answer
Connect the capacitor in parallel with the load resistor (R) (across (V_{OUT})).
Capacitor connected in parallel across R (across VOUT).
Background Concept
A smoothing capacitor in a rectifier circuit works by:
- charging up to (approximately) the peak output voltage when the rectified voltage rises;
- discharging through the load resistor when the rectified voltage falls.
For this to happen, the capacitor must be connected across the output so that it shares the same potential difference as the load.
Understanding the Question
The bridge rectifier provides (V_{OUT}) across the load resistor (R). You must add a capacitor so that it smooths (reduces ripple in) (V_{OUT}).
Approach
Place the capacitor in parallel with the load: one terminal to the positive output node and the other to the negative output node.
Step-by-Step Reasoning
- Identify the two output nodes across which (V_{OUT}) is labelled (the same nodes as the ends of (R)).
- Draw the capacitor symbol connected directly between these two nodes, i.e. in parallel with (R).
Key Takeaways
- Smoothing capacitor is placed across the load (parallel), not in series.
Common Mistakes
- Putting the capacitor in series with the resistor (this would not smooth the output correctly).
- Connecting the capacitor across the a.c. input instead of across the rectified output.
Things to Be Careful About
- If a polarised capacitor is assumed, it should have its positive plate connected to the positive output of the bridge.
Working
Answer
(0.67\ \text{s})
0.67 s
Background Concept
For a capacitor discharging through a resistor, the time constant is
The time constant sets how quickly the capacitor voltage changes: after a time (\tau), the voltage has fallen to (1/e) of its initial value during discharge.
Understanding the Question
You are given (R = 56\ \text{k}\Omega) and (C = 12\ \mu\text{F}). The time constant of the smoothing circuit is the product (RC), in seconds.
Approach
- Convert (\text{k}\Omega) to (\Omega) and (\mu\text{F}) to (\text{F}).
- Multiply (R) and (C).
Step-by-Step Reasoning
- Convert units:
- Multiply:
- Round appropriately: (\tau \approx 0.67\ \text{s}).
Key Takeaways
- (\tau = RC) and must be in seconds.
- Always convert prefixes (k, (\mu)) before multiplying.
Common Mistakes
- Using (56) instead of (56\times 10^3).
- Using (12) instead of (12\times 10^{-6}).
- Giving (\tau) in the wrong unit.
Things to Be Careful About
- Check powers of ten: (10^{4}\times 10^{-5} = 10^{-1}).
- Give a sensible number of significant figures (usually 2–3).
During each discharge cycle, the time for which the capacitor is discharging is .
Determine the minimum value of the smoothed output voltage.
minimum voltage = ______
Working
Assume ideal diodes so capacitor charges to peak
During discharge,
with (t = 0.14\ \text{s}) and (\tau = 0.672\ \text{s}):
Answer
(28\ \text{V})
28 V
Background Concept
In a smoothed rectifier output, the capacitor:
- charges rapidly to near the peak output voltage when the rectified supply rises above the capacitor voltage;
- discharges through the load resistor between peaks.
For a discharge through a resistor, the capacitor voltage falls exponentially:
where (V_0) is the voltage at the start of discharge and (\tau = RC).
Understanding the Question
You are told that for each discharge cycle, the capacitor is discharging for (0.14\ \text{s}). You already have (R = 56\ \text{k}\Omega) and (C = 12\ \mu\text{F}), so (\tau) can be found (or taken from part (c)(ii)). The minimum smoothed output voltage is the capacitor voltage at the end of the discharge interval.
Approach
- Take the maximum voltage (V_{\max}) to be the peak of the rectified waveform (ideal bridge: same as input peak).
- Use exponential discharge over time (t = 0.14\ \text{s}) with time constant (\tau).
Step-by-Step Reasoning
- Peak of input is (34\ \text{V}), so with ideal diodes, the capacitor charges to
- Time constant (from part (c)(ii)):
- After discharge time (t = 0.14\ \text{s}), the voltage is
- Evaluate the exponent:
- Hence
Key Takeaways
- Smoothing is analysed as capacitor charge to near peak, then exponential discharge.
- Use (V = V_0 e^{-t/RC}) to find the minimum at the end of the discharge interval.
Common Mistakes
- Using a linear drop instead of exponential.
- Using (t/\tau) the wrong way up (writing (e^{-\tau/t})).
- Forgetting to use the peak voltage as the starting voltage for discharge.
Things to Be Careful About
- This question typically assumes ideal diodes (no (0.7\ \text{V}) drop) unless stated.
- Keep consistent units (seconds for (t) and (\tau)).
- Quote the minimum voltage to a sensible number of significant figures.
Answer
Lenz’s law: the induced e.m.f. (and hence induced current) is in a direction such that the magnetic effect produced opposes the change in magnetic flux (flux linkage) that causes it.
The induced e.m.f./current acts so that its magnetic effect opposes the change in magnetic flux (flux linkage) producing it.
Background Concept
Electromagnetic induction occurs when the magnetic flux (or flux linkage) through a circuit changes. Faraday’s law relates the size of the induced e.m.f. to the rate of change of flux linkage:
The negative sign is not “just a minus sign”: it encodes Lenz’s law, which gives the direction of the induced e.m.f./current.
Understanding the Question
You are asked to state Lenz’s law. For 2 marks, Cambridge typically expects both:
- the induced e.m.f./current produces a magnetic effect, and
- that magnetic effect opposes the change (in flux/flux linkage) that produced it.
Approach
Write a single clear sentence including:
- “induced e.m.f./current is in such a direction that …”
- “… it opposes the change in magnetic flux/flux linkage causing it.”
Step-by-Step Reasoning
- When the flux through a circuit increases, the induced current must create a magnetic field that tends to reduce that increase.
- When the flux decreases, the induced current must create a magnetic field that tends to increase it back.
- This “opposition to the change” is the key idea.
Key Takeaways
- Lenz’s law is about direction.
- The induced current always acts to oppose the change in flux, not necessarily oppose the flux itself.
Common Mistakes
- Saying “opposes the magnetic field” (it opposes the change in flux).
- Omitting mention of induced current/e.m.f. direction.
Things to Be Careful About
- Use the phrase “opposes the change” explicitly.
- “Flux” or “flux linkage” are both acceptable provided the meaning is correct.
A helicopter hovering in stationary equilibrium has four rotors, each of length , as shown in the view from above in Fig. 7.1.
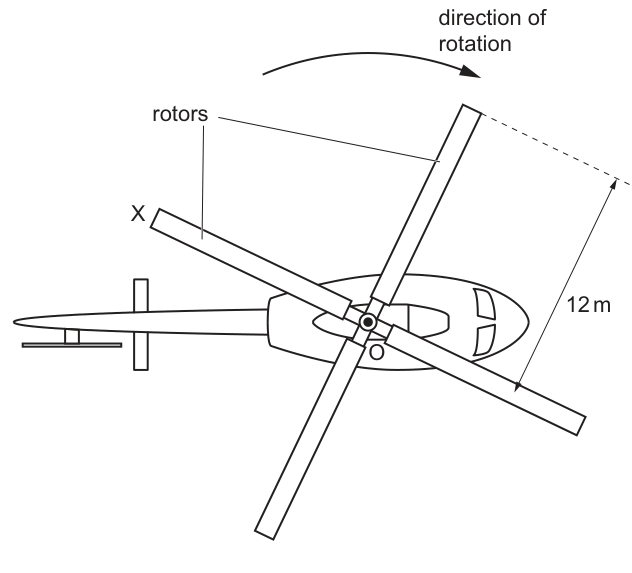
The vertical component of the Earth’s magnetic field at the helicopter is downwards with a flux density of .
The rotors each rotate in a horizontal plane in the direction shown with a frequency of .
Calculate the magnetic flux cut by rotor OX during one complete rotation. Give a unit with your answer.
= ______ unit ______
Working
Area swept in one rotation:
Answer
2.1 × 10^-2 Wb
Background Concept
Magnetic flux through an area is
where:
- is the magnetic flux density (in ),
- is the area (in ),
- is the angle between the field direction and the normal to the area.
If the field is perpendicular to the area (i.e. parallel to the normal), then and .
Understanding the Question
The rotor OX is a radius of length rotating in a horizontal plane. The Earth’s magnetic field component given is vertical downward, so it is perpendicular to the rotor plane.
During one complete revolution, the radius sweeps out a full circle of radius . The question asks for the total flux cut in one rotation, which corresponds to the flux through that swept circular area.
Approach
- Convert from mT to T.
- Find the area of the circle swept out: .
- Use (since the field is normal to the area).
Step-by-Step Reasoning
- Convert units:
- Swept area in one full rotation:
- Flux:
The unit is the weber (Wb).
Key Takeaways
- For a uniform field perpendicular to a surface, flux is simply .
- A rotating radius sweeps an area in one revolution.
Common Mistakes
- Forgetting to convert mT to T (a factor of error).
- Using (circumference) instead of (area).
- Including a factor incorrectly (here ).
Things to Be Careful About
- Always state the unit of flux: .
- Use a sensible number of significant figures (here 2 s.f. matches the given ).
Determine the magnitude of the electromotive force (e.m.f.) induced across the length of rotor OX.
e.m.f. = ______
Working
Time for one rotation:
Answer
1.8 V
Background Concept
Faraday’s law gives the magnitude of induced e.m.f. as the rate of change of flux linkage. For a single conductor sweeping out area so that the flux changes by in time :
For steady rotation, the flux change per revolution is constant, and the time per revolution is the period .
Understanding the Question
You already found the flux cut in one complete rotation (part (i)). The rotor completes rotations per second, so the flux cut per second is . That equals the induced e.m.f. magnitude.
Approach
Use either of these equivalent routes:
- with .
- Directly .
Step-by-Step Reasoning
- Period of rotation:
- Use Faraday’s law with one-rotation flux change :
- Substitute:
So the magnitude is about .
(You may also see the rotating-rod formula ; it is consistent because and .)
Key Takeaways
- Induced e.m.f. is a rate: flux change per unit time.
- If you know flux change per revolution and revolutions per second, multiply them.
Common Mistakes
- Using instead of .
- Forgetting that .
- Carrying forward the wrong flux from part (i) due to mT-to-T conversion.
Things to Be Careful About
- The question asks for magnitude, so no minus sign is needed.
- Check units: .
Use Lenz’s law to explain whether end O or end X of the rotor is at the higher potential.
Answer
The induced current must produce a magnetic force that opposes the rotation (Lenz’s law). With downward and rotation clockwise (viewed from above), this requires conventional current along the blade from so that gives a force opposing the motion.
Hence positive charge accumulates at , so end is at the higher potential.
End X is at the higher potential.
Background Concept
Lenz’s law says the induced current flows in the direction that opposes the change that produces it. In a moving conductor, the induced e.m.f. can be understood via:
- charges in the conductor moving with the metal and experiencing a magnetic force , causing charge separation, and/or
- the induced current producing a magnetic force on the conductor that tends to oppose the motion (a resisting torque).
Both descriptions give the same polarity.
Understanding the Question
- The rotor blade is a conductor rotating in a horizontal plane.
- The Earth’s field component is vertical downwards (into the rotor plane when viewed from above).
- The rotor rotates clockwise when viewed from above.
You must decide which end becomes more positive (higher potential): the centre or the tip .
Approach
Use Lenz’s law in its “opposes the motion” form:
- The induced e.m.f. would drive a current (if a circuit exists).
- That current in the downward magnetic field experiences a magnetic force.
- For Lenz’s law, that force must oppose the rotation (provide a braking torque).
- From the required current direction, infer which end is at higher potential.
A helpful visual is to look at one instant when the blade is horizontal to the right.
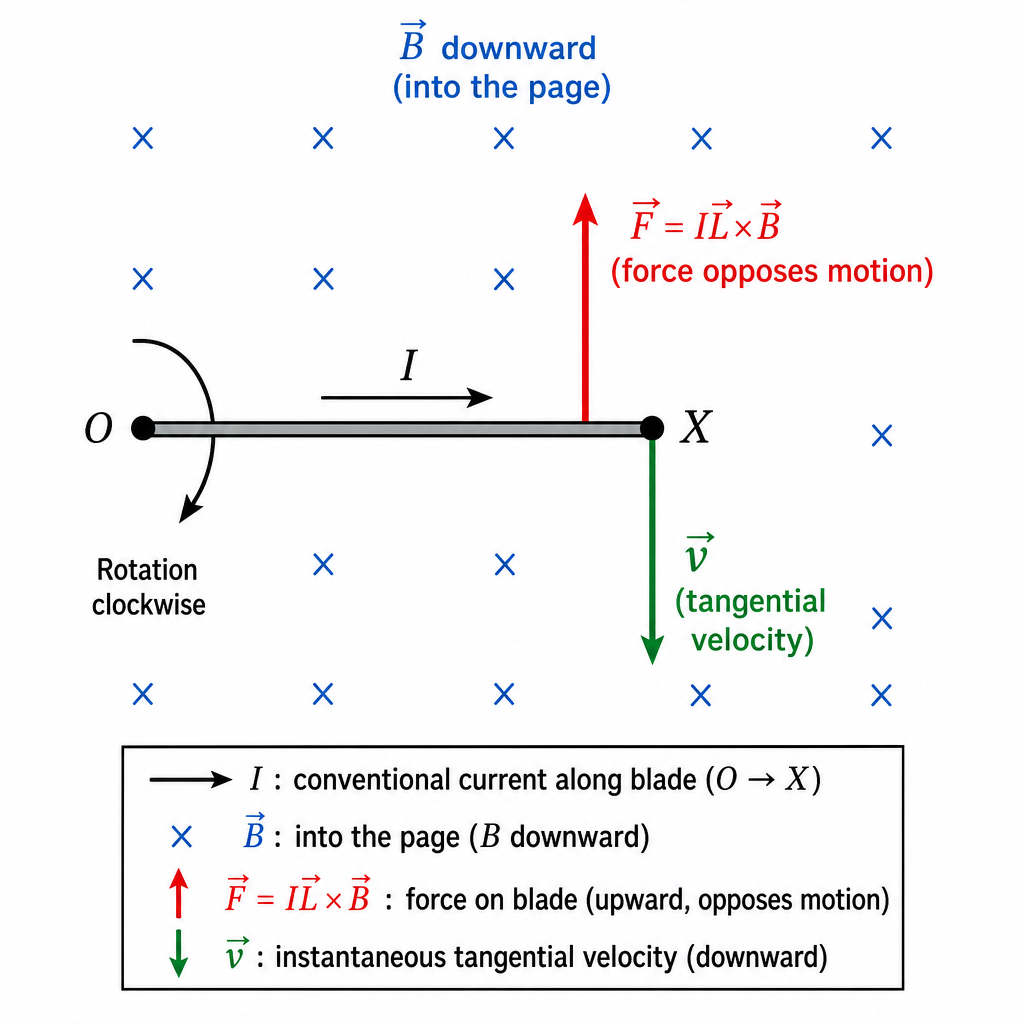
Step-by-Step Reasoning
Take the instant when the blade points to the right from the centre (so is to the right of ).
-
Direction of motion: since the blade rotates clockwise, the velocity of the tip at that instant is down the page (tangential).
-
The magnetic field is downward (into the page).
-
Suppose conventional current flowed outward () along the blade (to the right). The force on a current-carrying conductor is
Here is to the right and is into the page. Using the right-hand rule, points up the page.
- At this instant the blade’s motion is down the page, so a force up the page opposes the motion (braking). This is exactly what Lenz’s law requires.
So the induced e.m.f. must drive conventional current from to along the blade.
- If conventional current is driven from to , positive charge is driven toward and accumulates at the tip . Therefore is at a higher electric potential than .
Key Takeaways
- Lenz’s law often appears as “the induced effects oppose the motion/change producing them”.
- Determine polarity by demanding a braking magnetic force/torque on the moving conductor.
Common Mistakes
- Reversing clockwise/anticlockwise when viewed from above.
- Treating “opposes the flux” rather than “opposes the change / opposes the motion”.
- Stating a current direction without linking it to a force that opposes motion (missing the Lenz’s law reasoning).
Things to Be Careful About
- Be consistent with the viewing direction: the question specifies the view from above.
- The Earth’s field is downwards, i.e. into the page in that view.
- The question asks for higher potential, so you must conclude which end is positive (not just current direction).
Oxygen-15 () is radioactive and has a half-life of minutes.
The decay of oxygen-15 produces positrons. For this reason, oxygen-15 is sometimes used as a tracer in positron emission tomography (PET scanning).
Answer
A tracer is a (small amount of) radioactive substance introduced into the body/system so that its movement or location can be followed by detecting the radiation it emits outside the body.
A tracer is a radioactive substance introduced into the body/system so its location/movement can be followed by detecting the radiation it emits.
Background Concept
In nuclear medicine, a tracer is a substance used to follow what happens inside the body without opening it up. The key idea is that the substance emits radiation that can escape the body and be detected externally.
Understanding the Question
You are asked for what “tracer” means in the context of PET scanning, where a radioactive isotope is administered and its emissions are used to locate where it is in the body.
Approach
Give two clear points that typically earn the marks:
- it is a (small quantity of) radioactive material introduced into a system/body,
- its distribution/movement is determined by detecting the radiation it emits.
Step-by-Step Reasoning
- A tracer must be detectable from outside, so it must emit radiation.
- In medical use it is given to the patient (injected/inhale/ingest) in small quantity so it does not significantly change the process being studied.
- The emitted radiation is detected outside the body to infer where the tracer is, so we can track flow or uptake.
Key Takeaways
- A tracer is defined by radioactivity and detectability.
- It is used to determine location/movement inside a system.
Common Mistakes
- Saying only “a radioactive substance” (misses the purpose of tracking via detection).
- Saying only “a dye used to trace” without mentioning radiation and external detection.
Things to Be Careful About
- Mention introduced into the body/system and detected externally to secure both marks.
- Avoid vague statements like “used to see organs” without stating how (radiation detection).
The equation for the decay of oxygen-15 is
where X is the nucleus formed during the decay and Z is another particle.
Working
Conservation of nucleon number:
For a positron, so .
Conservation of proton number:
For , so .
Answer
, , , .
P = 15, Q = 7, R = 0, S = +1
Background Concept
A nuclear decay equation must conserve:
- nucleon (mass) number (total number of protons + neutrons),
- proton (atomic) number (number of protons).
For beta-plus decay ( emission), a proton changes into a neutron, so the nucleus keeps the same nucleon number but its proton number decreases by 1.
A positron has:
So it contributes and .
Understanding the Question
You are given:
and asked to state the integers .
Approach
- Use conservation of nucleon number to relate to and .
- Use conservation of proton number to relate to and .
- Use the known identity of to set and .
Step-by-Step Reasoning
- For a positron, and .
- Nucleon number conservation:
- Proton number conservation:
So the daughter nucleus has and (nitrogen-15).
Key Takeaways
- In decay: unchanged, decreases by 1.
- A positron is .
Common Mistakes
- Using (that would be / electron emission).
- Changing to (nucleon number must be conserved, so it stays ).
Things to Be Careful About
- The symbol is the positron.
- Always check both conserved numbers independently to avoid sign errors.
Answer
is a (electron) neutrino, .
electron neutrino (νe)
Background Concept
In beta decays, another very light particle is emitted to satisfy conservation laws (in particular lepton number and energy/momentum).
For beta-plus decay:
where is an electron neutrino.
Understanding the Question
The decay equation includes an extra particle besides the daughter nucleus and the positron. You must name this particle.
Approach
Recognise this is decay and recall the accompanying particle.
Step-by-Step Reasoning
- emission produces a positron.
- The accompanying particle is an electron neutrino (), emitted at the same time.
Key Takeaways
- decay emits a positron and an electron neutrino.
Common Mistakes
- Writing “antineutrino” (that is for decay: an electron and an antineutrino).
- Writing “neutron” or “gamma” (not the standard accompanying particle in decay).
Things to Be Careful About
- The expected name is “(electron) neutrino”; symbol is acceptable.
Answer
Activity is the number of decays per unit time (rate of decay) of the sample.
Number of decays per unit time (rate of decay).
Background Concept
Radioactive decay is random, but for a sample we can define an average rate at which nuclei decay.
The activity of a sample is defined as:
- the number of decays per unit time.
Its SI unit is the becquerel (Bq), where:
Understanding the Question
The question asks for the definition of activity, not a calculation.
Approach
State it as a rate: decays per second.
Step-by-Step Reasoning
- Activity describes how quickly a sample is decaying.
- Therefore it must be “number of decays per unit time”.
Key Takeaways
- Activity is a rate.
- Unit: (Bq).
Common Mistakes
- Defining activity as “number of radioactive nuclei” (that is , not ).
- Omitting “per unit time”.
Things to Be Careful About
- The definition is not the formula (though it is related). The question wants the meaning.
Calculate the decay constant of oxygen-15. Give a unit with your answer.
decay constant = ______ unit ______
Working
Answer
.
5.66 × 10^-3 s^-1
Background Concept
The decay constant is the probability per unit time that a nucleus will decay.
Half-life is related to by:
This comes from the exponential decay law .
Understanding the Question
You are given the half-life of oxygen-15 as and asked to calculate with a unit.
Approach
- Convert the half-life to seconds (so the unit of becomes ).
- Substitute into .
Step-by-Step Reasoning
- Convert minutes to seconds:
- Apply the formula:
- Unit: since we used seconds, is in .
Key Takeaways
- Always convert time to SI units before calculating .
- has dimension .
Common Mistakes
- Leaving half-life in minutes but writing unit .
- Using (missing the factor).
Things to Be Careful About
- Keep sufficient significant figures: half-life is 3 s.f., so to 3 s.f. is appropriate.
- State the unit explicitly ( or Bq per nucleus is not appropriate here).
Determine the rate at which positrons are produced in a sample of oxygen-15 that has a mass of .
rate = ______
Working
Molar mass of : .
Using ,
Answer
.
6.46 × 10^17 s^-1
Background Concept
For a radioactive sample:
- The activity (decays per second) is
where is the decay constant and is the number of undecayed nuclei.
If each decay produces one positron (as in decay), then:
- rate of positron production = activity.
To find from a mass, use the mole concept:
where is molar mass and is the Avogadro constant.
Understanding the Question
You are given a mass of oxygen-15: . You must find how many nuclei this corresponds to, then multiply by to get the decay rate (and hence positron production rate) in .
Approach
- Convert the isotope’s molar mass to .
- Find number of moles .
- Convert moles to number of nuclei: .
- Use .
Step-by-Step Reasoning
- Molar mass of is approximately (mass number in grams per mole):
- Moles in the sample:
- Number of nuclei:
- Use from part (c)(ii): .
Then:
- Because one is produced per decay, this is also the positron production rate.
Key Takeaways
- Convert mass to number of nuclei using and .
- Activity gives decays per second: .
- For emitters, positron rate equals decay rate.
Common Mistakes
- Using (wrong by a factor ).
- Forgetting to convert grams to kilograms.
- Using or (incorrect formula).
- Treating activity as “per minute” because the half-life was in minutes.
Things to Be Careful About
- Keep track of powers of ten carefully when multiplying by type factors.
- Ensure the final unit is .
- Assume one positron per decay only because the stem explicitly states oxygen-15 decay produces positrons.
The particles that are emitted from the body and detected outside it during PET scanning are not positrons but another type of particle.
Answer
Gamma-ray photons.
gamma-ray photons
Background Concept
In PET scanning, the radioactive tracer emits a positron. Positrons do not usually escape the body; instead they quickly interact with electrons and produce annihilation radiation.
This annihilation radiation consists of gamma-ray photons, which can escape the body and be detected.
Understanding the Question
The question says the detected particles are not positrons, and asks what they are.
Approach
Recall the PET detection mechanism: detection of gamma photons from positron-electron annihilation.
Step-by-Step Reasoning
- A positron emitted in tissue soon meets an electron.
- They annihilate, producing gamma photons.
- These gamma photons travel out of the body to the detectors.
Key Takeaways
- PET detects gamma photons, not the positrons themselves.
Common Mistakes
- Answering “positrons” (explicitly contradicted by the question).
- Answering “X-rays” (PET uses gamma photons from annihilation).
Things to Be Careful About
- The expected term is “gamma-ray photons” (or just “gamma photons”).
Answer
The emitted positron travels a short distance in tissue and annihilates with an electron. Their mass is converted to energy, producing two gamma-ray photons emitted in opposite directions.
Positron annihilates with an electron producing two oppositely directed gamma photons.
Background Concept
A positron is the antimatter counterpart of an electron. When a positron meets an electron, they can undergo annihilation, in which their rest mass is converted into electromagnetic radiation (photons):
To conserve momentum, the photons are produced in opposite directions (approximately apart) when the annihilation occurs with negligible net momentum.
Understanding the Question
You are asked to explain how the detected particles (gamma photons) are formed inside the body during PET.
Approach
Explain the sequence:
- decay emits a positron.
- Positron slows down in tissue.
- Positron annihilates with an electron.
- Two gamma photons are produced and escape to detectors.
Step-by-Step Reasoning
- Oxygen-15 decays by emission, producing a positron.
- In the body, the positron interacts with matter and rapidly loses kinetic energy.
- It then encounters an electron; because they are particle-antiparticle, they annihilate.
- The combined rest mass energy becomes photon energy (gamma rays).
- Two gamma photons are emitted in opposite directions to satisfy conservation of momentum, which is used in PET coincidence detection.
Key Takeaways
- PET signal comes from annihilation radiation.
- The detected photons originate from annihilation, typically producing two gamma photons in opposite directions.
Common Mistakes
- Saying the positron itself is detected outside the body (it is stopped quickly in tissue).
- Mentioning only “gamma is emitted” without describing annihilation with an electron.
- Stating one photon only (momentum conservation requires two in the simplest case).
Things to Be Careful About
- Use the word annihilation and mention the electron.
- Include the key detail: two gamma photons in opposite directions (this is central to PET).
Answer
Emission of electrons from a metal surface when electromagnetic radiation is incident on it, provided the radiation frequency is above a threshold value (for that metal).
Emission of electrons from a metal surface when EM radiation of frequency above a threshold is incident.
Background Concept
The photoelectric effect is the emission of electrons (photoelectrons) from a metal surface when it absorbs electromagnetic radiation (photons). The key quantum idea is that the energy arrives in packets of energy
where is the Planck constant and is the radiation frequency.
A metal has a work function , which is the minimum energy needed to liberate one electron from the surface. If the incoming photon energy is too small, electrons cannot be emitted.
Understanding the Question
You are asked to state what is meant by the photoelectric effect. For full credit, the definition must include (i) what happens (electrons are emitted from a metal surface) and (ii) the condition for it (radiation must have frequency above a threshold / photon energy must exceed the work function).
Approach
Write a concise definition with two points:
- emission of electrons from a metal surface due to incident EM radiation;
- only occurs when the radiation frequency exceeds a threshold frequency for that metal.
Step-by-Step Reasoning
- Mention the effect: electrons leave the metal surface.
- Mention the cause: incident electromagnetic radiation (light).
- Mention the condition: there is a minimum frequency (threshold frequency) below which no electrons are emitted.
Key Takeaways
- Photoelectric effect = electron emission due to incident EM radiation.
- There is a threshold frequency related to the work function.
Common Mistakes
- Saying only “electrons are emitted by light” but not stating the existence of a threshold frequency.
- Confusing threshold frequency with intensity (intensity affects number of electrons, not whether emission occurs).
Things to Be Careful About
- The threshold is a property of the metal surface (and its cleanliness), not of the light source.
- Use “electromagnetic radiation” or “light” and specify emission from the surface of a metal.
The photoelectric effect is investigated using two clean metal plates. One plate is made from metal X and the other is made from metal Y.
Metal X has work function energy . Metal Y has work function energy .
Metal X has threshold frequency .
State expressions, in terms of either or both of and , for
Working
At threshold for metal X:
For metal Y, work function :
Answer
2F
Background Concept
At the threshold frequency , emitted electrons just have zero maximum kinetic energy, so all the photon energy goes into overcoming the work function:
This means the threshold frequency is
So, for a given , the threshold frequency is directly proportional to the work function.
Understanding the Question
Metal X has work function and threshold frequency , so it satisfies . Metal Y has work function . You must write the threshold frequency of Y in terms of and/or .
Approach
Use the threshold condition for each metal:
- For X: .
- For Y: .
Eliminate using the first equation to express in terms of .
Step-by-Step Reasoning
- For metal X:
- For metal Y:
- Substitute :
So doubling the work function doubles the threshold frequency.
Key Takeaways
- Threshold condition: .
- If work function doubles (with fixed), threshold frequency doubles.
Common Mistakes
- Writing (inverting the proportionality).
- Using at threshold but forgetting that at threshold.
Things to Be Careful About
- Use consistent symbols: here is a frequency, not a force.
- Don’t confuse threshold frequency with stopping potential (a different experiment quantity).
Working
At threshold for metal X:
So
Answer
Φ/F
Background Concept
For the photoelectric effect, the maximum kinetic energy of emitted electrons is given by Einstein’s photoelectric equation:
At the threshold frequency , electrons are just emitted with , so:
Understanding the Question
You are told metal X has work function and threshold frequency . That means for metal X,
The question asks for an expression for the Planck constant in terms of and/or .
Approach
Use the threshold relation for metal X and rearrange for .
Step-by-Step Reasoning
Starting from
divide both sides by :
This is a valid expression because is energy (J) and is frequency (s), so has units J s, which matches .
Key Takeaways
- At threshold: .
- Planck constant can be found from a known work function and threshold frequency: .
Common Mistakes
- Writing (multiplying instead of dividing).
- Mixing up and and thinking they are different physical types; both are frequencies.
Things to Be Careful About
- Check units: must be in J s.
- Keep as an energy (not a potential or voltage).
The maximum kinetic energy of photoelectrons is determined for each of the plates in (b) for different frequencies of incident radiation.
On Fig. 9.1, sketch the variation of with for each plate. Label your lines X and Y to identify which line relates to which plate.
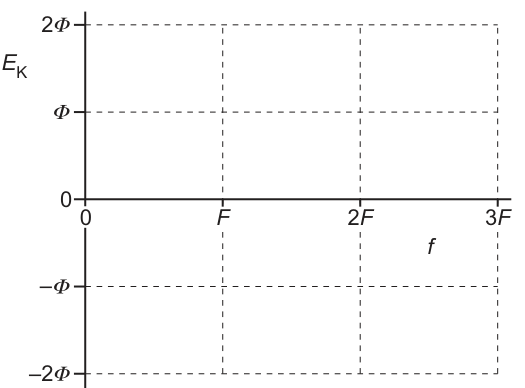
Working
So the – graph is a straight line of gradient .
For plate X: at and at .
For plate Y:
Same gradient , with threshold at and at .
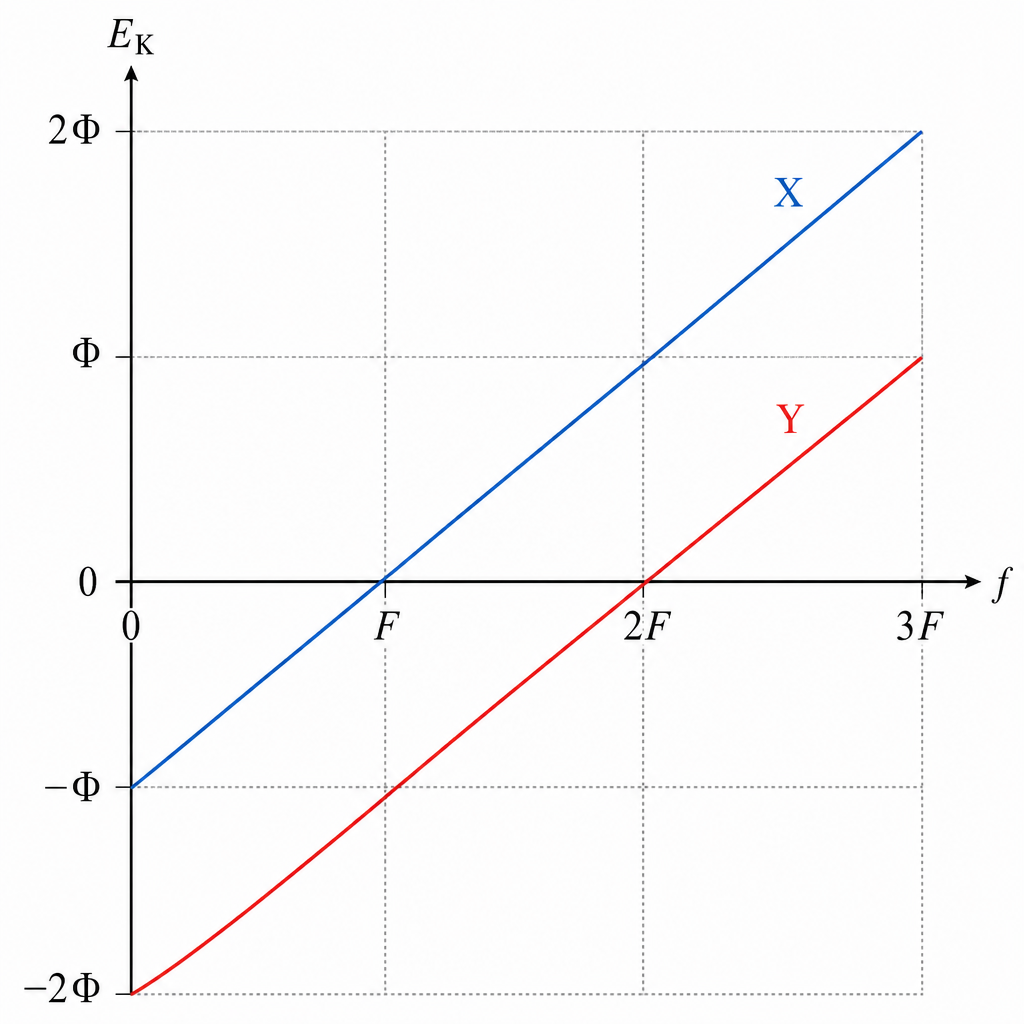
Answer
Two parallel straight lines of gradient : line X crosses the -axis at , line Y crosses at ; label the lines X and Y accordingly.
Two parallel straight lines (gradient h): X crosses at f = F, Y crosses at f = 2F.
Background Concept
Einstein’s photoelectric equation relates the maximum kinetic energy of emitted electrons to the photon frequency:
- is the maximum kinetic energy of the photoelectrons.
- is Planck’s constant.
- is the frequency of the incident radiation.
- is the work function (minimum energy needed to release an electron).
This has the form of a straight line if you plot (vertical axis) against (horizontal axis):
- gradient
- intercept
- the x-intercept (where ) is the threshold frequency .
Understanding the Question
You have two metals:
- Metal X: work function , threshold frequency .
- Metal Y: work function .
You must sketch on the provided axes (which already mark on the frequency axis and values like , on the energy axis) the straight-line relationships for both metals, and label which line is X and which is Y.
Approach
- Write the photoelectric equation for each metal.
- Identify three key graph features for each line:
- gradient (both are , so the lines are parallel),
- y-intercept at (negative work function),
- x-intercept where (threshold frequency).
- Use the given axis markings to place the lines accurately and label them.
Step-by-Step Reasoning
For metal X:
- At :
so the line crosses the axis at .
- Threshold frequency is given as , meaning when . So the line crosses the axis at .
So line X must go through and .
For metal Y:
- Same gradient (so parallel to X).
- At , intercept is .
- Threshold frequency satisfies , so:
So line Y crosses the axis at and the axis at .
Using the markings on the given grid, convenient check points are:
- For X at :
so X should pass through .
- For Y at :
so Y should pass through .
These points match the provided axis labels and make the sketch precise.
Key Takeaways
- vs is linear with gradient .
- x-intercept gives threshold frequency.
- Increasing work function shifts the line down and to the right (higher threshold frequency), without changing the gradient.
Common Mistakes
- Drawing curves instead of straight lines.
- Giving different gradients for X and Y (the gradient depends on , which is universal).
- Placing metal Y’s threshold at instead of .
- Confusing y-intercept with threshold frequency.
Things to Be Careful About
- Use the axis markings: ensure X crosses exactly at and Y at .
- Label both lines clearly (X and Y) to get the identification mark.
- The y-intercepts are negative: for X and for Y, as indicated on the vertical axis.
Answer
Redshift is the shift of spectral lines towards the red end of the spectrum, i.e. an increase in the observed wavelength (decrease in frequency) compared with the emitted value.
Shift of spectral lines to longer wavelength (towards red end of spectrum).
Background Concept
Light from atoms produces spectral lines at specific wavelengths. When the relative motion between the source and observer changes, the observed wavelength can differ from the emitted wavelength. A shift of a spectral line to a longer wavelength corresponds to the red end of the visible spectrum and is called redshift.
Understanding the Question
You are being asked to state what “redshift” means in astronomy, based on what happens to the observed spectral lines compared with their known (laboratory) wavelengths.
Approach
Give a clear definition in terms of spectral lines and wavelength (or frequency). For full credit, specify the direction of the shift: towards red / longer wavelength.
Step-by-Step Reasoning
- Spectral lines have known rest wavelengths (measured in the lab).
- If the observed line is at a longer wavelength than the rest value, the line has moved towards the red end of the spectrum.
- This is the definition of redshift.
Key Takeaways
- Redshift means spectral lines are observed at longer wavelengths than their rest values.
- Equivalent statement: observed frequency is lower.
Common Mistakes
- Saying only “light turns red” without mentioning spectral lines or wavelength shift.
- Confusing redshift with “the object is red in colour”; it is specifically about a change in spectral line position.
Things to Be Careful About
- Use a precise physics statement: “increase in wavelength” (or “decrease in frequency”), not vague wording.
- Redshift is a comparison between emitted (rest) and observed wavelengths.
Answer
Light from distant galaxies shows redshifted spectral lines, which indicates (Doppler effect) that the galaxies are moving away from us. Since most distant galaxies in all directions show redshift, space must be expanding so that galaxies are receding from each other.
Most galaxies show redshift → they are receding (Doppler) in all directions → the universe is expanding.
Background Concept
For waves, relative motion between source and observer causes a Doppler shift. For light, if the source is receding, the observed wavelength is increased (redshift). Astronomers measure redshift by comparing the observed wavelengths of known spectral lines with their laboratory values.
Understanding the Question
The question asks how the observation that galaxies’ spectra are redshifted leads to the conclusion that the universe is expanding. You must connect: (1) redshift measurement, to (2) recession speeds, to (3) the idea of expansion on a cosmic scale.
Approach
- State what redshift implies about motion (receding).
- Use the observational fact: redshift is seen for most distant galaxies and in all directions.
- Conclude that this is consistent with an overall expansion of the universe (not just a local motion).
Step-by-Step Reasoning
- Astronomers observe spectral lines from galaxies at wavelengths longer than the same lines measured in the lab.
- A longer observed wavelength is a redshift.
- For the Doppler effect, redshift means the source is moving away from the observer.
- When nearly all distant galaxies show redshift (whichever direction we look), it suggests recession is a general property of the universe.
- The simplest explanation is that distances between galaxies are increasing with time: the universe is expanding.
Key Takeaways
- Redshift is evidence of recession.
- Widespread recession of galaxies in all directions implies expansion of the universe.
Common Mistakes
- Claiming “redshift proves the Big Bang” directly (that is the next part; here it’s just expansion).
- Forgetting to mention that redshift corresponds to galaxies moving away.
Things to Be Careful About
- Avoid wording that suggests we are at the centre; expansion means all galaxies separate from each other, and any observer would see others receding.
- Make the logical chain explicit: observation (shift) → interpretation (receding) → conclusion (expanding universe).
Answer
Hubble’s law is
so more distant galaxies recede faster. If the universe is expanding now, running this expansion backwards implies that in the past galaxies were closer together, and at a finite time in the past all matter was concentrated in a very small region. This leads to the Big Bang theory (universe began from a hot, dense state and has been expanding since).
Using , galaxies were closer together in the past; extrapolating back gives a finite time when all matter was very close together → Big Bang origin from a hot, dense state.
Background Concept
Hubble’s law describes the observed relationship between a galaxy’s recession speed and its distance :
where is the Hubble constant. The key physical meaning is that recession speed increases with distance, which is the signature expected for an overall expansion of space.
Understanding the Question
You must explain how the relationship leads beyond “the universe is expanding” to the Big Bang idea that the universe had an origin in the past when it was much smaller, denser, and hotter.
Approach
- State what implies about the expansion (all separations increase; bigger separations increase faster).
- Use the idea of extrapolation backwards in time: if distances are increasing now, they were smaller in the past.
- Conclude that there is a finite time when the separation tends to zero (very small scale), motivating a beginning event (Big Bang).
Step-by-Step Reasoning
- Hubble’s law shows a linear relation between recession speed and distance:
- If a galaxy is farther away (larger ), it has a larger recession speed . This means the expansion is not just random motion; it follows a consistent pattern across the universe.
- Consider the expansion “in reverse”: if distances between galaxies are increasing now, then earlier they must have been smaller.
- Extrapolating back far enough implies that at some time in the past, all galaxies (and hence the matter/energy of the universe) were extremely close together.
- This suggests a hot, dense early universe that began expanding: the Big Bang model.
Key Takeaways
- means recession speed is proportional to distance.
- Reversing the expansion implies a smaller universe in the past.
- Extrapolation leads to the idea of a beginning from a hot, dense state (Big Bang).
Common Mistakes
- Stating Hubble’s law but not using it to argue “finite time ago” and “much smaller universe”.
- Saying “the universe expanded from Earth” (misconception); the model is expansion of space everywhere.
Things to Be Careful About
- The argument is conceptual: you do not need to calculate the age, but you do need the logical step “extrapolate backwards”.
- Use correct phrasing: “hot, dense state” and “expanded” rather than vague statements like “it started with an explosion” (Big Bang is expansion of space, not an explosion into pre-existing space).