Physics 9702/41 — October/November 2025
Cambridge A-Level · A Level Structured Questions · worked solutions for every part, with the mark scheme
Topics Temperature · Motion in a Circle · Oscillations · Thermodynamics · Gravitational Fields · Ideal Gases · +7 more
Answer
Speed (magnitude of velocity) is constant but the velocity direction changes continuously (tangent to the circle).
The acceleration is centripetal: directed towards the centre (perpendicular to the velocity).
Speed is constant but velocity direction changes; acceleration is towards the centre (perpendicular to velocity).
Background Concept
In uniform circular motion, an object moves in a circle at constant speed. Even though the speed is constant, the velocity is changing because velocity is a vector (it has direction as well as magnitude).
A change in velocity implies an acceleration. For circular motion, this acceleration is called centripetal acceleration and it always points towards the centre of the circle, continually changing the direction of the velocity so that the object stays on a circular path.
Understanding the Question
You are asked to describe uniform circular motion specifically in terms of velocity and acceleration. So you must mention (1) what happens to the velocity, and (2) what the acceleration is like (direction and nature).
Approach
Give two crisp statements:
- Velocity: magnitude constant, direction changing (tangent to circle).
- Acceleration: towards centre, perpendicular to velocity (centripetal).
Step-by-Step Reasoning
- Because the motion is uniform, the speed stays the same.
- But as the object goes around the circle, the direction of motion changes at every point, so the velocity vector changes.
- Therefore there must be acceleration.
- The acceleration must be directed towards the centre to bend the path into a circle, and it is perpendicular to the instantaneous velocity.
Key Takeaways
- Uniform circular motion: constant speed, changing velocity.
- Centripetal acceleration points towards the centre and is perpendicular to velocity.
Common Mistakes
- Saying “velocity is constant” (only the speed is constant).
- Missing the direction of acceleration (must be towards the centre).
Things to Be Careful About
- Use vector language correctly: velocity changes in direction, not magnitude.
- Acceleration is not zero even though speed is constant.
Fig. 1.1 shows the view from above of a polystyrene ball undergoing horizontal circular motion of radius .
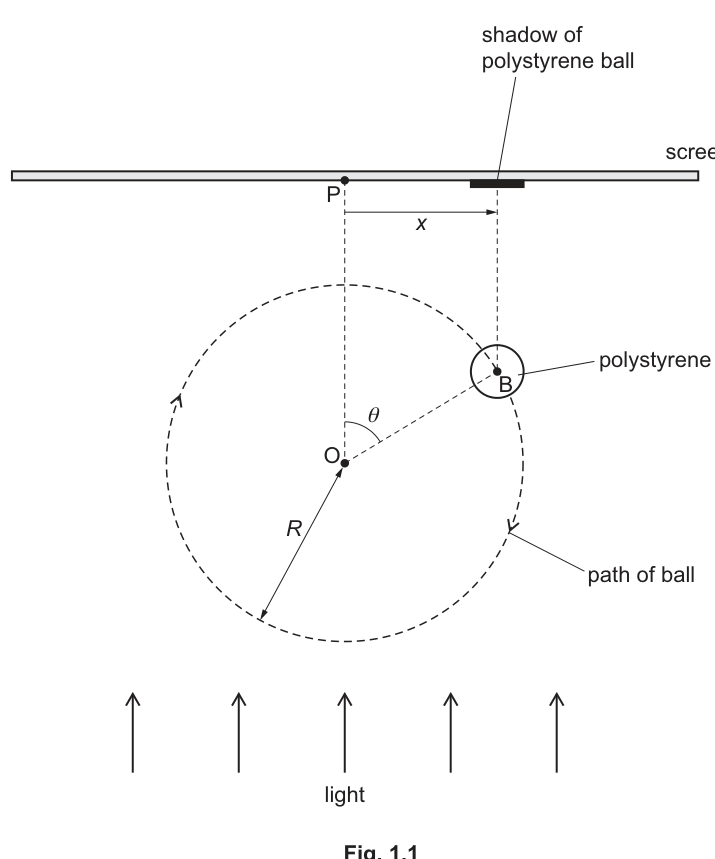
The ball is illuminated by parallel light so that a shadow of the ball forms on a screen placed on the opposite side of the ball from the light source.
The line joining points O and P is perpendicular to the screen.
The angular speed of the circular motion is .
Answer
v = R\omega
Background Concept
For motion in a circle of radius , the linear (tangential) speed is related to angular speed by
This comes from the idea that in one revolution the object travels a distance in a time period , so , and also . Eliminating gives .
Understanding the Question
The radius of the circular motion is and the angular speed is . The question asks for an expression for the speed in terms of these.
Approach
Apply the standard relationship with .
Step-by-Step Reasoning
- Start with
- Substitute :
Key Takeaways
- Use for uniform circular motion.
Common Mistakes
- Using (inverting incorrectly).
- Writing (mixing up with ).
Things to Be Careful About
- Units check: in m and in rad s gives in m s.
Determine an expression, in terms of and , for the centripetal acceleration of the ball.
centripetal acceleration = ______
Working
Using ,
Answer
v\omega
Background Concept
Centripetal acceleration is the acceleration needed to keep an object moving in a circular path. Its magnitude can be written in two common ways:
and
where is the radius, is the tangential speed, and is the angular speed.
Also, linear speed and angular speed are connected by
Understanding the Question
You are asked to give the centripetal acceleration in terms of and (so you must eliminate or ).
Approach
Start with and use to replace with .
Step-by-Step Reasoning
- Write centripetal acceleration:
- From , rearrange:
- Substitute into :
So the required expression is .
Key Takeaways
- Combine with to get .
Common Mistakes
- Writing (wrong rearrangement).
- Confusing with .
Things to Be Careful About
- Check units: has units , correct for acceleration.
The ball in (b) is in the position shown in Fig. 1.1, such that line OB is at an angle to the line OP.
Determine an expression, in terms of and , for the displacement of the shadow from P.
= ______
Answer
x = R\sin\theta
Background Concept
When an object moves in a circle, its position can be described by an angle measured from some reference line. If you take the projection of the radius onto a line perpendicular to that reference, you get a sinusoidal relationship (involving or depending on how is defined).
Understanding the Question
The ball is at point on a circle of radius centred at . The line is perpendicular to the screen (and parallel to the light rays). The shadow position on the screen is the projection of along onto the screen, so the displacement of the shadow from is the component of parallel to the screen.
Angle is between and . Therefore, the component of perpendicular to (i.e. along the screen) is .
Approach
Use right-triangle trigonometry on the radius vector : the displacement along the screen is the opposite side to angle .
Step-by-Step Reasoning
- Radius magnitude: .
- Angle between and is .
- Component of perpendicular to is
Key Takeaways
- The shadow displacement is a projection of circular motion, giving a sine (or cosine) dependence.
Common Mistakes
- Using when the geometry given defines such that the opposite component is required.
- Forgetting that is a displacement from , not the arc length.
Things to Be Careful About
- Ensure is the angle between and as stated, not between and the screen.
- Sign convention: the expression gives magnitude; direction depends on which side of is defined positive in the diagram.
Answer
\theta = \omega t
Background Concept
Angular speed is the rate of change of angular displacement:
For uniform circular motion, is constant, so integrating gives a linear relationship between and .
Understanding the Question
You are told that at . The object rotates with constant angular speed . You must write as a function of time.
Approach
Use and apply the initial condition to find .
Step-by-Step Reasoning
- For constant :
- Given when :
So
Key Takeaways
- Constant angular speed implies angular displacement increases linearly with time.
Common Mistakes
- Writing (adding an extra ).
- Forgetting the initial condition and writing without stating .
Things to Be Careful About
- is already in rad s, so comes out in radians.
Working
From (c)(i):
From (c)(ii):
Substitute:
Answer
x = R\sin\omega t
Background Concept
The projection of uniform circular motion onto a diameter gives simple harmonic motion. Mathematically, if a point goes around a circle with constant angular speed, its horizontal/vertical projection varies as or . Since increases linearly with time (), the projection becomes a sine/cosine function of time.
Understanding the Question
You already found:
- a geometric link between the shadow displacement and the angle ;
- a time dependence for .
You must combine them to show depends on time as .
Approach
Take the expression for and substitute to obtain .
Step-by-Step Reasoning
- From the geometry,
- For constant angular speed with at ,
- Substitute into :
which is exactly the required result.
Key Takeaways
- Combining a projection () with gives sinusoidal motion in time.
Common Mistakes
- Writing (incorrectly separating the sine argument).
- Dropping brackets: must be .
Things to Be Careful About
- Ensure the sine argument is dimensionless: is in radians.
- Use the same symbol consistently (it is angular speed for both the circle and the SHM model here).
Explain, with reference to the equation in (c)(iii), why the motion of the shadow of the ball on the screen may be modelled as simple harmonic.
Answer
The equation
is of the standard SHM form , so the shadow’s displacement varies sinusoidally with time (amplitude , angular frequency ) and can be modelled as SHM.
Because x = R sin(ωt) matches the SHM form x = x0 sin(ωt) (sinusoidal with amplitude R and angular frequency ω).
Background Concept
Simple harmonic motion (SHM) can be recognised in two equivalent ways:
- The displacement varies sinusoidally with time:
- The acceleration is proportional to and opposite the displacement:
Either of these is enough to justify that a motion is SHM (provided the motion is along a line about an equilibrium position).
Understanding the Question
You have obtained
The question asks you to explain why the shadow motion on the screen may be modelled as SHM, referring to this equation.
Approach
Compare the given equation directly to the standard SHM displacement equation and identify the parameters (amplitude and angular frequency). Optionally note that it implies .
Step-by-Step Reasoning
- Standard SHM form is .
- Your equation is exactly that with .
- Therefore the shadow oscillates back and forth about with sinusoidal variation in time, i.e. it is SHM.
(If you differentiate twice: , which is the defining acceleration condition for SHM.)
Key Takeaways
- Recognise SHM by matching to / .
- Projection of uniform circular motion produces SHM.
Common Mistakes
- Saying “it is SHM because it is a sine graph” without linking to the standard form and identifying the equilibrium position.
- Mixing up (angular frequency) with or .
Things to Be Careful About
- The model is for the shadow displacement along the screen, not the ball’s circular motion itself.
- State clearly the connection to the SHM equation (that is what the mark is for).
The circular motion of the ball in Fig. 1.1 has a diameter of and an angular speed of .
For the simple harmonic motion of the shadow of the ball in Fig. 1.1, calculate:
Working
Answer
Amplitude
0.23 m
Background Concept
For the shadow modelled as SHM,
The amplitude is the maximum value of . Comparing with shows
So the amplitude is equal to the radius of the original circular motion.
Understanding the Question
The circle has diameter , so its radius is half of that. The amplitude of the shadow’s SHM equals this radius.
Approach
Calculate radius from diameter and use amplitude .
Step-by-Step Reasoning
- Radius:
- Amplitude , so
Key Takeaways
- For , amplitude is .
Common Mistakes
- Using diameter as the amplitude (gives double the correct value).
Things to Be Careful About
- Keep units in metres as required in the answer line.
Working
Answer
Period
3.3 s
Background Concept
For any sinusoidal motion (including SHM), angular frequency and period are related by
Rearranging gives
Understanding the Question
The shadow’s displacement is , so its SHM has angular frequency . You are asked for the period.
Approach
Use and substitute .
Step-by-Step Reasoning
Calculate:
Key Takeaways
- is the key link between time period and angular frequency.
Common Mistakes
- Using (inverting incorrectly).
- Using (missing the ).
Things to Be Careful About
- is in rad s; the radian is dimensionless, so the result is in seconds.
- Round sensibly (typically 2 s.f. here, consistent with given data).
Working
For SHM,
Here and .
Answer
Maximum acceleration
0.83 m s^-2
Background Concept
In SHM, acceleration is related to displacement by
The magnitude of acceleration is largest when is largest, i.e. at the extremes (where is amplitude). Therefore,
Understanding the Question
You have angular frequency and the amplitude is the radius . You must find the maximum acceleration of the shadow in SHM.
Approach
Use with .
Step-by-Step Reasoning
- Identify amplitude:
- Apply the formula:
- Calculate:
so
Key Takeaways
- In SHM, maximum acceleration occurs at maximum displacement.
- Use .
Common Mistakes
- Using (missing one power of ).
- Using diameter as .
Things to Be Careful About
- Units: rad is dimensionless, so gives .
- Use the amplitude for the shadow, which equals the radius , not the diameter.
On Fig. 1.1, draw, and label with the letter A, the position of the shadow on the screen when the shadow has its maximum positive acceleration.
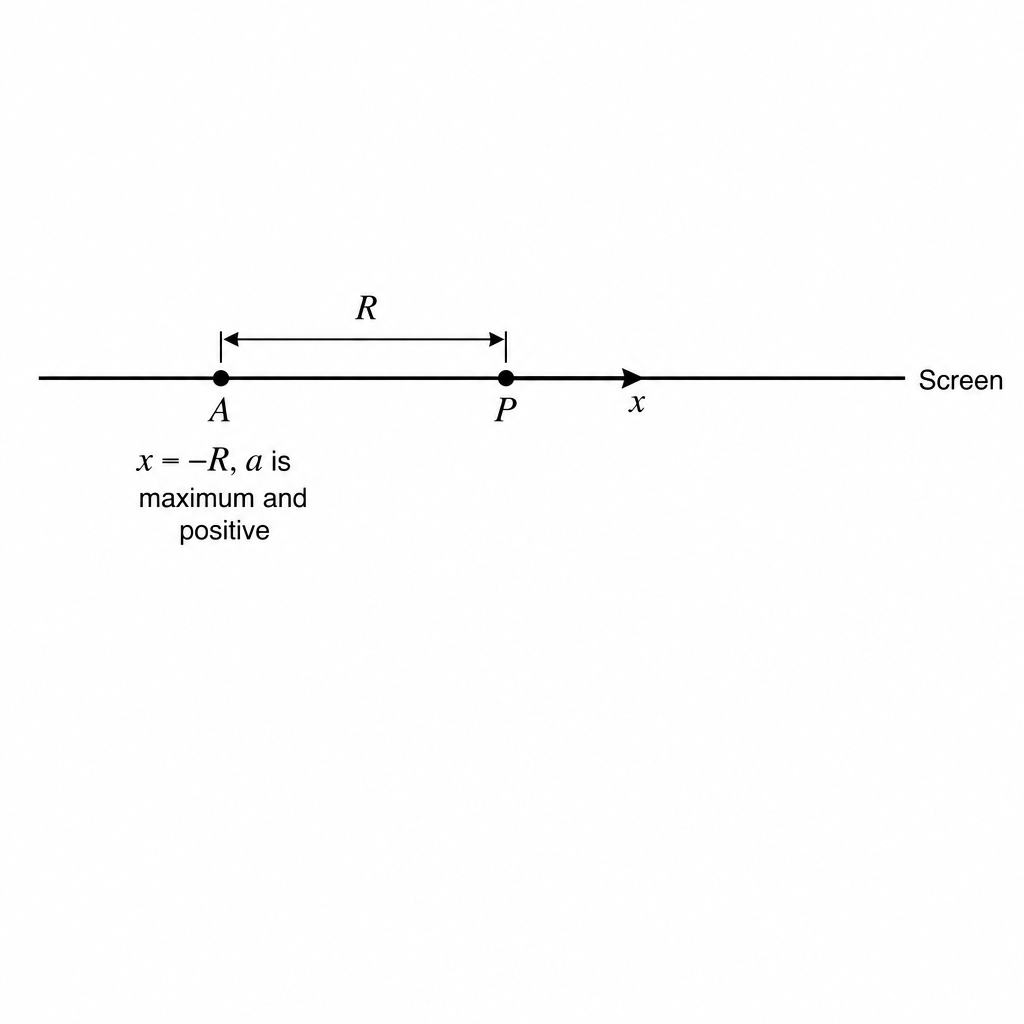
Answer
Maximum positive acceleration occurs at the most negative displacement: (left of on the screen). Mark this point as .
Point A at x = −R (left of P on the screen).
Background Concept
For SHM,
So:
- acceleration is always directed towards equilibrium (), because it has the opposite sign to ;
- the acceleration magnitude is
and is therefore maximum when is maximum, i.e. at .
Understanding the Question
The shadow performs SHM along the screen with displacement measured from (as shown on the diagram). You are asked to mark the position of the shadow when it has maximum positive acceleration.
Approach
- Maximum magnitude acceleration happens at the ends of the motion ().
- Use to decide which end gives positive acceleration.
Step-by-Step Reasoning
- At the extremes, .
- If then
so is negative.
- If then
so is positive and its magnitude is maximum.
Therefore the shadow must be at the left-hand extreme (negative direction from , given the diagram’s arrow for positive ).
Key Takeaways
- Maximum acceleration in SHM occurs at maximum displacement.
- The sign comes from (opposite to displacement).
Common Mistakes
- Choosing because it is “maximum” displacement, without considering the sign of acceleration.
- Confusing maximum acceleration with maximum speed (maximum speed occurs at ).
Things to Be Careful About
- Always use the diagram’s sign convention for (here positive is to the right from ).
- “Maximum positive acceleration” means largest acceleration in the +x direction, not largest magnitude regardless of direction.
State two ways in which the first law of thermodynamics describes that the internal energy of a system may be changed.
1 ______
2 ______
Answer
-
By transfer of thermal energy to/from the system (heating/cooling), .
-
By work done on/by the system, (e.g. compression/expansion).
By heating (thermal energy transfer) and by doing work (work done on/by the system).
Background Concept
The first law of thermodynamics is an energy-conservation statement for a thermodynamic system:
where:
- is the change in internal energy of the system,
- is the thermal energy transferred to the system (positive when energy is supplied as heat),
- is the work done on the system (positive when the surroundings do work on the system, e.g. compression).
So internal energy can be changed by (i) heating/cooling and (ii) doing mechanical/electrical work on the system.
Understanding the Question
The question asks for two distinct ways, according to the first law, that can change. These correspond directly to the two terms on the right-hand side of .
Approach
Read the first law and identify the two mechanisms of energy transfer into/out of the system: heat transfer and work transfer . State each clearly.
Step-by-Step Reasoning
- From , one contribution is : supplying thermal energy increases (removing thermal energy decreases ).
- The other contribution is : work done on the system increases (work done by the system tends to decrease ).
Key Takeaways
- The first law gives two routes to change internal energy: heat transfer and work transfer.
- These are the only two pathways in the first law expression.
Common Mistakes
- Stating only “temperature change” instead of the mechanism (heat transfer or work).
- Mixing up sign conventions without making it clear that the mechanism is work done on/by the system.
Things to Be Careful About
- Use the language of energy transfer: “thermal energy transferred” and “work done”.
- Ensure the two ways are distinct (do not give two examples of work, for instance).
Use the first law of thermodynamics to explain why a bicycle pump gets hot when it is used to pump up a tyre quickly.
Answer
Using the pump quickly means there is little time for heat transfer, so .
When the gas is compressed, work is done on the gas (), so by
and the internal energy increases.
The temperature of the air rises, and heat is then transferred from the hot air to the pump so the pump becomes hot.
Rapid compression is approximately adiabatic (q ≈ 0); work done on the air increases internal energy so temperature rises and the pump warms.
Background Concept
For a gas, internal energy is mainly the random kinetic energy (and, for real gases, some potential energy) of its molecules. A higher temperature corresponds to a higher mean random kinetic energy.
The first law relates changes in to energy transfers:
- If you compress a gas, the surroundings do work on it, so .
- If the process happens so quickly that little heat can flow in or out, then (adiabatic-like behaviour).
Understanding the Question
A bicycle pump is used to inflate a tyre quickly. The observation is that the pump gets hot. The question asks for an explanation specifically using the first law: identify and and deduce what happens to and temperature.
Approach
- Decide whether heat transfer is significant during the rapid pumping.
- Identify the sign of during compression.
- Use to conclude what happens to .
- Link increased internal energy to increased temperature of the gas and then to heating of the pump cylinder.
Step-by-Step Reasoning
- Rapid process implies small heat transfer: Pumping quickly means the compression happens over a short time, so there is not much time for thermal energy to flow from the gas to the surroundings. Therefore, take during the compression stroke.
- Compression means work done on the gas: You push the handle in, decreasing the gas volume. The pump (surroundings) does work on the gas, so .
- Apply the first law:
So .
4. Interpret : The internal energy of the air increases. For a gas, this corresponds to an increase in the average random kinetic energy of molecules, so the gas temperature rises.
5. Why the pump feels hot: The hotter compressed air is in contact with the pump walls. After (or during) repeated strokes, thermal energy transfers from the hot gas to the metal/plastic cylinder, so the pump itself becomes warm/hot.
Key Takeaways
- Fast compression is approximately adiabatic: .
- Compression implies (work done on the gas), so increases.
- Increased internal energy of a gas means higher temperature, so objects in contact warm up.
Common Mistakes
- Saying “pressure increases so temperature increases” without using the first law or mentioning work done.
- Claiming heat is transferred into the gas from outside during rapid pumping (the key point is that heat transfer is minimal during the rapid compression).
- Mixing sign conventions and concluding decreases during compression.
Things to Be Careful About
- The mark-worthy idea is the energy pathway: temperature rises because mechanical work is done on the gas, not because heat is supplied.
- Use wording like “little time for heat transfer” rather than claiming is exactly zero.
With reference to molecular energies, explain why the temperature of water remains at when it vaporises in a kettle, even though it is being heated.
Answer
Temperature is related to the average random kinetic energy of the molecules.
During vaporisation at , the energy supplied is used to increase the (intermolecular) potential energy as molecules separate / to break intermolecular bonds, not to increase their average kinetic energy.
Since the average kinetic energy does not increase, the temperature remains at until all the water has vaporised.
Energy supplied during boiling increases intermolecular potential energy (separation) rather than average kinetic energy, so temperature stays at 100 °C until vaporisation is complete.
Background Concept
Temperature is a measure of the average random kinetic energy of molecules. In simple terms:
- higher (\Rightarrow) molecules have greater average kinetic energy,
- constant (\Rightarrow) average kinetic energy stays constant.
Internal energy is the total microscopic energy of the molecules:
- random kinetic energy of molecules,
- potential energy due to intermolecular forces.
When a substance is heated without changing state, the added energy mainly increases kinetic energy, so temperature rises.
During a change of state (e.g. liquid to gas), energy is required to overcome intermolecular attractions and separate molecules; this increases potential energy. That energy is the latent heat.
Understanding the Question
Water in a kettle boils at (at atmospheric pressure). The kettle continues to supply energy, yet the temperature reading stays at while boiling occurs. The question asks for a molecular-energy explanation: what happens to the supplied energy if temperature (average kinetic energy) does not increase.
Approach
- State what temperature represents at molecular level (average kinetic energy).
- Describe what must happen to molecules during vaporisation (they separate and escape the liquid).
- Explain that the supplied energy increases intermolecular potential energy (latent heat), not the average kinetic energy.
- Conclude that temperature remains constant until the phase change finishes.
Step-by-Step Reasoning
- Link temperature to kinetic energy: For water molecules, temperature corresponds to their average random kinetic energy.
- What vaporisation requires: In the liquid, molecules are close together and held by intermolecular attractions. To become vapour, molecules must separate significantly and do work against these attractive forces.
- Where the heating energy goes: The energy supplied by the kettle during boiling is used to increase the molecules' potential energy (often described as "breaking" or overcoming intermolecular bonds) so molecules can escape into the gas phase.
- Why temperature stays at : Because the energy is not increasing the average kinetic energy, the average kinetic energy remains (approximately) constant, so the temperature remains at during the phase change.
- After all water has boiled: Once all liquid has become gas, further heating will then increase the kinetic energy of the steam, so its temperature can rise above .
Key Takeaways
- Temperature depends on average molecular kinetic energy.
- During boiling, added energy becomes latent heat: it increases potential energy by separating molecules.
- Therefore temperature stays constant during the phase change.
Common Mistakes
- Saying "the molecules stop gaining energy" (they do gain energy, but as potential energy).
- Claiming temperature stays constant because "heat is used to evaporate" without mentioning kinetic vs potential energy.
- Confusing latent heat with specific heat capacity (temperature rise) processes.
Things to Be Careful About
- Mention molecular energies explicitly: kinetic energy stays constant on average; potential energy increases.
- State the condition: this constant temperature is while vaporisation is occurring at constant pressure (e.g. boiling point at atmospheric pressure).
Answer
Gravitational field (strength) at a point is the force per unit mass on a small test mass placed at that point (direction is the direction of this force).
Force per unit mass on a small test mass at that point.
Background Concept
A (gravitational) field describes the effect a mass has on other masses around it without contact. At any point in space we define the gravitational field strength so that it tells us how much force a small test mass would experience.
By definition,
where is the gravitational force on a test mass placed at that point. The direction of is the same as the direction of the force on a positive test mass (i.e. towards the attracting mass).
Understanding the Question
You are asked to define gravitational field at a point. For full credit, you must include the key idea “force per unit mass” and make clear it refers to a small test mass placed at that point.
Approach
Recall the standard definition used in A Level: field strength equals gravitational force per unit mass. State it clearly (and optionally mention direction).
Step-by-Step Reasoning
- Place a small test mass at the point.
- Let the gravitational force on it be .
- Define gravitational field strength:
- Since gravity is attractive, the direction is towards the mass producing the field.
Key Takeaways
- Gravitational field strength is defined locally at a point.
- It is force per unit mass, with direction given by the force on a test mass.
Common Mistakes
- Saying “force” only, without “per unit mass”.
- Confusing gravitational field strength with gravitational potential.
Things to Be Careful About
- Use “test mass” language: the field exists whether or not the test mass is present, but the definition uses it conceptually.
- Direction matters if the definition asked for “field” as a vector; stating “towards the mass” is safe.
Fig. 3.1 shows an isolated point mass of mass .
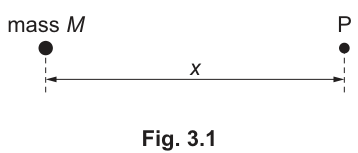
Point P is at distance from the point mass.
By considering the force exerted by the point mass on a test mass of mass placed at P, derive an equation for the gravitational field strength at P, in terms of and . Identify any other symbols you use.
Working
Force on test mass at distance :
Gravitational field strength
( is the gravitational constant.)
Answer
g = GM/x^2
Background Concept
For two point masses and separated by distance , Newton’s law of gravitation gives the attractive force:
where is the gravitational constant.
Gravitational field strength at a point is defined by
so if you know the gravitational force on a test mass at that point, dividing by gives the field strength due to the source mass.
Understanding the Question
A point mass is isolated. Point is a distance from . You place a test mass at and use the force on to derive at in terms of and . You must also identify any extra symbols (here, ).
Approach
- Write the gravitational force on due to using Newton’s law with separation .
- Use to eliminate the test mass .
Step-by-Step Reasoning
- The separation between and the test mass at is , so
- By definition of field strength,
- Substitute :
- Identify symbol: is the gravitational constant.
Key Takeaways
- For a point mass (or outside a spherical mass), gravitational field strength follows an inverse-square law.
- The test mass cancels: depends only on the source mass and distance.
Common Mistakes
- Forgetting to divide by , giving instead of .
- Using instead of in the denominator.
- Omitting or not identifying it.
Things to Be Careful About
- is a vector; this part asked for an equation for its strength (magnitude). Direction is asked in part (ii).
- The formula is valid for a point mass and for points outside a spherically symmetric mass (treated as if all mass is at the centre).
Answer
Arrow at directed towards .
Towards M.
Background Concept
The direction of the gravitational field at a point is defined as the direction of the gravitational force on a small test mass placed at that point. Since gravity is always attractive, the force (and hence the field) points towards the mass producing the field.
Understanding the Question
You are given a point mass and a point some distance away. You must indicate the direction of the gravitational field at on the diagram.
Approach
Decide which way a small test mass placed at would accelerate: it would be pulled towards . Draw the field arrow that way.
Step-by-Step Reasoning
- Place an imaginary test mass at .
- The gravitational force on it is towards .
- Therefore the gravitational field arrow at points towards .
Key Takeaways
- Gravitational field lines point in the direction a test mass would move: towards the attracting mass.
Common Mistakes
- Drawing the arrow away from (confusing with electric field direction from a positive charge).
Things to Be Careful About
- The field at is along the line joining to for a point mass.
Point Q is at distance from the point mass, on the opposite side of the mass from P, as shown in Fig. 3.2.
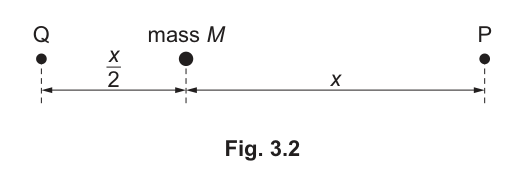
Compare the gravitational field at Q with that at P.
Working
At :
At , distance from is :
Direction at both points is towards , so directions at and are opposite.
Answer
Magnitude at is times that at , and the direction is opposite to that at (both point towards ).
At Q, g is four times larger than at P and in the opposite direction (towards M).
Background Concept
For a point mass , the gravitational field strength at distance is
This is an inverse-square law: halving makes four times bigger.
Direction: the field always points towards the mass .
Understanding the Question
Point is at distance from on one side. Point is at distance but on the opposite side of . You must compare the gravitational field at with that at (so compare both magnitude and direction).
Approach
- Write using .
- Write using .
- Take the ratio to compare magnitudes.
- Use “towards ” to compare directions for points on opposite sides.
Step-by-Step Reasoning
- At :
- At , the distance from is , so:
- Square the distance:
- Substitute:
- Direction: at the field points towards (towards the left if is left of ), while at it points towards (towards the right if is right of ). So the directions at and are opposite.
Key Takeaways
- Inverse-square laws: change in distance is squared in the effect.
- Always comment on direction when comparing fields on opposite sides of a source.
Common Mistakes
- Saying the field at is “twice” rather than “four times” (forgetting to square).
- Saying the direction is the same as at (it is towards in both cases, but since the points are on opposite sides, that means opposite directions along the line).
Things to Be Careful About
- Be explicit about what “same direction” means: the physically correct statement is “towards ”; when comparing two points on opposite sides, convert that into “opposite directions relative to the line.”
Two identical isolated uniform spheres X and Y each have radius . The centres of the spheres are separated by distance , as shown in Fig. 3.3.
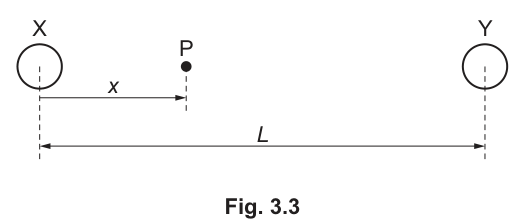
Point P lies on the line joining the centres of X and Y, and is at a variable displacement from the centre of sphere X.
The gravitational field strength at the surface of each sphere is .
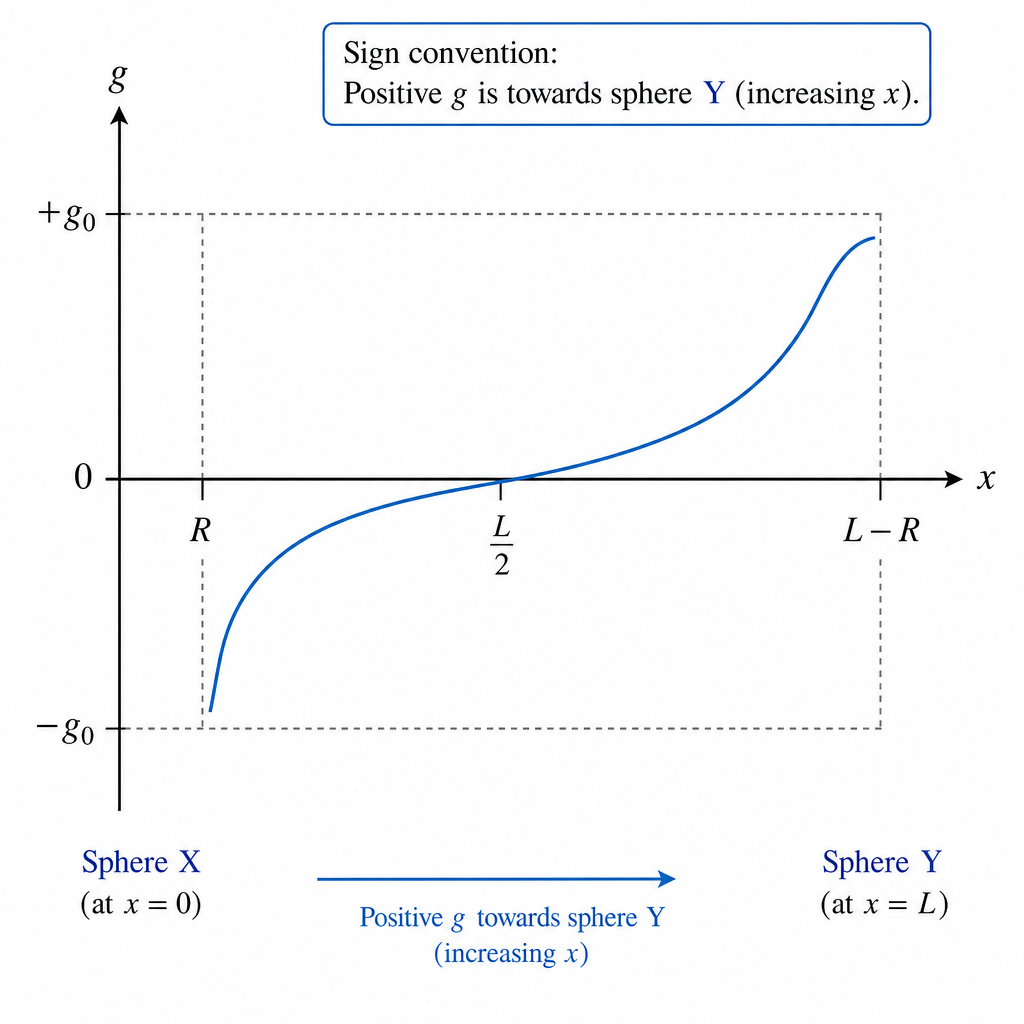
On Fig. 3.4, sketch the variation with of the gravitational field at point P between and .
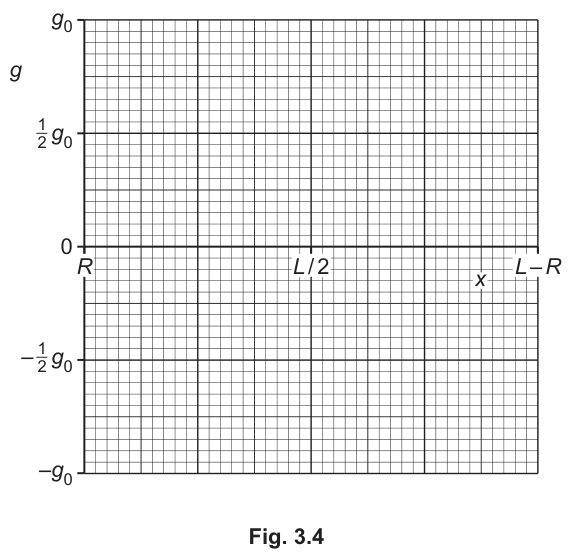
Answer
Take positive towards sphere .
Between the spheres,
- at , resultant is approximately (towards ),
- at , resultant (equal and opposite fields),
- at , resultant is approximately (towards ).
Sketch a smooth curve increasing from near at to at and then to near at , becoming steeper near each surface (inverse-square behaviour).
Sketch: g rises from about −g0 at x=R to 0 at x=L/2 then to about +g0 at x=L−R, steeper near surfaces.
Background Concept
Outside a uniform sphere, the gravitational field is the same as if all its mass were concentrated at its centre:
where is the distance from the centre.
When more than one mass produces a field at the same point, the resultant gravitational field is found by superposition (vector addition):
Because the two spheres are identical and arranged symmetrically, the midpoint between their centres is a key symmetry point.
Understanding the Question
Two identical spheres and (radius ) have centres separated by . A point lies between them on the line of centres.
- The horizontal coordinate is , measured from the centre of sphere .
- You are asked to sketch how the resultant gravitational field at varies as goes from (just outside sphere ) to (just outside sphere ).
- The field strength at the surface of an isolated sphere is given as , so the field due to one sphere alone at distance from its centre is .
The provided graph axis includes positive and negative values, so you must choose a sign convention and be consistent.
Approach
- Choose a positive direction along the line (natural choice: from towards , i.e. increasing ).
- Write the field contribution from each sphere at a general point :
- Distance from centre of is .
- Distance from centre of is .
- Use directions:
- Field due to points towards (negative direction).
- Field due to points towards (positive direction).
- Use symmetry to locate where resultant field is zero: for identical spheres it must be at .
- Use endpoint values (near and ) and the inverse-square idea to sketch curvature (steeper near surfaces, flatter in the middle).
Step-by-Step Reasoning
Let positive be towards (to the right, increasing ).
Field due to sphere at point (distance from its centre) has magnitude but points towards (negative):
Field due to sphere at point (distance from its centre) points towards (positive):
Resultant:
Now use key points for the sketch:
-
At the midpoint :
So the curve must cross the horizontal axis at .
-
Near sphere , at :
- The contribution from alone has magnitude (given).
- The contribution from is smaller because it is farther away (distance ).
So the resultant is negative and close to .
-
Near sphere , at :
By symmetry the resultant is positive and close to . -
Shape/curvature: because each contribution varies as , the magnitude changes rapidly when you are close to a sphere and more slowly when you are far away. So the sketch should be steeper near and near , and flatter near the middle.
A clear qualitative sketch is therefore:
Key Takeaways
- Outside a sphere, treat it as a point mass at its centre.
- Resultant gravitational field is found by vector superposition.
- For two identical masses, the zero-field point on the line joining them is at the midpoint.
Common Mistakes
- Adding magnitudes without directions (forgetting one field is opposite in direction).
- Putting the zero-field point somewhere other than despite symmetry.
- Sketching straight lines instead of showing curvature consistent with inverse-square behaviour.
Things to Be Careful About
- State or imply a sign convention (positive towards is consistent with the graph running from to ).
- The values at the surfaces are described as “approximately” because the other sphere still contributes; the important marking points are: negative near , zero at , positive near , and the correct curved shape.
State the value of absolute zero on:
Answer
-273 °C
Background Concept
Absolute zero is the lowest possible thermodynamic temperature, corresponding (in the ideal-gas model) to zero random translational kinetic energy per molecule.
The Celsius scale is defined relative to the kelvin (thermodynamic) scale by
where is the thermodynamic temperature and is the Celsius temperature.
Understanding the Question
You are asked to state the value of absolute zero on the Celsius scale (i.e. what Celsius temperature corresponds to ).
Approach
Use the fixed offset between the kelvin and Celsius scales: kelvin temperature is Celsius temperature plus about .
Step-by-Step Reasoning
At absolute zero, .
Using
set :
In exams this is usually quoted as .
Key Takeaways
- The kelvin and Celsius scales have the same size degree, but different zero points.
- Absolute zero corresponds to (approximately).
Common Mistakes
- Writing instead of a negative value.
- Confusing (freezing point of water) with absolute zero.
Things to Be Careful About
- The more accurate value is , but many mark schemes accept .
- Keep the unit as for the Celsius scale.
the thermodynamic temperature scale. Give a unit with your answer.
temperature = ______ unit ______
Answer
0 K
Background Concept
The thermodynamic (kelvin) scale is the SI temperature scale. Its unit is the kelvin (symbol ) and its zero point is defined at absolute zero.
Understanding the Question
The question asks for the value of absolute zero on the thermodynamic temperature scale and explicitly requests a unit.
Approach
State that absolute zero is the zero of the kelvin scale, and give the unit .
Step-by-Step Reasoning
By definition of the thermodynamic scale:
Key Takeaways
- The kelvin scale starts at absolute zero.
- Temperature in kelvin is written with unit (not ).
Common Mistakes
- Writing (incorrect; there is no degree sign for kelvin).
- Writing (confusing with ).
Things to Be Careful About
- Always include the unit as requested.
- Use uppercase for kelvin.
A sample contains a fixed amount of gas. The gas has pressure , volume and thermodynamic temperature .
Fig. 4.1 shows the variation of with for the sample, where is the Boltzmann constant.
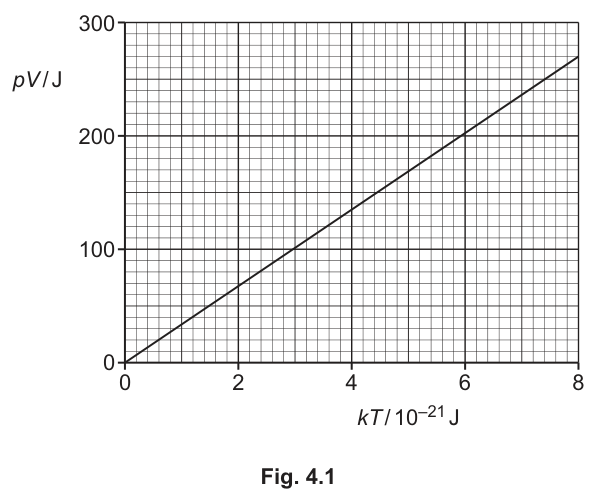
State what is indicated about the nature of the gas from the variation shown in Fig. 4.1.
Answer
is proportional to (straight line through origin), so the gas behaves as an ideal gas and obeys .
The gas behaves as an ideal gas (obeys pV = NkT).
Background Concept
For an ideal gas,
where:
- is pressure,
- is volume,
- is thermodynamic temperature,
- is the Boltzmann constant,
- is the number of molecules in the sample.
If is fixed, then is directly proportional to , and also directly proportional to .
Understanding the Question
A fixed amount of gas is used, so is constant. The graph shows how varies with . You must state what this tells you about the nature of the gas.
Approach
Recognise that a straight line through the origin means a direct proportionality: . Compare this with the ideal-gas equation .
Step-by-Step Reasoning
From the graph:
- It is a straight line.
- It passes through .
Therefore,
For an ideal gas,
which is exactly a direct proportionality between and for constant .
So the gas is behaving ideally (the ideal-gas model fits the data).
Key Takeaways
- A straight line through the origin indicates direct proportionality.
- vs being linear through the origin is evidence for (ideal gas behaviour).
Common Mistakes
- Saying only “it is a straight line” without stating what that implies physically.
- Confusing with without connecting to the meaning of the graph.
Things to Be Careful About
- The conclusion is about the model (ideal gas) fitting the data, not about the gas being a particular chemical substance.
- The phrase “fixed amount of gas” implies is constant, which is essential for interpreting the slope as a constant.
Working
For an ideal gas,
So for a graph of against , gradient .
Using the point , :
Answer
3.4 × 10^22
Background Concept
For an ideal gas,
If you plot (y-axis) against (x-axis), then the equation matches the straight-line form:
So:
- the graph should be a straight line through the origin,
- the gradient (slope) of the line is the number of molecules .
Understanding the Question
You are given a straight-line graph of versus for a fixed sample. You must determine by finding the gradient.
A specific point is readable from the graph: when , then .
Approach
- Use the ideal-gas relation .
- Recognise is the gradient of the vs graph.
- Calculate gradient using a point on the line (or a large triangle):
Step-by-Step Reasoning
From ,
Use the values from the graph:
- ,
- .
Then
Compute:
and dividing by multiplies by :
To sensible significant figures (limited by reading the graph),
The unit cancels (J/J), so is dimensionless, as it should be.
Key Takeaways
- For vs , the gradient equals because .
- Always include the factor from the x-axis label when using graph readings.
Common Mistakes
- Forgetting that the x-axis is in and using instead of .
- Using (inverting the gradient).
- Giving a unit (it has no unit).
Things to Be Careful About
- Use a clear point on the straight line (or a large triangle) to reduce percentage uncertainty.
- Quote an appropriate number of significant figures; readings from a graph typically justify 2 s.f.
Working
Using and :
Answer
5.6 × 10^-2 mol
Background Concept
The amount of substance (in moles) is related to the number of molecules by Avogadro’s constant :
where .
Understanding the Question
You have already found the number of molecules in the sample in part (b)(ii). This part asks you to convert that to moles.
Approach
Apply
and keep the unit as .
Step-by-Step Reasoning
Using :
Separate the numbers and powers of ten:
So
Rounded:
Key Takeaways
- Converting molecules to moles uses .
- has units , so comes out in .
Common Mistakes
- Multiplying by instead of dividing.
- Forgetting the unit .
Things to Be Careful About
- Keep powers of ten organised: .
- Your should be much less than because is much less than .
The root-mean-square (r.m.s.) speed of the molecules of the gas is when is equal to .
Determine the mass, in u, of one molecule of the gas, where u is the unified atomic mass unit.
mass = ______
Working
From kinetic theory,
So
Using , , :
With ,
Answer
4.0 u
Background Concept
In the kinetic theory of gases, pressure arises from molecules colliding with the container walls. One important result is
For a gas where is the root-mean-square speed,
so
Here:
- is the number of molecules,
- is the mass of one molecule,
- is the r.m.s. speed.
The unified atomic mass unit is
Understanding the Question
You are told that when , the r.m.s. speed is . Using your previously found , you must calculate the mass of one molecule and express it in u.
Approach
- Start from the kinetic theory equation linking to , and .
- Rearrange it to make the subject.
- Substitute the given values to obtain in kg.
- Convert kg to u using .
Step-by-Step Reasoning
Use
Rearrange for :
Substitute:
- ,
- ,
- so .
Then
Combine the denominator:
So
Convert to u:
Key Takeaways
- The kinetic theory equation links macroscopic gas behaviour to molecular properties.
- in joules is consistent with kinetic energy units, making the equation dimensionally sensible.
- Converting to u is a simple division by .
Common Mistakes
- Using instead of the kinetic theory equation (that would not involve ).
- Forgetting to square the r.m.s. speed.
- Using directly without the factor and the relationship.
- Not converting to u, or using the wrong value for .
Things to Be Careful About
- Use the same as in (b)(ii); if it was rounded, your final mass will be correspondingly approximate (error carried forward is usually allowed).
- Keep track of powers of ten when multiplying by .
- Quote the final value with a sensible number of significant figures (typically 2 s.f. from graph-derived ).
Answer
Electric potential at a point is the work done per unit positive charge in bringing a small positive test charge from infinity to that point (with no change in kinetic energy).
Work done per unit positive charge in bringing a test charge from infinity to the point (no change in kinetic energy).
Background Concept
Electric potential at a point is a scalar quantity defined via energy (or work) per unit charge.
If an external agent brings a small positive test charge from infinity to a point in an electric field, then the work done by the external agent is related to the potential difference by
When we use the definition “from infinity”, we are choosing the zero of potential to be at infinity.
Understanding the Question
You are asked to define electric potential at a point. That means you must give the standard wording: what is done (work done), per what (per unit charge), and from where (from infinity) to where (the point).
Approach
Use the formal definition: electric potential at a point equals work done per unit positive charge to bring a test charge from infinity to that point, typically specifying “no change in kinetic energy” (or “work done against the field”).
Step-by-Step Reasoning
- Start with the idea that potential measures energy per coulomb.
- Use a small positive test charge so it does not disturb the existing field.
- Specify the reference point “infinity” where the potential is taken as zero.
- State the work done per unit charge to bring it to the point.
Key Takeaways
- is work done per unit charge.
- The phrase “from infinity” fixes the reference of zero potential.
- Potential is a scalar (no direction).
Common Mistakes
- Defining potential as “force per unit charge” (that is electric field strength ).
- Missing “per unit charge”.
- Not stating the reference point (infinity).
Things to Be Careful About
- Use “work done by an external agent” or “work done against the field” (either is acceptable if clearly per unit charge).
- Include “positive test charge” to avoid sign confusion.
A hydrogen atom may be considered to consist of a proton and an electron separated by a distance of , as shown in Fig. 5.1.
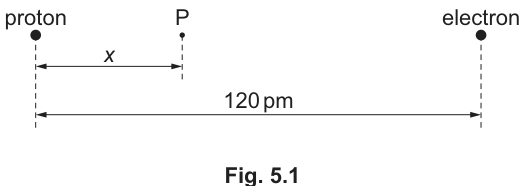
The two particles may be considered as point charges.
Point P lies on the line joining the electron and the proton and is at a variable distance from the proton.
Working
Potential at due to a point charge:
Here from the proton, and from the electron (with in pm).
For :
Answer
130 V
Background Concept
For a point charge , the electric potential at a distance (taking at infinity) is
Potential is a scalar, so when there are multiple charges, the total potential is the algebraic sum (superposition):
A positive charge gives positive potential; a negative charge gives negative potential.
Understanding the Question
A proton () and an electron () are separated by . Point lies on the line between them, at distance from the proton. When , you must show the potential at is .
Distances from :
- to proton:
- to electron:
Approach
- Write the total potential as the sum of the potentials from the proton and electron.
- Use for each charge.
- Substitute and convert pm to m.
- Keep the sign of the electron’s contribution negative.
Step-by-Step Reasoning
Total potential:
Now substitute :
So
Evaluate the bracket:
Difference:
Multiply by :
Key Takeaways
- Use superposition: add potentials as scalars.
- The electron contributes a negative term.
- Convert to carefully.
Common Mistakes
- Adding magnitudes instead of using the negative sign for the electron.
- Using separation as a distance to (you need and ).
- Forgetting the conversion from pm to m.
Things to Be Careful About
- The point is between the charges here, so (not ).
- Keep enough significant figures during working so the final rounding to is justified.
Working
For , distances are and .
Answer
32 V
Background Concept
The potential at a point due to multiple charges is found by adding their potentials (with signs):
For a proton–electron pair, at a point between them, the total potential is
Understanding the Question
You must calculate the potential at point when it is from the proton along the line joining the charges (separation ). The answer must be to two significant figures.
So the distances are:
- proton to :
- electron to :
Approach
- Write the same total potential expression as in (i).
- Substitute and .
- Convert pm to m inside the calculation.
- Round the final number to 2 s.f.
Step-by-Step Reasoning
Start:
Substitute :
Compute the bracket:
Difference:
Multiply by :
To 2 s.f.:
Key Takeaways
- Between charges: use and as the two distances.
- Electron term is negative.
- Rounding instruction (2 s.f.) is part of the mark.
Common Mistakes
- Using instead of .
- Forgetting to convert pm to m.
- Rounding too early and losing accuracy.
Things to Be Careful About
- The potential can be small even near charges because the positive and negative contributions partially cancel.
- Write units () and apply the requested significant figures.
On Fig. 5.1, draw a cross () at one position, other than infinity, where the electric potential is zero.
Working
For between the charges:
So .
Answer
Place at the midpoint between the proton and electron ( from the proton).
Midpoint between the charges, x = 60 pm from the proton.
Background Concept
Electric potential from charges adds as a scalar:
For equal and opposite charges ( and ), the potential can be zero where the positive and negative contributions are equal in magnitude.
Understanding the Question
You need to mark one position (not infinity) where the total potential due to the proton and electron is zero. The point must lie on the line joining them (as in the diagram).
Approach
Set the total potential expression to zero and solve for (distance from the proton). Between the charges the distances are and .
Step-by-Step Reasoning
Between the charges:
For :
Cancel :
So
This is exactly the midpoint, which makes sense by symmetry: you are equally far from and , so their potentials cancel.
Key Takeaways
- For and , where the distances to each charge are equal.
- Along the line segment between them, that is the midpoint.
Common Mistakes
- Stating “at infinity” (the question explicitly says other than infinity).
- Choosing a point closer to one charge than the other (then magnitudes cannot cancel).
Things to Be Careful About
- The point here is a point on the line; in 3D it corresponds to a plane perpendicular to the line at the midpoint (but you only need one point on the given line).
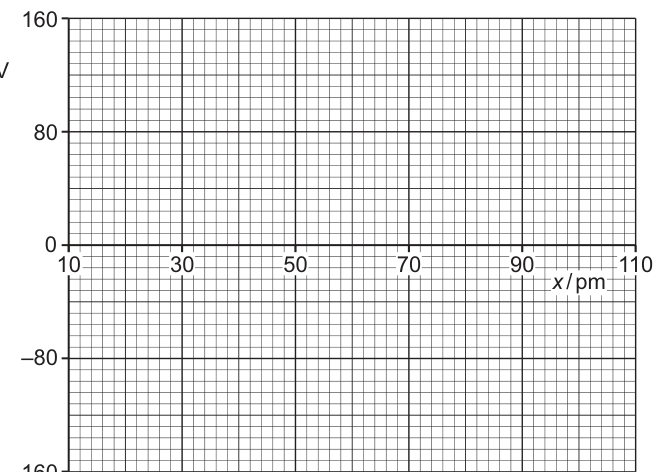
Answer
Sketch a smooth decreasing curve for
with the following features:
- passes through
- crosses at
- passes through
- non-linear (steeper near the ends and , flatter near ).
Decreasing non-linear curve: +130 V at 10 pm, crosses 0 at 60 pm, −130 V at 110 pm (steeper near ends).
Background Concept
For a point charge, potential varies as . For multiple charges, potentials add:
Because of the dependence, the graph is generally curved, not a straight line.
Also note the symmetry for equal and opposite charges: if you measure displacement from the midpoint, the potential changes sign.
Understanding the Question
You must sketch against for , where is the distance from the proton to point along the line joining the charges (total separation ).
You already found/verified:
- (from part iii)
By symmetry you can also infer what happens near (close to the electron).
Approach
To sketch correctly, anchor the curve using key physics features:
- Use the formula to know it is not linear ( terms).
- Plot key points: gives +130 V, gives 0.
- Use symmetry: exchanging with swaps the roles of proton/electron and flips the sign, so .
- Consider shape: near the proton end ( small) the positive term dominates, so is large positive; near the electron end ( small) the negative term dominates, so is large negative.
Step-by-Step Reasoning
Start from
Key points:
- At , you already showed .
- At , distances to both charges are equal (), so the two terms cancel and .
- At :
So the curve must pass through .
Shape / curvature:
- As increases from toward , decreases and increases, so falls.
- Near the two terms are close in value, so changes in are less dramatic (the curve looks flatter).
- Moving toward , the negative term becomes much larger in magnitude, so the curve becomes more steeply negative.
Therefore: a smooth monotonic decreasing curve, crossing the axis at , with steeper gradients nearer the ends and a gentler slope around the midpoint.
Key Takeaways
- Potential between and varies like .
- Zero potential occurs where distances are equal (midpoint).
- The graph is non-linear due to the dependence.
Common Mistakes
- Drawing a straight line between the endpoints (ignores behaviour).
- Crossing at the wrong value (must be ).
- Putting the wrong sign near the electron end (it must be negative near ).
Things to Be Careful About
- The question only asks for to , so you do not need to show the divergences at or , but the curve should still look steeper toward the ends of the given interval.
- Ensure the plotted values are consistent with the provided axes scale (about +130 V at and about -130 V at ).
Two parallel plate capacitors and are connected to a supply that has a potential difference (p.d.) . The capacitors may be connected in series or in parallel.
The supply provides charge and the plates of the two capacitors acquire charges and respectively. The p.d.s across the plates of the capacitors are and respectively.
Complete Table 6.1 to indicate how , and relate to each other, and how , and relate to each other, for series and parallel connections of the capacitors to the supply.
Table 6.1
| relationship between charges | relationship between p.d.s | |
|---|---|---|
| series | ||
| parallel |
Answer
Series:
- Charges:
- p.d.s:
Parallel:
- Charges:
- p.d.s:
Series: QS = Q1 = Q2 and VS = V1 + V2. Parallel: QS = Q1 + Q2 and VS = V1 = V2.
Background Concept
For any capacitor,
where is capacitance, is the charge stored (magnitude on one plate), and is the potential difference (p.d.) across the plates.
When capacitors are connected:
- In series, the same charge must pass through each component, so each capacitor ends up with the same magnitude of charge.
- In parallel, components share the same two connection points, so each has the same p.d. across it.
Understanding the Question
You have two capacitors connected to a supply of p.d. . The supply delivers a total charge to the combination. The capacitors acquire charges and and have p.d.s and .
You are asked to fill a table stating:
- how the charges relate (, , )
- how the p.d.s relate (, , )
for both series and parallel connections.
Approach
Use the standard circuit rules:
- Series: same charge on each capacitor; supply p.d. is shared so p.d.s add.
- Parallel: same p.d. on each capacitor; supply charge is shared so charges add.
Step-by-Step Reasoning
Series connection
- There is only one path for charge to move. Any charge transferred from the supply must appear on each capacitor in turn, so:
The charge delivered by the supply to the series combination is the same magnitude as the charge on each capacitor:
- The supply p.d. is split across the two capacitors, so total p.d. is the sum:
Parallel connection
- Each capacitor is connected directly across the same two supply terminals, so the p.d. across each equals the supply p.d.:
- The supply must provide the total charge placed on both capacitors, so:
Key Takeaways
- Series capacitors: same , adds.
- Parallel capacitors: same , adds.
Common Mistakes
- Swapping the rules (e.g. writing for series).
- Writing for series (this is for parallel).
- Forgetting that p.d.s in series add to the supply.
Things to Be Careful About
- These are relationships between magnitudes of charges on plates (one plate has , the other ).
- The question uses as “charge provided by the supply”, so in parallel it must equal the sum of the capacitor charges.
An isolated capacitor of capacitance stores of energy.
Working
Answer
9.0 V
Background Concept
Energy stored in a capacitor can be written in several equivalent forms:
The form is most useful when you know and want .
Understanding the Question
A single isolated capacitor has:
- Capacitance
- Stored energy
You must find the p.d. across it.
Approach
Use
Convert to and to , then rearrange for .
Step-by-Step Reasoning
- Convert units:
- Rearrange:
- Substitute:
So (to 2 s.f., matching the given energy).
Key Takeaways
- Choose the energy expression that matches the known quantities.
- Always convert prefixes (milli-, micro-) into SI before substituting.
Common Mistakes
- Using (missing the factor ).
- Forgetting to convert to or to .
Things to Be Careful About
- Check reasonableness: a large capacitance like storing only should have a modest voltage (a few volts to a few tens of volts), not hundreds of volts.
- Quote the final voltage to a sensible number of significant figures.
Working
Answer
4.2 × 10^-3 C
Background Concept
Capacitance is defined by:
So, rearranging,
This works for any capacitor, provided is the p.d. across that capacitor.
Understanding the Question
From part (i) the capacitor has p.d. across it (about ). The capacitance is . You are asked to find the charge stored on the capacitor.
Approach
Convert to farads, then use .
Step-by-Step Reasoning
-
Use and .
-
Substitute:
- Round appropriately (2 s.f.):
Key Takeaways
- After finding , charge is immediate from .
- must be converted to .
Common Mistakes
- Using (wrong rearrangement).
- Leaving in and getting a charge too large.
Things to Be Careful About
- Ensure the voltage used is the p.d. across that capacitor (here it is an isolated single capacitor).
- Keep track of powers of ten; it is often best to write the answer in standard form.
The capacitor is now connected in parallel with a capacitor of capacitance that is initially uncharged.
Determine the total energy, in mJ, now stored in the two capacitors.
energy = ______
Working
Initial charge on capacitor:
After connecting in parallel with , common p.d. :
Total energy stored:
Answer
14 mJ
Background Concept
When a charged capacitor is connected in parallel with another capacitor:
- The final p.d. across both capacitors becomes the same (parallel rule).
- If the system is isolated (no battery connected), total charge is conserved.
Energy in capacitors is not necessarily conserved during redistribution: energy can be dissipated as heat in the connecting wires due to current flow.
Understanding the Question
You start with:
- Capacitor charged (it stored initially).
- Capacitor initially uncharged.
They are then connected in parallel, with no mention of a supply, so the total charge initially on is shared between both capacitors.
You must find the total final energy stored in the two capacitors.
Approach
- Find the initial total charge available (this is the charge from part (ii)).
- In parallel, the final p.d. is common, and
So compute .
3. Then compute total energy using the equivalent capacitance:
Step-by-Step Reasoning
- Initial charge on the charged capacitor (from earlier parts):
- In parallel, capacitances add:
- Charge conservation gives:
so
This is smaller than the original , as expected because adding an uncharged capacitor increases the total capacitance and shares the charge.
- Total final energy:
Notice is less than the original : the “missing” energy is dissipated as heat during the brief current flow when the capacitors are connected.
Key Takeaways
- In parallel: same final voltage; capacitances add.
- For an isolated connection: total charge is conserved.
- Energy usually decreases during charge sharing (dissipation in the circuit).
Common Mistakes
- Assuming energy is conserved and answering .
- Using (forgetting that voltage changes when connected to an uncharged capacitor without a supply).
- Calculating energy in only one capacitor instead of the total.
Things to Be Careful About
- The phrase “initially uncharged” means before connection.
- Use only because the connection is parallel.
- Keep units consistent: convert to before using energy equations.
Answer
The induced e.m.f. is equal to the rate of change of magnetic flux linkage.
Induced e.m.f. equals the negative rate of change of magnetic flux linkage: ε = −d(NΦ)/dt.
Background Concept
Magnetic flux through a surface is
where is magnetic flux density, is area, and is the angle between and the normal to the area.
Flux linkage is for a coil of turns.
Faraday’s law states that an e.m.f. is induced when the magnetic flux linkage through a circuit changes, and its magnitude equals the rate of change of flux linkage. The negative sign in the equation (often associated with Lenz’s law) indicates the induced e.m.f. acts to oppose the change producing it.
Understanding the Question
This part asks for a statement of Faraday’s law (2 marks), so you should give (i) the relationship in words and (ii) the mathematical expression including flux linkage and the negative sign.
Approach
Provide the standard Cambridge A Level form:
- a clear statement about “rate of change of flux linkage”, and
- the equation .
Step-by-Step Reasoning
- Identify the quantity that must change: magnetic flux linkage .
- State proportionality/equality: induced e.m.f. equals the rate of change of .
- Write the calculus form and include the negative sign to show opposition to the change.
Key Takeaways
- Induction requires a change in flux linkage, not merely the presence of a magnetic field.
- The core formula is .
Common Mistakes
- Writing without the flux linkage .
- Omitting the negative sign.
- Stating “flux” rather than “flux linkage” when the question asks for Faraday’s law.
Things to Be Careful About
- Use “rate of change” wording (not just “change”).
- Include explicitly (even if later questions may have ).
- Keep the negative sign: it is often required for full credit.
An aircraft is flying horizontally at constant speed through the Earth’s magnetic field, as shown in Fig. 7.1.
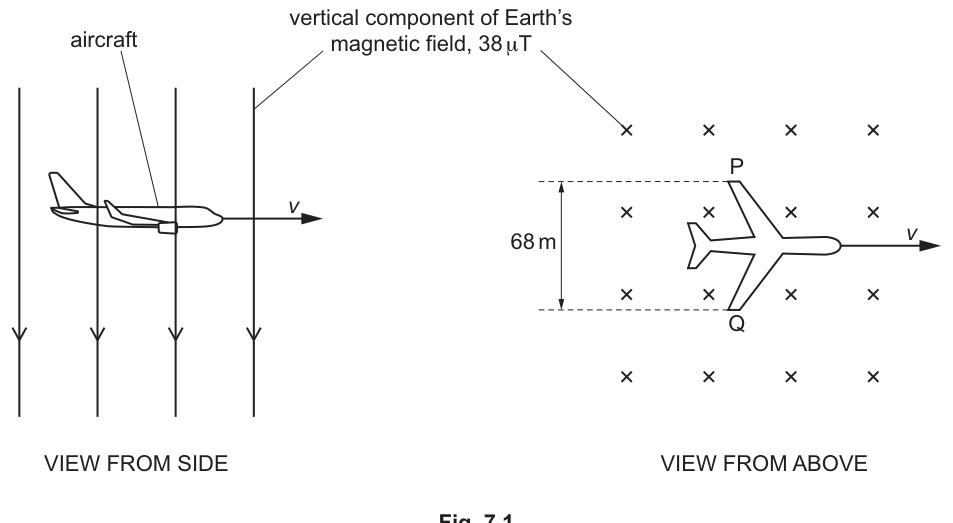
At the location of the aircraft, the vertical component of the Earth’s magnetic field is towards the ground.
The distance between the wingtips P and Q of the aircraft is .
As the aircraft moves through the magnetic field, an electromotive force (e.m.f.) of is induced between the wingtips P and Q.
Calculate the magnetic flux cut by the wings of the aircraft in a time of . Give a unit with your answer.
magnetic flux = ______ unit ______
Working
Using Faraday’s law for one turn:
Answer
Magnetic flux cut
8.1 Wb
Background Concept
Faraday’s law links induced e.m.f. to the rate of change of magnetic flux linkage:
If we are dealing with a single conductor effectively cutting flux (equivalent to ), the magnitude relation becomes
so the flux cut in a time interval is .
Understanding the Question
You are told an e.m.f. of is induced between the wingtips. Over , the question asks for the magnetic flux cut (i.e. the total change in flux linkage for ) and to give the correct unit.
Approach
Treat the given e.m.f. as a constant average e.m.f. over the interval and use
Step-by-Step Reasoning
- Start from
- Rearrange:
- Substitute values:
- The unit of magnetic flux is the weber (Wb). (Equivalently, .)
Key Takeaways
- Flux cut over time is the time integral of e.m.f.; for constant e.m.f., .
- Remember the unit: .
Common Mistakes
- Forgetting the unit, or writing without recognising it is a weber.
- Dividing by time instead of multiplying.
- Using without being clear what is (here effectively ).
Things to Be Careful About
- Use magnitude: the negative sign is about direction/polarity, not needed for a scalar “flux cut” value.
- Ensure time is in seconds and e.m.f. in volts so that .
Working
Vertical field component:
Answer
Area
2.1 × 10^5 m^2
Background Concept
Magnetic flux through an area is
In this question, the aircraft is cutting the vertical component of Earth’s field, so we take the relevant area as perpendicular to that vertical field component (so ), giving .
Understanding the Question
From part (b)(i) you have the flux cut in . You are told the vertical component of the Earth’s field is . The question asks for the area of flux cut in that same time.
Approach
Use
and be careful to convert microtesla to tesla.
Step-by-Step Reasoning
- Convert the magnetic flux density:
- Use (field perpendicular to area):
- Substitute :
- Quote to suitable significant figures (limited by 2 s.f. in ):
Key Takeaways
- For flux cutting problems, is linked to area by when the area is normal to .
- Always convert to .
Common Mistakes
- Using as (missing the factor).
- Forgetting the factor conceptually and becoming unsure whether to use .
- Giving the area unit as or .
Things to Be Careful About
- The vertical component is already provided; do not attempt to resolve the field further.
- Keep track of powers of ten when dividing by (it increases the result by ).
Working
In the area swept out is
Answer
2.1 × 10^2 m s^-1
Background Concept
When a straight conductor of length moves a distance perpendicular to its length, it “sweeps out” an area
If it moves at constant speed for time , then , so
This area is the area used in for flux cutting when the magnetic field is perpendicular to the swept area.
Understanding the Question
You have already found the area of flux cut in in part (b)(ii). The wingspan (distance between wingtips P and Q) is . The aircraft travels forward a distance in . The question asks you to use these to find the aircraft speed .
Approach
Model the swept area as a rectangle:
- one side is wingspan ,
- the other side is distance travelled in , i.e. .
So and rearrange to .
Step-by-Step Reasoning
- Write the area relation:
- Substitute , , :
- Calculate the denominator:
- Evaluate:
- Quote to suitable significant figures:
Key Takeaways
- The “area of flux cut” here is simply the swept area: wingspan distance travelled.
- Convert the physical picture into .
Common Mistakes
- Using (forgetting the time factor).
- Using (incorrect rearrangement).
- Using minutes instead of seconds.
Things to Be Careful About
- Check units: , so the formula is dimensionally consistent.
- Use the area from (b)(ii) consistently (carry forward is normally allowed but arithmetic must be correct).
Use Lenz’s law of electromagnetic induction to explain which of the wingtips P and Q is at the higher induced potential.
Answer
As the aircraft moves, charge carriers in the wings experience a magnetic force. The induced effect must oppose the motion (Lenz’s law), so the induced current in the wings must be such that the magnetic force on the wing is opposite to .
With to the right and vertically downwards (into the page in the view from above), the required current is from Q to P, giving a force to the left.
Hence wingtip P is at the higher induced potential (P is positive relative to Q).
P is at higher potential.
Background Concept
When a conductor moves through a magnetic field, its charge carriers have velocity and experience a magnetic force
This pushes positive and negative charges to opposite ends of the conductor, creating a potential difference (a motional e.m.f.).
Lenz’s law gives the direction: the induced e.m.f./current acts to oppose the change that produces it. In a motional induction situation, that often means the induced current produces a magnetic force that opposes the motion (a magnetic “drag”).
Understanding the Question
You are shown the aircraft moving horizontally. The vertical component of Earth’s magnetic field is towards the ground. The wingtips are P and Q. The question asks which wingtip is at higher potential and requires an explanation using Lenz’s law.
From the view from above, the vertical downward field is represented as crosses (field into the page). The aircraft moves to the right.
Approach
- Use Lenz’s law: induced current must create a force opposing the aircraft’s motion.
- Use the motor/generator force rule (or Fleming’s right-hand rule) to decide which direction of current along the wing gives a force opposite to .
- Once current direction along the wing is known, infer which tip is at higher potential (the tip where positive charge accumulates is at higher potential).
Step-by-Step Reasoning
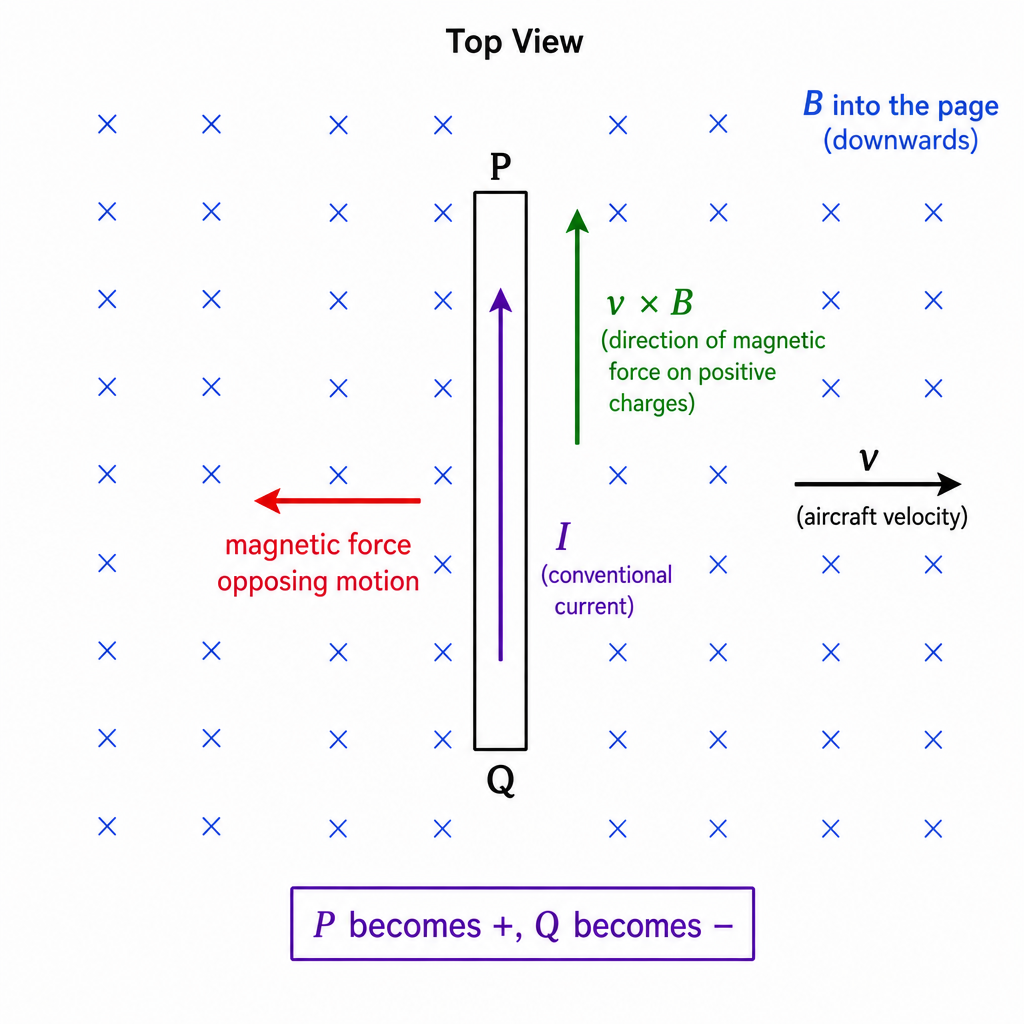
- Take the view from above:
- aircraft velocity is to the right.
- magnetic field is vertically downward, i.e. into the page.
-
Lenz’s law requirement: the induced current must produce a magnetic force on the wing to the left (opposing the motion to the right).
-
Consider current along the wing (from one tip to the other). If conventional current is from Q to P (up the page), then using
with upwards and into the page, points to the left. So that current direction produces a force opposing the motion, which matches Lenz’s law.
Therefore, the induced current in the wing itself is from Q to P.
- In a source of e.m.f., conventional current inside the source goes from lower potential to higher potential (from negative to positive). Since current in the wing is Q to P, P must be at the higher potential.
Equivalently, using : with right and into the page, is upwards, so positive charges are driven towards P, making P positive and hence at higher potential.
Key Takeaways
- Lenz’s law is about opposition: induced effects oppose the cause (here, the motion through the field).
- Use direction rules ( or ) carefully to link motion, field direction, current direction, and polarity.
Common Mistakes
- Saying “P is higher” without any reasoning based on Lenz’s law.
- Mixing up field direction (crosses mean into the page).
- Assuming conventional current always flows from high to low potential inside the moving conductor; in the induced source region it goes from negative to positive.
- Using Fleming’s left-hand rule (motor) without recognising it is still valid for finding force direction once current direction is known.
Things to Be Careful About
- Be explicit about which view you are using (above view is easiest because the downward field becomes “into the page”).
- Keep the distinction clear:
- charge separation sets up a potential difference,
- if a circuit were completed, current in the external circuit would flow from P to Q, but within the wing (the source region) it is Q to P.
- The question asks “higher induced potential”, so you must name P or Q and indicate polarity (e.g. “P is positive relative to Q”).
Answer
A photon is a discrete packet (quantum) of electromagnetic radiation.
It carries energy (and momentum).
A discrete quantum (packet) of electromagnetic radiation with energy E = hf.
Background Concept
Electromagnetic (e.m.) radiation transfers energy in discrete amounts, not continuously. The smallest “chunk” of energy that can be exchanged with matter is called a photon.
A photon has:
- energy
where is the Planck constant and is the radiation frequency;
- momentum
Even though it has no rest mass, it behaves as a particle in interactions (e.g. photoelectric effect).
Understanding the Question
The question asks for what is meant by a photon: i.e. a definition rather than a description of an experiment or an example.
Approach
State that a photon is a quantum/packet of e.m. radiation, and (for full credit) link it to the quantised energy .
Step-by-Step Reasoning
- Identify the key idea: radiation energy is quantised.
- Name the quantum: a photon.
- State what makes it “quantised”: each photon carries energy .
Key Takeaways
- A photon is the quantum of electromagnetic radiation.
- Photon energy depends on frequency: .
Common Mistakes
- Saying “a photon is a wave”: a photon is the particle/quantum description (light also has wave behaviour).
- Omitting the idea of a discrete packet/quantum.
Things to Be Careful About
- Don’t confuse photon energy with intensity: higher intensity means more photons per second, not higher energy per photon (unless frequency changes).
A stationary nucleus of uranium-238 () undergoes alpha decay to produce a nucleus of thorium-234 (). The kinetic energy of the emitted alpha particle is . A gamma-ray photon is also emitted during the decay.
Assume that the rebound kinetic energy of the thorium nucleus is negligible.
Table 8.1 shows the masses of the nuclides involved in the decay reaction. The mass of the uranium-238 nuclide is missing.
Table 8.1
| nuclide | nuclide mass / u |
|---|---|
| 4.000407 | |
| 233.915174 | |
The total energy released in the decay of the nucleus of uranium-238 is .
Calculate the mass, in u, of the uranium-238 nuclide. Give your answer to five decimal places.
mass = ______
Working
Energy released:
So
Using :
Answer
237.92017 u
Background Concept
In nuclear reactions/decays, the total mass of the products can be less than the mass of the reactant(s). The “missing” mass (mass defect) appears as energy released:
For a decay
the energy release corresponds to the mass difference between parent and all products. Often we use the conversion
so that MeV energy releases can be converted directly to a mass in u.
Understanding the Question
You are told:
- total energy released ,
- nuclide masses: and ,
- the uranium-238 nuclide mass is missing.
The question asks for in u, to five decimal places.
Approach
Use mass-energy equivalence with the definition of energy released:
- Write .
- Rearrange for .
- Convert (MeV) to an equivalent mass in u using .
- Add masses and round to 5 d.p.
Step-by-Step Reasoning
- Mass difference for this decay (ignoring any later recoil detail, since is given as the total release):
- Rearrange:
- Convert to u:
- Add the given product masses:
- Hence:
Rounded to five decimal places:
Key Takeaways
- Total energy release in a nuclear decay is found from mass defect: .
- Use to convert MeV (\leftrightarrow) u efficiently.
Common Mistakes
- Using the electron mass unit conversion (eV to kg) unnecessarily and making power-of-ten errors.
- Subtracting in the wrong direction (giving a negative mass defect).
- Rounding too early and losing accuracy before the final 5 d.p.
Things to Be Careful About
- The uranium mass must be slightly larger than because energy is released.
- Keep enough digits in the intermediate steps to ensure correct rounding to five decimal places.
Determine a value for the wavelength of the gamma radiation emitted during the decay of the uranium-238 nucleus.
wavelength = ______
Working
With recoil of thorium negligible:
Answer
1.68 × 10^-11 m
Background Concept
In a nuclear decay, the total energy released is shared between the kinetic energy of the decay products and any photon energy emitted.
If a gamma photon is emitted, its energy is related to its wavelength by
So once you know you can find
You must use in joules if you use SI values of and .
Understanding the Question
Given:
- total energy released ,
- kinetic energy of alpha particle ,
- assume thorium recoil KE is negligible.
Asked: wavelength of the gamma radiation.
The key clue is “rebound kinetic energy ... negligible”, which means we can take the energy split as just alpha KE plus gamma photon energy.
Approach
- Use energy conservation: .
- Find by subtraction.
- Convert MeV to J.
- Use .
Step-by-Step Reasoning
- With negligible thorium KE:
so
- Convert to joules:
Using ,
- Apply the photon relation:
with and :
This is in the gamma-ray region (very short wavelength).
Key Takeaways
- Use .
- Gamma photon energy gives wavelength via .
- Unit conversion (MeV (\to) J) is essential when using SI constants.
Common Mistakes
- Using (forgetting the alpha already has 4.200 MeV).
- Mixing eV/MeV with SI values of and without conversion to joules.
- Writing instead of .
Things to Be Careful About
- The photon energy here is the difference between the total release and the alpha kinetic energy, so it is much smaller than either number.
- Quote wavelength to sensible significant figures (limited by given energies).
In practice, the rebound kinetic energy of the thorium nucleus is not negligible.
Explain, without further calculation, how your answer in (b)(ii) compares with the true wavelength of gamma radiation emitted during the decay of the uranium-238 nucleus.
Answer
If the thorium nucleus has non-negligible rebound kinetic energy, some of goes into thorium KE, so is smaller than in (b)(ii).
Since , the true gamma wavelength is greater than the value calculated in (b)(ii).
True wavelength is larger than the value in (b)(ii).
Background Concept
Energy released in a decay must be shared between all forms of energy of the products:
- kinetic energy of the alpha particle,
- kinetic energy of the recoiling daughter nucleus,
- energy of any emitted photons.
For a photon,
So decreasing photon energy increases wavelength.
Understanding the Question
In (b)(ii) you assumed the thorium nucleus recoil kinetic energy is negligible, so you effectively set .
Now you are told this is not true and you must say how your computed wavelength compares to the true one, without doing any extra arithmetic.
Approach
- Recognise that if thorium recoil KE is not negligible, energy conservation becomes .
- Because , the remaining must be smaller.
- Use to infer the direction of change in wavelength.
Step-by-Step Reasoning
If recoil is not negligible, then
Compared with the earlier assumption , adding a positive term means the photon energy must reduce to keep the same total .
So is smaller than the value used in (b)(ii). Since
a smaller implies a larger .
Therefore the wavelength you calculated in (b)(ii) is an underestimate.
Key Takeaways
- Recoil of the daughter nucleus always takes some energy.
- Less photon energy means a longer photon wavelength.
Common Mistakes
- Saying the wavelength is smaller (mixing up the inverse relation between and ).
- Thinking the total energy release changes; is fixed by the mass difference.
Things to Be Careful About
- This is a comparison question: you must state direction (greater/less) and link it correctly to .
Gamma radiation emitted during the decay of a sample of uranium-238 has a single wavelength.
Nuclei of cobalt-60 () decay by beta emission, and also emit gamma radiation in the process.
Suggest why there is not a single wavelength for the gamma radiation emitted during the decay of a sample of cobalt-60.
Answer
In decay of , the daughter nucleus can be left in excited state(s) and then de-excites by gamma emission.
There are (at least) different possible energy-level transitions / a cascade of transitions, so different photon energies are produced and hence different wavelengths.
Because Co-60 beta decay can produce de-excitation via different (often cascaded) nuclear energy-level transitions, giving gamma photons of more than one energy and hence more than one wavelength.
Background Concept
Gamma rays are emitted when a nucleus drops from a higher (excited) nuclear energy level to a lower level. Because energy levels are discrete, each transition produces a photon with a specific energy difference:
and therefore a specific wavelength
If there is only one possible transition (one fixed ), you get a single gamma wavelength. If there are multiple transitions (different values), you get multiple wavelengths.
Understanding the Question
You are told uranium-238 gamma radiation has a single wavelength (i.e. one dominant photon energy).
You are asked why cobalt-60 does not give a single wavelength of gamma radiation in a sample.
The key idea is that cobalt-60 decay involves beta emission, which can leave the daughter nucleus in excited states that may de-excite in more than one step.
Approach
Explain qualitatively:
- Beta decay often leaves the daughter nucleus excited.
- De-excitation can occur through more than one transition (e.g. a cascade via an intermediate level, or different routes).
- Different transitions mean different gamma photon energies, hence different wavelengths.
Step-by-Step Reasoning
- In decay, a neutron converts to a proton and an electron is emitted. The daughter nucleus is frequently produced in an excited state.
- The excited nucleus can drop to the ground state in stages (for example, excited (\to) intermediate (\to) ground), emitting a gamma photon at each step.
- Each step has its own energy difference , so each gamma photon has its own .
- Because , different values correspond to different wavelengths.
So the gamma radiation from a cobalt-60 sample is not a single wavelength; it contains multiple discrete wavelengths (gamma lines).
Key Takeaways
- Gamma rays come from transitions between discrete nuclear energy levels.
- More than one transition (or a cascade) produces more than one gamma photon energy and wavelength.
Common Mistakes
- Saying “beta particles have a range of energies so gamma does too” without mentioning nuclear energy-level transitions (gamma energies depend on level differences).
- Claiming gamma is continuous like the beta spectrum.
Things to Be Careful About
- The reason for multiple wavelengths should be stated in terms of different nuclear transitions / multiple energy differences, not vague statements about “random energies”.
Answer
For a black body,
where .
Background Concept
A black body spectrum has a single peak when plotted as intensity (or power emitted per unit wavelength) against wavelength. The wavelength at which the emission is greatest is called the peak wavelength .
Wien’s displacement law links the position of this peak to the absolute temperature of the emitting surface:
where is Wien’s constant (approximately ). Hotter objects peak at shorter wavelengths.
Understanding the Question
The question asks for the statement of Wien’s displacement law (2 marks). That means you need both:
- the proportionality/equation linking and ;
- the constant (or an equivalent statement such as “”).
Approach
Write the standard equation, identify as the wavelength of maximum emission, and give the numerical value of the constant with units.
Step-by-Step Reasoning
- For a black body, the peak wavelength shifts with temperature.
- The relationship is inverse: as increases, decreases.
- The quantitative law is:
- State Wien’s constant:
Key Takeaways
- is the wavelength where the spectrum peaks.
- Wien’s law: .
- The constant is about .
Common Mistakes
- Forgetting to use kelvin for .
- Writing the law as (wrong direction).
- Omitting the constant or its units.
Things to Be Careful About
- Use the symbol (not just any wavelength).
- Quote the constant to an acceptable significant figure (typically 2 s.f. is fine) and include units .
Fig. 9.1 shows the variation with of the radiant flux intensity observed from a star X, where is the distance of the observer from the star. Fig. 9.2 shows the variation with wavelength of the rates of emission of radiation by star X and the Sun.
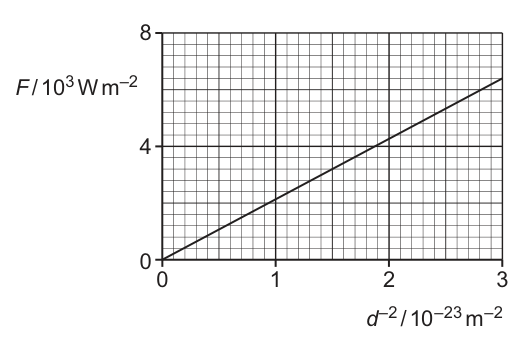
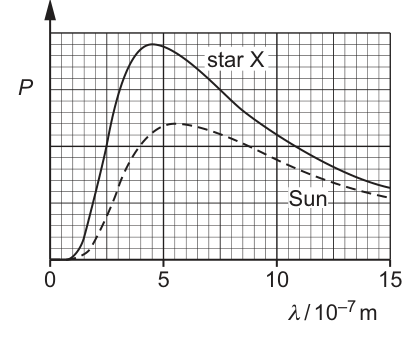
The surface temperature of the Sun is .
State three conclusions about star X that can be drawn from this data. The conclusions may be qualitative or quantitative. Use the space for any working.
1 ______
2 ______
3 ______
Answer
- From Fig. 9.1, , consistent with
so star X radiates approximately isotropically with constant luminosity .
- From Fig. 9.2, for star X is smaller than for the Sun, so . Using Wien’s law with ,
- The curve for star X in Fig. 9.2 has a larger peak / larger area under the curve than the Sun, so star X has a greater total power output (greater luminosity) than the Sun.
Three conclusions: (i) so isotropic emission with constant luminosity, (ii) (e.g. from Wien’s law), (iii) star X is more luminous than the Sun (greater total emitted power).
Background Concept
There are two key ideas here:
- Inverse-square spreading of radiation
If a source has luminosity (total power output), then at distance this power is spread over a sphere of area . The radiant flux intensity (power per unit area) is
So if is constant, then .
- Black-body spectra and temperature
For a (roughly) black-body emitter:
- Wien’s law: tells you the temperature from the peak wavelength.
- The total emitted power (luminosity) relates to surface area and temperature via Stefan–Boltzmann:
Also, if you compare two emission curves vs (rate of emission against wavelength), the area under the curve is proportional to the total emitted power.
Understanding the Question
You are given two graphs:
- Fig. 9.1: plotted against for star X.
- Fig. 9.2: spectral emission curves ( vs ) for star X and the Sun.
You must state three conclusions about star X that are supported by these graphs. These can be qualitative (e.g. “hotter than the Sun”) or quantitative (e.g. “”).
Approach
Pick conclusions that come directly from:
- The straight-line vs trend (inverse-square law, constant luminosity, isotropic emission).
- The peak wavelength shift (use Wien to compare/compute temperature).
- The overall size of the emission curve (compare total emitted power/luminosity).
Step-by-Step Reasoning
Conclusion from Fig. 9.1 (inverse square)
- The graph is a straight line through the origin when plotting against .
- That means
- This matches the theoretical law
So it is reasonable to conclude star X behaves like an isotropic radiator with constant luminosity (at least over the distances used).
Conclusion from Fig. 9.2 (temperature from peak wavelength)
- Star X peaks at a shorter wavelength than the Sun.
- By Wien’s displacement law,
shorter implies higher .
If you estimate from the graph (for example, about ), then
Even without calculation, the direction is clear: .
Conclusion from Fig. 9.2 (luminosity/total power)
- The curve for star X is higher (larger peak) and overall encloses a larger area than the Sun’s curve.
- Since the graph is rate of emission against , the total emitted power is proportional to the integral (area):
So star X has greater total power output (greater luminosity) than the Sun.
(If you want to go further: with Stefan–Boltzmann, a larger luminosity combined with a larger tells you something about radius , but without reliable numerical ratios from the graphs, the safest credited conclusion is simply “more luminous”.)
Key Takeaways
- A straight line of vs through the origin is strong evidence for an inverse-square relationship .
- Shorter peak wavelength higher surface temperature (Wien’s law).
- Larger area under the emission curve larger luminosity (total power output).
Common Mistakes
- Confusing (flux received) with (power emitted): depends on distance; does not.
- Using incorrectly (choosing a non-peak point on the curve).
- Claiming a definite radius for star X without enough numerical information.
Things to Be Careful About
- Read from the peak of the curve, and convert the axis scale correctly (here ).
- If you give a quantitative temperature, it should be consistent with your read-off of .
- For “three conclusions”, make them distinct (e.g. inverse-square behaviour, higher temperature, higher luminosity) rather than repeating the same idea in different words.
Star X is in a galaxy that is moving away from the Earth.
Suggest, with a reason, how the line for star X in Fig. 9.2 would appear differently if it had been obtained from data measured on the Earth.
Answer
The spectrum for star X would be shifted to longer wavelengths (peak at larger ), i.e. redshifted, because the galaxy is moving away from Earth (Doppler / cosmological redshift).
Shifted to longer wavelengths (redshifted peak), due to recession (Doppler/cosmological redshift).
Background Concept
When a light source is moving away from an observer, the observed wavelength increases. This is redshift. For relatively small speeds, the Doppler idea is that recession stretches the wave, giving a larger wavelength:
In cosmology, an overall redshift also occurs due to the expansion of space, but the key observable effect is the same: spectral features shift to longer wavelengths.
Understanding the Question
Fig. 9.2 shows vs for star X as it would be at the source (or equivalently, without considering recession effects). The question asks how the line (curve) for star X would look if it were instead obtained from measurements made on Earth, given the galaxy is moving away.
So we must describe the appearance of the curve (its position on the wavelength axis) and give the reason.
Approach
Use the definition of redshift: recession increases observed wavelength. For a continuous spectrum, that means the whole curve shifts right (towards larger ), including the position of the peak.
Step-by-Step Reasoning
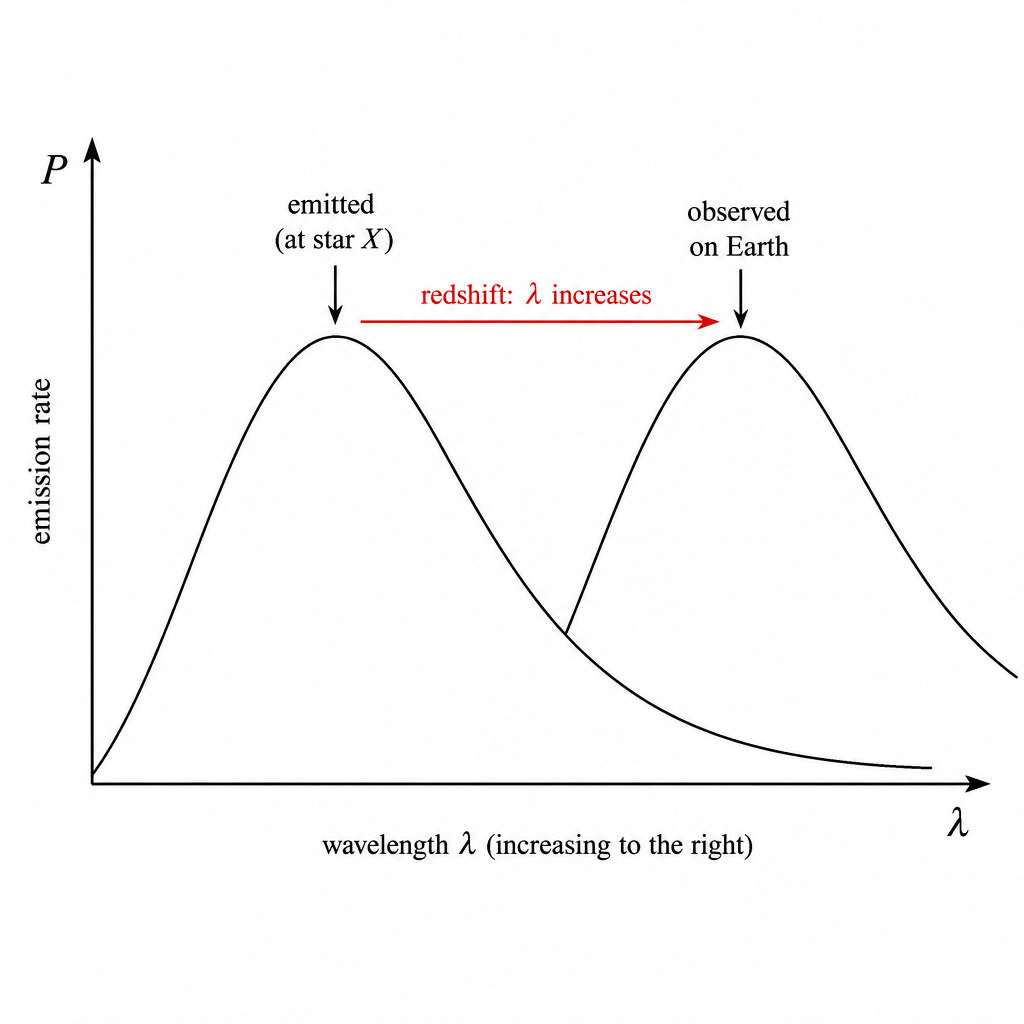
- Star X emits a spectrum with a peak at some emitted wavelength .
- Because the galaxy is receding, every wavelength is observed as a larger wavelength:
(where is the redshift).
3. Therefore the entire vs curve is displaced to the right: the peak appears at
That is exactly what “redshifted” means.
Key Takeaways
- Recession causes redshift: observed wavelengths are longer.
- For a whole spectrum, the peak and all features shift to the right on a axis.
Common Mistakes
- Saying the curve shifts to shorter wavelength (that would be blueshift, for an approaching source).
- Only mentioning “spectral lines” without linking it to the black-body curve shown.
Things to Be Careful About
- The question asks how the curve would appear differently: the key mark is the direction of shift on the wavelength axis.
- Keep the reason explicit: “moving away” redshift (Doppler/cosmological).
Answer
Specific acoustic impedance is the product of the density and the speed of sound in the medium:
Specific acoustic impedance is Z = ρc (product of density and speed of sound in the medium).
Background Concept
When a sound (or ultrasound) wave travels through a medium, it involves oscillations of pressure and particle motion. A useful material property that characterises how “resistant” a medium is to these oscillations is the specific acoustic impedance.
For a plane progressive wave in a material,
where:
- is the density of the medium (in ),
- is the speed of sound in the medium (in ),
- has units .
(Equivalent statement: is the ratio of acoustic pressure to particle velocity in the wave.)
Understanding the Question
You are asked to define specific acoustic impedance. For full credit, you should state what it is and give the standard defining relation.
Approach
Provide the accepted definition used in ultrasound physics: state that it depends on the medium, and write (and optionally mention the ratio form).
Step-by-Step Reasoning
- Identify the key quantities that set impedance for sound waves in a medium: density and speed of sound .
- Write the defining equation:
This matches the standard A Level definition and the units given in the question table.
Key Takeaways
- Specific acoustic impedance is a material property.
- It is given by (units ).
Common Mistakes
- Giving only units or only words without the equation.
- Confusing impedance with intensity or attenuation.
- Writing (incorrect relationship).
Things to Be Careful About
- Ensure the symbol is clear: is impedance, is density, is speed of sound.
- Use the correct SI-derived units (as in the table): .
Answer
Ultrasound incident on the crystal causes it to compress and expand (vibrate) at the wave frequency. By the piezoelectric effect this produces an alternating p.d. (charge separation) across the crystal faces, which is detected as an electrical signal.
Ultrasound makes the crystal vibrate (compress/expand), and the piezoelectric effect produces an alternating p.d./charge across it that is detected as an electrical signal.
Background Concept
A piezoelectric crystal converts between mechanical deformation and electrical signals:
- Direct piezoelectric effect (detection): applying stress/strain to the crystal causes charge separation, producing a p.d.
- Inverse piezoelectric effect (generation): applying an alternating p.d. makes the crystal vibrate and emit ultrasound.
In ultrasound detection, the incoming wave is a sequence of compressions and rarefactions (pressure variations). These exert a rapidly varying force on the crystal.
Understanding the Question
The question asks how ultrasound waves are detected by the crystal. So you must describe the chain:
- ultrasound pressure variations → 2) crystal deformation/vibration → 3) electrical output (p.d./charge) → 4) signal measured.
Approach
State that the ultrasound causes alternating compression/expansion of the crystal, and then invoke the direct piezoelectric effect to say an alternating p.d. is produced that can be amplified/recorded.
Step-by-Step Reasoning
- An ultrasound wave arriving at the crystal produces alternating high and low pressures at its surface.
- These pressure changes apply an alternating stress, so the crystal is repeatedly compressed and allowed to expand (it vibrates at the ultrasound frequency).
- In a piezoelectric material, mechanical strain causes separation of charge within the crystal lattice.
- Therefore an alternating potential difference appears across the electrodes on the crystal faces.
- This alternating voltage is taken as the detected signal (often sent to an amplifier and processing electronics).
Key Takeaways
- Detection uses the direct piezoelectric effect.
- Ultrasound pressure variations cause crystal deformation, producing an a.c. voltage at the same frequency.
Common Mistakes
- Describing only ultrasound generation (applying an a.c. voltage) instead of detection.
- Saying the crystal “detects intensity” without mentioning conversion to an electrical signal.
- Forgetting that the output is alternating (not steady d.c.).
Things to Be Careful About
- Use correct causality: wave → deformation → charge/p.d.
- Mention a measurable electrical quantity (p.d. / voltage / charge) to secure the mark.
Table 10.1 shows the specific acoustic impedance for body tissue, water and steel.
Table 10.1
| material | |
|---|---|
| body tissue | |
| water | |
| steel |
Calculate the intensity reflection coefficient for ultrasound incident on a water–steel boundary.
intensity reflection coefficient = ______
Working
For normal incidence,
Answer
Intensity reflection coefficient .
0.86
Background Concept
When a wave reaches a boundary between two media, part of the wave is reflected and part is transmitted. For ultrasound at normal incidence, the fraction of intensity reflected depends on the mismatch of specific acoustic impedances.
The intensity reflection coefficient is
where and are the specific acoustic impedances of the two media. The square appears because intensity is proportional to (wave amplitude).
Understanding the Question
You are given values for water and steel and asked for the intensity reflection coefficient for ultrasound incident on a water–steel boundary. That means:
- take ,
- take ,
- substitute into the formula for .
Approach
Use the standard boundary formula for at normal incidence. Compute the ratio of difference to sum, then square it, and finally round sensibly (typically to 2 s.f.).
Step-by-Step Reasoning
- Write the formula:
- Substitute the given impedances:
- Evaluate difference and sum:
- Form the ratio and square:
So about of the incident intensity is reflected at a water–steel boundary (very large mismatch).
Key Takeaways
- Reflection is large when there is a large impedance mismatch.
- Use
for normal incidence.
Common Mistakes
- Forgetting to square the ratio (giving the amplitude reflection coefficient instead of intensity).
- Swapping in the wrong values (e.g. using tissue instead of water).
- Arithmetic slips with powers of ten (keeping everything in standard form helps).
Things to Be Careful About
- is a ratio, so it has no unit and must be between and .
- Rounding: keep enough digits during calculation, round at the end (e.g. to 2 s.f.).
Explain, without calculation, what is likely to happen when ultrasound is incident on a body tissue–water boundary.
Answer
The impedances of body tissue and water are very similar, so only a small fraction of the ultrasound intensity is reflected at the boundary and most of the ultrasound is transmitted into the water.
Very little reflection; most ultrasound is transmitted.
Background Concept
At a boundary, reflection depends mainly on the mismatch between the two specific acoustic impedances:
- If and are very different, reflection is large.
- If and are close, reflection is small and transmission is large.
This is why coupling gel (with impedance similar to tissue) is used in ultrasound scanning: it reduces reflections at the skin boundary and lets more ultrasound enter the body.
Understanding the Question
You are told (in the table) that:
The question asks what is likely to happen when ultrasound hits a tissue–water boundary, without calculation. So you should compare the impedances qualitatively.
Approach
Compare values: since they are close, conclude that the reflection coefficient is small and transmission is large. State the physical outcome in words.
Step-by-Step Reasoning
- Look at the impedances: and differ by only a small fraction.
- Small impedance mismatch means the ratio
is small.
3. Since intensity reflection is proportional to the square of that ratio, the reflected intensity fraction is even smaller.
4. Therefore, only a small amount of the ultrasound is reflected; most continues through into the other medium.
Key Takeaways
- Similar impedances (\Rightarrow) good transmission, little reflection.
- Large mismatches (e.g. tissue–air, water–steel) cause strong reflections.
Common Mistakes
- Claiming “most is reflected” just because there is a boundary (reflection depends on impedance mismatch, not just the existence of a boundary).
- Confusing reflection with absorption/attenuation inside a material.
Things to Be Careful About
- The question says “without calculation”: you should not attempt to compute ; a clear comparison of the sizes of is enough.
- Use language that matches what represents: “small fraction of intensity reflected” and “most transmitted.”