Physics 9702/42 — February/March 2024
Cambridge A-Level · A Level Structured Questions · worked solutions for every part, with the mark scheme
Topics Motion in a Circle · Magnetic Fields · Gravitational Fields · Thermodynamics · Ideal Gases · Temperature · +8 more
Answer
Gravitational potential is defined to be zero at infinity.
Since gravity is attractive, work must be done to move a unit mass from near the point mass out to infinity, so the potential energy per unit mass at finite is less than zero. Hence near the mass is negative.
Gravitational potential is negative near a point mass because it is defined as zero at infinity and work is required to move unit mass to infinity against the attractive force, so the potential at finite r is less than zero.
Background Concept
Gravitational potential at a point is defined as the work done per unit mass by an external agent in bringing a small test mass from infinity to that point (with no change in kinetic energy). In equations,
A standard reference choice is at . This is a choice of zero level, like choosing where to measure height from.
For an attractive force such as gravity, the gravitational force on a test mass points towards the mass. If you move the test mass outwards (away from the mass), you must do positive work against this force.
Understanding the Question
The question asks specifically about the sign of gravitational potential near a point mass, i.e. why the values come out negative rather than positive.
You must connect:
- the reference point ( at infinity), and
- the fact gravity is attractive (so moving away requires energy input).
Approach
Use the definition of potential with the conventional zero at infinity. Consider moving a unit mass from distance to infinity: if an external agent must do positive work to reach infinity, then the potential at must be below the zero level at infinity, i.e. negative.
Step-by-Step Reasoning
- Take the standard reference:
-
Gravity is attractive, so a test mass at distance experiences a force towards the mass.
-
To take the mass from out to infinity slowly (no gain in kinetic energy), an external agent must apply an outward force and do positive work.
-
If going from to requires positive external work per unit mass, then going from to would require negative external work per unit mass (the field does work on the mass). Therefore,
So gravitational potential near the mass is negative.
Key Takeaways
- is defined relative to a chosen zero, usually at infinity.
- Because gravity is attractive, the potential at finite distance is below this reference and so is negative.
Common Mistakes
- Saying “it is negative because gravity is attractive” without mentioning the reference level at infinity.
- Confusing gravitational potential (J kg) with gravitational potential energy (J). The sign argument is the same, but units differ.
Things to Be Careful About
- The negativity is not because energy is “less than nothing” in an absolute sense; it is because of the chosen zero at infinity.
- Always link sign to work done against the field and the direction of the gravitational force.
A planet may be assumed to be a uniform sphere. It has gravitational potential at distance from the centre of the planet.
The variation with of is shown in Fig. 1.1.
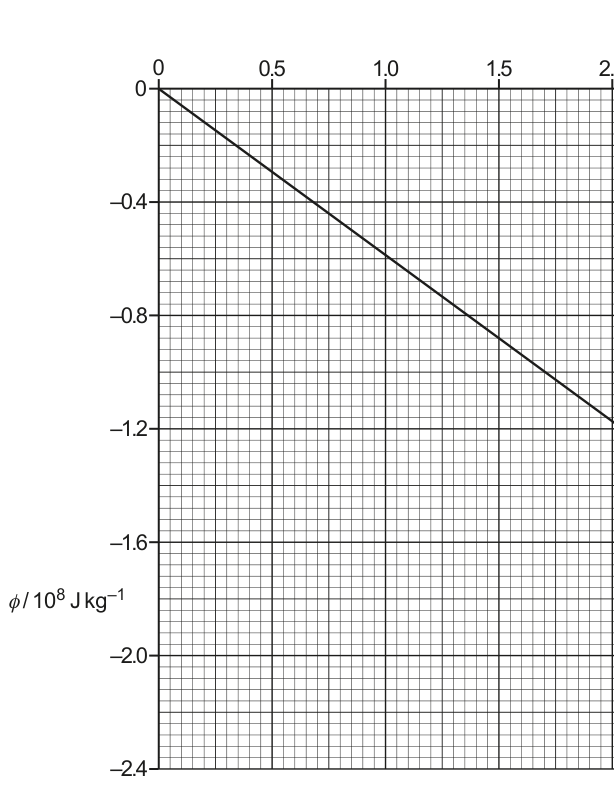
Working
Outside the planet,
So a graph of against has gradient .
From Fig. 1.1, using the origin and a point on the line (e.g. , ):
Hence
Answer
8.8 × 10^25 kg
Background Concept
For a spherically symmetric mass (such as a uniform spherical planet), the gravitational field and potential outside the sphere are the same as if all the mass were concentrated at the centre.
The gravitational potential due to a point (or spherically symmetric) mass at distance is
This is potential energy per unit mass (units: J kg). If you plot against you expect a straight line through the origin with gradient .
Understanding the Question
You are given a straight-line graph of versus (with scaled axes). You must use the gradient of this line to find , then divide by to find .
Key clues:
- straight line through the origin implies ;
- the known theoretical form is .
Approach
- Write .
- Compare with the straight-line form where and .
- Read two points on the line to get the gradient.
- Convert from the axis scales to real units.
- Use to obtain .
Step-by-Step Reasoning
- Start from:
So if we let and , then
meaning the gradient is .
-
Use two points on the drawn best-fit line. The axes are labelled and , so you must multiply the plotted values by the scale factors to get in J kg and in m.
-
Example using a point near the end of the line (any accurate read from the line is acceptable):
- plotted: so
- plotted: so
- Gradient:
- Set so:
- Divide by :
Key Takeaways
- Outside a spherical planet, .
- A vs graph has gradient .
- Always apply axis scale factors before computing gradients.
Common Mistakes
- Using the plotted numbers directly without multiplying by and .
- Taking the gradient as instead of .
- Forgetting the minus sign and concluding is negative (instead, the gradient is negative because is negative).
Things to Be Careful About
- Choose two well-separated points on the best-fit line (reduces percentage uncertainty in gradient).
- Check units: gradient of (J kg) vs (m) has units J kg m, which matches .
- Small differences in read-off can slightly change ; exam marking usually allows for reading tolerance.
The period of rotation of the planet is 0.72 Earth days.
A satellite in orbit around the planet remains above the same point on the surface of the planet.
Use the mass of the planet in (b)(i) to determine the radius of the orbit of the satellite.
= ______
Working
Geostationary orbit: orbital period equals planet rotation period.
For a circular orbit,
so
With , :
Answer
8.3 × 10^7 m
Background Concept
A satellite that remains above the same point on a rotating planet is in a geostationary (more generally, synchronous) orbit. That requires its orbital period to match the planet’s rotation period.
For a circular orbit of radius around mass , gravity provides the centripetal force:
This leads to an expression for the orbital period:
or equivalently
Understanding the Question
You are told:
- the planet’s rotation period is Earth days,
- a satellite stays over the same point on the surface (so ),
- use the planet’s mass from (b)(i).
You must find the orbital radius (distance from the planet’s centre).
Approach
- Convert days into seconds.
- Use the circular-orbit period formula and rearrange for .
- Substitute , , and .
Step-by-Step Reasoning
- Convert period to SI:
- Start from
Rearrange:
so
- Substitute and :
- Evaluate:
Key Takeaways
- Geostationary condition: .
- Circular orbit gives .
- Use SI units throughout before substituting.
Common Mistakes
- Forgetting to convert days to seconds.
- Using the planet’s radius instead of orbital radius from the centre.
- Using but forgetting the factor .
Things to Be Careful About
- here is measured from the centre of the planet.
- Keep enough significant figures through intermediate steps; round at the end.
- The relationship assumes a circular orbit and that the satellite’s mass is negligible compared with the planet.
The speed of the satellite in (b)(ii) is . The mass of the satellite is .
Determine the additional energy required to move the satellite from its orbit to infinity.
energy required = ______
Working
At infinity: .
For a circular orbit,
so the energy required to reach infinity is
Answer
energy required
4.2 × 10^10 J
Background Concept
For a mass in a circular gravitational orbit of radius around a planet of mass :
- Gravitational potential energy:
- Orbital speed comes from gravity providing centripetal force:
- Kinetic energy:
So the total mechanical energy in the circular orbit is
At infinity (taking the usual reference), . If the satellite just reaches infinity and comes to rest, then as well, so total energy is .
Therefore energy that must be supplied to go from orbit to infinity is
and since , the required energy equals the satellite’s orbital kinetic energy.
Understanding the Question
You are given the satellite’s orbital speed and mass . You must find the additional energy needed to move it from that orbit to infinity (where ).
This is essentially an “escape energy from orbit” calculation.
Approach
Use orbital energy:
- Either compute using from (ii),
- or use the equivalent result (simplest here because is given).
Step-by-Step Reasoning
- Energy needed is
- Substitute , :
- Round suitably:
Key Takeaways
- For a circular orbit, .
- The energy to escape to infinity (ending with zero speed) equals .
- Conveniently, for a circular orbit.
Common Mistakes
- Using only the potential energy change (that would ignore the initial kinetic energy).
- Using instead of .
- Forgetting that the final total energy at infinity is taken as zero.
Things to Be Careful About
- This result applies to a circular orbit. The equality depends on that.
- Ensure the final condition is “to infinity” with zero speed; if non-zero final speed were required, you would add extra kinetic energy.
- Keep units consistent: , give .
By referring to both kinetic energy and potential energy, explain what is meant by the internal energy of an ideal gas.
Answer
Internal energy is the total (random) molecular kinetic energy plus the molecular potential energy.
For an ideal gas the intermolecular forces are negligible, so the potential energy is constant (taken as zero) and the internal energy is due to the random kinetic energy of the molecules only.
Internal energy = total random molecular kinetic + potential energy; for an ideal gas, potential energy is constant/negligible so internal energy depends only on random molecular kinetic energy.
Background Concept
The internal energy of a substance is the energy associated with the microscopic motion and interactions of its particles. In general,
- it includes random kinetic energy of particles (translational, and possibly rotational/vibrational), and
- it includes potential energy due to intermolecular forces (because molecules attract/repel each other).
For an ideal gas, one key assumption is that the molecules exert no intermolecular forces on each other except during collisions. That means there is no significant stored intermolecular potential energy that changes with separation; effectively the potential energy can be treated as constant.
Understanding the Question
You are asked to explain what “internal energy of an ideal gas” means, specifically mentioning kinetic energy and potential energy. So you must:
- state what internal energy is in general, and
- state what changes for an ideal gas.
Approach
- Start with the general definition: sum of random kinetic + potential energies of molecules.
- Then apply the ideal-gas assumption: negligible intermolecular forces potential energy is constant/negligible.
- Conclude: internal energy of an ideal gas is due to random kinetic energy only (and so depends on temperature only).
Step-by-Step Reasoning
- General statement: internal energy is the total microscopic energy of the molecules:
- random kinetic energy (due to random motion), and
- potential energy (due to intermolecular forces).
- Ideal gas condition: molecules are treated as not interacting (except collisions), so their intermolecular potential energy does not change; it is taken as zero or constant.
- Therefore, for an ideal gas, is the total random kinetic energy of the molecules.
Key Takeaways
- Internal energy is a microscopic energy store.
- For an ideal gas, changing means changing molecular kinetic energy, so depends only on .
Common Mistakes
- Saying “internal energy is kinetic energy only” without first mentioning the general kinetic + potential definition.
- Confusing internal energy with “heat” (thermal energy transfer) or “temperature”.
- Claiming the ideal gas has no potential energy rather than “potential energy is constant/negligible”.
Things to Be Careful About
- The question explicitly demands reference to both kinetic and potential energy.
- Use the correct ideal-gas justification: negligible intermolecular forces.
A fixed mass of an ideal gas at a temperature of is sealed in a cylinder by a piston, as shown in Fig. 2.1.
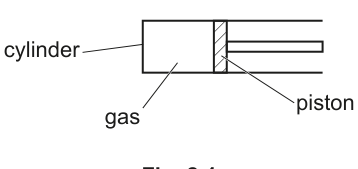
The initial volume of the gas is .
Thermal energy is supplied to the gas and its volume increases by .
The piston is freely moving so that the gas is always at atmospheric pressure.
Atmospheric pressure is .
Calculate the work done by the gas.
work done by gas = ______
Working
At constant pressure,
Answer
5.25 J
Background Concept
When a gas expands against an external pressure, it does work on its surroundings. For a quasistatic expansion at constant pressure ,
where:
- is the work done by the gas (in joules, J),
- is the pressure (in pascals, Pa),
- is the increase in volume (in ).
(For a freely moving piston open to the atmosphere, the gas pressure stays equal to atmospheric pressure, so is constant.)
Understanding the Question
The piston moves freely, so the gas always remains at atmospheric pressure . The volume increase is . You are asked for the work done by the gas during this expansion.
Approach
Because the pressure is constant, use and substitute the given values directly (they are already in SI units).
Step-by-Step Reasoning
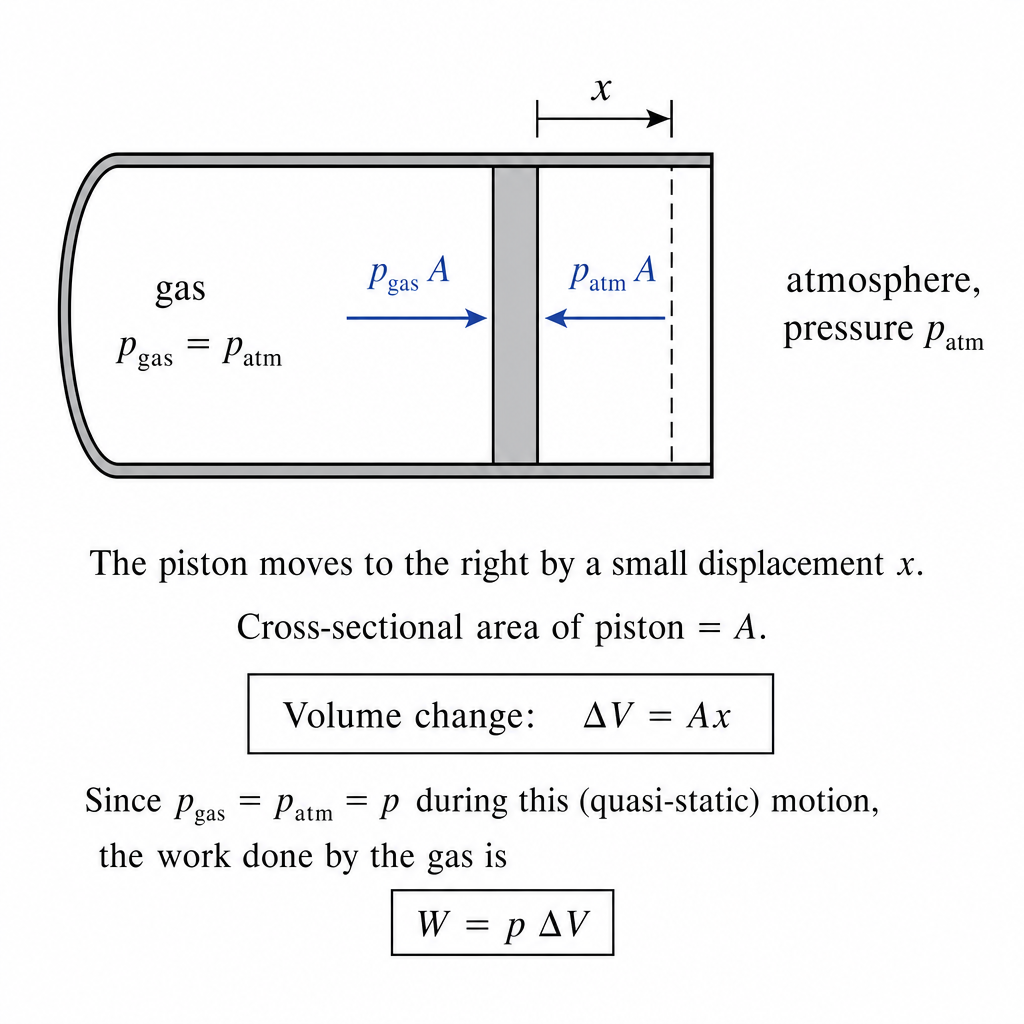
- Constant pressure implies the work is
- Substitute:
- Multiply powers of ten and numbers:
Key Takeaways
- For constant pressure processes, work is the simple area under a - graph: .
- Ensure is in Pa and in so that .
Common Mistakes
- Using the final volume instead of the change in volume.
- Mixing up work done by the gas vs work done on the gas (sign convention).
- Converting units unnecessarily and making a power-of-ten error.
Things to Be Careful About
- The piston is “freely moving” specifically to signal constant pressure.
- Quote to 2–3 significant figures to match given data (here 3 s.f.).
Working
Initial temperature:
Final volume:
At constant and fixed mass, , so
Answer
416 K
Background Concept
The ideal gas equation is
where is pressure, is volume, is amount of gas (moles), is the gas constant, and is thermodynamic temperature in kelvin.
If the mass (so ) is fixed and the piston moves freely so stays constant, then
So a volume ratio directly gives a temperature ratio.
Understanding the Question
Given:
- initial temperature (must convert to K),
- initial volume ,
- volume increase ,
- piston is freely moving so pressure is constant.
Find the final temperature in kelvin.
Approach
- Convert to kelvin.
- Find the final volume .
- Use constant at constant and fixed :
Step-by-Step Reasoning
- Convert to kelvin:
- Final volume:
- Apply :
- Substitute:
Key Takeaways
- Always use kelvin in gas-law calculations.
- With constant and fixed mass, temperature changes in the same ratio as volume.
Common Mistakes
- Using or in the formula (forgetting to add 273).
- Using instead of in the ratio.
- Assuming constant (that would be constant temperature, not constant pressure).
Things to Be Careful About
- Keep the powers of ten consistent; here they cancel in the ratio, but only if you form it correctly.
- Give the final answer to 3 s.f. to match the data.
The mass of the gas is . For this expansion, there is a net transfer of of thermal energy to the gas.
Calculate the specific heat capacity of the gas at this pressure.
= ______
Working
Mass:
Temperature rise:
Using at this pressure:
Answer
4.88 × 10^2 J kg^-1 K^-1
Background Concept
The specific heat capacity is defined by
where:
- is the thermal energy transferred (J),
- is mass (kg),
- is temperature change (K),
- is in .
At constant pressure, the thermal energy supplied to a gas goes into:
- increasing internal energy (raising molecular kinetic energy), and
- doing work as the gas expands.
That is why, physically, the constant-pressure heat capacity is larger than the constant-volume one (developed further in part (c)). In this part you are simply asked to calculate for the given constant-pressure process using the provided .
Understanding the Question
From part (b), the gas has been heated from () to the final temperature found in (b)(ii) (). During this expansion, the net thermal energy transferred to the gas is and the mass is .
You must find for this process (constant atmospheric pressure).
Approach
- Convert mass to kg.
- Compute using the initial and final temperatures.
- Rearrange to and substitute.
Step-by-Step Reasoning
- Convert mass:
- Temperature rise:
(Temperature differences are the same in K and in , but you must use kelvin values consistently.)
- Compute :
- Evaluate the denominator:
so
Key Takeaways
- Use with in kg and in K.
- For constant pressure heating, includes energy for both and expansion work.
Common Mistakes
- Using or directly without converting to kg.
- Using or instead of the difference.
- Mixing Celsius and kelvin in a way that changes the temperature difference.
Things to Be Careful About
- Use the final temperature from part (b)(ii), not a re-calculated or rounded intermediate that changes significantly.
- Quote units correctly as and give a sensible number of significant figures.
The gas in (b) is allowed to return to its starting temperature. The piston is now fixed in position.
Thermal energy is supplied to increase the temperature to the same final temperature as in (b).
Use the first law of thermodynamics to suggest and explain how the specific heat capacity of the gas for this situation compares with the value in (b)(iii).
Answer
With the piston fixed, so
From the first law, for the same temperature rise is the same, but:
- in (b) (constant pressure) some energy is used to do work, so ,
- here (constant volume) .
Therefore less thermal energy is needed for the same , so the specific heat capacity is smaller than in (b)(iii) (i.e. ).
Specific heat capacity is smaller than in (b)(iii) (constant volume: W = 0 so less energy needed for same ΔT; cV < cP).
Background Concept
The first law of thermodynamics (Cambridge convention) is
where:
- is the change in internal energy of the system,
- is the thermal energy transferred to the system,
- is the work done on the system.
If we instead talk about work done by the gas (), then and the first law is often written as
For a constant-volume process, so boundary work is zero:
Specific heat capacity depends on the constraint:
- At constant pressure: .
- At constant volume: .
Understanding the Question
You compare two ways of heating the same gas through the same temperature rise (from the starting temperature back up to the same final temperature found in (b)):
- In (b): piston free (constant pressure), so the gas expands and does work.
- Now: piston fixed (constant volume), so no expansion work is done.
You must use the first law to state how the specific heat capacity in the fixed-volume case compares with that in (b)(iii), and explain why.
Approach
- Identify that fixed piston means no work done.
- Use the first law to argue how the supplied heat differs between the two processes for the same .
- Relate to to compare the heat capacities.
Step-by-Step Reasoning
- Constant volume implies no work:
-
For the same gas and the same temperature increase, the change in internal energy is the same (for an ideal gas, depends only on ).
-
Apply the first law in the form :
- In (b) at constant pressure: because the gas expands, so
- With the piston fixed (constant volume): , so
- Since , for the same and same , a smaller required means a smaller .
Therefore the specific heat capacity at constant volume is less than the value in (b)(iii) (which is at constant pressure):
Key Takeaways
- Fixing the volume removes expansion work.
- At constant pressure, some supplied energy goes into doing work, so more heat is needed per kelvin.
- Hence is greater than .
Common Mistakes
- Saying because volume is fixed (wrong: depends on temperature change).
- Forgetting that the comparison is for the same final temperature (same ).
- Mixing up sign conventions for in the first law; the essential physics is: constant pressure needs extra energy for expansion work.
Things to Be Careful About
- Explicitly state for the fixed piston case to earn the mark.
- Make the comparison clear: smaller heat input needed for same implies smaller specific heat capacity.
A small object of mass rests on a platform. The platform is attached to an oscillator, as shown in Fig. 3.1.
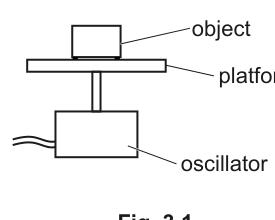
The oscillator moves the platform up and down.
The total energy of the oscillations of the object is .
In one oscillation the object travels a total distance of .
Calculate the angular frequency of the oscillations.
= ______
Working
Total distance in one oscillation .
Total energy for SHM:
Answer
39 rad s^-1
Background Concept
For simple harmonic motion (SHM), the total mechanical energy of the oscillating mass is constant (if we neglect damping). It can be written in terms of the amplitude and angular frequency as
This comes from the maximum kinetic energy (at the equilibrium position) or the maximum potential energy (at the turning points). The key idea is that the energy depends on both how far it oscillates (the amplitude) and how “fast” the oscillation is (via ).
Understanding the Question
You are told:
- mass
- total energy
- in one full oscillation, the object travels a total distance of
You must calculate the angular frequency .
The travel distance clue is how to find the amplitude .
Approach
- Convert the stated “total distance travelled in one oscillation” into amplitude .
- Substitute , , and into
and rearrange for .
Step-by-Step Reasoning
1) Convert distance per cycle to amplitude
In one complete cycle, the object moves:
- from to : distance
- then from back to : distance
So total distance in one cycle is .
2) Use the SHM energy equation
Rearrange:
Substitute values:
So .
Key Takeaways
- In SHM, total distance travelled in one full cycle is .
- Total energy in SHM is .
- Always convert mm to m and g to kg before substitution.
Common Mistakes
- Using instead of for the distance in one full oscillation.
- Forgetting unit conversions (e.g. using directly).
- Rearranging incorrectly (e.g. missing the square root for ).
Things to Be Careful About
- must be in metres for SI consistency.
- Quote in .
- Significant figures: energy is given to 2 s.f., so should be about 2 s.f. as well.
The frequency of the oscillator is fixed, and the amplitude of the oscillations is gradually increased.
Calculate the maximum amplitude of the oscillations so the object does not lose contact with the platform.
amplitude = ______
Working
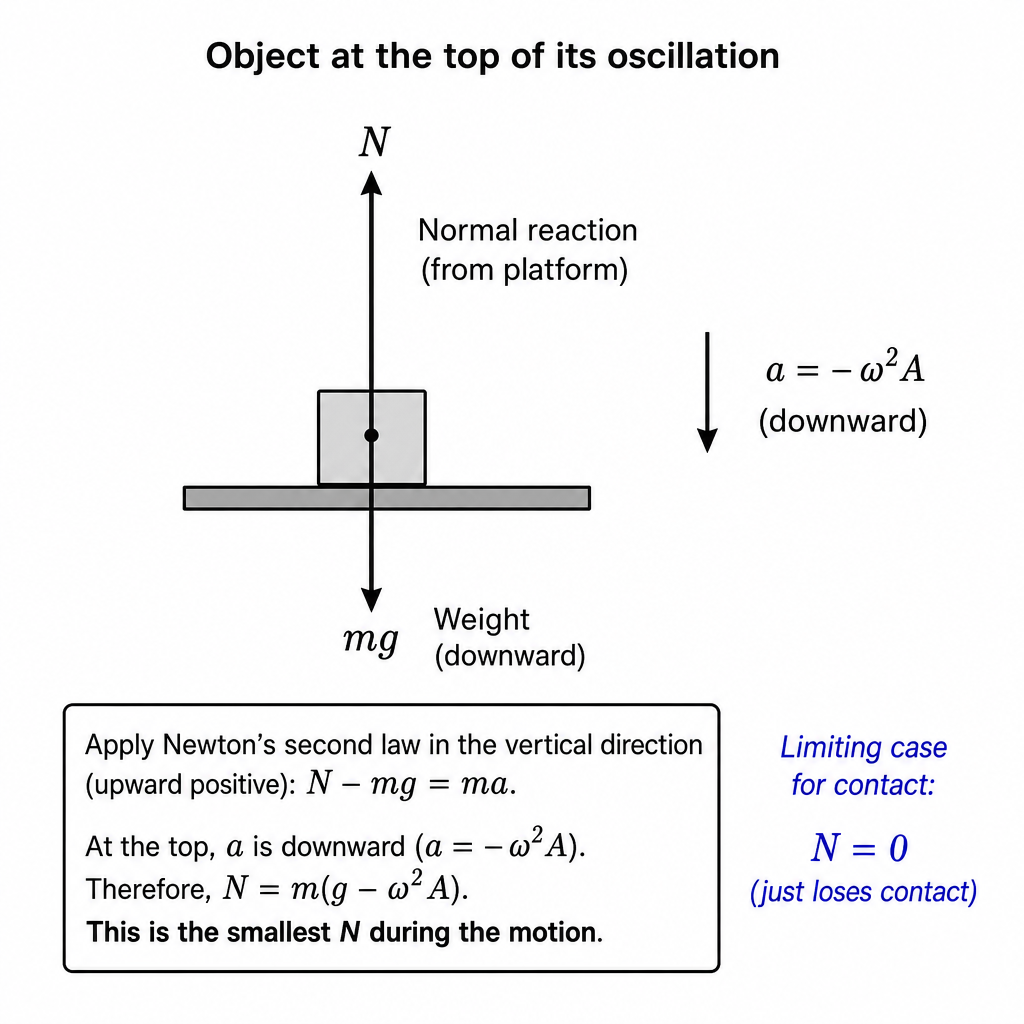
For the object (upward positive):
At the top of the motion, so
Minimum contact is when :
Answer
6.5 × 10^-3 m
Background Concept
An object stays in contact with a moving platform as long as the platform can provide the required normal contact force .
For vertical motion (take upward as positive), Newton’s second law gives
If would need to become negative to keep the object following the platform, contact is impossible (a surface cannot “pull” the object), so the object loses contact at the point where .
For SHM, acceleration relates to displacement from equilibrium by
At the top turning point, and acceleration is most downward: .
Understanding the Question
The frequency (hence ) is fixed at the value found in part (a). You gradually increase amplitude .
You must find the largest amplitude such that the object does not lose contact at any point in the cycle. Loss of contact happens when first reaches zero.
Approach
- Identify where in the SHM the normal reaction is smallest.
- Use and set at the limiting case.
- Use SHM acceleration at that position to solve for .
Step-by-Step Reasoning
The normal reaction is smallest when the platform is accelerating downward most strongly, because then the object would need the least upward push from the platform.
In SHM, maximum downward acceleration occurs at the top of the oscillation ():
Apply Newton’s second law:
At the threshold of losing contact, :
Cancel :
So
Using from (a):
So about (2 s.f.).
Key Takeaways
- Contact is lost when the normal reaction becomes zero.
- In vertical SHM, the most “dangerous” point for contact is the top, where acceleration is maximum downward.
- Limiting condition: .
Common Mistakes
- Using the bottom turning point instead of the top.
- Setting without considering direction/sign.
- Forgetting that loss of contact corresponds to (not ).
Things to Be Careful About
- Use in , not frequency unless you convert via .
- Ensure you use maximum downward acceleration (), not maximum speed.
- State amplitude in metres, not mm.
The amplitude of the oscillations is increased so it is greater than the value in (b)(i).
State and explain the position in an oscillation where the object first loses contact with the platform.
Answer
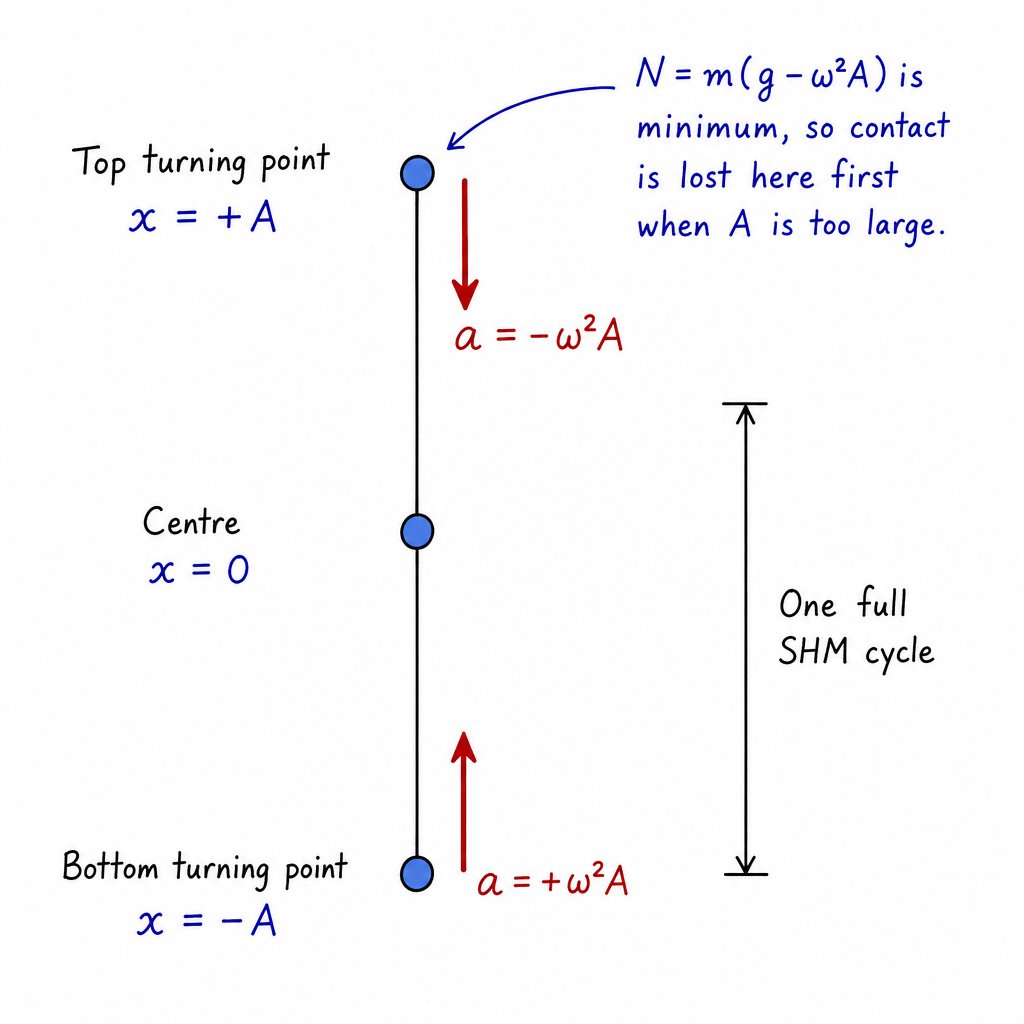
The object first loses contact at the highest point (maximum upward displacement).
At this point the platform has maximum downward acceleration , so
is minimum; when is increased beyond , and contact is lost.
At the top (maximum upward displacement), where downward acceleration is maximum so the normal reaction first becomes zero.
Background Concept
Loss of contact occurs when the normal reaction force becomes zero. Using upward positive:
So is smallest when the acceleration is most negative (largest downward acceleration).
In SHM,
so acceleration is downward (negative) when displacement is upward (positive), and its magnitude is largest at the turning points where .
Understanding the Question
You have increased the amplitude beyond the safe maximum found in (b)(i). The platform still oscillates at the same fixed .
You must state where in the cycle contact is first lost, and explain using SHM ideas and forces.
Approach
- Find where is most downward.
- Use to argue where is smallest.
- State that when amplitude is too large, becomes zero first at that position.
Step-by-Step Reasoning
At the top of the oscillation (maximum upward displacement), .
SHM acceleration:
This is the maximum downward acceleration.
Now relate this to contact force:
As you increase , the term increases, so decreases. Therefore the earliest point at which reaches zero is at the top of the motion.
Physically: at the top, the platform is trying to accelerate downward very rapidly. If this required downward acceleration exceeds , gravity alone cannot keep the object following the platform, and the platform would need to pull the object downward (impossible), so they separate.
Key Takeaways
- Loss of contact means .
- is smallest where acceleration is most downward.
- In SHM that occurs at the top turning point ().
Common Mistakes
- Saying it loses contact at the bottom because “it is moving fastest” (speed is irrelevant for contact here; acceleration is what matters).
- Confusing maximum speed (at equilibrium) with maximum acceleration (at turning points).
- Not stating the physical reason: a surface cannot exert a negative normal force.
Things to Be Careful About
- Always distinguish between displacement and acceleration ; their directions are opposite.
- Be clear that it is the top because acceleration is downward maximum there, not because the object is “lightest” without justification.
Three capacitors are connected as shown in Fig. 4.1.
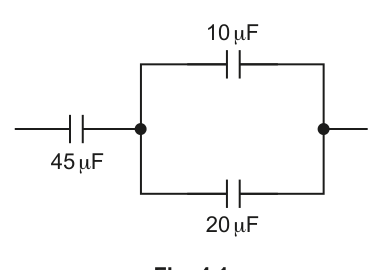
Determine the total capacitance, in , of the network of three capacitors.
capacitance = ______
Working
Parallel pair:
Series with :
Answer
18 μF
Background Concept
Capacitances combine differently depending on connection:
- Parallel (same p.d. across each):
- Series (same charge on each):
Understanding the Question
The diagram shows a capacitor in series with a parallel pair of and . You must find the single equivalent capacitance of the whole network.
Approach
- Replace the two parallel capacitors with one equivalent capacitor using addition.
- Replace the resulting series pair with one equivalent capacitor using the reciprocal formula.
Step-by-Step Reasoning
- For the parallel section:
- Now is in series with :
Use a common denominator ():
So
Key Takeaways
- Parallel capacitances add directly.
- Series capacitances add as reciprocals.
- Reduce networks step-by-step by spotting simple series/parallel groups.
Common Mistakes
- Adding all three directly (only valid if all three were in parallel).
- Using the series reciprocal formula on the parallel pair.
- Forgetting to invert at the end when using the series formula.
Things to Be Careful About
- Identify correctly which components share the same two nodes (parallel) and which lie in a single path (series).
- Keep units consistent; here everything is in so the final result can stay in .
A capacitor of capacitance is connected to a variable power supply initially set at .
The output of the power supply increases so that the potential difference (p.d.) across the capacitor increases to .
Calculate the increase in energy stored in the capacitor.
= ______
Working
Answer
6.34 × 10^-4 J
Background Concept
The energy stored in a capacitor is
where is capacitance in farads and is the potential difference across the capacitor.
If the voltage changes while stays constant, the change in stored energy is
Understanding the Question
A single capacitor of capacitance has its p.d. increased from to . The question asks for the increase in stored energy, not the final energy.
Approach
- Convert from to .
- Use .
- Substitute and evaluate, giving the answer in joules.
Step-by-Step Reasoning
Convert capacitance:
Calculate the difference in squares of voltage:
Now compute :
Rounded suitably:
Key Takeaways
- Stored energy depends on , so small voltage changes can noticeably change energy.
- Always convert to in calculations.
Common Mistakes
- Using with (incorrect; must use ).
- Leaving capacitance in and writing the final energy in joules without converting.
- Forgetting the factor of .
Things to Be Careful About
- Square the voltages before subtracting.
- Give the final answer to appropriate significant figures (limited by the voltages, typically 2–3 s.f.).
A sinusoidal a.c. power supply is connected to the input of a bridge rectifier.
The output of the rectifier is connected to a load resistor.
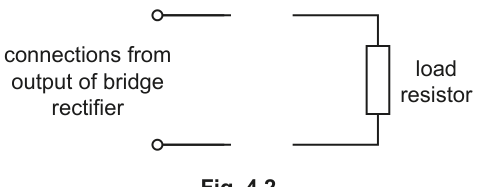
Complete the circuit in Fig. 4.2 by adding a capacitor to smooth the p.d. across the load resistor.
Answer
Connect a capacitor in parallel with the load resistor across the rectifier output terminals.
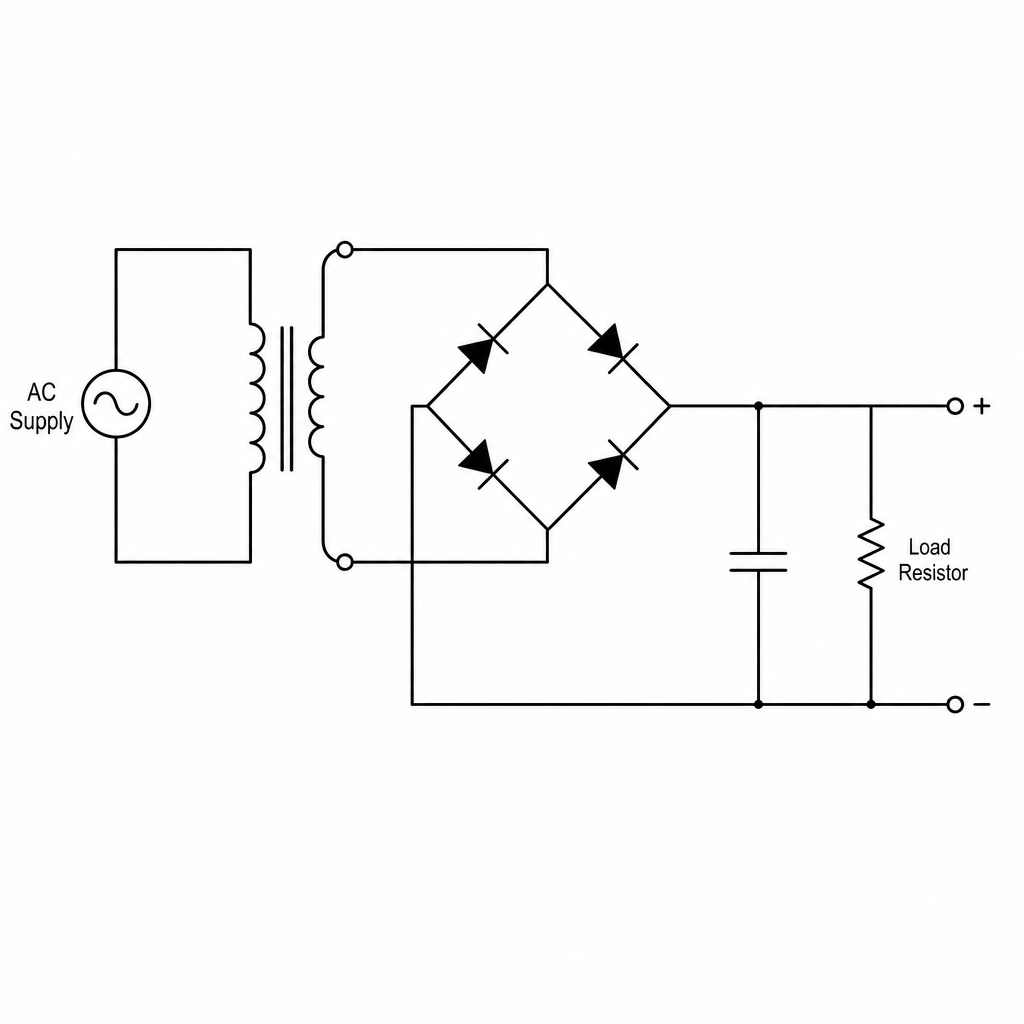
Capacitor in parallel with the load resistor across the rectifier output.
Background Concept
A bridge rectifier makes the output unidirectional, but it is still pulsating (it falls between peaks). A smoothing capacitor is connected across the output so that:
- it charges quickly to (about) the peak voltage when the rectified voltage rises,
- then it discharges through the load when the rectified voltage falls,
keeping the p.d. across the load more nearly constant.
Understanding the Question
The circuit already has the rectifier output connected to a load resistor. You are asked to add one component so that the p.d. across the load is smoother (less ripple).
Approach
To smooth the voltage across the load, the capacitor must be connected across the same two points as the load (so it directly sets/holds the load p.d.). Therefore, place it in parallel with the load resistor, at the rectifier output.
Step-by-Step Reasoning
- Identify the two terminals labelled “connections from output of bridge rectifier”.
- The load resistor is already connected across these terminals.
- Add a capacitor connected between the same two terminals (i.e. across the resistor).
Key Takeaways
- A smoothing capacitor is always placed across the DC output (in parallel with the load).
- Series placement would not hold the output voltage and would block DC after charging.
Common Mistakes
- Putting the capacitor in series with the load resistor.
- Putting the capacitor on the AC input side (before the rectifier).
Things to Be Careful About
- In real circuits an electrolytic capacitor would need correct polarity, but for circuit symbols in exams, simply placing it in parallel across the load earns the mark.
The variation with time of the p.d. of the smoothed output is shown in Fig. 4.3.
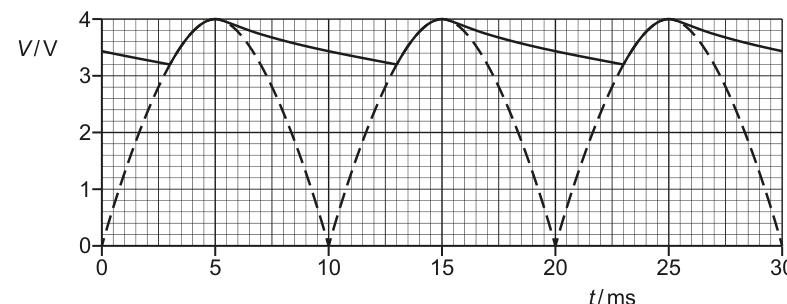
Determine the time constant, in ms, of the smoothing circuit.
time constant = ______
Working
From the graph, between peaks the capacitor discharges from about to about in .
Answer
45 ms
Background Concept
When a smoothing capacitor discharges through a load resistor , the p.d. across it decays exponentially:
where the time constant is
A larger means a slower decay, so the ripple is smaller.
Understanding the Question
You are given a graph of the smoothed output voltage. After each peak, the capacitor voltage falls (discharge) until the next peak recharges it. The time constant can be found by choosing two points on a discharge section and applying the exponential decay relationship.
Approach
- Pick a discharge interval between two consecutive peaks (one “gap” between recharging events).
- Read the initial voltage at the peak and the voltage after a known time .
- Use and rearrange for :
Step-by-Step Reasoning
From the graph:
- Peak voltage .
- Just before the next recharge, voltage .
- Time between peaks for a full-wave rectified supply on a 50 Hz input is , consistent with the peak separation on the graph.
Use the decay equation:
Substitute the read values:
Take natural logs:
So
Key Takeaways
- The smoothing section is an exponential discharge, characterised by .
- Time constant can be extracted from a graph using a voltage ratio and the time between those readings.
Common Mistakes
- Using the total period of the original AC supply ( for 50 Hz) instead of the peak spacing after full-wave rectification ().
- Using a linear drop instead of exponential decay.
- Forgetting the minus sign and getting a negative time constant.
Things to Be Careful About
- Choose points on the smooth discharge curve (not on the dashed rectified waveform).
- Your read-off values may vary slightly; exam marking usually allows a range (answers close to depending on readings).
A sinusoidal a.c. power supply has a maximum power of .
State the value of the mean power when the output of the power supply is:
Answer
8.0 W
Background Concept
For a resistor with a sinusoidal voltage, the instantaneous power varies as
The average value of over a full cycle is , so
With full-wave rectification, the voltage changes sign but the power (proportional to ) depends on and therefore has the same average over time.
Understanding the Question
You are told the maximum power is . You must state the mean power after full-wave rectification.
Approach
Use .
Step-by-Step Reasoning
Key Takeaways
- For a sinusoidal power waveform , mean is half the maximum.
- Full-wave rectification does not change the mean of a -type power variation.
Common Mistakes
- Answering (confusing maximum with mean).
- Halving again for full-wave rectification (it is half-wave rectification that reduces mean further).
Things to Be Careful About
- The question gives maximum power, not peak voltage. Use the given quantity directly with the mean-to-maximum relation for .
Working
For sinusoidal power, mean over a full cycle is .
Half-wave rectified gives zero power for half the time, so mean halves again:
Answer
4.0 W
Background Concept
With a sinusoidal voltage across a resistor, instantaneous power is proportional to , giving a shape:
and the mean over a full cycle is
Half-wave rectification removes one half-cycle completely (voltage is zero there), so the power is also zero for that half of the time.
Understanding the Question
You are told and asked for the mean power after half-wave rectification.
Approach
- Start with the known mean over a full cycle for : .
- Because half-wave rectification gives power only for half the time, halve the mean again.
Step-by-Step Reasoning
Mean over a full cycle if it were present all the time:
But for half-wave rectification, this non-zero power occurs only for half the cycle, so average over the whole time is
Equivalently:
Key Takeaways
- Sinusoidal (or full-wave rectified) power has mean .
- Half-wave rectification reduces mean power by an additional factor of 2 because the signal is zero for half the time.
Common Mistakes
- Giving (forgetting that half the cycle is removed).
- Giving (confusing maximum with mean).
Things to Be Careful About
- The halving for half-wave rectification is a time-duty-factor effect: zero output for half the cycle means half the average power compared with the full-wave case.
An object travels in a circle at constant speed.
State the names of two quantities that vary during the motion of the object.
1 ______
2 ______
Answer
1
2
Velocity; acceleration
Background Concept
In uniform circular motion, the speed (magnitude of velocity) is constant, but the direction of motion continually changes.
Velocity is a vector, so even if its magnitude stays the same, a changing direction means the velocity is changing.
A changing velocity implies an acceleration. For circular motion this acceleration is the centripetal acceleration, directed towards the centre of the circle:
Because , there must also be a resultant (centripetal) force towards the centre:
Understanding the Question
The object moves in a circle at constant speed. The question asks for two quantities that vary during the motion.
The key idea is that vectors can vary even if their magnitudes are constant, because their directions change continuously.
Approach
Pick vector quantities linked to the motion whose direction changes as the object goes around the circle. Common correct choices include velocity, acceleration, momentum, and resultant force.
Step-by-Step Reasoning
- The speed is constant, but the object’s direction of motion changes at every point on the circle.
- Therefore the velocity (a vector) changes.
- Since velocity changes, there is an acceleration (centripetal acceleration) towards the centre.
So two valid answers are velocity and acceleration (others such as momentum or force would also be acceptable).
Key Takeaways
- Constant speed does not mean constant velocity.
- In circular motion, vector directions change continuously, so vectors like velocity and acceleration vary.
Common Mistakes
- Writing speed (does not vary here).
- Writing kinetic energy (also constant because speed is constant).
- Giving only one quantity when two are asked.
Things to Be Careful About
- The question says constant speed, not constant velocity.
- Use vector quantities that genuinely change (usually their direction changes).
A charged particle of mass and with charge enters a region of uniform magnetic field, perpendicular to the field lines. The magnetic flux density is .
The particle travels in a circle with period and radius .
Working
Magnetic force provides centripetal force:
For circular motion,
Substitute:
Answer
B = 2πm/(qT)
Background Concept
A charged particle moving in a magnetic field experiences a magnetic force given by
where is the angle between the velocity and the magnetic field . If the particle enters perpendicular to the field lines, then and , so
When a force is always perpendicular to the velocity, it does no work (so the speed stays constant) but it changes the direction of the velocity, producing circular motion. The required centripetal force is
Also, for uniform circular motion, the speed relates to period by
Understanding the Question
A particle of mass and charge enters a uniform magnetic field perpendicular to the field lines and moves in a circle of radius with period . The task is to show, using the magnetic force, that
So we need to link to by combining the force law with circular-motion formulas.
Approach
- Use (because motion is perpendicular to ).
- Set this equal to the centripetal force .
- Replace using .
- Rearrange to isolate .
Step-by-Step Reasoning
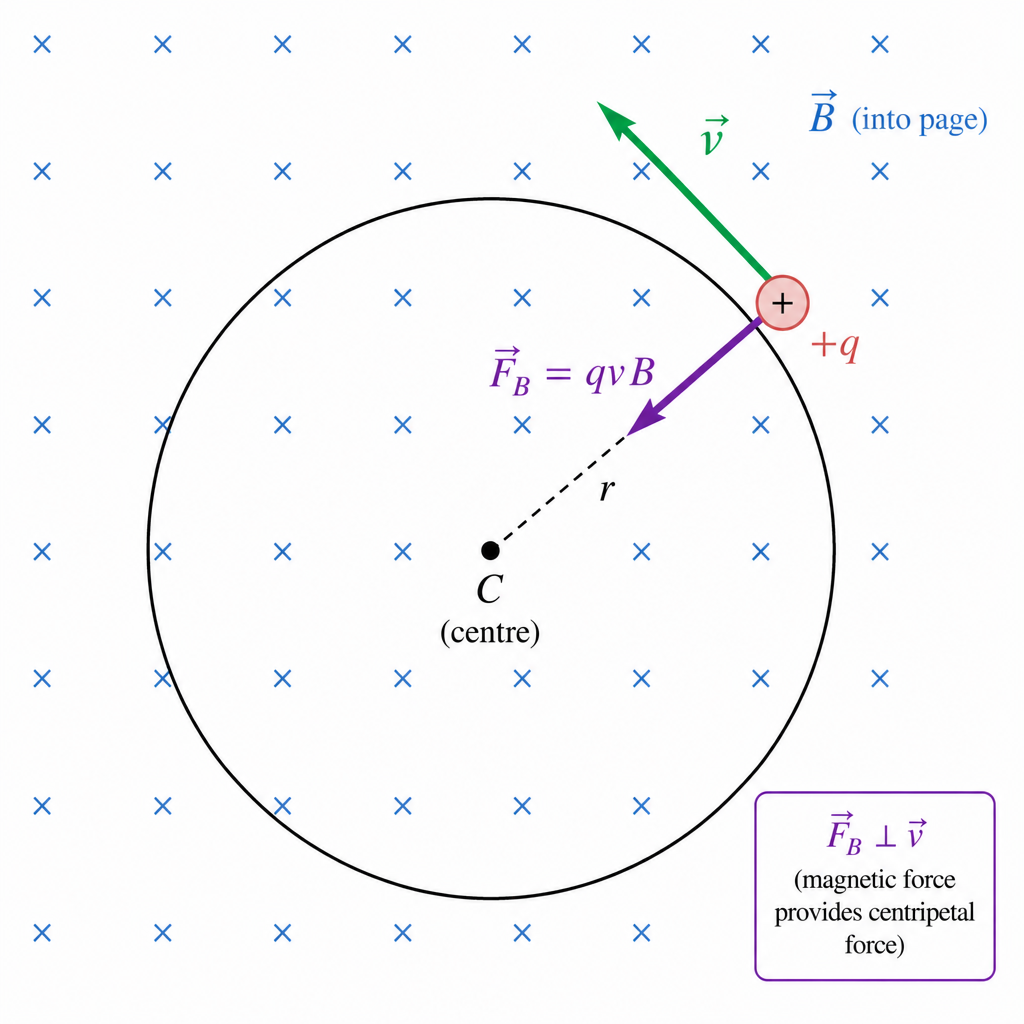
- Because the particle’s velocity is perpendicular to , the magnetic force magnitude is
- This magnetic force always points towards the centre of the circular path (it is perpendicular to ), so it acts as the centripetal force:
- Cancel one factor of :
- Use the relationship between speed and period for circular motion:
- Substitute for :
The cancels, showing the period does not depend on the radius.
Key Takeaways
- For perpendicular entry, .
- Magnetic force provides centripetal force: .
- Using leads to .
Common Mistakes
- Forgetting the factor and not using .
- Using the wrong centripetal term (e.g. instead of ).
- Using but not linking correctly to (must use ).
Things to Be Careful About
- The magnetic force must be the resultant force and must be perpendicular to for uniform circular motion.
- Keep track of which quantities are vectors vs magnitudes; the derivation uses magnitudes.
The particle is an alpha particle. The period of the circular motion is .
Calculate .
= ______
Working
Using
For an -particle: , , .
Answer
5.2 × 10^-2 T
Background Concept
From part (i), the magnetic flux density needed for circular motion of period is
This is sometimes called the cyclotron relationship: for a given particle ( and fixed) in a given , the period is fixed.
Understanding the Question
We are told the particle is an alpha particle and has period . We must calculate the magnetic flux density .
So we need:
- and for an alpha particle,
- convert to seconds,
- substitute into the formula.
Approach
- Use for an alpha particle.
- Use .
- Convert to .
- Substitute and calculate.
Step-by-Step Reasoning
Start with
Substitute values:
Compute the denominator:
Compute the numerator:
Then
Key Takeaways
- Use for an alpha particle.
- Always convert microseconds to seconds before substitution.
- The final unit for is tesla (T).
Common Mistakes
- Using instead of .
- Forgetting to convert to seconds.
- Using proton mass instead of alpha particle mass.
Things to Be Careful About
- Powers of ten: .
- Quote to sensible significant figures (usually 2 s.f. here).
A second alpha particle is in the same uniform field. It travels in a circle of radius .
State and explain how the periods of the motion of the two particles compare.
Answer
The periods are the same.
Since
and both particles are -particles in the same , is independent of (radius cancels).
Same period
Background Concept
For a charged particle moving perpendicular to a uniform magnetic field, the magnetic force provides the centripetal force and leads to
This shows that in a fixed magnetic field, the period depends only on:
- particle mass ,
- particle charge ,
- field strength ,
and not on the radius of the circular path.
Understanding the Question
A second alpha particle is in the same uniform magnetic field, but it moves in a circle of radius instead of . We must compare the periods.
The key clue is “same uniform field” and “alpha particle” (so and are unchanged).
Approach
Use the expression for the period in a magnetic field:
Since , , and are the same for both particles, the periods must be equal.
Step-by-Step Reasoning
- From magnetic circular motion,
- For both particles: is the alpha mass, , and is the same field.
- None of these depends on radius .
- Therefore doubling the radius to does not change the period.
So the two alpha particles have the same period.
Key Takeaways
- In a uniform magnetic field, the circular period is independent of speed and radius.
- Changing radius means the speed changes proportionally, keeping the period fixed.
Common Mistakes
- Assuming a bigger circle automatically means a longer period (true for some other situations, but not here because speed changes too).
- Bringing into the final expression for even though it cancels.
Things to Be Careful About
- This only holds when the motion is perpendicular to a uniform and the particle remains non-relativistic (mass effectively constant).
The speed of the alpha particle in (b)(ii) is . An electric field is applied so that this particle now moves with constant velocity.
Use your answer in (b)(ii) to calculate the electric field strength . Give the unit with your answer.
= ______ unit ______
Working
For constant velocity, resultant force is zero, so
Using and :
Answer
5.7 × 10^4 V m^-1
Background Concept
A charged particle in electric and magnetic fields experiences:
Electric force:
Magnetic force (magnitude):
If the fields are arranged so that the particle moves at constant velocity in a straight line, the resultant force must be zero. This is the principle of a velocity selector: the electric and magnetic forces balance.
For perpendicular geometry ():
Balancing forces gives:
Understanding the Question
The alpha particle from (b)(ii) has speed . An electric field is now applied so that it moves with constant velocity (meaning no acceleration).
We must use the previously found to calculate the required electric field strength , and include the unit.
Approach
- Constant velocity implies net force .
- Set electric force equal to magnetic force: .
- Cancel to get .
- Substitute and .
Step-by-Step Reasoning
- Condition for constant velocity:
- With perpendicular arrangement:
- Cancel (works for any non-zero charge):
- Substitute and :
- Units: can be written as or equivalently . So
Key Takeaways
- Constant velocity means zero resultant force.
- In crossed fields, balance and to get .
- and are equivalent units for electric field strength.
Common Mistakes
- Adding forces instead of balancing them (should be equal and opposite).
- Forgetting that magnetic force uses and depends on angle.
- Using (inverting incorrectly).
Things to Be Careful About
- Use from (b)(ii) with correct significant figures.
- Ensure is in and in T so that comes out in (or ).
A small coil C has 64 turns and cross-sectional area . The coil is placed inside a solenoid as shown in Fig. 6.1.
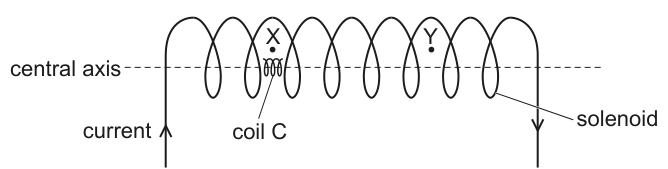
The centre of coil C is on the central axis of the solenoid.
There is a constant current in the solenoid.
Coil C is moved through the solenoid from position X to position Y.
On Fig. 6.2, sketch a line to show the variation of the magnetic flux linkage in coil C with position as it moves from X to Y.
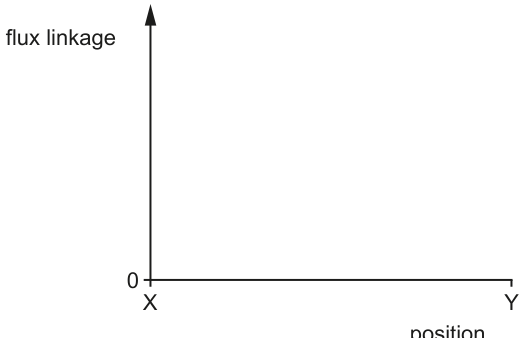
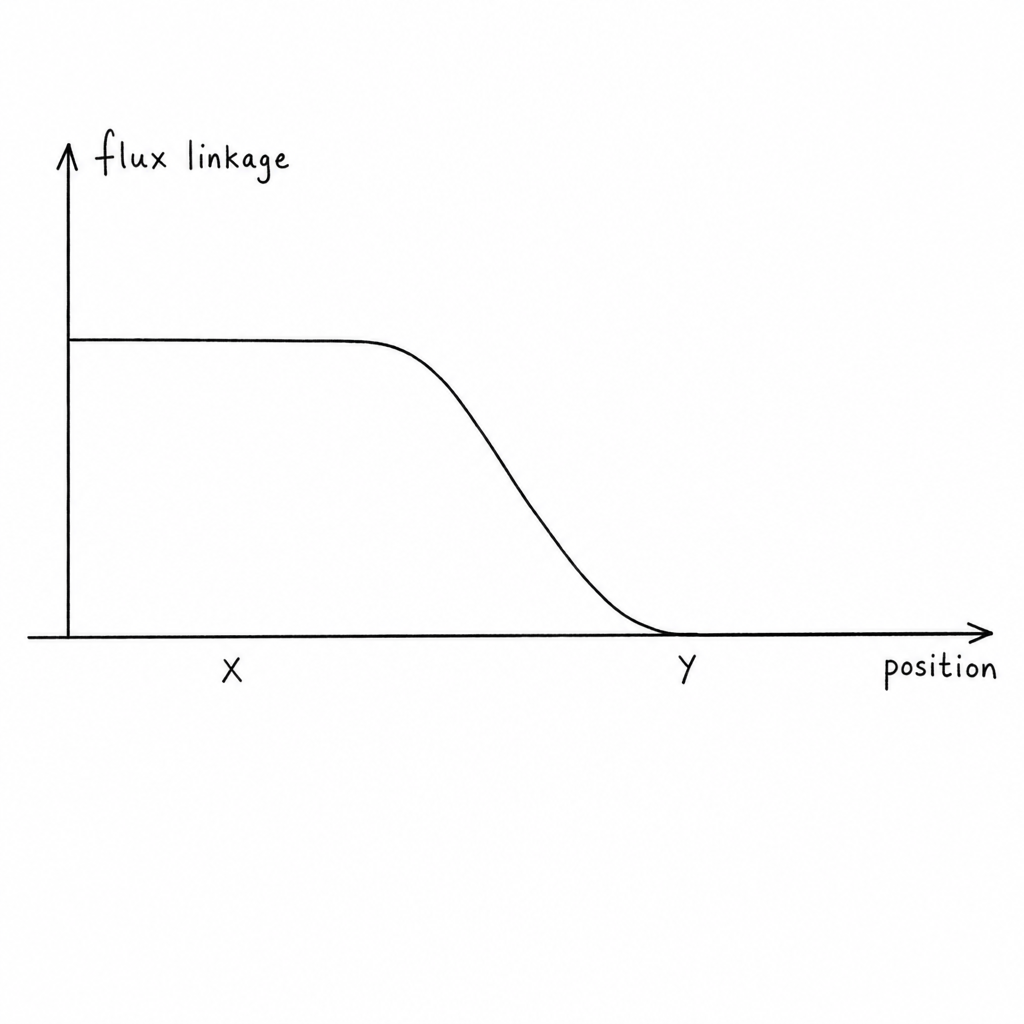
Answer
Flux linkage is approximately constant (maximum) while the coil is well inside the solenoid, then it decreases smoothly to approximately zero as the coil moves out of the end and is near zero at .
Constant high value inside solenoid then falls to ~0 outside (near Y).
Background Concept
Magnetic flux through a coil is
and the magnetic flux linkage is
where is the number of turns. For a coil on the axis of a solenoid, the field inside a long solenoid is approximately uniform and parallel to the axis, but near the end it “fringes” and drops to a much smaller value outside.
Understanding the Question
You move the small coil from (inside the solenoid) to (outside). The current in the solenoid is constant, so the solenoid’s field pattern in space does not change with time; only the coil’s position changes.
You must sketch how the flux linkage in the small coil varies with position.
Approach
- Decide how depends on position: because and are constant and the orientation is fixed.
- Use the known field pattern of a solenoid: nearly constant inside, small outside, with a transition region near the end.
- Sketch a graph with a flat section (inside) and a fall to (about) zero (outside).
Step-by-Step Reasoning
- Inside the solenoid (near ), is approximately constant, so
is constant. On the graph this is a horizontal line at some maximum value.
-
As the coil approaches the solenoid end, the field lines spread out and the field strength along the axis decreases. Therefore decreases, so decreases.
-
Well outside the solenoid (near ), the field is very small compared with inside, so and hence .
So the curve stays roughly constant then falls smoothly to near zero.
Key Takeaways
- Flux linkage depends on field strength: for fixed coil area and orientation.
- A solenoid produces a uniform field inside and a weak field outside, with an end-transition region.
Common Mistakes
- Drawing the flux linkage increasing as the coil leaves the solenoid (it should decrease).
- Making the drop instantaneous with no transition region (end effects cause a gradual change).
- Not showing it approaching (approximately) zero outside.
Things to Be Careful About
- The vertical scale is not required; only the correct qualitative shape matters.
- The sign of flux linkage is not being tested here; it is the magnitude/variation with position.
- If the solenoid is treated as “long”, the inside section should be clearly flat (uniform field).
Answer
Inside the solenoid, is (approximately) uniform and the coil’s area/orientation are constant, so
is constant.
Near the end, the field fringes and decreases, so decreases. Outside the solenoid, so the flux linkage is (approximately) zero.
Uniform B inside gives constant NΦ; fringing at end makes B fall; outside B≈0 so NΦ≈0.
Background Concept
Flux linkage is the total flux through all turns:
For a coil in a magnetic field,
If , and are fixed, then changes in flux linkage come only from changes in .
A long solenoid with steady current produces an approximately uniform magnetic flux density inside, directed along the axis. Outside, the field is much weaker; near the ends the field lines spread out (fringing), so reduces gradually.
Understanding the Question
Your sketch in (a)(i) should have a flat section and then a drop. This part asks you to justify those features using physics, not by describing the graph.
Approach
Explain the graph by connecting each region of the motion to what happens to :
- inside: constant
- near end: falls (fringing)
- outside: very small
Then translate changes into changes using .
Step-by-Step Reasoning
- While the coil is well inside the solenoid, the solenoid field is approximately uniform and constant in time because the current is constant. The coil’s area and orientation do not change. Therefore
is constant with position.
-
As the coil reaches the end region, the solenoid field is no longer uniform because field lines spread out into the surrounding space. This reduces the axial component of through the coil, so the flux and hence decrease.
-
Once outside, the solenoid’s field is weak (compared with inside), so and consequently .
Key Takeaways
- A constant solenoid current means a fixed spatial field pattern.
- Flux linkage changes if (and only if) the flux through the coil changes.
- End effects in solenoids produce gradual transitions rather than sharp steps.
Common Mistakes
- Saying “flux linkage is constant because current is constant” without linking to and .
- Claiming the outside field is exactly zero; in reality it is just much smaller.
Things to Be Careful About
- Always reference the defining relationship to justify a graph shape.
- Make clear which quantity is changing (here: with position near the end).
Coil C is now held stationary at X. The current in the solenoid varies so that the magnetic flux density at X varies from time 0 to time as shown in Fig. 6.3.
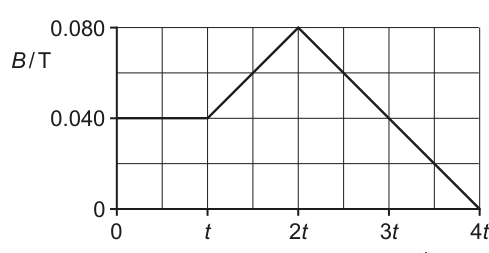
Calculate the maximum magnetic flux linkage in coil C.
flux linkage = ______
Working
Maximum .
Answer
3.6 × 10^-4 Wb
Background Concept
Magnetic flux through a coil is
For a coil whose plane is perpendicular to the field (so the field is normal to the coil area), and , giving .
Flux linkage is the flux through all turns:
Understanding the Question
The coil has turns and cross-sectional area . It is held at and the graph shows that reaches a maximum value of . You are asked for the maximum magnetic flux linkage .
Approach
- Read from the graph.
- Convert the coil area from to .
- Compute .
- Multiply by to get .
Step-by-Step Reasoning
- From the graph, the maximum magnetic flux density is
- Convert area:
So
- Find maximum flux through one turn:
- Multiply by number of turns:
Rounded appropriately (limited by 2 s.f. data),
Key Takeaways
- Convert areas carefully: introduces a factor of .
- Use when the coil is oriented for maximum flux.
- Flux linkage is .
Common Mistakes
- Using (wrong power of ten; it must be ).
- Forgetting to multiply by .
- Giving too many significant figures.
Things to Be Careful About
- The unit of flux is the weber (Wb). Flux linkage is sometimes written as Wb-turns, but the question’s answer line indicates Wb, so follow that.
- Ensure is read correctly from the graph (here , not ).
On Fig. 6.4, sketch a line to show the induced electromotive force (e.m.f.) in coil C from time 0 to time .
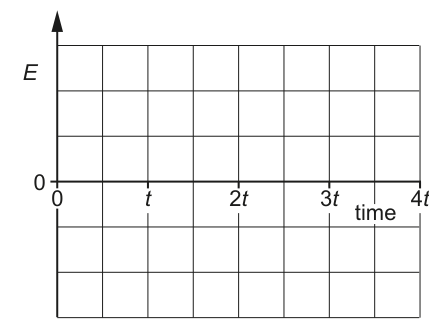
Working
From , is constant .
From ,
so is constant (one sign).
From ,
so is constant with opposite sign and the same magnitude.
Answer
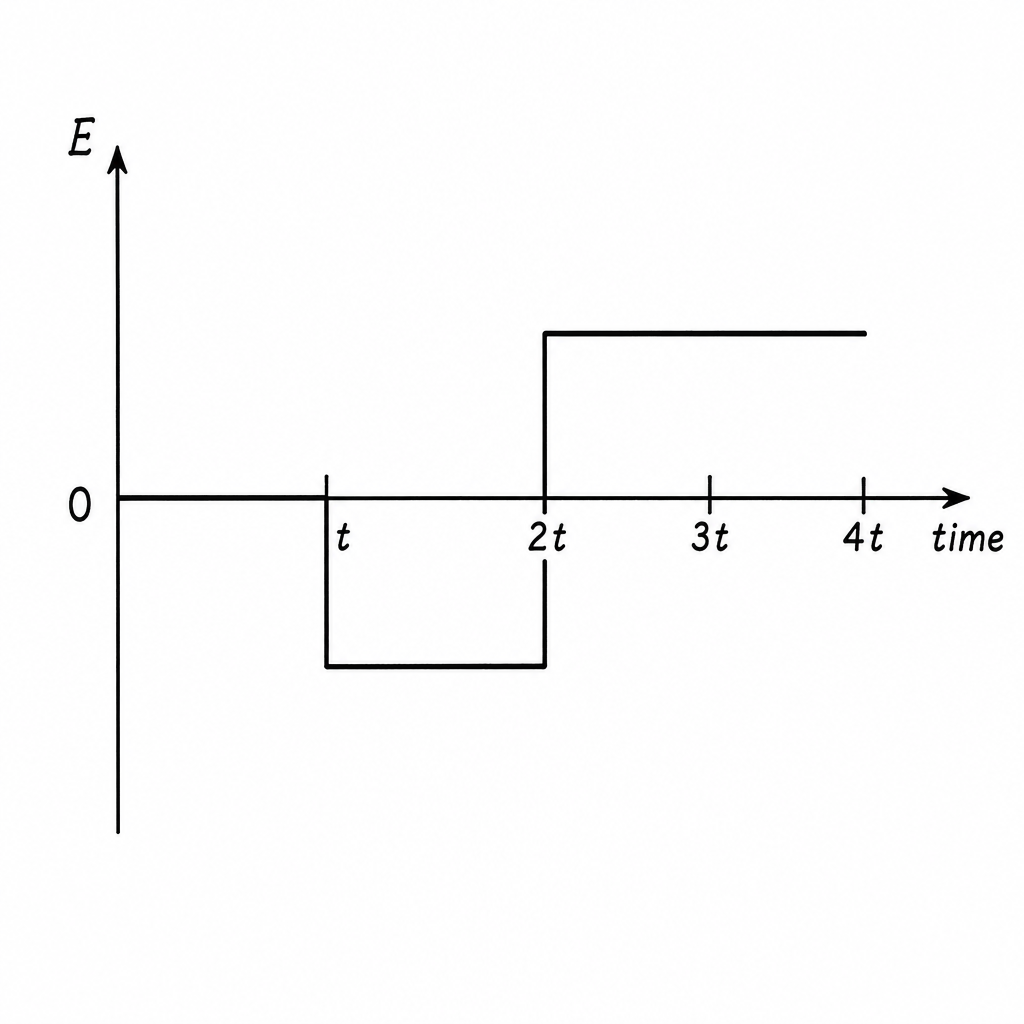
Sketch: E = 0 from 0 to t; constant value from t to 2t; constant equal-magnitude opposite sign from 2t to 4t.
Background Concept
Faraday’s law gives the induced e.m.f. in a coil:
If the coil’s area and orientation are fixed, then and
So the induced e.m.f. depends on the rate of change of magnetic flux density, i.e. the gradient of the -against- graph.
- If is constant, gradient is zero, so .
- If changes linearly with time, gradient is constant, so is constant.
- The minus sign means the induced e.m.f. changes sign depending on whether is increasing or decreasing.
Understanding the Question
The coil is held fixed at . The graph of vs time shows three sections:
- to : constant
- to : increases linearly to
- to : decreases linearly to
You must sketch the induced e.m.f. from to .
Approach
- Use .
- Find the gradient of each section of the graph.
- Convert each gradient into the corresponding e.m.f. level: zero gradient gives , constant non-zero gradient gives a horizontal line above or below the axis.
- Use opposite signs for increasing vs decreasing .
Step-by-Step Reasoning
- From to , the line on the graph is horizontal, so
So the graph lies on the zero line for this interval.
- From to , rises from to in a time . The gradient is
This is constant and positive. Therefore is constant and negative (taking the sign convention that an increasing flux gives negative e.m.f.). So draw a horizontal line at a constant value below the axis from to .
- From to , falls from to in time . The gradient is
This is constant and negative, so is constant and positive. Its magnitude is the same as in the previous section because the gradient magnitude is the same (). Therefore draw a horizontal line of the same height above the axis from to .
Putting these pieces together gives a “rectangular pulse” below zero then an equal “rectangular pulse” above zero.
Key Takeaways
- Induced e.m.f. is proportional to the gradient of the flux (or ) vs time graph.
- Flat gives zero e.m.f.
- Opposite gradients produce e.m.f.s of opposite sign; equal gradient magnitudes give equal e.m.f. magnitudes.
Common Mistakes
- Drawing with the same shape as (it should follow the gradient, not the value).
- Making the second pulse half the height because the time interval is longer (here the gradient is the same magnitude, so the height is the same).
- Forgetting the sign change between increasing and decreasing .
Things to Be Careful About
- The graph requires correct time intervals: only from to .
- At and , changes abruptly because the gradient changes abruptly.
- Exact numerical values of are not required because is not given; only the correct relative levels and signs matter.
A metal spring rests on a smooth table. The turns of the spring are equally spaced. The ends of the spring are connected to a d.c. power supply, as shown in Fig. 6.5.
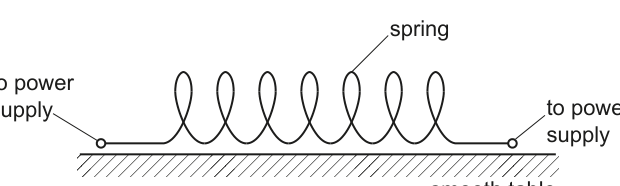
The spring is connected to the d.c. power supply using flexible leads. The spring is not under tension.
With reference to magnetic fields, describe and explain the change in the distance between the turns of the spring when the power supply is first switched on.
Answer
When the supply is switched on, current flows in the spring so each turn produces a magnetic field. Adjacent turns carry current in the same direction, so their magnetic fields interact and the turns attract (force between parallel currents). The turns move closer together, compressing the spring, until the magnetic attraction is balanced by the spring’s elastic restoring forces.
Turns move closer together because adjacent turns carry current in same direction and attract; compression continues until balanced by elastic forces.
Background Concept
A current produces a magnetic field around the conductor. When two conductors carry currents, each lies in the magnetic field produced by the other, and a magnetic force acts on them. For two parallel current-carrying conductors:
- currents in the same direction (\Rightarrow) attraction
- currents in opposite directions (\Rightarrow) repulsion
The force can be understood either from the field interaction picture or from
where a conductor of length carrying current in a magnetic flux density experiences a force .
A spring is effectively many adjacent loops/turns of wire; neighbouring turns behave like nearby conductors carrying current in the same sense.
Understanding the Question
A metal spring lies on a smooth (low-friction) table and is not stretched initially. Its ends are connected to a d.c. supply with flexible leads, so when current starts, the spring is free to change its length. The question asks what happens to the spacing between turns when the power supply is first switched on, and requires an explanation in terms of magnetic fields.
Approach
- Identify what switching on does: current begins to flow through all turns.
- Describe the magnetic fields due to the currents in each turn.
- Use the known interaction: adjacent turns carry current in the same direction, so they attract.
- State the mechanical outcome: spacing decreases until forces balance.
Step-by-Step Reasoning
-
On switching on, a current flows through the helical spring. Each turn is a current loop and produces a magnetic field.
-
Each turn is close to its neighbours, and the current in neighbouring turns is in the same direction around the helix (so adjacent sections are like parallel conductors with the same current direction).
-
Parallel currents in the same direction attract. Therefore neighbouring turns experience forces pulling them together.
-
Because the spring is on a smooth table and connected with flexible leads, it can move and shorten. The spacing between turns decreases (the spring compresses).
-
The compression continues until the spring’s elastic restoring force (tending to return it to its natural spacing) balances the magnetic attraction. After that, the spacing becomes steady.
Key Takeaways
- Currents create magnetic fields; magnetic fields exert forces on other currents.
- Same-direction parallel currents attract, causing a current-carrying spring to compress.
- Final separation is set by equilibrium between magnetic forces and elastic forces.
Common Mistakes
- Saying the turns repel (they attract for same-direction currents).
- Explaining using electrostatic forces (this is magnetic interaction, not charge build-up).
- Missing the idea of balance: the spring will not keep compressing indefinitely.
Things to Be Careful About
- The question says “first switched on”: it is about the initial change in spacing due to current starting to flow.
- Mentioning the role of the smooth table/flexible leads helps justify that the spring is free to move.
- Keep the explanation explicitly tied to magnetic fields and forces between current-carrying conductors.
Working
Answer
1.04 × 10^−27 N s
Background Concept
A photon carries energy and momentum . For electromagnetic radiation,
and
where is the Planck constant, is the frequency, and is the speed of light in vacuum.
Momentum has SI units , which is equivalent to .
Understanding the Question
You are given the photon energy and asked to calculate the photon momentum in . No wavelength or frequency is needed because is directly related to .
Approach
Use the relation and substitute the given energy and the speed of light.
Step-by-Step Reasoning
Start from
Substitute and :
Compute powers of ten and the numerical factor:
The unit is .
Key Takeaways
- Photon momentum can be found directly from energy using .
- Always track powers of ten and units; is a correct unit for momentum.
Common Mistakes
- Using (photons have no rest mass).
- Using instead of .
- Quoting the answer without a unit.
Things to Be Careful About
- Use .
- Keep the standard form correct: dividing by makes the exponent .
A laser beam has a power of . The light from the laser has a wavelength of .
Working
Energy in :
Answer
1.13 × 10^18
Background Concept
Laser power is the rate of energy transfer:
Each photon has energy
If a laser emits photons in time , then the total emitted energy is
Since , we get
Understanding the Question
You are told the laser power is and the wavelength is . In , the laser outputs energy . Dividing that by the energy per photon gives the number of photons emitted in that second.
Approach
- Convert and into SI units.
- Calculate photon energy using .
- Use with .
Step-by-Step Reasoning
Convert units:
- .
- .
Photon energy:
Energy emitted in :
Number of photons:
Key Takeaways
- Convert to SI units before substituting.
- Use then .
Common Mistakes
- Forgetting to convert or .
- Using (incorrect).
- Using but forgetting the time factor (here so it is numerically the same, but the method must be clear).
Things to Be Careful About
- Use standard values: and unless otherwise stated.
- Keep appropriate significant figures (typically 3 s.f. here).
The laser beam is incident normally on a surface that absorbs all of the photons.
Show that the force exerted on the surface by the laser beam is given by
where is the power of the laser beam and is the speed of light.
Working
Momentum per photon:
Photons per second:
Force rate of change of momentum (absorption):
Answer
F = P/c
Background Concept
Force is the rate of change of momentum:
Light carries momentum. A photon has momentum
If a surface absorbs light, the light’s momentum is transferred to the surface, producing a force due to the continuous momentum change per second.
Power is energy transferred per second:
Understanding the Question
A laser beam hits a surface normally and is fully absorbed. You must show (derive) that the force on the surface depends only on the beam power and the speed of light , and is given by .
Approach
- Work with “per photon” quantities (energy and momentum).
- Convert power into “photons per second”.
- Multiply momentum per photon by photons per second to get momentum transferred per second, which is the force.
Step-by-Step Reasoning
Each photon has energy and momentum
If the beam power is , then the energy delivered each second is joules per second. The number of photons emitted per second is therefore
For complete absorption, each photon’s momentum is transferred to the surface, so the momentum transferred per second is
The cancels:
This result is independent of wavelength because higher-energy photons carry more momentum, but fewer are emitted per second for the same power, and the effects cancel.
Key Takeaways
- Force from light is due to momentum transfer.
- For absorption at normal incidence: .
- The key idea is multiplying “momentum per photon” by “photons per second”.
Common Mistakes
- Using instead of .
- Forgetting that force is momentum change per unit time.
- Confusing absorption with reflection (reflection would double the momentum change, giving for normal incidence).
Things to Be Careful About
- The question specifies absorbs all photons and normal incidence; those conditions are exactly what makes the derivation simple.
- Make the cancellation of explicit to clearly “show that” the formula follows.
Light of a single wavelength is incident on the surface of different metals. The work function energy of the metals is given in Table 7.1.
Table 7.1
| metal | work function energy / eV |
|---|---|
| tungsten | 4.49 |
| magnesium | 3.68 |
| potassium | 2.26 |
Answer
Threshold wavelength is the maximum wavelength of incident light that will just cause photoemission (photon energy equals the work function, so emitted electrons have zero maximum kinetic energy).
Maximum wavelength that just causes photoemission (photon energy = work function).
Background Concept
In the photoelectric effect, electrons are emitted from a metal surface if photons have enough energy to overcome the metal’s work function .
Photon energy is
The threshold condition is when emitted electrons just have zero kinetic energy:
This defines the threshold frequency and corresponding threshold wavelength .
Understanding the Question
You are asked to explain what “threshold wavelength” means. This is a definition question tied to the idea of the minimum photon energy needed for emission.
Approach
State that it is the longest wavelength (i.e. lowest energy) that can still eject electrons, corresponding to photon energy equal to the work function.
Step-by-Step Reasoning
- Longer wavelength means smaller frequency.
- Smaller frequency means smaller photon energy because .
- There is a minimum energy required to release an electron from the metal: .
- At the threshold, and the emitted electrons have .
- Therefore the threshold wavelength is the maximum wavelength that still produces emission.
Key Takeaways
- “Threshold” means “just enough energy to cause emission”.
- Wavelength and photon energy are inversely related: larger gives smaller .
Common Mistakes
- Saying it is the minimum wavelength (it is the maximum wavelength).
- Defining it without mentioning photoemission/electron emission.
Things to Be Careful About
- Use the words “maximum wavelength” or “longest wavelength”. Both are acceptable and precise.
- Linking it to (or electrons emitted with zero kinetic energy) secures the mark.
For the metals in Table 7.1, calculate the value of the largest threshold wavelength.
threshold wavelength = ______
Working
Largest threshold wavelength corresponds to smallest work function: potassium, .
At threshold :
Answer
5.49 × 10^−7 m
Background Concept
The work function is the minimum energy needed to remove an electron from the surface of a metal.
At the threshold of photoemission, the photon energy just equals the work function:
So the threshold wavelength is
Because is inversely proportional to , a smaller work function gives a larger threshold wavelength.
Understanding the Question
You are given three metals and their work functions (in eV). You must find which has the largest threshold wavelength and calculate it in metres.
Approach
- Choose the smallest work function from the table (this gives the largest ).
- Convert that work function from eV to J.
- Use .
Step-by-Step Reasoning
From the table:
- tungsten:
- magnesium:
- potassium: (smallest)
Therefore potassium has the largest threshold wavelength.
Convert to joules using :
Now apply
Substitute and :
This is about , which is a sensible wavelength in the visible range.
Key Takeaways
- The largest threshold wavelength comes from the smallest work function.
- Threshold condition: .
- Always convert eV to J before using SI constants.
Common Mistakes
- Picking the largest work function (this would give the smallest threshold wavelength).
- Forgetting to convert eV to J.
- Using (inverting the formula).
Things to Be Careful About
- Use consistent significant figures (usually 3 s.f. given the data).
- Keep track of units: with in and in , comes out in metres only if is in joules.
Answer
Binding energy is the energy required to separate a nucleus completely into its individual nucleons (equivalently, the energy released when the nucleus is formed from free nucleons).
Energy required to completely separate the nucleus into its nucleons (equal to energy released on formation).
Background Concept
Nuclear binding energy is a measure of how strongly the nucleons (protons and neutrons) are held together in a nucleus.
- If you pull the nucleus apart into separate, free nucleons, you must supply energy. That energy is the binding energy.
- If you assemble the nucleus from free nucleons, energy is released (because the final nucleus has lower mass-energy). The amount released is the same magnitude as the binding energy.
Binding energy is linked to mass defect using
Understanding the Question
You are asked to state what is meant by the binding energy of a nucleus. For full marks you should clearly refer to:
- separating the nucleus into individual nucleons, and
- energy required (or equivalently energy released on formation).
Approach
Give the standard definition: “energy needed to completely separate the nucleus into its constituent nucleons”. Optionally add the equivalent statement about energy released when the nucleus forms.
Step-by-Step Reasoning
- Identify what is being separated: a nucleus into all its protons and neutrons.
- State that to do this separation, you must do work against the attractive nuclear force, so you must supply energy.
- Mention equivalence: the same energy would be released if the nucleons came together to form the nucleus.
Key Takeaways
- Binding energy quantifies nuclear stability.
- It is defined using complete separation into free nucleons.
- It is equal in magnitude to energy released on formation.
Common Mistakes
- Defining it as the energy to remove one nucleon (that is separation energy, not total binding energy).
- Mixing up binding energy with binding energy per nucleon.
- Forgetting to mention separation into individual nucleons.
Things to Be Careful About
- Use the word nucleons (protons and neutrons), not “atoms”.
- “Completely separate” means to infinity so nuclear forces are negligible.
A nucleus of uranium-235 absorbs a neutron and becomes unstable. It then undergoes a fission reaction. One possible reaction is
Working
Mass number:
Answer
Number of neutrons produced .
4
Background Concept
In any nuclear reaction, certain quantities are conserved:
- Nucleon (mass) number (total number of protons + neutrons).
- Proton (atomic) number (total number of protons / total charge number).
To balance a nuclear equation, the sum of on the left equals the sum of on the right, and similarly for .
Understanding the Question
The reaction given is
You must determine how many free neutrons are produced.
Approach
Use conservation of mass number (easiest here):
- Add values on the left.
- Add known values on the right.
- The difference is the number of neutrons (each neutron has ).
Step-by-Step Reasoning
Left side mass number:
Right side known mass numbers:
Let the number of neutrons be . Each has , so total mass number from neutrons is .
(You can also check charge conservation: so that is consistent.)
Key Takeaways
- Balance nuclear equations by conserving and .
- Free neutrons contribute , .
Common Mistakes
- Forgetting the absorbed neutron on the left.
- Using proton number to find neutrons (neutrons have , so does not help directly here).
- Arithmetic error: .
Things to Be Careful About
- Make sure to include all products (both fission fragments and neutrons).
- Each emitted neutron adds 1 to the total mass number.
Data for the binding energies per nucleon for this fission reaction are given in Table 8.1.
Table 8.1
| isotope | binding energy per nucleon / MeV |
|---|---|
| uranium-235 | 7.59 |
| xenon-142 | 8.37 |
| strontium-90 | 8.72 |
Calculate the energy released, in MeV, from the fission of one nucleus of uranium-235.
energy = ______
Working
Total binding energy of reactant nucleus:
Total binding energy of products:
Energy released:
Answer
Energy released .
190 MeV
Background Concept
The binding energy per nucleon is the average binding energy shared by each nucleon in that nucleus.
If a nucleus has mass number and binding energy per nucleon , then the total binding energy is
In a fission (or fusion) reaction, energy released is found from the increase in total binding energy:
(Free neutrons are not bound in nuclei, so they contribute no nuclear binding energy.)
Understanding the Question
You are given binding energy per nucleon values for:
- uranium-235:
- xenon-142:
- strontium-90:
You must calculate the energy released when one nucleus undergoes fission into and (plus neutrons).
Approach
- Convert each binding energy per nucleon into total binding energy by multiplying by mass number.
- Add total binding energies of product nuclei.
- Subtract the reactant nucleus total binding energy.
Step-by-Step Reasoning
- Reactant total binding energy (uranium-235):
- Product total binding energies:
- Total binding energy of products:
- Energy released:
To appropriate significant figures, this is about .
Key Takeaways
- Energy release in fission comes from products having higher binding energy per nucleon (greater total binding energy).
- Multiply “per nucleon” values by mass number to get total binding energies.
Common Mistakes
- Forgetting to multiply by mass number and just subtracting the per-nucleon values.
- Including the emitted neutrons as if they had binding energy (they are free particles).
- Using the total nucleon number instead of for uranium when only uranium-235 data are supplied.
Things to Be Careful About
- Keep units consistent: the table is already in .
- Round sensibly (typically 2–3 s.f. depending on given data).
The isotope xenon-142 is unstable. The isotope xenon-132 is stable.
Suggest a reason why xenon-142 is unstable.
Answer
has too many neutrons (neutron-to-proton ratio too large) compared with stable xenon, so it is unstable.
Neutron-to-proton ratio is too high (too many neutrons), so the nucleus is unstable.
Background Concept
Nuclear stability depends strongly on the neutron-to-proton ratio .
- For lighter nuclei, stability is roughly .
- For heavier nuclei, stable nuclei require more neutrons than protons, but there is still a limited range (the “band of stability”).
If a nucleus has:
- too many neutrons (too large ), it tends to undergo decay (a neutron turns into a proton).
- too many protons (too small ), it tends to undergo decay or electron capture.
Understanding the Question
You are told:
- is unstable.
- is stable.
You must suggest why is unstable, based on nuclear composition.
Approach
Compare how differs from :
- Same element means same number of protons ().
- Larger mass number means more neutrons.
- Too many neutrons relative to protons pushes it outside the stability band.
Step-by-Step Reasoning
For xenon, .
- For :
- For :
So has 10 extra neutrons compared with the stable isotope, giving a larger ratio. That makes it unstable (it will tend to reduce by converting neutrons into protons via decay).
Key Takeaways
- Same element same .
- Larger mass number more neutrons.
- Too high or too low leads to instability.
Common Mistakes
- Saying “it has too many nucleons” (not specific enough).
- Claiming it is unstable because it is “too heavy” without mentioning neutron/proton imbalance.
- Confusing xenon-142 with a different element (changing ).
Things to Be Careful About
- You only need a suggestion (1 mark), so one clear statement about neutron excess is sufficient.
- Don’t overcomplicate with binding energy calculations; the question is about stability trends.
Xenon-142 decays into the isotope caesium-142.
A sample initially contains only nuclei of xenon-142. After a time equal to , the ratio
is equal to 31.
Calculate the half-life of xenon-142. Show your working.
half-life = ______
Working
Let initial number be and remaining (undecayed) number after be .
So corresponds to half-lives:
Answer
Half-life .
1.2 s
Background Concept
Radioactive decay follows exponential decay:
where:
- is the initial number of undecayed nuclei,
- is the number of undecayed nuclei after time ,
- is the decay constant.
Half-life is the time for to fall to , and it is related to by
Sometimes it is easier to use the “number of half-lives” idea:
Understanding the Question
Initially the sample contains only xenon-142 nuclei.
After , you are told the ratio
equals .
Let:
- undecayed =
- decayed =
You must find .
Approach
- Convert the given ratio into the fraction remaining .
- Recognise a convenient power of 2 (or use logs).
- Relate the elapsed time to the number of half-lives.
Step-by-Step Reasoning
- Use the ratio provided:
Rearrange:
So the remaining fraction is
- Recognise
So corresponds to half-lives.
- Therefore
(Alternative log method: set , solve for , then use ; it gives the same result.)
Key Takeaways
- “Decayed : undecayed” can be turned into a remaining fraction .
- Recognising powers of 2 can avoid logarithms.
- Half-life relates to exponential decay through repeated halving.
Common Mistakes
- Using instead of .
- Treating the ratio as the number of half-lives directly.
- Mixing up decayed with undecayed in the ratio.
Things to Be Careful About
- Define clearly: decayed , undecayed .
- Check the rearrangement: a large decayed/undecayed ratio should mean very little remains (here only remains), which is a good sanity check.
Electrons in a vacuum are accelerated through a potential difference of . The electrons then strike a metal target and X-rays are produced.
Working
Maximum photon energy:
Answer
1.48 × 10^-11 m
Background Concept
When electrons are accelerated through a potential difference , they gain kinetic energy equal to the electrical work done:
where is the elementary charge.
In an X-ray tube, the minimum wavelength (highest photon energy) occurs when one electron gives up all of its kinetic energy to a single photon. For a photon,
So for the most energetic (shortest wavelength) photon,
Understanding the Question
Electrons are accelerated through in vacuum and then hit a metal target producing X-rays. You are asked for the minimum wavelength of the X-rays, i.e. the shortest possible wavelength in the spectrum.
Approach
- Find the maximum possible photon energy using .
- Convert this energy into a wavelength using .
Step-by-Step Reasoning
Electrical energy gained by one electron:
Since , this gives energy in joules:
Set this equal to the maximum photon energy:
Rearrange:
Substitute and :
Key Takeaways
- An electron accelerated through gains energy .
- The shortest X-ray wavelength corresponds to the maximum photon energy: .
Common Mistakes
- Using instead of .
- Forgetting that .
- Using but in eV·s without consistent units.
Things to Be Careful About
- Keep units consistent: convert to joules (or consistently use eV with in eV·m).
- Quote the wavelength in metres as requested.
The melting points of two metals are given in Table 9.1.
Table 9.1
| metal | melting point / |
|---|---|
| copper | 1090 |
| tungsten | 3420 |
Suggest why the metal target is made from tungsten rather than copper.
Answer
Tungsten has a much higher melting point than copper, so it is less likely to melt/overheat when struck by high-energy electrons.
Tungsten has a much higher melting point so it is less likely to melt when heated by the electron beam.
Background Concept
In an X-ray tube, most of the kinetic energy of the incident electrons is converted into thermal energy in the target (only a small fraction becomes X-ray photons). This makes the target heat up significantly.
A practical target material therefore needs to withstand high temperatures without melting or deforming.
Understanding the Question
You are given melting points for copper () and tungsten (). You must suggest why tungsten is chosen for the target rather than copper, using this data.
Approach
Use the fact that the target is heated strongly by the electron beam. A higher melting point makes the material more suitable.
Step-by-Step Reasoning
- Electron impact produces substantial heating of the target.
- Tungsten’s melting point () is much higher than copper’s ().
- Therefore tungsten is far less likely to melt, allowing the X-ray tube to operate safely at high accelerating voltages/currents.
Key Takeaways
- X-ray targets get very hot because most electron energy becomes heat.
- High melting point materials are preferred for durability.
Common Mistakes
- Stating “tungsten is a better conductor” (not relevant to the provided melting point data).
- Discussing attenuation coefficients or ultrasound properties (wrong section of the question).
Things to Be Careful About
- The question says “Suggest why … rather than copper” and provides melting points, so the expected argument should explicitly use melting point/overheating.
An X-ray beam is incident normally on a sample of soft tissue and bone as shown in Fig. 9.1.
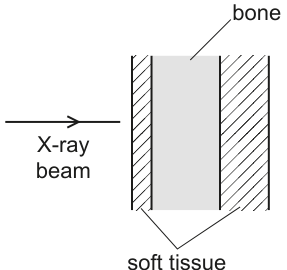
Data for the two materials are given in Table 9.2.
Table 9.2
| medium | linear attenuation coefficient | specific acoustic impedance |
|---|---|---|
| soft tissue | 0.22 | 1.7 |
| bone | 3.0 | 7.8 |
The total thickness of soft tissue is . The total thickness of bone is also .
The incident intensity of the X-ray beam is . The transmitted intensity of the X-ray beam is of the incident intensity.
Determine , in cm.
= ______
Working
For successive layers:
Given , and :
Answer
0.63 cm
Background Concept
X-ray intensity decreases as it passes through matter due to absorption and scattering. For a narrow, monoenergetic beam this is modelled by:
where:
- is the incident intensity,
- is the transmitted intensity,
- is the linear attenuation coefficient (units ),
- is thickness.
For several layers in sequence, attenuation happens in each layer, so the overall transmission is the product of transmissions, which is equivalent to adding the exponents.
Understanding the Question
An X-ray beam passes normally through a sample made of soft tissue and bone. The total thickness of soft tissue is and the total thickness of bone is also . Data are:
- soft tissue:
- bone:
The transmitted intensity is of , i.e. . You must determine .
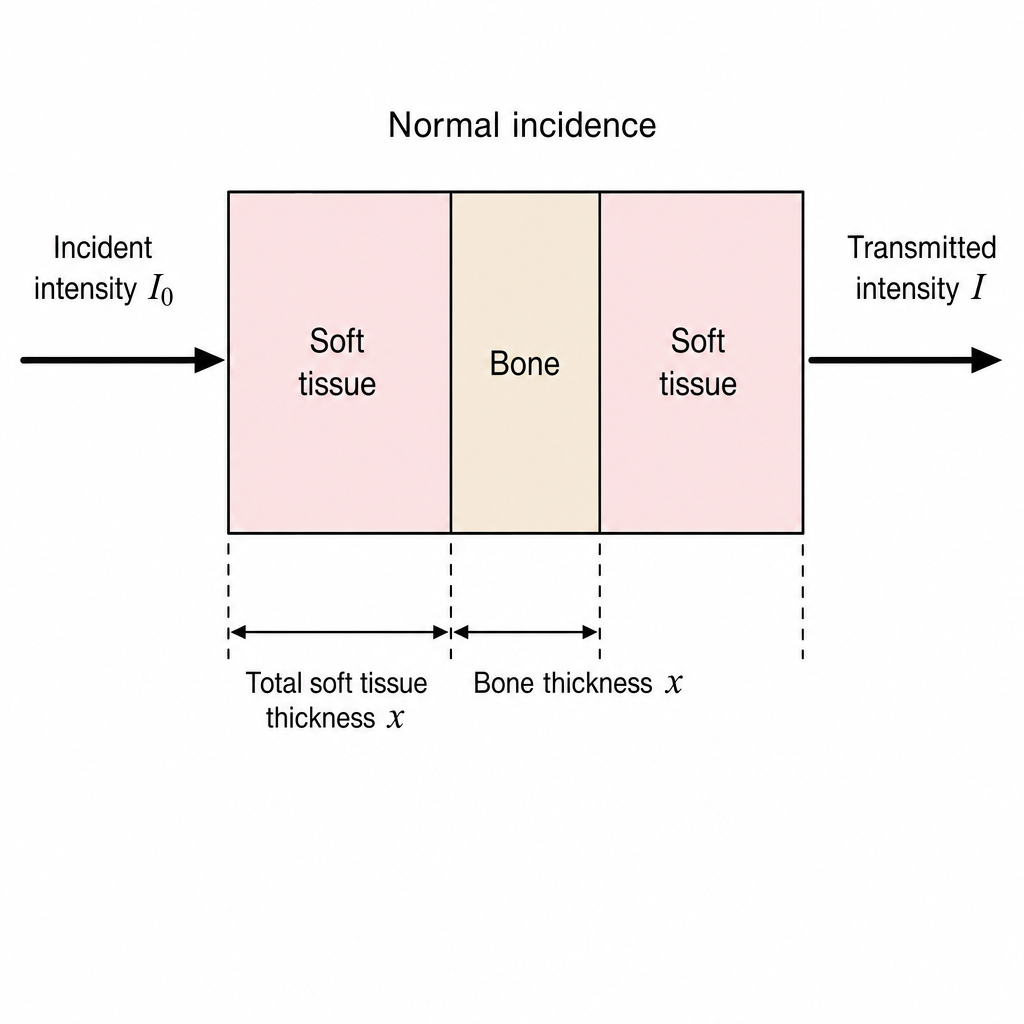
Approach
- Write down the transmission through soft tissue of thickness .
- Write down the transmission through bone of thickness .
- Multiply them to get total transmission, then solve for using natural logs.
Step-by-Step Reasoning
Transmission through soft tissue thickness :
Transmission through bone thickness :
Multiply to eliminate the intermediate intensity :
Substitute values:
Take natural logs:
So:
Rounded appropriately:
Key Takeaways
- Exponential attenuation: .
- For multiple layers, add terms in the exponent.
- Use to solve for thickness.
Common Mistakes
- Adding transmitted intensities instead of multiplying transmissions.
- Using instead of for the fraction transmitted.
- Mixing units (e.g. converting into metres when is in ).
Things to Be Careful About
- The question states the total thicknesses are for each material; you do not need to split between the two soft tissue layers.
- Keep in cm because is given in .
Answer
Specific acoustic impedance is the product of the density and the speed of sound in the medium:
Z = ρc (product of density and speed of sound in the medium).
Background Concept
For a wave travelling in a medium, the specific acoustic impedance characterises how much the medium resists the motion caused by the sound wave.
It can be defined as:
- the ratio of acoustic pressure amplitude to particle velocity amplitude, and for plane waves this equals
where is the density of the medium and is the speed of sound in that medium.
Impedance is crucial because mismatched impedances cause reflection at boundaries.
Understanding the Question
You are asked to define specific acoustic impedance. For full credit you need a clear statement, typically either the ratio definition or the definition (often both are accepted).
Approach
State the standard A-level definition: (and/or pressure/particle-velocity ratio).
Step-by-Step Reasoning
- Specific acoustic impedance is a property of a medium affecting transmission/reflection of ultrasound.
- For a plane progressive wave:
So a denser medium and/or a medium where sound travels faster has a larger impedance.
Key Takeaways
- Remember .
- Larger impedance mismatch between two media gives greater reflection.
Common Mistakes
- Confusing impedance with attenuation coefficient (that is for intensity loss in a medium).
- Writing or .
Things to Be Careful About
- Use correct symbols: for density, for sound speed (not the speed of light).
Use data from Table 9.2 to calculate the percentage of the intensity of ultrasound that is transmitted at a boundary between soft tissue and bone.
percentage transmitted = ______
Working
Intensity reflection coefficient:
With and :
Fraction transmitted:
Answer
Percentage transmitted
59 %
Background Concept
When an ultrasound wave hits a boundary between two media at normal incidence, part of the intensity is reflected because of the change in acoustic impedance.
The intensity reflection coefficient is:
The transmitted fraction (ignoring absorption in the media) is:
Understanding the Question
You must use the impedances in Table 9.2:
- soft tissue:
- bone:
and calculate the percentage intensity transmitted at a single soft tissue–bone boundary.
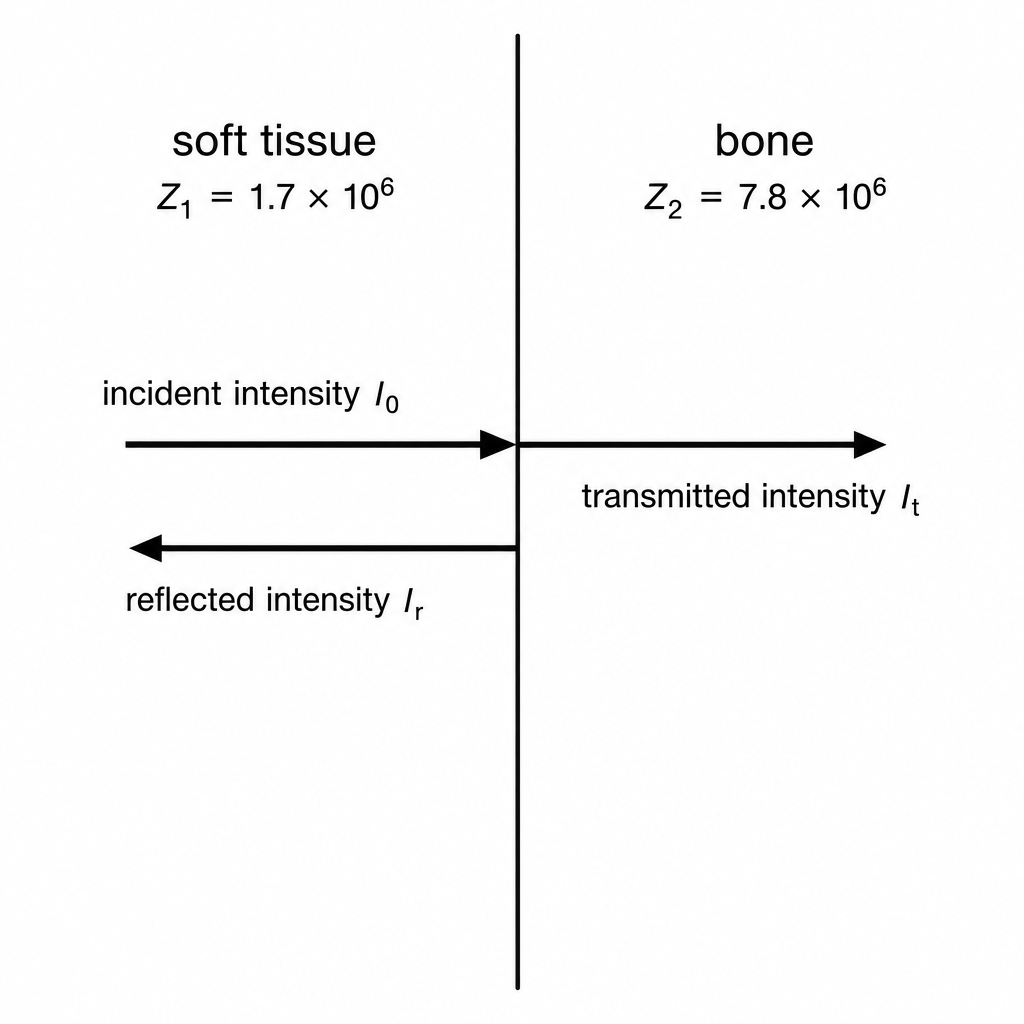
Approach
- Compute using the impedance mismatch formula.
- Convert to transmitted fraction with .
- Multiply by to get a percentage.
Step-by-Step Reasoning
Because both impedances are given with the same factor, you can use the numbers and directly in the ratio (the common factor cancels).
Calculate reflection coefficient:
Compute:
So about of the intensity is reflected.
Transmitted fraction:
Percentage transmitted:
Key Takeaways
- Reflection at an ultrasound boundary depends on impedance mismatch.
- Use and then .
Common Mistakes
- Using amplitude (pressure) coefficients instead of intensity coefficients.
- Forgetting to square the ratio in .
- Using or subtracting the wrong way round.
Things to Be Careful About
- The question asks for intensity transmitted, not amplitude.
- At normal incidence the formula above applies; for oblique incidence there can be additional complications (not needed here).
The ultrasound is now incident on the sample of soft tissue and bone shown in Fig. 9.1.
Suggest two reasons why the transmitted intensity through the sample is less than the answer in (c)(ii).
1 ______
2 ______
Answer
- There are two boundaries (soft tissue–bone and bone–soft tissue), so further reflections reduce the transmitted intensity.
- Ultrasound is attenuated (absorbed/scattered) as it passes through the soft tissue and bone, so intensity decreases with distance in the materials.
Further reflections at multiple boundaries; attenuation (absorption/scattering) in the tissue and bone.
Background Concept
The calculation in (c)(ii) treats transmission at a single boundary and (usually) assumes no losses other than reflection at that boundary.
In a real sample, ultrasound intensity can be reduced by:
- multiple reflections at several interfaces,
- attenuation within materials (absorption and scattering), often modelled by an exponential decay with distance,
- other effects such as beam divergence or non-normal incidence.
Understanding the Question
The sample in Fig. 9.1 consists of soft tissue, then bone, then soft tissue again. So an ultrasound wave entering the sample encounters more than one boundary and also travels through finite thicknesses of both media.
The question asks for two reasons why the intensity transmitted through the whole sample is less than the single-boundary transmission found in (c)(ii).
Approach
Pick two distinct mechanisms that necessarily reduce transmitted intensity through the entire stack:
- additional boundary reflections, and 2) attenuation within the materials.
Step-by-Step Reasoning
-
More than one boundary:
- In Fig. 9.1, the wave first goes from soft tissue to bone (one boundary) and later from bone back to soft tissue (second boundary).
- At each boundary, some intensity is reflected due to impedance mismatch.
- Therefore the final transmitted intensity after both boundaries is smaller than the transmission of just one boundary.
-
Attenuation inside soft tissue and bone:
- As ultrasound travels, its intensity reduces due to absorption (conversion to internal energy/heat) and scattering.
- Bone, in particular, tends to attenuate ultrasound strongly.
- So even the portion that is transmitted at the first boundary will lose additional intensity while passing through the thicknesses of bone and soft tissue.
(Other creditable possibilities include beam spreading or non-normal incidence leading to refraction and reduced intensity at the detector.)
Key Takeaways
- Total transmission through layered media is reduced by both boundary reflections and propagation losses.
- A single-interface transmission calculation is an overestimate for a multi-layer sample.
Common Mistakes
- Repeating the same reason twice (e.g. “reflection” and “echoes”) without identifying a second distinct mechanism.
- Saying “intensity decreases because it travels further” without naming attenuation mechanisms (absorption/scattering).
Things to Be Careful About
- The question compares to (c)(ii), so you must mention effects that were not included in the single-boundary model, especially the second boundary and attenuation through thickness.
The Sun has a surface temperature of . The luminosity of the Sun is .
Working
Using Stefan–Boltzmann:
Answer
6.96 × 10^8 m
Background Concept
A star’s luminosity is the total power it radiates (energy per unit time). If a star’s surface behaves approximately like a black body, the power radiated per unit area is given by the Stefan–Boltzmann law:
where:
- is the star’s radius,
- is its surface temperature,
- is the Stefan–Boltzmann constant.
Rearranging gives .
Understanding the Question
You are given the Sun’s surface temperature and luminosity . The question asks for the Sun’s radius .
Approach
Use:
Rearrange to make the subject, then substitute the given values (all already in SI units).
Step-by-Step Reasoning
Start with:
Solve for :
Substitute:
and evaluate to obtain:
This is consistent with the known solar radius (about ), so the magnitude is sensible.
Key Takeaways
- Use for a (black-body) star.
- Rearranging for radius introduces a square root, so powers of ten must be handled carefully.
Common Mistakes
- Forgetting the factor (using instead).
- Using instead of .
- Using the wrong value or units for .
Things to Be Careful About
- Ensure is in kelvin.
- Keep track of brackets when calculating and the denominator.
- Give the final radius with an appropriate number of significant figures and unit .
The Earth is a distance of from the Sun.
Calculate the radiant flux intensity of the radiation from the Sun at a distance of . Give a unit with your answer.
= ______ unit ______
Working
Answer
1.36 × 10^3 W m^-2
Background Concept
Radiant flux intensity (sometimes called irradiance) is the power received per unit area at some distance from a source.
If a source emits total power uniformly in all directions, that power spreads over the surface area of a sphere of radius :
So:
Units: is in watts (W), area is in , so is in .
Understanding the Question
The Sun’s luminosity is . Earth is at distance . The question asks for the radiant flux intensity at that distance.
Approach
Use the inverse square law for flux:
Calculate , then divide by this area.
Step-by-Step Reasoning
Square the distance:
Sphere area:
Now:
This is close to the known solar constant (), so it is reasonable.
Key Takeaways
- Flux decreases with square of distance: doubling makes four times smaller.
- Always include the unit .
Common Mistakes
- Using instead of .
- Squaring incorrectly (common power-of-ten error).
- Giving unit as or just W.
Things to Be Careful About
- Keep in metres.
- Use consistent significant figures (typically 3 s.f. here).
- Don’t confuse flux intensity with luminosity (total power).
The variation with wavelength of the intensity of radiation emitted from the Sun is shown in Fig. 10.1.
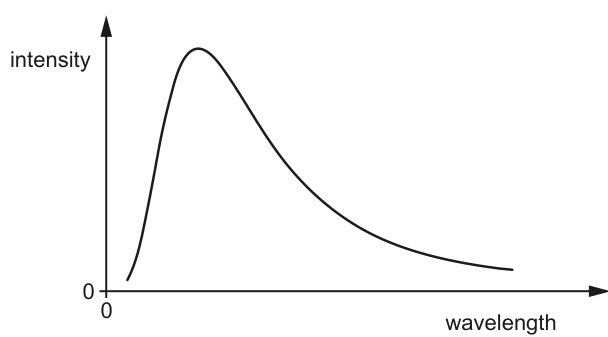
Another star has the same radius as the Sun but has a lower surface temperature.
On Fig. 10.1, sketch a line to show the variation with wavelength of the intensity of the radiation emitted for this star.
Answer
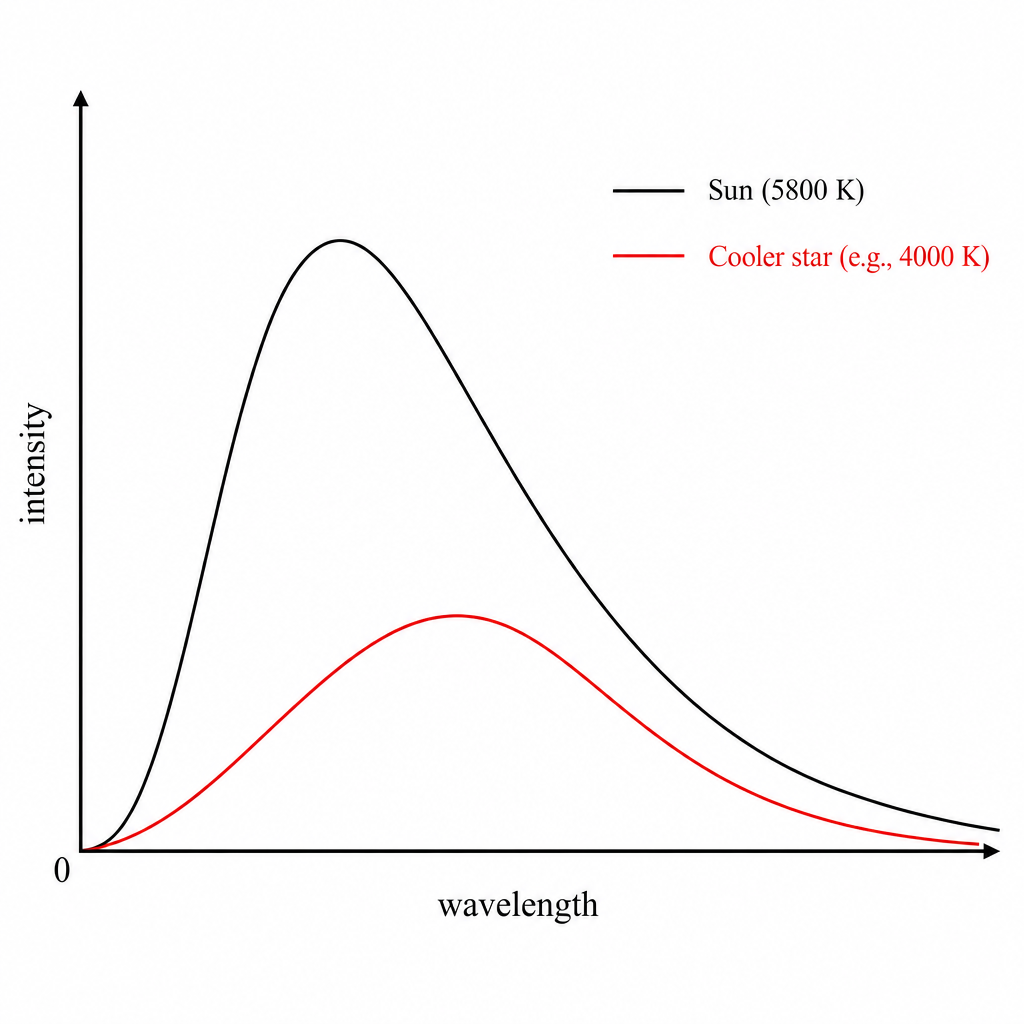
Sketch: peak at longer wavelength and lower intensity than the Sun.
Background Concept
A star’s spectrum is often approximated by black-body radiation.
Two key results:
- Wien’s displacement law:
so lowering makes the peak wavelength increase (shift to the right).
- Stefan–Boltzmann law (total power per unit area):
So a cooler star emits less power per unit area. If radius is the same, its luminosity is smaller, so the area under the curve is smaller and the curve is generally lower.
Understanding the Question
You are told the other star has the same radius as the Sun but a lower surface temperature. You must sketch its intensity vs wavelength curve on the same axes.
Approach
Use black-body curve features:
- Lower (\Rightarrow) peak moves to longer wavelength (right).
- Lower (\Rightarrow) overall intensity decreases (curve lower; smaller area).
Step-by-Step Reasoning
On the provided Sun curve, draw a second smooth curve that:
- starts at the origin and rises smoothly,
- reaches a lower maximum than the Sun’s peak,
- has its peak to the right of the Sun’s peak (greater wavelength),
- then falls off at long wavelengths.
Key Takeaways
- Cooler black bodies peak at longer wavelengths.
- Cooler black bodies emit less total radiation (smaller area under curve).
Common Mistakes
- Shifting the peak to the left for a cooler star (wrong direction).
- Keeping the peak height the same when temperature changes.
- Drawing sharp corners instead of a smooth black-body curve.
Things to Be Careful About
- Same radius does not mean same luminosity; luminosity still depends strongly on .
- The sketch is qualitative: correct relative position (right shift) and lower intensity are the key marking points.
A galaxy in the constellation Corona Borealis is moving away from the Earth.
The visible emission spectrum for the Sun is shown in Fig. 10.2.
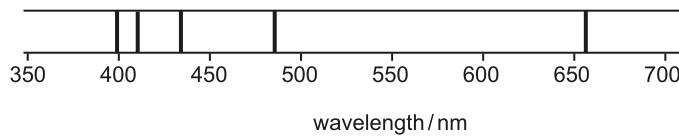
The lines are at wavelengths of , , , and . The compositions of the Sun and a star in the Corona Borealis galaxy are similar.
On Fig. 10.3, sketch the emission spectrum for the star in the Corona Borealis galaxy as observed from the Earth. No calculations are required.

Answer
All emission lines shifted to longer wavelength (to the right), same pattern.
Emission lines redshifted: all lines shifted to the right (longer wavelength).
Background Concept
If a light source is moving relative to an observer, the observed wavelength changes due to the Doppler effect.
- If the source is moving away, the observed wavelength increases: redshift.
- If the source is moving towards, the observed wavelength decreases: blueshift.
For spectra, this means all spectral lines appear at different wavelengths, but the pattern (relative separations) is preserved.
Understanding the Question
The galaxy is moving away from Earth. The star has similar composition to the Sun, so it produces the same set of emission lines, but due to motion those lines will be observed at longer wavelengths. You must sketch them on the blank wavelength axis.
Approach
Take each solar emission line position and shift it rightwards by the same fractional amount (no calculation needed here). Keep the number of lines and relative spacing pattern.
Step-by-Step Reasoning
- Identify that “moving away” implies redshift.
- Therefore each of the wavelengths , , , , would be observed at values greater than these.
- On the blank spectrum, draw the same five vertical lines, but all displaced to the right compared with the Sun’s spectrum.
Key Takeaways
- Receding sources produce redshift: wavelength increases.
- Spectral “fingerprints” remain the same but shift along the wavelength scale.
Common Mistakes
- Shifting lines to shorter wavelengths (blueshift).
- Changing the number of lines or the relative pattern.
Things to Be Careful About
- The question says “observed from the Earth”: always use Doppler shift direction based on relative motion to Earth.
- No calculation is required; a clear rightward shift is sufficient.
The galaxy in Corona Borealis is moving away from the Earth at a speed of .
Use information from (b)(i) to calculate, in nm, the observed wavelength of the lowest visible energy emission for the star in the Corona Borealis galaxy.
wavelength = ______
Working
Lowest visible energy corresponds to the largest wavelength: .
Answer
703 nm
Background Concept
Photon energy is related to wavelength by:
So a larger wavelength means a lower photon energy.
For Doppler shift at speeds not too close to , the redshift approximation is:
For a source moving away, , so:
Understanding the Question
From (b)(i), the star has the same set of emission lines as the Sun, but shifted to longer wavelengths. You are asked for the observed wavelength of the lowest visible energy emission line.
“Lowest energy” in the visible corresponds to the longest wavelength of the listed lines. The longest given is .
The galaxy’s recession speed is , so the line is redshifted.
Approach
- Choose the correct rest wavelength: .
- Convert into if using in .
- Apply .
Step-by-Step Reasoning
Identify the correct line:
- Among , the largest is .
- Therefore it corresponds to the lowest-energy visible emission.
Convert speed:
Compute fractional speed:
Apply the Doppler redshift approximation:
Key Takeaways
- Lowest photon energy in a set of lines corresponds to the longest wavelength.
- Receding sources give redshift: observed wavelength increases.
Common Mistakes
- Choosing the shortest wavelength line (that would be highest energy).
- Using for a receding source (wrong sign).
- Forgetting to convert to when using in .
Things to Be Careful About
- Keep consistent units for and .
- Quote the final wavelength in nm as requested.
- At , the simple approximation is typically accepted at this level unless stated otherwise.
The wavelength in (b)(ii) is used to calculate a value for the surface temperature of the star in the Corona Borealis galaxy. The calculation does not give an accurate value.
State and explain whether this value of temperature is too high or too low.
Answer
Too low: motion away causes redshift so the observed wavelength is larger than the emitted wavelength; using this larger wavelength in Wien’s law gives a smaller temperature.
Too low
Background Concept
Wien’s displacement law relates the wavelength of maximum intensity to temperature:
So:
- larger implies smaller .
Also, for a source moving away from the observer, Doppler redshift increases the observed wavelengths:
Understanding the Question
In (b)(ii) you found an observed wavelength that is redshifted due to the galaxy’s recession. If someone then uses that wavelength to calculate the star’s surface temperature (as if it were the wavelength corresponding to emission at the surface), the temperature will be wrong. You must say whether it is too high or too low and explain.
Approach
Connect the two effects:
- recession makes appear bigger,
- Wien’s law converts a bigger into a smaller .
Step-by-Step Reasoning
- Because the galaxy is moving away, all wavelengths are redshifted:
- If you mistakenly treat as the wavelength linked to temperature in Wien’s law, you would compute:
- Using a larger gives a smaller .
Therefore the calculated surface temperature would be too low.
Key Takeaways
- Redshift increases observed wavelengths.
- Wien’s law has an inverse relationship between and .
Common Mistakes
- Saying “too high” because confusing redshift with higher energy.
- Forgetting that the wavelength used is observed at Earth, not emitted at the star.
Things to Be Careful About
- Always distinguish between emitted and observed wavelength.
- Be explicit about the causal chain: recession (\rightarrow) larger observed (\rightarrow) smaller calculated .