Physics 9702/51 — May/June 2010
Cambridge A-Level · Planning, Analysis and Evaluation · worked solutions for every part, with the mark scheme
Topics Analysis, Conclusions and Evaluation · Planning
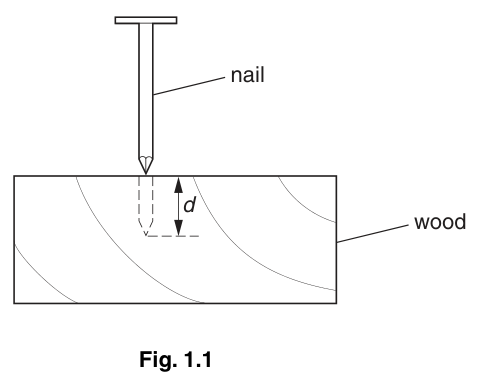
A hammer is often used to force a nail into wood. The faster the hammer moves, the deeper the nail moves into the wood.
This can be represented in a laboratory by a mass falling vertically onto a nail.
It is suggested that the depth of the nail in the wood (see Fig. 1.1) is related to the velocity of the mass at the instant it hits the nail by the equation
where and are constants.
Design a laboratory experiment to investigate the relationship between and so as to determine a value for . You should draw a diagram showing the arrangement of your equipment. In your account you should pay particular attention to
(a) the procedure to be followed,
(b) the measurements to be taken,
(c) the control of variables,
(d) the analysis of the data,
(e) the safety precautions to be taken.
Answer
Variables
- Independent variable: impact speed of the falling mass (vary by changing release height ).
- Dependent variable: depth driven into wood (or increase in depth after one impact).
- Control variables: mass and striking face, nail type/diameter/length, wood type/thickness/grain and moisture, initial nail depth and orientation, method of guiding the mass (vertical alignment), same number of impacts (one per run).
Apparatus / arrangement
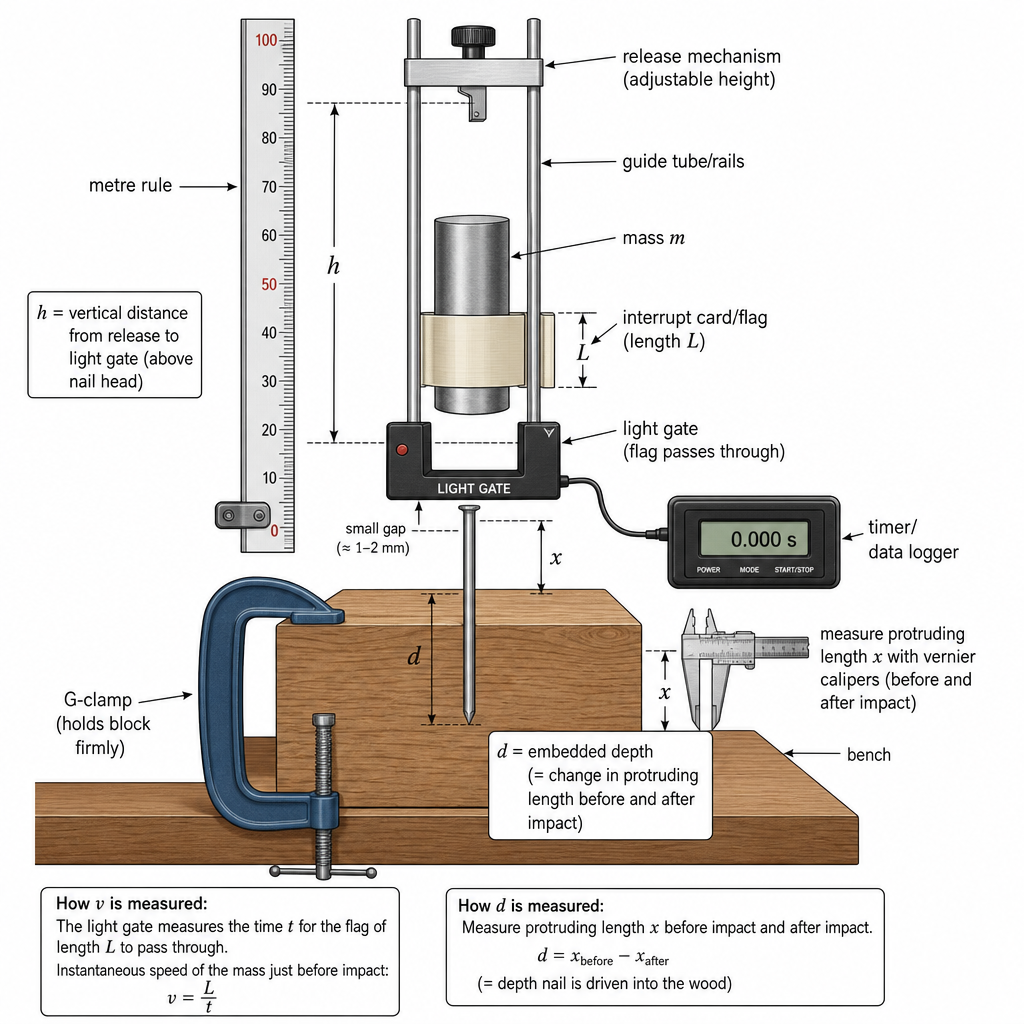
- Block of wood clamped to bench.
- Nail held vertical (pilot hole/guide to keep it straight).
- Falling mass guided by vertical tube/rails so it hits nail head centrally.
- Light gate (with interrupt card of known length ) placed just above the nail head to measure speed immediately before impact.
- Metre rule to measure drop height ; vernier calipers/ruler to measure nail position before and after impact.
Procedure and measurements
- Insert nail to a fixed initial depth (use a marked reference line on the nail or measure protruding length above the wood).
- Set a chosen drop height (measure from the release point to a fixed reference near the light gate / nail head).
- Release the mass without push; record the time that the interrupt card blocks the light gate.
- Calculate impact speed using
- After the single impact, measure the new protruding length; calculate penetration depth for that run as
- Repeat steps 2–5 for at least 6 different heights to give a wide range of ; repeat each height and average .
Control of variables (how)
- Use the same mass and same guide each time; ensure the mass falls vertically and hits the nail head squarely.
- Use identical nails and the same wood block (or identical blocks); keep grain direction and nail position similar.
- Keep initial nail depth the same each run (use a fixed starting mark/stop).
- One impact per run; replace nail/wood if deformation affects later results.
Analysis of data (to find )
Relationship: .
Take logarithms:
- For each run calculate and .
- Plot graph of (y-axis) against (x-axis).
- Best-fit straight line gradient ; y-intercept .
Safety
- Clamp wood securely; keep hands clear of falling mass and nail.
- Use a safety screen and wear eye protection (risk of nail splintering/bouncing mass).
- Ensure guide prevents sideways motion; prevent rebound (e.g. catcher/soft stop below).
See working
Background Concept
A power-law relationship has the form
where is the dependent variable (what you measure), is the independent variable (what you vary), and and are constants.
To determine an unknown power , the standard technique is to take logarithms:
This is in the straight-line form if we identify:
- gradient
- intercept
So if the suggested model is correct, a plot of against should be a straight line, and its gradient gives .
Understanding the Question
You are asked to design a workable laboratory experiment that links:
- the speed of a mass at the moment just before it hits a nail, and
- the depth that the nail is driven into wood,
and then to process the data to obtain a value for the exponent .
Because this is a planning question, marks come from:
- a clear method (what you do, step-by-step),
- correct and realistic measurements (how you get and ),
- control of other variables (so the test is fair),
- a correct analysis method (log-linearisation and graph),
- sensible safety precautions.
Approach
- Create impacts at different speeds by varying the release height of the mass.
- Measure as close to the nail as possible (so it represents the speed at impact). A light gate close to the nail is the most direct method.
- Measure as a change in nail position (e.g. protruding length before and after). This is often easier and more precise than trying to measure the buried portion directly.
- Repeat readings and use several values of .
- Linearise using logs and use a straight-line graph to obtain from the gradient.
Step-by-Step Reasoning
1) Measuring the speed
- Attach an interrupt card (flag) of known length to the falling mass.
- Place a light gate a small distance above the nail head.
- As the mass passes the light gate, it blocks the beam for time .
- The speed at that point is
Placing the light gate close to the nail makes this measured speed a good approximation to the speed at impact (air resistance and further acceleration over a small gap are small compared with other uncertainties).
2) Varying
- Change the release height (measured with a metre rule from a fixed reference point).
- Use a wide range of values (at least 6) to produce a clear range of .
- Release the mass from rest without pushing to keep the method consistent.
(An alternative method, if light gates are unavailable, is to use , but then you are not measuring directly and air resistance may matter; light gates are usually credited as the better plan.)
3) Measuring the penetration depth
- Before the impact, measure the protruding length of the nail above the wood, (e.g. using vernier calipers).
- After one impact, measure the new protruding length .
- The depth driven in by that impact is
This method measures a difference of two lengths, which can be more reliable than trying to judge the depth of the tip inside the wood.
4) Controlling variables
A fair test means only changes while other factors stay the same.
- Keep constant: use the same falling mass for all trials.
- Keep nail properties constant: use identical nails (same diameter/shape) and insert to the same initial depth (a marker line on the nail or a physical stop helps).
- Keep wood properties constant: same wood type and thickness; if repeated impacts damage the wood significantly, move to a fresh region or use a new block.
- Keep alignment constant: use a guide tube/rails so the mass hits the nail head centrally every time and does not glance off.
- Keep the number of impacts constant: one impact per data point, otherwise would depend on the number of strikes as well as speed.
5) Analysis to find
From
take logs:
So:
- calculate and for each run,
- plot (y) against (x),
- draw the best-fit straight line,
- the gradient is .
If you include repeats, you can plot means of at each and estimate uncertainties (e.g. half-range from repeats for , or instrument precision), and use error bars to judge the reliability of the straight-line fit.
6) Safety
- Clamp the wood securely; keep hands away from the falling mass and nail.
- Wear eye protection and/or use a screen (wood/nail fragments, rebound).
- Ensure the guide prevents lateral motion; provide a safe stop/catcher to prevent the mass from bouncing unpredictably.
Key Takeaways
- To determine an unknown exponent in , use a log-log plot: gradient gives .
- Measure impact speed as close as possible to impact (light gate near the nail).
- Measure penetration as a change in protruding length for better precision.
- Good plans explicitly control variables and include repeats.
Common Mistakes
- Trying to find by plotting against directly (does not give unless ).
- Not measuring at (or near) the moment of impact (e.g. using an unrelated speed value).
- Forgetting to keep the initial nail depth the same each run.
- Allowing multiple impacts for one reading of without stating it and controlling it.
- Vague safety statements ("be careful") without specific hazards and precautions.
Things to Be Careful About
- Define exactly what your measured represents (total depth or additional depth per impact) and keep it consistent.
- Keep the light gate sufficiently close to the nail so that the measured is representative of impact speed.
- Use enough different values of and a wide range to make the log-log line reliable.
- Ensure units and significant figures are sensible; logs require positive values, so avoid any run where is too small to measure reliably.
- If the wood deforms or cracks, later readings may not be comparable; plan to use fresh positions or fresh samples.
The rest of this paper
1 more questions- Q2Analysis, Conclusions and Evaluation15M