Chemistry 9701/33 — February/March 2025
Cambridge AS Level · Advanced Practical Skills · worked solutions for every part, with the mark scheme
Topics Manipulation, Measurement and Observation · Presentation of Data and Observations · Analysis, Conclusions and Evaluation · Qualitative Analysis
Potassium alum is a hydrated salt containing aluminium ions, potassium ions and sulfate ions.
of hydrated potassium alum contains of water of crystallisation.
Hydrated potassium alum decomposes when heated, losing its water of crystallisation and becoming anhydrous.
You will determine the formula of potassium alum by heating the hydrated salt until it becomes anhydrous.
FA 1 is hydrated potassium alum.
Method
- Weigh a crucible with its lid. Record the mass in the space for results.
- Add all of the FA 1 to the crucible.
- Weigh the crucible and lid with FA 1. Record the mass.
- Calculate and record the mass of FA 1 added.
- Place the crucible on the pipe-clay triangle. Heat the crucible and contents gently for approximately 2 minutes with the lid on.
- Remove the lid. Heat the crucible and contents strongly for approximately 5 minutes.
- Replace the lid and leave the crucible and residue to cool for at least 5 minutes.
While the crucible is cooling, you may begin work on Question 2 or Question 3.
- Reweigh the crucible and contents with the lid on. Record the mass.
- Remove the lid. Heat the crucible and contents strongly for a further 2 minutes.
- Replace the lid and leave the crucible and residue to cool for at least 5 minutes.
- Reweigh the crucible and residue with the lid on. Record the mass.
- Calculate and record the mass of residue obtained.
Results
Answer
| mass / g | |
|---|---|
| mass of crucible and lid | 15.20 |
| mass of crucible, lid and FA 1 | 17.70 |
| mass of crucible, lid and residue after first heating | 16.57 |
| mass of crucible, lid and residue after second heating | 16.56 |
| mass of FA 1 = 17.70 − 15.20 | 2.50 |
| mass of residue = 16.56 − 15.20 | 1.36 |
All four balance readings are recorded to the same number of decimal places (2 d.p.), and the fourth reading (16.56 g) is within 0.02 g of the third (16.57 g), showing the residue has reached constant mass.
Representative results table with six unambiguous headings, units in g, all weighings to 2 d.p., and masses of FA 1 and residue calculated by difference (candidate-dependent values).
Background Concept
In a thermal decomposition experiment the mass lost on heating a hydrated salt is the water of crystallisation, and the mass remaining is the anhydrous salt. To be sure all the water has been driven off, the salt is heated and reweighed until two consecutive weighings agree closely ('heating to constant mass'). Balance readings must all be recorded to the same precision (a 2 d.p. balance gives readings like 15.20 g), and every column/entry in the results table needs a unit.
Understanding the Question
This part is the practical data-recording exercise: you perform the heating of FA 1 (hydrated potassium alum) and record four balance readings plus two calculated masses. The mark scheme awards marks for the table headings, units, consistent decimal places, correct calculated masses, and the accuracy of your result (the ratio mass of FA 1 / mass of residue should fall between 1.70 and 2.00, ideally 1.80–1.90).
Approach
Set up a table with six rows: the four balance readings and the two calculated masses, each labelled unambiguously with the unit /g. Record every balance reading to 2 decimal places. Calculate the mass of FA 1 and the mass of residue by subtraction. The fourth weighing should be very slightly lower than (or nearly equal to) the third — within +0.02 to −0.05 g — to demonstrate constant mass.
Step-by-Step Reasoning
The values shown are representative of a good experiment. The mass of FA 1 is found as (crucible + lid + FA 1) − (crucible + lid) = 17.70 − 15.20 = 2.50 g. The residue mass is (crucible + lid + residue after second heating) − (crucible + lid) = 16.56 − 15.20 = 1.36 g. The mass ratio 2.50/1.36 = 1.84 lies in the highest accuracy band (1.80–1.90), consistent with the theoretical ratio 474.3/258.3 ≈ 1.84 for KAl(SO₄)₂·12H₂O → KAl(SO₄)₂. The fourth reading (16.56 g) is only 0.01 g below the third (16.57 g), satisfying the constant-mass criterion. In the real exam your own readings replace these numbers; the marking logic is identical.
Key Takeaways
- Always label every table entry with a quantity and unit.
- Record all balance readings to the same number of decimal places.
- Heat strongly, cool in the covered crucible, and reweigh until consecutive masses agree within about 0.02 g.
- Calculated masses should be quoted to at least 2 significant figures.
Common Mistakes
- Omitting units or writing 'g' only on some entries — every entry needs a unit.
- Recording readings with inconsistent decimal places (e.g. 15.2 and 16.56).
- Labelling rows ambiguously such as 'reading 1' instead of 'mass of crucible and lid'.
- Not heating to constant mass, so the fourth reading differs from the third by more than the allowed tolerance.
- Weighing a hot crucible (convection currents give erratic readings) — always cool for at least 5 minutes with the lid on.
Things to Be Careful About
- Use the lid during gentle heating to prevent spitting of crystals, but remove it for strong heating so water vapour escapes.
- Handle the hot crucible with tongs, never fingers.
- The accuracy marks depend on the mass ratio, so weigh all of FA 1 and heat thoroughly — losing residue or leaving water in both lower your ratio accuracy.
Calculations
Calculate the amount, in mol, of water of crystallisation lost during the thermal decomposition of FA 1.
amount of lost = .............................. mol
Working
Mass of water lost = mass of FA 1 − mass of residue = 2.50 − 1.36 = 1.14 g
Answer
amount of H₂O lost = 0.0633 mol
0.0633 mol (candidate-dependent; = (mass of FA 1 − mass of residue)/18, to 2–4 s.f.)
Background Concept
The amount of a substance in moles is mass divided by molar mass: . Water of crystallisation has , so the mass lost during heating (which is entirely water if the experiment is done correctly) divided by 18 gives the moles of water driven off.
Understanding the Question
You must use your own experimental masses: the mass of hydrated FA 1 you weighed out and the mass of anhydrous residue left after heating. The difference between these two masses is the water that was lost.
Approach
Subtract the residue mass from the FA 1 mass to get the mass of water, then divide by 18. Quote the answer to 2–4 significant figures.
Step-by-Step Reasoning
With the representative data, mass of FA 1 = 2.50 g and mass of residue = 1.36 g, so the water lost = 2.50 − 1.36 = 1.14 g. Then mol. If your own masses differ, substitute them in the same expression; error carried forward applies to later parts.
Key Takeaways
- Mass lost on heating a hydrated salt = mass of water of crystallisation (assuming only water is lost).
- with .
Common Mistakes
- Using the mass of residue instead of the mass difference.
- Dividing by 18 but forgetting significant figures (e.g. writing 0.063333).
- Rounding the FA 1 or residue masses to 1 s.f. before subtracting.
Things to Be Careful About
- Use your measured masses unrounded (at least 2 s.f.) in this calculation.
- The answer must be given to 2–4 significant figures to earn the mark.
Use the information given and your answer to (b)(i) to determine the amount, in mol, of potassium alum used.
amount of potassium alum = .............................. mol
Working
1 mol of hydrated alum contains 12 mol of water, so:
Answer
amount of potassium alum = 0.00528 mol
0.00528 mol (candidate-dependent; = answer to (b)(i)/12, to 2–4 s.f.)
Background Concept
The formula of a hydrated salt fixes the mole ratio between the salt and its water of crystallisation. The stem states that 1 mol of hydrated potassium alum contains 12 mol of water, so moles of alum = moles of water ÷ 12.
Understanding the Question
You are converting the moles of water you calculated in (b)(i) into the moles of hydrated alum that were present, using the given 12:1 ratio.
Approach
Divide your (b)(i) answer by 12 and quote to 2–4 significant figures.
Step-by-Step Reasoning
From (b)(i), mol. Since 12 mol of water accompany 1 mol of alum, mol (i.e. mol). With your own data, substitute your (b)(i) value; ecf applies if (b)(i) was wrong.
Key Takeaways
- Hydration number gives a fixed mole ratio: moles of compound = moles of water ÷ 12 here.
Common Mistakes
- Multiplying by 12 instead of dividing.
- Carrying too few significant figures from (b)(i).
Things to Be Careful About
- This value is used directly in (b)(iii), so keep it unrounded in your calculator.
Calculate the relative formula mass, , of anhydrous potassium alum.
= ..............................
Working
Answer
= 258
258 (candidate-dependent; = mass of residue / answer to (b)(ii), to 2–4 s.f.)
Background Concept
Rearranging gives . The mass of the anhydrous residue divided by the moles of anhydrous alum gives the relative formula mass of the anhydrous salt.
Understanding the Question
You use the mass of residue from part (a) and the moles of alum from (b)(ii) to calculate experimentally.
Approach
Divide mass of residue by your (b)(ii) answer; quote to 2–4 significant figures.
Step-by-Step Reasoning
. The theoretical value is 258.3 (K = 39.1, Al = 27.0, 2 × SO₄ = 2 × 96.1 = 192.2; total 258.3), so the experimental result agrees well. With your own data, substitute your values; ecf applies.
Key Takeaways
- is the central relationship linking experimental mass and calculated moles.
Common Mistakes
- Dividing the mass of FA 1 (hydrated) instead of the residue.
- Using the wrong moles (e.g. the water moles from (b)(i)).
Things to Be Careful About
- Keep full precision from (b)(ii) in the calculator before rounding the final .
Anhydrous potassium alum contains aluminium ions, potassium ions and sulfate ions.
of potassium alum also contains of aluminium ions.
Use the you have calculated in (b)(iii) to suggest the formula of anhydrous potassium alum.
Show your working.
The formula = .............................. .
Working
The anhydrous alum contains , and ions, with 1 mol of Al per mol of alum.
Answer
The formula = AlK(SO₄)₂
AlK(SO4)2
Background Concept
The anhydrous alum is an ionic salt made of Al³⁺, K⁺ and SO₄²⁻ ions. Charge balance requires the total positive charge (+4 from Al³⁺ and K⁺) to equal the total negative charge, so two sulfate ions (2 × 2−) are needed per one Al³⁺ and one K⁺. The experimental confirms this: subtracting the masses of one Al and one K from the measured should leave a remainder equal to a whole number of sulfate groups ( of SO₄ = 96.1).
Understanding the Question
You must use your calculated (about 258) plus the given fact that there is 1 mol of aluminium ions per mol of alum, and the known charges of the ions, to deduce the formula. Working must be shown.
Approach
Subtract (Al) = 27.0 from ; the remainder must be K plus some number of SO₄ groups. Test how many SO₄ (96.1 each) fit alongside K (39.1). Charge balance confirms the combination.
Step-by-Step Reasoning
Starting from and 1 Al per formula unit: remaining for K and sulfate. One K leaves , and , so there are two sulfate ions. Equivalently, the mark scheme accepts using the theoretical anhydrous of 258.3. Charge balance checks: gives , so the neutral formula is AlK(SO₄)₂.
Key Takeaways
- Ionic formulae must be electrically neutral — use ion charges to check.
- Experimental values can be decomposed using values to identify the composition.
Common Mistakes
- Writing KAl(SO₄)₂ but forgetting to show the working with the and values — the working is part of the mark.
- Suggesting AlKSO₄ (one sulfate), which does not balance charge and does not match the mass.
- Writing the hydrated formula including water — the question asks for the anhydrous formula.
Things to Be Careful About
- Use (Al) = 27(.0) or the value 258.3 explicitly in your working, as the mark scheme requires.
- Bracket the sulfate group correctly: AlK(SO₄)₂, not AlKSO₄₂.
The uncertainty in a single balance reading for a two decimal place balance is .
Calculate the maximum percentage error in your measurement of the mass of the residue of anhydrous potassium alum.
Show your working.
maximum percentage error = .............................. %
Working
The mass of residue is found from two balance readings, so the uncertainty is g.
Answer
maximum percentage error = 1.5 %
1.5 % (candidate-dependent; = 2 × 0.01 / mass of residue × 100)
Background Concept
The uncertainty in a single reading on a balance reading to 0.01 g is ±0.01 g. When a mass is obtained by difference (two weighings), the absolute uncertainties add, giving a total uncertainty of 2 × 0.01 = 0.02 g. Percentage uncertainty = (total absolute uncertainty ÷ measured value) × 100.
Understanding the Question
You are asked for the maximum percentage error in the mass of the residue — a mass by difference — using the 0.01 g single-reading uncertainty and your own residue mass.
Approach
Double the single-reading uncertainty (two readings), divide by the mass of residue, multiply by 100.
Step-by-Step Reasoning
With the representative residue mass of 1.36 g: % error = (0.02/1.36) × 100 = 1.47% ≈ 1.5%. With your own data, substitute your residue mass. Note the mark scheme explicitly defines U = 0.01 for a 2 d.p. balance and requires the factor of 2.
Key Takeaways
- A mass by difference carries twice the single-reading uncertainty.
- Smaller measured masses give larger percentage uncertainties — this is why a reasonably large sample improves accuracy.
Common Mistakes
- Forgetting to double the uncertainty for the two balance readings.
- Using the mass of FA 1 instead of the mass of residue.
- Omitting the × 100 or the % sign.
Things to Be Careful About
- The question says 'a single balance reading' has uncertainty 0.01 g — the residue mass needs two readings, hence 2 × 0.01.
A student obtains a higher value for the relative formula mass, , of anhydrous potassium alum than expected. The student incorrectly suggests that this is because some of the anhydrous potassium alum residue decomposes to aluminium oxide and potassium oxide during strong heating.
Explain why the student’s suggestion is not correct.
Answer
If the anhydrous alum decomposed, the extra mass lost would not be water, so the calculated moles of water, (b)(i), would be too high, and the moles of residue/anhydrous alum, (b)(ii), would also be too high. Since = mass of residue ÷ moles of alum, a too-high denominator gives an that is too low, not higher. So decomposition cannot explain the student's high .
Decomposition would make the calculated moles of water and of residue both too high, so the calculated Mr would be too low — it cannot explain a higher Mr.
Background Concept
When evaluating an error, follow it through the calculation chain: mass of water lost → moles of water (b)(i) → moles of alum (b)(ii) → = mass of residue ÷ moles (b)(iii). Each step's error direction determines the final effect.
Understanding the Question
The student claims decomposition (loss of oxygen/sulfur oxides forming Al₂O₃ and K₂O) causes a high . You must show whether this claim is consistent with the calculation logic.
Approach
Assume decomposition happens and track each quantity: what happens to mass loss, to moles of water, to moles of residue, and hence to .
Step-by-Step Reasoning
If the residue decomposes, gases such as SO₃ are lost, so the total mass loss during heating is greater than the water alone. The candidate would then calculate moles of water (b)(i) as (mass FA 1 − mass residue)/18 — too high, because the mass difference includes non-water loss. Dividing by 12 gives moles of alum (b)(ii) also too high. The mass of residue itself is too low (material was lost as gas). = mass of residue ÷ moles of alum = (too low) ÷ (too high), which is definitely too low. Therefore decomposition would produce a lower , contradicting the student's observation of a higher — the suggestion is not correct.
Key Takeaways
- To evaluate an error claim, propagate it step by step through the calculation rather than guessing.
- A numerator that is too small divided by a denominator that is too large gives a result that is too small.
Common Mistakes
- Saying only 'the mass would be wrong' without stating the direction of the effect on .
- Claiming decomposition raises without following the arithmetic.
- Confusing which quantities are affected: both (b)(i) and (b)(ii) become too high, and the residue mass becomes too low.
Things to Be Careful About
- The mark scheme requires both halves: the effect on moles of water/residue AND the conclusion that would be too low. State both explicitly.
Many oxidising agents are able to oxidise acidified potassium iodide to iodine in acidic conditions.
The amount of iodine produced can be determined by titrating it with aqueous sodium thiosulfate.
You will determine the change in oxidation state of an oxidising agent when it reacts with iodide ions.
FA 2 is aqueous sodium thiosulfate, containing () in .
FA 3 is a solution of an oxidising agent.
FA 4 is potassium iodide, .
FA 5 is sulfuric acid, .
FA 6 is starch solution.
Method
- Fill the burette with FA 2.
- Pipette of FA 3 into a conical flask.
- Use the measuring cylinder to add of FA 4, an excess, to the conical flask.
- Use the measuring cylinder to add of FA 5, an excess, to the conical flask.
- Add FA 2 from the burette until the solution becomes yellow.
- Add about 10 drops of FA 6 to the conical flask.
- Perform a rough titration and record your burette readings in the space below.
The rough titre is = .............................. .
- Carry out as many accurate titrations as you think necessary to obtain consistent results.
- Make sure any recorded results show the precision of your practical work.
- Record, in a suitable form in the space below, all your burette readings and the volume of FA 2 added in each accurate titration.
Keep FA 3, FA 4, FA 5 and FA 6 for use in Question 3.
Answer
Rough titre = 25.20 cm³
Accurate titrations:
| 1 | 2 | 3 | |
|---|---|---|---|
| Final burette reading / cm³ | 25.05 | 50.10 | 25.10 |
| Initial burette reading / cm³ | 0.00 | 25.05 | 0.00 |
| Titre / cm³ | 25.05 | 25.05 | 25.10 |
All burette readings are recorded to the nearest 0.05 cm³. The two titres of 25.05 cm³ are identical (concordant); the third titre, 25.10 cm³, is within 0.10 cm³ of them.
See working — representative readings: rough titre 25.20 cm³; accurate titres 25.05, 25.05, 25.10 cm³ (candidate-dependent)
Background Concept
This is a redox titration known as iodometric titration. The oxidising agent FA 3 oxidises iodide ions () to iodine () in acidic conditions. The iodine produced is then titrated with sodium thiosulfate:
Iodine is reduced to iodide while thiosulfate is oxidised to tetrathionate. Starch is the indicator: it forms an intense blue-black complex with iodine. The end point is the instant the blue-black colour just disappears, meaning all the iodine has been consumed.
Understanding the Question
This part asks you to actually carry out the titration and record your results properly. The 7 marks are awarded for: (I) recording all the data — the rough titre plus initial and final readings for two or more accurate titrations; (II) correct table headings with units; (III) all burette readings to 0.05 cm³; (IV) concordant titres within 0.10 cm³; and accuracy marks comparing your mean titre with the supervisor's value.
Approach
Fill the burette with FA 2 (thiosulfate). Pipette 25.0 cm³ of FA 3 into a conical flask. Add 10 cm³ of FA 4 (excess KI) and 20 cm³ of FA 5 (excess sulfuric acid) using measuring cylinders. Titrate until the solution turns yellow, then add about 10 drops of starch — the solution turns blue-black. Continue titrating dropwise until the blue colour just disappears. Do a rough titration first, then repeat accurately until you get concordant results.
Step-by-Step Reasoning
- Rough titration: Add FA 2 quickly until the colour just changes. This gives an approximate end point. Record this titre — it is not used in the mean.
- Accurate titrations: Add FA 2 slowly, especially near the end point. When the solution turns pale yellow, add the starch indicator (10 drops). The solution becomes blue-black. Continue adding FA 2 dropwise, swirling constantly, until the blue-black colour just disappears — this is the end point.
- Record the initial and final burette readings for each accurate titration. The titre is final minus initial.
- Repeat until two (or more) titres agree within 0.10 cm³.
- All burette readings must be to the nearest 0.05 cm³ (half a division).
In the representative example above, the two 25.05 cm³ titres are identical, and the 25.10 cm³ titre is within 0.10 cm³ of them — all concordant.
Key Takeaways
- Burette readings are recorded to the nearest 0.05 cm³.
- Concordant titres must agree within 0.10 cm³.
- Starch is added only near the end point, when the solution is already pale yellow — adding it too early binds iodine and slows the reaction.
- The rough titre is recorded but never used in the mean.
Common Mistakes
- Adding starch too early — it forms a strong iodine–starch complex that makes the end point sluggish and inaccurate.
- Not recording initial and final readings separately for each titration.
- Recording readings only to 0.1 cm³ instead of 0.05 cm³.
- Including the rough titre in the mean.
- Not repeating until concordant titres are obtained.
Things to Be Careful About
- The end point is the disappearance of the blue-black colour, not the yellow colour.
- Swirl the flask continuously while adding FA 2 to ensure thorough mixing.
- Make sure the burette is filled to below the 0.00 mark and that no air bubbles are trapped in the jet.
- The mark scheme requires readings to 0.05 cm³ and titres within 0.10 cm³ of each other.
From your accurate titration results, calculate a suitable mean value to use in your calculations.
Show clearly how you obtain the mean value.
of FA 3 required .............................. of FA 2
Working
Mean titre = (25.05 + 25.05)/2 = 25.05 cm³
The two identical accurate titres (25.05 cm³ and 25.05 cm³) are selected and averaged.
25.05 cm³
Background Concept
The mean titre is the average of the concordant (consistent) accurate titrations. The mark scheme requires that the titres averaged are within a total spread of not more than 0.20 cm³, and that the working is shown (or ticks placed next to the selected readings).
Understanding the Question
From your accurate titrations in part (a), select the best titres and calculate a mean value to use in the subsequent calculations. You must show how you obtained the mean.
Approach
Apply the mark scheme hierarchy: (1) two or more identical titres, then (2) two or more within 0.05 cm³, then (3) two or more within 0.10 cm³. Average the best set and quote to 2 decimal places.
Step-by-Step Reasoning
With titres 25.05, 25.05 and 25.10 cm³:
- The two identical titres (25.05 and 25.05) are the best — they are identical, which is the top of the hierarchy.
- Mean = (25.05 + 25.05)/2 = 25.05 cm³, quoted to 2 d.p.
The third titre (25.10 cm³) is concordant with the others but is not needed for the mean since two identical titres already exist.
Key Takeaways
- Only concordant titres are averaged.
- The mean is quoted to 2 decimal places (nearest 0.01 cm³).
- Show your working — either the sum and division, or ticks next to the selected readings.
Common Mistakes
- Including the rough titre in the mean.
- Averaging titres that differ by more than 0.20 cm³.
- Quoting the mean to 1 d.p. instead of 2 d.p.
Things to Be Careful About
- The rough titre must be clearly labelled and excluded.
- The mean titre is used in all subsequent calculations, so it must be correct.
Calculations
Give your answers to (c)(ii), (c)(iii) and (c)(iv) to an appropriate number of significant figures.
Answer
Answers to (c)(ii), (c)(iii) and (c)(iv) are given to 3 or 4 significant figures.
3 or 4 significant figures
Background Concept
Significant figures reflect the precision of the data. The data in this question have 3–4 significant figures: 22.00 (4 s.f.), 248.2 (4 s.f.), 0.0175 (3 s.f.), 25.0 (3 s.f.). The answers should therefore be quoted to 3 or 4 significant figures to match the precision of the inputs.
Understanding the Question
This part is an instruction: give your answers to parts (c)(ii), (c)(iii) and (c)(iv) to an appropriate number of significant figures. The mark is awarded simply for doing so.
Approach
After calculating each amount, round to 3 or 4 significant figures. Do not round to 2 s.f. (too few) or to 5+ s.f. (too many).
Step-by-Step Reasoning
The mark scheme states that answers to (c)(ii), (c)(iii) and (c)(iv) must be given to 3 or 4 significant figures. For example, 2.220 × 10⁻³ mol (4 s.f.) and 4.375 × 10⁻⁴ mol (4 s.f.) are acceptable; 2.2 × 10⁻³ mol (2 s.f.) would not be.
Key Takeaways
- Match the number of significant figures to the precision of the given data.
- The mark scheme explicitly requires 3 or 4 s.f. for these parts.
Common Mistakes
- Giving answers to 2 s.f. (too few) or to 5+ s.f. (false precision).
- Rounding intermediate values and then quoting the rounded value as final.
Things to Be Careful About
- Keep intermediate values to full precision and round only the final answer.
- The mark is lost if the answers are not given to 3 or 4 s.f.
Calculate the amount, in mol, of sodium thiosulfate in the volume of FA 2 in (b).
amount of = .............................. mol
Working
Concentration of FA 2 = 22.00 / 248.2 = 0.08864 mol dm⁻³
Amount of = 0.08864 × 25.05/1000 = 2.220 × 10⁻³ mol
2.220 × 10⁻³ mol
Background Concept
FA 2 is a solution of sodium thiosulfate pentahydrate, , with . The concentration is found by dividing the mass dissolved (22.00 g) by the molar mass, giving the number of moles in 1.00 dm³. Then the amount in the titre volume is concentration × volume (in dm³).
Understanding the Question
Calculate the amount, in mol, of sodium thiosulfate in the volume of FA 2 used in part (b) — i.e. in the mean titre (25.05 cm³ in the representative example).
Approach
- Find the concentration of FA 2: where V = 1.00 dm³.
- Amount = concentration × titre volume (converted to dm³).
Step-by-Step Reasoning
Concentration of FA 2:
Amount in the titre (25.05 cm³ = 0.02505 dm³):
This is the amount of sodium thiosulfate that reacted with the iodine.
Key Takeaways
- Concentration = mass / (molar mass × volume).
- Amount = concentration × volume, with volume in dm³.
- Convert cm³ to dm³ by dividing by 1000.
Common Mistakes
- Forgetting to convert the titre from cm³ to dm³ (off by a factor of 1000).
- Using the mass (22.00 g) directly instead of first finding the concentration.
- Using the wrong molar mass (e.g. using without the 5H₂O, ).
Things to Be Careful About
- The molar mass given (248.2) is for the pentahydrate — use it as given.
- The answer must be given to 3 or 4 significant figures (per part (c)(i)).
Calculate the amount, in mol, of iodine that reacts with the amount of sodium thiosulfate in (c)(ii).
amount of = .............................. mol
Working
From the equation: 1 mol reacts with 2 mol .
Amount of = ½ × 2.220 × 10⁻³ = 1.110 × 10⁻³ mol
1.110 × 10⁻³ mol
Background Concept
The titration reaction is:
The stoichiometric ratio is 1 mol I₂ : 2 mol Na₂S₂O₃. So the amount of iodine is half the amount of thiosulfate used.
Understanding the Question
Use the amount of sodium thiosulfate from (c)(ii) to calculate the amount of iodine that reacted with it.
Approach
Apply the mole ratio from the balanced equation: n(I₂) = ½ × n(Na₂S₂O₃).
Step-by-Step Reasoning
Amount of Na₂S₂O₃ = 2.220 × 10⁻³ mol.
Amount of I₂ = ½ × 2.220 × 10⁻³ = 1.110 × 10⁻³ mol.
This is the amount of iodine produced by the reaction of FA 3 with excess iodide.
Key Takeaways
- The balanced equation gives the mole ratio directly.
- 1 mol I₂ : 2 mol Na₂S₂O₃, so n(I₂) = ½ n(Na₂S₂O₃).
Common Mistakes
- Using the ratio the wrong way round (multiplying by 2 instead of ½).
- Forgetting that the ratio is 1:2, not 1:1.
Things to Be Careful About
- This answer depends on (c)(ii) — if (c)(ii) is wrong, this will be wrong too (error carried forward).
- Give the answer to 3 or 4 significant figures.
Calculate the amount, in mol, of FA 3 used to produce the amount of iodine in (c)(iii).
amount of FA 3 = .............................. mol
Working
Amount of FA 3 = 0.0175 × 25.0/1000 = 4.375 × 10⁻⁴ mol
4.375 × 10⁻⁴ mol
Background Concept
FA 3 is a 0.0175 mol dm⁻³ solution of the oxidising agent. A 25.0 cm³ pipette was used, so the volume is 25.0 cm³ = 0.0250 dm³. Amount = concentration × volume.
Understanding the Question
Calculate the amount, in mol, of FA 3 used to produce the iodine found in (c)(iii). This is simply the moles of oxidising agent in the 25.0 cm³ sample.
Approach
n(FA 3) = c × V = 0.0175 × 25.0/1000.
Step-by-Step Reasoning
This is the amount of oxidising agent that produced the iodine titrated.
Key Takeaways
- Amount = concentration × volume (volume in dm³).
- The pipette volume (25.0 cm³) is used, not the measuring cylinder volumes (10 cm³ and 20 cm³).
Common Mistakes
- Using 10 cm³ or 20 cm³ (the measuring cylinder volumes) instead of 25.0 cm³.
- Forgetting to convert cm³ to dm³.
Things to Be Careful About
- The answer is independent of the titre — it is fixed by the pipette volume and the given concentration.
- Give the answer to 3 or 4 significant figures.
Calculate the amount, in mol, of iodine produced by the reaction of of FA 3 with potassium iodide. Give your answer to one decimal place.
amount of = .............................. mol
Working
Amount of per mol of FA 3 = 1.110 × 10⁻³ / 4.375 × 10⁻⁴ = 2.537 ≈ 2.5 mol (1 d.p.)
2.5 mol
Background Concept
This part finds the stoichiometric ratio between the oxidising agent and iodine: how many moles of iodine are produced per mole of FA 3. This ratio is the key to determining the oxidation state change in (c)(vi).
Understanding the Question
Divide the amount of iodine (from (c)(iii)) by the amount of FA 3 (from (c)(iv)) to find the moles of I₂ produced per mole of oxidising agent. Give the answer to one decimal place.
Approach
n(I₂) per mol FA 3 = n(I₂) / n(FA 3) = (c)(iii) / (c)(iv).
Step-by-Step Reasoning
So 1 mol of FA 3 produces 2.5 mol of I₂.
Key Takeaways
- A ratio of amounts gives the stoichiometric relationship between reactant and product.
- The answer is quoted to 1 decimal place as instructed.
Common Mistakes
- Dividing the wrong way round (FA 3 by I₂).
- Quoting 2.537 instead of rounding to 2.5 (1 d.p.).
Things to Be Careful About
- The mark scheme requires the answer to 1 decimal place.
- This ratio feeds directly into part (c)(vi).
The oxidising agent in FA 3 is a compound of a transition metal, M.
The redox reaction of FA 3 with iodide ions produces ions.
Use your answer to (c)(v) to calculate the change in the oxidation state of M during this reaction.
Show your working.
The oxidation state of M changes from .............................. to .............................. .
Working
Each mol of formed requires 2 mol of electrons (each , I goes from −1 to 0).
Electrons transferred per mol of FA 3 = 2.5 × 2 = 5
Since is the product, M has accepted 5 electrons:
M changes from (2 + 5) = +7 to +2.
M changes from +7 to +2
Background Concept
In the redox reaction, iodide ions are oxidised to iodine and the oxidising agent (containing transition metal M) is reduced. Each iodide ion, , loses one electron when it becomes part of (oxidation state of I goes from −1 to 0). So each mol of formed corresponds to 2 mol of electrons transferred. The oxidising agent accepts these electrons, so its oxidation state decreases by the same number.
Understanding the Question
You know from (c)(v) that 1 mol of FA 3 produces 2.5 mol of I₂. The product of the reduction is . Find the change in oxidation state of M — i.e. the initial oxidation state and the final oxidation state.
Approach
- Electrons transferred per mol of FA 3 = (c)(v) × 2 = 2.5 × 2 = 5.
- M accepts 5 electrons, so its oxidation state decreases by 5.
- The product is , so the initial oxidation state = +2 + 5 = +7.
- M changes from +7 to +2.
Step-by-Step Reasoning
Step 1 — electrons per mol of I₂: Each : I goes from −1 to 0, losing 1 electron per I atom. Per mol of I₂ (2 mol of I atoms), 2 mol of electrons are transferred.
Step 2 — electrons per mol of FA 3: 2.5 mol of I₂ are produced per mol of FA 3, so electrons transferred = 2.5 × 2 = 5 mol per mol of FA 3.
Step 3 — oxidation state of M: M accepts 5 electrons, so its oxidation state decreases by 5. The product is , so the initial oxidation state was +2 + 5 = +7.
Therefore M changes from +7 to +2. (This is consistent with, for example, manganese in permanganate, Mn⁷⁺ → Mn²⁺.)
Key Takeaways
- Each mol of I₂ corresponds to 2 mol of electrons transferred.
- The oxidising agent's oxidation state decreases by exactly the number of electrons it accepts.
- The final oxidation state (+2) plus the electrons accepted gives the initial oxidation state.
Common Mistakes
- Forgetting to multiply by 2 (using 2.5 instead of 5 for the electron transfer).
- Getting the sign wrong — M is reduced, so its oxidation state decreases, not increases.
- Writing the change as +5 instead of −5, or stating the initial state as +2 and final as +7.
Things to Be Careful About
- The mark scheme requires both values to be integers — +7 and +2 are integers.
- Show the working clearly: M1 is the electron transfer calculation (2.5 × 2 = 5), M2 is the oxidation state deduction (from 7 to 2).
A student suggests that the experiment in (a) would be more accurate if the FA 5, sulfuric acid, is measured using a pipette.
State whether the student is correct. Explain your answer.
Answer
The student is incorrect. FA 5 (sulfuric acid) is used in excess, so the exact volume added does not affect the amount of iodine produced. Measuring it with a pipette would not improve the accuracy of the result.
Incorrect — FA 5 is in excess, so the exact volume does not matter
Background Concept
In this experiment, FA 5 (1.00 mol dm⁻³ sulfuric acid) provides the acidic conditions needed for the oxidation of iodide to iodine. It is added in excess — 20 cm³ of a 1.00 mol dm⁻³ solution is far more than needed. The amount of iodine produced is determined by the limiting reagent, which is FA 3 (the oxidising agent), not by the acid.
Understanding the Question
A student suggests that measuring FA 5 with a pipette (instead of a 25 cm³ measuring cylinder) would make the experiment more accurate. You must state whether this is correct and explain why.
Approach
Consider what the pipette would achieve: precise measurement of the acid volume. But does the acid volume affect the result? Since the acid is in excess, the reaction goes to completion regardless of the exact volume. Therefore, precise measurement of FA 5 adds nothing.
Step-by-Step Reasoning
The amount of iodine produced depends on:
- The amount of FA 3 (the oxidising agent) — measured precisely with a 25.0 cm³ pipette.
- The presence of excess FA 4 (KI) — ensures all FA 3 reacts.
- The presence of excess FA 5 (acid) — provides the acidic medium.
Since FA 5 is in excess, the exact volume (whether 20.0 cm³ or 20.5 cm³) makes no difference to the amount of iodine produced. The titration with FA 2 measures the iodine, and that measurement is what determines the accuracy of the final result. So the student is incorrect.
Key Takeaways
- Excess reagents do not need precise measurement — only the limiting reagent and the titrant matter.
- Accuracy improvements must target quantities that actually affect the result.
Common Mistakes
- Saying the student is correct (the mark is lost).
- Giving a vague reason like "a pipette is more accurate" without linking it to the fact that FA 5 is in excess.
- Confusing FA 5 with FA 3 or FA 2 — only FA 3 (the oxidising agent) and FA 2 (the titrant) need precise measurement.
Things to Be Careful About
- The mark scheme requires BOTH: "student is incorrect" AND "FA 5 is in excess, so the exact volume does not matter."
- Do not argue that a pipette would improve accuracy in general — the question is specific to FA 5.
Qualitative Analysis
For each test you should record all your observations in the spaces provided.
Examples of observations include:
- colour changes seen
- the formation of any precipitate and its solubility (where appropriate) in an excess of the reagent added
- the formation of any gas and its identification (where appropriate) by a suitable test.
You should record clearly at what stage in a test an observation is made.
Where no change is observed, you should write ‘no change’.
Where reagents are selected for use in a test, the name or correct formula of the element or compound must be given.
If any solution is warmed, a boiling tube must be used. If a solid is heated, a hard-glass test-tube must be used.
Rinse and reuse test-tubes and boiling tubes where possible.
No additional tests should be attempted.
Carry out the following tests using FA 3 and record your observations in Table 3.1.
Use a depth of FA 3 in a test-tube for each test.
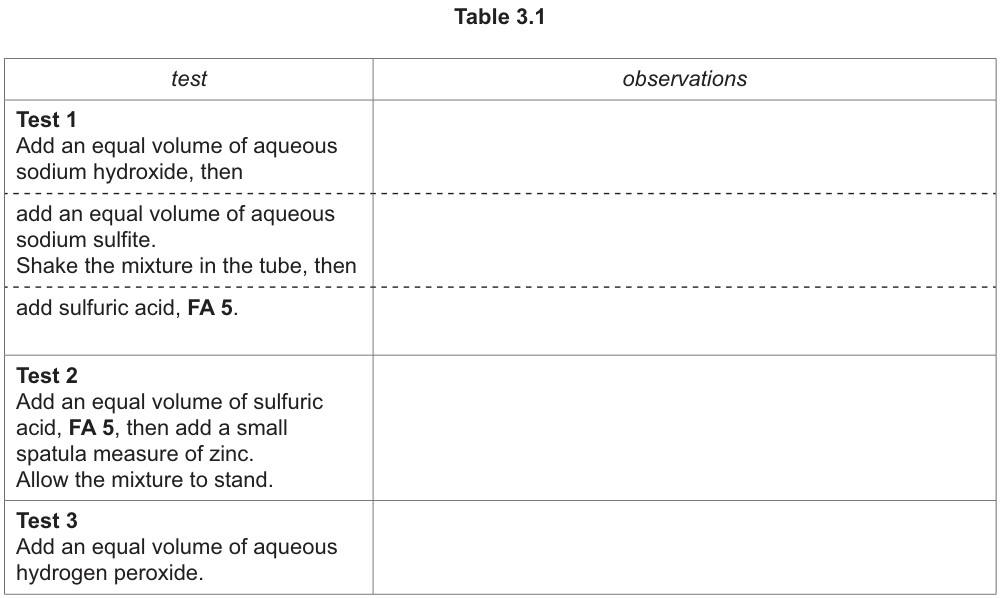
Give the formula of the gas formed in Test 3.
The gas formed is .............................. .
Answer
Table 3.1 Observations:
- Test 1:
- (with NaOH) no change / solution remains purple.
- (with NaSO) green solution forms / turns green, then a brown precipitate / solid forms.
- (with HSO) solution turns colourless.
- Test 2:
- purple solution turns colourless.
- fizzing / effervescence occurs.
- Test 3:
- fizzing / effervescence occurs.
- a dark brown solid / precipitate forms.
Gas formed in Test 3:
O
O2
Background Concept
Potassium manganate(VII), KMnO, is a strong oxidising agent. In acidic solution, the purple MnO ion is reduced to the colourless Mn ion. In neutral or alkaline conditions, it can be reduced to MnO (a brown solid) or MnO (a green manganate(VI) ion). Hydrogen peroxide, HO, can act as both an oxidising and a reducing agent. When mixed with KMnO, HO is oxidised to oxygen gas, O, while MnO is reduced to MnO (brown precipitate) or Mn (colourless), depending on conditions. Sodium sulfite, NaSO, is a reducing agent that reduces MnO to MnO (green) and then to MnO (brown). Zinc reacts with dilute sulfuric acid to produce hydrogen gas, H.
Understanding the Question
You are given FA 3, which is aqueous KMnO (a purple solution). You must predict the observations for three tests involving redox chemistry and gas evolution, and identify the gas produced in Test 3. The mark scheme rewards two descriptive points per test (maximum 4 marks total for the table), plus the gas formula.
Approach
Recall the standard colour changes and precipitates formed when KMnO reacts with common reducing agents (sulfite, zinc, hydrogen peroxide) and acids. For Test 3, identify the gas that causes effervescence and re-lights a glowing splint.
Step-by-Step Reasoning
Test 1: Adding NaOH to KMnO causes no reaction, so the solution remains purple. Adding NaSO reduces MnO; initially, green MnO is formed, which further reduces to brown MnO precipitate. Adding HSO provides acidic conditions, reducing MnO fully to colourless Mn.
Test 2: Adding HSO and then Zn. Zn reduces purple MnO to colourless Mn. Simultaneously, Zn reacts with the acid to produce H gas, causing fizzing/effervescence.
Test 3: Adding HO to KMnO. HO is oxidised to O gas (fizzing), and MnO is reduced to brown MnO precipitate. The gas that re-lights a glowing splint is oxygen, O.
Key Takeaways
- KMnO is purple; Mn is colourless; MnO is green; MnO is brown.
- Reducing agents (SO, Zn, HO) decolourise KMnO in acid, but may form brown MnO in neutral/alkaline conditions.
- Oxygen re-lights a glowing splint.
Common Mistakes
- Writing "colourless" for Test 1 with NaSO without mentioning the intermediate green colour or brown precipitate.
- Forgetting that Test 2 produces gas (H) from the reaction of Zn with acid, not just the decolourisation of MnO.
- Identifying the gas in Test 3 as H instead of O.
Things to Be Careful About
- Record observations at each stage (e.g., green then brown in Test 1 with sulfite).
- Ensure the gas formula is written correctly as O, not O or O.
FA 7 is a solution containing four ions, three of which are listed in the Qualitative analysis notes.
Carry out the following tests and record your observations in Table 3.2.
Use a depth of FA 7 for each test. A boiling tube must be used for Test 1 and a test-tube for the other tests.
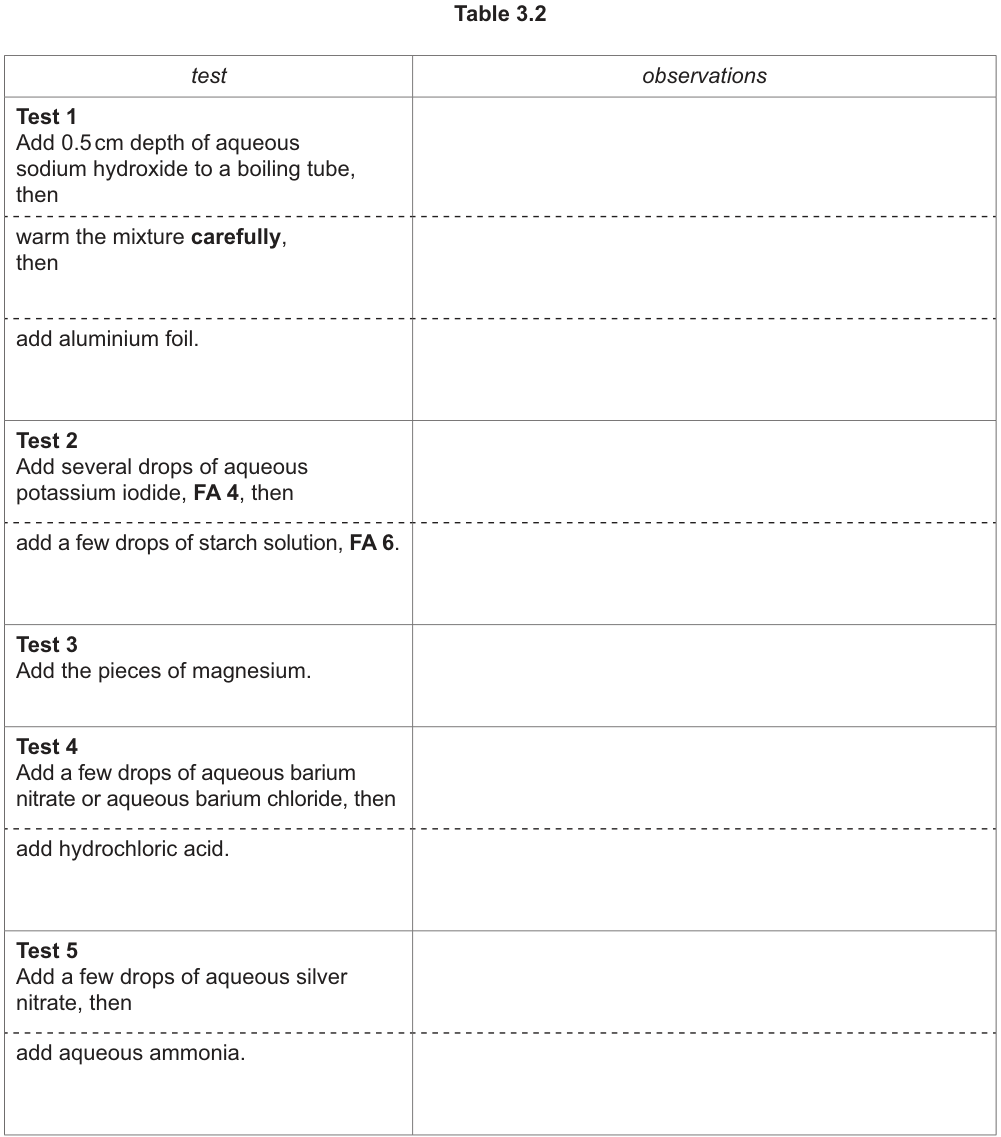
Answer
Table 3.2 Observations:
- Test 1:
- (with NaOH) a brown / red-brown / rust precipitate forms.
- (with excess NaOH) precipitate is insoluble.
- (on warming) a gas is evolved that turns damp red litmus paper blue (NH).
- (with Al foil) fizzing / effervescence occurs.
- Test 2:
- (with KI) the solution turns darker yellow / orange-brown / brown.
- (with starch) the solution turns dark blue / blue-black / black.
- Test 3:
- fizzing / effervervescence occurs.
- the gas gives a 'pop' with a lighted splint (H).
- Test 4:
- (with Ba) a white precipitate forms.
- (with HCl) the precipitate remains / is insoluble.
- the solution is yellow.
- Test 5:
- (with AgNO) no change / no precipitate.
- (with NH) a brown / red-brown / rust precipitate forms.
- (with excess NH) the precipitate is insoluble.
See table observations above
Background Concept
FA 7 is a mixture of (NH)Fe(SO) and HSO. The ions present are NH, Fe, SO, and H.
- Fe forms a brown/rust precipitate with NaOH and NH, insoluble in excess. It is a mild oxidising agent that oxidises I to I (brown/orange), which forms a blue-black complex with starch.
- NH reacts with OH on warming to release NH gas (turns red litmus blue). Al foil in NaOH can also produce H gas (fizzing).
- SO forms a white precipitate with Ba (BaSO), insoluble in dilute acids.
- H reacts with active metals (Mg) to produce H gas (pop test). It does not react with AgNO or Ba to form precipitates.
Understanding the Question
You must record observations for five tests on FA 7 and use them to identify the four ions. The mark scheme awards marks for two correct observation points per test (maximum 6 marks for part (b)(i)).
Approach
Systematically predict the outcome of each test based on the ions present. Ensure observations are specific (e.g., "brown precipitate" not just "precipitate", "blue-black" for starch-iodine).
Step-by-Step Reasoning
Test 1 (NaOH, warm, Al):
- NaOH + Fe → Fe(OH)(s) [brown ppt, insoluble in excess].
- NaOH + NH → NH(g) + HO [gas on warming, turns litmus blue].
- Al + NaOH → H(g) [fizzing/effervescence].
Test 2 (KI, starch):
- 2Fe + 2I → 2Fe + I [solution turns brown/orange].
- I + starch → blue-black complex.
Test 3 (Mg):
- Mg + 2H → Mg + H(g) [fizzing, pop with splint].
- Mg can also reduce Fe to Fe, but the acid reaction dominates the gas observation.
Test 4 (Ba, HCl):
- Ba + SO → BaSO(s) [white ppt, insoluble in HCl].
- Fe(aq) makes the solution yellow.
Test 5 (AgNO, NH):
- No halides present, so no AgCl/AgBr/AgI precipitate with AgNO [no change].
- NH + Fe → Fe(OH)(s) [brown ppt, insoluble in excess NH].
Key Takeaways
- Fe oxidises I to I (starch test is positive).
- BaSO is white and insoluble in acid; distinguish from BaCO (soluble in acid).
- Mg reacts with acid to give H; distinguish from reactions with metal ions.
- AgNO tests for halides; absence of precipitate confirms no Cl, Br, I.
Common Mistakes
- Describing the Fe(OH) precipitate as "orange" or "rust" without specifying it is insoluble in excess reagent.
- Forgetting the colour of the Fe solution (yellow) in Test 4.
- Writing "no reaction" for Test 5 with AgNO instead of "no precipitate".
- Confusing the starch-iodine colour (blue-black) with the iodine solution colour (brown/orange).
Things to Be Careful About
- Use precise terminology: "brown precipitate" for Fe(OH), not "rust" (though rust is allowed, brown is better).
- Specify "insoluble in excess" for Fe tests with both NaOH and NH.
- Ensure the gas test in Test 3 mentions the 'pop' sound, not just that gas is evolved.
Give the formula of each of the four ions in FA 7.
The ions are ........................ , ........................ , ........................ and ........................ .
Answer
The ions are H, NH, Fe and SO.
H+, NH4+, Fe3+, SO42-
Background Concept
FA 7 is identified as a solution of iron(III) ammonium sulfate, (NH)Fe(SO), with added sulfuric acid (HSO). This is a common source of Fe and NH in qualitative analysis, often used to test for the interference of one ion on another or to demonstrate mixed ion tests.
Understanding the Question
You must list the four ions present in FA 7 based on the observations recorded in part (b)(i). The mark scheme awards 2 marks for all four correct, 1 mark for 2 or 3 correct.
Approach
Match each observation to the ion responsible:
- Fizzing with Mg, no ppt with AgNO → H (acidic solution, no halides).
- Gas with NaOH on warming → NH.
- Brown ppt with NaOH/NH, brown solution with KI → Fe.
- White ppt with Ba insoluble in acid → SO.
Step-by-Step Reasoning
- H: Test 3 shows fizzing with Mg (H gas). Test 4 shows no reaction with Ba or Ag that would indicate carbonate or halide. The solution is acidic due to added HSO.
- NH: Test 1 shows gas evolved on warming with NaOH that turns red litmus blue (NH).
- Fe: Test 1 shows brown ppt with NaOH (insoluble in excess). Test 2 shows oxidation of I to I (brown solution, blue-black with starch).
- SO: Test 4 shows white ppt with Ba that is insoluble in HCl.
Key Takeaways
- Mixed ion solutions require systematic deduction: each test isolates a specific ion or class of ions.
- (NH)Fe(SO) is a double salt that dissociates into NH, Fe, and SO.
Common Mistakes
- Forgetting H because it is a spectator in many precipitation tests but is confirmed by the reaction with Mg.
- Writing "iron" instead of "Fe" or "Fe(III)".
- Confusing SO with SO (sulfite would give a ppt with Ba but it would dissolve in acid with effervescence).
Things to Be Careful About
- Include charges on all ions: H, NH, Fe, SO.
- Do not write molecular formulas like (NH)Fe(SO); the question asks for ions.
Give the ionic equation for one reaction that takes place in Test 1 or Test 3 of (b)(i).
Include state symbols.
Answer
Any one of the following:
Fe3+(aq) + 3OH-(aq) -> Fe(OH)3(s) (or any one from the list)
Background Concept
Ionic equations must show only the species that actually change during the reaction. State symbols are mandatory: (aq) for dissolved ions, (s) for precipitates, (g) for gases, (l) for liquids.
- Precipitation: Fe(aq) + 3OH(aq) → Fe(OH)(s)
- Gas evolution (ammonia): NH(aq) + OH(aq) → NH(g) + HO(l)
- Metal-acid reaction: Mg(s) + 2H(aq) → Mg(aq) + H(g)
- Redox (metal-metal ion): Mg(s) + 2Fe(aq) → Mg(aq) + 2Fe(aq)
Understanding the Question
You must write the ionic equation for one reaction that occurs in Test 1 or Test 3 of part (b)(i). The equation must be balanced and include state symbols.
Approach
Choose the simplest and most unambiguous reaction. The precipitation of Fe(OH) or the reaction of Mg with H are the most straightforward.
Step-by-Step Reasoning
Test 1 reactions:
- Fe + 3OH → Fe(OH)(s) [precipitation]
- NH + OH → NH(g) + HO(l) [gas evolution on warming]
- 2Al + 2OH + 2HO → 2AlO + 3H(g) [fizzing with Al foil, though the mark scheme accepts simpler equations]
Test 3 reactions:
- Mg + 2H → Mg + H(g) [effervescence]
- Mg + 2Fe → Mg + 2Fe [redox, no gas]
Select any one and ensure charges and atoms are balanced.
Key Takeaways
- Always include state symbols in ionic equations for qualitative analysis.
- Distinguish between molecular and ionic equations; use ionic form for reactions in solution.
- Balance both mass and charge.
Common Mistakes
- Forgetting state symbols (e.g., writing Fe(OH) without (s)).
- Writing the full molecular equation (e.g., FeCl + 3NaOH → Fe(OH) + 3NaCl) instead of the ionic equation.
- Unbalanced charge or atoms (e.g., NH + OH → NH + H is wrong).
- Writing HO as (g) instead of (l) for the ammonia reaction (though (g) is sometimes allowed if steam is produced, (l) is standard).
Things to Be Careful About
- The question asks for one equation; writing more does not help and may introduce errors.
- Ensure the equation matches the test: Test 1 involves NaOH/Al, Test 3 involves Mg.