Chemistry 9701/22 — May/June 2024
Cambridge AS Level · AS Level Structured Questions · worked solutions for every part, with the mark scheme
Topics Atomic Structure · Chemical Bonding · Hydroxy Compounds · States of Matter · Chemical Periodicity · Atoms, Molecules and Stoichiometry · +7 more
Complete Table 1.1 using relevant information from the Periodic Table.
Table 1.1
| nucleon number | proton number | number of electrons | |
|---|---|---|---|
| 24 | |||
| 27 |
Answer
| nucleon number | proton number | number of electrons | |
|---|---|---|---|
| 24 | 12 | 10 | |
| 27 | 13 | 10 |
Mg2+: 12, 10; Al3+: 13, 10
Background Concept
The atomic structure of an element is defined by its proton number (atomic number, ), which is the number of protons in the nucleus and determines the element's identity. The nucleon number (mass number, ) is the total number of protons and neutrons. In a neutral atom, the number of electrons equals the proton number. When an atom forms an ion, it loses or gains electrons. A positive ion (cation) has lost electrons, so the number of electrons is . A negative ion (anion) has gained electrons, so the number of electrons is .
Understanding the Question
The question asks to complete a table for two ions, and , by finding their proton numbers and the number of electrons they contain, given their nucleon numbers (24 and 27 respectively).
Approach
- Look up the proton numbers for magnesium (Mg) and aluminium (Al) from the Periodic Table.
- Calculate the number of electrons by subtracting the ionic charge from the proton number.
Step-by-Step Reasoning
- For : Magnesium is in Group 2, Period 3. Its proton number is 12. As a neutral atom, it has 12 electrons. The charge means it has lost 2 electrons. Number of electrons = .
- For : Aluminium is in Group 3, Period 3. Its proton number is 13. As a neutral atom, it has 13 electrons. The charge means it has lost 3 electrons. Number of electrons = .
Key Takeaways
The proton number is fixed for a given element and is found directly from the Periodic Table. The number of electrons in an ion is adjusted by the charge: lose electrons for positive ions, gain for negative ions.
Common Mistakes
- Confusing nucleon number (mass number) with proton number. The nucleon number is given (24 and 27) and is not needed to find the proton number or electron count for these specific questions, though it defines the isotope.
- Forgetting to subtract the charge for cations (e.g., writing 12 for Mg2+ electrons).
Things to Be Careful About
Ensure you are reading the correct column in the Periodic Table. Proton number is the integer, not the relative atomic mass.
Answer
- is smaller than .
- Both ions have the same number of electrons (10) and the same shielding effect.
- has a greater nuclear charge (13 protons) than (12 protons).
- The greater nuclear charge in exerts a stronger attraction on the electron cloud, pulling the electrons closer to the nucleus.
Al3+ is smaller due to greater nuclear charge with same shielding.
Background Concept
Ionic radius is the measure of the size of an ion. When comparing isoelectronic species (ions with the same number of electrons), the size is determined by the nuclear charge (number of protons). A higher nuclear charge pulls the electron cloud more strongly towards the nucleus, resulting in a smaller ionic radius. Shielding is the effect where inner electrons repel outer electrons, reducing the effective nuclear charge felt by the outer electrons. For isoelectronic ions, the electron configuration is identical, so the shielding effect is the same.
Understanding the Question
The question asks to state and explain the difference in ionic radius between and . We established in part (a) that both have 10 electrons (isoelectronic with neon).
Approach
- State which ion is smaller.
- Explain that they have the same number of electrons and thus the same shielding.
- Compare the nuclear charges (proton numbers) and explain how this affects the attraction on the electron cloud.
Step-by-Step Reasoning
- State the difference: is smaller than .
- Shielding: Both ions have 10 electrons with the configuration . The inner shell (1s) shields the outer shells (2s, 2p) equally in both cases. Therefore, the shielding effect is the same.
- Nuclear charge: Aluminium has a proton number of 13, while magnesium has a proton number of 12. has a greater nuclear charge () than ().
- Explanation: The greater positive charge in the nucleus of attracts the 10 electrons more strongly than the nucleus of . This stronger electrostatic attraction pulls the electron cloud closer to the nucleus, resulting in a smaller ionic radius.
Key Takeaways
For isoelectronic ions, ionic radius decreases as nuclear charge (proton number) increases. Always mention both the same shielding and the greater nuclear charge for full marks.
Common Mistakes
- Saying "more protons" without specifying "greater nuclear charge" or "more positive charge in the nucleus".
- Forgetting to mention that the shielding is the same. If shielding is different, the argument is invalid.
- Stating that has more protons so it is larger (confusing the effect).
Things to Be Careful About
The mark scheme specifically looks for "same shielding" AND "greater nuclear charge". Omitting either point may cost a mark. Also, ensure you compare the correct ions (Al3+ is smaller, not larger).
Answer
A regular (lattice) arrangement of positive ions (cations) surrounded by a sea of delocalised electrons.
Diagram showing positive ions in a regular lattice surrounded by delocalised electrons.
Background Concept
Metals, such as sodium, have metallic bonding. This is described as a regular arrangement of positive metal ions (cations) in a lattice, surrounded by a 'sea' of delocalised electrons. The delocalised electrons are the outer-shell (valence) electrons that are not associated with any particular atom but are free to move throughout the structure. The electrostatic attraction between the positive ions and the delocalised electrons holds the structure together.
Understanding the Question
The question asks for a labelled diagram showing the structure and bonding in sodium metal.
Approach
Draw a representation of the metallic lattice. Show at least a 2x2 arrangement of positive ions and some delocalised electrons around them. Label both components clearly.
Step-by-Step Reasoning
- Structure: Sodium forms a giant metallic lattice. Draw circles to represent the positive sodium ions (). Arrange them in a regular pattern (e.g., rows and columns). Put a '+' sign inside each circle to indicate the positive charge.
- Bonding: Draw smaller circles or dashes with a '-' sign (or just '-' signs) scattered around and between the positive ions to represent the delocalised electrons. These are the valence electrons from the sodium atoms (3s1) that have been released into the 'sea'.
- Labels: Clearly label the circles with '+' as 'positively charged ions' or 'cations' and the '-' symbols as 'delocalised electrons'.
Key Takeaways
The metallic bonding model must show both the regular arrangement of positive ions and the delocalised electrons. Simply drawing a lattice of atoms is incorrect; they must be shown as ions (+).
Common Mistakes
- Drawing neutral atoms instead of positive ions. Sodium metal consists of ions, not neutral Na atoms.
- Forgetting to label the diagram. The question asks for a 'labelled diagram'.
- Drawing the electrons as being attached to specific ions. They must be shown as free/delocalised throughout the structure.
Things to Be Careful About
Ensure the positive ions are clearly marked with a '+' and the electrons with a '-'. The arrangement should look regular, not random. At least a 2x2 grid of ions is typically expected to show the 'regular arrangement'.
Fig. 1.1 shows the variation in melting point of some Period 3 elements in their standard states at room temperature and pressure.
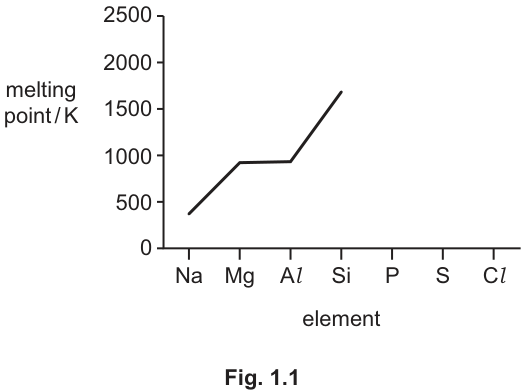
Answer
Silicon has a giant covalent (macromolecular) structure. A large amount of energy is required to break the strong covalent bonds throughout the lattice.
Giant covalent structure; strong covalent bonds require large energy to break.
Background Concept
The melting point of a substance depends on the strength of the forces that must be overcome to separate the particles. For giant structures (giant ionic, giant metallic, giant covalent), melting involves breaking strong bonds (ionic, metallic, or covalent) throughout the entire lattice. Silicon is in Group 4 and forms a giant covalent structure similar to diamond, where each silicon atom is covalently bonded to four other silicon atoms in a tetrahedral arrangement. These strong covalent bonds extend throughout the entire crystal, requiring a large amount of thermal energy to break, hence the high melting point.
Understanding the Question
Part (d)(i) asks to explain why silicon (Si) has a high melting point, based on the provided graph showing a sharp peak at Si.
Approach
Identify the structure and bonding of silicon. State that it is a giant covalent structure. Explain that melting requires breaking the bonds within this structure.
Step-by-Step Reasoning
- Structure: Silicon is a Group 4 element. In its standard state, it forms a giant covalent (macromolecular) lattice. Each Si atom is bonded to four others via strong covalent bonds.
- Melting process: To melt silicon, the strong covalent bonds holding the atoms together in the giant lattice must be broken.
- Energy: Because covalent bonds are strong and there are many of them in the giant structure, a large amount of energy (high temperature) is required to break them. This results in a high melting point (~1700 K).
Key Takeaways
High melting points in Period 3 elements (Na, Mg, Al, Si) are due to strong bonding (metallic or covalent) in giant structures. For Si, it is specifically the breaking of strong covalent bonds in a giant covalent lattice.
Common Mistakes
- Saying 'strong forces' without specifying 'covalent bonds'. 'Forces' is too vague and could imply intermolecular forces, which are weak.
- Saying 'breaking intermolecular forces'. Silicon does not have simple molecular structure; it has a giant covalent structure where bonds are broken, not just intermolecular forces.
- Not mentioning 'giant covalent' or 'macromolecular'.
Things to Be Careful About
Be precise: 'strong covalent bonds' must be mentioned. 'Large amount of energy' or 'high temperature' is the consequence, but the reason is the bond breaking.
Complete Fig. 1.1 to show the variation in the melting points of the elements P, S and Cl.
Answer
The graph should show melting points for P, S, and Cl all lower than Mg (~920 K). The order of melting points must be (i.e., Cl is lowest, then P, then S). The line should drop sharply from Si to P, rise slightly to S, then fall to Cl.
Graph showing melting points: P < S, and Cl < P. All lower than Mg.
Background Concept
The melting points of Period 3 elements after silicon depend on their molecular structures and the intermolecular forces (van der Waals forces) between the molecules. Simple molecular substances have low melting points because only weak intermolecular forces need to be overcome, not strong covalent bonds.
- Phosphorus (): Exists as discrete molecules (tetrahedral). Moderate van der Waals forces.
- Sulfur (): Exists as discrete rings (crown-shaped). Larger molecules have more electrons, leading to stronger van der Waals dispersion forces than . Thus, S has a higher melting point than P.
- Chlorine (): Exists as small diatomic molecules. Very few electrons, so very weak van der Waals forces. Lowest melting point of the three.
Understanding the Question
Part (d)(ii) asks to complete the graph in Fig 1.1 for P, S, and Cl. The graph already shows Na, Mg, Al, Si. We need to plot the relative melting points for the remaining elements.
Approach
- Recall that P, S, and Cl are simple molecular, so their melting points will be much lower than Si (and lower than Mg/Al).
- Determine the relative order of melting points based on molecular size and van der Waals forces: .
- Plot these points on the graph and connect them with a line.
Step-by-Step Reasoning
- General trend: After the peak at Si (giant covalent), the melting points drop dramatically because P, S, and Cl form simple molecular structures with weak intermolecular forces. All three will be well below 1000 K (Mg is ~920 K).
- Relative order:
- Chlorine (): Smallest molecule, fewest electrons, weakest van der Waals forces. Lowest melting point (~239 K). Plot a point low on the y-axis for Cl.
- Phosphorus (): Larger molecule than , more electrons, stronger van der Waals forces. Higher melting point than Cl (~317 K). Plot a point for P higher than Cl.
- Sulfur (): Largest molecule ( ring), most electrons, strongest van der Waals forces. Highest melting point of the three (~388 K). Plot a point for S higher than P.
- Plotting: Draw a line from Si down to P, then up slightly to S, then down to Cl. Ensure all three points are clearly below the Mg/Al level (around 900-950 K) and below 500 K on the y-axis scale (0 to 500 is the first major interval). The exact values aren't critical, but the relative order and that they are low is essential.
Key Takeaways
For simple molecular substances, melting point increases with molecular size/number of electrons due to stronger van der Waals forces. .
Common Mistakes
- Plotting P, S, Cl as having high melting points (confusing them with giant structures).
- Getting the relative order wrong (e.g., thinking Cl > S because Cl is further right in the period). Remember it's about molecular size, not atomic number.
- Drawing a straight line without the slight peak at S. The graph should show Cl < P < S.
Things to Be Careful About
The mark scheme requires 'all 3 melting points lower than Mg' and 'Cl < P < S'. Ensure the plotted points reflect this. Don't just draw a flat line; show the slight variation. The values should be roughly in the 200-400 K range, well below the 500 K mark on the axis.
Two Period 3 elements react with an excess of oxygen at room pressure.
Complete Table 1.2.
Table 1.2
| 1 | 2 | 3 |
|---|---|---|
| Period 3 element | state of oxide at room temperature and pressure | approximate pH of solution made when oxide is added to water |
| Na | ||
| S |
Answer
| Period 3 element | state of oxide at room temperature and pressure | approximate pH of solution made when oxide is added to water |
|---|---|---|
| Na | solid | 10–14 |
| S | gas | 0–4 |
Na2O: solid, pH 10-14; SO2: gas, pH 0-4
Background Concept
Period 3 elements react with oxygen to form oxides. The nature of these oxides changes across the period from basic (metallic) to acidic (non-metallic).
- Sodium (Na): Reacts to form sodium oxide (), a giant ionic lattice. At room temperature, it is a solid. When added to water, it reacts to form sodium hydroxide (), a strong alkali, giving a high pH (10-14).
- Sulfur (S): Reacts to form sulfur dioxide (), a simple molecular gas. At room temperature, it is a gas. When dissolved in water, it forms sulfurous acid (), a weak acid, giving a low pH (0-4, typically around 2-3).
Understanding the Question
Part (e)(i) asks to complete a table for Na and S, giving the state of their oxides at room temperature and the approximate pH when the oxide is added to water.
Approach
- Identify the oxides formed by Na and S with excess oxygen.
- State their physical state at room temperature.
- Determine the pH of their aqueous solutions based on their acid-base nature.
Step-by-Step Reasoning
- Sodium (Na): Oxide is (sodium oxide). It is an ionic solid, so state is solid. Reaction with water: . NaOH is a strong base, so pH is 10–14 (or >7, but 10-14 is more precise for strong alkali).
- Sulfur (S): Oxide is (sulfur dioxide). It is a simple molecular substance, so state is gas. Reaction with water: . Sulfurous acid is acidic, so pH is 0–4 (or <7, but 0-4 is typical for acid rain/weak acid solutions in this context).
Key Takeaways
Metal oxides (like Na2O) are basic and form alkaline solutions (high pH). Non-metal oxides (like SO2) are acidic and form acidic solutions (low pH). State depends on structure: ionic = solid, simple molecular = gas/liquid.
Common Mistakes
- Saying SO2 is a liquid or solid. It is a gas at room temperature.
- Giving a pH of exactly 7 or saying 'neutral'. Na2O is basic, SO2 is acidic.
- Confusing the oxide of S. Excess oxygen gives SO2 (and some SO3, but SO2 is the primary product asked for in this context, and it's a gas. SO3 is a solid/liquid but reacts to form H2SO4. The mark scheme accepts gas and pH 0-4, which fits SO2 perfectly).
Things to Be Careful About
The pH ranges given in mark schemes are often broad (e.g., 10-14, 0-4). Ensure you don't write a single value like '14' or '1' if a range is expected, though often a value within the range is accepted. 'Solid' and 'gas' must be exact words.
The solutions made in column 3 of Table 1.2 are mixed together.
Name the type of reaction that occurs.
Answer
acid–base reaction (or neutralisation)
acid-base (or neutralisation)
Background Concept
The solutions made in column 3 are NaOH (alkaline, pH 10-14) and H2SO3 (acidic, pH 0-4). Mixing an acid and a base results in an acid-base reaction, also known as a neutralisation reaction, producing a salt and water.
Understanding the Question
Part (e)(ii) asks for the type of reaction when the solutions from column 3 (NaOH and H2SO3) are mixed.
Approach
Identify the nature of the two solutions: one is basic (alkaline), the other is acidic. The reaction between an acid and a base is called acid-base or neutralisation.
Step-by-Step Reasoning
- Solution 1: NaOH (strong base/alkali).
- Solution 2: H2SO3 (weak acid).
- Mixing them: (or similar).
- This is a classic acid-base or neutralisation reaction.
Key Takeaways
Acid + Base -> Salt + Water. The reaction type is neutralisation or acid-base.
Common Mistakes
- Saying 'precipitation' or 'redox'. While redox can occur in some mixing, the primary reaction between an acid and a base is neutralisation.
- Not using the standard terms 'acid-base' or 'neutralisation'.
Things to Be Careful About
Both 'acid-base' and 'neutralisation' are accepted. Use the exact terminology.
Answer
P4O10 + 6H2O -> 4H3PO4
Background Concept
Phosphorus burns in excess oxygen to form phosphorus(V) oxide, (often written as but the molecular formula is ). When this acidic oxide reacts with water, it forms phosphoric(V) acid, .
Understanding the Question
Part (e)(iii) asks for an equation for the reaction between and an excess of water.
Approach
- Write the reactants: and .
- Write the product: (phosphoric acid).
- Balance the equation.
Step-by-Step Reasoning
- Reactants:
- Product:
- Unbalanced:
- Balance P: 4 P on left, so need 4 on right.
- Balance H: 4 * 3 = 12 H on right, so need 6 on left.
- Check O: Left = 10 + 6 = 16. Right = 4 * 4 = 16. Balanced.
Key Takeaways
Acidic oxides react with water to form acids. is the molecular formula for phosphorus(V) oxide. The product is .
Common Mistakes
- Using instead of . While is the empirical formula, the question specifically gives , so use that.
- Forgetting to balance the equation.
- Writing the product as (metaphosphoric acid). With excess water, orthophosphoric acid () is formed.
Things to Be Careful About
Ensure the equation is fully balanced. State symbols are not strictly required by the mark scheme for this specific entry (unlike some other parts), but it's good practice. The mark scheme gives .
Aluminium hydroxide is amphoteric.
Answer
reacts with both acids and bases (or shows both acidic and basic behaviour)
reacts with both acids and bases
Background Concept
Amphoteric substances are those that can act as either an acid or a base. In the context of Period 3 oxides and hydroxides, aluminium hydroxide () is amphoteric. This means it can react with strong acids (acting as a base) and strong bases (acting as an acid) to form salts and water.
Understanding the Question
Part (f)(i) asks to explain what is meant by 'amphoteric'.
Approach
Give the standard definition: a substance that reacts with both acids and bases, or exhibits both acidic and basic properties.
Step-by-Step Reasoning
- Definition: Amphoteric means the substance can react with both acids and bases.
- Alternative phrasing: Shows both acidic and basic behaviour.
Key Takeaways
Amphoteric = reacts with acid + base. Key examples in A-Level Chemistry: , , , .
Common Mistakes
- Saying 'reacts with water'. All oxides/hydroxides react with water to some extent (or don't), that's not the definition.
- Saying 'reacts with acids only' or 'bases only'. That's basic or acidic, respectively.
Things to Be Careful About
The definition must mention both acids and bases. 'Reacts with both' is the key phrase.
Write an equation to describe the reaction that occurs when aluminium hydroxide, , reacts with .
Answer
(Alternatively: )
Al(OH)3 + NaOH -> NaAl(OH)4
Background Concept
Aluminium hydroxide is amphoteric. When it reacts with a strong base like sodium hydroxide (), it acts as an acid and dissolves to form a soluble complex ion, tetrahydroxoaluminate(III), . The salt formed is sodium aluminate, (or ).
Understanding the Question
Part (f)(ii) asks for an equation for the reaction between and .
Approach
Write the reactants: and . Write the product: . Ensure it is balanced (it is 1:1:1).
Step-by-Step Reasoning
- Reactants:
- Product: (sodium tetrahydroxoaluminate)
- Equation:
- Check balance: Al: 1=1, Na: 1=1, O: 3+1=4, H: 3+1=4. Balanced.
- Ionic equation alternative:
Key Takeaways
Amphoteric hydroxides dissolve in excess strong base to form complex aluminate ions. The formula is the standard molecular equation product.
Common Mistakes
- Writing the product as (sodium meta-aluminate) or . While these exist in some contexts, the aqueous complex ion is the correct product in aqueous NaOH.
- Not balancing the equation or getting the formula of the product wrong.
- Forgetting that is a solid and dissolves (though state symbols aren't always strictly penalised if the chemistry is right, the mark scheme here just gives the formula equation).
Things to Be Careful About
The mark scheme specifically gives . Use this exact formula. The ionic equation is also acceptable and often preferred in advanced chemistry, but stick to the molecular one if unsure.
Separate samples of and react with to produce the same products, as shown in Table 2.1.
Table 2.1
| reaction | equation | |
|---|---|---|
| 1 | ||
| 2 |
Complete the reaction pathway diagram in Fig. 2.1 for reaction 2.
Label the diagram to show the enthalpy change, , and the activation energy, .
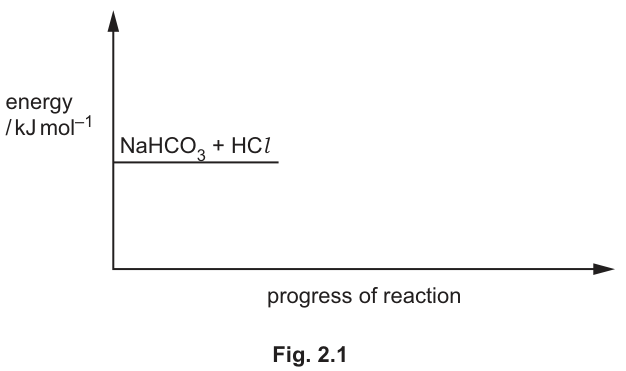
Answer
- Draw a curve starting at the reactant level, rising to a peak (the hump), and finishing at a product level higher than the reactant level.
- Draw an upward arrow from the reactant energy level to the peak of the curve, and label it .
- Draw an upward arrow from the reactant energy level to the product energy level, and label it (or ).
See diagram: endothermic profile with and arrows pointing upwards.
Background Concept
A reaction pathway diagram (or energy profile) plots the energy of the system against the progress of the reaction. The vertical axis represents energy (often in kJ mol), and the horizontal axis represents the progress of the reaction from reactants to products.
The peak of the curve represents the transition state (activated complex). The energy difference between the reactants and the peak is the activation energy (), which is the minimum energy required for the reaction to occur. The energy difference between the reactants and the products is the enthalpy change of reaction ().
If the products are at a higher energy level than the reactants, the reaction is endothermic (). If the products are at a lower energy level, the reaction is exothermic ().
Understanding the Question
The question asks to complete a reaction pathway diagram for reaction 2:
The given is positive, meaning the reaction is endothermic. The diagram must show the products at a higher energy level than the reactants. We also need to label the activation energy () and the enthalpy change ( or ).
Approach
- Draw the reaction curve: start at the reactant line, curve up to a maximum (the hump), and then curve down to a product line that is higher than the reactant line.
- Label the activation energy () as an upward arrow from the reactant level to the peak.
- Label the enthalpy change () as an upward arrow from the reactant level to the product level.
Step-by-Step Reasoning
- Profile shape: Since kJ mol, the reaction is endothermic. The product energy level () must be drawn higher than the reactant energy level (). A smooth curve with a peak connects them.
- Activation energy (): This is the energy barrier from reactants to the transition state. Draw a vertical arrow from the reactant line up to the top of the peak. Label it .
- Enthalpy change (): This is the net energy difference between products and reactants. Draw a vertical arrow from the reactant line up to the product line. Label it (or ). The arrow must point upwards because energy is absorbed.
Key Takeaways
- Endothermic reactions have products at a higher energy level than reactants.
- is always measured from the reactant level to the peak.
- is measured from the reactant level to the product level; its direction (up/down) indicates whether the reaction is endothermic or exothermic.
Common Mistakes
- Drawing an exothermic profile (products lower than reactants) when is positive.
- Labeling from the product level to the peak.
- Forgetting to draw the arrow for or drawing it in the wrong direction (downwards for an endothermic reaction).
Things to Be Careful About
- Ensure the arrow starts at the reactant energy level, not the x-axis.
- The arrow must point upwards for an endothermic reaction.
- The curve should have a clear peak (hump) representing the activation energy barrier.
The value for is determined by experiment using the following method.
- of is added to a polystyrene cup.
- The initial temperature of the acid is recorded as .
- of is added and the mixture is stirred.
- All the solid disappears and a colourless solution is produced.
The maximum temperature recorded during the reaction is .
Answer
No more fizzing / effervescence stops.
No more fizzing / effervescence stops.
Background Concept
When a carbonate reacts with an acid, carbon dioxide gas is produced. This is observed as fizzing or effervescence. The reaction continues as long as there is unreacted carbonate or acid present.
Understanding the Question
The experiment involves adding solid to . The solid disappears and a colourless solution is produced. We need one other observation that indicates the reaction is complete.
Approach
Since gas is produced during the reaction, the fizzing will stop when the limiting reagent is completely used up. Here, is the limiting reagent ( mol requires mol , but mol is present). When all the solid carbonate has reacted, no more will be produced.
Step-by-Step Reasoning
- The reaction produces gas: .
- Gas evolution is seen as fizzing or effervescence.
- When the reaction is complete, no more gas is produced, so the fizzing stops.
Key Takeaways
- Gas evolution is a common visual indicator of reaction progress.
- The cessation of gas bubbles indicates the reaction has finished.
Common Mistakes
- Saying 'the solution becomes clear' (this is already stated in the question as 'a colourless solution is produced').
- Saying 'temperature stops rising' (this is harder to observe visually than fizzing and is not the primary visual indicator).
Things to Be Careful About
- Use precise terminology: 'fizzing' or 'effervescence', not just 'bubbles' (though 'bubbles stop' is often accepted, 'fizzing stops' is better).
- Do not say 'no more solid dissolves' as the question already states 'All the solid disappears'.
Calculate the value of in .
Assume the specific heat capacity of the reaction mixture is the same as for water and no heat is lost to the surroundings.
Show your working.
Working
Moles of reacted = mol
Rounding to 3 significant figures:
Answer
-34.5
Background Concept
Calorimetry is used to measure the heat energy change during a reaction. The formula is:
where:
- is the heat energy change in Joules (J).
- is the mass of the solution in grams (g). For dilute aqueous solutions, we assume the density is , so mass in g = volume in cm.
- is the specific heat capacity in J K g (or J K mol for water). We assume .
- is the temperature change in K (or °C, as the magnitude is the same).
The enthalpy change is the heat energy change per mole of reaction. If the temperature increases, the reaction is exothermic, and is negative.
Understanding the Question
We are given:
- Volume of = (assume mass = )
- Moles of =
We need to calculate in kJ mol.
Approach
- Calculate using .
- Convert to kJ.
- Divide by the moles of to find the energy change per mole.
- Apply the correct sign: temperature increased, so the reaction is exothermic, is negative.
Step-by-Step Reasoning
- Calculate :
- Convert to kJ:
- Calculate :
The reaction is exothermic (temperature rose), so is negative.
- Significant figures: The temperature change () has 2 significant figures, but typically in these calculations, we report to 3 significant figures or match the least precise data. The mark scheme accepts .
Key Takeaways
- Always convert J to kJ when asked for in kJ mol.
- Remember the sign convention: temperature rise = exothermic = negative .
- Assume mass of solution = volume of solution (in g) for dilute aqueous reactions.
Common Mistakes
- Forgetting to convert J to kJ (resulting in ).
- Forgetting the negative sign for an exothermic reaction.
- Using the wrong mass (e.g., including the mass of the solid, which is not standard unless specified).
Things to Be Careful About
- The mark scheme allows kJ directly.
- Ensure is calculated correctly: , not .
- The value is correct to 3 significant figures.
Thermal decomposition occurs when is heated.
Calculate the enthalpy change for reaction 3, , using the data in Table 2.1 and the value of calculated in (b)(ii).
(If you were unable to calculate a value for in (b)(ii), assume the enthalpy change is . This is not the correct value.)
Working
Reaction 1:
Reaction 2:
Target:
Target = (Reaction 2) (Reaction 1)
Answer
+88.9
Background Concept
Hess's law states that the total enthalpy change for a reaction is independent of the pathway taken. This allows us to calculate for a reaction by combining other reactions whose values are known.
If we need to reverse a reaction, we change the sign of . If we multiply a reaction by a factor, we multiply by the same factor.
Understanding the Question
We need to find for:
Given:
Approach
We need to manipulate equations 1 and 2 to sum to the target equation.
- Target has on the left. Equation 2 has on the left. So multiply Equation 2 by 2.
- Target has on the right. Equation 1 has on the left. So reverse Equation 1 (multiply by -1).
Target = (Equation 2) (Equation 1)
Step-by-Step Reasoning
-
Multiply Equation 2 by 2:
-
Reverse Equation 1:
-
Add the two equations:
-
Cancel common terms:
cancels. cancels. One and one cancel from both sides.
Result: -
Calculate :
Key Takeaways
- Hess's law allows algebraic manipulation of chemical equations and their values.
- Reversing a reaction changes the sign of .
- Multiplying a reaction by a factor multiplies by the same factor.
Common Mistakes
- Forgetting to reverse the sign of when subtracting the equation.
- Incorrectly balancing the equations before combining.
- Arithmetic errors in adding/subtracting the values.
Things to Be Careful About
- The mark scheme accepts the alternative value , which gives . Always use your calculated value from part (b)(ii) if possible.
- Ensure the final equation matches the target exactly.
is a salt that contains a Period 4 element from Group 2. When is heated brown gas forms.
Identify the formula of and use it to write an equation for the reaction.
Answer
Group 2, Period 4 element is calcium ().
Brown gas is nitrogen dioxide (), so the salt is calcium nitrate: .
Equation:
(or )
Ca(NO3)2; Ca(NO3)2 -> CaO + 2NO2 + 1/2 O2
Background Concept
Group 2 elements are beryllium, magnesium, calcium, strontium, barium, and radium. They are in periods 2, 3, 4, 5, 6, and 7 respectively. The Period 4 Group 2 element is calcium ().
Nitrates of Group 2 metals decompose on heating to give the metal oxide, nitrogen dioxide gas, and oxygen gas. The general equation is:
Nitrogen dioxide () is a brown gas. This is a characteristic test for nitrate ions or Group 2 nitrates.
Understanding the Question
- Salt contains a Period 4 Group 2 element. This is calcium ().
- When heated, brown gas forms. Brown gas from thermal decomposition is , indicating the salt is a nitrate.
- So is calcium nitrate, .
- We need to write the balanced equation for its thermal decomposition.
Approach
- Identify the Group 2 Period 4 element: Calcium ().
- Identify the anion from the brown gas: Nitrate (), producing .
- Write the formula: .
- Write the balanced decomposition equation: .
Step-by-Step Reasoning
- Identify the metal: Group 2, Period 4 is calcium ().
- Identify the anion: Brown gas on heating is . This comes from the decomposition of a nitrate ().
- Formula of salt: Calcium nitrate is .
- Balanced equation:
To avoid fractions: . Both are acceptable.
Key Takeaways
- Period 4 Group 2 is calcium.
- Brown gas in thermal decomposition of nitrates is .
- Group 2 nitrates decompose to oxide, , and .
Common Mistakes
- Identifying the wrong Group 2 element (e.g., magnesium is Period 3).
- Writing the wrong products (e.g., instead of ; Group 1 nitrates give nitrite and oxygen, but Group 2 give oxide, , and ).
- Forgetting to balance the equation.
Things to Be Careful About
- The question asks for the formula of and the equation. Both are required for marks.
- State symbols are often expected in CIE equations, though not always strictly penalized if omitted in some contexts, but best to include: , .
Answer
The rates of the forward and reverse reactions are equal. The concentrations of reactants and products remain constant (no change in measurable macroscopic properties).
Rates of forward and reverse reactions are equal; concentrations of reactants and products remain constant.
Background Concept
Dynamic equilibrium occurs in a closed system when a reversible reaction has proceeded to the point where the rate of the forward reaction equals the rate of the reverse reaction. Despite the continuous reaction at the molecular level (hence 'dynamic'), there is no net change in the amounts of reactants and products. This means that all macroscopic, measurable properties of the system—such as colour, concentration, pressure (if gases are involved), and pH—remain constant over time.
Understanding the Question
The question asks for a description of 'dynamic equilibrium'. This is a standard definition question requiring two key pieces of information: the kinetic aspect (rates of reaction) and the thermodynamic/macroscopic aspect (constant concentrations or properties).
Approach
Recall the two-part definition of dynamic equilibrium. First, state that the forward and reverse reaction rates are equal. Second, state that this results in no net change in the concentrations of reactants and products, meaning macroscopic properties are constant.
Step-by-Step Reasoning
- Mark 1 (M1): State that the rate of the forward reaction is equal to the rate of the reverse (or backward) reaction. This captures the 'dynamic' nature of the equilibrium.
- Mark 2 (M2): State that there is no change in measurable properties, or more specifically, that the concentrations of reactants and products remain constant. This captures the 'equilibrium' aspect.
Key Takeaways
Dynamic equilibrium is characterized by equal forward and reverse rates, leading to constant macroscopic properties. It is a dynamic process at the molecular level, not a static one.
Common Mistakes
- Stating that the reaction has 'stopped'. The reaction continues; the rates are just equal.
- Saying 'the concentrations are equal'. Concentrations are constant, not necessarily equal to each other.
- Forgetting to mention that it must be a closed system (though often implied in simple definitions, it's good practice).
Things to Be Careful About
- Use precise terminology: 'rates are equal', not 'speeds are the same' (though often accepted, 'rates' is better).
- Specify 'concentrations of reactants and products' rather than just 'amounts', especially if the volume could change (though for solutions in a fixed volume, they are equivalent).
- Ensure both parts of the definition are present for full marks.
Reaction 4 describes the reversible reaction between yellow and colourless to produce red .
An equilibrium mixture contains , and . A few colourless crystals of soluble are added. The mixture is then left until it reaches equilibrium again. The temperature of both equilibrium mixtures is the same.
Deduce the changes that occur, if any, in the equilibrium mixture after is added compared to the original equilibrium mixture.
- change in appearance
- change in relative concentration of
- change in value of the equilibrium constant,
Answer
- Change in appearance: The mixture becomes darker red (or more red).
- Change in relative concentration of Fe³⁺(aq): Decreases.
- Change in value of Kc: Remains constant (no change).
Darker red; [Fe³⁺] decreases; Kc is constant.
Background Concept
Le Chatelier's principle states that if a dynamic equilibrium is disturbed by changing the conditions, the position of equilibrium moves to counteract the change. Adding a reactant increases its concentration, so the system will try to reduce it by favoring the forward reaction. The equilibrium constant, Kc, is only dependent on temperature. If the temperature remains constant, Kc remains constant, even if concentrations change.
Understanding the Question
We have an equilibrium mixture of Fe³⁺(aq) (yellow), SCN⁻(aq) (colourless), and FeSCN²⁺(aq) (red). Soluble KSCN(s) is added, which dissociates to give more SCN⁻(aq) ions. We need to deduce the changes in appearance, [Fe³⁺], and Kc after the system re-equilibrates at the same temperature.
Approach
- Identify the disturbance: addition of SCN⁻(aq) (a reactant).
- Apply Le Chatelier's principle: equilibrium shifts to the right (forward direction) to consume the added SCN⁻.
- Deduce the effect on species: Fe³⁺ is consumed (concentration decreases), FeSCN²⁺ is produced (concentration increases).
- Deduce the effect on appearance: more red FeSCN²⁺ means a darker red colour.
- Deduce the effect on Kc: temperature is unchanged, so Kc is constant.
Step-by-Step Reasoning
- Appearance (M1): Adding KSCN increases [SCN⁻]. By Le Chatelier's principle, the equilibrium shifts to the right to reduce [SCN⁻]. This produces more FeSCN²⁺(aq), which is red. Therefore, the mixture becomes darker red.
- Concentration of Fe³⁺ (M2): As the equilibrium shifts to the right, Fe³⁺(aq) reacts with the added SCN⁻(aq). Therefore, the relative concentration of Fe³⁺(aq) decreases.
- Value of Kc (M3): The equilibrium constant Kc is a function of temperature only. Since the temperature of both mixtures is the same, the value of Kc remains constant.
Key Takeaways
- Adding a reactant shifts the equilibrium to the right (products side).
- The colour change reflects the change in concentration of the coloured species.
- Kc only changes if the temperature changes.
Common Mistakes
- Saying Kc increases or decreases. Kc is constant at constant temperature.
- Saying the concentration of Fe³⁺ increases. It is consumed in the forward reaction.
- Saying the colour becomes yellow. FeSCN²⁺ is red and its concentration increases.
Things to Be Careful About
- The question asks for 'relative concentration' or just change. 'Decreases' is the correct term.
- Ensure you distinguish between the position of equilibrium (which shifts) and the value of Kc (which stays constant).
The expression for the equilibrium constant, , for reaction 4 is shown.
of and of are added together and allowed to reach equilibrium. The total volume of the mixture is .
At equilibrium the concentration of is .
Calculate the equilibrium constant, , for reaction 4.
Include the units in your answer.
Working
Step 1: Calculate initial concentrations
Step 2: Determine equilibrium concentrations
Given .
From the stoichiometry of reaction 4 (1:1:1 ratio), the concentration of Fe³⁺ and SCN⁻ that reacts is equal to .
Step 3: Calculate Kc
Rounding to 3 significant figures: .
Step 4: Determine units
Answer
170; mol⁻¹ dm³
Background Concept
The equilibrium constant Kc is calculated from the equilibrium concentrations of reactants and products. For a general reaction , . To find equilibrium concentrations, we often use an ICE (Initial, Change, Equilibrium) table or simple stoichiometric deduction. Units of Kc depend on the stoichiometry of the reaction and must be derived from the expression.
Understanding the Question
We are given initial moles of Fe³⁺ and SCN⁻ (5.00 × 10⁻⁵ mol each) and total volume (25.0 cm³). At equilibrium, [FeSCN²⁺] = 4.23 × 10⁻⁴ mol dm⁻³. We need to calculate Kc and its units.
Approach
- Convert initial moles to initial concentrations (mol dm⁻³).
- Use the stoichiometry (1:1:1) to find the equilibrium concentrations of Fe³⁺ and SCN⁻. Since 1 mol of FeSCN²⁺ is formed from 1 mol of Fe³⁺ and 1 mol of SCN⁻, the decrease in [Fe³⁺] and [SCN⁻] is equal to the increase in [FeSCN²⁺].
- Substitute equilibrium concentrations into the Kc expression.
- Derive the units for Kc.
Step-by-Step Reasoning
-
Initial Concentrations (M1):
Volume = 25.0 cm³ = 25.0 / 1000 = 0.0250 dm³.
. Same for SCN⁻. -
Equilibrium Concentrations (M2):
.
From the equation , the change in concentration for Fe³⁺ and SCN⁻ is .
. -
Calculate Kc (M3):
.
To 3 significant figures (matching the data given: 5.00, 25.0, 4.23), . -
Units (M4):
(or ).
Key Takeaways
- Always convert volumes to dm³ when calculating concentrations in mol dm⁻³.
- Use stoichiometry to relate changes in concentration. For a 1:1:1 reaction, .
- Always include units for Kc unless they cancel out completely.
Common Mistakes
- Forgetting to convert cm³ to dm³ (dividing by 1000).
- Using moles directly in the Kc expression instead of concentrations.
- Calculating the equilibrium concentration incorrectly (e.g., adding instead of subtracting).
- Forgetting units or getting the units wrong (e.g., writing mol dm⁻³ instead of mol⁻¹ dm³).
- Rounding too early in the calculation, leading to a final answer with incorrect significant figures.
Things to Be Careful About
- Significant figures: The given data (5.00, 25.0, 4.23) has 3 significant figures, so the final answer should be to 3 s.f. (170, not 170.1).
- The expression for Kc is given in the question; ensure you use it exactly as written (products over reactants, concentrations raised to stoichiometric coefficients).
- Units: is equivalent to . Both are acceptable.
Answer
1s² 2s² 2p⁶ 3s² 3p⁶ 3d⁵
Background Concept
Electronic configuration describes the distribution of electrons in atomic or molecular orbitals. For neutral atoms, electrons fill orbitals in order of increasing energy: 1s, 2s, 2p, 3s, 3p, 4s, 3d, 4p, etc. (Aufbau principle). However, when transition metals form positive ions, electrons are removed from the highest principal quantum number shell first. For first-row transition metals, this means electrons are removed from the 4s orbital before the 3d orbital, even though 4s was filled before 3d in the neutral atom.
Understanding the Question
We need the full electronic configuration of the iron(III) ion, Fe³⁺. Iron (Fe) has atomic number 26.
Approach
- Write the electronic configuration of the neutral Fe atom (26 electrons).
- Remove 3 electrons to form Fe³⁺. Remove two from 4s and one from 3d.
- Write the remaining configuration.
Step-by-Step Reasoning
- Neutral Fe atom (Z=26): (or ).
- Forming Fe³⁺: Remove 3 electrons. The 4s electrons are removed first (2 electrons), then one from 3d.
- Fe³⁺ configuration: (23 electrons remaining).
Key Takeaways
- Transition metal ions lose 4s electrons before 3d electrons.
- Fe³⁺ has a half-filled 3d subshell (3d⁵), which is particularly stable.
Common Mistakes
- Writing the configuration as (incorrect removal order).
- Forgetting to remove the correct number of electrons (Fe³⁺ means 3 electrons removed, not 2).
- Writing the configuration in order of filling (4s before 3d) for the ion. While sometimes accepted in simplified contexts, the standard convention for ions is to list 3d before 4s if 4s is empty, or simply omit 4s. The mark scheme gives , which is the correct full configuration.
Things to Be Careful About
- The question asks for the 'full' electronic configuration, so do not use the noble gas core abbreviation .
- Ensure the total number of electrons is correct: 2 + 2 + 6 + 2 + 6 + 5 = 23. Fe has 26, Fe³⁺ has 23. Correct.
is colourless.
Complete the dot-and-cross diagram in Fig. 3.1 to show the arrangement of outer electrons in an ion.
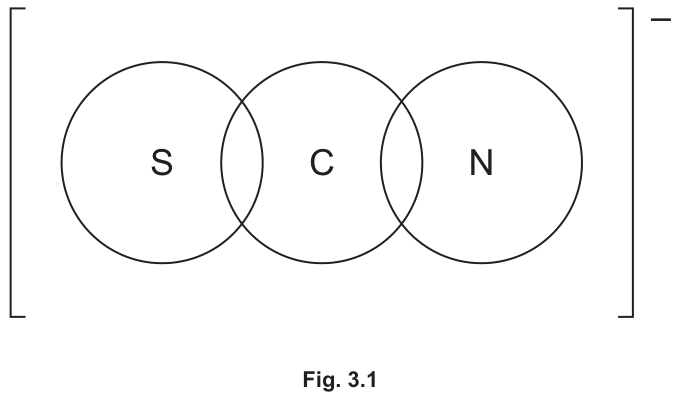
Answer
The diagram shows the thiocyanate ion, . Between S and C, there is a single bond (2 shared electrons, one dot and one cross). Between C and N, there is a triple bond (6 shared electrons, three pairs). S has 3 lone pairs (6 electrons). N has 1 lone pair (2 electrons). C has no lone pairs. The entire structure is enclosed in square brackets with a negative charge superscript.
Dot-and-cross diagram: S-C single bond (2e), C≡N triple bond (6e), 3 lone pairs on S, 1 lone pair on N, overall charge -1.
Background Concept
A dot-and-cross diagram shows the arrangement of outer (valence) electrons in a molecule or ion. Dots and crosses are used to distinguish electrons from different atoms. Covalent bonds are formed by sharing electron pairs. Lone pairs are non-bonding pairs of electrons. For polyatomic ions, the structure is enclosed in brackets with the overall charge indicated.
Understanding the Question
We need to complete the dot-and-cross diagram for the thiocyanate ion, SCN⁻. The outline shows three overlapping circles for S, C, and N, with brackets and a negative charge. We need to place the correct number of bonding and non-bonding electrons.
Approach
- Count total valence electrons: S (6) + C (4) + N (5) + 1 (for negative charge) = 16 electrons.
- Determine the bonding arrangement. Carbon needs 4 bonds to complete its octet. Nitrogen typically forms 3 bonds and has 1 lone pair. Sulfur can form various bonds. The mark scheme indicates a single bond between S and C, and a triple bond between C and N.
- Place bonding electrons: S-C (2e), C≡N (6e). Total bonding = 8e.
- Place lone pairs to complete octets: S needs 6 more e⁻ (3 lone pairs), N needs 2 more e⁻ (1 lone pair), C has 8 e⁻ from bonds (no lone pairs).
- Total electrons: 8 (bonding) + 6 (S lone pairs) + 2 (N lone pair) = 16. Correct.
Step-by-Step Reasoning
- Valence electrons (M1 context): S has 6, C has 4, N has 5, plus 1 for the charge = 16 outer electrons.
- Bonding (M1): To satisfy the octet rule for C (4 bonds) and N (3 bonds + lone pair), and considering the mark scheme guidance:
- Between C and N: 6 electrons (triple bond, ).
- Between C and S: 2 electrons (single bond, ).
- Lone pairs (M2):
- Sulfur (S): Has 2 bonding electrons, needs 6 more to complete octet. Place 3 lone pairs (6 electrons) around S.
- Carbon (C): Has 8 bonding electrons (2 from S-C, 6 from C≡N). Octet complete. No lone pairs.
- Nitrogen (N): Has 6 bonding electrons, needs 2 more. Place 1 lone pair (2 electrons) around N.
- Overall: Enclose in brackets with a negative charge. Formal charges: S (-1), C (0), N (0). Sum = -1. Matches the ion charge.
Key Takeaways
- Count total valence electrons carefully, including charge.
- Carbon typically forms 4 bonds and has no lone pairs in stable molecules/ions.
- Nitrogen in a nitrile-like group () has 1 lone pair.
- Sulfur can have expanded octets or lone pairs depending on bonding.
Common Mistakes
- Drawing a double bond between S and C and a double bond between C and N (). While this is a valid resonance structure, the mark scheme specifically rewards the structure with the given lone pairs. (Actually, with 2 lone pairs on S and 1 on N is also a valid Lewis structure, but CIE mark schemes often accept specific resonance forms or have a preferred one. The mark scheme explicitly says: '6 electrons between C and N AND 2 electrons between C and S'. This forces the single-triple bond structure).
- Forgetting the overall charge or brackets.
- Incorrect number of lone pairs (e.g., putting lone pairs on Carbon).
- Not using dots and crosses to show the origin of electrons (though the mark scheme description focuses on the arrangement, a proper dot-and-cross diagram should use different symbols for electrons from different atoms).
Things to Be Careful About
- The mark scheme is very specific: '6 electrons between C and N' (triple bond) and '2 electrons between C and S' (single bond). Do not draw double bonds.
- '3 lone pairs around S AND none around C AND 1 lone pair around N'. Ensure these are exactly as specified.
- The diagram must be enclosed in square brackets with a minus sign outside.
exists as a pair of stereoisomers.
Draw the three-dimensional structures of the two stereoisomers of .
can be used to represent .
Answer
The carbon bearing Br is chiral (bonded to four different groups: H, Br, CH, and (CH)CH).
Two enantiomers drawn as 3D structures with wedge and dashed bonds at the chiral carbon, showing non-superimposable mirror images
Background Concept
Optical isomerism (enantiomerism) occurs when a molecule contains a chiral centre — a carbon atom bonded to four different groups. The two enantiomers are non-superimposable mirror images of each other, related like left and right hands. They have identical physical properties except for the direction in which they rotate plane-polarised light.
Understanding the Question
The molecule CH(CH)CHBrCH (2-bromooctane) has a carbon-2 that is bonded to: H, Br, CH (carbon-1), and (CH)CH (the heptyl group, carbon-3 to carbon-8). These are four different groups, so carbon-2 is chiral. The question asks you to draw both enantiomers in three-dimensional form, using the R group abbreviation for CH(CH).
Approach
- Identify the chiral centre (C-2).
- Draw one enantiomer using a solid wedge for a bond coming towards you and a dashed wedge for a bond going away.
- Draw the mirror image by swapping two of the groups (or reflecting the entire structure).
Step-by-Step Reasoning
- The chiral carbon has four different substituents: H, Br, CH, and R (where R = CH(CH)).
- In the first enantiomer, place Br on a solid wedge (coming out), H on a dashed wedge (going in), with R and CH in the plane.
- The second enantiomer is the mirror image: swap the positions of Br and H (or equivalently, swap any two groups).
- Both structures must clearly show the 3D arrangement using wedge and dash notation.
Key Takeaways
- A chiral centre requires four different groups attached to a single carbon.
- Enantiomers are drawn as non-superimposable mirror images using wedge (towards viewer) and dash (away from viewer) notation.
- Swapping any two groups at a chiral centre inverts the stereochemistry.
Common Mistakes
- Drawing the two structures as identical (superimposable) rather than as mirror images.
- Using plain lines instead of wedge/dash bonds, failing to show the 3D arrangement.
- Not recognising that the long alkyl chain R and the CH are different groups.
Things to Be Careful About
- Ensure the mirror image relationship is clear — the two structures must be non-superimposable.
- The question allows R to represent CH(CH), which simplifies the drawing.
A sample of reacts with to make in an mechanism.
Complete Fig. 4.1 to show the mechanism for the reaction of and .
Include charges, dipoles, lone pairs of electrons and curly arrows, as appropriate.
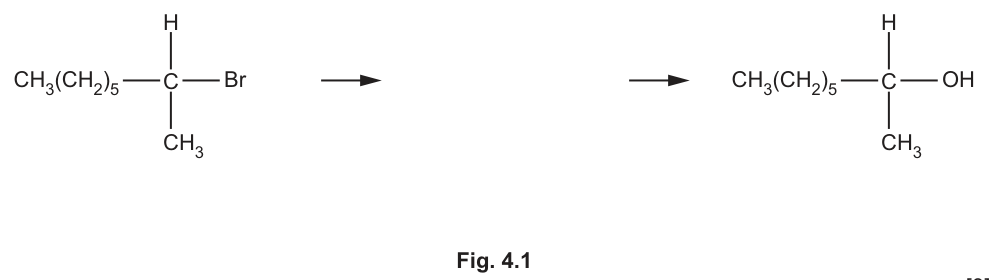
Answer
Step 1: The CBr bond breaks heterolytically. A curly arrow goes from the CBr bond to Br, forming a carbocation intermediate and Br. The CBr bond is polarised with on C and on Br.
Step 2: The lone pair on OH attacks the positively charged carbon of the carbocation, forming the COH bond.
SN1 mechanism: (1) curly arrow from C-Br bond to Br showing heterolytic fission with dipole labels, forming carbocation CH3(CH2)5CH+CH3 + Br-; (2) curly arrow from lone pair on OH- to the C+ of the carbocation
Background Concept
The S1 (substitution nucleophilic unimolecular) mechanism proceeds in two steps. First, the CX bond undergoes heterolytic fission to form a carbocation intermediate and a halide ion. This is the rate-determining step and involves only the substrate molecule (hence 'unimolecular'). Second, the nucleophile attacks the planar carbocation to form the product. The carbocation is trigonal planar, which is why S1 reactions at a chiral centre give racemic mixtures.
Understanding the Question
The question provides the starting material (2-bromooctane) and the product (octan-2-ol) and asks you to fill in the mechanism between them. You must include: charges, dipoles, lone pairs of electrons, and curly arrows. The mechanism is specifically S1.
Approach
- Draw the reactant with the CBr bond polarised ( on C, on Br).
- Show a curly arrow from the CBr bond to Br, indicating heterolytic fission.
- Draw the carbocation intermediate with a positive charge on C.
- Draw OH with lone pairs on oxygen and a negative charge.
- Show a curly arrow from a lone pair on O to the C.
Step-by-Step Reasoning
- M1: The CBr bond must show a dipole with on carbon and on bromine (because Br is more electronegative). A curly arrow starts from the bond (not from Br) and points to Br, showing the electron pair leaving with Br. This produces Br (or NaBr).
- M2: The intermediate is a carbocation: CH(CH)CHCH. The positive charge must be shown on carbon. The carbon is now trigonal planar (sp hybridised) with an empty p orbital.
- M3: OH acts as the nucleophile. A curly arrow starts from a lone pair on the oxygen atom (which must be drawn) and points to the positively charged carbon, forming the new COH bond.
Key Takeaways
- In S1, the curly arrow for the first step starts from the bond (representing the electron pair in the bond), not from the atom.
- The carbocation intermediate must carry a formal positive charge.
- The nucleophile's curly arrow starts from a lone pair, which must be explicitly drawn.
Common Mistakes
- Drawing a curly arrow from Br to C (wrong direction — the bond pair goes to Br).
- Forgetting the positive charge on the carbocation intermediate.
- Not drawing lone pairs on OH before showing the curly arrow from them.
- Drawing the S2 mechanism instead (single step with simultaneous attack and departure).
- Starting the first curly arrow from Br rather than from the CBr bond.
Things to Be Careful About
- The dipole labels ( and ) are required for M1.
- The curly arrow must start from the bond, not from the atom.
- The intermediate must be clearly a carbocation with the + charge on the correct carbon.
- OH must show at least one lone pair and the negative charge.
Separate samples of , and are tested with different reagents.
Complete Table 4.1. If no reaction occurs, write in the relevant box.
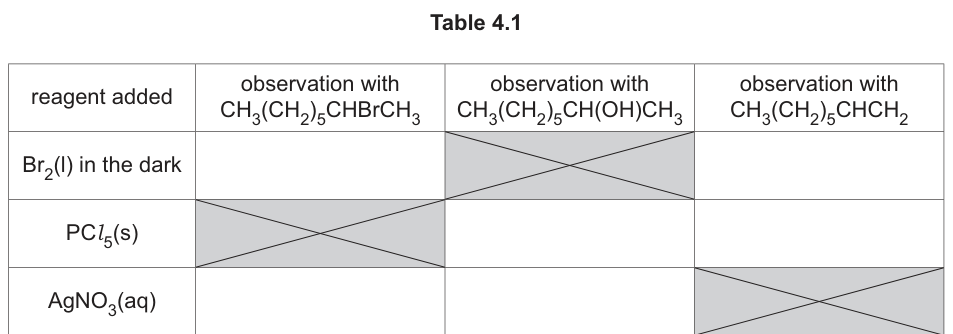
Answer
| Reagent | CH(CH)CHBrCH | CH(CH)CH(OH)CH | CH(CH)CHCH |
|---|---|---|---|
| Br(l) in the dark | (not required) | orange/brown to colourless | |
| PCl(s) | (not required) | steamy fumes | |
| AgNO(aq) | cream precipitate | (not required) |
Br2 + 2-bromooctane: ✗; Br2 + oct-1-ene: orange/brown to colourless; PCl5 + octan-2-ol: steamy fumes; PCl5 + oct-1-ene: ✗; AgNO3 + 2-bromooctane: cream precipitate; AgNO3 + octan-2-ol: ✗
Background Concept
Three key chemical tests are being applied:
- Bromine water / Br(l): Tests for C=C double bonds (addition reaction decolourises bromine). Saturated compounds do not react in the dark.
- PCl: Tests for the OH group in alcohols (and carboxylic acids). The reaction produces HCl gas, observed as steamy fumes.
- AgNO(aq): Tests for halide ions. Halogenoalkanes react slowly via nucleophilic substitution to release halide ions, which precipitate as AgX. AgBr is cream/off-white.
Understanding the Question
Three compounds are tested with three reagents. Some cells are hatched (not to be filled). The six cells to complete test whether the student can predict reactions and non-reactions based on functional groups present.
- CH(CH)CHBrCH: a halogenoalkane (CBr bond, no C=C, no OH)
- CH(CH)CH(OH)CH: an alcohol (OH group, no CBr, no C=C)
- CH(CH)CHCH: an alkene (C=C double bond, no CBr, no OH)
Approach
For each cell, identify the functional group in the compound and determine whether the reagent reacts with that group.
Step-by-Step Reasoning
Br(l) in the dark:
- With 2-bromooctane: This is a saturated halogenoalkane with no C=C. Bromine does not react with alkanes/halogenoalkanes in the dark. Answer:
- With oct-1-ene: Contains a C=C double bond. Bromine adds across the double bond, decolourising the orange/brown solution. Answer: orange/brown to colourless
PCl(s):
- With octan-2-ol: Contains an OH group. PCl reacts with alcohols to produce chloroalkane + POCl + HCl. The HCl gas gives steamy fumes. Answer: steamy fumes
- With oct-1-ene: No OH group. PCl does not react with alkenes. Answer:
AgNO(aq):
- With 2-bromooctane: The CBr bond undergoes slow nucleophilic substitution with water (present in aqueous solution), releasing Br ions which react with Ag to form AgBr precipitate. AgBr is cream/off-white. Answer: cream precipitate
- With octan-2-ol: No halogen present, so no halide ion can be released. No precipitate forms. Answer:
Key Takeaways
- Bromine test is specific for C=C (addition reaction).
- PCl test is specific for OH (and COOH), producing HCl steamy fumes.
- AgNO test detects halide ions released from halogenoalkanes (cream = AgBr, white = AgCl, yellow = AgI).
Common Mistakes
- Writing 'colourless' for the bromine test without mentioning the starting colour (must say orange/brown to colourless).
- Confusing the PCl observation with the sodium test (PCl gives steamy fumes of HCl; sodium gives effervescence of H).
- Thinking AgNO reacts directly with the CBr bond without recognising that substitution must first release Br.
- Writing 'white' precipitate for AgBr (it is cream/off-white; white is AgCl).
Things to Be Careful About
- The mark scheme accepts 'cream precipitate' OR 'off-white precipitate' for AgBr.
- 'No reaction' must be indicated with in the appropriate boxes.
- The bromine test must mention both the starting colour and the final colour.
is heated with to produce three different molecules, , and .

Answer
Elimination
elimination
Background Concept
Elimination reactions involve the removal of a small molecule (such as HBr or HO) from a substrate to form a double bond. In halogenoalkanes, heating with a strong base in ethanol removes H and Br from adjacent carbons to form an alkene.
Understanding the Question
The starting material is 2-bromooctane and the products are three alkenes (oct-2-ene trans, oct-2-ene cis, and oct-1-ene). The loss of HBr to form C=C is characteristic of elimination.
Approach
Identify the reaction type by noting that a small molecule (HBr) has been removed and a C=C double bond has formed in the products.
Step-by-Step Reasoning
- The reactant is a halogenoalkane (contains CBr).
- The products are alkenes (contain C=C).
- HBr has been eliminated from the molecule.
- This is an elimination reaction.
Key Takeaways
- Formation of a C=C from a halogenoalkane by loss of HX is elimination.
- Multiple alkene products can form when there are different -hydrogens available.
Common Mistakes
- Confusing elimination with substitution (substitution would give an alcohol, not an alkene).
Things to Be Careful About
- The answer must be 'elimination', not 'dehydrohalogenation' (though the latter is the specific type, 'elimination' is what the mark scheme requires).
Answer
D = NaOH (sodium hydroxide) in ethanol, heated under reflux
NaOH in ethanol, heat/reflux
Background Concept
Halogenoalkanes undergo elimination when heated with a strong base (NaOH or KOH) dissolved in ethanol. The ethanolic solvent favours elimination over substitution (aqueous NaOH favours substitution to give alcohols). The conditions are typically heat under reflux.
Understanding the Question
The question asks to identify reagent D and the conditions that convert 2-bromooctane into a mixture of alkenes via elimination.
Approach
Recall the standard conditions for elimination of halogenoalkanes: a strong base in an alcoholic solvent, heated.
Step-by-Step Reasoning
- For elimination, a strong base is needed to abstract a -hydrogen.
- NaOH (or KOH) in ethanol provides the base (OH) in a solvent that favours elimination.
- Heating under reflux provides the energy needed for the reaction.
- Using aqueous NaOH would favour substitution instead, giving the alcohol.
Key Takeaways
- Ethanolic NaOH/KOH + heat = elimination (gives alkenes).
- Aqueous NaOH/KOH + heat = substitution (gives alcohols).
- The solvent choice determines the reaction pathway.
Common Mistakes
- Writing 'NaOH(aq)' instead of 'NaOH in ethanol' — aqueous conditions give substitution, not elimination.
- Omitting the heating condition.
Things to Be Careful About
- Must specify ethanol as the solvent (not water).
- 'Heat' or 'reflux' must be stated as the condition.
Both and bonds are present in a molecule of as a result of different types of hybridisation in the carbon atoms.
Complete Table 4.2 to show the number of carbon atoms with each type of hybridisation in a molecule of .
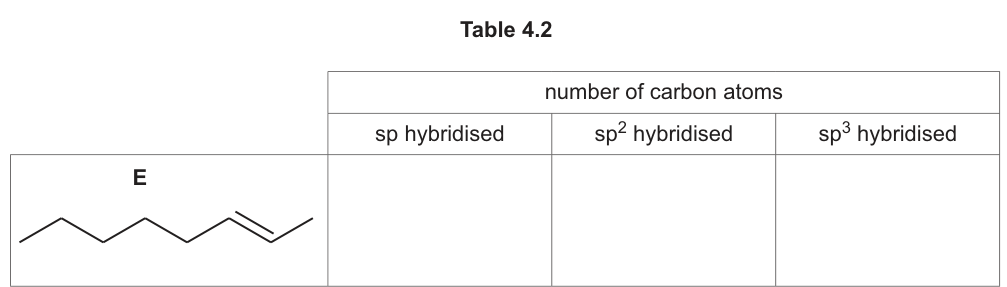
Answer
| Hybridisation | Number of carbon atoms |
|---|---|
| sp | 0 |
| sp | 2 |
| sp | 6 |
sp: 0, sp2: 2, sp3: 6
Background Concept
Carbon hybridisation depends on the number of electron domains (regions of electron density) around the carbon:
- sp: 4 electron domains (4 single bonds) — tetrahedral, 109.5°
- sp: 3 electron domains (2 single bonds + 1 double bond, or 1 single + 1 double + lone pair) — trigonal planar, 120°
- sp: 2 electron domains (e.g. 2 double bonds, or 1 triple bond + 1 single bond) — linear, 180°
In an alkene, the two carbons of the C=C are sp hybridised (each has 3 electron domains: the double bond counts as one domain, plus two single bonds). All other carbons with only single bonds are sp.
Understanding the Question
Molecule E is trans-oct-2-ene: CHCH=CH(CH)CH. It has 8 carbon atoms total. The question asks how many are sp, sp, and sp hybridised.
Approach
- Draw or visualise the full structure of oct-2-ene.
- Identify the C=C double bond carbons (sp).
- Check for any triple bonds or allene-type carbons (sp) — there are none.
- Count the remaining carbons (all sp).
Step-by-Step Reasoning
- Oct-2-ene: CH–CH=CH–CH–CH–CH–CH–CH
- The C=C is between C-2 and C-3. Both are sp hybridised (each has 3 electron domains: one double bond + two single bonds). That gives 2 sp carbons.
- No carbon has a triple bond or two double bonds, so there are 0 sp carbons.
- The remaining 6 carbons (C-1, C-4, C-5, C-6, C-7, C-8) each have 4 single bonds, so they are all sp. That gives 6 sp carbons.
- Check: 0 + 2 + 6 = 8 ✓
Key Takeaways
- Each carbon in a C=C double bond is sp hybridised.
- All saturated carbons (only single bonds) are sp.
- sp hybridisation requires a triple bond or cumulated double bonds (allene).
Common Mistakes
- Counting the sp carbons as 1 instead of 2 (both carbons of the double bond are sp).
- Assigning sp hybridisation to alkene carbons.
- Miscounting the total number of carbons.
Things to Be Careful About
- The double bond involves TWO sp carbons, not one.
- Verify that the total adds up to the number of carbon atoms in the molecule.
Describe the essential feature of an unbranched hydrocarbon that causes its molecules to show stereoisomerism. Explain how this feature leads to stereoisomerism.
Answer
- The molecule contains a C=C double bond, which includes a bond.
- The bond prevents/restricts rotation about the CC bond.
- Each carbon of the double bond carries two different groups (e.g. one H and one alkyl group), so the groups can be arranged in two different spatial configurations (E and Z).
Presence of a pi bond causing restricted rotation about C=C, with two different groups on each double-bonded carbon atom
Background Concept
E/Z (cis/trans) isomerism is a form of stereoisomerism that arises from restricted rotation about a C=C double bond. The double bond consists of one bond and one bond. The bond is formed by sideways overlap of p orbitals above and below the internuclear axis. Rotation about the C=C would require breaking this bond, which requires significant energy (~270 kJ mol), so rotation is effectively prevented at room temperature. If each carbon of the double bond carries two different groups, two distinct arrangements are possible: the groups can be on the same side (Z/cis) or opposite sides (E/trans).
Understanding the Question
The question asks for the essential structural feature in an unbranched hydrocarbon that causes stereoisomerism, and how this feature leads to the phenomenon. The answer requires three linked points: the bond, restricted rotation, and the requirement for different groups.
Approach
Build the explanation logically: (1) identify the structural feature ( bond in C=C), (2) explain its consequence (restricted rotation), (3) state the additional condition needed (different groups on each carbon).
Step-by-Step Reasoning
- M1: The essential feature is the presence of a C=C double bond, which contains a bond. The bond is formed by overlap of p orbitals and locks the two carbon atoms in a fixed relative orientation.
- M2: Because of the bond, there is restricted (or no) rotation about the CC bond. This means groups attached to the double-bonded carbons cannot freely exchange positions, so different spatial arrangements are 'frozen in'.
- M3: For stereoisomerism to actually occur, each carbon of the double bond must carry two different groups. If either carbon has two identical groups (e.g. two H atoms), then swapping them gives the same molecule and no isomerism exists. In oct-2-ene, C-2 has H and CH, and C-3 has H and (CH)CH — both have two different groups, so E and Z isomers exist.
Key Takeaways
- The bond is the structural cause of restricted rotation.
- Restricted rotation alone is not sufficient — the two groups on each carbon must also be different.
- E/Z isomerism is a type of stereoisomerism (same connectivity, different spatial arrangement).
Common Mistakes
- Saying 'the double bond prevents rotation' without mentioning the bond specifically.
- Omitting the requirement that each carbon must have two different groups.
- Confusing this with optical isomerism (which requires a chiral centre, not a double bond).
- Saying 'different groups on the molecule' rather than 'different groups on each double-bonded carbon'.
Things to Be Careful About
- All three points are needed for full marks: bond, restricted rotation, AND different groups on each carbon.
- The mark scheme accepts various wordings for M3: 'two different groups on each double-bonded carbon', 'two different atoms on each', or 'one H and one alkyl on each'.
Compound has molecular formula . It contains only one functional group.
Table 5.1 shows the two peaks with the greatest values in the mass spectrum of .
Table 5.1
| relative abundance | |
|---|---|
| 74 | 50 |
| 75 |
Calculate the relative abundance, , of the peak at using the information from Table 5.1.
Working
The M+1 peak at arises from molecules containing one atom.
With 4 carbon atoms, the relative abundance of M+1 compared to M is:
Since the relative abundance of M () is 50:
Answer
2.2
Background Concept
In mass spectrometry, the molecular ion peak (M) corresponds to the molecule containing all the most abundant isotopes. A small peak appears at M+1 (one mass unit higher) due to the natural presence of , which has an abundance of 1.1% relative to . Each carbon atom in the molecule contributes independently to the probability of having one , so the relative height of the M+1 peak compared to M is approximately , where is the number of carbon atoms.
Understanding the Question
The question gives the relative abundance of the M peak () as 50 and asks for the relative abundance of the M+1 peak (). Compound W has molecular formula , so it contains 4 carbon atoms. The command word is "calculate", so a numerical answer with working is required.
Approach
Use the formula: relative abundance of M+1 = (number of C atoms × 1.1/100) × relative abundance of M.
Step-by-Step Reasoning
- Identify the number of carbon atoms in W: has 4 carbon atoms.
- The probability that any one molecule contains exactly one (giving the M+1 peak) is approximately of the M peak intensity.
- The M peak has a relative abundance of 50.
- Therefore .
Key Takeaways
- The M+1 peak in mass spectrometry is due to .
- The ratio of M+1 to M peak heights gives the number of carbon atoms: .
- This is a straightforward application once the 1.1% rule is known.
Common Mistakes
- Forgetting to multiply by the relative abundance of M (50) and just giving 4.4.
- Using 1.1% as a decimal incorrectly (e.g., writing 1.1 instead of 0.011).
- Confusing the M+1 peak with the M+2 peak (which relates to or ).
Things to Be Careful About
- The 1.1% figure must be used as given; do not confuse it with other isotopic abundances.
- Ensure the final answer is dimensionless (it is a relative abundance, not a percentage).
The mass spectrum of also shows peaks at and .
Suggest the molecular formulae of these fragments.
Answer
:
: (or )
m/e = 29: C2H5+; m/e = 59: C3H7O+
Background Concept
In mass spectrometry, the molecular ion () fragments into smaller cations and neutral radicals. The value of each fragment peak tells us the mass of the cation. For alcohols, common fragmentation pathways include loss of an alkyl group (giving an oxonium ion) or loss of a methyl radical (giving a fragment containing the oxygen).
Understanding the Question
W has molecular formula with . Peaks at and must be identified as fragment cations. The command word is "suggest", so a chemically reasonable formula is required.
Approach
Calculate what mass is lost from the molecular ion to give each fragment, then identify the neutral loss and the resulting cation.
Step-by-Step Reasoning
For :
- Mass lost from M: . A loss of 45 corresponds to or + ... Actually, the fragment itself has mass 29. Common cations of mass 29 are (ethyl cation) or (formyl cation). For an alcohol with 4 carbons, is the most likely fragment from cleavage of the C–C bond.
For :
- Mass lost from M: , which corresponds to loss of a radical.
- The remaining cation has formula .
- This is consistent with an oxonium ion formed by alpha-cleavage of the alcohol, where the is lost and the positive charge resides on the oxygen-containing fragment.
Key Takeaways
- Fragment peaks in mass spectra correspond to cations; the neutral loss accounts for the difference from M.
- Loss of (15) from a butanol gives at .
- at is a common alkyl fragment.
Common Mistakes
- Writing without the positive charge (fragments detected are cations).
- For , writing (mass 43) instead of .
- Confusing the neutral loss with the fragment itself.
Things to Be Careful About
- Always include the charge on fragment formulae.
- Check that the formula mass matches the stated value.
A sample of , , is heated under reflux with an excess of acidified until there is no further reaction. Only one organic product, , is present in the mixture at the end of the reaction.
Fig. 5.1 shows the infrared spectrum of .
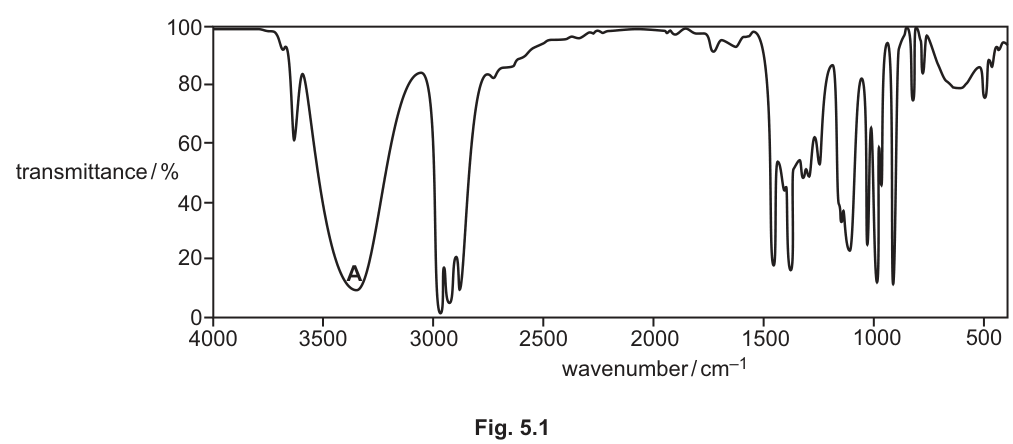
Fig. 5.2 shows the infrared spectrum of .
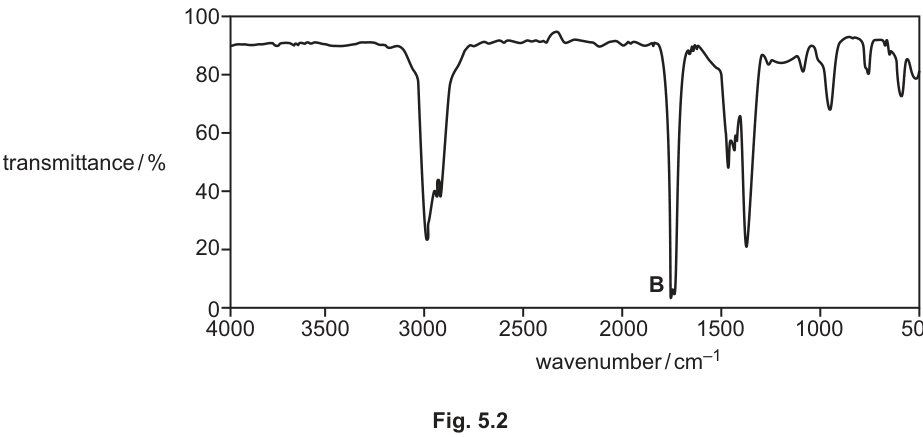
Table 5.2
| bond | functional groups containing the bond | characteristic infrared absorption range (in wavenumbers) / |
|---|---|---|
| hydroxy, ester | 1040–1300 | |
| aromatic compound, alkene | 1500–1680 | |
| amide carbonyl, carboxyl ester | 1640–1690 1670–1740 1710–1750 | |
| nitrile | 2200–2250 | |
| alkane | 2850–2950 | |
| amine, amide | 3300–3500 | |
| carboxyl hydroxy | 2500–3000 3200–3650 |
Absorption A is shown in Fig. 5.1.
Absorption B is shown in Fig. 5.2.
Complete Table 5.3 using the information given in Fig. 5.1, Fig. 5.2 and Table 5.2.
Table 5.3
| absorption | bond | functional group containing the bond |
|---|---|---|
| A | ||
| B |
Answer
| absorption | bond | functional group containing the bond |
|---|---|---|
| A | hydroxy | |
| B | carbonyl |
A: O-H bond, hydroxy group; B: C=O bond, carbonyl group
Background Concept
Infrared spectroscopy identifies functional groups by the characteristic wavenumber at which bonds absorb IR radiation. Each bond type vibrates at a specific frequency range. The O–H stretch in alcohols appears as a broad band at 3200–3650 (broad due to hydrogen bonding), while the C=O stretch of a carbonyl group appears as a strong, sharp band at 1670–1740 .
Understanding the Question
Absorption A in Fig. 5.1 is a broad band centred around 3350 . Absorption B in Fig. 5.2 is a strong sharp band around 1715 . Table 5.2 provides the reference ranges. The task is to match each absorption to the correct bond and functional group.
Approach
Compare the wavenumber of each labelled absorption to the ranges in Table 5.2.
Step-by-Step Reasoning
Absorption A (~3350 , broad):
- Falls within the 3200–3650 range for O–H in hydroxy compounds.
- The broadness confirms it is an O–H stretch involved in hydrogen bonding (alcohol).
- Bond: ; Functional group: hydroxy.
Absorption B (~1715 , sharp and strong):
- Falls within the 1670–1740 range for C=O in carbonyl compounds.
- Bond: ; Functional group: carbonyl (which includes aldehydes and ketones).
Key Takeaways
- Broad O–H absorption at 3200–3650 is diagnostic of alcohols (and carboxylic acids, but those also show C=O and a much broader O–H at 2500–3000 ).
- Sharp C=O absorption at 1670–1740 indicates a carbonyl group (aldehyde, ketone, carboxylic acid, or ester).
Common Mistakes
- Writing "alcohol" instead of "hydroxy" for the functional group (the table asks for the functional group containing the bond, not the compound class).
- For absorption B, writing "ketone" instead of "carbonyl" — the table lists "carbonyl" as the functional group category.
Things to Be Careful About
- Use the exact terminology from Table 5.2 for the functional group column.
- Distinguish between the bond (e.g., O–H) and the functional group (e.g., hydroxy).
Use the information in (a) and (b)(i) to draw the structure of in the box in Fig. 5.3.
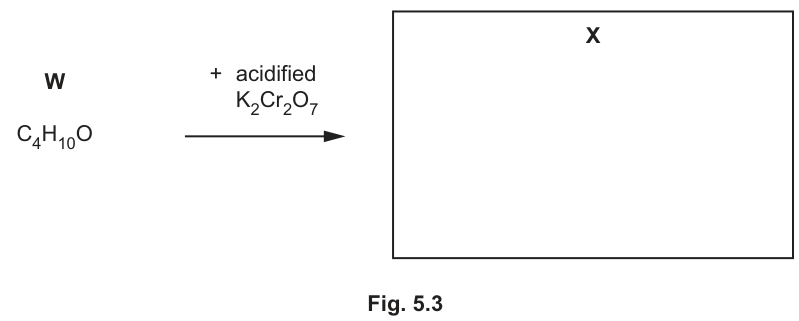
Answer
CH3COCH2CH3 (butanone)
Background Concept
Secondary alcohols are oxidised by acidified potassium dichromate(VI) under reflux to ketones. The ketone retains the same number of carbon atoms as the parent alcohol. Tertiary alcohols are not oxidised by acidified dichromate. The IR spectrum of a ketone shows a strong C=O absorption but no O–H absorption.
Understanding the Question
W has formula and shows an O–H absorption (from part b(i)), so W is an alcohol. When W is heated under reflux with excess acidified , it gives a single organic product X. The IR spectrum of X shows a C=O absorption but no O–H absorption, so X is a ketone (not a carboxylic acid, which would show both C=O and a very broad O–H). A ketone from oxidation of a alcohol means W is a secondary alcohol, specifically butan-2-ol.
Approach
- From the IR of W: it is an alcohol (O–H present, C=O absent).
- From the IR of X: it has C=O but no O–H, so it is a ketone (not a carboxylic acid).
- Oxidation of a alcohol to a ketone means the alcohol is butan-2-ol.
- The ketone product is butanone: .
Step-by-Step Reasoning
- W is with an O–H group → an alcohol.
- X shows C=O at ~1715 but no broad O–H → X is a ketone (a carboxylic acid would show a very broad O–H at 2500–3000 ).
- Oxidation of a primary alcohol gives an aldehyde then a carboxylic acid; oxidation of a secondary alcohol gives a ketone.
- Since X is a ketone, W must be a secondary alcohol: butan-2-ol, .
- The oxidation product X is butanone: .
- Cross-check with mass spectrum: loss of from butan-2-ol gives at ✓; at ✓.
Key Takeaways
- The distinction between ketone and carboxylic acid in IR: carboxylic acids show both C=O AND a very broad O–H (2500–3000 ); ketones show only C=O.
- Reflux with excess oxidising agent ensures complete oxidation; a primary alcohol would give a carboxylic acid under these conditions.
- The number of carbon atoms is conserved in alcohol → ketone oxidation.
Common Mistakes
- Drawing butanal or butanoic acid instead of butanone (these would come from a primary alcohol and would show different IR).
- Drawing butan-2-ol as X instead of the oxidation product.
- Forgetting to draw the full displayed or structural formula clearly.
Things to Be Careful About
- The question asks for the structure of X (the product), not W.
- Ensure the ketone has 4 carbons total: .
is a structural isomer of .
Both and produce colourless bubbles when sodium is added to them.
does not react when heated with acidified .
does not react when warmed with alkaline .
Answer
Hydroxy (tertiary alcohol)
Hydroxy (tertiary alcohol)
Background Concept
Alcohols react with sodium metal to produce hydrogen gas (colourless bubbles) and a sodium alkoxide. Primary and secondary alcohols are oxidised by acidified (orange to green), but tertiary alcohols are not, because the carbon bearing the OH group has no hydrogen atom available for removal. The iodoform test (alkaline ) is positive for methyl ketones and for alcohols containing the group (i.e., ethanol and secondary alcohols with a methyl on the carbinol carbon).
Understanding the Question
Y is a structural isomer of W (). Three tests are described:
- Colourless bubbles with sodium → Y is an alcohol (has O–H).
- No reaction with acidified → Y is a tertiary alcohol.
- No reaction with alkaline → confirms no group (consistent with tertiary).
The question asks to name the functional group.
Approach
Since Y reacts with sodium, it must contain an O–H group → hydroxy functional group. The additional information confirms it is specifically a tertiary alcohol.
Step-by-Step Reasoning
- Reaction with Na producing gas → Y is an alcohol → functional group is hydroxy.
- No oxidation by acidified dichromate → tertiary alcohol (the C–OH carbon has no H).
- No iodoform reaction → no unit, consistent with tertiary.
- The functional group name is "hydroxy" (or equivalently, Y is a tertiary alcohol).
Key Takeaways
- The hydroxy (–OH) group is the functional group in all alcohols.
- Tertiary alcohols resist oxidation because there is no C–H bond on the carbinol carbon for the oxidising agent to remove.
- The iodoform test distinguishes methyl carbinols from other alcohols.
Common Mistakes
- Writing "alcohol" as the functional group name instead of "hydroxy".
- Saying "hydroxyl" (which refers to the radical ) instead of "hydroxy".
Things to Be Careful About
- The mark scheme accepts "hydroxy (tertiary alcohol)" — naming the functional group as hydroxy and specifying it is a tertiary alcohol.
Answer
2C4H10O + 2Na -> 2C4H9ONa + H2
Background Concept
Alcohols react with sodium metal in a similar way to water: the O–H bond is cleaved, the hydrogen is released as gas, and a sodium alkoxide is formed. The general equation is . This is a redox reaction where sodium is oxidised and the hydrogen in the O–H bond is reduced.
Understanding the Question
The equation must be completed with coefficients and the organic product. Both W and Y react with sodium, so the equation applies to either (both are alcohols). The product is the sodium alkoxide .
Approach
Write the general alcohol + sodium reaction, substitute the molecular formula, and balance.
Step-by-Step Reasoning
- The reaction is: alcohol + sodium → sodium alkoxide + hydrogen.
- Unbalanced:
- Balancing: 2 H atoms are needed for , so 2 alcohol molecules provide them:
- Check: Left: C = 8, H = 20, O = 2, Na = 2. Right: C = 8, H = 18 + 2 = 20, O = 2, Na = 2. ✓
Key Takeaways
- The sodium alkoxide is formed by replacing the H of the O–H group with Na.
- The stoichiometry is 2:2:2:1 (alcohol : Na : alkoxide : hydrogen).
Common Mistakes
- Writing (forgetting that one H is lost from the alcohol).
- Not balancing the equation (writing 1:1:1:1).
- Writing the product as instead of the alkoxide.
Things to Be Careful About
- The organic product formula is (or equivalently ).
- State symbols are not required here but the equation must be balanced.
Answer
(CH3)3C-OH (2-methylpropan-2-ol)
Background Concept
For molecular formula , the possible alcohol isomers are:
- Butan-1-ol (primary):
- Butan-2-ol (secondary):
- 2-Methylpropan-1-ol (primary):
- 2-Methylpropan-2-ol (tertiary):
Only the tertiary alcohol resists oxidation by acidified dichromate and gives a negative iodoform test.
Understanding the Question
Y is a structural isomer of W. From part (c)(i), Y is a tertiary alcohol. The only tertiary alcohol with formula is 2-methylpropan-2-ol (tert-butanol).
Approach
Identify the unique tertiary alcohol isomer of and draw its structure.
Step-by-Step Reasoning
- Y reacts with Na → alcohol (has O–H).
- Y does not react with acidified → tertiary alcohol (no C–H on the carbinol carbon).
- Y does not give iodoform → no group (consistent with tertiary).
- The only tertiary alcohol is 2-methylpropan-2-ol: .
- Structure: a central carbon bonded to three methyl groups and one OH group.
Key Takeaways
- There is only one tertiary alcohol with 4 carbon atoms.
- Tertiary alcohols cannot be oxidised because the carbinol carbon has no hydrogen to lose.
- The iodoform test is negative for all tertiary alcohols (no unit).
Common Mistakes
- Drawing butan-2-ol (secondary) instead of the tertiary isomer.
- Drawing 2-methylpropan-1-ol (primary) — this would react with dichromate.
- Forgetting the OH group or placing it on the wrong carbon.
Things to Be Careful About
- Draw the full structure showing all bonds (the central C bonded to three CH₃ groups and one OH).
- The IUPAC name is 2-methylpropan-2-ol; the common name is tert-butanol.