Chemistry 9701/54 — October/November 2025
Cambridge A-Level · Planning, Analysis and Evaluation · worked solutions for every part, with the mark scheme
Topics Planning · Analysis, Conclusions and Evaluation
A student uses a technique called the Winkler method to determine the mass of oxygen dissolved in a sample of water from a lake.
Two solutions, X and Y, are prepared.
Solution X is aqueous manganese(II) sulfate, .
Solution Y is alkaline aqueous potassium iodide, .
Calculate the mass of solid hydrated manganese(II) sulfate, , needed to make of solution X.
Give your answer to two decimal places.
Working
Answer
38.87 g
38.87 g
Background Concept
Concentration in relates the amount of solute to the volume of solution: . To find the mass of solid needed, use . A hydrated salt like includes its water of crystallisation in the formula mass, so the molar mass is higher than that of the anhydrous salt.
Understanding the Question
We must calculate the mass of solid hydrated manganese(II) sulfate needed to prepare of a solution. The volume is given in and must be converted to before using .
Approach
- Convert to .
- Calculate the amount in moles: .
- Calculate the molar mass of , including the one water of crystallisation.
- Convert moles to mass: .
Step-by-Step Reasoning
- The answer is given to two decimal places as required.
Key Takeaways
Always convert volume to before using . Include water of crystallisation when calculating the molar mass of a hydrated salt.
Common Mistakes
- Forgetting the water of crystallisation, giving instead of .
- Using the volume in directly without converting to .
- Rounding the molar mass incorrectly before multiplying.
Things to Be Careful About
- The final answer must be given to two decimal places.
- Use consistent values for each element (Mn ≈ 54.9, S ≈ 32.1, O = 16.0, H = 1.0).
The student is given a small beaker containing the mass of calculated in (a). Describe how the student should prepare exactly of solution X.
Include the names and capacities of each piece of key apparatus used.
Write your answer using a series of numbered steps.
Answer
- Weigh out the 38.87 g of into a beaker.
- Dissolve the solid in a small volume of distilled water in the beaker.
- Transfer the solution to a volumetric flask using a funnel.
- Rinse the beaker and funnel with distilled water, adding the rinsings to the flask.
- Add distilled water to the flask up to the graduation mark, adding dropwise near the mark.
- Stopper the flask and invert it several times to mix the solution thoroughly.
Dissolve in distilled water; transfer to a 100 cm³ volumetric flask, rinsing the beaker; make up to the mark with distilled water; stopper and invert to mix.
Background Concept
Preparing a solution of exact concentration requires a volumetric flask, which has a single graduation mark calibrated to deliver a specific volume at a given temperature. Quantitative transfer — rinsing the beaker and funnel — ensures all the solute reaches the flask, so the final concentration matches the calculation.
Understanding the Question
The question asks for the procedure to make exactly of solution X from the calculated mass of solid. Key apparatus: a volumetric flask, a beaker, a funnel, and distilled water. The answer must be written as numbered steps with apparatus names and capacities.
Approach
Follow the standard sequence for preparing a solution of known concentration: dissolve → transfer → rinse → make up to the mark → mix.
Step-by-Step Reasoning
- M1 (dissolve): The solid is dissolved in a small volume of distilled water in a beaker, so it fully dissolves before transfer.
- M2 (transfer and rinse): The solution is poured into a volumetric flask through a funnel. The beaker and funnel are rinsed with distilled water and the rinsings added, ensuring no solute is left behind (quantitative transfer).
- M3 (make up and mix): Distilled water is added until the bottom of the meniscus sits on the graduation mark; the flask is stoppered and inverted several times to give a uniform solution.
Key Takeaways
The volumetric flask is the only apparatus that gives an exact volume. Rinsing is essential for accuracy. Mixing by inversion ensures homogeneity.
Common Mistakes
- Using a measuring cylinder instead of a volumetric flask (not accurate enough).
- Not rinsing the beaker, losing some solute and making the solution too dilute.
- Adding water past the mark, which cannot be corrected.
- Omitting the funnel or the inversion step.
Things to Be Careful About
- The meniscus must sit exactly on the graduation mark.
- The flask capacity must be stated as .
- The numbered-step format is required by the question.
Solution Y is prepared as follows.
| step 1 | Place of distilled water in a beaker. |
| step 2 | Add about of solid sodium hydroxide, , and stir to dissolve. |
| step 3 | Cool the solution to room temperature using an ice-bath. |
| step 4 | Repeat steps 2 and 3 until a total of of has been dissolved. |
| step 5 | Dissolve about of potassium iodide, , into the solution formed in step 4. |
Solution Y is corrosive.
Other than wearing safety goggles, state one safety precaution that the student should take when preparing solution Y.
Answer
Wear chemically resistant gloves.
Wear chemically resistant gloves.
Background Concept
Corrosive substances can damage skin and eyes. Safety precautions aim to prevent contact with the hazardous material. For a corrosive alkaline solution, protecting the hands with chemically resistant gloves is a standard precaution.
Understanding the Question
Solution Y contains a high concentration of NaOH (32 g in 100 cm³) and KI, making it corrosive. We are asked for one safety precaution other than wearing safety goggles.
Approach
Identify the hazard — skin contact with a corrosive alkali — and choose a precaution that directly prevents it.
Step-by-Step Reasoning
- The main hazard is contact of the corrosive solution with skin.
- Chemically resistant gloves protect the hands during preparation.
- This is the specific precaution the mark scheme credits.
Key Takeaways
Match the safety precaution to the hazard: corrosive → gloves; volatile/toxic → fume cupboard; flammable → keep away from flames.
Common Mistakes
- Giving a vague precaution such as "handle carefully" (not specific enough).
- Suggesting a precaution that does not address the hazard, e.g. "wear a lab coat" (acceptable but not the credited point here).
Things to Be Careful About
- The mark scheme specifically wants chemically resistant gloves.
- Only one precaution is required.
Answer
Dissolving NaOH(s) is (very) exothermic, so the solution becomes hot; cooling prevents the temperature from rising too high before more NaOH is added.
Dissolving NaOH(s) is (very) exothermic.
Background Concept
Dissolving many ionic solids, especially NaOH, releases heat — the process is exothermic. The temperature of the solution rises significantly as NaOH dissolves.
Understanding the Question
In step 3, the solution is cooled in an ice-bath before repeating steps 2 and 3 (adding more NaOH). The question asks why cooling is necessary.
Approach
Consider the thermal effect of dissolving NaOH and why controlling temperature matters for safety and procedure.
Step-by-Step Reasoning
- Dissolving NaOH(s) is very exothermic.
- Without cooling, the temperature would rise substantially as each portion of NaOH dissolves.
- A hot solution could splash or boil when more NaOH is added, which is hazardous.
- Cooling to room temperature keeps the process controlled and safe.
Key Takeaways
Exothermic dissolution requires temperature control for safety; cooling prevents excessive heating and uncontrolled boiling/splashing.
Common Mistakes
- Saying "to dissolve faster" — cooling actually slows dissolution, so this is wrong.
- Not mentioning the exothermic nature of the dissolution.
Things to Be Careful About
- The key point is that dissolving NaOH is exothermic.
- The answer should link cooling to controlling the temperature rise.
The student uses the following procedure to determine the mass of oxygen dissolved in a sample of water from the lake.
| step 1 | Collect a sample of lake water in a bottle. |
| step 2 | Add of solution X and of solution Y to the bottle. |
| step 3 | Immediately stopper the bottle, ensuring as little air as possible is trapped. |
| step 4 | Shake the bottle to mix its contents. A brown precipitate, manganese(III) hydroxide, , is formed. |
| step 5 | Add of concentrated sulfuric acid to the contents of the bottle. The precipitate dissolves, and iodine is formed. |
| step 6 | Dilute this solution to exactly using distilled water to form solution Z. |
| step 7 | Transfer of solution Z into a conical flask, and titrate with aqueous sodium thiosulfate, . Add of starch solution near to the end-point. |
| step 8 | Repeat step 7 as many times as necessary. |
Answer
Oxygen from the trapped air could dissolve into the water sample, increasing the measured dissolved oxygen content and giving a falsely high result.
Oxygen in trapped air could dissolve into the water sample, giving a falsely high result.
Background Concept
The Winkler method measures the mass of oxygen already dissolved in the lake water. Any oxygen that enters the sample from the atmosphere after collection would be measured as if it were originally present, inflating the result.
Understanding the Question
Step 3 instructs the student to stopper the bottle ensuring as little air as possible is trapped. The question asks why this matters.
Approach
Recognise that the quantity being measured is dissolved O₂, and that trapped air is a potential source of extra O₂.
Step-by-Step Reasoning
- The bottle contains lake water plus reagents.
- Trapped air above the liquid contains oxygen.
- This oxygen could dissolve into the sample.
- It would then react in the Winkler sequence and be counted, giving a falsely high dissolved oxygen content.
Key Takeaways
Control of variables: prevent contamination of the measured quantity (O₂) from the atmosphere to obtain an accurate result.
Common Mistakes
- Saying "to prevent oxidation" without linking it to the measured oxygen content.
- Not mentioning that the result would be too high.
Things to Be Careful About
- The answer must link trapped air to the dissolved oxygen measurement.
- The mark scheme credits "oxygen in trapped air could dissolve into the water sample".
Identify the piece of apparatus that the student should use to transfer the of solution Z in step 7.
Answer
A 25.0 cm³ volumetric pipette.
25.0 cm³ volumetric pipette
Background Concept
A volumetric pipette is calibrated to deliver a single, exact volume (here 25.0 cm³) and is the standard apparatus for transferring a known volume of solution into a conical flask in a titration.
Understanding the Question
Step 7 transfers 25.0 cm³ of solution Z into a conical flask. The question asks which apparatus should be used.
Approach
Recall the apparatus used for precise, fixed-volume transfer in titrations.
Step-by-Step Reasoning
- A volumetric pipette delivers an exact volume (25.0 cm³) accurately.
- It is the correct choice for transferring a known volume of solution Z for titration.
- A burette is used to deliver the titrant (thiosulfate), not the sample.
Key Takeaways
Volumetric pipette for exact fixed-volume transfer; burette for dispensing variable volumes of titrant.
Common Mistakes
- Saying "measuring cylinder" (insufficient accuracy).
- Saying "burette" (used for the titrant, not the sample).
- Omitting the capacity (25.0 cm³).
Things to Be Careful About
- The pipette must be rinsed with solution Z before use to avoid dilution.
- The capacity must be stated as 25.0 cm³.
Answer
Starch forms a blue-black complex with iodine, giving a sharp colour change at the end-point so it can be observed more clearly.
To observe the end-point more clearly (starch–iodine complex gives a sharp colour change).
Background Concept
In iodometric titrations, starch is used as an indicator. It forms an intense blue-black complex with iodine (I₂). At the end-point, when all the I₂ has reacted with thiosulfate, the blue colour disappears sharply.
Understanding the Question
Step 7 adds 1 cm³ of starch solution near the end-point of the thiosulfate titration. The question asks why starch is added.
Approach
Recognise that starch is an indicator for iodine and that it improves the visibility of the end-point.
Step-by-Step Reasoning
- I₂ in solution is brown/yellow, so the colour change at the end-point is subtle.
- Starch forms a deep blue-black complex with I₂.
- Adding starch near the end-point (when most I₂ has reacted) gives a sharp change from blue-black to colourless.
- This makes the end-point easier to detect accurately.
Key Takeaways
Starch is the indicator in iodine–thiosulfate titrations; it is added near the end-point for a sharp colour change.
Common Mistakes
- Adding starch too early, which can adsorb iodine and give a poor end-point.
- Saying starch "reacts with iodine" without explaining the colour change.
Things to Be Careful About
- The mark scheme credits "to observe the end-point more clearly".
- The blue-black colour disappears at the end-point.
The student records the results shown in Table 1.1.
Table 1.1
| rough titration | titration 1 | titration 2 | titration 3 | |
|---|---|---|---|---|
| final burette reading / | 13.60 | 12.75 | 26.20 | 14.50 |
| initial burette reading / | 0.00 | 0.05 | 13.15 | 1.35 |
| titre / | 13.60 |
Working
Titration 1:
Titration 2:
Titration 3:
Concordant titres: 13.05 and 13.15 (within 0.10 cm³ of each other)
Mean titre =
Answer
Titres: 12.70, 13.05, 13.15 cm³; mean titre = 13.10 cm³
Mean titre = 13.10 cm³
Background Concept
A titre is the volume of titrant used, found by subtracting the initial burette reading from the final reading. Concordant titres — those within 0.10 cm³ of each other — are averaged to give a reliable mean; outliers are rejected.
Understanding the Question
Table 1.1 gives final and initial burette readings for a rough titration and three titrations. We must complete the titre column and calculate the mean titre.
Approach
- Calculate each titre as final − initial.
- Identify which titres are concordant (within 0.10 cm³).
- Average only the concordant titres.
Step-by-Step Reasoning
- Titre 1 =
- Titre 2 =
- Titre 3 =
- Titration 1 (12.70) differs from the others by more than 0.10 cm³, so it is rejected as an outlier.
- Titrations 2 and 3 (13.05 and 13.15) are concordant.
- Mean =
Key Takeaways
Reject outliers and average concordant titres. The rough titre is never included in the mean.
Common Mistakes
- Averaging all three titres including the outlier (12.70).
- Including the rough titre (13.60) in the mean.
- Arithmetic errors in subtracting burette readings.
Things to Be Careful About
- Concordance criterion is within 0.10 cm³.
- The mean must be quoted to the same precision as the titres (two decimal places).
Answer
Titrations 2 and 3 are concordant (within 0.10 cm³ of each other), so the results are reliable and no further titrations are needed.
Titrations 2 and 3 are within 0.10 cm³ of each other (concordant).
Background Concept
Concordant results are those within 0.10 cm³ of each other. Two concordant titres are sufficient to give a reliable mean titre, so further titrations are unnecessary.
Understanding the Question
Having completed the table, the student asks why no further titrations are needed. The answer lies in the concordance of the results.
Approach
Check whether any two titres meet the concordance criterion.
Step-by-Step Reasoning
- Titration 2 = 13.05 cm³, titration 3 = 13.15 cm³.
- They differ by 0.10 cm³, meeting the concordance criterion.
- With two concordant titres, the mean is reliable, so no further titrations are required.
Key Takeaways
Two concordant titres (within 0.10 cm³) are sufficient for a reliable mean.
Common Mistakes
- Saying "the results are similar" without the 0.10 cm³ criterion.
- Not identifying which titres are concordant.
Things to Be Careful About
- The specific criterion is within 0.10 cm³.
- The answer should name titrations 2 and 3.
Calculate the percentage error in the measurement of the titre for titration 3.
Show your working.
Working
Percentage error =
Answer
0.760%
0.760%
Background Concept
A burette reading has an uncertainty of ±0.05 cm³. A titre involves two readings (initial and final), so the total absolute uncertainty is . Percentage error is the absolute uncertainty divided by the measured value, multiplied by 100.
Understanding the Question
Calculate the percentage error in the titre for titration 3, which is 13.15 cm³. Working must be shown.
Approach
Percentage error = .
Step-by-Step Reasoning
- Each burette reading: ±0.05 cm³.
- Two readings per titre: total uncertainty = .
- Percentage error = .
Key Takeaways
Percentage error = (absolute uncertainty / measured value) × 100. Always double the burette uncertainty for a titre because two readings are involved.
Common Mistakes
- Using only one reading (±0.05) instead of two.
- Not showing the working (the mark requires it).
- Using the mean titre instead of the titration-3 titre.
Things to Be Careful About
- The titre for titration 3 is 13.15 cm³, not the mean.
- The answer should be given to three significant figures (0.760%).
The following equations show the reactions that take place during the procedure in (d).
steps 2, 3 and 4
step 5
step 7
Working
From :
Answer
6.55 × 10⁻⁶ mol
Background Concept
The titration reaction is , so 1 mol of iodine reacts with 2 mol of thiosulfate. Moles of thiosulfate are found from using the mean titre.
Understanding the Question
Given the mean titre of 13.10 cm³ of thiosulfate, find the amount of iodine in 25.0 cm³ of solution Z.
Approach
- Convert the titre to dm³.
- Calculate moles of thiosulfate: .
- Halve to find moles of iodine using the 2:1 stoichiometric ratio.
Step-by-Step Reasoning
- From the equation,
Key Takeaways
Use the mean titre (13.10 cm³), not individual titres. Apply the stoichiometric ratio from the balanced equation.
Common Mistakes
- Forgetting to halve the thiosulfate moles for iodine.
- Using an individual titre instead of the mean.
- Failing to convert cm³ to dm³.
Things to Be Careful About
- The ratio is 1 I₂ : 2 S₂O₃²⁻.
- Keep consistent units (dm³ for volume in ).
Use your answer to (f)(i) and the equations given to calculate the amount, in mol, of dissolved oxygen, , in of solution Z.
Working
From the equations: , so .
Answer
6.55 × 10⁻⁵ mol
Background Concept
The three equations form a chain linking dissolved O₂ to the iodine titrated. From step 2–4: , so 1 mol O₂ gives 4 mol Mn(OH)₃. From step 5: , so 2 mol Mn(OH)₃ give 1 mol I₂. Combining: 4 mol Mn(OH)₃ give 2 mol I₂, i.e. 1 mol O₂ gives 2 mol I₂. Thus .
Understanding the Question
We know the moles of I₂ in 25.0 cm³ of solution Z from (f)(i). We must find the moles of dissolved O₂ in the full 500.0 cm³ of Z, using the stoichiometry of the equations.
Approach
- Use the chain stoichiometry to relate O₂ to I₂.
- Calculate moles of O₂ in 25.0 cm³.
- Scale up from 25.0 cm³ to 500.0 cm³ (factor of 20).
Step-by-Step Reasoning
- From the equations, .
- Scaling to 500.0 cm³:
Key Takeaways
Chain stoichiometry across multiple equations requires tracking the mole ratios carefully. The dilution factor is the ratio of total volume to aliquot volume.
Common Mistakes
- Getting the O₂:I₂ ratio wrong (e.g. 1:1 instead of 1:2).
- Forgetting to scale up from 25 cm³ to 500 cm³.
- Using the wrong dilution factor.
Things to Be Careful About
- The dilution factor is 20 (500/25).
- The O₂:I₂ ratio is 1:2, so halve the iodine moles.
Dissolved oxygen content, , is the mass of oxygen dissolved in water.
Use your answer to (f)(ii) to calculate the dissolved oxygen content in the lake water collected in step 1.
[If you were unable to obtain an answer to (f)(ii), then use amount of in of solution Z = . This is not the correct answer.]
Working
Answer
8.38 mg dm⁻³
Background Concept
Dissolved oxygen content in is the mass of oxygen (in mg) dissolved in 1 dm³ of the original lake water. The lake water sample was 250 cm³, and all its oxygen ended up in the 500.0 cm³ of solution Z, so the moles of O₂ in Z equal the moles originally in the lake sample.
Understanding the Question
Using the moles of O₂ in 500.0 cm³ of Z from (f)(ii), calculate the dissolved oxygen content in of the lake water.
Approach
- Scale the moles from the 250 cm³ lake sample to 1 dm³ (×1000/250).
- Convert moles to mass using .
- Convert grams to milligrams (×1000).
Step-by-Step Reasoning
- . This is the O₂ in the original 250 cm³ lake sample.
- Content =
Key Takeaways
The dilution to 500 cm³ does not change the total amount of O₂. Unit conversions: 1 dm³ = 1000 cm³, 1 g = 1000 mg.
Common Mistakes
- Using 500 instead of 250 for the original sample volume.
- Forgetting to convert grams to milligrams.
- Using of O (16.0) instead of O₂ (32.0).
Things to Be Careful About
- The original sample was 250 cm³; the dilution to 500 cm³ keeps the total O₂ constant.
- The final unit is .
A student uses the following method to investigate the kinetics of the reaction between iodine and tin to produce tin(IV) iodide, .
| step 1 | Rinse a block of tin with distilled water and then rinse it with propanone. |
| step 2 | Place of a solution of iodine dissolved in methylbenzene in a beaker. |
| step 3 | Suspend the block of tin from a three decimal place balance as shown in Fig. 2.1. Start a timer. |
| step 4 | Record the balance reading every 100 seconds. |
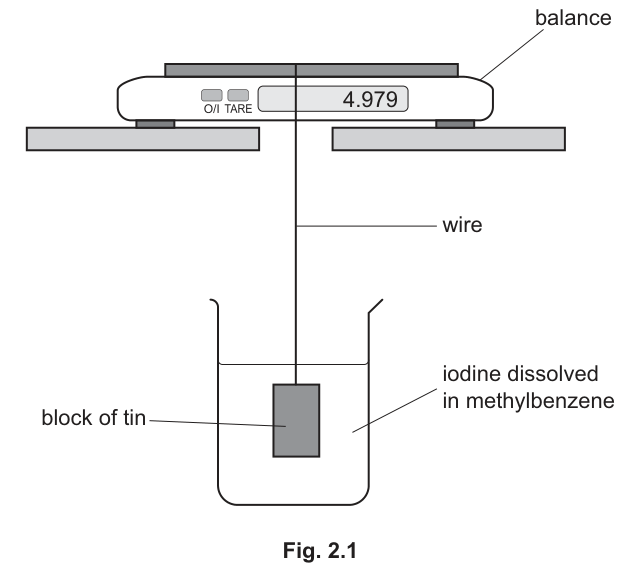
Suggest why the student rinses the block of tin with propanone after rinsing it with distilled water in step 1.
Answer
Propanone is volatile and miscible with water, so it increases the rate of drying and removes the distilled water from the surface of the tin.
Propanone is volatile and miscible with water, so it increases the rate of drying and removes the distilled water.
Background Concept
When washing an object with an aqueous solution, residual water remains on the surface. To dry it quickly, a solvent that is miscible with water and highly volatile (evaporates easily at room temperature) is used. Propanone (acetone) fits both criteria: it dissolves in water, mixing with the residual droplets, and its low boiling point (56 °C) means it evaporates rapidly, taking the water with it.
Understanding the Question
The question asks why propanone is used as a final rinse after distilled water. The goal is to remove water from the tin block before it is suspended in the reaction mixture.
Approach
Identify the physical properties of propanone that make it an effective drying agent for an aqueous rinse, and explain how these properties remove water.
Step-by-Step Reasoning
- Distilled water leaves residual droplets on the tin.
- Propanone is miscible with water, meaning it mixes with and displaces the water droplets.
- Propanone is highly volatile (evaporates very quickly at room temperature).
- As the propanone evaporates, it takes the water with it, leaving the tin dry and ensuring the initial mass measurement is not affected by water.
Key Takeaways
Using a volatile, water-miscible solvent like propanone is a standard technique to rapidly dry glassware or solid samples after an aqueous wash, preventing mass errors from residual water.
Common Mistakes
- Stating "propanone dries the tin" without explaining why (i.e. missing the points about volatility and miscibility with water).
- Saying "propanone is a solvent" without specifying it dissolves water and evaporates quickly.
Things to Be Careful About
Ensure the answer explicitly mentions both the removal/miscibility with water and the rapid evaporation (volatility). The mark scheme specifically looks for "increase the rate of drying" or "removal of water".
Answer
Iodine is not very soluble in water.
Iodine is not very soluble in water.
Background Concept
Iodine () is a non-polar molecule. According to the principle of 'like dissolves like', non-polar solutes dissolve best in non-polar solvents. Water is a highly polar solvent, so iodine has very low solubility in it. Methylbenzene (toluene) is a non-polar organic solvent, in which iodine is highly soluble, forming a characteristic purple/brown solution.
Understanding the Question
The question asks why water cannot be used as the solvent for iodine in this kinetics experiment. The experiment requires a solution of iodine to react with the tin block.
Approach
Recall the solubility of iodine in water compared to organic solvents.
Step-by-Step Reasoning
- The reaction requires iodine to be dissolved in a solvent to come into contact with the tin surface.
- Iodine is a non-polar diatomic molecule.
- Water is a polar solvent.
- Iodine is only slightly soluble in water (forming a very pale brown/yellow solution), so a 0.400 mol dm solution cannot be prepared in water.
- Therefore, a non-polar solvent like methylbenzene must be used to achieve the required concentration.
Key Takeaways
Solvent selection in chemical experiments must consider the solubility of the reactants. Non-polar halogens like iodine require non-polar organic solvents.
Common Mistakes
- Saying "iodine reacts with water" (it does react slightly, but the primary reason is lack of solubility).
- Not specifying that iodine is not very soluble or insoluble in water.
Things to Be Careful About
Be precise: iodine is slightly soluble in water, but not to the extent required for a 0.400 mol dm solution. The mark scheme accepts "iodine is not (very) soluble (in water)".
Suggest why a three decimal place balance is more suitable than a two decimal place balance for this experiment.
Answer
The change in mass of the tin block over the course of the reaction is very small, so a balance with higher precision (three decimal places) is needed to measure the mass change accurately.
The mass change is very small, so a more precise balance (three decimal places) is needed to measure it accurately.
Background Concept
In kinetics experiments where the progress of reaction is monitored by measuring the mass of a reactant decreasing (or a product increasing), the precision of the balance determines the resolution of the data. If the total mass change over the experiment is only ~0.36 g, a balance that reads to 0.01 g (two decimal places) would give a relative uncertainty of ~3%, and might not even resolve small early-time changes. A balance reading to 0.001 g (three decimal places) gives a relative uncertainty of ~0.3%, allowing for a much more accurate determination of the rate of reaction.
Understanding the Question
The question asks why a three-decimal-place balance is preferred over a two-decimal-place balance. We must consider the magnitude of the mass change expected in this experiment.
Approach
Estimate or observe the total mass change from the data (from 4.979 g to 4.620 g, a change of 0.359 g) and relate this to the precision of the balance.
Step-by-Step Reasoning
- The total mass of tin reacted is 0.359 g over 500 seconds.
- The mass change at each 100-second interval is roughly 0.07 g.
- A two-decimal place balance (precision 0.01 g) would only give readings like 4.91 g, losing significant information about the rate.
- The mass change is very small, so higher precision is required to obtain accurate data for the rate calculation.
Key Takeaways
Apparatus precision must be matched to the magnitude of the expected change. Small changes require high-precision instruments to minimize percentage uncertainty.
Common Mistakes
- Saying "it is more accurate" without explaining why (i.e. the mass change is small).
- Confusing precision with accuracy.
Things to Be Careful About
The mark scheme specifically looks for the phrase "mass change is (too / very) small". Link the small magnitude of change directly to the need for higher decimal places.
Suggest a control experiment that could be used to verify that the loss in mass of tin is caused by reaction with iodine and not any other factor.
Answer
Repeat the experiment using only methylbenzene (without any iodine) and measure the mass change of the tin block over the same time period.
Repeat the experiment without any iodine (using only methylbenzene).
Background Concept
A control experiment is used to establish a baseline and rule out alternative factors that could cause the observed effect. In this experiment, the loss in mass of the tin block is attributed to the reaction with iodine. However, tin could also react with dissolved oxygen, or the tin could physically erode, or the methylbenzene could dissolve some tin.
Understanding the Question
The question asks for a control experiment to verify that the mass loss is specifically due to the reaction with iodine, and not some other factor (like reaction with air or solvent effects).
Approach
Remove the independent variable (iodine) from the experiment while keeping all other conditions (solvent, temperature, time, tin block) identical.
Step-by-Step Reasoning
- The variable being tested is the presence of iodine.
- To control for other factors, repeat the entire procedure but replace the iodine/methylbenzene solution with pure methylbenzene.
- If the tin block loses mass in pure methylbenzene, that mass loss must be subtracted from the results of the iodine experiment to get the true mass lost to the reaction with iodine.
- If there is no mass loss in methylbenzene alone, it confirms iodine is the cause.
Key Takeaways
Controls involve removing the key variable of interest to see if the effect persists. This isolates the cause-and-effect relationship.
Common Mistakes
- Suggesting a control with water (water is not used, so this doesn't control the methylbenzene variable).
- Suggesting a control with a different metal (this tests the metal, not the iodine).
- Not specifying "without iodine" or "with only methylbenzene".
Things to Be Careful About
The control must use the same solvent (methylbenzene) and same conditions, just without the reactant being investigated (iodine). The mark scheme accepts "repeat without any iodine".
The student’s results are shown in Table 2.1.
Complete Table 2.1.
Table 2.1
| time / s | balance reading / g | total mass of tin reacted / g |
|---|---|---|
| 0 | 4.979 | 0.000 |
| 100 | 4.910 | |
| 200 | 4.859 | |
| 300 | 4.761 | |
| 400 | 4.688 | |
| 500 | 4.620 |
Working
Total mass of tin reacted = initial mass - balance reading at time
Initial mass = 4.979 g
- At 100 s: g
- At 200 s: g
- At 300 s: g
- At 400 s: g
- At 500 s: g
Answer
| time / s | total mass of tin reacted / g |
|---|---|
| 100 | 0.069 |
| 200 | 0.120 |
| 300 | 0.218 |
| 400 | 0.291 |
| 500 | 0.359 |
0.069, 0.120, 0.218, 0.291, 0.359
Background Concept
In a kinetics experiment monitoring mass loss, the raw data is often the mass of the remaining reactant. To analyze the rate of reaction, it is more useful to plot the total mass reacted (or volume of gas evolved, etc.) against time. This is calculated by subtracting the current reading from the initial reading.
Understanding the Question
The student has recorded the balance reading (mass of tin remaining) at 100-second intervals. The table requires the 'total mass of tin reacted' to be calculated for each time point.
Approach
Subtract each balance reading from the initial balance reading (at time = 0) to find the cumulative mass lost.
Step-by-Step Reasoning
- Initial mass at s is 4.979 g. Reacted mass = 0.000 g.
- At s: reacted = g.
- At s: reacted = g.
- At s: reacted = g.
- At s: reacted = g.
- At s: reacted = g.
All values should be given to three decimal places to match the precision of the balance.
Key Takeaways
When processing kinetics data, converting 'remaining' to 'reacted' (or vice versa) is a common first step to make the graph's gradient directly represent the rate of reaction.
Common Mistakes
- Subtracting the reacted mass from the current reading (double counting).
- Not maintaining three decimal places in the final answer.
- Calculation errors in simple subtraction.
Things to Be Careful About
Ensure the values are to 3 decimal places. The mark scheme awards 1 mark for the correct set of values.
Use the results from Table 2.1 to plot a graph on the grid in Fig. 2.2 to show the relationship between total mass of tin reacted and time.
Use a cross () to plot each data point. Draw a straight line of best fit.
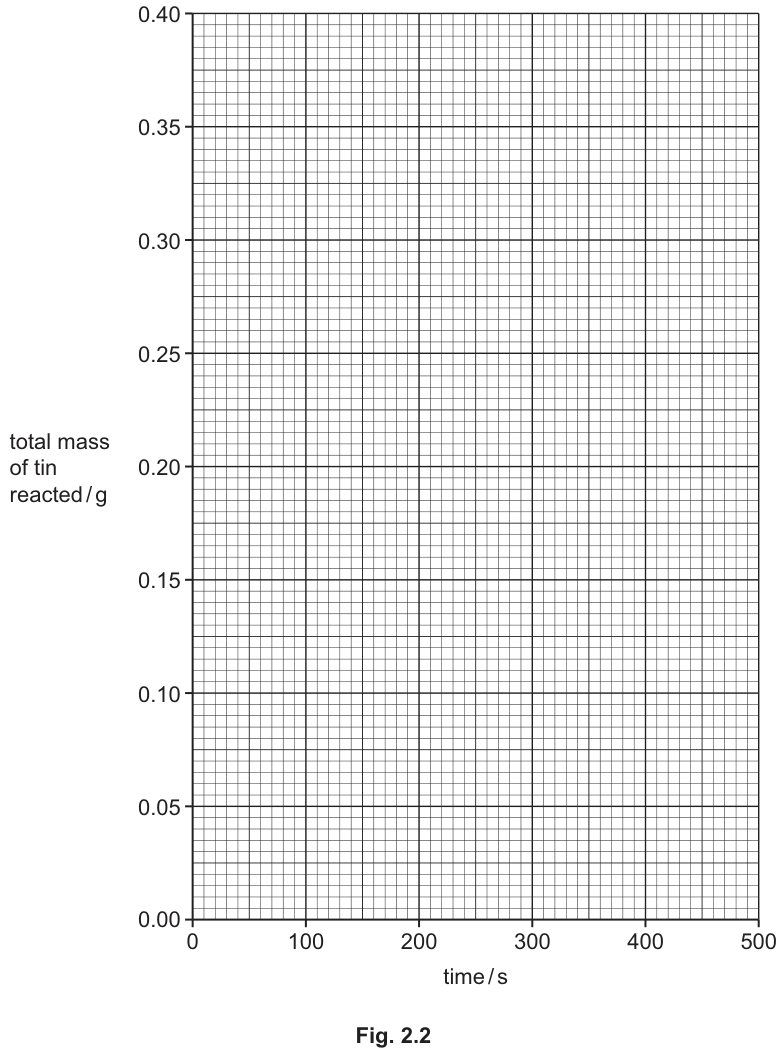
Answer
Plot the following points using crosses () on the grid:
- (0, 0.000)
- (100, 0.069)
- (200, 0.120)
- (300, 0.218)
- (400, 0.291)
- (500, 0.359)
Draw a straight line of best fit that passes as close as possible to all the points, with roughly equal numbers of points above and below the line.
See diagram: points plotted at (0,0), (100,0.069), (200,0.120), (300,0.218), (400,0.291), (500,0.359) with a straight line of best fit.
Background Concept
Graphical analysis is a fundamental tool in kinetics. Plotting the amount of product formed (or reactant consumed) against time allows the gradient of the line to represent the rate of reaction. A straight line indicates a constant rate (zero-order reaction with respect to the monitored quantity, though here it's likely first-order overall but the mass loss is linear over this short period or the surface area is constant).
Understanding the Question
The student must plot the calculated data from part (b) on the provided grid (Fig 2.2) and draw a line of best fit. The y-axis is 'total mass of tin reacted / g' and the x-axis is 'time / s'.
Approach
- Determine the coordinates for each data point.
- Plot them accurately on the grid.
- Draw a straight line of best fit.
Step-by-Step Reasoning
- Point 1: , . Plot at the origin.
- Point 2: , . Plot slightly below the 0.070 line.
- Point 3: , . Plot exactly on the 0.120 line.
- Point 4: , . Plot slightly below the 0.220 line.
- Point 5: , . Plot slightly above the 0.290 line.
- Point 6: , . Plot just below the 0.360 line.
- Draw a straight line of best fit. The line should pass through or near most points. Point 3 (200, 0.120) appears slightly below the general trend, making it a potential anomaly, but the line should still be drawn to minimize overall deviation.
Key Takeaways
When plotting graphs, use a sharp pencil, plot crosses (not dots) so the center is visible, and ensure the line of best fit is a straight ruler-drawn line that balances the points on either side.
Common Mistakes
- Plotting the balance reading (mass remaining) instead of mass reacted.
- Using dots instead of crosses.
- Drawing a 'join-the-dots' line instead of a line of best fit.
- Incorrect axis scaling or misreading the grid.
Things to Be Careful About
The mark scheme gives M1 for correct plotting (center of crosses on the line) and M2 for a straight line of best fit. Ensure the line is straight (use a ruler) and doesn't just connect the points.
Circle the point on the graph in Fig. 2.2 that you consider to be most anomalous.
Suggest one reason why this anomaly may have occurred during this experimental procedure.
Assume all measurements of mass are accurate.
Answer
Anomalous point: The point at time = 200 s (mass reacted = 0.120 g) is most anomalous (it lies noticeably below the line of best fit).
Reason: The balance reading was taken before 200 s had elapsed (the timer was not started at the same time as immersion, or the reading was taken too early).
Anomalous point at 200 s. Reason: The balance reading was taken before 200 s had elapsed (or the timer was started too late / reading taken too early).
Background Concept
An anomalous result (or outlier) is a data point that does not fit the general trend of the data. In kinetics, this can arise from human error in timing, equipment malfunction, or environmental fluctuations. Identifying and explaining anomalies is a key evaluation skill.
Understanding the Question
The student must circle the most anomalous point on the graph and suggest one reason for it. The question states to assume all mass measurements are accurate, so the error must be in the timing or procedure.
Approach
- Visually inspect the plotted points and the line of best fit to find the point furthest from the line.
- Propose a timing-related error that would cause the mass reacted to appear lower than expected at that time.
Step-by-Step Reasoning
- Looking at the data: the rate is roughly constant. From 0-100s, mass lost = 0.069g. From 300-400s, mass lost = 0.073g. From 400-500s, mass lost = 0.068g.
- At 200s, the mass lost is 0.120g. If the rate was constant (~0.0007 g/s), at 200s we would expect ~0.140g. The value 0.120g is significantly lower.
- This means less mass had reacted than expected at 200s. This could happen if the timer was started after the tin was immersed, or if the reading at 200s was taken before 200s had actually elapsed. Essentially, the time recorded is too large for the amount of mass reacted, or the mass reacted is too small for the time recorded.
- Another possibility: the timer was not started immediately when the tin was lowered into the solution.
Key Takeaways
Anomalies in time-based experiments often relate to timing errors (starting/stopping the clock too early or too late). Always check if the error is consistent with a timing mismatch.
Common Mistakes
- Circling a point that is actually on the line of best fit.
- Suggesting 'human error' without being specific (the mark scheme requires a specific reason like 'taken too early').
- Suggesting the balance was inaccurate (the question says to assume mass measurements are accurate).
Things to Be Careful About
The reason must link to the specific anomaly: the mass reacted is lower than expected for that time, so the time must have been recorded too late or the reading taken too early.
Use your graph in Fig. 2.2 to determine the gradient of the line of best fit.
State the coordinates of both points you used in your calculation. These must be selected from your line of best fit.
Give your gradient to three significant figures.
coordinates 1: .......................................... coordinates 2: ..........................................
gradient = ...............................................................
Working
Select two points on the line of best fit (not the data points themselves).
Example coordinates from the line of best fit:
- Point 1: (0, 0.000)
- Point 2: (500, 0.360)
Gradient =
(Other acceptable points on the line, e.g., (100, 0.072) and (400, 0.288) giving gradient = )
Answer
coordinates 1: (0, 0.000)
coordinates 2: (500, 0.360)
gradient = 0.000720 g s
coordinates 1: (0, 0.000), coordinates 2: (500, 0.360), gradient = 0.000720 g s^-1
Background Concept
The gradient of a 'mass reacted against time' graph represents the rate of reaction (change in mass per unit time). To calculate the gradient accurately, one must use two points on the line of best fit, not the actual data points (which contain experimental error). The points should be far apart to minimize percentage uncertainty in the gradient calculation.
Understanding the Question
The student must determine the gradient of the line of best fit from part (c). They must state the coordinates of two points used (must be from the line, not the data) and calculate the gradient to 3 significant figures.
Approach
- Read off two points that lie exactly on the drawn line of best fit.
- Calculate .
- Round to 3 significant figures.
Step-by-Step Reasoning
- The line passes through the origin (0, 0) approximately.
- At , the line is at approximately (the data point is 0.359, the line is slightly above).
- Using (0, 0.000) and (500, 0.360):
Gradient = g/s. - Using (100, 0.072) and (400, 0.288):
Gradient = g/s. - The value 0.000718 (using data points 0 and 500) is also acceptable if the line is drawn very close to it, but 0.000720 is a cleaner 3-sig-fig answer from the line.
- Units are g s (or g/s).
Key Takeaways
Always use points on the line of best fit for gradient calculations, not the raw data points. Choose points that are far apart and easy to read from the grid.
Common Mistakes
- Using raw data points (e.g., (0,0) and (500, 0.359)) to calculate the gradient. While this gives 0.000718, the mark scheme requires points from the line of best fit.
- Not stating the coordinates.
- Incorrect significant figures (must be 3).
- Wrong units.
Things to Be Careful About
The coordinates must be clearly stated in (x, y) format. The gradient calculation must use these exact coordinates. 3 significant figures: 0.000720 (not 0.00072 or 0.0007200).
Another student makes various concentrations of solutions of iodine dissolved in methylbenzene by dilution of the solution.
The student repeats the experiment at a different temperature using these solutions.
Table 2.2
| volume of solution used / | volume of methylbenzene used / | / | relative rate of reaction |
|---|---|---|---|
| 100.0 | 0.0 | 0.400 | 4.76 |
| 0.300 | 3.57 | ||
| 0.200 | 2.35 | ||
| 0.100 | 1.15 |
Complete Table 2.2 by adding the volumes of solutions that are mixed to make of a solution of iodine dissolved in methylbenzene for each required concentration.
Working
Total volume = 100.0 cm. Initial concentration mol dm.
Using :
- For : cm. Volume of methylbenzene = cm.
- For : cm. Volume of methylbenzene = cm.
- For : cm. Volume of methylbenzene = cm.
Answer
| volume of 0.400 mol dm I solution / cm | volume of methylbenzene / cm |
|---|---|
| 75.0 | 25.0 |
| 50.0 | 50.0 |
| 25.0 | 75.0 |
75.0, 25.0; 50.0, 50.0; 25.0, 75.0
Background Concept
To investigate the effect of concentration on rate, a series of solutions with different concentrations must be prepared by dilution. The total volume must be kept constant (100.0 cm) to ensure that the volume of the reaction mixture is the same in all experiments (a control variable). The dilution formula is .
Understanding the Question
The student has a stock solution of 0.400 mol dm I in methylbenzene. They need to make 100.0 cm of solutions with concentrations 0.300, 0.200, and 0.100 mol dm by mixing the stock solution with pure methylbenzene.
Approach
Calculate the volume of stock solution () needed for each concentration using , then subtract from 100.0 cm to find the volume of methylbenzene.
Step-by-Step Reasoning
- For 0.300 mol dm:
cm of stock solution.
Methylbenzene = cm. - For 0.200 mol dm:
cm of stock solution.
Methylbenzene = cm. - For 0.100 mol dm:
cm of stock solution.
Methylbenzene = cm.
All volumes should be given to 1 decimal place (or 3 sig figs) to match the precision of the 100.0 cm total volume.
Key Takeaways
When preparing dilution series, keep the total volume constant to control for volume effects. Use to find the solute volume, and subtract from total to find the solvent volume.
Common Mistakes
- Forgetting to subtract from 100.0 to find the methylbenzene volume.
- Using the wrong total volume.
- Not maintaining 3 significant figures / 1 decimal place.
Things to Be Careful About
The table already has the first row (100.0 and 0.0). Fill in the remaining three rows. Ensure the sum of volumes in each row is exactly 100.0 cm.
Answer
The independent variable is the concentration of iodine, .
Background Concept
In an experiment, the independent variable is the one that is deliberately changed or controlled by the experimenter to test its effect on the dependent variable. Here, the student is varying the concentration of iodine to see how it affects the rate of reaction.
Understanding the Question
Identify the independent variable in the experiment described in part (e).
Approach
Look at what is being changed systematically in Table 2.2. The concentration of iodine is varied (0.400, 0.300, 0.200, 0.100), and the relative rate is measured.
Step-by-Step Reasoning
- The concentration of iodine is the variable being manipulated.
- Therefore, is the independent variable.
- The dependent variable is the relative rate of reaction.
Key Takeaways
The independent variable is what you change; the dependent variable is what you measure.
Common Mistakes
- Saying 'volume of methylbenzene' (this is a means to an end, the actual variable of interest is the concentration).
- Saying 'concentration' without specifying which concentration.
Things to Be Careful About
Be specific: '' or 'concentration of iodine'.
The student concludes that the rate equation for the reaction between iodine and tin is as follows.
State whether the results support the student’s conclusion.
Explain your answer using values from Table 2.2.
Answer
No, the results do not support the conclusion.
Explanation:
If rate , then halving the concentration should reduce the rate to (0.25) of its original value.
- When is halved from 0.400 to 0.200 mol dm, the rate changes from 4.76 to 2.35.
- Ratio of rates: (or ).
- Since halving the concentration halves the rate (rate is proportional to ), the reaction is first order with respect to iodine, not second order.
- The correct rate equation is rate .
Working for verification:
- ; . (First order)
- If second order: , rate ratio should be 4.
Answer
No. The rate is proportional to the concentration of iodine (first order), not the square of the concentration. For example, halving from 0.400 to 0.200 mol dm halves the rate (4.76 to 2.35), indicating first order.
No. The rate is proportional to [I2] (first order). Halving [I2] from 0.400 to 0.200 mol dm-3 halves the rate (4.76 to 2.35).
Background Concept
The rate equation expresses how the rate of reaction depends on the concentration of reactants: rate . The orders and must be determined experimentally. If doubling doubles the rate, the reaction is first order in A (). If doubling quadruples the rate, it is second order ().
Understanding the Question
A student proposes rate (second order). We must use the data in Table 2.2 to test this conclusion.
Approach
- State whether the results support the conclusion (Yes/No).
- Calculate the ratio of concentrations and the ratio of rates for a pair of data points.
- Compare the ratios to determine the actual order.
Step-by-Step Reasoning
- Look at (rate = 4.76) and (rate = 2.35).
- Concentration ratio: (concentration halved).
- Rate ratio: (rate halved).
- Since halving the concentration halves the rate (or doubling doubles the rate), the rate is directly proportional to .
- This means the reaction is first order with respect to iodine.
- The proposed equation rate implies second order, which is incorrect.
- Therefore, the results do not support the student's conclusion.
Key Takeaways
To determine order, compare how the rate changes when concentration changes. Use ratios: if rate ratio = (concentration ratio), then is the order.
Common Mistakes
- Saying 'Yes' without checking the math.
- Calculating the ratio incorrectly (e.g., , then saying which is wrong).
- Not using actual values from the table to explain.
- Stating 'it's first order' without showing the calculation from the table.
Things to Be Careful About
The mark scheme requires: M1 for 'no' (or equivalent), AND M2 for explanation using actual values from columns 3 and 4. You must show the calculation or comparison using the numbers in the table (e.g., 'halving concentration from 0.400 to 0.200 halves the rate from 4.76 to 2.35').