Chemistry 9701/54 — May/June 2025
Cambridge A-Level · Planning, Analysis and Evaluation · worked solutions for every part, with the mark scheme
Topics Analysis, Conclusions and Evaluation · Planning
The relative molecular mass, , of an unknown volatile liquid, Y, can be determined experimentally.
A student uses the following method to determine the volume of a conical flask.
step 1 Weigh a dry conical flask.
step 2 Fill the conical flask completely with distilled water.
step 3 Weigh the conical flask when filled with distilled water.
step 4 Use a thermometer to measure the temperature of the distilled water in the conical flask.
The student collects the results shown in Table 1.1.
Table 1.1
| mass of dry flask / g | 31.022 |
| mass of flask filled with water / g | 161.175 |
| temperature of water in flask / °C | 23.0 |
| laboratory atmospheric pressure / kPa | 99.0 |
Fig. 1.1 shows the variation of the density of water with temperature.
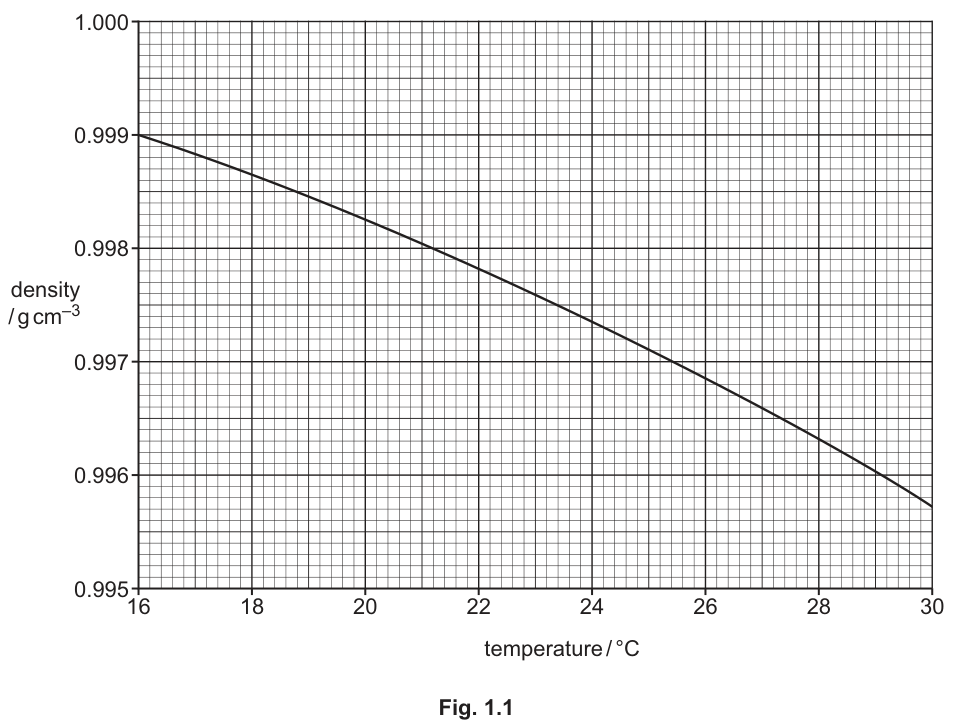
Use Fig. 1.1 to determine the density of water at 23.0 °C.
Give your answer to four decimal places.
Answer
0.9976 g cm^-3
Background Concept
The density of water varies slightly with temperature. Between 16 °C and 30 °C, the density decreases approximately linearly from about 0.9991 g cm⁻³ to 0.9956 g cm⁻³. This is because thermal expansion increases the volume of a given mass of water as temperature rises, reducing the density. In practical work, the density of water at the working temperature must be read from a calibration graph or table to convert a mass of water into an accurate volume.
Understanding the Question
The question asks you to read the density of water at 23.0 °C from Fig. 1.1, which plots density (g cm⁻³) against temperature (°C). The answer must be given to four decimal places. The graph shows a straight line with a negative gradient, so you can interpolate directly.
Approach
Locate 23.0 °C on the x-axis (between 22 and 24), move vertically to the line, then horizontally to the y-axis to read the density. The graph has fine gridlines allowing four-decimal-place precision.
Step-by-Step Reasoning
- On the x-axis, find 23.0 °C — this is the midpoint between the 22 and 24 gridlines.
- Move vertically upward to the plotted line.
- Move horizontally to the y-axis. The line at 23 °C sits just below the 0.9977 gridline and just above the 0.9976 gridline, at approximately 0.9976 g cm⁻³.
- The mark scheme accepts 0.9976 g cm⁻³ to four decimal places.
Key Takeaways
- Graph reading in Paper 5 requires precision to the number of decimal places specified.
- The density of water is not exactly 1.000 g cm⁻³ at room temperature; using 1.000 would introduce error.
- Linear interpolation between gridlines is sufficient for a straight-line graph.
Common Mistakes
- Reading 0.9975 or 0.9977 instead of 0.9976 due to imprecise interpolation.
- Giving only three decimal places (0.998) when four are required.
- Confusing the axes and reading the temperature from the y-axis.
Things to Be Careful About
- The question specifies four decimal places — the answer 0.9976 has exactly four.
- Ensure you read at 23.0 °C, not 22 or 24 °C.
- Include the unit g cm⁻³.
Working
Mass of water
Answer
130.466 cm^3
Background Concept
The volume of a container can be determined by filling it with water, measuring the mass of water added, and dividing by the density of water at the measured temperature. This relies on the relationship , rearranged to . The mass of water is found by difference: (mass of flask + water) − (mass of dry flask). Using the correct density at the experimental temperature (rather than assuming 1.000 g cm⁻³) is essential for accuracy.
Understanding the Question
You are given: mass of dry flask = 31.022 g, mass of flask + water = 161.175 g, and the density of water at 23.0 °C = 0.9976 g cm⁻³ (from part a(i)). You must calculate the volume of the flask. The command word is "calculate", so working must be shown.
Approach
Step 1: Find the mass of water by subtracting the dry flask mass from the filled flask mass. Step 2: Divide this mass by the density to obtain the volume. Both steps are straightforward arithmetic.
Step-by-Step Reasoning
- Mass of water = 161.175 − 31.022 = 130.153 g. (M1 — correct subtraction.)
- Volume = mass / density = 130.153 / 0.9976 = 130.466 cm³. (M2 — correct division using the density from a(i).)
- The volume is 130.466 cm³, which represents the internal volume of the conical flask.
Note: If a different density were used in a(i) (e.g. 0.9975), the volume would differ slightly — error carried forward is allowed.
Key Takeaways
- The water-displacement method for flask volume requires the density at the actual water temperature.
- Mass by difference: always subtract the tare (empty) mass from the filled mass.
- Units: mass in g divided by density in g cm⁻³ gives volume in cm³.
Common Mistakes
- Using density = 1.000 g cm⁻³ instead of 0.9976, giving 130.153 cm³ instead of 130.466 cm³.
- Forgetting to subtract the dry flask mass and using 161.175 g as the water mass.
- Arithmetic errors in the subtraction (31.022, not 31.023 or 31.020).
Things to Be Careful About
- The subtraction must use the exact values given: 161.175 − 31.022, not rounded values.
- The density used must be the one determined in a(i); ecf applies if a different (but consistently used) density is carried forward.
- Report the volume to an appropriate number of significant figures (at least 5 to match the precision of the data).
Another student determines the volume of a different conical flask to be . This conical flask is used to determine the of unknown volatile liquid Y.
The following method is used.
step 1 Cover the opening of the dry conical flask with aluminium foil and secure using a rubber band.
step 2 Weigh the conical flask, aluminium foil and rubber band. Record the mass.
step 3 Use a syringe with a needle to make a small hole in the aluminium foil and inject approximately of Y into the conical flask. Remove the syringe.
step 4 Place the conical flask in a water-bath containing boiling water.
step 5 Allow all of Y to evaporate. Keep the conical flask containing vaporised Y in the boiling water for a further 3 minutes.
step 6 Carefully remove the conical flask from the boiling water and dry the outside surface thoroughly.
step 7 Weigh the conical flask, aluminium foil, rubber band and contents. Record this mass.
Suggest why the conical flask containing vaporised Y is kept in boiling water for 3 minutes in step 5.
Answer
To ensure the vapour of Y in the conical flask has reached the temperature of the boiling water () / thermal equilibrium has been established.
To ensure the vapour has reached the temperature of the boiling water (100 °C)
Background Concept
In the Dumas method for determining of a volatile liquid, the liquid is vaporised in a sealed flask immersed in a boiling water bath. The ideal gas equation is then applied using the temperature of the water bath. For this to be valid, the vapour inside the flask must actually be at the bath temperature. Thermal equilibration takes time, especially through the glass walls of the flask and the aluminium foil seal.
Understanding the Question
The command word is "suggest" — you must give a chemically sensible reason. The question asks specifically why the flask is kept in boiling water for an additional 3 minutes after all the liquid has evaporated. What is happening during those 3 minutes?
Approach
Consider what happens immediately after the last droplet evaporates: the vapour may still be cooler than 100 °C because heat transfer through glass takes time. The 3-minute wait ensures the vapour temperature equals the bath temperature before the flask is removed and weighed.
Step-by-Step Reasoning
- Once all liquid Y has evaporated, the flask contains only vapour of Y at approximately atmospheric pressure.
- However, the vapour may not yet be at 100 °C — the glass walls and the vapour itself need time to reach thermal equilibrium with the boiling water.
- If the flask were removed immediately, the vapour temperature would be below 100 °C, and using K in would introduce error.
- The 3-minute hold ensures thermal equilibrium: the vapour is genuinely at 100 °C when the flask is removed.
Key Takeaways
- In any experiment using , the temperature used must be the actual temperature of the gas.
- Waiting periods in methods exist to allow thermal (or chemical) equilibration.
- "Suggest" questions require a chemically logical reason, not a vague statement.
Common Mistakes
- Saying "to make sure all the liquid has evaporated" — the question states evaporation is already complete; the 3 minutes is after that point.
- Saying "to cool the flask" — the flask is kept in boiling water, not removed.
- Vague answers like "to be safe" or "to make the experiment accurate" without specifying what is being equilibrated.
Things to Be Careful About
- The mark scheme specifically requires the idea that the vapour reaches the temperature of the boiling water. Mentioning "equilibrium" or "100 °C" is essential.
Suggest why it is not necessary to determine the mass of liquid Y injected into the conical flask by the syringe in step 3.
Answer
The mass of vapour occupying the flask (measured at step 7) is the value used in the calculation, not the mass initially injected.
The mass of vapour occupying the flask at step 7 is used in the calculation
Background Concept
In the Dumas method, an excess of volatile liquid is injected into the flask. When heated, the liquid vaporises and the excess escapes through the pinhole in the foil. At the end of heating, the flask contains exactly enough vapour to fill its volume at atmospheric pressure and the bath temperature. The mass of this vapour is found by weighing the flask before and after the experiment (step 7 mass − step 2 mass). The initial injected mass is irrelevant because any excess has escaped.
Understanding the Question
The command word is "suggest". The question asks why the student does not need to know how much liquid Y was injected via the syringe. What quantity actually appears in the calculation?
Approach
Identify what enters the calculation: , where comes from and the mass of vapour is (step 7 mass − step 2 mass). The syringe volume/mass never appears.
Step-by-Step Reasoning
- An excess of liquid Y is injected (~5 cm³) — more than can fit as vapour in the flask at 100 °C.
- On heating, Y vaporises; excess vapour escapes through the pinhole.
- At the end, the flask contains vapour of Y at 100 °C and 99.0 kPa filling 129.56 cm³.
- The mass of this vapour = (mass at step 7) − (mass at step 2) = 31.429 − 31.123 = 0.306 g.
- This 0.306 g is used in . The 5 cm³ injected is irrelevant — it was never all retained.
Key Takeaways
- In the Dumas method, the mass used is the mass of vapour remaining in the flask, not the mass injected.
- The pinhole ensures only the equilibrium amount of vapour remains.
- Understanding which quantity enters the calculation is key to justifying experimental design choices.
Common Mistakes
- Saying "the mass cancels out" — it does not cancel; it is simply not needed because the retained mass is measured directly.
- Saying "the syringe is not accurate enough" — the reason is conceptual, not instrumental.
- Confusing the mass injected with the mass of vapour in the flask.
Things to Be Careful About
- The answer must reference that the mass used in the calculation is the mass of vapour in the flask (step 7 minus step 2), not the injected mass.
The student thinks that Y is toxic. Other than wearing safety glasses and a lab coat, state one safety precaution that must be taken when carrying out this experiment.
Answer
Carry out the experiment in a fume hood / fume cupboard.
Use a fume hood
Background Concept
When handling toxic volatile liquids, the primary risk is inhalation of vapour. A fume hood (fume cupboard) extracts vapour away from the operator's breathing zone, preventing inhalation. Other controls (gloves, lab coat, safety glasses) protect against skin and eye contact but do not address the inhalation risk from volatile toxic substances.
Understanding the Question
The command word is "state" — a brief, specific answer is required. The question excludes safety glasses and lab coat (already mentioned), so you must give a different precaution. The substance is toxic and volatile (it vaporises at 100 °C), so the main hazard is inhalation.
Approach
Identify the hazard (inhalation of toxic vapour) and the appropriate control measure (fume hood to remove vapour from the breathing zone).
Step-by-Step Reasoning
- Y is toxic and volatile — heating it produces toxic vapour that can escape through the pinhole.
- The primary route of exposure is inhalation.
- A fume hood provides local exhaust ventilation, drawing vapour away from the student.
- This is the most appropriate and specific precaution beyond PPE.
Key Takeaways
- For volatile toxic substances, the inhalation route is the dominant hazard.
- A fume hood is the standard control for volatile toxic reagents.
- "Wear gloves" or "wash hands" are valid but less specific to the volatility aspect; a fume hood directly addresses the vapour hazard.
Common Mistakes
- Repeating "wear a lab coat" or "wear safety glasses" — these are excluded by the question.
- Saying "wear gloves" — while sensible, it does not address the inhalation risk from a volatile toxic substance as directly as a fume hood.
- Saying "do the experiment outside" — not a standard laboratory control.
Things to Be Careful About
- The question asks for ONE precaution. Do not list several.
- The answer must be specific to the toxicity and volatility of Y.
Table 1.2 shows the student’s results.
Table 1.2
| temperature of water-bath / °C | 100.0 |
| laboratory atmospheric pressure / kPa | 99.0 |
| mass of conical flask, aluminium foil and rubber band measured in step 2 / g | 31.123 |
| mass of conical flask, aluminium foil, rubber band and Y measured in step 7 / g | 31.429 |
| mass of Y in flask in step 7 / g | 0.306 |
| volume of conical flask used / | 129.56 |
Working
The balance reads to , so the uncertainty in a single reading is .
Answer
3.21 × 10^-3 %
Background Concept
Percentage error (or percentage uncertainty) is calculated as . For a digital balance reading to 0.001 g, the uncertainty in a single reading is taken as ±0.0005 g (half the smallest division). Some mark schemes express this as g to represent the full range of uncertainty (from −0.0005 to +0.0005, a span of 0.001 g). The percentage error quantifies how significant the instrument's precision is relative to the quantity being measured.
Understanding the Question
The mass measured in step 2 is 31.123 g (a single balance reading). The balance reads to 0.001 g. You must calculate the percentage error in this single measurement. The command word is "calculate" and you must "show your working".
Approach
- State the uncertainty of the balance: ±0.0005 g per reading.
- Apply the percentage error formula: (absolute uncertainty / measured value) × 100.
- The mark scheme uses in the numerator, representing the total uncertainty range of 0.001 g.
Step-by-Step Reasoning
- Balance precision: reads to 0.001 g → uncertainty = ±0.0005 g.
- Total absolute uncertainty = g (the full ± range).
- Percentage error = .
- This very small percentage error confirms the balance is highly precise for this mass.
Key Takeaways
- Percentage error = (absolute uncertainty / measured value) × 100.
- For a balance reading to 0.001 g, uncertainty = ±0.0005 g (or expressed as a range of 0.001 g).
- Small percentage errors indicate the instrument is appropriate for the quantity measured.
Common Mistakes
- Using 0.001 g as the uncertainty without the ×2 convention, giving a different (but arguably valid) answer.
- Dividing by the wrong mass (e.g. 0.306 g instead of 31.123 g).
- Forgetting to multiply by 100 to get a percentage.
- Reporting as a decimal (0.0000321) instead of a percentage.
Things to Be Careful About
- The question asks for the error in the mass measured in step 2 (31.123 g), not the mass of Y (0.306 g).
- The mark scheme's convention of should be followed.
- Express the answer in scientific notation or as a percentage to 3 significant figures.
The student assumes that the vapour formed from liquid Y is an ideal gas. The ideal gas equation is shown.
Use the ideal gas equation and the results in Table 1.2 to calculate the amount, in mol, of Y in the conical flask in step 7.
Assume that the temperature of the vapour formed from liquid Y is .
Working
Convert to SI units:
Answer
4.14 × 10^-3 mol
Background Concept
The ideal gas equation relates the pressure, volume, temperature, and amount of an ideal gas. In the Dumas method, the vapour of the volatile liquid fills the flask at atmospheric pressure and the bath temperature, so the number of moles of vapour can be calculated directly. All quantities must be in SI units: pressure in Pa, volume in m³, temperature in K, and J mol⁻¹ K⁻¹.
Understanding the Question
You must calculate the number of moles of vapour Y in the flask using the data in Table 1.2. The command word is "calculate" and you must use the ideal gas equation. The temperature is assumed to be 100 °C (373 K). The pressure is 99.0 kPa and the volume is 129.56 cm³.
Approach
- Convert all quantities to SI units.
- Rearrange to .
- Substitute and evaluate.
Step-by-Step Reasoning
- Pressure: (multiply by 1000).
- Volume: (since ). Equivalently, .
- Temperature: .
- Rearrange: .
- Substitute: .
- Numerator: (or Pa·m³).
- Denominator: .
- Result: .
Key Takeaways
- Always convert to SI units before substituting into .
- and .
- Temperature must always be in Kelvin for gas law calculations.
- The mark scheme awards M1 for correct unit conversions and M2 for correct rearrangement and evaluation.
Common Mistakes
- Using 99.0 Pa instead of 99 000 Pa.
- Using 129.56 m³ instead of m³.
- Using 100 K instead of 373 K.
- Forgetting to convert °C to K (using 100 instead of 373).
- Using vs — both are acceptable.
Things to Be Careful About
- The volume conversion: to m³ is , NOT .
- The pressure is 99.0 kPa (not 101.3 kPa standard) — use the given value.
- Report to 3 significant figures: mol.
Working
Answer
73.9
Background Concept
The relative molecular mass () is numerically equal to the molar mass in g mol⁻¹. It is calculated as , where is the mass of the substance and is the number of moles. In the Dumas method, both (from the balance) and (from the ideal gas equation) are determined experimentally.
Understanding the Question
You must calculate of Y using the mass of Y from Table 1.2 (0.306 g) and the moles calculated in part (c)(ii). The command word is "calculate".
Approach
Simply divide the mass of Y by the number of moles: .
Step-by-Step Reasoning
- Mass of Y in flask (step 7) = 0.306 g (given in Table 1.2).
- Moles of Y (from c(ii)) = mol.
- .
- To appropriate significant figures: (or 74).
Note: ecf applies — if a different value of was obtained in (c)(ii), using that value here still earns the mark provided the division is correct.
Key Takeaways
- is dimensionless (relative), but numerically equals the molar mass in g mol⁻¹.
- The calculation is a simple division; the challenge is in obtaining correctly in (c)(ii).
- The result (~74) is consistent with a small organic molecule (e.g. has ; has ; a close match).
Common Mistakes
- Inverting the division: instead of .
- Using the wrong mass (e.g. 31.429 g instead of 0.306 g).
- Using moles from (c)(ii) incorrectly (e.g. instead of ).
Things to Be Careful About
- The mass of Y is 0.306 g (the difference between step 7 and step 2 masses), already given in the table.
- ecf from (c)(ii) is allowed.
- Report to 3 significant figures.
The actual temperature of the vapour formed from liquid Y is less than . Describe and explain the effect this has on the calculated value of the .
Answer
The calculated would be greater than the true value. At a lower actual temperature, more moles of vapour occupy the flask (at the same pressure and volume), so the mass of vapour measured in step 7 is greater than it would be at . Since the student uses (too high) in , the calculated is too small, and is too large.
The calculated Mr would be greater than the true value because the mass of vapour measured is greater (more moles fit at lower T) and the calculated n is too small (using T = 373 K).
Background Concept
In the Dumas method, the flask is assumed to contain vapour at the bath temperature (100 °C). If the actual vapour temperature is lower, the physical situation changes: at the same pressure and volume, a lower temperature means more moles of gas are present (from ). More moles means more mass of vapour in the flask. The student, however, calculates using K, which underestimates the true number of moles. The mass measured is the actual (larger) mass. Thus is too large.
Understanding the Question
The command words are "describe and explain". You must state the effect on (greater) AND give the reasoning. The key insight is that the mass measured changes (it is larger than it would be at true 100 °C) because more vapour fits in the flask at a lower temperature.
Approach
Consider what happens physically if the vapour is at, say, 95 °C instead of 100 °C:
- At lower T, more moles fit in the same V at the same p → more mass of vapour in the flask → step 7 mass is greater.
- The student still uses T = 373 K → calculated n is smaller than true n.
- : numerator too large, denominator too small → too large.
Step-by-Step Reasoning
- If actual vapour temperature < 100 °C, then at the same and , the actual number of moles is greater than .
- More moles of vapour means more mass of Y in the flask when weighed at step 7. The mass measured (0.306 g) is therefore greater than the mass that would be present if the vapour were truly at 100 °C.
- The student calculates using K, obtaining a value that is too small (since the true T is lower, the true is larger).
- : the measured is too large AND the calculated is too small → both effects make too large (greater than true value).
The mark scheme's key point: "mass of vapour measured is greater (all other measurements are the same)" — this is the primary explanation.
Key Takeaways
- Systematic errors from wrong temperature assumptions affect both the measured mass AND the calculated moles.
- At lower temperature, more gas molecules fit in a fixed volume at fixed pressure.
- When evaluating errors, trace the effect through each quantity in the calculation chain.
Common Mistakes
- Saying would be smaller (wrong direction).
- Only stating the effect without explaining why the mass is greater.
- Focusing only on the calculation error without mentioning that the mass itself is also affected.
- Saying "the temperature is wrong so the answer is wrong" without specifying direction or mechanism.
Things to Be Careful About
- The mark scheme requires BOTH the direction (greater) AND the reason (mass of vapour is greater). One without the other scores zero.
- The reasoning is about the actual mass being larger because more moles fit at lower T, not about the calculation of alone.
The boiling point of methylbenzene is .
Suggest why the of methylbenzene cannot be determined using this method.
Answer
The boiling water bath is at , which is below the boiling point of methylbenzene (), so methylbenzene would not vaporise (would not boil) in the water-bath.
The temperature of the water bath (100 °C) is not high enough to boil methylbenzene (bp 111 °C)
Background Concept
The Dumas method requires the liquid to be fully vaporised in the flask. This is achieved by heating the flask in a boiling water bath, which provides a maximum temperature of 100 °C (at atmospheric pressure). For the method to work, the liquid must have a boiling point below 100 °C so that it vaporises completely when immersed in the boiling water. If the boiling point exceeds 100 °C, the liquid cannot fully vaporise at the available temperature.
Understanding the Question
The command word is "suggest". You must explain why methylbenzene (bp = 111 °C) cannot be analysed by this method. The water bath provides a maximum temperature of 100 °C. Compare this with 111 °C.
Approach
The Dumas method requires complete vaporisation. The maximum temperature available is 100 °C (boiling water). Methylbenzene boils at 111 °C. Since 100 < 111, the liquid will not boil/vaporise fully.
Step-by-Step Reasoning
- The water bath is at 100 °C (the temperature of boiling water at ~99 kPa, approximately 100 °C).
- Methylbenzene has a boiling point of 111 °C.
- At 100 °C, methylbenzene is below its boiling point — it remains a liquid and does not fully vaporise.
- Without complete vaporisation, the flask does not contain vapour of methylbenzene at 100 °C and atmospheric pressure, so the ideal gas calculation is invalid.
- Therefore, this method cannot determine the of methylbenzene.
Key Takeaways
- The Dumas method is limited to liquids with boiling points below the temperature of the heating bath.
- A boiling water bath provides a maximum of ~100 °C; for higher-boiling liquids, an oil bath or other heating method at higher temperature would be needed.
- Understanding the physical requirement (complete vaporisation) is essential for evaluating method limitations.
Common Mistakes
- Saying "methylbenzene is not volatile" — it is volatile, just not volatile enough at 100 °C.
- Saying "methylbenzene decomposes at 100 °C" — it does not; it simply does not boil.
- Saying "the method requires the liquid to be a gas at room temperature" — it must be a gas at the bath temperature.
Things to Be Careful About
- The key comparison is: bath temperature (100 °C) < boiling point (111 °C). State both values.
- The answer must reference the temperature of the water bath being insufficient, not just "it doesn't work".
A student carries out an experiment to determine the charge of an aqueous ion, , of metal M.
The student prepares of aqueous copper(II) nitrate, , to use in the experiment.
Working
Answer
24.15 g
24.15 g
Background Concept
When preparing a standard solution from a hydrated salt, the water of crystallisation must be included in the relative formula mass (). The number of moles of the hydrated salt equals the number of moles of the anhydrous salt dissolved, because each formula unit of the hydrate releases one formula unit of the salt into solution.
Understanding the Question
We need the mass of that, when dissolved and made up to , gives a solution of in . The command word is "calculate".
Approach
- Find moles needed from .
- Compute of the hydrated salt (include the three waters).
- Multiply moles by to get mass.
Step-by-Step Reasoning
- Volume in dm³: .
- Moles of : .
- : Cu = 63.5; N = 28.0; O = 96.0; H₂O = . Total = 241.5.
- Mass = .
Key Takeaways
Always use the of the hydrated form when weighing out a hydrate to prepare a solution of known concentration of the anhydrous salt.
Common Mistakes
- Using (anhydrous) instead of 241.5 (tri-hydrate), giving 18.75 g.
- Forgetting to convert cm³ to dm³.
Things to Be Careful About
- The question specifies the trihydrate ; do not omit the water of crystallisation.
- Report to 4 significant figures (or 2 decimal places in grams) as the mark scheme expects 24.15 g.
Describe the steps the student should take to prepare of starting from the mass calculated in (a) supplied in a small beaker.
Give the name and capacity of any apparatus used.
Write your answer using a series of numbered steps.
Answer
- Add a small volume of distilled water to the small beaker and dissolve the solid completely, stirring with a glass rod.
- Transfer the solution quantitatively into a volumetric flask, rinsing the beaker and glass rod with distilled water and adding the washings to the flask.
- Add distilled water up to the calibration mark on the neck of the volumetric flask, then stopper and invert the flask several times to mix thoroughly.
See numbered steps: dissolve in small volume of distilled water; transfer to 100 cm³ volumetric flask with washings; make up to calibration mark and invert to mix.
Background Concept
A standard solution of precise concentration is prepared using a volumetric flask, which is calibrated to contain an exact volume at a specific temperature. The key principle is quantitative transfer — every drop of solute must reach the flask, hence the use of washings.
Understanding the Question
The command word is "describe" and the question asks for numbered steps starting from the weighed solid. Three marks are available (M1, M2, M3), each corresponding to a critical stage: dissolving, transferring with washings, and making up to the mark with mixing.
Approach
Structure the answer chronologically: dissolve → transfer → make up → mix. Name the apparatus (volumetric flask with capacity) and mention washings explicitly.
Step-by-Step Reasoning
- M1: The solid must first be dissolved in a small volume of distilled water in the beaker. Using only a small volume ensures the final volume does not exceed the flask's capacity before topping up.
- M2: The solution is transferred to a 100 cm³ volumetric flask. The beaker and glass rod must be rinsed (washed) with distilled water and the washings added to the flask to ensure all solute is transferred quantitatively.
- M3: Distilled water is added carefully until the bottom of the meniscus reaches the calibration mark. The flask is then stoppered and inverted repeatedly to ensure uniform concentration.
Key Takeaways
- Always specify the type and capacity of the volumetric apparatus.
- "With washings" is a mark-bearing phrase — it demonstrates understanding of quantitative transfer.
- Inverting the stoppered flask is the correct mixing technique (not stirring with a rod inside the flask).
Common Mistakes
- Saying "add water to 100 cm³" without mentioning the calibration mark or volumetric flask.
- Omitting the washings step.
- Suggesting stirring in the volumetric flask rather than inverting.
Things to Be Careful About
- The question requires the name AND capacity of apparatus — "volumetric flask" alone without "100 cm³" loses the mark.
- Do not say "measuring cylinder" — a volumetric flask is required for accurate standard solution preparation.
The student sets up the electrochemical cell shown in Fig. 2.1 to investigate the effect of changing the concentration of on the measured cell potential, .
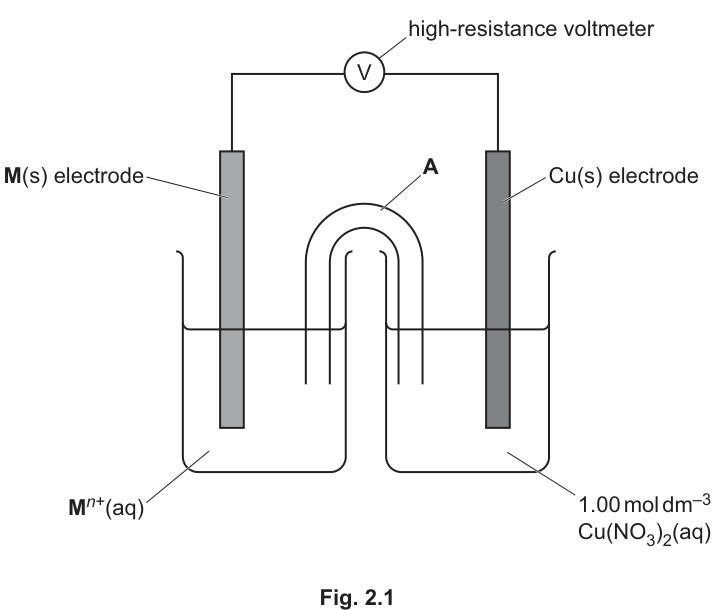
Suggest the function of the item labelled A in Fig. 2.1.
Answer
To allow ions to move between the two half-cells (completing the electrical circuit and maintaining charge balance).
To allow ions to move between half-cells
Background Concept
An electrochemical cell consists of two half-cells connected externally by a wire (electron flow) and internally by a salt bridge (ion flow). Without the salt bridge, charge would build up in each half-cell and the reaction would cease almost immediately.
Understanding the Question
Item A in Fig. 2.1 is the inverted U-tube connecting the two beakers — a salt bridge. The question asks for its function.
Approach
State what the salt bridge does: it permits ion migration between the half-cells to maintain electrical neutrality.
Step-by-Step Reasoning
- At the anode (M electrode), ions are produced, making that solution positive.
- At the cathode (Cu electrode), ions are reduced, making that solution negative.
- The salt bridge allows anions to migrate toward the anode compartment and cations toward the cathode compartment, preventing charge accumulation.
- The mark scheme accepts: "to allow ion(s) to move (between half-cells / two beakers)."
Key Takeaways
The salt bridge completes the circuit by allowing ionic convection between half-cells, maintaining electrical neutrality so the redox reaction can continue.
Common Mistakes
- Saying "to complete the circuit" without mentioning ion movement (this is too vague for some examiners, though often accepted).
- Saying "to allow electrons to flow" — electrons flow through the wire, not the salt bridge.
Things to Be Careful About
The mark scheme specifically rewards the phrase about ion movement. "Completing the circuit" alone may not score unless ion movement is mentioned.
The student uses the apparatus in Fig. 2.1 to measure the cell potentials, using six solutions each with a different concentration of .
Table 2.1 shows the results obtained by the student.
Table 2.1
| concentration of / | cell potential, / V | electrode potential of / V | |
|---|---|---|---|
| 3.295 | |||
| 3.304 | |||
| 3.325 | |||
| 3.343 | |||
| 3.354 | |||
| 3.384 |
Complete Table 2.1. Record your values to three decimal places.
Working
| / V | Electrode potential / V | |
|---|---|---|
| 3.295 | ||
| 3.304 | ||
| 3.325 | ||
| 3.343 | ||
| 3.354 | ||
| 3.384 |
Answer
See completed table above.
Electrode potentials: -2.958, -2.967, -2.988, -3.006, -3.017, -3.047 V
Background Concept
In an electrochemical cell, . Here, copper is the cathode (higher ) and M is the anode. So , which rearranges to .
Understanding the Question
The formula is given: electrode potential of , with . We must compute this for each row and record to three decimal places.
Approach
For each row, subtract from 0.337.
Step-by-Step Reasoning
All values are negative, consistent with M being a very reactive metal (strong reducing agent, very negative ).
Key Takeaways
When a cell potential is larger than the reference electrode potential, the unknown electrode potential will be negative. The subtraction order matters: .
Common Mistakes
- Reversing the subtraction: gives positive values (wrong sign).
- Recording to only two decimal places.
Things to Be Careful About
The question specifies three decimal places. Each answer must be recorded to exactly three decimal places (e.g., -2.958, not -2.96).
Answer
The concentration of .
concentration of Mⁿ⁺(aq)
Background Concept
The independent variable is the factor that the experimenter deliberately changes or controls. The dependent variable is what is measured as a result.
Understanding the Question
The student uses six solutions each with a different concentration of and measures . The question asks for the independent variable.
Approach
Identify what is being varied: the concentration of .
Step-by-Step Reasoning
- The student changes the concentration of across six solutions — this is the independent variable.
- The measured cell potential (or derived electrode potential) is the dependent variable.
- The concentration of (1.00 mol dm⁻³) and temperature are controlled variables.
Key Takeaways
The independent variable is what you change; the dependent variable is what you measure.
Common Mistakes
- Saying "cell potential" (that is the dependent variable).
- Saying "log[Mⁿ⁺]" — while this is what is plotted, the actual variable changed is the concentration itself.
Things to Be Careful About
Be specific: "concentration of " is the precise answer. Simply saying "concentration" without specifying which ion may not score.
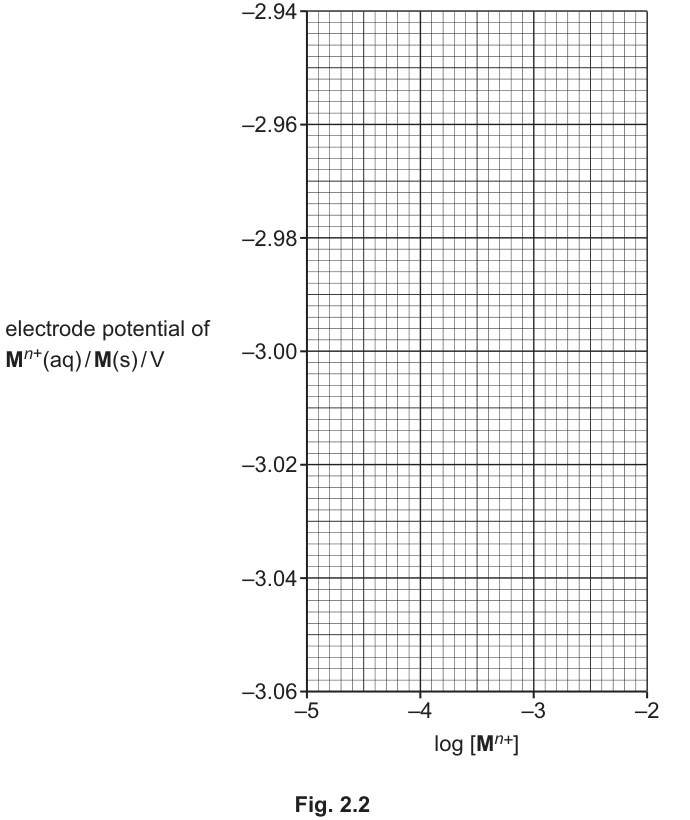
Plot a graph on the grid in Fig. 2.2 to show the relationship between the electrode potential of and . Use a cross (×) to plot each data point. Draw a straight line of best fit.
Answer
Plot all six points as crosses (×) on the grid in Fig. 2.2 using the completed values from part (d):
| / V | |
|---|---|
Draw a single straight line of best fit through the points (the point at lies slightly above the line and should be excluded from the fit).
Six points plotted as crosses with a straight line of best fit showing a positive gradient of approximately 0.030 V per unit log
Background Concept
When plotting experimental data, each point should be marked with a clear cross (×) at the correct coordinates. A line of best fit for linear data should pass as close as possible to all points, with roughly equal scatter above and below. Anomalous points that deviate significantly may be excluded from the line.
Understanding the Question
The grid in Fig. 2.2 has axes: on the x-axis (range -5 to -2) and electrode potential on the y-axis (range -3.06 to -2.94). Two marks are available: M1 for correct plotting, M2 for a straight line of best fit.
Approach
- Read off each (x, y) pair from the completed table.
- Plot each as a cross on the grid.
- Draw a straight line that best represents the trend, noting that the point at (-3.30, -3.006) is slightly above the line.
Step-by-Step Reasoning
- Point 1: (-2.00, -2.958) — near the top right of the grid.
- Point 2: (-2.30, -2.967) — slightly left and below point 1.
- Point 3: (-3.00, -2.988) — middle of the grid.
- Point 4: (-3.30, -3.006) — this point is noticeably above where a straight line through the others would predict (expected ≈ -2.997), making it the anomalous point.
- Point 5: (-4.00, -3.017) — lower left region.
- Point 6: (-5.00, -3.047) — bottom left corner.
The line of best fit should pass close to points 1, 2, 3, 5, and 6, with point 4 lying above it.
Key Takeaways
- Use crosses, not dots or circles, for data points.
- The line of best fit is a straight line for linear relationships; do not join points.
- Anomalous points are identified by their deviation from the expected trend.
Common Mistakes
- Plotting points inaccurately (e.g., misreading the small grid squares).
- Drawing a curve through the points instead of a straight line.
- Including the anomalous point in the line of best fit, distorting the gradient.
Things to Be Careful About
- The y-axis has small increments (0.02 V per major division, 0.002 V per small square). Precision in plotting matters for M1.
- The line must be straight (ruler), not a freehand curve.
Circle the one point on the graph that you consider to be most anomalous.
Suggest one reason why this anomaly may have occurred during the experimental procedure. Assume no error was made in the measurement of the cell potential.
Answer
The point at (concentration ) is circled as most anomalous — it lies above the line of best fit.
Reason: the actual concentration of in this solution was lower than the recorded value of (e.g., due to incomplete dilution or pipette error), resulting in a higher measured electrode potential than expected.
Point at log[Mⁿ⁺] = -3.30 is anomalous; the actual concentration was lower than the recorded 5.00 × 10⁻⁴ mol dm⁻³
Background Concept
An anomalous point deviates from the expected linear trend. In this experiment, a lower-than-recorded concentration of would give a more negative electrode potential (by the Nernst equation), which corresponds to a larger and hence a less negative calculated electrode potential when using the recorded (higher) concentration value — placing the point above the line.
Understanding the Question
We must identify which point is furthest from the line of best fit and suggest a procedural reason (not a measurement error in ) for the anomaly.
Approach
Check the residuals from the line. The point at (-3.30, -3.006) sits about 0.009 V above where the line predicts (~-2.997), making it the most anomalous.
Step-by-Step Reasoning
- If the true concentration were lower than , the true would be more negative (further left on the x-axis), but the student plotted it at -3.30. The measured reflects the true (lower) concentration, giving a larger and thus a less negative electrode potential — the point appears higher (less negative y) than expected at x = -3.30.
- Possible cause: the dilution to make was not performed accurately (e.g., the pipette delivered slightly less than the intended volume, or the volumetric flask was over-filled).
Key Takeaways
Anomalous points in concentration-dependent measurements often arise from dilution or pipetting errors rather than voltmeter reading errors.
Common Mistakes
- Choosing the wrong point as anomalous.
- Suggesting "the voltmeter reading was wrong" — the question explicitly excludes measurement error in .
- Giving a vague answer like "human error" without specifying what went wrong.
Things to Be Careful About
The question says "assume no error was made in the measurement of the cell potential" — the reason must relate to the concentration preparation, not the voltmeter.
Answer
Repeat the measurement for the solution that gave the anomalous result (at ) and take the mean, or discard the anomalous result and re-prepare the solution.
Repeat the procedure for the solution giving the anomalous result
Background Concept
Reliability refers to the consistency of repeated measurements. An anomalous result reduces reliability; repeating the measurement allows confirmation or rejection of the outlier.
Understanding the Question
The command word is "suggest" — we need one practical way to improve the reliability of the data in Table 2.1.
Approach
The most direct improvement targeting the identified anomaly is to repeat that specific measurement.
Step-by-Step Reasoning
- Repeating the measurement for the anomalous concentration () would allow the student to determine whether the original result was a one-off error or reproducible.
- If the repeat gives a concordant result with the line, the original can be discarded.
- Alternatively, re-preparing the solution more carefully (ensuring accurate dilution) and re-measuring would address the root cause.
Key Takeaways
"Repeat the anomalous measurement" is the standard reliability improvement for a single outlier in a series of results.
Common Mistakes
- Saying "use more accurate equipment" — this addresses precision/systematic error, not reliability of a specific anomalous point.
- Saying "take more readings" without specifying which one to repeat.
Things to Be Careful About
The mark scheme specifically rewards "repeat the procedure for the solution giving an anomalous result" — the answer should reference the anomalous point specifically.
Use Fig. 2.2 to determine the gradient of the line of best fit.
State the coordinates of both points you used in your calculation. These must be selected from your line of best fit. Give the gradient to three significant figures.
Working
Points on the line of best fit (read from the graph):
Answer
Gradient = V (to three significant figures)
0.0297 V
Background Concept
The gradient of a line of best fit is calculated by selecting two well-separated points on the line (not data points) and computing . Using points far apart minimises the effect of reading errors.
Understanding the Question
We must use the line drawn in (f)(i), state two coordinates from that line in form, and calculate the gradient to three significant figures. Two marks: M1 for valid coordinates, M2 for correct gradient.
Approach
Choose the two most widely separated points on the line that are easy to read from the grid.
Step-by-Step Reasoning
- The line passes through approximately (-5.00, -3.047) at the left end and (-2.00, -2.958) at the right end.
- Gradient = (3 s.f.)
Note: the gradient is positive because as increases (becomes less negative), the electrode potential also increases (becomes less negative).
Key Takeaways
- Always use points on the line, not data points, for gradient calculations.
- Choose widely separated points for accuracy.
- Express coordinates in form as required.
Common Mistakes
- Using data points instead of points on the line of best fit.
- Choosing points too close together, amplifying reading error.
- Reporting the gradient to fewer than three significant figures.
- Getting the sign wrong (the gradient is positive).
Things to Be Careful About
The mark scheme requires coordinates in the form — writing them as separate x and y values without parentheses may not score M1.
For the electrode equilibrium,
the Nernst equation can be written as shown.
The equation for a straight line is .
State which parts in the Nernst equation correspond to , and .
Answer
Comparing with :
y = E, m = 2.303RT/nF, c = E
Background Concept
Many physical equations can be rearranged into the form to extract information graphically. The gradient gives a physically meaningful quantity (here, related to the number of electrons transferred), and the intercept gives the standard value (here, the standard electrode potential).
Understanding the Question
The Nernst equation is already in the correct form: (the y-axis variable) equals a constant (, the intercept) plus a coefficient (, the gradient) multiplied by (the x-axis variable).
Approach
Match each term in the Nernst equation to its counterpart in by identifying which quantity is plotted on each axis.
Step-by-Step Reasoning
- The y-axis is electrode potential , so .
- The x-axis is , so .
- The coefficient multiplying is , so .
- The constant term (value of when , i.e., at 1 mol dm⁻³) is , so .
Key Takeaways
Recognising the linear form of an equation allows graphical determination of physical constants (gradient → ; intercept → ).
Common Mistakes
- Writing (omitting in the denominator).
- Confusing with or with .
Things to Be Careful About
The question asks specifically for , , and — three separate marks. Each must be clearly identified.
Use the value that you calculated for the gradient of your line of best fit in (g)(i) and the Nernst equation to calculate the value of in .
The experiment is carried out at .
(If you were unable to determine an answer to (g)(i), then use the value 0.0285 for the gradient. This is not the correct value.)
Working
From (g)(ii):
Rearranging for :
Substituting , , , gradient :
Answer
Therefore the ion is .
n = 2
Background Concept
The Nernst equation relates the electrode potential to the concentration of the electroactive species. The gradient of a plot of versus is , which depends inversely on — the number of electrons transferred. Measuring the gradient therefore allows determination of the charge on the ion.
Understanding the Question
We use the gradient from (g)(i) and the expression for from (g)(ii) to calculate . The experiment is at 25.0°C = 298 K. The answer must be rounded to a whole number (since represents a count of electrons).
Approach
- Set the gradient equal to .
- Rearrange to isolate .
- Substitute known values.
- Round to the nearest whole number.
Step-by-Step Reasoning
- From (g)(ii): gradient
- Rearranging:
- Numerator: (to 4 s.f.)
- Denominator: (to 4 s.f.)
- Rounded to a whole number:
If the fallback gradient of 0.0285 were used: , which still rounds to 2.
Key Takeaways
The Nernst equation's gradient provides a direct experimental route to determine the number of electrons in a half-reaction — a key application of electrochemistry in analytical chemistry.
Common Mistakes
- Forgetting to convert 25.0°C to 298 K (using 25 instead of 298).
- Using incorrectly (e.g., using 9650).
- Not rounding to a whole number (writing or ).
- Algebraic errors in rearranging (dividing by instead of multiplying).
Things to Be Careful About
- The mark scheme requires the rearrangement AND correct substitution (M1), then the correctly calculated value rounded to a whole number (M2).
- Use (from 25.0°C), not 25.
- The final answer must be a whole number: , not 1.99 or 2.0.