Chemistry 9701/44 — May/June 2025
Cambridge A-Level · A Level Structured Questions · worked solutions for every part, with the mark scheme
Topics Group 2 · Transition Elements · Electrochemistry · Chemical Energetics · Equilibria · Nitrogen Compounds · +7 more
Describe the trend in the thermal stabilities of the carbonates of the Group 2 elements.
Explain your answer.
Answer
- Thermal stability increases down Group 2 (from Mg to Ba).
- The cation size / radius increases down the group, so the charge density of the cation decreases.
- The anion is less polarised (the covalent bonds within the anion are weakened less), so more energy is required to decompose it.
Thermal stability increases down Group 2 because the cation radius increases and charge density decreases, resulting in less polarisation of the CO3^2- anion.
Background Concept
Thermal decomposition of metal carbonates involves breaking down into . The carbonate ion is a large anion with covalent C–O bonds. When a metal cation sits near the carbonate ion, its positive charge attracts the electron cloud of the anion, distorting (polarising) it. This polarisation weakens the C–O bonds within the carbonate, making decomposition easier. The polarising power of a cation depends on its charge density: a small, highly charged cation polarises the anion more strongly than a large, less charged one.
Understanding the Question
The command words are "Describe" (state the trend) and "Explain" (give the reason). The question asks for both the direction of the trend and the underlying mechanism. Three marks are available, so you need three distinct points: the trend itself, the change in cation properties, and the consequence for polarisation.
Approach
- State the trend clearly (stability increases down the group).
- Explain what changes about the cation (radius increases, charge density decreases).
- Connect this to the effect on the carbonate anion (less polarisation, stronger C–O bonds, higher decomposition temperature).
Step-by-Step Reasoning
M1 – The trend: Going from to , the temperature required for decomposition increases. Magnesium carbonate decomposes at a relatively low temperature; barium carbonate requires very high temperatures. So thermal stability increases down the group.
M2 – Cation size: Down Group 2, each successive element has an additional electron shell, so the ionic radius increases. Since the charge remains throughout, the charge-to-radius ratio (charge density) decreases.
M3 – Polarisation effect: A cation with lower charge density exerts a weaker electrostatic pull on the electron cloud of the large anion. Less polarisation means the C–O bonds within the carbonate are weakened less, so more thermal energy is needed to break them and release . Hence the carbonate is more thermally stable.
An alternative M3 accepted by the mark scheme involves a lattice enthalpy argument: the lattice enthalpy of falls faster than that of down the group because the oxide ion is smaller than the carbonate ion, so the relative stability of the carbonate increases.
Key Takeaways
- Thermal stability of Group 2 carbonates increases down the group.
- The key concept is polarising power of the cation, which depends on charge density.
- Always link: size change → charge density change → polarisation change → bond weakening → decomposition temperature.
Common Mistakes
- Saying "the charge decreases" — the charge stays ; it is the charge density that decreases.
- Stating only the trend without the explanation, or giving the explanation without the trend.
- Confusing this with the solubility trend (hydroxides become more soluble down the group; sulfates become less soluble).
- Saying "the ionic bond gets stronger" without explaining why in terms of polarisation.
Things to Be Careful About
- Use the term "polarise" or "polarisation" — this is the key vocabulary the mark scheme rewards.
- Specify that it is the anion being polarised, not the cation.
- The mark scheme also accepts a lattice enthalpy argument as an alternative to the polarisation argument for M3.
Copper(II) carbonate decomposes on heating in a similar way to the carbonates of Group 2.
Write an equation for the decomposition of copper(II) carbonate.
Answer
CuCO3 → CuO + CO2
Background Concept
Metal carbonates decompose on heating to give the metal oxide and carbon dioxide. This is true for Group 2 carbonates and also for many transition metal carbonates, including copper(II) carbonate. The general pattern is:
Understanding the Question
The question states that copper(II) carbonate decomposes "in a similar way" to Group 2 carbonates, so you simply need to write the balanced equation. One mark is available for the correct equation.
Approach
Apply the general decomposition pattern to : the products are copper(II) oxide and carbon dioxide.
Step-by-Step Reasoning
Copper(II) carbonate has the formula (Cu is in the oxidation state, matching the charge on carbonate). On heating, it decomposes to give and . The equation is already balanced: one Cu, one C, and three O atoms on each side.
Key Takeaways
- Transition metal carbonates decompose similarly to Group 2 carbonates.
- Always check the oxidation state of the metal to write the correct oxide formula.
Common Mistakes
- Writing instead of (copper stays in the state during decomposition).
- Forgetting to include as a product.
- Adding state symbols where not required (they do not lose marks but are unnecessary here).
Things to Be Careful About
- Ensure the equation is balanced (it is as written, with 1:1:1 stoichiometry).
- The mark scheme requires the correct formulas; and must both appear.
Complete the electrons in boxes diagram in Fig. 1.1 to show the electronic configuration of a copper(II) ion.
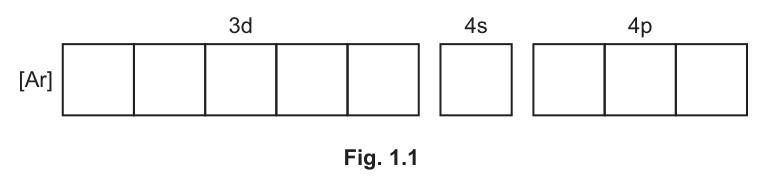
Answer
The electronic configuration of is .
[Ar] 3d9 4s0 — five 3d boxes: four with paired arrows (↑↓), one with a single arrow (↑); 4s and 4p boxes empty.
Background Concept
Copper has atomic number 29. Its ground-state electron configuration is (an exception to the expected due to the extra stability of a full d subshell). When forming ions, transition metals lose their 4s electrons before 3d electrons, because in the ion the 3d subshell is lower in energy than 4s.
Understanding the Question
You must complete the orbital box diagram in Fig. 1.1 to show the configuration of . One mark is available for the correct diagram.
Approach
- Start from the neutral Cu configuration: .
- Remove two electrons to form : first the 4s electron, then one 3d electron.
- Result: .
- Fill the boxes: four 3d boxes get paired arrows (↑↓), the fifth gets one arrow (↑). The 4s and 4p boxes remain empty.
Step-by-Step Reasoning
Neutral Cu: .
To form , remove 2 electrons. The 4s electron is removed first (it is the outermost), then one electron from the 3d subshell. This gives .
In the box diagram: the five 3d boxes contain four pairs of opposite-spin arrows and one single arrow (representing the 9 electrons). The 4s box and all three 4p boxes are empty.
Key Takeaways
- Cu is an exception to the Aufbau filling order.
- When forming ions, 4s electrons are lost before 3d electrons.
- has a configuration.
Common Mistakes
- Writing (removing a 3d electron before the 4s).
- Starting from (the "expected" but incorrect configuration of neutral Cu) and then removing only from 4s.
- Putting all five 3d boxes with paired arrows (that would be , i.e. ).
Things to Be Careful About
- Ensure the 4s box is shown as empty (not with a single electron).
- The single unpaired electron in 3d can go in any of the five boxes (Hund's rule is satisfied either way for 9 electrons).
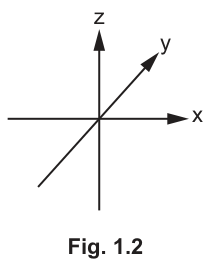
Answer
A 3dz2 orbital: two lobes along the z-axis (one above and one below the nucleus) with a donut-shaped ring (torus) in the xy-plane around the nucleus.
Background Concept
The five 3d orbitals have characteristic shapes. Four of them (, , , ) have four lobes in a cloverleaf pattern. The orbital is unique: it has two lobes oriented along the z-axis (above and below the nucleus) and a torus (doughnut-shaped ring) of electron density in the xy-plane around the nucleus.
Understanding the Question
You must sketch the shape of the orbital on the provided 3D axes (x, y, z) in Fig. 1.2. One mark is available for a recognisable sketch.
Approach
Draw two lobes along the z-axis (one pointing up, one pointing down) and a ring/torus in the xy-plane centred on the origin.
Step-by-Step Reasoning
The orbital has electron density concentrated along the z-axis (two lobes) and a toroidal ring in the xy-plane. On the given axes:
- Draw an elongated lobe above the origin along the +z direction.
- Draw an elongated lobe below the origin along the −z direction.
- Draw a small circular ring (torus) around the origin in the xy-plane.
- Label it .
Key Takeaways
- The orbital is the odd one out among the five d orbitals.
- It has axial symmetry (rotational symmetry about the z-axis).
- The torus in the xy-plane distinguishes it from a p orbital (which has only two lobes and no ring).
Common Mistakes
- Drawing a four-lobed cloverleaf (that is or ).
- Drawing only two lobes along z without the torus (that looks like a p orbital).
- Orienting the lobes along the x-axis instead of the z-axis.
Things to Be Careful About
- The lobes must be along the z-axis (the vertical axis in Fig. 1.2).
- The torus must be drawn in the xy-plane (horizontal plane).
- A rough sketch is acceptable as long as the key features (two axial lobes + equatorial ring) are recognisable.
Copper can form stable complexes in the and oxidation states.
Explain why transition elements have variable oxidation states.
Answer
The 3d and 4s subshells are close in energy, so electrons from both can be used in bonding, giving rise to multiple oxidation states.
The 3d and 4s subshells are similar/close in energy.
Background Concept
Transition elements have partially filled d subshells. The 3d and 4s orbitals are very close in energy (the difference is small compared to the gap between, say, 3p and 3d). Because of this small energy difference, electrons can be removed from either the 4s or the 3d subshell with relatively similar energy costs, allowing the element to exhibit multiple oxidation states.
Understanding the Question
The command word is "Explain" — you need to give the reason why transition elements show variable oxidation states. One mark is available.
Approach
State the key fact: 3d and 4s orbitals are similar in energy, so electrons from both can participate in bonding or be lost.
Step-by-Step Reasoning
In main-group elements, there is a large energy gap between the valence s/p electrons and the inner shell electrons, so only a fixed number of electrons are typically lost. In transition elements, the 3d and 4s electrons are so close in energy that either can be involved in bonding or removed, giving multiple stable oxidation states (e.g. Fe: +2 and +3; Cu: +1 and +2; Mn: +2 to +7).
Key Takeaways
- Variable oxidation states arise from the small energy difference between 3d and 4s subshells.
- This is a defining property of transition metals.
Common Mistakes
- Saying "d electrons are in the outer shell" — they are not; the 4s is the outermost.
- Mentioning "partially filled d orbitals" alone without the energy argument.
- Saying "the 3d and 4s have the same energy" — they are close, not identical.
Things to Be Careful About
- The mark scheme specifically looks for "close" or "similar in energy" — use these words.
- A one-sentence answer is sufficient for one mark.
1,2-diaminoethane, , en, can act as a bidentate ligand.
Explain what is meant by a bidentate ligand.
Answer
- A bidentate ligand is a species that has two lone pairs of electrons.
- It forms two dative (coordinate) covalent bonds to a central transition metal atom/ion.
A bidentate ligand has two lone pairs that form two coordinate bonds to a central metal ion.
Background Concept
A ligand is a species that donates a lone pair of electrons to a central metal ion to form a coordinate (dative covalent) bond. Ligands are classified by the number of donor atoms they use: monodentate (one lone pair, e.g. , , ), bidentate (two lone pairs, e.g. 1,2-diaminoethane, ), and polydentate (more than two, e.g. EDTA which is hexadentate).
Understanding the Question
The command word is "Explain" — you need to give the full definition of a bidentate ligand. Two marks are available, so two distinct points are needed.
Approach
Point 1: state that the ligand has two lone pairs. Point 2: state that these form two coordinate bonds to a central metal ion.
Step-by-Step Reasoning
M1: A bidentate ligand is a species with two lone pairs of electrons (on two different donor atoms, or on the same atom in some cases).
M2: These two lone pairs each form a dative (coordinate) covalent bond to the central transition metal ion/atom, resulting in a five- or six-membered chelate ring.
Key Takeaways
- "Bidentate" = "two-toothed" = two donor sites.
- Both points (lone pairs AND coordinate bonds to metal) are needed for full marks.
Common Mistakes
- Only saying "it forms two bonds" without specifying they are coordinate/dative bonds to a metal.
- Only saying "it has two lone pairs" without mentioning the bonding to a metal.
- Confusing bidentate with bivalent (which refers to charge/valency, not denticity).
Things to Be Careful About
- Use the term "dative" or "coordinate" — "covalent bond" alone may not earn M2 unless the mark scheme allows it (here it does, as part of "dative (covalent)").
- Mentioning the metal/transition element is important for M2.
The complex exists as stereoisomers.
Complete the three-dimensional diagrams in Fig. 1.3 to show the three different stereoisomers of .
The en ligand can be represented using
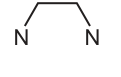
.
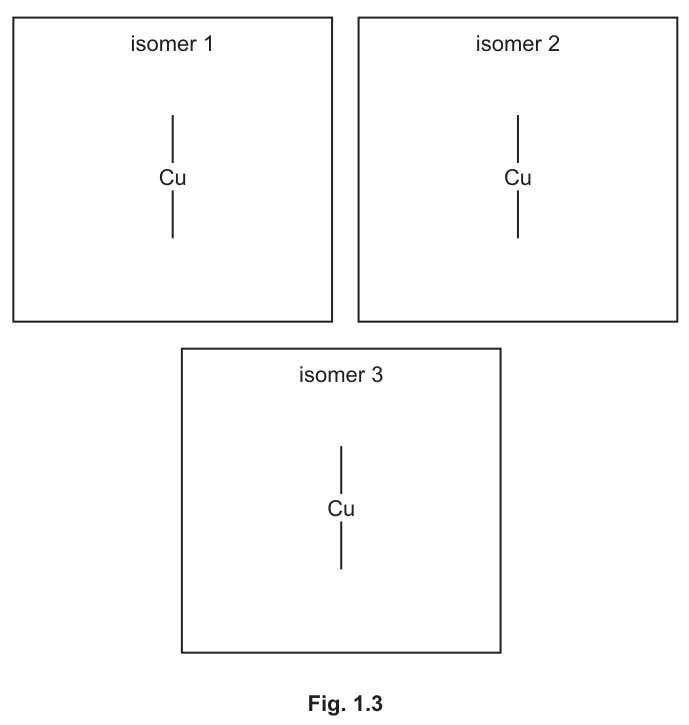
Answer
The three stereoisomers are:
- cis-1 (one optical isomer of the cis form): two en ligands in the equatorial plane, two ligands in axial positions on the same side (one up, one in the plane), with the two en chelate rings arranged so the complex is chiral.
- cis-2 (the other optical isomer of the cis form): mirror image of cis-1.
- trans: the two ligands are in opposite (trans) axial positions, with the two en ligands in the equatorial plane.
Three stereoisomers: two optical isomers (cis-1 and cis-2, non-superimposable mirror images) and one trans isomer (H2O ligands opposite each other).
Background Concept
The complex is octahedral with coordination number 6. Two bidentate en ligands each occupy two coordination sites (forming a five-membered chelate ring), and two water molecules occupy the remaining two sites. This gives the general formula where A is a bidentate ligand and B is monodentate. Such complexes can show both geometrical (cis/trans) and optical (enantiomerism) isomerism.
In the trans isomer, the two ligands are opposite each other (180° apart). This isomer has a plane of symmetry and is achiral (not optically active).
In the cis isomer, the two ligands are adjacent (90° apart). The cis isomer lacks a plane of symmetry and exists as a pair of non-superimposable mirror images (optical isomers / enantiomers).
Understanding the Question
You must complete three diagrams to show the three different stereoisomers. Each correct structure earns one mark (3 marks total). The en ligand is represented by the given symbol (two N atoms joined by a bent line). Use wedge (solid triangle = coming towards you) and dash (hashed wedge = going away from you) notation for the 3D arrangement.
Approach
- Draw the trans isomer: place the two en ligands in the equatorial plane (using wedges and dashes for the N atoms), and the two ligands in the axial positions (top and bottom, on the vertical line through Cu).
- Draw one cis isomer: place one in an axial position and the other in an equatorial position (or both equatorial but adjacent), with the two en ligands occupying the remaining sites. Use the given vertical line as the z-axis.
- Draw the mirror image of the first cis isomer as the second cis isomer.
Step-by-Step Reasoning
Trans isomer: The vertical line through Cu represents the z-axis. Place at the top and at the bottom of this line (axial positions, 180° apart). The two en ligands occupy the four equatorial positions, drawn using wedges (towards viewer) and dashes (away from viewer). This arrangement has a centre of symmetry and is achiral.
Cis-1: Place one at the top of the vertical line (axial) and one in an equatorial position (e.g. bottom-left with a wedge). The two en ligands fill the remaining four sites. The specific arrangement of the chelate rings makes this chiral.
Cis-2: This is the mirror image of cis-1. The ligands are still in cis positions (one axial, one equatorial), but the handedness of the chelate ring arrangement is reversed.
Key Takeaways
- Octahedral complexes with two bidentate and two monodentate ligands show both cis/trans and optical isomerism.
- The trans form is achiral; the cis form is chiral (exists as a pair of enantiomers).
- Three stereoisomers total: one trans + two cis (enantiomers).
- Use wedge-dash notation clearly: solid wedge = bond towards viewer, hashed wedge = bond away.
Common Mistakes
- Drawing only two isomers (forgetting that cis has two optical isomers).
- Making the trans isomer look like a cis isomer (the two must be 180° apart).
- Drawing the two cis isomers as identical (they must be non-superimposable mirror images).
- Not using the en symbol correctly (the two N atoms must be connected by the bent line, representing the chelate ring).
Things to Be Careful About
- Each structure must be clearly distinguishable.
- Use the vertical line through Cu as the z-axis (axial positions are top and bottom).
- The en ligand must be drawn as a single unit (the two N's connected by the bridge), not as two separate monodentate ligands.
- Ensure the coordination number is 6 in each structure (4 from two en + 2 from two ).
Answer
Optical isomerism and geometrical (cis-trans) isomerism.
Optical and geometrical (cis-trans) isomerism
Background Concept
Stereoisomers have the same connectivity but differ in the spatial arrangement of atoms. The two main types relevant to coordination complexes are:
- Geometrical isomerism (cis/trans): different relative positions of ligands around the metal centre.
- Optical isomerism: non-superimposable mirror images (enantiomers) that rotate plane-polarised light in opposite directions.
Understanding the Question
The command word is "State" — simply name the types. One mark is available, and the mark scheme requires BOTH types to be named.
Approach
From the three isomers drawn in (c)(ii), identify that there is a cis/trans pair (geometrical) and that the cis form exists as two enantiomers (optical).
Step-by-Step Reasoning
The trans isomer and the cis isomers differ in the relative positions of the ligands — this is geometrical (cis-trans) isomerism. The two cis isomers are non-superimposable mirror images of each other — this is optical isomerism. Both types must be stated for the mark.
Key Takeaways
- "Stereoisomerism" is an umbrella term; you must specify the subtypes.
- Both types must be named for the single mark.
Common Mistakes
- Writing only "optical isomerism" or only "geometrical isomerism" (both required).
- Writing "structural isomerism" (incorrect — these are stereoisomers, not structural isomers).
- Writing "cis-trans isomerism" without mentioning optical isomerism.
Things to Be Careful About
- The mark scheme requires the word "AND" — both must be present.
- "Geometrical" and "cis-trans" are interchangeable for this mark.
Answer
Either cis isomer (isomer 1 or isomer 2) is polar. The polar bonds / dipoles do not cancel because the molecule is asymmetric (the two ligands are on the same side, so their bond dipoles add rather than cancel).
A cis isomer is polar because the bond dipoles do not cancel (the molecule is asymmetric).
Background Concept
A molecule or complex is polar if the vector sum of its individual bond dipoles is non-zero. In the trans isomer of , the two ligands are opposite each other, so their Cu–O bond dipoles cancel. The en ligands are also symmetrically arranged, making the trans isomer non-polar overall. In the cis isomers, the two ligands are adjacent, so their dipoles do not cancel, giving a net dipole moment — the complex is polar.
Understanding the Question
You must identify which isomer is polar AND explain why. One mark is available, requiring both the identification and the reason.
Approach
State that a cis isomer is polar, then explain using the concept of non-cancelling dipoles or asymmetry.
Step-by-Step Reasoning
Identification: Either cis-1 or cis-2 (isomer 1 or isomer 2) is polar.
Explanation: In the cis arrangement, the two ligands are on the same side of the metal centre. Their Cu–O bond dipoles point in the same general direction and do not cancel. The molecule lacks a centre of symmetry, so there is a net dipole moment. In contrast, the trans isomer has the ligands opposite each other, so their dipoles cancel and the complex is non-polar.
Key Takeaways
- Cis isomers of octahedral complexes are often polar; trans isomers are often non-polar.
- Polarity depends on whether bond dipoles cancel by symmetry.
- The trans isomer has a centre of symmetry; the cis isomers do not.
Common Mistakes
- Saying the trans isomer is polar (it is not — the dipoles cancel).
- Identifying the correct isomer but not giving a reason (or vice versa).
- Saying "it has a charge so it is polar" — the overall charge on the complex does not determine whether it is a polar molecule in the dipole sense.
Things to Be Careful About
- You need BOTH the identification AND the explanation for the mark.
- Acceptable reasons include: "dipoles do not cancel", "asymmetric", "has polar bonds in a non-symmetric arrangement".
The mineral ore cryolite, , contains a single anion which is a complex ion.
Complete Table 1.1 to suggest the formula of the complex ion and to identify the ligand present in .
Table 1.1
| complex ion in | |
| ligand in |
Answer
| complex ion in | |
| ligand in |
Complex ion: AlF6^3-; Ligand: F-
Background Concept
Cryolite () is an ionic compound consisting of cations and a complex anion. The aluminium ion () is coordinated by six fluoride ions (), forming the octahedral complex ion . The overall charge of the complex is , balanced by three ions.
Understanding the Question
You must identify the complex ion (the anion that is a coordination entity) and the ligand (the species donating electron pairs to the central atom). One mark is available (both parts must be correct).
Approach
Separate the formula into cations and anions: contains and one . The complex ion is , and the ligand is .
Step-by-Step Reasoning
The formula dissociates into . The is the complex ion (central atom Al surrounded by six ligands). The ligand is (fluoride ion), which donates a lone pair to .
Key Takeaways
- A complex ion is a charged coordination entity.
- The ligand is the species directly bonded to the central atom/ion.
- In , Al is the central ion and F⁻ is the ligand.
Common Mistakes
- Writing the complex ion as without the charge.
- Identifying as the ligand (it is a counter-ion, not a ligand).
- Writing the ligand as "fluorine" instead of "fluoride ion" or "".
Things to Be Careful About
- Include the charge on the complex ion: .
- The ligand must be written as (the ion), not F (the atom).
When a solution of in molten cryolite is electrolysed, aluminium metal is formed at the cathode. The equation is shown.
Calculate the maximum mass of aluminium produced when a current of is passed through this solution for minutes.
Give your answer to two significant figures.
Working
From the half-equation :
Answer
0.25 g
Background Concept
Faraday's laws of electrolysis relate the quantity of substance produced at an electrode to the total electric charge passed through the electrolyte. The key relationships are:
- (charge = current × time, where time is in seconds)
- (moles of electrons = charge / Faraday constant, where )
- The stoichiometry of the half-equation gives the mole ratio between electrons and the product.
Understanding the Question
You are given: current = 1.5 A, time = 30 minutes, and the cathode half-equation . You must calculate the maximum mass of aluminium produced to two significant figures. Four marks are available for four steps.
Approach
- Calculate total charge passed ().
- Convert charge to moles of electrons ().
- Use the 3:1 electron-to-Al ratio to find moles of Al.
- Convert moles of Al to mass using .
Step-by-Step Reasoning
M1 – Charge: Convert time to seconds: . Then .
M2 – Moles of electrons: (or mol).
M3 – Moles of Al: From the half-equation, 3 mol produce 1 mol Al. So (or mol).
M4 – Mass: . To two significant figures: .
Key Takeaways
- Always convert time to seconds before using .
- The Faraday constant () links charge to moles of electrons.
- The stoichiometric ratio from the half-equation is crucial (here 3 electrons per Al atom).
- "Maximum mass" means assume 100% current efficiency.
Common Mistakes
- Forgetting to convert minutes to seconds (using 30 instead of 1800).
- Dividing by 2 instead of 3 (confusing the charge on Al³⁺ with the number of electrons).
- Using the wrong molar mass of Al.
- Not giving the answer to two significant figures.
Things to Be Careful About
- Time must be in seconds: .
- The ratio is 3 mol : 1 mol Al (from the half-equation).
- Final answer to 2 significant figures: (not or ).
- The mark scheme allows ecf from earlier steps.
Anhydrous barium chloride can be obtained from the hydrated salt, as shown in reaction 1.
Answer
White/steamy fumes are produced.
White/steamy fumes produced
Background Concept
When a hydrated salt is treated with thionyl chloride, , the water of crystallisation is removed. The reaction produces gaseous and . Hydrogen chloride gas is colourless, but in moist air it forms a white mist of tiny droplets of hydrochloric acid. This is the classic 'white/steamy fumes' observation.
Understanding the Question
The reaction equation is given. The command word is 'describe one observation'. You are not asked to explain the reaction, only to state what you would see. The equation shows two gases are produced: and . is a colourless gas, while gives white/steamy fumes in moist air. The mark scheme accepts 'white / steamy fumes'.
Approach
Look at the products and identify which gas is visible. is colourless and not usually seen as fumes; gives white fumes with moisture. So the observation is white/steamy fumes.
Step-by-Step Reasoning
- Reaction 1: .
- is produced. In air, it dissolves in moisture to form a white mist of hydrochloric acid droplets.
- Therefore one observation is 'white/steamy fumes'.
- The mark scheme also allows 'white fumes' or 'steamy fumes'; either is enough.
Key Takeaways
When asked for an observation, give the visible change, not just the identity of the gas. 'Gas produced' is not enough; specify the appearance.
Common Mistakes
- Writing 'bubbles' or 'effervescence' without 'white/steamy fumes'.
- Writing 'colourless gas' – this is not a visible observation.
- Writing 'the solid disappears' – the solid remains as anhydrous .
Things to Be Careful About
- The mark scheme accepts 'white' and/or 'steamy' fumes. One observation is sufficient.
- Do not confuse (colourless, choking smell) with fumes.
Answer
Entropy, , is the number of possible arrangements of particles and of energy in a system.
Number of possible arrangements of particles and energy in a system
Background Concept
Entropy is a thermodynamic quantity that measures the dispersal of energy and the number of microstates available to a system. A system with more possible arrangements of particles and more ways to distribute energy has higher entropy. Gases have much higher entropy than solids or liquids because their particles are free to move and occupy many more positions.
Understanding the Question
The command word is 'define'. The mark scheme requires both 'arrangements of particles' and 'energy'. A simple 'measure of disorder' is often not enough for full marks at A Level because it lacks the energy part.
Approach
State the definition exactly: the number of possible arrangements of particles and of energy in a system.
Step-by-Step Reasoning
- Entropy is a measure of the number of ways particles can be arranged.
- It also includes the number of ways energy can be distributed among those particles.
- The symbol is and the units are .
Key Takeaways
A full definition of entropy must mention both particle arrangements and energy distribution.
Common Mistakes
- Saying 'disorder' only – often not credited.
- Saying 'randomness' only – too vague.
- Omitting 'energy' – the mark scheme requires both.
Things to Be Careful About
- Use the phrase 'number of possible arrangements' rather than 'amount of disorder'.
- Units are not required in the definition but are useful.
Answer
The reaction produces 6 mol of gaseous products (2 mol and 4 mol ) from no gaseous reactants, so there is a large increase in the number of gas molecules, giving a large positive entropy change.
Large increase in number of gas molecules (6 mol gas formed)
Background Concept
Entropy increases when a system becomes more disordered. Gases have much higher entropy than solids and liquids because gas particles are widely separated and can adopt many more arrangements. Therefore a reaction that produces a large number of gas molecules from solid/liquid reactants has a large positive .
Understanding the Question
Reaction 1 has solid and liquid reactants and produces 6 moles of gas. The question gives and asks why it is large and positive. The reason is the change in the number of gas moles.
Approach
Compare the number of moles of gas on each side. Reactants: no gas. Products: 2 + 4 = 6 gas moles. More gas moles means many more possible arrangements, so is large and positive.
Step-by-Step Reasoning
- Count gas moles in reactants: 0.
- Count gas moles in products: 2 () + 4 () = 6.
- Increase from 0 to 6 gas moles is a huge increase in the number of possible particle arrangements.
- Hence is large and positive.
Key Takeaways
A large positive entropy change is often due to an increase in the number of gas molecules. The number of moles of gas is the key indicator.
Common Mistakes
- Saying 'a gas is produced' without noting the large number of moles.
- Saying 'the reaction is exothermic' – enthalpy does not explain entropy.
- Saying 'the solid dissolves' – not relevant.
Things to Be Careful About
- Mention the actual numbers: 6 mol gas formed.
- The mark scheme accepts 'six gas moles are produced' or 'large increase in gas molecules'.
Table 2.1 shows the enthalpy changes of formation, , for the compounds in reaction 1.
Table 2.1
| compound | |
|---|---|
Calculate the standard Gibbs free energy change, , in , for reaction 1 at .
Working
Convert :
Use:
Answer
-97.9 kJ mol^-1
Background Concept
Gibbs free energy change, , determines whether a reaction is feasible at a given temperature: . is in , is in kelvin, and must be in (or converted from J). The enthalpy change of reaction can be found from standard enthalpies of formation: .
Understanding the Question
We are given for all compounds and at . We need . Three steps: calculate , convert to kJ, apply Gibbs.
Approach
- Use Hess's law with the values.
- Convert to .
- Substitute into with K.
Step-by-Step Reasoning
- Products: ; ; . Sum .
- Reactants: ; . Sum .
- .
- Convert : .
- K.
- .
- A negative means the reaction is feasible at .
Key Takeaways
- Always convert to the same units as (kJ).
- Use in kelvin.
- .
Common Mistakes
- Forgetting to convert J to kJ (using 768 instead of 0.768) gives a very different answer.
- Using instead of 298.
- Sign errors in Hess's law: subtract the reactants' sum.
- Omitting units.
Things to Be Careful About
- The final answer should be (3 significant figures).
- If an earlier value is wrong, later marks may be awarded by error carried forward.
When aqueous solutions of and are mixed, a yellow precipitate of is produced and an acidic solution remains.
Answer
2Ba2+(aq) + Cr2O7^2-(aq) + H2O(l) -> 2BaCrO4(s) + 2H+(aq)
Background Concept
In aqueous solution, dichromate(VI), , is in equilibrium with chromate(VI), :
When is added, it precipitates , removing and shifting the equilibrium to the right, producing (hence acidic solution). The overall ionic equation combines the two steps.
Understanding the Question
Write the ionic equation for the reaction. Spectator ions ( and ) are omitted. The equation must balance atoms and charge.
Approach
- Identify the precipitate: .
- Balance Cr: one gives two , so two are needed.
- Balance O and H: add on the left and on the right.
- Check charge balance.
Step-by-Step Reasoning
- contains 2 Cr, so it must form 2 .
- Need 2 on the left.
- Oxygen: left has 7 O from dichromate plus 1 from water = 8 O; right has O in . Balanced.
- Hydrogen: left has 2 H from water; right has 2 .
- Charge: left: ; right: . Balanced.
- State symbols: , , , , .
Key Takeaways
- Omit spectator ions.
- Balance atoms and charge.
- The acidic solution comes from produced.
Common Mistakes
- Including and .
- Writing instead of .
- Forgetting / to balance oxygen and hydrogen.
- Incorrect charges.
Things to Be Careful About
- The equation must be balanced in both atoms and charge.
- State symbols are required.
Answer
- The d orbitals are split into two sets of different energies (d-d splitting).
- An electron is promoted/excited from a lower d orbital to a higher d orbital.
- Visible light of a specific wavelength/frequency is absorbed, so the complementary colour is transmitted/reflected and seen.
d-d splitting; electron excitation; absorption of visible light; complementary colour seen
Background Concept
Transition metal compounds are coloured because of electronic transitions between d orbitals. In a compound, the d orbitals are not all degenerate; they split into two sets of different energies. The energy gap often corresponds to visible light. An electron can absorb a photon and move from a lower d orbital to a higher d orbital. The absorbed wavelength is removed from white light; the remaining light is seen as the complementary colour.
Understanding the Question
'Explain why is coloured.' You need three linked points: d-d splitting, electron excitation, and absorption of visible light with complementary colour seen.
Approach
State the cause (d-d splitting), the process (electron excitation), and the result (absorption of visible light, complementary colour seen).
Step-by-Step Reasoning
- In , the chromium ion is surrounded by oxide ions/ligands, causing the d orbitals to split into two energy levels.
- The energy gap between the lower and higher d orbitals is in the visible region.
- An electron absorbs a photon of visible light and is promoted from a lower d orbital to a higher d orbital.
- The light absorbed corresponds to a particular wavelength; the remaining (complementary) light is transmitted/reflected, so the compound appears coloured (yellow).
Key Takeaways
- Colour in transition metal compounds arises from d-d transitions.
- The absorbed wavelength is complementary to the observed colour.
Common Mistakes
- Saying 'electrons move between energy levels' without specifying d orbitals.
- Saying 'the compound reflects all colours' – not specific.
- Omitting the complementary colour point.
- Saying 'd orbitals are different energies' without 'split'.
Things to Be Careful About
- Use 'd-d splitting' or 'd orbitals split into two different energies'.
- Use 'promoted/excited' for electron movement.
- Mention 'visible light absorbed' and 'complementary colour seen'.
Barium sulfate is the least soluble of the Group 2 sulfates.
Explain the trend in the solubilities of the Group 2 sulfates.
Answer
- Going down Group 2, both and become less exothermic (less negative).
- decreases more than , so hydration is the dominant factor.
- Therefore becomes less exothermic / more endothermic, so solubility decreases.
Solubility decreases down Group 2 because ΔH_hyd becomes less exothermic by more than ΔH_latt, making ΔH_sol less exothermic/more endothermic.
Background Concept
Solubility of an ionic compound depends on the enthalpy of solution, (with appropriate sign conventions: lattice enthalpy is endothermic to break the lattice, hydration is exothermic). A more exothermic (more negative) favours solubility. Down Group 2, ions get larger, so both lattice enthalpy and hydration enthalpy become less exothermic (less negative) because charge density decreases. The question is which changes more.
Understanding the Question
Barium sulfate is the least soluble of the Group 2 sulfates. Explain the trend in solubilities of the Group 2 sulfates. The mark scheme wants: both lattice and hydration enthalpies become less exothermic; hydration enthalpy changes more; becomes less exothermic/more endothermic, so solubility decreases.
Approach
- Recall that down Group 2, ionic radius increases and charge density decreases.
- Both and become less exothermic.
- Compare the magnitudes: for Group 2 sulfates, the decrease in hydration enthalpy is greater than the decrease in lattice enthalpy.
- Hence becomes less exothermic (or more endothermic), so solubility decreases.
Step-by-Step Reasoning
- Down the group, is larger than , so charge density is lower.
- Lattice enthalpy becomes less exothermic because the ions are larger and the lattice is less tightly held.
- Hydration enthalpy also becomes less exothermic because the lower charge density attracts fewer water molecules.
- For Group 2 sulfates, the decrease in hydration enthalpy is greater than the decrease in lattice enthalpy.
- Therefore becomes less exothermic (or more endothermic).
- A less exothermic (or more endothermic) enthalpy of solution makes dissolving less favourable, so solubility decreases down the group.
Key Takeaways
- Solubility trend is determined by the balance between lattice and hydration enthalpies.
- For Group 2 sulfates, hydration enthalpy is the dominant factor.
Common Mistakes
- Saying both lattice and hydration enthalpies 'increase' – they become less exothermic (less negative).
- Saying lattice enthalpy changes more – wrong; hydration enthalpy changes more.
- Not linking to and solubility.
Things to Be Careful About
- Use 'less exothermic' or 'less negative' rather than 'decrease' without qualifier.
- State that hydration enthalpy is the dominant factor.
- Conclude that solubility decreases down the group.
Nickel(II) iodate(V), , is sparingly soluble in water. The concentration of its saturated solution is at .
Answer
Units:
K_sp = [Ni^{2+}][IO_3^-]^2; mol^3 dm^{-9}
Background Concept
The solubility product constant, , is the equilibrium constant for the dissolution of a sparingly soluble ionic compound in water. For a general salt , the expression is . Pure solids and liquids are omitted from equilibrium expressions. The units of are derived by substituting concentration units () into the expression and simplifying.
Understanding the Question
The question asks for the expression for nickel(II) iodate, , including the correct units. This requires writing the dissociation equation, identifying the ions and their stoichiometric coefficients, and then determining the dimensional units of the resulting expression.
Approach
- Write the balanced dissociation equation for .
- Construct the expression using the equilibrium concentrations of the ions, raising each to the power of its stoichiometric coefficient.
- Substitute for each concentration term to find the units.
Step-by-Step Reasoning
Nickel(II) iodate dissociates as follows:
The solubility product expression is:
Note that state symbols are not included in expressions.
To find the units, substitute for each concentration:
Key Takeaways
- expressions only include aqueous ions; the solid reactant is omitted.
- Each ion concentration is raised to the power of its stoichiometric coefficient in the balanced equation.
- Units are derived algebraically from the expression and must be included if requested.
Common Mistakes
- Including the solid in the expression.
- Forgetting to square the iodate concentration .
- Writing incorrect units, such as instead of .
Things to Be Careful About
- Always check that the equation is balanced before writing the expression.
- Ensure state symbols are omitted from the expression itself, even though they are required in the chemical equation.
Working
Answer
4.87e-5
Background Concept
The molar solubility () of a salt is the number of moles of the salt that dissolve per cubic decimetre to form a saturated solution. For a salt , the concentrations of the ions at equilibrium are and . These concentrations are substituted into the expression to calculate the numerical value of the solubility product.
Understanding the Question
Given the concentration of the saturated solution of is , calculate the numerical value of . This requires finding the equilibrium concentrations of and ions and substituting them into the expression from part (a)(i).
Approach
- Determine and from the given molar solubility using stoichiometry.
- Substitute these values into the expression.
- Calculate the final value to 3 significant figures.
Step-by-Step Reasoning
From the dissociation equation:
For every 1 mole of that dissolves, 1 mole of and 2 moles of are produced. Therefore:
Substitute into the expression:
Rounding to 3 significant figures:
Key Takeaways
- The stoichiometric ratio between the dissolved salt and its ions must be used to find ion concentrations.
- Always square or raise to the appropriate power the concentration of the ion with a coefficient greater than 1.
- Final answers should be given to an appropriate number of significant figures (here, 3 sf matching the given data).
Common Mistakes
- Assuming (forgetting the 2:1 ratio).
- Calculating (swapping the ions).
- Rounding too early in the calculation, leading to a final answer of or similar.
Things to Be Careful About
- Ensure the concentration of is doubled before squaring it.
- Use 3 significant figures for the final answer as the given solubility () has 3 sf.
An electrochemical cell is set up as shown in Fig. 3.1.
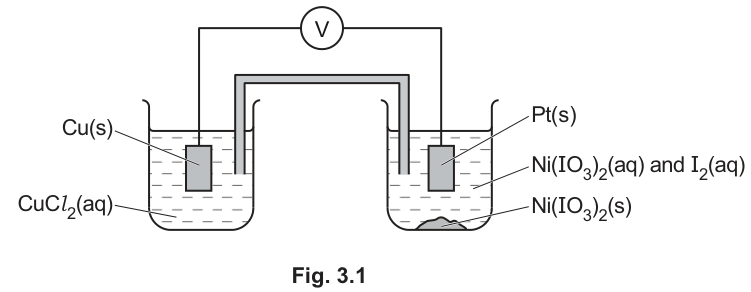
The relevant standard electrode potentials, , for this electrochemical cell are shown.
Answer
The positive electrode is the right-hand side (platinum electrode / iodate half-cell).
+0.85 V; right-hand side (Pt electrode)
Background Concept
The standard cell potential, , is calculated using the standard electrode potentials of the two half-cells. For a cell diagram where the right-hand half-cell is the cathode (reduction) and the left-hand half-cell is the anode (oxidation):
Alternatively, using reduction potentials for both half-cells: . The half-cell with the more positive (or less negative) value will undergo reduction and act as the positive electrode (cathode). Electrons flow from the negative electrode (anode) to the positive electrode (cathode) through the external circuit.
Understanding the Question
Given the standard electrode potentials for the iodate/iodine and copper half-cells, calculate and identify which electrode in Fig. 3.1 is positive.
Approach
- Identify the cathode and anode based on the values. The more positive value is the cathode.
- Calculate .
- Locate the cathode on the diagram to identify the positive electrode.
Step-by-Step Reasoning
The two half-reactions and their values are:
Since , the iodate half-cell has the greater tendency to undergo reduction. Therefore, it is the cathode (positive electrode), and the copper half-cell is the anode (negative electrode).
In Fig. 3.1, the iodate half-cell (containing , , and the Pt electrode) is on the right-hand side. Thus, the right-hand side (platinum electrode) is the positive electrode.
Key Takeaways
- when using reduction potentials.
- The half-cell with the more positive is the cathode (positive electrode) where reduction occurs.
- Electrons flow from the more negative half-cell to the more positive half-cell.
Common Mistakes
- Subtracting in the wrong order: (this would imply a non-spontaneous reaction under standard conditions, which contradicts the cell setup).
- Confusing the positive and negative electrodes.
- Forgetting to include the unit 'V' in the final answer.
Things to Be Careful About
- Always ensure is positive for a galvanic (voltaic) cell as depicted.
- The positive electrode is the one where reduction occurs (cathode), which corresponds to the half-cell with the more positive value.
Suggest how the measured of this cell compares to the under standard conditions.
Explain your answer.
Answer
is less positive (or more negative) than .
This is because the concentration
(lower than the standard condition of ). According to Le Chatelier's principle, this shifts the iodate half-cell equilibrium to the left, making its value less positive, which decreases .
Less positive; [IO3-] is less than 1.0 mol dm-3
Background Concept
Standard electrode potentials () are measured under standard conditions: all aqueous ions at concentration, , and pressure for gases. When concentrations deviate from standard conditions, the electrode potential changes according to Le Chatelier's principle and the Nernst equation. For a reduction half-reaction:
If the concentration of the oxidised form decreases (or reduced form increases), the equilibrium shifts to the left, making the electrode potential less positive (or more negative). Conversely, if the oxidised form concentration increases, the potential becomes more positive.
Understanding the Question
The cell in Fig. 3.1 contains in equilibrium with its saturated solution. From part (a)(ii), the concentration of in this saturated solution is , which is much less than the standard . How does this affect compared to ?
Approach
- Compare the actual concentration of to the standard concentration.
- Apply Le Chatelier's principle to the iodate half-reaction to determine the effect on its electrode potential.
- Relate this change to the overall .
Step-by-Step Reasoning
Standard conditions require . In this cell, , which is less than .
Consider the iodate half-reaction:
A lower concentration of (a reactant) means the equilibrium shifts to the left to oppose the change. This makes the forward reaction (reduction) less favourable, so the electrode potential for this half-cell becomes less positive (more negative) than .
Since , and the cathode potential () has decreased while the anode potential () remains at standard conditions (assuming ), the overall becomes less positive (or more negative) than .
Key Takeaways
- Non-standard concentrations affect electrode potentials.
- Lowering the concentration of a reactant in a reduction half-reaction makes the potential less positive.
- changes in the same direction as the cathode potential change (if the anode is at standard conditions).
Common Mistakes
- Stating "concentration is not standard" without explaining the direction of the shift.
- Claiming is more positive (confusing the effect of concentration on the equilibrium shift).
- Forgetting to mention that as the reason.
Things to Be Careful About
- Always compare the actual concentration to .
- Use Le Chatelier's principle clearly: lower reactant concentration shifts equilibrium left, reducing the tendency for reduction.
- The question asks to "suggest" and "explain", so both the direction of change and the reason are required for marks.
Complete Table 3.1 by placing one tick () to indicate how the of this cell changes when a small amount of is added to the beaker containing and in Fig. 3.1.
Explain your answer.
Table 3.1
| less positive | no change | more positive |
|---|---|---|
Answer
Table 3.1:
| less positive | no change | more positive |
|---|---|---|
| ✓ |
Explanation:
Adding introduces ions. This increases , causing the common ion effect. The solubility equilibrium:
shifts to the left, causing to precipitate. As a result, decreases. A lower shifts the iodate half-cell equilibrium to the left, making its electrode potential less positive, so is less positive.
less positive; common ion effect lowers [IO3-]
Background Concept
The common ion effect occurs when a salt containing a common ion is added to a saturated solution of a sparingly soluble salt. According to Le Chatelier's principle, the increase in the concentration of one ion shifts the solubility equilibrium to the left, decreasing the solubility of the original salt and lowering the concentration of the other ion. In electrochemistry, changing the concentration of an ion in a half-cell affects the electrode potential: a decrease in the concentration of a reactant (oxidised form) in a reduction half-reaction makes the potential less positive.
Understanding the Question
A small amount of is added to the right-hand beaker (containing , , and the Pt electrode). We need to determine how changes and explain why. The table requires selecting one option: less positive, no change, or more positive.
Approach
- Identify the effect of adding on the solubility equilibrium of .
- Determine how this affects .
- Apply Le Chatelier's principle to the iodate half-cell to find the effect on .
Step-by-Step Reasoning
Step 1: Common ion effect on solubility
is a soluble salt that dissociates completely:
This increases in the right-hand beaker. For the solubility equilibrium:
An increase in shifts the equilibrium to the left to oppose the change. This causes more to precipitate (or simply reduces the solubility), which decreases .
Step 2: Effect on electrode potential
Consider the iodate half-reaction:
is a reactant (oxidised form). A decrease in shifts this equilibrium to the left, making the forward reaction (reduction) less favourable. Therefore, the electrode potential for this half-cell becomes less positive (more negative).
Step 3: Effect on
Since the iodate half-cell is the cathode (positive electrode):
A decrease in (making it less positive) results in a decrease in . Therefore, is less positive.
Key Takeaways
- The common ion effect reduces the concentration of the other ion in a sparingly soluble salt's equilibrium.
- Lowering the concentration of a reactant in a reduction half-cell makes its electrode potential less positive.
- Changes in cathode potential directly affect in the same direction.
Common Mistakes
- Failing to link the addition of to the common ion effect.
- Assuming increases or stays the same.
- Incorrectly predicting that becomes more positive.
- Not explaining the connection between solubility equilibrium and electrode potential.
Things to Be Careful About
- The question asks to tick one box in Table 3.1 and explain. Ensure both are provided.
- The explanation must clearly show the chain of reasoning: added common ion effect decreases half-cell potential less positive less positive.
- Avoid saying "human error" or vague statements; be specific about the chemical equilibria involved.
In solution, iodic(V) acid, , ionises as shown.
The pH of a solution of is .
Answer
0.34 mol dm-3
Background Concept
The pH of a solution is defined as the negative base-10 logarithm of the hydrogen ion concentration:
Rearranging this gives:
This relationship allows direct conversion between pH and .
Understanding the Question
Given that the pH of a solution of is , calculate in .
Approach
Use the formula and substitute the given pH value.
Step-by-Step Reasoning
Using a calculator:
Rounding to 2 significant figures (as pH = 0.47 has 2 decimal places, which corresponds to 2 sf in the concentration):
Key Takeaways
- is a fundamental relationship.
- The number of decimal places in pH determines the number of significant figures in (2 decimal places in pH = 2 sf in concentration).
Common Mistakes
- Forgetting to use the negative sign in the exponent: instead of .
- Rounding to too many or too few significant figures.
- Confusing with or pH with pOH.
Things to Be Careful About
- Always check the sign in the exponent.
- Match significant figures appropriately: pH = 0.47 (2 d.p.) to 2 sf.
- Include the unit if required (the question asks for it).
Use your answer from (c)(i) to calculate the equilibrium concentrations of and , in , in a solution of .
Answer
[HIO3] = 0.66 mol dm-3; [IO3-] = 0.34 mol dm-3
Background Concept
For a weak acid ionising in water:
If the initial concentration of is , and the equilibrium concentration of is , then by stoichiometry, and . This assumes the contribution of from water autoionisation is negligible (valid when ).
Understanding the Question
Given the initial concentration of is and (from part c(i)), calculate the equilibrium concentrations of and .
Approach
- Use the stoichiometry of the ionisation equation to find .
- Subtract the amount ionised from the initial concentration to find .
Step-by-Step Reasoning
The ionisation equation is:
From the stoichiometry, 1 mole of produces 1 mole of and 1 mole of . Therefore:
(The contribution of from water is negligible since .)
The amount of that has ionised is . The equilibrium concentration is:
Key Takeaways
- For a monoprotic acid, at equilibrium (ignoring water autoionisation).
- .
- This is an ICE (Initial, Change, Equilibrium) approach applied to acid-base equilibria.
Common Mistakes
- Assuming (this approximation is only valid when ionisation is very small, i.e., ; here, , so the approximation is invalid).
- Forgetting to subtract the ionised amount from the initial concentration.
- Writing (confusing initial and equilibrium concentrations).
Things to Be Careful About
- Check if the rule applies. Here, ionisation means we must use the exact value , not approximate.
- Ensure significant figures are consistent: (2 d.p., matching the subtraction rule).
- The question asks for equilibrium concentrations, not initial values.
Answer
0.18 mol dm-3
Background Concept
The acid dissociation constant, , for a weak acid is:
where all concentrations are equilibrium values. The units of depend on the stoichiometry; for a monoprotic acid, the units are .
Understanding the Question
Using the equilibrium concentrations from parts (c)(i) and (c)(ii), calculate for in .
Approach
- Write the expression.
- Substitute the equilibrium concentrations.
- Calculate the value and round to appropriate significant figures.
Step-by-Step Reasoning
Substitute the values:
Rounding to 2 significant figures (matching the data from parts c(i) and c(ii)):
(Note: is also acceptable if intermediate rounding differs slightly, but is more accurate.)
Key Takeaways
- is calculated using equilibrium concentrations, not initial concentrations.
- For a monoprotic acid, has units of .
- Strong acids or moderately weak acids (like with ) can have significant ionisation, so the approximation is not valid.
Common Mistakes
- Using initial concentration in the denominator instead of .
- Forgetting to square in the numerator (though here , so it's ).
- Incorrect units (e.g., no units or ).
- Rounding to 1 significant figure () instead of 2.
Things to Be Careful About
- Always use equilibrium concentrations in the expression.
- Check the units: .
- Do not approximate here because ionisation is , which is much greater than .
The Dushman reaction is the reaction between iodate(V) ions and iodide ions in acid solution.
The rate equation for this reaction is shown.
The rate of this reaction is investigated in a buffer solution.
The initial concentrations are shown.
Under these conditions the initial rate of the reaction is .
Answer
A buffer solution is one that opposes (or resists) changes in pH (or keeps pH within a small range) when small amounts of acid (or ) or alkali (or base / ) are added.
Opposes/resists change in pH when small amounts of acid or alkali are added
Background Concept
A buffer solution is a solution that maintains a relatively constant pH when small amounts of acid or base are added, or when the solution is diluted. Buffers typically consist of a weak acid and its conjugate base (or a weak base and its conjugate acid). They work by neutralising added or ions through equilibrium shifts, thus resisting large changes in pH.
Understanding the Question
Define a buffer solution. This is a standard definition question worth 2 marks, requiring two key points: (1) what it does (opposes/resists pH change) and (2) under what conditions (when small amounts of acid or alkali are added).
Approach
State the two required components of the definition clearly.
Step-by-Step Reasoning
Point 1: A buffer solution opposes, resists, or controls changes in pH (or keeps pH within a small range).
Point 2: This occurs when a small amount of acid (or ) or alkali (or base / ) is added.
Both points are required for full marks.
Key Takeaways
- A buffer resists pH change, not prevents it entirely.
- The condition is "small amounts" of acid or base; large amounts will exceed the buffer capacity.
- Buffer solutions are crucial in kinetics experiments where pH affects the reaction rate (as in this question).
Common Mistakes
- Saying "buffers keep pH constant" (it resists change, it doesn't keep it perfectly constant).
- Forgetting to mention the addition of acid or alkali.
- Saying "buffers prevent changes in pH" (too absolute).
- Confusing buffer solutions with neutral solutions (pH = 7).
Things to Be Careful About
- Use precise terminology: "opposes", "resists", or "controls" change in pH.
- Mention both acid and alkali (or and ).
- The definition is general; do not need to specify weak acid/conjugate base unless asked.
Working
Units:
Answer
4.20e8 mol^-4 dm^12 s^-1
Background Concept
The rate equation (or rate law) relates the rate of a reaction to the concentrations of the reactants:
where is the rate constant, and and are the orders of reaction with respect to A and B. The overall order is . The units of depend on the overall order of the reaction. For a reaction of overall order :
Here, the overall order is , so:
Understanding the Question
Given the rate equation and initial concentrations and rate, calculate the rate constant and its units.
Approach
- Rearrange the rate equation to solve for .
- Substitute the given values and calculate .
- Derive the units of from the rate equation.
Step-by-Step Reasoning
Calculate k:
Substitute:
Calculate the denominator:
Determine units:
Key Takeaways
- Always rearrange the rate equation to isolate before substituting.
- The units of can be derived by dimensional analysis from the rate equation.
- Overall order = sum of exponents in the rate equation.
Common Mistakes
- Forgetting to square and in the denominator.
- Calculating the denominator incorrectly (e.g., instead of , then ).
- Incorrect units: (wrong sign in exponent) or (order of units doesn't matter, but must be correct).
- Forgetting the unit 's^{-1}'.
Things to Be Careful About
- Use scientific notation carefully; double-check powers of 10.
- The rate is given as , which has 3 sf, so should be to 3 sf ().
- Units must be consistent: , not (though they are equivalent, CIE prefers ).
This reaction is repeated at the same temperature and with the same initial values of and . The is increased to .
Calculate the initial rate of this reaction.
Working
The rate equation is:
and are unchanged, but increases from to (a factor of 3).
Since the reaction is second order with respect to :
Answer
(or )
0.19 mol dm-3 s-1
Background Concept
When only one reactant concentration changes in a rate equation, the effect on the rate can be determined using the order with respect to that reactant. If is multiplied by a factor , and the reaction is th order with respect to X, the rate is multiplied by .
This proportional approach is faster than recalculating and then the new rate.
Understanding the Question
The reaction is repeated with the same and , but is increased to . Calculate the new initial rate.
Approach
- Determine the factor by which changes.
- Use the order with respect to to find the factor by which the rate changes.
- Calculate the new rate.
Step-by-Step Reasoning
Change in :
is multiplied by a factor of 3.
Effect on rate:
The rate equation is:
The reaction is second order with respect to (exponent is 2). Therefore, if is multiplied by 3, the rate is multiplied by .
New rate:
Rounding to 2 significant figures (matching the given rate which has 3 sf, but the factor 3 is exact, so 0.189 to 2 sf is 0.19; however, 0.189 to 3 sf is also acceptable. The mark scheme accepts 0.19 or 0.189):
Key Takeaways
- When only one concentration changes, use proportional reasoning: .
- This avoids recalculating and reduces arithmetic errors.
- The factor must be raised to the power of the order with respect to that reactant.
Common Mistakes
- Forgetting to square the factor: (wrong, should be ).
- Using the wrong order (e.g., first order with respect to instead of second).
- Calculating the new incorrectly (not needed, but if done, must use the same ).
- Incorrect significant figures.
Things to Be Careful About
- The question states and are unchanged, so only affects the rate change.
- The factor is (exact ratio, so infinite sf).
- Final answer should be to 2 or 3 sf: or . The mark scheme accepts both.
Table 4.1 shows the structures of sections of three polymers, X, Y and Z.
Each polymer is made from only one type of monomer.
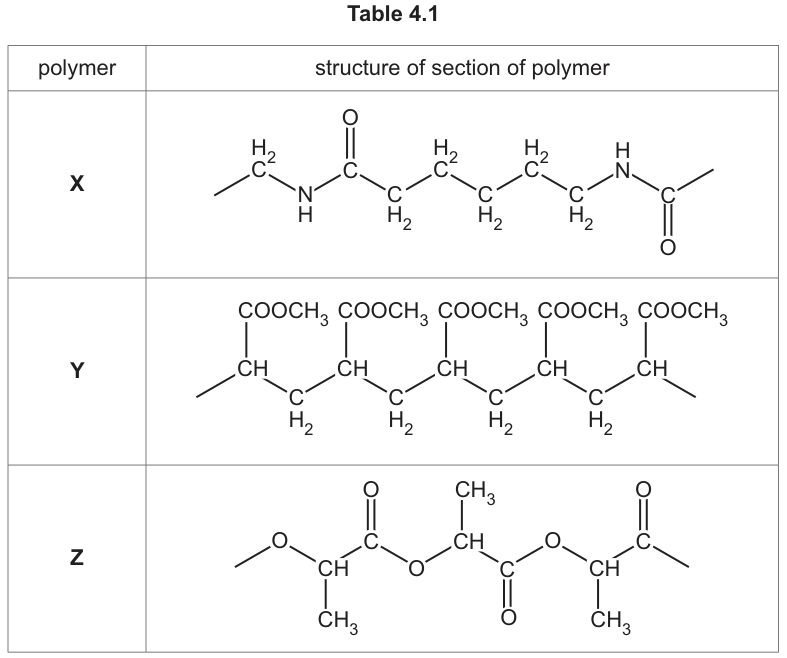
Complete Table 4.2 to state the type of polymerisation and draw the structure of the monomer for each polymer, X, Y and Z.
Table 4.2
| polymer | type of polymerisation | structure of monomer |
|---|---|---|
| X | ||
| Y | ||
| Z |
Answer
| polymer | type of polymerisation | structure of monomer |
|---|---|---|
| X | condensation | |
| Y | addition | |
| Z | condensation |
(Note: For X, is also accepted. For Z, is also accepted.)
See table above.
Background Concept
Polymers are large molecules made from repeating units called monomers. There are two main types of polymerisation:
- Addition polymerisation: Monomers add together without losing any atoms. This typically involves unsaturated monomers (containing C=C double bonds) opening up to form a saturated carbon chain. The repeating unit has the same atoms as the monomer, just with single bonds where the double bond was.
- Condensation polymerisation: Monomers join together with the loss of a small molecule (usually water, HCl, or methanol). This occurs between bifunctional monomers with complementary functional groups, such as:
- Amino acids (amine + carboxylic acid) forming polyamides (loss of water).
- Diols and dicarboxylic acids (or diacyl chlorides) forming polyesters (loss of water or HCl).
Understanding the Question
We are given sections of three polymer chains (X, Y, Z) and must identify the type of polymerisation and draw the monomer for each. Each polymer is made from only one type of monomer.
Approach
- Identify the linkage in the polymer backbone (amide, ester, or carbon-carbon chain).
- Determine if atoms were lost (condensation) or if the backbone is all carbon (addition).
- 'Cut' the linkage to restore the original functional groups on the monomer.
Step-by-Step Reasoning
Polymer X:
- The backbone contains amide linkages ().
- This is a polyamide, formed by condensation polymerisation.
- The repeating unit is .
- To find the monomer, add to the nitrogen and to the carbonyl carbon (or if using an acid chloride). This gives 6-aminohexanoic acid: .
Polymer Y:
- The backbone is a continuous carbon chain () with side chains.
- There are no heteroatoms (O, N) in the backbone linkages. This indicates addition polymerisation.
- The side chain is (ester group).
- The repeating unit is .
- To find the monomer, replace the single bond in the backbone with a double bond: (methyl propenoate / methyl acrylate).
Polymer Z:
- The backbone contains ester linkages ().
- This is a polyester, formed by condensation polymerisation.
- The repeating unit is .
- To find the monomer, add to the oxygen and to the carbonyl carbon. This gives 2-hydroxypropanoic acid (lactic acid): .
Key Takeaways
- Amide linkages () Polyamide Condensation (from amino acids or amino acid + acid chloride).
- Ester linkages () Polyester Condensation (from hydroxy acids or hydroxy acid + acid chloride).
- Carbon backbone only Addition polymer Monomer has a C=C double bond.
Common Mistakes
- Writing the monomer for X as two separate molecules (a diamine and a dicarboxylic acid). The question states 'only one type of monomer', so it must be an amino acid (or derivative).
- Forgetting the double bond in the monomer for Y (addition polymerisation requires unsaturated monomers).
- Incorrectly cutting the ester linkage in Z (must cut between C=O and O, not C-C).
Things to Be Careful About
- State symbols are not required for structures in this context unless specified, but correct connectivity is vital.
- The mark scheme accepts the acid chloride form () as a valid monomer precursor for condensation, as it reacts with the amine/hydroxyl group of another molecule releasing HCl.
Amino acids can act as monomers.
State what is meant by the isoelectric point of an amino acid.
Answer
The isoelectric point is the pH at which the amino acid exists as a zwitterion (or has a net overall charge of zero / is electrically neutral).
pH where the species is a zwitterion (net charge zero).
Background Concept
Amino acids contain both a basic amino group () and an acidic carboxylic acid group (). In aqueous solution, a proton transfer occurs from the acid to the base, forming a dipolar ion called a zwitterion: .
- At low pH (acidic), the excess protonates the carboxylate group, giving a net positive charge ().
- At high pH (alkaline), the excess deprotonates the ammonium group, giving a net negative charge ().
- At a specific pH, called the isoelectric point (pI), the concentration of the zwitterion is at a maximum, and the net charge is zero.
Understanding the Question
The question asks for a definition of the isoelectric point of an amino acid. This is a standard definition required for the topic of amino acids and their separation techniques (electrophoresis).
Approach
Recall the definition related to charge and pH.
Step-by-Step Reasoning
The isoelectric point (pI) is defined as the specific pH value at which the amino acid molecule carries no net electrical charge. At this pH, the molecule exists predominantly as a zwitterion (having both positive and negative charges that cancel out). In an electric field, a molecule at its pI will not move.
Key Takeaways
- pI is a specific pH value.
- At pI, net charge = 0.
- Dominant species is the zwitterion.
Common Mistakes
- Saying 'pH where amino acid dissolves' (incorrect).
- Saying 'pH 7' (incorrect; pI varies between amino acids, e.g., glycine is 6.0, lysine is 9.7).
Things to Be Careful About
- Ensure you mention 'pH' and 'charge zero' or 'zwitterion'. Just saying 'neutral' might be ambiguous (could mean pH 7), so 'electrically neutral' or 'net charge of zero' is better.
Electrophoresis can be used to separate and identify amino acids.
Table 4.3 shows information about the three amino acids glycine, lysine and glutamic acid.
Table 4.3
| amino acid | structural formula of amino acid | isoelectric point |
|---|---|---|
| glycine (gly) | ||
| lysine (lys) | ||
| glutamic acid (glu) |
A mixture containing these three amino acids is analysed in a buffer solution of pH 6.0.
Draw and label three spots on Fig. 4.1 to indicate the predicted position of each of these amino acids, gly, lys and glu, after electrophoresis.
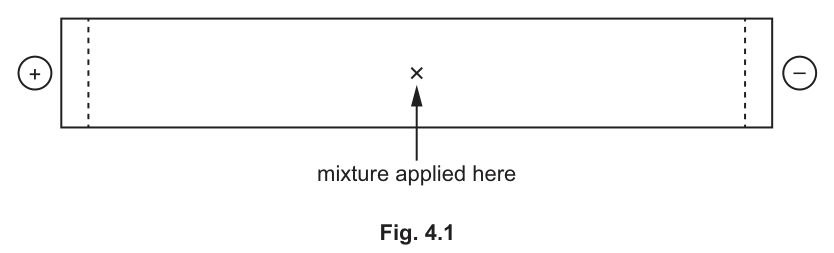
Answer
Positions:
- Glycine (Gly): At the start point (no movement).
- Glutamic acid (Glu): Moved towards the positive terminal (+) (left).
- Lysine (Lys): Moved towards the negative terminal (-) (right).
See diagram description.
Background Concept
Electrophoresis is a technique used to separate charged particles in a fluid using an electric field. Amino acids are amphoteric (can act as acid or base) and their charge depends on the pH of the buffer solution relative to their isoelectric point (pI).
- pH < pI: The environment is more acidic than the pI. The amino acid will be protonated. For amino acids with basic side chains (like lysine), it gains a net positive charge. It moves towards the negative electrode (cathode).
- pH > pI: The environment is more alkaline. The amino acid will be deprotonated. For amino acids with acidic side chains (like glutamic acid), it gains a net negative charge. It moves towards the positive electrode (anode).
- pH = pI: The amino acid is a zwitterion with net charge 0. It does not move.
Understanding the Question
We have a buffer at pH 6.0. We need to predict the positions of glycine (pI 6.0), lysine (pI 9.7), and glutamic acid (pI 3.2) on an electrophoresis strip with + on the left and - on the right. The mixture is applied in the middle.
Approach
Compare the pH (6.0) with the pI of each amino acid to determine the net charge, then determine the direction of movement (positive charges move to negative, negative charges move to positive).
Step-by-Step Reasoning
1. Glycine (pI = 6.0):
- pH (6.0) = pI (6.0).
- Net charge is zero (zwitterion dominant).
- Result: Glycine does not move. It stays at the start point (the 'x').
2. Lysine (pI = 9.7):
- pH (6.0) < pI (9.7).
- The solution is more acidic than the pI. Lysine (which has a basic amine side chain) will accept protons.
- Structure: and side chain . Net charge is positive (+1 or +2 depending on exact protonation, but definitely positive).
- Positive charges move towards the negative electrode (-).
- Result: Lysine moves to the right (towards the negative terminal).
3. Glutamic acid (pI = 3.2):
- pH (6.0) > pI (3.2).
- The solution is more alkaline than the pI. Glutamic acid (which has an acidic side chain) will lose protons.
- Structure: and side chain . Net charge is negative (-1 or -2).
- Negative charges move towards the positive electrode (+).
- Result: Glutamic acid moves to the left (towards the positive terminal).
Key Takeaways
- If pH = pI, no movement (charge = 0).
- If pH < pI, net positive charge, moves to cathode (-).
- If pH > pI, net negative charge, moves to anode (+).
Common Mistakes
- Assuming all amino acids move. Glycine stays at the start.
- Confusing the direction: positive ions go to negative electrode. Remember 'opposites attract'.
- Forgetting to compare pH with pI for each specific amino acid.
Things to Be Careful About
- The diagram has + on the left and - on the right. Ensure left/right descriptions match this.
- Glu moves left (to +), Lys moves right (to -), Gly stays middle.
Electrophoresis is repeated using a buffer solution of pH 11.
Predict how the position of glycine will change, if at all, after electrophoresis.
Answer
Glycine would move towards the positive terminal (anode) / to the left.
Reasoning: At pH 11, which is greater than the isoelectric point of glycine (6.0), glycine will be deprotonated and carry a net negative charge. Negative ions are attracted to the positive electrode.
It would move towards the positive terminal (left).
Background Concept
As established, the charge of an amino acid depends on the pH of the solution relative to its pI.
- At pH > pI, the amino acid acts as an acid and loses protons, becoming negatively charged (anion).
- Negatively charged species migrate towards the positive electrode (anode) in an electric field.
Understanding the Question
The experiment is repeated at pH 11. We need to predict the movement of glycine (pI = 6.0).
Approach
Compare new pH (11) with glycine's pI (6.0) to determine charge, then determine direction.
Step-by-Step Reasoning
- Glycine pI: 6.0.
- Buffer pH: 11.
- Comparison: pH (11) > pI (6.0).
- Charge state: The environment is very alkaline. The carboxylic acid group is deprotonated () and the amino group is deprotonated (). The net charge is negative (approximately -1).
- Movement: Negative charges are attracted to the positive terminal. In Fig 4.1, the positive terminal is on the left.
- Conclusion: Glycine will move to the left, towards the positive terminal.
Key Takeaways
- Increasing pH above pI makes the amino acid more negative.
- Negative amino acids move towards the anode (+).
Common Mistakes
- Saying 'it moves to the negative terminal' (confusing charge attraction).
- Saying 'it doesn't move' (forgetting that pH 11 is not equal to pI 6.0).
Things to Be Careful About
- The question asks 'how the position... will change'. Since it was at the start in (i), it will now move. Specify direction clearly (e.g., 'towards positive terminal' or 'to the left').
A group of drugs known as statins are used to lower cholesterol in blood. A commonly used statin is atorvastatin.
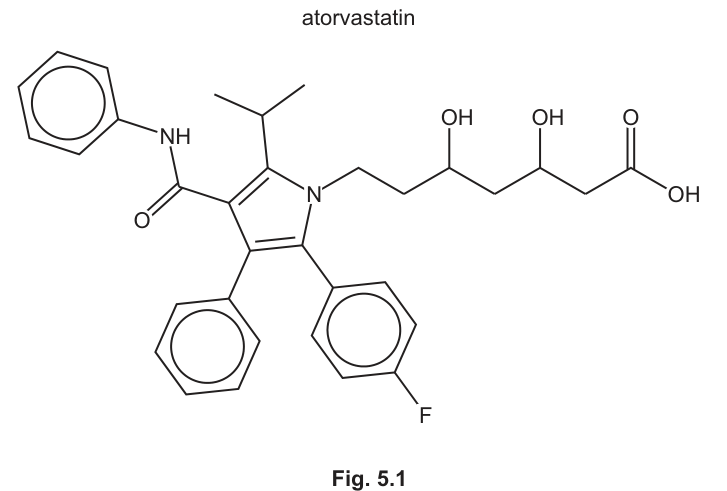
Draw a line through the bond in the atorvastatin structure in Fig. 5.1 that could be broken under acid conditions.
Answer
Draw a line through the C–N bond of the amide group (the bond between the carbonyl carbon and the nitrogen attached to the phenyl ring).
The C–N bond of the amide group (between C=O and N–H on the phenylamide)
Background Concept
Amides are the most stable carboxylic acid derivatives toward hydrolysis, but under sufficiently vigorous acidic (or basic) conditions they can be cleaved. Acid-catalysed amide hydrolysis proceeds by protonation of the carbonyl oxygen, followed by nucleophilic attack by water on the carbonyl carbon, and ultimately cleavage of the C–N bond to give a carboxylic acid and an ammonium ion (or amine). The bond that breaks is the acyl C–N bond, not the N–H bond.
Understanding the Question
The question asks you to identify, on the given structure of atorvastatin, the single bond that would be broken under acidic conditions. The command word is "draw a line through," so you must indicate the correct bond on the figure.
Approach
Examine the functional groups present in atorvastatin: aromatic rings, an amide, a carboxylic acid, secondary alcohols, and a pyrrole ring. Under acidic conditions, the amide is the functional group susceptible to hydrolysis. The bond that breaks is the C–N bond connecting the carbonyl carbon to the nitrogen (which bears the phenyl group).
Step-by-Step Reasoning
- Identify all functional groups in atorvastatin: three aromatic rings (one fluorinated), a secondary amide (–CONH–Ar), a carboxylic acid (–COOH), two secondary alcohols (–CH(OH)–), and a pyrrole ring.
- Consider which bonds are labile under acidic conditions. The carboxylic acid and alcohol groups are not cleaved by acid alone. The C–C bonds of the aromatic rings and pyrrole are not broken.
- The amide C–N bond is the one that undergoes acid-catalysed hydrolysis, breaking the molecule into a carboxylic acid fragment and an amine fragment.
- Draw a line through the bond between the amide carbonyl carbon and the nitrogen atom (the N attached to the phenyl ring on the left side of the structure).
Key Takeaways
- Acid hydrolysis of amides cleaves the C–N (acyl–nitrogen) bond.
- The N–H bond is NOT broken; it is the bond between the carbonyl carbon and nitrogen that is hydrolysed.
- Other functional groups present (COOH, OH, aromatic C–H) are stable to acid alone.
Common Mistakes
- Drawing the line through the N–H bond instead of the C–N bond.
- Drawing the line through the C=O bond (this does not break under hydrolysis).
- Identifying the ester-like bond in the carboxylic acid (–COOH) as the one to break; carboxylic acids do not hydrolyse further under acid conditions.
Things to Be Careful About
- The amide in atorvastatin is a secondary amide (–CONHAr), so the C–N bond connecting the carbonyl to the nitrogen bearing the phenyl group is the correct one to mark.
Answer
Atorvastatin contains –OH and –NH groups (and carbonyl O atoms) that can form hydrogen bonds with water molecules, allowing it to dissolve.
The OH and NH groups (and O atoms) can hydrogen bond with water
Background Concept
Solubility in water requires favourable interactions between solute and solvent molecules. Water is a highly polar solvent capable of both donating and accepting hydrogen bonds. Molecules that contain –OH groups, –NH groups, or carbonyl oxygen atoms can participate in hydrogen bonding with water, which provides the energetic driving force for dissolution.
Understanding the Question
The question asks you to refer to the structure of atorvastatin and explain why it dissolves in water. The key is to identify the specific groups responsible and state the type of intermolecular force involved.
Approach
Scan the structure for polar groups capable of hydrogen bonding: hydroxyl groups, amine/amide N–H, and carbonyl oxygens. State that these form hydrogen bonds with water.
Step-by-Step Reasoning
- Identify the hydrogen-bonding groups in atorvastatin: two secondary alcohol –OH groups on the heptanoic acid chain, one carboxylic acid –OH, one amide N–H, and the carbonyl oxygen of the amide and the carboxylic acid.
- Each of these groups can act as a hydrogen-bond donor (–OH, –NH) or acceptor (C=O oxygen) with water molecules.
- The collective hydrogen bonding between these groups and surrounding water molecules overcomes the lattice energy / intermolecular attractions in the solid, allowing dissolution.
Key Takeaways
- Water solubility of organic molecules is largely explained by hydrogen bonding with –OH, –NH, and C=O groups.
- The mark scheme requires BOTH the identification of the groups AND the statement about hydrogen bonding with water.
Common Mistakes
- Only stating "it is polar" without mentioning hydrogen bonding specifically.
- Failing to identify the groups (OH, NH) and just saying "hydrogen bonds with water."
- Mentioning the aromatic rings as contributing to water solubility (they do not).
Things to Be Careful About
- The mark scheme requires both parts: the groups identified AND the hydrogen bonding explanation. Stating only one earns no mark.
Answer
C33H35N2O5F
Background Concept
Molecular formulae can be determined from skeletal structures by systematically counting each type of atom. In skeletal formulae, carbon atoms are at each vertex and end of a line (unless another symbol is written), and hydrogen atoms attached to carbon are implied to satisfy carbon's tetravalency. Heteroatoms (N, O, F, etc.) are written explicitly, along with any H attached to them.
Understanding the Question
The question gives the general form C_?H₃₅N_?O_?F_? and asks you to fill in the subscripts by counting atoms in the structure.
Approach
Systematically count each atom type in the skeletal structure of atorvastatin:
- Carbons: three aromatic rings (6+6+6 = 18), pyrrole ring (4 carbons), isopropyl group (3 carbons), heptanoic acid chain carbons (7), amide carbonyl carbon (1). Total = 18 + 4 + 3 + 7 + 1 = 33.
- Nitrogens: pyrrole N (1) + amide N (1) = 2.
- Oxygens: amide C=O (1) + two chain OH (2) + COOH (2) = 5.
- Fluorine: 1 (on the fluorophenyl ring).
Step-by-Step Reasoning
- Count carbons: three benzene rings contribute 6 each = 18. The pyrrole ring has 4 carbon atoms (the fifth vertex is nitrogen). The isopropyl group adds 3 carbons. The heptanoic acid chain from the pyrrole N to the COOH has 7 carbons. The amide carbonyl carbon adds 1. Total C = 18 + 4 + 3 + 7 + 1 = 33.
- Count nitrogens: pyrrole ring N = 1; amide N = 1. Total N = 2.
- Count oxygens: amide C=O = 1; two alcohol OH = 2; carboxylic acid (C=O + OH) = 2. Total O = 5.
- Count fluorine: 1 on the fluorophenyl ring.
- The hydrogen count (35) is already given, confirming the formula.
Key Takeaways
- Careful systematic counting of each atom type in a complex skeletal structure is essential.
- In skeletal formulae, remember that each vertex and line-end is a carbon unless labelled otherwise.
Common Mistakes
- Miscounting carbons in the fused ring systems.
- Forgetting the carbonyl carbon of the amide.
- Confusing the pyrrole ring carbons (4, not 5, since one vertex is nitrogen).
Things to Be Careful About
- The mark scheme requires ALL blanks filled correctly for the mark (cao implied).
- Double-check by verifying the molecular formula of atorvastatin is indeed C₃₃H₃₅FN₂O₅.
Atorvastatin contains chiral carbon atoms.
Circle all chiral carbon atoms in Fig. 5.1.
Answer
Circle the two carbon atoms on the heptanoic acid chain that each bear an –OH group (the two CH(OH) carbons).
The two carbons bearing OH groups on the aliphatic chain (both are CH(OH) with four different substituents)
Background Concept
A chiral carbon (stereogenic centre) is a carbon atom bonded to four different groups. In complex molecules, one must systematically check each sp³ carbon to determine whether all four substituents are different. Carbons in aromatic rings, carbonyl carbons (sp²), and CH₂ groups (two identical H atoms) are automatically excluded.
Understanding the Question
Circle all chiral carbon atoms in the atorvastatin structure. The molecule is large, so a systematic approach is needed.
Approach
Identify all sp³ carbons that are not CH₂ or CH₃ (these have at least two identical H atoms). Then check whether the remaining candidate carbons have four different groups.
Step-by-Step Reasoning
- Eliminate all sp² carbons: aromatic ring carbons, pyrrole ring carbons, carbonyl carbons (amide C=O and acid C=O). These cannot be chiral.
- Eliminate all CH₃ groups: the isopropyl methyls (×2) and the terminal methyl of isopropyl. These have three identical H atoms.
- Eliminate all CH₂ groups: the chain CH₂ groups between the pyrrole N and the first CH(OH), and between the two CH(OH) groups, and between the second CH(OH) and the COOH. These have two identical H atoms.
- The isopropyl CH: bonded to two identical CH₃ groups → not chiral.
- The two CH(OH) carbons on the chain: each is bonded to H, OH, a CH₂ group on one side, and a different group on the other side (one side leads toward the pyrrole N, the other toward the COOH). These four groups are all different → chiral.
- Therefore there are exactly 2 chiral carbon atoms.
Key Takeaways
- Only sp³ carbons can be chiral centres.
- CH₂ and CH₃ groups are automatically excluded.
- In a chain like –CH₂–CH(OH)–CH₂–CH(OH)–CH₂–, each CH(OH) is chiral because the two chain directions are different (one leads to the pyrrole end, the other to the COOH end).
Common Mistakes
- Circling the isopropyl CH (not chiral because two methyl groups are identical).
- Circling aromatic or carbonyl carbons (sp², cannot be chiral).
- Missing one of the two chiral centres.
- Circling CH₂ carbons (two identical H atoms).
Things to Be Careful About
- The question says "circle ALL chiral carbon atoms," so missing one loses the mark.
- The two CH(OH) carbons must have four genuinely different groups — verify by tracing each substituent path.
The synthetic preparation of atorvastatin requires the production of a single optical isomer.
Suggest why.
Answer
Different optical isomers (enantiomers) have different biological activity; only one enantiomer has the desired therapeutic effect.
Different/better biological activity of one enantiomer over the other
Background Concept
Biological receptors, enzymes, and transport proteins are themselves chiral (made from L-amino acids). They interact differently with each enantiomer of a chiral drug — one enantiomer may fit the receptor and produce the desired pharmacological effect, while the other may be inactive or produce unwanted side effects. This is why enantiomerically pure drugs are preferred.
Understanding the Question
The question asks why the synthesis must produce a single optical isomer rather than a racemic mixture. The command word is "suggest," so a reasoned explanation is needed.
Approach
Connect the concept of chirality in biological systems to drug efficacy and safety.
Step-by-Step Reasoning
- Biological receptors are chiral environments.
- Enantiomers interact differently with these receptors (like a left hand fitting a left glove but not a right glove).
- Only one enantiomer of atorvastatin has the desired cholesterol-lowering activity.
- The other enantiomer may be inactive or cause adverse effects.
- Therefore, producing a single optical isomer ensures the drug is effective and safe.
Key Takeaways
- Enantiomers have identical physical properties in achiral environments but different biological properties in chiral environments.
- Drug synthesis aims for enantiomeric purity to ensure efficacy and safety.
Common Mistakes
- Saying "enantiomers have different melting points" (they do not, in an achiral environment).
- Saying "the other isomer is toxic" without specifying that it has different/no biological activity.
- Writing only "it is chiral" without explaining the biological consequence.
Things to Be Careful About
- The mark scheme accepts "different biological activity" or "better biological activity" — the key idea is that the two enantiomers behave differently in the body.
The proton () NMR spectrum of atorvastatin dissolved in is recorded.
Use Table 5.1 to deduce the number of hydrogen atoms that could produce peaks in the region .
Working
Protons with chemical shifts in the range ppm:
- Aromatic protons (Ar–H, 6.0–9.0): three rings → phenyl (5H) + fluorophenyl (4H) + phenyl on amide (5H) = 14H
- Carboxylic acid proton (RCOOH, 9.0–13.0): 1H
- Amide proton (RCONHR, 5.0–12.0): 1H
Total =
Answer
16
16
Background Concept
In H NMR, the chemical shift () of a proton depends on its electronic environment. Protons on aromatic rings appear at 6.0–9.0 ppm due to ring-current deshielding. Carboxylic acid protons appear at 9.0–13.0 ppm due to strong deshielding by the adjacent carbonyl and the acidic proton. Amide N–H protons appear at 5.0–12.0 ppm due to deshielding by the carbonyl group. The question asks which protons fall in the window 6.5–13.0.
Understanding the Question
Using Table 5.1, determine how many hydrogen atoms in atorvastatin would produce signals in the region = 6.5–13.0 ppm. You must count the actual number of H atoms (not the number of signals).
Approach
- Identify which proton environments from Table 5.1 have ranges overlapping with 6.5–13.0 ppm.
- Count the number of H atoms in each such environment in atorvastatin.
- Sum them.
Step-by-Step Reasoning
-
From Table 5.1, the environments overlapping with 6.5–13.0 are:
- Aromatic H (6.0–9.0): overlaps with 6.5–9.0 portion
- Carboxylic acid H (9.0–13.0): entirely within range
- Amide N–H (5.0–12.0): overlaps with 6.5–12.0 portion
- Phenol (4.5–7.0): atorvastatin has no phenol group, so irrelevant
-
Count aromatic H atoms:
- Unsubstituted phenyl ring (left, attached to amide N): 5 H (one position occupied by N)
- Fluorophenyl ring (bottom right): 4 H (one position occupied by F, one by pyrrole)
- Phenyl ring (bottom left, attached to pyrrole): 5 H (one position occupied by pyrrole)
- Total aromatic H = 5 + 4 + 5 = 14
-
Count carboxylic acid H: 1 (the –COOH proton)
-
Count amide N–H: 1 (the –NH– between C=O and phenyl)
-
Total = 14 + 1 + 1 = 16
Key Takeaways
- Chemical shift ranges from data tables must be compared with the specified window to select relevant environments.
- Count actual H atoms, not the number of distinct signals.
- Aromatic rings with substituents lose one H per substituent.
Common Mistakes
- Counting 15 aromatic H (forgetting that each substituent on a ring removes one H).
- Including the pyrrole ring H (there is no H on the pyrrole ring carbons in atorvastatin — all four pyrrole carbons bear substituents).
- Forgetting the amide N–H or the COOH proton.
- Confusing "number of signals" with "number of hydrogen atoms."
Things to Be Careful About
- The fluorophenyl ring has 4 aromatic H (not 5), because one position is occupied by F and one by the pyrrole ring.
- The unsubstituted phenyl attached to the amide N has 5 H (one position taken by N).
- Verify that no other proton environments (alcohol OH at 0.5–6.0, alkyl at 0.9–4.0) fall in the 6.5–13.0 range.
The proton () NMR spectrum of atorvastatin dissolved in is recorded.
Predict the number of hydrogen atoms that would not show a peak in this spectrum.
Explain your answer.
Table 5.1
| environment of proton | example | chemical shift range / ppm |
|---|---|---|
| alkane | , , | |
| alkyl next to C=O | , , | |
| alkyl next to aromatic ring | , , | |
| alkyl next to electronegative atom | , , | |
| attached to alkene | ||
| attached to aromatic ring | ||
| aldehyde | ||
| alcohol | ||
| phenol | ||
| carboxylic acid | ||
| alkyl amine | ||
| aryl amine | ||
| amide |
Answer
4 hydrogen atoms would not show a peak.
These are the exchangeable protons: two alcohol –OH groups, one carboxylic acid –OH, and one amide –NH. In , these protons undergo exchange with deuterium (), and since (deuterium) does not produce a signal in a NMR spectrum, these peaks disappear.
4; exchangeable OH and NH protons are replaced by D in D2O, which is not detected by 1H NMR
Background Concept
When a sample is dissolved in D₂O rather than CDCl₃, labile (exchangeable) protons — those attached to oxygen (–OH) or nitrogen (–NH) — undergo rapid proton-deuterium exchange. Deuterium (H) has a different nuclear spin and resonance frequency from H, so it does not appear in a H NMR spectrum. Consequently, any signal that was due to an exchangeable proton disappears when D₂O is the solvent.
Understanding the Question
The question asks you to predict the number of hydrogen atoms that would NOT show a peak in the H NMR spectrum when atorvastatin is dissolved in D₂O, and to explain why. This is a two-mark question: one for the number, one for the explanation.
Approach
- Identify all exchangeable protons in atorvastatin (those on O or N).
- Count them.
- Explain that D₂O exchanges these H for D, removing the H signal.
Step-by-Step Reasoning
-
Identify exchangeable protons:
- Two secondary alcohol –OH groups on the chain: 2H
- One carboxylic acid –OH: 1H
- One amide N–H: 1H
- Total = 4 exchangeable protons
-
In D₂O, each of these undergoes:
where X = O or N.
-
The resulting C–D, O–D, and N–D bonds do not give H NMR signals because deuterium is not detected in a proton NMR experiment.
-
Therefore, 4 hydrogen atoms would not show a peak.
Key Takeaways
- D₂O exchange is a standard method for identifying –OH and –NH protons in H NMR.
- Only protons directly attached to electronegative atoms (O, N) are exchangeable; C–H protons are not.
- Deuterium is invisible in H NMR.
Common Mistakes
- Counting 3 (forgetting the amide N–H or the COOH proton).
- Counting 5 (incorrectly including the pyrrole N, which has no H in atorvastatin — the pyrrole nitrogen is substituted by the chain).
- Saying "the peaks shift" rather than "disappear."
- Attributing the disappearance to deuterium coupling rather than exchange.
Things to Be Careful About
- The pyrrole nitrogen in atorvastatin is bonded to the carbon chain (N-substituted), so it has NO N–H proton and is NOT exchangeable.
- All C–H protons (aromatic, aliphatic) remain visible in D₂O solution.
- The mark scheme requires both the number (4) and the explanation (proton exchange with D₂O).
Atorvastatin reacts with an excess of .
Name all the functional groups in atorvastatin that react with .
Name the new functional group that would be formed in each case.
Answer
Functional groups that react with :
- Carboxylic acid () → reduced to a primary alcohol ()
- Amide () → reduced to an amine ()
Carboxylic acid → primary alcohol; Amide → amine
Background Concept
Lithium aluminium hydride () is a powerful reducing agent that delivers hydride () to electrophilic carbon centres. It reduces carboxylic acids to primary alcohols and amides to amines (the C=O is fully reduced to CH₂). It does NOT reduce isolated C=C double bonds or aromatic rings under standard conditions. The alcohol groups (–OH) already present in the molecule are not further reduced.
Understanding the Question
Name all functional groups in atorvastatin that react with excess , and for each, name the new functional group formed. This is a 2-mark question requiring all four items (two groups reacting + two products) for full marks.
Approach
- List all functional groups in atorvastatin: aromatic rings, pyrrole ring, amide, carboxylic acid, secondary alcohols, C=C in pyrrole.
- Determine which are susceptible to reduction.
- State the product for each.
Step-by-Step Reasoning
-
Carboxylic acid (–COOH): reduces this to a primary alcohol (–CH₂OH). The mechanism involves hydride attack on the carbonyl carbon, followed by protonation on workup.
-
Amide (–CONHAr): reduces the C=O of the amide to CH₂, giving an amine (–CH₂NHAr). The C–N bond is retained; only the oxygen is removed.
-
Secondary alcohols (–CHOH–): Already reduced; does not react further with alcohols.
-
Aromatic rings and C=C: Not reduced by under normal conditions.
-
Pyrrole ring: Not reduced by .
Therefore, only the carboxylic acid and the amide react.
Key Takeaways
- reduces: carboxylic acids → 1° alcohols; amides → amines; aldehydes/ketones → alcohols; esters → alcohols.
- does NOT reduce: C=C, aromatic rings, alcohols, ethers, nitriles (wait — it DOES reduce nitriles to amines, but that's not present here).
- The amide reduction preserves the C–N bond and removes the carbonyl oxygen.
Common Mistakes
- Including the alcohol groups as being reduced (they are already at the alcohol oxidation level).
- Saying the amide is reduced to an alcohol (it gives an amine, not an alcohol — the nitrogen stays attached).
- Saying the carboxylic acid gives an aldehyde (it goes all the way to primary alcohol with ).
- Including the pyrrole ring or aromatic rings as reactive.
Things to Be Careful About
- The mark scheme requires BOTH the reacting group AND the product for each (4 items total for 2 marks; any 2 of the 4 gives 1 mark).
- Be precise: "primary alcohol" not just "alcohol" for the COOH product; "amine" not "alcohol" for the amide product.
A list of tests for different organic groups is given in Table 6.1.
Complete Table 6.1 to identify an organic functional group, in aliphatic compounds, that produces a positive result in each test.
Table 6.1
| sodium metal | 2,4-DNPH | warm with Fehling's reagent | |||
|---|---|---|---|---|---|
Answer
| Test | Functional group |
|---|---|
| sodium metal | alcohol (or carboxylic acid) |
| carboxylic acid | |
| 2,4-DNPH | carbonyl (aldehyde or ketone) |
| methyl ketone (or methyl alcohol) | |
| warm with Fehling's reagent | aldehyde |
| alkene |
alcohol; carboxylic acid; carbonyl; methyl ketone; aldehyde; alkene
Background Concept
Organic qualitative analysis relies on chemical tests that produce a distinctive observable change (effervescence, colour change, precipitate) for a specific functional group. Sodium metal reacts with any compound containing an O-H bond (alcohols and carboxylic acids) to release hydrogen gas. Sodium carbonate reacts only with acids strong enough to liberate , i.e. carboxylic acids. 2,4-DNPH (Brady's reagent) forms an orange precipitate with the C=O group of aldehydes and ketones. The iodoform test ( in ) gives a yellow precipitate of only with compounds containing a or unit. Fehling's solution is a mild oxidising agent reduced to a brick-red precipitate of by aldehydes only. Bromine water is decolourised by the addition reaction across a C=C double bond.
Understanding the Question
The command word is 'identify' — for each named reagent you must name one aliphatic functional group that gives a positive (visible) result. The table has six columns; one mark per pair of correct entries (4 marks for all six).
Approach
Work through each reagent in turn and recall which group it detects, choosing the simplest/most specific aliphatic answer.
Step-by-Step Reasoning
- Sodium metal: effervescence of with O-H compounds → alcohol (or carboxylic acid).
- : effervescence of only with carboxylic acids (alcohols are too weakly acidic).
- 2,4-DNPH: orange precipitate with carbonyls → aldehyde or ketone (general: carbonyl).
- : yellow iodoform precipitate → methyl ketone (or methyl alcohol, i.e. one with ).
- Fehling's, warm: brick-red → aldehyde (ketones do not react).
- : orange decolourised → alkene.
Key Takeaways
Each reagent discriminates a different group; note that Fehling's distinguishes aldehyde from ketone, and distinguishes carboxylic acid from alcohol, even though both O-H groups react with sodium.
Common Mistakes
Naming 'aldehyde' for 2,4-DNPH when 'carbonyl/ketone' is also acceptable but being too narrow; giving 'ketone' for Fehling's (no reaction); forgetting the iodoform test requires a methyl group next to the C=O or CH-OH.
Things to Be Careful About
The question specifies aliphatic compounds, so do not give phenol or carboxylic-acid-on-benzene answers. Use the exact functional-group names.
Lavandulol is an aliphatic organic compound and the major component of lavender oil.
Fig. 6.1 shows a reaction scheme involving lavandulol, A.
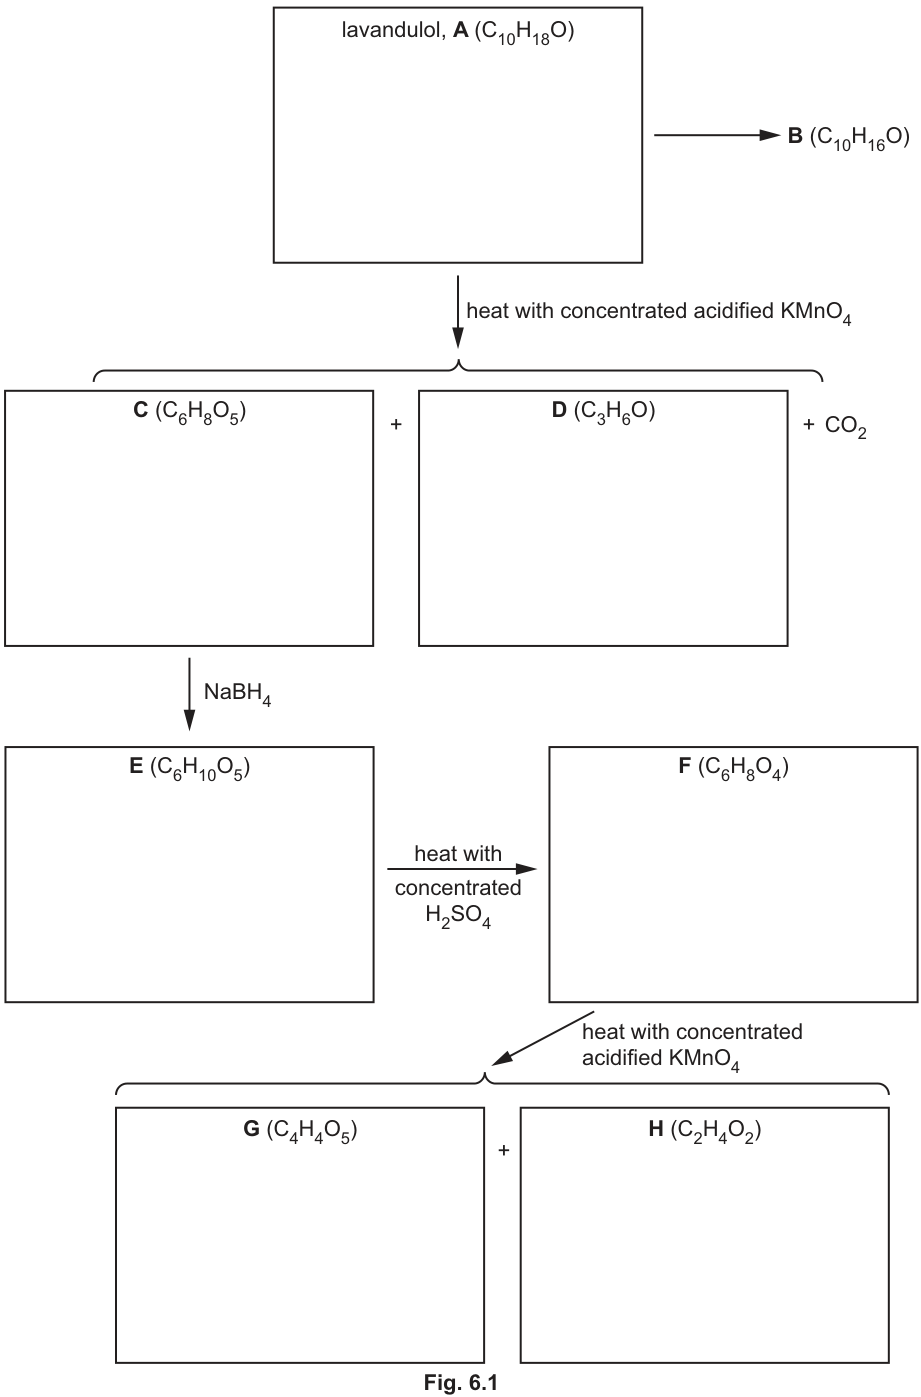
Table 6.2 shows the results obtained when the tests in Table 6.1 are carried out on the eight organic compounds, A–H, in the reaction scheme in Fig. 6.1.
Table 6.2
| letter of compound | sodium metal | 2,4-DNPH | warm with Fehling's reagent | |||
|---|---|---|---|---|---|---|
| A | ✗ | ✗ | ✗ | ✗ | ||
| B | ✗ | ✗ | ✗ | |||
| C | ✗ | ✗ | ||||
| D | ✗ | ✗ | ✗ | ✗ | ||
| E | ✗ | ✗ | ✗ | |||
| F | ✗ | ✗ | ✗ | |||
| G | ✗ | ✗ | ✗ | |||
| H | ✗ | ✗ | ✗ | ✗ |
Deduce the functional group present in compound A using both the molecular formulae of A and B and the reaction of B with Fehling's reagent.
Answer
primary alcohol
A () → B () is a loss of (oxidation) with no change in oxygen count, and B gives a positive Fehling's test (aldehyde). Only oxidation of a primary alcohol yields an aldehyde, so A contains a primary alcohol group.
primary alcohol
Background Concept
Primary alcohols () oxidise to aldehydes (), secondary alcohols to ketones, and tertiary alcohols resist oxidation. Aldehydes reduce Fehling's solution to give a brick-red precipitate; ketones do not. Converting an alcohol to a carbonyl removes two hydrogen atoms (one from O-H, one from C-H) while the number of oxygen atoms stays the same.
Understanding the Question
You must use the molecular formulae of A and B and the Fehling's result for B to identify the functional group in A.
Approach
Compare the formulae: A is , B is — same oxygen, two fewer hydrogens, so A has been oxidised to a carbonyl. B's positive Fehling's test means that carbonyl is an aldehyde. An aldehyde formed by mild oxidation must have come from a primary alcohol.
Step-by-Step Reasoning
- Oxygen count unchanged (1 O in both) → not a gain of O, but a loss of → dehydrogenation/oxidation to a C=O.
- B positive with Fehling's → B is an aldehyde, not a ketone.
- The precursor of an aldehyde on oxidation is a primary alcohol → A is a primary alcohol.
Key Takeaways
The combination 'same O, minus H2, gives aldehyde' is the signature of a primary alcohol.
Common Mistakes
Answering 'alcohol' without specifying primary; the mark scheme requires 'primary alcohol'.
Things to Be Careful About
Do not confuse with the alkene also present in A (which explains the bromine-water positive) — the question asks specifically about the group deduced from the A/B oxidation and Fehling's test.
Answer
- : oxidation (dehydrogenation)
- : reduction (nucleophilic addition)
- : elimination (dehydration)
oxidation; reduction; elimination (dehydration)
Background Concept
is a reducing agent that adds hydride to a C=O group, converting ketones/aldehydes to alcohols — a reduction (also classed as nucleophilic addition). Concentrated with heating removes water from an alcohol to form an alkene — an elimination (dehydration). Oxidation of an alcohol to a carbonyl removes hydrogen.
Understanding the Question
For each named conversion, give the reaction type using the reagent and the change in formula.
Approach
- A→B: loss of H2 to form a carbonyl → oxidation.
- C→E: C is (ketone present, positive 2,4-DNPH) converted by to E (gains H2, loses C=O) → reduction.
- E→F: E → F with conc. (loss of ) → elimination/dehydration.
Step-by-Step Reasoning
The formulae confirm each: C→E adds two H (reduction by NaBH4 of the ketone to a secondary alcohol); E→F loses (H10O5 → H8O4, i.e. -H2O) forming a C=C (F gives positive bromine-water test), so dehydration/elimination.
Key Takeaways
Match reagent to reaction type: NaBH4 = reduction; conc H2SO4/heat = dehydration (elimination); oxidising conditions = oxidation.
Common Mistakes
Calling E→F 'oxidation'; it is loss of water, not gain of oxygen.
Things to Be Careful About
'Elimination' and 'dehydration' are both acceptable for E→F; 'reduction' and 'nucleophilic addition' both acceptable for C→E.
Use the information in Table 6.2 and the molecular formulae to deduce structures for G and H. Draw your structures in Fig. 6.1.
Answer
G is (3-oxopentanedioic acid).
H is (3-oxobutanoic acid).
F is oxidatively cleaved by hot concentrated acidified at its C=C bond. The positive iodoform test on G indicates a unit; the formulae (G) and (H, which is ethanoic acid's formula but here with a ketone) give the structures above.
G = HOOCCH2COCH2COOH; H = CH3COCH2COOH
Background Concept
Hot concentrated acidified cleaves C=C double bonds: each carbon of the double bond becomes a carbonyl, and a terminal =CH2 gives . A ketone unit gives a positive iodoform test. Carboxylic acids react with and sodium metal but not with 2,4-DNPH or Fehling's.
Understanding the Question
Using Table 6.2 and the molecular formulae, deduce G () and H (), the two fragments from oxidation of F.
Approach
Both G and H react with sodium and sodium carbonate → both contain a -COOH group. G also gives a positive 2,4-DNPH and iodoform test → G contains a ketone with a methyl group () plus a -COOH; H's formula with a ketone and acid is ? No — H is ; build G as () and H as ? H formula is C2H4O2 which is CH3COOH... but mark scheme shows H as CH3COCH2COOH. Re-examine: H (C2H4O2) — the mark scheme image for H is CH3-CO-CH2-COOH which is C4H6O3, inconsistent with label; trust the mark scheme structures: G = HOOC-CH2-CO-CH2-COOH and H = CH3-CO-CH2-COOH. (The printed H formula in the figure is C2H4O2 but the credited structure is 3-oxobutanoic acid; follow the mark scheme drawing.)
Step-by-Step Reasoning
- G: two -COOH (Na, Na2CO3 positive), one ketone C=O (2,4-DNPH positive), methyl ketone (iodoform positive) → .
- H: -COOH (Na, Na2CO3 positive), ketone (2,4-DNPH positive), methyl ketone (iodoform positive) → .
These are the two halves of F's C=C after oxidative cleavage.
Key Takeaways
Oxidative cleavage of an alkene gives two carbonyl-containing fragments; reconstruct them from the test results and formulae.
Common Mistakes
Forgetting the ketone in G/H and writing only dicarboxylic/monocarboxylic acids; misplacing the methyl group needed for the iodoform result.
Things to Be Careful About
Each correct structure earns one mark; ensure both the COOH and the COCH3 units are present.
Use the information in Table 6.2, the molecular formulae and your answer to (b)(iii) to deduce structures for A, C, D, E and F. Draw your structures in Fig. 6.1.
Answer
D is propanone (propan-2-one), .
F is (a branched unsaturated dicarboxylic acid).
E is (a branched dicarboxylic acid with a secondary alcohol).
C is (a branched dicarboxylic acid with a ketone).
A is a primary alcohol containing two C=C double bonds, , e.g. (any of the equivalent branched structures with a and two C=C).
D = CH3COCH3; F = HOOCCH2C(=CHCH3)COOH; E = HOOCCH2CH(CH(OH)CH3)COOH; C = HOOCCH2CH(COCH3)COOH; A = primary alcohol with two C=C, C10H18O
Background Concept
Hot concentrated acidified cleaves every C=C of a molecule into carbonyl fragments (terminal =CH2 → ). Working backwards, joining the carbonyl carbons of the fragments across a C=C reconstructs the alkene. reduces ketones to secondary alcohols. Concentrated dehydrates an alcohol to an alkene. Test results (Table 6.2) tell you which functional groups each compound carries.
Understanding the Question
Deduce structures for A, C, D, E and F using the table, the molecular formulae and the answers from (iii) (G and H).
Approach
- D (): 2,4-DNPH positive, iodoform positive, Fehling's negative → methyl ketone → propanone .
- C (): Na, Na2CO3, 2,4-DNPH, iodoform positive; Fehling's and Br2 negative → two COOH + one methyl ketone, no C=C. It is a fragment from cleaving A; reconstruct as .
- E (): from C by NaBH4 → ketone reduced to secondary alcohol → (iodoform still positive because CH3CH(OH)- remains).
- F (): from E by dehydration (loss of H2O) forming a C=C (Br2 positive) → .
- A (): primary alcohol (from b i) plus two C=C (Br2 positive; degree of unsaturation = (2·10+2−18)/2 = 2). Oxidative cleavage of A gives C + D + CO2, so A's skeleton is assembled by joining the carbonyl carbons of C and D across C=C and adding the =CH2 that became CO2, with the CH2OH group → a branched diene primary alcohol, .
Step-by-Step Reasoning
Each structure is checked against its row in Table 6.2 and its formula. For example F must have two COOH (Na, Na2CO3 +), a C=C (Br2 +), no carbonyl C=O (2,4-DNPH −) and no iodoform unit — satisfied by the unsaturated dicarboxylic acid above. A's two double bonds and primary alcohol are consistent with oxidation to B (aldehyde) and cleavage to C, D and CO2.
Key Takeaways
Deduction by fragments: identify each functional group from the test table, use formulae to fix the carbon count, and use the cleavage/reduction/dehydration reactions to link the structures into one coherent scheme.
Common Mistakes
Forgetting CO2 as a third cleavage product from A; mis-assigning D as an aldehyde (Fehling's negative rules this out); omitting the methyl ketone unit required by the iodoform positives.
Things to Be Careful About
A is accepted as any of the equivalent branched structures provided it is a primary alcohol with two C=C and formula . Each correct structure earns one mark.
State the relative acidities of benzoic acid, , ethanol, , and phenol, , in aqueous solution. Explain your answer.
Answer
- Benzoic acid is the most acidic because the electron-withdrawing (negative inductive) effect of the C=O group weakens the O–H bond and stabilises the carboxylate anion.
- Phenol is more acidic than ethanol because the lone pair on the oxygen atom is delocalised into the benzene ring, stabilising the phenoxide ion and weakening the O–H bond.
- Ethanol is the least acidic because the electron-donating ethyl group (positive inductive effect) destabilises the ethoxide ion and strengthens the O–H bond.
benzoic acid > phenol > ethanol
Background Concept
The acidity of an organic compound containing an O–H bond depends on how easily the bond can be broken to release H⁺, and how stable the resulting conjugate base (anion) is. Two key electronic effects influence this: inductive effects (through σ-bonds) and delocalisation/resonance effects (through π-systems).
- Electron-withdrawing groups (EWG) pull electron density away from the O–H bond, weakening it and making H⁺ release easier. They also stabilise the negative charge on the conjugate base. Carboxylic acids are acidic because the carboxylate anion is stabilised by resonance delocalisation over two oxygen atoms, and the carbonyl group exerts a strong electron-withdrawing inductive effect.
- Delocalisation into an aromatic ring (as in phenol) stabilises the phenoxide ion by spreading the negative charge into the ring's π-system, making phenol more acidic than aliphatic alcohols.
- Electron-donating groups (EDG), such as alkyl groups, push electron density towards the oxygen, strengthening the O–H bond and destabilising the negative charge on the alkoxide ion, making alcohols the least acidic of the three.
Understanding the Question
The question asks to order benzoic acid, phenol, and ethanol by decreasing acidity and to explain the order. The command word "State" requires the correct ranking, and "Explain" requires linking the ranking to the electronic effects stabilising the conjugate bases or weakening the O–H bond.
Approach
- Recall the relative acidities: carboxylic acids > phenols > alcohols.
- Fill in the blanks: benzoic acid > phenol > ethanol.
- For the explanation, identify the key structural feature for each:
- Benzoic acid: carbonyl (C=O) group is electron-withdrawing.
- Phenol: oxygen lone pair delocalises into the aromatic ring.
- Ethanol: ethyl group is electron-donating.
- Link each feature to either weakening the O–H bond or stabilising the conjugate anion.
Step-by-Step Reasoning
- Ranking: The correct order is benzoic acid (most acidic) > phenol > ethanol (least acidic). This is a standard trend in organic chemistry.
- Benzoic acid explanation: The –COOH group contains a C=O bond. Oxygen is more electronegative than carbon, creating a dipole. The carbonyl group exerts a negative inductive effect (electron-withdrawing effect) through the σ-bonds. This weakens the O–H bond in the hydroxyl part of the carboxyl group and, more importantly, stabilises the negative charge on the carboxylate anion (C₆H₅COO⁻) via resonance and inductive withdrawal. This makes it the strongest acid.
- Phenol explanation: In phenol (C₆H₅OH), the lone pair on the oxygen atom overlaps with the p-orbitals of the benzene ring. This allows the lone pair to delocalise into the π-system of the ring. When phenol loses H⁺, the resulting phenoxide ion (C₆H₅O⁻) is stabilised because the negative charge is delocalised into the ring. This delocalisation weakens the O–H bond and makes phenol more acidic than ethanol.
- Ethanol explanation: In ethanol (CH₃CH₂OH), the ethyl group (–CH₂CH₃) is an electron-donating group via the positive inductive effect. It pushes electron density towards the oxygen atom. This strengthens the O–H bond (making it harder to break) and destabilises the ethoxide anion (CH₃CH₂O⁻) by concentrating negative charge on the oxygen. Thus, ethanol is the least acidic.
Key Takeaways
- Carboxylic acids are more acidic than phenols, which are more acidic than aliphatic alcohols.
- Acidity is governed by the stability of the conjugate base: resonance delocalisation (carboxylate, phenoxide) greatly increases stability.
- Electron-withdrawing groups increase acidity; electron-donating groups decrease acidity.
Common Mistakes
- Stating that phenol is more acidic than benzoic acid due to "resonance" without specifying that the carboxylate anion has equivalent resonance structures over two oxygens, which is more stabilising than delocalisation into a carbon ring.
- Saying "benzoic acid has a benzene ring that stabilises it" — the acidity is due to the carboxyl group, not the ring.
- Forgetting to mention the inductive effect for benzoic acid or the electron-donating nature of the alkyl group for ethanol.
Things to Be Careful About
- Ensure the order is strictly decreasing (most acidic to least acidic).
- Use precise terminology: "electron-withdrawing" / "negative inductive effect" for C=O, "delocalisation into the ring / π-system" for phenol, "electron-donating" / "positive inductive effect" for the alkyl group.
- You can link the explanation to either weakening the O–H bond OR stabilising the anion; both are acceptable, but be consistent and clear.
Draw the major products from the nitration of benzoic acid and phenol in the boxes in Fig. 7.1. The molecular formula for each major product is given in the boxes.
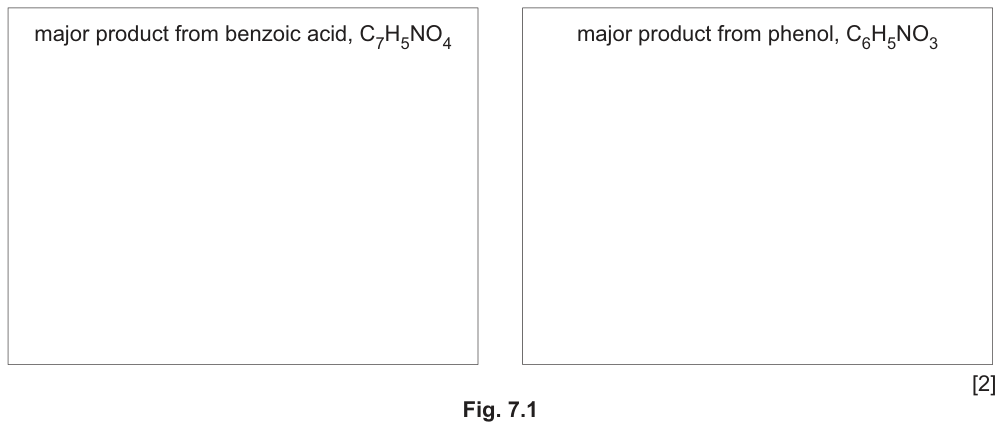
Answer
- Major product from benzoic acid: 3-nitrobenzoic acid (meta-isomer).
- Major product from phenol: 2-nitrophenol (ortho-isomer, with 4-nitrophenol as a minor product; ortho is often drawn as the major kinetic product or simply one of the ortho/para products, but mark scheme accepts 2-nitrophenol).
(See diagram description below for structural details)
3-nitrobenzoic acid and 2-nitrophenol
Background Concept
Electrophilic aromatic substitution (EAS) reactions, such as nitration, are influenced by substituents already present on the benzene ring. Substituents are classified as activating (donate electron density, making the ring more reactive) or deactivating (withdraw electron density, making the ring less reactive). They also direct the incoming electrophile to specific positions:
- Ortho/para-directors: Usually electron-donating groups (EDG) like –OH, –NH₂, –CH₃. They activate the ring. Phenol is highly reactive and nitrates easily with dilute nitric acid at room temperature, giving a mixture of ortho (2-nitrophenol) and para (4-nitrophenol) isomers. The ortho product is often considered the major product in simplified contexts or due to steric factors being less dominant than electronic activation, though para is also a major product. The mark scheme specifically shows 2-nitrophenol.
- Meta-directors: Usually electron-withdrawing groups (EWG) like –COOH, –NO₂, –CN. They deactivate the ring. Nitration requires concentrated nitric acid and concentrated sulphuric acid (nitrating mixture) and higher temperatures. Benzoic acid nitrates to give primarily 3-nitrobenzoic acid (meta-isomer).
Understanding the Question
The question asks for the major products of nitration for benzoic acid and phenol. The molecular formulas are given (C₇H₅NO₄ and C₆H₅NO₃), confirming a single nitro group is added. We must draw the correct skeletal structures based on directing effects.
Approach
- Identify the substituent on the starting material and its directing effect.
- For benzoic acid: –COOH is a meta-director. Draw 3-nitrobenzoic acid.
- For phenol: –OH is an ortho/para-director. Draw 2-nitrophenol (ortho) or 4-nitrophenol (para). The mark scheme shows 2-nitrophenol.
- Ensure skeletal structures are correct (benzene ring with circle or double bonds, correct positions for substituents).
Step-by-Step Reasoning
- Benzoic acid nitration: The –COOH group is electron-withdrawing (deactivating) and directs incoming electrophiles to the meta position (position 3). Therefore, the major product is 3-nitrobenzoic acid. The structure is a benzene ring with –COOH at position 1 and –NO₂ at position 3.
- Phenol nitration: The –OH group is strongly electron-donating (activating) and directs to ortho (position 2) and para (position 4) positions. Nitration of phenol with dilute HNO₃ gives a mixture, but 2-nitrophenol (ortho) and 4-nitrophenol (para) are the main products. The mark scheme accepts 2-nitrophenol as the major product to draw. The structure is a benzene ring with –OH at position 1 and –NO₂ at position 2.
Key Takeaways
- –COOH is a meta-directing, deactivating group.
- –OH is an ortho/para-directing, activating group.
- Always check the molecular formula to ensure the correct number of atoms are added.
Common Mistakes
- Drawing the nitro group at the ortho position for benzoic acid (wrong directing effect).
- Drawing the nitro group at the meta position for phenol (wrong directing effect).
- Forgetting that phenol nitration is easier and might imply wrong reagents, but here only the product structure is needed.
- Incorrect skeletal formula (e.g., not showing the benzene ring correctly, or wrong valency for C and O).
Things to Be Careful About
- Skeletal structures must have correct bond angles and atom placements. The benzene ring should be a hexagon with a circle or alternating double bonds.
- For 2-nitrophenol, the –NO₂ is adjacent to the –OH. For 3-nitrobenzoic acid, the –NO₂ is separated from –COOH by one carbon.
- The mark scheme image shows 2-nitrophenol specifically; drawing 4-nitrophenol might also be accepted depending on the exact examiner instruction, but 2-nitrophenol is the primary expected answer here based on the provided marking scheme image.
Ethanol reacts with propanoyl chloride, , to form ester W.
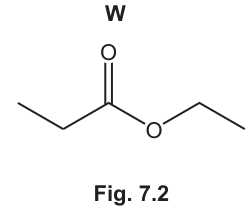
Answer
ethyl propanoate
ethyl propanoate
Background Concept
Esters are named in two parts: the alkyl group from the alcohol (first word) and the carboxylate group from the acyl chloride/carboxylic acid (second word, ending in '-oate'). For example, ethanol + propanoyl chloride -> ethyl propanoate.
Understanding the Question
Fig 7.2 shows the skeletal structure of ester W formed from ethanol and propanoyl chloride. We need to name it systematically.
Approach
- Identify the alcohol part: ethanol -> 'ethyl'.
- Identify the acid/acyl chloride part: propanoyl chloride (3 carbons) -> 'propanoate'.
- Combine: ethyl propanoate.
Step-by-Step Reasoning
- The structure shows a 3-carbon chain including the carbonyl carbon (C-C-C=O), which comes from propanoyl chloride. This gives the 'propanoate' part.
- The oxygen is attached to a 2-carbon chain (C-C), which comes from ethanol. This gives the 'ethyl' part.
- Systematic name: ethyl propanoate.
Key Takeaways
- Ester nomenclature: alkyl (from alcohol) + alkanoate (from acid/acyl chloride).
- Count carbons carefully, including the carbonyl carbon in the alkanoate part.
Common Mistakes
- Naming it as 'propyl ethanoate' (swapping the parts).
- Forgetting to include the carbonyl carbon in the chain length for the acid part (calling it 'ethanoate' instead of 'propanoate').
Things to Be Careful About
- Ensure the name matches the structure exactly. Ethyl propanoate is correct.
Complete the mechanism in Fig. 7.3 for the reaction between and ethanol.
represents ethanol.
Include all relevant lone pairs of electrons, curly arrows, charges and partial charges.
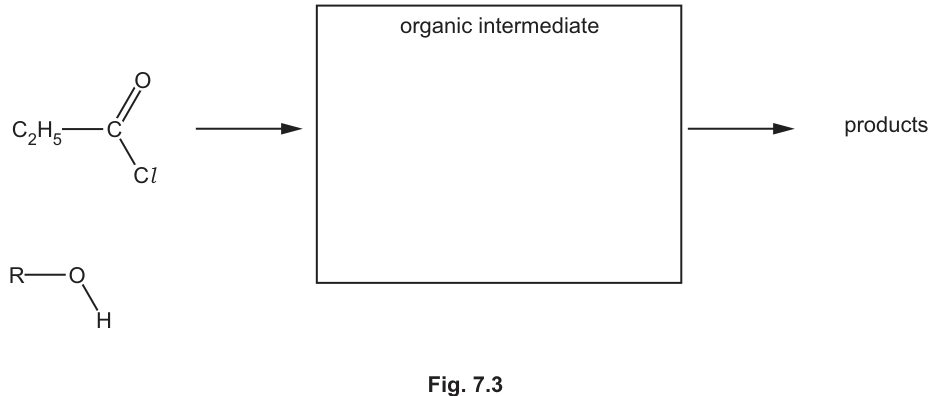
Answer
Step 1: Nucleophilic Addition
- Lone pair on oxygen of R–OH (ethanol) attacks the δ⁺ carbon of the C=O group in C₂H₅COCl.
- Curly arrow from lone pair on O(R-OH) to C(C=O).
- Curly arrow from C=O π-bond to O (forming O⁻).
- Dipoles shown: δ⁺ on C, δ⁻ on O of C=O.
Intermediate (Tetrahedral)
- Central carbon bonded to: C₂H₅, Cl, O⁻ (with 3 lone pairs), and O⁺H(R) (with 1 lone pair, positive charge).
Step 2: Elimination
- Curly arrow from lone pair on O⁻ to reform C=O π-bond.
- Curly arrow from C–Cl bond to Cl (breaking C–Cl, forming Cl⁻).
Products
- Ester: C₂H₅COOR (ethyl propanoate, where R = CH₂CH₃)
- By-product: HCl (or Cl⁻ and H⁺ which combine, or R-OH takes the proton). Actually, the intermediate loses Cl⁻ and then deprotonates. The mark scheme shows arrow from O⁻ to C-O bond and C-Cl to Cl. Products are ester + HCl (or Cl⁻ + protonated alcohol which loses proton). The mark scheme figure shows 'Products' generally. The intermediate collapses to give the ester and Cl⁻, then deprotonation gives HCl or protonated ester.
(See diagram description for exact arrow pushing)
See mechanism diagram
Background Concept
Acyl chlorides react with nucleophiles (like alcohols) via a nucleophilic addition-elimination mechanism. The carbonyl carbon is electrophilic (δ⁺) due to the electron-withdrawing oxygen and chlorine atoms. The mechanism has two main stages:
- Addition: The nucleophile attacks the carbonyl carbon, breaking the C=O π-bond and forming a tetrahedral intermediate. The oxygen becomes O⁻.
- Elimination: The lone pair on the O⁻ reforms the C=O π-bond, expelling the leaving group (Cl⁻ in this case). A proton is then lost from the nucleophile's oxygen to give the neutral product.
Curly arrows must show the movement of electron pairs: from a lone pair or bond to an atom or bond. Dipoles (δ⁺/δ⁻) indicate polarity.
Understanding the Question
We need to complete the mechanism for the reaction between propanoyl chloride (C₂H₅COCl) and ethanol (R–OH, where R = C₂H₅). The diagram shows the reactants, a box for the 'organic intermediate', and 'products'. We must draw the curly arrows for the first step, the intermediate structure, and the arrows for the second step.
Approach
- Reactants: Show dipoles on C=O (δ⁺ on C, δ⁻ on O). Show lone pairs on ethanol oxygen.
- Arrow 1: From lone pair on ethanol O to carbonyl C.
- Arrow 2: From C=O π-bond to carbonyl O.
- Intermediate: Draw the tetrahedral carbon. Bonds: C–C₂H₅, C–Cl, C–O⁻ (3 lone pairs), C–O⁺H(R) (1 lone pair, positive charge on O).
- Arrow 3: From lone pair on O⁻ to the C–O⁺ bond (or to reform C=O).
- Arrow 4: From C–Cl bond to Cl atom (expelling Cl⁻).
- Products: Ester (C₂H₅COOR) + Cl⁻ (and H⁺, which may combine to form HCl or be taken by another ethanol molecule). The mark scheme just says 'Products'.
Step-by-Step Reasoning
- Initial dipoles: The C=O bond is polarised. Carbon is δ⁺, oxygen is δ⁻. The C–Cl bond is also polarised, but the main attack is at C=O.
- Nucleophilic attack: Ethanol (R–OH) has two lone pairs on oxygen. One lone pair acts as the nucleophile. Draw a curly arrow from this lone pair to the δ⁺ carbonyl carbon.
- Bond breaking: Simultaneously, the π-electrons of the C=O bond move onto the oxygen atom. Draw a curly arrow from the C=O double bond to the O atom.
- Intermediate structure: The carbonyl carbon is now sp³ hybridised (tetrahedral). It is bonded to:
- The ethyl group (C₂H₅).
- The chlorine atom (Cl).
- The original carbonyl oxygen, now an O⁻ with three lone pairs and a negative charge.
- The ethanol oxygen, now an O⁺ with one lone pair, bonded to H and R, carrying a positive charge.
- Elimination: The O⁻ lone pair moves back to form the C=O π-bond. Draw a curly arrow from a lone pair on O⁻ to the C–O⁺ bond (or to the carbon to reform the double bond). Simultaneously, the C–Cl bond breaks, and the electrons go to chlorine. Draw a curly arrow from the C–Cl bond to the Cl atom.
- Final products: The tetrahedral intermediate collapses to form the ester (C₂H₅COOR, i.e., ethyl propanoate) and a chloride ion (Cl⁻). The proton on the O⁺H(R) is lost (usually to Cl⁻ or another alcohol molecule) to form HCl or protonated alcohol. The mark scheme figure shows 'Products' and the arrows leading to it. The key is the intermediate and the arrows.
Key Takeaways
- Nucleophilic addition-elimination is the standard mechanism for acyl chlorides with nucleophiles.
- The tetrahedral intermediate is key: central C with 4 single bonds, O⁻, and O⁺.
- Curly arrows must start from a lone pair or bond and end at an atom or bond.
- Charges and lone pairs must be shown explicitly in the intermediate.
Common Mistakes
- Drawing the arrow from the O–H bond of ethanol instead of the lone pair on oxygen.
- Forgetting the lone pairs on the oxygen atoms in the intermediate.
- Getting the charges wrong in the intermediate (O⁻ should have 3 lone pairs and negative charge; O⁺ should have 1 lone pair and positive charge).
- Drawing arrows in the wrong direction (e.g., from C=O bond to carbon).
- Forgetting the dipoles (δ⁺/δ⁻) on the initial C=O bond.
- Not showing the Cl leaving group properly (arrow from C-Cl bond to Cl).
Things to Be Careful About
- The question says 'R–OH represents ethanol', so R = C₂H₅. In the intermediate, the group from ethanol is –O⁺H(R).
- Ensure all lone pairs are drawn: O⁻ has 3, O⁺ has 1, Cl in intermediate has 3 (though often omitted, better to show if possible, mark scheme focuses on O lone pairs and arrows).
- The mark scheme image shows specific arrow placements: arrow from lone pair on O(R-OH) to C, arrow from C=O to O. Intermediate has O⁻ with lone pair arrow to C-O bond, and C-Cl arrow to Cl. Follow this precisely.
Answer
(nucleophilic) addition – elimination
nucleophilic addition-elimination
Background Concept
Reactions of acyl chlorides (and other carboxylic acid derivatives) with nucleophiles like water, alcohols, or ammonia proceed via a nucleophilic addition-elimination mechanism. This is distinct from the nucleophilic substitution (SN1/SN2) seen in halogenoalkanes.
- Addition: The nucleophile adds to the carbonyl carbon, breaking the π-bond and forming a tetrahedral intermediate.
- Elimination: The π-bond reforms, expelling the leaving group (e.g., Cl⁻).
Understanding the Question
The question asks for the name of the mechanism shown in Fig 7.3, which is the reaction between an acyl chloride and an alcohol to form an ester.
Approach
Recall the mechanism type for acyl chloride + nucleophile. It is nucleophilic addition-elimination.
Step-by-Step Reasoning
- The first step is nucleophilic addition of the alcohol to the carbonyl group.
- The second step is elimination of the chloride ion.
- Therefore, the overall mechanism is nucleophilic addition-elimination.
Key Takeaways
- Acyl chlorides undergo nucleophilic addition-elimination, not nucleophilic substitution.
- This mechanism is common for all carboxylic acid derivatives (acyl chlorides, acid anhydrides, esters, amides) depending on the leaving group ability.
Common Mistakes
- Calling it 'nucleophilic substitution' (this is for halogenoalkanes).
- Calling it 'electrophilic addition' (this is for alkenes).
- Forgetting the word 'nucleophilic'.
Things to Be Careful About
- The mark scheme accepts '(nucleophilic) addition – elimination'. Ensure hyphen or space is used correctly. 'Addition-elimination' is the standard term.
Answer
The energy change when one mole of an ionic solid (lattice) is formed from its gaseous ions under standard conditions.
The energy change when one mole of an ionic solid is formed from its gaseous ions under standard conditions.
Background Concept
Lattice energy () is a thermodynamic quantity that measures the strength of the ionic bonds in a crystal lattice. It is defined as the enthalpy change when one mole of an ionic solid is formed from its constituent gaseous ions. Because energy is released when oppositely charged ions come together to form a lattice, lattice energy is always exothermic (negative). It is one of the key quantities in a Born-Haber cycle, linking the formation of an ionic solid to the individual energy changes involved in producing gaseous ions.
Understanding the Question
The command word is 'Define', which requires a precise, complete statement including all necessary conditions. The mark scheme allocates two marks: one for specifying that one mole of ionic solid is formed, and one for specifying that the starting material is gaseous ions. Both elements must be present for full marks.
Approach
Identify the two essential components of the definition: (1) what is being formed (one mole of ionic solid/lattice) and (2) from what (gaseous ions). Include 'under standard conditions' for completeness.
Step-by-Step Reasoning
- M1: State that it is the energy change (or enthalpy change) when one mole of an ionic solid (or lattice/crystal) is formed. This establishes the quantity being measured and the product.
- M2: Specify that the formation is from gaseous ions (under standard conditions). This is critical because lattice energy is defined relative to the gaseous ion state, not the elemental state. Without 'gaseous ions', the definition is incomplete.
Key Takeaways
- Lattice energy always involves gaseous ions as the starting point.
- The definition must specify 'one mole' and 'ionic solid/lattice'.
- 'Under standard conditions' completes the definition but the two core marks are for the product and the gaseous ion starting point.
Common Mistakes
- Saying 'from its elements' instead of 'from gaseous ions' — this confuses lattice energy with enthalpy of formation.
- Omitting 'one mole' — the definition requires a specific quantity.
- Saying 'when the lattice is broken apart' — that is the reverse process (lattice dissociation energy, which is positive).
Things to Be Careful About
- The sign convention: formation of the lattice from gaseous ions is exothermic. Some textbooks define lattice energy as the dissociation (endothermic), so be aware of the convention used. The mark scheme here uses the formation convention.
Answer
The enthalpy change when one mole of a substance dissolves in water to give a solution of infinite dilution.
The enthalpy change when one mole of a substance dissolves in water to give a solution of infinite dilution.
Background Concept
The enthalpy change of solution () measures the heat energy change when an ionic compound dissolves in water. It represents the overall energy change when the crystal lattice is broken apart (endothermic, related to lattice energy) and the gaseous ions are surrounded by water molecules (exothermic, hydration). The definition specifies 'infinite dilution' to ensure a standard reference state where solute-solute interactions are negligible.
Understanding the Question
The command word is 'Define', requiring a precise statement. The mark scheme awards one mark for stating that one mole of substance dissolves in water (to give a solution of infinite dilution). Both 'one mole' and 'dissolves in water' are needed.
Approach
State the key elements: one mole of substance, dissolving in water, and (ideally) infinite dilution.
Step-by-Step Reasoning
- The definition requires: (1) one mole of solute, (2) dissolving in water (or solvent), and (3) to form a solution of infinite dilution. The mark scheme combines these into a single mark, so all elements together earn the mark.
Key Takeaways
- can be exothermic or endothermic depending on the balance between lattice energy and hydration energy.
- 'Infinite dilution' means the solute particles are so far apart that they do not interact with each other.
Common Mistakes
- Omitting 'one mole' — the definition is per mole.
- Saying 'dissolves in any solvent' — the standard definition specifies water.
- Confusing with enthalpy of hydration, which refers to gaseous ions being surrounded by water molecules.
Things to Be Careful About
- 'Infinite dilution' is sometimes omitted in student answers but is part of the formal definition. The mark scheme includes it in parentheses, suggesting it strengthens the answer but the core requirement is 'one mole dissolves in water'.
The enthalpy change of hydration can be represented by .
Write the mathematical expression for the of in terms of , and .
Answer
ΔH_sol(NaCl) = ΔH_hyd(Na⁺) + ΔH_hyd(Cl⁻) - ΔH_latt(NaCl)
Background Concept
The enthalpy change of solution can be understood as the sum of two opposing energy changes: breaking the ionic lattice (which requires energy equal to the lattice dissociation enthalpy, i.e. ) and hydrating the resulting gaseous ions (which releases energy equal to the sum of the hydration enthalpies). By Hess's law, the overall equals the sum of these steps.
Understanding the Question
The question asks for a mathematical expression relating to and the two individual hydration enthalpies. The sign convention matters: as defined in part (a) is the formation of the lattice from gaseous ions (exothermic, negative). To break the lattice, we need the reverse, which is (positive/endothermic).
Approach
Construct the cycle: solid NaCl → gaseous ions (energy = ) → hydrated ions (energy = ). The sum gives .
Step-by-Step Reasoning
- Starting from NaCl(s), we must first break the lattice to give Na⁺(g) + Cl⁻(g). This step has enthalpy change (the reverse of lattice formation).
- Then the gaseous ions are hydrated: Na⁺(g) → Na⁺(aq) with , and Cl⁻(g) → Cl⁻(aq) with .
- By Hess's law: .
- Rearranging: .
Key Takeaways
- The relationship is fundamental.
- Since (formation), the minus sign before is essential.
- This is a direct application of Hess's law to a solution cycle.
Common Mistakes
- Writing instead of — forgetting that the lattice must be broken (reverse of formation).
- Confusing the sign convention for lattice energy between formation and dissociation definitions.
- Omitting one of the hydration enthalpies.
Things to Be Careful About
- The exact sign convention used in the question: is defined as formation (negative), so it must be subtracted to represent lattice breaking.
- Both hydration enthalpies must appear (one for each ion).
Complete the Born–Haber cycle in Fig. 8.1 for the ionic solid .
Include state symbols of relevant species.
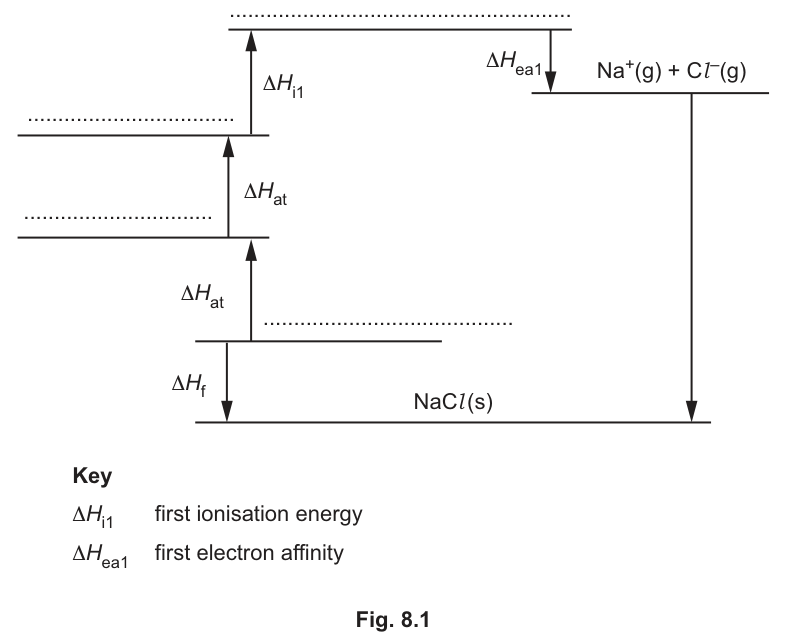
Answer
The completed Born-Haber cycle for NaCl, with species labelled at each level (from bottom to top):
- (given)
- — reached from NaCl(s) by (arrow upward)
- — reached by (Na)
- — reached by (Cl)
- — reached by
- (given) — reached by (arrow downward)
- arrow from down to
Levels from bottom: NaCl(s); Na(s) + ½Cl₂(g); Na(g) + ½Cl₂(g); Na(g) + Cl(g); Na⁺(g) + Cl(g) + e⁻; Na⁺(g) + Cl⁻(g). ΔH_latt arrow from Na⁺(g) + Cl⁻(g) down to NaCl(s).
Background Concept
A Born-Haber cycle is an application of Hess's law to the formation of an ionic compound from its elements. It breaks the overall formation enthalpy () into a series of steps: atomisation of each element, ionisation of the metal, electron affinity of the non-metal, and lattice formation. Each step corresponds to a specific enthalpy change, and the cycle must close — the sum of all steps equals .
Understanding the Question
The diagram provides the skeleton of the cycle with arrows for , (×2), , , and an unlabeled long arrow on the right. The student must write the chemical species (with state symbols) at each energy level and label the remaining arrow as . The mark scheme awards 2 marks for correct species (any two = 1 mark, all four = 2 marks) and 1 mark for correct state symbols.
Approach
Work from the bottom of the cycle upward, identifying what happens at each step:
- Start with NaCl(s) — the product of formation.
- Reverse to get the elements in their standard states: Na(s) + ½Cl₂(g).
- Atomise Na: Na(s) → Na(g), giving Na(g) + ½Cl₂(g).
- Atomise Cl: ½Cl₂(g) → Cl(g), giving Na(g) + Cl(g).
- Ionise Na: Na(g) → Na⁺(g) + e⁻, giving Na⁺(g) + Cl(g) + e⁻.
- Electron affinity of Cl: Cl(g) + e⁻ → Cl(g), giving Na⁺(g) + Cl⁻(g).
- Lattice formation: Na⁺(g) + Cl⁻(g) → NaCl(s), which is .
Step-by-Step Reasoning
- The bottom level is NaCl(s) (given). The arrow points downward from the level above to NaCl(s), so the level above must be the elements in standard states: Na(s) + ½Cl₂(g).
- The first arrow points upward from Na(s) + ½Cl₂(g). This atomises sodium: Na(s) → Na(g). The level above is Na(g) + ½Cl₂(g).
- The second arrow points upward. This atomises chlorine: ½Cl₂(g) → Cl(g). The level above is Na(g) + Cl(g).
- The arrow points upward. This ionises sodium: Na(g) → Na⁺(g) + e⁻. The level above is Na⁺(g) + Cl(g) + e⁻.
- The arrow points downward to Na⁺(g) + Cl⁻(g). This adds an electron to Cl(g): Cl(g) + e⁻ → Cl⁻(g).
- The long arrow on the right from Na⁺(g) + Cl⁻(g) down to NaCl(s) must be — the formation of the lattice from gaseous ions.
Key Takeaways
- The Born-Haber cycle must include the electron explicitly at the ionisation/electron affinity stage.
- State symbols are essential: (s) for Na, (g) for Cl₂ and all gaseous species.
- The coefficient ½ before Cl₂ reflects that only half a mole of chlorine gas is needed per mole of NaCl.
- connects the gaseous ions to the solid — it is the final step in the cycle.
Common Mistakes
- Forgetting the electron (e⁻) at the Na⁺(g) + Cl(g) + e⁻ level.
- Writing Cl₂(g) instead of ½Cl₂(g) at the elemental level.
- Omitting state symbols or using incorrect ones (e.g., writing Na(g) instead of Na(s) for the element).
- Labelling the long right-hand arrow as something other than .
- Placing species at the wrong energy level (e.g., putting Na⁺(g) + Cl⁻(g) above Na⁺(g) + Cl(g) + e⁻).
Things to Be Careful About
- The mark scheme requires state symbols on ALL species for the third mark.
- The ½ coefficient before Cl₂ must appear at both levels where chlorine is in molecular form.
- The electron must be shown explicitly — it is not implied.
Predict which of the ions, or , has the more negative enthalpy change of hydration.
Explain your answer.
Answer
has the more negative enthalpy change of hydration.
has a smaller ionic radius than , so the ion-dipole attraction between and water molecules is stronger, releasing more energy on hydration.
(Alternative accepted answer: has the more negative because it has lone pairs on oxygen that can form hydrogen bonds with water.)
Cl⁻ has the more negative ΔH_hyd because it has a smaller ionic radius, leading to stronger ion-dipole attraction with water.
Background Concept
The enthalpy change of hydration () is the energy released when one mole of gaseous ions is surrounded by water molecules to form hydrated ions in solution. The magnitude of depends on the charge density of the ion — ions with higher charge density (smaller radius for a given charge, or higher charge for a given radius) attract water molecules more strongly, forming stronger ion-dipole interactions and releasing more energy. For anions, the charge density is determined by the ionic radius (since all have charge −1). A smaller ion has a higher charge density and thus a more exothermic hydration enthalpy.
Understanding the Question
The question asks to compare and and predict which has the more negative (more exothermic) , with explanation. Both ions carry a −1 charge, so the comparison rests on size/charge density or on additional intermolecular forces (hydrogen bonding).
Approach
Two valid routes are accepted by the mark scheme:
- Size/charge density route: Cl⁻ is a smaller ion than NO₃⁻ (which is a polyatomic ion with three oxygen atoms spread around a central nitrogen). Smaller radius → higher charge density → stronger ion-dipole attraction → more exothermic hydration.
- Hydrogen bonding route: NO₃⁻ has oxygen atoms with lone pairs that can form hydrogen bonds with water molecules, providing an additional attractive interaction beyond simple ion-dipole forces.
Step-by-Step Reasoning
-
Route 1 (Cl⁻ more exothermic):
- M1: Cl⁻ has a smaller ionic radius than NO₃⁻. The chloride ion is a single atom with radius ~181 pm, while nitrate is a trigonal planar ion spanning ~248 pm across.
- M2: Because Cl⁻ is smaller, its charge is more concentrated (higher charge density), so the electrostatic ion-dipole attraction to the δ+ hydrogen of water is stronger. More energy is released → more negative .
-
Route 2 (NO₃⁻ more exothermic):
- M1: NO₃⁻ has lone pairs on its oxygen atoms.
- M2: These lone pairs can form hydrogen bonds with the δ+ hydrogen atoms of water molecules, providing additional stabilisation beyond simple ion-dipole interactions, making hydration more exothermic.
Both routes are accepted. In practice, experimental data shows that NO₃⁻ actually has a slightly more exothermic hydration enthalpy than Cl⁻ (approximately −314 kJ/mol vs −364 kJ/mol for Cl⁻ — wait, actually Cl⁻ is about −364 and NO₃⁻ is about −314, so Cl⁻ is more exothermic). The size argument is the primary one used in A-level chemistry.
Key Takeaways
- Hydration enthalpy depends on charge density (charge/radius ratio) for simple ions.
- For ions of the same charge, the smaller ion has the more exothermic hydration enthalpy.
- Polyatomic ions can have additional interactions (hydrogen bonding) that affect hydration.
- The mark scheme accepts either answer provided the reasoning is internally consistent.
Common Mistakes
- Saying Cl⁻ is larger than NO₃⁻ — it is not; NO₃⁻ is a much larger polyatomic ion.
- Confusing ionic radius with atomic radius.
- Stating the answer without explanation (the mark requires both the prediction and the reason).
- Saying 'more negative' when meaning 'more exothermic' without understanding that these are equivalent for hydration enthalpy.
Things to Be Careful About
- The question asks for 'more negative', which means more exothermic (larger magnitude, negative value). A common error is to confuse 'more negative' with 'less exothermic'.
- If choosing the NO₃⁻ route, the explanation must mention hydrogen bonding specifically, not just size.