Chemistry 9701/52 — February/March 2025
Cambridge A-Level · Planning, Analysis and Evaluation · worked solutions for every part, with the mark scheme
Topics Planning · Analysis, Conclusions and Evaluation
Brass is an alloy of copper and zinc.
An experiment is completed to find the percentage by mass of copper in a sample of brass.
In the experiment, the sample of brass is reacted with an excess of concentrated nitric acid, . This forms a solution containing ions. The amount of ions formed is determined by titration.
A student uses the following method.
- step 1 Weigh a glass beaker and record the mass.
- step 2 Add approximately of powdered brass to the beaker and record the mass of the beaker and the brass.
- step 3 Transfer the brass into conical flask A which contains excess concentrated .
- step 4 Reweigh the glass beaker and record the mass.
- step 5 Add aqueous sodium carbonate, , dropwise to flask A until a precipitate of copper(II) carbonate, , appears. Then add dilute ethanoic acid dropwise until the precipitate is fully dissolved.
- step 6 Transfer all the contents of flask A to a volumetric flask and make up to the mark with distilled water. This is solution B.
- step 7 Transfer of solution B into conical flask C.
- step 8 Add , an excess, of aqueous potassium iodide, , to flask C.
- step 9 Titrate the contents of flask C against sodium thiosulfate, , using starch solution as an indicator.
- step 10 Repeat steps 7 to 9 until concordant results are obtained.
Both copper and zinc in brass react with concentrated in step 3.
Suggest why step 3 in the experiment should be completed in a fume cupboard.
Answer
is a toxic gas.
NO2 is a toxic gas
Background Concept
Concentrated nitric acid is a powerful oxidising agent. When it reacts with metals such as copper and zinc, it is reduced to nitrogen dioxide, , rather than producing hydrogen gas. is a brown, toxic, pungent gas that is harmful if inhaled. Laboratory safety requires that any reaction producing a toxic gas be carried out in a fume cupboard, which extracts the gas away from the user and prevents it from entering the laboratory atmosphere.
Understanding the Question
Step 3 involves adding the brass (a mixture of copper and zinc) to excess concentrated . The two equations provided (reaction 1 for zinc and reaction 2 for copper) both show as a product. The question asks why this step should be done in a fume cupboard. The answer is that the reaction produces a toxic gas.
Approach
Look at the products of the reactions in step 3. Identify the gaseous product and state its hazard. The equations are given, so the gaseous product is clearly . The fume cupboard is needed because this gas is toxic.
Step-by-Step Reasoning
From reaction 1:
From reaction 2:
Both reactions produce . Nitrogen dioxide is a toxic gas — it is harmful if inhaled and can cause serious respiratory damage. A fume cupboard removes the gas from the laboratory atmosphere, protecting the person carrying out the experiment. This is the single marking point: is a toxic gas.
Key Takeaways
When a reaction produces a toxic, harmful, or irritating gas, it must be carried out in a fume cupboard. Recognising hazardous products from a balanced equation is a core safety skill in chemistry.
Common Mistakes
- Saying "the acid is dangerous" — while true, the specific point is the gas produced by the reaction.
- Saying "it produces a gas" without specifying that the gas is toxic.
Things to Be Careful About
The mark requires the word "toxic" (or an equivalent such as "poisonous" or "harmful"). Simply saying "it produces " without stating the hazard may not score the mark.
Answer
To determine the accurate mass of brass transferred to the conical flask by difference: mass of brass = (mass of beaker + brass) − (mass of beaker after transfer).
To determine the mass of brass transferred by difference
Background Concept
Weighing by difference is a standard analytical technique. Instead of trying to weigh a powder directly (which is difficult because powder can be lost or stick to surfaces), you weigh the container before and after transferring the powder, and subtract. This gives the exact mass of material actually transferred.
Understanding the Question
In steps 1–4, the student weighs the beaker, then the beaker with brass, then the beaker after transferring the brass to the conical flask. Step 4 asks why the beaker is reweighed. The answer is that the difference between the second and third weighings gives the exact mass of brass that was actually transferred.
Approach
Recognise that the mass of brass added is not simply "about 1.00 g" — it must be determined precisely. The reweighing in step 4 allows the mass of brass transferred to be calculated by difference.
Step-by-Step Reasoning
Mass of beaker + brass = 26.65 g (from step 2).
Mass of beaker after transfer = 25.65 g (from step 4).
Mass of brass transferred = 26.65 − 25.65 = 1.00 g.
The reweighing in step 4 is essential because not all the brass may be transferred — some powder may remain stuck to the beaker. Weighing by difference accounts for this and gives the accurate mass of brass that actually reacted.
Key Takeaways
Weighing by difference is a fundamental technique in quantitative chemistry. It eliminates errors from powder loss during transfer and gives the exact mass of material used.
Common Mistakes
- Saying "to check the mass" without explaining that it is to find the mass of brass by difference.
- Confusing the purpose: it is not to check the beaker's mass but to determine how much brass was transferred.
Things to Be Careful About
The mark scheme requires the idea of "by difference" — the mass of brass transferred is the difference between the two weighings. Make this explicit in your answer.
Answer
A 10.0 volumetric pipette.
A 10.0 cm3 volumetric pipette
Background Concept
A volumetric pipette is designed to deliver a single, precise, fixed volume of liquid (e.g. 10.0 , 25.0 ). It is the correct apparatus for transferring an exact aliquot of a solution. A measuring cylinder is less precise, and a burette is used for variable volumes in titrations.
Understanding the Question
Step 7 requires transferring exactly 10.0 of solution B into conical flask C. The question asks for a suitable piece of apparatus. The answer is a volumetric pipette calibrated to 10.0 .
Approach
Recall the apparatus used for transferring a precise fixed volume: a volumetric pipette. It is the standard choice for taking an aliquot in a titration procedure.
Step-by-Step Reasoning
The experiment requires an exact 10.0 aliquot of solution B. A volumetric pipette is manufactured to deliver a precise volume (here 10.0 ) with high accuracy. A measuring cylinder would only give an approximate volume, and a burette is not designed for transferring a single fixed volume quickly. Therefore, a 10.0 volumetric pipette is the correct choice.
Key Takeaways
Volumetric pipettes are used for transferring exact fixed volumes (aliquots). They are essential in titration procedures for ensuring accurate and reproducible results.
Common Mistakes
- Saying "measuring cylinder" — this is not precise enough for a titration aliquot.
- Saying "burette" — a burette is for delivering variable volumes during a titration, not for transferring a fixed aliquot.
- Forgetting the capacity: "a volumetric pipette" alone may not score; the size (10.0 ) should be stated.
Things to Be Careful About
The mark scheme specifies "(10 ) volumetric pipette". Both the type of apparatus and its capacity are required.
Identify the substance used to rinse the burette before step 9 is done for the first time.
Answer
aqueous sodium thiosulfate (the solution to be used in the titration).
0.0600 mol dm-3 aqueous sodium thiosulfate
Background Concept
A burette must be rinsed with the solution that will be placed in it before filling. This prevents the solution from being diluted by residual water (or contaminated by a different solution) left from a previous rinse or wash. Rinsing with the titrant itself ensures the concentration of the solution in the burette is exactly as intended.
Understanding the Question
Step 9 involves titrating against . The question asks what substance should be used to rinse the burette before the first titration. The answer is the same solution that will be used in the burette.
Approach
Recall the rule: rinse the burette with the solution it will contain. Here, that is aqueous sodium thiosulfate.
Step-by-Step Reasoning
If the burette is rinsed with distilled water, a thin film of water would remain on the walls and dilute the thiosulfate solution when it is added, changing its effective concentration. Rinsing with the solution ensures that the concentration of the solution in the burette is exactly .
Key Takeaways
Always rinse a burette with the solution it will contain. This is a standard technique in volumetric analysis.
Common Mistakes
- Saying "distilled water" — this would dilute the titrant and give incorrect results.
- Saying "deionised water" — same problem.
- Saying "the solution being titrated" (i.e. the contents of the conical flask) — the burette must be rinsed with what goes IN the burette, not what is in the flask.
Things to Be Careful About
The answer must specify the concentration () and the substance (aqueous sodium thiosulfate). The mark scheme accepts " aqueous sodium thiosulfate".
In step 9, is used.
This solution is prepared from before the experiment.
Describe how to make a standard solution of from the solution.
Give the name and capacity of any apparatus you would use.
Write your answer in a series of numbered steps.
Working
Volume of needed:
Answer
- Using a burette, transfer of into a volumetric flask.
- Add distilled water up to the graduation mark on the volumetric flask.
- Stopper the flask and invert it several times to mix the solution thoroughly.
Dilute 30.00 cm3 of 0.200 mol dm-3 Na2S2O3 to 100.0 cm3 with distilled water in a volumetric flask
Background Concept
A standard solution is one of accurately known concentration. When a more concentrated solution is available, a dilution is performed: a measured volume of the concentrated solution is transferred to a volumetric flask and made up to the mark with solvent (here distilled water). The dilution equation relates the initial and final concentrations and volumes.
Understanding the Question
The student needs of from a stock solution of . The question asks for a series of numbered steps describing how to do this, naming the apparatus and its capacity.
Approach
- Use the dilution equation to find the volume of stock solution needed.
- Describe the practical steps: measure the stock solution with a burette, transfer to a volumetric flask, make up to the mark with distilled water, and mix.
Step-by-Step Reasoning
Step 1 — Calculate the volume needed.
Using :
Step 2 — Transfer the stock solution.
A burette is used because it can deliver accurately. The of is run into a volumetric flask.
Step 3 — Make up to the mark.
Distilled water is added until the bottom of the meniscus sits exactly on the graduation mark. The flask is stoppered and inverted several times to ensure the solution is homogeneous.
The three marks correspond to: (M1) the volume calculation = ; (M2) using a burette to transfer it to a volumetric flask; (M3) making up to the mark with distilled water.
Key Takeaways
- The dilution equation is used to find the volume of stock solution required.
- A burette delivers accurate volumes; a volumetric flask makes up a precise final volume.
- Thorough mixing (inverting the flask) is essential for a homogeneous solution.
Common Mistakes
- Using a measuring cylinder instead of a burette for the — not accurate enough.
- Forgetting to name the volumetric flask as .
- Saying "add water to make up to 100 cm³" without specifying "up to the mark" or using distilled water.
- Not showing the calculation for the volume of stock solution.
Things to Be Careful About
The mark scheme gives three distinct marks: the calculated volume (), the use of a burette to transfer it to a volumetric flask, and making up to the mark with distilled water. All three must appear in the answer. The question asks for numbered steps, so present them as such.
The measurements collected during steps 1 to 4 are shown in Table 1.1.
Table 1.1
| mass of glass beaker/g | 25.55 |
| mass of glass beaker containing powdered brass/g | 26.65 |
| mass of glass beaker after transferring brass to conical flask A/g | 25.65 |
Determine the mass of powdered brass added to conical flask A.
Working
Mass of brass transferred = mass of (beaker + brass) − mass of beaker after transfer
Answer
1.00 g
Background Concept
Weighing by difference: the mass of material transferred is obtained by subtracting the mass of the container after transfer from the mass of the container plus material before transfer. This accounts for any powder that may have remained in the beaker.
Understanding the Question
Table 1.1 gives three masses: the empty beaker (25.55 g), the beaker plus brass (26.65 g), and the beaker after transferring the brass (25.65 g). The question asks for the mass of brass added to conical flask A. This is the difference between the second and third masses.
Approach
Subtract the mass of the beaker after transfer from the mass of the beaker containing the brass. The empty beaker mass (25.55 g) is not needed for this calculation — it is a check that the beaker's mass is constant.
Step-by-Step Reasoning
Mass of beaker + brass = 26.65 g
Mass of beaker after transfer = 25.65 g
Mass of brass transferred = 26.65 − 25.65 = 1.00 g
Note: the mass of the empty beaker (25.55 g) is not used in this subtraction. It was recorded in step 1 as a check, but the difference between steps 2 and 4 directly gives the mass of brass transferred.
Key Takeaways
Weighing by difference is a reliable way to determine the mass of a transferred solid. The empty container mass is often recorded as a control but may not be needed in the final calculation.
Common Mistakes
- Subtracting the wrong values, e.g. 26.65 − 25.55 = 1.10 g (this includes the empty beaker, which is wrong).
- Forgetting units or giving the answer to too many decimal places.
Things to Be Careful About
The correct subtraction is 26.65 − 25.65 = 1.00 g. The answer should be given to two decimal places consistent with the data.
The volumes measured in each of the titrations are shown in Table 1.2.
Table 1.2
| rough titration | titration 1 | titration 2 | titration 3 | |
|---|---|---|---|---|
| final burette reading/ | 24.05 | 24.80 | 45.35 | 22.50 |
| initial burette reading/ | 3.25 | 4.50 | 24.80 | 2.10 |
| titre/ |
Answer
| rough | 1 | 2 | 3 | |
|---|---|---|---|---|
| titre/ | 20.80 | 20.30 | 20.55 | 20.40 |
Working: titre = final reading − initial reading.
- rough:
- 1:
- 2:
- 3:
Titres: rough 20.80, 1: 20.30, 2: 20.55, 3: 20.40 cm3
Background Concept
In a titration, the titre is the volume of titrant delivered from the burette. It is calculated as the difference between the final and initial burette readings: titre = final reading − initial reading.
Understanding the Question
Table 1.2 gives final and initial burette readings for four titrations (rough, 1, 2, 3). The task is to complete the table by calculating each titre.
Approach
For each column, subtract the initial reading from the final reading.
Step-by-Step Reasoning
- Rough:
- Titration 1:
- Titration 2:
- Titration 3:
Each titre is recorded to two decimal places, consistent with the burette readings.
Key Takeaways
The titre is always final reading minus initial reading. Burette readings are recorded to two decimal places (typically to the nearest ).
Common Mistakes
- Subtracting in the wrong order (initial − final), which gives a negative value.
- Forgetting to include units.
- Recording the titre to the wrong number of decimal places.
Things to Be Careful About
All titres should be positive values. Check that each subtraction is final − initial. The rough titration is included in the table and must also be completed.
Working
Concordant titres: 20.30 and 20.40 (within of each other).
Mean titre
Answer
20.35 cm3
Background Concept
Concordant titres are those that agree within of each other. When calculating a mean titre, only concordant results are averaged — the rough titration and any outliers are excluded. This improves the reliability of the result.
Understanding the Question
From part (g)(i), the titres are: rough 20.80, 1: 20.30, 2: 20.55, 3: 20.40. The question asks for a suitable mean titre to use in the calculations.
Approach
Identify which titres are concordant (agree within ), then average only those values.
Step-by-Step Reasoning
Looking at the titres:
- 20.80 (rough) — this is a rough estimate, never used in the mean.
- 20.30 and 20.40 — these agree within , so they are concordant.
- 20.55 — this differs from 20.30 by and from 20.40 by , so it is not concordant with the others.
Mean titre
Key Takeaways
Only concordant titres are averaged. The rough titration is never included in the mean. Outliers (titres that differ by more than from the others) are also excluded.
Common Mistakes
- Averaging all four titres including the rough: — this is wrong.
- Including the non-concordant 20.55 in the mean.
- Averaging 20.30, 20.55 and 20.40 (three values) instead of just the two concordant ones.
Things to Be Careful About
The mark scheme specifically uses . Only these two values are concordant. The rough titration is never used in the mean.
Working
Each burette reading has an uncertainty of . A titre involves two readings (final and initial), so the total uncertainty is .
Percentage error
Answer
0.490%
Background Concept
Percentage error measures the uncertainty of a measurement relative to its magnitude. For a burette, each reading is accurate to . Since a titre is the difference between two readings (final and initial), the maximum uncertainty in the titre is the sum of the uncertainties of the two readings: .
Understanding the Question
The question asks for the percentage error in the titre of titration 3, which is 20.40 . Working must be shown.
Approach
- Determine the absolute uncertainty in the titre: .
- Divide by the titre value and multiply by 100 to get the percentage.
Step-by-Step Reasoning
Absolute uncertainty in the titre = .
Titre in titration 3 = 20.40 .
Percentage error:
The answer is given to three significant figures, consistent with the data.
Key Takeaways
The uncertainty in a titre is double the uncertainty of a single burette reading, because two readings (initial and final) are involved. Percentage error = (absolute uncertainty / measured value) × 100.
Common Mistakes
- Using only one burette reading uncertainty ( instead of ).
- Using the wrong titre value (e.g. using the mean 20.35 instead of 20.40).
- Forgetting to multiply by 100 to get a percentage.
- Not showing working — the mark scheme requires it.
Things to Be Careful About
The mark scheme formula is . The "2 × 0.05" accounts for the two burette readings. The titre used is that of titration 3 (20.40), not the mean.
In step 8, ions react with ions. The ionic equation for the reaction is shown.
In step 9, reacts with formed in reaction 3. The equation for the reaction is shown.
Using a second sample of brass, another student determined the mean titre to be of .
Calculate the amount, in mol, of in this student's mean titre.
Working
Amount of
Answer
(or )
1.04 × 10^-3 mol
Background Concept
The amount of substance (in moles) in a solution is given by , where is the concentration in and is the volume in . Since volumes are often given in , they must be converted by dividing by 1000.
Understanding the Question
The mean titre is of . The question asks for the amount, in mol, of in this titre.
Approach
Use . Convert the volume from to by dividing by 1000, then multiply by the concentration.
Step-by-Step Reasoning
This is the amount of sodium thiosulfate that reacted with the iodine in the titration.
Key Takeaways
The formula is fundamental in volumetric analysis. Always convert to by dividing by 1000.
Common Mistakes
- Forgetting to convert to (dividing by 1000).
- Using the wrong concentration or volume.
- Giving the answer to too many or too few significant figures.
Things to Be Careful About
The mark scheme gives / . The answer should be given to three significant figures (consistent with the data).
Use the equation for reaction 4 and your answer to (h)(i) to determine the amount, in mol, of that reacted with the .
Working
From reaction 4:
Mole ratio
Amount of
Answer
5.21 × 10^-4 mol
Background Concept
Stoichiometry uses the coefficients in a balanced equation to relate the amounts of reactants and products. In reaction 4, one mole of reacts with two moles of . Therefore, the amount of is half the amount of .
Understanding the Question
From part (h)(i), the amount of is mol. The question asks for the amount of that reacted, using the stoichiometry of reaction 4.
Approach
Identify the mole ratio between and from the balanced equation, then divide the amount of by 2.
Step-by-Step Reasoning
Reaction 4:
The coefficient of is 1 and the coefficient of is 2. So:
Key Takeaways
Balanced equations give the mole ratios needed to convert between amounts of different species. Always check the coefficients carefully.
Common Mistakes
- Using the wrong ratio (e.g. multiplying by 2 instead of dividing by 2).
- Not carrying forward the value from part (h)(i) correctly.
- Rounding too early in the calculation.
Things to Be Careful About
The mark scheme answer is / . Error carried forward (ecf) applies: if part (h)(i) was wrong but the ratio is applied correctly, this mark can still be earned.
Use the equation for reaction 3 and your answer to (h)(ii) to determine the amount, in mol, of in of their solution B.
Working
From reaction 3:
Mole ratio
Amount of (in of solution B)
Answer
1.04 × 10^-3 mol
Background Concept
Reaction 3 shows that two moles of ions produce one mole of : . Therefore, the amount of is twice the amount of .
Understanding the Question
From part (h)(ii), the amount of is mol. The question asks for the amount of in the aliquot of solution B, using the stoichiometry of reaction 3.
Approach
Identify the mole ratio between and from reaction 3, then multiply the amount of by 2.
Step-by-Step Reasoning
Reaction 3:
The coefficient of is 2 and the coefficient of is 1. So:
This is the amount of in the aliquot of solution B.
Key Takeaways
The stoichiometric chain is: . Each step uses the mole ratio from the relevant balanced equation.
Common Mistakes
- Using the wrong ratio (e.g. dividing by 2 instead of multiplying by 2).
- Confusing the direction of the conversion.
- Forgetting that this is the amount in the aliquot, not the whole solution.
Things to Be Careful About
Error carried forward applies: if part (h)(ii) was wrong but the ratio is applied correctly, this mark can still be earned. The answer is mol.
Working
Amount of in of solution B
Solution B is , so total in solution B:
Mass of copper
Answer
0.661 g
Background Concept
The aliquot taken in step 7 is only one-tenth of the solution B. To find the total amount of in the whole solution (and hence in the brass sample), the amount in the aliquot must be multiplied by the dilution factor .
The mass of a substance is calculated from , where of copper is 63.5.
Understanding the Question
From part (h)(iii), the amount of in of solution B is mol. The question asks for the mass of copper in the second sample of brass.
Approach
- Scale up the amount from the aliquot to the full solution B (multiply by 10).
- Convert moles of copper to mass using with .
Step-by-Step Reasoning
Step 1 — Scale up to the full solution.
The aliquot is of solution B. So the total amount of in solution B is:
Step 2 — Convert to mass.
Mass of copper
This is the mass of copper in the second sample of brass.
Key Takeaways
When an aliquot is taken from a larger solution, the amount in the aliquot must be multiplied by the dilution factor to find the total amount. Mass is calculated from .
Common Mistakes
- Forgetting to scale up from to .
- Using the wrong molar mass for copper.
- Confusing the dilution factor (multiplying by 10 vs dividing by 10).
Things to Be Careful About
The mark scheme shows: . The scaling factor is 10 because . The molar mass of copper is 63.5.
The mass of the second sample of powdered brass was .
Calculate the percentage by mass of copper in the second sample of powdered brass.
Give your answer to three significant figures.
Working
Percentage by mass of copper
To three significant figures:
Answer
63.0%
Background Concept
Percentage by mass is calculated as: (mass of component / total mass of sample) × 100. In this case, the component is copper and the sample is the brass.
Understanding the Question
From part (h)(iv), the mass of copper is 0.661 g. The mass of the brass sample is 1.05 g. The question asks for the percentage by mass of copper, to three significant figures.
Approach
Divide the mass of copper by the mass of brass and multiply by 100. Then round to three significant figures.
Step-by-Step Reasoning
To three significant figures: 63.0%.
Note: 62.95 rounds to 63.0 (three significant figures). The zero after the decimal point is significant because it is a placeholder that indicates the precision of the measurement.
Key Takeaways
Percentage composition = (mass of component / total mass) × 100. Always check the required number of significant figures in the final answer.
Common Mistakes
- Giving the unrounded answer (62.95%) instead of 63.0%.
- Rounding to the wrong number of significant figures (e.g. 63% has only two significant figures).
- Using the wrong mass of brass (e.g. 1.00 g from part (f) instead of 1.05 g).
Things to Be Careful About
The mark scheme gives 63.0. Three significant figures means the answer must be written as 63.0, not 63 or 62.95. The mass of brass here is 1.05 g (given in the question), not the 1.00 g from part (f) — this is a different sample.
Ester X has the formula .
is an alkyl group with the general formula .
Ester X undergoes alkaline hydrolysis with aqueous potassium hydroxide, .
The resulting mixture is acidified with dilute hydrochloric acid, .
The organic products of the hydrolysis after acidification are ethanoic acid, , and an alcohol, . Once the identity of is found, the structure of ester X can then be determined.
A student uses the following steps.
- step 1 Equal molar quantities of ester X and are placed in a round-bottomed flask.
- step 2 A few drops of a suitable indicator are added to show whether a reaction has occurred.
- step 3 A substance is added to promote smooth boiling.
- step 4 The reaction mixture is set up for reflux and heated for 30 minutes.
- step 5 After 30 minutes, the reaction mixture in the round-bottomed flask is acidified by adding dropwise.
- step 6 Thin-layer chromatography is carried out on the reaction mixture.
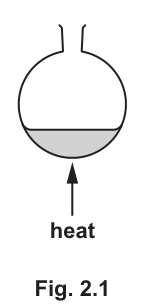
Complete the diagram in Fig. 2.1 to show the apparatus used for reflux in step 4. Label the diagram.
Answer
A Liebig condenser is fitted vertically into the neck of the round-bottomed flask. The condenser is labelled. The lower side-arm is labelled "water in" with an arrow pointing inwards, and the upper side-arm is labelled "water out" with an arrow pointing outwards.
Liebig condenser fitted vertically with water in at bottom and water out at top
Background Concept
Reflux is a technique used to heat a reaction mixture for an extended period without losing volatile components. The mixture is boiled in a flask, and the vapours are condensed back into the flask using a condenser.
Understanding the Question
The question asks to complete a diagram showing a round-bottomed flask being heated, to illustrate the setup for reflux. You need to add the condenser and label the water flow correctly.
Approach
Recall the standard reflux apparatus: a round-bottomed flask with a vertical condenser (usually a Liebig condenser) attached to the top. Cold water must enter at the bottom and exit at the top to ensure the condenser jacket is always full of water, providing efficient cooling.
Step-by-Step Reasoning
- Draw a Liebig condenser vertically on top of the round-bottomed flask neck.
- Label the condenser as "(Liebig) condenser".
- Draw an arrow pointing into the lower side-arm and label it "water in".
- Draw an arrow pointing out of the upper side-arm and label it "water out".
Key Takeaways
Reflux setups always have the condenser vertical and water flowing counter-current (in at bottom, out at top) for maximum efficiency.
Common Mistakes
- Forgetting to label the water in/out arrows or getting the direction wrong (water in at top would leave the jacket unfilled).
- Drawing a different type of condenser (e.g., vertical but not labelled as Liebig, or a condenser at an angle).
Things to Be Careful About
Ensure all labels are clear and the water flow direction is correct (bottom to top).
Answer
anti-bumping granules
anti-bumping granules
Background Concept
When heating liquids, especially during reflux or distillation, localised superheating can occur, leading to sudden, violent boiling known as bumping. This can cause the mixture to splash out of the flask.
Understanding the Question
The question asks for the substance added in step 3 to promote smooth boiling.
Approach
Recall the standard laboratory additive used to prevent bumping.
Step-by-Step Reasoning
Anti-bumping granules (or boiling chips) are added to the liquid. They provide a rough surface for bubbles to form, ensuring a steady and smooth boil without sudden bumping.
Key Takeaways
Anti-bumping granules are essential for safe heating of liquids in closed or semi-closed systems like reflux.
Common Mistakes
- Writing 'boiling stones' (though acceptable in some contexts, 'anti-bumping granules' is the precise CIE term).
- Suggesting a catalyst or a solvent.
Things to Be Careful About
Use the exact terminology 'anti-bumping granules'.
As the reaction proceeds in step 4, the indicator changes colour.
Table 2.1 shows the colours of three different indicators at pH 1.0 and at pH 14.0 and the pH range over which the indicators change colour.
Table 2.1
| indicator | colour at pH 1.0 | pH range over which it changes colour | colour at pH 14.0 |
|---|---|---|---|
| thymolphthalein | colourless | 9.5–10.5 | blue |
| methyl orange | red | 3.0–4.5 | yellow |
| bromocresol green | yellow | 4.0–5.5 | blue |
Use the table to identify a suitable indicator.
Explain your choice.
Answer
thymolphthalein
As the KOH is used up during the reaction, the pH of the mixture decreases from 14 to around 9 (the pH of the potassium ethanoate solution), which falls within the colour change range of thymolphthalein (9.5–10.5).
thymolphthalein; pH drops from 14 to ~9, within range 9.5-10.5
Background Concept
Alkaline hydrolysis of an ester (saponification) uses a strong base like KOH. The reaction is: . Initially, the solution is strongly alkaline due to excess or stoichiometric KOH (pH ~14). As the reaction proceeds, KOH is consumed, and the product is a salt of a weak acid (potassium ethanoate), which hydrolyses to give a slightly alkaline solution (pH ~8-9). When the reaction is complete, the pH will be around 9.
Understanding the Question
An indicator is added to show whether the reaction has occurred. We need to choose an indicator that changes colour as the pH changes from ~14 to ~9.
Approach
Look at the pH ranges of the given indicators. The pH change is from 14 down to ~9. The indicator must change colour within this range.
Step-by-Step Reasoning
- Initial pH is ~14 (KOH solution). Thymolphthalein is blue, methyl orange is yellow, bromocresol green is blue.
- Final pH (when KOH is used up) is ~9 (potassium ethanoate solution). Thymolphthalein is colourless, methyl orange is red, bromocresol green is blue.
- Thymolphthalein changes from blue to colourless in the range 9.5–10.5. This range is within the pH change of the mixture (14 to 9).
- Methyl orange (3.0–4.5) and bromocresol green (4.0–5.5) change colour at much lower pH values, which the mixture will not reach during the hydrolysis (it only goes down to ~9).
- Therefore, thymolphthalein is the suitable indicator.
Key Takeaways
When selecting an indicator for a reaction that changes pH, ensure the indicator's colour change range overlaps with the pH change of the reaction mixture.
Common Mistakes
- Choosing an indicator that changes colour in acidic range (methyl orange, bromocresol green) without realising the mixture remains alkaline.
- Not explaining that the pH range of the indicator must match the pH change of the mixture.
Things to Be Careful About
The product is a salt of a weak acid and strong base, so the final pH is alkaline (~9), not neutral (7) or acidic. The indicator must change colour between 9 and 14.
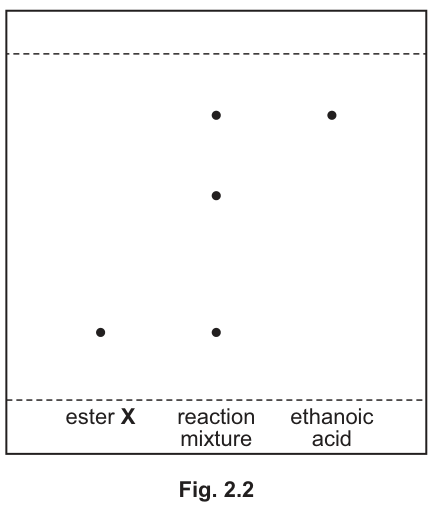
In step 6, a small sample of the reaction mixture is analysed along with samples of ester X and ethanoic acid.
Fig. 2.2 shows the chromatogram produced.
State what feature of the chromatogram shows that the hydrolysis is incomplete.
Answer
There is a spot in the reaction mixture chromatogram with the same value (or same vertical position / height from the baseline) as the spot on the ester X chromatogram.
spot in reaction mixture has same Rf as ester X
Background Concept
Thin-layer chromatography (TLC) separates components of a mixture based on their affinity for the stationary phase (silica) and the mobile phase (solvent). Each compound has a characteristic value (ratio of distance moved by spot to distance moved by solvent front). If a reaction is incomplete, the starting material will still be present in the product mixture.
Understanding the Question
The chromatogram shows lanes for 'ester X' (starting material), 'reaction mixture' (products + unreacted material), and 'ethanoic acid' (product). We need to identify the feature showing hydrolysis is incomplete.
Approach
Incomplete hydrolysis means some ester X has not reacted. Therefore, the reaction mixture lane should contain a spot corresponding to ester X.
Step-by-Step Reasoning
- Look at the 'ester X' lane: there is one spot near the baseline.
- Look at the 'reaction mixture' lane: there are three spots. One is near the baseline, aligned with the ester X spot. One is in the middle. One is near the top, aligned with the ethanoic acid spot.
- The spot in the reaction mixture lane that is at the same height (same value) as the spot in the ester X lane indicates the presence of unreacted ester X.
- This proves the hydrolysis is incomplete.
Key Takeaways
In TLC analysis of a reaction, a spot in the product mixture lane aligning with the starting material lane indicates incomplete reaction.
Common Mistakes
- Saying 'there are more spots' without specifying which one indicates incomplete reaction.
- Not mentioning value or same vertical position/height.
Things to Be Careful About
Be precise: 'same value' or 'same distance from baseline'.
Suggest an experimental process that could be used to extract the alcohol, , from the reaction mixture.
Answer
fractional distillation
fractional distillation
Background Concept
After acidification, the reaction mixture contains ethanoic acid, the alcohol (ROH), water, and possibly unreacted ester or excess acid. To isolate the alcohol, we need a separation technique based on differences in physical properties, typically boiling points.
Understanding the Question
Suggest a process to extract the alcohol ROH from the reaction mixture.
Approach
The mixture is a mixture of miscible liquids with different boiling points. Fractional distillation is the standard method to separate such mixtures.
Step-by-Step Reasoning
- The reaction mixture after acidification contains ethanoic acid (bp 118°C), alcohol (bp depends on R, e.g., propan-2-ol bp 82°C), water (bp 100°C), and dilute HCl.
- These are miscible liquids with different boiling points.
- Fractional distillation can separate them based on their boiling points. The alcohol (lower bp) would distil off first (or can be separated from the higher boiling acid and water).
- Therefore, fractional distillation is the appropriate method.
Key Takeaways
Fractional distillation is used to separate miscible liquids with different boiling points.
Common Mistakes
- Suggesting 'distillation' without 'fractional' (simple distillation is less effective for close boiling points, though sometimes accepted; fractional is better).
- Suggesting 'extraction' with a separating funnel (this works for immiscible liquids, but alcohols and acids are often miscible with water/each other in this mixture).
Things to Be Careful About
'Fractional distillation' is the precise term expected.
Fig. 2.3 shows an infrared spectrum of the extracted in (d).
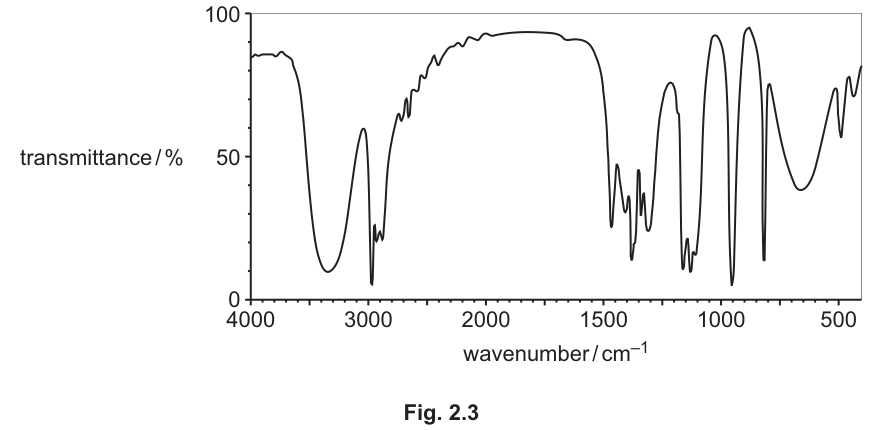
Table 2.2
| bond | functional groups containing the bond | characteristic infrared absorption range (in wavenumbers)/ |
|---|---|---|
| C–O | hydroxy, ester | 1040–1300 |
| C=C | aromatic compound, alkene | 1500–1680 |
| C=O | amide carbonyl, carboxyl ester | 1640–1690 1670–1740 1710–1750 |
| CN | nitrile | 2200–2250 |
| C–H | alkane | 2850–2950 |
| N–H | amine, amide | 3300–3500 |
| O–H | carboxyl hydroxy | 2500–3000 3200–3650 |
Use Table 2.2 to explain how the infrared spectrum in Fig. 2.3 shows that the extracted does not contain any ester X.
Answer
The spectrum does not contain an absorption peak in the region 1710–1750 cm, which is characteristic of the C=O bond in an ester.
no absorption at 1710-1750 cm^-1
Background Concept
Infrared (IR) spectroscopy identifies functional groups based on the absorption of infrared radiation by specific bonds. Each bond type absorbs at characteristic wavenumber ranges.
Understanding the Question
We need to explain how the IR spectrum of the extracted alcohol shows it does not contain any unreacted ester X. Ester X has a C=O bond (ester carbonyl).
Approach
Look at Table 2.2 for the absorption range of the ester C=O bond. Check if this absorption is present in the spectrum.
Step-by-Step Reasoning
- From Table 2.2, the C=O bond in an ester absorbs in the range 1710–1750 cm.
- Look at Fig. 2.3 (IR spectrum of ROH). There is a broad peak around 3300 cm (O-H of alcohol) and peaks around 2900 cm (C-H).
- There is no significant absorption peak in the 1710–1750 cm region.
- The absence of this peak indicates there is no ester C=O bond present, so no ester X remains in the extracted alcohol.
Key Takeaways
Absence of a characteristic absorption peak can confirm the absence of a functional group.
Common Mistakes
- Saying 'there is no C=O peak' without specifying the wavenumber range (must reference 1710-1750 cm or ester carbonyl).
- Confusing ester C=O with carboxylic acid C=O (though both are around 1700, the table gives specific ranges).
Things to Be Careful About
Use the exact range from the table: 1710–1750 cm.
Fig. 2.4 shows the proton () NMR spectrum of compound .
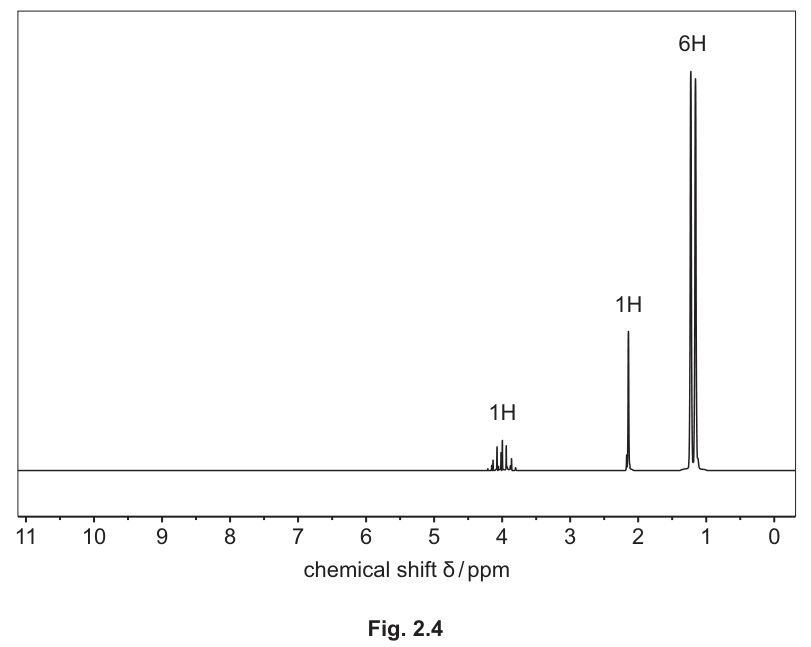
Table 2.3 shows some relevant () NMR information.
Use Table 2.3 to complete Table 2.4, and state the name of .
Table 2.3
| environment of proton | example | chemical shift range /ppm |
|---|---|---|
| alkane | , , | 0.9–1.7 |
| alkyl next to C=O | , , | 2.2–3.0 |
| alkyl next to aromatic ring | , , | 2.3–3.0 |
| alkyl next to electronegative atom | , , | 3.2–4.0 |
| attached to alkene | 4.5–6.0 | |
| attached to aromatic ring | 6.0–9.0 | |
| aldehyde | 9.3–10.5 | |
| alcohol | 0.5–6.0 | |
| phenol | 4.5–7.0 | |
| carboxylic acid | 9.0–13.0 |
Table 2.4
| chemical shift /ppm | splitting pattern | relative peak area | structure responsible for the peak |
|---|---|---|---|
| 1.2 | doublet | 6 | |
| 1 | |||
| multiplet | 1 |
Name of
Answer
| chemical shift /ppm | splitting pattern | relative peak area | structure responsible for the peak |
|---|---|---|---|
| 1.2 | doublet | 6 | |
| 2.2 | singlet | 1 | |
| 4.0 | multiplet | 1 |
Name of ROH: propan-2-ol
Row 2: 2.2, singlet, 1, -OH; Row 3: 4.0, multiplet, 1, >CH-O; propan-2-ol
Background Concept
Proton (H) NMR spectroscopy provides information about the environment of hydrogen atoms in a molecule:
- Chemical shift (): indicates the electronic environment (e.g., next to electronegative atoms, aromatic rings, etc.).
- Splitting pattern: indicates the number of neighbouring protons ( rule).
- Relative peak area: indicates the number of protons in that environment.
Understanding the Question
We are given an NMR spectrum of ROH with three signals: a doublet at 1.2 ppm (6H), a singlet at 2.2 ppm (1H), and a multiplet at 4.0 ppm (1H). We need to complete the table and identify ROH.
Approach
Use the chemical shift ranges in Table 2.3 to assign each signal to a proton environment. Use splitting patterns to confirm neighbouring protons. Combine the fragments to deduce the structure.
Step-by-Step Reasoning
-
Signal at 1.2 ppm (doublet, 6H):
- Shift 1.2 ppm is in the alkane range (0.9–1.7 ppm).
- Area 6H suggests two equivalent groups.
- Splitting is a doublet, so each is next to 1 proton (). This fits .
- Table entry: 1.2, doublet, 6, .
-
Signal at 2.2 ppm (singlet, 1H):
- Shift 2.2 ppm could be alkyl next to C=O or alcohol. Since we have an alcohol (ROH), the -OH proton often appears as a singlet (no splitting due to exchange) and can vary widely (0.5–6.0 ppm). 2.2 ppm is reasonable for an alcohol -OH.
- Area 1H, singlet (no neighbouring protons to split it, or exchange broadens it).
- Table entry: 2.2, singlet, 1, .
-
Signal at 4.0 ppm (multiplet, 1H):
- Shift 4.0 ppm is in the range for alkyl next to electronegative atom (3.2–4.0 ppm), specifically or .
- Area 1H, multiplet (complex splitting due to neighbouring protons: the 6H from two methyls and 1H from OH, though OH often doesn't split, the 6H from methyls split the CH into a septet, which is a multiplet).
- This fits a group (methine group attached to oxygen).
- Table entry: 4.0, multiplet, 1, .
-
Deduce structure:
- Fragments: two groups, one , one .
- Combine: .
- This is propan-2-ol (isopropyl alcohol).
- Formula: , which fits with ().
Key Takeaways
NMR data (shift, splitting, integration) must be combined to deduce molecular fragments and then the full structure. Remember that -OH protons often appear as singlets and can have variable chemical shifts.
Common Mistakes
- Assigning the 2.2 ppm peak to a next to C=O (but there is no C=O in an alcohol, and area is 1H).
- Forgetting that the -OH proton gives a singlet.
- Misinterpreting the multiplet at 4.0 ppm.
Things to Be Careful About
- The chemical shift for -OH can vary widely (0.5–6.0 ppm), so don't rule it out just because 2.2 ppm is also in the 'alkyl next to C=O' range; the absence of C=O in the IR spectrum (part e) confirms it's an alcohol.
- The multiplet at 4.0 ppm is a septet (split by 6 equivalent methyl protons), but 'multiplet' is acceptable as per the mark scheme.
Answer
Displayed formula of isopropyl ethanoate ():
- Left: group (C bonded to 3 H's).
- Middle: Carbonyl group (C double bonded to O, single bonded to left C and right O).
- Right: Ester oxygen bonded to a central CH group.
- Central CH: bonded to 1 H (up), and two groups (right and down, each C bonded to 3 H's).
Displayed formula of isopropyl ethanoate
Background Concept
Ester X has the formula . From part (f), we identified ROH as propan-2-ol, so R is the propan-2-yl group (isopropyl group), .
Understanding the Question
Draw the displayed formula for ester X. A displayed formula must show all atoms and all bonds.
Approach
Combine the ethanoate part () with the isopropyl group (). Draw all C-H, C-C, C-O, and C=O bonds.
Step-by-Step Reasoning
- Ethanoate part: . Draw C bonded to 3 H's, double bonded to O, single bonded to another O.
- Isopropyl part: . Draw the central C bonded to 1 H, and two groups (each C bonded to 3 H's).
- Connect the ester oxygen to the central C of the isopropyl group.
- Ensure all bonds are shown as lines.
Key Takeaways
Displayed formulas show every atom and every bond. For esters, ensure the ester linkage is correctly drawn with all hydrogens on the alkyl groups.
Common Mistakes
- Drawing a structural formula instead of a displayed formula (e.g., without showing all bonds).
- Forgetting to show all C-H bonds.
- Drawing the wrong isomer (e.g., propyl ethanoate instead of isopropyl ethanoate).
Things to Be Careful About
The question asks for a displayed formula, so every single bond must be drawn as a line. Do not use condensed formulae.
Ester X will undergo hydrolysis with water in the presence of under reflux, using a similar procedure.
Suggest why none of the indicators in Table 2.1 would change colour in this experiment.
Answer
The pH remains below 3.0 (or the solution remains acidic) throughout the reaction because dilute is present as a catalyst, so none of the indicators change colour.
pH remains below 3.0
Background Concept
Esters can be hydrolysed under acidic conditions (acid hydrolysis) or alkaline conditions (alkaline hydrolysis/saponification). Acid hydrolysis is reversible and uses a dilute strong acid (like ) as a catalyst. The reaction is: .
Understanding the Question
In acid-catalysed hydrolysis, the student uses dilute and reflux. The question asks why none of the indicators in Table 2.1 would change colour.
Approach
Look at the pH ranges of the indicators. They all change colour at pH > 3.0 (methyl orange starts at 3.0). In acid hydrolysis, the solution is acidic due to the catalyst and the product (ethanoic acid). The pH will not rise above 3.0.
Step-by-Step Reasoning
- The reaction uses dilute as a catalyst. This means the solution is strongly acidic initially (pH < 1).
- As the reaction proceeds, ethanoic acid is produced, but the strong acid catalyst remains, so the pH stays low (below 3.0).
- The indicators in Table 2.1 change colour at pH 3.0 or above (methyl orange: 3.0-4.5, bromocresol green: 4.0-5.5, thymolphthalein: 9.5-10.5).
- Since the pH never rises above 3.0, none of the indicators will change colour.
Key Takeaways
In acid-catalysed reactions, the pH remains acidic. Indicators that change colour in alkaline or neutral ranges will not show a colour change.
Common Mistakes
- Saying 'the pH doesn't change' (it does change slightly as acid is produced, but it stays low).
- Not referencing the specific pH range of the indicators (below 3.0).
Things to Be Careful About
The key point is that the pH remains below the lowest colour change range of the given indicators (3.0 for methyl orange).