Chemistry 9701/52 — October/November 2024
Cambridge A-Level · Planning, Analysis and Evaluation · worked solutions for every part, with the mark scheme
Topics Analysis, Conclusions and Evaluation · Planning
Solution X is dilute hydrochloric acid of unknown concentration. A student uses titration with aqueous sodium carbonate, , to determine the concentration of solution X.
The student plans to prepare of aqueous sodium carbonate, .
Working
Answer
13.25 g
13.25 g
Background Concept
To prepare a solution of known concentration, the required mass of solute is determined from the relationship (where is amount in mol, is concentration in mol dm⁻³, and is volume in dm³), followed by converting moles to mass using . The relative formula mass is calculated by summing the atomic masses of all atoms in the formula.
Understanding the Question
The question asks for the mass of anhydrous sodium carbonate () needed to prepare exactly 250.0 cm³ of a 0.500 mol dm⁻³ solution. The answer must be given to two decimal places (as would be read from a two-decimal-place balance).
Approach
Convert volume to dm³, calculate moles using , then multiply by to get mass.
Step-by-Step Reasoning
- Volume conversion:
- Moles needed:
- Mass =
Key Takeaways
- Always convert cm³ to dm³ before using .
- The relative formula mass of sodium carbonate is 106.0 (anhydrous form).
- A two-decimal-place balance reads to 0.01 g, so 13.25 g is appropriate.
Common Mistakes
- Using 250.0 instead of 0.2500 in the calculation (forgetting to convert cm³ to dm³).
- Calculating incorrectly, e.g. forgetting there are two sodium atoms or three oxygen atoms.
- Giving the answer as 13.3 g (only one decimal place) instead of 13.25 g.
Things to Be Careful About
- The question specifies a two-decimal-place balance, so the answer must have exactly two decimal places.
- Ensure you use the anhydrous formula mass (106.0), not the decahydrate (, ).
Describe how the student should make of starting from the mass of calculated in (i) supplied in a beaker.
Give the name and size of any key apparatus to be used.
Write your answer using a series of numbered steps.
Answer
- Add a small volume of distilled water to the beaker and stir to dissolve the completely.
- Transfer the solution into a volumetric flask, rinsing the beaker with distilled water and adding the rinsings to the flask.
- Add distilled water to the volumetric flask until the bottom of the meniscus is level with the calibration mark.
Dissolve in beaker with small volume of distilled water; transfer to 250 cm³ volumetric flask rinsing the beaker; top up to the mark with distilled water.
Background Concept
Preparing a standard solution (one of accurately known concentration) requires quantitative transfer of the solute into a volumetric flask and dilution to a precise volume. The key principles are: complete dissolution before transfer, rinsing to ensure no solute is left behind, and topping up to the calibration mark so the final volume is exactly correct.
Understanding the Question
The question asks for a numbered-step description of how to prepare 250.0 cm³ of 0.500 mol dm⁻³ Na₂CO₃(aq) from the solid already weighed into a 50 cm³ beaker. Three marks are available, each corresponding to a key procedural step.
Approach
Follow the standard method: dissolve → transfer (with rinsing) → make up to mark. Name the volumetric flask and its size.
Step-by-Step Reasoning
M1 — Dissolution: The solid must be dissolved in a small volume of distilled water in the beaker. Using only a small volume ensures the final volume can be brought exactly to the mark without overflowing. Distilled water is specified to avoid impurities.
M2 — Transfer and rinse: The solution is poured into a 250 cm³ volumetric flask. The beaker must then be rinsed with distilled water and the rinsings added to the flask. This ensures quantitative transfer — all the solute ends up in the flask, not left adhering to the beaker walls.
M3 — Make up to mark: Distilled water is added until the bottom of the meniscus sits on the calibration mark. This gives exactly 250.0 cm³ of solution, ensuring the concentration is precisely 0.500 mol dm⁻³.
Key Takeaways
- Always rinse the dissolving vessel and add rinsings to the volumetric flask for quantitative transfer.
- The volumetric flask must be named with its size (250 cm³).
- The final adjustment must reference the meniscus and the calibration mark.
Common Mistakes
- Omitting the rinsing step (loses M2 mark).
- Not specifying the size of the volumetric flask.
- Saying 'add water to 250 cm³' instead of 'add water to the mark' — the mark scheme requires reference to the calibration mark.
- Using 'deionised water' instead of 'distilled water' (usually accepted but distilled is the mark scheme term).
Things to Be Careful About
- The answer must be in numbered steps as specified.
- Each mark requires a distinct action; combining steps into one sentence may lose a mark.
- The word 'rinsing' must appear in connection with the transfer step.
The student incorrectly makes up the of and the concentration is not . The student calls this solution Y.
The student uses the following method to determine both the concentration of solution X and the concentration of solution Y.
step 1 Transfer of solution Y into a conical flask using a volumetric pipette. Add a few drops of methyl orange.
step 2 Titrate the sample in the conical flask with solution X.
step 3 Transfer a fresh portion of solution Y into a second conical flask, but do not add methyl orange.
step 4 Use the burette to add the volume of solution X used in step 2 to the second conical flask.
step 5 Measure and record the mass of a dry evaporating basin.
step 6 Transfer the contents of the second conical flask into the evaporating basin.
step 7 Use a water bath to heat the solution in the evaporating basin until all the water is evaporated and only solid remains.
step 8 Measure and record the mass of the evaporating basin and solid residue.
In step 1, of solution Y is transferred using a volumetric pipette.
State what the volumetric pipette should be rinsed with before carrying out step 1.
Answer
Solution Y
solution Y
Background Concept
Before using a volumetric pipette, it must be rinsed with the solution it is about to contain. This is because any residual water (from washing) would dilute the solution drawn into the pipette, causing the actual concentration delivered to be lower than intended. Rinsing with the solution itself removes this water and ensures the pipette delivers the correct concentration.
Understanding the Question
The pipette is being used to transfer 25.0 cm³ of solution Y (the sodium carbonate solution) into the conical flask. The question asks what the pipette should be rinsed with beforehand.
Approach
Apply the standard rule: rinse the pipette with the solution it will contain.
Step-by-Step Reasoning
The pipette will contain solution Y. Therefore, it must be rinsed with solution Y to prevent dilution from residual water. Rinsing with distilled water would be incorrect because it would leave water in the pipette that dilutes the solution Y, giving a lower concentration of Na₂CO₃ in the flask and an inaccurate titre.
Key Takeaways
- Pipettes are always rinsed with the solution they will contain.
- Burettes are rinsed with the solution they will contain (solution X in this case).
- Conical flasks are NOT rinsed with the solution — they should be clean and dry (or rinsed with distilled water only), because any extra solution in the flask would change the amount of solute being titrated.
Common Mistakes
- Saying 'distilled water' — this would dilute the solution and is wrong.
- Saying 'solution X' — the pipette contains solution Y, not X.
- Saying 'the acid' — the pipette is used for the alkali (solution Y).
Things to Be Careful About
- The mark scheme specifically requires 'solution Y' as the answer. Simply saying 'the sodium carbonate solution' may also be accepted, but 'solution Y' is the precise term used in the question.
Answer
The indicator (methyl orange) changes colour.
The indicator (methyl orange) changes colour.
Background Concept
In an acid-base titration, the end-point is detected by an indicator that changes colour at a pH close to the equivalence point. Methyl orange is yellow in alkaline solution (pH > 4.4) and red/orange in acidic solution (pH < 3.1). In a titration of carbonate with HCl, the solution starts alkaline (yellow) and the end-point is marked by the colour change to orange.
Understanding the Question
The student is titrating solution Y (Na₂CO₃, alkaline) with solution X (HCl, acidic) using methyl orange as indicator. The question asks how the end-point is detected.
Approach
State that the colour change of the indicator signals the end-point.
Step-by-Step Reasoning
As HCl is added to the Na₂CO₃ solution, the pH drops. At the end-point, the solution changes from yellow to orange (the methyl orange transition range). The student swirls the flask continuously and adds the acid drop-by-drop near the end-point to observe this colour change precisely.
Key Takeaways
- The end-point is detected by the indicator changing colour.
- For methyl orange in this titration: yellow → orange (or red).
- The student should add the titrant slowly near the end-point and swirl to mix.
Common Mistakes
- Saying 'the solution becomes neutral' — the end-point is a colour change, not a pH statement.
- Saying 'the acid is in excess' — this describes what happens after the end-point, not how it is detected.
- Not mentioning the indicator at all.
Things to Be Careful About
- The mark scheme accepts 'indicator changes colour' or 'methyl orange changes colour'. The key word is 'changes colour' or 'colour change'.
Explain why the evaporating basin is not heated directly with a Bunsen burner in step 7.
Answer
To avoid spitting (of the solid as it forms).
To avoid spitting of the solid.
Background Concept
When evaporating a solution to dryness, direct heating with a Bunsen burner causes the liquid to boil vigorously. As the solution concentrates and solid begins to form, the rapid boiling can cause droplets of the solution (or small pieces of solid) to be ejected from the basin — this is called 'spitting'. Spitting causes loss of product, meaning the measured mass of residue will be too low, leading to an inaccurate result.
Understanding the Question
The student evaporates the solution to obtain solid NaCl for weighing. The question asks why a water bath is used instead of direct Bunsen burner heating.
Approach
Identify the practical problem (spitting) that direct heating causes and that a water bath avoids.
Step-by-Step Reasoning
A water bath provides gentle, uniform heating at a maximum of 100°C. This prevents violent boiling and the ejection of solid particles (spitting) that would occur with the intense, localised heat of a Bunsen flame. By avoiding spitting, the student ensures all the NaCl remains in the basin and the measured mass is accurate.
Key Takeaways
- 'Spitting' is the key term the mark scheme expects.
- A water bath provides gentle heating that prevents loss of solid.
- This is a common practical consideration in gravimetric analysis.
Common Mistakes
- Saying 'to prevent the basin cracking' — while possible, this is not the mark scheme answer.
- Saying 'to heat evenly' — too vague; must mention spitting.
- Saying 'to avoid losing solid' without mentioning the mechanism (spitting).
Things to Be Careful About
- The mark scheme specifically requires the word 'spitting'. Other phrasings like 'loss of solid' or 'splashing' may not score.
Suggest what the student should do to ensure all of the water has evaporated from the residue before completing step 8.
Answer
Heat to constant mass.
Heat to constant mass.
Background Concept
In gravimetric analysis, 'heating to constant mass' means repeatedly heating the residue, cooling it in a desiccator, and reweighing until two consecutive masses agree (within the precision of the balance, typically ±0.01 g). This ensures all volatile components (water in this case) have been completely removed and the mass measured is that of the pure dry solid only.
Understanding the Question
After evaporation in step 7, the student must ensure all water has been removed before the final weighing in step 8. The question asks how to confirm this.
Approach
State the standard technique: heat, cool, weigh, repeat until the mass no longer changes.
Step-by-Step Reasoning
The procedure is:
- Heat the basin with contents for a period.
- Cool in a desiccator (to prevent re-absorption of moisture from the air).
- Weigh.
- Reheat, recool, reweigh.
- If the mass is unchanged (or changes by less than 0.01 g), all water has been removed. If the mass has decreased, repeat.
This is summarised as 'heat to constant mass'.
Key Takeaways
- 'Heat to constant mass' is the standard phrase for ensuring complete removal of a volatile substance.
- The desiccator prevents re-absorption of water during cooling.
- This technique applies to any gravimetric determination.
Common Mistakes
- Saying 'heat for longer' — this doesn't confirm completion.
- Saying 'weigh until the mass doesn't change' without mentioning reheating.
- Omitting the cooling step (which could cause convection currents affecting the balance).
Things to Be Careful About
- The exact phrase 'heat to constant mass' is what the mark scheme requires. Any equivalent description (reheat and reweigh until mass is unchanged) also scores.
The student’s burette readings taken in step 2 are shown in Fig. 1.1.
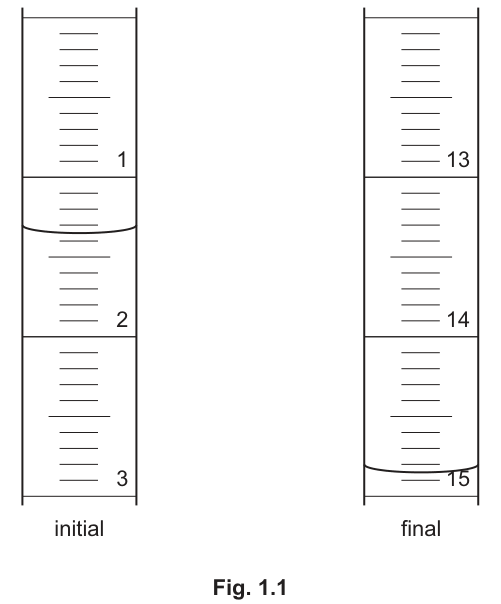
Use Fig. 1.1 to complete Table 1.1.
Table 1.1
| burette reading (final) / | |
| burette reading (initial) / | |
| volume of solution X added / |
Answer
| burette reading (final) / cm³ | 14.85 |
| burette reading (initial) / cm³ | 1.35 |
| volume of solution X added / cm³ | 13.50 |
The volume is calculated as .
Final: 14.85 cm³, Initial: 1.35 cm³, Volume added: 13.50 cm³
Background Concept
A burette is graduated from top to bottom (0 cm³ at the top, 50 cm³ at the bottom). Readings are taken from the bottom of the meniscus at eye level. Burette readings must be recorded to two decimal places (nearest 0.05 cm³), as the smallest graduation is typically 0.1 cm³ and the uncertainty is ±0.05 cm³. The titre volume is the difference between the final and initial readings.
Understanding the Question
The student has taken two burette readings (shown in Fig. 1.1) and these must be recorded in a table along with the calculated volume of solution X added.
Approach
Read each burette to the nearest 0.05 cm³, record both readings, then subtract to find the titre.
Step-by-Step Reasoning
Initial reading: The meniscus is between the 1 and 2 cm³ graduations. The bottom of the meniscus sits at 1.35 cm³ (three small divisions below the 1 mark, each division being 0.1 cm³, with the meniscus at the midpoint between 1.3 and 1.4, giving 1.35).
Final reading: The meniscus is between the 14 and 15 cm³ graduations. The bottom of the meniscus sits at 14.85 cm³ (eight and a half small divisions below the 14 mark).
Volume added:
Both readings and the titre must be recorded to two decimal places.
Key Takeaways
- Always read from the bottom of the meniscus.
- Record to two decimal places (e.g. 1.35, not 1.4 or 1.3).
- The titre = final reading − initial reading (not the other way around).
Common Mistakes
- Reading from the top of the meniscus instead of the bottom.
- Recording to only one decimal place (e.g. 1.4 instead of 1.35).
- Reversing the subtraction (getting a negative number).
- Misreading the scale by one division.
Things to Be Careful About
- The burette scale increases downward, so a reading near the top is a small number and near the bottom is a large number.
- All values must have exactly two decimal places, including the titre (13.50, not 13.5).
- M1 requires both readings correct; M2 requires the subtraction correct.
Calculate the percentage error in the volume of solution X calculated in (i).
Show your working.
Working
Each burette reading has an uncertainty of . Two readings are taken, so the total uncertainty in the titre is:
Answer
0.741%
0.741%
Background Concept
When a titre volume is calculated as the difference between two burette readings, the uncertainties in both readings combine. Each individual reading has an uncertainty of ±0.05 cm³ (half the smallest graduation of 0.1 cm³). Since the titre involves two readings (initial and final), the total uncertainty is . The percentage error is then the absolute uncertainty divided by the measured value, multiplied by 100.
Understanding the Question
The question asks for the percentage error in the titre volume of 13.50 cm³ calculated in part (c)(i). Working must be shown.
Approach
Determine the total uncertainty in the titre (from two readings), then divide by the titre volume and multiply by 100.
Step-by-Step Reasoning
- Uncertainty per reading = ±0.05 cm³
- Number of readings used = 2 (initial and final)
- Total uncertainty in titre =
- Percentage error =
Note: The mark scheme writes this as , combining steps 3 and 4.
Key Takeaways
- The percentage error in a titre uses in the numerator (not ), because two readings contribute uncertainty.
- The denominator is the titre volume itself (13.50 cm³).
- Working must be shown — the answer alone does not score.
Common Mistakes
- Using only one uncertainty (0.05 instead of 0.10) — this gives 0.370%, which is wrong.
- Dividing by 25.0 (the pipette volume) instead of 13.50 (the titre).
- Not showing working (the mark scheme explicitly requires it).
- Using ±0.1 cm³ per reading instead of ±0.05 cm³.
Things to Be Careful About
- The factor of 2 must appear in the working to show understanding of why two readings contribute.
- The answer should be given to 3 significant figures (0.741%) as shown in the mark scheme.
A second student repeats the experiment in (b) using solution X and of solution Y.
The results are shown in Table 1.2.
Table 1.2
| volume of solution X added in titration / | 13.35 |
| mass of dry evaporating basin / g | 44.52 |
| mass of evaporating basin and solid residue / g | 45.69 |
The reaction that takes place in the titration is:
Using the results in Table 1.2, calculate the following:
-
the amount, in mol, of sodium chloride
-
the concentration of solution X and the concentration of solution Y.
Working
Amount of NaCl:
Concentration of solution X (HCl):
From the equation, (ratio 2:2)
Concentration of solution Y (Na₂CO₃):
From the equation,
Answer
Amount of NaCl = 0.0200 mol
Concentration of solution X = 1.50 mol dm⁻³
Concentration of solution Y = 0.400 mol dm⁻³
n(NaCl) = 0.0200 mol; c(X) = 1.50 mol dm⁻³; c(Y) = 0.400 mol dm⁻³
Background Concept
This question combines gravimetric analysis (finding moles from mass of a product) with titration stoichiometry. The balanced equation gives the mole ratios between all species. The NaCl produced comes from both reactants, and its amount allows back-calculation of the amounts of HCl and Na₂CO₃ that reacted. Concentration is then found from .
Understanding the Question
The second student's data gives: titre volume of X = 13.35 cm³, mass of empty basin = 44.52 g, mass of basin + residue = 45.69 g. From these, calculate n(NaCl), c(X), and c(Y). The pipette volume of Y is 25.0 cm³ (from the method in part b).
Approach
- Find mass of NaCl by difference, then moles using Mr.
- Use the 2:2 ratio (HCl:NaCl) to find moles of HCl, then divide by titre volume for c(X).
- Use the 1:2 ratio (Na₂CO₃:NaCl) to find moles of Na₂CO₃, then divide by 25.0 cm³ for c(Y).
Step-by-Step Reasoning
M1 — Moles of NaCl:
- Mass of NaCl = 45.69 − 44.52 = 1.17 g
- Mr(NaCl) = 23.0 + 35.5 = 58.5
- n(NaCl) = 1.17 / 58.5 = 0.0200 mol
M2 — Concentration of X (HCl):
- From the equation: 2HCl → 2NaCl, so the ratio is 1:1
- n(HCl) = n(NaCl) = 0.0200 mol
- Volume of HCl = 13.35 cm³ = 0.01335 dm³
- c(HCl) = 0.0200 / 0.01335 = 1.498... ≈ 1.50 mol dm⁻³
M3 — Concentration of Y (Na₂CO₃):
- From the equation: 1Na₂CO₃ → 2NaCl, so the ratio is 1:2
- n(Na₂CO₃) = n(NaCl) / 2 = 0.0200 / 2 = 0.0100 mol
- Volume of Na₂CO₃ = 25.0 cm³ = 0.0250 dm³
- c(Na₂CO₃) = 0.0100 / 0.0250 = 0.400 mol dm⁻³
Key Takeaways
- The mole ratio from the balanced equation is essential for converting between species.
- The 2:2 ratio between HCl and NaCl means they have equal moles.
- The 1:2 ratio between Na₂CO₃ and NaCl means Na₂CO₃ has half the moles of NaCl.
- Always convert cm³ to dm³ before calculating concentration.
Common Mistakes
- Using the wrong mole ratio (e.g. dividing n(NaCl) by 2 to get n(HCl) instead of n(Na₂CO₃)).
- Forgetting to convert cm³ to dm³ (dividing by 13.35 instead of 0.01335).
- Using the wrong volume for c(Y) — it's 25.0 cm³ (the pipette volume), not 13.35 cm³.
- Not recognising that the NaCl comes from BOTH reactants and using it to find both concentrations.
Things to Be Careful About
- The volume of solution Y used is 25.0 cm³ (from the pipette), not the titre volume.
- The titre volume (13.35 cm³) is the volume of solution X (HCl) used.
- Answers should be to 3 significant figures to match the data precision.
State what happens to the value obtained for the concentration of solution Y if not all the water is evaporated in step 7.
Explain your answer.
Answer
The calculated concentration of solution Y would be higher than the true value.
If not all the water is evaporated, the measured mass of the residue is too high. This gives a calculated that is too high, which in turn gives a calculated that is too high, so the calculated concentration of Y is too high.
The calculated concentration of Y will be higher than the true value because the mass of residue (and hence n(NaCl) and n(Na₂CO₃)) will be too high.
Background Concept
In gravimetric analysis, the mass of a dried residue is used to determine the amount of a product, and from that, the amounts of reactants via stoichiometry. If the residue is not fully dry, the measured mass includes water, inflating the apparent mass of the product. This error propagates through all subsequent calculations.
Understanding the Question
The student uses the mass of NaCl residue to work back to the concentration of solution Y (Na₂CO₃). The question asks what happens to the calculated c(Y) if some water remains in the residue.
Approach
Trace the error: incomplete evaporation → mass too high → moles of NaCl too high → moles of Na₂CO₃ too high → concentration of Y too high.
Step-by-Step Reasoning
M1 — Direction of error: The calculated concentration of Y will be higher than the true value.
M2 — Explanation: If water remains in the residue, the measured mass of 'NaCl' is actually NaCl + water. This means:
- Mass of residue is too high
- is too high
- is too high
- is too high
Therefore the calculated concentration of Y is greater than the true concentration.
Key Takeaways
- Systematic errors in gravimetric analysis propagate through stoichiometric calculations.
- An overestimated mass leads to an overestimated concentration.
- Always state both the direction of the error (higher/lower) AND the reason.
Common Mistakes
- Saying the concentration would be lower — the error direction is wrong.
- Only stating the direction without explaining why (loses M2).
- Only explaining the mechanism without stating the direction (loses M1).
- Confusing the effect on c(X) vs c(Y) — the question specifically asks about c(Y).
Things to Be Careful About
- Both marks are needed: M1 for the direction (higher) and M2 for the explanation (mass/amount of NaCl too high).
- The explanation must connect the water remaining to the mass being too high, not just say 'the result is wrong'.
A group of students uses the following method to investigate the change in mass that takes place when metal M combines with sulfur to form a metal sulfide.
step 1 Weigh a clean crucible and lid using a balance. Record the mass.
step 2 Place a coiled length of metal wire into the crucible and weigh the crucible, lid and wire.
step 3 Cover the metal wire in the crucible with a large quantity of powdered sulfur and replace the lid.
step 4 Heat the crucible in a fume hood until the crucible glows red. Continue heating strongly until no more sulfur can be seen.
step 5 Allow the apparatus to cool and weigh the crucible, lid and residue.
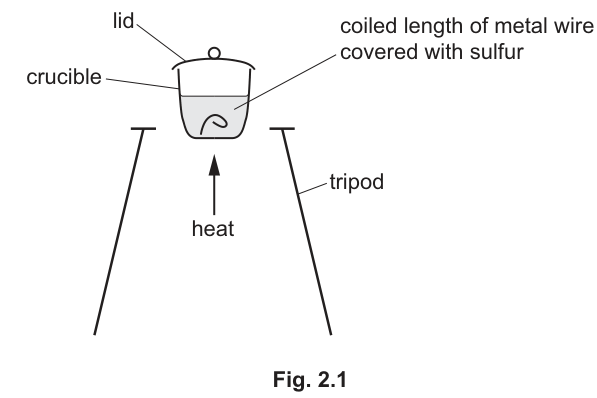
Fig. 2.1 shows how the apparatus is set up when heating the crucible in step 4.
Identify the missing piece of apparatus used to support the crucible during heating.
Answer
pipeclay triangle
pipeclay triangle
Background Concept
When heating a crucible strongly, it cannot be placed directly on a tripod because the tripod bars are too thick and would not support the crucible evenly, potentially causing it to crack or tip over. A pipeclay triangle is a standard piece of apparatus consisting of a metal frame covered with a heat-resistant ceramic (pipeclay) coating. It sits on the tripod and provides a stable, heat-resistant platform for the crucible.
Understanding the Question
The question asks to identify the missing piece of apparatus in Fig. 2.1 that supports the crucible during heating. The diagram shows a tripod and a crucible, but the crucible is floating above the tripod bars. We need to name the component that bridges the two.
Approach
Recall standard laboratory procedures for heating crucibles. The missing link between the tripod and the crucible is the pipeclay triangle.
Step-by-Step Reasoning
- Observe the apparatus in Fig. 2.1: a tripod is present, and a crucible is being heated above it.
- Recall that a crucible requires a stable, heat-resistant support that allows heat from the Bunsen burner to reach the bottom of the crucible.
- The correct apparatus for this is a pipeclay triangle, which rests on the tripod ring and holds the crucible securely.
Key Takeaways
Always ensure crucibles are supported by a pipeclay triangle on a tripod when strong heating is required. Direct contact with metal tripod bars is incorrect and dangerous.
Common Mistakes
- Writing 'wire gauze': wire gauze is used for flasks and beakers to distribute heat evenly, not for supporting crucibles under strong direct heat.
- Writing 'ceramic mat': this is used to protect the bench, not to support the crucible during heating.
Things to Be Careful About
Use the exact terminology 'pipeclay triangle'. 'Triangle' alone is not sufficient; 'wire gauze' is incorrect.
Answer
Heating sulfur produces toxic sulfur dioxide gas (), which must be vented safely in a fume hood to protect the students from inhalation.
toxic gas is produced
Background Concept
When sulfur is heated in the presence of air (oxygen), it burns to form sulfur dioxide gas:
Sulfur dioxide is a toxic, pungent, and irritating gas. Prolonged or high-concentration exposure can cause severe respiratory damage. Fume hoods are designed to capture and exhaust such hazardous gases away from the user.
Understanding the Question
The students are heating sulfur in a crucible. The question asks why this must be done in a fume hood. We need to identify the hazard produced by the reaction.
Approach
Identify the gaseous product of heating sulfur in air and state its hazard.
Step-by-Step Reasoning
- Sulfur reacts with oxygen in the air when heated.
- The product is sulfur dioxide (), which is a gas.
- is toxic and harmful if inhaled.
- Therefore, the experiment must be conducted in a fume hood to safely remove the toxic gas from the laboratory environment.
Key Takeaways
Always consider the physical state and toxicity of products when designing or evaluating heating experiments, especially those involving non-metals like sulfur.
Common Mistakes
- Saying 'to avoid smoke': while can form a mist, the primary hazard is its toxicity as a gas.
- Saying 'to prevent explosion': there is no explosion risk here.
Things to Be Careful About
The mark scheme specifically looks for 'toxic gas'. Mentioning 'sulfur dioxide' is good, but the core reason is its toxicity. Do not just say 'gas' without specifying it is toxic or harmful.
Answer
A large excess of sulfur is used to ensure that all of the metal M reacts completely, making M the limiting reactant.
to ensure all of the metal M reacts
Background Concept
In a reaction between two reactants, the limiting reactant is the one that is completely consumed first and determines the amount of product formed. To ensure a quantitative reaction (where all of a specific reactant is converted to product), the other reactant is typically added in excess.
Understanding the Question
The students want to find out how much sulfur reacts with a known mass of metal M. To do this accurately, they need to be sure that every atom of M has reacted. Using a large quantity of sulfur guarantees this.
Approach
Explain the purpose of using an excess of one reactant in a synthesis experiment.
Step-by-Step Reasoning
- The goal is to combine metal M with sulfur to form a metal sulfide.
- If sulfur were the limiting reactant, some metal M would be left unreacted, and the final mass would not accurately reflect the stoichiometry of the sulfide.
- By using a large quantity (excess) of powdered sulfur, sulfur is in excess and metal M is the limiting reactant.
- This ensures all of the metal M reacts, allowing accurate calculation of the mass of sulfur that combined with it.
Key Takeaways
In quantitative synthesis experiments, always use an excess of the reagent that is not being measured or is easier to remove later (like volatile sulfur, which can be driven off or is in excess but doesn't affect the final mass of the metal sulfide if excess is removed, though here excess sulfur is likely just not fully reacting or is driven off as gas).
Common Mistakes
- Saying 'to make the reaction go faster': while powdered sulfur increases surface area and speed, the 'large quantity' specifically ensures completion.
- Saying 'to produce more product': the amount of product is limited by the metal M anyway.
Things to Be Careful About
The key phrase is 'ensure all of the metal M reacts'. Do not just say 'excess sulfur' without explaining why.
Five students each use a different mass of M.
Their results are shown in Table 2.1.
Complete Table 2.1 by inserting values for the mass of M and the mass of sulfur which reacts for each student.
Table 2.1
| student 1 | student 2 | student 3 | student 4 | student 5 | |
|---|---|---|---|---|---|
| mass of crucible and lid / g | 34.15 | 38.28 | 35.68 | 33.70 | 36.84 |
| mass of crucible, lid and M / g | 35.58 | 39.42 | 36.54 | 34.27 | 37.13 |
| mass of crucible, lid and residue after heating / g | 36.04 | 39.70 | 36.74 | 34.42 | 37.19 |
| mass of M / g | |||||
| mass of sulfur which reacts / g |
Working
Mass of M = (mass of crucible, lid and M) − (mass of crucible and lid)
Mass of S reacting = (mass of crucible, lid and residue) − (mass of crucible, lid and M)
| student 1 | student 2 | student 3 | student 4 | student 5 | |
|---|---|---|---|---|---|
| mass of M / g | 1.43 | 1.14 | 0.86 | 0.57 | 0.29 |
| mass of sulfur which reacts / g | 0.46 | 0.28 | 0.20 | 0.15 | 0.06 |
Example calculation (student 1):
Mass of M =
Mass of S =
Answer
See completed table above.
mass of M: 1.43, 1.14, 0.86, 0.57, 0.29; mass of S: 0.46, 0.28, 0.20, 0.15, 0.06
Background Concept
In a mass-balance experiment like this, the mass of a specific component is found by subtracting the mass of the container (crucible + lid) from the total mass. The mass of sulfur that actually reacted is found by comparing the final mass of the solid residue (metal sulfide + unreacted sulfur if any, but ideally just metal sulfide) with the initial mass of the metal.
Actually, a simpler way:
Mass of residue (metal sulfide) = (mass of crucible, lid and residue) - (mass of crucible and lid).
Mass of sulfur reacted = (Mass of residue) - (Mass of metal M).
Alternatively: Mass of sulfur reacted = (mass of crucible, lid and residue) - (mass of crucible, lid and M). This works because the only thing added to the 'crucible + lid + M' system that remains is the sulfur that reacted (assuming excess sulfur is removed or doesn't add to the final weighed mass, though the method says 'until no more sulfur can be seen', implying excess is removed or volatilized).
Understanding the Question
We are given three mass measurements for each student and need to calculate the mass of metal M used and the mass of sulfur that reacted with it.
Approach
Use simple subtraction to isolate the mass of M and the mass of S from the total masses.
Step-by-Step Reasoning
For each student:
-
Mass of M: Subtract the empty crucible mass from the crucible + M mass.
- Student 1:
- Student 2:
- Student 3:
- Student 4:
- Student 5:
-
Mass of S reacting: Subtract the 'crucible + lid + M' mass from the 'crucible + lid + residue' mass. This gives the mass of sulfur that is now part of the residue (i.e., reacted).
- Student 1:
- Student 2:
- Student 3:
- Student 4:
- Student 5:
Key Takeaways
Always carefully track which masses correspond to which components. The difference between 'crucible + M' and 'crucible + residue' directly gives the mass of sulfur incorporated into the product.
Common Mistakes
- Subtracting the wrong values (e.g., residue - empty crucible gives total mass of product, not just sulfur).
- Forgetting to align the columns correctly for each student.
Things to Be Careful About
Ensure calculations are done to the correct number of decimal places (2 d.p. as given in the data). The final answers should match the precision of the input data.
Answer
The mass of metal M (or the mass of the metal used).
mass of M
Background Concept
In an experiment, the independent variable is the factor that the experimenter deliberately changes or controls to observe its effect on the dependent variable. The dependent variable is what is measured or observed in response.
Understanding the Question
The question states: 'Five students each use a different mass of M.' This means the mass of M is the variable being changed by the students. We need to identify this as the independent variable.
Approach
Read the experimental description to see what is deliberately varied.
Step-by-Step Reasoning
- The method says students use 'a different mass of M'.
- This mass is chosen by the students and varies across the experiment.
- Therefore, the mass of M is the independent variable.
Key Takeaways
The independent variable is what you change; the dependent variable is what you measure (here, the mass of sulfur that reacts, which is derived from the final mass).
Common Mistakes
- Confusing independent and dependent variables. The mass of sulfur is the dependent variable (it depends on how much metal is there).
- Saying 'the metal M': the variable is the mass of the metal, not the identity of the metal (which is constant).
Things to Be Careful About
Be precise: 'mass of M' or 'mass of metal', not just 'M'.
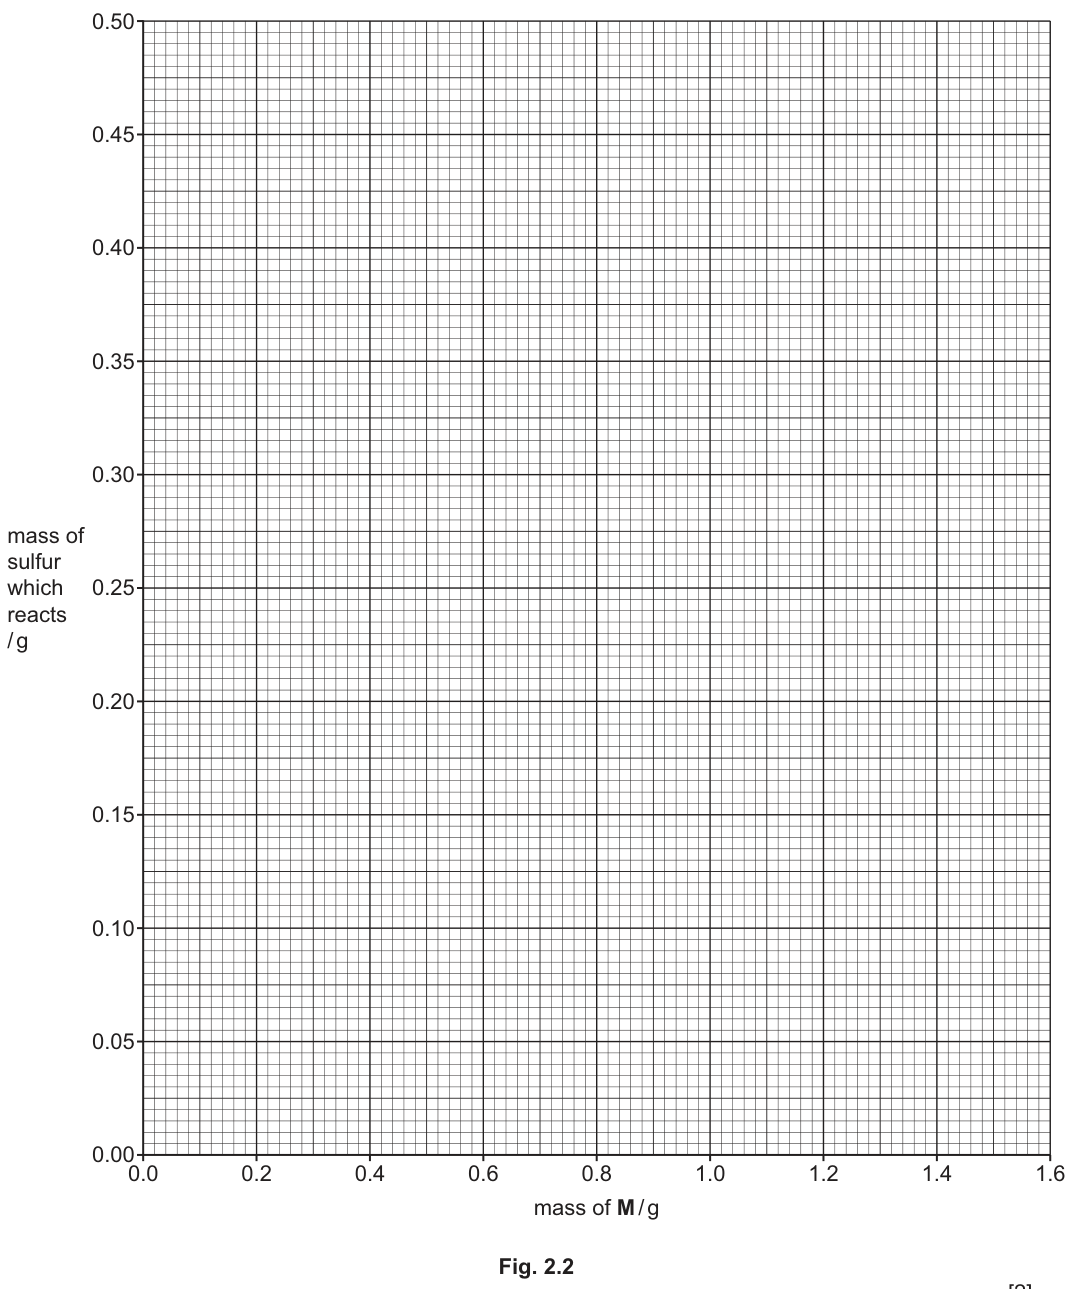
Plot a graph on the grid in Fig. 2.2 to show the relationship between mass of sulfur which reacts and mass of M.
Use a cross () to plot each data point. Draw a straight line of best fit which includes the origin.
Working
Data points to plot (x, y):
- Student 1:
- Student 2:
- Student 3:
- Student 4:
- Student 5:
Answer
A graph with the above 5 points plotted as crosses () and a straight line of best fit drawn passing through the origin and through the cluster of points.
See diagram for plotted points and line of best fit through origin
Background Concept
A graph of mass of sulfur reacting against mass of metal M should ideally be a straight line through the origin, because the mass of sulfur reacting is directly proportional to the mass of metal M (Law of Definite Proportions). The gradient of this line represents the mass ratio of sulfur to metal in the compound.
Understanding the Question
We need to plot the data from part (b) on the provided grid (Fig. 2.2) and draw a line of best fit that includes the origin .
Approach
- Plot each pair where = mass of M and = mass of S.
- Draw a straight line that best represents the trend, ensuring it passes through because if of metal is used, of sulfur will react.
Step-by-Step Reasoning
- Plotting: Mark each point accurately on the grid.
- : x=1.43, y=0.46
- : x=1.14, y=0.28
- : x=0.86, y=0.20
- : x=0.57, y=0.15
- : x=0.29, y=0.06
- Line of best fit: Draw a straight line. It must go through . It should have roughly equal numbers of points on either side, minimizing the distance to all points. Note that is somewhat high compared to the others, so the line might pass slightly below it.
Key Takeaways
Lines of best fit through the origin are common in stoichiometry experiments. The gradient gives the constant mass ratio.
Common Mistakes
- Forgetting to include the origin in the line of best fit.
- Drawing a curve instead of a straight line.
- Plotting points inaccurately (e.g., misreading the axis scales).
Things to Be Careful About
The x-axis goes from 0.0 to 1.6 in steps of 0.2. The y-axis goes from 0.00 to 0.50 in steps of 0.05. Ensure points are plotted within these ranges accurately.
Circle the point on the graph you consider to be most anomalous.
Suggest one reason why this anomaly may have occurred during this experimental procedure.
Assume no error was made in the measurement of any mass.
Answer
Anomalous point: Student 1 (1.43, 0.46) or the point furthest from the line of best fit.
Reason: Not all of the excess sulfur had been removed/volatilised in step 4, so the final mass includes unreacted sulfur, making the mass of sulfur appearing to react too high.
Anomalous point: Student 1; Reason: excess sulfur not fully removed
Background Concept
An anomalous result (or outlier) is a data point that does not fit the general trend of the data. In a proportional relationship, this would be a point that is far from the line of best fit. We must also consider experimental errors that could cause such a deviation, keeping in mind the specific steps of the method.
Understanding the Question
We need to identify which point on the graph is most anomalous and suggest a reason for it, assuming no measurement errors (i.e., the balance readings are correct).
Approach
- Look at the ratios (y/x) or visually inspect the graph to find the point furthest from the line through the origin.
- Relate the deviation to the experimental steps. If the y-value (mass of S) is too high, it means the final residue was heavier than it should be. This could happen if unreacted sulfur was not removed.
Step-by-Step Reasoning
- Calculate ratios (mass S / mass M) for each student:
- S1:
- S2:
- S3:
- S4:
- S5:
Student 1 has a significantly higher ratio (0.321) than the others (which cluster around 0.23-0.26). Thus, Student 1's point is anomalous.
- Reason: The mass of sulfur 'reacting' is calculated as (final mass) - (initial mass of M). If the final mass is too high, it means there is extra mass in the residue. Since we assume no measurement error, the extra mass must be unreacted sulfur that was not removed during heating. Step 4 says 'Continue heating strongly until no more sulfur can be seen', but visually it's hard to tell if all sulfur gas has escaped, especially if the crucible is covered or if sulfur sublimed and recondensed.
Key Takeaways
Anomalies often arise from incomplete reactions or failure to remove excess reagents. Always link the error to a specific step in the method.
Common Mistakes
- Suggesting 'balance was not zeroed': the question says 'Assume no error was made in the measurement of any mass'.
- Suggesting 'metal was impure': possible, but 'excess sulfur not removed' is the more direct link to the method described.
Things to Be Careful About
The reason must specifically address why the mass of sulfur appears to be too high (y-value too high). If you say 'metal was wet', that would make the initial mass of M too high, affecting the x-value, which is not the primary issue here (though it could be). Focus on the final residue mass being too high.
Determine the gradient of your line of best fit.
State the coordinates of both points you used in your calculation.
These must be selected from your line of best fit.
Give your gradient to three significant figures.
Working
Select two points on the line of best fit (not necessarily data points).
Example points: and
(Note: Actual coordinates will vary based on the drawn line. Typical acceptable gradient is between 0.230 and 0.250.)
Answer
Gradient (to 3 s.f.)
gradient = 0.240 (example values)
Background Concept
The gradient of a line on a graph is calculated as . For a line through the origin, it is simply for any point on the line. The gradient represents the constant ratio between the two variables.
Understanding the Question
We need to calculate the gradient of the line of best fit drawn in part (d)(i). We must state the coordinates used and give the answer to 3 significant figures.
Approach
- Choose two points on the line of best fit that are far apart to minimize reading errors.
- Read their coordinates.
- Calculate .
Step-by-Step Reasoning
- Use the origin as one point if the line passes through it (which it should).
- Choose another point on the line, e.g., where . Read the corresponding value from the line (not the data point). Let's say .
- Gradient .
- Ensure the answer is to 3 significant figures: .
Key Takeaways
Always use points on the line of best fit, not the actual data points, for gradient calculations. Use a large triangle (far apart points) to reduce percentage error in reading coordinates.
Common Mistakes
- Using data points instead of points on the line (especially the anomalous point).
- Not giving the answer to 3 significant figures.
- Reading the wrong axis or misinterpreting the scale.
Things to Be Careful About
The coordinates must be 'selected from your line of best fit'. Do not just copy a data point unless it lies exactly on your line. The mark scheme accepts a range of gradients (typically 0.230 - 0.250) depending on how the line was drawn.
Use your line of best fit in Fig. 2.2 to determine if the results obtained by the students are reliable.
Explain your answer.
Answer
The results are not reliable because there is an anomalous point (Student 1's result), which indicates inconsistency or uncontrolled variables in the experiment.
not reliable; there is an anomalous point
Background Concept
Reliability in an experiment refers to the consistency of the results. If data points scatter widely around the line of best fit, or if there are anomalous results that cannot be explained by normal experimental error, the data is considered not reliable.
Understanding the Question
We need to state whether the results are reliable and explain why, based on the graph and the anomaly identified in part (d)(ii).
Approach
Link the presence of an anomaly to the concept of reliability.
Step-by-Step Reasoning
- In part (d)(ii), we identified Student 1's point as anomalous.
- An anomalous point means the data does not follow a consistent trend.
- Therefore, the results are not reliable.
Key Takeaways
Reliability is compromised by anomalies. Always mention the anomaly when justifying a lack of reliability.
Common Mistakes
- Saying 'reliable because most points are on the line': the presence of an anomaly reduces overall reliability.
- Not giving a reason: must state 'there is an anomalous point'.
Things to Be Careful About
The mark scheme requires both 'not reliable' AND the reason 'there is an anomalous point'.
Another student suggests that the metal M used in the experiment is strontium, Sr, which forms strontium sulfide, SrS, when heated with sulfur.
Deduce the gradient of the line of best fit for the graph of mass of sulfur which reacts against mass of strontium for the compound SrS.
Working
For strontium sulfide, :
Molar mass of
Molar mass of
The mass ratio of S to Sr in the compound is:
Answer
Gradient
0.366
Background Concept
The gradient of the graph (mass of S reacting / mass of M) represents the mass ratio of sulfur to metal in the formed compound. For a known compound like , we can calculate this theoretical mass ratio using the relative atomic masses () of the elements.
Understanding the Question
We are given that the metal might be strontium (Sr), forming SrS. We need to calculate what the gradient of the graph would be if this were true.
Approach
- Find the molar mass of S and Sr.
- Calculate the ratio .
Step-by-Step Reasoning
- From the data sheet (or standard values): , .
- In SrS, 1 mole of Sr reacts with 1 mole of S.
- Mass of 1 mole of S = .
- Mass of 1 mole of Sr = .
- Gradient .
- To 3 significant figures, gradient .
Key Takeaways
The gradient of a mass-mass graph for a binary compound is equal to the ratio of the molar masses of the elements (adjusted for stoichiometry).
Common Mistakes
- Using the wrong atomic masses.
- Calculating the ratio the wrong way round (mass of M / mass of S instead of mass of S / mass of M). Remember the y-axis is mass of S and x-axis is mass of M.
Things to Be Careful About
Use the correct values. Ensure the ratio is , i.e., .
Use your answer to (i) to explain if the results of the experiment support the student’s suggestion.
Answer
The experimental gradient (from part e, e.g., ) is different from the theoretical gradient for (). Therefore, the results do not support the suggestion that the metal is strontium.
gradient is different, so not strontium
Background Concept
To verify if an unknown metal is a specific element, we can compare the experimental mass ratio (gradient of the graph) with the theoretical mass ratio calculated from the known formula of the compound it forms.
Understanding the Question
We calculated the theoretical gradient for SrS as 0.366. We also have an experimental gradient from part (e) (around 0.240). We need to compare them and conclude whether the metal is strontium.
Approach
Compare the two values. If they are significantly different, the hypothesis is incorrect.
Step-by-Step Reasoning
- Experimental gradient (from part e).
- Theoretical gradient for SrS (from part g(i)).
- . The values are significantly different.
- Therefore, the metal M is not strontium, and the results do not support the student's suggestion.
Key Takeaways
Experimental data must align with theoretical predictions to support a hypothesis. Large discrepancies indicate the hypothesis is wrong.
Common Mistakes
- Saying 'they are similar': 0.240 and 0.366 are very different (almost 50% difference).
- Not explicitly stating 'the results do not support the suggestion'.
Things to Be Careful About
Clearly state that the gradients are different and link this directly to the conclusion about the metal's identity.