Chemistry 9701/43 — May/June 2024
Cambridge A-Level · A Level Structured Questions · worked solutions for every part, with the mark scheme
Topics Introduction to A Level Organic Chemistry · Group 2 · Equilibria · Transition Elements · Electrochemistry · Analytical Techniques · +6 more
Describe the trend in the solubility of the hydroxides of magnesium, calcium and strontium.
Explain your answer.
.......................................... > .......................................... > ..........................................
most soluble least soluble
Answer
Order of solubility (most to least):
Going down Group 2:
- Both and become less exothermic (less negative)
- changes by a greater amount than
- Hence becomes more exothermic (more negative)
- A more exothermic favours dissolution, so solubility increases
Sr(OH)2 > Ca(OH)2 > Mg(OH)2 (most to least soluble)
Background Concept
The solubility of an ionic compound in water is governed by the enthalpy of solution, — the enthalpy change when one mole of the solid dissolves. This can be viewed as the sum of two steps:
- Breaking the ionic lattice: energy is absorbed to separate the ions, so this step is endothermic, .
- Hydrating the separated ions: water molecules surround and stabilise the ions, releasing energy, so this step is exothermic, .
So , where is the (positive) lattice-breaking term and is the (negative) hydration term. The more exothermic (more negative) is, the more energetically favourable dissolution is, and the greater the solubility.
Going down Group 2, the cation radius increases: Mg²⁺ < Ca²⁺ < Sr²⁺. This affects both enthalpy terms:
- Lattice enthalpy: the lattice enthalpy of formation becomes less exothermic (less negative) because the larger cation is held less tightly in the lattice. Equivalently, the energy needed to break the lattice becomes less endothermic (less positive).
- Hydration enthalpy: becomes less exothermic (less negative) because the larger cation attracts water molecules less strongly.
The crucial point is which term changes by more. For Group 2 hydroxides, the lattice enthalpy changes by a greater amount than the hydration enthalpy, so the net effect is that becomes more exothermic (more negative) down the group.
Understanding the Question
This part asks you to (i) describe the trend in solubility of Mg(OH)₂, Ca(OH)₂ and Sr(OH)₂, and (ii) explain it. The mark scheme awards one mark for the correct order and three marks for the enthalpy explanation. You need to mention both lattice and hydration enthalpy, state that both become less exothermic down the group, and crucially state that the lattice enthalpy changes by a greater amount — this is what makes more exothermic.
Approach
- State the order: Sr(OH)₂ > Ca(OH)₂ > Mg(OH)₂ (most to least soluble).
- Recall that .
- State that both and become less exothermic (less negative) down the group.
- State that changes by a greater amount.
- Conclude that becomes more exothermic (more negative), favouring dissolution.
Step-by-Step Reasoning
Going down Group 2, the cation radius increases (Mg²⁺ < Ca²⁺ < Sr²⁺).
Lattice enthalpy: The lattice enthalpy of formation for Mg(OH)₂ is more negative than for Sr(OH)₂, because the small Mg²⁺ ion is strongly attracted to the OH⁻ ions in the lattice. As the cation gets larger, the attraction weakens and the lattice enthalpy becomes less negative (less exothermic). In terms of dissolution, this means the lattice-breaking term becomes less positive (less endothermic).
Hydration enthalpy: Similarly, the small Mg²⁺ ion is strongly hydrated — water molecules are attracted to it strongly, releasing a lot of energy. The larger Sr²⁺ ion is hydrated less strongly, so its hydration enthalpy is less negative (less exothermic).
Now, . As we go down the group, the lattice-breaking term becomes less positive and the hydration term becomes less negative. The mark scheme tells us that the lattice enthalpy changes by a greater amount than the hydration enthalpy. This means the decrease in the endothermic lattice-breaking term is larger than the decrease in the exothermic hydration term, so the net becomes more negative (more exothermic).
A more exothermic means dissolution is more energetically favourable, so solubility increases down the group: Sr(OH)₂ > Ca(OH)₂ > Mg(OH)₂.
Key Takeaways
- Both lattice and hydration enthalpies become less exothermic with larger ions
- The trend in solubility depends on which enthalpy term changes more
- For Group 2 hydroxides, solubility increases down the group (the opposite of Group 2 sulfates)
Common Mistakes
- Stating the wrong order (e.g., thinking solubility decreases down the group — that is true for sulfates, not hydroxides)
- Only mentioning one of the two enthalpy terms (both must be mentioned for the mark)
- Failing to state that changes more than — this is a required mark
- Confusing the sign convention for lattice enthalpy (formation vs breaking)
Things to Be Careful About
- Use the correct sign convention and terminology: "less exothermic" or "less negative"
- The mark scheme explicitly requires the point that changes more
- Give the order from most to least soluble as asked in the question
Suggest the variation in pH of saturated solutions of the hydroxides of magnesium, calcium and strontium.
Explain your answer.
Answer
pH increases down the group: .
The concentration of OH⁻ ions in the saturated solution increases as solubility increases, so the pH increases.
pH increases down the group: Sr(OH)2 > Ca(OH)2 > Mg(OH)2
Background Concept
The pH of a saturated solution of a metal hydroxide depends on the concentration of hydroxide ions, [OH⁻], which in turn depends on the solubility of the hydroxide. A more soluble hydroxide produces a higher [OH⁻] in its saturated solution. Since pOH = −log[OH⁻] and pH + pOH = 14, a higher [OH⁻] means a lower pOH and hence a higher pH.
Understanding the Question
This part connects the solubility trend from part (i) to the pH of saturated solutions. Since Sr(OH)₂ is the most soluble, its saturated solution has the highest [OH⁻] and therefore the highest pH. The question asks you to "suggest" the variation, which means you should state the trend and give a brief reason.
Approach
Use the solubility trend from (a)(i): more soluble → higher [OH⁻] → higher pH.
Step-by-Step Reasoning
From part (i), solubility increases down the group: Sr(OH)₂ > Ca(OH)₂ > Mg(OH)₂. Each formula unit of hydroxide releases OH⁻ ions when it dissolves. A more soluble hydroxide gives a higher concentration of OH⁻ in its saturated solution. Since pH = 14 − pOH and pOH = −log[OH⁻], a higher [OH⁻] gives a lower pOH and hence a higher pH. So the pH of saturated solutions increases down the group: Sr(OH)₂ > Ca(OH)₂ > Mg(OH)₂.
Key Takeaways
- pH of a saturated metal hydroxide solution is directly linked to its solubility
- Higher solubility → higher [OH⁻] → higher pH
Common Mistakes
- Saying pH decreases when it should increase
- Not linking the pH trend to the solubility trend from part (i)
Things to Be Careful About
- The mark scheme wants the link between [OH⁻] and pH made explicit: "pH increases as the concentration of [OH⁻] ions increases"
Barium hydroxide, , is a strong base.
A solution of with a pH of is made by dissolving in distilled water.
Calculate the mass of required to make this solution.
Show your working.
[: , ]
Working
moles of in
mass
Answer
0.339 g
Background Concept
pH is a measure of the hydrogen ion concentration: pH = −log[H⁺]. In aqueous solution at 298 K, the ionic product of water is . Given the pH, we can find [H⁺], then [OH⁻] using . For a strong base like Ba(OH)₂, which fully dissociates as Ba(OH)₂ → Ba²⁺ + 2OH⁻, the concentration of the base is half the concentration of OH⁻. Finally, the mass required is found from moles = concentration × volume, and mass = moles × .
Understanding the Question
We are given the pH (12.2) and volume (250.0 cm³) of a Ba(OH)₂ solution, and the relative molecular mass (171.3). We need to find the mass of Ba(OH)₂ required. The key steps are: pH → [H⁺] → [OH⁻] (via ) → [Ba(OH)₂] (÷2) → moles (× volume) → mass (× ).
Approach
- Convert pH to [H⁺] using [H⁺] = 10^(−pH).
- Find [OH⁻] using .
- Divide by 2 to get [Ba(OH)₂] (stoichiometry: 1 Ba(OH)₂ gives 2 OH⁻).
- Convert volume to dm³ and calculate moles.
- Multiply by to get mass.
Step-by-Step Reasoning
- [H⁺]: pH = 12.2, so .
- [OH⁻]: .
- [Ba(OH)₂]: Ba(OH)₂ dissociates fully: Ba(OH)₂ → Ba²⁺ + 2OH⁻. So .
- Moles: Volume = 250.0 cm³ = 0.2500 dm³. Moles = .
- Mass: Mass = moles × = .
Key Takeaways
- pH → [H⁺] → [OH⁻] via is a standard route for strong base calculations
- Stoichiometry matters: Ba(OH)₂ gives 2 OH⁻ per formula unit
- Always convert cm³ to dm³ before using concentration × volume
Common Mistakes
- Forgetting to divide [OH⁻] by 2 to get [Ba(OH)₂]
- Using the volume in cm³ without converting to dm³
- Using pH directly instead of converting to [H⁺] first
Things to Be Careful About
- at 298 K (assumed unless stated otherwise)
- Give the final answer to an appropriate number of significant figures (3 s.f. is standard)
- The mark scheme allows error carried forward (ecf), so even if an earlier step is wrong, correct subsequent working can still score
The solubility of iron(II) hydroxide, , is at .
Answer
Ksp = [Fe2+][OH-]^2
Background Concept
The solubility product, , is the equilibrium constant for the dissolution of a sparingly soluble salt. For Fe(OH)₂(s) ⇌ Fe²⁺(aq) + 2OH⁻(aq), the expression is . The solid is not included in the expression, and the stoichiometric coefficient 2 becomes the power on [OH⁻].
Understanding the Question
This is a straightforward recall question: write the expression for Fe(OH)₂.
Approach
Write the dissolution equilibrium, then apply the convention: product of ion concentrations, each raised to its stoichiometric coefficient, excluding the solid.
Step-by-Step Reasoning
Fe(OH)₂(s) ⇌ Fe²⁺(aq) + 2OH⁻(aq). The expression excludes the solid and raises each ion concentration to the power of its stoichiometric coefficient: .
Key Takeaways
- excludes the solid
- Coefficients become powers
Common Mistakes
- Including Fe(OH)₂ in the expression
- Writing [OH⁻] without the power 2
Things to Be Careful About
- The square on [OH⁻] is essential
Working
Let solubility
,
Units:
Answer
Ksp = 8.01 × 10^-16 mol^3 dm^-9
Background Concept
If the molar solubility of Fe(OH)₂ is mol dm⁻³, then at equilibrium [Fe²⁺] = and [OH⁻] = (because each formula unit dissolves to give one Fe²⁺ and two OH⁻). Substituting into gives .
Understanding the Question
Given the solubility , calculate and give its units.
Approach
- Write [Fe²⁺] = and [OH⁻] = .
- Substitute into the expression.
- Calculate .
- Determine units from the expression.
Step-by-Step Reasoning
[Fe²⁺] =
[OH⁻] =
Units: [Fe²⁺] has units mol dm⁻³, [OH⁻]² has units (mol dm⁻³)² = mol² dm⁻⁶. Product: mol³ dm⁻⁹.
Key Takeaways
- For a salt with formula AB₂,
- Units of depend on the stoichiometry of the dissolution
Common Mistakes
- Forgetting the factor 4 (from )
- Getting the units wrong (forgetting the cube)
Things to Be Careful About
- The units are mol³ dm⁻⁹, not just a number
- Use 3 significant figures in the final answer
Answer
A transition element is an element which forms one or more stable ions with incomplete d orbitals.
An element which forms one or more stable ions with incomplete d orbitals
Background Concept
The IUPAC definition of a transition element is based on the electronic configuration of its ions, not its neutral atom. A transition element must be able to form at least one stable ion in which the d subshell is neither empty nor completely full (i.e. it has between 1 and 9 electrons in the d orbitals). This distinguishes true transition metals from Group 3 elements such as scandium (Sc³⁺ has a 3d⁰ configuration) and zinc (Zn²⁺ has a 3d¹⁰ configuration), which are not classified as transition elements despite being in the d-block.
Understanding the Question
The command word is "define", which requires a precise, textbook-standard statement. The mark scheme expects the key phrase "incomplete d orbitals" in a stable ion.
Approach
Recall the formal definition verbatim, ensuring the qualifier "stable ion" and the phrase "incomplete d orbitals" both appear.
Step-by-Step Reasoning
The definition must include:
- It is an element (not an atom or species in general).
- It forms one or more stable ions — this is the critical criterion; the neutral atom's configuration is irrelevant.
- Those ions have incomplete d orbitals — meaning the d subshell is partially filled (d¹ to d⁹).
This excludes Sc (Sc³⁺ = [Ar]3d⁰) and Zn (Zn²⁺ = [Ar]3d¹⁰) from being transition elements.
Key Takeaways
- The definition hinges on the ion, not the atom.
- "Incomplete" means partially filled (not empty, not full).
- Sc and Zn are d-block elements but NOT transition elements.
Common Mistakes
- Saying "an element with partially filled d orbitals" without specifying "in its ions" — this would incorrectly include Sc and Zn.
- Confusing "d-block element" with "transition element".
Things to Be Careful About
- The word "stable" is important — some very unstable or theoretical ions do not count.
- "Incomplete" must be used rather than "partially filled" or "not full" to match the mark scheme exactly.
Answer
Transition elements have vacant d orbitals that are energetically accessible, allowing them to accept lone pairs of electrons from ligands to form coordinate (dative covalent) bonds.
They have vacant d orbitals that are energetically accessible for accepting lone pairs from ligands
Background Concept
A complex ion consists of a central metal ion surrounded by ligands, each of which donates a lone pair of electrons to form a coordinate (dative covalent) bond. For this to occur, the metal ion must have available orbitals of suitable energy to accept those electron pairs. In transition metals, the (n−1)d, ns, and np orbitals are close enough in energy to be used for bonding, providing vacant orbitals that can accept lone pairs.
Understanding the Question
The command word is "explain", requiring a reason linking the property (complex formation) to a structural feature (vacant d orbitals). One mark is available.
Approach
Identify the structural feature of transition metal ions that enables them to act as Lewis acids (electron-pair acceptors): the presence of low-energy vacant d orbitals.
Step-by-Step Reasoning
- Ligands (e.g. NH₃, H₂O, Cl⁻) each possess at least one lone pair of electrons.
- To form a coordinate bond, the metal ion must have an empty orbital of appropriate energy to accept that lone pair.
- Transition metal ions have vacant 3d (and 4s/4p) orbitals that are close in energy to the ligand donor orbitals, making them energetically accessible.
- This allows multiple coordinate bonds to form, giving a complex ion with a defined coordination number.
By contrast, main-group metal ions like Na⁺ or Mg²⁺ lack accessible d orbitals at suitable energies and form far fewer stable complexes.
Key Takeaways
- Complex formation requires the metal to be a Lewis acid (electron-pair acceptor).
- The key enabling feature is vacant d orbitals of appropriate (low) energy.
- This is a defining chemical property of transition elements.
Common Mistakes
- Saying "they have d orbitals" without specifying that the orbitals must be vacant and energetically accessible.
- Attributing complex formation to variable oxidation states (a related but distinct property).
Things to Be Careful About
- The phrase "energetically accessible" is the mark scheme's key wording — it emphasises that the orbitals must be at a suitable energy to overlap with ligand lone pairs.
The 3d orbitals in an isolated ion are degenerate.
Answer
Degenerate orbitals are orbitals that have the same energy.
Orbitals of the same energy
Background Concept
In quantum mechanics, orbitals within the same subshell (e.g. the five 3d orbitals: d_xy, d_xz, d_yz, d_x²−y², d_z²) are said to be degenerate when they possess exactly the same energy. This occurs in an isolated atom or ion where no external electric field or ligand field is present to break the symmetry and differentiate the orbitals by energy.
Understanding the Question
The command word is "define". The stem specifies that the 3d orbitals in an isolated Ag⁺ ion are degenerate, and asks for the meaning of "degenerate" in this context.
Approach
Provide the concise, standard definition: orbitals of the same (equal) energy.
Step-by-Step Reasoning
- In an isolated gaseous ion, all five 3d orbitals experience the same nuclear charge and electron–electron repulsions symmetrically.
- Therefore they have identical energies — they are degenerate.
- When ligands approach (as in a complex ion), the electrostatic field of the ligands interacts differently with each d orbital depending on its orientation, lifting the degeneracy (d-orbital splitting).
Key Takeaways
- Degenerate = same energy.
- Degeneracy exists in isolated atoms/ions but is broken by ligand fields or external electric/magnetic fields.
Common Mistakes
- Saying "orbitals of the same shape" — shape is not the defining criterion.
- Saying "orbitals in the same shell" — that is necessary but not sufficient (e.g. 3s and 3p are in the same shell but not degenerate in multi-electron atoms).
Things to Be Careful About
- The definition must specify energy, not shape or size.
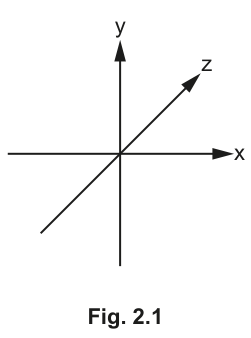
Answer
The 3d orbital has four lobes lying in the xy-plane, oriented between the x and y axes (at 45° to each axis). There is a nodal plane containing the z-axis.
Four lobes in the xy-plane between the x and y axes at 45° to each
Background Concept
The five 3d orbitals differ in their spatial orientation. The d_xy orbital has its four lobes concentrated in the xy-plane, directed between (not along) the x and y axes. This is in contrast to d_x²−y², which also has four lobes in the xy-plane but directed along the x and y axes. The d_xy orbital has two nodal planes: the xz-plane and the yz-plane (both containing the z-axis).
Understanding the Question
The command word is "sketch", requiring a drawing on the provided axes (Fig. 2.1 shows x, y, and z axes). One mark is available for a correctly oriented four-lobed shape in the xy-plane between the axes.
Approach
Recall that d_xy means the orbital's electron density lies in the region between the x and y axes (where the product xy is large). Draw four lobes in the xy-plane at 45° to both axes.
Step-by-Step Reasoning
- The subscript "xy" indicates the orbital's angular dependence involves the product xy.
- Maximum electron density occurs where |xy| is largest, i.e. at 45° to both x and y axes in the xy-plane.
- There are four lobes (two positive, two negative phase), arranged in a cloverleaf pattern in the xy-plane.
- The z-axis passes through the nodes (zero electron density along x and y axes and along z).
- The lobes must be drawn between the x and y axes, NOT along them (that would be d_x²−y²).
Key Takeaways
- d_xy: four lobes in xy-plane, between the axes.
- d_x²−y²: four lobes in xy-plane, along the axes.
- d_z²: two lobes along z-axis with a toroidal ring in the xy-plane.
- The subscript tells you which axes the lobes lie between.
Common Mistakes
- Drawing the lobes along the x and y axes instead of between them (confusing d_xy with d_x²−y²).
- Drawing a d_z² shape (two lobes along z with a donut ring) instead.
- Omitting the 3D perspective of the axes.
Things to Be Careful About
- The lobes must be clearly between the x and y axes, at approximately 45° to each.
- The drawing should be in the plane of the paper (xy-plane) as shown by the axes in Fig. 2.1.
Tollens’ reagent can be used to distinguish between aldehydes and ketones. Tollens’ reagent contains , which can be prepared in a two-step process.
step 1 Aqueous is added dropwise to aqueous to form as a brown precipitate.
step 2 Aqueous is added dropwise to to form a colourless solution containing .
Construct equations for each of the steps in the preparation of .
step 1 ........................................................................................................................................
step 2 ........................................................................................................................................
Answer
Step 1:
Step 2:
Step 1: 2AgNO3 + 2NaOH → Ag2O + 2NaNO3 + H2O; Step 2: Ag2O + 4NH3 + H2O → 2[Ag(NH3)2]OH
Background Concept
Tollens' reagent is prepared in two steps. First, silver(I) ions from AgNO₃ react with hydroxide ions from NaOH to form a brown precipitate of silver(I) oxide (Ag₂O). This is a precipitation reaction where Ag⁺ and OH combine. Second, aqueous ammonia is added, which acts as a ligand and dissolves the Ag₂O precipitate by forming the soluble diamminesilver(I) complex ion [Ag(NH₃)₂]⁺, with OH⁻ as the counter-ion.
Understanding the Question
The command word is "construct", requiring balanced chemical equations. The stem provides the reactants and products for each step. Two marks are available (one per equation).
Approach
For Step 1: combine AgNO₃ and NaOH to give Ag₂O, NaNO₃, and H₂O. Balance by ensuring Ag atoms match (need 2 AgNO₃ for 1 Ag₂O) and that O and H balance.
For Step 2: Ag₂O reacts with NH₃ and H₂O to form [Ag(NH₃)₂]OH. Each Ag needs 2 NH₃ ligands, and the oxide ion plus water provides the OH⁻ counter-ions.
Step-by-Step Reasoning
Step 1:
- Reactants: AgNO₃(aq) and NaOH(aq)
- Products: Ag₂O(s), NaNO₃(aq), H₂O(l)
- Balancing Ag: 2 AgNO₃ needed for 1 Ag₂O
- Balancing NO₃⁻: 2 NaNO₃ produced
- Balancing Na: 2 NaOH needed
- Checking O: Left = 2(3) + 2(1) = 8; Right = 1 + 2(3) + 1 = 8 ✓
- Checking H: Left = 2(1) = 2; Right = 2(1) = 2 ✓
Step 2:
- Reactants: Ag₂O, NH₃, H₂O
- Product: [Ag(NH₃)₂]OH
- Each Ag needs 2 NH₃ ligands → 4 NH₃ for 2 Ag
- 2 Ag atoms → 2 formula units of [Ag(NH₃)₂]OH
- O from Ag₂O and H₂O provide 2 OH⁻ groups
- Checking H: Left = 4(3) + 2 = 14; Right = 2(6+1) = 14 ✓
The ionic alternatives are also accepted:
- Step 1: 2Ag⁺ + 2OH⁻ → Ag₂O + H₂O
- Step 2: Ag₂O + 4NH₃ + H₂O → 2[Ag(NH₃)₂]⁺ + 2OH⁻ (or Ag⁺ + 2NH₃ + OH⁻ → [Ag(NH₃)₂]OH)
Key Takeaways
- Ag₂O is amphoteric and dissolves in excess ammonia via complex formation.
- The coordination number of Ag⁺ in this complex is 2.
- Balancing requires careful atom counting, especially of H and O.
Common Mistakes
- Writing AgOH instead of Ag₂O (AgOH is unstable and decomposes to Ag₂O + H₂O).
- Forgetting H₂O as a reactant in Step 2.
- Incorrect coefficient for NH₃ (must be 4, not 2, to provide 2 ligands per Ag).
- Not balancing the equation (e.g. writing Ag₂O + 2NH₃ + H₂O → [Ag(NH₃)₂]OH without the factor of 2 on the product).
Things to Be Careful About
- State symbols are not required by the mark scheme but the formulae must be correct.
- The complex formula [Ag(NH₃)₂]OH must be written with square brackets around the complex ion and OH outside.
Name the shape of the complex ion .
State the bond angle for H-N-Ag and for N-Ag-N.
shape ........................................................................................................................................
bond angle for H-N-Ag = .............. °
bond angle for N-Ag-N = .............. °
Answer
Shape: linear
Bond angle for H–N–Ag = 109.5°
Bond angle for N–Ag–N = 180°
Linear; H-N-Ag = 109.5°; N-Ag-N = 180°
Background Concept
The shape of a complex ion is determined by its coordination number (the number of coordinate bonds from ligands to the central metal ion). A coordination number of 2 gives a linear geometry with a bond angle of 180° at the metal centre. However, the bond angle H–N–Ag refers to the geometry around the nitrogen atom within the NH₃ ligand. In NH₃, nitrogen has three bonding pairs and one lone pair (tetrahedral electron-pair geometry), giving bond angles of approximately 109.5° (or slightly less, ~107°, due to lone-pair repulsion). The mark scheme accepts 109.5°.
Understanding the Question
Two marks are available: one for the correct bond angle H–N–Ag (109.5°), and one for both the shape (linear) and the N–Ag–N bond angle (180°) together.
Approach
- Determine the coordination number of Ag⁺ in [Ag(NH₃)₂]⁺: it is 2 (two NH₃ ligands).
- Coordination number 2 → linear shape → N–Ag–N = 180°.
- For H–N–Ag, consider the geometry at nitrogen: NH₃ has tetrahedral electron geometry, so the H–N–Ag angle ≈ 109.5°.
Step-by-Step Reasoning
- The complex [Ag(NH₃)₂]⁺ has Ag⁺ bonded to two NH₃ ligands via coordinate bonds from the N lone pairs.
- Coordination number = 2 → linear arrangement of ligands around the metal → N–Ag–N = 180°.
- Within each NH₃ ligand, N is approximately sp³ hybridised with a tetrahedral arrangement of electron pairs (3 bonding + 1 lone pair).
- The H–N–Ag angle is therefore approximately 109.5° (the tetrahedral angle).
Key Takeaways
- Coordination number determines the geometry at the metal centre.
- CN = 2 → linear (180°); CN = 4 → tetrahedral (109.5°) or square planar (90°); CN = 6 → octahedral (90°).
- Bond angles within ligands follow VSEPR rules for the ligand's own geometry.
Common Mistakes
- Saying the shape is "tetrahedral" (confusing the geometry at N with the geometry at Ag).
- Giving the H–N–Ag angle as 180° (this is the N–Ag–N angle, not the H–N–Ag angle).
- Giving the H–N–Ag angle as 90° (no basis for this).
Things to Be Careful About
- The question asks for TWO different angles: one at nitrogen (H–N–Ag) and one at silver (N–Ag–N). Do not confuse them.
- The mark scheme requires both "linear" AND "180°" for the second mark to be awarded.
An electrochemical cell uses as the positive electrode and as the negative electrode immersed in an alkaline electrolyte.
The overall cell reaction is shown.
Complete the half-equation for the reaction at each electrode.
at the positive electrode .....................................................................................
at the negative electrode ........................................................................................
Answer
At the positive electrode (reduction):
At the negative electrode (oxidation):
Positive electrode: Ag2O + H2O + 2e- → 2Ag + 2OH-; Negative electrode: Zn + 2OH- → Zn(OH)2 + 2e-
Background Concept
In an electrochemical cell, oxidation occurs at the negative electrode (anode) and reduction occurs at the positive electrode (cathode). In alkaline conditions, half-equations are balanced using OH⁻ and H₂O rather than H⁺. The overall cell reaction must be the sum of the two half-equations, with electrons cancelling.
Understanding the Question
The overall reaction is given: Ag₂O + Zn + H₂O → 2Ag + Zn(OH)₂. The cell operates in alkaline electrolyte. We must split this into two balanced half-equations. The positive electrode is where reduction occurs (Ag₂O → Ag), and the negative electrode is where oxidation occurs (Zn → Zn(OH)₂).
Approach
- Identify which species is reduced (Ag in Ag₂O goes from +1 to 0) and which is oxidised (Zn goes from 0 to +2).
- Write the reduction half-equation, balancing atoms and charge using OH⁻ and H₂O.
- Write the oxidation half-equation similarly.
- Verify that adding the two half-equations gives the overall reaction.
Step-by-Step Reasoning
Reduction at positive electrode:
- Ag₂O → Ag: silver is reduced from +1 to 0, so 2 electrons are gained (2 Ag⁺ each gaining 1 e⁻).
- Balance O: Ag₂O has 1 O on the left. In alkaline solution, add H₂O to the left and OH⁻ to the right.
- Ag₂O + H₂O + 2e⁻ → 2Ag + 2OH⁻
- Check atoms: Ag: 2=2 ✓; O: 1+1=2 ✓; H: 2=2 ✓
- Check charge: Left = 0 + 0 + (−2) = −2; Right = 0 + 2(−1) = −2 ✓
Oxidation at negative electrode:
- Zn → Zn(OH)₂: zinc is oxidised from 0 to +2, losing 2 electrons.
- Balance O and H using OH⁻: Zn + 2OH⁻ → Zn(OH)₂ + 2e⁻
- Check atoms: Zn: 1=1 ✓; O: 2=2 ✓; H: 2=2 ✓
- Check charge: Left = 0 + 2(−1) = −2; Right = 0 + (−2) = −2 ✓
Verification: Adding both half-equations:
Ag₂O + H₂O + 2e⁻ + Zn + 2OH⁻ → 2Ag + 2OH⁻ + Zn(OH)₂ + 2e⁻
Cancel 2e⁻ and 2OH⁻ from both sides:
Ag₂O + H₂O + Zn → 2Ag + Zn(OH)₂ ✓ (matches the given overall equation)
Key Takeaways
- In alkaline conditions, use OH⁻ and H₂O to balance half-equations.
- Reduction occurs at the positive electrode; oxidation at the negative electrode.
- Always verify by adding the two half-equations and checking they reproduce the overall equation.
Common Mistakes
- Using H⁺ instead of OH⁻/H₂O (the electrolyte is alkaline).
- Forgetting to include H₂O in the reduction half-equation.
- Incorrect electron count (must be 2e⁻ for both half-equations to balance with the overall reaction).
- Writing the oxidation half-equation with electrons on the wrong side.
Things to Be Careful About
- The question provides the start of each half-equation ("Ag₂O + ..." and "Zn + ..."), so the format must be followed.
- State symbols are not required by the mark scheme but must not contradict the alkaline conditions.
Coordination polymers are made when a bidentate ligand acts as a bridge between different metal ions.
Under certain conditions and the bidentate ligand dps can form a coordination polymer containing chains.
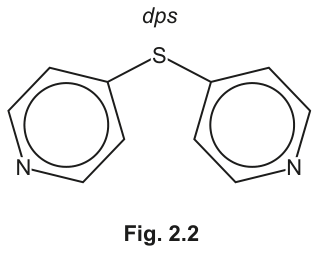
The bidentate ligand dps uses each of the nitrogen atoms to bond to a different .
Complete Fig. 2.3 by drawing the structure for the coordination polymer . Show two repeat units.
The dps ligand can be represented using N⌒N.
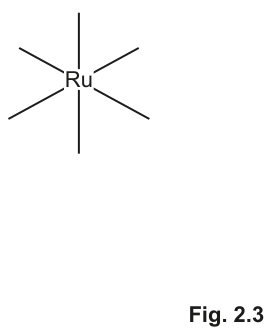
Answer
Each Ru centre is octahedrally coordinated with five Cl⁻ ligands and one N atom from the dps bridge. The dps ligand (N⌒N) bridges two Ru centres, with each N bonding to a different Ru. Dashed lines indicate continuation of the polymer chain.
Chain of octahedral Ru centres, each with 5 Cl ligands, bridged by dps (N⌒N) ligands; two repeat units shown with dashed lines at chain ends
Background Concept
A coordination polymer forms when bridging ligands connect multiple metal centres into an extended chain or network. A bidentate ligand that uses each of its donor atoms to bond to a different metal centre acts as a bridge. In this case, dps (4,4'-dipyridyl sulfide) has two nitrogen donor atoms (one from each pyridine ring), and each N coordinates to a different Ru³⁺ ion. Each Ru³⁺ is octahedrally coordinated (coordination number 6): five positions are occupied by Cl⁻ ligands and one by an N from dps.
Understanding the Question
The command word is "complete" (draw the structure). Two marks: M1 for the dps ligand correctly bonded to two Ru centres (bridging), and M2 for the rest of the structure being correct (octahedral Ru with 5 Cl, dashed lines for chain continuation, two repeat units shown).
Approach
- Draw an octahedral Ru centre with 5 Cl ligands and 1 N from dps.
- Show the dps ligand (N⌒N) bridging to a second Ru centre.
- Draw the second Ru with 5 Cl and 1 N from the same dps.
- Add dashed lines at each end of the dps ligand to show the chain continues (polymer).
- Show two repeat units as requested.
Step-by-Step Reasoning
- Each Ru³⁺ has coordination number 6 (octahedral geometry), as shown by the six bonds radiating from Ru in Fig. 2.3.
- Five of these bonds go to Cl⁻ ligands (monodentate).
- The sixth bond goes to one N atom of the dps ligand.
- The other N atom of the same dps ligand bonds to the next Ru³⁺ in the chain.
- This creates a linear chain: ...–Ru–N⌒N–Ru–N⌒N–Ru–...
- The charge on each repeat unit [Ru(dps)Cl₄]⁻ must be consistent: Ru³⁺ + 4Cl⁻ + dps (neutral) = −1 charge. Wait — the formula says [Ru(dps)Cl₄]⁻. Let me recheck: Ru³⁺ + 4(−1) + 0 = −1. But the diagram shows 5 Cl per Ru. Looking at the mark scheme image more carefully, each Ru has 5 Cl shown. The formula [Ru(dps)Cl₄]⁻ suggests 4 Cl per Ru. However, in the polymer, each Ru is bonded to one N from each of two dps ligands (one on each side), giving 2 N + 4 Cl = 6 coordination. So each Ru has 4 Cl and 2 N (from two different dps bridges). This gives [Ru(dps)Cl₄]⁻ per repeat unit where dps contributes one N to this Ru and one N to the next Ru.
Actually, looking at the mark scheme diagram again: each Ru shows 5 Cl and 1 N from dps. But the formula is [Ru(dps)Cl₄]⁻. In the polymer, each Ru is bonded to one N from the dps on its left AND one N from the dps on its right. So each Ru has 2 N (from two dps bridges) + 4 Cl = 6 coordination. The mark scheme drawing shows this correctly with 5 Cl visible on each Ru because one Cl position is shared conceptually... Let me look again at the MS image: it shows each Ru with 5 Cl drawn explicitly and 1 N from dps. The dashed lines at the ends of the dps indicate the chain continues. So the representation shows 5 Cl + 1 N per Ru = 6 coordination, and the next N from the same dps bonds to the next Ru.
The correct drawing: two Ru centres, each octahedral. Each Ru has 5 Cl ligands drawn. One coordination site on each Ru is occupied by an N from the bridging dps. Dashed lines extend from the terminal N atoms to show the chain continues beyond the drawn portion.
Key Takeaways
- Bidentate bridging ligands connect metal centres in coordination polymers.
- Each metal must maintain its full coordination number (6 for octahedral Ru³⁺).
- Dashed lines indicate the repeating nature of the polymer beyond the drawn portion.
Common Mistakes
- Drawing the dps as a chelating ligand (both N atoms bonding to the same Ru) instead of bridging (each N to a different Ru).
- Incorrect number of Cl ligands (must total 6 coordination sites per Ru).
- Not showing two repeat units.
- Forgetting dashed lines to indicate chain continuation.
Things to Be Careful About
- The dps must clearly bridge between two different Ru centres.
- The overall charge [Ru(dps)Cl₄]⁻ must be consistent with the structure drawn.
- Show exactly two repeat units as the question requires.
When a sample of hydrated lithium ethanedioate, , is gently heated, two gaseous products are formed and a white solid residue remains.
The residue is added to . A gas is produced that turns limewater milky.
Complete the equation for the decomposition of .
Answer
Li2CO3 + H2O + CO
Background Concept
When hydrated metal ethanedioates (oxalates) are gently heated, they undergo thermal decomposition. For Group 1 metals like lithium, the ethanedioate ion () decomposes to give a metal carbonate, carbon monoxide (), and water (from the water of crystallisation). Unlike Group 2 ethanedioates, which can produce as well as , lithium ethanedioate produces only as the gaseous carbon-containing product alongside the water of crystallisation. The solid residue is the metal carbonate.
Understanding the Question
The question asks to complete the equation for the gentle heating of hydrated lithium ethanedioate, . We are told two gaseous products form and a white solid residue remains. The residue, when added to , produces a gas that turns limewater milky — this confirms the residue is a carbonate (), as carbonates react with acids to release .
Approach
Identify the products of decomposition: the water of crystallisation is released as , the ethanedioate ion decomposes to and the carbonate ion () which pairs with to form . Write the balanced equation.
Step-by-Step Reasoning
- The water of crystallisation is released: .
- The anhydrous lithium ethanedioate, , decomposes to lithium carbonate and carbon monoxide: .
- Combining these, the full equation is: .
- The white solid residue is , which reacts with to produce , confirming the carbonate identity.
Key Takeaways
Hydrated Group 1 ethanedioates decompose on gentle heating to give the metal carbonate, water, and carbon monoxide. The carbonate residue can be identified by its reaction with acid to produce .
Common Mistakes
- Writing instead of as the gaseous product from the ethanedioate decomposition. Lithium ethanedioate specifically produces .
- Forgetting the water of crystallisation as one of the products.
- Not balancing the equation correctly (the given equation is already balanced with coefficients of 1).
Things to Be Careful About
Ensure all three products are placed in the correct blanks. The order does not strictly matter for marking, but all three (, , ) must be present. State symbols are not required here as the question does not ask for them, but if included, , , would be correct.
The trend in the decomposition temperatures of the Group 2 ethanedioates is similar to that of the Group 2 nitrates.
Suggest which of and will decompose at the lower temperature. Explain your answer.
Answer
will decompose at the lower temperature.
has a smaller ionic radius than , giving it a higher charge density. This causes greater polarisation (distortion) of the anion, weakening the bonds within the ethanedioate ion and making decomposition occur at a lower temperature.
CaC2O4
Background Concept
The thermal stability of Group 2 salts containing large, polarisable anions (like ethanedioate, , or nitrate, ) depends on the polarising power of the cation. According to Fajans' rules, a small, highly charged cation has a high charge density and can distort (polarise) the electron cloud of a large anion. This polarisation weakens the bonds within the anion, making the salt less thermally stable (decomposes at a lower temperature).
Down Group 2, the ionic radius increases (), so the charge density decreases. Therefore, thermal stability of ethanedioates increases down the group: .
Understanding the Question
The question asks which of or decomposes at a lower temperature and to explain why. This requires comparing the ionic radii and charge densities of and and relating this to the polarisation of the ethanedioate anion.
Approach
Identify that is smaller than , meaning it has higher charge density. Explain that higher charge density leads to greater polarisation of the anion, which weakens the internal bonds and lowers the decomposition temperature.
Step-by-Step Reasoning
- Compare ionic radii: (period 4) is smaller than (period 6).
- Smaller radius with the same charge (+2) means has a higher charge density.
- Higher charge density cation polarises the large anion more effectively.
- This polarisation distorts the electron cloud of the anion, weakening the bonds within it.
- Weaker bonds mean less energy is required to break them, so decomposes at a lower temperature than .
Key Takeaways
Down Group 2, cation size increases and charge density decreases. This reduces the polarisation of large anions, increasing thermal stability. Therefore, lighter Group 2 salts with polarisable anions decompose at lower temperatures.
Common Mistakes
- Stating that has a higher charge than (both are +2).
- Saying the anion is "more stable" or "less stable" without explaining the mechanism (polarisation).
- Not mentioning charge density or ionic radius explicitly.
Things to Be Careful About
The explanation must link ionic radius to charge density, and charge density to polarisation of the anion. Simply saying "Ca is smaller" is not enough; the consequence (polarisation and bond weakening) must be stated.
Potassium iron(III) ethanedioate, , dissolves in water to form a green solution.
Explain why transition elements can form coloured complexes.
Answer
- The ligands cause the orbitals of the central metal ion to split into two sets of different energy levels ( splitting).
- Electrons can be promoted (excited) from the lower-energy orbitals to the higher-energy orbitals.
- Light of a specific wavelength is absorbed to provide the energy for this transition, and the colour observed is the complementary colour to the absorbed light.
d orbitals split; electrons excited; absorbed light complementary colour seen
Background Concept
Transition metal complexes are often coloured due to transitions. When ligands approach a central metal ion, they interact with the orbitals. In an octahedral complex, the five degenerate orbitals split into two sets: the lower-energy set (, , ) and the higher-energy set (, ). The energy difference between these sets () corresponds to the energy of visible light.
When white light shines on the complex, electrons in the lower orbitals can absorb photons of specific wavelengths to jump to the higher orbitals. The colour we see is the light that is NOT absorbed — the complementary colour.
Understanding the Question
The question asks to explain why transition elements can form coloured complexes, using as an example (a green solution). This is a fundamental property of transition metals with partially filled orbitals.
Approach
State the three key points required: (1) orbitals split into different energy levels, (2) electrons are excited between these levels, (3) absorbed light and observed complementary colour.
Step-by-Step Reasoning
- Orbital splitting: In the complex ion , the oxalate ligands () act as ligands and cause the five orbitals of to split into two energy levels ( splitting).
- Electron promotion: Electrons in the lower-energy orbitals can absorb energy (from visible light) and be promoted (excited) to the higher-energy orbitals.
- Colour observed: The wavelength of light absorbed corresponds to the energy gap (). The colour seen by the observer is the complementary colour to the absorbed light (e.g., if red light is absorbed, green is seen).
Key Takeaways
Colour in transition metal complexes arises from electron transitions. The ligands split the orbitals, and the energy gap determines which wavelength of light is absorbed. The observed colour is complementary to the absorbed colour.
Common Mistakes
- Saying "electrons move between orbitals" without mentioning they are split into different energy levels.
- Saying "light is reflected" instead of "light is absorbed and the complementary colour is seen".
- Forgetting to mention that the energy gap corresponds to visible light.
- Stating that all transition metals form coloured complexes (e.g., has a full subshell and is colourless).
Things to Be Careful About
The explanation must include all three points: splitting of orbitals, excitation of electrons, and the relationship between absorbed and observed (complementary) colours. Using the term "complementary colour" is important for full marks.
The anhydrous iron(III) compound decomposes on heating to form a mixture of , and .
Complete the equation for the decomposition of .
Working
Identify oxidation state changes:
- In , Fe is +3.
- In , Fe is +2 (reduction: ).
- In , C is +4. In , C is +3 (oxidation: ).
Balance the equation:
- For every 2 moles of , 2 moles of are reduced to , gaining 2 electrons.
- 1 mole of is oxidised to 2 moles of , losing 2 electrons.
- The remaining 4 moles of from the 2 moles of complex form 2 moles of (using 4 moles) and 1 mole of (using 1 mole), but we need to balance K and C.
Balanced equation:
2K3[Fe(C2O4)3] -> 2K2[Fe(C2O4)2] + K2C2O4 + 2CO2
Background Concept
When potassium iron(III) ethanedioate is heated, it undergoes a redox decomposition. The iron(III) is reduced to iron(II), and some of the ethanedioate ions are oxidised to carbon dioxide. Balancing such equations requires tracking the oxidation state changes and ensuring mass and charge balance.
Understanding the Question
The question gives the products: , , and . We need to balance the equation:
Approach
- Determine oxidation states: Fe goes from +3 to +2 (reduction). Carbon in goes from +3 to +4 in (oxidation).
- Write half-equations or use electron balance to find stoichiometric coefficients.
- Balance all atoms (K, Fe, C, O) and verify.
Step-by-Step Reasoning
- Oxidation states: In , Fe is +3. In , Fe is +2. So Fe is reduced: .
- Oxidation: In , each C is +3. In , C is +4. So ethanedioate is oxidised: .
- Electron balance: To balance electrons, we need 2 Fe reduced for every 1 oxidised. So start with 2 moles of .
- Products from 2 moles: 2 moles of (contains 2 Fe and 4 ) and 2 moles of (from 1 ).
- Remaining atoms: 2 moles of reactant have 6 groups. 4 are used in , 1 is oxidised to . 1 remains to form .
- Potassium balance: 2 moles of reactant have 6 K. Products: 2 × 2 = 4 K in , and 2 K in . Total = 6 K. Balanced.
Final equation: .
Key Takeaways
Redox decomposition equations require careful tracking of oxidation states and electron transfer. Balance electrons first, then adjust coefficients to balance all atoms.
Common Mistakes
- Not balancing the potassium atoms (left with 6 K, must have 6 K on right).
- Forgetting that 2 moles of complex are needed to provide enough Fe for the electron balance.
- Incorrectly balancing the ethanedioate ligands between the products.
Things to Be Careful About
The coefficients must be whole numbers and in the lowest whole-number ratio. Check all atoms: K (6=6), Fe (2=2), C (12=12), O (24=24).
The complex ion shows stereoisomerism.
Complete the three-dimensional diagrams in Fig. 3.1 to show the two stereoisomers of .
The ligand can be represented using O⌒O.
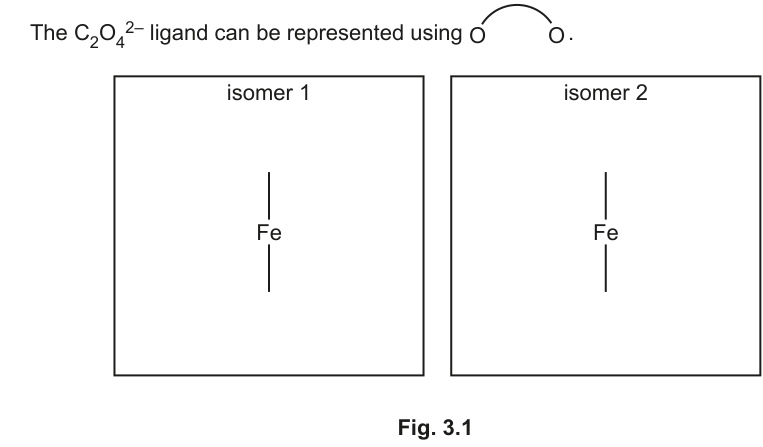
Answer
The two stereoisomers are optical isomers (enantiomers) of the octahedral complex . Each isomer has three bidentate oxalate ligands () coordinated to the central Fe atom.
Isomer 1:
- Draw the central Fe atom.
- Draw three ligands as curved lines connecting adjacent oxygen atoms.
- Use solid wedges for bonds coming out of the plane, dashed wedges for bonds going into the plane, and straight lines for bonds in the plane.
- The three ligands should be arranged such that the complex has a non-superimposable mirror image.
Isomer 2:
- Draw the mirror image of Isomer 1.
- Ensure the two structures are non-superimposable (they are enantiomers).
Two non-superimposable mirror images of [Fe(C2O4)3]3- with three bidentate O-O ligands
Background Concept
The complex ion is an octahedral complex with three bidentate oxalate ligands (). Each oxalate ligand coordinates to the central metal ion through two oxygen atoms, forming a five-membered chelate ring. When three bidentate ligands are arranged around an octahedral central atom, the complex can exist as a pair of optical isomers (enantiomers) — non-superimposable mirror images.
Understanding the Question
The question asks to complete the 3D diagrams in Fig. 3.1 to show the two stereoisomers of . The template shows a central Fe atom with two vertical bond lines. We need to add the three bidentate ligands using the representation (a curved line connecting two O atoms).
Approach
Draw an octahedral arrangement around Fe. Place three oxalate ligands such that they form a propeller-like arrangement. Draw one enantiomer, then draw its non-superimposable mirror image. Use wedge-dash notation to show 3D geometry.
Step-by-Step Reasoning
- Octahedral geometry: The central Fe atom has six coordination sites. In the template, two vertical bonds are shown (one up, one down). We need to add four more bonds in the horizontal plane (two in-plane, two out-of-plane).
- Bidentate ligands: Each ligand is represented as with a curved line. It occupies two adjacent coordination sites.
- Isomer 1: Place three ligands in a clockwise or anticlockwise arrangement. For example:
- One ligand in the plane (top-right to bottom-right, curved).
- One ligand coming out of the plane (solid wedge, top-left to bottom-left).
- One ligand going into the plane (dashed wedge, left to right).
Actually, a standard representation: place one ligand vertically in the plane (top to bottom-right), one with solid wedges (bottom-left to top-left), one with dashed wedges (right to left). The exact arrangement must show a chiral centre.
- Isomer 2: Draw the mirror image. If Isomer 1 has a clockwise propeller, Isomer 2 has an anticlockwise propeller.
- Non-superimposable: The two structures should not be superimposable by rotation. They are enantiomers.
Key Takeaways
Octahedral complexes with three bidentate ligands exhibit optical isomerism. The two enantiomers are non-superimposable mirror images, often described as having a right-handed or left-handed propeller arrangement.
Common Mistakes
- Drawing the ligands in a way that makes the complex superimposable on its mirror image (e.g., placing all ligands in the same plane).
- Not using wedge-dash notation correctly to show 3D geometry.
- Forgetting that each ligand connects two adjacent oxygen atoms (bidentate).
- Drawing the mirror image incorrectly (it must be a true mirror image, not just a rotated version).
Things to Be Careful About
The diagram must clearly show the 3D arrangement. Use solid wedges for bonds coming towards the viewer, dashed wedges for bonds going away, and straight lines for bonds in the plane. The two isomers must be non-superimposable mirror images. Check that each oxalate ligand forms a five-membered ring with the metal (two O atoms bonded to Fe, connected by a C-C bond, though the C-C is not shown in the simplified O-O representation).
Buffer solutions are used to regulate pH.
Write two equations to describe how a solution containing ions acts as a buffer solution when small amounts of acid or alkali are added.
Answer
When small amounts of acid () are added:
When small amounts of alkali () are added:
HC2O4- + H+ -> H2C2O4; HC2O4- + OH- -> C2O4 2- + H2O
Background Concept
A buffer solution resists changes in pH when small amounts of acid or alkali are added. It typically consists of a weak acid and its conjugate base (or a weak base and its conjugate acid). For the ethanedioate system, the relevant species are (ethanedioic acid, weak acid), (hydrogen ethanedioate ion, amphoteric/conjugate base of and conjugate acid of ), and (ethanedioate ion, conjugate base).
When is added, the conjugate base () reacts with it to form the weak acid (). When is added, the weak acid ( acting as acid here) reacts with it to form the conjugate base () and water.
Understanding the Question
The question asks for two equations showing how a solution containing ions acts as a buffer when small amounts of acid or alkali are added. We need to write the reaction of with and with .
Approach
Write the neutralisation equations: acts as a base with , and as an acid with .
Step-by-Step Reasoning
-
Addition of acid (): The ion acts as a base and accepts a proton:
This removes the added , preventing a large drop in pH.
-
Addition of alkali (): The ion acts as an acid and donates a proton to :
This removes the added , preventing a large rise in pH.
Key Takeaways
Buffer action involves the conjugate base neutralising added acid and the weak acid neutralising added alkali. For amphoteric ions like , they can act as either acid or base depending on what is added.
Common Mistakes
- Writing the equation with as the buffer component reacting with (it cannot accept more protons easily).
- Not balancing the equations (charges and atoms must balance).
- Forgetting the state symbols if required (though not asked here).
- Writing as or instead of the ionic form (the question asks for the action of the ions).
Things to Be Careful About
The equations must show the ionic species reacting. is the acid, is the alkali. The products must be correct: from , and from . Charges must balance on both sides.
A fuel cell is an electrochemical cell that can be used to generate electrical energy by using oxygen to oxidise a fuel.
Ethanedioic acid, , dissolved in an alkaline electrolyte is being investigated as a fuel.
The relevant standard electrode potentials, , for the cell are shown.
Use these equations to deduce the overall cell reaction. Calculate the value of .
overall cell reaction ...................................................................................................................
Working
Overall cell reaction:
The fuel (ethanedioate) is oxidised, so reverse the second half-equation:
Oxygen is reduced (first half-equation as given):
Multiply the oxidation half-equation by 2 to balance electrons:
Add the two half-equations:
Calculate :
2C2O4 2- + O2 + 2H2O -> 4CO2 + 4OH-; E°cell = 0.99 V
Background Concept
In a fuel cell, the fuel is oxidised at the anode (negative electrode) and oxygen is reduced at the cathode (positive electrode). The overall cell reaction is the sum of the oxidation and reduction half-equations. The standard cell potential is calculated as:
where is the reduction potential of the species being reduced, and is the reduction potential of the species being oxidised.
Understanding the Question
Ethanedioic acid (as ethanedioate, ) is the fuel and is oxidised to . Oxygen is reduced to . We are given two standard electrode potentials:
We need to deduce the overall cell reaction and calculate .
Approach
- Identify which half-reaction is oxidation (fuel) and which is reduction (oxygen).
- Reverse the oxidation half-reaction and multiply to balance electrons.
- Add the half-reactions to get the overall reaction.
- Calculate .
Step-by-Step Reasoning
-
Oxidation (anode): Ethanedioate is oxidised to . Reverse the second half-equation:
-
Reduction (cathode): Oxygen is reduced to . Keep the first half-equation as is:
-
Balance electrons: Multiply the oxidation half-equation by 2:
-
Add half-equations: The cancel:
-
Calculate :
The positive value indicates the reaction is feasible.
Key Takeaways
In a fuel cell, the fuel is oxidised (anode) and oxygen is reduced (cathode). The overall reaction is obtained by combining the half-equations with balanced electrons. .
Common Mistakes
- Forgetting to multiply the oxidation half-equation to balance electrons (4 electrons needed, but only 2 produced).
- Calculating as (gives -0.99 V, wrong sign).
- Not reversing the second half-equation when writing the overall reaction.
- Including electrons in the overall cell reaction (they should cancel out).
Things to Be Careful About
- State symbols must be included in the overall reaction as given in the half-equations.
- is always calculated as reduction potential minus oxidation potential (both given as reduction potentials in the data). Do not change the sign of values when reversing the half-equation for the calculation; use the formula .
- The final answer for should be +0.99 V (positive, indicating spontaneity).
Answer
The standard electrode potential, , is the voltage (potential difference) of a half-cell compared to the standard hydrogen electrode (SHE) under standard conditions.
Standard conditions are:
- Concentration of
- Pressure of (or )
- Temperature of
Voltage of a half-cell compared to the standard hydrogen electrode (SHE) at 1 mol dm^-3 concentration, 101 kPa pressure and 298 K temperature.
Background Concept
Electrode potential is a measure of the tendency of an element or ion to acquire electrons (be reduced). The standard electrode potential, , is a specific value measured under standard conditions to allow comparison between different half-cells. By convention, all electrode potentials are measured relative to the Standard Hydrogen Electrode (SHE), which is assigned a potential of .
Standard conditions ensure that the activities of all species are unity (approximately 1 mol dm for solutions, 100 kPa or 101 kPa for gases) and the temperature is fixed at 298 K (25 °C).
Understanding the Question
The question asks for a definition of standard electrode potential () and a description of the standard conditions required for this measurement. This is a direct recall question worth 2 marks.
Approach
State the definition clearly, ensuring the comparison to the SHE is mentioned. Then list the three standard conditions: concentration, pressure, and temperature.
Step-by-Step Reasoning
- M1 (Definition): The potential difference (voltage) measured when a half-cell is connected to the standard hydrogen electrode (SHE). The SHE acts as the reference point ( V).
- M2 (Conditions): The three standard conditions are:
- Concentration: (for aqueous ions).
- Pressure: (or / depending on the specific syllabus version, but CIE typically uses 101 kPa or 100 kPa; the mark scheme specifies 101 kPa).
- Temperature: (25 °C).
Key Takeaways
- Always mention the reference electrode (SHE) in the definition of standard electrode potential.
- Memorize the three standard conditions: 1 M concentration, ~100 kPa pressure, 298 K temperature.
Common Mistakes
- Defining it as the potential of a full cell (wrong, it's a half-cell vs SHE).
- Forgetting to mention the SHE.
- Listing only two of the three standard conditions.
- Using incorrect pressure units (e.g., atm without converting, though 1 atm is often accepted, 101 kPa is safer for CIE).
Things to Be Careful About
- Ensure the definition includes "voltage" or "potential difference" and "compared to SHE".
- State symbols are not required for the definition text, but conditions must be precise.
An electrochemical cell is set up to measure of the electrode.
Draw a labelled diagram of this electrochemical cell.
Include all necessary substances. It is not necessary to state conditions used.
Answer
Diagram Description:
- Left half-cell (Standard Hydrogen Electrode - SHE):
- Platinum electrode (Pt) immersed in solution ().
- Hydrogen gas () bubbled over the platinum electrode via a gas delivery tube.
- Right half-cell (Silver/Silver Ion):
- Silver electrode (Ag) immersed in solution (e.g., ).
- Connections:
- Salt bridge connecting the two solutions (e.g., filter paper soaked in or a U-tube with electrolyte).
- External circuit with a voltmeter (V) connecting the Pt electrode to the Ag electrode via wires.
See diagram description. Key components: Pt electrode in H+(aq) with H2 gas; Ag electrode in Ag+(aq); salt bridge; voltmeter.
Background Concept
To measure the standard electrode potential of a half-cell (like ), it must be connected to a standard hydrogen electrode (SHE). The SHE consists of a platinum electrode coated with platinum black, immersed in a solution with , with hydrogen gas at 101 kPa bubbled over it. The potential of the measured cell is the potential of the half-cell relative to the SHE ().
Understanding the Question
Part (b)(i) asks for a labeled diagram of an electrochemical cell used to measure of the electrode. This involves drawing the SHE and the silver half-cell, connected appropriately.
Approach
Draw two beakers. Left: SHE (Pt, H2, H+). Right: Silver half-cell (Ag, Ag+). Connect with a salt bridge and a voltmeter in the external circuit. Label all parts.
Step-by-Step Reasoning
- M1 (Right half-cell components): Silver electrode labeled Ag (or Ag(s)) in a solution containing silver ions, labeled Ag+(aq) (e.g., AgNO3(aq)).
- M2 (Left half-cell components - SHE): Platinum electrode labeled Pt in acid solution labeled H+(aq). Hydrogen gas labeled H2(g) being delivered to the electrode via a tube.
- M3 (Connections): A salt bridge connecting the two solutions. A voltmeter (labeled V) connected in the external circuit via wires to both electrodes (Pt and Ag).
Key Takeaways
- The SHE always has Pt, H2, and H+.
- The salt bridge is essential for completing the circuit and maintaining electrical neutrality.
- The voltmeter measures the potential difference.
Common Mistakes
- Forgetting the gas delivery system for H2.
- Not labeling the electrodes (Pt and Ag).
- Forgetting the salt bridge or voltmeter.
- Using incorrect species (e.g., Ag2+ instead of Ag+).
Things to Be Careful About
- State symbols are not strictly required for the diagram labels in this context unless specified, but species must be correct (Ag+, H+).
- The platinum electrode in the SHE is inert; it conducts electrons but does not participate in the reaction.
A separate electrochemical cell is set up using a lower concentration of than that used in (b)(i).
Suggest how the electrode potential, , for the electrode would change from its value. Explain your answer.
Answer
The electrode potential would be more negative (or less positive) than .
Explanation:
The equilibrium for the silver half-cell is:
Lowering the concentration of shifts this equilibrium to the left (to produce more Ag+). This makes the forward reaction (reduction) less favorable, so the electrode is less positive/more negative in potential.
More negative; equilibrium shifts left (Ag+ + e- <=> Ag moves to left) due to lower [Ag+].
Background Concept
The electrode potential depends on the concentration of the ions involved, described by the Nernst equation. For the half-reaction , decreasing reduces the tendency for reduction to occur. According to Le Chatelier's principle, decreasing the concentration of a reactant () shifts the equilibrium to the left (towards reactants).
Understanding the Question
Part (b)(ii) asks how the electrode potential changes if is lower than standard (). It asks for the direction of change (more/less negative) and an explanation.
Approach
Consider the reduction equilibrium . Lower means less driving force for reduction. The potential becomes more negative (less positive). Explain using equilibrium shift.
Step-by-Step Reasoning
- Change in E: The value becomes more negative (or less positive). Since for Ag+/Ag is +0.80 V, a lower concentration will make it less than +0.80 V (e.g., +0.75 V). In relative terms compared to standard, it is more negative.
- Explanation: The half-reaction is . Decreasing causes the equilibrium to shift to the left (to oppose the decrease in Ag+ concentration). This means the forward reaction (gain of electrons/reduction) is less favored, so the potential is more negative.
Key Takeaways
- Lower concentration of oxidized form () makes the potential more negative (less positive).
- Higher concentration of oxidized form makes the potential more positive (more positive tendency to be reduced).
- Use the equilibrium equation to explain the shift.
Common Mistakes
- Saying the potential becomes positive (it is already positive, just less so).
- Not mentioning the equilibrium shift.
- Confusing the direction of the shift.
Things to Be Careful About
- The question asks for a suggestion and explanation. "More negative" is the key phrase. "Shifts left" is the key explanation.
- Ensure the equilibrium equation is written correctly.
Answer
The enthalpy change of solution, , is the enthalpy change when one mole of a solute dissolves in water (to form an infinitely dilute solution) under standard conditions.
Enthalpy change when one mole of solute dissolves in water.
Background Concept
Enthalpy change of solution () is the heat change when a substance dissolves in a solvent (usually water). It is the sum of the lattice energy (breaking the lattice, endothermic) and the enthalpy of hydration (forming ion-dipole bonds with water, exothermic).
(Note: sign conventions vary; if lattice energy is defined as formation, ).
Understanding the Question
Part (c) asks for the definition of enthalpy change of solution. This is a 1-mark recall question.
Approach
State the definition: enthalpy change per mole of solute dissolving in water.
Step-by-Step Reasoning
- M1: Enthalpy change when one mole of solute dissolves.
- M2: In water (or excess water / to form dilute solution).
Key Takeaways
- Always mention "one mole".
- Specify the solvent (water).
Common Mistakes
- Forgetting "one mole".
- Not specifying water (though implied, it's good practice).
- Confusing with enthalpy of hydration.
Things to Be Careful About
- The mark scheme accepts "dissolves in water". "Infinitely dilute" is technically more precise for standard conditions but "dissolves in water" is usually sufficient for 1 mark.
Some relevant energy changes for are shown in Table 4.1.
Table 4.1
| energy change | value / |
|---|---|
| enthalpy change of solution of | |
| enthalpy change of hydration of silver ions | |
| enthalpy change of hydration of nitrate ions |
Complete the energy cycle in Fig. 4.1 to show the relationship between the lattice energy, , of and the energy changes shown in Table 4.1.
Include state symbols for all the species.
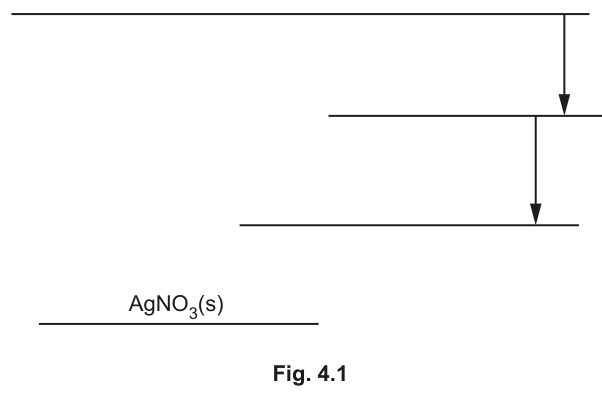
Answer
Cycle Description:
- Top level:
- Middle right level: (optional intermediate step, usually combined) OR directly to aqueous ions.
- Actually, standard cycle: Top .
- Bottom level:
Arrows:
- Down (blue/long arrow): From to . Label: (Lattice enthalpy, exothermic, so down).
- Up (blue/arrow): From to . Label: (Enthalpy of solution, endothermic +22.6, so up).
- Down (black/arrow): From to . Label: (Enthalpy of hydration, exothermic, so down).
(Note: The provided Fig 4.1 in the question has specific lines. Top line empty, middle lines empty, bottom is AgNO3(s). The completion should fill the top with gaseous ions, the middle/right with aqueous ions, and draw arrows.)
Correct Cycle Structure based on Fig 4.1 and Mark Scheme Fig 4.2:
- Top line:
- Second line down (right side): (This seems to be a stepwise hydration in the mark scheme image, but usually it's combined. Let's look at mark scheme Fig 4.2 description: "The middle level shows aqueous ions: Ag+(aq) + NO3-(g) then Ag+(aq) + NO3-(aq)." This implies stepwise hydration, but for calculation, we sum them. Actually, looking at the calculation: -475 (Ag+) + -314 (NO3-). The cycle likely shows hydration of both.
- Third line down (right side):
- Bottom line:
Arrows to draw:
- Down arrow from Top () to Bottom ():
- Up arrow from Bottom () to Third line ():
- Down arrow from Top () to Third line (): (or split into two steps as per diagram structure if required, but usually the total hydration is the key). The mark scheme image Fig 4.2 shows arrows down from top to middle-right, then middle-right to lower-right. This suggests stepwise hydration or just showing the species. Let's assume the main arrows needed are Lattice (top to bottom) and Solution (bottom to aqueous) and Hydration (top to aqueous).
Simplified Answer for candidate:
- Top level:
- Level above bottom (right):
- Arrow down from top to bottom:
- Arrow up from bottom to level above bottom:
- Arrow down from top to level above bottom:
Cycle: Top Ag+(g)+NO3-(g). Bottom AgNO3(s). Arrow down (lattice). Arrow up from bottom to Ag+(aq)+NO3-(aq) (solution). Arrow down from top to Ag+(aq)+NO3-(aq) (hydration).
Background Concept
The enthalpy cycle for the solution of an ionic compound relates the lattice enthalpy, enthalpy of solution, and enthalpies of hydration.
If lattice enthalpy is defined as the formation of the lattice from gaseous ions (exothermic, negative):
Rearranging: .
Understanding the Question
Part (d)(i) asks to complete the energy cycle (Fig 4.1) showing the relationship between lattice energy, solution enthalpy, and hydration enthalpies for AgNO3. State symbols are required.
Approach
Identify the species at each energy level. Top: gaseous ions. Bottom: solid. Right side (intermediate/final): aqueous ions. Draw arrows with correct directions (signs of enthalpy changes).
Step-by-Step Reasoning
- Top Level: The gaseous ions formed from breaking the lattice: .
- Bottom Level: Given as .
- Aqueous Level: The dissolved ions: .
- Arrows:
- Lattice Enthalpy (): Formation of solid from gaseous ions. Exothermic (down arrow). From to .
- Enthalpy of Solution (): Given as +22.6 kJ/mol (endothermic, up arrow). From to .
- Enthalpy of Hydration (): Sum of hydration of Ag+ and NO3-. Exothermic (down arrow). From to .
Note on the diagram structure in Fig 4.1: The diagram has intermediate lines. The mark scheme image (Fig 4.2) shows a stepwise process or just labeling levels. The key is to have the correct species and arrows. The mark scheme credits "two arrows in blue" (likely lattice and solution) and "correct species in red with state symbols".
Key Takeaways
- Lattice formation is exothermic (down).
- Solution can be endo or exothermic (here up).
- Hydration is always exothermic (down).
- State symbols are crucial: (g), (s), (aq).
Common Mistakes
- Wrong direction for arrows (sign errors).
- Missing state symbols.
- Confusing lattice dissociation (up) with lattice formation (down). CIE usually defines lattice energy as formation (negative value), so arrow is down.
- Forgetting the nitrate ion in the species labels.
Things to Be Careful About
- The mark scheme calculation uses -811.6, implying lattice energy is defined as formation (negative). Ensure the arrow direction matches this (down).
- State symbols: Ag+(g), NO3-(g), AgNO3(s), Ag+(aq), NO3-(aq).
Working
From the cycle:
(Note: This assumes is lattice dissociation. If is lattice formation (negative), the equation is .
Let's use the values:
Using :
The question asks for lattice energy . In CIE, lattice energy is often the formation enthalpy (negative of dissociation).
Answer
-811.6
Background Concept
Hess's Law allows us to calculate unknown enthalpy changes using a cycle. For solution:
Path 1: Solid Aqueous ions.
Path 2: Solid Gaseous ions Aqueous ions.
So, .
Understanding the Question
Part (d)(ii) asks to calculate the lattice energy () of AgNO3 using the data in Table 4.1.
Approach
Use the relationship: . Or rearrange for lattice formation energy. Note the sign convention. The mark scheme gives -811.6, so it wants the formation enthalpy (negative value).
Step-by-Step Reasoning
-
Data:
- Total
-
Equation:
(where lattice dissociation is endothermic, +)
-
Lattice Energy Definition: CIE defines lattice energy as the enthalpy change when 1 mole of solid is formed from gaseous ions. This is the reverse of dissociation, so it is exothermic (negative).
Key Takeaways
- Always check the sign convention for lattice energy (formation vs dissociation). CIE usually uses formation (negative).
- Sum the hydration enthalpies for all ions.
- .
Common Mistakes
- Forgetting to sum both hydration enthalpies.
- Sign errors (adding 22.6 to -789 instead of subtracting).
- Giving the positive value (+811.6) when the definition requires negative (-811.6).
Things to Be Careful About
- Significant figures: Data has 3 sig figs (22.6, 475, 314). Result -811.6 has 4. The mark scheme accepts -811.6. Usually, addition/subtraction follows decimal places. 22.6 (1 d.p.) + 789 (0 d.p.) -> 812? No, 789 is exact sum of -475 and -314. 475 and 314 have 0 d.p. So result should be to 0 d.p. -> -812? Mark scheme says -811.6. I will follow the mark scheme precision.
- Actually, 475 and 314 are integers. 22.6 has 1 decimal. Sum = 789. 22.6 + 789 = 811.6. The mark scheme keeps the .6.
Suggest the trend in the magnitude of the lattice energies of the metal nitrates, , and .
Explain your answer.
.......................................... .......................................... ..........................................
most exothermic least exothermic
Answer
Trend: Most exothermic: ; Least exothermic: .
(Order: in magnitude of exothermicity, i.e., most negative to least negative).
Explanation:
- Lattice energy depends on the charge and size of the ions.
- has a higher charge () than () and (). Higher charge leads to stronger electrostatic attraction, so more exothermic lattice energy.
- Between and , has a smaller ionic radius than . Smaller radius leads to shorter bond distance and stronger attraction, so is more exothermic than .
- Correct statement: Magnitude of lattice energy is related to the attraction between ions (or strength of ionic bonds). Higher charge/smaller radius = stronger attraction = more exothermic lattice energy.
Most exothermic: Mg(NO3)2. Least exothermic: RbNO3. Mg2+ has higher charge; Na+ has smaller radius than Rb+. Greater attraction between ions.
Background Concept
Lattice enthalpy (formation) is the enthalpy change when 1 mole of an ionic solid is formed from its gaseous ions. It is always exothermic (negative value). The magnitude (absolute value) depends on Coulomb's Law:
- Charge (): Higher charges on ions lead to stronger attraction and more exothermic lattice energy. This is the dominant factor.
- Radius (): Smaller ions can get closer together, leading to stronger attraction and more exothermic lattice energy.
Understanding the Question
Part (e) asks for the trend in lattice energy magnitudes for , , and , from most exothermic to least exothermic, and an explanation.
Approach
- Identify the cations: , , . Anion is for all.
- Compare charges: is , others are . So has the highest lattice energy magnitude (most exothermic).
- Compare radii for ions: is smaller than (Group 1 trend: size increases down the group). So is more exothermic than .
- Order: (most exothermic) > > (least exothermic).
Step-by-Step Reasoning
- M1 (Order): , , (from most to least exothermic).
- M2 (Reasoning 1 - Charge): has a higher charge () than or (). Higher charge density/attraction.
- M3 (Reasoning 2 - Radius): has a smaller radius than . Smaller radius means ions are closer, stronger attraction.
- General statement: Relate magnitude to attraction between ions or strength of ionic bonds.
Key Takeaways
- Charge is more important than radius for lattice energy trends.
- Radius trend within a group: size increases down the group, lattice energy becomes less exothermic.
- Always specify "most exothermic" to "least exothermic" (i.e., most negative to least negative, or largest magnitude to smallest magnitude). Since all are exothermic, "most exothermic" means largest negative number (e.g., -3000 kJ/mol is more exothermic than -2000 kJ/mol).
Common Mistakes
- Getting the order wrong (e.g., putting RbNO3 first).
- Not mentioning charge or radius specifically.
- Saying "Mg has higher mass" (irrelevant).
- Confusing exothermic/endothermic signs. Lattice formation is exothermic. "Most exothermic" means the most negative value (largest magnitude).
Things to Be Careful About
- The question asks for "magnitude of lattice energies" but then says "most exothermic least exothermic". This implies ordering by the exothermic nature (negative values). Most exothermic = most negative = largest magnitude.
- Ensure the explanation links charge/radius to attraction/bond strength.
In aqueous solution, persulfate ions, , react with iodide ions, as shown in reaction 1.
The rate of reaction 1 is investigated.
A sample of is mixed with a large excess of iodide ions of known concentration. The graph in Fig. 5.1 shows the results obtained.
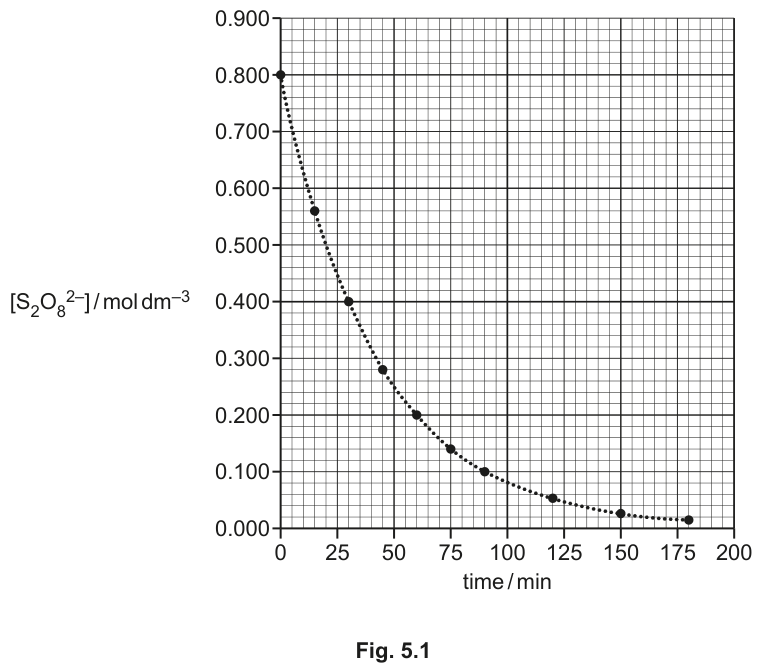
Working
Draw a tangent to the curve at .
Gradient of tangent
Using points on the tangent, for example and :
Rate gradient
Answer
0.016 mol dm^-3 min^-1
Background Concept
The rate of reaction at any specific instant is the gradient of the tangent to the concentration-time graph at that point. For the initial rate, this is the tangent drawn at . Since the concentration of a reactant decreases over time, the gradient of the tangent is negative. The rate of reaction is defined as a positive quantity, so the rate is the negative of the gradient: .
Understanding the Question
The question asks for the initial rate of reaction 1 using the provided concentration-time graph for . You must draw a tangent at the origin () and calculate its gradient.
Approach
- Draw a straight line tangent to the curve at . Ensure it touches the curve at exactly one point and follows the curve's direction at that point.
- Pick two points on this tangent line (not necessarily data points on the curve) to calculate the gradient: .
- Take the negative of this gradient to get the positive initial rate.
Step-by-Step Reasoning
- At , .
- Drawing a tangent at this point, we can see it passes through or near . (Note: the mark scheme accepts answers between and , reflecting slight variations in how the tangent is drawn by hand).
- Using and :
- The initial rate is the negative of the gradient: .
Key Takeaways
- The initial rate is always found from the gradient of the tangent at on a concentration-time graph.
- Reactant concentration decreases, so the gradient is negative; the rate itself is positive.
Common Mistakes
- Taking the gradient directly without making it positive (giving ).
- Using two points from the curve itself instead of the tangent line (this gives the average rate over an interval, not the initial instantaneous rate).
- Drawing a tangent that cuts through the curve rather than just touching it at .
Things to Be Careful About
- Always use points that lie on the tangent line for the gradient calculation, not necessarily the plotted data points.
- Ensure the units are correct: .
The rate equation for reaction 1 is .
Suggest why a large excess of iodide ions allows the rate constant to be determined from the half-life in this investigation.
Answer
A large excess of iodide ions means remains effectively constant throughout the reaction. This makes the reaction pseudo-first order with respect to , allowing the half-life to be used to determine the rate constant.
[I-] remains constant, making the reaction pseudo-first order
Background Concept
When a reaction has a rate equation involving multiple reactants, such as , the kinetics can be simplified if one reactant (say B) is present in large excess. Because B is in large excess, its concentration changes negligibly compared to A. Thus, can be treated as a constant. The rate equation then becomes , where . This is called pseudo-first-order kinetics.
Understanding the Question
The true rate equation is . The investigation uses a large excess of . The question asks why this allows the rate constant to be determined from the half-life.
Approach
Explain that the excess reactant's concentration does not change significantly, effectively removing it from the varying terms in the rate equation and simplifying the kinetics to first order with respect to the limiting reactant.
Step-by-Step Reasoning
- The rate equation is .
- Because is in large excess, its concentration stays practically constant as the reaction proceeds.
- We can combine the constant and constant into a new effective rate constant .
- The rate equation becomes , which is first order with respect to .
- For a first-order reaction, the half-life is constant and related to the rate constant by . Thus, can be found from the half-life, and since is known, the true can be calculated.
Key Takeaways
- Large excess of one reactant leads to pseudo-first-order kinetics.
- The concentration of the excess reactant is treated as constant.
Common Mistakes
- Saying "the concentration of iodide is zero" (it's not, it's just large and roughly constant).
- Forgetting to mention that the overall order with respect to the changing reactant becomes one, or that the rate equation simplifies.
Things to Be Careful About
- Use precise language: " stays constant" or " does not change significantly". Mark schemes often accept "the overall order is one under these conditions" as an alternative way to express the pseudo-first-order simplification.
The reaction of persulfate ions, , with iodide ions is catalysed by ions.
Write two equations to show how catalyses reaction 1.
equation 1 .................................................................................................................................
equation 2 .................................................................................................................................
Answer
equation 1:
equation 2:
2Fe^2+ + S2O8^2- -> 2Fe^3+ + 2SO4^2- and 2Fe^3+ + 2I- -> 2Fe^2+ + I2
Background Concept
Transition metal ions can act as homogeneous catalysts in redox reactions by providing an alternative reaction pathway with a lower activation energy. They do this by changing oxidation states. The catalyst is oxidised in one step and reduced in a subsequent step, regenerating the original catalyst at the end of the cycle.
Understanding the Question
The overall reaction is . We are told catalyses this. We need to write two equations showing how participates and is regenerated.
Approach
- Identify the oxidising and reducing agents in the overall reaction. is reduced to , and is oxidised to .
- can be oxidised to . It will react with the oxidising agent () first.
- The resulting will then react with the reducing agent (), reducing back to .
- Ensure the two equations sum to the overall equation and that electrons are balanced in each step.
Step-by-Step Reasoning
- Step 1: is oxidised by persulfate. Persulfate is a strong oxidising agent.
Half-equation for persulfate:
Half-equation for iron: (multiply by 2)
Combined: - Step 2: The produced is now an oxidising agent and will oxidise iodide ions.
Half-equation for iodide:
Half-equation for iron: (multiply by 2)
Combined: - Adding both steps: . Canceling and gives the overall equation.
Key Takeaways
- Homogeneous redox catalysts change oxidation state during the reaction.
- The catalyst is consumed in the first step and regenerated in a later step.
- Always check that the proposed steps sum to the overall balanced equation.
Common Mistakes
- Writing unbalanced equations (e.g., missing the coefficient 2 for or ).
- Forgetting to include state symbols where required (though often not strictly penalised if omitted, it's good practice).
- Reversing the order of steps (though chemically both orders are possible, the standard expectation is oxidation of the catalyst by the stronger oxidant first).
Things to Be Careful About
- Ensure the number of electrons lost in the oxidation half-equation equals the number gained in the reduction half-equation before combining.
- The mark scheme accepts the equations in either order, but both must be present and sum correctly.
Describe the effect of an increase in temperature on the rate constant and the rate of reaction 1.
Answer
An increase in temperature will cause both the rate constant () and the rate of reaction to increase.
Both the rate constant and the rate of reaction will increase.
Background Concept
The Arrhenius equation, , shows that the rate constant is exponentially dependent on temperature. As temperature increases, a larger proportion of molecules have kinetic energy greater than or equal to the activation energy . This leads to a higher frequency of successful collisions, increasing . Since rate , an increase in directly leads to an increase in the rate of reaction (assuming concentrations are momentarily unchanged).
Understanding the Question
The question asks for the effect of a temperature increase on two specific quantities: the rate constant () and the rate of reaction 1.
Approach
Recall the relationship between temperature, the rate constant, and the reaction rate. State clearly that both increase.
Step-by-Step Reasoning
- Increasing temperature increases the average kinetic energy of the particles.
- More particles have energy , so the proportion of successful collisions increases.
- This increases the rate constant .
- Since rate , and has increased, the rate of reaction also increases.
Key Takeaways
- Temperature affects the rate constant , not just the rate.
- Both and the rate increase with temperature.
Common Mistakes
- Saying "the rate constant decreases" (confusing with equilibrium constant for exothermic reactions).
- Only mentioning the rate increases and forgetting to explicitly state the rate constant increases (the mark scheme rewards mentioning both).
Things to Be Careful About
- Be precise: "rate constant" and "rate of reaction" are distinct concepts, though both increase here. Do not conflate them.
In aqueous solution, thiosulfate ions, , react with hydrogen ions, as shown in reaction 2.
The rate of reaction is first order with respect to and zero order with respect to under certain conditions.
The rate constant, , for this reaction is .
Calculate the half-life, , for reaction 2.
Working
For a first-order reaction, the half-life is given by:
Given :
Rounding to 3 significant figures:
Answer
43.9 s
Background Concept
For a first-order reaction, the half-life () is constant and independent of the initial concentration. It is related to the rate constant by the equation . This is a fundamental relationship in chemical kinetics.
Understanding the Question
Reaction 2 is first order with respect to . The rate constant . Calculate the half-life.
Approach
Use the first-order half-life formula directly, substituting the given value of .
Step-by-Step Reasoning
- Formula:
- Substitute :
- Round to 3 significant figures (matching the precision of ): .
Key Takeaways
- The formula applies only to first-order reactions.
- Always check the units: is in , so will be in seconds.
Common Mistakes
- Using the wrong formula (e.g., , which is for second-order reactions).
- Arithmetic errors when dividing by .
- Incorrect significant figures.
Things to Be Careful About
- Ensure you use , not .
- The question states the reaction is first order with respect to and zero order with respect to , so the overall order is 1, justifying the use of the first-order half-life formula.
The compound nitrosyl bromide, , can be formed as shown in reaction 3.
The rate is first order with respect to and first order with respect to .
The reaction mechanism has two steps.
Suggest equations for the two steps of this mechanism. State which is the rate-determining step.
step 1 ........................................................................................................................................
step 2 ........................................................................................................................................
rate-determining step = ...............................
Answer
step 1: (or )
step 2: (or )
rate-determining step = step 1
step 1: NO + Br2 -> NOBr2; step 2: NOBr2 + NO -> 2NOBr; RDS = step 1
Background Concept
The mechanism of a reaction is the step-by-step sequence of elementary reactions by which the overall chemical change occurs. The rate-determining step (RDS) is the slowest step in the mechanism and dictates the overall rate of reaction. The rate equation reflects the molecularity of the RDS. If the rate equation is , the RDS must involve one molecule of A and one molecule of B colliding.
Understanding the Question
Overall reaction: .
Rate equation: (first order in NO, first order in Br2).
There are two steps. We need to propose the equations and identify the RDS.
Approach
- The rate equation tells us the RDS involves one NO and one Br2. So step 1 (the slow step) must be .
- The two steps must add up to the overall equation: .
- Deduce the second step by subtracting step 1 from the overall equation.
- Identify step 1 as the rate-determining step.
Step-by-Step Reasoning
- Identify RDS: Rate . This means the slow step (RDS) has one NO and one Br2 as reactants.
- Propose Step 1 (RDS): . What is the intermediate? It must contain NO and Br2. A common intermediate is (a complex) or the reaction could produce .
Let's use : . - Propose Step 2: The overall equation is . Subtract step 1 from overall:
.
This is a fast step. - Check: Step 1 + Step 2 = . Cancel : . Matches overall equation.
- Alternative mechanism: Step 1: . Step 2: . Sum: . Also valid.
- Rate-determining step: Step 1, because it involves the reactants in the rate equation and is the slow step.
Key Takeaways
- The rate equation gives the molecularity of the rate-determining step.
- Proposed elementary steps must sum to the overall balanced equation.
- Intermediates are produced in one step and consumed in a later step.
Common Mistakes
- Proposing a step with as the RDS (termolecular steps are rare, and it doesn't match the rate equation which is first order in NO).
- Forgetting to cancel intermediates when adding the steps to check they sum to the overall equation.
- Identifying step 2 as the RDS.
Things to Be Careful About
- The mark scheme accepts either the intermediate pathway or the pathway. Both are correct as long as they sum to the overall equation and the first step matches the rate law.
- Explicitly state which step is the rate-determining step. Don't just write the equations.
Answer
The ratio of the concentrations of a solute in two immiscible solvents at equilibrium.
The ratio of the concentrations of a solute in two immiscible solvents at equilibrium.
Background Concept
Partition coefficients describe how a solute distributes itself between two immiscible solvents (typically an organic solvent and water) when the system reaches equilibrium. The principle is based on the relative solubilities of the solute in each solvent phase. At equilibrium, the ratio of concentrations in the two phases is constant at a given temperature, regardless of the total amount of solute present.
Understanding the Question
The command word is 'State', requiring a concise definition. The question asks specifically about , the partition coefficient, and what it represents.
Approach
Provide the standard definition: a ratio of concentrations of the same solute in two immiscible solvents at equilibrium.
Step-by-Step Reasoning
The partition coefficient is defined as:
It is the ratio of concentrations of the solute dissolved in two immiscible solvents when the system is at equilibrium. The key elements are: (1) it is a ratio of concentrations, (2) there are two solvents, and (3) the system is at equilibrium.
Key Takeaways
- is a ratio of concentrations (not moles or masses directly).
- The two solvents must be immiscible.
- The system must be at equilibrium.
Common Mistakes
- Saying 'ratio of amounts' instead of 'ratio of concentrations' — the mark specifically requires concentrations.
- Omitting 'at equilibrium' or 'two immiscible solvents'.
Things to Be Careful About
The definition must specify concentrations (not moles or mass) and must mention equilibrium and two solvents.
The partition coefficient, , for a compound, X, between carbon disulfide, , and water is .
of X is dissolved in water and made up to in a volumetric flask.
of this aqueous solution is shaken with of .
The mixture is left to reach equilibrium.
Calculate the mass of X, in g, extracted into the layer.
Working
Mass of X in of aqueous solution:
Let = mass of X extracted into (in g).
Mass remaining in water = g.
Answer
Mass of X extracted into =
0.642 g
Background Concept
The partition coefficient relates the equilibrium concentrations of a solute in two immiscible solvents. When a solute is distributed between two phases, at equilibrium the ratio of its concentrations is constant. In extraction problems, we use this to calculate how much solute transfers from one phase to the other.
The concentration in each phase is the mass of solute in that phase divided by the volume of that phase. Since is a ratio of concentrations, the units cancel, but we must use consistent units for mass and volume.
Understanding the Question
We are told for compound X between and water. The convention 'between CS₂ and water' means . We start with 1.85 g of X in 100.0 cm³ of water, take 40.0 cm³ of this solution, and extract with 25.0 cm³ of . We must find the mass extracted.
Approach
- Calculate the mass of X in the 40.0 cm³ aliquot taken from the 100.0 cm³ stock solution.
- Set up the expression using unknown = mass in .
- Solve the resulting equation for .
Step-by-Step Reasoning
Step 1: The original solution contains 1.85 g in 100.0 cm³. Taking 40.0 cm³ gives:
Step 2: At equilibrium, if g is in the layer (volume 25.0 cm³), then g remains in the water layer (volume 40.0 cm³).
Step 3: Cross-multiplying:
Key Takeaways
- Always calculate the mass in the aliquot actually used for extraction, not the total mass in the stock solution.
- The partition coefficient expression uses concentrations, so divide mass by the respective volume of each layer.
- The algebraic setup is the key method mark (M1); the final numerical answer is the accuracy mark (M2).
Common Mistakes
- Using 1.85 g instead of 0.740 g (forgetting to scale down to the 40.0 cm³ aliquot).
- Inverting the expression (putting water concentration in the numerator).
- Dividing by 100.0 cm³ instead of 40.0 cm³ for the aqueous layer volume.
Things to Be Careful About
- The volume of the aqueous layer is 40.0 cm³ (the aliquot taken), not 100.0 cm³.
- Ensure the numerator and denominator of are correctly assigned to the right solvent based on the phrase 'between CS₂ and water'.
The compound has many structural isomers. Four suggested structures of are shown in Fig. 6.1.
Using Fig. 6.1, complete Table 6.1 to predict the number of carbon atoms that have , and hybridisation in Kekulé benzene, Dewar benzene and Ladenburg benzene.
Table 6.1
| structure | hybridised | hybridised | hybridised |
|---|---|---|---|
| Kekulé benzene | |||
| Dewar benzene | |||
| Ladenburg benzene |
Answer
| structure | sp | ||
|---|---|---|---|
| Kekulé benzene | 0 | 6 | 0 |
| Dewar benzene | 0 | 4 | 2 |
| Ladenburg benzene | 0 | 0 | 6 |
Kekulé: 0, 6, 0; Dewar: 0, 4, 2; Ladenburg: 0, 0, 6
Background Concept
Hybridisation of a carbon atom is determined by the number of sigma () bonds it forms:
- 2 bonds → sp hybridisation (linear, 180°)
- 3 bonds → sp² hybridisation (trigonal planar, 120°)
- 4 bonds → sp³ hybridisation (tetrahedral, 109.5°)
Pi () bonds do not affect hybridisation — they arise from unhybridised p orbitals. A carbon in a C=C double bond has 3 bonds and 1 bond, so it is sp².
Understanding the Question
We are given three structural isomers of and must count how many carbon atoms have each type of hybridisation. The structures are shown in Fig. 6.1.
Approach
For each structure, examine every carbon atom, count its bonds (to other carbons, to hydrogen, or to any other atom), and assign hybridisation accordingly.
Step-by-Step Reasoning
Kekulé benzene: A six-membered ring with alternating single and double bonds. Each carbon is bonded to 2 ring carbons and 1 hydrogen = 3 bonds. The double bonds provide bonds but don't change the count. All 6 carbons are sp².
Dewar benzene: A bicyclo[2.2.0]hexa-2,5-diene. It has two fused four-membered rings with two C=C double bonds. The two bridgehead carbons (where the rings fuse) are each bonded to 3 other carbons and 1 hydrogen = 4 bonds → sp³. The four carbons in the double bonds each have 3 bonds → sp². So: 4 sp², 2 sp³.
Ladenburg benzene (prismane): A triangular prism with 6 vertices. Each carbon is at a corner and is bonded to 3 other carbons and 1 hydrogen = 4 bonds. All 6 carbons are sp³. No double bonds exist.
Key Takeaways
- Hybridisation depends only on the number of bonds (electron domains), not on bonds.
- Bridgehead carbons in bicyclic systems are typically sp³ because they form 4 single bonds.
- Prismane has no bonds at all — all bonds are single bonds.
Common Mistakes
- Counting a carbon in a double bond as sp (forgetting it has 3 bonds, not 2).
- Misidentifying bridgehead carbons in Dewar benzene as sp².
- Thinking Ladenburg benzene has some sp² carbons because it's an isomer of benzene.
Things to Be Careful About
- The mark scheme awards M1 for rows 1 and 2 correct (Kekulé and Dewar), and M2 for row 3 (Ladenburg). Getting the Ladenburg row wrong costs M2 but not M1.
Describe the shape of delocalised benzene.
Include the geometry of each carbon, the C-C-H bond angle and the type of bond(s) between the carbon atoms and between the carbon and hydrogen atoms.
Answer
- Each carbon is trigonal planar; the molecule is a regular hexagon with bond angles of .
- C–C bonds: each consists of a -bond and a -bond (delocalised system).
- C–H bonds: -bonds only.
Trigonal planar, 120°, hexagonal; C-C has sigma and pi bonds; C-H has sigma bonds only.
Background Concept
Benzene is a planar, regular hexagonal molecule. Each carbon is sp² hybridised, giving trigonal planar geometry with 120° bond angles. The unhybridised p orbitals on each carbon overlap sideways above and below the plane of the ring to form a delocalised system. The C–C bonds are therefore intermediate between single and double bonds — each has one bond and partial character from the delocalised electrons. The C–H bonds are pure bonds formed by overlap of sp² hybrid orbitals with 1s orbitals of hydrogen.
Understanding the Question
The command word is 'Describe', asking for a factual account of the shape and bonding. The question explicitly asks for: geometry of each carbon, the C-C-H bond angle, and the type of bonds between C-C and C-H.
Approach
Address each element requested: geometry, bond angle, and bond types for C-C and C-H separately.
Step-by-Step Reasoning
Geometry and angle: Each carbon has 3 electron domains (2 C-C sigma bonds + 1 C-H sigma bond), so it is trigonal planar with 120° angles. The overall shape is a regular hexagon.
C-C bonds: In delocalised benzene, each pair of adjacent carbons shares a bond (from sp²-sp² overlap) and contributes to the delocalised system (from p-p overlap). So C-C bonds have both and character.
C-H bonds: Formed by overlap of an sp² hybrid orbital on carbon with the 1s orbital of hydrogen. These are bonds only — no component.
Key Takeaways
- Delocalisation means the electrons are shared over all six carbons, not localised between specific pairs.
- The distinction between C-C (sigma + pi) and C-H (sigma only) is a common mark-scheme requirement.
- 'Trigonal planar' and '120°' must both appear for M1.
Common Mistakes
- Saying C-C bonds are '1.5 bonds' without specifying sigma and pi — the mark scheme requires naming both bond types.
- Omitting the C-H bond type (the question explicitly asks for it).
- Saying 'hexagonal planar' without mentioning 120° or trigonal planar geometry.
Things to Be Careful About
- M1 requires BOTH '120°' AND 'hexagonal/trigonal planar'.
- M2 requires BOTH 'C-C has pi and sigma bonds' AND 'C-H has sigma bonds only'.
Answer
Bond strain (ring strain) — the bond angles in the small/fused rings deviate significantly from the ideal angles for the hybridisation state, causing instability.
Bond strain / ring strain
Background Concept
Ring strain arises when bond angles in a cyclic molecule are forced away from the ideal angles for the hybridisation of the atoms involved. In a four-membered ring (as in Dewar benzene), the internal angles are approximately 90°, far from the ideal 109.5° for sp³ or 120° for sp² carbons. In prismane (Ladenburg benzene), the triangular faces force 60° angles on sp³ carbons that 'want' 109.5°. This angular deviation stores potential energy, making the molecules thermodynamically unstable and prone to rearrangement to the strain-free benzene.
Understanding the Question
The command word is 'Suggest', asking for a reasoned explanation. We must explain why these specific isomers are unstable compared to benzene.
Approach
Identify the structural feature common to both Dewar and Ladenburg benzene that causes instability: strained ring systems with bond angles far from ideal.
Step-by-Step Reasoning
- Dewar benzene contains two fused four-membered rings. The C-C-C angles at the bridgehead carbons are compressed well below 109.5°.
- Ladenburg benzene (prismane) contains three four-membered rings and two three-membered rings. The 60° angles in the triangular faces are extremely strained for sp³ carbons.
- Neither molecule can achieve the ideal bond angles for its hybridisation, so both have high strain energy.
- Benzene, by contrast, has ideal 120° angles and delocalisation stabilisation.
Key Takeaways
- Ring strain is the key concept: deviation from ideal bond angles stores energy.
- The smaller the ring, the greater the angular strain.
- This is why benzene (with its ideal geometry) is far more stable than these cage/bicyclic isomers.
Common Mistakes
- Saying 'they are not aromatic' — while true, this doesn't explain instability; the question asks why they are unstable, and ring strain is the direct answer.
- Saying 'they have wrong number of bonds' — they are valid isomers with correct valencies.
Things to Be Careful About
The mark scheme accepts 'bond strain' or 'ring strain' as the answer. Do not over-elaborate or give an incorrect reason.
Complete Table 6.2 to predict the number of peaks in the proton () NMR spectrum for Dewar benzene, Ladenburg benzene and delocalised benzene.
Table 6.2
| number of peaks | |
|---|---|
| Dewar benzene | |
| Ladenburg benzene | |
| delocalised benzene |
Answer
| number of peaks | |
|---|---|
| Dewar benzene | 2 |
| Ladenburg benzene | 1 |
| delocalised benzene | 1 |
Dewar benzene: 2; Ladenburg benzene: 1; delocalised benzene: 1
Background Concept
The number of peaks in a NMR spectrum equals the number of chemically distinct proton environments in the molecule. Two protons are equivalent (same environment) if they can be interchanged by a symmetry operation (rotation, reflection, or inversion). Equivalent protons resonate at the same chemical shift and give a single signal.
Understanding the Question
We must determine how many sets of equivalent protons exist in each of three isomers by examining their symmetry.
Approach
For each structure, identify the symmetry elements and group the hydrogen atoms into equivalence classes.
Step-by-Step Reasoning
Dewar benzene: This bicyclic molecule has a plane of symmetry. The 4 vinylic H atoms (on the C=C double bonds) are all equivalent to each other by symmetry. The 2 bridgehead H atoms are equivalent to each other. These two sets are in different environments (vinylic vs aliphatic). Therefore: 2 peaks.
Ladenburg benzene (prismane): This highly symmetric molecule (point group ) has all 6 carbons equivalent by symmetry, and therefore all 6 hydrogens are equivalent. There is only one proton environment. Therefore: 1 peak.
Delocalised benzene: All 6 carbons are equivalent (perfect hexagonal symmetry), so all 6 hydrogens are in identical environments. Therefore: 1 peak.
Key Takeaways
- Symmetry analysis is the tool for counting NMR signals.
- Prismane is often surprising — despite its complex 3D structure, it has very high symmetry.
- Dewar benzene has lower symmetry than prismane, giving 2 environments.
Common Mistakes
- Thinking Dewar benzene has 3 peaks (confusing the two types of vinylic H — they are actually equivalent by the mirror plane).
- Thinking Ladenburg benzene has more than 1 peak due to its unusual shape.
- Confusing number of peaks with number of hydrogen atoms.
Things to Be Careful About
- Only one mark is available for the whole table, so all three values must be correct.
- The question asks for number of peaks (signals), not splitting patterns or integration ratios.
The reaction of phenylethanone with 1,4-dibromobutane, , in the presence of is shown in Fig. 6.2.
The mechanism of this reaction is similar to that of the alkylation of benzene.
Answer
BrCH2CH2CH2CH2Br + FeBr3 -> BrCH2CH2CH2CH2+ + FeBr4-
Background Concept
In Friedel-Crafts alkylation, a Lewis acid catalyst (such as , , or ) polarises the C–Br bond of a halogenoalkane. The halogen donates a lone pair to the electron-deficient metal, weakening the C–Br bond until it breaks heterolytically, generating a carbocation electrophile and a tetrahedral anion ().
Understanding the Question
We must write the equation for the formation of the electrophile from 1,4-dibromobutane and . This is the first step of the electrophilic substitution mechanism.
Approach
The halogenoalkane reacts with the Lewis acid. One C–Br bond breaks heterolytically: Br goes to to form , and the carbon becomes a carbocation. The other C–Br bond remains intact (as shown in the product of Fig. 6.2).
Step-by-Step Reasoning
accepts a lone pair from one bromine atom of the dibromobutane. The C–Br bond breaks, with both electrons going to the bromine (which is now bonded to Fe). This gives:
- Electrophile: (a primary carbocation, stabilised enough by the reaction conditions)
- By-product:
The equation is balanced: one Br moves from the organic molecule to the iron.
Key Takeaways
- The Lewis acid catalyst generates the electrophile by accepting a halide ion.
- Only one of the two C–Br bonds breaks in this step.
- The product anion is always when is the catalyst.
Common Mistakes
- Writing without the negative charge.
- Breaking both C–Br bonds.
- Forgetting to include as a reactant.
Things to Be Careful About
- The charges must be shown: on the carbocation and on .
- The equation must be balanced (one Br transferred).
Complete the mechanism in Fig. 6.3 for the reaction of phenylethanone with ions.
Include all relevant curly arrows and charges.
Draw the structure of the organic intermediate.
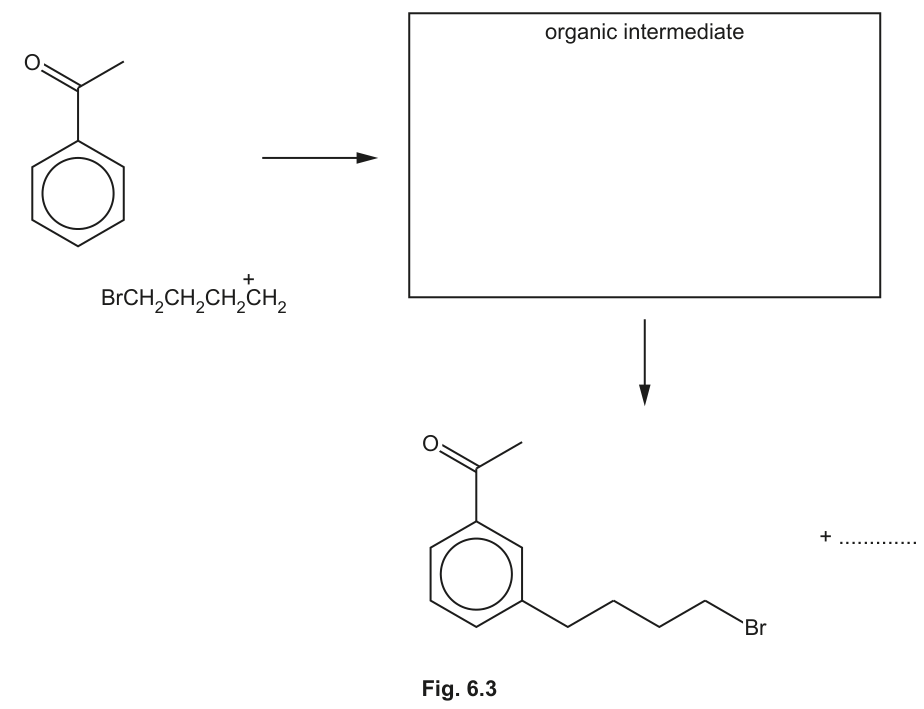
Answer
Step 1: Curly arrow from the delocalised system of the benzene ring to the of .
Organic intermediate: A cyclohexadienyl cation (arenium ion) with the group and the group attached to the ring (meta to each other), a positive charge delocalised over the ring (shown as a horseshoe with ), and an H on the carbon bearing the alkyl chain.
Step 2: Curly arrow from the C–H bond on the substituted carbon back into the ring to restore aromaticity, releasing .
See diagram: curly arrow from ring to C+, arenium ion intermediate with + charge, curly arrow from C-H into ring, H+ released.
Background Concept
Electrophilic aromatic substitution proceeds via two key steps:
- The electrons of the aromatic ring attack the electrophile, forming a new C–C bond. This breaks aromaticity and produces a resonance-stabilised cyclohexadienyl cation (arenium ion / sigma complex).
- A base (often or the solvent) removes the proton from the carbon that bonded to the electrophile. The C–H bond electrons return to the ring, restoring aromaticity.
The driving force for step 2 is the large stabilisation energy gained by restoring the aromatic system.
Understanding the Question
We are asked to complete the mechanism shown in Fig. 6.3. The figure provides phenylethanone and the electrophile , with a box for the organic intermediate and an arrow leading to the product plus a blank for the by-product. We must add curly arrows, draw the intermediate, and identify the by-product.
Approach
- Draw a curly arrow from the ring's system (from inside the hexagon) to the positively charged carbon of the electrophile.
- Draw the arenium ion: the ring now has the alkyl chain and an H on the same carbon, with a positive charge delocalised over the remaining 5 carbons (shown with a horseshoe inside the ring and a + sign).
- Draw a curly arrow from the C–H bond on the substituted carbon into the ring (to reform the bond).
- The by-product is .
Step-by-Step Reasoning
M1 — First curly arrow: From the delocalised system inside the benzene ring to the of the electrophile. This represents the electrons forming a new sigma bond to the electrophilic carbon. The arrow must start from inside the hexagon (representing the delocalised electrons) and point to the carbon.
M2 — Intermediate structure: The carbon that was attacked now has 4 bonds: 2 to ring carbons, 1 to H, and 1 to the chain. It is sp³ and breaks the cyclic conjugation. The positive charge is delocalised over the other 5 carbons (shown as a horseshoe arc inside the ring with a + sign). The group remains on its original carbon. The two substituents are meta to each other (as in the product).
M3 — Second curly arrow and by-product: From the C–H bond on the substituted carbon, back into the ring (to the adjacent C–C bond), restoring aromaticity. This releases as the by-product.
Key Takeaways
- Curly arrows in electrophilic substitution always go from electron-rich species (pi system, C-H bond) to electron-poor species (electrophile, or into the ring).
- The intermediate is NOT a free carbocation on one carbon — the charge is delocalised (shown with horseshoe notation).
- The by-product of the mechanism is (which then combines with to give HBr and regenerate ).
Common Mistakes
- Drawing the curly arrow from the C–C bond rather than from inside the ring (the delocalised electrons are shown as the circle inside the hexagon).
- Drawing a localised positive charge on one carbon instead of the delocalised horseshoe notation.
- Forgetting the H on the substituted carbon in the intermediate.
- Drawing the second curly arrow in the wrong direction (must go from C–H bond INTO the ring, not from ring to H).
- Writing as the by-product of the mechanism step (it is ; HBr forms later when reacts with ).
Things to Be Careful About
- The position of substitution is meta to the group (because is a meta-directing deactivator).
- The intermediate must show the correct connectivity: the alkyl chain and H on the same carbon.
- All charges must be shown: + on the ring (in the intermediate) and + on .
The reaction shown in Fig. 6.2 forms small amounts of two by-products, Y () and Z ().
Suggest structures for Y and Z in the boxes in Fig. 6.4.
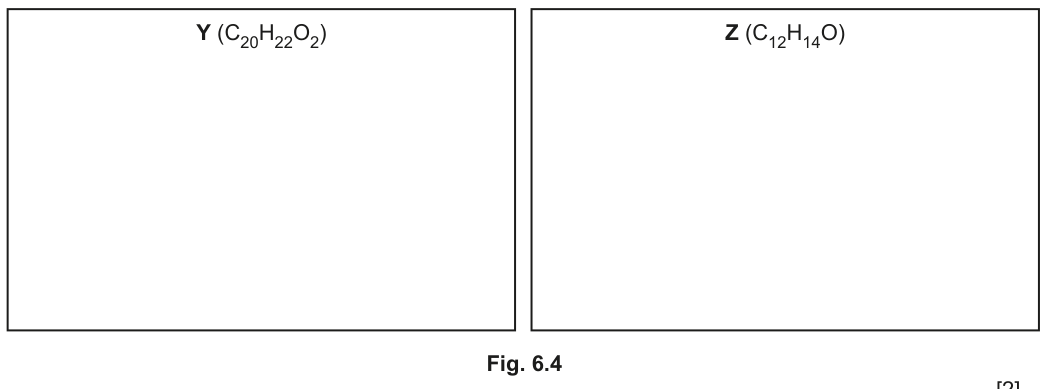
Answer
Y (): Two phenylethanone rings each substituted (meta to ) and linked by the chain — i.e. 1,4-bis(3-acetylphenyl)butane.
Z (): Intramolecular cyclisation — the butyl chain folds back and attacks the same ring, forming a fused bicyclic system (a tetralin derivative with an acetyl group on the aromatic ring).
Y = 1,4-bis(3-acetylphenyl)butane; Z = acetyl-substituted tetralin (benzene fused to cyclohexane with COCH3 on the aromatic ring)
Background Concept
In Friedel-Crafts alkylation, two common side reactions produce by-products:
- Multiple alkylation: The alkyl group introduced is electron-donating, activating the ring toward further substitution. If the electrophile (or a second molecule of the aromatic substrate) is present in excess, a second alkylation can occur, linking two aromatic rings together.
- Intramolecular cyclisation: When the electrophile contains a chain long enough to reach back to the ring it is already attached to, a second intramolecular electrophilic substitution can occur, forming a new ring fused to the original.
Understanding the Question
We are told the reaction forms small amounts of Y () and Z (). We must deduce their structures from the molecular formulae and the reaction conditions.
Approach
For Y: The molecular formula has 20 carbons. Phenylethanone is . Two phenylethanone units = . The difference is , which matches the butylene chain (as a bridge, losing 2 H at each end). So Y is two phenylethanone rings linked by a chain — a bis-alkylation product.
For Z: The molecular formula has 12 carbons. The main product (mono-alkylated phenylethanone) is . Removing HBr (80 mass units) from the main product gives . This means Z is formed by intramolecular cyclisation: the terminal C–Br bond reacts with the ring (the chain folds back), eliminating HBr and forming a new six-membered ring fused to the benzene.
Step-by-Step Reasoning
Y — bis-substitution:
- The chain on the mono-alkylated product still has a reactive C–Br bond.
- A second molecule of phenylethanone can attack this carbon (acting as a new electrophile after the Br leaves with FeBr₃).
- Result: two aromatic rings connected by , each bearing a group meta to the chain.
- Formula check: 2 × (COCH₃) + − 2H (at connection points) = . ✓
Z — intramolecular cyclisation:
- The butyl chain attached to the ring has a terminal Br. The chain is long enough (4 carbons) to reach back to the ring.
- The ring attacks the terminal carbon intramolecularly, displacing Br⁻ (assisted by FeBr₃), forming a new C–C bond and a fused six-membered ring.
- This gives a tetralin (1,2,3,4-tetrahydronaphthalene) skeleton with an acetyl group on the aromatic ring.
- Formula check: benzene ring (C₆) + fused cyclohexane ring (adds C₄, shares C₂) + acetyl (C₂) = C₁₂. H count for tetralin with acetyl: C₁₂H₁₄O. ✓
Key Takeaways
- Molecular formula analysis is the key to deducing by-product structures.
- Bis-alkylation (intermolecular) and cyclisation (intramolecular) are the two classic side reactions in Friedel-Crafts alkylation.
- A 4-carbon tether is long enough for intramolecular attack to form a stable 6-membered ring.
Common Mistakes
- For Y: drawing the two rings connected by a shorter or longer chain, or forgetting the acetyl groups.
- For Z: drawing a 5-membered or 7-membered fused ring instead of 6 (the chain length determines ring size).
- For Z: forgetting that the product still has the acetyl group on the aromatic ring.
- Drawing Z as a simple elimination product (styrene-type) rather than a cyclisation product.
Things to Be Careful About
- The substitution pattern on Y must be meta (matching the main product's regiochemistry).
- Z must be a fused bicyclic system, not a spiro compound.
- Both structures must be consistent with the given molecular formulae exactly.
Four esters, A, B, C and D, with the molecular formula are shown in Fig. 7.1.
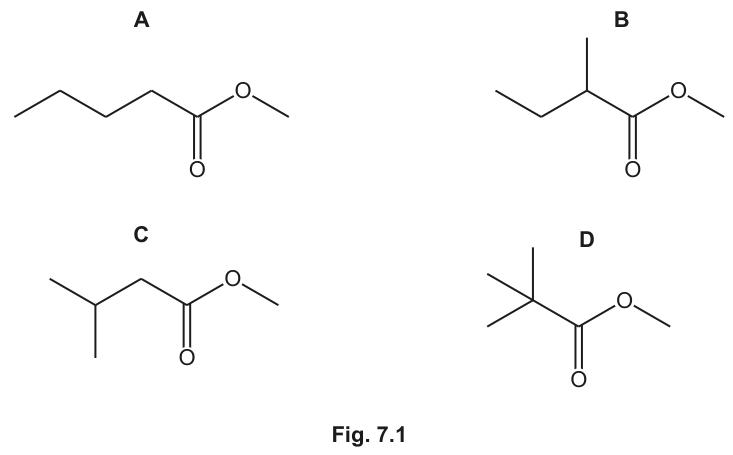
Answer
methyl pentanoate
methyl pentanoate
Background Concept
Esters are named as two separate words: the alkyl group derived from the alcohol (the group attached to the single-bonded oxygen) is named first, followed by the carboxylate name derived from the acid (the chain containing the carbonyl carbon), with the '-oic acid' ending replaced by '-oate'.
Understanding the Question
The question asks for the systematic (IUPAC) name of ester A shown in Fig. 7.1. The displayed formula must be interpreted to identify the two fragments.
Approach
Split the molecule at the ester linkage (). Count the carbons on each side: the carbonyl carbon and its attached chain form the acid-derived part, and the carbon on the single-bonded oxygen forms the alcohol-derived part.
Step-by-Step Reasoning
In ester A the group on the single-bonded oxygen is a (one carbon), so the alcohol-derived name is 'methyl'. The chain containing the carbon has five carbons in a straight row (), corresponding to pentanoic acid, so the acid-derived name is 'pentanoate'. Combining these gives methyl pentanoate. The molecular formula is consistent (5 + 1 = 6 carbons, one degree of unsaturation from the carbonyl).
Key Takeaways
Always name the alkyl (alcohol) part first and the carboxylate (acid) part second; count the carbonyl carbon as part of the acid chain.
Common Mistakes
Naming the methyl group as part of the acid chain (giving an incorrect 'hexanoate') or reversing the two words. Writing 'pentanoic acid methyl ester' is not the systematic form expected.
Things to Be Careful About
Ensure the carbonyl carbon is included when counting the five carbons of the pentanoate chain; omitting it gives 'butanoate', which is wrong.
A mixture of these esters, A, B, C and D, is analysed by gas–liquid chromatography.
The chromatogram produced is shown in Fig. 7.2. The number above each peak represents the area under the peak.
The area under each peak is proportional to the mass of the respective ester in the mixture.
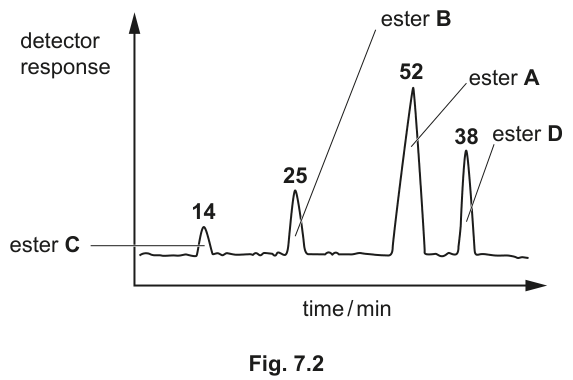
Answer
The time between injection of the sample and the detection of a particular component (peak).
time between injection and detection
Background Concept
In gas–liquid chromatography (GLC), a volatile sample is injected into a stream of carrier gas that carries it through a column containing a liquid stationary phase. Components separate because they partition between the mobile and stationary phases to different extents. The retention time is the characteristic time at which each component emerges and is detected.
Understanding the Question
This part simply asks for the definition of 'retention time'.
Approach
State the two events that the time interval is measured between.
Step-by-Step Reasoning
Retention time is the elapsed time from the moment the sample is injected into the column to the moment that a given component reaches the detector and produces a peak. It is measured along the time axis of the chromatogram (here the x-axis is time / min). A component that interacts more strongly with the stationary phase has a longer retention time.
Key Takeaways
Retention time is a time interval (injection to detection), not the height or area of a peak, and is used to identify components.
Common Mistakes
Confusing retention time with peak area (which relates to amount) or with peak height. Saying only 'the time it takes to pass through the column' without reference to injection and detection is incomplete.
Things to Be Careful About
The definition must mention both injection and detection to earn the mark.
Working
Total area = 14 + 25 + 52 + 38 = 129
Answer
29.5%
29.5%
Background Concept
In GLC the area under each peak is proportional to the amount of that component reaching the detector. The question states that, for these isomeric esters (same ), the area is proportional to mass, so the percentage by mass equals the percentage of the total peak area.
Understanding the Question
From Fig. 7.2 the four peak areas are: ester C = 14, ester B = 25, ester A = 52, ester D = 38. We must find the mass percentage of ester D.
Approach
Add the four areas to get the total, then divide the area of D by the total and multiply by 100.
Step-by-Step Reasoning
Total = 14 + 25 + 52 + 38 = 129. The fraction due to D = 38/129 = 0.2946. As a percentage this is 29.46%, which rounds to 29.5%. Because the esters are isomers of identical relative molecular mass, the mass percentage equals the area percentage, so no molar-mass correction is needed.
Key Takeaways
Peak area gives relative amount; when components share the same , area percentage equals mass percentage.
Common Mistakes
Dividing by the wrong total (e.g. omitting one peak), or dividing D's area by the sum of the other three. Using the wrong peak's area for D (38, not 52).
Things to Be Careful About
Report the answer to an appropriate number of significant figures (29.5%); the mark scheme accepts 29.5%.
Separate samples of the esters, A, B, C and D, are analysed using proton () NMR and carbon-13 NMR spectroscopy.
Complete Table 7.1 to show the number of peaks in each NMR spectrum for esters B and C.
Table 7.1
| ester | number of peaks in proton () NMR spectrum | number of peaks in carbon-13 NMR spectrum |
|---|---|---|
| B | ||
| C |
Answer
| ester | NMR peaks | NMR peaks |
|---|---|---|
| B | 5 | 6 |
| C | 4 | 5 |
B: 5 (1H), 6 (13C); C: 4 (1H), 5 (13C)
Background Concept
In NMR each chemically distinct proton environment gives one signal; in NMR each chemically distinct carbon gives one signal. Symmetry makes equivalent atoms produce a single peak.
Understanding the Question
Ester B is methyl 2-methylbutanoate, . Ester C is methyl 3-methylbutanoate, . We must count the number of peaks in each spectrum for B and C.
Approach
Draw each structure, label every carbon and every set of equivalent protons, and count the distinct environments, using symmetry (notably the two equivalent methyls in C's isopropyl group).
Step-by-Step Reasoning
Ester B : the carbons are all different — the on C-4, the , the , the C-2 methyl, the carbonyl , and the — giving 6 peaks. For : the terminal , the , the , the C-2 , and the are five different proton environments, so 5 peaks.
Ester C : the two methyls on the isopropyl carbon are equivalent, so carbons are: (equivalent , , , , = 5 peaks. Proton environments: equivalent 's, , , = 4 peaks.
Key Takeaways
Counting NMR peaks is a symmetry exercise; equivalent methyl groups (as in an isopropyl unit) collapse to one signal in both spectra.
Common Mistakes
Treating the two equivalent methyls in C as different (giving 6/5 instead of 5/4), or forgetting the carbonyl carbon counts as a peak.
Things to Be Careful About
The carbonyl carbon has no protons but still gives a signal; the is a distinct environment from the alkyl methyls.
Identify all of the esters from A, B, C and D that have at least one triplet peak in their proton () NMR spectrum.
Answer
A and B
A and B
Background Concept
A proton signal is split into peaks by equivalent neighbouring protons on adjacent carbons. A group directly bonded to a group is split by the two protons into a triplet (). Conversely, a bonded to a is a doublet, and a bonded to a carbon with no hydrogens is a singlet.
Understanding the Question
Among esters A, B, C and D we must identify those that show at least one triplet in their spectrum.
Approach
For each ester, look for a group attached to a (which gives the triplet) or, equivalently, a flanked appropriately. Check all four structures.
Step-by-Step Reasoning
A methyl pentanoate : the terminal is next to a , so it is a triplet. Yes.
B methyl 2-methylbutanoate : the on the is next to a , giving a triplet. Yes.
C methyl 3-methylbutanoate : the two methyls are each next to a (one H), giving a doublet; the is a singlet; the is split by the (doublet). No triplet.
D methyl 2,2-dimethylpropanoate : the three methyls are on a carbon with no hydrogens, so they are a singlet; the is a singlet. No triplet.
Thus A and B show a triplet.
Key Takeaways
A triplet arises from a adjacent to a ; examine the immediate neighbour of every methyl.
Common Mistakes
Including C (its methyls are doublets, not triplets) or D (all singlets). Confusing the singlet with a triplet.
Things to Be Careful About
The group has no neighbouring protons and is always a singlet in these esters; do not count it toward a triplet.
Compound F, , shows stereoisomerism and effervesces with .
Compound F reacts with alkaline to form yellow precipitate G and compound H.
Compound F reacts with to form compound J, .
Compound F reacts with to form compound K, .
Compound K reacts with propan-2-ol to form compound L.
Draw the structures of compounds F, G, H, J, K and L in the boxes in Fig. 7.3.
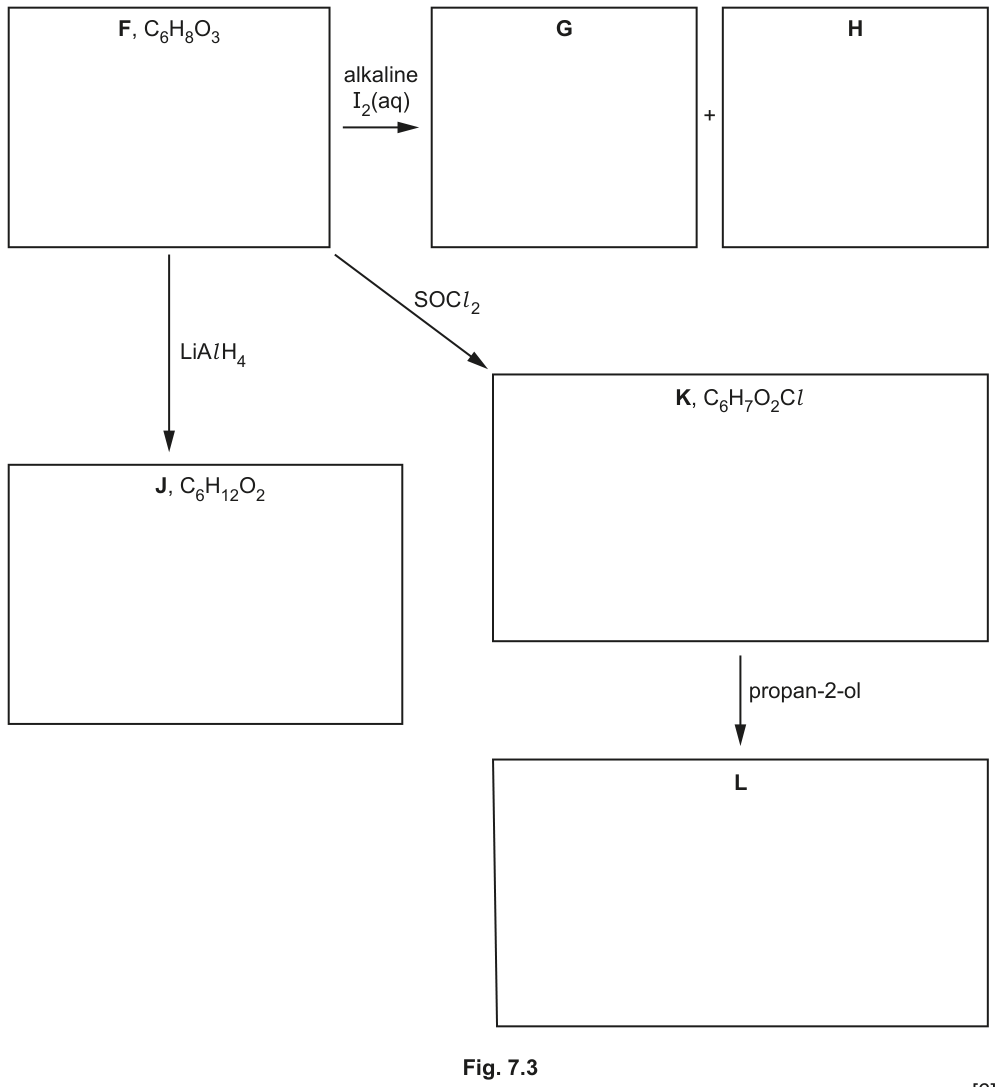
Answer
F = (an unsaturated keto-acid with a group and a bearing a methyl and a , showing E/Z stereoisomerism).
G = (iodoform, yellow precipitate).
H = (the dicarboxylic acid formed after oxidation of the methyl ketone).
J = (the diol from reduction of both groups by ).
K = (the acyl chloride from ).
L = (the propan-2-yl ester from K + propan-2-ol).
F: CH3COCH=C(CH3)COOH; G: CHI3; H: HOOCCH=C(CH3)COOH; J: CH3CH(OH)CH=C(CH3)CH2OH; K: CH3COCH=C(CH3)COCl; L: CH3COCH=C(CH3)COOCH(CH3)2
Background Concept
Several characteristic reactions identify functional groups: effervescence with indicates a carboxylic acid (or other strong-enough acid); a positive iodoform test (yellow with alkaline ) requires a methyl ketone (or group), and the ketone is oxidised to a carboxylate; reduces both carbonyls of a ketone and a carboxylic acid to groups; converts a into an acyl chloride ; an acyl chloride reacts with an alcohol to give an ester. Stereoisomerism (E/Z) arises from a double bond with two different groups on each carbon.
Understanding the Question
Compound F () effervesces with (so it contains a ) and shows stereoisomerism (so it contains a with appropriate substitution). Its reactions with alkaline , , and reveal the remaining groups. We must draw F, G, H, J, K, L.
Approach
Use the formula and the three reaction clues to build F: a (from carbonate), a (from the iodoform test), and a (from stereoisomerism). Then propagate each reaction through to G, H, J, K, L.
Step-by-Step Reasoning
F: has 3 degrees of unsaturation: one (ketone), one (acid), one . Placing the methyl ketone and the acid on the double bond gives ; the carries H and on one side and and on the other, so E/Z stereoisomerism is possible. This satisfies all clues (acid, methyl ketone, double bond).
G: the yellow precipitate from the iodoform reaction is .
H: oxidation of the group to gives the dicarboxylic acid .
J: reduces the ketone to and the acid to , leaving the intact, giving (, matching the formula).
K: replaces only the acid with , giving (, matching).
L: K reacts with propan-2-ol via addition–elimination to form the isopropyl ester .
Note the mark scheme accepts several positional isomers of F (the double bond and groups may be arranged differently) provided the same three functional groups are present and the downstream products are consistent.
Key Takeaways
Combine formula, degree-of-unsaturation, and reaction tests to deduce a structure, then apply each named reagent's specific transformation to obtain the products.
Common Mistakes
Forgetting that reduces the carboxylic acid as well as the ketone (giving a diol, not an alcohol-acid). Drawing K with the ketone also chlorinated. Omitting the in the products. Choosing a methyl ketone arrangement that cannot give E/Z isomerism.
Things to Be Careful About
Keep the carbon count and formula consistent at each step (J must be , K must be ). In L, the ester oxygen comes from propan-2-ol, so the group is attached through oxygen. The ketone is unchanged in K and L.
Neotame is an artificial sweetener added to some foods.
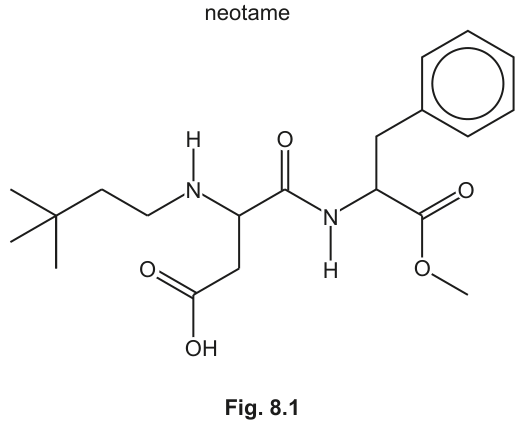
Answer
2
2
Background Concept
A chiral carbon (or stereocenter) is a carbon atom that is bonded to four different groups or atoms. This tetrahedral arrangement means the molecule lacks a plane of symmetry and can exist as two non-superimposable mirror images (enantiomers). In organic molecules like amino acids and peptides, the alpha-carbon (the carbon adjacent to the carbonyl group in amino acids) is typically chiral because it is bonded to an amino group, a carboxyl group (or derivative), a hydrogen atom, and a side chain (R group).
Understanding the Question
The question asks for the number of chiral carbon atoms in the neotame molecule shown in Fig. 8.1. We must examine every carbon atom in the structure and determine if it is bonded to four distinct groups.
Approach
Scan the carbon skeleton. Ignore carbons in methyl groups (CH3) and methylene groups (CH2) as they are bonded to at least two identical hydrogen atoms. Ignore carbons in the benzene ring (sp2 hybridized, planar). Focus on sp3 hybridized carbons with single bonds to four different entities.
Step-by-Step Reasoning
- Left-hand side chain: The group is a 3,3-dimethylbutyl group attached to a nitrogen. The quaternary carbon (C bonded to three methyls) is not chiral (three identical methyl groups). The CH2 carbons are not chiral.
- First alpha-carbon (from aspartic acid part): Look at the carbon bonded to the secondary amine nitrogen (N-H). Let's call this C_alpha1. It is bonded to:
- Hydrogen atom (H)
- The nitrogen-containing group: -NH-CH2-CH2-C(CH3)3
- The carboxylic acid side chain: -CH2-COOH
- The amide carbonyl group: -C(=O)-NH-...
These four groups are different. So, C_alpha1 is chiral.
- Right-hand side (phenylalanine part): Look at the carbon bonded to the amide nitrogen and the ester group. Let's call this C_alpha2. It is bonded to:
- Hydrogen atom (H)
- The amide nitrogen: -NH-C(=O)-...
- The benzyl side chain: -CH2-C6H5
- The ester carbonyl group: -C(=O)OCH3
These four groups are different. So, C_alpha2 is chiral.
- Other carbons: The methyl carbons in the ester (-OCH3) and the t-butyl group are not chiral. The ring carbons are not chiral.
Total chiral carbons = 2.
Key Takeaways
To identify chiral centers, look for sp3 carbons with 4 different substituents. In peptides/amino acid derivatives, the alpha-carbons are the primary candidates.
Common Mistakes
- Counting the nitrogen-bearing carbons incorrectly.
- Missing a chiral center because the side chain looks similar to another part (e.g., confusing the benzyl group with the rest of the chain).
- Forgetting that H atoms are implicit in skeletal structures.
Things to Be Careful About
- Ensure you are looking at carbon atoms, not nitrogen or oxygen.
- Remember that implicit hydrogens count as a group. A CH group in a skeletal structure is bonded to H, plus the three drawn bonds.
Neotame contains the arene functional group.
Identify all the other functional groups present in neotame.
Answer
- Amide
- Amine (secondary)
- Ester
- Carboxylic acid
amide, amine, ester, carboxylic acid
Background Concept
Functional groups are specific groups of atoms or bonds within molecules that are responsible for the characteristic chemical reactions of those molecules. Common organic functional groups include:
- Carboxylic acid: -COOH
- Ester: -COO- (carbonyl bonded to an oxygen which is bonded to a carbon chain)
- Amide: -CONH- (carbonyl bonded to a nitrogen)
- Amine: -NH2, -NHR, -NR2 (nitrogen with single bonds to carbons/hydrogens)
- Arene: Benzene ring or derivative.
Understanding the Question
The question states neotame contains an arene group and asks to identify all other functional groups. We need to scan the molecule in Fig 8.1 and label the distinct chemical moieties.
Approach
Break the molecule down into its constituent parts based on the bonds around heteroatoms (O, N).
Step-by-Step Reasoning
- Bottom left: There is a -C(=O)OH group. This is a carboxylic acid (or carboxyl) group.
- Top left chain: There is an -NH- group bonded to two carbon chains (the t-butyl-ethyl chain and the central CH). This is a secondary amine group.
- Center: There is a -C(=O)-NH- linkage connecting the left and right halves. A carbonyl group bonded to a nitrogen is an amide group (specifically a peptide bond here).
- Right side: There is a -C(=O)-O-CH3 group. A carbonyl bonded to an alkoxy group is an ester group.
- Top right: A benzene ring (arene), already mentioned.
So the other functional groups are: amide, amine, ester, carboxylic acid.
Key Takeaways
Be able to distinguish between similar groups like amides (C=O next to N) and amines (N with single bonds only), and esters (C=O next to O) vs carboxylic acids (C=O next to OH).
Common Mistakes
- Calling the amide an 'amine' and 'ketone'. It is an amide.
- Calling the ester a 'carboxylic acid' or 'ether'.
- Missing the carboxylic acid on the side chain.
Things to Be Careful About
- The question asks for 'all' other groups. Listing only two might only get 1 mark depending on the scheme (scheme says any two [1], all four [2]). Best to list all four to be safe.
- 'Amine' is acceptable for the secondary amine. 'Secondary amine' is more precise but 'amine' is usually sufficient for marking.
Neotame reacts with an excess of hot to form three organic products.
State the two types of reaction that occur when neotame reacts with hot .
1 .........................................................................................................................................
2 .........................................................................................................................................
Answer
- Hydrolysis
- Acid–base (reaction)
hydrolysis, acid-base
Background Concept
When organic molecules containing ester or amide linkages are heated with aqueous sodium hydroxide (NaOH):
- Esters undergo alkaline hydrolysis (saponification) to form a carboxylate salt and an alcohol.
- Amides can also be hydrolyzed by heating with strong base (though it's harder than esters) to form a carboxylate salt and an amine (or ammonia).
- Carboxylic acids react with bases (like NaOH) in a neutralization (acid-base) reaction to form a carboxylate salt and water.
Understanding the Question
Neotame is treated with excess hot NaOH(aq). We need to name the two types of reaction occurring. The molecule has an ester, an amide, and a carboxylic acid.
Approach
Identify the reactive sites:
- Ester group (-COOCH3) -> Hydrolysis.
- Amide group (-CONH-) -> Hydrolysis (requires hot concentrated base, which is specified as 'hot NaOH').
- Carboxylic acid group (-COOH) -> Acid-base neutralization.
Step-by-Step Reasoning
The reaction involves breaking bonds using water/OH- (hydrolysis) and proton transfer (acid-base).
- The ester group (-COOCH3) reacts with NaOH to break the C-O bond. This is hydrolysis.
- The amide group (-CONH-) reacts with NaOH to break the C-N bond. This is also hydrolysis.
- The carboxylic acid group (-COOH) donates a proton to OH- to form -COO- Na+ and H2O. This is an acid-base reaction (or neutralization).
So the two types are hydrolysis and acid-base.
Key Takeaways
Hot aqueous alkali causes hydrolysis of esters and amides, and neutralization of carboxylic acids.
Common Mistakes
- Saying 'oxidation' or 'reduction'.
- Saying 'substitution' (while hydrolysis is technically a nucleophilic acyl substitution, 'hydrolysis' is the specific term expected).
- Forgetting that the carboxylic acid part is an acid-base reaction.
Things to Be Careful About
- The question asks for 'types' of reaction, not mechanisms. 'Hydrolysis' and 'acid-base' are the correct categories.
Draw the structures of the three organic products formed from the reaction of neotame with an excess of hot .
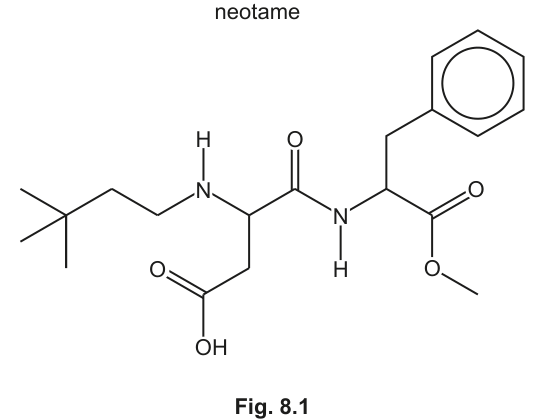

Answer
Product 1 (left part - sodium salt of modified aspartic acid):
(Structure: 3,3-dimethylbutylamino group attached to CH, which is attached to CH2COONa and COONa)
Product 2 (right part - sodium phenylalaninate):
(Structure: Phenylalanine with amino group as H2N and carboxyl as COONa)
Product 3 (alcohol):
(Methanol)
(See diagram below for structural drawings)
Three products: Sodium 3-({[(3,3-dimethylbutyl)amino]methyl}... wait, let's describe structures clearly. 1. Sodium salt of N-(3,3-dimethylbutyl)aspartic acid. 2. Sodium phenylalaninate. 3. Methanol.
Background Concept
Hydrolysis of amides and esters with hot NaOH breaks the molecule into fragments.
- Ester hydrolysis: R-COO-R' + NaOH -> R-COO- Na+ + R'-OH. The alkyl group from the alcohol part leaves as an alcohol.
- Amide hydrolysis: R-CO-NH-R' + NaOH -> R-COO- Na+ + R'-NH2. The bond between C and N breaks. The carbonyl side becomes a carboxylate salt. The nitrogen side becomes an amine (or ammonia if R' is H).
- Acid-Base: Any -COOH groups present will react with NaOH to form -COO- Na+.
Understanding the Question
We need to draw the three organic products from reacting neotame with excess hot NaOH.
Neotame structure breakdown:
- Left fragment (Aspartic acid derivative): (CH3)3C-CH2-CH2-NH-CH(CH2COOH)-CO- ...
- Right fragment (Phenylalanine methyl ester): ... -NH-CH(CH2Ph)-COOCH3
- Linkages: Amide bond between Left-CO and Right-NH. Ester bond at Right-COOCH3. Carboxylic acid on Left side chain.
Approach
- Break the Ester: The -COOCH3 group at the bottom right breaks. The -OCH3 becomes CH3OH (methanol). The carbonyl carbon becomes -COO- Na+.
- Break the Amide: The -CO-NH- bond in the middle breaks. The carbonyl carbon (from the left part) becomes -COO- Na+. The nitrogen (from the right part) gains a hydrogen to become -NH2 (or -NH- if secondary, but here it's part of the amino acid backbone, so it becomes a primary amine -NH2 because the H on N stays? Wait. Amide hydrolysis: R-CO-NH-R' + OH- -> R-COO- + H2N-R'. Yes, the N gets protonated from water or just becomes amine. In base, it's R'-NH2 (neutral amine) and R-COO-.
- Neutralize Acids: The original -COOH on the left side chain becomes -COO- Na+.
Step-by-Step Reasoning
Product 3 (Simplest): Methanol from the ester methyl group.
Structure: H3C-OH.
Product 2 (Right fragment):
Original: -NH-CH(CH2-Ph)-COOCH3
- Ester breaks: -COOCH3 -> -COO- Na+ + CH3OH.
- Amide breaks: The bond is between the left C=O and this N-H. So the N-H becomes H2N- (the amine of phenylalanine).
Structure: H2N-CH(CH2-C6H5)-COO- Na+.
(Note: The amino group is basic, but in excess NaOH, it stays as H2N- because amines are weak bases and won't be deprotonated by OH- significantly, and carboxylate is already deprotonated. Actually, amino acids exist as zwitterions in water, but in excess strong base, the amino group is free base (H2N-) and carboxyl is salt (COO-). The mark scheme shows H2N- and -ONa. Correct.)
Product 1 (Left fragment):
Original: (CH3)3C-CH2-CH2-NH-CH(CH2-COOH)-CO- ...
- Amide breaks: The C=O stays with this fragment. It becomes -COO- Na+.
- Carboxylic acid side chain: -CH2-COOH becomes -CH2-COO- Na+.
- The amine nitrogen: It is a secondary amine (R-NH-R'). It does not react with NaOH (amines are bases, not acids, unless very strong acid like NaH). So it stays as -NH-.
Structure: (CH3)3C-CH2-CH2-NH-CH(CH2-COO- Na+)-COO- Na+.
Key Takeaways
- Hydrolysis of peptides/amides breaks the peptide bond.
- Hydrolysis of esters breaks the ester bond.
- In basic conditions, carboxylic acids become carboxylate salts (COO- Na+).
- Amines remain as amines (neutral).
Common Mistakes
- Drawing the amine as -NH- Na+ (amines don't form salts with NaOH, only acids do).
- Forgetting to convert the original carboxylic acid to the salt.
- Drawing methanoic acid or CO2 from the ester (it's a methyl ester, so methanol).
- Breaking the wrong bond in the amide (break C-N, not C-C).
Things to Be Careful About
- State symbols: The question asks for structures, usually structural formulae are enough, but showing the ionic form (-ONa) is crucial for the salt products.
- The mark scheme shows 'ONa' explicitly. Ensure you write -COONa or -COO- Na+.
- The amine on the right product is H2N-, not H3N+ or NH-.
Diagram Description:
- Top Left Box: Structure of sodium 3-({[(3,3-dimethylbutyl)amino]methyl}... no, sodium N-(3,3-dimethylbutyl)aspartate.
- Chain: t-Butyl (cross shape) - CH2 - CH2 - NH - CH - ...
- The CH has two branches down: one is CH2-C(=O)ONa, the other is C(=O)ONa.
- Basically the left half of neotame, but C=O is now C(=O)ONa, and side chain COOH is COONa.
- Top Right Box: Sodium phenylalaninate.
- Benzene ring - CH2 - CH(NH2) - C(=O)ONa.
- Note: NH2 is H2N-.
- Bottom Box: Methanol.
- H3C-OH.
Samples of phenol, , are reacted separately with sodium and with dilute nitric acid.
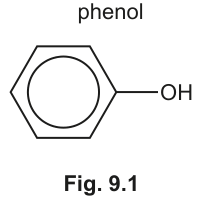
Answer
C6H5OH + Na -> C6H5ONa + 1/2 H2
Background Concept
Phenol () is weakly acidic because the lone pair on the oxygen atom is delocalized into the benzene ring, weakening the O–H bond and stabilizing the resulting phenoxide ion () through resonance. This allows phenol to react with reactive metals like sodium, similar to how carboxylic acids or water react, releasing hydrogen gas.
Understanding the Question
The question asks for the balanced chemical equation for the reaction between phenol and sodium metal. This is a simple acid-metal reaction where phenol acts as the acid.
Approach
Identify the products: sodium phenoxide (the salt) and hydrogen gas. Write the unbalanced equation and then balance it, typically using a fraction for to keep the organic coefficients as 1.
Step-by-Step Reasoning
- Reactants: Phenol () and sodium ().
- Products: The sodium replaces the hydrogen in the hydroxyl group to form sodium phenoxide (). The displaced hydrogen atoms combine to form hydrogen gas ().
- Balancing: One mole of phenol reacts with one mole of sodium to produce one mole of sodium phenoxide and half a mole of hydrogen gas.
Key Takeaways
Phenol is acidic enough to react with sodium metal to produce hydrogen gas and the corresponding salt (sodium phenoxide). This distinguishes it from alcohols like ethanol which also react but are less acidic, and from water.
Common Mistakes
- Writing as a product (confusing with acid-base neutralization).
- Forgetting to balance the hydrogen gas (writing instead of or balancing with and ).
- Writing (reacting with base instead of metal).
Things to Be Careful About
Ensure the formula for sodium phenoxide is correct: (or ). Do not include state symbols unless required, though for Na and or for phenol could be used, the mark scheme here focuses on the stoichiometry.
Draw the structures of the two major isomeric organic products formed in the reaction of phenol with dilute .
Answer
The two major products are 2-nitrophenol (ortho) and 4-nitrophenol (para).
Structure 1: 2-nitrophenol
A benzene ring with an group and an group on adjacent carbons (positions 1 and 2).
Structure 2: 4-nitrophenol
A benzene ring with an group and an group on opposite carbons (positions 1 and 4).
(See diagram below for structural representation)
2-nitrophenol and 4-nitrophenol
Background Concept
The hydroxyl group () attached to a benzene ring is strongly activating and is an ortho/para-directing group. This is because the oxygen atom donates electron density into the ring via resonance, increasing electron density specifically at the ortho (positions 2, 6) and para (position 4) positions. This makes the ring much more reactive towards electrophiles than benzene itself.
When phenol reacts with dilute nitric acid at room temperature, mononitration occurs. The electrophile is the nitronium ion (), generated in small amounts. Because the group directs to ortho and para positions, the major products are 2-nitrophenol and 4-nitrophenol. (Note: concentrated nitric acid would lead to 2,4,6-trinitrophenol, picric acid).
Understanding the Question
You are asked to draw the structures of the two major organic isomers formed when phenol reacts with dilute nitric acid. This is an electrophilic aromatic substitution reaction.
Approach
- Identify the directing effect of the group: ortho and para.
- Draw the benzene ring with the group fixed at position 1.
- Place the group at position 2 (ortho) for the first isomer.
- Place the group at position 4 (para) for the second isomer.
Step-by-Step Reasoning
- Reactants: Phenol + dilute .
- Reaction Type: Electrophilic substitution (nitration).
- Directing Effect: The group is ortho/para directing.
- Product 1 (Ortho): The nitro group () attaches to the carbon adjacent to the hydroxyl group. This is 2-nitrophenol (or ortho-nitrophenol).
- Product 2 (Para): The nitro group attaches to the carbon opposite the hydroxyl group. This is 4-nitrophenol (or para-nitrophenol).
- Structure Drawing: Draw a hexagon with a circle inside (or alternating double bonds) for the benzene ring. Attach at the top. Attach at the top-right (ortho) for one structure, and at the bottom (para) for the other.
Key Takeaways
The group on phenol activates the ring and directs incoming electrophiles to the ortho and para positions. Dilute nitric acid results in mono-substitution, yielding a mixture of ortho and para isomers.
Common Mistakes
- Drawing 3-nitrophenol (meta product) – the group does not direct meta.
- Drawing 2,4,6-trinitrophenol – this requires concentrated nitric acid and heat.
- Forgetting to show the benzene ring correctly (circle vs double bonds).
Things to Be Careful About
Both isomers must be drawn to get the mark. Ensure the group is written correctly (N attached to ring, not O).
Salicylic acid can be synthesised from phenol.
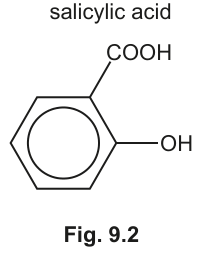
One of the steps in this synthesis is the electrophilic substitution reaction of carbon dioxide with the phenoxide ion, .
Complete the mechanism in Fig. 9.3 for the reaction of with .
Include all relevant curly arrows, dipoles and charges. Draw the structure of the organic intermediate.
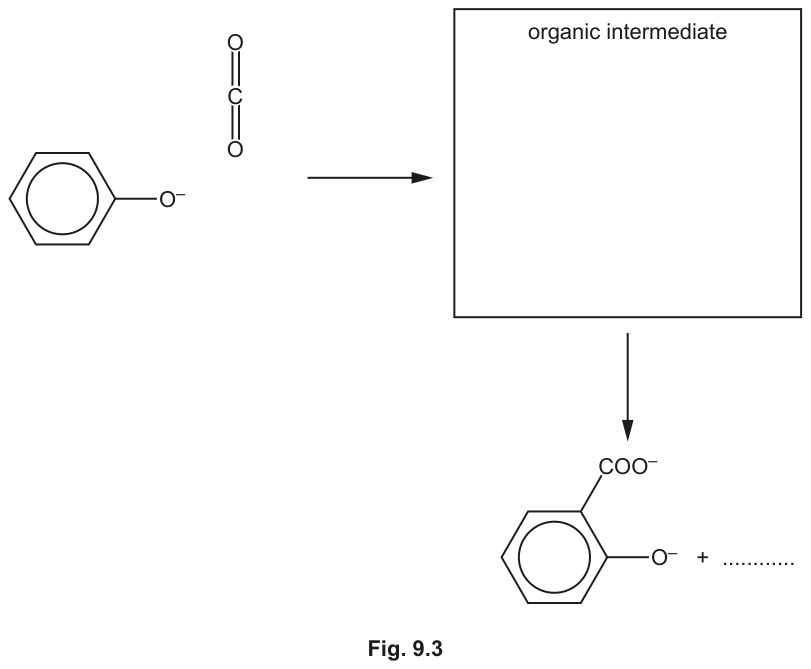
Answer
Step 1: Electrophilic Attack
- Draw a dipole on : on the carbon atom, on the oxygen atoms (specifically the one accepting the electrons).
- Draw a curly arrow from the benzene ring (pi system, specifically the ortho position relative to ) to the carbon atom of .
- Draw a curly arrow from the double bond (pi bond) to the oxygen atom.
Step 2: Intermediate Structure
- Draw the intermediate: A benzene ring with a positive charge (delocalized, often shown as a circle with a + or a specific carbocation). The group is at position 1. At position 2 (ortho), there is a carbon bonded to an atom and a group.
Step 3: Rearomatization
- Draw a curly arrow from the bond (at position 2) into the ring (to reform the pi system/aromaticity).
- The final products shown are the 2-hydroxybenzoate ion (salicylate) and .
(See diagram below for the full mechanism)
Mechanism: Arrow from ring to C of CO2 (with delta+ on C, delta- on O, arrow C=O to O). Intermediate: Ring with + charge, COO- and H at ortho position. Arrow from C-H bond to ring, producing H+.
Background Concept
This reaction is the Kolbe-Schmitt reaction, used to synthesize salicylic acid (2-hydroxybenzoic acid) from phenol. In this step, phenol is first deprotonated to form the phenoxide ion (), which is even more nucleophilic than phenol. Carbon dioxide acts as a weak electrophile. The reaction is an electrophilic aromatic substitution.
The phenoxide ion has a negative charge on oxygen, which is strongly electron-donating by resonance, activating the ortho and para positions. Attack by occurs preferentially at the ortho position due to chelation effects or specific reaction conditions (though para is also possible, ortho leads to salicylic acid which is the desired product here, as shown in Fig 9.2).
is a linear molecule () with polar bonds. The carbon is and oxygen is , making carbon susceptible to nucleophilic attack by the electron-rich benzene ring.
Understanding the Question
You must complete the mechanism for the reaction between the phenoxide ion and to form an intermediate, which then loses a proton to form the 2-hydroxybenzoate ion (as shown in the final products in Fig 9.3). You need to show:
- The initial attack: dipoles on and the curly arrow from the ring to .
- The structure of the organic intermediate (the sigma complex/arenium ion).
- The restoration of aromaticity: curly arrow from the C-H bond and the release of .
Approach
- Dipoles: Identify the electrophilic carbon in . Draw on C and on O.
- Attack: Draw an arrow from the electron-rich benzene ring (pi electrons at the ortho position) to the electrophilic carbon. Simultaneously, push the pi electrons from one bond onto the oxygen to form a carboxylate group ().
- Intermediate: Draw the resulting cyclohexadienyl cation. The ring loses aromaticity temporarily. The carbon at the ortho position is now hybridized, bonded to H and . The ring has a positive charge.
- Rearomatization: The base (or the system) removes the proton from the carbon. Draw an arrow from the C-H bond back into the ring to restore the delocalized pi system. The proton leaves as .
Step-by-Step Reasoning
- M1 (Dipoles and Attack Arrow): has dipoles . Draw a curly arrow from the benzene ring (specifically the bond between C2 and C3, or the pi cloud near C2) to the Carbon of . Draw a curly arrow from the double bond to the Oxygen atom. This forms the bond and the group.
- M2 (Intermediate Structure): The intermediate is a carbocation. Draw the benzene ring (with circle or double bonds) but with a positive charge delocalized in the ring. At the position ortho to the group (let's say C2), draw a bond to an H atom and a bond to a group. The group remains at C1.
- M3 (Rearomatization): To restore aromaticity, the C-H bond at C2 breaks. Draw a curly arrow from the C-H sigma bond into the ring (towards the adjacent carbon to reform the double bond). This releases . The final product is the 2-hydroxybenzoate ion (salicylate ion) and a proton.
Key Takeaways
Electrophilic substitution on activated rings involves an attack by the pi system on an electrophile, forming a non-aromatic intermediate (sigma complex), followed by loss of a proton to restore aromaticity. The phenoxide ion is highly activated, allowing even weak electrophiles like to react.
Common Mistakes
- Forgetting the dipoles on .
- Drawing the arrow from the oxygen lone pair instead of the ring pi system (though oxygen lone pair donation activates the ring, the attack is by the ring carbons).
- Drawing the wrong intermediate: forgetting the positive charge on the ring or the H atom on the carbon attached to .
- Not showing the arrow for the loss of .
Things to Be Careful About
- The attack is at the ortho position to give salicylic acid (as per the final product shown).
- The intermediate must show the positive charge in the ring and the carbon with both H and attached.
- Curly arrows must start from electrons (bond or lone pair) and point to the atom receiving them.
Some syntheses use Diels–Alder reactions, which normally involve a diene and an alkene reacting together to form a cyclohexene.
Draw three curly arrows in Fig. 9.4 to complete the mechanism for the Diels–Alder reaction between buta-1,3-diene and ethene.
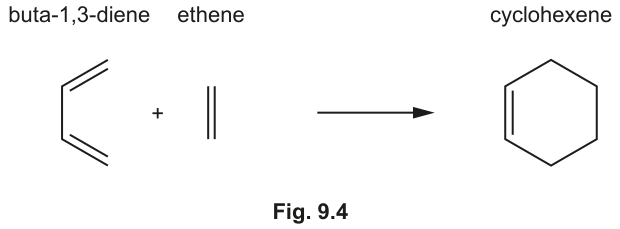
Answer
Draw three curved arrows showing the concerted movement of electrons:
- Arrow from the first double bond of buta-1,3-diene (C1=C2) to the single bond between C2-C3 (forming new double bond C2=C3).
- Arrow from the second double bond of buta-1,3-diene (C3=C4) to the double bond of ethene (forming new C-C bond).
- Arrow from the double bond of ethene to the first carbon of buta-1,3-diene (forming new C-C bond).
(Note: The arrows can be drawn in a clockwise or counter-clockwise cycle)
Three curly arrows in a cycle: diene C=C to diene C-C, diene C=C to alkene C=C, alkene C=C to diene C=C.
Background Concept
The Diels-Alder reaction is a [4+2] cycloaddition reaction between a conjugated diene (4 pi electrons) and a dienophile (an alkene or alkyne, 2 pi electrons) to form a substituted cyclohexene system. It is a concerted reaction, meaning all bond breaking and bond forming happens simultaneously in a single step via a cyclic transition state. No intermediates (ions or radicals) are formed.
The mechanism is represented by three curly arrows showing the cyclic flow of electrons. This is a pericyclic reaction.
Understanding the Question
You are given the reaction of buta-1,3-diene (the diene) and ethene (the dienophile) to form cyclohexene. You need to draw the three curly arrows that represent the movement of the pi electrons to form the two new sigma bonds and the new pi bond in the product.
Approach
Identify the source and destination of electrons for the three new/changed bonds:
- The pi bond in the diene (C1=C2) becomes a single bond, and the electrons shift to form a new pi bond between C2 and C3.
- The pi bond in the diene (C3=C4) breaks to form a new sigma bond with the dienophile.
- The pi bond in the dienophile (ethene) breaks to form a new sigma bond with the other end of the diene.
Draw arrows in a continuous loop.
Step-by-Step Reasoning
- Arrow 1: Start at the center of the C1=C2 double bond in buta-1,3-diene. Point to the C2-C3 single bond. This forms the new double bond in the product (cyclohexene double bond is between C2 and C3 of the original diene).
- Arrow 2: Start at the center of the C3=C4 double bond in buta-1,3-diene. Point to one of the carbons in the ethene double bond. This forms one of the new C-C sigma bonds.
- Arrow 3: Start at the center of the ethene double bond. Point to the C1 carbon of buta-1,3-diene. This forms the other new C-C sigma bond.
- The result is a six-membered ring with a double bond between the original C2 and C3 positions.
Key Takeaways
Diels-Alder reactions are concerted cycloadditions. The mechanism involves a cyclic flow of 6 pi electrons (3 arrows). The diene must be in the s-cis conformation. The product is a cyclohexene derivative.
Common Mistakes
- Drawing ionic intermediates (carbocations/carbanions) – Diels-Alder is concerted.
- Drawing arrows in the wrong direction (e.g., from single bond to double bond).
- Only drawing two arrows.
Things to Be Careful About
The arrows must form a closed loop. The direction (clockwise or anticlockwise) doesn't matter as long as the electron flow is consistent.
Another Diels–Alder reaction of buta-1,3-diene is shown in Fig. 9.5.
Predict the product formed in this reaction.
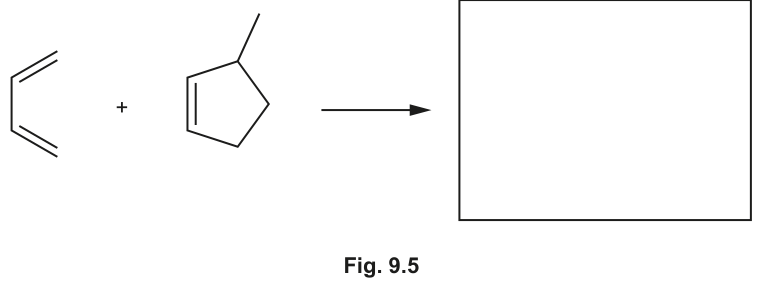
Answer
The product is a bicyclic compound: 4-methylbicyclo[3.3.0]oct-2-ene (or similar naming, essentially a cyclohexene ring fused to a cyclopentane ring with a methyl group).
Structure: A six-membered ring (cyclohexene) fused to a five-membered ring (cyclopentane). The double bond is in the six-membered ring. The methyl group is on the five-membered ring at the position adjacent to the fusion (specifically, at the carbon that was the methyl-substituted carbon of the cyclopentene).
(See diagram below)
Bicyclic structure: cyclohexene ring fused to cyclopentane ring with methyl group.
Background Concept
In a Diels-Alder reaction, the diene (buta-1,3-diene) provides 4 carbons and the dienophile (alkene) provides 2 carbons to form a new six-membered ring. If the dienophile is part of a ring (like cyclopentene), the product will be a fused bicyclic system.
- Diene: Buta-1,3-diene (). Carbons 1, 2, 3, 4.
- Dienophile: 3-methylcyclopent-1-ene. The double bond is between C1 and C2 of the cyclopentene ring. The methyl group is at C3 (allylic position).
The reaction forms two new sigma bonds between C1 and C4 of the diene and the two carbons of the alkene double bond. A new double bond forms between C2 and C3 of the diene.
Understanding the Question
React buta-1,3-diene with 3-methylcyclopent-1-ene. Predict the structure of the product.
Approach
- Identify the reacting parts: The diene is the linear 4-carbon chain. The dienophile is the double bond in the 5-membered ring.
- The double bond in the cyclopentene ring breaks to form bonds with the ends of the diene.
- The diene forms a new ring (cyclohexene) fused to the original cyclopentane ring.
- The methyl group stays on the cyclopentane ring part.
- The double bond ends up in the new cyclohexene ring (between the original C2 and C3 of the diene).
Step-by-Step Reasoning
- Diene: Buta-1,3-diene. Let's number it C1=C2-C3=C4.
- Dienophile: Cyclopentene ring with a methyl group. Let the double bond be C1'=C2'. The methyl is at C3'.
- Bond Formation: C1 of diene bonds to C2' of cyclopentene. C4 of diene bonds to C1' of cyclopentene. (Or vice versa, but let's assume standard orientation).
- New Double Bond: Forms between C2 and C3 of the diene.
- Resulting Structure:
- We have a six-membered ring formed by C1-C2-C3-C4 and the two carbons from the cyclopentene double bond (C1', C2').
- This six-membered ring is fused to the rest of the cyclopentene ring (C3', C4', C5').
- So we have a cyclohexene ring fused to a cyclopentane ring. This is a bicyclo[3.3.0]octane system (pentalene skeleton but saturated except for one double bond).
- The double bond is in the six-membered ring.
- The methyl group is on the five-membered ring. Specifically, it was at the allylic position of the alkene. In the product, the carbons that were C1' and C2' are now saturated (sp3). The methyl was at C3'. So the methyl is on a carbon adjacent to the fusion point.
Let's trace carefully:
Cyclopentene: C1=C2-C3(Me)-C4-C5-C1.
Diene: C1=C2-C3=C4.
New bonds: Diene-C1 to Cyclo-C2. Diene-C4 to Cyclo-C1.
New ring: Diene-C1-C2-C3-C4-Cyclo-C1-Cyclo-C2. (6 membered ring). Fusion is at Cyclo-C1 and Cyclo-C2.
Remaining part of cyclopentene: Cyclo-C1-C5-C4-C3(Me)-Cyclo-C2. (5 membered ring fused at C1-C2 bond).
Double bond: Between Diene-C2 and Diene-C3.
Methyl group: At Cyclo-C3 (which is adjacent to Cyclo-C2).
So the product is a bicyclo[3.3.0]oct-2-ene derivative with a methyl group. Specifically, 4a-methylbicyclo[3.3.0]oct-2-ene (using bicyclic nomenclature) or simply a cyclohexene fused to a cyclopentane with a methyl group on the cyclopentane ring adjacent to the bridgehead.
Looking at the marking scheme image for Fig 9.4 (which corresponds to part c(ii)): It shows a six-membered ring with a double bond (left side) fused to a five-membered ring (right side). The methyl group is on the top carbon of the five-membered ring, adjacent to the top bridgehead carbon.
Key Takeaways
Diels-Alder reactions with cyclic dienophiles produce fused bicyclic compounds. The double bond from the diene ends up in the new six-membered ring. Substituents on the dienophile retain their relative positions.
Common Mistakes
- Drawing the double bond in the wrong place (should be in the ring formed from the diene, not the dienophile ring).
- Losing the methyl group or placing it on the wrong ring.
- Not recognizing the fused ring system (drawing them separate or connected by a chain).
Things to Be Careful About
Ensure the connectivity is correct. The two rings share a bond (the bond that was the double bond in the dienophile, now a single bond fusion). The double bond is between the carbons that were originally C2 and C3 of the diene.