Biology 5090/62 — October/November 2016
Cambridge O-Level · Alternative to Practical · worked solutions for every part, with the mark scheme
Topics Observations and Measurements · Experimental Contexts · Planning Experiments and Investigations · Analysis, Conclusions and Evaluation · Microscopy and Biological Drawing
Fig. 1.1 shows a flower.
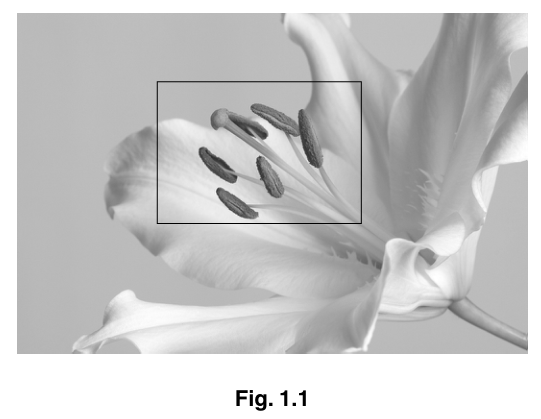
Describe two visible features of this flower that suggest it is likely to be insect-pollinated rather than wind-pollinated.
- ______
- ______
Answer
- Large, broad or wide petals that form a landing platform for insects.
- Solid, non-feathery stigma; or erect, sturdy (not pendulous) stamens/filaments.
- Large/broad/wide petals forming a landing platform for insects.
- Solid/not feathery stigma (or erect/sturdy filaments).
Walkthrough
The question asks for visible features in Fig. 1.1 that suggest insect pollination. Wind-pollinated flowers typically have small, dull petals (no need to attract insects), feathery stigmas to catch airborne pollen, and pendulous stamens to release pollen into the wind. Insect-pollinated flowers do the opposite. Looking at the photograph:
- Petals: They are large, broad, and white. This provides a visual attractant and a landing platform for insects.
- Stigma: It is solid and compact, not feathery or plume-like. A feathery stigma is an adaptation for trapping wind-blown pollen; a solid stigma is adapted for receiving pollen directly from an insect's body.
- Stamens/Filaments: They are erect and sturdy, not hanging down. Pendulous stamens would allow pollen to fall freely in the wind; sturdy stamens position the anthers where an insect will brush against them.
Any two of these visible features score the marks. Do not mention features not visible in the photograph (e.g., scent, nectar).
Key Takeaways
Insect-pollinated flowers invest energy in attracting pollinators (large, coloured petals, scent, nectar) and ensuring pollen transfer (sturdy anthers, solid stigmas). Wind-pollinated flowers invest in mass pollen production and airborne capture (small/dull petals, feathery stigmas, pendulous anthers).
Common Mistakes
- R references to features not visible in Fig. 1.1: Candidates often mention scent, nectar, or sticky pollen. While true for insect-pollinated flowers, these are not visible in the photograph and score zero.
- Naming a structure instead of explaining its function: Saying "large petals" is fine, but "large petals for attracting insects" or "landing platform" is much better and often required for full credit.
- Confusing stigma types: Describing the stigma as "sticky" is acceptable, but "feathery" is the specific term for wind-pollinated stigmas that must be rejected.
Things to Be Careful About
- The question specifies visible features. Read the image carefully; do not invent invisible adaptations.
- Give exactly two features as requested. Giving more will not earn extra marks and may introduce errors.
- Use precise biological terminology: landing platform, solid stigma, erect filaments.
Make a large drawing of the structures of the flower shown within the box on Fig. 1.1.
Answer
See diagram below.
Large labelled drawing of the central reproductive structures (stamens and carpel) within the box.
Walkthrough
This part tests biological drawing conventions for the Practical Test. The box in Fig. 1.1 encloses the stamens (filaments and anthers) and the carpel (style and stigma). You must draw these structures at a large scale.
- Content: Draw all six anthers and the central style with the stigma at the top. Do not draw the petals or the rest of the flower outside the box.
- Outline: Use clear, continuous, single lines drawn with a sharp pencil. No shading, stippling, or cross-hatching anywhere.
- Double lines: Draw the filaments and the style as double lines (two parallel lines) to represent their thickness as solid tubes.
- Relative positions: Ensure all anthers are below the level of the top of the stigma. The stigma should have a rounded top and be wider than the style.
- Size: The length of the style with the stigma must be at least 60 mm on your paper. Use a ruler to measure this during the exam.
Key Takeaways
Biological drawings on Papers 3 and 4 are marked heavily on conventions rather than artistic skill. Continuous lines, no shading, double lines for solid structures, correct proportions, and minimum size requirements are all mandatory.
Common Mistakes
- Shading or stippling: This is the most common deduction. Drawings must be clean outlines only.
- Ruled lines: Label lines must be single, straight lines drawn with a ruler, but the structures themselves must be drawn freehand with continuous curves.
- Incorrect proportions: Drawing the stigma narrower than the style, or placing anthers above the stigma level, loses marks.
- Insufficient size: Failing to meet the 60 mm minimum length for the style + stigma loses a mark.
Things to Be Careful About
- Always use a sharp pencil (usually 2H or HB) so lines are dark but erasable.
- Measure the 60 mm length with a ruler before you start drawing to ensure you have enough space.
- The anthers should be clearly delimited (separate from the filaments), often shown as oval or elongated shapes at the end of the double-lined filaments.
On your drawing label the following structures with a label line, the appropriate letter and its biological name:
A the part of the flower in which pollen grains are produced
B the part of the flower to which the pollen grains are transferred during pollination
C the part of the flower through which the pollen tube grows after pollination.
Answer
- A: Anther
- B: Stigma
- C: Style
On your drawing, add label lines pointing to:
- A → the anther (top of the stamen)
- B → the stigma (top of the carpel)
- C → the style (the tube below the stigma)
A: anther, B: stigma, C: style
Walkthrough
The question asks for the biological names of three structures based on their function:
- A is where pollen grains are produced. In a flower, pollen is produced in the anthers (plural of anther), which are located at the top of the stamens.
- B is where pollen grains are transferred during pollination. Pollen lands on the stigma, the receptive top part of the carpel (female part).
- C is the pathway through which the pollen tube grows after pollination to reach the ovule. The pollen tube grows down the style, the tube connecting the stigma to the ovary.
Ensure your label lines touch the correct structures and do not cross each other.
Key Takeaways
Know the parts of the flower and their roles in sexual reproduction: anther (pollen production), stigma (pollen reception), style (pollen tube pathway), ovary (ovule protection), filament (stamen support).
Common Mistakes
- Confusing style and stigma: The stigma is the top, sticky surface; the style is the tube below it.
- Confusing anther and filament: The anther is the sac at the top; the filament is the stalk.
- Label lines crossing: Keep label lines neat and ensure they point exactly to the structure named.
Things to Be Careful About
- Use the exact biological terms: anther, stigma, style. Do not use colloquial terms like "top part" or "tube".
- Ensure label lines are single, straight lines drawn with a ruler, touching the structure without crossing other lines.
Fig. 1.2 shows a pollen grain from an insect-pollinated flower, as seen with an electron microscope.
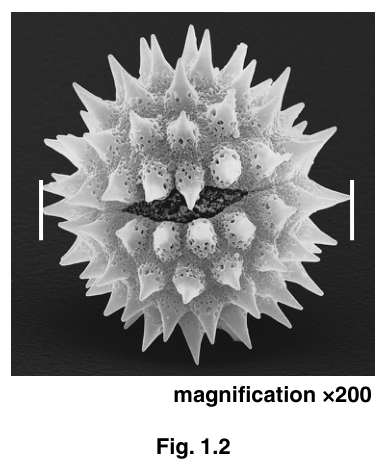
Describe one feature of this pollen grain that indicates it has been produced by an insect-pollinated flower.
______
Answer
The pollen grain has a rough, spiky, spiny, or thorny surface (with projections or spines). This increases surface area and allows pollen grains to stick to the bodies of insects for transport.
Rough/spiny/spiky/thorny surface (with projections or spines) to stick to insects.
Walkthrough
Fig. 1.2 is a scanning electron micrograph of a pollen grain from an insect-pollinated flower. Wind-pollinated pollen is typically smooth, small, and light to be carried by the wind. Insect-pollinated pollen needs to attach to the insect's body, so it has evolved surface adaptations.
Looking at the image, the pollen grain is covered in spikes, spines, or rough projections. These features increase the surface area and create a rough texture that allows the pollen to stick to the hairs or body of an insect when it lands on the flower.
Key Takeaways
Pollen grain morphology reflects the pollination mechanism: smooth/light for wind, rough/spiky/sticky for insects.
Common Mistakes
- Saying "it is sticky": While true, the visible feature in the micrograph is the spiky/rough surface. Stickiness is a chemical property not directly visible as a shape.
- Mentioning size: The size alone is not the distinguishing feature; the surface texture is.
Things to Be Careful About
- Describe what is visible in the image: "spiky", "spiny", "rough", "thorny", or "with projections".
- Do not over-explain; one clear feature is enough for the mark.
Measure and record the diameter of the pollen grain, as indicated by the two lines in Fig. 1.2.
measured diameter = ______
Calculate the actual diameter of the pollen grain.
Show your working.
______
Working
Step 1: Measure the diameter on the printed image.
Using a ruler, measure the distance between the two vertical indicator lines in Fig. 1.2.
Measured diameter = (accept to , or to )
Step 2: Calculate the actual diameter.
Convert to micrometres () if required (though mm is acceptable if units are stated):
Answer
measured diameter = (accept )
calculated actual diameter = (or )
Measured diameter: 54-56 mm. Actual diameter: 0.27-0.28 mm (or 270-280 µm).
Walkthrough
This is a standard magnification calculation question on Paper 4.
-
Measure the image: Place a ruler across the two vertical white lines in Fig. 1.2. The distance between them represents the diameter of the pollen grain in the image. A typical printed exam paper will give a measurement between and (or to ). Record this value.
-
Identify the magnification: The caption below Fig. 1.2 states "magnification ". This means the image is 200 times larger than the actual specimen.
-
Apply the formula:
Rearrange to solve for actual size:
- Substitute and calculate:
- Units: The answer must include units. is correct. You may also convert to by multiplying by 1000, giving . Both are acceptable as long as the unit is stated.
Key Takeaways
Always show your working for magnification calculations. The formula is . Never forget to include units in your final answer.
Common Mistakes
- Forgetting units: Writing "0.27" without "mm" or "µm" loses a mark.
- Incorrect formula: Using gives a much larger number and is wrong.
- Measurement error: Measuring to the edge of the spiky pollen grain instead of between the indicator lines. Always measure between the specific lines given in the diagram.
- No working: If you write the correct final answer without showing the calculation, you only get 2 marks instead of 3.
Things to Be Careful About
- Read the magnification carefully. It is , not .
- Measure to the correct precision. If your ruler has mm markings, estimate to the nearest mm or 0.5 mm.
- The mark scheme accepts a range for the measured value (), so any value in this range is fine, and the subsequent calculation will be marked correct based on your measurement (error carried forward).
After pollination and fertilisation have taken place in a flower, a fruit containing seeds develops.
As the fruit matures, in addition to the increased size of the fruit, there are changes in colour, composition and texture.
Describe a test to show that a fruit contains reducing sugar.
Answer
- Prepare a sample: Crush or blend the fruit and mix with water to make a fruit solution/extract.
- Add reagent: Add Benedict's solution (reagent) to the fruit mixture.
- Heat: Place the mixture in a hot or warm water bath and heat it (do not heat directly over a Bunsen burner).
- Observe colour change: If reducing sugar is present, the solution will change from blue to green, then yellow, then orange, and finally brick-red (or simply "blue to brick-red") on heating.
Crush fruit to make solution, add Benedict's reagent, heat in a water bath, observe colour change from blue to green/yellow/orange/brick-red.
Walkthrough
The question asks for a test to show the presence of reducing sugar in a fruit. The standard 5090 test is Benedict's test.
- Sample preparation: You cannot test a solid fruit directly. You must crush or blend the fruit and mix it with water to create a fruit solution or extract. This allows the sugar to dissolve and react with the reagent.
- Reagent: Add Benedict's solution (which is blue) to the fruit mixture.
- Condition: Reducing sugars only react with Benedict's solution when heated. Place the test tube in a hot water bath (typically around ) and heat for a few minutes. Do not heat directly over a Bunsen burner as the test tube may crack or the solution may boil over.
- Observation: If reducing sugar is present, the blue copper(II) sulfate is reduced to red copper(I) oxide. The colour changes from blue → green → yellow → orange → brick-red precipitate. For a positive result, any change from blue towards green/yellow/orange/red is acceptable, but "blue to brick-red" is the classic description.
Key Takeaways
Benedict's test is for reducing sugars (e.g., glucose, fructose, maltose). It requires heating. Non-reducing sugars (e.g., sucrose) do not give a positive result unless they are first hydrolysed.
Common Mistakes
- Forgetting to heat: Benedict's test requires heat. Without heating, no colour change occurs.
- Heating directly over a flame: This is unsafe and may break the test tube. Always use a water bath.
- Vague colour change: Saying "it changes colour" is not enough. You must specify the starting colour (blue) and the positive result colours (green/yellow/orange/brick-red).
- Not preparing a sample: Testing the solid fruit directly will not work. You must make a solution/extract.
Things to Be Careful About
- Use the exact name Benedict's solution (or reagent). Do not just say "chemical" or "indicator".
- Mention the water bath. A reference to "heating" alone may not score if the water bath is not mentioned, as direct heating is rejected.
- Give the full colour progression or at least "blue to brick-red" to be safe.
Describe an investigation you could carry out using this test to compare the amount of reducing sugar in an unripe, immature fruit with a ripe, mature fruit.
Answer
To compare the amount of reducing sugar in unripe vs. ripe fruit, carry out the Benedict's test on both samples under controlled conditions:
-
Controlled variables (use the same amount for both):
- Use the same mass (or volume/weight) of fruit sample for both unripe and ripe fruit.
- Use the same volume and concentration of Benedict's reagent.
- Heat both samples at the same temperature (in the same water bath).
- Leave both samples in the water bath for the same time period.
-
Comparison / Interpretation:
- Method 1 (Final colour): After heating, compare the final colour. A colour change to yellow, orange, or brick-red indicates a higher concentration of reducing sugar (ripe fruit), while green indicates less (unripe fruit).
- Method 2 (Time taken): Alternatively, time how long it takes for the colour change to occur. A faster colour change indicates a higher concentration of reducing sugar.
Use same mass of fruit, same volume/concentration of Benedict's, heat at same temperature for same time; compare final colour (darker/more orange-red = more sugar) or time taken for colour change (faster = more sugar).
Walkthrough
This is a planning question. You are comparing the reducing sugar content of two different fruits (unripe vs. ripe). To make this a fair test, you must control all variables except the one you are changing (the type/ripeness of the fruit).
-
Controlled variables: What must be kept the same to ensure a fair comparison?
- Amount of fruit: Use the same mass (e.g., 5 g) or volume of fruit sample for both. If you use more unripe fruit, it will naturally have more sugar, skewing the results.
- Reagent: Use the same volume (e.g., 2 cm³) and concentration of Benedict's solution for both tests.
- Heating conditions: Both test tubes must be heated at the same temperature and for the same amount of time. If one is heated longer, it may develop a darker colour even if the sugar concentration is the same.
-
How to interpret the results:
- Benedict's test is semi-quantitative. The final colour indicates the approximate concentration of reducing sugar.
- Blue: No reducing sugar.
- Green: Low concentration.
- Yellow/Orange: Medium concentration.
- Brick-red: High concentration.
- Therefore, the ripe fruit (which has more sugar) should produce a darker/more orange-red colour compared to the unripe fruit (which should be greener or yellow).
- Alternatively, you could measure the time it takes for the colour change to occur. A higher concentration reacts faster, so a faster colour change indicates more reducing sugar.
Key Takeaways
In comparative food tests, control the mass of sample, volume of reagent, temperature, and time. The final colour or time taken for colour change provides a semi-quantitative measure of sugar concentration.
Common Mistakes
- Vague controlled variables: Saying "keep it the same" without specifying what (e.g., "same mass of fruit", "same volume of Benedict's").
- Not explaining the interpretation: Simply saying "compare the colours" is not enough. You must explain how the colour relates to sugar amount (e.g., "brick-red indicates more sugar").
- Suggesting a quantitative method: 5090 does not require making a calibration curve or using a colorimeter for this level. A visual comparison of colour or time is sufficient and expected.
Things to Be Careful About
- The question asks for an investigation, so you must describe the method (controlled variables) and the interpretation (how to compare the results). Both are needed for the 4 marks.
- You can choose either the "final colour" method or the "time taken" method, but you must explain it clearly. The mark scheme accepts either.
- Ensure you mention both unripe and ripe fruit in your comparison.
The rest of this paper
2 more questions- Q2Observations and Measurements · Experimental Contexts · Analysis, Conclusions and Evaluation · Planning Experiments and Investigations10M
- Q3Observations and Measurements · Analysis, Conclusions and Evaluation9M