Biology 5090/61 — October/November 2011
Cambridge O-Level · Alternative to Practical · worked solutions for every part, with the mark scheme
Topics Experimental Contexts · Microscopy and Biological Drawing · Use of Techniques, Apparatus and Materials · Analysis, Conclusions and Evaluation
Fig. 1.1 is a photograph of part of a flower.
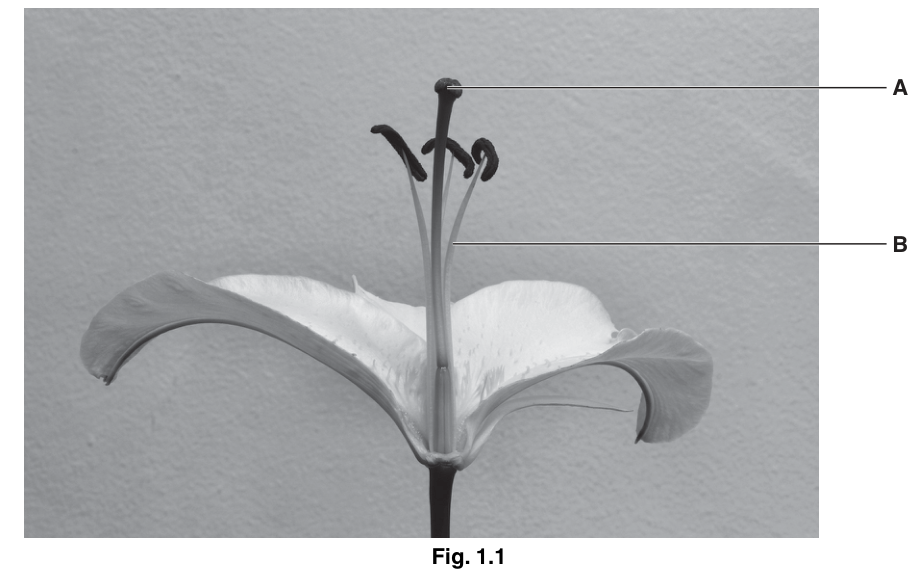
Identify the structures labelled A and B.
A ______
B ______
Answer
A: stigma
B: filament
A: stigma; B: filament
Walkthrough
The question asks to identify two labelled structures on a photograph of a dissected flower. Structure A points to the lobed, receptive tip at the top of the central female organ (carpel/pistil). This is the stigma, where pollen grains land and germinate. Structure B points to the long, slender stalk supporting one of the male organs (stamen). The male organ consists of an anther at the top and a filament below it; B is pointing to the filament.
Key Takeaways
In a flower, the female reproductive organ (carpel or pistil) has a stigma at the top, a style below it, and an ovary at the base. The male reproductive organ (stamen) has an anther at the top and a filament below it. Students must not confuse the stigma with the anther, or the filament with the style.
Common Mistakes
- Naming A as the 'carpel' or 'pistil' (these are the whole structures, not just the tip).
- Naming B as the 'style' (the style is the stalk of the central carpel, whereas B is the stalk of a surrounding stamen) or 'anther' (the anther is the dark, curved sac at the top of the filament).
Things to Be Careful About
Ensure the exact terms 'stigma' and 'filament' are used. Vague answers like 'top part' or 'stalk' will not score.
Fig. 1.2 is a transverse section through one of the structures in the flower shown in Fig. 1.1.
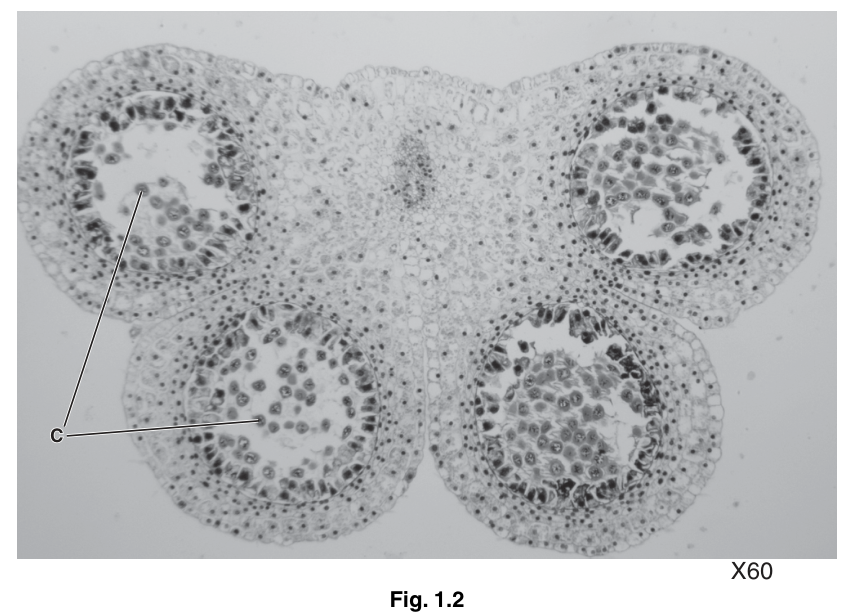
Name the type of cell division that occurs to produce structures C shown in Fig. 1.2.
______
Answer
meiosis
meiosis
Walkthrough
Fig. 1.2 is a photomicrograph (magnification X60) of a transverse section through an anther. The structures labelled C are pollen grains. Pollen grains are male gametophytes that produce male gametes. In plants, the cells within the pollen sacs (microsporangia) undergo meiosis (reduction division) to produce haploid microspores, which then develop into pollen grains. Therefore, the type of cell division is meiosis.
Key Takeaways
Meiosis is the reduction division that halves the chromosome number. In flowers, meiosis occurs in the anthers to produce pollen grains (male gametes) and in the ovary to produce ovules (female gametes).
Common Mistakes
- Writing 'mitosis' (mitosis produces somatic cells and maintains chromosome number; it does not produce gametes/pollen).
- Writing 'reduction' without 'meiosis' (though the mark scheme accepts 'reduction', 'meiosis' is the precise biological term).
Things to Be Careful About
The mark scheme accepts 'meiosis' or 'reduction'. Use the precise term 'meiosis' to be safe.
Explain the significance of this type of division in the life cycle of the plant.
Answer
It halves the chromosome number to produce haploid pollen (gametes), so that the diploid chromosome number is restored at fertilisation.
It halves the chromosome number to produce haploid pollen, so the diploid number is restored at fertilisation.
Walkthrough
The question asks for the significance of meiosis in the plant life cycle. Meiosis reduces the chromosome number by half, producing haploid cells (in this case, pollen grains/microspores). When a pollen grain fertilises an ovule, the haploid male gamete fuses with the haploid female gamete. This fusion (fertilisation) restores the original diploid chromosome number in the zygote, ensuring that the offspring has the correct number of chromosomes.
Key Takeaways
Meiosis is essential for sexual reproduction because it produces haploid gametes. Without meiosis, fertilisation would double the chromosome number every generation.
Common Mistakes
- Only stating 'it makes haploid cells' without mentioning fertilisation or the restoration of the diploid number.
- Saying 'it reduces the number of cells' (it reduces the chromosome number, not the cell number).
Things to Be Careful About
The mark scheme awards marks for: 1) chromosome number halved/haploid, and 2) gametes/pollen/ovule produced, and 3) diploid number restored at fertilisation. You need at least two of these linked points to get 2 marks. Ensure you mention 'haploid', 'gametes/pollen', and 'fertilisation' or 'diploid'.
On Fig. 1.1, draw a line labelled X–X to show where the section shown in Fig. 1.2 might have been taken.
Answer
See diagram
Walkthrough
Fig. 1.2 is a transverse section through an anther, showing four pollen sacs. On Fig. 1.1, the anthers are the dark, curved, lobed structures at the top of the filaments (the stamens surrounding the central carpel). To show where this section was taken, draw a horizontal line across one of these anthers and label it X–X. The line must be horizontal (transverse) and pass through the anther.
Key Takeaways
A transverse section cuts across a structure at right angles to its long axis. For an anther, which is roughly spherical or lobed, a transverse section will show the internal pollen sacs arranged in a circle or cross shape.
Common Mistakes
- Drawing the line through the style or the ovary instead of the anther.
- Drawing the line vertically (longitudinal section) instead of horizontally (transverse section).
Things to Be Careful About
The line must be labelled 'X–X' (or 'x–x'). It must be drawn clearly on the photograph. The mark scheme specifically requires the line to be 'horizontally through anther'.
Draw a clear outline of the specimen shown in Fig. 1.2 in the space below. Do not include individual cells. Include the shape of the five distinct internal areas.
Answer
Large outline drawing of the anther transverse section, at least 8 cm across, with clear continuous lines showing 4 pollen sacs and a central vascular bundle.
Walkthrough
The candidate must draw a clear outline of the specimen in Fig. 1.2. The drawing must be at least 8 cm across and wider at the top. Use clear, continuous single lines with no shading, stippling, or cross-hatching. Do not draw individual cells; instead, outline the five distinct internal areas: the four pollen sacs (microsporangia) and the central vascular bundle (stele). Ensure the indentations on the left and right sides between the pollen sacs are well drawn to match the overall shape of the anther.
Key Takeaways
Biological drawings for the Practical Test must follow strict conventions: continuous sharp pencil lines, no shading, correct proportions, and minimum size requirements. Outlining structures rather than drawing every cell is often clearer and scores better if done accurately.
Common Mistakes
- Shading or stippling the pollen sacs (this is explicitly rejected in 5090 drawing marks).
- Drawing individual cells inside the pollen sacs (the question says 'Do not include individual cells').
- Making the drawing too small (must be at least 8 cm across).
- Using ruled lines or broken lines.
Things to Be Careful About
The mark scheme awards marks for: 1) size (at least 8 cm across, wider at top), 2) clear continuous lines, 3) realistic outline of 4 pollen sacs + vascular bundle, 4) indentations on left and right. Ensure all four criteria are met. Labels are not required for this specific part unless asked, but if added, they must have straight label lines that do not cross each other or the drawing.
Calculate the magnification of your drawing compared with the actual size of the specimen from which Fig. 1.2 was taken. Show all working clearly.
length of drawing = ______
equivalent length of specimen = ______
magnification = ______
Working
Let the measured length of the drawing be (in mm or cm).
Let the measured equivalent length on Fig. 1.2 be (in mm or cm).
The actual size of the specimen () is calculated from the magnification of Fig. 1.2 (X60):
The magnification of the drawing () is:
Example calculation:
Suppose the drawing is long and Fig. 1.2 is long.
The final answer depends on the candidate's own measurements. Ensure units are consistent (e.g., both in mm) and include a line on either the drawing or Fig. 1.2 showing the measurement.
Answer
length of drawing = (candidate's measurement in mm)
equivalent length of specimen = (candidate's measurement in mm, divided by 60)
magnification = (candidate's calculation)
See working (candidate-dependent measurement)
Walkthrough
To calculate the magnification of the drawing compared to the actual specimen, you need three values: the length of the drawing, the length of the equivalent part on Fig. 1.2, and the actual size of the specimen.
- Measure the length of your drawing () in mm. Draw a line on your drawing to show what you measured.
- Measure the equivalent length on Fig. 1.2 () in mm. Draw a line on Fig. 1.2 to show this measurement.
- Calculate the actual size () of the specimen. Fig. 1.2 is magnified X60, so the actual size is the length on the figure divided by 60: . Be careful with units; convert everything to mm.
- Calculate the magnification of your drawing using the formula: .
Key Takeaways
When calculating magnification from a printed photomicrograph, you must account for the magnification of the printed image. The actual size is not the length on the printed figure; it is the length on the figure divided by the stated magnification (X60).
Common Mistakes
- Forgetting to divide the length on Fig. 1.2 by 60 to find the actual size. This is the most common error and will cost marks.
- Using different units for the drawing length and the figure length (e.g., cm for one and mm for the other) without converting.
- Not drawing lines on the figures to show what was measured.
Things to Be Careful About
The mark scheme awards marks for: correct measurements + lines on figures + units; correct formula (drawing size over specimen); allowance for magnification of Fig. 1.2; calculation correct and well expressed. Ensure your working is clear and shows all steps. The final magnification is a dimensionless number (often written as '× 360' or just '360').
Describe, with practical details, how you would make a stained, temporary slide of pollen from the flower shown in Fig. 1.1.
Answer
- Rub or brush the anther to transfer pollen grains onto a clean glass slide.
- Add a drop of water (or mountant) and a few drops of a suitable stain (e.g., iodine solution or acetocarmine).
- Place a cover slip over the specimen at an angle to prevent air bubbles from forming.
- Blot away any excess stain or liquid from the edges of the cover slip with filter paper or a tissue.
See working
Walkthrough
The question asks for a description of how to make a stained, temporary slide of pollen. This is a standard practical technique. Break the method down into logical steps:
- Sample transfer: Pollen is produced in the anther. Rub the anther on a clean glass slide or use a fine brush to transfer the pollen grains onto the slide.
- Reagents: Add a drop of water to suspend the pollen. Add a stain to make the structures (like the nucleus or starch grains) more visible. Suitable stains for pollen include iodine solution (which stains starch blue-black) or acetocarmine (which stains nuclei).
- Cover slip: Place a cover slip over the specimen. To prevent air bubbles, hold the cover slip at an angle (about 45 degrees) to the slide, touch one edge to the liquid, and slowly lower it down.
- Cleanup: If too much liquid or stain is used, it can spread and make the slide messy or damage the microscope. Use filter paper or a tissue to blot away any excess liquid from the edges of the cover slip.
Key Takeaways
Making a temporary mount requires specific practical details: transferring the sample, using the correct reagents (water + stain), using a cover slip correctly (to avoid bubbles), and cleaning up excess liquid.
Common Mistakes
- Forgetting to mention the cover slip.
- Not explaining how to avoid air bubbles (e.g., 'place it carefully' is not enough; 'at an angle' is required).
- Not naming a suitable stain (just saying 'stain' is not enough; must name 'iodine' or 'acetocarmine').
- Not mentioning blotting excess liquid.
Things to Be Careful About
The mark scheme awards marks for: transfer of pollen to slide; adding stain/water/mountant; name of suitable stain; use of cover slip; method of preventing air bubbles; removing excess stain/liquid. You need at least four of these points for 4 marks. Ensure you name a specific stain (iodine solution or acetocarmine) rather than just 'stain'.
The rest of this paper
2 more questions- Q2Microscopy and Biological Drawing · Experimental Contexts6M
- Q3Analysis, Conclusions and Evaluation · Experimental Contexts16M