Chemistry 5070/42 — October/November 2025
Cambridge O-Level · Alternative to Practical · worked solutions for every part, with the mark scheme
Topics Experimental Contexts · Use of Techniques, Apparatus and Materials · Analysis, Conclusions and Evaluation · Planning Experiments and Investigations · Observations and Measurements · Qualitative Analysis
A student investigates the rate of a reaction.
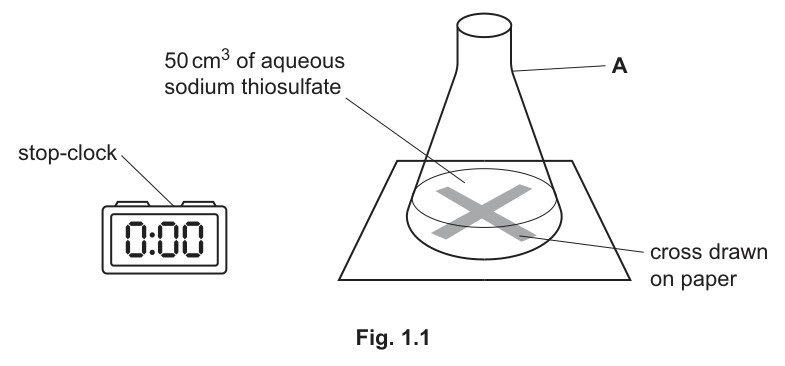
Fig. 1.1 shows the apparatus the student uses.
Answer
conical flask
conical flask
Walkthrough
The diagram shows a piece of glassware with a flat base, triangular/conical body, and cylindrical neck. This is a conical flask (also known as an Erlenmeyer flask).
Key Takeaways
- Be able to recognise standard laboratory apparatus from diagrams: conical flask, beaker, measuring cylinder, burette, and pipette.
Common Mistakes
- Confusing a conical flask with a round-bottomed flask or a beaker.
Things to Be Careful About
- Erlenmeyer flask is also accepted, but conical flask is the standard term used in Cambridge O Level.
The student adds a fixed volume and concentration of dilute hydrochloric acid to A, swirls the mixture in A and places it back on the cross.
- The mixture in the flask slowly turns cloudy.
- The student records the time taken for the solution to become so cloudy that the cross is no longer visible through the mixture.
State the name of a piece of apparatus needed which is not shown in Fig. 1.1.
______
Answer
measuring cylinder
measuring cylinder
Walkthrough
The student needs to add a "fixed volume" of dilute hydrochloric acid to the conical flask. Fig. 1.1 shows only the flask, paper with the cross, and a stop-clock. To measure a specified volume of a solution quickly and accurately in a rate experiment, a measuring cylinder (or pipette / burette) is required.
Key Takeaways
- A measuring cylinder is the standard apparatus used to measure fixed volumes of liquids in reaction rate investigations.
Common Mistakes
- Suggesting a beaker to measure volume (beakers have inaccurate graduation marks and are not used for measuring volumes accurately).
Things to Be Careful About
- Ensure the apparatus named is appropriate for measuring liquid volume.
The student repeats the experiment with the same fixed volume and concentration of dilute hydrochloric acid and with increasing concentrations of aqueous sodium thiosulfate, using a new cross drawn on paper for each experiment.
Explain why drawing a new cross on paper in each experiment reduces the accuracy of the results.
______
Answer
- The newly drawn crosses may be different in thickness or darkness (darker or lighter).
- This affects the time taken for the cross to become no longer visible, meaning concentration is no longer the only variable affecting the result.
The crosses may be darker or lighter, which affects the time taken for the cross to disappear.
Walkthrough
In the disappearing cross experiment, the end-point is reached when enough solid sulfur precipitates to obscure the cross drawn on the paper below.
- If a new cross is drawn each time, its lines might be thicker, thinner, darker, or lighter than the previous one.
- A darker/thicker cross takes more precipitate (and thus a longer time) to become obscured than a faint/thin cross. This introduces an uncontrolled variable, reducing the accuracy and validity of the comparison between different concentrations.
Key Takeaways
- To ensure a fair test, all control variables must remain constant so that the only variable affecting the dependent variable (time) is the independent variable (concentration).
- Using the identical cross ensures a consistent end-point across all trials.
Common Mistakes
- Simply saying "it makes it unfair" without specifying how the cross differs (e.g. darker/lighter/thickness) or how that alters the recorded time.
Things to Be Careful About
- State both marking points: (1) difference in the cross (darkness/thickness) and (2) the effect on the time taken to disappear / failure to control variables.
The student then:
- uses the same cross drawn on paper
- repeats the experiment with the same fixed volume and concentration of dilute hydrochloric acid and with increasing concentrations of aqueous sodium thiosulfate.
Suggest the effect of increasing the concentration of aqueous sodium thiosulfate on the time taken for the cross to become no longer visible.
______
Answer
The time taken decreases.
decreases
Walkthrough
Increasing the concentration of aqueous sodium thiosulfate increases the rate of reaction because there are more thiosulfate particles per unit volume, leading to more frequent successful collisions.
As the rate of reaction increases, the precipitate of sulfur forms faster, so the time taken for the cross to disappear decreases.
Key Takeaways
- .
- Higher concentration faster rate shorter/smaller time.
Common Mistakes
- Confusing rate with time and incorrectly stating that the time "increases".
Things to Be Careful About
- The question asks for the effect on time taken, not the rate.
Sulfur dioxide gas is produced during this reaction.
Sulfur dioxide causes breathing difficulties in humans.
Suggest one precaution necessary in this investigation to avoid breathing difficulties.
______
Answer
Carry out the experiment in a fume cupboard (or in a well-ventilated room / near an open window).
use a well-ventilated room
Walkthrough
Sulfur dioxide () is a toxic, pungent gas that irritates the respiratory system and can trigger asthma attacks. To prevent inhalation of the gas during the experiment, it should be conducted in a fume cupboard or in a well-ventilated room / by an open window.
Key Takeaways
- When toxic, irritating, or harmful gases (e.g. , , ) are produced, the appropriate safety precaution is to work in a fume cupboard or well-ventilated area.
Common Mistakes
- Suggesting standard general PPE such as "wear safety goggles" or "wear gloves" — these protect eyes and skin, not the respiratory tract.
- Wearing a standard dust mask is usually insufficient for toxic gases, so a fume cupboard / ventilation is the best answer.
Things to Be Careful About
- Always tailor the safety precaution to the specific hazard described (inhalation risk ventilation / fume cupboard).
A student investigates the temperature changes when an acid neutralises aqueous potassium hydroxide.
The ionic equation for the reaction is shown.
The reaction is exothermic.
The temperature change is used to determine the concentration of hydrogen ions in an acid.
X is an acid of concentration
Y is potassium hydroxide
The student:
- step 1 fills the burette with Y
- step 2 stands a plastic cup inside a beaker
- step 3 uses a volumetric pipette to put of X into the plastic cup
- step 4 measures the initial temperature of X and records it in Table 2.1
- step 5 adds of Y from the burette to the plastic cup
- step 6 stirs the mixture for 30 seconds and records in Table 2.1 the temperature of the mixture
- step 7 repeats steps 5 and 6 until a total of of Y is added.
Fig. 2.1 on page 6 shows two of the thermometer readings in during the experiment.
Complete Table 2.1.
You should:
- record the student's results for and using Fig. 2.1
- subtract the initial temperature of X from each temperature recorded to determine the temperature change.
All temperatures and temperature changes should be recorded to .
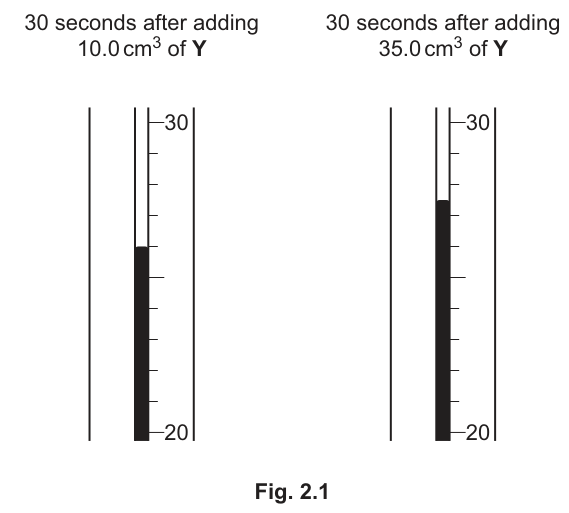
Table 2.1
| volume of Y / | temperature / | temperature change / |
|---|---|---|
| 0.0 | 20.5 | 0.0 |
| 5.0 | 23.5 | |
| 10.0 | ||
| 15.0 | 29.5 | |
| 20.0 | 31.5 | |
| 25.0 | 30.5 | |
| 30.0 | 29.0 | |
| 35.0 | ||
| 40.0 | 26.5 |
Answer
| volume of Y / | temperature / | temperature change / |
|---|---|---|
| 0.0 | 20.5 | 0.0 |
| 5.0 | 23.5 | 3.0 |
| 10.0 | 27.0 | 6.5 |
| 15.0 | 29.5 | 9.0 |
| 20.0 | 31.5 | 11.0 |
| 25.0 | 30.5 | 10.0 |
| 30.0 | 29.0 | 8.5 |
| 35.0 | 27.5 | 7.0 |
| 40.0 | 26.5 | 6.0 |
Completed Table 2.1 with temperatures 27.0 and 27.5 °C and corresponding temperature changes 3.0, 6.5, 9.0, 11.0, 10.0, 8.5, 7.0, 6.0 °C
Walkthrough
-
Reading thermometer for of Y:
Looking at the first thermometer in Fig. 2.1, the scale between and has 10 divisions, meaning each major subdivision represents . The liquid level is exactly at the line for . -
Reading thermometer for of Y:
Looking at the second thermometer in Fig. 2.1, the liquid level is midway between the and lines, which corresponds to . -
Calculating temperature change:
The initial temperature of acid X at is . Each temperature change is calculated by subtracting from the recorded temperature:- For :
- For :
- For :
- For :
- For :
- For :
- For :
- For :
-
All values must be recorded to the nearest (i.e. ending in or ).
Key Takeaways
- When taking measurements from analogue scales, read carefully using the smallest graduation.
- Maintain consistent decimal precision across the entire data table.
Common Mistakes
- Writing whole integers (e.g. or ) without the trailing (e.g. or ).
- Subtracting from previous row temperatures instead of the initial temperature ().
Things to Be Careful About
- Ensure every single calculated value ends with either or as requested by the precision instruction.
Plot a graph of the temperature change (-axis) against the volume of Y (-axis) on Fig. 2.2.
Draw a line of best fit through the points where the temperature change is increasing.
Draw a line of best fit through the points where the temperature change is decreasing.
Extend both lines so that they cross.

Answer
- -axis labelled as
temperature change / °C. - Suitable linear scale chosen for the -axis starting at and going up to at least (e.g., ), so plotted points occupy more than half of the vertical grid.
- All 9 points correctly plotted to within small square:
, , , , , , , , . - One straight line of best fit drawn through the increasing points (from to ).
- A second straight line of best fit drawn through the decreasing points (from to ).
- Both straight lines extended until they cross cleanly at an intersection point.
Graph plotted with labelled axes, correct points, and two intersecting straight lines of best fit.
Walkthrough
-
Labelling and Scaling:
- The -axis is pre-labelled
volume of Y / cm³from to . - Label the -axis with the quantity and unit:
temperature change / °C. - Choose an appropriate linear scale for the -axis so the maximum value () occupies more than half of the vertical height of the grid (e.g. large square or ).
- The -axis is pre-labelled
-
Plotting Points:
- Plot all 9 pairs of values precisely using small crosses or encircled dots to within small square.
-
Drawing Best-Fit Lines:
- Thermometric titrations produce two distinct regions: an increasing temperature phase while neutralisation occurs (exothermic reaction generating heat), followed by a cooling/dilution phase once all acid has reacted and excess cold alkali is added.
- Draw one straight line using a ruler through the rising points.
- Draw another straight line through the falling points.
- Extend both lines until they intersect. The point of intersection represents the exact equivalence (neutralisation) point.
Key Takeaways
- In thermometric titrations, two intersecting straight lines represent the reaction phase and the post-equivalence dilution phase.
- Scales must be linear and utilize at least half the available grid space.
Common Mistakes
- Drawing a single smooth curved line instead of two distinct intersecting straight lines.
- Forgetting units on the -axis label.
- Joining points dot-to-dot instead of using a line of best fit.
Things to Be Careful About
- Ensure ruler lines are drawn sharply and extended sufficiently so the intersection point is clearly visible.
Find the point on the graph where the two lines cross.
Determine the volume of Y at this point.
volume of Y = ______
Answer
20.0 cm3
Walkthrough
- Locate the exact point where the two straight lines of best fit cross on the graph from part (b).
- Read down vertically to the horizontal axis (-axis) to find the volume of alkali Y.
- The lines intersect at (or the candidate's line intersection value from their drawn graph).
Key Takeaways
- The intersection of the two lines in a thermometric titration gives the exact volume of titrant required for complete neutralisation.
Common Mistakes
- Reading the maximum plotted point value instead of the intersection of the two best-fit lines.
Things to Be Careful About
- Include units if not already provided on the answer line (here is provided on the answer line).
Y is potassium hydroxide.
The formula of potassium hydroxide is .
Calculate the number of moles of hydroxide ions, , in the volume of Y in (c).
number of moles = ______
Working
Answer
0.040
Walkthrough
- Potassium hydroxide fully dissociates in aqueous solution: Therefore, .
- Use the volume obtained in part (c) ().
- Convert volume from to by dividing by :
- Calculate moles:
Key Takeaways
- .
Common Mistakes
- Forgetting to convert volume from to .
Things to Be Careful About
- Allow error carried forward (ecf) from part (c): .
The volume of Y in (c) is the volume needed to completely neutralise of X.
Use your answer to (d) to calculate the concentration of hydrogen ions, , in X.
concentration = ______
Working
From the equation , the mole ratio of to is .
Answer
1.6
Walkthrough
- From the ionic equation , of neutralises of .
- Therefore, moles of in of acid X = moles of from part (d) = .
- Calculate the concentration of ions: (Alternatively, ).
Key Takeaways
- In a neutralisation, .
- .
Common Mistakes
- Dividing by without converting to .
- Using the concentration of acid X given in the stem () instead of calculating the concentration of hydrogen ions from the experimental results.
Things to Be Careful About
- Allow error carried forward (ecf) from part (d): .
Suggest why of X is measured using a volumetric pipette and not a measuring cylinder.
______
Answer
A volumetric pipette is more accurate / precise than a measuring cylinder.
A volumetric pipette is more accurate than a measuring cylinder.
Walkthrough
- Volumetric pipettes are calibrated to deliver a single, fixed volume (such as ) with very high accuracy and low percentage uncertainty.
- Measuring cylinders have wider diameters and greater graduations, making them less precise/accurate.
Key Takeaways
- Volumetric pipettes deliver fixed volumes more accurately and precisely than measuring cylinders.
Common Mistakes
- Stating that a pipette is "easier to use" or "faster" (which does not address accuracy).
Things to Be Careful About
- Accept words such as 'accurate', 'precise', or 'higher resolution'.
Answer
To ensure complete mixing/reaction of the reactants (or to ensure even distribution of thermal energy / uniform temperature throughout the mixture).
To allow the reactants to completely react (or to distribute thermal energy evenly)
Walkthrough
- Stirring ensures that the solutions mix thoroughly so that neutralisation occurs rapidly and completely.
- Stirring also distributes the heat generated evenly throughout the entire solution so that the thermometer measures a true, uniform temperature rather than a local hot spot.
Key Takeaways
- In calorimetry/thermometric titrations, stirring is essential for complete reaction and uniform temperature distribution.
Common Mistakes
- Vague answers such as "to speed up the reaction" without explaining that it allows complete reaction or even heat distribution.
Things to Be Careful About
- Either reason (ensuring complete reaction OR even heat distribution) is accepted by the mark scheme.
A student does a series of tests using aqueous solution P and aqueous solution Q.
The tests the student does on P are shown in Table 3.1.
Some of the observations for these tests are also shown.
Table 3.1
| test number | test | observations |
|---|---|---|
| 1 | flame test | orange-red flame |
| 2 | add aqueous ammonia |
Answer
- Dip a clean (nichrome / platinum) wire or wooden splint into solution P.
- Place the wire / splint into a roaring / blue / non-luminous Bunsen flame.
Dip a wire/splint into P and place in a blue/roaring flame
Walkthrough
To carry out a flame test on an aqueous solution:
- A sample of the solution is picked up using a clean unreactive wire (such as nichrome or platinum) or a soaked wooden splint.
- The sample is introduced into the hottest, non-luminous (blue / roaring) part of a Bunsen burner flame with the air-hole open. A luminous (yellow) flame must not be used as its own colour would mask the flame colour of the cation.
Key Takeaways
- Flame tests require a clean carrier (wire/splint) and a non-luminous (blue/roaring) flame.
Common Mistakes
- Forgetting to specify that the flame must be blue/non-luminous/roaring.
Things to Be Careful About
- Do not just say "heat over a flame"; explicitly state placing the sample into the blue/roaring flame.
Describe one observation expected in test 2 based on the observation in test 1.
______
Answer
No precipitate (or slight white precipitate)
No precipitate (or slight white precipitate)
Walkthrough
The orange-red flame in test 1 indicates the presence of calcium ions (). When aqueous ammonia is added to a solution containing , no precipitate forms (or only a very faint/slight white precipitate forms at very high concentrations) because calcium hydroxide is moderately soluble.
Key Takeaways
- gives no precipitate (or a slight white precipitate) with aqueous ammonia.
Common Mistakes
- Stating that a thick/dense white precipitate forms (which would confuse it with , , or ).
Things to Be Careful About
- Be precise: calcium ions give no precipitate with , unlike with .
Describe one additional test to confirm the identity of the cation in P.
Include the result of a positive test.
test = ______
result = ______
Answer
test: Add aqueous sodium hydroxide
result: White precipitate which is insoluble in excess
test = add aqueous sodium hydroxide; result = white precipitate, insoluble in excess
Walkthrough
To confirm the identity of , aqueous sodium hydroxide () is added:
- On adding aqueous sodium hydroxide, a white precipitate of calcium hydroxide, , forms.
- When excess sodium hydroxide is added, the white precipitate remains insoluble.
Key Takeaways
- + : white precipitate, insoluble in excess.
- This distinguishes from and (which dissolve in excess ).
Answer
Calcium /
calcium / Ca2+
Walkthrough
An orange-red (brick-red) flame is characteristic of calcium ions ().
Key Takeaways
- Flame test colour for calcium is orange-red / brick-red.
Common Mistakes
- Confusing orange-red (calcium) with red/crimson (lithium) or yellow/orange (sodium).
Things to Be Careful About
- Either the name "calcium" or the ion formula "" is acceptable.
Solution Q is acidic.
The tests the student does on Q are shown in Table 3.2.
Some of the observations for these tests are also shown.
Table 3.2
| test number | test | observations |
|---|---|---|
| 3 | add five drops of universal indicator | colour change |
| 4 | add a piece of magnesium ribbon | magnesium ribbon disappears |
| 5 | add dilute nitric acid followed by aqueous barium nitrate | white precipitate |
Answer
(From green to) red / orange / yellow
red / orange / yellow
Walkthrough
Solution Q is acidic. Universal indicator is green in neutral conditions and turns red, orange, or yellow when added to an acidic solution depending on the .
Key Takeaways
- Universal indicator turns red/orange/yellow in acidic solutions ().
Common Mistakes
- Stating blue or purple (which indicate alkaline solutions).
Things to Be Careful About
- Any acidic colour (red, orange, yellow) is accepted.
A gas is produced in test 4.
Predict one other observation made by the student in test 4.
______
Answer
Effervescence / bubbling / fizzing
effervescence
Walkthrough
When a reactive metal like magnesium reacts with an acid, a gas (hydrogen) is produced. The visible observation of gas being produced in a liquid is effervescence (bubbles / fizzing).
Key Takeaways
- Production of a gas in an aqueous reaction is observed as effervescence / bubbling / fizzing.
Common Mistakes
- Writing "a gas is produced" as an observation — the observation is what is seen (bubbles/fizzing/effervescence).
Things to Be Careful About
- The question already states the magnesium ribbon disappears and a gas is produced, so "bubbles / fizzing / effervescence" or "mixture gets warm" is the required additional observation.
Answer
Hydrogen /
hydrogen / H2
Walkthrough
Magnesium reacts with an acid to produce hydrogen gas, .
Key Takeaways
- Metals above hydrogen in the reactivity series react with acids to produce hydrogen gas.
Common Mistakes
- Writing "oxygen" or "carbon dioxide".
Things to Be Careful About
- Give either the name "hydrogen" or formula "".
Describe a test to confirm the identity of this gas.
Include the result of a positive test.
test = ______
result = ______
Answer
test: Use a lighted splint
result: Pops / burns with a 'pop' sound
test = lighted splint; result = 'pop' sound
Walkthrough
The standard test for hydrogen gas is to place a lighted splint into the mouth of the test tube. A positive result is a distinct 'pop' or squeaky pop sound as the hydrogen burns rapidly.
Key Takeaways
- Hydrogen gas: lighted splint gives a 'pop' sound.
Common Mistakes
- Confusing with the test for oxygen (glowing splint relights).
Things to Be Careful About
- Must specify a lighted (or burning) splint, not a glowing splint.
Q contains one cation and one anion.
Identify the cation and the anion in Q.
cation = ______ anion = ______
Answer
cation: Hydrogen /
anion: Sulfate /
cation = hydrogen / H+; anion = sulfate / SO42-
Walkthrough
- Cation: Since solution Q is an acid, the cation responsible for acidic properties is the hydrogen ion, .
- Anion: In test 5, adding dilute nitric acid followed by aqueous barium nitrate produces a white precipitate of barium sulfate (). This confirms the presence of sulfate ions, .
Therefore, solution Q is sulfuric acid ().
Key Takeaways
- All acids contain ions as their cation.
- The test for sulfate ions () is adding dilute nitric acid followed by aqueous barium nitrate (or barium chloride), forming a white precipitate of .
Common Mistakes
- Naming magnesium as the cation (magnesium was added to the solution, not present originally in Q).
- Forgetting the charge on the formula if writing ionic formulae ( and ).
Things to Be Careful About
- Ensure both the cation and anion are clearly identified.
The reaction between a metal and dilute sulfuric acid is exothermic.
Plan an experiment to determine which metal, magnesium or zinc, releases more thermal energy per gram of metal when reacting with excess dilute sulfuric acid.
You are provided with magnesium powder, zinc powder, dilute sulfuric acid and common laboratory apparatus. No other chemicals should be used.
Your plan should include:
- the apparatus needed
- the method to use and the measurements to take
- how the measurements are used to determine which metal releases more thermal energy per gram.
You may draw a diagram to help answer the question.
Answer
Apparatus:
- Polystyrene cup with a lid (and beaker to support it)
- Measuring cylinder (or pipette / burette)
- Thermometer
- Balance
Method and Measurements:
- Measure a known volume (e.g. ) of dilute sulfuric acid using a measuring cylinder and pour it into a polystyrene cup.
- Measure and record the initial temperature of the acid using a thermometer.
- Weigh a known mass (e.g. ) of magnesium powder using a balance.
- Add the magnesium powder to the acid, stir the mixture, and record the maximum temperature reached (or temperature when effervescence stops).
- Repeat the entire procedure using the same volume of dilute sulfuric acid and the zinc powder (either using the same mass or a measured mass of zinc).
Determination / Processing:
- Calculate the temperature rise for each metal:
- Calculate the temperature rise per gram of metal:
- The metal with the greater value of releases more thermal energy per gram.
See working
Walkthrough
To compare the thermal energy released per gram of two different metals reacting with excess acid, we design a simple calorimetry experiment using a polystyrene cup:
-
Apparatus selection:
- A measuring cylinder, burette, or pipette to measure the volume of dilute sulfuric acid.
- A thermometer to measure the initial and maximum temperature.
- A balance to determine the mass of metal powder used.
- An insulated container such as a polystyrene cup with a lid to reduce heat loss to the surroundings.
-
Experimental procedure & variables controlled:
- Measure a fixed volume of sulfuric acid (which must be in excess) and record its initial temperature.
- Weigh a known mass of magnesium powder.
- Add the metal to the acid, stir continuously to ensure complete mixing, and monitor the temperature until it reaches its highest point (when effervescence stops and temperature stops rising).
- Repeat the exact same method with zinc powder, keeping the acid volume and concentration constant.
-
Processing results:
- Find the temperature change .
- Calculate the energy released per gram by dividing the temperature change by the mass of metal used (), or directly compare if identical masses were weighed out.
- The metal with the larger value of (or larger for the same mass) releases more thermal energy per gram.
Key Takeaways
- Calorimetry experiments require controlling the volume of liquid and measuring both initial and peak temperatures.
- To determine energy per gram, either the mass must be held constant or the temperature rise must be divided by the mass used ().
- Highlighting the exact point when the reaction finishes (maximum temperature reached / effervescence ceases) is essential for accurate thermal measurements.
Common Mistakes
- Forgetting to specify measuring the initial temperature of the acid before adding the metal.
- Omitting the specific measuring apparatus needed (e.g. stating 'measure acid' without naming a measuring cylinder or pipette).
- Failing to state how the final conclusion is reached from the data gathered.
Things to Be Careful About
- Ensure sulfuric acid is present in excess so that all of the weighed metal reacts completely.
- Clearly mention repeating the experiment with the second metal (zinc) under the same conditions.