Chemistry 5070/41 — October/November 2025
Cambridge O-Level · Alternative to Practical · worked solutions for every part, with the mark scheme
Topics Experimental Contexts · Use of Techniques, Apparatus and Materials · Observations and Measurements · Planning Experiments and Investigations · Analysis, Conclusions and Evaluation · Qualitative Analysis
A student separates petroleum.
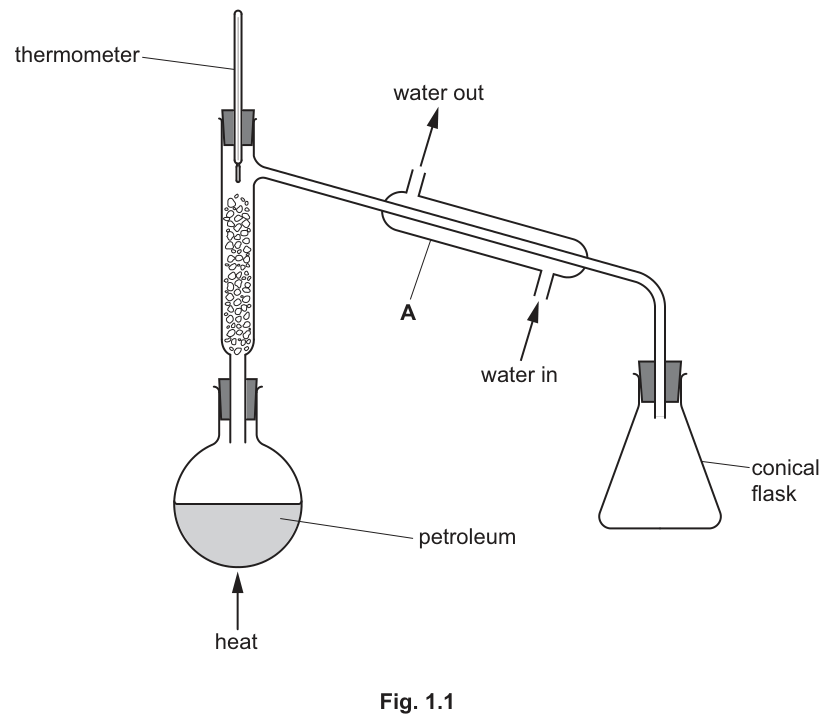
Fig. 1.1 shows how the student assembles the apparatus.
Answer
condenser
condenser
Walkthrough
The apparatus labelled A consists of an inner tube through which hot vapour passes, surrounded by an outer jacket through which cold water circulates to cool and condense the vapour back into a liquid. This piece of apparatus is called a condenser (or Liebig condenser / water condenser).
Key Takeaways
- A condenser cools vapour and changes it back into a liquid during distillation.
- Cold water enters at the bottom (lower port) and exits at the top (upper port) to ensure the jacket fills completely without air pockets.
Common Mistakes
- Confusing the condenser with the fractionating column.
- Naming the whole set-up ('distillation') instead of the specific piece of glassware labelled A.
Things to Be Careful About
- Write 'condenser' or 'Liebig condenser'. Both are accepted.
The student makes a mistake when assembling the apparatus.
Describe this mistake.
______
Answer
The conical flask is sealed with a bung / the receiving flask has a stopper.
The conical flask is sealed with a bung
Walkthrough
Looking at Fig. 1.1, the receiving conical flask has a tightly fitted bung/stopper with no opening or vent. During distillation, heating increases the gas volume and pressure. If the entire apparatus is sealed with no escape route for expanding air or non-condensed gases, pressure will build up inside the glassware, creating an explosion risk. The receiving flask should be open to the atmosphere or have a vent.
Key Takeaways
- A distillation apparatus must never be a completely closed/sealed system.
- Pressure build-up caused by heating in a closed system can cause the glassware to shatter or explode.
Common Mistakes
- Claiming the water connections are incorrect (the 'water in' at the bottom and 'water out' at the top are actually correct).
- Claiming the thermometer position is wrong (its bulb is placed right next to the side-arm, which is correct).
Things to Be Careful About
- Be specific: state clearly that a bung/stopper has been inserted into the conical flask (or that the system is closed/sealed).
When it is correctly assembled, the apparatus shown in Fig. 1.1 is used to separate petroleum into useful substances.
Answer
fractional distillation
fractional distillation
Walkthrough
Petroleum is a mixture of hydrocarbons with different boiling points. The presence of a fractionating column packed with glass beads allows repeated condensation and vaporisation cycles, separating the mixture into fractions based on boiling point. This method is called fractional distillation.
Key Takeaways
- Fractional distillation is used to separate miscible liquids with different boiling points.
- Simple distillation is used to separate a solvent from a solution (or liquids with vastly different boiling points), whereas fractional distillation is required for complex mixtures of liquids with close boiling points.
Common Mistakes
- Writing 'simple distillation' or just 'distillation'—the fractionating column specifically indicates 'fractional distillation'.
Things to Be Careful About
- Ensure you include the word 'fractional'.
Answer
boiling point
boiling point
Walkthrough
Fractional distillation separates substances based on differences in their boiling points (or boiling point ranges). Substances with lower boiling points boil and evaporate first, rise up the fractionating column, condense in the condenser, and are collected first.
Key Takeaways
- Different fractions/hydrocarbons in petroleum have different boiling points due to differences in molecular size and intermolecular forces.
Common Mistakes
- Stating 'melting point' or 'density' instead of 'boiling point'.
Things to Be Careful About
- 'Boiling point' or 'different boiling points' is the required answer.
State the name of the piece of apparatus the student uses to safely heat the petroleum in Fig. 1.1.
Explain why this piece of apparatus is suitable.
piece of apparatus ______
explanation ______
Answer
piece of apparatus: electric heater / heating mantle / water bath
explanation: petroleum is flammable
piece of apparatus: electric heater; explanation: petroleum is flammable
Walkthrough
Petroleum (and the hydrocarbon fractions produced from it) consists of volatile organic compounds that are highly flammable. Using a naked flame (like a Bunsen burner) would present a serious fire hazard because vapours could easily ignite. Therefore, a flameless heating device, such as an electric heater, heating mantle, or water bath, must be used.
Key Takeaways
- Flammable liquids must never be heated directly with a Bunsen burner (open flame).
- Safe heating alternatives include electric heating mantles, hotplates, or water baths.
Common Mistakes
- Naming a 'Bunsen burner' as the safe heating source.
- Giving a vague explanation like 'it heats it evenly' rather than stating that petroleum is flammable.
Things to Be Careful About
- The question asks for both the piece of apparatus and the explanation. Ensure both parts are answered explicitly.
A student investigates the temperature changes when an acid neutralises aqueous sodium hydroxide.
The ionic equation for the reaction is shown.
The reaction is exothermic.
The temperature change is used to determine the concentration of hydrogen ions in an acid.
X is sodium hydroxide solution
Y is an acid of concentration
The student:
- step 1 fills the burette with Y
- step 2 stands a plastic cup inside a beaker
- step 3 uses a volumetric pipette to put of X into the plastic cup
- step 4 measures the initial temperature of X and records it in Table 2.1
- step 5 adds of Y from the burette to the plastic cup
- step 6 stirs the mixture for 30 seconds and records in Table 2.1 the temperature of the mixture
- step 7 repeats steps 5 and 6 until a total of of Y is added.
Fig. 2.1 on page 6 shows two of the thermometer readings in during the experiment.
Complete Table 2.1.
You should:
- record the student's results for and using Fig. 2.1
- subtract the initial temperature of X from each temperature recorded to determine the temperature change.
All temperatures and temperature changes should be recorded to .
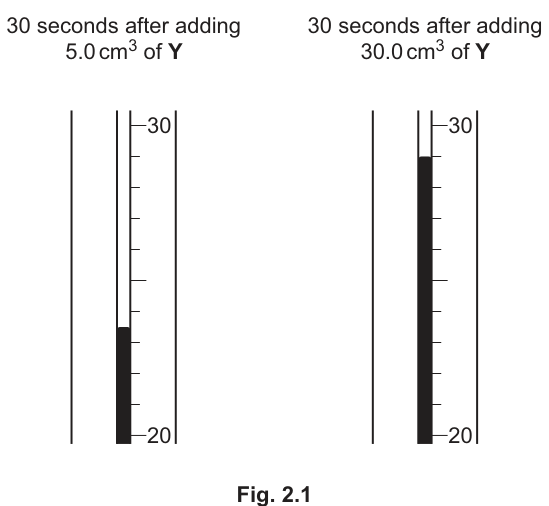
Table 2.1
| volume of Y / | temperature / | temperature change / |
|---|---|---|
| 0.0 | 20.5 | 0.0 |
| 5.0 | ||
| 10.0 | 26.0 | |
| 15.0 | 29.5 | |
| 20.0 | 31.5 | |
| 25.0 | 30.5 | |
| 30.0 | ||
| 35.0 | 27.5 | |
| 40.0 | 26.5 |
Answer
| volume of Y / | temperature / | temperature change / |
|---|---|---|
| 0.0 | 20.5 | 0.0 |
| 5.0 | 24.0 | 3.5 |
| 10.0 | 26.0 | 5.5 |
| 15.0 | 29.5 | 9.0 |
| 20.0 | 31.5 | 11.0 |
| 25.0 | 30.5 | 10.0 |
| 30.0 | 29.0 | 8.5 |
| 35.0 | 27.5 | 7.0 |
| 40.0 | 26.5 | 6.0 |
Completed Table 2.1 with 24.0 °C and 29.0 °C recorded, and temperature changes 0.0, 3.5, 5.5, 9.0, 11.0, 10.0, 8.5, 7.0, 6.0 °C
Walkthrough
- Read thermometer at : From Fig. 2.1, the liquid level sits exactly at the fourth mark above , which is .
- Read thermometer at : The liquid level is one mark below , which is .
- Calculate temperature changes: Subtract the initial temperature ( at ) from each temperature reading:
- For :
- For :
- For :
- For :
- For :
- For :
- For :
- For :
- For :
- Ensure all entries are recorded to or precision as instructed.
Key Takeaways
- Thermometer readings and calculated differences in Paper 4 must be recorded with a consistent decimal place (e.g., or ) when specified.
- Temperature change is always calculated relative to the initial starting temperature at .
Common Mistakes
- Writing whole numbers without the decimal place (e.g., writing instead of or instead of ).
- Subtracting consecutive readings rather than always subtracting the initial temperature ().
Things to Be Careful About
- Double check the initial temperature value () used as the baseline for all subtractions.
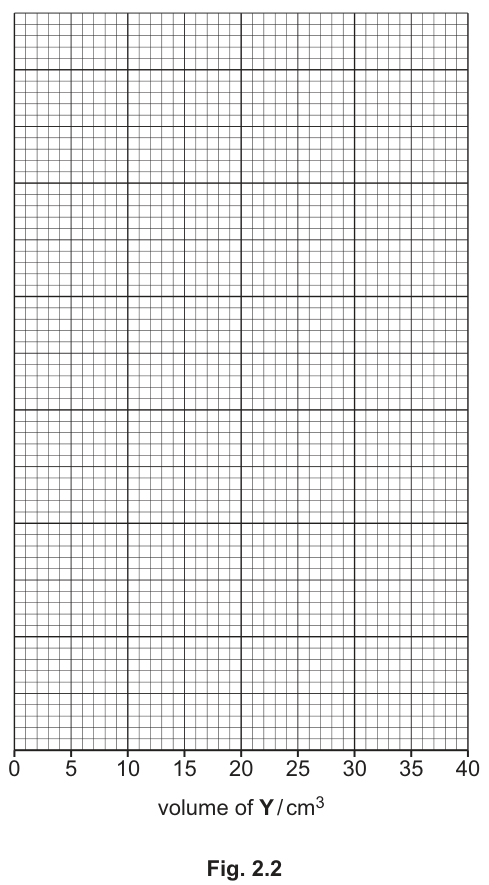
Plot a graph of the temperature change (-axis) against the volume of Y (-axis) on Fig. 2.2.
Draw a line of best fit through the points where the temperature change is increasing.
Draw a line of best fit through the points where the temperature change is decreasing.
Extend both lines so that they cross.
Answer
- -axis labelled with
temperature change / °C(or ). - Suitable linear scale on the -axis (e.g. per major division/2 cm, running from to at least ) occupying more than half the vertical grid.
- All points plotted accurately to within small square:
, , , , , , , , . - Straight line of best fit drawn through increasing temperature change points and extended.
- Straight line of best fit drawn through decreasing temperature change points and extended to intersect the first line.
Graph plotted with suitable scale, points correctly plotted, and two intersecting straight lines of best fit drawn
Walkthrough
- Axis Setup: The -axis is pre-labelled with
volume of Y / cm³from to . Label the vertical axis astemperature change / °C. Choose a linear scale such that the maximum value () occupies more than half the grid height (for instance, every 2 cm / 10 small squares, reaching or at the top). - Plotting Points: Plot all 9 pairs of coordinates from Table 2.1 accurately to within half a small square using small crosses or encircled dots.
- Lines of Best Fit:
- Draw a straight line of best fit through the rising section of points (from to ).
- Draw a second straight line of best fit through the falling section of points (from to ).
- Intersection: Extend both straight lines until they intersect clearly. The intersection point corresponds to the stoichiometric neutralisation endpoint.
Key Takeaways
- In thermometric titrations, two distinct linear trends appear: an increase while the reaction occurs, and a decrease once all reactant has been consumed due to heat loss and dilution by cold titrant.
- The equivalence point is found at the intersection of these two straight lines.
Common Mistakes
- Drawing a single curved line over all points instead of two distinct straight lines.
- Forgetting units on the -axis label.
- Choosing a compressed scale where the plotted data spans less than half of the available grid.
Things to Be Careful About
- Ensure straight lines are drawn with a ruler and extended cleanly to cross each other.
Find the point on the graph where the two lines cross.
Determine the volume of Y at this point.
volume = ______
Answer
(or value read directly from the candidate's graph intersection, typically )
20.0 cm3
Walkthrough
- Locate the exact point on Fig. 2.2 where the two straight lines of best fit intersect.
- Project down vertically to the horizontal axis (-axis) to read the volume of Y.
- The ideal intersection for this dataset is at (values in the range depending on exact line placement are accepted).
Key Takeaways
- The intersection of the warming and cooling lines represents the exact volume of acid needed to neutralise the fixed amount of alkali.
Common Mistakes
- Reading the -value (temperature change) instead of the -value (volume of Y).
- Reading a data point instead of the intersection of the best-fit lines.
Things to Be Careful About
- Ensure the reading matches the intersection drawn on your own graph.
X is sodium hydroxide solution.
The formula of sodium hydroxide is .
Calculate the number of moles of hydroxide ions, , in of X.
number of moles = ______
Working
Answer
0.0400
Walkthrough
- Use the formula:
- Convert the volume from to by dividing by :
- Multiply by the concentration of ():
Since contains one ion per formula unit, the moles of are equal to the moles of .
Key Takeaways
- To convert volume from to , divide by .
- is a monobasic base, so of provides of .
Common Mistakes
- Forgetting to convert to (giving ).
- Arithmetic slips in decimals.
Things to Be Careful About
- Give the answer to an appropriate number of significant figures ( or ).
The volume of Y in (c) is the volume needed to completely neutralise of X.
Use your answers to (c) and (d) to calculate the concentration of hydrogen ions, , in Y.
concentration = ______
Working
From the equation , of reacts with of .
Answer
2.00 mol/dm3
Walkthrough
- From the neutralisation equation , the reacting ratio is .
- Therefore, moles of in the neutralisation volume of Y equals the moles of from part (d) ().
- Use the formula:
- Substitute the volume from part (c) ():
(Allow error carried forward from (c) and (d) via ).
Key Takeaways
- Neutralisation between strong acids and alkalis involves a ratio between and ions.
- Concentration is calculated by dividing moles by volume in .
Common Mistakes
- Inverting the division (dividing volume by moles).
- Forgetting to convert volume from to .
Things to Be Careful About
- Ensure the volume used is your value from (c) and the moles are from (d).
Answer
A burette is more accurate / precise / has a higher resolution than a measuring cylinder.
A burette is more accurate / precise than a measuring cylinder
Walkthrough
- A burette is graduated with smaller increments (typically divisions) and has a narrower bore, allowing for greater precision and lower percentage error compared to a measuring cylinder.
- State clearly that the burette provides greater accuracy/precision or higher resolution.
Key Takeaways
- Burettes and volumetric pipettes are high-precision volumetric glassware compared to measuring cylinders, which are only for approximate measurements.
Common Mistakes
- Vague statements such as "it is easier to use" or "to avoid spilling" without mentioning accuracy/precision.
Things to Be Careful About
- Clearly identify the comparison: burette is more accurate/precise than the measuring cylinder.
Suggest why the temperatures are recorded after 30 seconds and not immediately after mixing.
______
Answer
To allow the reaction to complete and the temperature to reach its maximum / stop changing (or to ensure thorough mixing and heat distribution throughout the mixture).
To allow the temperature to reach a maximum / to allow the reaction to complete
Walkthrough
- When acid and alkali are mixed, the reaction takes a few moments to fully mix and react.
- Stirring for 30 seconds ensures the heat released during the exothermic reaction is evenly distributed throughout the solution and transferred to the thermometer bulb.
- This allows the thermometer to record the true maximum temperature of the mixture at that stage rather than an instantaneous local reading.
Key Takeaways
- In thermometric experiments, solutions must be stirred to ensure complete reaction and uniform temperature distribution before reading.
Common Mistakes
- Simply repeating the question ("because 30 seconds is enough time") without explaining that the reaction needs time to complete/reach maximum temperature.
Things to Be Careful About
- Focus on the chemical/physical reason: reaching maximum temperature or complete mixing/reaction.
A student does a series of tests using aqueous solution Q and aqueous solution R.
Solution Q is acidic. Solution Q contains one cation and one anion.
The tests the student does on Q are shown in Table 3.1.
Some of the observations for these tests are also shown.
Table 3.1
| test number | test | observations |
|---|---|---|
| 1 | add five drops of universal indicator | colour change |
| 2 | add a piece of magnesium ribbon | magnesium ribbon disappears |
| 3 | add dilute nitric acid followed by aqueous silver nitrate | white precipitate |
Answer
Red (or orange / yellow)
Red
Walkthrough
Universal indicator starts green in neutral conditions (). Because solution Q is acidic (), adding universal indicator causes it to turn red, orange, or yellow depending on the acid strength/concentration.
Key Takeaways
- Universal indicator shows a spectrum of colours: red/orange/yellow for acids, green for neutral, and blue/purple for alkalis.
Common Mistakes
- Confusing universal indicator with litmus (which only turns red in acid) or phenolphthalein (which is colourless in acid).
Things to Be Careful About
- The question asks for the expected colour change; stating "red", "orange", "yellow", or "from green to red" is accepted.
A gas is produced in test 2.
Predict one other observation made by the student in test 2.
______
Answer
Effervescence / bubbling / fizzing
Effervescence
Walkthrough
When a reactive metal like magnesium reacts with an acid, hydrogen gas is evolved. Visible gas formation in a liquid is observed as effervescence, bubbling, or fizzing.
Key Takeaways
- When gas is produced in a liquid reaction mixture, the primary observation is effervescence / fizzing / bubbling.
Common Mistakes
- Stating the name of the gas (e.g. "hydrogen is formed") instead of an observation (what is actually seen).
Things to Be Careful About
- The stem states that the magnesium ribbon disappears, so the candidate must provide the other distinct visual observation: effervescence.
Answer
Hydrogen (or )
Hydrogen
Walkthrough
The general reaction of a metal with an acid is:
Thus, the reaction between magnesium and an acid releases hydrogen gas.
Key Takeaways
- Reactive metals displace hydrogen from dilute acids to form hydrogen gas ().
Common Mistakes
- Writing the symbol as instead of the diatomic molecular formula or the full name.
Things to Be Careful About
- Give either the correct chemical name ("hydrogen") or correct molecular formula ("").
Describe a test to confirm the identity of this gas.
Include the result of a positive test.
test ______
result ______
Answer
test Lighted splint (held to the mouth of the tube)
result Burns with a 'pop' sound
test: lighted splint; result: 'pop' sound
Walkthrough
The standard qualitative test for hydrogen gas requires holding a burning/lighted splint near the gas. A positive result is that the gas ignites with a squeaky 'pop' sound.
Key Takeaways
- Test for hydrogen: lighted splint 'pops'.
- Test for oxygen: glowing splint relights.
Common Mistakes
- Using a "glowing splint" instead of a "lighted splint". A glowing splint is used for oxygen, not hydrogen.
Things to Be Careful About
- Ensure both the tool ("lighted splint") and the observation ("pop sound") are clearly stated.
Answer
cation = hydrogen /
anion = chloride /
cation = hydrogen, anion = chloride
Walkthrough
- Cation: Solution Q is an acid. All aqueous acids contain hydrogen ions as their only cation, so the cation is (hydrogen).
- Anion: In Test 3, adding dilute nitric acid followed by aqueous silver nitrate gives a white precipitate of silver chloride (). This confirms the presence of chloride ions ().
Key Takeaways
- Acidic aqueous solutions contain cations.
- Halide test: (white precipitate).
Common Mistakes
- Naming the metal from test 2 (magnesium) as the cation in Q, forgetting that magnesium was added to Q, not originally in Q.
- Writing chlorine instead of chloride.
Things to Be Careful About
- Specify the ion names ("hydrogen" and "chloride") or their correct ionic formulae ("" and "").
The tests the student does on R are shown in Table 3.2.
Some of the observations for these tests are also shown.
Table 3.2
| test number | test | observations |
|---|---|---|
| 4 | flame test | blue-green flame |
| 5 | add aqueous ammonia drop by drop until a change is seen add excess aqueous ammonia | light blue precipitate blue precipitate dissolves |
Answer
- Dip a clean nichrome / platinum wire (or wooden splint) into solution R (or spray solution R).
- Place it into a roaring / blue / non-luminous Bunsen burner flame.
Dip a wire/splint into R and place in a blue/roaring Bunsen flame
Walkthrough
To carry out a flame test:
- A carrier (such as a clean nichrome or platinum wire, or a soaked wooden splint) is dipped into the solution R to pick up a sample.
- The sample is introduced into the hot, non-luminous (blue/roaring) flame of a Bunsen burner with the air-hole open, so that the characteristic flame colour is clearly visible.
Key Takeaways
- Flame tests must be done in a non-luminous (blue) flame so the flame itself does not mask the emission colour.
Common Mistakes
- Stating to use a yellow/luminous flame, which would obscure the colour and coat the wire in soot.
- Forgetting to mention how the sample is transferred into the flame.
Things to Be Careful About
- Ensure both marking points are met: the sample transfer method (wire/splint/spray) and the flame condition (blue/roaring/non-luminous).
Describe one additional observation expected in test 5 based on the observations in tests 4 and 5.
______
Answer
Forms a dark blue / deep blue solution
Dark blue solution
Walkthrough
The observations in tests 4 and 5 indicate the presence of copper(II) ions, (blue-green flame, light blue precipitate with ammonia). When excess aqueous ammonia is added to a copper(II) solution, the light blue precipitate dissolves to give a characteristic dark blue (or deep blue) solution.
Key Takeaways
- with : light blue precipitate, soluble in excess to form a deep/dark blue solution.
Common Mistakes
- Just saying "blue solution" without specifying "dark blue" or "deep blue".
- Describing it as a precipitate rather than a solution.
Things to Be Careful About
- The mark scheme specifically looks for "dark(er) blue solution" or "deep blue solution".
Describe one additional test to confirm the identity of the cation in R.
Include the result of a positive test.
test ______
result ______
Answer
test Add aqueous sodium hydroxide (drop by drop and then in excess)
result Light blue precipitate; precipitate is insoluble in excess
test: add aqueous sodium hydroxide; result: light blue precipitate, insoluble in excess
Walkthrough
Since aqueous ammonia has already been used, the other standard confirmatory reagent for metal cations is aqueous sodium hydroxide ():
- Test: Add aqueous sodium hydroxide dropwise, then in excess.
- Result: A light blue precipitate of copper(II) hydroxide, , is formed.
- In excess: The light blue precipitate remains insoluble in excess , distinguishing it from amphoteric cations.
Key Takeaways
- with gives a light blue ppt, insoluble in excess.
- with gives a light blue ppt, soluble in excess giving a dark blue solution.
Common Mistakes
- Omitting the observation in excess sodium hydroxide (insoluble in excess).
- Stating that the precipitate dissolves in excess sodium hydroxide (confusing with ).
Things to Be Careful About
- All 3 marks must be addressed: M1 reagent (aqueous sodium hydroxide), M2 (light) blue precipitate, M3 insoluble in excess.
Answer
Copper(II) (or )
Copper(II)
Walkthrough
The blue-green flame in the flame test and the light blue precipitate with aqueous ammonia that dissolves in excess both unambiguously identify the cation as copper(II), .
Key Takeaways
- Blue-green flame test .
- Light blue precipitate with .
Common Mistakes
- Writing "copper" without the oxidation state (II) or writing .
Things to Be Careful About
- In O Level Chemistry, write "copper(II)" or "" to ensure full marks.
Alcohols are used as fuels to heat water.
Plan an experiment to determine which alcohol, methanol or ethanol, releases more thermal energy per gram of alcohol burned.
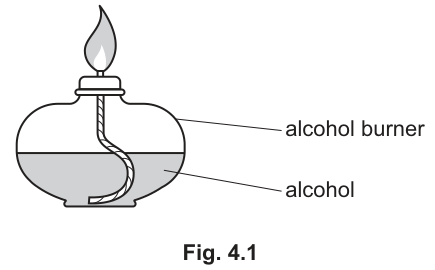
Your plan should describe the use of an alcohol burner, as shown in Fig. 4.1, to heat water. You should use water, methanol, ethanol and common laboratory apparatus. No other chemicals should be used.
Your plan should include:
- the additional apparatus needed
- the method to use and the measurements to take
- how the measurements are used to determine which alcohol releases more thermal energy per gram burned.
You may draw a diagram to help answer the question.
Answer
Apparatus:
- Measuring cylinder (or burette / volumetric pipette)
- Thermometer
- Balance
- Copper can / beaker / calorimeter
- Clamp and stand / tripod and gauze
Method and Measurements:
- Measure a fixed volume of water (e.g. ) using a measuring cylinder and pour it into a copper can / beaker.
- Measure and record the initial temperature of the water using a thermometer.
- Measure and record the initial mass of the alcohol burner containing methanol using a balance.
- Place the burner beneath the container of water, light the wick, and heat the water (e.g. for a set time or until a temperature rise of around is reached).
- Extinguish the flame, stir the water, and record the highest final temperature reached.
- Reweigh the alcohol burner and record its final mass.
- Repeat steps 1 to 6 using ethanol, keeping the volume of water, the distance between the flame and the container, and the container identical.
Determination:
- Calculate the temperature rise: .
- Calculate the mass of alcohol burned: .
- Calculate the temperature change per gram of alcohol burned for each alcohol:
- The alcohol with the greater temperature change per gram releases more thermal energy per gram.
Plan describing: measuring a fixed volume of water; recording initial/final water temperatures and initial/final burner masses for methanol and ethanol; calculating temperature change per gram burned (temperature change / mass of fuel burned); the fuel giving the greater temperature change per gram releases more energy.
Walkthrough
To compare the energy released per gram of two liquid fuels (methanol and ethanol), a standard simple calorimetry investigation is planned:
-
Apparatus required:
- A measuring cylinder or pipette to measure a defined volume of water.
- A container (such as a beaker or copper can/calorimeter) to hold the water.
- A thermometer to measure water temperature.
- A balance (precision balance) to measure the mass of the spirit burner before and after combustion.
- A clamp stand or tripod and gauze to position the container over the burner.
-
Measurements to record:
- Mass of burner + alcohol before burning and after burning (to find the mass of alcohol burned, ).
- Temperature of water before heating and maximum temperature after heating (to find the temperature rise, ).
-
Control variables (Fair test):
- Same volume/mass of water used for each alcohol.
- Same type of container (material and size).
- Same starting temperature of water (or same height/distance of beaker above the wick).
-
Processing results:
- For each alcohol, calculate:
- Compare the two values: the alcohol with the larger value of releases more thermal energy per gram.
Key Takeaways
- In simple combustion calorimetry, the thermal energy released is proportional to the temperature rise of the water (assuming heat capacity and mass of water are kept constant: ).
- Comparing energy per gram requires dividing the temperature increase by the actual mass of fuel consumed, not just burning for a fixed duration.
Common Mistakes
- Measuring the volume of alcohol burned instead of the mass burned (the question asks for energy per gram).
- Forgetting to take the final mass of the burner or assuming all alcohol in the burner was consumed.
- Not keeping the volume of water constant between trials.
- Stating that the alcohol with the highest temperature rise wins without dividing by the mass of alcohol burned.
Things to Be Careful About
- Always state both the initial and final readings for both temperature and mass.
- Clearly state the mathematical relationship used to draw the final conclusion: .