Chemistry 5070/31 — October/November 2025
Cambridge O-Level · Practical Test · worked solutions for every part, with the mark scheme
Topics Experimental Contexts · Observations and Measurements · Analysis, Conclusions and Evaluation · Use of Techniques, Apparatus and Materials · Qualitative Analysis · Planning Experiments and Investigations
You are going to measure the temperature changes when an acid neutralises aqueous sodium hydroxide.
The ionic equation for the reaction is shown.
The reaction is exothermic.
The temperature changes can be used to determine the concentration of hydrogen ions in an acid.
X is sodium hydroxide solution
Y is an acid of concentration
Read all the instructions carefully before starting the experiment.
All temperatures and temperature changes should be recorded to .
- step 1. Fill the burette with Y.
- step 2. Stand a plastic cup inside a beaker.
- step 3. Use a volumetric pipette to put of X into the plastic cup.
- step 4. Measure the initial temperature of X and record it in Table 1.1.
- step 5. Add of Y from the burette to the plastic cup.
- step 6. Stir the mixture for 30 seconds and record in Table 1.1 the temperature of the mixture.
- step 7. Repeat steps 5 and 6 until a total of of Y has been added.
Subtract the initial temperature of X from each temperature recorded to determine the temperature change.
Complete Table 1.1 with these temperature changes.
Table 1.1
| volume of | temperature / | temperature change / |
|---|---|---|
| 0.0 | 0.0 | |
| 5.0 | ||
| 10.0 | ||
| 15.0 | ||
| 20.0 | ||
| 25.0 | ||
| 30.0 | ||
| 35.0 | ||
| 40.0 |
Working
- Record all 9 temperatures in Table 1.1.
- Ensure all temperature measurements and calculated temperature changes are given to or .
- Temperature values must show an increase over at least the first three additions (, , ), reach a maximum, and then decrease.
- Calculate each temperature change correctly using:
Answer
Completed table containing 9 temperature readings and accurately calculated temperature changes, recorded to .
Completed table of candidate readings and temperature changes recorded to nearest 0.5 °C
Walkthrough
In this practical step, the candidate measures the temperature of the reaction mixture as successive portions of acid Y are added to a fixed volume of alkali X.
To score full marks on this table:
- Completeness: All 9 rows must be filled with recorded temperatures and calculated temperature changes.
- Precision: Thermometer readings must be consistently recorded to the nearest (i.e. ending in or ).
- Trend: Because neutralisation is exothermic, adding acid causes the temperature to rise initially until all is neutralised (the equivalence point). Further addition of cold acid then cools the solution down, so the readings must rise for at least the first three additions before decreasing.
- Calculations: The temperature change in each row is found by subtracting the initial temperature (at ) from the measured temperature.
- Accuracy: The maximum temperature change achieved should be close (within ) to the Supervisor's recorded value.
Key Takeaways
- Always record measurements to the precision specified by the apparatus and instructions (here, ).
- Thermometric titrations show a characteristic rise to a maximum followed by a decrease.
Common Mistakes
- Omitting the on whole-number readings (e.g. writing instead of ).
- Incorrect subtraction when calculating the temperature change from the initial value.
Things to Be Careful About
- Ensure the initial temperature is accurately read before any acid is added, as every temperature change depends on this baseline value.
Plot a graph of the temperature change (-axis) against the volume of Y (-axis) on Fig. 1.1.
Draw a line of best fit through the points where the temperature change is increasing.
Draw a line of best fit through the points where the temperature change is decreasing.
Extend both lines so that they cross.

Answer
- -axis labelled with variable and unit: .
- Linear scale chosen for the -axis such that the plotted points occupy more than half of the vertical grid height.
- All 8 or 9 data points plotted accurately to within small square.
- Two distinct straight lines of best fit drawn: one through the increasing points and one through the decreasing points.
- Both lines extended so that they intersect cleanly.
Accurately plotted graph with labelled y-axis, suitable scale, and two intersecting best-fit straight lines
Walkthrough
To construct the thermometric titration graph:
- Axis label and unit: Label the vertical axis as .
- Scale: Select a sensible linear scale (e.g. 1 major division = or ) so the plotted data covers more than half of the vertical grid.
- Plotting: Plot each coordinate with a small neat cross or dot within small square.
- Lines of best fit: Use a ruler to draw a straight line of best fit through the rising points, and a second straight line of best fit through the falling points.
- Extrapolation: Extend both straight lines until they cross each other. The intersection corresponds to the exact endpoint of the titration.
Key Takeaways
- In thermometric titrations, two intersecting straight lines are used to determine the equivalence point rather than a smooth curved line.
- Graph axes must always include both the quantity and its unit.
Common Mistakes
- Drawing a single continuous curve over the peak instead of two intersecting straight lines.
- Drawing a scale that uses less than half of the available grid height.
- Forgetting to write the unit on the -axis label.
Things to Be Careful About
- Do not force the lines to pass through an anomalous point; aim for a balanced distribution of points on either side of each straight line.
Find the point on the graph where the two lines cross.
Determine the volume of Y at this point.
volume = ______
Working
Read the -axis value directly below the point where the two lines of best fit intersect on Fig. 1.1.
Answer
20.0 cm3 (or candidate's graph value)
Walkthrough
The point of intersection of the two best-fit lines represents the theoretical maximum temperature change, which occurs at the exact neutralisation point (equivalence point). Project vertically downwards from this intersection to the -axis to read the exact volume of acid Y required.
Key Takeaways
- The intersection of the rising and falling best-fit lines gives the neutralisation volume without requiring an exact measurement at that specific volume.
Common Mistakes
- Reading the -axis value (temperature change) instead of the -axis value (volume of Y).
- Misreading the grid subdivisions on the horizontal axis.
Things to Be Careful About
- Ensure the reading reflects the intersection of the drawn lines, not simply the data point with the highest recorded temperature.
X is sodium hydroxide solution.
The formula of sodium hydroxide is NaOH.
Calculate the number of moles of hydroxide ions, , in of X.
number of moles = ______
Working
Answer
0.0400 mol
Walkthrough
To find the number of moles of hydroxide ions in the sodium hydroxide solution:
- Sodium hydroxide () dissociates completely to provide one ion per formula unit, so the concentration of is .
- Convert the volume from to :
- Multiply concentration by volume in :
Key Takeaways
- .
- Always convert to by dividing by .
Common Mistakes
- Forgetting to divide the volume by , resulting in .
Things to Be Careful About
- Give the answer to an appropriate number of significant figures (e.g. or ).
The volume of Y in (c) is the volume needed to completely neutralise of X.
Use your answers to (c) and (d) to calculate the concentration of hydrogen ions, , in Y.
concentration = ______
Working
From the equation , the mole ratio of to is .
Using :
Answer
2.00 mol / dm3 (or evaluated from candidate's values)
Walkthrough
- According to the neutralisation equation , one mole of reacts exactly with one mole of .
- Therefore, the moles of in the neutralisation volume of Y equals the moles of calculated in part (d) ().
- Calculate the concentration of by dividing the number of moles by the volume of Y from part (c) in :
Key Takeaways
- In a neutralisation reaction between and , .
- Concentration is given by .
Common Mistakes
- Inverting the formula (e.g. dividing volume by moles).
- Forgetting to convert volume from to .
Things to Be Careful About
- Carry forward values from parts (c) and (d) accurately.
Answer
A burette is more accurate / has higher precision than a measuring cylinder.
A burette is more accurate / precise than a measuring cylinder
Walkthrough
A burette has smaller scale divisions () compared to a standard measuring cylinder ( or ), allowing volumes of liquid to be delivered and measured with greater precision and smaller percentage uncertainty.
Key Takeaways
- Burettes and volumetric pipettes offer higher precision and lower experimental error than measuring cylinders.
Common Mistakes
- Stating that a burette is "easier to use" or "faster" rather than referring to accuracy/precision.
Things to Be Careful About
- Use clear scientific terminology: "more accurate", "more precise", or "has higher resolution".
Suggest why the temperatures are recorded after 30 seconds and not immediately after mixing.
______
Answer
To allow the reaction to complete and the temperature to reach its maximum / to ensure thorough mixing and heat transfer to the thermometer.
To allow the temperature to reach its maximum / stop changing
Walkthrough
When acid is added to alkali, the neutralisation reaction and subsequent heat transfer throughout the solution and into the thermometer bulb take time. Waiting 30 seconds while stirring ensures that the solution is thoroughly mixed and that the thermometer has reached thermal equilibrium with the liquid, registering the true maximum temperature.
Key Takeaways
- In thermometric experiments, stirring ensures uniform temperature distribution and waiting ensures the maximum temperature is attained before reading.
Common Mistakes
- Claiming it is "to let the solution cool down" (the aim is to measure the maximum temperature before significant heat loss occurs).
Things to Be Careful About
- Clearly state that waiting allows the temperature to reach its maximum or stop changing.
You are provided with aqueous solution Q and aqueous solution R.
You will do a series of tests using Q and R.
Tests using solution Q
You should:
- record your observations for each of these tests
- test and name any gases evolved.
To a depth of Q in a test-tube, add five drops of universal indicator.
observations ______
Answer
Red solution.
Red solution
Walkthrough
Universal indicator changes colour depending on pH. Q gives a red colour, which means Q is strongly acidic. There is no need to name the acid yet; just record the colour you see.
Key Takeaways
- Universal indicator is a mixture of dyes that gives a pH colour.
- Red = strongly acidic, purple/blue = alkaline, green = neutral.
- In practical papers, observations must be recorded exactly as seen.
Common Mistakes
- Writing "acid" instead of the colour. The mark is for the observation, not the conclusion.
- Saying "red litmus" – the test uses universal indicator, not litmus.
Things to Be Careful About
- Record the colour of the solution, not the colour of the indicator bottle.
- The answer must be a colour, and the mark scheme accepts "red (solution)".
To a depth of Q in a test-tube, add a piece of magnesium ribbon.
observations ______
conclusion ______
Answer
Observations: effervescence; magnesium disappears / colourless solution forms; tube becomes warm.
Conclusion: the gas is hydrogen – a lighted splint gives a 'pop' sound.
Effervescence; magnesium disappears/colourless solution; tube warms; gas gives pop with lighted splint, so hydrogen
Walkthrough
Magnesium is a reactive metal. When added to an acid (Q is hydrochloric acid), it reacts to form a salt and hydrogen gas:
The bubbles are effervescence, the magnesium ribbon gets used up, and the reaction is exothermic so the tube warms. To identify the gas, hold a lighted splint at the mouth of the tube: hydrogen burns with a squeaky 'pop'.
Key Takeaways
- Metal + acid → salt + hydrogen.
- Hydrogen is tested with a lighted splint: 'pop' sound.
- The reaction is exothermic.
Common Mistakes
- Writing "bubbles" without "effervescence" – both are accepted, but record what you see.
- Testing with a glowing splint (that is for oxygen); hydrogen needs a lighted splint.
- Forgetting to name the gas as hydrogen.
Things to Be Careful About
- The mark scheme gives any two from the first three observations, then one mark each for the test, the result and the gas name.
- "Colourless solution" is accepted because the magnesium chloride solution is colourless.
Allow the reaction to finish.
Divide the solution equally between two test-tubes for use in (c) and (d).
To one of the samples from (b), add aqueous sodium hydroxide drop by drop until a change is seen.
Then add excess aqueous sodium hydroxide.
observations ______
Answer
White precipitate; insoluble in excess aqueous sodium hydroxide.
White precipitate, insoluble in excess
Walkthrough
After the magnesium has reacted with the acid, the solution contains magnesium ions. Adding aqueous sodium hydroxide to a solution containing Mg²⁺ gives a white precipitate of magnesium hydroxide:
Magnesium hydroxide is insoluble in excess sodium hydroxide, so the precipitate stays.
Key Takeaways
- Aqueous sodium hydroxide is used to test for cations.
- Mg²⁺ gives a white precipitate that is insoluble in excess NaOH.
- The observation must include both the initial precipitate and its behaviour in excess.
Common Mistakes
- Writing "white precipitate" only – the mark scheme awards one mark for the precipitate and one for "insoluble in excess".
- Confusing with Al³⁺, which gives a white precipitate soluble in excess NaOH.
Things to Be Careful About
- Add the sodium hydroxide drop by drop first; record the change before adding excess.
- "Insoluble in excess" is the key second mark.
To the other sample from (b), add a few drops of dilute nitric acid followed by depth of aqueous silver nitrate.
observations ______
Answer
White precipitate.
White precipitate
Walkthrough
Silver nitrate is used to test for halide ions. The solution from part (b) contains chloride ions. Adding silver nitrate gives a white precipitate of silver chloride:
Dilute nitric acid is added first to remove any carbonate or sulfite ions that could also give precipitates.
Key Takeaways
- , a white precipitate.
- Dilute nitric acid is added before silver nitrate to prevent false positives from carbonate ions.
- Chloride gives a white precipitate; bromide gives cream; iodide gives yellow.
Common Mistakes
- Writing "cream precipitate" – that is for bromide.
- Forgetting the nitric acid step, though the observation mark only needs the precipitate.
- Saying "silver chloride" instead of "white precipitate" – both are fine, but the mark scheme wants the observation.
Things to Be Careful About
- The mark is for the observation, not the name of the precipitate.
- "White precipitate" is the accepted answer.
Q contains one cation and one anion.
Identify the cation and the anion in Q.
cation = ______ anion = ______
Answer
Cation: hydrogen ion,
Anion: chloride ion,
Cation: H+; Anion: Cl-
Walkthrough
Q gives a red colour with universal indicator, so it is an acid. When magnesium is added, hydrogen gas is produced, which confirms the presence of hydrogen ions. The silver nitrate test gives a white precipitate, which identifies chloride ions. Therefore Q is hydrochloric acid, HCl, containing H⁺ and Cl⁻.
Key Takeaways
- An acid contains H⁺ as its cation.
- The white precipitate with silver nitrate identifies Cl⁻.
- The evidence from each test must be combined to name the ions.
Common Mistakes
- Writing "magnesium" as the cation – the magnesium is added to the acid and is not part of Q.
- Writing "hydrochloric acid" instead of the ions – the question asks for the cation and anion.
- Confusing the anion test: chloride gives white, bromide cream, iodide yellow.
Things to Be Careful About
- The cation is H⁺, not Mg²⁺, because Q is the original solution before magnesium is added.
- The mark scheme accepts "hydrogen / H⁺" and "chloride / Cl⁻".
Tests using solution R
Record your observations for each of these tests.
Put depth of dilute hydrochloric acid in a test-tube.
Dip a wooden splint or flame test wire into this test-tube.
Place the damp end of the wooden splint or flame test wire into R.
Place the damp end of the wooden splint or flame test wire into the flame of a Bunsen burner with the air-hole open.
Answer
Blue-green flame.
Blue-green flame
Walkthrough
A flame test is used to identify metal cations. The damp wire is dipped into R, then held in the flame. The colour observed is blue-green, which is characteristic of copper(II) ions.
Key Takeaways
- Flame tests identify certain metal cations by their flame colour.
- Copper(II) gives a blue-green flame.
- The first colour seen is the one to record.
Common Mistakes
- Writing "green" only – the mark scheme accepts "blue–green".
- Confusing with barium (apple green) or copper (blue-green).
Things to Be Careful About
- The wire must be clean to avoid contamination.
- Record the first flame colour, before any colour from impurities.
Answer
So the flame is blue and does not mask the colour of the flame test.
So the flame colour can be seen clearly / not masked
Walkthrough
With the air-hole open, the Bunsen flame is blue and non-luminous. A yellow, luminous flame would add its own colour and hide the blue-green colour from the copper. Opening the air-hole makes the observation reliable.
Key Takeaways
- A blue flame is hotter and non-luminous.
- Flame test colours are best seen against a blue flame.
- The air-hole controls the amount of air entering the burner.
Common Mistakes
- Saying "to make the flame hotter" – that is true but not the reason here; the mark is about not masking the colour.
- Saying "to make a yellow flame" – that is the opposite.
Things to Be Careful About
- The mark scheme accepts "so the flame colour can be clearly seen" or "so the flame doesn't mask the colour".
To depth of R in a test-tube, add aqueous ammonia drop by drop until a change is seen.
Then add excess aqueous ammonia.
observations ______
Answer
Light blue precipitate; dissolves in excess aqueous ammonia to give a dark blue solution.
Light blue precipitate, soluble in excess giving a dark blue solution
Walkthrough
Aqueous ammonia is a test for cations. With copper(II) ions it first gives a light blue precipitate of copper(II) hydroxide. On adding excess ammonia, the precipitate dissolves to form a dark blue solution containing the complex ion [Cu(NH3)4]2+. This is a characteristic test for Cu²⁺.
Key Takeaways
- Cu²⁺ + ammonia → light blue precipitate, soluble in excess to a dark blue solution.
- This distinguishes Cu²⁺ from Fe²⁺ (green) and Fe³⁺ (brown).
- The observation must include both stages.
Common Mistakes
- Writing "blue precipitate" only – need "light blue" and "dark blue solution in excess".
- Saying "insoluble in excess" – for copper it is soluble.
- Confusing with sodium hydroxide test: with NaOH, Cu²⁺ gives a blue precipitate insoluble in excess.
Things to Be Careful About
- The mark scheme has three points: light blue ppt, soluble in excess, dark blue solution.
- Record the colour change clearly.
Answer
Copper(II) ion, Cu²⁺
Cu2+
Walkthrough
The flame test gave a blue-green colour, which is typical of copper(II). The ammonia test confirmed it: a light blue precipitate that dissolves in excess to a dark blue solution. Both tests together identify the cation as Cu²⁺.
Key Takeaways
- Flame colour and ammonia test are both used to identify Cu²⁺.
- Blue-green flame + light blue ppt soluble in excess ammonia = copper(II).
- The conclusion must be a cation, not a compound.
Common Mistakes
- Writing "copper" instead of "copper(II)" – the charge matters.
- Writing "copper sulfate" – the question asks for the cation.
- Confusing with other blue-flame metals.
Things to Be Careful About
- The mark scheme accepts "Copper(II) / Cu²⁺".
- Use the Roman numeral to show the +2 charge.
You are not expected to do any experimental work for this question.
Alcohols are used as fuels to heat water.
Plan an experiment to determine which alcohol, methanol or ethanol, releases more thermal energy per gram of alcohol burned.
Your plan should describe the use of an alcohol burner, as shown in Fig. 3.1, to heat water. You should use water, methanol, ethanol and common laboratory apparatus. No other chemicals should be used.
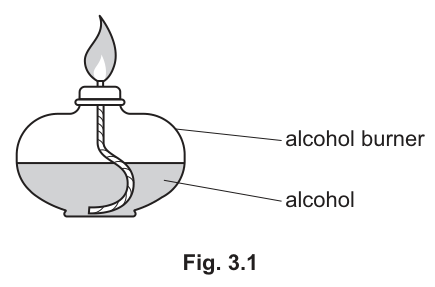
Your plan should include:
- the additional apparatus needed
- the method to use and the measurements to take
- how the measurements are used to determine which alcohol releases more thermal energy per gram burned.
You may draw a diagram to help answer the question.
Answer
Apparatus:
- Beaker / copper calorimeter / metal can (container to hold water)
- Measuring cylinder
- Thermometer
- Balance
- Clamp, boss, and stand (or tripod and gauze)
Method and Measurements:
- Measure a fixed volume of water (e.g. ) using a measuring cylinder and pour it into the beaker / calorimeter.
- Measure and record the initial temperature of the water using a thermometer.
- Weigh the alcohol burner containing methanol on the balance and record its initial mass.
- Place the burner under the beaker, light the wick, and heat the water (e.g. for a fixed time or until a substantial temperature rise occurs).
- Extinguish the flame, stir the water, and record the maximum/final temperature reached.
- Reweigh the alcohol burner and record its final mass.
- Repeat the entire procedure using the same volume of water and an alcohol burner containing ethanol.
Determination:
- Calculate the temperature rise: .
- Calculate the mass of alcohol burned: .
- Calculate the temperature rise per gram of alcohol burned:
- The alcohol with the greater temperature change per gram releases more thermal energy per gram burned.
Plan describing: measuring a fixed volume of water; recording initial and final water temperature; recording initial and final mass of spirit burner; repeating with both methanol and ethanol; and calculating temperature change per gram (temperature change / mass burned) where a higher value indicates more thermal energy released per gram.
Walkthrough
This question asks you to design a simple calorimetry investigation to compare the thermal energy released per gram of two different alcohols (methanol and ethanol).
A complete experimental plan must cover three essential areas:
-
Apparatus:
- A container to hold the water (e.g., beaker, metal can, or copper can).
- A measuring cylinder (or burette / pipette) to measure a known volume of water.
- A thermometer to measure temperature changes.
- A balance to measure the mass of the spirit burner before and after combustion.
-
Method and Measurements:
- Control variables: The volume/mass of water used must be identical for both experiments, and the distance between the flame and the beaker should be kept constant.
- Measurements to take:
- Initial temperature of the water and final (maximum) temperature of the water.
- Initial mass of the burner containing alcohol and final mass of the burner after heating.
- Repetition: Perform the identical procedure with ethanol so a fair comparison can be made.
-
Determination / Processing of Data:
- Calculate the change in water temperature: .
- Calculate the mass of fuel consumed: .
- Calculate the energy proxy: .
- Conclude that the fuel giving the higher temperature rise per gram burned releases more thermal energy per gram.
Key Takeaways
- In simple calorimetry, heat released by the burning fuel is transferred to a known volume of water: .
- Because the mass of water () and specific heat capacity () are constant, the temperature change is directly proportional to the thermal energy transferred.
- Comparing energy per gram requires dividing the temperature change by the mass of fuel lost during combustion ().
Common Mistakes
- Forgetting to reweigh the burner: Candidates often record the initial mass of the burner but forget to measure its mass after combustion to determine the mass of alcohol actually burned.
- Not controlling variables: Forgetting to state that the volume or mass of water must be kept the same for both tests.
- Vague data processing: Saying just "see which heats up faster" instead of explicitly calculating the temperature rise divided by the mass of alcohol burned.
Things to Be Careful About
- Use standard laboratory apparatus names (e.g., "measuring cylinder", not just "measuring cup").
- Specify taking both initial and final readings for both temperature and mass so changes ( and ) can be calculated.