Chemistry 5070/42 — October/November 2024
Cambridge O-Level · Alternative to Practical · worked solutions for every part, with the mark scheme
Topics Experimental Contexts · Use of Techniques, Apparatus and Materials · Analysis, Conclusions and Evaluation · Observations and Measurements · Qualitative Analysis · Planning Experiments and Investigations
A student does an experiment to make pure hydrated copper(II) sulfate crystals, .
The student makes aqueous copper(II) sulfate by reacting a dilute acid with excess copper(II) oxide.
Name the acid.
______
Answer
Sulfuric acid
sulfuric acid
Walkthrough
The student is making copper(II) sulfate, which is a sulfate salt. Sulfate salts are prepared by reacting the metal oxide, metal hydroxide, or metal carbonate with dilute sulfuric acid. Since the reactant is copper(II) oxide, the acid must be dilute sulfuric acid.
Key Takeaways
Sulfate salts are always prepared using sulfuric acid. Carbonate salts use hydrochloric acid, nitrate salts use nitric acid.
Common Mistakes
Writing "sulfuric acid" as "sulphuric acid" (both are acceptable in Cambridge, but "sulfuric" is standard in the mark scheme). Writing "sulfuric acid" without "dilute" is fine here as the question already states "dilute acid", but the answer just needs to name the acid.
Things to Be Careful About
The question asks to "Name the acid". Just writing the name or formula is acceptable. Ensure correct spelling.
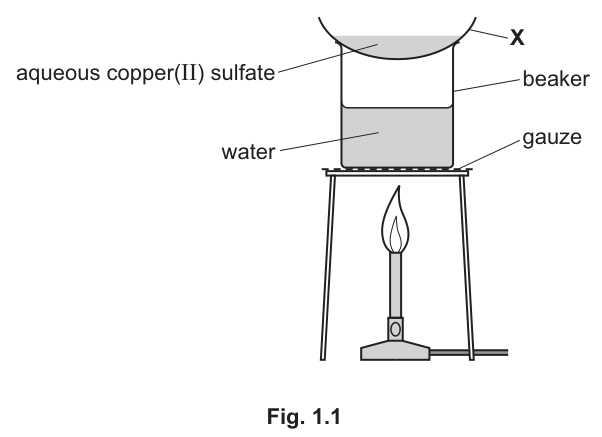
Fig. 1.1 shows the apparatus the student uses to crystallise the aqueous copper(II) sulfate.
Answer
Evaporating dish (or evaporating basin / bowl)
evaporating dish
Walkthrough
Apparatus X is the container holding the aqueous copper(II) sulfate while it is heated. In crystallisation experiments, this is always an evaporating dish (also called an evaporating basin or bowl). It has a wide, shallow shape to maximise surface area for evaporation.
Key Takeaways
Evaporating dishes are used to heat liquids to evaporate the solvent and leave behind the solute or to concentrate a solution for crystallisation.
Common Mistakes
Calling it a "beaker" or a "crucible". A beaker is not suitable for direct heating to dryness or prolonged evaporation as it can crack. A crucible is used for heating solids to high temperatures (e.g. in a muffle furnace) or for strong heating, not for gentle evaporation of solutions.
Things to Be Careful About
The mark scheme accepts "evaporating dish", "evaporating basin", or "bowl". Any of these is correct.
Describe how the student decides when to stop heating the aqueous copper(II) sulfate.
______
Answer
Crystals start to form (on the surface of the solution / in the solution).
crystals start to form
Walkthrough
The goal of heating the aqueous copper(II) sulfate in an evaporating dish is to evaporate some of the water (the solvent) to produce a saturated solution. When the solution is saturated, further evaporation will cause the dissolved solute (copper(II) sulfate) to come out of solution as solid crystals. The student should stop heating when they see crystals forming on the surface of the liquid or on the sides of the dish. If they heat it to dryness, they will get anhydrous copper(II) sulfate powder, not hydrated crystals, and the crystals might spitting or decompose.
Key Takeaways
In crystallisation, you do not evaporate to dryness. You stop heating when the solution is saturated, indicated by the first appearance of crystals.
Common Mistakes
Saying "when all the water has evaporated" or "when the solution is dry". This would produce anhydrous powder, not hydrated crystals.
Things to Be Careful About
The observation must be about crystals forming. Simply saying "when it is concentrated" is too vague and does not score a mark.
Suggest why apparatus X is heated with a water bath and not heated directly using the Bunsen burner.
______
Answer
Any two from:
- The water bath heats the solution more gently / slowly.
- To prevent the water of crystallisation from being removed (from the crystals).
- To prevent the solid from spitting out.
water bath heats the solution more gently / slowly; to prevent water of crystallisation being removed
Walkthrough
A water bath provides a gentle, uniform heat source. The maximum temperature is (the boiling point of water), which is lower than the direct flame of a Bunsen burner. This gentle heating ensures that water evaporates slowly, allowing large, pure crystals to form rather than a fine powder.
Furthermore, hydrated copper(II) sulfate contains water of crystallisation (). If heated too strongly or directly, the thermal energy could exceed the energy required to break the bonds holding the water molecules in the crystal lattice, driving off the water of crystallisation and leaving white anhydrous copper(II) sulfate powder.
Finally, strong localised heating from a Bunsen burner can cause the solution to boil violently, making the hot liquid spit out of the dish, which is a safety hazard.
Key Takeaways
Water baths are used for gentle heating to control evaporation rates and to prevent thermal decomposition or loss of volatile components (like water of crystallisation).
Common Mistakes
Saying "to prevent the solution from boiling". The solution must boil/evaporate; the point is to control the rate of evaporation. Saying "to save fuel" is not a valid chemical or practical reason.
Things to Be Careful About
The question asks for two reasons. Ensure both are distinct. "Gentle heating" and "prevent water of crystallisation being removed" are the two primary marks. "Prevent spitting" is an acceptable alternative.
Describe the final step needed to produce pure hydrated copper(II) sulfate crystals.
______
Answer
Dry (the crystals) (between filter paper / in a warm oven).
dry (the crystals)
Walkthrough
After the crystals have formed and been separated from the remaining solution (mother liquor) by filtration, they will be wet. To obtain pure, dry hydrated copper(II) sulfate crystals, the final step is to dry them. This is typically done by pressing them between sheets of filter paper to absorb surface moisture, or by leaving them to air dry, or by placing them in a warm oven at a low temperature.
Key Takeaways
The crystallisation process involves: dissolving reactants -> filtering to remove excess reactant -> evaporating to saturation -> cooling to crystallise -> filtering to collect crystals -> drying the crystals.
Common Mistakes
Saying "put it in the sun" (too slow, might dissolve) or "heat strongly in an oven" (will drive off water of crystallisation). The answer must simply be "dry the crystals".
Things to Be Careful About
The mark scheme is very brief: "dry (the crystals)". Any reasonable method of drying that does not involve strong heating is acceptable, but just writing "dry" is sufficient for the mark.
A student titrates four samples of aqueous sodium carbonate with dilute hydrochloric acid, .
In titration 1 the student:
- rinses and fills a burette with
- adds of aqueous sodium carbonate to a conical flask
- adds methyl orange indicator to the conical flask
- adds from the burette while swirling the flask, adding drop by drop near the end-point, until the solution just changes colour.
The student repeats the titration three more times.
Fig. 2.1 shows the burette readings for two of the titrations.
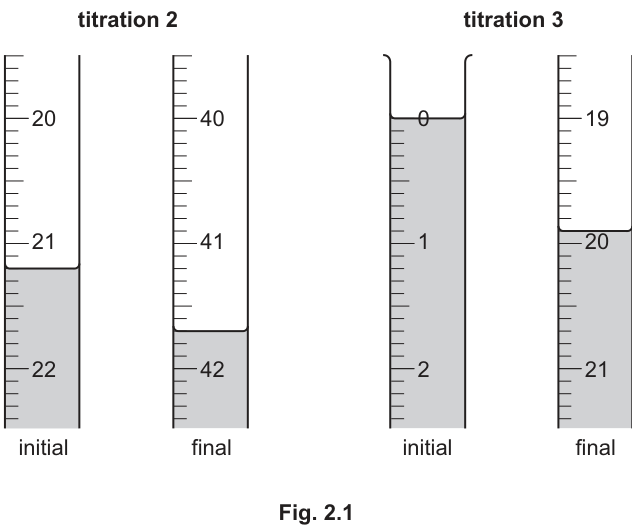
Record the burette readings in Table 2.1.
Complete Table 2.1.
Table 2.1
| titration number 1 | titration number 2 | titration number 3 | titration number 4 | |
|---|---|---|---|---|
| final burette reading / | 21.1 | 40.4 | ||
| initial burette reading / | 0.2 | 20.3 | ||
| volume of used / | 20.9 | |||
| best titration results (✓) |
Answer
| titration number 1 | titration number 2 | titration number 3 | titration number 4 | |
|---|---|---|---|---|
| final burette reading / cm³ | 21.1 | 42.1 | 20.8 | 40.4 |
| initial burette reading / cm³ | 0.2 | 21.3 | 0.0 | 20.3 |
| volume of HCl(aq) used / cm³ | 20.9 | 20.8 | 20.8 | 20.1 |
| best titration results (✓) |
All readings and calculated volumes are given to 1 decimal place. The initial reading for titration 3 is written as 0.0 to show the required precision.
Titration 2: initial 21.3, final 42.1, volume 20.8; Titration 3: initial 0.0, final 20.8, volume 20.8; Titration 4: volume 20.1
Walkthrough
The student must read the burette scales in Fig. 2.1 and fill in the missing values for titrations 2 and 3, then calculate the volume used for all four titrations.
- Read titration 2: The initial meniscus is at 21.3 cm³ and the final meniscus is at 42.1 cm³. The volume used is cm³.
- Read titration 3: The initial meniscus is exactly at the 0 mark. To maintain 1 decimal place precision, this is recorded as 0.0 cm³. The final meniscus is at 20.8 cm³. The volume used is cm³.
- Calculate titration 4 volume: The final reading is 40.4 cm³ and the initial is 20.3 cm³. The volume used is cm³.
All values must be recorded to 1 decimal place, including writing 0.0 instead of 0 to show the precision of the instrument.
Key Takeaways
- Burette readings are always taken to 1 decimal place.
- The volume of titrant used is always final reading minus initial reading.
- Leading zeros must be written (e.g., 0.0) to indicate the correct precision.
Common Mistakes
- Recording the initial reading for titration 3 as simply "0" instead of "0.0". The mark scheme requires all readings to 1 decimal place.
- Subtracting the initial from the final incorrectly, or misreading the meniscus level.
- Forgetting to write the unit in the table header (though the unit is already provided in the table structure here).
Things to Be Careful About
- Always read the bottom of the meniscus at eye level.
- Ensure all calculated volumes and recorded readings have exactly 1 decimal place.
- Titrations 2 and 3 give identical results (20.8 cm³), which will be important for the next part.
Answer
| titration number 1 | titration number 2 | titration number 3 | titration number 4 | |
|---|---|---|---|---|
| final burette reading / cm³ | 21.1 | 42.1 | 20.8 | 40.4 |
| initial burette reading / cm³ | 0.2 | 21.3 | 0.0 | 20.3 |
| volume of HCl(aq) used / cm³ | 20.9 | 20.8 | 20.8 | 20.1 |
| best titration results (✓) | ✓ | ✓ |
Titrations 2 and 3 give the same volume (20.8 cm³) and are therefore the best results. Titration 1 (20.9 cm³) and titration 4 (20.1 cm³) are further away and are not used.
Tick titration 2 and titration 3
Walkthrough
The student must identify the two best (concordant) titration results from the completed table.
- List the volumes used: Titration 1 = 20.9 cm³, Titration 2 = 20.8 cm³, Titration 3 = 20.8 cm³, Titration 4 = 20.1 cm³.
- Find concordant values: Concordant results are typically within 0.10 cm³ of each other. Here, titrations 2 and 3 are identical at 20.8 cm³.
- Tick the best results: Place a tick (✓) next to the volume for titration 2 and titration 3.
Titration 4 (20.1 cm³) is an anomalous result, likely due to a missed drop or over-titration. Titration 1 (20.9 cm³) is close but not as good as the identical pair.
Key Takeaways
- Best titration results are those that are concordant (usually within 0.10 cm³ of each other).
- Anomalous results should be identified and excluded from average calculations.
- Only concordant results are used to calculate the average volume for subsequent calculations.
Common Mistakes
- Ticking titration 1 and 2 because they are close, ignoring that 2 and 3 are identical.
- Failing to recognise that identical results are the best possible concordance.
Things to Be Careful About
- Ensure the ticks are placed in the correct row (usually the volume row or the best results row as specified). Here, the row is explicitly labeled "best titration results (✓)".
Use the ticked (✓) titration results in Table 2.1 to calculate the average volume of needed to neutralise of the aqueous sodium carbonate.
volume = ______
Answer
volume = 20.8 cm³
20.8
Walkthrough
The student must calculate the average volume of HCl(aq) using only the ticked (best) titration results.
- Identify ticked values: From part (b), the best results are 20.8 cm³ (titration 2) and 20.8 cm³ (titration 3).
- Calculate the average: Add the two values and divide by 2.
Since both values are identical, the average is simply 20.8 cm³.
Key Takeaways
- Always use concordant results (ticked values) for the average, not all results.
- The average volume is used in all subsequent mole calculations for this titration.
Common Mistakes
- Including the anomalous result (20.1 cm³) in the average calculation.
- Including titration 1 (20.9 cm³) in the average.
Things to Be Careful About
- The average volume must be used exactly as calculated in parts (d) and (e). Do not round prematurely.
Use your answer from (c) to calculate the number of moles of in the average volume of needed to neutralise of the aqueous sodium carbonate.
number of moles = ______
Working
Answer
number of moles = 0.0104
0.0104
Walkthrough
The student must calculate the number of moles of HCl in the average volume calculated in part (c).
- Identify given values: Concentration of HCl = 0.500 mol/dm³. Average volume = 20.8 cm³.
- Convert volume to dm³: Since concentration is in mol/dm³, volume must be in dm³.
- Calculate moles: Use the equation .
Alternatively, calculate directly: .
Key Takeaways
- Always convert volume from cm³ to dm³ by dividing by 1000 when using concentration in mol/dm³.
- The mole equation is fundamental to titration calculations.
Common Mistakes
- Forgetting to divide the volume by 1000, leading to an answer 1000 times too large (e.g., 10.4 mol).
- Using the wrong volume (e.g., using 25.0 cm³ instead of the average HCl volume).
Things to Be Careful About
- Keep intermediate values unrounded to avoid rounding errors in subsequent calculations. 0.0104 is exact here.
The equation for the reaction between hydrochloric acid and sodium carbonate is:
Use your answer from (d) to calculate the concentration of the aqueous sodium carbonate.
Give your answer to three significant figures.
concentration = ______
Working
The balanced equation is:
The mole ratio of HCl to Na₂CO₃ is 2 : 1.
Step 1: Calculate moles of Na₂CO₃
Step 2: Calculate concentration of Na₂CO₃
Volume of Na₂CO₃ = 25.0 cm³ = dm³ = 0.0250 dm³
Answer
concentration = 0.208 mol / dm³
0.208
Walkthrough
The student must use the mole ratio from the balanced equation to find the moles of sodium carbonate, then calculate its concentration.
- Identify mole ratio: From the equation , 2 moles of HCl react with 1 mole of Na₂CO₃. The ratio is 2:1.
- Calculate moles of Na₂CO₃: Since HCl is the limiting reactant in the titration (we are neutralising a fixed amount of Na₂CO₃), we use the moles of HCl calculated in part (d).
- Calculate concentration: The volume of Na₂CO₃ solution is 25.0 cm³. Convert this to dm³:
The answer 0.208 is already to 3 significant figures.
Key Takeaways
- Always use the stoichiometric ratio from the balanced equation to relate moles of reactants.
- Concentration can be found by (with V in dm³) or .
Common Mistakes
- Using a 1:1 mole ratio instead of the correct 2:1 ratio from the equation.
- Forgetting to convert the volume of Na₂CO₃ (25.0 cm³) to dm³ before calculating concentration.
- Rounding too early, which can affect the final 3 s.f. answer.
Things to Be Careful About
- The question asks for the answer to 3 significant figures. 0.208 has 3 s.f., so no further rounding is needed.
- Ensure state symbols are not required in the final concentration answer (only the number and unit).
The student is provided with of the aqueous sodium carbonate.
Use your answer to (e) to calculate the mass of in of this solution.
[: C, 12; O, 16; Na, 23]
mass = ______
Working
Step 1: Calculate of Na₂CO₃
Step 2: Calculate moles of Na₂CO₃ in 150 cm³
Concentration = 0.208 mol/dm³ (from part e)
Volume = 150 cm³ = dm³ = 0.150 dm³
Step 3: Calculate mass
Rounding to 3 significant figures (consistent with the concentration): 3.31 g.
Answer
mass = 3.31
3.31
Walkthrough
The student must calculate the mass of Na₂CO₃ dissolved in 150 cm³ of the solution prepared in part (e).
-
Calculate of Na₂CO₃:
-
Calculate moles in 150 cm³:
Using the concentration from part (e), 0.208 mol/dm³: -
Calculate mass:
Rounding to 3 significant figures gives 3.31 g.
Key Takeaways
- Mass can be found using .
- When scaling up from a titration volume (25 cm³) to a larger volume (150 cm³), recalculate the moles using the new volume and the concentration found.
Common Mistakes
- Using the wrong (e.g., forgetting to multiply Na and O by their subscripts).
- Forgetting to convert 150 cm³ to dm³ before multiplying by concentration.
- Not rounding the final answer to an appropriate number of significant figures (3 s.f. is standard here).
Things to Be Careful About
- The values are given: C = 12, O = 16, Na = 23. Use these exactly.
- 3.3072 g rounded to 3 s.f. is 3.31 g. If the question does not specify s.f., 3.31 is appropriate given the input data precision.
Answer
The conical flask is swirled to mix the contents (or to ensure the reactants are well mixed / to ensure the reaction goes to completion).
This ensures that the acid and sodium carbonate react fully and evenly, giving an accurate end-point.
to mix the contents / to ensure the reaction
Walkthrough
The student is asked to state the purpose of swirling the conical flask during a titration.
- Purpose: Swirling ensures that the titrant (HCl) added from the burette is immediately mixed with the analyte (Na₂CO₃) in the flask.
- Why it matters: Without swirling, the acid could locally exceed the end-point before mixing, leading to an inaccurate volume reading. Swirling ensures the reaction proceeds evenly and the indicator changes colour uniformly when the end-point is truly reached.
Key Takeaways
- Swirling is a standard technique in titrations to ensure homogeneity of the reaction mixture.
- It prevents localised excess of titrant.
Common Mistakes
- Saying "to heat the solution" (swirling does not significantly heat it).
- Saying "to dissolve the sodium carbonate" (it is already in solution).
Things to Be Careful About
- Keep the answer concise. "To mix the contents" or "to ensure the reaction" is sufficient for 1 mark.
Answer
The HCl(aq) is added drop by drop near the end-point to ensure the end-point is not exceeded (or to make the volume reading more accurate / to avoid overshooting the end-point).
This allows the student to stop the titration as soon as the indicator changes colour, giving a precise titre.
to ensure the end-point is not exceeded / to make the volume accurate
Walkthrough
The student is asked to state why the titrant is added drop by drop near the end-point.
- Purpose: Near the end-point, a single drop of titrant can cause the indicator to change colour. If the titrant is added too quickly (e.g., in a stream), the student may add too much acid, overshooting the end-point.
- Why it matters: Overshooting leads to a larger volume being recorded than is actually needed to neutralise the analyte, resulting in an inaccurate (too high) titre. Adding drop by drop allows for precise control and an accurate end-point determination.
Key Takeaways
- Adding titrant dropwise near the end-point is crucial for accuracy in titrations.
- It prevents overshooting the end-point.
Common Mistakes
- Saying "to slow down the reaction" (the reaction is already fast; it's about control).
- Saying "to save reagent" (not the primary scientific reason).
Things to Be Careful About
- The answer must focus on accuracy and not exceeding the end-point. "To ensure the end-point is not exceeded" is the standard mark scheme wording.
A student investigates solution P and solution Q.
Solution P is colourless and contains sodium ions.
Describe how to do a flame test on solution P to confirm the identity of this cation.
______
Answer
- Dip a clean nichrome wire into solution P.
- Place the wire in a blue / roaring / non-luminous Bunsen flame.
- Observe the flame colour: it turns yellow.
Dip a wire into solution P, place it in a blue non-luminous Bunsen flame and observe a yellow flame.
Walkthrough
The flame test is used to identify metal cations by the colour they give to a flame. Sodium ions give a strong yellow flame. Dip a clean wire into solution P so that some solution is carried on the wire, then hold the wire in the blue, non-luminous part of a Bunsen flame. Observe the colour of the flame: yellow confirms sodium ions.
Key Takeaways
- Flame test procedure: clean wire, dip in sample, place in blue flame, observe colour.
- Sodium gives a yellow flame.
Common Mistakes
- Using a luminous/yellow Bunsen flame, which masks the yellow flame colour.
- Forgetting to state the colour observed.
- Missing one of the three steps, such as placing the wire in the flame.
Things to Be Careful About
- The mark scheme awards separate marks for dipping the wire, using a blue/roaring/non-luminous flame, and observing the yellow flame.
- The answer should say yellow, not just coloured flame.
Solution P contains an anion composed of nitrogen and oxygen.
Describe a test to identify the anion in solution P.
test = ______
observations = ______
identity of anion = ______
Answer
test: add aqueous sodium hydroxide and aluminium, then warm the mixture.
observations: effervescence; the gas given off turns damp red litmus paper blue.
identity of anion: nitrate, NO₃⁻.
Nitrate, NO₃⁻
Walkthrough
The anion contains nitrogen and oxygen, so it is likely nitrate, NO₃⁻. The test for nitrate is to reduce it to ammonia using aluminium and warm sodium hydroxide. Add aqueous sodium hydroxide and aluminium to solution P and warm the mixture. If nitrate is present, ammonia gas is produced. Ammonia is an alkaline gas, so it turns damp red litmus paper blue. This confirms the anion is nitrate.
Key Takeaways
- Nitrate ions are identified by adding sodium hydroxide and aluminium, then warming.
- Ammonia gas turns damp red litmus paper blue.
Common Mistakes
- Missing the warming step; the reaction needs heat.
- Using blue litmus paper; ammonia turns red litmus blue, not the other way round.
- Stating the gas is hydrogen or oxygen instead of ammonia.
- Forgetting to name the anion as nitrate.
Things to Be Careful About
- The mark scheme gives separate marks for sodium hydroxide, aluminium, warming, gas turning damp red litmus blue, ammonia, and nitrate.
- The observation must mention damp red litmus paper turning blue.
- The anion is nitrate, NO₃⁻, not nitrite.
The tests the student does on solution Q are shown in Table 3.1.
Some of the observations for these tests are also shown.
Table 3.1
| tests on solution Q | observations | |
|---|---|---|
| 1 | Add drops of aqueous ammonia to solution Q until a change is seen. Then add excess aqueous ammonia. | green precipitate insoluble in excess |
| 2 | Add drops of aqueous sodium hydroxide to solution Q until a change is seen. Then add excess aqueous sodium hydroxide. | green precipitate soluble in excess, giving a green solution |
| 3 | Add aqueous silver nitrate to solution Q. | white precipitate |
| 4 | Add dilute nitric acid to solution Q. Then add aqueous barium nitrate. |
Answer
chromium(III), Cr³⁺
chromium(III), Cr³⁺
Walkthrough
From tests 1 and 2 in Table 3.1, solution Q gives a green precipitate with both aqueous ammonia and aqueous sodium hydroxide. The precipitate is insoluble in excess ammonia but soluble in excess sodium hydroxide, giving a green solution. This combination is characteristic of chromium(III) ions. Iron(II) also gives a green precipitate with sodium hydroxide, but its hydroxide is insoluble in excess sodium hydroxide, so the solubility in excess NaOH identifies chromium(III).
Key Takeaways
- Chromium(III) hydroxide is green.
- It is insoluble in excess ammonia but soluble in excess sodium hydroxide.
- The behaviour in excess reagent is used to distinguish cations.
Common Mistakes
- Identifying iron(II) because the precipitate is green; Fe(OH)₂ is insoluble in excess NaOH.
- Identifying copper(II), which gives a blue precipitate.
- Forgetting the charge on the ion.
Things to Be Careful About
- The answer should be chromium(III) or Cr³⁺.
- The key clue is soluble in excess sodium hydroxide but insoluble in excess ammonia.
Test 3 is incomplete.
Describe what else must be done in test 3 to ensure that the white precipitate observed leads to a valid conclusion about the anion in solution Q.
______
Answer
Add dilute nitric acid (before adding the silver nitrate).
Add dilute nitric acid.
Walkthrough
Test 3 uses aqueous silver nitrate to test for halide ions. A white precipitate with silver nitrate suggests chloride, but carbonate ions also give a white precipitate with silver nitrate, so the test would not be valid unless carbonates are removed first. Adding dilute nitric acid before the silver nitrate removes carbonate and sulfite ions. The acid must be nitric acid, not hydrochloric acid, because hydrochloric acid would introduce chloride ions and give a false positive.
Key Takeaways
- The standard test for halides uses dilute nitric acid followed by aqueous silver nitrate.
- Acidification removes carbonate ions that would otherwise give a false white precipitate.
Common Mistakes
- Adding silver nitrate before the acid.
- Using hydrochloric acid instead of nitric acid.
- Not stating dilute nitric acid specifically.
Things to Be Careful About
- The mark scheme accepts add dilute nitric acid.
- The acid is added before the silver nitrate.
The student completes test 3 correctly. The observation remains the same.
Identify an anion in solution Q.
______
Answer
chloride, Cl⁻
chloride, Cl⁻
Walkthrough
After the solution has been acidified with dilute nitric acid, aqueous silver nitrate is added. A white precipitate indicates chloride ions, because silver chloride is white. Silver bromide is cream and silver iodide is yellow. Since the observation remains a white precipitate, the anion in solution Q is chloride.
Key Takeaways
- White precipitate with acidified silver nitrate = chloride.
- Silver bromide is cream; silver iodide is yellow.
Common Mistakes
- Saying bromide or iodide because they also precipitate with silver nitrate.
- Forgetting to give the ion symbol.
Things to Be Careful About
- The answer should be chloride or Cl⁻.
- The precipitate is white, not cream or yellow.
The ion identified in (iii) is the only anion in solution Q.
Describe the expected observation from test 4.
______
Answer
No (observable) change / no precipitate.
No precipitate / no observable change.
Walkthrough
Barium nitrate is used to test for sulfate ions: a white precipitate of barium sulfate forms if sulfate is present. In test 4, dilute nitric acid is added first to remove carbonate and sulfite ions, then aqueous barium nitrate is added. Since the only anion in solution Q is chloride, there is no sulfate, sulfite or carbonate present, so no precipitate forms. The expected observation is no observable change.
Key Takeaways
- Barium nitrate gives a white precipitate with sulfate ions.
- If no sulfate is present, there is no precipitate.
Common Mistakes
- Predicting a white precipitate, which would mean sulfate is present.
- Predicting effervescence, which would mean carbonate is present.
- Forgetting that only chloride is present.
Things to Be Careful About
- The mark scheme accepts no observable change or no precipitate.
- The word only anion is important: it rules out sulfate, sulfite and carbonate.
Solution Q is acidic.
Describe the observation when solution Q is added to sodium carbonate.
______
Answer
effervescence / fizzing / bubbling
Effervescence / fizzing / bubbling.
Walkthrough
Acidic solutions react with carbonates to produce carbon dioxide gas. When solution Q, which is acidic, is added to sodium carbonate, carbon dioxide is released, so the mixture effervesces, fizzes or bubbles. The question only asks for the observation, not for the name of the gas.
Key Takeaways
- Acid + carbonate → salt + water + carbon dioxide.
- The visible observation is effervescence.
Common Mistakes
- Saying carbon dioxide is produced instead of giving the observation.
- Saying the solution turns milky; that is the limewater test, not the direct observation.
- Saying a precipitate forms.
Things to Be Careful About
- Effervescence, fizzing and bubbling are all accepted.
- Do not need to identify the gas unless asked.
Muntz metal is an alloy that contains zinc and copper.
Zinc reacts with dilute sulfuric acid. Copper does not react with dilute sulfuric acid.
Plan an investigation to find the percentage by mass of zinc in a powdered sample of Muntz metal which contains only zinc and copper.
Your plan must include the use of common laboratory apparatus, Muntz metal and dilute sulfuric acid. No other chemicals should be used.
Your plan must include:
- the apparatus needed
- the method to use and the measurements to take
- procedures to ensure that the percentage determined is as accurate as possible
- how the measurements are used to determine the percentage by mass of zinc in the sample of Muntz metal.
You may draw a diagram to help answer the question.
Answer
Apparatus
- beaker, conical flask or similar reaction vessel
- balance
- filter funnel and filter paper
- glass rod
- drying oven, or paper and a warm dry place, with tongs
- spatula
Method and measurements
- Weigh a fixed mass of powdered Muntz metal, for example 1.00 g, and record this mass. Also weigh a dry filter paper and record its mass.
- Put the Muntz metal in the beaker and add excess dilute sulfuric acid.
- Stir with a glass rod and wait until the effervescence stops. Zinc reacts and gives hydrogen gas; copper does not react, so copper stays as a solid.
- Filter the mixture. All the copper from the sample is retained on the filter paper.
- Wash the copper residue and then dry it completely. Cool it and weigh the filter paper, twist them dry, and - weigh the dry filter paper alone.
- Subtract the mass of the filter paper to find the mass of copper.
To make the percentage as accurate as possible
- Use excess acid and leave the mixture until effervescence stops, so all the zinc has reacted.
- Wash the residue and confirm nothing remains on the filter paper; no powder is lost in transfer.
- Dry the copper completely and, after cooling, until constant mass, so no extra water is weighed.
- Repeat with fresh samples of Muntz metal and average the percentages.
Using the measurements
Mass of zinc = mass of Muntz metal − mass of copper, so
or
Both give the same result.
Plan the reaction and filtration of the alloy: percentage by mass of zinc = (mass of Muntz metal - mass of copper) / mass of Muntz metal × 100%
Walkthrough
This is a 6-mark planning question on the Alternative to Practical paper. It looks for the kind of method a real laboratory technician would follow, so the answer must have four areas: obtaining residue, apparatus, a sequence of measurements, steps to improve accuracy, and the formula that finally turns the measurements into an answer.
The zinc in the alloy reacts with dilute sulfuric acid: zinc metal + dilute sulfuric acid gives zinc sulfate solution and hydrogen gas. Copper is below hydrogen in the reactivity series, so copper does not react with dilute acid. That is the entire idea of the planning: the solid left after the acid has stopped fizzing is copper. The amount of zinc is therefore the mass lost by the original sample.
The apparatus list is simple: a beaker or conical flask, a balance, a filter funnel and filter paper, a glass rod, and a way of drying the solution/correctly. The balance is essential because the whole calculation is weight measurement.
For measurements of a fixed mass of the freshly delivered, that same mass of alloy is then added to the acid. When the bubbles stop, the zinc has all reacted. Filtering separates the powdered copper from the potassium sulfate solution. The copper is washed a little, dried, and weighed; the weight of the filter paper is subtracted. The mass of zinc is then mass of Muntz metal - mass of copper.
If the acid is not in excess, some zinc may remain unreacted, leaving more copper in the filter and making the zinc percentage too low. If the copper is not dried, water is added to its mass. That is why the mark scheme stresses excess acid, waiting for effervescence to stop, washing/drying, and repeating and averaging the whole procedure.
The calculation may then be done in either of the two equivalent forms:
The question says a diagram may be drawn. A labelled diagram of the apparatus (flask, filter funnel and paper, mass balance) could help, but it is not essential; the plan must contain the details listed above.
Key Takeaways
- The reactive metal in an alloy can be separated by using acid that reacts with only one ingredient.
- Filtration separates an insoluble solid (copper) from a solution, so the lost insoluble copper can be recovered and weighed.
- Mass measurements need careful transfer, washing and drying to make the final percent trustworthy.
- Repeats and averages are expected in any good quantitative procedure.
- The percentage is simply zinc mass divided by original metal mass, written as a percentage, not a fraction.
Common Mistakes
- do NOT weigh the copper with the filter paper and forget to subtract the filter paper mass.
- do NOT stop the acid before bubbling has stopped, otherwise some zinc is still unreacted and the final mass difference is too small.
- do NOT give a percentage formula that is just mass of copper / mass of alloy × 100%, which is the percentage of copper, not zinc.
- do NOT use a pure copper known method is not intended.
- do NOT state that copper disappears; the acid only dissolves zinc, not copper.
- Do not leave out whole sections of the plan: missing one of the four list items loses a mark directly.
Things to Be Careful About
- Use the same mass units for sample, copper, and zinc, e.g. all in grams.
- Apply the correct equation: mass of zinc = mass of alloy - mass of copper.
- In the calculator, the phrase "mass of copper / mass of alloy × 100" gives % copper; the question is % zinc, so subtract from the equation reservoir 0.0 % or use the subtraction on the numerator.
- Cooling the dried filter paper before weighing prevents hot convection currents/massive errors on an ordinary balance.
- Make sure the sulfuric acid is genuinely in excess, and give a check such as “wait until effervescence stops”, because this gives evidence that all zinc has reacted.
- dry to constant mass means repeated drying and weighing gives the same reading; this is an accepted precision check in Cambridge O Level practical answers.
- If you draw a filtration set-up, label the funnel, filter paper and receiver, and label the copper as the residue.