Chemistry 5070/41 — October/November 2024
Cambridge O-Level · Alternative to Practical · worked solutions for every part, with the mark scheme
Topics Experimental Contexts · Use of Techniques, Apparatus and Materials · Analysis, Conclusions and Evaluation · Observations and Measurements · Qualitative Analysis · Planning Experiments and Investigations
A teacher investigates the electrolysis of molten lead(II) bromide.
Lead(II) bromide is a solid at room temperature.
Fig. 1.1 shows the apparatus the teacher uses.
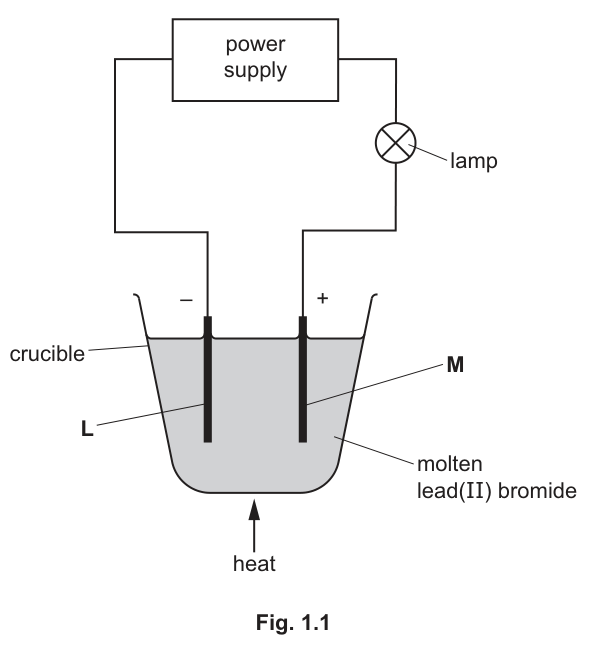
Name the pieces of apparatus labelled L and M.
Suggest the material from which L and M are made.
name ______
material ______
Answer
L is the cathode (connected to the negative terminal).
M is the anode (connected to the positive terminal).
Material: carbon (or graphite) or platinum.
Both electrodes must be inert so they do not react with the molten electrolyte or the products formed at them. Carbon/graphite is the most commonly used material in school experiments.
L = cathode, M = anode; material = carbon (graphite) or platinum
Walkthrough
The circuit diagram shows a power supply connected to two electrodes dipping into molten lead(II) bromide. The electrode connected to the negative terminal is the cathode (L), and the electrode connected to the positive terminal is the anode (M). This is a standard convention in electrolysis: cathode = negative, anode = positive.
The electrodes must be made of an inert material — one that will not react with the electrolyte or the products. The mark scheme accepts carbon (also called graphite) or platinum. Carbon is the most common choice in school laboratories because it is cheap and conducts electricity well. Platinum is inert but expensive.
Key Takeaways
- In electrolysis, the cathode is the negative electrode and the anode is the positive electrode.
- Electrodes for electrolysis must be inert — they do not participate in the reaction. Carbon/graphite and platinum are the standard inert electrode materials.
Common Mistakes
- Confusing which electrode is which: remember cathode = negative (both start with 'c' and 'n' — no, that doesn't help; just remember: cathode attracts positive ions, so it must be negative).
- Suggesting a reactive metal like copper or iron as the electrode material — these would react with the electrolyte or products and would not give the correct results.
- Not naming the electrodes at all and just describing them.
Things to Be Careful About
- The question asks for the name of the apparatus (cathode/anode) and the material they are made from — two separate pieces of information.
- Carbon and graphite are acceptable alternatives; they are the same material (graphite is a form of carbon).
- Platinum is also acceptable but less commonly used in school labs.
Describe the appearance of the products at L and at M.
appearance of product at L ______
appearance of product at M ______
Answer
Appearance of product at L (cathode, negative electrode):
A shiny, silver-grey (or dark grey/black) solid or liquid deposit of lead metal. Since the electrolyte is molten and hot, the lead produced may appear as a silvery liquid or a grey solid on cooling.
Appearance of product at M (anode, positive electrode):
An orange-brown vapour (or gas) of bromine.
At the cathode: (lead metal is deposited).
At the anode: (bromine gas is released).
At L: shiny silver/grey solid or liquid (lead); at M: orange-brown vapour (bromine)
Walkthrough
Molten lead(II) bromide, , contains two types of ions: positive lead(II) ions () and negative bromide ions ().
At the cathode (L, negative electrode):
Positive ions are attracted to the negative cathode. The ions gain electrons (reduction) to form lead metal:
Lead is a dense, silvery-grey metal. At the high temperature of the molten electrolyte (melting point of is about 373 °C), the lead produced may initially appear as a silvery liquid, but it quickly cools to a grey/silver solid deposit on the electrode.
At the anode (M, positive electrode):
Negative ions are attracted to the positive anode. The ions lose electrons (oxidation) to form bromine molecules:
Bromine is a halogen that exists as a reddish-brown/orange-brown vapour at room temperature. At the elevated temperature of the experiment, it is released as an orange-brown gas/vapour above the molten electrolyte.
Key Takeaways
- In electrolysis of a binary ionic compound, the metal is produced at the cathode and the non-metal (halogen) at the anode.
- Lead metal appears as a shiny silver/grey solid or liquid; bromine appears as an orange-brown vapour.
- The half-equations show reduction at the cathode (gain of electrons) and oxidation at the anode (loss of electrons).
Common Mistakes
- Saying lead is produced at the anode or bromine at the cathode — the metal always goes to the cathode, the non-metal to the anode.
- Describing bromine as a liquid — at the temperature of this experiment, bromine is a gas/vapour.
- Not mentioning the colour: lead is silver/grey and bromine is orange/brown — these are the key observable features.
- Writing the full equation instead of describing the appearance — the question asks for the appearance, not the equation.
Things to Be Careful About
- The question asks for the appearance of the products, not the chemical names (though naming them helps). Focus on colour and state: shiny silver/grey solid/liquid at L, orange-brown vapour at M.
- Lead(II) bromide melts at about 373 °C. At this temperature, lead (melting point 327 °C) may actually be liquid, so both "solid" and "liquid" are acceptable descriptions for the lead deposit.
- Bromine vapour is toxic — in a real experiment, this would be done in a fume cupboard, but the question does not ask about safety.
The teacher stops heating and allows the lead(II) bromide to cool.
Explain why the lamp goes out.
______
Answer
When the teacher stops heating, the molten lead(II) bromide solidifies (cools to become a solid). In the solid state, the and ions are fixed in a rigid lattice and cannot move. Since electrical conduction in an ionic compound requires mobile ions to carry the charge through the substance, no current can flow through the solid lead(II) bromide. With no current flowing in the circuit, the lamp goes out.
In summary:
- Heating stops → molten solidifies.
- Solid ionic compound → ions are fixed in place, not free to move.
- No mobile ions → no electrical conductivity → no current → lamp goes out.
The molten lead(II) bromide solidifies on cooling; ions are fixed in the lattice and cannot move, so current cannot flow and the lamp goes out.
Walkthrough
This question tests the understanding of why ionic compounds conduct electricity only when molten or dissolved, not when solid.
Step 1: What happens when heating stops?
The molten lead(II) bromide cools down and solidifies. Lead(II) bromide has a melting point of about 373 °C. Once the temperature drops below this, the substance becomes a solid.
Step 2: What is different about the solid state?
In the molten (liquid) state, the ions ( and ) are free to move around. This mobility allows them to carry electric charge through the electrolyte, completing the circuit and allowing current to flow — which is why the lamp was lit.
In the solid state, the ions are held in a fixed, rigid ionic lattice. They can vibrate about their positions but cannot move freely from one place to another. Without mobile charge carriers, the solid cannot conduct electricity.
Step 3: What is the consequence for the circuit?
With no conductivity through the electrolyte, the circuit is effectively broken. No electric current can flow, so the lamp goes out.
This is the key principle: ionic compounds conduct electricity only when the ions are free to move — i.e., in the molten state or in aqueous solution. In the solid state, they are insulators.
Key Takeaways
- Ionic compounds conduct electricity only when molten or dissolved because the ions must be mobile to carry charge.
- In the solid state, ions are fixed in a lattice and cannot move, so no current flows.
- The lamp going out is direct evidence that the circuit has been broken by the loss of conductivity.
Common Mistakes
- Saying "the electricity stops" without explaining why — must mention solidification and/or ions being fixed/cannot move.
- Saying "ions are not present" in the solid — ions ARE present in solid lead(II) bromide, they just cannot move.
- Saying "the power supply turns off" — the power supply is still on; the issue is the electrolyte stopping conduction.
- Not mentioning that the compound solidifies — this is the trigger event that leads to the loss of conductivity.
- Saying "electrons cannot flow" — in ionic conduction, it is ions that move, not electrons. Electrons flow in the external wires, but through the electrolyte it is ions carrying the charge.
Things to Be Careful About
- The mark scheme awards two marks: one for stating the compound solidifies (M1), and one for explaining that current cannot flow because ions cannot move (M2). Both points are needed for full marks.
- Use precise language: say "ions are fixed in a lattice and cannot move" rather than "ions stop moving" or "no ions."
- This is a classic 5070 question linking the state of an ionic compound to its electrical conductivity. The same principle applies to aqueous solutions: solid NaCl does not conduct, but dissolved NaCl does.
A student titrates four samples of aqueous sodium hydroxide, , with aqueous ethanedioic acid.
In titration 1 the student:
- rinses and fills a burette with aqueous ethanedioic acid
- uses a volumetric pipette to add of to a conical flask
- adds thymolphthalein indicator to the conical flask
- places the conical flask on a white tile
- adds aqueous ethanedioic acid from the burette while swirling the flask, adding drop by drop near the end-point, until the solution just changes colour.
The student repeats the titration three more times.
Fig. 2.1 shows the burette readings for two of the titrations.
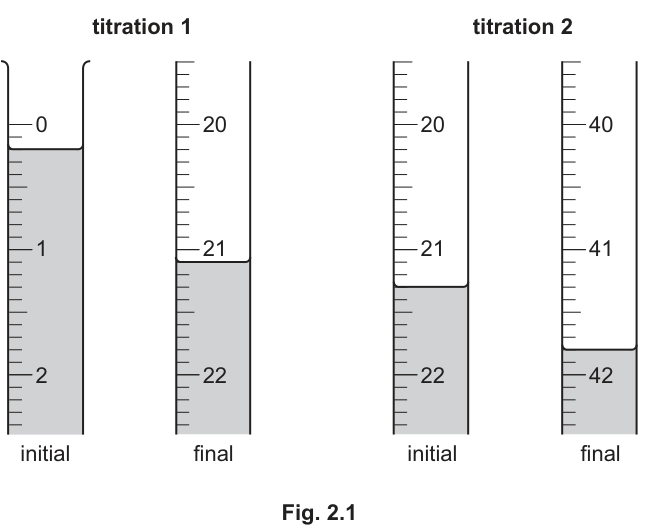
Record the burette readings in Table 2.1.
Complete Table 2.1.
Table 2.1
| titration number | ||||
|---|---|---|---|---|
| 1 | 2 | 3 | 4 | |
| final burette reading / | 20.1 | 40.4 | ||
| initial burette reading / | 20.5 | |||
| volume of ethanedioic acid added / | 20.1 | |||
| best titration results (✓) |
Answer
| titration number | ||||
|---|---|---|---|---|
| 1 | 2 | 3 | 4 | |
| final burette reading / | 21.1 | 41.8 | 20.1 | 40.4 |
| initial burette reading / | 0.2 | 21.4 | 0.0 | 20.5 |
| volume of ethanedioic acid added / | 20.9 | 20.4 | 20.1 | 19.9 |
| best titration results (✓) |
Titration 1: final = 21.1, initial = 0.2, volume = 20.9; Titration 2: final = 41.8, initial = 21.4, volume = 20.4; Titration 3: initial = 0.0; Titration 4: volume = 19.9
Walkthrough
To complete Table 2.1 from the burette diagrams in Fig. 2.1:
- Titration 1:
- Initial reading: The bottom of the meniscus is at .
- Final reading: The bottom of the meniscus is at .
- Volume added = .
- Titration 2:
- Initial reading: The bottom of the meniscus is at .
- Final reading: The bottom of the meniscus is at .
- Volume added = .
- Titration 3:
- Final reading is and volume added is , so initial reading = .
- Titration 4:
- Final reading is and initial reading is .
- Volume added = .
All readings must be recorded to one decimal place, including trailing zeros like .
Key Takeaways
- Burette scales increase downwards.
- Always read from the bottom of the meniscus.
- All burette readings must be recorded to a consistent precision of one decimal place (e.g. , not just ).
Common Mistakes
- Reading the scale upwards (e.g. reading as ).
- Writing whole numbers without a decimal place (e.g. writing instead of ).
- Incorrect subtraction when calculating the titre.
Things to Be Careful About
- Ensure every numerical entry in the burette table has exactly 1 decimal place.
Answer
Ticks placed in the columns for titration 3 and titration 4.
Titrations 3 and 4 ticked
Walkthrough
The four titre values obtained are:
- Titration 1:
- Titration 2:
- Titration 3:
- Titration 4:
To find the two best results, identify the two titres closest in value (concordant):
- Difference between Titration 3 and Titration 4 = .
- This is the smallest difference between any pair of titrations, so Titration 3 and Titration 4 are ticked.
Key Takeaways
- The best titration results are those that are concordant (closest together, typically within ).
Common Mistakes
- Ticking the first and second titrations by default without checking numerical proximity.
- Ticking more or fewer than two values when asked for two.
Things to Be Careful About
- Follow error carried forward (ecf) from the calculated volumes in part (a).
Use the ticked (✓) titration results in Table 2.1 to calculate the average volume of aqueous ethanedioic acid needed to neutralise of the aqueous sodium hydroxide.
volume = ______
Working
Answer
20.0
20.0
Walkthrough
Using the two ticked values from part (b):
- Titration 3:
- Titration 4:
Calculate the mean:
Key Takeaways
- Only concordant (ticked) titres are averaged; anomalous or rough titres are excluded.
Common Mistakes
- Averaging all four titrations instead of only the ticked ones.
- Truncating to .
Things to Be Careful About
- Retain the appropriate number of decimal places matching the precision of the data.
Working
Answer
0.02
0.02
Walkthrough
To find the number of moles of :
Key Takeaways
- Volume in must be converted to by dividing by .
Common Mistakes
- Forgetting to convert to (giving ).
Things to Be Careful About
- Ensure correct arithmetic with powers of 10.
One mole of ethanedioic acid is neutralised by two moles of sodium hydroxide.
Use your answers to (c) and (d) to calculate the concentration, in , of ethanedioic acid.
Give your answer to three significant figures.
concentration = ______
Working
Moles of ethanedioic acid:
Concentration of ethanedioic acid:
Answer
0.500
0.500
Walkthrough
- Use the mole ratio from the question: of ethanedioic acid reacts with of .
- Calculate concentration:
- The question asks for three significant figures: write .
Key Takeaways
- .
- Always apply the stoichiometric ratio between acid and base.
- Trailing zeros are required when expressing a value to a specified number of significant figures.
Common Mistakes
- Forgetting to divide moles of by .
- Multiplying by instead of dividing.
- Writing instead of (losing the mark for 3 significant figures).
Things to Be Careful About
- Give the final answer to exactly 3 significant figures as instructed.
The formula of ethanedioic acid is .
of the aqueous ethanedioic acid contains of .
Use your answer from (e) to calculate the relative formula mass, , of .
= ______
Working
Concentration in :
Relative formula mass, :
Answer
126
126
Walkthrough
Method 1:
- Find the concentration of ethanedioic acid in :
- contains .
- Therefore, contains .
- Calculate using the molar concentration from part (e) ():
Alternative Method:
- Moles of acid in .
- .
Key Takeaways
- .
Common Mistakes
- Using directly with without adjusting for the volume ( vs ).
Things to Be Careful About
- Ensure the volume units for both mass and moles are aligned before calculating .
Use your answer from (f)(i) to deduce the value of in .
Give your answer to the nearest whole number.
[: H, 1; C, 12; O, 16]
= ______
Working
of anhydrous :
of :
Value of :
Answer
2
2
Walkthrough
- Calculate the relative formula mass of anhydrous ethanedioic acid, :
- The mass attributed to the water of crystallisation () is:
- Since :
Key Takeaways
- Hydrated formula mass equals the anhydrous formula mass plus .
Common Mistakes
- Incorrectly calculating the of (e.g. arithmetic errors in ).
- Forgetting to divide the difference by .
Things to Be Careful About
- Follow ecf from part (f)(i) if applicable.
State why the conical flask is placed on a white tile before aqueous ethanedioic acid is added from the burette.
______
Answer
To see the colour change more clearly.
To see the colour change more clearly
Walkthrough
A white tile provides a neutral, bright background beneath the conical flask so that subtle colour changes of the indicator at the end-point can be seen clearly and immediately.
Key Takeaways
- Placing a white tile under a titration flask improves visibility of the indicator's end-point colour change.
Common Mistakes
- Stating that it prevents spills or protects the bench (which is not the purpose of the white tile).
Things to Be Careful About
- Use clear wording such as 'to see the colour change more clearly / easily'.
Answer
A measuring cylinder is not accurate enough.
A measuring cylinder is not accurate enough
Walkthrough
A volumetric pipette delivers a fixed volume (such as ) with high accuracy and precision. A measuring cylinder has a much larger percentage error and is not accurate enough for quantitative volumetric analysis (titration).
Key Takeaways
- Volumetric pipettes are used in titrations because of their high accuracy and precision.
- Measuring cylinders are only suitable for approximate measurements.
Common Mistakes
- Saying a measuring cylinder cannot measure (it can, but not accurately enough).
Things to Be Careful About
- Mention that the measuring cylinder lacks sufficient accuracy or precision.
A student investigates solid Y and solution Z.
Solid Y is a white powder.
The tests the student does on Y are shown in Table 3.1.
Some of the observations for these tests are also shown.
Table 3.1
| tests on solid Y | observations | |
|---|---|---|
| 1 | Add excess dilute acid to Y in a boiling tube. The gas produced is tested using limewater. | colourless solution formed limewater becomes milky |
| 2 | Add dilute nitric acid to some of the solution from test 1. Then add aqueous barium nitrate. | white precipitate |
| 3 | Add aqueous sodium hydroxide drop by drop to some of the solution from test 1 until a change is seen. Then add excess aqueous sodium hydroxide. | white precipitate soluble in excess giving a colourless solution |
| 4 | Add aqueous ammonia drop by drop to some of the solution from test 1 until a change is seen. Then add excess aqueous ammonia. | white precipitate soluble in excess giving a colourless solution |
Describe how the gas is passed through limewater in test 1.
You may draw a labelled diagram to help answer the question.
______
Answer
Place a delivery tube under the surface of the limewater and connect the other end of the tube to the boiling tube where the gas is produced, so that the gas bubbles through the limewater.
Use a delivery tube/connecting tube so the gas from the boiling tube bubbles into the limewater.
Walkthrough
We need to show how the gas produced from solid Y and dilute acid reaches the limewater. The safest way is to fit a tube in the top of the boiling tube and put the other end under the surface of limewater. As gas forms, it goes along the tube and bubbles through the limewater.
Key Takeaways
The standard limewater test for carbon dioxide is only useful if the gas is actually passed through the limewater. A word like “bubbled” or “passed through” is the idea the mark scheme wants.
Common Mistakes
- Writing only “test with limewater” without saying how the gas reaches the limewater.
- Confusing “the gas is produced” with “the gas is collected”; the mark is about the test, not collecting the gas.
Things to Be Careful About
The question allows a labelled diagram, so a simple sketch of the boiling tube, delivery tube and test tube of limewater would also get the mark. A written description is equally acceptable.
Answer
- The white powder dissolves / disappears.
- There is effervescence / fizzing (bubbles of gas).
Solid dissolves/disappears; effervescence/fizzing.
Walkthrough
Solid Y reacts with excess dilute acid. A useful observation is that the solid does not stay at the bottom: it dissolves or disappears because the acid reacts with it. A second useful observation is bubbly or fizzing: this shows a gas is being produced. The table already gives “colourless solution formed”, so the student should not just repeat that as “other observation”.
Key Takeaways
Acid + carbonate gives a salt, water and carbon dioxide. Effervescence and the solid disappearing are the two observations that describe this for Test 1.
Common Mistakes
- Repeating “colourless solution formed”, which is already given in Table 3.1.
- Writing “the liquid bubbles” instead of “the solid effervesces”. The mark is for a clear observation: dissolving away and fizzing.
Things to Be Careful About
An observation should be what you see, not a chemical equation. Write “solid disappears”, not “the carbonate reacts”. The pH change would be a different piece of information, and the question asks explicitly for two observations.
Answer
carbon dioxide
carbon dioxide
Walkthrough
The limewater test is a known test. When carbon dioxide is bubbled through limewater, an insoluble white precipitate of calcium carbonate forms, so the limewater looks milky.
Key Takeaways
Limewater is aqueous calcium hydroxide; it counts CO2 by producing a milky white substance.
Common Mistakes
- Writing “carbon” or “oxygen” instead of carbon dioxide.
- Writing “coal gas” or “hydrogen”; hydrogen does not make limewater milky.
If is Universal About
Mention the exact name “carbon dioxide” — “CO2” is fine, but the mark scheme accepts “carbon dioxide”.
Answer
carbonate ()
carbonate
Walkthrough
The anion in Y is responsible for the gas seen in test 1. In Test 1 the gas turned limewater milky, so the gas is carbon dioxide. The only common anion that gives carbon dioxide when reacted with dilute acid is carbonate.
Key Takeaways
A white solid that gives CO2 with dilute acid is a carbonate. The anion in Y is non-metallic.
Common Mistakes
- Writing “oxide” or “sulfite”; these do not give the same test.
- Writing a full formula of Y instead of the anion name.
Things to Be Careful About
The question asks for the anion, not the whole compound. You could name the ion as “carbonate” by itself, with the formula .
Answer
dilute sulfuric acid
dilute sulfuric acid
Walkthrough
In test 2, nitric acid and aqueous barium nitrate are added. The anion brought into solution by the acid in test 1 is tested. A white precipitate with barium nitrate shows that the solution contains sulfate ions. That sulfate has to be supplied by the acid used in test 1, because test 1 showed that Y contains carbonate and not sulfate. Barium sulfate is white and insoluble, so the white precipitate confirms sulfate. Therefore the acid in Test 1 was dilute sulfuric acid.
Key Takeaways
Barium nitrate, in acidic solution, is a sulfate test: a white precipitate means sulfate. Here the sulfate comes from sulfuric acid.
Common Mistakes
- Writing “hydrochloric acid”; chloride with barium nitrate gives no white precipitate.
- Thinking the white precipitate comes from the carbonate; the carbonate would already have decomposed in Test 1.
Things to Be Careful
The acid was described only as “dilute acid” in Test 1. Test 2 identifies its anion. You cannot write “sulfate” in the acid answer — the acid must be named sulfuric acid.
Answer
zinc ion,
zinc ion, Zn2+
Walkthrough
The four tests give a usable pattern. A white precipitate with aqueous sodium hydroxide suggests the metal hydroxide formed is white. The key clue is that the precipitate dissolves in excess NaOH and also dissolves in excess ammonia. The common cation that forms a white hydroxide and redissolves in both excess alkali and excess ammonia is zinc, Zn2+.
Key Takeaways
A zinc salt produces a white hydroxide, but zinc salts are special because the hydroxide dissolves in excess aqueous sodium hydroxide and in excess aqueous ammonia. This fuller pattern identifies Zhion+.
Common Mistakes
Writing “aluminium”: aluminium hydroxide dissolves in excess NaOH but not in excess ammonia, and it tallies by the mark scheme for a different cation. Remember Y has Zn2+ because it dissolves in both.
Things to Be Careful
“Soluble in excess” is the decisive phrase for zinc. A white ppt alone is not enough; you must also say that it redissolves in excess NaOH and excess ammonia.
Solution Z is colourless.
Answer
A colourless solution cannot contain ions, because aqueous copper(II) ions are blue.
The solution is colourless, but Cu2+(aq) would give a blue solution.
Walkthrough
The student suggests Cu2+ in colourless Z. In aqueous solution, Cu2+ ions make the solution blue. Since Z is described as colourless, Z cannot contain Cu2+ ions.
Key Takeaways
Colour is often a quick clue in qualitative analysis: copper(II) ions in solution are blue; zinc, sodium, potassium etc. are usually colourless.
Common Mistakes
Saying “it could be copper but ...” without giving the blue colour evidence. The mark is for the colour of aqueous Cu2+.
Things to Be Careful
Use the fact “colourless” as the observation; do not try to show a test. The question is asking why the student is not correct, so the answer must include the colour contrast.
Solution Z contains ions.
Describe how to do a flame test on solution Z to confirm the identity of this cation.
______
Answer
- Dip a clean wire or wooden splint into solution Z.
- Place it in a blue (roaring, non-luminous) Bunsen flame.
- Observe the colour produced: a lilac/purple flame confirms K+ ions.
Dip wire/splint into Z, hold in a blue Bunsen flame, and observe lilac/purple flame colour.
Walkthrough
The flame test gives a specific colour to potassium. The candidate should dip a clean wire/splint into the solution so that some solution sticks to it, hold it in the blue flame of a Bunsen burner, then see the flame colour. The flame causes the potassium ions to give a lilac/purple colour.
Key Takeaways
K+ gives a lilac/purple flame in a flame test; sodium gives a yellow-orange flame, calcium orange-red, copper blue-green.
Common Mistakes
-Saying the test uses “sodium hydroxide”; the flame test is a different cation test.
- Forgetting to say the flame is blue/roaring, or forgetting to observe the flame colour.
Things to Be Careful About
The wire should be dipped into Z itself, not the dry solid, because Z is a solution. The mark scheme counts “observe colour” as one of the steps, so always write the flame colour lilac/purple as the conclusion.
Solution Z contains ions of a Group VII element.
Describe a test and the possible results to identify which Group VII ion is present in Z.
______
Answer
Add dilute nitric acid, then aqueous silver nitrate.
Possible results:
- white precipitate = chloride
- cream precipitate = bromide
- yellow precipitate = iodide
White precipitate = chloride, cream = bromide, yellow = iodide.
Walkthrough
Z contains a Group VII ion. The classic test is to add dilute nitric acid first, then aqueous silver nitrate. Silver ions react with halide ions to give insoluble precipitates. The colour of the precipitate tells you which halide is present: white is chloride, cream is bromide, yellow is iodide.
Key Takeaways
H+ with silver nitrate gives AgCl (white), AgBr (cream), AgI (yellow). The acid is added first so that carbonate or hydroxide impurities do not give the same silver precipitate.
Common Mistakes
-Writing “silver nitrate alone” without adding nitric acid.
- Confusing the colours: chloride = white, bromide = cream, iodide = yellow.
Things to Be Careful About
Use “silver nitrate”, not “barium nitrate”. The white precipitate with barium nitrate would be sulfate, but the question is about a halide, so use silver nitrate. For each possible result, mention the colour and the ion it identifies.
Argentan is an alloy containing only zinc, nickel and copper.
Zinc and nickel both react with dilute hydrochloric acid. Copper does not react with dilute hydrochloric acid.
Plan an investigation to find the percentage by mass of copper in a powdered sample of argentan.
Your plan must include the use of common laboratory apparatus, argentan and dilute hydrochloric acid. No other chemicals should be used.
Your plan must include:
- the apparatus needed
- the method to use and the measurements to take
- procedures to ensure that the percentage determined is as accurate as possible
- how the measurements are used to determine the percentage by mass of copper in the sample.
You may draw a diagram to help answer the question.
Apparatus
- balance (accurate to 0.01 g)
- beaker or conical flask
- measuring cylinder
- stirring rod
- filter funnel and filter paper
- distilled water for washing
- drying oven or warm place
Method and measurements
- Weigh a fixed mass of the argentan powder, e.g. about 2.00 g, and record it.
- Place the powder in a beaker and add excess dilute hydrochloric acid.
- Stir until effervescence stops; add a little more acid to confirm no further reaction.
- Filter the mixture. The unreacted copper remains on the filter paper; the zinc and nickel chlorides pass through in the filtrate.
- Wash the copper on the filter paper with distilled water, then dry it in an oven and allow it to cool.
- Weigh the dry copper. If it was collected on filter paper, weigh the filter paper before and after and subtract.
Accuracy
- Use excess acid and wait until effervescence stops so all zinc and nickel have reacted.
- Wash the copper to remove acid and soluble salts, and dry it completely before weighing.
- Repeat the experiment and average the results.
- Avoid losing solid during transfer; use an accurate balance.
- Wear eye protection because dilute hydrochloric acid is corrosive/irritant.
Calculation
Weigh a fixed mass of argentan, add excess dilute HCl, filter, wash and dry the unreacted copper, reweigh it; percentage by mass of copper = (mass of copper / mass of argentan) x 100%.
Walkthrough
This is a planning question, so the answer is judged on whether the method would work and whether it covers the four required sections: apparatus, method and measurements, accuracy, and calculation.
The chemistry is based on the reactivity series. Zinc and nickel are above hydrogen, so they react with dilute hydrochloric acid to form soluble chlorides and hydrogen gas. Copper is below hydrogen, so it does not react. Adding excess acid therefore removes all the zinc and nickel, leaving only solid copper, which can be separated by filtration.
For the apparatus, choose a balance, a beaker or conical flask, a measuring cylinder, a stirring rod, and filter funnel and filter paper. For the method, weigh a fixed mass of argentan, add excess dilute hydrochloric acid, wait until effervescence stops, filter, wash and dry the copper, then weigh it. For accuracy, use excess acid, make sure the reaction is complete, wash and dry the copper, and repeat and average. For the calculation, use:
Safety is an additional mark-worthy point: wear eye protection because dilute hydrochloric acid is corrosive/irritant.
Key Takeaways
- Metals above hydrogen in the reactivity series react with dilute acids; metals below hydrogen do not.
- Filtration separates an insoluble solid (copper) from a solution containing soluble products (zinc chloride and nickel chloride).
- Percentage by mass is calculated from the mass of the component divided by the mass of the whole sample, multiplied by 100%.
- Accuracy in this experiment comes from using excess acid, ensuring complete reaction, washing and drying the solid, and repeating the experiment.
Common Mistakes
- Not using excess acid, so some zinc or nickel remains unreacted and the final copper mass is too high.
- Weighing wet copper, which adds the mass of water and makes the percentage too high.
- Not washing the copper, leaving acid or soluble salts that add extra mass.
- Forgetting to subtract the mass of the filter paper if the copper is weighed on it.
- Not repeating the experiment, so the result may be unreliable.
- Trying to evaporate the filtrate to find copper; the copper is in the residue, not the filtrate.
- Forgetting safety precautions with the acid.
Things to Be Careful About
- Use the same units for both masses in the percentage calculation.
- Wait until effervescence stops and add a little extra acid to confirm all reactive metal has reacted.
- Dry the copper completely and allow it to cool before weighing, so the balance reading is accurate.
- If using filter paper, weigh it before filtration and after drying, then subtract.
- Repeat and average to improve reliability.
- Dilute hydrochloric acid is corrosive/irritant; wear goggles and avoid skin contact.