Chemistry 5070/42 — May/June 2024
Cambridge O-Level · Alternative to Practical · worked solutions for every part, with the mark scheme
Topics Use of Techniques, Apparatus and Materials · Experimental Contexts · Analysis, Conclusions and Evaluation · Planning Experiments and Investigations · Observations and Measurements · Qualitative Analysis
A student finds the amount of iron(II) ions in a solution by titration.
The student:
- uses a volumetric pipette to add of aqueous iron(II) sulfate to a conical flask
- adds approximately of dilute sulfuric acid to the flask
- slowly adds aqueous potassium manganate(VII) to the conical flask until the solution just turns pink
- repeats the titration several times.
Fig. 1.1 shows the apparatus the student uses to measure the volume of dilute sulfuric acid.
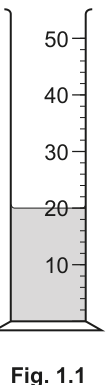
Name the apparatus shown in Fig. 1.1.
______
Answer
Measuring cylinder
Measuring cylinder
Walkthrough
The image shows a cylindrical glass container with volume markings from 10 to 50 cm³, filled with liquid to the 20 mark. This is a standard measuring cylinder used for approximate volume measurements in the laboratory.
Key Takeaways
Recognizing common laboratory apparatus used for measuring liquid volumes. A measuring cylinder is used when approximate accuracy is sufficient.
Common Mistakes
Calling it a "graduated cylinder" (acceptable in some regions but "measuring cylinder" is the standard 5070 term) or confusing it with a volumetric pipette or burette.
Things to Be Careful About
Use the exact term "measuring cylinder" as expected by the mark scheme. Do not add extra words that might not be credited.
Explain why the student does not need to use a volumetric pipette to measure the volume of dilute sulfuric acid.
______
Answer
The volume of acid only needs to be approximate; it does not need to be accurate or precise.
The volume of acid only needs to be approximate.
Walkthrough
In this titration, the dilute sulfuric acid is added to provide an acidic medium for the reaction between iron(II) ions and manganate(VII) ions. The exact volume of acid does not affect the stoichiometry of the titration reaction, so it only needs to be an approximate amount (e.g., "approximately 20 cm³") to ensure the solution is sufficiently acidic. Only the volume of the titrant (potassium manganate(VII)) needs to be measured accurately.
Key Takeaways
Understanding the role of reagents in a titration. Only the titrant's volume must be measured accurately; excess reagents added to create conditions (like acidity) do not need precise volumes.
Common Mistakes
Stating that the acid is not part of the reaction (it is, it provides H⁺ ions) or saying the volume doesn't matter at all (it must be sufficient to make the solution acidic).
Things to Be Careful About
The explanation must focus on the accuracy of the volume measurement, not just that the volume is unimportant. The volume needs to be approximate, not precise. Using words like "accurate" or "precise" in the negative is required to score the mark.
Describe how the student uses the volumetric pipette to measure of aqueous iron(II) sulfate safely.
______
Answer
Use a safety pipette filler to suck the liquid up to the mark in the pipette, then release the liquid into the conical flask.
Use a safety pipette filler to suck the liquid up to the mark in the pipette and place liquid into the flask.
Walkthrough
A volumetric pipette is used to measure a precise volume (25.0 cm³). To do this safely and accurately, a pipette filler (or safety pipette filler) must be used to draw the liquid up into the pipette. The student should fill the pipette above the graduation mark, then release the filler slightly to bring the meniscus down to the mark. Finally, the liquid is drained into the conical flask. Mouth pipetting is unsafe and not permitted.
Key Takeaways
Safe laboratory technique for using volumetric pipettes. Always use a pipette filler; never use your mouth.
Common Mistakes
Describing mouth pipetting, or forgetting to mention the pipette filler. Simply saying "use the pipette" is not enough; the safety aspect (filler) must be included.
Things to Be Careful About
The mark scheme specifically requires mentioning a "safety pipette filler" or "pipette filler" and the action of sucking the liquid up to the mark. Ensure the sequence is logical: fill, adjust to mark, deliver to flask.
Name the apparatus the student uses to add the aqueous potassium manganate(VII) to the flask.
______
Answer
Burette
Burette
Walkthrough
In a titration, the titrant (the solution of known concentration, here potassium manganate(VII)) is added gradually from a burette. The burette allows precise measurement of the volume added to reach the endpoint.
Key Takeaways
Recognizing the apparatus used to deliver titrant in a titration. The burette is essential for measuring the volume of titrant added accurately.
Common Mistakes
Calling it a "dropper" or "pipette". The burette is specifically designed for controlled, gradual addition with precise volume readings.
Things to Be Careful About
Use the exact term "burette". Do not add extra words that might not be credited.
Answer
Potassium manganate(VII) is self-indicating; the solution changes colour when the endpoint is reached.
Potassium manganate(VII) is self-indicating.
Walkthrough
Potassium manganate(VII) (KMnO₄) is a deep purple solution. During the titration, it is reduced to colourless Mn²⁺ ions as long as there is iron(II) present. When all the iron(II) has been oxidized, the next drop of potassium manganate(VII) remains unreacted, turning the solution a permanent pale pink. This colour change acts as its own indicator, so no external indicator is needed.
Key Takeaways
Understanding self-indicating reagents in titrations. Potassium manganate(VII) is a common example where the titrant itself provides the endpoint colour change.
Common Mistakes
Saying the solution "is coloured" without explaining the colour change. The explanation must mention that it is self-indicating or that the colour changes (purple to colourless, then to pink).
Things to Be Careful About
The mark scheme accepts "self-indicating" or "solution changes colour". Ensure the explanation links the reagent to the colour change that signals the endpoint.
Answer
The student knows when to stop when two results are within 0.2 cm³ of each other (concordant results).
Two results are within 0.2 cm³ of each other.
Walkthrough
In a titration, the student performs a rough titration followed by accurate titrations. To ensure reliability, the student continues until they obtain at least two concordant results. Concordant results are titres that are within 0.2 cm³ of each other. This indicates that the endpoint has been found consistently and the results can be averaged.
Key Takeaways
Understanding the criterion for concordant results in titrations. Repeating until titres are within 0.2 cm³ ensures reliability and allows for a reliable mean.
Common Mistakes
Saying "until the results are the same" or "until the colour changes". The specific criterion is that two results must be within 0.2 cm³ of each other.
Things to Be Careful About
The mark scheme specifically requires "within 0.2 cm³ of each other". Do not just say "results are the same"; the 0.2 cm³ tolerance is essential for scoring the mark.
A student investigates the temperature change when a solid completely dissolves in water.
The student:
- measures of distilled water and pours it into a beaker
- uses a thermometer to measure the initial temperature of the water in the beaker
- records this temperature in Table 2.1 at time
- adds a sample of the solid to the beaker and starts a stop-watch
- stirs the mixture and records the temperature and time at intervals for a total of .
Some of the results are shown in Table 2.1.
Table 2.1
| time / | temperature / |
|---|---|
| 0 | 19.5 |
| 60 | 13.0 |
| 120 | |
| 180 | 14.0 |
| 240 | 14.5 |
| 300 |
Fig. 2.1 shows the results for and .
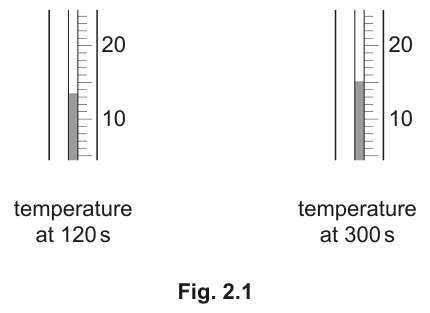
Record the values from Fig. 2.1 to the nearest in Table 2.1.
Answer
| time / s | temperature / °C |
|---|---|
| 0 | 19.5 |
| 60 | 13.0 |
| 120 | 13.5 |
| 180 | 14.0 |
| 240 | 14.5 |
| 300 | 15.0 |
13.5 and 15.0
Walkthrough
The question asks for two temperature readings from Fig. 2.1 to be recorded in Table 2.1. The instruction specifies rounding to the nearest 0.5 °C. Looking at the left thermometer (120 s), the meniscus is halfway between 13.0 and 14.0, giving 13.5 °C. Looking at the right thermometer (300 s), the meniscus is halfway between 15.0 and 16.0, giving 15.0 °C. These values are then placed into the empty cells of the table.
Key Takeaways
When reading a thermometer, identify the major scale markings and the minor divisions. If the scale is divided into 1 °C intervals with smaller marks at 0.5 °C, estimate to the nearest 0.5 °C as instructed.
Common Mistakes
- Reading the wrong scale or misaligning the meniscus with the graduation lines.
- Recording values to more decimal places than requested (e.g., 13.4 or 13.6 instead of 13.5).
Things to Be Careful About
The mark scheme explicitly requires both values to be expressed to the nearest 0.5 °C. A reading like 13.4 or 15.2 would not score the mark. Always check the precision demanded by the question.
Calculate the maximum temperature change in the investigation.
maximum temperature change = ______
Working
The maximum temperature change is the difference between the highest and lowest temperatures recorded in the table.
Highest temperature = 19.5 °C (at 0 s)
Lowest temperature = 13.0 °C (at 60 s)
Answer
6.5
6.5
Walkthrough
The maximum temperature change is simply the range of temperatures observed during the experiment. From the completed table, the highest temperature is 19.5 °C (the initial temperature at 0 s) and the lowest is 13.0 °C (at 60 s). Subtracting the lowest from the highest gives the maximum change: 19.5 - 13.0 = 6.5 °C.
Key Takeaways
Temperature change (ΔT) in a dissolution or reaction is calculated as the absolute difference between the maximum and minimum temperatures recorded.
Common Mistakes
- Calculating the change from the initial temperature to the final temperature (19.5 - 15.0 = 4.5) instead of the maximum change observed.
- Forgetting to include the unit °C in the final answer.
Things to Be Careful About
Ensure you use the highest and lowest values from the entire table, not just the initial and final values. The mark scheme awards the mark for 'highest value – lowest value from table 2.1'.
Answer
The temperature decreases initially (from 0 s to 60 s) and then increases (from 60 s to 300 s).
Temperature decreases initially, then increases.
Walkthrough
Looking at the temperature column in Table 2.1: it starts at 19.5 °C, drops to 13.0 °C at 60 s, rises to 13.5 °C at 120 s, 14.0 °C at 180 s, 14.5 °C at 240 s, and 15.0 °C at 300 s. The trend is a decrease followed by an increase.
Key Takeaways
When describing trends in data, clearly state the direction of change and the time periods over which it occurs.
Common Mistakes
- Only describing one part of the trend (e.g., 'it goes down' without mentioning it later goes up).
- Using vague language like 'changes' instead of 'decreases' and 'increases'.
Things to Be Careful About
The mark scheme awards one mark for 'temperature decreases (initially)' and one mark for 'temperature increases'. Both parts of the trend must be described to earn full marks.
Suggest the temperature of the mixture if it is left for 60 minutes.
Explain your answer.
temperature after 60 minutes = ______
explanation = ______
Answer
temperature after 60 minutes = 19.5 °C
explanation = The mixture will return to room temperature (the initial temperature). Heat is gained from the surroundings as the endothermic dissolution process finishes and thermal equilibrium is re-established.
19.5; the mixture returns to room temperature.
Walkthrough
The temperature initially dropped because the dissolving solid absorbed heat from the water (endothermic process). Once the solid has completely dissolved, no more heat is absorbed. The cold mixture (15.0 °C at 300 s) is now cooler than the room (19.5 °C). Heat will transfer from the warmer room to the cooler mixture until they reach thermal equilibrium at room temperature (19.5 °C).
Key Takeaways
In temperature change experiments, if the system is left long enough, it will return to the ambient room temperature after the reaction or dissolution is complete.
Common Mistakes
- Predicting the temperature will continue to decrease.
- Forgetting to explain why it returns to 19.5 °C (mentioning heat gain from surroundings or returning to room temperature).
Things to Be Careful About
The prediction must be 19.5 °C (the initial/room temperature). The explanation must reference returning to room temperature or gaining heat from the surroundings.
Describe the energy change when the solid dissolves in water.
Explain how the results in Table 2.1 support your answer.
description = ______
explanation = ______
Answer
description = endothermic (the reaction absorbs energy from the surroundings)
explanation = the temperature of the mixture decreases, showing that energy is being absorbed from the surroundings.
Endothermic; temperature decreases.
Walkthrough
When a solid dissolves and the temperature of the mixture decreases, the process is absorbing heat energy from the surroundings (the water). This is the definition of an endothermic process. The decrease in temperature in Table 2.1 (from 19.5 °C to 13.0 °C) is the direct evidence that energy is being absorbed.
Key Takeaways
- Temperature decreases → endothermic (absorbs energy).
- Temperature increases → exothermic (releases energy).
Common Mistakes
- Calling it 'endothermic' without explaining how the results support it.
- Saying 'it absorbs heat' without linking it to the observed temperature decrease.
Things to Be Careful About
The mark scheme requires both the description (endothermic/absorbs energy) and the explanation (temperature decreases). Both are needed for the two marks.
Answer
To ensure an even temperature throughout the mixture (so the thermometer reads the correct average temperature) and to ensure that all the solid dissolves.
To ensure an even temperature and all solid dissolves.
Walkthrough
Stirring serves two main purposes in dissolution experiments: it speeds up the dissolving process by bringing fresh solvent into contact with the solid, and it ensures the temperature is uniform throughout the liquid so the thermometer gives an accurate reading of the whole mixture.
Key Takeaways
Always stir during dissolution or reaction experiments to ensure homogeneity and accurate temperature measurement.
Common Mistakes
- Saying 'to make it dissolve faster' without mentioning temperature uniformity (or vice versa, though either is often accepted, the mark scheme gives both).
Things to Be Careful About
The mark scheme accepts 'to ensure an even temperature' or 'to ensure that (all) the solid dissolves'. Either reason is sufficient for the mark.
The maximum temperature change calculated is not the true value for this investigation.
This may be because the volume of water and the temperature are not measured precisely.
Explain how to obtain a more precise temperature measurement.
______
Answer
Use a thermometer with finer graduations (graduated to less than 1 °C intervals).
Use a thermometer with graduations less than 1 °C.
Walkthrough
The current thermometer has 1 °C markings (as seen in Fig. 2.1, where readings are estimated to 0.5 °C). To obtain a more precise measurement, a thermometer with smaller divisions (e.g., 0.1 °C or 0.2 °C intervals) should be used.
Key Takeaways
Precision of a measuring instrument is determined by the smallest division on its scale.
Common Mistakes
- Saying 'use a better thermometer' without specifying what makes it better (finer graduations).
- Suggesting 'read it more carefully' (this doesn't improve the instrument's precision).
Things to Be Careful About
The mark scheme specifically requires 'graduated to less than 1 °C intervals'. Simply saying 'more precise thermometer' may not score if it doesn't explain how it is more precise.
The maximum temperature change calculated is less than the true value for this investigation.
Suggest a reason for this, other than the precision of measurements.
Describe an improvement to the method which reduces this error.
reason = ______
improvement = ______
Answer
reason = heat is gained from (or lost to) the surroundings (the cold mixture absorbs heat from the warmer room).
improvement = use a lid on the beaker or use a polystyrene beaker (or add insulation around the beaker).
Heat gain from surroundings; use a lid or polystyrene beaker.
Walkthrough
The maximum temperature change calculated (6.5 °C) is less than the true value because heat from the warmer room transfers into the cold mixture during the 300 s of the experiment. This heat gain partially offsets the cooling effect of the endothermic dissolution. To reduce this error, the system should be better insulated to prevent heat exchange with the surroundings. Using a lid reduces heat loss/gain from the top, and a polystyrene beaker is a better insulator than a glass beaker.
Key Takeaways
In temperature change experiments, heat exchange with the surroundings is a common source of error. Insulation (lids, polystyrene cups) minimizes this.
Common Mistakes
- Suggesting 'use a bigger beaker' (this would increase heat exchange).
- Saying 'heat is lost' when the mixture is cold and gaining heat from the room.
Things to Be Careful About
The reason must relate to heat exchange with the surroundings. The improvement must be a practical method to reduce this exchange (lid, polystyrene beaker, insulation).
A student does a series of experiments to investigate solution R.
The student leaves a wooden splint with one end dipped into R for ten minutes. The student then places the damp end of the wooden splint into the flame of a Bunsen burner with the air hole open.
The student concludes that R contains sodium ions.
State the observation which allows the student to make this conclusion.
______
Answer
Yellow flame.
Yellow flame
Walkthrough
The splint is dipped into solution R, so any sodium ions in R are carried into the flame. When the damp end is placed in the Bunsen flame, sodium ions give a characteristic yellow colour to the flame. The observation that allows the conclusion is therefore a yellow flame.
Key Takeaways
- Flame tests are used to identify metal ions.
- Sodium compounds colour a non-luminous Bunsen flame yellow.
Common Mistakes
- Saying 'orange' or 'red' instead of yellow.
- Describing the splint burning rather than the flame colour.
Things to Be Careful About
The question asks for the observation, not the conclusion. The observation is the yellow flame itself.
Explain why the air hole on the Bunsen burner must be open when doing this flame test.
______
Answer
With the air hole open the Bunsen flame is blue, so the yellow sodium flame is not masked.
With the air hole open the Bunsen flame is blue, so the yellow sodium flame is not masked.
Walkthrough
A Bunsen burner with the air hole closed burns with a yellow, luminous flame. This yellow flame would make it impossible to see the yellow colour given by sodium. Opening the air hole gives a blue flame, so the only yellow colour seen comes from the sodium ions in the sample.
Key Takeaways
- A blue Bunsen flame is non-luminous and does not interfere with flame colours.
- Opening the air hole controls the amount of air mixing with the gas.
Common Mistakes
- Saying 'to make the flame hotter' without mentioning the yellow flame.
- Saying 'to allow oxygen in' without linking to the flame colour.
Things to Be Careful About
The mark is for avoiding a yellow Bunsen flame, not for general combustion.
The student adds dilute nitric acid to R.
The student observes effervescence of a colourless gas which turns limewater milky.
State the conclusions from these observations.
______
Answer
Carbon dioxide is formed.
R contains carbonate ions ().
Carbon dioxide is formed; R contains carbonate ions (CO3^2-)
Walkthrough
When a dilute acid is added to a solution and effervescence occurs, a gas is being produced. The gas turns limewater milky, which is the test for carbon dioxide. The only common negative ion that gives carbon dioxide with dilute acid is carbonate. Therefore the conclusions are that carbon dioxide is produced and R contains carbonate ions.
Key Takeaways
- Carbon dioxide turns limewater milky.
- Carbonate ions react with dilute acid to give carbon dioxide.
Common Mistakes
- Saying 'carbonate gas' instead of carbon dioxide.
- Forgetting to state that R contains carbonate ions.
Things to Be Careful About
The question says 'conclusions', so both the gas and the ion should be given.
The student adds aqueous barium nitrate to some of the mixture from (b)(i).
The student concludes that R contains sulfate ions.
State the observation which allows the student to make this conclusion.
______
Answer
White precipitate.
White precipitate
Walkthrough
Barium ions react with sulfate ions to form insoluble barium sulfate. This appears as a white precipitate. The observation that allows the conclusion is therefore a white precipitate.
Key Takeaways
- Barium nitrate is a test for sulfate ions.
- Barium sulfate is a white precipitate.
Common Mistakes
- Saying 'white solid' without precipitate.
- Confusing with chloride or carbonate tests.
Things to Be Careful About
The observation must be 'white precipitate', not just 'a precipitate'.
The student adds aqueous silver nitrate to some of the mixture from (b)(i).
The student observes a colourless solution.
State a conclusion from this observation.
______
Answer
No chloride, bromide or iodide ions are present.
No chloride, bromide or iodide ions are present.
Walkthrough
Silver ions form insoluble precipitates with chloride, bromide and iodide ions. If adding silver nitrate gives a colourless solution, no precipitate has formed, so none of these halide ions is present.
Key Takeaways
- Silver halides are insoluble precipitates.
- A colourless solution with silver nitrate means no halide ions.
Common Mistakes
- Saying 'no precipitate' is acceptable but the mark scheme wants the ion conclusion.
- Saying 'no halide ions' without specifying chloride/bromide/iodide.
Things to Be Careful About
The conclusion is about the absence of halide ions, not about sulfate or carbonate.
The student adds aqueous sodium hydroxide to R and warms the mixture.
Describe a test and observation to show that R does not contain ammonium ions.
test = ______
observation = ______
Answer
Test: hold damp red litmus paper in the gas given off.
Observation: the litmus paper does not turn blue / there is no colour change.
Test: damp red litmus paper in the gas; observation: no colour change / litmus does not turn blue.
Walkthrough
Ammonium ions react with warm sodium hydroxide to release ammonia gas. Ammonia is the only common alkaline gas that turns damp red litmus blue. To test for ammonium ions, the student should test the gas with damp red litmus paper. If no ammonia is present, the paper stays red, so there is no colour change.
Key Takeaways
- Ammonium ions give ammonia with warm sodium hydroxide.
- Ammonia turns damp red litmus blue.
Common Mistakes
- Using blue litmus paper instead of red.
- Saying 'no gas given off' rather than testing with litmus.
Things to Be Careful About
The observation must be 'no colour change' or 'does not turn blue', not just 'no ammonia'.
Solution R is made from a mixture of two different ionic compounds.
Suggest the names of these two compounds.
______
Answer
Sodium sulfate and sodium carbonate.
Sodium sulfate and sodium carbonate
Walkthrough
From the flame test, R contains sodium ions. From the acid test, R contains carbonate ions. From the barium nitrate test, R contains sulfate ions. The silver nitrate test shows no halide ions, and the ammonium test shows no ammonium ions. Since R is a mixture of two ionic compounds, the sodium ions must be paired with the two negative ions found: sulfate and carbonate. So the two compounds are sodium sulfate and sodium carbonate.
Key Takeaways
- Ionic compounds are named from their positive and negative ions.
- A mixture can contain two compounds sharing the same positive ion.
Common Mistakes
- Giving only one compound.
- Forgetting that the compounds are ionic and must contain both cation and anion.
Things to Be Careful About
The names must be full compound names, not just ions.
The student tests a different solution, P, and finds it difficult to decide whether the solution contains chloride ions or bromide ions.
The student also has aqueous potassium chloride and aqueous potassium bromide.
Suggest how the student could use the aqueous potassium chloride and aqueous potassium bromide to make it easier to decide whether P contains chloride ions or bromide ions.
______
Answer
Add aqueous silver nitrate to samples of aqueous potassium chloride and aqueous potassium bromide, and to solution P. Compare the colour of the precipitate formed with P with those from the known solutions. Silver chloride is white and silver bromide is cream, so the unknown halide can be identified by matching the precipitate colour.
Use silver nitrate to make precipitates with known chloride and bromide, then compare the precipitate colour with that from P.
Walkthrough
Chloride and bromide ions both give precipitates with silver nitrate, but the precipitates have different colours: silver chloride is white and silver bromide is cream. By testing the known potassium chloride and potassium bromide solutions in the same way, the student can see the two standard colours. Then testing P and comparing its precipitate colour with the standards makes it easy to identify which halide is present.
Key Takeaways
- Silver nitrate is the test for halide ions.
- Silver chloride is white; silver bromide is cream.
- Known standards can be used for comparison.
Common Mistakes
- Saying 'use potassium chloride and potassium bromide directly' without adding silver nitrate.
- Not mentioning comparison of colours.
Things to Be Careful About
The question asks how to use the known solutions, so the comparison step is essential.
The student adds dilute hydrochloric acid to another solution and a gas is produced. The gas is passed through limewater.
Describe how the gas can be passed through limewater.
You may draw a labelled diagram to help answer the question.
Answer
Fit a delivery tube into the reaction vessel so that gas can escape through it. Place the other end of the delivery tube into a test tube of limewater, so that the gas bubbles through the limewater.
Use a delivery tube from the reaction vessel to bubble the gas through limewater.
Walkthrough
To pass a gas through a liquid, the gas must be led from the reaction vessel into the liquid. A delivery tube is fitted to the reaction vessel, and its other end is placed below the surface of the limewater in a test tube. The gas then bubbles through the limewater, allowing any carbon dioxide to turn it milky.
Key Takeaways
- A delivery tube is used to transfer gas from a reaction to a test reagent.
- The gas must bubble through the liquid, not just pass over it.
Common Mistakes
- Saying 'use limewater in the reaction vessel' without a delivery tube.
- Not mentioning that the gas bubbles through the limewater.
Things to Be Careful About
The diagram is optional; a clear description is enough.
Copper(II) carbonate reacts with dilute sulfuric acid at room temperature.
The word equation for the reaction is shown.
Plan an experiment to determine the volume of carbon dioxide formed when a known mass of copper(II) carbonate completely reacts with dilute sulfuric acid.
Your plan must include the use of common laboratory apparatus, dilute sulfuric acid and copper(II) carbonate. No other chemicals should be used.
Your plan must include:
- the apparatus needed
- the method to use and the measurements to take
- procedures to ensure that the volume measured is as accurate as possible.
You may draw a diagram to help answer the question.
Answer
Apparatus
- conical flask (or boiling tube) fitted with a bung and delivery tube
- gas syringe (or inverted measuring cylinder/burette filled with water in a trough)
- balance
- measuring cylinder / burette for acid
- (optional) small test tube on a string / dropping funnel
Method
- Measure a known mass of copper(II) carbonate on a balance and place it in the conical flask.
- Add an excess of dilute sulfuric acid so that all the carbonate reacts. To avoid gas loss, either add the acid through a dropping funnel with the bung already in place, or place the acid in a small tube suspended inside the flask, then shake to mix after sealing.
- Connect the flask to a gas syringe (or collect the gas over water in an inverted measuring cylinder). Seal the flask with a bung.
- Allow the reaction to continue until no more effervescence is seen and the gas volume reading is constant.
- Record the volume of carbon dioxide collected.
- Repeat the experiment and calculate the average volume.
Accuracy
- Use a bung and delivery tube to prevent gas escaping.
- Add the acid without opening the flask (e.g. dropping funnel or small tube on a string) so no gas is lost.
- Wait until the volume reading is steady before recording.
- Repeat and take an average to improve reliability.
See working
Walkthrough
This is a planning question. You need to design an experiment that measures the volume of carbon dioxide given off when a known mass of copper(II) carbonate reacts with excess dilute sulfuric acid. The marks are split into three sections: apparatus, method and measurements, and accuracy.
Start by choosing a container for the reaction (conical flask) and a way to collect the gas (gas syringe or measuring cylinder over water). You must also measure the mass of carbonate and the volume of gas. To make sure all the carbonate reacts, use excess acid. To avoid losing gas, seal the flask with a bung and add the acid without opening the flask – for example with a dropping funnel or a small tube on a string. Wait until effervescence stops and the volume reading is constant before recording. Repeat and average.
Key Takeaways
- A plan must name apparatus and explain how measurements are taken.
- Using excess reactant ensures complete reaction.
- A bung and controlled addition prevent gas loss.
- Waiting for completion and repeating improve accuracy and reliability.
Common Mistakes
- Not naming a suitable container or gas-collection equipment.
- Forgetting to use excess acid.
- Adding acid after opening the flask, losing gas.
- Recording the volume before the reaction is complete.
- Not repeating the experiment.
Things to Be Careful About
- The mark scheme gives up to two marks per section; make sure each section has at least two valid points.
- The gas syringe is the most accurate method; if using water displacement, ensure the measuring cylinder is full of water and inverted.
- State that the volume should be measured at room temperature and pressure (r.t.p.) if you want to convert to moles, but this is not required for the volume itself.
- If you draw a diagram, label the flask, bung, delivery tube and gas syringe.