Chemistry 5070/41 — May/June 2024
Cambridge O-Level · Alternative to Practical · worked solutions for every part, with the mark scheme
Topics Use of Techniques, Apparatus and Materials · Experimental Contexts · Analysis, Conclusions and Evaluation · Planning Experiments and Investigations · Observations and Measurements · Qualitative Analysis
A student finds the concentration of a dilute acid, HA(aq), by titration.
The student:
- adds of aqueous sodium hydroxide to a conical flask
- adds a few drops of methyl orange indicator to the aqueous sodium hydroxide
- slowly adds HA(aq) to the aqueous sodium hydroxide until the methyl orange changes colour
- records the volume of HA(aq) added.
Fig. 1.1 shows the apparatus the student uses to measure of aqueous sodium hydroxide.
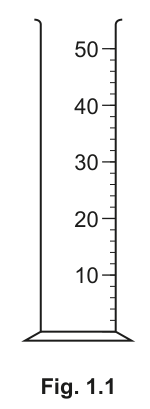
Name the apparatus shown in Fig. 1.1.
______
Answer
measuring cylinder
measuring cylinder
Walkthrough
The student measures 25.0 cm of aqueous sodium hydroxide. Fig. 1.1 shows a cylindrical glass vessel with a flat base and a scale marked from 10 to 50 cm. This is a measuring cylinder.
Key Takeaways
Measuring cylinders are used for approximate volume measurements. They are not precise enough for the fixed volume of titrand in a titration.
Common Mistakes
Calling it a "graduated cylinder" (acceptable in some regions, but "measuring cylinder" is the standard 5070 term). Confusing it with a beaker (which has no scale) or a burette (which has a tap).
Things to Be Careful About
Use the exact syllabus term "measuring cylinder".
Name a more suitable piece of apparatus to measure of aqueous sodium hydroxide.
______
Answer
(volumetric) pipette
(volumetric) pipette
Walkthrough
In a titration, the volume of the solution in the conical flask (the titrand) must be measured very accurately. A measuring cylinder is not accurate enough. The standard apparatus for measuring a fixed, precise volume like 25.0 cm is a volumetric pipette.
Key Takeaways
Volumetric pipettes are used to deliver a single, fixed, highly accurate volume of liquid. Burettes are used for variable volumes.
Common Mistakes
Suggesting a "pipette" without specifying "volumetric" (though often accepted, "volumetric pipette" is precise). Suggesting a "measuring cylinder" (too inaccurate). Suggesting a "burette" (used for the titrant, not the fixed titrand volume).
Things to Be Careful About
The mark scheme accepts "(volumetric) pipette".
Fig. 1.2 shows the apparatus used to determine the volume of HA(aq) at the end of the experiment.
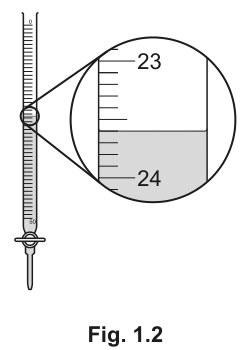
Name the apparatus shown in Fig. 1.2.
______
Answer
burette
burette
Walkthrough
Fig. 1.2 shows a long, narrow glass tube with a tap at the bottom and a scale. The magnified view shows the scale between 23 and 24 cm. This apparatus is a burette, used to deliver variable volumes of the titrant.
Key Takeaways
Burettes are essential for titrations, allowing precise measurement of the volume of titrant added.
Common Mistakes
Calling it a "graduated tube" or "measuring cylinder". Forgetting the tap at the bottom is a key feature of a burette.
Things to Be Careful About
The exact term is "burette".
The initial reading on this apparatus is .
Use Fig. 1.2 to determine the volume of HA(aq) used in the titration.
volume of HA(aq) = ______
Working
Final reading = 23.6 cm
Initial reading = 1.0 cm
Volume used = 23.6 - 1.0 = 22.6 cm
Answer
22.6
22.6
Walkthrough
The burette scale runs from top to bottom, so values increase downwards. The meniscus is read at eye level at the bottom of the curve. In Fig. 1.2, the scale goes from 23 at the top to 24 at the bottom, with 10 small divisions between them, meaning each small division represents 0.1 cm. The bottom of the meniscus sits on the 6th line below 23, giving a final reading of 23.6 cm. The volume of acid used is the difference between the final and initial readings: 23.6 - 1.0 = 22.6 cm.
Key Takeaways
Always read the bottom of the meniscus at eye level. Subtract the initial reading from the final reading to find the volume delivered.
Common Mistakes
Reading the top of the meniscus. Adding the readings instead of subtracting. Reading the scale upwards (23.4 instead of 23.6).
Things to Be Careful About
Burette scales increase downwards. Ensure readings are to 1 decimal place (e.g., 1.0, not 1).
The student washes the apparatus in Fig. 1.2 before it is used.
State the substance used to wash the apparatus.
______
Answer
HA
HA
Walkthrough
Before filling a burette with a solution, it must be rinsed with that same solution. This prevents any residual water from diluting the titrant and changing its concentration. Since the burette will contain HA(aq), it must be washed with HA.
Key Takeaways
Always rinse a burette with the solution it will contain. Rinse a pipette with the solution it will deliver. Rinse a conical flask with distilled water (never with the solution, as this would change the moles of titrand).
Common Mistakes
Suggesting "water" or "distilled water" (this would dilute the acid). Suggesting "sodium hydroxide" (this would neutralise some of the acid and change its concentration).
Things to Be Careful About
The question asks for the substance used to wash Fig. 1.2 (the burette). The answer must be the titrant, HA.
Describe the colour change of the methyl orange at the end-point.
from ______ to ______
Answer
from yellow to red / pink
yellow to red / pink
Walkthrough
Methyl orange is an indicator that is yellow in alkaline solutions and red (or pink) in acidic solutions. The conical flask initially contains aqueous sodium hydroxide (alkaline), so the indicator is yellow. As HA(aq) is added, it neutralises the alkali. At the end-point, the solution becomes slightly acidic, causing the methyl orange to change to red or pink.
Key Takeaways
Know the colour changes of common indicators: methyl orange (yellow in alkali, red in acid), phenolphthalein (pink in alkali, colourless in acid), and universal indicator.
Common Mistakes
Saying "red to yellow" (this is the change if adding alkali to acid, but here acid is added to alkali). Saying "orange" (orange is the intermediate colour at the end-point, but the change is described as from the initial colour to the final colour).
Things to Be Careful About
Always state both colours in the correct order: from the colour in the initial solution to the colour in the final solution.
A student investigates the reaction of four metals, A, B, C and D, with aqueous copper(II) sulfate.
The four metals are all grey solids.
The student:
- puts of aqueous copper(II) sulfate into a beaker and measures its temperature
- records this temperature in Table 2.1
- adds a sample of A to the aqueous copper(II) sulfate
- stirs the reaction mixture until there is no further increase in temperature
- measures the highest temperature of the mixture and records this temperature in Table 2.1
- observes any changes in the appearance of the mixture in the beaker.
The student repeats the experiment three more times using B, C and D instead of A.
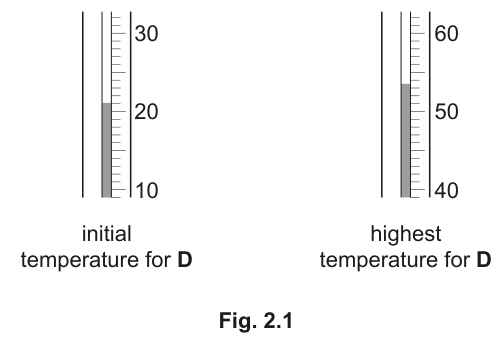
The results for D are shown in Fig. 2.1.
The results for A, B and C are shown in Table 2.1.
Table 2.1
| metal | initial temperature / | highest temperature / | temperature increase / |
|---|---|---|---|
| A | 20 | 69.5 | 49.5 |
| B | 24.5 | 46.0 | |
| C | 22.0 | 61.0 | 39.0 |
| D |
State the value in Table 2.1 which the student records to an incorrect degree of precision.
______
Answer
20
20
Walkthrough
In Table 2.1, all other temperature measurements are recorded to one decimal place (e.g. , , ). The initial temperature for metal A is recorded simply as 20 rather than 20.0, which lacks the required degree of precision consistent with the rest of the table.
Key Takeaways
- All readings from the same instrument in a data table should be recorded to a consistent degree of precision (the same number of decimal places).
Common Mistakes
- Naming the metal ('A') instead of stating the numerical value ('20').
Things to Be Careful About
- Ensure the exact number from the table is stated.
The temperatures for D are shown in Fig. 2.1.
Record these temperatures in Table 2.1.
Calculate and record the temperature increases for B and D in Table 2.1.
Answer
| metal | initial temperature / | highest temperature / | temperature increase / |
|---|---|---|---|
| A | 20 | 69.5 | 49.5 |
| B | 24.5 | 46.0 | 21.5 |
| C | 22.0 | 61.0 | 39.0 |
| D | 21.0 | 53.5 | 32.5 |
Table completed: B temperature increase = 21.5 °C; D initial = 21.0 °C, highest = 53.5 °C, increase = 32.5 °C
Walkthrough
- Read thermometer scales for D:
- Initial temperature for D: The meniscus is on the line representing .
- Highest temperature for D: The meniscus is halfway between 53 and 54, giving .
- Calculate temperature increases:
- For B:
- For D:
- Ensure all values are recorded to 1 decimal place.
Key Takeaways
- Thermometer scales with divisions can typically be read to the nearest (1 decimal place).
- Temperature change is calculated as .
Common Mistakes
- Writing 21 instead of 21.0 for the initial temperature of D.
- Arithmetic errors when subtracting decimals.
Things to Be Careful About
- Keep all values to one decimal place to maintain consistency.
The equation for the reaction between B and aqueous copper(II) sulfate is shown.
Copper(II) sulfate is a blue solution.
At the end of the experiment, the student observes a colourless solution, a grey solid and a brown solid.
Explain how these observations show that B is in excess in this reaction.
______
Answer
Grey solid (B) remains unreacted at the end of the reaction.
Grey solid remains / B remains unreacted
Walkthrough
Metal B is introduced as a grey solid. If all the copper(II) sulfate has reacted (indicated by the blue solution turning colourless) and some grey solid is still present alongside the displaced brown solid (copper), it shows that not all of metal B was consumed. Therefore, B is in excess.
Key Takeaways
- An unreacted solid starting material remaining at the end of a reaction confirms it is in excess.
- Complete decolourisation of a coloured reactant solution confirms that the solution was the limiting reactant.
Common Mistakes
- Stating that the brown solid shows B is in excess (the brown solid is copper, a product).
- Stating only that the blue colour disappeared (this proves reacted completely, but the presence of leftover B proves B was in excess).
Things to Be Careful About
- Distinguish clearly between the reactant metal (grey solid) and the displaced product metal (brown solid).
Using the equation in (iii), write the formula for:
- the colourless solution
- the grey solid
- the brown solid.
colourless solution ______
grey solid ______
brown solid ______
Answer
colourless solution:
grey solid:
brown solid:
colourless solution: BSO4; grey solid: B; brown solid: Cu
Walkthrough
From the equation:
- The aqueous product formed is , which is the colourless solution.
- The unreacted reactant metal is , which is the grey solid.
- The displaced metal product is (copper), which is the brown solid.
Key Takeaways
- In metal displacement reactions, copper metal formed is typically seen as a brown/pink-brown solid.
- Group 2/transition-metal-free sulfate solutions are colourless.
Common Mistakes
- Writing names instead of formulae when formulae are explicitly asked for.
- Confusing grey solid (metal B) with brown solid ().
Things to Be Careful About
- Use the exact formula as presented in the equation (, , ).
Use your results to arrange A, B, C and D in decreasing order of reactivity.
Explain how the results give this order of reactivity.
most reactive ______
______
______
least reactive ______
explanation ______
Answer
most reactive: A
C
D
least reactive: B
explanation: The greater the temperature increase, the more reactive the metal.
most reactive: A, C, D, least reactive: B; explanation: the greater the temperature increase, the more reactive the metal
Walkthrough
- Compare temperature increases:
- A:
- C:
- D:
- B:
- Determine order:
- Highest temperature change corresponds to the most reactive metal.
- Decreasing order: A > C > D > B.
- Explain:
- A more reactive metal displaces copper more vigorously, releasing more heat energy and producing a greater temperature rise.
Key Takeaways
- In displacement reactions with the same solution and volume, a larger temperature increase indicates a more reactive metal.
Common Mistakes
- Inverting the order (least to most reactive instead of most to least reactive).
Things to Be Careful About
- Ensure the prompt's request for 'decreasing order of reactivity' is followed.
A student repeats the experiment using a fifth metal.
This metal is the second most reactive of the five metals.
Suggest a temperature increase for this experiment.
______
Answer
45.0 °C (any value greater than 39.0 °C and less than 49.5 °C)
Walkthrough
- Metal A is the most reactive with a temperature rise of .
- Metal C had the second highest temperature rise of .
- If a fifth metal is the second most reactive of all five metals, its reactivity lies between A (most reactive) and C (which now becomes third most reactive).
- Therefore, its temperature increase must be greater than and less than . Any value in this range (e.g. ) is acceptable.
Key Takeaways
- The reactivity of metals correlates with the magnitude of temperature increase.
- To be second in reactivity, the value must be strictly between the first and former-second values.
Common Mistakes
- Giving a value outside the range .
Things to Be Careful About
- Include units if they are not already printed on the answer line.
The temperature increases measured are less than the true values for these experiments.
Suggest a reason for this.
Describe an improvement to the method which makes the results closer to the true values.
reason ______
improvement ______
Answer
reason: Heat is lost to the surroundings (or the beaker).
improvement: Use a polystyrene cup (or add insulation) / put a lid on the beaker.
reason: heat loss to surroundings; improvement: use a polystyrene cup / use a lid
Walkthrough
- Reason for lower temperature increase:
- The reaction is exothermic, and during the time it takes to react and reach maximum temperature, some thermal energy is lost to the surroundings and the glass beaker.
- Improvement:
- To reduce heat loss, use a better thermal insulator such as a polystyrene cup instead of a glass beaker, add insulation around the container, or place a lid on top.
Key Takeaways
- The main source of error in simple thermometric experiments is heat loss to the surroundings.
- Improvements always target reducing this loss: insulating the container (polystyrene cup) and covering it with a lid.
Common Mistakes
- Suggesting 'repeat the experiment' as an improvement (repeating improves reliability, not systematic heat loss error).
- Giving a vague answer like 'use a better thermometer'.
Things to Be Careful About
- Clearly distinguish between the reason (heat loss) and the method improvement (polystyrene cup/lid).
State and explain the effect of using half the concentration of aqueous copper(II) sulfate on the temperature increase for metal A.
effect ______
explanation ______
Answer
effect:
The temperature increase will be lower / halved (approximately ).
explanation:
Halving the concentration means there are only half the number of copper(II) ions (or moles of ) reacting, so only half the amount of heat energy is released.
effect: temperature increase is halved; explanation: half the number of copper ions react so half the heat energy is released
Walkthrough
- Identify the limiting reactant:
- Metal A is in excess, so aqueous limits the extent of the reaction.
- Effect of halving concentration:
- With the same volume () but half the concentration, the number of moles of ions present is halved.
- Since heat released is directly proportional to the moles of reacting copper ions, only half as much heat energy is released.
- Effect on temperature change:
- Because the volume of solution (mass of water being heated) remains constant (), releasing half the heat energy causes approximately half the temperature increase.
Key Takeaways
- When the aqueous reactant is limiting, .
- Heat produced is directly proportional to the moles of limiting reactant that react.
- Halving concentration (at constant volume) halves the moles reacting, thereby halving the temperature increase.
Common Mistakes
- Stating that the rate of reaction is slower without discussing the final temperature change.
- Forgetting to specify that the number of copper ions reacting is halved.
Things to Be Careful About
- Ensure both the quantitative effect (halved / lower) and the molecular reason (half as many copper ions reacting) are clearly stated to gain all 3 marks.
A student does a series of experiments to investigate solution R.
The student leaves a wooden splint with one end dipped into R for ten minutes. The student then places the damp end of the wooden splint into a blue Bunsen burner flame.
The flame briefly shows a shade of red and then turns yellow.
Answer
- R may contain lithium ions, .
- R may contain calcium ions, .
May contain lithium ions; may contain calcium ions.
Walkthrough
The wooden splint picks up some of solution R. When it is placed in the Bunsen flame, the metal ions in R are heated and give out light of characteristic colours. A red shade is typical of lithium (crimson) and also of calcium (brick-red). Because the colour is only a shade of red, the student cannot tell which of these two ions is responsible, so two possible conclusions are that R may contain lithium ions or calcium ions.
Key Takeaways
Flame tests are used to identify metal cations. Lithium gives a red/crimson flame and calcium gives a brick-red flame. A flame colour can suggest more than one ion, so the conclusion must be worded as 'may contain'.
Common Mistakes
- Saying 'R contains lithium' or 'contains calcium' as a definite conclusion — the colour is not unique.
- Giving only one possible ion when two are asked for.
- Confusing the yellow flame (sodium) with the red shades.
Things to Be Careful About
The yellow part of the flame is usually due to sodium contamination and is not used to identify ions. The answer needs two separate possible ions.
Explain why it is difficult to make a definite conclusion from the observation in (a)(i).
______
Answer
Different ions give similar flame colours: both lithium and calcium give a red shade, so the colour alone cannot identify which ion is present.
Different ions give similar flame colours.
Walkthrough
The red flame colour could be produced by lithium or by calcium because their flame colours are similar shades of red. A single colour therefore does not uniquely identify one ion, so a definite conclusion cannot be made.
Key Takeaways
Flame colours are not unique to one element. To confirm an ion, further tests are needed.
Common Mistakes
- Saying 'the flame is not hot enough' or 'the splint burned' — the mark is about similar colours of different ions.
- Giving no reason for why it is difficult.
Things to Be Careful About
Use the idea that different ions can give the same/similar colour, not that the observation is unreliable.
The student adds dilute nitric acid to R, followed by aqueous barium nitrate.
The student concludes that R does not contain sulfate ions.
State the observation which allows the student to make this conclusion.
______
Answer
Colourless solution / no change (no white precipitate forms).
Colourless solution / no change.
Walkthrough
To test for sulfate ions, dilute nitric acid is added to remove carbonate ions, then barium nitrate is added. If sulfate ions were present, a white precipitate of barium sulfate would form. The student concludes no sulfate is present, so the observation must be that no white precipitate forms and the solution stays colourless.
Key Takeaways
Sulfate test: acidify with nitric acid, add barium nitrate; white precipitate = sulfate. No precipitate = no sulfate.
Common Mistakes
- Writing 'white precipitate' — that would show sulfate is present.
- Forgetting that the observation is the absence of a precipitate.
Things to Be Careful About
'No change' or 'colourless solution' are accepted. Do not say 'no reaction' without saying what is seen.
The student adds dilute nitric acid to R, followed by aqueous silver nitrate.
The student observes a white precipitate.
State a conclusion from this observation.
______
Answer
R contains chloride ions, .
R contains chloride ions, Cl-.
Walkthrough
Silver nitrate is used to test for halide ions. Chloride ions give a white precipitate of silver chloride. Since nitric acid was added first, carbonate ions are removed, so the white precipitate must be due to chloride ions. Conclusion: R contains chloride ions.
Key Takeaways
Chloride test: acidify with nitric acid, add silver nitrate; white precipitate = chloride. Bromide gives cream, iodide gives yellow.
Common Mistakes
- Saying 'sulfate' or 'carbonate' — the white precipitate with silver nitrate after acidification indicates chloride.
- Forgetting to state the ion rather than just the precipitate.
Things to Be Careful About
Write 'chloride ions' or .
The student adds aqueous silver nitrate to aqueous sodium carbonate. A white precipitate forms.
The student adds dilute nitric acid a drop at a time until no further change is seen.
The white precipitate dissolves to form a colourless solution.
Answer
Effervescence / fizzing / bubbles (carbon dioxide gas is given off).
Effervescence / fizzing / bubbles.
Walkthrough
Silver nitrate and sodium carbonate give a white precipitate of silver carbonate. Adding nitric acid reacts with the carbonate, producing carbon dioxide gas. The observation is effervescence/fizzing/bubbles as the precipitate dissolves.
Key Takeaways
Carbonates react with acids to give carbon dioxide, seen as effervescence.
Common Mistakes
- Writing 'the precipitate dissolves' only — that is already given; the other observation is gas bubbles.
- Saying 'hydrogen' instead of carbon dioxide.
Things to Be Careful About
Effervescence is the key observation; the gas is carbon dioxide.
Answer
To remove carbonate ions, which would also give a white precipitate with silver nitrate, so the white precipitate shows chloride ions only.
To remove carbonate ions, which would also give a white precipitate with silver nitrate.
Walkthrough
In part (c), silver nitrate is used to test for chloride. However, carbonate ions also form a white precipitate with silver ions (silver carbonate). Adding nitric acid first removes carbonate ions by converting them to carbon dioxide and water, so any white precipitate that forms afterwards must be silver chloride. This makes the test specific for chloride.
Key Takeaways
Acidification removes interfering ions such as carbonate before testing for chloride or sulfate.
Common Mistakes
- Saying 'to make the solution acidic' without saying why.
- Not mentioning that carbonate also gives a white precipitate with silver nitrate.
Things to Be Careful About
The mark is for the idea of preventing/removing carbonate interference, or distinguishing chloride from carbonate.
The student adds a few drops of aqueous sodium hydroxide to R.
State the observation the student makes which suggests that R may contain .
______
Answer
A white precipitate forms.
A white precipitate forms.
Walkthrough
Adding sodium hydroxide to a solution tests for metal cations. Calcium ions form a white precipitate of calcium hydroxide. The observation that suggests is therefore a white precipitate.
Key Takeaways
Many cations give precipitates with NaOH; calcium gives a white precipitate. This only suggests calcium, it does not confirm it.
Common Mistakes
- Saying 'blue precipitate' (that would suggest copper).
- Treating the white precipitate as definite proof of calcium.
Things to Be Careful About
Use 'white precipitate' exactly; the confirmatory test is in part (f).
Describe what else the student needs to do to confirm that ions are present.
State what the student observes.
what the student does ______
observation ______
Answer
What the student does: add excess aqueous sodium hydroxide.
Observation: the white precipitate remains (it is insoluble in excess).
Add excess aqueous sodium hydroxide; white precipitate remains.
Walkthrough
To confirm calcium, add excess sodium hydroxide. Calcium hydroxide is insoluble in excess, so the white precipitate remains. (If the precipitate dissolved in excess, it would suggest aluminium or zinc, not calcium.) Alternatively, adding aqueous ammonia to a calcium solution gives no precipitate, or only a very slight one, because calcium hydroxide is sparingly soluble.
Key Takeaways
Calcium is confirmed by a white precipitate with NaOH that does not dissolve in excess. Aluminium and zinc hydroxides dissolve in excess NaOH.
Common Mistakes
- Writing that the precipitate dissolves in excess — that would rule out calcium.
- Giving only 'add sodium hydroxide' without stating the observation.
- Using a flame test alone as confirmation (it was already inconclusive).
Things to Be Careful About
The answer needs both the action and the observation. The mark scheme accepts the ammonia alternative.
The student warms the solution from (e).
The student concludes that ammonia gas is produced.
State the observation the student makes which confirms that ammonia gas is produced.
______
Answer
Damp red litmus paper turns blue.
Damp red litmus paper turns blue.
Walkthrough
Ammonia gas is alkaline. To confirm it, hold damp red litmus paper in the gas; it turns blue. This is the standard test for ammonia.
Key Takeaways
Ammonia turns damp red litmus blue.
Common Mistakes
- Saying 'blue litmus turns red' — that is for acids.
- Saying 'limewater turns milky' — that is for carbon dioxide.
Things to Be Careful About
Use damp red litmus paper; the colour change is red to blue.
Answer
Ammonium ion, .
Ammonium ion, NH4+.
Walkthrough
When a solution containing ammonium ions is warmed with sodium hydroxide, ammonia gas is produced. Since the student detected ammonia, the other cation in R must be ammonium, .
Key Takeaways
Ammonium ions + warm alkali → ammonia gas. This is how ammonium ions are identified.
Common Mistakes
- Writing 'ammonia' as the cation instead of 'ammonium'.
- Giving another cation such as sodium.
Things to Be Careful About
The ion is ammonium, , not ammonia, .
Solution R is made from a mixture of two different ionic compounds.
Suggest the names of these two compounds.
______
Answer
Calcium chloride and ammonium chloride.
Calcium chloride and ammonium chloride.
Walkthrough
From the observations, R contains calcium ions (red flame, white precipitate with NaOH insoluble in excess), ammonium ions (ammonia gas with warm NaOH), and chloride ions (white precipitate with acidified silver nitrate). To make a mixture of two ionic compounds, the ions must pair up: calcium with chloride gives calcium chloride, , and ammonium with chloride gives ammonium chloride, .
Key Takeaways
Evidence from qualitative tests can be combined to identify the ions present and then name the ionic compounds.
Common Mistakes
- Naming only one compound.
- Writing 'calcium and ammonium chloride' as one compound.
- Including ions that were not detected, such as sulfate or carbonate.
Things to Be Careful About
Both compounds contain chloride because chloride was the only anion detected. The names are calcium chloride and ammonium chloride.
Barium carbonate decomposes when heated. The word equation for the reaction is shown.
Plan an experiment to determine the percentage loss in mass when barium carbonate is heated.
Your plan must include the use of common laboratory apparatus and a sample of barium carbonate. No other chemicals should be used.
Your plan must include:
- the apparatus needed
- the method to use and the measurements to take
- procedures to ensure that the percentage determined is as accurate as possible
- how the measurements are used to determine the percentage loss in mass.
You may draw a diagram to help answer the question.
Answer
Apparatus:
- a crucible (or evaporating dish)
- a pipe-clay triangle on a tripod and a Bunsen burner
- tongs
- a balance
Method:
- Place the empty crucible on the balance and record its mass, or use the tare/zero function so the balance shows zero with the empty crucible on it.
- Add a sample of B to the crucible and reweigh it. The mass recorded is the initial mass of B.
- Heat the crucible strongly for some time.
- Remove the Bunsen burner, allow the crucible to cool, and reweigh it with the residue.
- Heat again, cool, and reweigh. Repeat this until the mass after further heating is the same as the previous mass: constant mass has been reached.
To make the result as accurate as possible:
- Heat to constant mass so that all of B has decomposed.
- Repeat the whole experiment and average the calculated percentage losses to check reliability and to identify anomalous results.
- Be careful not to lose any solid from the crucible while heating or transferring it.
- No other chemicals are needed: the only thing changing the mass is the gas released on heating.
Calculation:
Weigh a crucible, add a sample of B and weigh; heat the sample, cool, reweigh, and repeat until constant mass; percentage loss = (initial mass of B - final mass of B) / initial mass of B x 100.
Walkthrough
The question asks for a plan to determine the percentage loss in mass when a solid carbonate, B, is heated strongly. Barium carbonate decomposes on heating, releasing carbon dioxide gas:
The carbon dioxide escapes as a gas, so the solid that remains is lighter than the sample you started with. The mass lost is the mass of carbon dioxide given off.
Because this is a planning question, the answer is marked in the four usual sections: apparatus, method and measurements, accuracy, and calculation.
Apparatus — you need something that can be heated safely, such as a crucible, and a balance to measure mass. A Bunsen burner gives the heat needed.
Method and measurements — the key idea is to measure the mass of B before and after heating. The simplest way is to put the empty crucible on the balance and use the tare/zero function, so the balance reads the mass of the sample alone when you add B. If you do not use the zero function, you must subtract the mass of the empty crucible from the mass of crucible + B.
Heating to constant mass — heating the sample once may not be enough to decompose all of the carbonate. You should heat, cool, weigh, then heat again and weigh again. When two consecutive weighings are the same, no more carbon dioxide is being produced, so the mass lost by the residue is complete.
Accuracy — the mark scheme awards a mark for repeating the experiment and taking an average, or repeating to test for reliability and spot anomalous results. It also awards a mark for heating until constant mass, because this makes the final mass reliable.
The final calculation compares the loss in mass with the original mass of the sample:
This gives the percentage of the sample that has been lost as gas.
Key Takeaways
- A planning answer must cover the apparatus, the method, the measurements, and how to make the results accurate.
- For heating experiments on solids, the idea of constant mass is very important: it tells you when the reaction is complete.
- A mass loss is removed, so the mass change is initial minus final, not final minus initial.
- A percentage is always calculated against the initial value, multiplied by 100.
- No other reagents are needed here; the experiment is simply a thermal decomposition.
Common Mistakes
- Heating the sample only once and not checking for constant mass. The decomposition may not be finished, so the mass loss is too small.
- Forgetting that the container has mass. Either tare the balance or subtract the mass of the empty container.
- Using "container + sample" as the mass of the sample in the numerator and denominator inconsistently.
- Writing the percentage formula as final mass ÷ initial mass, or mass loss ÷ final mass, both of which are wrong.
- Losing solid from the crucible by spitting or spillage during heating. This makes the mass loss appear too large.
Things to Be Careful About
- Use the same balance for all weighings, and record masses in grams to a sensible and consistent number of decimal places.
- Allow the crucible to cool before reweighing; hot apparatus affects the measured mass on a balance.
- If you use the tare function, the final mass of the sample is read directly. If you do not, subtract the mass of the empty crucible every time.
- In the calculation, the mass lost should be the decrease in mass of the sample only, after constant mass has been reached.