Physics 5054/11 — October/November 2025
Cambridge O-Level · Multiple Choice · answer key with instant marking and worked solutions
Topics Forces · Kinetic Particle Model of Matter · Sound · Reflection and Refraction of Light · Physical Quantities and Measurement · Kinematics · +18 more
Tap an option under each question to check it — your score builds as you go.
Object X is placed against a ruler.
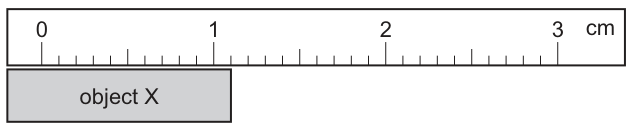
This ruler is placed against another ruler to measure the end correction.

What is the length of the object X?
Options
A
B
C
D
Working
From Fig. 1.1, the left edge of object X is aligned with the physical left end of the ruler. The right edge aligns with the mark at .
From Fig. 1.2, the distance between the physical end of the ruler and the mark (the end correction / space before zero) is:
Therefore, the total length of object X is the distance from the physical end to the mark plus the reading from to :
Answer
C
C
Walkthrough
-
Observe Fig. 1.1:
Object X is placed against the bottom edge of the ruler, with its left edge aligned flush with the physical left end of the ruler (not with the mark). The right edge of object X lines up with on the scale. -
Determine the end correction from Fig. 1.2:
When two identical rulers are placed together with the left physical end of the top ruler aligned with the mark of the bottom ruler, the mark of the top ruler aligns with the mark on the bottom ruler. This shows that there is a dead space of between the physical end of the ruler and the graduation mark. -
Calculate the true length of Object X:
The length of object X consists of two parts:- The space from the left physical edge of the ruler to the mark ().
- The distance along the scale from to the right edge of object X ().
This corresponds to option C.
Key Takeaways
- When an object is aligned with the physical edge of a ruler that has dead space before the zero mark, that dead space (end correction) must be added to the scale reading.
- Always check whether the object is aligned with the zero graduation or the physical edge of the measuring instrument.
Common Mistakes
- Subtracting the correction instead of adding: Mistakenly computing (Option A).
- Ignoring the end correction entirely: Reading only the scale position (Option B).
- Misreading the end correction: Reading the end correction as and calculating (Option D).
Things to Be Careful About
- Ensure the reading of the subdivisions is accurate: each small mark represents ().
- Look closely at Fig. 1.2 to verify which feature of the top ruler aligns with which mark on the bottom ruler.
Quantities can be described as scalar or vector.
Which row shows scalar quantities and vector quantities?
Options
| scalar quantities | vector quantities | |
|---|---|---|
| A | displacement, force, temperature | distance, weight, mass |
| B | displacement, mass, force | distance, weight, temperature |
| C | distance, force, weight | displacement, mass, temperature |
| D | distance, mass, temperature | displacement, force, weight |
Working
A scalar quantity has magnitude only. A vector quantity has magnitude and direction.
- distance: scalar
- mass: scalar
- temperature: scalar
- displacement: vector
- force: vector
- weight: vector
Row D is the only row that places all three scalars and all three vectors correctly.
Answer
D
D
Walkthrough
A scalar quantity is described only by its size, or magnitude. A vector quantity needs both a magnitude and a direction to be fully described.
Go through each quantity:
- distance is just how far something has travelled, so it is scalar.
- mass is the amount of matter in an object, so it is scalar.
- temperature is a measure of hotness, so it is scalar.
- displacement is distance in a stated direction, so it is vector.
- force has both size and direction, so it is vector.
- weight is the gravitational force on an object, acting downwards, so it is vector.
Check the rows:
- Row A puts displacement and force with the scalars, so it is wrong.
- Row B also puts displacement and force with the scalars, so it is wrong.
- Row C puts distance, force and weight with the scalars, so it is wrong.
- Row D correctly lists distance, mass and temperature as scalars, and displacement, force and weight as vectors.
Key Takeaways
- Scalars have magnitude only: distance, mass, temperature, speed, energy, time.
- Vectors have magnitude and direction: displacement, force, weight, velocity, acceleration.
- Weight is a force, so it is a vector, even though it is often confused with mass.
Common Mistakes
- Confusing weight with mass: mass is scalar, weight is a vector force.
- Thinking that force is always a vector but forgetting that displacement is also a vector.
- Assuming temperature could be a vector because it can go up or down; it has no direction in space, so it is scalar.
Things to Be Careful About
- Read the table headings carefully: the first column is scalar quantities, the second is vector quantities.
- A quantity is vector only if direction matters when describing it. If direction is not needed, it is scalar.
- In an MCQ, check every quantity in the chosen row, not just one or two.
The diagram shows the speed–time graphs for two objects moving with uniform acceleration.
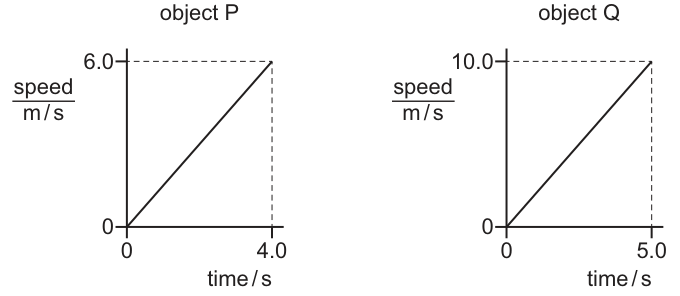
A student uses the graphs to make two conclusions.
- The distance travelled by object P is 26 m less than the distance travelled by object Q.
- The acceleration of object P is less than the acceleration of object Q.
Which conclusions are correct?
Options
A neither 1 nor 2
B 1 only
C 2 only
D both 1 and 2
Working
Distance travelled by P = area under graph = m.
Distance travelled by Q = area under graph = m.
Difference in distance = m. Conclusion 1 is incorrect.
Acceleration of P = gradient of graph = m/s.
Acceleration of Q = gradient of graph = m/s.
Difference in acceleration = m/s. Conclusion 2 is correct.
Answer
C
C
Walkthrough
The question provides two speed-time graphs and asks to evaluate two conclusions about the objects' motion. We must calculate both the distance travelled and the acceleration for each object from the graphs.
For object P, the graph is a straight line from (0, 0) to (4.0, 6.0). The distance travelled is the area under the graph, which is a triangle: m. The acceleration is the gradient of the line: m/s.
For object Q, the graph is a straight line from (0, 0) to (5.0, 10.0). The distance travelled is m. The acceleration is m/s.
Now we test the conclusions. Conclusion 1 claims the distance difference is 26 m, but m, so it is false. Conclusion 2 claims the acceleration difference is 0.50 m/s, and m/s, so it is true. Only conclusion 2 is correct, which corresponds to option C.
Key Takeaways
- The area under a speed-time graph gives the distance travelled.
- The gradient of a speed-time graph gives the acceleration.
- For straight-line graphs starting from the origin, these are simply the area and gradient of a right-angled triangle.
Common Mistakes
- Confusing the area under the graph with the final speed or time.
- Calculating the gradient as time divided by speed instead of speed divided by time.
- Misreading the graph axes or missing the final values (e.g., reading 6.0 m/s at 5.0 s for P).
- Forgetting to multiply by when calculating the area of a triangle.
Things to Be Careful About
- Units: ensure distance is in metres (m) and acceleration is in m/s.
- Significant figures: the graph values are given to 2 or 3 significant figures, so answers should be consistent (e.g., 1.5 m/s, not 1.500).
- Read the axes carefully: the time axis for P ends at 4.0 s, while for Q it ends at 5.0 s.
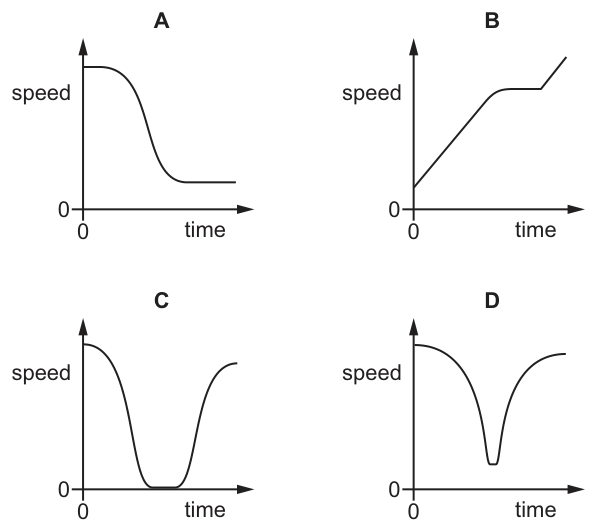
Which speed–time graph represents the motion of a railway train making a short stop at a station?
Options
Working
A train making a short stop at a station will:
- Decelerate as it approaches (speed decreases).
- Stop at the station (speed is zero for a period of time).
- Accelerate as it leaves (speed increases).
Analyzing the graphs:
- Graph A: speed decreases to a constant non-zero value.
- Graph B: speed increases from zero.
- Graph C: speed decreases to zero, remains at zero for a time, then increases. This matches the scenario.
- Graph D: speed decreases to zero and immediately increases, with no time spent at zero speed.
Answer
C
C
Walkthrough
A speed-time graph plots speed on the vertical axis and time on the horizontal axis. The gradient of the graph represents acceleration (or deceleration if negative). A horizontal line at speed = 0 means the object is stationary.
For a train making a short stop:
- It approaches the station and slows down, so the speed decreases (downward slope).
- It stops at the station, meaning it is stationary for a period of time. On the graph, this is a horizontal section lying on the time axis (speed = 0).
- It leaves the station and speeds up, so the speed increases (upward slope).
Graph C is the only option that shows the speed reaching zero and staying there for a measurable interval before increasing again. Graph D shows the speed briefly touching zero but not remaining there, which would not be a stop. Graph A shows the train slowing to a lower constant speed, and Graph B shows a train accelerating from rest.
Key Takeaways
- Speed-time graphs show how speed changes over time.
- A horizontal section on the time axis (speed = 0) represents a period of rest.
- Deceleration is a downward slope, acceleration is an upward slope.
Common Mistakes
- Choosing Graph D: this shows the speed briefly touching zero but not staying there. A "stop" means remaining stationary for some time, not just an instantaneous change.
- Choosing Graph A: this shows the train slowing down to a lower constant speed, not stopping completely.
- Confusing speed-time graphs with distance-time graphs.
Things to Be Careful About
- Ensure you are reading the vertical axis as "speed", not "distance". If it were a distance-time graph, a horizontal line on the axis would mean the distance is zero (back at the start), which is different. Here, speed = 0 correctly means stationary.
- "Short stop" implies a non-zero duration at zero speed, which eliminates Graph D.
The diagram shows an athlete doing press-ups on a floor. The athlete is using both hands. The area of contact of each hand with the floor is . The athlete’s toes act as a pivot during each press-up.
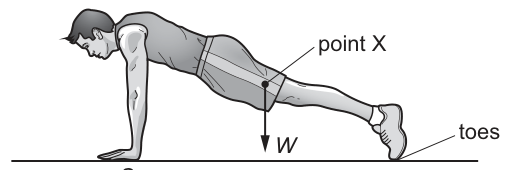
The athlete’s weight acts through point X. The distance between his toes and point X is three quarters of the distance between his toes and his shoulders.
What is the pressure exerted on the palm of each of the athlete’s hands?
Options
A
B
C
D
Working
Take moments about the toes (pivot). Let be the distance from the toes to the hands. The weight acts at point X, which is at distance from the toes.
Let be the total upward force from both hands. Taking anticlockwise moments about the toes:
The athlete uses both hands, so the force on each hand is half the total:
The pressure on each palm is the force on that hand divided by the contact area :
Answer
B
B
Walkthrough
- Identify the pivot and forces: The toes act as the pivot. The weight acts downwards at point X. The floor pushes up on the hands with a total upward force .
- Apply the principle of moments: For the athlete to be in equilibrium, the clockwise moment about the toes must equal the anticlockwise moment. Let the distance from toes to hands be . The problem states the distance from toes to X is of the distance from toes to shoulders (hands), so the distance to X is .
Dividing both sides by , we find the total upward force from the hands is . - Force per hand: The athlete is using both hands. Assuming the weight is distributed symmetrically, each hand supports half of the total upward force.
- Calculate pressure: Pressure is defined as force divided by area (). The question asks for the pressure on the palm of each hand, and the area of contact for each hand is given as .
Key Takeaways
- The principle of moments is used to find the reaction force at a point when a load is applied at a different distance from a pivot.
- When a total load is supported by multiple identical contact points (like two hands), the force on each point is the total force divided by the number of points.
- Pressure is always calculated using the force acting on a specific area (), not the total force over the total area, unless the question asks for average pressure over the whole contact region.
Common Mistakes
- Forgetting there are two hands: Students often calculate the total force and then divide by the area of one hand , getting (Option D). The question asks for pressure on each palm, so the force per hand must be used.
- Using the wrong distance: Confusing the distance from toes to X () with the distance from shoulders to X (). The moments must be taken about the toes (pivot), so distances are measured from the toes.
- Calculating total pressure: Dividing the total force by the total area gives , which is numerically correct here, but conceptually the question asks for pressure on each palm, so using force per hand and area per hand is the direct route.
Things to Be Careful About
- Read the distance ratio carefully: "The distance between his toes and point X is three quarters of the distance between his toes and his shoulders." This means .
- Unit of area: The area is given for each hand. Do not assume is the total area. If the question had said "total area of contact is ", the answer would be different. Here, is clearly "the area of contact of each hand".
- Vector directions: Weight acts down, reaction forces act up. Moments about the pivot must balance.
A parachutist falls towards the ground at constant speed with a fully open parachute.
Which statement is correct?
Options
A There are no forces acting on the parachutist.
B The upward force on the parachute is equal to the weight of the parachutist.
C The upward force on the parachute is greater than the weight of the parachutist.
D The upward force on the parachute is less than the weight of the parachutist.
Working
At constant speed, the acceleration is zero, so the resultant force on the parachutist is zero. The only vertical forces are the downward weight and the upward air resistance (drag) on the parachute. For the resultant force to be zero, these two forces must be equal.
Answer
B
B
Walkthrough
The parachutist is falling at constant speed. Constant speed means no acceleration, so by Newton's first law the resultant force on the parachutist must be zero.
There are two vertical forces acting:
- the downward weight of the parachutist,
- the upward air resistance (drag) on the parachute.
For the resultant force to be zero, the upward force must exactly balance the downward weight. So the correct statement is B.
Option A is wrong because there are forces acting: weight and air resistance. Option C would mean the resultant force is upward, so the parachutist would slow down. Option D would mean the resultant force is downward, so the parachutist would speed up. Neither matches constant speed.
Key Takeaways
- Constant speed does not mean no forces; it means the forces are balanced.
- When the resultant force is zero, there is no acceleration, so an object moves at constant velocity.
- A parachutist with a fully open parachute reaches terminal velocity when air resistance equals weight.
Common Mistakes
- Saying "there are no forces acting" instead of "the forces are balanced".
- Choosing "greater than" or "less than" without checking that a non-zero resultant force would cause acceleration.
- Confusing weight with mass: the upward force balances the weight, not the mass.
Things to Be Careful About
- The phrase "constant speed" in this context means constant velocity, because the parachutist continues falling in the same direction.
- The upward force is air resistance or drag, not a normal contact force.
- The resultant force is zero, but individual forces are still present and equal in size.
A student measures the density of an irregularly shaped stone.
Which items of equipment are needed?
Options
A a balance and a measuring cylinder containing water
B a balance and a ruler
C a ruler and a measuring cylinder containing water
D a measuring cylinder containing water only
Working
Density is mass divided by volume, so both must be measured.
- A balance measures the mass of the stone.
- A measuring cylinder containing water measures the volume of the irregular stone by the rise in water level when the stone is fully submerged.
- A ruler cannot give the volume of an irregular shape.
Therefore the correct option is A.
Answer
A
A
Walkthrough
To find the density of any object you need its mass and its volume: .
For an irregularly shaped stone, the mass is found using a balance. The volume cannot be found by measuring length, width and height with a ruler, because the stone is not a regular shape. Instead, the stone is lowered into a measuring cylinder containing water. The increase in the water level gives the volume of the stone.
So the two items needed are a balance and a measuring cylinder containing water.
- Option A gives both, so it is correct.
- Option B has a balance and a ruler, but a ruler cannot measure the volume of an irregular shape.
- Option C has a ruler and a measuring cylinder, but no balance, so the mass is missing.
- Option D has only a measuring cylinder, so the mass is missing.
Key Takeaways
- Density is calculated from mass and volume.
- A balance measures mass.
- A measuring cylinder with water measures the volume of an irregular solid by displacement.
- A ruler is only useful for regular shapes whose volume can be calculated from dimensions.
Common Mistakes
- Choosing C or D because the volume by displacement is recognised, but forgetting that mass is also needed.
- Choosing B because a balance is included, but not realising a ruler cannot give the volume of an irregular stone.
- Thinking the measuring cylinder measures mass instead of volume.
Things to Be Careful About
- The stone must be fully submerged for the displacement reading to give its complete volume.
- Read the water level at the bottom of the meniscus, at eye level, to avoid parallax error.
- Density is mass per unit volume, so both quantities must be measured; one without the other is not enough.
The table shows how the extension of a spring varies with load.
| load / | 0 | 2 | 4 | 6 | 8 | 10 | 12 | 14 | 16 |
|---|---|---|---|---|---|---|---|---|---|
| extension / | 0 | 3 | 6 | 9 | 12 | 15 | 20 | 27 | 38 |
Between which two loads is the limit of proportionality?
Options
A and
B and
C and
D and
Working
The limit of proportionality is where the extension stops being proportional to the load — the ratio extension/load stops being constant.
| load / | 2 | 4 | 6 | 8 | 10 | 12 | 14 | 16 |
|---|---|---|---|---|---|---|---|---|
| extension / | 3 | 6 | 9 | 12 | 15 | 20 | 27 | 38 |
| extension ÷ load / () | 1.5 | 1.5 | 1.5 | 1.5 | 1.5 | 1.7 | 1.9 | 2.4 |
The ratio is constant at 1.5 cm/N up to 10 N. At 12 N it rises to 1.7 cm/N, so the extension is no longer proportional to the load. The limit of proportionality lies between 10 N and 12 N.
Options A and B lie inside the proportional region; option D is already beyond the limit.
Answer
C
C
Walkthrough
A spring that obeys Hooke's law extends in proportion to the load: double the load and the extension doubles. The limit of proportionality is reached when this relationship stops being true, so the way to locate it is to check whether the extension per newton stays the same as the load increases.
From the table, every 2 N step gives an extra 3 cm of extension up to 10 N: 3, 6, 9, 12, 15 cm. That is a constant 1.5 cm per newton. At 12 N the extension is 20 cm, which is more than the 18 cm a proportional spring would give (12 × 1.5 = 18 cm). So between 10 N and 12 N the spring has passed its limit of proportionality.
Options A and B lie at loads below 10 N, where proportionality still holds — the extension per newton is still 1.5 cm/N. Option D is so far past the limit that the spring is already deforming non-linearly. Option C correctly identifies the interval where the behaviour first changes.
Key Takeaways
- The limit of proportionality is the point at which extension stops being proportional to load.
- To locate it, compare the ratio of extension to load (or the increase in extension) for each successive load step.
- Up to the limit the ratio is constant; beyond it the ratio grows.
Common Mistakes
- Choosing D because it is the last pair of loads in the table — the limit is where proportionality first fails, not where the data ends.
- Confusing the limit of proportionality with the point where the spring begins to stretch plastically or snaps.
- Guessing without checking that the extension per newton is still 1.5 at the relevant loads.
Things to Be Careful About
- Take the ratio at each load, or multiply the load by 1.5 and compare with the actual extension.
- The limit lies between the last proportional load (10 N) and the first non-proportional load (12 N).
- Keep the unit cm/N in mind when comparing the ratios.
A man stands at rest on the surface of the Earth.
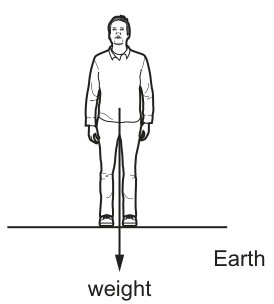
The weight of the man is the gravitational force that acts on him.
According to Newton’s third law, the weight of the man is one force in a pair of forces.
Which force is the other force in the pair?
Options
A a force downwards on the Earth
B a force downwards on the man
C a force upwards on the Earth
D a force upwards on the man
Answer
C
C
Walkthrough
The weight of the man is the gravitational force exerted by the Earth on the man, acting downwards. Newton's third law states that forces always occur in equal and opposite pairs acting on two different objects. If the Earth pulls the man downwards (weight), the man must pull the Earth upwards with an equal gravitational force. This upward gravitational pull on the Earth is the other force in the pair. Option D (a force upwards on the man) is the normal contact force from the ground; it balances the weight so the man is at rest, but it is not the Newton's third law pair because it acts on the same object (the man) and is a contact force, not a gravitational force.
Key Takeaways
- Newton's third law pairs always act on two different objects and are of the same type of force.
- Do not confuse a balanced force (normal reaction balancing weight) with a Newton's third law pair.
Common Mistakes
- Choosing D: The normal reaction force (upwards on the man) is often mistakenly chosen as the third law pair to weight. It balances the weight, but it is a contact force, whereas weight is a gravitational force. The third law pair to weight is the gravitational pull of the man on the Earth.
- Choosing A: Forgetting that the reaction force must be opposite in direction.
Things to Be Careful About
- Always check the objects the forces act on. A third law pair acts on two different objects (A on B and B on A). Weight is Earth on man, so the pair is man on Earth.
- Always check the type of force. Weight is gravitational, so its third law pair must also be gravitational. The normal contact force is a contact force and cannot be the pair to weight.
The pressure and volume of a sample of gas at constant temperature are measured and plotted on a graph.
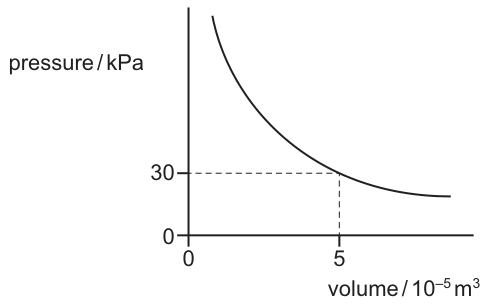
The pressure is decreased to .
What is the new volume of this sample of gas?
Options
A
B
C
D
Working
From the graph, at an initial pressure kPa, the volume is m.
The gas is at constant temperature, so Boyle's law applies:
Substitute the known values, with the new pressure kPa:
Solve for the new volume :
Answer
A
A
Walkthrough
The question asks for the new volume of a gas sample when its pressure is decreased, with the temperature held constant. This is a direct application of Boyle's law, which states that for a fixed mass of gas at constant temperature, the product of pressure and volume is constant ().
Step 1: Read the initial state from the graph.
The graph plots pressure against volume. The axes are labelled 'pressure / kPa' and 'volume / m'. The dashed lines show that when the pressure is kPa, the volume is on the x-axis. Because of the axis label, this means m.
Step 2: Apply Boyle's law.
We are given the new pressure kPa. We need to find the new volume . Rearranging gives:
Step 3: Substitute and calculate.
In standard form, this is m.
This matches option A.
Key Takeaways
- Boyle's law () applies to a fixed mass of gas at constant temperature.
- Always read the axis labels carefully; a multiplier like must be included in your calculation.
- When pressure decreases, volume must increase, so the answer should be larger than the initial volume ( m). m is indeed larger, which is a good sanity check.
Common Mistakes
- Ignoring the axis multiplier: The x-axis is 'volume / m', so the value 5 represents m, not 5 m. Forgetting the leads to incorrect numerical answers.
- Inverting the ratio: Dividing by 30 and multiplying by 12.5 instead of the other way around gives m, showing a conceptual error in rearranging the formula.
- Confusing the axes: Reading the pressure from the x-axis or volume from the y-axis.
Things to Be Careful About
- The x-axis label 'volume / m' means the numbers on the axis must be multiplied by to get the volume in cubic metres. Always convert to standard SI units before substituting into the equation, or keep the multiplier consistent throughout.
- Boyle's law only applies when the temperature and mass of the gas are constant. The question explicitly states 'at constant temperature', so the law is valid here.
- Standard form requires the number to be between 1 and 10. must be written as to match the options.
The diagram shows a solid metal block.
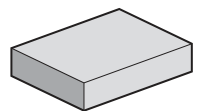
Which equation is used to calculate the density of the metal from which the block is made?
Options
A
B
C
D
Answer
B
B
Walkthrough
Density is defined as mass per unit volume. The standard equation is . Option A multiplies mass and volume, which is incorrect. Option C gives weight divided by area, which is the equation for pressure (since weight is a force). Option D uses weight instead of mass, which is incorrect because density is an intrinsic property based on mass, not weight (which depends on gravitational field strength). Therefore, option B is the correct equation.
Key Takeaways
- Density is mass divided by volume.
- Distinguish between mass and weight in physical equations.
Common Mistakes
- Confusing the density equation with the pressure equation (weight/area or force/area).
- Using weight instead of mass in the density equation.
Things to Be Careful About
- Remember that density depends on mass, not weight. Weight changes with gravitational field strength, but mass and density do not.
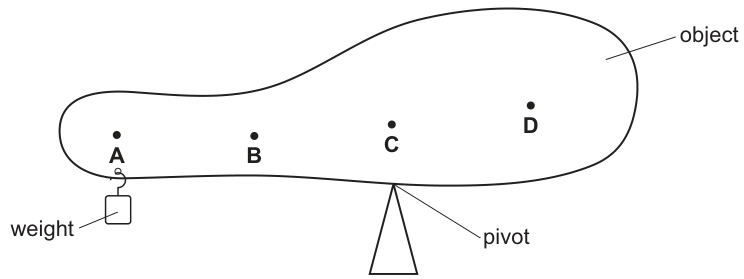
A student balances a non-uniform object on a pivot. To do this, a weight is suspended near the left-hand end of the object, as shown.
Where is the centre of gravity of the object?
Options
Answer
D
D
Walkthrough
When an object is balanced on a pivot, the resultant moment about the pivot is zero. For a rigid body (or a system of bodies) in this state of equilibrium, the centre of gravity must lie vertically above the pivot point. If the centre of gravity were anywhere else—say, to the left or right of the pivot—gravity would create an unbalanced turning effect (a moment), and the object would rotate until the centre of gravity was directly above the pivot.
In the diagram, the object is balanced on the triangular pivot. We examine the four marked points:
- Points A, B, and C are all to the left of the vertical line passing through the pivot.
- Point D is located vertically above the pivot.
Because point D is the only point directly above the pivot, it is the only position where the centre of gravity can be for the object to remain balanced. Note that the object is non-uniform (wider on the right) and has an extra weight suspended from the left end; both of these factors shift the combined centre of gravity to the right, which is why the pivot must be placed to the right of the object's geometric middle.
Key Takeaways
- The centre of gravity of a balanced object is always vertically above the point of support (the pivot).
- For a non-uniform object, or an object with additional masses attached, the centre of gravity is not necessarily at its geometric centre.
Common Mistakes
- Choosing a point near the geometric centre of the object: the object is non-uniform, so its centre of gravity is not at its middle.
- Choosing the point where the extra weight is suspended: the suspended weight is just one part of the system; the centre of gravity is where the total weight of the system acts.
- Confusing the pivot with the centre of gravity: the pivot is the support providing an upward normal reaction force, while the centre of gravity is the point where the downward weight acts. They are vertically aligned, but distinct points.
Things to Be Careful About
- Always remember that "balanced" means the object is in rotational equilibrium. The condition for this when supported at a single point is that the centre of gravity is vertically above that support point.
- Do not assume the centre of gravity is at the middle of the shape, especially when the shape is non-uniform or when extra masses are attached.
Seven energy sources are listed.
fossil fuel hydroelectric solar nuclear geothermal wind tides
How many of these energy sources are renewable energy sources?
Options
A 3
B 4
C 5
D 6
Answer
Renewable energy sources: hydroelectric, solar, geothermal, wind, tides. That is 5 sources.
C
C
Walkthrough
There are seven energy sources listed. We need to decide which ones can be replaced naturally within a short timescale (renewable) and which cannot (non-renewable).
- Fossil fuel — non-renewable, because coal, oil and gas take millions of years to form.
- Hydroelectric — renewable, because the water cycle continually provides falling water.
- Solar — renewable, because the Sun's energy is continually available.
- Nuclear — non-renewable, because the uranium fuel is a finite resource that is mined.
- Geothermal — renewable, because heat from the Earth's interior is continuously produced.
- Wind — renewable, because moving air is continually produced by solar heating of the atmosphere.
- Tides — renewable, because the Moon's gravitational pull continually causes tides.
So the renewable sources are hydroelectric, solar, geothermal, wind and tides: 5 renewable sources.
Key Takeaways
- Renewable energy sources are those that are naturally replenished over a short timescale.
- Non-renewable sources are finite and will eventually run out.
- Common renewable sources include solar, wind, hydroelectric, geothermal, tides and biomass.
- Common non-renewable sources include fossil fuels and nuclear fuels.
Common Mistakes
- Counting nuclear as renewable because it does not burn a fossil fuel. Nuclear fuel is finite, so it is non-renewable.
- Forgetting geothermal or tides when listing renewable sources.
Things to Be Careful About
- Read the list carefully and classify each source individually before counting.
- The mark scheme expects the correct count, so make sure you have not missed any renewable source.
A student heats a substance in which the particles are in fixed positions and vibrate.
After a short period of heating, the particles start to flow past each other, but the forces between the particles remain strong.
What has happened to the substance?
Options
A It has condensed.
B It has evaporated.
C It has frozen.
D It has melted.
Working
A solid has particles in fixed positions that vibrate. A liquid has particles that can flow past each other while the forces between them remain strong. Heating the solid until its particles can flow past each other is melting.
- A Condensing is gas to liquid — wrong.
- B Evaporating is liquid to gas from the surface — wrong.
- C Freezing is liquid to solid — wrong.
- D Melting is solid to liquid — correct.
Answer
D
D
Walkthrough
The question describes the particles of a substance before and after heating.
Before heating: particles are in fixed positions and vibrate. This is the particle arrangement of a solid.
After heating: particles start to flow past each other, but the forces between them remain strong. This is the particle arrangement of a liquid. In a gas, the forces between particles are very weak and the particles are far apart, so the phrase "forces remain strong" confirms the substance has become a liquid, not a gas.
The change from solid to liquid is called melting. Heating supplies energy to the particles, allowing them to break out of their fixed positions while still staying close together.
Now check each option:
- A It has condensed — condensation is gas to liquid. The substance started as a solid, so this is wrong.
- B It has evaporated — evaporation is liquid to gas, and only from the surface. The substance started as a solid and ended as a liquid, so this is wrong.
- C It has frozen — freezing is liquid to solid. The substance started as a solid and was heated, so this is wrong.
- D It has melted — melting is solid to liquid. This matches the description exactly.
Key Takeaways
- Solids: particles in fixed positions, vibrating about those positions.
- Liquids: particles can slide/flow past each other, but forces between them remain strong.
- Gases: particles are far apart, move quickly and randomly, with very weak forces between them.
- Melting is the change from solid to liquid and requires heating.
Common Mistakes
- Choosing evaporated because heating is mentioned. Evaporation is a liquid-to-gas change, not a solid-to-liquid change.
- Choosing condensed or frozen without checking the starting state. The substance starts as a solid, so it cannot condense or freeze.
- Ignoring the phrase "forces remain strong". This rules out a gas and confirms the final state is a liquid.
Things to Be Careful About
- Learn the four main changes of state in both directions: melting/freezing, boiling/condensing, and evaporation.
- "Flow past each other" is a key phrase for a liquid; "fixed positions" is a key phrase for a solid.
- The question is about the whole substance, not just its surface, so evaporation is not appropriate.
A student investigates how changing the temperature of a gas affects the volume of the gas.
The gas is kept at a constant pressure.
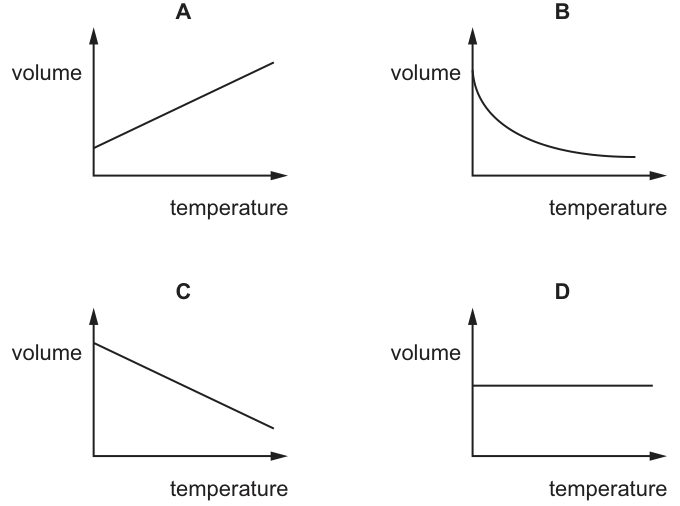
Which graph shows the relationship between the temperature and the volume of a sample of gas at constant pressure?
Options
Working
According to Charles's law, for a fixed mass of gas at constant pressure, the volume is directly proportional to the absolute temperature ().
This means that as the temperature increases, the volume increases in a linear fashion.
- If the temperature axis is in kelvin, the graph is a straight line passing through the origin.
- If the temperature axis is in degrees Celsius, the graph is a straight line with a positive gradient that does not pass through the origin. Instead, it has a positive y-intercept (volume at is greater than zero), and extrapolates to zero volume at .
Evaluating the options:
- Graph A: A straight line with a positive slope starting above zero volume. This correctly represents Charles's law for temperature in degrees Celsius.
- Graph B: A downward curving line. This represents an inverse relationship, such as Boyle's law ( at constant ), not Charles's law.
- Graph C: A straight line with a negative slope. This incorrectly shows volume decreasing as temperature increases.
- Graph D: A horizontal line. This incorrectly shows volume remaining constant regardless of temperature changes.
Answer
A
A
Walkthrough
The question asks for the graph showing the relationship between the volume and temperature of a gas at constant pressure. This is described by Charles's law, which states that the volume of a fixed mass of gas is directly proportional to its absolute temperature () when pressure is held constant.
Mathematically, , where is in kelvin and is a constant. If we convert the temperature to degrees Celsius (), the equation becomes . This is the equation of a straight line () with a positive gradient and a positive y-intercept . Therefore, the graph of volume against temperature in degrees Celsius is a straight line with a positive slope that starts above zero volume on the vertical axis.
Looking at the options:
- Graph A is a straight line with a positive gradient and a positive y-intercept, matching our derivation.
- Graph B is a curve showing an inverse relationship, which would be correct for Boyle's law (volume against pressure at constant temperature), but not for Charles's law.
- Graph C shows volume decreasing as temperature increases, which contradicts the kinetic particle model (particles move faster and push harder, expanding the gas if pressure is constant).
- Graph D shows no change in volume with temperature, which is incorrect.
Thus, Graph A is the correct answer.
Key Takeaways
- Charles's law: Volume is directly proportional to absolute temperature at constant pressure.
- The graph of volume against temperature in kelvin is a straight line through the origin.
- The graph of volume against temperature in degrees Celsius is a straight line with a positive gradient and a positive y-intercept (extrapolating to zero volume at ).
Common Mistakes
- Choosing Graph B: Confusing Charles's law with Boyle's law. Boyle's law relates volume and pressure at constant temperature, giving a hyperbolic curve ().
- Choosing Graph D: Assuming volume is constant. Volume only remains constant if the gas is in a rigid container (constant volume process), but the question specifies constant pressure.
- Forgetting the intercept: Assuming the line must pass through the origin. This is only true if the temperature axis is in kelvin. If it is in Celsius, the line must have a positive y-intercept.
Things to Be Careful About
- Always check the units on the axes. If the temperature is in kelvin, the line passes through the origin. If it is in degrees Celsius, it has a positive y-intercept. Both are straight lines with a positive gradient, so Graph A is correct in either case here since it is the only straight line with a positive slope.
- Ensure the mass of gas and pressure are constant; otherwise, the relationship does not follow Charles's law.
A sample of a solid melts and becomes a liquid.
Which statement about the sample during the process of melting is correct?
Options
A Its temperature changes from a negative to a positive value.
B Its temperature is constant.
C The forces between its particles become stronger.
D The kinetic energy of its particles increases.
Working
During melting, the substance changes state at its melting point. The temperature stays constant while it melts, because the thermal energy supplied is used to overcome the forces between the particles, not to increase their kinetic energy.
- A is incorrect: melting happens at the melting point, which is not necessarily a change from negative to positive temperature.
- B is correct: the temperature is constant during melting.
- C is incorrect: the forces between particles become weaker as the solid changes to a liquid.
- D is incorrect: the average kinetic energy of the particles does not increase during melting; the energy goes into separating the particles.
Answer
B
B
Walkthrough
Melting is a change of state from solid to liquid. A pure solid has a fixed melting point. While it is melting, the temperature remains constant even though energy is being supplied. The energy is used to weaken or overcome the forces between particles, increasing their potential energy rather than their kinetic energy. Since temperature measures the average kinetic energy of the particles, the temperature stays constant during the change of state.
Option A is wrong because the melting point of a substance is not necessarily a change from a negative to a positive temperature; it depends on the substance. Option C is wrong because the forces between particles become weaker, not stronger, when a solid melts. Option D is wrong because the average kinetic energy of the particles does not increase during melting; the supplied energy is used to separate the particles, not to make them move faster on average.
Key Takeaways
- A pure substance changes state at a fixed temperature.
- During melting, the temperature is constant even though energy is being supplied.
- The energy supplied during melting is used to overcome the forces between particles, so it increases potential energy rather than kinetic energy.
- Temperature is related to the average kinetic energy of the particles.
Common Mistakes
- Choosing D: thinking that energy supplied must increase kinetic energy. During melting it is used to separate particles.
- Choosing C: thinking the forces between particles become stronger. They become weaker as the solid turns into a liquid.
- Thinking that temperature always rises when a substance is heated. During a change of state it stays constant.
Things to Be Careful About
- The melting point is a fixed temperature for a pure substance, but impurities can change it.
- Distinguish between kinetic energy (related to temperature) and potential energy (related to the separation of particles).
- The question asks about the process of melting, so the constant-temperature statement is the defining feature.
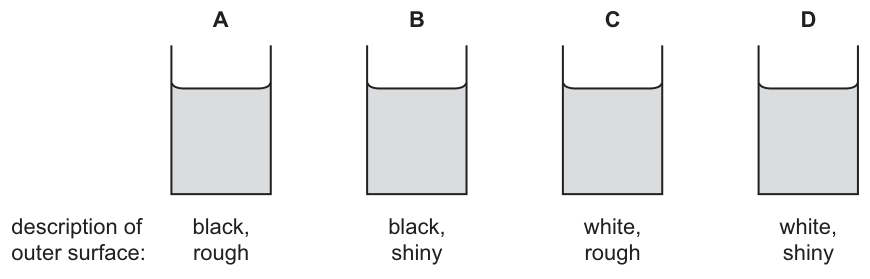
Four metal cans are identical except for the colour and the texture of their outer surfaces.
of water at is poured into each can.
Which can cools the most rapidly?
Options
Working
Cooling by thermal radiation is fastest from surfaces that are good emitters of infrared radiation.
- Colour: Dark (black) surfaces emit more infrared radiation than light (white) surfaces. This eliminates cans C and D.
- Texture: Matte (rough) surfaces emit more infrared radiation than shiny surfaces. This eliminates can B.
Can A has a black, rough surface, making it the best emitter. It will lose thermal energy to the surroundings most rapidly and cool down the fastest.
Answer
A
A
Walkthrough
The question asks which can cools most rapidly. The water inside is hot (70 °C), so it will lose thermal energy to the surroundings. While convection and conduction also play a role, the variation in surface properties (colour and texture) specifically targets the rate of thermal radiation (infrared emission).
- Emission and Colour: Dark, matte surfaces are the best emitters and absorbers of infrared radiation. Light, shiny surfaces are the worst. Since can A and B are black and can C and D are white, the black cans (A and B) will cool faster than the white cans (C and D) due to higher emission rates.
- Emission and Texture: Rough (matte) surfaces are better emitters than shiny surfaces. Shiny surfaces tend to reflect radiation rather than emit it. Comparing the two black cans, can A is rough and can B is shiny. Therefore, can A emits radiation faster than can B.
- Conclusion: Combining these factors, the black, rough surface (can A) is the best emitter of infrared radiation. It transfers thermal energy to the surroundings most quickly, so the water inside cools most rapidly.
Key Takeaways
- Good emitters of thermal radiation are dark and matte (rough).
- Bad emitters of thermal radiation are light and shiny.
- A good absorber is also a good emitter (though here we are looking at emission for cooling).
- Surface properties affect the rate of cooling by radiation.
Common Mistakes
- Confusing emission and reflection: A student might think a shiny surface keeps the heat in because it reflects radiation back. While shiny surfaces do reflect radiation well, the question is about cooling (emission). A shiny surface is a poor emitter, so it cools slowly. Conversely, a black rough surface is a good emitter, so it cools quickly.
- Focusing on absorption only: Students often remember that black surfaces absorb heat well (e.g., solar heaters) but forget that good absorbers are equally good emitters. Since the can is hotter than the surroundings, emission (cooling) is the dominant effect of the surface properties here.
Things to Be Careful About
- Ensure you distinguish between emission (cooling down, losing energy) and absorption (heating up, gaining energy). For an object hotter than its surroundings, a good emitter cools faster. For an object colder than its surroundings (or in the sun), a good absorber warms faster. In this question, the water is hot, so we look for the best emitter.
- Remember that 'rough' or 'matte' is the keyword for a good emitter/absorber, not just 'dark'. A black shiny surface (can B) is a better emitter than a white rough surface (can C) generally, but the combination of black and rough (can A) is the absolute best emitter among the choices.
The sentences describe sound waves. Three words have been omitted.
Sound waves are longitudinal waves that consist of regions of higher pressure called ______(1) and regions of lower pressure called ______(2).
An echo occurs when a sound wave is ______(3).
Which words complete gaps 1, 2 and 3?
Options
| 1 | 2 | 3 | |
|---|---|---|---|
| A | compressions | rarefactions | reflected |
| B | compressions | rarefactions | refracted |
| C | rarefactions | compressions | refracted |
| D | rarefactions | compressions | reflected |
Working
Sound waves are longitudinal: the vibrating particles create regions where they are pushed together, called compressions (higher pressure), and regions where they are spread apart, called rarefactions (lower pressure).
An echo is heard when a sound wave is reflected from a surface.
So gap 1 = compressions, gap 2 = rarefactions, gap 3 = reflected.
Option C and D have gaps 1 and 2 reversed, and options B and C use "refracted" instead of "reflected".
Answer
A
A
Walkthrough
Read the sentence carefully. A sound wave is a longitudinal wave, which means the particles of the medium vibrate backwards and forwards along the direction the wave travels. This creates alternate regions of high pressure and low pressure.
- The regions of higher pressure are called compressions because the particles are compressed, or pushed closer together.
- The regions of lower pressure are called rarefactions because the particles are spread further apart.
This fixes gaps 1 and 2: compressions then rarefactions. This immediately rules out options C and D, which have the two words in the wrong order.
For gap 3, an echo is the sound you hear when a sound wave bounces back from a surface such as a wall or a cliff. Bouncing back is reflection. Refraction is the bending of a wave as it changes speed when it passes from one medium into another, which is not what produces an echo. So option B is wrong because it says "refracted", and option A is correct because it says "reflected".
Key Takeaways
- A longitudinal sound wave consists of compressions (higher pressure) and rarefactions (lower pressure).
- An echo is caused by the reflection of sound waves.
- In multiple-choice questions with three gaps, check each gap in turn and eliminate options that fail on any one of them.
Common Mistakes
- Reversing compressions and rarefactions. Remember: compression = particles pushed together = higher pressure; rarefaction = particles spread apart = lower pressure.
- Confusing reflection with refraction. Reflection is bouncing back from a surface; refraction is bending due to a change in speed when entering a different medium.
Things to Be Careful About
- Read the whole sentence before choosing, so the order of the gaps matches the order of the words in the option.
- The word "echo" should immediately suggest reflection, not refraction.
- Do not be distracted by options that contain two correct words but one wrong word; every gap must be correct for the option to be chosen.
A ray of light strikes a plane mirror at an angle of incidence of .
The angle of incidence is then increased by .
What is the new angle between the incident ray and the reflected ray?
Options
A
B
C
D
Working
The angle of incidence is measured from the normal. When it is increased by :
By the law of reflection, the angle of reflection equals the angle of incidence:
The angle between the incident ray and the reflected ray is:
So the correct option is D.
Answer
D
D
Walkthrough
The angle of incidence is always measured from the normal, which is the line drawn at to the mirror surface.
- The original angle of incidence is .
- It is increased by , so the new angle of incidence is
- The law of reflection states that the angle of reflection equals the angle of incidence. Therefore the reflected ray also makes with the normal.
- Both rays are measured from the same normal but on opposite sides of it. So the total angle between the incident ray and the reflected ray is
This matches option D.
Key Takeaways
- The law of reflection: angle of incidence = angle of reflection.
- Angles of incidence and reflection are measured from the normal, not from the mirror surface.
- The angle between the incident and reflected rays is the sum of the two angles with the normal.
Common Mistakes
- Measuring from the mirror surface instead of the normal. The angle of incidence is to the normal, not to the surface.
- Adding only to the original angle between the rays. The original angle between the rays was ; increasing the incidence by increases the angle between the rays by , giving , not .
- Forgetting that the reflected ray also changes. If the incident ray moves by , the reflected ray also moves by , so the angle between them changes by .
Things to Be Careful About
- Always identify the normal before applying the law of reflection.
- The angle of incidence is not the angle between the ray and the mirror surface.
- In this question, the new angle of incidence is , so the reflected ray makes with the normal on the other side of the normal.
- The total angle between the two rays is the sum of the two equal angles, not just one of them.
The following lists show colours of the spectrum.
Which list shows these colours in order of increasing frequency?
Options
A
B
C
D
Working
In the visible spectrum, frequency increases from red to violet:
red → orange → yellow → green → blue → violet
- A is wrong because it starts with blue and violet, then goes back to red.
- B is wrong because it starts with green and blue, then goes back to red.
- C is wrong because violet is placed in the middle, before yellow, green and blue.
- D gives the correct order: red → orange → yellow → green → blue → violet.
Answer
D
D
Walkthrough
The question asks for the colours of the spectrum in order of increasing frequency. The spectrum is produced when white light is dispersed by a prism. Red light is deviated least and violet light is deviated most, which tells us that red has the lowest frequency and violet has the highest frequency. Therefore the increasing-frequency order is red, orange, yellow, green, blue, violet.
Check each option:
- Option A starts with blue and violet, which are high-frequency colours, and then lists red and orange, which are low-frequency colours. This is not increasing frequency.
- Option B starts with green and blue, then goes back to red. It is not a continuous increasing order.
- Option C places violet in the middle, before yellow, green and blue. Violet should be last.
- Option D lists red, orange, yellow, green, blue, violet, which matches the correct order exactly.
Key Takeaways
- The visible spectrum is always ordered red, orange, yellow, green, blue, violet when frequency increases (or wavelength decreases).
- Red has the lowest frequency and the longest wavelength; violet has the highest frequency and the shortest wavelength.
- A common memory aid is the order of colours in a rainbow: ROYGBIV.
Common Mistakes
- Reversing the order: some students list violet to red for increasing frequency. Violet is the highest frequency, so it must come last.
- Confusing frequency with wavelength: as frequency increases, wavelength decreases. The question asks for frequency, so red comes first.
- Choosing an option that contains all the colours but in the wrong sequence, such as placing violet in the middle.
Things to Be Careful About
- Read the direction requested: increasing frequency, not increasing wavelength.
- Remember that the colour order is fixed: red, orange, yellow, green, blue, violet.
- In dispersion by a prism, red is deviated least and violet is deviated most, which is consistent with red having the lowest frequency.
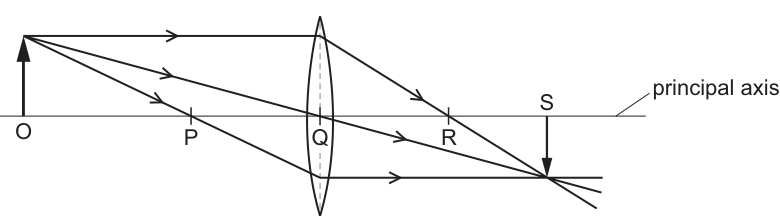
An object O is placed near to a thin converging lens.
The diagram shows three rays of light from the object passing through the lens.
Which row describes the image formed and gives the position of a principal focus (focal point) of the lens?
Options
| image formed | position of principal focus | |
|---|---|---|
| A | real | R |
| B | real | Q |
| C | virtual | P |
| D | virtual | S |
Working
For a converging lens, the standard ray diagram rules are:
- A ray parallel to the principal axis refracts through the principal focus on the opposite side. In the diagram, this ray passes through R, so R is the principal focus.
- A ray passing through the optical centre (Q) continues straight without deviation.
- A ray passing through the principal focus on the object side (P) emerges parallel to the principal axis.
The three rays converge at point S on the opposite side of the lens. Because the light rays actually meet at S, the image formed is real (and inverted, as shown by the downward arrow).
Answer
A
A
Walkthrough
The diagram shows the three standard rays used to locate an image formed by a converging lens:
- The ray from the top of the object parallel to the principal axis refracts through the lens and passes through point R. By definition, the point where this ray crosses the principal axis is the principal focus. Thus, R is the principal focus.
- The ray passing through the optical centre Q travels straight through without changing direction.
- The ray passing through point P on the principal axis (the principal focus on the object side) emerges from the lens parallel to the principal axis.
All three refracted rays meet at point S. Since the light rays physically converge at S, the image is real. (Virtual images are formed when rays diverge and must be traced backwards to meet; they appear on the same side of the lens as the object). The image at S is inverted, which is characteristic of a real image formed by a single converging lens when the object is outside the focal length.
Key Takeaways
- The principal focus of a converging lens is the point on the principal axis where a ray parallel to the axis converges after refraction.
- An image is real if the light rays actually converge at a point; it is virtual if they only appear to diverge from a point.
- For a converging lens with the object outside the focal length, the image is real, inverted, and formed on the opposite side of the lens.
Common Mistakes
- Choosing Q as the principal focus: Q is the optical centre, not the focus. The ray through Q is not deflected.
- Choosing P as the principal focus: P is the principal focus on the object side, but the parallel ray on the object side passes through the focus on the image side (R). Since the image is real, the focus must be R, eliminating P.
- Thinking the image is virtual: A virtual image for a converging lens occurs when the object is inside the focal length, and the rays diverge on the other side. Here, they converge at S, so it is real.
Things to Be Careful About
- Remember that a converging lens has two principal foci, one on each side (P and R in this diagram). The ray parallel to the axis on the object side passes through the focus on the image side (R).
- Real images are formed on the opposite side of the lens from the object and can be projected onto a screen. Virtual images are on the same side as the object and cannot be projected.
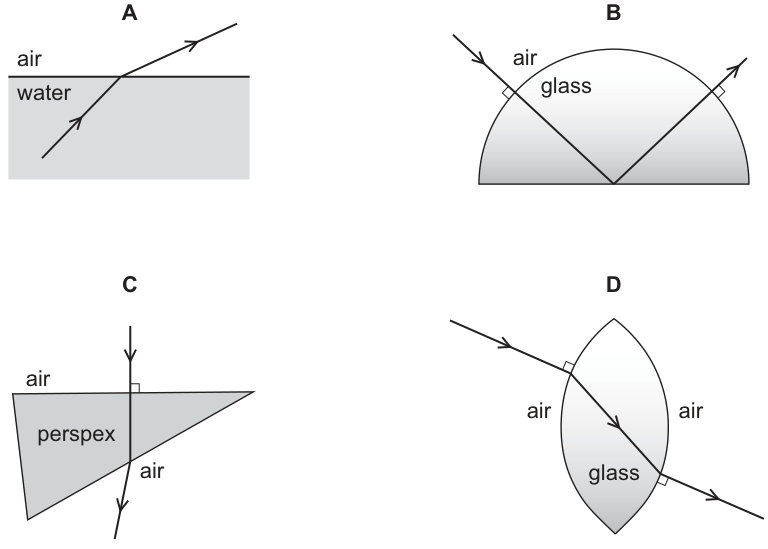
In which diagram is the path of the light ray not correct?
Options
Answer
Diagram D is not correct.
When light travels from air (a less dense medium) into glass (a more dense medium), it should bend towards the normal. Diagram D shows the ray bending away from the normal on entry, which is incorrect. Furthermore, a biconvex glass lens is a converging lens and should bend light rays towards the principal axis; diagram D shows it diverging.
Diagrams A, B, and C are correct:
- A: Light travels from water to air (denser to less dense), so it bends away from the normal. Correct.
- B: Light enters the curved surface normally (along the radius), so it does not bend. It then hits the flat surface at an angle greater than the critical angle, causing total internal reflection. It exits the curved surface normally. Correct.
- C: Light enters the flat top normally, so it does not bend. It hits the hypotenuse at 45°, which is greater than the critical angle for perspex (~42°), causing total internal reflection. It then exits the vertical face. Correct.
D
Walkthrough
- Diagram A: A light ray travels from water (optically denser) into air (optically less dense). At the boundary, the ray bends away from the normal. This is the correct behavior for refraction from a denser to a less dense medium.
- Diagram B: A ray in air is incident normally on the curved surface of a semicircular glass block. Because it is along the radius, it hits the surface at 90° to the boundary (normal incidence) and passes through without bending. Inside the glass, it strikes the flat bottom surface. The angle of incidence here is greater than the critical angle for glass-to-air, so total internal reflection occurs. The reflected ray then hits the curved surface normally and exits without bending. This path is correct.
- Diagram C: A ray is incident normally on the horizontal flat top of a right-angled perspex prism. It enters without bending. It then strikes the hypotenuse face. For a right-angled isosceles prism, the angle of incidence at the hypotenuse is 45°. The critical angle for perspex is about 42°, so 45° > critical angle, and total internal reflection occurs. The ray is reflected at 90° and exits through the vertical face. This path is correct.
- Diagram D: A ray is incident obliquely on a biconvex glass lens from air. Air is less dense than glass. When light enters a denser medium, it must bend towards the normal. Diagram D shows the ray bending away from the normal on entry. On exit, light goes from glass (denser) to air (less dense) and should bend away from the normal, but the diagram shows it bending towards. Furthermore, a biconvex lens is a converging lens; it should bend parallel or oblique rays towards the principal axis. Diagram D shows the ray bending away from the axis, which is the behavior of a diverging lens. Thus, diagram D is incorrect.
Key Takeaways
- Refraction rule: light bends towards the normal when entering a more optically dense medium, and away from the normal when entering a less dense medium.
- Normal incidence (ray along the normal to the surface) results in no bending, regardless of the media.
- Total internal reflection (TIR) only occurs when light travels from a more dense medium to a less dense medium AND the angle of incidence exceeds the critical angle.
- A biconvex (converging) lens bends light rays towards the principal axis; a biconcave (diverging) lens bends them away.
Common Mistakes
- Reversing the direction of bending: students often remember "bends towards" but apply it to the wrong boundary (e.g., bending towards the normal when going from glass to air).
- Forgetting that TIR requires the light to be in the denser medium first.
- Assuming all lenses converge light: a biconvex lens converges, but a biconcave lens diverges. The diagram must match the lens shape and the correct bending direction.
Things to Be Careful About
- Always identify which medium is optically denser before deciding the direction of bending. Glass and perspex are denser than air; water is denser than air.
- "Normal incidence" means the ray is perpendicular to the surface (along the normal). In this case, the angle of incidence is 0°, so there is no refraction.
- For total internal reflection, the angle of incidence must be strictly greater than the critical angle. For typical glass or perspex, the critical angle is around 41-42°, so a 45° incidence (as in diagram C) will always cause TIR.
A ray of light travels from X to Y along an optical fibre. The angle of incidence at Y is greater than the critical angle.
In which direction does the ray of light travel after reaching point Y?
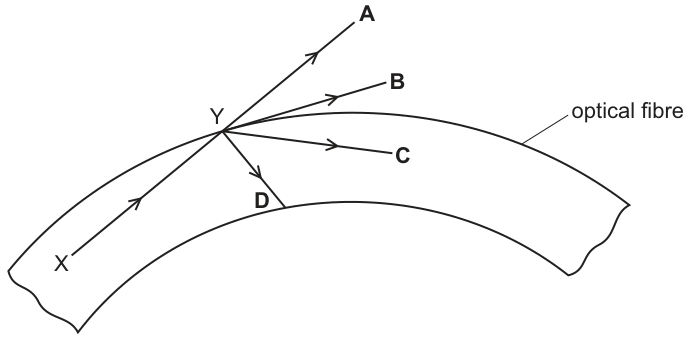
Options
A A
B B
C C
D D
Answer
C
Since the angle of incidence at Y is greater than the critical angle, total internal reflection occurs. The ray is completely reflected back into the core of the optical fibre, following the law of reflection (angle of reflection equals angle of incidence). Path C shows this internal reflection.
C
Walkthrough
The question describes a ray of light travelling inside an optical fibre and striking the boundary at point Y. We are told that the angle of incidence at Y is greater than the critical angle.
When light travels from a more optically dense medium (the fibre core) to a less optically dense medium (the cladding or air), it can either refract out or reflect back in, depending on the angle of incidence:
- If the angle of incidence is less than the critical angle, the ray refracts out into the less dense medium (path A).
- If the angle of incidence is exactly equal to the critical angle, the ray refracts along the boundary (path B).
- If the angle of incidence is greater than the critical angle, total internal reflection occurs. The ray is completely reflected back into the denser medium, obeying the law of reflection (the angle of reflection equals the angle of incidence, both measured from the normal to the surface).
Looking at the diagram, path C shows the ray reflecting back into the core of the optical fibre. Path D does not follow the law of reflection at point Y. Therefore, path C is the correct path.
Key Takeaways
- Total internal reflection occurs when light travels from a denser to a less dense medium and the angle of incidence exceeds the critical angle.
- Optical fibres use total internal reflection to guide light around bends with minimal loss.
- The reflected ray must obey the law of reflection: angle of incidence equals angle of reflection.
Common Mistakes
- Confusing total internal reflection with refraction: students may choose A (refraction out) if they forget the condition "greater than the critical angle".
- Choosing B (travelling along the boundary): this only happens when the angle of incidence is exactly equal to the critical angle, not greater than it.
- Misidentifying the reflected ray: students must remember that the angle of reflection is measured from the normal, not the surface, and must equal the angle of incidence.
Things to Be Careful About
- The critical angle is only defined for light travelling from a more optically dense medium to a less optically dense medium.
- "Greater than the critical angle" is the key phrase that triggers total internal reflection. If it were "equal to", the answer would be B.
- Always check that the reflected ray makes the correct angle with the normal; path D in the diagram is a distractor that does not satisfy the law of reflection at Y.
A firework is launched vertically from the ground.
When the firework reaches a height of , the firework explodes, producing coloured light.
A student on the ground below the firework incorrectly measures the time between seeing the coloured light and hearing the explosion. The student obtains a value of .
What is the speed of sound that the student’s value suggests?
Options
A
B
C
D
Working
Light travels at the speed of light, so the light reaches the student almost instantly. The measured 1.8 s is therefore effectively the time for the sound to travel 360 m.
This matches option A.
Answer
A
A
Walkthrough
The firework explodes at a height of 360 m. The coloured light travels to the student at the speed of light, which is much faster than sound, so the light arrives almost immediately. The 1.8 s measured by the student is therefore essentially the time taken by the sound to travel the 360 m down to the ground.
Use the defining equation for speed:
where is the speed, is the distance travelled and is the time taken. Substitute and :
The correct option is A.
Key Takeaways
- Speed is distance travelled per unit time: .
- In everyday situations, the speed of light is so large that light travel time can be treated as zero.
- This question tests whether you can identify the distance (360 m) and the time (1.8 s) and apply the speed equation correctly.
Common Mistakes
- Reversing the ratio: dividing time by distance gives 0.005 s/m, which is not a speed.
- Choosing 360 m directly without dividing by the time.
- Forgetting that the light travel time is negligible, which is the key idea behind using 1.8 s as the sound travel time.
Things to Be Careful About
- Keep units consistent: distance in metres and time in seconds give speed in m/s.
- The word "incorrectly" tells you the value may not be the true speed of sound, but the calculation is still simply 360/1.8.
- Match the calculated value to the correct option letter, here A.
A loudspeaker produces a sound wave of frequency .
The amplitude of the sound wave is increased.
What is heard?
Options
A a louder sound of a higher pitch
B a louder sound of the same pitch
C a sound of higher pitch but the same loudness
D a sound of the same pitch and same loudness
Working
Loudness depends on the amplitude of the sound wave. Pitch depends on the frequency of the sound wave.
The frequency is still , so the pitch is unchanged. Increasing the amplitude makes the sound louder.
Answer
B
B
Walkthrough
A sound wave has two important properties here: amplitude and frequency.
- The amplitude is the size of the vibrations. A larger amplitude means the wave carries more energy, so the sound is heard as louder.
- The frequency is the number of vibrations per second. It determines the pitch of the sound: a higher frequency gives a higher pitch.
In this question, the loudspeaker still produces a sound wave of frequency . Only the amplitude is increased. Therefore the sound becomes louder, but its pitch does not change.
This matches option B.
Key Takeaways
- Amplitude is linked to loudness.
- Frequency is linked to pitch.
- Changing the amplitude of a sound wave does not change its frequency, so the pitch stays the same.
Common Mistakes
- Choosing A: this assumes that increasing amplitude also increases pitch. Pitch depends on frequency, not amplitude.
- Choosing C: this assumes that amplitude changes pitch. Increasing amplitude only makes the sound louder.
- Choosing D: this ignores the effect of amplitude on loudness. A larger amplitude does make the sound louder.
Things to Be Careful About
- Amplitude and frequency are independent properties of a wave.
- A louder sound can still have the same pitch if its frequency is unchanged.
- "Higher pitch" means higher frequency, not larger amplitude.
A bar magnet is placed on a sheet of paper.
The diagram shows the field lines due to the magnet.
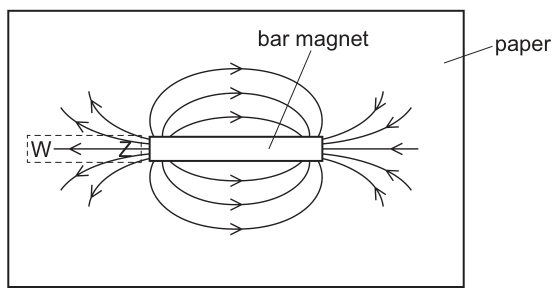
A soft-iron bar is placed on the paper on the rectangle marked WZ. The soft-iron bar becomes an induced magnet.
What are the magnetic poles at the ends of the soft-iron bar?
Options
| pole at W | pole at Z | |
|---|---|---|
| A | N | N |
| B | N | S |
| C | S | N |
| D | S | S |
Working
- Magnetic field lines always point away from a North (N) pole and towards a South (S) pole.
- In Fig. 26, the arrows on the magnetic field lines point outwards from the left end of the bar magnet and inwards towards the right end. Therefore, the left end of the bar magnet is a North (N) pole.
- When an unmagnetised soft-iron bar is placed near a magnetic pole, it undergoes magnetic induction. The end nearest to the magnet's pole develops the opposite polarity (attraction), and the far end develops the same polarity:
- End (closest to the N pole of the bar magnet) becomes a South (S) pole.
- End (furthest from the N pole) becomes a North (N) pole.
Thus, the pole at is N and the pole at is S.
Answer
B
B
Walkthrough
-
Identify the poles of the permanent magnet:
- By convention, magnetic field lines outside a magnet travel from the North pole to the South pole.
- Looking at Fig. 26, the field lines emerge out of the left end of the magnet (arrows point away to the left) and enter into the right end (arrows point inwards towards the right).
- This means the left end of the bar magnet is a North (N) pole, and the right end is a South (S) pole.
-
Apply the principle of magnetic induction:
- Soft iron is a ferromagnetic material that easily becomes magnetised in the presence of an external magnetic field.
- Induced magnetism always results in an attraction between the permanent magnet and the soft iron.
- Therefore, the end of the soft-iron bar closest to the magnet's North pole (end ) must be induced as an opposite pole, which is a South (S) pole.
- The opposite end of the soft-iron bar (end ) must therefore be a North (N) pole.
Matching with the given options:
- Pole at : N
- Pole at : S
- This corresponds to Option B.
Key Takeaways
- Magnetic field lines outside a magnet always point from North to South.
- Induced magnetism always causes attraction between the magnetic material and the magnet; the near end always acquires the opposite pole to the inducing pole, while the far end acquires the same pole.
Common Mistakes
- Reversing the convention for field lines (thinking field lines point towards North instead of South).
- Forgetting that an induced magnet has two opposite poles and mistakenly choosing identical poles (options A or D).
Things to Be Careful About
- Check the direction of the arrowheads carefully: arrowheads pointing away from the magnet indicate a North pole.
Which material is an electrical conductor at room temperature?
Options
A aluminium
B glass
C plastic
D rubber
Working
Aluminium is a metal. Metals conduct electricity because they contain free (delocalised) electrons that can move through the metal carrying charge. Glass, plastic and rubber are all insulators at room temperature.
Answer
A
A
Walkthrough
The question asks which material is an electrical conductor at room temperature. A conductor is a material that allows electric charge to flow through it easily. In metals, the outer electrons are free to move, so metals such as aluminium conduct electricity well. Glass, plastic and rubber do not have free electrons, so they are electrical insulators. Therefore the correct option is A.
Key Takeaways
- Metals are good electrical conductors because they have free electrons.
- Non-metals such as glass, plastic and rubber are usually electrical insulators.
- The question is about electrical conduction, not thermal conduction.
Common Mistakes
- Choosing glass because it can be used as an insulator in some situations, but glass is not a conductor.
- Confusing electrical conductors with thermal conductors. Although metals are often good thermal conductors too, the question is specifically about electricity.
- Thinking that plastic or rubber can conduct because they can become charged by friction. Being able to hold static charge does not make a material a conductor.
Things to Be Careful About
- Read the question carefully: it asks for a conductor, not an insulator.
- Remember that the presence of free electrons is the key reason metals conduct electricity.
- At O Level, you should know common conductors (metals, graphite) and common insulators (glass, plastic, rubber, wood).
A student investigates electrostatic charge using a balloon and a cloth. The balloon and cloth are initially uncharged.
The student rubs the balloon with the cloth. The balloon gains a negative charge of magnitude .
The cloth becomes charged and a force acts between the balloon and the cloth.
Which row correctly describes the magnitude and sign of the charge on the cloth and the type of force between the balloon and the cloth?
Options
| magnitude of charge on cloth | sign of charge on cloth | type of force | |
|---|---|---|---|
| A | equal to | positive | attraction |
| B | equal to | negative | repulsion |
| C | greater than | positive | repulsion |
| D | greater than | negative | attraction |
Working
Rubbing transfers electrons from the cloth to the balloon. The balloon gains a negative charge, so it has gained electrons. The cloth has lost the same number of electrons, so it has an equal positive charge. Charge is conserved, so the magnitude of the charge on the cloth is equal to . Opposite charges attract, so the force is attraction.
- A: correct — equal magnitude, positive charge, attraction.
- B: wrong — the cloth cannot also be negative because electrons have moved from the cloth to the balloon.
- C: wrong — the magnitudes are equal and opposite charges attract, not repel.
- D: wrong — the cloth is positive, not negative.
Answer
A
A
Walkthrough
When the balloon is rubbed with the cloth, electrons are transferred from one object to the other. The balloon gains a negative charge of magnitude , which means it has gained electrons. Those electrons must have come from the cloth, so the cloth now has a shortage of electrons and becomes positively charged.
Charge is conserved: the total charge before rubbing is zero, so after rubbing the positive charge on the cloth must exactly balance the negative charge on the balloon. Therefore the magnitude of the charge on the cloth is also , not greater than .
The balloon is negative and the cloth is positive. Opposite charges attract, so the force between them is attraction.
Check each option:
- A is correct: equal to , positive, attraction.
- B is wrong because the cloth is positive, not negative, and opposite charges attract.
- C is wrong because the magnitude is equal, not greater, and opposite charges attract.
- D is wrong because the cloth is positive, not negative.
Key Takeaways
- Charging by friction involves the transfer of electrons, not protons.
- The object that gains electrons becomes negatively charged; the object that loses electrons becomes positively charged.
- Charge is conserved, so the magnitudes of the charges on the two objects are equal.
- Unlike charges attract; like charges repel.
Common Mistakes
- Thinking that protons move during charging by friction. Only electrons move.
- Thinking the cloth becomes negative. Its sign depends on the direction of electron transfer.
- Thinking the cloth could have a greater magnitude of charge than the balloon. Conservation of charge requires equal magnitudes.
- Confusing attraction with repulsion: opposite charges always attract.
Things to Be Careful About
- The phrase "magnitude of charge" means the size of the charge without its sign.
- The sign of the charge and the type of force are separate ideas; check both in the table.
- The answer must match the row exactly: equal to , positive, attraction.
A student connects four circuits using two identical cells, two identical resistors and a motor.
In which circuit does the coil of the motor rotate the fastest?
Options
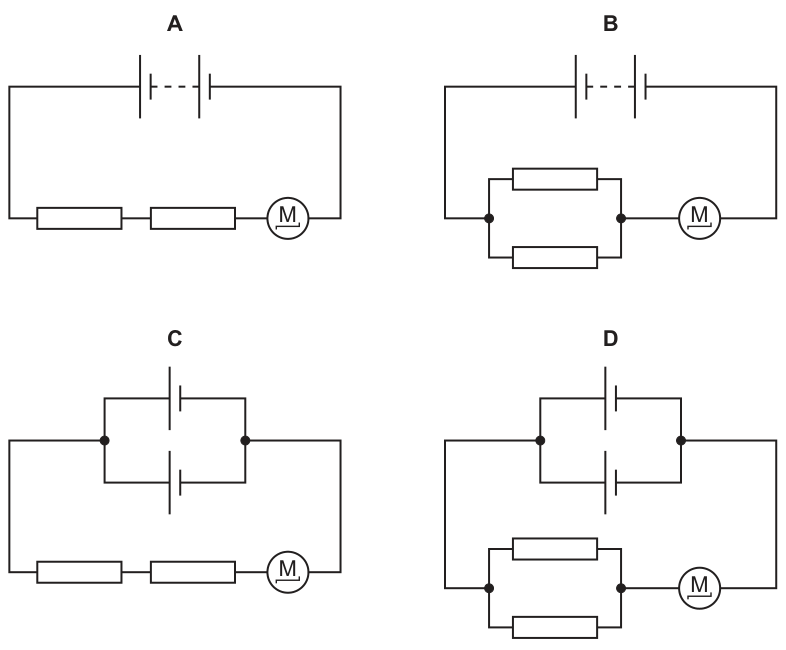
Working
The speed of a d.c. motor is determined by the current flowing through it: a larger current produces a faster rotation. To find the largest current, we need the largest total e.m.f. and the smallest total resistance.
Let the e.m.f. of one cell be and the resistance of one resistor be . Let the motor's resistance be .
- Circuit A: Cells in series (), resistors in series (). Total resistance = . Current .
- Circuit B: Cells in series (), resistors in parallel (). Total resistance = . Current .
- Circuit C: Cells in parallel (), resistors in series (). Total resistance = . Current .
- Circuit D: Cells in parallel (), resistors in parallel (). Total resistance = . Current .
Comparing the four expressions, Circuit B has the largest numerator () and the smallest denominator (), so it produces the largest current .
Answer
B
B
Walkthrough
- Identify the physical principle: A d.c. motor rotates faster when a larger current flows through its coil. Thus, we must find the circuit that delivers the greatest current to the motor.
- Analyze the cells: Cells in series add their e.m.f.s (), while identical cells in parallel keep the same e.m.f. (). This immediately eliminates circuits C and D, which only provide .
- Analyze the resistors: Identical resistors in series add their resistances (), while identical resistors in parallel halve the resistance (). A smaller total resistance allows a larger current to flow for a given e.m.f. according to .
- Combine the effects: Circuit B has the cells in series (maximising e.m.f. to ) and the resistors in parallel (minimising resistance to ). This gives the highest current , making the motor rotate the fastest.
Key Takeaways
- Motor speed is proportional to the current through it.
- Cells in series increase total e.m.f.; cells in parallel do not increase e.m.f. (though they can supply more current if internal resistance is significant).
- Resistors in parallel decrease total resistance; resistors in series increase it.
- To maximise current in a circuit, maximise the e.m.f. and minimise the total resistance.
Common Mistakes
- Confusing cells in parallel with cells in series: Candidates may think parallel cells give more e.m.f. or more current. Parallel cells only increase the available current capacity (by reducing effective internal resistance), but the e.m.f. remains .
- Assuming parallel resistors increase resistance: A common error is adding resistances regardless of whether they are in series or parallel. Remember that parallel resistors provide alternative paths for current, reducing the overall resistance.
- Ignoring the motor's resistance: While the motor's resistance is constant across all circuits, forgetting to include it in the total resistance still leaves the correct ordering of currents, but it is physically more accurate to include it.
Things to Be Careful About
- Internal resistance of cells: At O Level, cells are usually treated as ideal unless internal resistance is mentioned. If internal resistance were included, cells in parallel would have an internal resistance of , but the e.m.f. would still only be , so circuits C and D would still be eliminated.
- Motor behaviour: A motor is not a pure resistor; it generates a back e.m.f. when rotating. However, for a given load, a higher supply voltage (or lower series resistance) still results in a higher steady-state current and faster rotation. The qualitative reasoning holds perfectly.
The diagram shows a lightning strike.
Charge flows between the cloud and objects on the ground.
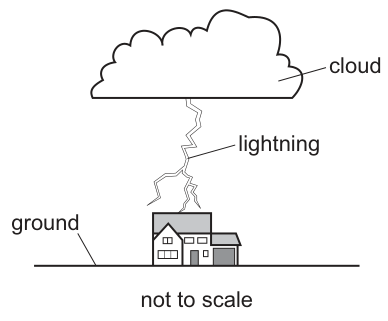
During the lightning strike, there is a current of between the cloud and the house for .
How much charge flows during the lightning strike?
Options
A
B
C
D
Working
The relationship between charge, current and time is:
Convert the time from milliseconds to seconds:
Substitute the values into the equation:
Rounding to 2 significant figures (consistent with the given data):
Answer
A
A
Walkthrough
The question asks for the amount of charge that flows during a lightning strike. We are given the current and the time duration .
- Identify the relevant formula: The definition of electric current is the rate of flow of charge, given by . Rearranging this to solve for charge gives .
- Check units: The current is given in Amperes (A), which is the standard SI unit. The time is given in milliseconds (ms), which is not the standard SI unit (seconds). We must convert milliseconds to seconds by multiplying by .
- Substitute and calculate:
- Match with options: The calculated value is 1456 C. The options are given to 2 significant figures (1500, 15000, 24000, 54000). Rounding 1456 to 2 significant figures gives 1500 C. This matches option A.
Key Takeaways
- Formula: Charge is the product of current and time ().
- Unit Conversion: Always ensure time is in seconds (s) when using standard SI units for current (A) and charge (C). Milliseconds (ms) must be divided by 1000.
- Significant Figures: The final answer should be rounded to the same number of significant figures as the least precise data given in the question (here, 2.8 and 52 both have 2 s.f., so the answer 1500 is appropriate).
Common Mistakes
- Forgetting unit conversion: Using directly in the calculation gives C, which is not among the options but shows a failure to convert ms to s.
- Powers of ten errors: Calculating and then incorrectly handling the powers of ten ( and ) can lead to answers like 15000 (Option B) if the power of 10 is off by a factor of 10.
- Rounding too early or too late: Not rounding 1456 to 1500 might lead a student to look for an exact match and get confused, though 1500 is clearly the intended answer for 1456 to 2 s.f.
Things to Be Careful About
- Millisecond conversion: Remember that . A common mistake is to divide by 100 instead of 1000, or to forget the conversion entirely.
- Scientific notation: Be careful with . This is 28,000. Multiplying is easier to compute as .
- Significant figures: The mark scheme accepts 1500 C. 1456 C is the exact calculation, but in multiple choice questions matching the options, you must identify the correctly rounded value. 1500 has 2 significant figures (the trailing zeros are not significant unless marked), which matches the input data precision.
Two current-carrying conductors are placed next to each other. The current in the conductors is in the same direction.
Which statement about the forces experienced by the conductors is correct?
Options
A The forces are in the same direction, and the conductors are forced apart.
B The forces are in opposite directions, and the conductors are forced apart.
C The forces are in the same direction, and the conductors are forced towards each other.
D The forces are in opposite directions, and the conductors are forced towards each other.
Answer
D
D
Walkthrough
Two parallel conductors carrying current in the same direction attract each other. This is a standard rule for the magnetic effect of a current: parallel currents in the same direction attract, and parallel currents in opposite directions repel. Because the conductors attract, the force on each conductor is directed towards the other. This means the force on the left conductor is to the right, and the force on the right conductor is to the left — the forces are in opposite directions. This is also required by Newton's third law: the force exerted by conductor 1 on conductor 2 is equal and opposite to the force exerted by conductor 2 on conductor 1. Therefore, the forces are in opposite directions, and the conductors are forced towards each other. This matches option D.
Key Takeaways
- Parallel current-carrying conductors with current in the same direction attract each other; those with current in opposite directions repel.
- The forces between two interacting objects are always equal in magnitude and opposite in direction (Newton's third law).
Common Mistakes
- Assuming that because the currents are in the same direction, the forces on the conductors must also be in the same direction. Forces between two objects are always opposite.
- Confusing the direction of the current with the direction of the magnetic force.
Things to Be Careful About
- Newton's third law is a universal requirement: whatever the magnetic interaction, the force on conductor A due to conductor B must be equal and opposite to the force on conductor B due to conductor A. This immediately tells you the forces are in opposite directions, eliminating options A and C without even needing the attraction or repulsion rule.
- Remember the rule: same direction of current means attract; opposite direction of current means repel.
Which component is not needed to make a simple d.c. motor work?
Options
A battery
B brushes
C diode
D split-ring commutator
Working
A simple d.c. motor needs:
- a battery to supply the current through the coil;
- brushes to make electrical contact with the rotating coil;
- a split-ring commutator to reverse the current in the coil every half turn so the coil keeps rotating in the same direction.
A diode is not needed — the motor works without one, so the component that is not needed is the diode.
Answer
C
C
Walkthrough
This question asks which component is not needed to make a simple d.c. motor work, so we recall the construction of the motor and the job of each listed component.
- Battery (A): supplies the current that flows through the coil, producing the magnetic forces that turn the coil. It is definitely needed.
- Brushes (B): fixed carbon blocks that press against the split-ring commutator and carry the current from the stationary supply wires into the rotating coil. Without them the current could not reach the moving coil, so they are needed.
- Split-ring commutator (D): reverses the direction of the current in the coil every half turn. This keeps the coil turning in the same direction instead of stopping and reversing at the vertical position. It is essential, so it is needed.
- Diode (C): allows current to flow in one direction only. A d.c. motor does not need a diode — the battery already supplies current in one direction, and the split-ring commutator does the switching. So the diode is the component that is not needed, and the answer is C.
Key Takeaways
- A simple d.c. motor consists of a coil on an axle between the poles of a magnet, a battery, brushes and a split-ring commutator.
- The split-ring commutator reverses the current every half turn so the direction of rotation is maintained.
- The brushes transfer current from the stationary supply to the rotating coil.
- A diode is not a component of a d.c. motor.
Common Mistakes
- Confusing the job of the split-ring commutator with that of a diode: both deal with current direction, but the commutator reverses the current every half turn and is part of the motor, while a diode simply blocks current in one direction and is not needed here.
- Thinking the brushes are optional — they are essential because they carry current into the rotating coil.
- Reading the question as "which component is needed" instead of "which is not needed".
Things to Be Careful About
- The question asks for the component that is not needed, so look for the extra item that plays no part in the motor.
- Remember the exact role of the split-ring commutator: it reverses the current direction every half turn so the coil keeps rotating the same way.
Which component is used in an electric circuit to detect changes in temperature?
Options

Answer
B
B
Walkthrough
The question asks which component is used in an electric circuit to detect changes in temperature. The component whose resistance changes significantly with temperature is a thermistor. Because of this property, a thermistor is commonly used as a temperature sensor in circuits (for example, in automatic heating systems or temperature alarms).
We must therefore identify the correct circuit symbol for a thermistor from the options given:
- A fixed resistor is represented by a plain rectangular box.
- A variable resistor (or rheostat) is represented by a rectangular box with a diagonal arrow passing through it.
- A thermistor is represented by a rectangular box with a diagonal line passing through it that has a small horizontal flat end (often described as a 'hockey stick' or 'T' shape on the diagonal).
- A fuse is represented by a rectangular box with a straight wire line passing continuously through its centre.
The marking scheme indicates the correct answer is B. Note that the provided text description of the image appears to contain a typo, swapping the labels for B and C (describing B as the variable resistor and C as the thermistor). In the actual image, the thermistor symbol — the rectangle with the diagonal line having a horizontal flat end — is labelled B. Therefore, B is the correct choice.
Key Takeaways
- A thermistor is a temperature-sensitive resistor used as a sensor in circuits.
- The circuit symbol for a thermistor is a rectangle with a diagonal line that has a small horizontal flat end, distinguishing it from the diagonal arrow of a variable resistor.
Common Mistakes
- Confusing the symbol for a thermistor with that of a variable resistor. Remember: an arrow means 'variable' (adjustable by hand), while the flat-ended diagonal line means 'thermistor' (temperature-sensitive).
- Choosing the fuse symbol, which is a rectangle with a straight continuous line through it.
Things to Be Careful About
- Always check the exact shape of the diagonal line in the resistor symbols. A simple diagonal arrow = variable resistor. A diagonal line with a horizontal flat end = thermistor.
- Be aware that text descriptions of images can sometimes contain label swaps (as seen here with B and C); rely on the mark scheme and the actual visual features of the symbols to determine the correct answer.
A kettle of power is powered by the mains supply.
What is the appropriate rating for the fuse in the circuit?
Options
A
B
C
D
Working
The power is .
For an appliance on the mains, , so the normal working current is
A fuse must be rated just above the working current so that it does not melt during normal use. The next standard rating above is . A fuse is too low and would blow during normal operation; a fuse is larger than necessary.
Answer
C
C
Walkthrough
The kettle is marked with its power, , and it is connected to the mains. To choose a fuse, you first need to know the current the kettle takes during normal working.
The equation linking power, current and potential difference is . Before substituting, convert the power into watts:
Then
So the kettle normally draws about .
A fuse is a thin wire that melts if the current through it exceeds its rated value, breaking the circuit. It must be able to carry the normal working current without melting, but it should melt when the current becomes dangerously high. Therefore the fuse rating should be the next standard value above the normal current.
The options are , , and .
- and are too small: the kettle would melt them whenever it is switched on.
- is the next standard fuse rating above , so it is appropriate.
- would not protect the circuit as well because it allows too much current before melting.
Hence the correct answer is C.
Key Takeaways
- The power equation lets you find the current drawn by an appliance when you know its power and the supply voltage.
- Always convert kilowatts to watts before using the formula.
- A fuse must be rated just above the normal working current: large enough not to melt during normal use, but small enough to protect the circuit if a fault occurs.
- Common standard fuse ratings include , and .
Common Mistakes
- Choosing : this is below the working current of , so the fuse would melt whenever the kettle is used.
- Choosing : this is above the next sensible rating and gives weaker protection, since a fault current could be large before the fuse melts.
- Forgetting to convert to , which would give the wrong current.
- Confusing the formula with : this question needs power, voltage and current, not resistance.
Things to Be Careful About
- The unit kW must be converted to W because the standard unit of power in is the watt.
- The current works out to , not exactly . Do not round it up to and then choose ; fuse ratings come in standard values, and is the one just above the calculated current.
- The fuse is placed in the live wire of the circuit, so it can disconnect the appliance if the current becomes too large.
- In the exam, give the option letter as the final answer, but show the current calculation in the working.
A student uses a simple iron-cored transformer. The primary coil has 250 turns. The secondary coil has 200 turns.
The input voltage to the primary coil is .
What is the output voltage?
Options
A
B
C
D
Working
For an ideal transformer, the ratio of the voltages is equal to the ratio of the number of turns:
Substitute the values:
Rearrange:
Answer
C —
C
Walkthrough
A transformer uses an alternating current in the primary coil to induce an alternating voltage in the secondary coil. For an ideal transformer, the voltage ratio equals the turns ratio:
where:
- is the primary (input) voltage,
- is the secondary (output) voltage,
- is the number of turns on the primary coil,
- is the number of turns on the secondary coil.
Here , and . Putting these into the equation:
Multiply both sides by and by to get:
Because the secondary has fewer turns than the primary, the transformer steps the voltage down. The output is therefore smaller than , which immediately rules out option D (). Option C, , is the correct output voltage.
Why the other options are wrong:
- A () and B () are far too small and come from using the ratio upside down or dividing rather than forming the ratio correctly.
- D () comes from using , which is the inverted ratio.
Key Takeaways
- The transformer turns ratio tells you how the voltage changes between primary and secondary coils.
- If the secondary has fewer turns, the transformer steps the voltage down.
- When substituting, keep the primary and secondary quantities paired correctly on both sides of the equation.
- A quick sanity check: the output voltage should be smaller than the input when the secondary coil has fewer turns.
Common Mistakes
- Using the ratio upside down: gives option D, which is wrong.
- Confusing primary and secondary: always identify which coil is connected to the input and which is connected to the output.
- Forgetting that the turns ratio is a voltage ratio, not a power ratio: power is approximately conserved in an ideal transformer, not voltage.
Things to Be Careful About
- The turns ratio is written as , so do not swap the numbers when substituting.
- Units: both voltages are in volts, so no conversion is needed here.
- In multiple-choice questions, use the physical direction of the change to check your answer: fewer turns on the secondary means a lower output voltage than the input.
Four statements about an atom are listed.
- The atom has a nucleus surrounded by positively charged electrons.
- Most of the atom is empty space.
- The nucleus is positively charged.
- The nucleus is very large compared with the rest of the atom.
Which statements are correct?
Options
A 1 and 2
B 1 and 4
C 2 and 3
D 3 and 4
Working
Statement 1 is false: electrons are negatively charged, not positively charged.
Statement 2 is true: alpha-particle scattering showed that most of the atom is empty space.
Statement 3 is true: the nucleus contains protons and is positively charged.
Statement 4 is false: the nucleus is very small compared with the whole atom.
The correct statements are 2 and 3.
Answer
C
C
Walkthrough
The question asks which two statements about the atom are correct.
-
Statement 1 says the atom has a nucleus surrounded by positively charged electrons. Electrons are actually negatively charged, so this is false.
-
Statement 2 says most of the atom is empty space. The alpha-particle scattering experiment showed that most alpha particles pass straight through a thin gold foil, with only a few deflected. This is because the atom is mostly empty space with a tiny, dense nucleus. So this statement is true.
-
Statement 3 says the nucleus is positively charged. The nucleus contains protons, which are positively charged, so this is true.
-
Statement 4 says the nucleus is very large compared with the rest of the atom. In fact, the nucleus is extremely small compared with the whole atom—most of the atom's volume is empty space. This is false.
The two correct statements are 2 and 3, which is option C.
Key Takeaways
- An atom has a small, dense, positively charged nucleus.
- Electrons are negatively charged and surround the nucleus.
- Most of the atom is empty space, as shown by the alpha-particle scattering experiment.
- The nucleus is tiny compared with the overall size of the atom, yet it contains most of the atom's mass.
Common Mistakes
- Thinking electrons are positively charged: electrons are always negatively charged.
- Thinking the nucleus is large: it is very small compared with the whole atom.
- Mixing up the results of the alpha-particle scattering experiment: the fact that most alpha particles pass straight through shows the atom is mostly empty space.
Things to Be Careful About
- Read each numbered statement separately before checking the options.
- Remember the correct order of the atomic model: a very small positive nucleus, surrounded by negative electrons, with mostly empty space in between.
A smoke alarm contains a radioactive source, S. The useful emissions from S are blocked by a few centimetres of air.
What is the useful radioactive radiation emitted by S?
Options
A alpha and gamma
B alpha only
C beta and gamma
D beta only
Working
A smoke alarm contains an alpha-emitting source (americium-241). The useful radiation is blocked by a few centimetres of air, which is the signature of alpha particles:
- Alpha: stopped by a few centimetres of air or a sheet of paper ✓
- Beta: travels up to about a metre in air ✗
- Gamma: very penetrating, needs thick lead or concrete ✗
So the useful radiation is alpha, and alpha only.
- Option A includes gamma, which is far too penetrating.
- Options C and D include beta, which is too penetrating.
Therefore the answer is B.
Answer
B
B
Walkthrough
The question links the penetrating power of radiation to the design of a smoke alarm. The alarm uses a small amount of americium-241, which emits alpha particles. These alpha particles ionise the air between two plates, allowing a small current to flow. When smoke enters the detector, it absorbs the alpha particles, the current falls, and the alarm sounds.
The key line in the stem is "The useful emissions from S are blocked by a few centimetres of air." Of the three radiations:
- Alpha is the least penetrating; it is stopped by a few centimetres of air (or even a sheet of paper).
- Beta is more penetrating; it can pass through a few metres of air (or a few mm of aluminium).
- Gamma is extremely penetrating; it needs a thick block of lead or concrete to stop it.
Since the useful emissions are blocked by a few centimetres of air, they must be alpha. That eliminates beta and gamma, so the correct option is "alpha only", B.
Why each distractor is wrong:
- A (alpha and gamma): gamma is far too penetrating to be blocked by a few cm of air.
- C (beta and gamma): neither beta nor gamma is blocked by a few cm of air.
- D (beta only): beta travels roughly a metre in air, so it would not be blocked by a few centimetres.
Key Takeaways
- Alpha: low penetration (a few cm of air or a sheet of paper), strongly ionising.
- Beta: moderate penetration (a few mm of aluminium), moderately ionising.
- Gamma: very high penetration (thick lead), weakly ionising.
- A smoke alarm relies on an alpha source; smoke absorbs the alpha particles and interrupts the ionisation current.
Common Mistakes
- Choosing beta or gamma because those radiations travel further — the smoke alarm works precisely because alpha is easily absorbed by smoke.
- Forgetting that "blocked by a few centimetres of air" is the defining clue pointing to alpha.
Things to Be Careful About
- Recall the approximate ranges: alpha ≈ a few cm of air, beta ≈ a metre of air, gamma ≈ very large.
- Read the stem carefully: it describes the useful radiation, not the background or all radiation emitted.
The planets in the Solar System orbit the Sun.
Which statement is correct?
Options
A There is a force on each planet away from the Sun.
B There is a force on each planet in the direction in which it travels.
C There is a force on each planet opposite to the direction in which it travels.
D There is a force on each planet towards the Sun.
Working
Each planet is kept in its orbit by the gravitational attraction of the Sun. This force acts towards the centre of the orbit, so it is directed towards the Sun.
The other options are incorrect: A gives a force away from the Sun, B gives a force along the direction of travel and C gives a force opposite to the motion, none of which would keep a planet in a circular orbit.
Answer
D
D
Walkthrough
A planet moving round the Sun would travel in a straight line unless a force acted on it. The Sun's gravity pulls each planet towards it. Because this pull is always towards the centre of the orbit, it changes the direction of the planet's motion but does hardly any work changing its speed, so the planet circles the Sun.
Look at each option in turn. A says the force is away from the Sun, which would push the planet outwards and could not keep it in orbit. B says the force is in the direction of travel, which would only speed the planet up along its path, not bend it round the Sun. C says the force is opposite to the direction of travel, which would only slow the planet down. D says the force is towards the Sun, which matches the gravitational pull that provides the required centripetal force.
Key Takeaways
- A body moving in a circle must have a resultant force towards the centre of the circle.
- For a planet, this centripetal force is the Sun's gravitational attraction.
- A force can change direction without changing speed; that is what happens in a circular orbit.
Common Mistakes
- Choosing B or C: these describe forces along or against the motion, but a circular path needs a sideways (radial) force, not a force in the line of travel.
- Confusing the force on the planet with the planet's tendency to move in a straight line due to inertia.
- Thinking the centripetal force is a separate force; it is the name given to the resultant force towards the centre, here supplied by gravity.
Things to Be Careful About
- The force is always directed towards the Sun, not in the direction of the planet's velocity.
- Although the planet is moving, its velocity direction changes continuously; the force is perpendicular to the velocity at every instant.
- For Paper 1, read each option as a complete statement: only D correctly states the direction of the Sun's pull.
A star is a distance of 4.2 light-years from the Earth.
What is 4.2 light-years in metres?
Options
A
B
C
D
Working
A light-year is the distance light travels in one year.
Speed of light,
Time in one year,
Distance for 4.2 light-years,
Answer
D
D
Walkthrough
The question gives a distance in light-years and asks for the same distance in metres. A light-year is not a unit of time; it is a unit of distance. It is the distance light travels in one year.
To convert, use the basic relation
Here the speed is the speed of light, , and the time is one year in seconds.
First convert one year into seconds:
So one light-year is
For 4.2 light-years, multiply by 4.2:
This matches option D.
Key Takeaways
- A light-year is a unit of distance, not of time.
- It is found from , where is the speed of light and is one year in seconds.
- Always convert the year into seconds before calculating.
- In astronomy, very large distances are often written in standard form.
Common Mistakes
- Treating a light-year as a time interval. It is a distance.
- Forgetting to convert one year into seconds, which gives a completely wrong answer.
- Using 3600 instead of 365 × 24 × 3600 for the number of seconds in a year.
- Losing a factor of 10 when multiplying powers of ten. Check by adding the powers: .
Things to Be Careful About
- Use approximately seconds in a year; this is enough for an O Level calculation.
- The answer needs to be in standard form, so combine the powers of ten carefully.
- Option C, , is the size of one light-year, not 4.2 light-years. The correct option multiplies that by 4.2.
What is a protostar?
Options
A a cloud of gas that is collapsing and decreasing in temperature
B a cloud of gas that is collapsing and increasing in temperature
C a star that is expanding and decreasing in temperature
D a star that is expanding and increasing in temperature
Working
A protostar is the early stage of a star's life. It begins as a cloud of gas (a nebula) that collapses under gravity. As the cloud collapses, gravitational potential energy is converted into kinetic energy of the particles, so the temperature of the cloud increases. It is not yet a star because nuclear fusion has not started.
Answer
B
B
Walkthrough
A protostar is the first stage in the life cycle of a star. It starts as a large cloud of gas and dust (a nebula). Gravity pulls the particles together, so the cloud collapses. During this collapse, gravitational potential energy is transferred to kinetic energy of the particles, which makes the cloud hotter. So the protostar is a collapsing cloud of gas that is increasing in temperature. This matches option B.
Option A is wrong because although a protostar is a collapsing cloud, its temperature increases, not decreases. Options C and D are wrong because a protostar is a cloud of gas, not yet a star, and it is collapsing, not expanding.
Key Takeaways
- A protostar forms from a collapsing cloud of gas (a nebula).
- As the cloud collapses, its temperature increases because gravitational potential energy is converted into kinetic energy of the particles.
- A protostar is not yet a star because nuclear fusion has not started.
- This is the first stage in the life cycle of a star, before the main sequence.
Common Mistakes
- Choosing A: thinking the temperature decreases as the cloud collapses. In fact, the collapse heats the gas.
- Choosing C or D: thinking a protostar is already a star. A protostar is a cloud of gas, not a star.
Things to Be Careful About
- Remember that the collapse of the cloud causes heating, not cooling.
- A protostar becomes a star only when the core gets hot enough for nuclear fusion of hydrogen to begin.
Your score so far
Answer a question to start scoring
Your marks add up here as you work through the paper.