Physics 5054/22 — May/June 2025
Cambridge O-Level · Theory · worked solutions for every part, with the mark scheme
Topics Forces · Kinematics · Energy, Work and Power · Pressure · Momentum · Kinetic Particle Model of Matter · +10 more
A ball is dropped by the side of a vertical scale that is marked in centimetres.
A video recording of the fall shows the position of the ball on the scale every 0.10 s.
The distance the ball falls is shown by the position on the scale.
Table 1.1 shows the results.
Table 1.1
| time / s | 0 | 0.10 | 0.20 | 0.30 | 0.40 | 0.50 |
|---|---|---|---|---|---|---|
| distance / cm | 0 | 5 | 20 | 44 | 78 | 123 |
Answer
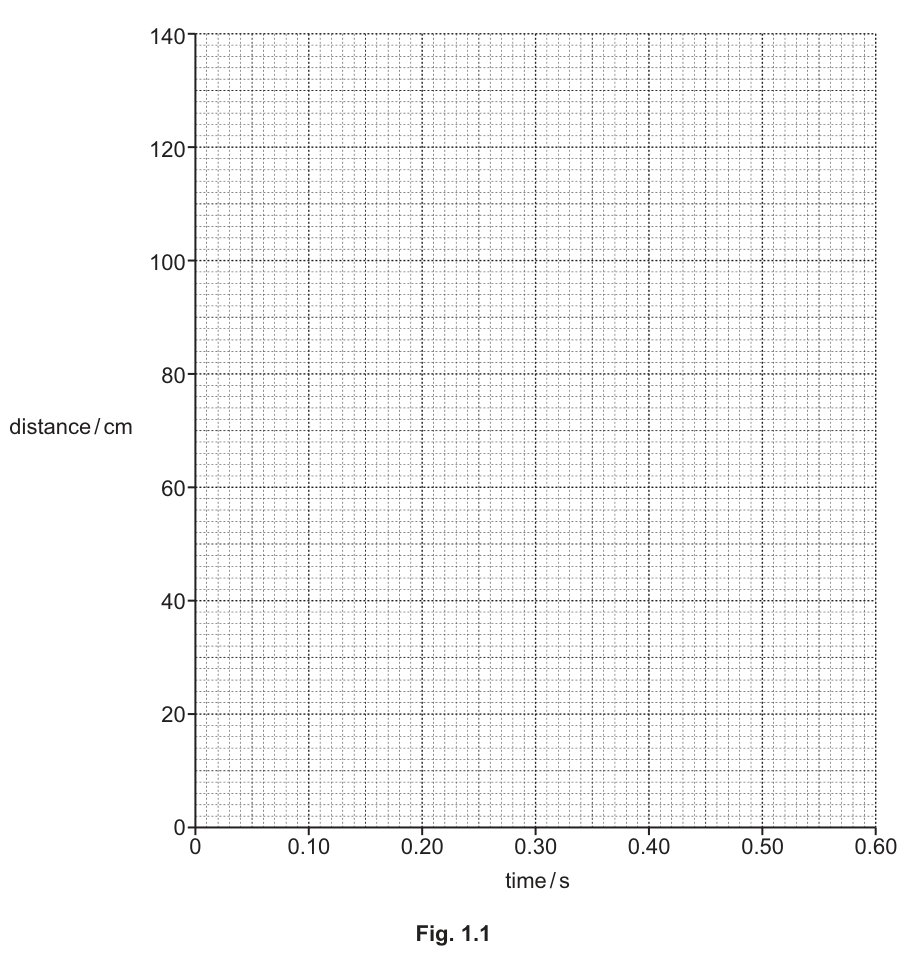
Plot the following points on the grid in Fig. 1.1:
- (0, 0)
- (0.10, 5)
- (0.20, 20)
- (0.30, 44)
- (0.40, 78)
- (0.50, 123)
Draw a smooth curve through the points, starting steeply and becoming less steep.
See diagram
Walkthrough
The question asks for a distance-time graph to be plotted from the data in Table 1.1. The horizontal axis is time in seconds, and the vertical axis is distance in centimetres. We plot each pair of values from the table as a point on the grid. Because the ball is accelerating, the distance increases by larger amounts each second, so the curve must get steeper as time increases. We draw a smooth curve (not straight line segments) through the points to show the continuous motion.
Key Takeaways
- Graphs must be plotted with points within half a small square of the correct position.
- For accelerating motion, the distance-time graph is a curve with an increasing gradient.
Common Mistakes
- Drawing straight lines between the points instead of a smooth curve.
- Plotting points more than half a small square away from their correct positions.
Things to Be Careful About
- Read the scale carefully: the vertical axis is in cm and the horizontal axis is in s.
- Ensure the curve is smooth and concave down (gradient increasing), representing acceleration.
Working
Answer
195
195
Walkthrough
Average speed is defined as the total distance travelled divided by the total time taken. From the table, at , the distance fallen is . We substitute these values into the formula to find the average speed over this interval.
Key Takeaways
- Average speed = total distance / total time.
- Ensure units are consistent; here both are in cm and s, giving cm/s.
Common Mistakes
- Using the wrong time or distance value (e.g., using or ).
- Forgetting to include the unit in the final answer.
Things to Be Careful About
- The question asks for the answer in cm/s, so no unit conversion is needed.
Describe how to use the graph in Fig. 1.1 to determine the speed of the ball at time .
Answer
- Draw a tangent to the curve at the point where .
- Find the gradient (slope) of this tangent.
Draw a tangent at t=0.40s and find its gradient.
Walkthrough
The speed of the ball at a specific instant is the instantaneous speed, which is the gradient of the distance-time graph at that point. Since the graph is a curve, we cannot simply use two points on the curve. Instead, we draw a straight line (tangent) that just touches the curve at . The gradient of this tangent gives the instantaneous speed at that moment.
Key Takeaways
- Instantaneous speed is the gradient of the distance-time graph at a specific time.
- For a curved graph, a tangent must be drawn at the point of interest.
Common Mistakes
- Using two points on the curve to find the gradient (this gives average speed, not instantaneous).
- Not drawing the tangent accurately.
Things to Be Careful About
- The gradient of a distance-time graph is speed, not acceleration.
As the ball falls, the acceleration of the ball decreases and eventually becomes zero before it reaches the ground.
Explain, in terms of the forces acting, why the acceleration decreases, and why it eventually becomes zero.
Answer
- As the ball falls, air resistance (upwards force) increases with speed.
- The resultant force (weight minus air resistance) decreases, so the acceleration decreases.
- Eventually, air resistance equals weight, the resultant force is zero, and the acceleration becomes zero.
Air resistance increases with speed, reducing the resultant force until it balances weight, making acceleration zero.
Walkthrough
Two main forces act on the falling ball: its weight (downwards) and air resistance (upwards). Initially, the speed is low, so air resistance is small, and the resultant force is nearly equal to the weight, giving a large acceleration. As the ball speeds up, air resistance increases. This reduces the resultant force (), and by Newton's second law (), the acceleration decreases. When the air resistance becomes large enough to equal the weight, the resultant force is zero. With no resultant force, there is no acceleration, and the ball falls at a constant speed (terminal velocity).
Key Takeaways
- Weight is constant; air resistance increases with speed.
- Resultant force determines acceleration.
- Zero resultant force means zero acceleration (terminal velocity).
Common Mistakes
- Saying 'gravity decreases' (gravity/weight is constant).
- Not mentioning that air resistance increases with speed.
- Saying 'forces cancel' without specifying which forces.
Things to Be Careful About
- Use the terms 'resultant force' and 'air resistance' or 'drag'.
- Explain the sequence: speed increases -> air resistance increases -> resultant force decreases -> acceleration decreases.
Describe the appearance of a distance–time graph when the acceleration of the ball is zero.
Answer
A straight line of constant gradient (slope).
A straight line of constant gradient.
Walkthrough
When acceleration is zero, the speed is constant. On a distance-time graph, constant speed is represented by a straight line with a constant gradient (slope). The line will be straight and sloping upwards (positive gradient) since the ball is still moving downwards (increasing distance).
Key Takeaways
- Zero acceleration means constant speed.
- Constant speed on a distance-time graph is a straight line.
Common Mistakes
- Saying 'horizontal line' (this would mean zero speed, i.e., the ball has stopped).
- Saying 'curve' (this would mean changing speed/acceleration).
Things to Be Careful About
- Ensure the line is described as having a 'constant gradient' or being 'straight', not just 'straight line' without qualification.
Fig. 2.1 shows a fork-lift truck used to lift a load.
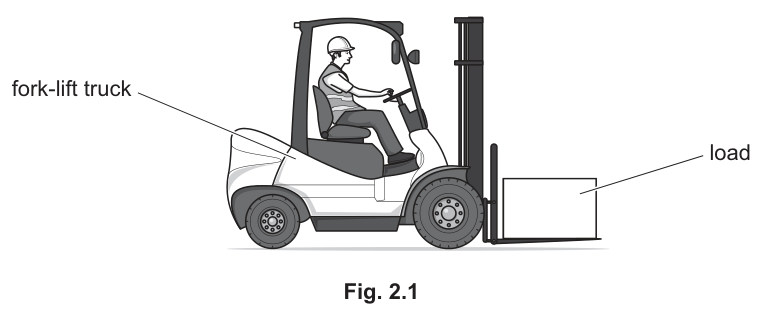
When lifting the load, the electric motor on the fork-lift truck has a useful output power of 600 W.
Answer
work done or energy per unit time
work done or energy per unit time
Walkthrough
Power is defined as the rate at which work is done or energy is transferred. The candidate simply needs to state this definition to earn the mark.
Key Takeaways
- Power is the rate of doing work or transferring energy.
- The SI unit of power is the watt (W), where 1 W = 1 J/s.
Common Mistakes
- Writing only "energy used" or "work done" without mentioning the time element.
- Confusing power with energy or force.
Things to Be Careful About
- The definition must include the concept of time (per unit time). "Energy per unit time" or "work done per unit time" are both fully acceptable.
The efficiency of the motor is 70%.
Calculate the input power to the motor.
input power = ______
Working
Rearranging for input power:
Substitute the given values (efficiency = 70% = 0.70):
Answer
860 W
860 W
Walkthrough
The motor has a useful output power of 600 W and an efficiency of 70%. Efficiency is the ratio of useful output energy (or power) to the total input energy (or power). To find the input power, we rearrange the efficiency equation: input power = output power / efficiency. Converting 70% to a decimal gives 0.70. Dividing 600 W by 0.70 gives approximately 857 W, which rounds to 860 W to 2 significant figures.
Key Takeaways
- Efficiency = (useful output) / (total input).
- Input power is always greater than useful output power when efficiency is less than 100%.
Common Mistakes
- Multiplying 600 by 0.70 instead of dividing (this would give the output power if 600 W were the input).
- Forgetting to convert the percentage to a decimal (using 70 instead of 0.70).
- Not providing the unit W in the final answer.
Things to Be Careful About
- Ensure the efficiency is expressed as a decimal (0.70) or a fraction (7/10) in the calculation. Rounding to 2 significant figures is appropriate here as the given data (600 W, 70%) has 2 or 3 significant figures.
The fork-lift truck lifts a load with mass of 50 kg through a vertical distance of 2.3 m.
Working
The work done against gravity is equal to the gain in gravitational potential energy:
where , , and .
Rounded to 2 significant figures, this is 1100 J. (Using gives 1150 J, which also rounds to 1100 J to 2 s.f.).
Answer
1100 J
1100 J
Walkthrough
To lift the load at a constant speed, the upward force must equal the weight of the load. The work done is the force multiplied by the distance moved in the direction of the force. Here, work done = weight × height = mgh. Using , the weight is . The work done is . Rounding to 2 significant figures gives 1100 J, which matches the mark scheme. If is used, the work done is .
Key Takeaways
- Work done against gravity equals the gain in gravitational potential energy: .
- Work is measured in joules (J), mass in kg, in N/kg (or m/s²), and height in metres.
Common Mistakes
- Forgetting to multiply by and simply calculating .
- Using the wrong value for or omitting it entirely.
Things to Be Careful About
- The mark scheme accepts 1100 J, which is 1127 J rounded to 2 significant figures. Be consistent with significant figures based on the data given in the question.
Working
Power is the rate of doing work:
Rearranging for time:
Using the work done from part (c)(i) and the useful output power of 600 W:
Answer
1.9 s
1.9 s
Walkthrough
The motor has a useful output power of 600 W, which is the rate at which it does useful work on the load. Power = work done / time. Rearranging gives time = work done / power. Substituting the work done (1127 J) and the output power (600 W) gives a time of approximately 1.88 s, which rounds to 1.9 s to 2 significant figures.
Key Takeaways
- Power relates work done (or energy transferred) to time: .
- Time is found by rearranging the equation to .
Common Mistakes
- Using the input power (860 W) instead of the output power (600 W) to calculate the time. The output power is what is actually doing the lifting.
- Carrying forward an incorrect value from part (c)(i) without marking it as an error carried forward (ecf).
Things to Be Careful About
- Always use the useful output power when calculating the time taken to do a specific amount of useful work. The input power includes energy wasted as thermal energy, which does not contribute to lifting the load.
Describe how energy is transferred to thermal energy as the load is lifted by the fork-lift truck.
Answer
friction / air resistance / electrical heating
friction, air resistance, or electrical heating
Walkthrough
The motor is only 70% efficient, meaning 30% of the input energy is transferred to thermal energy stores (wasted). This happens due to friction between moving parts (like the gears and the mast), air resistance on the moving load and truck, and electrical heating (resistance) in the motor's coils and wires.
Key Takeaways
- No machine is 100% efficient; some energy is always transferred to thermal energy stores.
- Common mechanisms for this dissipation include friction, air resistance (drag), and electrical resistance (heating).
Common Mistakes
- Writing "heat" instead of "thermal energy" (5054 is strict about energy stores and transfers terminology).
- Saying "gravity" or "weight" transfers energy to thermal energy.
Things to Be Careful About
- Use precise terminology: say "thermal energy" rather than "heat". Any one valid mechanism (friction, air resistance, electrical heating) is sufficient for the mark.
Fig. 3.1 shows a flat tyre on a car. The tyre needs to be inflated.
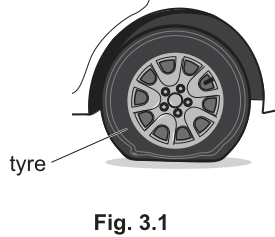
The force exerted by the flat tyre on the road is 1350 N.
The area of the flat tyre in contact with the road is .
Working
Answer
1.9 x 10^5
1.9 x 10^5
Walkthrough
The question gives the force and the contact area . The pressure is defined as force per unit area, so we use the equation . Substituting the values gives . Rounding to two significant figures (matching the precision of the given data) gives .
Key Takeaways
Pressure is force distributed over an area. Large forces over small areas produce very high pressures, which is why a flat tyre (small contact area) exerts a high pressure on the road.
Common Mistakes
- Forgetting to convert units (not needed here, but common in other pressure questions).
- Giving the answer to too many significant figures (the scheme accepts , not ).
- Using the wrong formula, such as .
Things to Be Careful About
- Always include the unit Pa (pascals) when the question asks for pressure in Pa.
- Use standard form for large numbers: rather than .
- The area is small, so the pressure will be large; check that the order of magnitude makes sense (, so is correct).
Air is pumped into the tyre to inflate it. This increases the pressure inside. The force exerted by the tyre on the road does not change.
State how the area of the tyre in contact with the road changes.
Answer
The area decreases.
The area decreases.
Walkthrough
The question states that the force exerted by the tyre on the road does not change, but the pressure inside increases. From , if is constant and increases, then must decrease. As the tyre inflates, it becomes rounder and lifts off the road, reducing the contact patch.
Key Takeaways
Pressure and area are inversely proportional for a constant force. Inflating a tyre reduces the contact area with the road.
Common Mistakes
- Saying the area increases (confusing the relationship).
- Not stating that the area decreases simply; adding unnecessary details that aren't credited.
Things to Be Careful About
- The question asks to 'state' how the area changes, so a single clear sentence is sufficient.
- Do not mention the pressure outside the tyre; focus only on the contact area with the road.
Inside the inflated tyre, a particle of air collides against the wall of the tyre.
Answer
Momentum is mass times velocity.
mass x velocity
Walkthrough
Momentum is a vector quantity defined as the product of an object's mass and its velocity. For a particle of air, it is the mass of the particle multiplied by its velocity.
Key Takeaways
Momentum () = mass () velocity (). It is a vector, so direction matters.
Common Mistakes
- Defining momentum as 'mass times speed' (speed is scalar, velocity is vector; momentum is a vector).
- Saying 'momentum is the force of a moving object' (confusing momentum with force or energy).
Things to Be Careful About
- Use the word 'velocity', not 'speed', in the definition.
- Do not include units in a definition unless asked.
Using ideas about momentum, explain why there is a force on the wall of the tyre as the particle collides with it.
Answer
On collision, the particle's momentum changes (or direction changes). Force is the rate of change of momentum, so a force is exerted on the particle, and by Newton's third law, an equal and opposite force is exerted on the wall. (Alternatively: momentum is transferred to the wall, and force is the rate of change of momentum.)
The collision causes a change in the particle's momentum; force is the rate of change of momentum, so a force is exerted on the wall.
Walkthrough
When an air particle collides with the tyre wall, it bounces back, so its velocity changes direction. This means its momentum changes. Force is defined as the rate of change of momentum (). Since the particle's momentum changes, a force acts on it. By Newton's third law, the particle exerts an equal and opposite force on the tyre wall. Alternatively, you can say that momentum is transferred to the wall during the collision, and this transfer of momentum over time is a force.
Key Takeaways
Collisions involve a change in momentum. A change in momentum over time is a force. Newton's third law ensures the wall experiences this force.
Common Mistakes
- Saying 'the particle has momentum, so there is a force' (momentum alone doesn't cause force; change in momentum does).
- Forgetting to mention the change in momentum or direction.
- Not linking the force on the particle to the force on the wall (Newton's third law).
Things to Be Careful About
- The question asks to use 'ideas about momentum', so you must mention change in momentum, not just energy or speed.
- Two separate points are needed: (1) change in momentum on collision, and (2) force is related to change in momentum (or Newton's third law).
As the car moves, the temperature of the air inside the tyre increases. The increase in temperature causes an increase in the pressure of the air.
Using ideas about particles, explain why the pressure increases.
Answer
The higher temperature means the particles have greater kinetic energy (and speed). They collide with the walls more frequently and with greater force (larger change in momentum per second), so the pressure increases.
Particles move faster and collide more frequently and with greater force against the walls.
Walkthrough
Temperature is a measure of the average kinetic energy of the particles. When the temperature increases, the air particles gain kinetic energy and move faster (higher speed). Because they are moving faster, two things happen: (1) they hit the walls of the tyre more often (more collisions per second), and (2) they hit the walls with greater speed, meaning each collision involves a larger change in momentum. Since pressure is the total force per unit area, and force is the rate of change of momentum, more frequent and harder collisions mean a greater force on the walls, and thus a higher pressure.
Key Takeaways
Higher temperature -> higher particle kinetic energy -> higher particle speed -> more frequent and harder collisions with walls -> higher pressure.
Common Mistakes
- Saying 'particles expand' (particles do not expand; the space between them or their speed changes).
- Saying 'particles get heavier' (mass is constant).
- Not linking the increased speed to the collision frequency or force (just saying 'they move faster' is not enough for both marks).
Things to Be Careful About
- Use particle model language: 'particles', 'kinetic energy', 'speed', 'collisions', 'change in momentum'.
- Do not mention the volume changing unless asked; the question implies constant volume (the tyre is rigid enough).
- Two distinct points are needed: higher speed/kinetic energy, and the consequence (more collisions or harder collisions / larger change in momentum per second).
A sound wave from a vibrating tuning fork is displayed on the oscilloscope shown in Fig. 4.1. The sound wave is detected using a microphone.
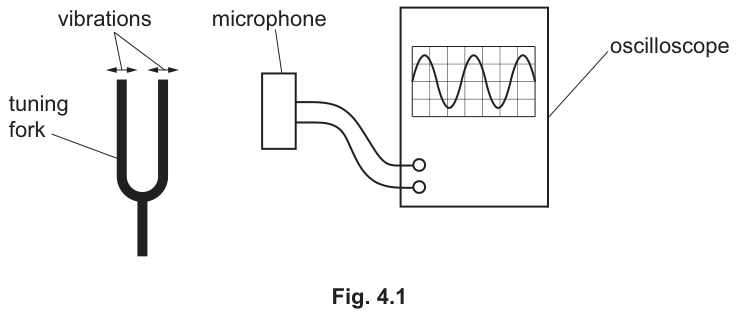
Describe the motion of the air particles as the sound wave passes from the tuning fork to the microphone.
Answer
Air particles oscillate backwards and forwards (or to and fro / closer and further apart).
This oscillation is in the same direction as the direction of travel of the sound wave (parallel to the vibrations of the tuning fork / in the direction of the microphone). Mention of compressions and rarefactions is also acceptable.
Air particles oscillate backwards and forwards in the direction of travel of the wave.
Walkthrough
Sound waves are longitudinal waves. This means the particles of the medium (air) vibrate parallel to the direction in which the wave is travelling. As the tuning fork vibrates, it pushes and pulls on the adjacent air particles, creating regions of compression (particles closer together) and rarefaction (particles further apart). These particles then pass the disturbance on to their neighbours. Therefore, the air particles themselves only move backwards and forwards along the line of travel of the wave, from the tuning fork to the microphone.
Key Takeaways
- Sound is a longitudinal wave.
- In a longitudinal wave, particle oscillation is parallel to the direction of energy transfer (wave travel).
Common Mistakes
- Stating that particles move with the wave (they only oscillate about a fixed point; they do not travel from the fork to the microphone).
- Saying particles move up and down (that is for transverse waves).
- Using the word 'heat' instead of 'thermal energy' (not applicable here, but a common general mistake).
Things to Be Careful About
- The mark scheme accepts 'backwards and forwards', 'to and fro', 'longitudinal', or 'compressions and rarefactions'. Ensure the direction of oscillation is explicitly linked to the direction of wave travel.
Fig. 4.2 shows the trace seen on the oscilloscope when the tuning fork vibrates.
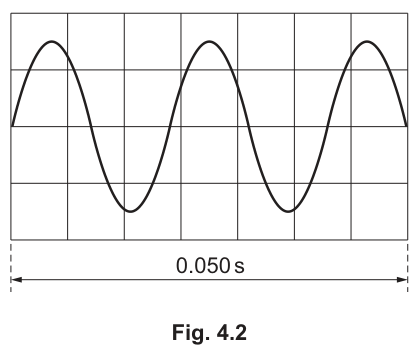
The frequency of the sound is constant.
Answer
Frequency is the number of oscillations (or complete waves) passing a given point per second.
number of oscillations per second
Walkthrough
Frequency is a fundamental property of any wave. It is defined as the number of complete cycles (oscillations or wavelengths) that pass a fixed point in one second. The unit is the hertz (Hz), where 1 Hz = 1 oscillation per second.
Key Takeaways
- Frequency is the rate of oscillation: number of waves per second.
- Unit is hertz (Hz).
Common Mistakes
- Saying 'number of waves per minute' or 'per hour'. The definition strictly requires 'per second'.
- Confusing frequency with wave speed. Speed is distance per second; frequency is cycles per second.
Things to Be Careful About
- The mark scheme accepts 'number of oscillations per second' or 'number of wavelength(s) passing a point per second'. Both are correct.
The trace shown on Fig. 4.2 is produced in 0.050 s.
Calculate the frequency of the sound wave.
frequency = ______
Working
From Fig. 4.2, count the number of complete wave cycles shown on the trace.
Number of waves = 2.5
Time taken = 0.050 s
Alternatively, the time period for one wave is s.
Answer
50
50
Walkthrough
The oscilloscope trace in Fig. 4.2 shows the waveform over a specific time interval. By counting the peaks (or complete cycles) on the grid, we see there are 2.5 complete waves in the 0.050 s time window. Frequency is defined as the number of waves per second. We calculate this by dividing the total number of waves by the total time: Hz. Alternatively, we can find the time period (time for one wave) as s, and then use Hz.
Key Takeaways
- Reading the number of cycles from an oscilloscope trace over a known time.
- Using or .
Common Mistakes
- Miscounting the number of waves (e.g., counting 3 instead of 2.5 by including the partial wave at the end incorrectly).
- Forgetting to divide by the time in seconds (e.g., , but if time was in ms, conversion is needed).
Things to Be Careful About
- The mark scheme accepts 2.5 waves seen, or 1 wave taking 0.02 s. The final answer must be 50 Hz. The unit Hz is required.
A student near the tuning fork observes the trace and listens to the sound. He notices that the amplitude of the trace decreases.
State how the sound heard by the student changes.
Answer
The sound becomes quieter (or less loud / lower volume).
quieter
Walkthrough
The amplitude of a sound wave on an oscilloscope represents the maximum displacement of the air particles, which corresponds to the energy of the wave. The energy of a sound wave determines its loudness. As the wave travels away from the source, its energy spreads out and is absorbed by the medium, causing the amplitude to decrease. A smaller amplitude means a quieter sound.
Key Takeaways
- Amplitude of a sound wave is linked to its loudness.
- Decreasing amplitude means decreasing loudness.
Common Mistakes
- Saying the pitch changes (pitch is linked to frequency, not amplitude).
- Saying the speed changes.
Things to Be Careful About
- Use words like 'quieter', 'less loud', or 'lower volume'. Avoid saying 'the sound gets smaller' without context.
The tuning fork is replaced by a new tuning fork that produces a sound wave of half the frequency. The controls on the oscilloscope are not changed.
On Fig. 4.3, draw the trace obtained with the new tuning fork. The trace obtained with the original tuning fork is shown.
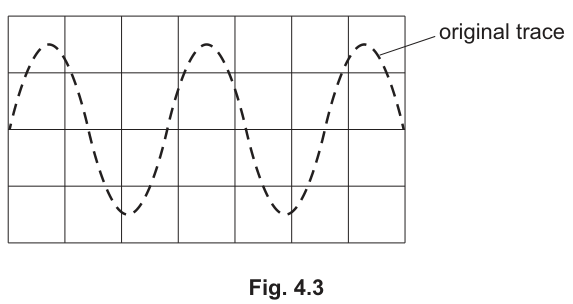
Answer
A solid sinusoidal trace drawn on the grid with half the frequency of the dashed original trace. The new trace should have a period twice as long (e.g., one complete cycle spanning 4 horizontal grid squares instead of 2), with the same amplitude. At least one complete oscillation must be visible.
Trace with double the period (half the frequency) and same amplitude.
Walkthrough
The original trace in Fig. 4.3 shows 2.5 waves across the grid. Half the frequency means the wave takes twice as long to complete one cycle. Therefore, the period is doubled. If the original wave took 2 horizontal grid squares for one complete cycle, the new wave must take 4 horizontal grid squares. The amplitude (height of the wave) remains the same because the tuning fork's vibration amplitude hasn't changed, only its frequency. The new trace should be drawn as a solid line, showing at least one full cycle to demonstrate the new period.
Key Takeaways
- Frequency and period are inversely proportional: . Half the frequency means double the period.
- On an oscilloscope with fixed time-base settings, a lower frequency wave is more 'stretched out' horizontally.
Common Mistakes
- Drawing a wave with half the amplitude instead of half the frequency.
- Drawing a wave with the same period but different frequency (impossible on a fixed grid).
- Not drawing at least one complete oscillation.
Things to Be Careful About
- The mark scheme requires 'half frequency shown' AND 'at least one complete oscillation seen'. Ensure the wavelength (horizontal spacing) is clearly double that of the original dashed trace.
Fig. 4.4 shows three adjacent wavefronts of the sound wave as the wavefronts move towards a gap in a wall created by an open door.
Another student, standing at P on the other side of the wall, hears the sound.
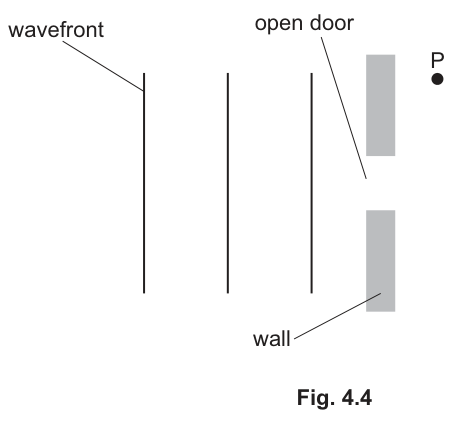
Answer
Three curved wavefronts drawn on the right side of the wall (the side with P). The wavefronts should be semi-circular (or curved) and centered on the open door (the gap). The wavelength (spacing between wavefronts) must be the same as on the left side. The wavefronts should curve outwards towards P.
Three curved wavefronts spreading out from the gap with the same wavelength.
Walkthrough
When plane wavefronts pass through a gap that is roughly the same size as the wavelength, they spread out or diffract. The diffracted wavefronts become curved (circular or semi-circular) and appear to originate from the gap. On the oscilloscope or ray diagram, we draw these as curved lines. The key requirements are: (1) the wavefronts must be curved and centered on the gap, (2) the wavelength (the perpendicular distance between adjacent wavefronts) must remain the same as on the incident side, and (3) there must be at least three wavefronts shown to represent the ongoing wave. Point P is located behind the wall, in the 'shadow' region, but because of diffraction, the sound waves spread into this region and reach P.
Key Takeaways
- Diffraction causes plane wavefronts to become curved after passing through a gap.
- The wavelength does not change during diffraction.
- The wavefronts spread into the region behind the obstacle.
Common Mistakes
- Drawing straight wavefronts after the gap (this would be no diffraction).
- Drawing wavefronts that are closer together or further apart (wavelength must be constant).
- Drawing the center of curvature away from the gap.
Things to Be Careful About
- The mark scheme awards marks for '(at least) three correctly curved wavefronts centered on gap' and 'same wavelength as on left and some curving in correct direction'. Ensure the curves are smooth and clearly centered on the door opening.
State the name of the process involved as the wavefronts pass through the gap and reach P.
Answer
Diffraction
diffraction
Walkthrough
The spreading out of waves as they pass through a gap or around an obstacle is called diffraction. In this case, the sound wavefronts spread out after passing through the open door, allowing the sound to reach point P which is not in a straight line from the source.
Key Takeaways
- Diffraction is the spreading of waves through a gap or around an edge.
- Significant diffraction occurs when the gap size is comparable to the wavelength.
Common Mistakes
- Saying 'refraction' (which is bending due to a change in speed/medium).
- Saying 'reflection' (bouncing back).
- Saying 'interference' (superposition of waves).
Things to Be Careful About
- The answer is simply 'diffraction'. No extra words are needed, though 'wave diffraction' is also acceptable.
A student sets up the circuit shown in Fig. 5.1 to measure the resistance of a length of wire. The circuit contains four identical cells.
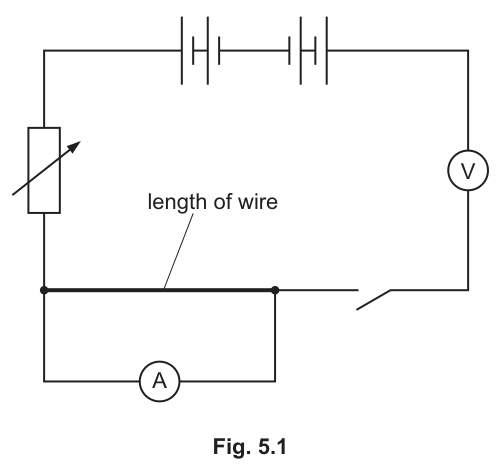
The student finds that both meters read zero when the switch is closed. This is because the circuit shown in Fig. 5.1 is not suitable for the measurement.
Describe all the changes to the circuit in Fig. 5.1 that are needed so that the meters produce readings that can be used to calculate the resistance of the length of wire.
Answer
- Swap the positions of the ammeter and the voltmeter (the voltmeter must be connected in parallel with the length of wire, and the ammeter in series in the main line).
- Reverse the left two cells so that all four cells face the same direction and provide a net e.m.f. to drive the current.
Swap the ammeter and voltmeter; reverse the left two cells so all cells face the same direction.
Walkthrough
The original circuit has two critical errors that prevent any useful readings. First, the four cells are arranged with the left two facing one way and the right two facing the opposite way. Their e.m.f.s cancel each other out, giving a net e.m.f. of zero, so no current flows. Reversing the left two cells makes them all aid each other. Second, the meters are swapped. A voltmeter has very high resistance; placing it in series with the main circuit blocks almost all current, so the ammeter reads zero. An ammeter has very low resistance; placing it in parallel with the wire shorts the wire, so the voltmeter reads zero. Swapping them so the voltmeter is in parallel with the wire and the ammeter is in series gives a correct setup to measure and and calculate .
Key Takeaways
- A voltmeter must always be connected in parallel with the component whose p.d. is being measured.
- An ammeter must always be connected in series in the main circuit so the same current flows through it.
- Cells in series must all face the same direction to add their e.m.f.s; opposing cells cancel out.
Common Mistakes
- Saying "reverse the voltmeter" or "reverse the ammeter". The meters themselves don't need reversing; their positions in the circuit are swapped.
- Forgetting to address the cells. The question states both meters read zero, which is primarily caused by the opposing cells giving zero net e.m.f. (and the voltmeter in series blocking current).
Things to Be Careful About
- Ensure both corrections are stated. The mark scheme awards one mark for swapping the meters and one mark for aligning the cells. Just swapping the meters is not enough; the cells would still give zero net e.m.f. if left opposing.
- When describing the correct circuit, specify that the voltmeter is in parallel with the wire and the ammeter is in series.
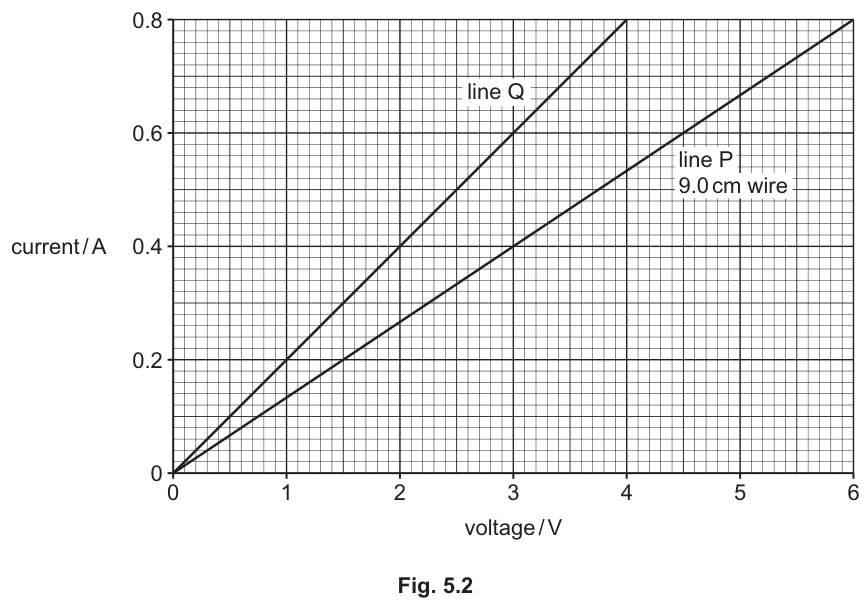
Fig. 5.2 shows the current–voltage graph for a 9.0 cm length of wire (line P) and for a different length of the same wire with the same cross-sectional area (line Q).
Working
From the graph for line P (9.0 cm wire), read a clear point on the line. When the voltage V, the current A.
Answer
7.5
7.5
Walkthrough
To find the resistance of the 9.0 cm wire, use Ohm's law in the form . Pick a point on line P where the grid lines cross clearly. At V, the current is A. Substitute these values into the equation:
Any other valid point on line P (e.g., V, A) will give the same result.
Key Takeaways
- Resistance is the ratio of voltage to current (), not the gradient of an I-V graph (which is ).
- Always read values from a graph where the lines cross grid intersections clearly to minimise reading errors.
Common Mistakes
- Calculating the gradient of the line () and forgetting to invert it to get resistance.
- Reading the wrong line or misreading the axes (e.g., reading current as 0.6 A at 6.0 V).
Things to Be Careful About
- The axes are current (y-axis) against voltage (x-axis). The resistance is , which is the reciprocal of the gradient. Ensure units are in volts and amperes to get resistance in ohms ().
Explain whether line Q is obtained with a length of wire that is longer or shorter than 9.0 cm.
Answer
Line Q is obtained with a shorter length of wire.
For the same voltage, line Q shows a larger current than line P, which means line Q has a smaller resistance. Since resistance is directly proportional to length for the same wire (same cross-sectional area and material), a smaller resistance indicates a shorter length.
shorter
Walkthrough
Compare lines P and Q on the current-voltage graph. At any given voltage (e.g., V), line Q has a higher current ( A) than line P ( A). By Ohm's law (), a higher current for the same voltage means a lower resistance. Therefore, the wire for line Q has a smaller resistance than the 9.0 cm wire.
For a uniform wire of the same material and cross-sectional area, resistance is directly proportional to length (). A smaller resistance must therefore correspond to a shorter length of wire.
Key Takeaways
- On an I-V graph with current on the y-axis, a steeper line represents a lower resistance.
- Resistance of a wire is directly proportional to its length, assuming constant cross-sectional area and material.
Common Mistakes
- Stating "longer" because line Q is steeper, without linking the slope to resistance correctly.
- Forgetting to state that the resistance is smaller or that resistance is proportional to length; the mark scheme requires this reasoning to justify "shorter".
Things to Be Careful About
- Ensure the explanation explicitly links the graph observation (larger current / smaller resistance) to the physical property (shorter length). Just saying "shorter" without reasoning may not earn the mark if the question asks to explain.
Working
From line Q, when V, A.
Resistance is proportional to length (), so:
Answer
6.0
6.0
Walkthrough
First, calculate the resistance of the wire for line Q using a point on the graph. At V, A:
We already found for cm.
Since resistance is directly proportional to length for the same wire:
Key Takeaways
- Resistance is directly proportional to length: , so .
- Always calculate the resistance for the unknown case before using the ratio.
Common Mistakes
- Assuming the length is proportional to the current directly, giving cm.
- Using the gradient of the graph () directly in the ratio without inverting to get resistance.
Things to Be Careful About
- The answer must be in cm, matching the unit given in the question. Give the answer to an appropriate number of significant figures (6.0 cm, not just 6, to match the precision of 9.0 cm).
Fig. 6.1 shows part of a mains circuit that includes three lamps and a heater.
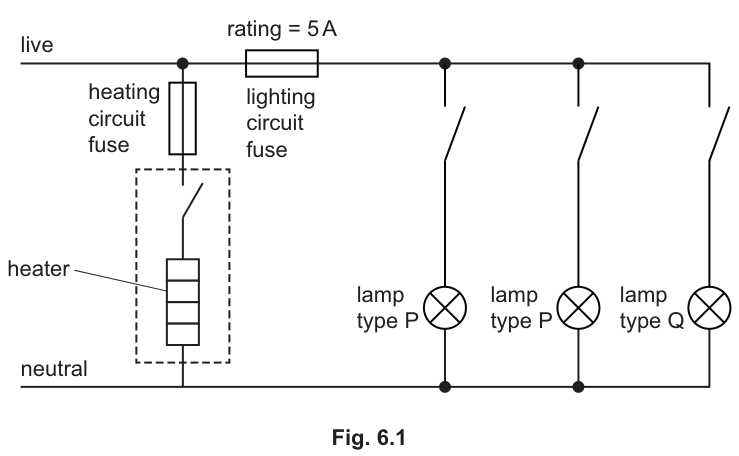
The mains voltage is 230 V, and the power of the heater is 2000 W.
There is a 5 A fuse in the lighting circuit. Four fuses of different ratings are available for use in the heating circuit as shown in the list.
Underline the most suitable fuse value for the heating circuit fuse, and explain your choice.
Your answer must include a calculation.
available fuses:
5 A 8 A 13 A 30 A
calculation
explanation ______
Working
Answer
13 A
The 13 A fuse is the most suitable because it is the lowest rating available that is greater than the normal operating current of 8.7 A. A 5 A or 8 A fuse would blow during normal operation, while a 30 A fuse would not blow quickly enough to protect the heater and wiring if a fault occurred.
13 A
Walkthrough
First, calculate the normal operating current of the heater using the power equation , rearranged to . Substituting the given values gives A. Next, choose a fuse from the available options (5 A, 8 A, 13 A, 30 A). A fuse must have a rating slightly higher than the normal operating current so it does not blow during normal use, but low enough to blow and protect the circuit if the current rises significantly during a fault. The 5 A and 8 A fuses would blow immediately under normal operation. The 30 A fuse is too high and would allow dangerous current to flow before blowing. The 13 A fuse is the correct choice as it is the lowest available rating above 8.7 A.
Key Takeaways
- Fuses are chosen to have a rating just above the normal operating current of the appliance or circuit.
- The power equation can be rearranged to find current when power and voltage are known.
Common Mistakes
- Choosing the 30 A fuse because it is the largest and therefore 'safest' — this ignores that a fuse must blow to protect the circuit, and a 30 A fuse would not blow for a heater drawing 8.7 A even if a fault caused the current to double.
- Choosing 8 A because it is the closest value to 8.7 A — an 8 A fuse would blow during normal operation since 8.7 A exceeds its rating.
- Forgetting to include units in the calculation.
Things to Be Careful About
- Always check that the chosen fuse rating is strictly greater than the calculated normal current.
- Round the calculated current to 2 or 3 significant figures (8.7 A) as appropriate for the given data.
Answer
When the current exceeds the fuse rating, the fuse wire heats up and melts (or blows), which cuts off the current and breaks the circuit.
The fuse melts or blows, cutting off the current and breaking the circuit.
Walkthrough
A fuse contains a thin wire with a low melting point. When the current flowing through it becomes too large, the electrical energy is converted into thermal energy in the wire ( heating). This causes the wire to heat up rapidly and melt. Once the wire melts, the circuit is physically broken, the current stops flowing, and the appliance is protected from overheating or catching fire.
Key Takeaways
- The primary function of a fuse is to melt and break the circuit when the current exceeds a safe value.
Common Mistakes
- Saying the fuse 'stops the electricity' or 'blocks the current' without mentioning that it physically melts or breaks the circuit.
- Confusing the action of a fuse with a trip switch (which trips a mechanism rather than melting).
Things to Be Careful About
- Use precise physics terminology: 'melts' or 'blows' rather than 'breaks' (which could refer to a switch). The melting is what causes the circuit to break.
Table 6.1 shows the current in lamps of type P and type Q when connected to the mains supply.
Table 6.1
| lamp type | current / A |
|---|---|
| P | 0.26 |
| Q | 0.43 |
Calculate the current in the lighting circuit fuse when all three lamps are switched on.
current = ______
Working
The lamps are connected in parallel, so the total current drawn from the supply is the sum of the currents through each branch.
Answer
0.95 A
0.95
Walkthrough
In a parallel circuit, the total current supplied is equal to the sum of the currents in each individual branch. The lighting circuit has two lamps of type P and one lamp of type Q. From Table 6.1, the current for type P is 0.26 A and for type Q is 0.43 A. Therefore, the total current is A. This total current flows through the lighting circuit fuse.
Key Takeaways
- In a parallel circuit, the total current is the sum of the currents in the separate branches.
- The current in the main supply line (and thus through the main fuse) is greater than the current in any single branch.
Common Mistakes
- Adding only one type P lamp current to the type Q current (giving 0.69 A) and forgetting there are two type P lamps.
- Multiplying all three currents together instead of adding them.
Things to Be Careful About
- Ensure you account for all lamps in the circuit. The diagram shows two type P lamps and one type Q lamp.
The rating for the lighting circuit fuse in Fig. 6.1 is 5 A.
The lamp of type Q is removed from the circuit.
Calculate the maximum number of additional lamps of type P that can now be connected in parallel to the lighting circuit.
number of additional lamps = ______
Working
With lamp Q removed, the current used by the two remaining type P lamps is:
The lighting circuit fuse has a rating of 5 A, so the remaining current available for additional lamps is:
Each additional type P lamp draws 0.26 A. The maximum number of additional lamps is:
Since only whole lamps can be added, the maximum number is 17. (Adding 18 would give A, which exceeds the 4.48 A available and would blow the 5 A fuse.)
Answer
17
17
Walkthrough
First, calculate the current already used by the lamps left in the circuit. Lamp Q is removed, leaving two type P lamps. Their combined current is A. The fuse rating is 5 A, which is the maximum current the circuit can safely carry. Subtract the used current from the maximum to find the available current: A. Divide this available current by the current drawn by one additional type P lamp (0.26 A): . Because you cannot add a fraction of a lamp, you must round down to 17. If you added 18 lamps, the total current would be A, which exceeds the 5 A fuse rating and would cause it to blow.
Key Takeaways
- The total current in a parallel circuit cannot exceed the rating of the main fuse.
- When calculating how many additional components can be added, always round down to the nearest whole number to ensure the total current stays within the safe limit.
Common Mistakes
- Rounding 17.23 up to 18, which would blow the fuse.
- Forgetting to subtract the current already used by the two type P lamps before calculating the remaining capacity.
- Using the total current of all three original lamps (0.95 A) instead of just the two type P lamps (0.52 A) after removing lamp Q.
Things to Be Careful About
- Always check your final answer by calculating the total current with your chosen number of additional lamps to ensure it does not exceed the fuse rating.
In some houses the lighting circuit is protected by a trip switch (circuit breaker) instead of a fuse.
State two advantages of using a trip switch rather than a fuse.
- ______
- ______
Answer
- A trip switch can be reset and used again after it trips, whereas a fuse must be replaced after it blows.
- A trip switch acts faster (or is more sensitive) than a fuse, turning off the circuit immediately.
- It can be reset and used again. 2. It is faster acting (or more sensitive).
Walkthrough
A trip switch (circuit breaker) and a fuse both protect circuits from overcurrent, but they operate differently. A fuse contains a wire that melts and is destroyed when the current is too high; it must then be physically replaced. A trip switch uses an electromagnet or a bimetallic strip to trip a mechanical switch, which breaks the circuit. Once the fault is removed, the switch can simply be flipped back to the 'on' position and reused. Additionally, trip switches can be designed to be more sensitive and to react faster than standard fuses. Some trip switches (residual current circuit breakers, RCCBs) can also detect a difference between the live and neutral currents, protecting against electric shock, which a standard fuse cannot do.
Key Takeaways
- Trip switches are reusable; fuses are single-use.
- Trip switches can be more sensitive and faster-acting than fuses.
Common Mistakes
- Saying 'a trip switch is cheaper' — this is not necessarily true and is not a primary physics advantage.
- Saying 'a trip switch does not melt' — while true, this is not an advantage in itself; the advantage is that it can be reset.
- Providing only one advantage when two are required.
Things to Be Careful About
- Ensure the two advantages you state are distinct. 'Can be reset' and 'does not need replacing' are the same point; choose two clearly different benefits such as reusability and speed/sensitivity.
Fig. 7.1 shows a simple d.c. motor. The poles at the ends of the magnets are not labelled.
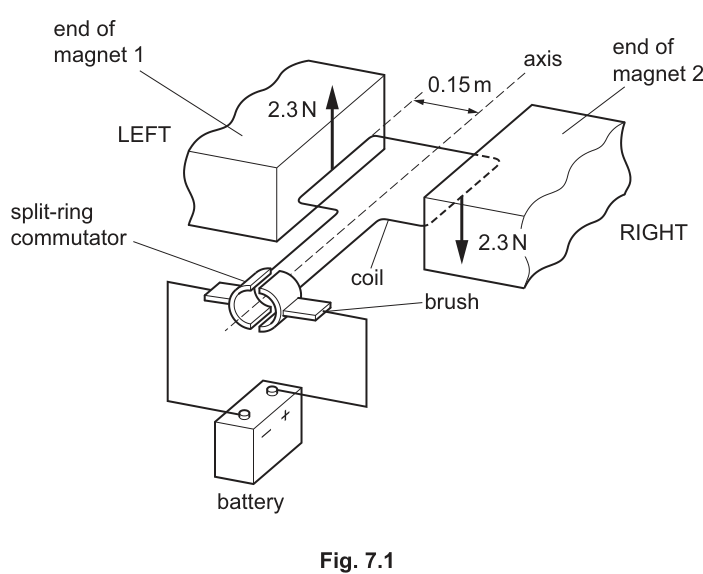
State the purpose of the split-ring commutator and the brushes.
split-ring commutator ______
brushes ______
Answer
split-ring commutator:
- To reverse the current in the coil.
- It reverses the current every half turn (or when the coil is vertical).
brushes:
- To connect the commutator (or coil) to the battery (external circuit).
- This provides current to the coil and avoids the wires tangling or twisting.
split-ring commutator: to reverse the current in the coil every half turn; brushes: to connect the commutator to the battery and provide current to the coil
Walkthrough
A simple d.c. motor needs a continuous supply of current to the rotating coil, and the current direction in the coil must reverse every half turn so that the motor keeps spinning in the same direction. The brushes are stationary contacts that press against the rotating split-ring commutator. They connect the rotating coil to the stationary battery, allowing current to flow into the coil without the supply wires becoming tangled as the coil spins.
The split-ring commutator consists of two half-rings insulated from each other. As the coil rotates, the commutator halves swap contact with the brushes every half turn. This reverses the direction of current flowing through the coil at exactly the right moment (when the coil is vertical) so that the force on each side of the coil continues to push it in the same rotational direction.
Key Takeaways
- The brushes provide a sliding electrical connection between the stationary circuit and the rotating coil.
- The split-ring commutator reverses the current in the coil every half turn to maintain continuous rotation in one direction.
Common Mistakes
- Saying the commutator 'reverses the voltage' or 'reverses the battery connections' — it only reverses the current in the coil.
- Saying the brushes 'supply power' — they specifically provide the electrical connection to the rotating coil.
Things to Be Careful About
- The question asks for the purpose of both components. Ensure you give at least one clear mark-worthy point for each, and two for the commutator as indicated by the mark scheme (reversing current + timing of reversal).
There is an upward force shown on the left side of the coil.
There is a magnetic field in the space between the ends of the magnets.
State the direction of this magnetic field.
Explain how you determined this direction.
direction ______
explanation ______
Answer
direction: from left to right (from magnet 1 to magnet 2)
explanation:
- The current flows from the positive terminal of the battery to the negative terminal. Looking at the left side of the coil, the current flows towards the front (out of the page) / towards the split-ring commutator on the left.
- Using Fleming's left-hand rule: point the thumb (force) upwards and the second finger (current) towards the front/left. The first finger (magnetic field) must then point to the right. This confirms the field is from left to right.
direction: from left to right; explanation: current on the left side flows towards the front/left; applying Fleming's left-hand rule (thumb up, second finger front) requires the first finger to point to the right
Walkthrough
First, determine the direction of current in the left side of the coil. The battery's positive terminal is on the right, so current flows out of the right terminal, into the right brush, through the right half of the commutator, along the right side of the coil (away from the viewer), across the back, along the left side of the coil (towards the viewer / out of the page), into the left half of the commutator, and back to the negative terminal.
We are given that the force on the left side is upwards. We know the current on the left side is flowing towards the front (out of the page). We can use Fleming's left-hand rule to find the magnetic field direction.
- Thumb (Force/Thrust) = upwards
- Second finger (Current) = towards the front (out of the page)
- First finger (Magnetic field) = must point to the right
Therefore, the magnetic field is directed from left to right (from magnet 1 to magnet 2).
Key Takeaways
- Current always flows from the positive terminal to the negative terminal in the external circuit.
- Fleming's left-hand rule links force, magnetic field, and current: thumb = force, first finger = field, second finger = current.
- When using the left-hand rule, ensure your fingers are oriented correctly in 3D space relative to the page.
Common Mistakes
- Getting the current direction wrong by looking at the battery and assuming current flows from negative to positive (that is electron flow, not conventional current).
- Forgetting to mention which fingers represent which quantity when explaining the left-hand rule application; the mark scheme requires 'left-hand rule mentioned and explained using two of current, field or motion'.
Things to Be Careful About
- The question asks for an explanation, not just a statement. You must name the rule (Fleming's left-hand rule) and describe how the known quantities (force and current) determine the unknown quantity (field).
State what happens to the rotation of the coil if the magnetic field and the current in the coil are both reversed at the same time.
Answer
No change (to the direction of rotation).
no change
Walkthrough
The direction of the force on a current-carrying conductor in a magnetic field is given by Fleming's left-hand rule. If you reverse the current, the force reverses direction. If you reverse the magnetic field, the force also reverses direction. If you reverse both the current and the magnetic field at the same time, the two reversals cancel each other out, and the force remains in the original direction. Therefore, the rotation of the coil is unaffected.
Key Takeaways
- Reversing one factor (current or field) reverses the force.
- Reversing both factors simultaneously leaves the force direction unchanged.
Common Mistakes
- Thinking that reversing both will make the motor stop or spin faster. The direction is unchanged, and the speed is unchanged (assuming field strength and current magnitude are unchanged).
Things to Be Careful About
- The question asks what happens to the rotation. 'No change' or 'it continues to rotate in the same direction' are both acceptable. Avoid saying 'it reverses' or 'it stops'.
In Fig. 7.1, the coil is horizontal. The force upward on the left side and the force downward on the right side are each 2.3 N.
The distance between the sides of the coil and the axis is 0.15 m.
Calculate the total moment exerted on the coil by these forces.
Give the unit of your answer.
moment = ______
unit = ______
Working
The total moment is the sum of the moments from both forces acting on the coil. Each force acts at a perpendicular distance of 0.15 m from the axis.
Answer
moment = 0.69
unit = Nm
0.69 Nm
Walkthrough
A moment is calculated as force multiplied by the perpendicular distance from the pivot (axis of rotation) to the line of action of the force.
Here, there are two forces, each of 2.3 N, acting on opposite sides of the coil. Both forces create a turning effect in the same direction (clockwise or anti-clockwise, depending on perspective, but they add together).
- Moment from left force =
- Moment from right force =
- Total moment =
Alternatively, you can write: .
The unit of moment is the newton-metre (Nm).
Key Takeaways
- The turning effect (moment) of a force is , where is the perpendicular distance from the pivot.
- When multiple forces act to produce rotation in the same direction, their moments add together.
Common Mistakes
- Forgetting to include both forces and only calculating the moment for one side (). The question asks for the total moment.
- Using the full width of the coil (0.30 m) with one of the forces instead of using the distance from the axis (0.15 m) for each force.
- Forgetting the unit. The mark scheme awards a separate mark for 'Nm'.
Things to Be Careful About
- Ensure you use the correct distance: 0.15 m is the distance from the axis to each side, not the total width. The mark scheme accepts
force x distanceas a method mark, so showing the formula before substituting is important.
Answer
As the coil becomes more vertical, the perpendicular distance between the line of action of the forces and the axis of rotation decreases. Since moment = force × perpendicular distance, the turning effect becomes smaller.
the perpendicular distance between the line of action of the forces and the axis decreases
Walkthrough
The moment of a force depends on the perpendicular distance from the pivot to the line of action of the force. When the coil is horizontal (as in Fig. 7.1), the forces are vertical, and the perpendicular distance from the axis to each force is the full 0.15 m.
As the coil rotates and becomes more vertical, the sides of the coil move closer to the vertical line passing through the axis. The forces (which remain vertical, assuming a uniform horizontal magnetic field) now have a line of action that is closer to the axis. The perpendicular distance from the axis to the line of action of the force decreases.
Since , and is decreasing while remains constant, the moment (turning effect) decreases.
When the coil is exactly vertical, the line of action of both forces passes directly through the axis, the perpendicular distance is zero, and the moment is zero. This is why a d.c. motor needs momentum to carry it past this 'dead point'.
Key Takeaways
- The turning effect is maximized when the coil is horizontal (perpendicular to the magnetic field) and zero when the coil is vertical (parallel to the magnetic field).
- It is the perpendicular distance from the pivot to the line of action of the force that matters, not the physical length of the coil arm.
Common Mistakes
- Saying 'the force becomes smaller' — the magnetic force on a current-carrying conductor in a uniform field is constant regardless of orientation (as long as the current and field are unchanged). It is the distance that changes.
- Saying 'the magnetic field becomes weaker' — the field is uniform between the pole faces.
Things to Be Careful About
- Use the precise phrase 'perpendicular distance' or 'distance between the line of action of the force and the pivot'. Simply saying 'the distance decreases' may not be precise enough if not qualified correctly. The mark scheme accepts '(perpendicular) distance between (line of action of) forces decreases' or 'coil leaves magnetic field' as alternatives.
Fig. 8.1 is a diagram of a nuclear reactor.
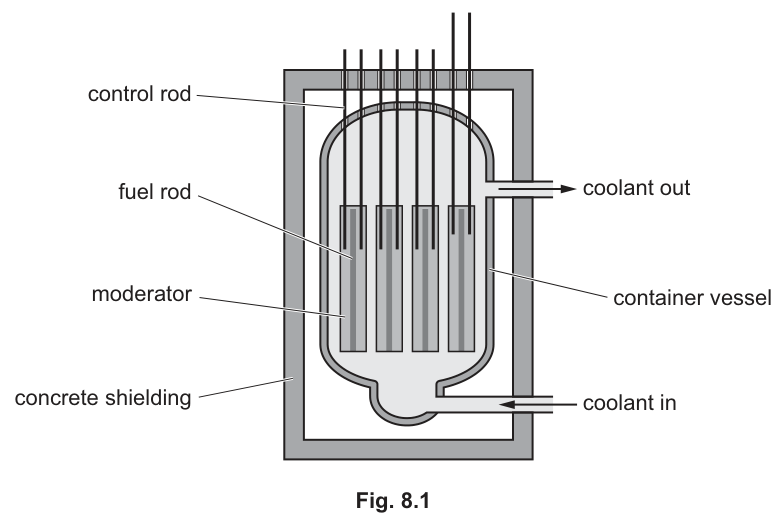
Nuclear fission occurs within the fuel rods which become hotter as a result. The thermal energy is transferred to the coolant circulating around the rods.
In Table 8.1 state the purpose of each part of the reactor.
Table 8.1
| part | purpose |
|---|---|
| container vessel | to withstand high pressures and temperatures and make sure no coolant escapes |
| concrete shielding | |
| control rods | |
| moderator |
Answer
| part | purpose |
|---|---|
| concrete shielding | protects workers / absorbs radiation |
| control rods | controls number of neutrons / absorbs neutrons |
| moderator | slows down the neutrons |
See table
Walkthrough
The question asks for the purpose of three components in a nuclear reactor diagram. We recall the standard roles of each part in sustaining a controlled fission chain reaction and protecting the environment.
- Concrete shielding: Nuclear fission produces ionising radiation (alpha, beta, gamma) and fast neutrons. Thick concrete absorbs this radiation to protect workers and the public from harmful exposure.
- Control rods: Made of materials like cadmium or boron that absorb neutrons. Inserting them deeper reduces the number of neutrons available to cause further fission, slowing the reaction; withdrawing them speeds it up. Thus they control the rate of fission.
- Moderator: The neutrons emitted during fission are very fast (high energy). Fast neutrons are less likely to cause further fission in uranium-235. The moderator (e.g., water or graphite) slows the neutrons down to thermal speeds through collisions, increasing the probability of further fission.
Key Takeaways
A nuclear reactor requires a fuel, a moderator to slow neutrons, control rods to regulate the reaction rate, and shielding to absorb radiation.
Common Mistakes
- Stating that control rods "stop the reaction completely" (they control it, not just stop it).
- Saying the moderator "absorbs neutrons" (that is the function of the control rods).
- Saying shielding "cools the reactor" (that is the function of the coolant).
Things to Be Careful About
Ensure the purpose matches the component exactly. Shielding is for radiation protection, not temperature regulation.
Describe what causes the fission of a single nucleus of uranium-235 in the fuel rods, and describe what happens during the fission.
Answer
- A neutron hits (or collides with) the uranium-235 nucleus.
- The nucleus splits (into daughter nuclei).
- More neutrons are emitted.
A neutron hits the nucleus, causing it to split into daughter nuclei and emit more neutrons.
Walkthrough
The question asks for a description of what causes fission in a single uranium-235 nucleus and what happens during the process.
- Trigger: Uranium-235 is fissile, meaning it can undergo fission when it absorbs a slow (thermal) neutron. The neutron hits and is absorbed by the nucleus, making it unstable.
- Splitting: The unstable nucleus deforms and splits into two smaller nuclei, called daughter nuclei (e.g., barium and krypton).
- Products: Along with the daughter nuclei, the fission event releases a large amount of kinetic energy (thermal energy) and typically two or three additional free neutrons. These emitted neutrons can then go on to cause further fission events, sustaining a chain reaction.
Key Takeaways
Nuclear fission is triggered by neutron absorption, results in the splitting of a heavy nucleus into lighter daughter nuclei, and releases more neutrons plus a large amount of energy.
Common Mistakes
- Saying the nucleus "absorbs a proton" (it is a neutron that triggers fission).
- Saying the nucleus "explodes" (it splits into two daughter nuclei).
- Forgetting to mention that more neutrons are emitted, which is essential for a chain reaction.
Things to Be Careful About
The question asks about a single nucleus, so do not describe the chain reaction as a whole, only the single event: one neutron in, two daughter nuclei and more neutrons out.
The specific heat capacity of the coolant is an important quantity in the design of the reactor.
Answer
The amount of energy (or heat) needed to raise the temperature of a unit mass of a substance by one degree (or one kelvin).
The amount of energy needed to raise the temperature of a unit mass of a substance by 1 K (or 1 °C).
Walkthrough
The question asks for the definition of specific heat capacity. This is a standard thermal physics definition.
Specific heat capacity () is defined as the amount of thermal energy required to raise the temperature of a unit mass (1 kg) of a substance by one unit of temperature (1 K or 1 °C). The equation linking these quantities is , where is energy, is mass, is specific heat capacity, and is the temperature change.
Key Takeaways
Specific heat capacity is a material property that indicates how much energy is needed to change its temperature. A high specific heat capacity means the substance can absorb a lot of energy with only a small temperature rise.
Common Mistakes
- Forgetting to specify "per unit mass" (that makes it specific heat capacity, as opposed to just heat capacity).
- Forgetting to specify "per unit temperature rise" (that makes it specific heat capacity, as opposed to just energy).
- Saying "heat" instead of "thermal energy" or "energy" (5054 prefers "energy" or "thermal energy" over the informal "heat").
Things to Be Careful About
Ensure both conditions are met: unit mass AND unit temperature rise. The mark scheme awards one mark for the energy/temperature part (M1) and one for the unit mass part (A1).
Suggest and explain whether the coolant should have a large or a small specific heat capacity.
Answer
It should have a large specific heat capacity. This means it absorbs more energy for the same temperature rise (or heats up slower / has a smaller temperature rise / less chance of boiling).
Large specific heat capacity; it absorbs more energy for the same temperature rise (or heats up slower / has a smaller temperature rise).
Walkthrough
The question asks whether the coolant should have a large or small specific heat capacity and requires an explanation.
From the definition, a substance with a large specific heat capacity can absorb a large amount of thermal energy for a given temperature rise (). In a nuclear reactor, the coolant's job is to remove the large amount of thermal energy generated by fission without itself getting too hot. If the coolant had a small specific heat capacity, it would heat up very quickly, potentially reaching its boiling point and losing its effectiveness as a liquid coolant. A large specific heat capacity ensures the temperature rise is kept small and manageable for a given amount of energy absorbed.
Key Takeaways
A coolant with a high specific heat capacity is ideal for transferring large amounts of thermal energy while maintaining a relatively low and stable temperature.
Common Mistakes
- Saying "large specific heat capacity because it heats up faster" (this is the opposite; a large specific heat capacity means it heats up slower for the same energy input).
- Not providing a valid reason linked to the definition (e.g., "because it is better" without explaining the physics).
- Suggesting a small specific heat capacity and claiming it is better because it heats up faster (while this is physically true, it is a poor design choice for a reactor coolant as it risks boiling and does not absorb as much total energy before reaching a dangerous temperature).
Things to Be Careful About
The explanation must link the chosen property (large specific heat capacity) to a physical consequence (smaller temperature rise, more energy absorbed, less chance of boiling). Any one of these valid consequences is sufficient for the mark.
Fig. 9.1 shows the path of a comet, the orbit of Earth and the orbit of Jupiter around the Sun.
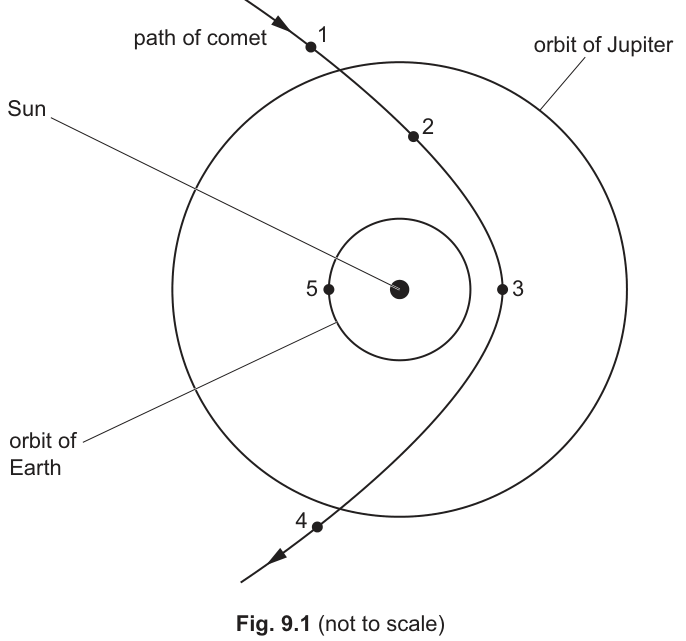
The comet is at position 3 when Earth is at position 5.
Answer
Draw a circular orbit for Mercury inside the orbit of Earth and label it 'Mercury'.
Draw a circular orbit for Mars between the orbit of Earth and the orbit of Jupiter and label it 'Mars'.
Mercury orbit inside Earth's orbit; Mars orbit between Earth and Jupiter
Walkthrough
The question asks for the orbits of Mercury and Mars relative to the already drawn orbits of Earth and Jupiter. The order of the planets from the Sun is Mercury, Venus, Earth, Mars, Jupiter, Saturn, Uranus, Neptune. Therefore, Mercury must be drawn on a path closer to the Sun than Earth, and Mars on a path between Earth and Jupiter. Both should be roughly circular as per the simplified Solar System model used at this level.
Key Takeaways
Candidates must know the order of the planets in the Solar System and be able to place them on a diagram relative to given reference orbits.
Common Mistakes
Placing Mars outside Jupiter's orbit or Mercury outside Earth's orbit. Forgetting to label the orbits.
Things to Be Careful About
The diagram is 'not to scale', but the relative order must be correct. Ensure labels are clear and point to the correct new orbits.
Explain why the comet at position 3 cannot be seen from Earth when Earth is at position 5.
Answer
The Sun is located between Earth (at position 5) and the comet (at position 3). The Sun blocks the light from the comet, so it cannot be seen from Earth.
The Sun is in the way, blocking the line of sight
Walkthrough
Look at Fig. 9.1. Earth is at position 5 on its orbit. The Sun is at the center. The comet is at position 3, which is on the opposite side of the Sun from Earth. Light travels in straight lines, so the Sun physically blocks the observer on Earth from seeing the comet. This is similar to a solar eclipse but on a larger scale.
Key Takeaways
Understanding the geometry of the Solar System helps explain observational limitations, such as why some objects are only visible at certain times of the year.
Common Mistakes
Saying 'the comet is too far away' or 'the Sun is too bright' without mentioning that the Sun is physically between them. The key phrase is 'the Sun is in the way' or 'blocking the line of sight'.
Things to Be Careful About
Ensure the explanation specifically references the Sun's position between the two bodies.
A force causes the comet to orbit the Sun.
Answer
Gravitational force (or gravity / gravitational attraction from the Sun).
Gravitational force
Walkthrough
Any object orbiting a massive body like the Sun is kept in its curved path by the gravitational attraction between the two masses. This is the universal force of gravity.
Key Takeaways
Gravity is the centripetal force that keeps planets, comets, and moons in orbit.
Common Mistakes
Saying 'centrifugal force' (which is a fictitious force in a rotating frame) or 'solar wind'. The correct term is gravitational force or gravity.
Things to Be Careful About
Accept 'gravity' or 'gravitational attraction'. Be precise and say 'gravitational force' rather than just 'force'.
Four positions of the comet are shown in Fig. 9.1.
On Fig. 9.1, mark the direction of the force that acts on the comet at each of the four positions shown.
Answer
Draw four arrows, one at each of the positions 1, 2, 3, and 4 on the comet's path. All four arrows must point directly towards the center of the Sun.
Four arrows pointing from positions 1, 2, 3, 4 towards the Sun
Walkthrough
The gravitational force is always attractive and acts along the line connecting the two masses. Therefore, at any point on the comet's orbit, the force exerted by the Sun on the comet is directed straight towards the Sun's center. Draw an arrow at positions 1, 2, 3, and 4 pointing radially inward to the Sun.
Key Takeaways
Gravitational force is always attractive and acts along the line joining the centers of mass.
Common Mistakes
Drawing arrows tangent to the path (which would represent velocity, not force) or arrows pointing away from the Sun.
Things to Be Careful About
The arrows should be drawn by eye but must clearly point towards the Sun. They don't need to be perfectly to scale, but the direction must be correct.
Describe how the strength of the force that acts on the comet changes as the comet moves from position 1 through position 3 to position 4.
Explain your answer.
description ______
explanation ______
Answer
description: The gravitational force increases as the comet moves from position 1 to position 3, and then decreases as it moves from position 3 to position 4.
explanation: Gravitational force increases as the distance between the comet and the Sun decreases. Position 3 is the closest point to the Sun (perihelion), so the force is strongest there.
number of orbits = 12
Force increases from 1 to 3 and decreases from 3 to 4 because the comet is closest to the Sun at position 3
Walkthrough
The gravitational force between two objects depends on the distance between them: the closer they are, the stronger the force. As the comet moves from position 1 (far away) towards position 3 (closest approach to the Sun), the distance decreases, so the gravitational force increases. After position 3, as it moves towards position 4 (moving away), the distance increases, so the force decreases.
Key Takeaways
Gravitational field strength and the resulting force increase as distance to the massive body decreases.
Common Mistakes
Saying the force is constant, or confusing the comet's speed with the force. The explanation must explicitly mention the changing distance to the Sun.
Things to Be Careful About
The description and explanation are separate marks. Give a clear description of the trend (increase then decrease) and then explain why using the relationship between force and distance.
Table 9.1 gives the orbital radius and the orbital speed of Earth and of Jupiter as each moves around the Sun.
Table 9.1
| orbital radius / km | orbital speed / (km / s) | |
|---|---|---|
| Earth | 30 | |
| Jupiter | 13 |
Earth completes more orbits of the Sun than Jupiter in the same time.
Calculate the number of orbits that Earth makes around the Sun in the time that Jupiter makes one orbit.
Show your working.
number of orbits = ______
Working
The time for one orbit (period ) is the circumference divided by the orbital speed:
For Jupiter:
For Earth:
Number of Earth orbits in the time of one Jupiter orbit:
Alternatively, using ratios:
Answer
12
12
Walkthrough
To find how many orbits Earth makes while Jupiter makes one, we need to compare their orbital periods. The period is the time for one complete orbit, which is the circumference divided by the speed .
Calculate :
Calculate :
Divide the Jupiter period by the Earth period:
A quicker method uses ratios. The distance Jupiter travels is times the distance Earth travels. Jupiter's speed is of Earth's speed, so it takes times as long to travel that relative distance. Multiply these ratios: .
Key Takeaways
Orbital period can be found from . Comparing periods gives the number of orbits one body makes relative to another.
Common Mistakes
Forgetting to multiply by (it cancels out in the ratio, but must be included if calculating absolute times). Using diameter instead of radius. Arithmetic errors with powers of ten.
Things to Be Careful About
Ensure units are consistent (both radii in km, both speeds in km/s). The final answer is a dimensionless number (12 orbits).