Physics 5054/21 — May/June 2025
Cambridge O-Level · Theory · worked solutions for every part, with the mark scheme
Topics Kinematics · Forces · Physical Quantities and Measurement · Turning Effect of Forces · Mass, Weight and Density · Energy, Work and Power · +10 more
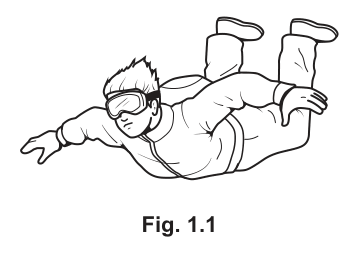
Fig. 1.1 shows a skydiver falling vertically through the air.
In the first part of the fall, her speed increases and her acceleration decreases.
In the second part of the fall, her speed is constant.
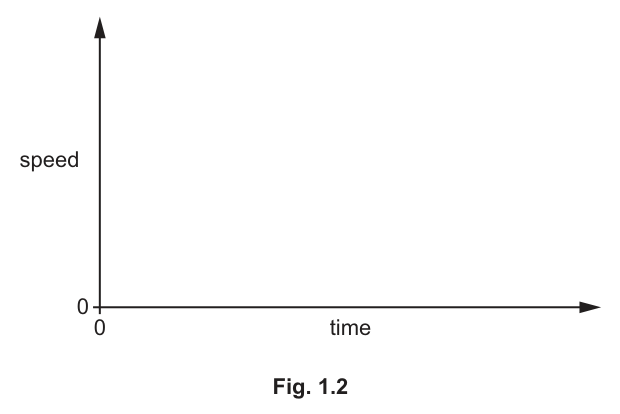
On Fig. 1.2 sketch the speed–time graph for the skydiver.
On your graph, mark one point where the speed of the skydiver is increasing with an A and one point where the speed of the skydiver is constant with a B.
Answer
Sketch a curve starting from the origin (0, 0). The curve should rise steeply at first and then bend over so that its gradient decreases (it is concave down). Mark a point on this rising curved section and label it A.
The curve should then flatten out and become a horizontal straight line. Mark a point on this horizontal section and label it B.
Speed-time graph: curve from origin with decreasing gradient labelled A, then horizontal line labelled B
Walkthrough
The skydiver's speed increases, but her acceleration decreases. On a speed–time graph, acceleration is represented by the gradient. A decreasing acceleration means the gradient of the curve must get less steep over time. This gives a curve that rises from the origin and becomes concave down.
Eventually, her speed is constant. Constant speed means zero acceleration, which corresponds to a gradient of zero. On the graph, this is a horizontal straight line.
Point A is on the rising section where speed is increasing. Point B is on the horizontal section where speed is constant (terminal velocity).
Key Takeaways
- The gradient of a speed–time graph represents acceleration.
- A decreasing gradient means decreasing acceleration.
- A horizontal line on a speed–time graph represents constant speed (zero acceleration).
Common Mistakes
- Drawing a straight line with a constant gradient (this would mean constant acceleration, not decreasing acceleration).
- Drawing a curve that gets steeper (this would mean increasing acceleration).
- Forgetting to label the points A and B as required.
Things to Be Careful About
- Ensure the curve starts from the origin (speed = 0 at time = 0).
- The curve must smoothly transition into the horizontal line; do not draw a sharp corner.
Answer
The gradient (or slope) of the speed–time graph decreases as time increases.
The gradient of the speed-time graph decreases.
Walkthrough
Acceleration is defined as the rate of change of speed. On a speed–time graph, this rate of change is represented by the gradient (slope) of the line. If the acceleration is decreasing, the gradient of the graph must be getting less steep over time.
Key Takeaways
- Acceleration is the gradient of a speed–time graph.
- A decreasing acceleration corresponds to a decreasing gradient.
Common Mistakes
- Saying 'the speed decreases' (the speed is increasing, just the acceleration is decreasing).
- Using the word 'slope' without linking it to the gradient representing acceleration.
Things to Be Careful About
- Be precise: say 'gradient' or 'slope' of the graph, not 'speed' or 'acceleration' decreasing on its own without linking to the graph's feature.
During the first part of the fall, there is a resultant vertical force acting downwards on the skydiver.
One of the vertical forces acting on the skydiver is her weight.
State the name of the other vertical force that acts on the skydiver.
Answer
Air resistance (or drag).
Air resistance (or drag)
Walkthrough
As the skydiver falls through the air, two main vertical forces act on her: her weight (downwards) and the air resistance or drag (upwards) caused by her motion through the air.
Key Takeaways
- Weight acts downwards.
- Air resistance (drag) acts upwards, opposing motion.
Common Mistakes
- Saying 'friction' (it is specifically air resistance or drag).
- Saying 'buoyancy' (this is negligible for a skydiver in air).
Things to Be Careful About
- Use the exact terms 'air resistance' or 'drag' as preferred in the mark scheme.
Answer
As the speed increases, the air resistance (upwards force) increases.
Eventually, the air resistance equals (or balances) the weight, so the resultant vertical force is zero.
Air resistance increases with speed until it equals the weight.
Walkthrough
Air resistance depends on speed: the faster the skydiver falls, the greater the air resistance. As her speed increases during the first part of the fall, the upward air resistance force increases.
The resultant vertical force is the weight minus the air resistance. When the air resistance has increased enough to equal the weight, the two forces balance each other out. The resultant vertical force then becomes zero, meaning there is no further acceleration and the skydiver falls at a constant speed (terminal velocity).
Key Takeaways
- Air resistance increases with speed.
- Terminal velocity is reached when the upward drag force equals the downward weight.
- At terminal velocity, the resultant force is zero.
Common Mistakes
- Saying 'the weight decreases' (weight is constant).
- Saying 'the air resistance becomes zero' (it increases, not decreases).
- Not mentioning that the air resistance equals the weight.
Things to Be Careful About
- Clearly state that air resistance increases with increased speed.
- Explicitly state that air resistance equals or balances the weight.
At one instant, the vertical force on the skydiver is downwards.
At the same instant, the wind causes an additional horizontal force of to the right to act on the skydiver.
Draw a vector diagram to determine the resultant of the vertical force and the horizontal force. Place an arrow on all of the forces to show their directions.
Determine the magnitude (size) of this resultant force and its direction to the vertical.
magnitude of resultant = ______
direction = ______ to vertical
Working
Magnitude of resultant force:
Direction to the vertical:
Answer
magnitude of resultant = 412 N (410–413 N accepted)
direction = 14° (12–16°) to vertical
412 N, 14°
Walkthrough
The skydiver experiences a vertical force of 400 N downwards and a horizontal force of 100 N to the right. These two forces are perpendicular to each other.
To find the resultant, draw a vector diagram: draw a vertical arrow pointing downwards labelled '400 N'. From the tip of this arrow, draw a horizontal arrow pointing to the right labelled '100 N'. Draw the resultant vector from the tail of the 400 N arrow to the tip of the 100 N arrow.
Since the forces are perpendicular, we can use Pythagoras' theorem to find the magnitude of the resultant:
To find the direction to the vertical, use trigonometry. The angle between the resultant and the vertical force is given by:
Key Takeaways
- Resultant of two perpendicular vectors can be found using Pythagoras' theorem.
- Direction can be found using trigonometric ratios (tan, sin, cos).
- Vector diagrams must show all forces with correct directions and the resultant.
Common Mistakes
- Forgetting to include units in the final answer.
- Calculating the angle to the horizontal instead of the vertical (would be ).
- Drawing the vector diagram incorrectly (e.g., not placing the tail of the second vector at the tip of the first).
Things to Be Careful About
- The question asks for the direction to the vertical, so use the vertical force as the adjacent side in the tangent calculation.
- Graphical methods may yield slightly different results (e.g., 410 N, 12–16°), which are accepted according to the mark scheme.
Answer
(total) clockwise moments = (total) anticlockwise moments (in equilibrium)
(total) clockwise moments = (total) anticlockwise moments (in equilibrium)
Walkthrough
The principle of moments is the condition for rotational equilibrium. When an object is balanced and not rotating, the turning effects (moments) trying to rotate it clockwise must exactly balance the turning effects trying to rotate it anticlockwise. This is stated as: the sum of the clockwise moments about a pivot equals the sum of the anticlockwise moments about the same pivot, provided the object is in equilibrium.
Key Takeaways
- The principle of moments applies to objects in rotational equilibrium.
- Moments are calculated as force multiplied by the perpendicular distance from the pivot.
Common Mistakes
- Forgetting to state that the object must be in equilibrium.
- Writing 'clockwise moment = anticlockwise moment' without specifying 'total' or 'sum of', which can be ambiguous if multiple forces are acting.
Things to Be Careful About
- The mark scheme requires both the equation and the condition 'in equilibrium' to earn full marks. Ensure you use the word 'total' or 'sum' to indicate all moments are included.
An airline passenger wishes to check the weight of a suitcase that he carries as hand luggage onto an aeroplane.
He uses a uniform plank of wood, pivoted at its centre, as shown in Fig. 2.1.
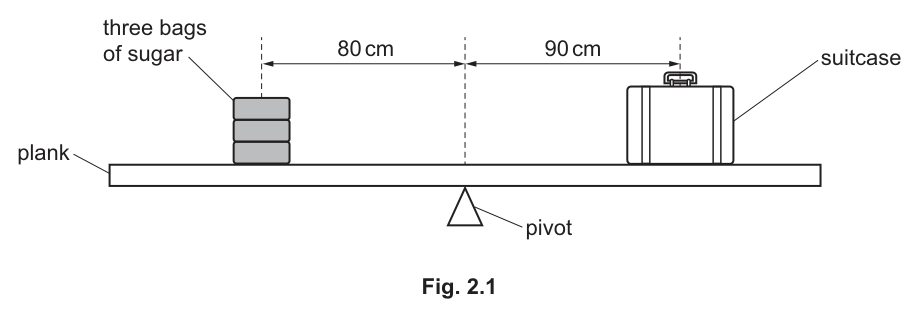
The plank is balanced with the suitcase on one side of the pivot and three bags of sugar, each of mass , on the other side.
The distances are shown on Fig. 2.1.
Working
Answer
weight = 19.6
19.6
Walkthrough
Weight is a force calculated by multiplying mass by the gravitational field strength. The mass of one bag of sugar is given as . Using (or as an alternative accepted value), the weight is . If is used, the answer is .
Key Takeaways
- Weight (in newtons) = mass (in kg) gravitational field strength (in N/kg).
- Mass is an intrinsic property, while weight is the force of gravity acting on that mass.
Common Mistakes
- Confusing mass and weight, or forgetting to multiply by .
- Using the total mass of the three bags () instead of the mass of one bag () as asked.
Things to Be Careful About
- The mark scheme accepts either or depending on the value of used. Always include the unit in the final answer.
The maximum weight of a suitcase that can be carried onto the aeroplane is .
Determine whether the weight of the suitcase exceeds the maximum allowed.
Show a calculation in your answer.
Working
Using the principle of moments (anticlockwise moment = clockwise moment):
Answer
The weight of the suitcase is . Since , the weight of the suitcase does not exceed the maximum allowed.
52 N; the weight does not exceed the maximum allowed
Walkthrough
The plank is balanced, so the total anticlockwise moment about the pivot equals the total clockwise moment. The sugar bags create an anticlockwise moment: . The suitcase creates a clockwise moment: . Equating the two gives , so (or if was used in part (i)). The calculated weight () is less than the maximum allowed weight of , so the suitcase is within the limit.
Key Takeaways
- The principle of moments can be used to find an unknown force (or weight) when the system is balanced.
- Distances must be measured from the pivot to the line of action of the force.
Common Mistakes
- Forgetting to multiply by the number of bags (3) when calculating the total anticlockwise moment.
- Using distances in metres without converting, though since both sides use the same units (cm), they cancel out.
- Failing to explicitly state whether the weight exceeds the limit after calculating it.
Things to Be Careful About
- Carry forward the answer from part (b)(i) (error carried forward is allowed). If a student used for the weight of one bag, their moment would be , giving a suitcase weight of , which still correctly leads to the conclusion that it does not exceed .
A tall bus is tested for stability.
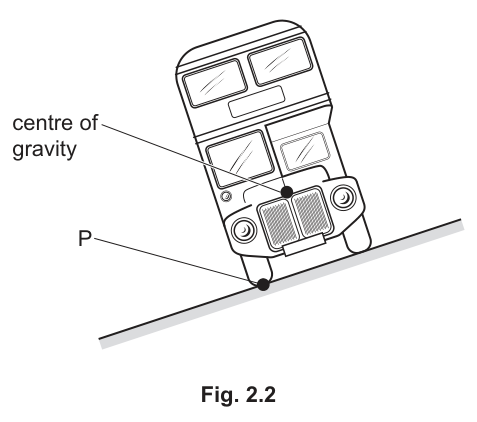
Fig. 2.2 shows the bus on a slope.
The centre of gravity of the bus is marked.
Answer
The point where the entire weight of the object can be considered to act.
the point where the weight of the object acts
Walkthrough
The centre of gravity is the specific point in an object where all of its weight can be considered to be concentrated. For a uniform object, this is its geometric centre, but for irregular objects or vehicles, it depends on the distribution of mass.
Key Takeaways
- The centre of gravity is the effective point of application of the gravitational force (weight) on an object.
Common Mistakes
- Describing it as the 'center of mass' without mentioning weight (though related, the definition in this context focuses on weight).
- Saying it is the 'middle of the object', which is only true for uniform objects.
Things to Be Careful About
- Use the phrase 'where the weight acts' or 'where the weight can be taken to act' to match the marking scheme precisely.
When the slope is made very steep, the bus falls over by rotating about point P.
Explain why the bus falls over.
Answer
When the slope is steep, the vertical line through the centre of gravity falls outside the base of the bus (to the left of point P). The weight of the bus then creates an anticlockwise moment about P, which causes the bus to rotate and fall over.
The centre of gravity falls outside the base (to the left of P), so the weight causes an anticlockwise moment about P, toppling the bus.
Walkthrough
Stability depends on the position of the centre of gravity relative to the base of support. As the slope increases, the vertical line drawn downwards from the centre of gravity moves further to the left. When this line falls outside the base (specifically, to the left of the lower wheel contact point P), the weight of the bus acts at a perpendicular distance from P. This creates an unbalanced anticlockwise moment about P, causing the bus to rotate and topple over.
Key Takeaways
- An object topples when the vertical line through its centre of gravity falls outside its base of support.
- The weight acting outside the base creates a moment that rotates the object about the pivot point (the edge of the base).
Common Mistakes
- Saying 'the weight is too heavy' or 'the bus is too tall' without referencing the position of the centre of gravity relative to the base.
- Failing to identify the pivot point (P) and the direction of the turning effect (anticlockwise moment).
Things to Be Careful About
- The explanation requires two linked points: 1) the centre of gravity falls outside the base, and 2) this causes a turning effect (moment) about the pivot point P. Both are needed for full marks.
A battery, a pulley and a motor are used to lift a load as shown in Fig. 3.1.
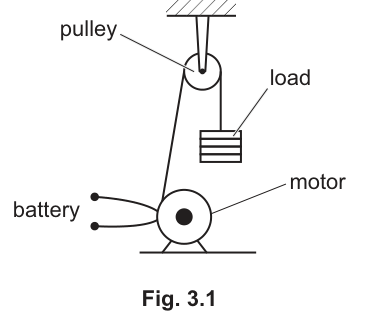
Answer
- The chemical energy store in the battery decreases.
- Electrical energy is transferred to the motor.
- Mechanical energy is transferred to the load.
- The gravitational energy store of the load increases.
- Thermal energy increases in the motor and the surrounding air due to friction and electrical heating.
See working
Walkthrough
The question asks for the transfers between energy stores as the load is lifted. We trace the energy from its source to its final useful and wasted destinations:
- The battery provides energy from its chemical energy store, which decreases as it is used.
- This chemical energy is converted into electrical energy that is transferred to the motor.
- The motor converts electrical energy into mechanical energy, which is transferred via the cord to the load.
- As the load is lifted, its height increases, so its gravitational energy store increases.
- No system is perfectly efficient, so some energy is always wasted as thermal energy (heating the motor windings due to electrical resistance, and heating the pulley and air due to friction).
Any three of these linked statements earn the three marks.
Key Takeaways
- Energy is never lost; it is only transferred between stores or dissipated.
- Use the correct terminology: 'chemical energy store', 'gravitational energy store', and 'thermal energy', rather than informal terms like 'heat' or 'electricity'.
Common Mistakes
- Saying 'energy is used up' or 'lost' instead of 'transferred' or 'dissipated'.
- Using incorrect store names, such as 'battery energy' or 'lift energy'.
- Confusing the energy store with the energy transfer (e.g., saying 'electrical energy is transferred to the battery' instead of 'from the battery').
Things to Be Careful About
- The mark scheme accepts 'increase in thermal energy' or 'electrical heating'. Ensure you specify that thermal energy increases in the motor or the air, not just 'heat is produced'.
The efficiency of the motor, pulley and load system is less than 100%.
By comparing the input energy and the useful output energy, explain why the efficiency is less than 100%.
Answer
The useful output energy is less than the total input energy.
The useful output energy is less than the input energy.
Walkthrough
Efficiency is defined as the ratio of useful output energy to total input energy. Since some energy is always wasted (dissipated as thermal energy to the surroundings), the useful output energy must be less than the total input energy. This directly explains why the efficiency is less than 100%.
Key Takeaways
- Efficiency < 100% because useful output energy is always less than total input energy.
Common Mistakes
- Simply stating 'there is friction' without explicitly comparing the useful output energy to the input energy as the question requires.
- Saying 'efficiency is less than 100% because energy is wasted' without making the direct comparison requested.
Things to Be Careful About
- Read the command word carefully: 'By comparing... explain why'. You must state the comparison (output < input) to earn the mark.
Answer
Total energy is constant. The energy from the power supply equals the energy gained by the weight plus the thermal energy transferred to the air (due to friction and heating).
Total energy is constant; energy from power supply = energy gained by weight + thermal energy to air.
Walkthrough
The principle of conservation of energy states that energy cannot be created or destroyed, only transferred from one store to another. Therefore, the total energy in the system remains constant.
In this scenario:
- The total energy supplied by the battery (input energy) must equal the sum of all energy gains and dissipations.
- The useful gain is the increase in the gravitational energy store of the weight.
- The wasted energy is the thermal energy transferred to the motor and the surrounding air.
Thus: Energy from power supply = Energy gained by weight + Thermal energy to air.
Key Takeaways
- Conservation of energy means total energy is constant.
- Input energy = useful output energy + wasted energy.
Common Mistakes
- Saying 'energy is conserved' without explaining what that means in the context of the system (i.e., input = useful + wasted).
- Forgetting to state that 'total energy is constant' as the foundational principle.
Things to Be Careful About
- The mark scheme awards one mark for stating 'total energy is constant' and one mark for the energy balance equation. Both must be present for full marks.
The input power to the motor is . The motor is used for . The efficiency of the motor is 60%.
Calculate the energy supplied to the load.
energy = ______
Working
Total input energy = power × time
Energy supplied to the load = efficiency × input energy
Answer
180
180
Walkthrough
First, calculate the total energy supplied to the motor using the power and time:
Next, use the efficiency to find the useful energy actually supplied to the load. Efficiency is 60%, or 0.60:
Key Takeaways
- Energy = power × time ().
- Useful output energy = efficiency × total input energy.
Common Mistakes
- Forgetting to convert the percentage efficiency into a decimal (using 60 instead of 0.60).
- Calculating only the input energy (300 J) and forgetting to apply the efficiency.
- Using the wrong formula, such as energy = power / time.
Things to Be Careful About
- Ensure units are consistent: power in watts (W) and time in seconds (s) gives energy in joules (J).
- The question asks for the energy supplied to the load, which is the useful output energy, not the total input energy.
Evaporation of water from the surface of the skin causes cooling.
Answer
- The faster-moving particles escape from the surface of the water on the skin.
- This leaves behind the slower-moving particles, reducing the average kinetic energy of the remaining particles and causing cooling.
See working
Walkthrough
Evaporation is a surface phenomenon where particles with enough kinetic energy break free from the liquid. When these faster particles escape, the particles left behind have a lower average kinetic energy. Since temperature is a measure of average kinetic energy, the remaining liquid cools down.
Key Takeaways
- Evaporation causes cooling because the highest-energy particles leave the liquid.
- Temperature is directly related to the average kinetic energy of the particles.
Common Mistakes
- Saying 'heat escapes' instead of referring to particle speeds.
- Stating that the remaining particles 'lose energy' rather than recognising that the average energy of the remaining group is simply lower.
Things to Be Careful About
- The question asks for ideas about particles, so you must mention particle speed or kinetic energy. Just saying 'evaporation removes heat' will not score.
Answer
Evaporation occurs only at the surface of the liquid, whereas boiling occurs throughout the liquid and involves the formation of bubbles. (Any one difference is acceptable.)
Evaporation occurs on the surface, while boiling occurs throughout the liquid.
Walkthrough
Evaporation and boiling are both processes where a liquid turns into a gas, but they differ in where and how they occur. Evaporation is a slow process that happens only at the surface at any temperature. Boiling is a rapid process that happens throughout the liquid at a specific temperature (the boiling point) and is characterised by bubble formation.
Key Takeaways
- Evaporation: surface only, any temperature.
- Boiling: throughout the liquid, at a fixed temperature, involves bubbles.
Common Mistakes
- Saying 'boiling is faster' without specifying the location or temperature conditions.
- Confusing evaporation with condensation.
Things to Be Careful About
- Only one difference is required. Any valid difference from the mark scheme will score.
When a refrigerator is switched on, cooling coils placed at the top of the space inside the refrigerator become cold. This causes a convection current which cools the air inside the refrigerator. The refrigerator is shown in Fig. 4.1.
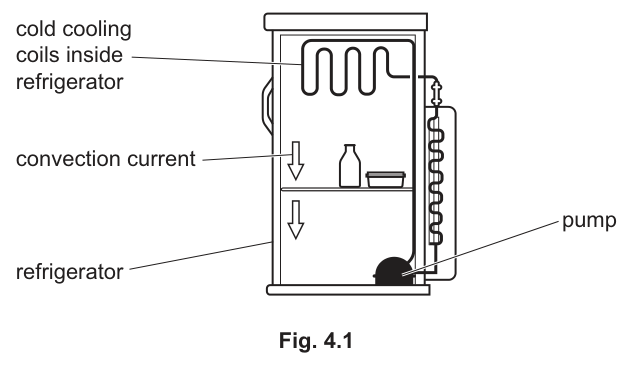
Explain how the cooling coils cause a convection current in the air inside the refrigerator.
Answer
The cooling coils cool the air near the top. This cold air is denser than the warmer air below it, so it sinks. The warmer air then moves up to replace it, creating a convection current.
See working
Walkthrough
When the air near the cooling coils at the top of the refrigerator is cooled, its particles lose kinetic energy and move closer together. This makes the cold air denser than the warmer air below it. Gravity pulls the denser cold air downwards, and the less dense warm air is displaced upwards to take its place. This continuous cycle of sinking cold air and rising warm air forms a convection current.
Key Takeaways
- Convection currents are driven by density differences caused by temperature changes.
- Cold, dense fluid sinks; warm, less dense fluid rises.
Common Mistakes
- Saying 'cold air goes down' without mentioning density.
- Describing the movement of the cooling coils or the refrigerant instead of the air inside the compartment.
Things to Be Careful About
- Both 'cold air sinks' and 'cold air is denser' are required for full marks. Ensure you link density to the sinking motion.
The food in the refrigerator is initially at a temperature of . The food has a mass of and a specific heat capacity of .
Calculate the final temperature of the food after of thermal energy is removed from it.
final temperature = ______
Working
Answer
5.2 °C
5.2
Walkthrough
The thermal energy removed from the food is given by . We can rearrange this to find the temperature change: . Substituting the given values: , , and . This gives . Since energy is removed, the final temperature is the initial temperature minus the change: , which rounds to .
Key Takeaways
- Use to link energy, mass, specific heat capacity, and temperature change.
- Remember to subtract the temperature change from the initial temperature when energy is removed.
Common Mistakes
- Forgetting to subtract the temperature change from the initial temperature, giving as the answer.
- Using the wrong formula or mixing up the values for mass and specific heat capacity.
Things to Be Careful About
- The question asks for the final temperature, not the temperature change. Ensure you perform the final subtraction. Round to an appropriate number of significant figures (2 or 3).
Fig. 5.1 is a diagram showing the arrangement of air particles as a longitudinal wave passes through them.
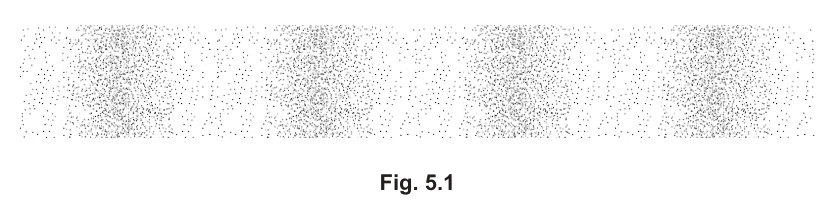
On Fig. 5.1, mark the centre of a compression with the letter C, and mark the centre of a rarefaction with the letter R.
Answer
On Fig. 5.1, place the letter C at the centre of any region where the dots are closest together (compression), and place the letter R at the centre of any region where the dots are furthest apart (rarefaction).
C marked at the centre of a compression; R marked at the centre of a rarefaction
Walkthrough
A longitudinal wave (such as a sound wave in air) propagates by creating regions where the particles of the medium are pushed together and regions where they are pulled apart. The dense regions are called compressions and the sparse regions are called rarefactions. To answer this part, we simply look at Fig. 5.1 and locate the centres of these two types of regions.
Key Takeaways
In a longitudinal wave, the particles oscillate parallel to the direction of wave travel. This creates alternating zones of high particle density (compressions) and low particle density (rarefactions).
Common Mistakes
Candidates often place the letter at the edge of a compression or rarefaction rather than at its centre. The mark scheme awards the mark for marking the centre of the region.
Things to Be Careful About
Ensure the letters C and R are placed clearly inside the densest and least dense clusters of dots, respectively. Either compression and either rarefaction may be marked.
Answer
In a compression, the air particles are close together (high density / high pressure). In a rarefaction, the air particles are spread apart (low density / low pressure).
Compressions are where particles are close together (high density/pressure); rarefactions are where particles are spread apart (low density/pressure)
Walkthrough
This part asks for the physical difference between the two regions that make up a longitudinal wave. A compression is the region of maximum particle density and maximum pressure, while a rarefaction is the region of minimum particle density and minimum pressure. Stating either the particle arrangement (close together vs. spread apart) or the pressure/density difference is sufficient to earn the mark.
Key Takeaways
Longitudinal waves are characterised by compressions (high pressure/density) and rarefactions (low pressure/density). This is in contrast to transverse waves, which are characterised by crests and troughs.
Common Mistakes
Candidates sometimes say 'compressions are where the wave is high and rarefactions are where it is low'. This is incorrect terminology for longitudinal waves; those terms apply to transverse waves. Stick to 'pressure', 'density', or 'particles close together/spread apart'.
Things to Be Careful About
The mark scheme accepts 'pressure is high', 'particles close together', or 'density is high' for a compression. Any of these is a complete, correct answer for 1 mark.
In a ripple tank, a water wave is produced by a wooden bar moving up and down on the surface of water.
The wooden bar makes 45 complete oscillations in .
Calculate the frequency of the wave produced.
frequency = ______
Working
Answer
frequency = 0.75 Hz
0.75 Hz
Walkthrough
Frequency is defined as the number of complete oscillations (or cycles) that occur per second. The unit of frequency is the hertz (Hz), where .
The wooden bar makes 45 oscillations in 1.0 minute. First, convert the time into seconds because the definition of hertz requires seconds:
Now apply the formula:
Key Takeaways
Always ensure the time is in seconds when calculating frequency in hertz. is a fundamental relationship.
Common Mistakes
Forgetting to convert minutes to seconds and calculating , which is incorrect. Another mistake is writing the unit as 'oscillations' instead of 'Hz'.
Things to Be Careful About
The mark scheme accepts '0.75' with the unit 'Hz'. Ensure the unit is included as it is part of the answer blank.
The frequency of the water wave is increased by moving the wooden bar up and down more quickly.
State what happens to the speed and what happens to the wavelength of the wave produced.
speed ______
wavelength ______
Answer
speed: no change (or 'stays the same')
wavelength: decreases
speed: no change; wavelength: decreases
Walkthrough
The speed of a wave in a particular medium depends only on the properties of that medium (e.g., depth of water for surface water waves, temperature for sound in air). Since the medium (the water in the ripple tank) has not changed, the speed of the wave remains constant.
The wave equation links speed (), frequency (), and wavelength ():
Rearranging for wavelength:
If the frequency is increased (by moving the bar more quickly) and the speed stays the same, the wavelength must decrease.
Key Takeaways
Wave speed is determined by the medium, not the source. If frequency increases and speed is constant, wavelength must decrease.
Common Mistakes
Saying that 'speed increases' because the source is moving faster. The source frequency changes, but the medium's properties (and thus the wave speed) do not. Saying 'wavelength increases' is a direct result of misapplying the wave equation.
Things to Be Careful About
The question asks to 'state what happens', so a simple 'no change' / 'decreases' is sufficient. Do not attempt to calculate new values as none are given.
The crests of the water wave move into the shallow region shown in Fig. 5.2.
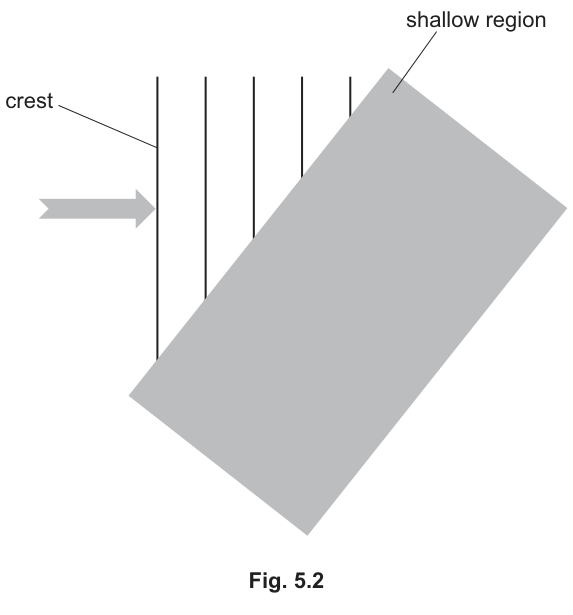
On Fig. 5.2, draw the crests in the shallow region.
Answer
On Fig. 5.2, draw at least 3 new wavefronts (straight lines) in the shallow region. These lines must be:
- Parallel to each other.
- Spanning the full width of the shallow region.
- Closer together than the wavefronts in the deep water (shorter wavelength, because speed has decreased).
- Bent so they are more parallel to the shallow region boundary (refracted towards the normal to the boundary).
- They must join smoothly with the incoming wavefronts at the boundary.
At least 3 parallel wavefronts in the shallow region, closer together than in deep water, and bent towards the normal (more parallel to the boundary) joining the incoming wavefronts.
Walkthrough
When water waves travel from deep water into shallow water, their speed decreases. Because and frequency remains constant, the wavelength must decrease. This means the wavefronts (crests) in the shallow region must be drawn closer together.
Furthermore, because one end of a wavefront enters the shallow region and slows down before the other end, the wavefront pivots. This is refraction. The wavefronts bend to become more parallel to the boundary (i.e., they refract towards the normal to the boundary surface).
To draw this correctly on Fig. 5.2:
- The incoming wavefronts are vertical lines travelling right.
- The shallow region boundary is a diagonal line. The normal to this boundary is perpendicular to it.
- Draw 3 or more straight lines in the shallow region. They should be parallel to each other, spaced closer together than the deep-water wavefronts, and angled so they are more parallel to the diagonal boundary line than the incoming vertical lines. Ensure they connect seamlessly to the incoming wavefronts at the boundary.
Key Takeaways
Water waves slow down in shallow water. This causes refraction: wavefronts bend towards the normal and wavelength decreases. Always draw wavefronts (not rays) for ripple tank refraction.
Common Mistakes
- Drawing rays (arrows) instead of wavefronts (lines). The question asks for 'crests', which are wavefronts.
- Drawing the wavefronts in the shallow region further apart (this would happen if speed increased, e.g., deep to shallow is wrong; shallow to deep increases speed).
- Drawing the wavefronts parallel to the incoming ones (no refraction drawn).
- Drawing the wavefronts bending the wrong way (away from the normal).
Things to Be Careful About
The mark scheme specifically requires 'at least 3 wavefronts', 'parallel to each other', 'on correct side of normal', and 'join wavefronts shown'. Ensure your lines actually connect to the ends of the incoming wavefronts at the boundary.
Answer
Diffraction is the spreading out (or bending) of waves as they pass through a gap or around the edge of an obstacle.
Spreading out / bending at an edge / obstacle, or spreading out after passing through a gap / hole
Walkthrough
Diffraction is a fundamental wave behaviour. It occurs when a wave encounters an obstacle or a gap in a barrier. The wave does not just travel in a straight line past the edge; it spreads out into the region behind the barrier. This is true for all types of waves (water, sound, light), though it is most noticeable when the gap size is comparable to the wavelength.
The mark scheme accepts either 'spreading out' or 'bending' at an edge/obstacle, or 'spreading out' after passing through a gap/hole.
Key Takeaways
Diffraction is the spreading of waves around obstacles or through gaps. It is not specific to any one type of wave.
Common Mistakes
Saying 'diffraction is when waves bounce off a surface' (that is reflection) or 'diffraction is when waves bend when entering a new medium' (that is refraction). Be precise: diffraction is about obstacles and gaps.
Things to Be Careful About
The mark scheme accepts a variety of wordings: 'spreading out', 'bending at an edge', 'passing through a gap'. Any clear description of the wave spreading into the shadow region earns the mark.
A student sets up a circuit to determine the resistance of a length of wire.
The circuit contains a battery of unknown e.m.f., a length of a wire used to make a resistor X, an ammeter, a voltmeter and a variable resistor R.
Fig. 6.1 shows part of the circuit diagram.
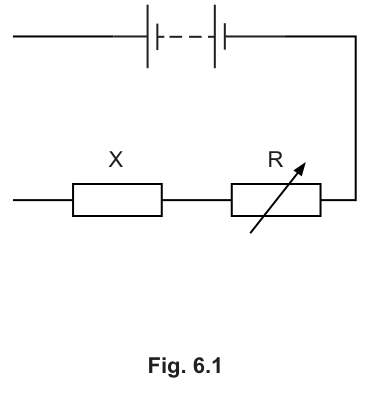
On Fig. 6.1, complete the circuit diagram by adding one voltmeter and one ammeter in suitable places to allow the determination of the resistance of X.
Answer
- Connect the ammeter in series anywhere in the main circuit loop.
- Connect the voltmeter in parallel across resistor X.
Ammeter in series in the circuit, voltmeter in parallel across resistor X
Walkthrough
To measure the resistance of resistor X using the equation , two measurements are needed:
- The current flowing through X, measured by an ammeter. An ammeter has very low resistance and must be connected in series anywhere along the main loop so that the total current passes through it.
- The potential difference across X, measured by a voltmeter. A voltmeter has very high resistance and must be connected in parallel (across) resistor X.
Key Takeaways
- Ammeters measure current and are placed in series.
- Voltmeters measure potential difference (voltage) and are connected in parallel across the specific component.
Common Mistakes
- Connecting the voltmeter in series or the ammeter in parallel.
- Placing the voltmeter across the battery or across the variable resistor R instead of across X.
Things to Be Careful About
- Ensure correct standard circuit symbols: a circle with an 'A' for an ammeter and a circle with a 'V' for a voltmeter.
Answer
Any two from:
- Resistors X and R share the e.m.f. (total potential difference) of the battery ().
- As the resistance of R is varied, the potential difference across X and R varies.
- If the resistance of R increases, the p.d. across R increases (and the p.d. across X decreases).
X and R share the total voltage of the battery; changing the resistance of R changes the share of the potential difference across X and R
Walkthrough
In a series circuit, the total voltage (e.m.f.) from the power supply is shared between components in direct proportion to their resistances:
When the variable resistor R is adjusted:
- Increasing increases its proportion of the total circuit resistance, so increases.
- Because the total e.m.f. is constant, the potential difference across resistor X, , must decrease.
- Thus, varying allows the circuit to output a variable potential difference across X, acting as a potential divider.
Key Takeaways
- In a potential divider, the voltage across each resistor is proportional to its resistance.
- The sum of voltages across series components equals the total supply voltage.
Common Mistakes
- Stating that the total voltage changes instead of the individual shared voltages.
- Confusing which voltage increases when the variable resistance is adjusted.
Things to Be Careful About
- Clearly state which resistor's resistance changes and what happens to the voltage across each component.
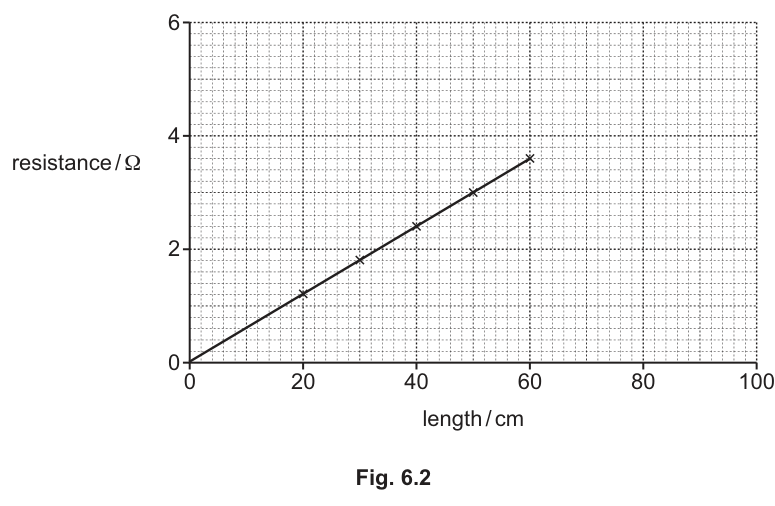
The student determines the resistance of the resistor X for five different lengths of the wire making it. The lengths of wire range from to . The type of wire and the cross-sectional area of the wire are kept constant.
Fig. 6.2 shows a graph of the results.
Answer
Resistance is directly proportional to length.
directly proportional
Walkthrough
The graph in Fig. 6.2 shows a straight line passing directly through the origin . When a graph of against is a straight line through the origin, the two quantities are directly proportional ().
Key Takeaways
- A straight-line graph passing through indicates direct proportionality.
Common Mistakes
- Writing "as length increases, resistance increases" without stating "directly proportional" (which is required for precision when it's a straight line through the origin).
- Confusing direct proportionality with a general linear relationship ().
Things to Be Careful About
- Ensure both words "directly proportional" are written, not just "proportional".
Calculate the current in a length of the wire when there is a potential difference (p.d.) of across it.
Show your working.
current = ______
Working
From the graph, at length , resistance .
Since resistance is directly proportional to length:
Using Ohm's law:
Answer
1.7
1.7 A
Walkthrough
-
Find the resistance of the length of wire:
From the graph in Fig. 6.2, we can read off a point, e.g., at , (or at , ).
The resistance per unit length is:For a length:
-
Calculate the current:
We are given a potential difference .
Using :
Key Takeaways
- Direct proportionality allows simple scaling: .
- Current is determined from potential difference and resistance via .
Common Mistakes
- Inverting the ratio when scaling the resistance.
- Forgetting to calculate resistance for and using directly.
- Rounding to 1 significant figure instead of 2.
Things to Be Careful About
- State the calculated resistance value () clearly in working to secure intermediate marks.
The p.d. across the wire making the resistor X is kept constant for all the measurements of resistance.
Describe the relationship between the current in the wire and the length of the wire.
Answer
- As length increases, current decreases.
- Current is inversely proportional to length (or ).
As length increases, current decreases; current is inversely proportional to length
Walkthrough
- Resistance is directly proportional to length ().
- When potential difference is constant, current is given by , meaning current is inversely proportional to resistance ().
- Substituting gives:
- Therefore, as the length of the wire increases, the current decreases, and more specifically, current is inversely proportional to the length of the wire.
Key Takeaways
- If and , then (inverse proportionality).
Common Mistakes
- Giving only the qualitative statement "current decreases" without stating the exact mathematical relationship ("inversely proportional"), which loses the second mark.
- Stating that current is inversely proportional to voltage.
Things to Be Careful About
- Ensure both the general trend (as length increases, current decreases) and the formal relationship (inversely proportional) are stated.
Answer
Resistance is inversely proportional to cross-sectional area (or as cross-sectional area increases, resistance decreases).
inversely proportional
Walkthrough
The resistance of a wire depends on its length , cross-sectional area , and resistivity according to:
Therefore, for a constant length and material, resistance is inversely proportional to the cross-sectional area (). A thicker wire offers more paths for electrons to flow, thereby reducing resistance.
Key Takeaways
- (resistance is directly proportional to length).
- (resistance is inversely proportional to cross-sectional area).
Common Mistakes
- Saying resistance is "directly proportional to area".
- Confusing diameter/radius with cross-sectional area (resistance is inversely proportional to the square of diameter, but inversely proportional to area directly).
Things to Be Careful About
- Be precise: state "inversely proportional" rather than just "decreases".
Fig. 7.1 shows an alternating current (a.c.) power supply connected to a transformer.
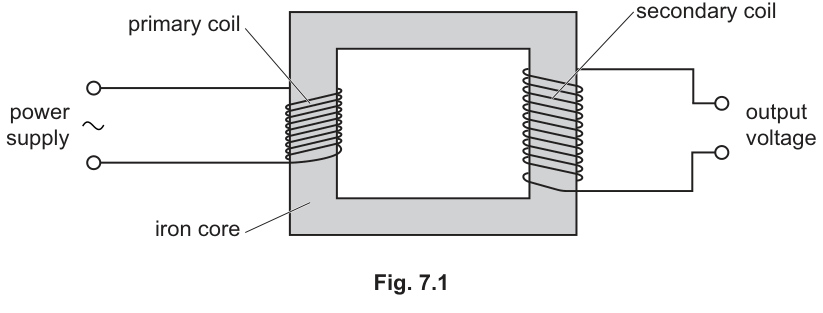
Explain how an alternating current in the primary coil produces an alternating output voltage.
Answer
The alternating current in the primary coil produces a changing (or alternating) magnetic field. The iron core transmits this changing magnetic field to the secondary coil. The changing magnetic field induces an alternating voltage (e.m.f.) in the secondary coil.
See working
Walkthrough
To explain how a transformer works, we follow the chain of events from the primary coil to the secondary coil. First, an alternating current in the primary coil produces a magnetic field that is constantly changing in strength and reversing in direction. Second, the soft iron core is a good conductor of magnetic flux, so it transmits this changing magnetic field from the primary coil to the secondary coil. Third, by the principle of electromagnetic induction, a changing magnetic field through a coil induces an e.m.f. across it. Because the magnetic field is itself alternating, the induced e.m.f. in the secondary coil is also alternating.
Key Takeaways
A transformer requires an alternating current to produce a changing magnetic field. The iron core links the two coils magnetically. Electromagnetic induction occurs when the magnetic flux through the secondary coil changes.
Common Mistakes
- Saying 'the current flows from primary to secondary'. Current does not flow across the gap; energy is transferred magnetically.
- Forgetting the word 'changing' or 'alternating'. A steady direct current would produce a constant magnetic field, which would induce zero voltage in the secondary coil.
- Saying 'magnetism induces voltage'. The specific phrase required is 'changing magnetic field' or 'changing magnetic flux'.
Things to Be Careful About
Each of the three marks requires a distinct physical link in the chain: (1) AC produces changing magnetic field, (2) core transmits it, (3) changing field induces voltage. Stating only two of these will lose a mark.
A student uses a voltmeter set on a range to measure the input and output voltages. She obtains the values shown in Table 7.1.
Table 7.1
| input voltage / | output voltage / |
|---|---|
| 1.2 | 2.4 |
| 2.3 | 4.6 |
| 4.8 | 9.6 |
| 6.4 | no reading |
Suggest why no output voltage reading is obtained with this voltmeter when the input voltage is .
Working
From the table, the output voltage is always twice the input voltage (ratio 2:1). For an input of 6.4 V, the expected output voltage is:
Answer
The expected output voltage is 12.8 V, which is off the scale (too large) for the 0-10 V range of the voltmeter.
The expected output voltage is 12.8 V, which is off the scale (too large) for the 0-10 V voltmeter range.
Walkthrough
First, examine the data in Table 7.1 to find the relationship between input and output voltages. For 1.2 V input, output is 2.4 V; for 2.3 V input, output is 4.6 V; for 4.8 V input, output is 9.6 V. In every case, the output is exactly twice the input. This means the transformer has a turns ratio of 2:1 (step-up). When the input is 6.4 V, the output should be . The student is using a voltmeter set to the 0-10 V range. Since 12.8 V is greater than 10 V, the reading is off the scale of the voltmeter, so no reading can be obtained.
Key Takeaways
Always check if a calculated value falls within the range of the measuring instrument. A voltmeter cannot measure a voltage larger than its selected range.
Common Mistakes
- Simply saying 'it is too big'. The mark scheme requires 'off the scale' or 'too large for the voltmeter'.
- Not showing the calculation. It is helpful to state that the expected voltage is 12.8 V to justify why it is off the scale.
Things to Be Careful About
The voltmeter range is 0-10 V. Any value above 10 V will be off scale. Be careful to read the range from the question text, not just assume it.
The number of turns on the primary coil is 48.
Calculate the number of turns on the secondary coil.
number of turns = ______
Working
The transformer turns-ratio equation is:
Rearranging for the number of turns on the secondary coil :
Using the values from the third row of the table (, ) and :
Answer
number of turns = 96
96
Walkthrough
The transformer equation links the voltages across the coils to the number of turns on each coil: . We are given . We can use any of the valid data pairs from the table to find the ratio. Using and :
Any consistent pair from the table gives the same result. The number of turns on the secondary coil is 96.
Key Takeaways
The transformer equation is valid for ideal transformers. The ratio of voltages equals the ratio of turns.
Common Mistakes
- Inverting the ratio: writing . This would give , which is wrong.
- Using the invalid data point (6.4 V input, no reading) in the calculation.
- Forgetting to write the unit or just writing the number. The question asks for 'number of turns', which is a count, so no unit is strictly required, but 96 is the value.
Things to Be Careful About
Ensure you match with and with . The equation can also be written as , which is algebraically equivalent. Make sure your substitution is consistent.
The student uses an oscilloscope to display an alternating output voltage from the transformer.
Fig. 7.2 shows the front of the oscilloscope before it is connected to the transformer.
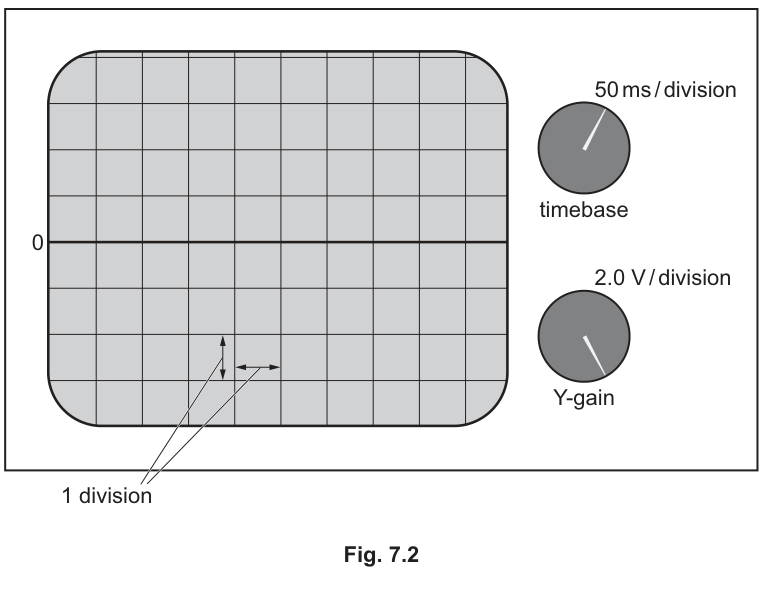
When the oscilloscope is connected to the output of the transformer, a trace representing the alternating output voltage is displayed on the screen.
Answer
A sine wave (or any alternating trace) drawn oscillating above and below the central horizontal zero line.
See diagram
Walkthrough
The oscilloscope screen has a central horizontal line marked '0', which represents zero volts. An alternating voltage will cause the trace to move above and below this line. To represent an alternating output voltage, draw a continuous wave (such as a sine wave) that is symmetric about the central zero line. The wave should span a sensible number of divisions horizontally and vertically to be clearly visible. For example, a sine wave with a peak amplitude of 2 vertical divisions and a period of 4 horizontal divisions would be a sensible trace.
Key Takeaways
An oscilloscope displays voltage on the vertical axis and time on the horizontal axis. An alternating signal produces a trace that oscillates above and below the zero line.
Common Mistakes
- Drawing the trace entirely above or below the zero line. This would represent a direct current (d.c.) signal or a d.c. offset, not a pure alternating voltage.
- Drawing a straight horizontal line. This would represent zero voltage or a constant d.c. voltage.
- Drawing a jagged or random trace without a clear alternating pattern.
Things to Be Careful About
The trace must be 'either side of mid-line'. A trace that only goes above the line will not score. Keep the drawing neat and clearly oscillating.
Answer
- Measure the vertical height (in divisions) of the trace from the centre line to the peak.
- Multiply this height by the Y-gain setting (2.0 V/division) to find the maximum voltage.
Measure the vertical height of the trace in divisions from the centre line to the peak, then multiply by the Y-gain setting (2.0 V/division).
Walkthrough
The maximum value of the output voltage is the peak voltage. On the oscilloscope trace, this corresponds to the maximum vertical distance from the central zero line to the highest point (peak) of the wave. First, count the number of vertical divisions from the centre line to the peak. Second, look at the Y-gain control setting, which is given as 2.0 V/division. This means each vertical division represents 2.0 volts. Multiply the number of divisions by 2.0 to calculate the maximum voltage in volts. For example, if the peak is 2.5 divisions above the centre, the maximum voltage is .
Key Takeaways
The vertical deflection on an oscilloscope is proportional to the voltage. The Y-gain setting tells you how many volts each vertical division represents. Maximum voltage = (peak height in divisions) × (Y-gain in V/division).
Common Mistakes
- Measuring the total peak-to-peak height instead of the height from the centre line to the peak. The maximum value (amplitude) is half the peak-to-peak value.
- Forgetting to multiply by the Y-gain setting. Just stating 'measure the height in divisions' is only half the answer.
- Using the timebase setting. The timebase is used for measuring time or frequency, not voltage.
Things to Be Careful About
Be precise with wording: say 'height from the centre line to the peak', not just 'height of the trace'. Ensure you mention multiplying by the Y-gain value. The question asks to 'describe how', so a two-step procedure is required.
Plutonium-239 () is an isotope that is used as the fuel in some nuclear reactors.
State the names of the types of particles found in a nucleus of plutonium-239, and state how many there are of each type.
Answer
protons and neutrons
94 protons and 145 neutrons
94 protons and 145 neutrons
Walkthrough
Plutonium-239 is written in nuclide notation as . The bottom number (94) is the proton number, which tells us there are 94 protons in the nucleus. The top number (239) is the nucleon number (mass number), which is the total number of protons and neutrons. To find the number of neutrons, we subtract the proton number from the nucleon number: neutrons. The nucleus therefore contains 94 protons and 145 neutrons.
Key Takeaways
- The proton number (bottom number) gives the number of protons.
- The nucleon number (top number) is the sum of protons and neutrons.
- Number of neutrons = nucleon number proton number.
Common Mistakes
- Confusing the proton number and nucleon number.
- Forgetting to subtract to find the number of neutrons, or subtracting in the wrong order.
- Stating only the names of the particles without giving the required numbers.
Things to Be Careful About
- Ensure you state both the names of the particles AND the number of each, as the question asks for both.
- The nucleon number is not the number of neutrons; it is the total number of nucleons (protons + neutrons).
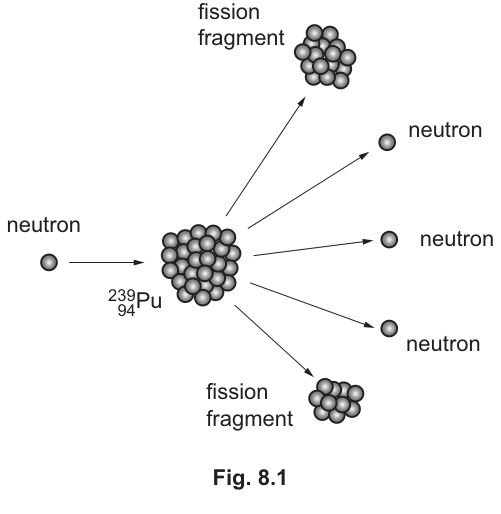
Fig. 8.1 shows the nuclear fission process that occurs within the fuel rods of the nuclear reactor.
Answer
A neutron is absorbed by a plutonium-239 nucleus, causing it to split (undergo fission).
At least one of the neutrons released during this fission then hits another plutonium-239 nucleus, causing it to split as well. This process continues, creating a chain reaction.
See working
Walkthrough
Nuclear fission occurs when a heavy nucleus, such as plutonium-239, absorbs a neutron and becomes unstable, splitting into two smaller nuclei (fission fragments). Crucially, this splitting also releases additional neutrons (typically two or three). If at least one of these newly released neutrons goes on to be absorbed by another plutonium-239 nucleus, it will cause that nucleus to fission and release more neutrons. This self-sustaining sequence, where the products of one reaction trigger further reactions, is called a chain reaction.
Key Takeaways
- Fission is triggered by neutron absorption.
- Fission releases more neutrons than were absorbed.
- A chain reaction occurs when the released neutrons cause further fission events.
Common Mistakes
- Saying the nucleus 'absorbs another nucleus' instead of a neutron.
- Forgetting to mention that the released neutrons go on to cause further fission.
- Using the word 'fusion' instead of 'fission'.
Things to Be Careful About
- The explanation must clearly link the release of neutrons from one fission event to the absorption by another nucleus. Both parts are needed for full marks.
Explain how control rods are used to increase and decrease the rate of the chain reaction in a nuclear reactor.
Answer
Control rods are made of materials that absorb neutrons.
To decrease the rate of the chain reaction, the control rods are lowered (inserted) between the fuel rods, absorbing more neutrons and leaving fewer available to cause fission.
To increase the rate of the chain reaction, the control rods are raised (withdrawn), absorbing fewer neutrons and allowing more to cause fission.
See working
Walkthrough
Control rods are typically made of neutron-absorbing materials like cadmium or boron. Their purpose is to regulate the number of free neutrons available to sustain the chain reaction. By lowering (inserting) the control rods further between the fuel rods, more neutrons are absorbed, reducing the number of fission events and decreasing the reaction rate. Conversely, raising (withdrawing) the control rods means fewer neutrons are absorbed, increasing the reaction rate.
Key Takeaways
- Control rods absorb neutrons.
- Inserting/lowering them decreases the reaction rate.
- Raising/withdrawing them increases the reaction rate.
Common Mistakes
- Stating that control rods 'slow down' neutrons (that is the role of the moderator, e.g., water or graphite).
- Forgetting to explain the direction of movement (lowering to decrease, raising to increase).
Things to Be Careful About
- The question asks how they are used to increase AND decrease the rate. Both actions must be described to earn full marks, alongside the fundamental principle that they absorb neutrons.
Plutonium-239 decays by the emission of an alpha particle (-particle).
State two differences between an alpha particle and a beta particle (-particle).
difference 1 ______
difference 2 ______
Answer
difference 1: An alpha particle has a positive charge (), whereas a beta particle has a negative charge ().
difference 2: An alpha particle has a much greater mass (it consists of 2 protons and 2 neutrons) than a beta particle (which is a fast-moving electron).
(Other acceptable differences: An alpha particle has lower penetrating power / higher ionising power than a beta particle.)
See working
Walkthrough
Alpha () and beta () particles are both emitted during radioactive decay, but they are fundamentally different. An alpha particle is a helium nucleus, consisting of 2 protons and 2 neutrons, giving it a mass of 4 u and a charge of . A beta particle is a high-speed electron emitted from the nucleus when a neutron turns into a proton, giving it a very small mass and a charge of . Because of these differences, alpha particles are much more strongly ionising but less penetrating than beta particles.
Key Takeaways
- Alpha particles are heavy, positively charged helium nuclei.
- Beta particles are light, negatively charged electrons.
- They differ in charge, mass, ionising ability, and penetrating power.
Common Mistakes
- Saying alpha particles are 'positive' and beta particles are 'negative' without specifying the exact charges or mass differences if required.
- Confusing beta particles with protons.
- Stating only one difference when two are asked for.
Things to Be Careful About
- The question asks for 'two differences'. Any two valid points from charge, mass, composition, ionising power, or penetrating power will score. Be precise with terminology (e.g., use 'charge' not just 'positive/negative').
Alpha particles from the radioactive source are detected in a cloud chamber or with a spark counter.
Draw a labelled diagram of either a cloud chamber or a spark counter.
Label the position of the radioactive source with an S.
Answer
Spark counter:
A spark counter consists of a fine metal wire suspended parallel to a flat metal plate. The radioactive source S is placed between the wire and the plate, very close to the wire. A high voltage supply is connected across the wire and the plate.
Cloud chamber (alternative):
A cloud chamber is a closed container with a volatile liquid (like alcohol) at the bottom and a cooling source (like dry ice) at the base to create a vapour. The radioactive source S is placed inside or just outside the chamber.
See diagram
Walkthrough
Both a cloud chamber and a spark counter are used to detect alpha particles, which produce clear, straight tracks due to their strong ionising ability.
Spark counter: A fine wire and a metal plate are arranged with a small gap between them. A high voltage is applied across them, just below the threshold for spontaneous sparking. When an alpha particle passes through the gap, it ionises the air molecules. The freed electrons are accelerated by the high voltage and cause a cascade of further ionisations, resulting in a visible spark jumping between the wire and the plate along the ionised track.
Cloud chamber: A sealed container contains air supersaturated with vapour (from a volatile liquid like alcohol). The bottom is cooled, creating a temperature gradient. When an alpha particle passes through, it ionises the air. The supersaturated vapour condenses on these ions, forming tiny liquid droplets that make the particle's path visible as a white track.
Key Takeaways
- Spark counter: fine wire, plate, high voltage, source nearby.
- Cloud chamber: closed container, volatile liquid/vapour, cooling source, source inside/outside.
- Both rely on the ionising effect of alpha particles.
Common Mistakes
- Forgetting to label the radioactive source with 'S'.
- Drawing a cloud chamber without the cooling mechanism or vapour.
- Drawing a spark counter without the high voltage supply or the fine wire.
- Confusing the components with a Geiger-Müller tube.
Things to Be Careful About
- You only need to draw and label ONE of the two apparatuses. Ensure all key components are clearly labelled.
- The source must be explicitly labelled 'S'.
State what causes the tracks in a cloud chamber or state what causes the sparks in a spark counter.
Answer
Ionisation (of the air/gas).
Ionisation of air
Walkthrough
Alpha particles are strongly ionising. As they travel through the air in a cloud chamber or spark counter, they knock electrons off air molecules, creating positive ions and free electrons. This process is called ionisation. In a cloud chamber, the vapour condenses on these ions to form visible tracks. In a spark counter, the free electrons are accelerated by the electric field, causing further ionisation and resulting in a visible spark.
Key Takeaways
- Radiation detectors like cloud chambers and spark counters work because alpha particles ionise the gas they pass through.
Common Mistakes
- Saying 'radiation' or 'particles' without specifying ionisation.
- Saying 'excitation' instead of ionisation.
Things to Be Careful About
- The mark scheme specifically awards the mark for 'ionisation'. Ensure this exact concept is stated.
The life cycle of a star begins with a large cloud of dust and gas which collapses.
Five later stages of the life cycle of a very massive star are:
Place these stages in Table 9.1 in the order in which they occur.
Table 9.1
| earlier time |
|---|
| cloud of dust and gas |
| ______ |
| ______ |
| ______ |
| ______ |
| ______ |
| later time |
Answer
Completed Table 9.1:
| earlier time |
|---|
| cloud of dust and gas |
| protostar |
| stable star |
| red supergiant |
| supernova |
| black hole |
| later time |
protostar, stable star, red supergiant, supernova, black hole
Walkthrough
The question asks for the order of stages after the initial cloud of dust and gas collapses. For a very massive star, the collapse first produces a protostar, which then becomes a stable star while it is fusing hydrogen. Later it swells into a red supergiant, explodes as a supernova, and the core left behind becomes a black hole.
The mark scheme gives one mark for the first two stages in the correct order (protostar, stable star) and one mark for the last three in the correct order (red supergiant, supernova, black hole). Writing all five in the correct order earns the full two marks.
Key Takeaways
- A very massive star follows: protostar → stable star → red supergiant → supernova → black hole.
- The stable star is the long, middle stage of a star's life.
- The final remnant of a very massive star after a supernova is a black hole.
Common Mistakes
- Writing black hole before supernova: the explosion happens before the black hole is formed.
- Placing red supergiant before the stable star: a star becomes stable first, then evolves into a red supergiant.
- Confusing the life cycle of a low-mass star (which ends as a white dwarf) with that of a very massive star.
Things to Be Careful About
- The words “earlier time” and “later time” in the table show the direction of time; read from top to bottom.
- The supernova is an explosion, so it must come immediately before the formation of the black hole.
The original collapse of the cloud of dust and gas that formed the Sun was caused by an inward force.
Answer
gravity (gravitational attraction)
gravity (gravitational attraction)
Walkthrough
A large cloud of dust and gas collapses because every particle attracts every other particle. This inward attraction is gravity. The mark is awarded for naming gravity or gravitational attraction.
Key Takeaways
- Gravity is the inward force that pulls matter together to form stars.
- The same gravitational force causes the collapse of a cloud of dust and gas at the start of star formation.
Common Mistakes
- Saying “weight” instead of gravity: weight is the force of gravity on an object, not the name of the force itself.
- Giving “magnetism” or “pressure” as the inward force.
Things to Be Careful About
- The mark scheme accepts “gravity” or “gravitational attraction”.
- “Force of gravity” is also acceptable, but the key idea is gravitational attraction, not another type of force.
Further collapse is prevented by an outward force. The Sun will remain in the stable stage of its life cycle for a few billion years.
Describe what causes the outward force.
Answer
The outward force is caused by the very high temperature (and pressure) of the gas and radiation in the core, which pushes outwards.
The high temperature / pressure of gas and radiation pushes outwards
Walkthrough
In the stable stage of a star, the inward pull of gravity is balanced by an outward force. This outward force comes from the very high temperature of the core: the gas particles move very fast and exert a large pressure outward. Radiation (light) also exerts a pressure that helps push outward.
The mark scheme accepts either “high temperature” or “pressure of light / radiation”.
Key Takeaways
- A stable star is in balance: inward gravity is balanced by outward pressure.
- The outward pressure is caused by the high temperature and by radiation pressure from the light produced in the core.
- As long as this balance is maintained, the star stays in its stable stage.
Common Mistakes
- Writing just “nuclear fusion” without linking it to temperature or pressure: fusion produces the energy, but the mark is for the outward pressure/temperature, not the process itself.
- Saying “heat” alone: “high temperature” or “pressure of light/radiation” is the accepted wording.
Things to Be Careful About
- The question asks what causes the outward force, so the answer must state the cause, not just say “there is an outward force”.
- Mentioning that the pressure balances gravity helps show understanding, but the key mark is the cause.
One of the first supernovas ever observed is known as SN185. It was formed from the explosion of a star in the Milky Way galaxy.
The remnants of SN185 are at a distance of 8200 light-years from Earth.
Answer
A light-year is the distance that light travels in one year.
the distance light travels in one year
Walkthrough
Although its name contains “year”, a light-year is a unit of distance, not time. It is the distance travelled by light in a vacuum in one year. Since light travels at about 3.0 × 10^8 m/s, this is a very large distance.
Key Takeaways
- A light-year measures distance, not time.
- One light-year is the distance light covers in one year.
- Astronomers use light-years because distances between stars and galaxies are enormous.
Common Mistakes
- Saying a light-year is a time interval: this loses the mark.
- Defining it as “the time light takes to reach Earth” without mentioning the distance travelled in one year.
Things to Be Careful About
- Use the word “distance” clearly in the definition.
- Include the idea of “one year” because that is what makes it a light-year.
State the time that passed between the explosion that formed SN185 and the electromagnetic radiation from the explosion reaching Earth.
Answer
8200 years
8200 years
Walkthrough
Because a light-year is the distance light travels in one year, light from an object 8200 light-years away takes 8200 years to reach Earth. So the radiation from the supernova explosion arrived at Earth 8200 years after the explosion happened.
Key Takeaways
- Distance in light-years can be read directly as the number of years light takes to reach us.
- The statement “8200 light-years away” means we see the object as it was 8200 years ago.
Common Mistakes
- Giving the answer as “8200 light-years” and forgetting the unit should be years.
- Thinking the time is only the number of years since the supernova was observed, rather than the light travel time.
Things to Be Careful About
- The unit is essential here: the answer is 8200 years, not 8200 light-years.
- No calculation is needed; the definition supplies the answer directly.
A recently observed supernova is SN2014J.
The remnants of SN2014J are 12 million light-years from Earth, outside the Milky Way.
There is no redshift seen in the electromagnetic radiation from the remnants of SN185 but a large redshift is seen in the electromagnetic radiation from the remnants of SN2014J.
Explain this difference.
Answer
SN185 is not moving (or has very little speed) away from Earth, so little or no redshift is seen. SN2014J is much further from Earth, so the expansion of the Universe is carrying it away faster, giving a large redshift.
SN185 is not moving / has little speed away from Earth; SN2014J is much further away and moving away faster because of the expansion of the Universe, so its redshift is large
Walkthrough
Redshift happens when a source of light is moving away from an observer: the wavelengths of light are stretched, making the light appear redder. If a source has little or no motion away from Earth, little or no redshift is seen.
SN185 is in the Milky Way, close to Earth, so its motion away from Earth is negligible and no redshift is seen.
SN2014J is outside the Milky Way and much further away. The Universe is expanding, and more distant objects are moving away from us faster. Therefore SN2014J is moving away much faster than SN185, so its light is strongly redshifted.
The mark scheme gives one mark for the idea that SN185 is not moving/little speed away, and one mark for the idea that SN2014J is moving away faster (or that the redshift is larger because of the expansion of the Universe).
Key Takeaways
- Redshift indicates that a source of light is moving away from the observer.
- In an expanding Universe, more distant objects generally recede faster, so they show a larger redshift.
- An object in our own galaxy may show little or no redshift because its motion away from us is small.
Common Mistakes
- Saying “SN2014J is farther away, so it has redshift” without explaining that it is moving away faster: distance alone does not cause redshift; it is the recession due to expansion.
- Saying the supernova explosion itself caused the redshift.
- Forgetting to compare the two supernovae explicitly.
Things to Be Careful About
- The word “redshift” is one word in 5054 and in the mark scheme.
- Use “expansion of the Universe” rather than “the Universe is moving” without explanation.
- Make sure both credited points are clearly stated: little/no motion for SN185 and faster recession for SN2014J.
Most of the atoms found in the early Universe were hydrogen and helium.
The Universe now contains atoms of heavier elements.
Explain how the heavier elements are formed.
Answer
Heavier elements are formed by nuclear fusion in stars; the heaviest elements are formed during a supernova (the explosion of a massive star).
Heavier elements are formed by nuclear fusion in stars, with the heaviest formed in supernova explosions
Walkthrough
The early Universe contained mostly hydrogen and helium. Heavier elements are made by nuclear fusion: inside stars, light nuclei join together to form heavier nuclei. For most elements, this happens during the stable and later stages of a star's life.
Elements heavier than iron need extremely high temperatures and pressures, such as those found in a supernova explosion. When a very massive star explodes as a supernova, it creates and scatters many heavy elements into space. These elements can later become part of new stars, planets and living things.
The mark scheme gives one mark for fusion and one mark for a supernova/explosion of a star (or for fusion taking place in a star).
Key Takeaways
- Fusion is the joining of light nuclei to make heavier nuclei.
- Stars are the “factories” where heavier elements are made.
- The very heaviest elements are made in supernovae.
- Supernovae also spread these elements into space.
Common Mistakes
- Saying heavier elements were formed in the Big Bang directly: the early Universe made mainly hydrogen and helium.
- Mentioning only “fusion” without saying it happens in a star, or only “supernova” without mentioning fusion.
- Confusing fusion with fission (splitting nuclei).
Things to Be Careful About
- The mark scheme needs the idea of fusion and the idea of a supernova/explosion of a star.
- It is safer to name both “nuclear fusion” and “supernova explosion” explicitly.
- You do not need to know exactly which elements are made at each stage; the general idea is enough.