Physics 5054/12 — May/June 2025
Cambridge O-Level · Multiple Choice · answer key with instant marking and worked solutions
Topics Kinematics · Forces · Energy, Work and Power · General Properties of Waves · Sound · Pressure · +17 more
Tap an option under each question to check it — your score builds as you go.
Which list contains only vector quantities?
Options
A mass, distance, weight
B momentum, gravitational field strength, displacement
C energy, force, velocity
D acceleration, time, speed
Working
A vector quantity has both magnitude and direction.
- A – mass and distance are scalars, so this list is not only vectors.
- B – momentum, gravitational field strength and displacement all have direction, so this list contains only vectors.
- C – energy is a scalar, so this list is not only vectors.
- D – time and speed are scalars, so this list is not only vectors.
Answer
B
B
Walkthrough
A scalar quantity has only magnitude (size). A vector quantity has both magnitude and direction.
Look at each list:
- A: mass is a scalar, distance is a scalar, weight is a vector. Because mass and distance are scalars, the list is not only vectors.
- B: momentum is mass × velocity, so it has the direction of the velocity; gravitational field strength is force per unit mass and points towards the centre of the Earth; displacement is distance in a stated direction. All three are vectors, so this is the correct list.
- C: energy is a scalar, force is a vector, velocity is a vector. Because energy is a scalar, the list is not only vectors.
- D: acceleration is a vector, but time and speed are scalars. Because time and speed are scalars, the list is not only vectors.
Key Takeaways
- Vectors have both magnitude and direction: displacement, velocity, acceleration, force, weight, momentum and gravitational field strength.
- Scalars have only magnitude: mass, distance, speed, time, energy, temperature and density.
- In an O Level multiple-choice question, check every quantity in the list, not just the first one.
Common Mistakes
- Thinking that distance is a vector because it sounds similar to displacement. Distance has no direction, so it is a scalar.
- Thinking that speed is a vector because it is related to velocity. Speed is the magnitude of velocity and has no direction.
- Confusing weight with mass. Weight is a force and is a vector; mass is a scalar.
Things to Be Careful About
- The word “only” in the question means every quantity in the chosen list must be a vector.
- Gravitational field strength is a vector even though it is often written as a number such as 10 N/kg; its direction is towards the centre of the Earth.
The diagram shows the distance–time graph for a moving object.
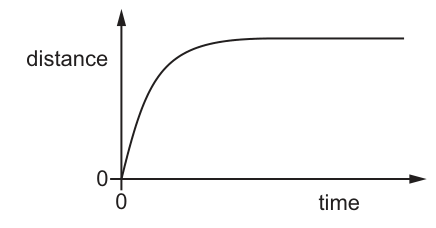
What is a description of the moving object?
Options
A a ball thrown vertically upwards and falling back to the thrower
B a car starting from rest and speeding up as it moves away from a traffic signal
C a rock dropped from a high cliff and falling into the sea below
D a train braking to a halt as it stops at a station
Working
The gradient of a distance-time graph represents the speed of the object.
- The graph starts at the origin with a steep gradient, meaning the object begins with a high speed.
- The gradient decreases as time passes (the curve flattens), meaning the object is slowing down.
- The graph becomes horizontal, meaning the gradient is zero, so the speed is zero and the object has stopped. The distance remains constant.
Evaluating the options:
- A: A ball thrown up and falling back would have a distance from the thrower that increases then decreases. The graph does not decrease.
- B: A car speeding up has an increasing speed, so the gradient of the distance-time graph would increase (curve bending upwards).
- C: A rock falling accelerates due to gravity, so its speed increases. The gradient would increase (curve bending upwards).
- D: A train braking to a halt has a decreasing speed, so the gradient decreases (curve bending downwards). When it stops, the speed is zero and the graph becomes horizontal. This matches the graph.
Answer
D
D
Walkthrough
The question provides a distance-time graph and asks which physical scenario matches it. The key to reading a distance-time graph is that its gradient at any point equals the speed of the object at that time.
- Initial section: The curve starts at the origin with a steep positive gradient. A steep gradient means a high speed. So the object is moving quickly at the start.
- Middle section: The curve bends so that the gradient becomes less steep over time. A decreasing gradient means the speed is decreasing. The object is slowing down (decelerating).
- Final section: The curve becomes a horizontal line. The gradient of a horizontal line is zero. A speed of zero means the object has stopped. The distance is no longer changing, so it remains constant.
Now we match this behaviour to the options:
- Option A (ball thrown up and falling back): If distance is measured from the thrower, the distance would increase as the ball rises and then decrease as it falls back down. The graph would go up and then come back down to the time axis. This does not match.
- Option B (car speeding up): If the car is speeding up, its speed is increasing. The gradient of the distance-time graph would increase over time, producing a curve that bends upwards (concave up). This does not match.
- Option C (rock dropped from a cliff): A falling rock accelerates due to gravity, so its speed increases. Like option B, the gradient would increase, producing a curve that bends upwards. This does not match.
- Option D (train braking to a halt): A braking train has a decreasing speed, so the gradient of the distance-time graph decreases over time, producing a curve that bends downwards (concave down). When the train halts, its speed becomes zero, and the graph becomes horizontal. This perfectly matches the given graph.
Key Takeaways
- The gradient of a distance-time graph represents speed.
- An increasing gradient (curve bending upwards) means the object is accelerating.
- A decreasing gradient (curve bending downwards) means the object is decelerating.
- A horizontal line on a distance-time graph means the object is stationary (speed is zero).
Common Mistakes
- Confusing a distance-time graph with a speed-time graph. On a speed-time graph, a horizontal line means constant speed, not a stopped object. Here, the y-axis is distance, so a horizontal line means distance is not changing, i.e., the object has stopped.
- Thinking a curved line always means constant acceleration. The curve here shows decreasing acceleration (deceleration), not constant acceleration. Constant acceleration would be a straight line on a velocity-time graph, or a parabola on a distance-time graph, but the key is the direction the curve bends.
Things to Be Careful About
- Always check the axis labels. The y-axis is distance, not speed. If it were speed, a horizontal line at a non-zero value would mean constant speed, not stopping.
- Remember that distance is a scalar and only increases or stays constant for a moving object in one direction. If an object changes direction (like the ball in option A), the distance-time graph would either show a decrease (if measuring displacement from a point) or a continuous increase (if measuring total path length), but never a horizontal line unless it stops permanently.
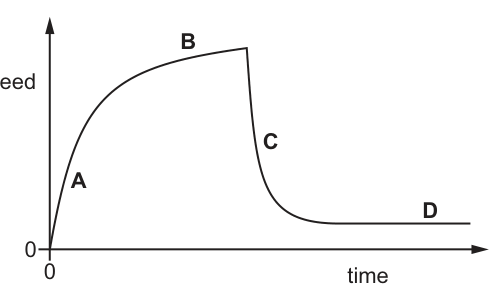
The speed–time graph for a falling skydiver is shown. As he falls, the skydiver spreads out his arms and legs and then opens his parachute.
Which part of the graph shows the skydiver falling with terminal velocity?
Options
Answer
Terminal velocity is constant speed, which occurs when the upward air resistance equals the downward weight, giving a resultant force of zero and zero acceleration.
On a speed–time graph, constant speed is represented by a horizontal line.
- Sections A and B show increasing speed (acceleration).
- Section C shows decreasing speed (deceleration) as the parachute opens.
- Section D is a horizontal line, showing constant speed.
Therefore, section D shows the skydiver falling with terminal velocity.
Answer
D
D
Walkthrough
The question asks which part of the speed–time graph shows the skydiver falling with terminal velocity.
-
Understand terminal velocity: As a skydiver falls, gravity pulls them down (weight) and air resistance pushes up (drag). Initially, weight is greater than drag, so the skydiver accelerates. As speed increases, drag increases. When drag equals weight, the resultant force is zero. By Newton's first law, the skydiver no longer accelerates and continues to fall at a constant speed. This constant speed is called terminal velocity.
-
Read the speed–time graph: The vertical axis is speed and the horizontal axis is time.
- A sloping line means the speed is changing (acceleration or deceleration).
- A horizontal line means the speed is not changing (constant speed, zero acceleration).
-
Match to the sections:
- Section A: The curve rises steeply and then flattens. Speed is increasing, but the rate of increase (acceleration) is decreasing because drag is building up.
- Section B: Speed is still increasing slightly, approaching a first terminal velocity (before the parachute opens).
- Section C: The curve drops steeply. The parachute opens, greatly increasing air resistance. Drag is now much larger than weight, so the skydiver decelerates rapidly.
- Section D: The line is horizontal. Speed is constant at a new, lower terminal velocity.
Since terminal velocity is constant speed, the correct section is D.
Key Takeaways
- Terminal velocity is constant speed, achieved when driving force (weight) equals resistive force (drag).
- On a speed–time graph, constant speed is always a horizontal line.
- Acceleration is the gradient of a speed–time graph; zero gradient means zero acceleration.
Common Mistakes
- Confusing speed–time with distance–time: On a distance–time graph, a horizontal line means the object is stationary. On a speed–time graph, a horizontal line means constant speed (not necessarily zero speed, unless it is on the time axis).
- Choosing A or B: These sections show the skydiver still accelerating (speed is increasing), so they are not terminal velocity.
- Choosing C: Section C shows rapid deceleration (negative acceleration) as the parachute opens, not constant speed.
Things to Be Careful About
- Always check the axis labels. If the vertical axis is 'speed' or 'velocity', a horizontal line is constant speed. If it is 'distance' or 'displacement', a horizontal line is stationary.
- Terminal velocity is not zero speed; it is the maximum constant speed reached during the fall. Section D is at a low but non-zero speed.
- The gradient of the graph gives acceleration. A horizontal line has a gradient of zero, confirming zero acceleration and thus constant speed.
A car driver travelling at constant speed in a straight line sees a hazard in the road ahead at .
The speed–time graph shows how the speed of the car changes from .
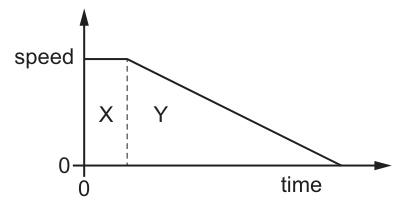
Three students suggest what area X and area Y represent.
student 1 Area X represents the thinking distance.
student 2 Area Y represents the stopping distance.
student 3 Area X + area Y represents the stopping distance.
Which students are correct?
Options
A 1 and 2
B 1 and 3
C 1 only
D 2 only
Working
The area under a speed–time graph gives the distance travelled.
- Area X is the distance travelled at constant speed before the brakes are applied. This is the thinking distance.
- Area Y is the distance travelled while the car is braking and decelerating to rest. This is the braking distance.
- The stopping distance is the total distance travelled from seeing the hazard to coming to a complete stop, which is the sum of the thinking distance and the braking distance (Area X + Area Y).
Student 1 is correct (Area X = thinking distance).
Student 2 is incorrect (Area Y = braking distance).
Student 3 is correct (Area X + Area Y = stopping distance).
Students 1 and 3 are correct, which corresponds to option B.
Answer
B
B
Walkthrough
The question provides a speed-time graph with two shaded areas: X and Y. The graph shows a horizontal section (constant speed) followed by a straight line sloping down to zero (constant deceleration).
- Area under the graph: In a speed-time graph, the area between the line and the time axis represents the distance travelled.
- Area X: This rectangular area corresponds to the time interval before the driver applies the brakes. During this time, the car travels at a constant speed. The distance covered in this phase is called the thinking distance (the distance travelled during the driver's reaction time). Thus, student 1 is correct.
- Area Y: This triangular area corresponds to the time interval while the brakes are applied and the car decelerates to rest. The distance covered in this phase is called the braking distance. Thus, student 2 is incorrect, as area Y is only the braking distance, not the total stopping distance.
- Total stopping distance: The stopping distance is defined as the total distance travelled from the moment the driver sees the hazard until the car stops completely. This is the sum of the thinking distance and the braking distance. Therefore, Area X + Area Y represents the stopping distance, making student 3 correct.
Since students 1 and 3 are correct, the correct option is B.
Key Takeaways
- The area under a speed-time graph always represents the distance travelled.
- Stopping distance = thinking distance + braking distance.
- Thinking distance is the distance travelled at constant speed during the driver's reaction time (rectangular area on a speed-time graph).
- Braking distance is the distance travelled while the car is decelerating to rest (triangular area on a speed-time graph for uniform deceleration).
Common Mistakes
- Confusing braking distance with stopping distance. Students often think the deceleration area alone is the stopping distance.
- Misinterpreting the graph axes. Remember that speed-time graphs give distance from the area, not from the gradient (which gives acceleration).
- Forgetting that thinking distance occurs at constant speed, so it forms a rectangle, not a triangle.
Things to Be Careful About
- Ensure you read the graph axes correctly: speed-time graphs use area for distance, whereas distance-time graphs use gradient for speed.
- The term 'stopping distance' specifically includes both the thinking phase and the braking phase. 'Braking distance' is only the second phase.
- In this question, the deceleration is uniform (straight line), so the braking distance is a triangle. If deceleration were not uniform, the area would still be the braking distance, but it would be a curved shape.
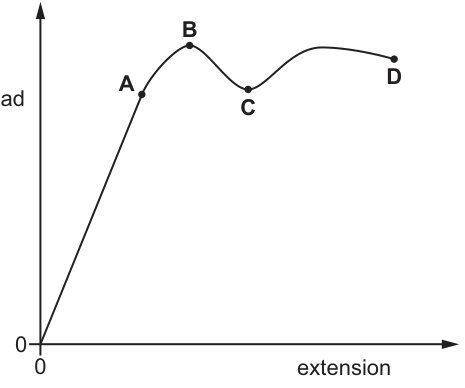
The diagram shows a graph of load against extension for a material.
At which point is the limit of proportionality?
Options
Answer
A
The initial straight-line portion of the load-extension graph, from the origin to point A, shows that load is directly proportional to extension (Hooke's law). Point A is where this straight line ends and the graph begins to curve, which is the definition of the limit of proportionality.
A
Walkthrough
The question asks to identify the limit of proportionality on a load-extension graph. The graph plots load on the vertical axis against extension on the horizontal axis. Starting from the origin (0,0), the curve is a straight line up to point A. A straight line on a load-extension graph means that load is directly proportional to extension (), which is the statement of Hooke's law. The limit of proportionality is defined as the point up to which this direct proportionality holds; it is the exact point where the straight line ends and the curve begins. Therefore, point A is the limit of proportionality. Beyond point A, the material deforms plastically. Point B represents the maximum load the material can support before necking begins, and point D is where the material fractures.
Key Takeaways
- On a load-extension graph, the initial straight-line region from the origin is where Hooke's law is obeyed.
- The limit of proportionality is the point where this straight line ends and the graph starts to curve.
- Beyond the limit of proportionality, the material undergoes plastic deformation and will not return to its original shape when the load is removed.
Common Mistakes
- Selecting point B: Point B is the maximum load (or yield point in some simplified diagrams). Students often confuse the limit of proportionality with the yield point or the point of maximum load.
- Selecting point D: Point D is the fracture point, where the material breaks, not the limit of proportionality.
Things to Be Careful About
- Ensure you are looking at a load-extension graph (or stress-strain, which has the same shape and features). The limit of proportionality is always the end of the initial straight-line portion from the origin.
- Do not confuse the limit of proportionality with the elastic limit; they are very close together on this graph, but the strict definition of the limit of proportionality is the end of the linear region where Hooke's law is obeyed.
There is no atmosphere on the Moon.
Two metal spheres of identical volume but different mass are at rest at the same height above the ground on the Moon. The two spheres are dropped at the same time.
How do the spheres move after they are dropped?
Options
A The sphere with the larger mass has a smaller acceleration.
B The sphere with the larger mass hits the ground first.
C The sphere with the smaller mass has a smaller acceleration.
D The two spheres hit the ground together.
Working
There is no atmosphere on the Moon, so there is no air resistance. The only force on each sphere is its weight, so each sphere has the same acceleration of free fall .
A larger mass has a larger weight, but also a larger mass, so the acceleration is the same for both spheres. Both start from rest at the same height, so they have identical motion and hit the ground together.
Answer
D
D
Walkthrough
The question tells us there is no atmosphere on the Moon. This is the key clue: it means there is no air resistance or drag acting on the spheres. The only force on each sphere is its weight, which pulls it downwards.
For any object in free fall, the acceleration is the gravitational field strength . Even though the heavier sphere has a larger weight, it also has a larger mass, so the acceleration is the same. This is why all objects fall with the same acceleration in a vacuum.
Both spheres are at rest at the same height and are dropped at the same time. With the same acceleration and the same starting conditions, they follow exactly the same motion and reach the ground at the same time. The fact that the spheres have identical volume is irrelevant; volume does not affect free fall.
Option D is correct. Options A and C are wrong because they suggest the acceleration depends on mass. Option B is wrong because it suggests the heavier sphere falls faster, which is the common misconception that only applies when air resistance is significant.
Key Takeaways
- In the absence of air resistance, all objects fall with the same acceleration regardless of their mass.
- The acceleration of free fall is the gravitational field strength of the planet or moon.
- A larger mass gives a larger weight, but the acceleration is still because the larger mass also needs a larger force to accelerate it.
- Air resistance is the reason objects of different mass or shape can fall at different speeds on Earth.
Common Mistakes
- Choosing B: thinking the heavier sphere hits the ground first. This is only true when air resistance is significant, but the question states there is no atmosphere.
- Choosing A or C: thinking acceleration depends on mass. In free fall, the acceleration is independent of mass.
- Ignoring the phrase 'no atmosphere' and applying Earth-like air resistance reasoning.
Things to Be Careful About
- The value of on the Moon is about 1.6 N/kg, but you do not need to know it; the same applies to both spheres.
- Do not confuse mass with weight. The heavier sphere has a larger weight, but its acceleration is still .
- The identical volume is a distractor; it does not affect the motion in free fall.
- Both spheres start from rest at the same height, so the comparison is fair: same initial velocity, same height, same acceleration.
A student determines the density of a small rock.
The weight of the small rock is .
She pours of water into a measuring cylinder.
She carefully submerges the rock in the of water. The new reading on the measuring cylinder is .
What is the density of the rock?
Options
A
B
C
D
Working
Volume of the rock =
Mass of the rock from :
Answer
D
D
Walkthrough
The rock is submerged in water, so the increase in the measuring cylinder reading gives the rock's volume:
Density is mass per unit volume, but the question gives the rock's weight, not its mass. Use with :
Then
This rounds to , which is option D.
Options A and C give density in ; density is mass per unit volume, not weight per unit volume, so those cannot be correct. Option B would come from an incorrect mass or volume.
Key Takeaways
- Density is defined as mass divided by volume.
- The volume of an irregular solid can be found by water displacement: the rise in the measuring cylinder reading equals the volume of the object.
- Weight and mass are different: , so mass is found by dividing weight by .
- Units matter: here the answer is in because the mass was converted to grams and the volume is in cubic centimetres.
Common Mistakes
- Using the weight directly as the mass. This gives a wrong density and the wrong unit.
- Using the final reading as the rock's volume instead of the increase .
- Choosing an answer in : density is not weight per unit volume.
- Forgetting to convert to before dividing by .
Things to Be Careful About
- The displaced volume is the difference between the two readings, not the final reading.
- Use as given in O Level questions unless another value is stated.
- Keep the units consistent: mass in grams with volume in gives density in .
- The answer is quoted to 2 significant figures because the data has 2 significant figures.
A rock of mass is travelling in space at a speed of .
What is its kinetic energy?
Options
A
B
C
D
Working
Answer
C
C
Walkthrough
- Identify the knowns: The problem gives us the mass and the speed of the rock.
- Recall the formula: The kinetic energy () of a moving object is given by the equation .
- Substitute and calculate: Substitute the known values into the equation:
. - Select the answer: The kinetic energy is , which is option C.
Key Takeaways
- The kinetic energy of an object is the energy it has due to its motion.
- The formula is fundamental and must be memorized.
- Ensure all quantities are in SI units (kg, m/s) before substituting into the formula.
Common Mistakes
- Forgetting to square the velocity: A common mistake is to calculate , which is option A. Remember to square the velocity first.
- Using the wrong formula: Confusing this with momentum () or gravitational potential energy ().
Things to Be Careful About
- Always square the velocity () before multiplying by the mass and the half.
- The unit of energy is the joule (J).
Which row shows an advantage and a disadvantage of using nuclear fuel to generate electrical power?
Options
| advantage | disadvantage | |
|---|---|---|
| A | does not produce carbon dioxide | produces radioactive waste |
| B | does not produce carbon dioxide | only works in some weather conditions |
| C | energy source is renewable | produces radioactive waste |
| D | energy source is renewable | only works in some weather conditions |
Working
Nuclear fuel does not produce carbon dioxide when generating electricity — this is a genuine advantage.
Nuclear fuel produces radioactive waste — this is a genuine disadvantage.
Nuclear fuel is non-renewable, so the advantage in rows C and D is false.
Nuclear power stations work in any weather, so the disadvantage in rows B and D is false.
Answer
A
A
Walkthrough
The question asks which row correctly pairs an advantage and a disadvantage of using nuclear fuel to generate electrical power.
Advantage: Nuclear fission releases energy without burning fuel, so no carbon dioxide is produced. This is a real environmental advantage compared with fossil fuels.
Disadvantage: The fission process leaves behind radioactive waste products that remain dangerous for a very long time and must be stored safely. This is the main drawback of nuclear power.
Now test the other statements:
- Renewable? No. Nuclear fuel (uranium) is a finite resource dug out of the ground, so it is non-renewable. Rows C and D are wrong on the advantage.
- Only works in some weather conditions? No. Nuclear reactors run continuously regardless of sunshine, wind or rain. That statement describes solar or wind power, not nuclear. Rows B and D are wrong on the disadvantage.
Only row A has both statements correct.
Key Takeaways
- Nuclear fuel is non-renewable but produces no carbon dioxide during generation.
- Its main disadvantage is the radioactive waste it produces.
- Weather-dependent generation ("only works in some weather conditions") applies to solar and wind power, not nuclear.
Common Mistakes
- Choosing C or D because a student thinks nuclear is renewable — it is not; uranium is a finite mined resource.
- Choosing B or D because a student confuses nuclear with solar or wind power, which do depend on weather.
Things to Be Careful About
- Read each statement in the row independently: check the advantage and the disadvantage separately before selecting the row.
- Remember that "does not produce carbon dioxide" is true for nuclear, but also for renewables — the distinguishing feature of nuclear is the radioactive waste.
Which row gives the definition of work done and the unit of work done?
Options
| definition of work done | unit of work done | |
|---|---|---|
| A | the energy transferred per unit time | |
| B | the energy transferred per unit time | |
| C | the force multiplied by the distance moved in the direction of the force | |
| D | the force multiplied by the distance moved in the direction of the force |
Working
Work done is defined as the force multiplied by the distance moved in the direction of the force.
The unit of work done is the joule, .
Option A and B give “energy transferred per unit time”, which is the definition of power, not work. Option D has the correct definition but the wrong unit: is not a unit of work.
Answer
C
C
Walkthrough
The question asks for the correct definition and unit of work done. Work is done when a force moves an object through a distance in the direction of the force. The amount of work done is calculated as force × distance moved in the direction of the force:
Its unit is the joule (). One joule is the work done when a force of one newton moves an object one metre in the direction of the force, so is equivalent to , not .
The phrase “energy transferred per unit time” is the definition of power, not work. Therefore only row C has both the correct definition and the correct unit.
Key Takeaways
- Work done = force × distance moved in the direction of the force.
- The unit of work done is the joule ().
- Power is the rate of energy transfer, measured in watts (), and is not the same as work done.
- is not a unit of work; (newton metre) is equivalent to the joule.
Common Mistakes
- Choosing A or B: confusing work done with power. “Energy transferred per unit time” is power.
- Choosing D: knowing the correct definition but accepting as the unit. The unit of work is the joule (), equivalent to , not .
- Writing as the unit of work; work is force × distance, so the unit is .
Things to Be Careful About
- Read the whole row: both the definition and the unit must be correct.
- Remember the difference between and . would be a unit for something like force per distance, not work.
- The joule is the SI unit of work and energy; the watt is the unit of power.
A hammer hits a nail into a piece of wood.
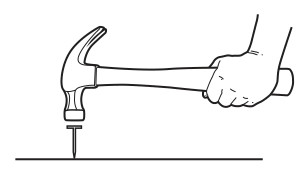
The weight of the nail is negligible.
The hammer exerts a force and a pressure on the nail.
The nail exerts a force and a pressure on the wood.
How do these forces and pressures compare?
Options
| forces | pressures | |
|---|---|---|
| A | ||
| B | ||
| C | ||
| D |
Answer
The force is transmitted through the nail. Since the weight (and mass) of the nail is negligible, the force exerted by the hammer on the nail is equal to the force exerted by the nail on the wood. Therefore, .
Pressure is defined as force divided by area: .
The area of contact between the hammer and the nail (the head of the nail) is much larger than the area of contact between the nail and the wood (the sharp tip).
Since the force is the same in both cases, but the area at the wood is smaller, the pressure must be greater than .
Therefore: and .
This corresponds to option A.
A
Walkthrough
-
Forces ( vs ):
The problem states the weight of the nail is negligible. In physics problems of this type at O Level, we treat the nail as a light object transmitting force. According to Newton's laws, if an object has negligible mass, the resultant force on it is negligible (). The force pushing the nail forward ( from the hammer) must be balanced by the resistive force from the wood (, effectively the force the nail exerts on the wood, by Newton's third law pairs acting on the nail). Thus, the force is transmitted directly: . This eliminates options C and D. -
Pressures ( vs ):
The formula for pressure is , where is the force and is the area of contact.- is the pressure at the hammer-nail interface. The area here is the area of the hammer face or the nail head, which is relatively large.
- is the pressure at the nail-wood interface. The area here is the cross-sectional area of the sharp tip of the nail, which is very small.
Since (forces are equal) and (area at wood is smaller), the pressure is greater than ().
-
Conclusion:
Combining these, and . This matches row A in the table.
Key Takeaways
- Force Transmission: In a system of light objects (negligible mass), the force applied to one end is transmitted to the other end. The force does not increase as it goes deeper; it stays the same (assuming no acceleration of the object itself).
- Pressure and Area: Pressure is inversely proportional to area for a given force. A sharp object (small area) exerts a large pressure, which is why nails and pins can penetrate surfaces.
Common Mistakes
- Thinking force increases: Candidates often choose C or D, believing that the force 'builds up' or is 'concentrated' as it goes into the wood. Force is not concentrated; it is transmitted. Only the pressure changes due to the area.
- Confusing force and pressure: Forgetting that pressure depends on area (). If a candidate thinks the forces are different, they might get the pressure relationship wrong too.
- Unit errors: Not relevant here as it's a comparison, but always remember .
Things to Be Careful About
- Negligible mass: The phrase 'weight of the nail is negligible' is the key to assuming . If the nail had significant mass and was accelerating downwards rapidly, , so . But for O Level, 'negligible' implies we treat them as equal.
- Area identification: Ensure you identify the correct contact areas. Hammer hits the top (large area), nail hits the bottom (small area).
- Vector vs Scalar: Force is a vector, pressure is a scalar (though it acts in a direction normal to the surface). The comparison is of magnitudes.
The pressure at a point beneath the surface of a liquid varies with the depth of the point and with the density of the liquid.
Which changes both increase the pressure beneath the surface of a liquid?
Options
| change in depth | change in density | |
|---|---|---|
| A | decrease | decrease |
| B | decrease | increase |
| C | increase | decrease |
| D | increase | increase |
Working
Pressure beneath a liquid surface is given by , where is the depth, is the density and is the gravitational field strength.
- Increasing the depth increases the pressure.
- Increasing the density increases the pressure.
So the pressure increases when both depth and density increase. This is option D.
Options A, B and C each contain at least one change (decrease in depth or decrease in density) that would reduce the pressure.
Answer
D
D
Walkthrough
The pressure in a liquid at a point depends on the weight of the liquid above it. The deeper you go, the more liquid is above you, so the pressure is greater. Similarly, if the liquid is denser, the liquid above you weighs more, so the pressure is greater. The equation is . To increase pressure, both depth and density must increase, which is option D.
Key Takeaways
- Liquid pressure increases with depth.
- Liquid pressure increases with density.
- The equation summarises both relationships.
Common Mistakes
- Choosing an option where one quantity decreases: any decrease in depth or density lowers the pressure.
- Confusing pressure with force: pressure depends on the weight of liquid above, so density matters.
Things to Be Careful About
- Read the table carefully: the question asks which changes both increase the pressure, so both columns must be "increase".
- Remember is constant for the same liquid location, so only depth and density vary.
The diagram shows a cylinder containing air.
The piston is free to move inside the cylinder and atmospheric pressure acts outside the cylinder.
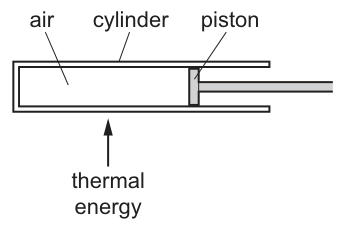
As the air inside the cylinder is heated, the piston moves to the right.
Which quantity decreases?
Options
A the average force exerted on the piston each time that one air particle hits the piston
B the average speed of the air particles
C the mass of air inside the cylinder
D the number of collisions made by air particles with the piston in one second
Working
Heating the air increases its temperature, so the average kinetic energy and average speed of the air particles increase. This eliminates B.
Because the particles move faster, they strike the piston with greater momentum, so the average force exerted per collision increases. This eliminates A.
The cylinder is closed, so no air enters or escapes; the mass of air remains constant. This eliminates C.
The piston is free to move against constant atmospheric pressure, so the pressure of the air inside remains constant. Pressure is the total force per unit area, which equals (number of collisions per second) × (average force per collision). Since the average force per collision has increased, the number of collisions per second must decrease to keep the pressure constant. This confirms D.
Answer
D
D
Walkthrough
-
Analyze option B (average speed): Heating the air transfers thermal energy to the gas particles, increasing their average kinetic energy. Since kinetic energy is proportional to the square of speed, the average speed of the particles increases. Option B is incorrect because it increases, not decreases.
-
Analyze option A (average force per collision): Force is the rate of change of momentum. Faster-moving particles have greater momentum, so when they bounce off the piston, the change in momentum per collision is larger. This means the average force exerted by each individual collision increases. Option A is incorrect because it increases.
-
Analyze option C (mass of air): The cylinder is sealed by the piston, meaning no air can enter or escape. By conservation of mass, the total mass of air inside the cylinder remains constant. Option C is incorrect because it stays the same.
-
Analyze option D (number of collisions per second): The piston is free to move and atmospheric pressure acts outside, so the air pressure inside remains constant (equal to the atmospheric pressure). Macroscopically, pressure is the total force per unit area. Microscopically, the total force on the piston is the product of the number of collisions per second and the average force per collision. Since the average force per collision has increased (from step 2) and the total pressure must remain constant, the number of collisions per second must decrease. Option D is correct.
Key Takeaways
- Temperature is a measure of the average kinetic energy of particles; an increase in temperature means an increase in average particle speed.
- Pressure in a gas is the result of particle collisions with the container walls. Total pressure depends on both the force per collision and the number of collisions per unit area per second.
- When a gas is heated at constant pressure (a movable piston), the volume increases. The particles move faster (increasing force per collision), but they are more spread out (decreasing collision frequency) so that the overall pressure remains unchanged.
Common Mistakes
- Confusing speed with collision frequency: A student might think that because particles move faster, they hit the piston more often. This ignores the fact that the volume has increased, reducing the number density of particles.
- Confusing mass with density: The density of the air decreases as the volume increases, but the total mass remains constant. Selecting C shows a misunderstanding of conservation of mass in a closed system.
- Ignoring the constant pressure condition: Failing to recognize that a free-moving piston against atmospheric pressure implies constant pressure is the key to solving the question.
Things to Be Careful About
- Always distinguish between the force per collision (which depends on particle speed) and the total force / pressure (which depends on both speed and collision frequency).
- Read the setup carefully: "free to move" and "atmospheric pressure acts outside" together mean the internal pressure is constant. If the piston were fixed, the pressure would increase, and the number of collisions per second would actually increase.
- In multiple-choice questions, systematically eliminating the clearly wrong options (B and C) makes the correct choice much easier to justify.
A fixed mass of air has a volume of and a pressure of .
The volume of the air is now changed to . The temperature of the air remains constant.
What is the new pressure of the air?
Options
A
B
C
D
Working
At constant temperature, pressure is inversely proportional to volume:
Option A is the inverse ratio , and options C and D are the same ratios with powers-of-ten errors.
Answer
B
B
Walkthrough
The question gives a fixed mass of air at constant temperature and asks what happens to the pressure when the volume is reduced from to . Both pressures are in kPa and both volumes in cm³, so no unit conversion is needed — the units cancel.
At constant temperature, the kinetic particle model tells us the air particles on average have the same kinetic energy, so they hit the walls with the same average force per collision. But if the volume is reduced, the same number of particles has less space, so the collision rate with the walls rises, and the pressure increases.
This is Boyle's law: for a fixed mass of gas at constant temperature, . Rearranging gives .
The volume decreased to two-thirds of the original, so the pressure must rise to three-halves of the original — an increase from 120 kPa to 180 kPa. This inverse relationship is the whole point: smaller volume means greater pressure.
The distractors:
- A (80 kPa) — the inverse ratio , i.e. treating pressure as proportional to volume instead of inversely proportional. The most common misconception.
- C (80 000 kPa) — the same inverse-ratio error as A but also with a power-of-ten slip.
- D (180 000 kPa) — the correct number 180 but expressed as if it were pascals rather than kilopascals (), a unit error.
So B is the only option showing both the correct inverse ratio and the correct units.
Key Takeaways
- For a fixed mass of gas at constant temperature, pressure and volume are inversely proportional: halving the volume doubles the pressure.
- The working form is , and it works with any consistent pair of units.
- Identify a correct-ratio-with-unit-error distractor: is NOT unless the question specifically asks for pascals.
Common Mistakes
- Using the ratio the wrong way round: instead of , giving 80 kPa instead of 180 kPa.
- Confusing inverse proportion with direct proportion — as volume drops, pressure rises.
- Dropping the kilo prefix and writing 180 000 kPa instead of 180 kPa, or mixing kPa with Pa mid-calculation.
Things to Be Careful About
- Always ask yourself: should the answer be larger or smaller than the starting value? Volume fell, so pressure must rise — that alone eliminates 80 kPa and 80 000 kPa instantly.
- Check units are consistent before substituting. Here kPa and cm³ both cancel, so the answer comes out in kPa directly.
- Keep the unit attached to the numerical answer; an answer without a unit is incomplete even in a multiple-choice context.
The diagram shows four changes of state, W, X, Y and Z.

Which row gives the names of the four changes of state?
Options
| W | X | Y | Z | |
|---|---|---|---|---|
| A | condensation | boiling | freezing | melting |
| B | condensation | boiling | melting | freezing |
| C | boiling | condensation | freezing | melting |
| D | boiling | condensation | melting | freezing |
Answer
D
D
Walkthrough
The diagram shows three boxes representing the states of matter: gas, liquid, and solid. We need to identify the change of state for each arrow based on its direction.
- Arrow W points from liquid to gas. The change of state from a liquid to a gas is called boiling (or evaporation).
- Arrow X points from gas to liquid. The change of state from a gas to a liquid is called condensation.
- Arrow Y points from solid to liquid. The change of state from a solid to a liquid is called melting.
- Arrow Z points from liquid to solid. The change of state from a liquid to a solid is called freezing.
Matching these to the given options:
- W = boiling
- X = condensation
- Y = melting
- Z = freezing
This exactly matches row D.
Key Takeaways
- Know the names of the changes of state between solid, liquid, and gas.
- Always check the direction of the arrow in a state change diagram, as the reverse process has a different name (e.g., melting vs. freezing).
Common Mistakes
- Reading the arrow direction the wrong way around (e.g., assuming W is gas to liquid instead of liquid to gas).
- Confusing similar-sounding terms like melting and freezing, or boiling and condensation.
Things to Be Careful About
- Boiling and evaporation both describe the change from liquid to gas, but "boiling" is the specific term used in the options provided.
- Ensure you match each letter (W, X, Y, Z) to the correct arrow and direction before selecting the row.
The diagram shows a metal pan on a hotplate.
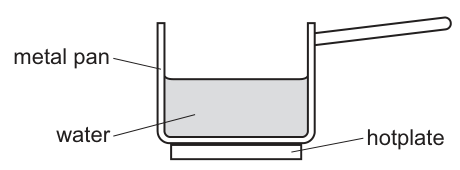
The pan is heated by the hotplate.
How is the thermal energy transferred from the hotplate to the metal pan?
Options
A conduction
B convection
C diffraction
D refraction
Working
Thermal energy is transferred from the hotplate to the metal pan by direct contact between two solid surfaces. The vibrating particles in the hotplate collide with the particles in the pan, transferring kinetic energy. This process is conduction.
Convection is the transfer of thermal energy by the movement of fluids (liquids or gases), so it does not apply to the solid hotplate and solid pan.
Diffraction and refraction are properties of waves, not mechanisms for transferring thermal energy.
Answer
A
A
Walkthrough
The question asks for the mechanism of thermal energy transfer from the hotplate to the metal pan. The diagram shows the metal pan resting directly on the hotplate. Both are solids in direct physical contact. In solids, thermal energy is transferred by conduction: the particles in the hotter region (the hotplate) vibrate more vigorously and collide with neighbouring particles (in the pan), passing on kinetic energy. Therefore, the transfer is by conduction.
- Convection (Option B) is the transfer of thermal energy by the bulk movement of a fluid (liquid or gas). It does not occur between two solid surfaces in contact.
- Diffraction (Option C) and refraction (Option D) are phenomena associated with waves (such as light or sound), not with the transfer of thermal energy.
Key Takeaways
- Conduction is the transfer of thermal energy through a material or between materials in direct contact, without the material itself moving. It is the primary method of heat transfer in solids.
- Convection occurs in fluids (liquids and gases) due to density differences causing fluid movement.
- Diffraction and refraction are wave behaviours and are not mechanisms for thermal energy transfer.
Common Mistakes
- Choosing convection because the pan contains water. The question specifically asks about the transfer from the hotplate to the metal pan, not from the pan to the water. (The transfer from the pan to the water would also involve conduction at the boundary, followed by convection within the water).
- Selecting diffraction or refraction due to a lack of familiarity with thermal energy transfer terminology, confusing wave properties with thermal processes.
Things to Be Careful About
- Read the question carefully to identify exactly which two regions are involved in the energy transfer. "From the hotplate to the metal pan" means solid-to-solid contact = conduction. If it asked "from the water to the air above it", the answer would be evaporation/convection/radiation depending on context, but definitely not conduction through a solid.
- The options include wave phenomena (diffraction, refraction) to test whether the candidate knows the difference between thermal energy transfer mechanisms and wave properties. Always match the physical process (thermal transfer) to the correct category of physics.
A beaker of cold water is heated at its base.
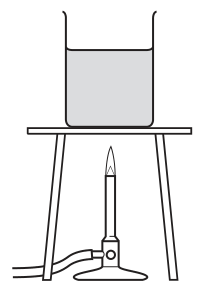
What happens to the heated water?
Options
| density of heated water | movement of heated water | |
|---|---|---|
| A | decreases | no movement |
| B | decreases | upwards |
| C | increases | no movement |
| D | increases | upwards |
Answer
B
B
Walkthrough
When the water at the base of the beaker is heated, the water molecules gain kinetic energy and move further apart. This causes the volume of the heated water to increase while its mass remains the same, so its density decreases. The less dense, warmer water rises upwards, and the cooler, denser water moves down to take its place. This circulation of fluid is called a convection current. Therefore, the density of the heated water decreases and it moves upwards. This matches option B.
Key Takeaways
- Heating a liquid causes it to expand and its density to decrease.
- Less dense fluid rises above denser, cooler fluid, creating convection currents.
Common Mistakes
- Thinking that heated water becomes denser (confusing mass and volume changes).
- Thinking that heated water stays in place (forgetting that convection requires movement).
Things to Be Careful About
- Convection only occurs in fluids (liquids and gases) because the particles are free to move. It does not occur in solids.
- Density is mass per unit volume. When heated, volume increases, so density decreases.
The graph shows, at one instant, the pressure variation along a sound wave.
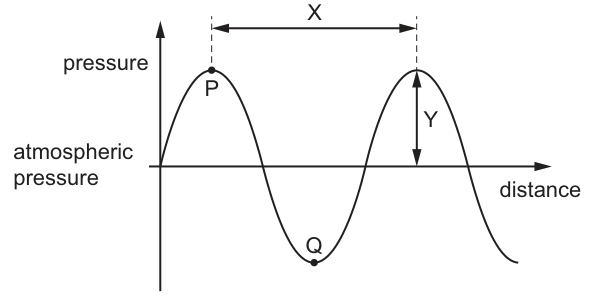
Which point on the diagram represents a rarefaction and what is the wavelength of the sound wave?
Options
| rarefaction | wavelength | |
|---|---|---|
| A | P | X |
| B | P | Y |
| C | Q | X |
| D | Q | Y |
Working
A sound wave is a longitudinal wave, consisting of compressions (regions of high pressure) and rarefactions (regions of low pressure).
- On a pressure versus distance graph, a crest above atmospheric pressure represents a compression. Point P is at a crest, so P is a compression.
- A trough below atmospheric pressure represents a rarefaction. Point Q is at a trough, so Q is a rarefaction.
- The wavelength is the distance between two consecutive points that are in phase, such as two consecutive compressions. The distance X is measured between two consecutive crests, so X is the wavelength.
- The distance Y is the amplitude (maximum pressure variation).
Therefore, Q is a rarefaction and X is the wavelength. This matches option C.
Answer
C
C
Walkthrough
The question provides a graph of pressure variation against distance for a sound wave. Sound waves are longitudinal waves, meaning the particles oscillate parallel to the direction of wave travel. This creates alternating regions of high pressure (compressions) and low pressure (rarefactions).
- Point P is at a peak (crest) above the atmospheric pressure line. This represents a region where the pressure is higher than normal, which is a compression.
- Point Q is at a trough (valley) below the atmospheric pressure line. This represents a region where the pressure is lower than normal, which is a rarefaction.
- The wavelength () is defined as the distance between two consecutive points that are in phase. On this graph, the distance X is measured horizontally between two consecutive crests (compressions), so X represents one full wavelength.
- The distance Y is measured vertically from the atmospheric pressure line to a crest, representing the amplitude of the pressure variation, not the wavelength.
Matching these findings to the options: rarefaction is Q, and wavelength is X. This corresponds to option C.
Key Takeaways
- Sound waves are longitudinal waves with compressions and rarefactions.
- On a pressure-distance graph, compressions are crests above atmospheric pressure and rarefactions are troughs below it.
- Wavelength is the distance between consecutive in-phase points (e.g., crest to crest), not the amplitude.
Common Mistakes
- Confusing a pressure-distance graph with a displacement-distance graph: on a displacement graph, the points of maximum displacement are not compressions or rarefactions (they are at atmospheric pressure). On a pressure graph, a crest (high pressure) is a compression and a trough (low pressure) is a rarefaction.
- Reading Y as the wavelength: Y is the vertical distance from atmospheric pressure to a crest, which is the amplitude of the pressure variation, not the wavelength. Wavelength is a horizontal distance.
Things to Be Careful About
- Ensure you are reading the correct axis: the vertical axis is pressure, not displacement. A crest on a pressure graph is a compression, not a rarefaction.
- Wavelength is a horizontal distance (distance between consecutive compressions), not a vertical distance (amplitude).
A cork on the surface of water moves up and down as a wave passes across the surface.
The diagram shows how the height of the cork above the average level of the surface varies with time.
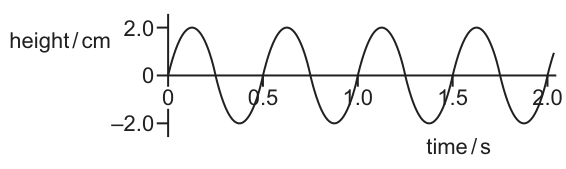
The numerical value of the wavelength of this wave is equal to the numerical value of the amplitude of this wave.
What is the speed of the wave?
Options
A
B
C
D
Working
From the graph, the amplitude (maximum displacement from the centre line) is 2.0 cm.
The question states that the numerical value of the wavelength is equal to the numerical value of the amplitude. Therefore, the wavelength is:
From the graph, one complete wave cycle takes 0.5 s, so the time period is:
The frequency is:
Using the wave speed equation:
Answer
C
C
Walkthrough
The problem asks for the speed of a wave given a graph of the cork's height against time. This graph is a displacement-time graph for the motion of a single point (the cork), not a snapshot of the wave in space.
First, read the amplitude from the graph. The height oscillates between +2.0 cm and -2.0 cm. The amplitude is the maximum displacement from the equilibrium (average) position, which is 2.0 cm.
The question gives a specific condition: 'The numerical value of the wavelength of this wave is equal to the numerical value of the amplitude of this wave.' Since the amplitude is 2.0 cm, its numerical value is 2.0. Therefore, the wavelength must be 2.0 cm. Note that we are equating numerical values, so the units are handled separately in the calculation.
Next, read the time period from the graph. The wave repeats itself every 0.5 s (from t=0 to t=0.5 is one full cycle). Thus, s.
Calculate the frequency using :
Finally, calculate the wave speed using the wave equation :
This matches option C.
Key Takeaways
- A displacement-time graph shows how the displacement of a single point varies with time. The vertical axis gives amplitude and the horizontal axis gives time period.
- The wave speed equation links speed, frequency, and wavelength.
- 'Numerical value' means ignoring units when setting up an equality, but units must be included in the final calculation.
Common Mistakes
- Confusing amplitude with wavelength on the graph: The graph is height vs time, so the horizontal distance between peaks is the time period, not the wavelength. The wavelength is not shown on this graph; it is given by the text condition.
- Reading peak-to-peak as amplitude: The distance from +2.0 to -2.0 is 4.0 cm, but the amplitude is half of that, 2.0 cm. If a candidate used 4.0 as the amplitude, they would get cm and cm/s (Option D), which is a distractor.
- Confusing period and frequency: Using directly as frequency would give cm/s (Option A).
- Unit errors: Ensuring the final speed is in cm/s consistent with the given wavelength in cm and frequency in Hz (1/s).
Things to Be Careful About
- Graph type: Distinguish between a displacement-distance graph (where horizontal axis is distance and peak-to-peak is wavelength) and a displacement-time graph (where horizontal axis is time and peak-to-peak is period). This is a displacement-time graph.
- Numerical value: The question carefully says 'numerical value'. Amplitude is 2.0 cm. Numerical value is 2.0. Wavelength is therefore 2.0 cm. If a student thought wavelength was 2.0 m, they would get a different answer. Always keep track of units.
- Significant figures: The graph readings (2.0, 0.5) suggest 2 significant figures. The answer 4.0 is appropriate.
A water wave travels from deep water to shallow water in a ripple tank.
What happens to the speed and to the wavelength of the wave?
Options
| speed of wave | wavelength | |
|---|---|---|
| A | increases | increases |
| B | increases | decreases |
| C | decreases | increases |
| D | decreases | decreases |
Working
A water wave slows down when it moves from deep water to shallow water, so its speed decreases.
The frequency is set by the source and does not change when the wave enters shallow water.
Using the wave equation,
if decreases while stays the same, then must also decrease.
So both the speed and the wavelength decrease.
Answer
D
D
Walkthrough
When a water wave moves into shallow water, the bottom of the tank affects the wave and makes it travel more slowly. So the speed of the wave decreases.
The frequency of a wave is fixed by the source that produces it. The source is not changing, so the frequency stays the same when the wave passes from deep water to shallow water.
The wave equation is
where is the speed, is the frequency and is the wavelength. If the speed decreases and the frequency stays the same, then the wavelength must also decrease. So the correct option is D.
Key Takeaways
- Water waves travel more slowly in shallow water than in deep water.
- The frequency of a wave is set by the source and does not change when the wave enters a different medium.
- The wave equation links speed, frequency and wavelength.
- When a wave slows down, its wavelength becomes shorter.
Common Mistakes
- Choosing A, B or C by guessing that speed and wavelength change in opposite directions. Use instead.
- Thinking that the frequency changes when the wave enters shallow water. It does not; the source controls the frequency.
- Confusing the change in wavelength with the change in direction of the wavefronts.
Things to Be Careful About
- Both the speed and the wavelength decrease, while the frequency stays the same.
- The wave equation applies to all types of waves, including water waves, sound waves and light waves.
- In a ripple tank, a change of depth causes a change in speed, and the frequency is unchanged because it is fixed by the wave source.
The diagram shows a ray of light directed at a plane mirror.
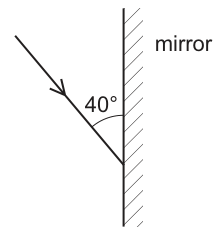
What are the angle of incidence and the angle of reflection?
Options
| angle of incidence / | angle of reflection / | |
|---|---|---|
| A | 40 | 40 |
| B | 40 | 50 |
| C | 50 | 40 |
| D | 50 | 50 |
Working
The angle of incidence is the angle between the incident ray and the normal. The normal is perpendicular to the mirror surface.
By the law of reflection, the angle of reflection equals the angle of incidence:
This matches option D. Option A uses the angle with the mirror (). Option B mixes the angle with the mirror and the angle with the normal. Option C has the correct angle of incidence but incorrectly states the angle of reflection is different.
Answer
D
D
Walkthrough
The question asks for the angle of incidence and the angle of reflection for a ray hitting a plane mirror. The diagram shows the angle between the incident ray and the mirror surface is .
By definition, the angle of incidence is the angle between the incident ray and the normal to the surface at the point of incidence. The normal is an imaginary line perpendicular () to the mirror.
The law of reflection states that the angle of reflection is equal to the angle of incidence. Therefore:
Looking at the options, D gives for both angles. Option A incorrectly uses the angle with the mirror. Option B mixes the two values. Option C has the correct angle of incidence but incorrectly assigns a different value to the angle of reflection.
Key Takeaways
- The angle of incidence is always measured from the normal, not from the mirror surface.
- The normal is perpendicular () to the reflecting surface.
- The law of reflection states that the angle of reflection equals the angle of incidence.
Common Mistakes
- Measuring from the mirror: Students often read the angle directly as the angle of incidence. This is incorrect because angles in reflection are always measured from the normal. This leads to option A or B.
- Forgetting the law of reflection: Some students might calculate the correct angle of incidence () but then fail to realize that the angle of reflection must be the same, leading to option C.
Things to Be Careful About
- Always draw the normal: When solving reflection problems, mentally (or physically) draw the normal line perpendicular to the mirror surface at the point where the ray hits. This makes it clear that the angle given () and the angle of incidence () are complementary and add up to .
- Definitions matter: The angle of incidence is strictly defined as the angle between the incident ray and the normal. There is no such thing as an "angle with the mirror" in the formal law of reflection, though it is a useful intermediate value to calculate.
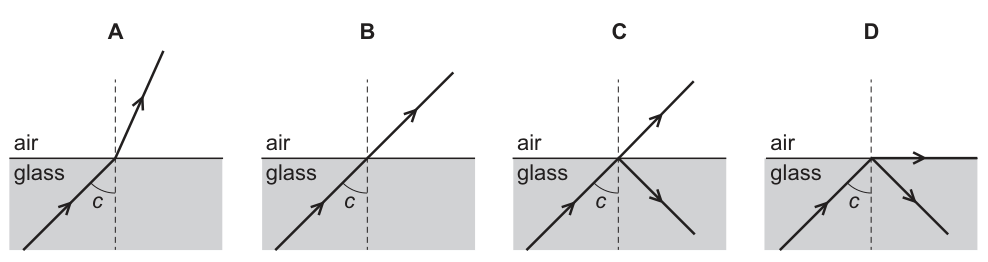
A ray of light in glass is incident on the surface at an angle . The angle is the critical angle.
Which diagram shows what happens to the light?
Options
Answer
D
D
Walkthrough
The critical angle is defined as the angle of incidence in a denser medium (glass) for which the angle of refraction in the less dense medium (air) is exactly 90°. When light is incident at the critical angle, the refracted ray travels along the boundary between the two media, perpendicular to the normal. At the same time, a portion of the light is partially reflected back into the glass, with the angle of reflection equal to the angle of incidence . Diagram D correctly shows the refracted ray along the surface and a reflected ray back into the glass. Diagrams A, B, and C show incorrect refraction angles for the critical angle.
Key Takeaways
- The critical angle is the angle of incidence in the denser medium that produces a 90° angle of refraction.
- At the critical angle, the refracted ray travels along the boundary, and partial reflection also occurs.
- Total internal reflection only occurs for angles of incidence strictly greater than the critical angle.
Common Mistakes
- Confusing the critical angle with the angle for total internal reflection: at the critical angle, there is still a refracted ray along the boundary, whereas for angles greater than the critical angle, there is no refracted ray at all.
- Assuming the ray passes straight through without bending: light only passes straight through without refraction if it is incident along the normal (0° angle of incidence).
- Forgetting the reflected ray: even at the critical angle, partial reflection occurs, so both a refracted ray along the boundary and a reflected ray should be present in the diagram.
Things to Be Careful About
- Ensure you identify the denser medium correctly; the critical angle is measured from the normal in the denser medium (glass), not the less dense medium (air).
- Remember that the angle of refraction at the critical angle is 90° to the normal, meaning the ray travels parallel to the boundary surface, not at an angle into the air.
- Distinguish between the critical angle (refracted ray along the boundary) and angles greater than the critical angle (total internal reflection with no refracted ray).
An object O is placed between a converging lens and one principal focus F of the lens.
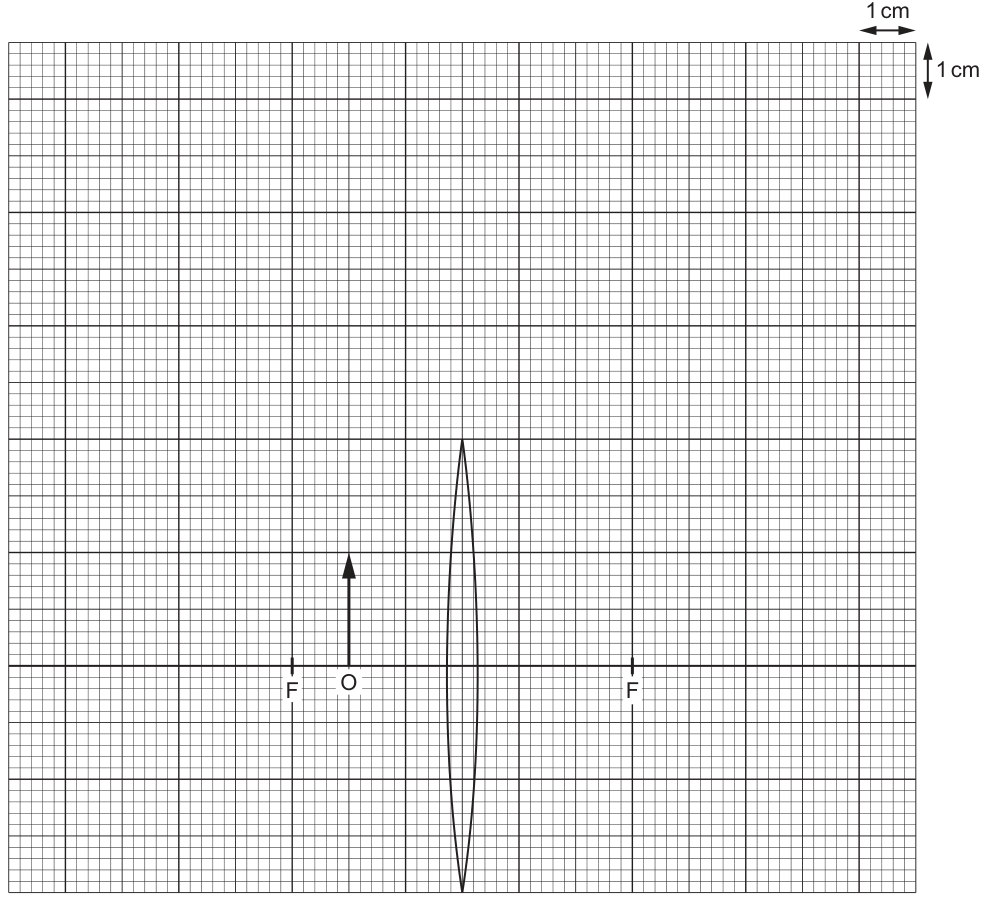
What is the magnification of the image formed?
Options
A 1.0
B 2.0
C 3.0
D 6.0
Working
From the diagram, the focal length is cm and the object distance is cm.
Using the lens formula:
The negative sign indicates a virtual image on the same side as the object.
The linear magnification is given by the ratio of image distance to object distance (taking magnitudes):
(Alternatively, using the direct magnification formula for a converging lens: .)
Answer
C
C
Walkthrough
The question asks for the magnification of the image formed by a converging lens when the object is placed between the lens and its principal focus. This is the classic setup for a magnifying glass.
-
Read values from the diagram: The grid squares are 1 cm by 1 cm. The principal focus is 6 cm from the lens centre, so the focal length is cm. The object is 4 cm from the lens, so the object distance is cm. The object height is given as 2 cm, though we don't strictly need it if we use the distance formula for magnification.
-
Apply the lens formula: For a converging lens forming a virtual image, we use , taking and as positive and allowing to be negative for a virtual image.
Rearranging for :
So cm. The image is virtual and located 12 cm from the lens on the same side as the object.
-
Calculate magnification: Linear magnification is the ratio of image distance to object distance (magnitudes) or image height to object height.
The image is upright and 3 times the size of the object (6 cm tall).
-
Match to options: The calculated magnification is 3.0, which corresponds to option C.
Key Takeaways
- When an object is placed between a converging lens and its principal focus (), the image is virtual, upright, and magnified.
- The lens formula can be used with sign conventions (virtual image distance is negative) or by rearranging to find magnification directly as .
- Magnification is a dimensionless ratio; it does not require the object height unless you are calculating the image height.
Common Mistakes
- Sign errors: Forgetting that is negative for a virtual image and getting , which gives an incorrect positive and wrong magnification.
- Confusing and : Using the wrong distance in the magnification ratio.
- Using the wrong formula: Attempting to use the mirror formula or forgetting that magnification is and not .
Things to Be Careful About
- Sign conventions: 5054 accepts the convention where with negative for virtual images. Be consistent.
- Reading the diagram: Ensure you count the grid squares correctly. The focus is at 6 cm, not 5 or 7. The object is at 4 cm.
- Magnification definition: Magnification is or . It is not the ratio of object to image.
Which statement about red light and violet light is correct?
Options
A A prism deviates red light more than it deviates violet light.
B Red light has a lower frequency than violet light.
C Red light has a shorter wavelength than violet light.
D The speed of red light in a vacuum is less than the speed of violet light in a vacuum.
Working
In the visible spectrum the colours in order are red, orange, yellow, green, blue, indigo and violet. Frequency increases from red to violet, so red light has a lower frequency than violet light. Wavelength decreases from red to violet, so red light has a longer wavelength, not a shorter one. A prism deviates violet light more than red light, and all electromagnetic waves travel at the same speed in a vacuum.
Answer
B
B
Walkthrough
Start with the order of colours in the visible spectrum: red, orange, yellow, green, blue, indigo, violet. As you move from red to violet, the frequency increases and the wavelength decreases. Therefore red light has the lowest frequency and the longest wavelength in the visible spectrum. Violet light has the highest frequency and the shortest wavelength.
Now test each option. Option A says a prism deviates red light more than violet light. This is wrong because violet light is deviated more than red light when white light passes through a prism. Option B says red light has a lower frequency than violet light. This is correct. Option C says red light has a shorter wavelength than violet light. This is wrong because red light has a longer wavelength. Option D says the speed of red light in a vacuum is less than the speed of violet light in a vacuum. This is wrong because all electromagnetic waves, including all colours of light, travel at the same speed in a vacuum.
Key Takeaways
- The visible spectrum is ordered red, orange, yellow, green, blue, indigo, violet.
- Frequency increases from red to violet.
- Wavelength decreases from red to violet.
- All electromagnetic waves travel at the same speed in a vacuum.
- A prism disperses white light because different colours are refracted by different amounts; violet is deviated most.
Common Mistakes
- Thinking red light has a shorter wavelength than violet light. In fact red has the longest wavelength in the visible spectrum.
- Thinking a prism deviates red light more than violet light. Violet is deviated more.
- Thinking different colours of light travel at different speeds in a vacuum. They all travel at .
Things to Be Careful About
- Distinguish frequency from wavelength: they are inversely related for a fixed speed.
- The speed of light in a vacuum is the same for all electromagnetic waves; differences in speed in a medium cause dispersion.
- When asked about red and violet light, remember the order of the spectrum and which end has higher frequency and which end has longer wavelength.
Ultrasound is used to clean jewellery in a liquid.
What is another use of ultrasound?
Options
A optical fibre communication
B prenatal scanning
C photography
D telephone communications
Working
Ultrasound is sound of frequency above 20 000 Hz. It can be used to form images inside the body because it is reflected at boundaries between different tissues.
Prenatal scanning uses ultrasound to produce an image of a developing baby, so it is a correct use.
- Optical fibre communication uses light, not ultrasound.
- Photography uses light.
- Telephone communications use electrical signals, not ultrasound.
Answer
B
B
Walkthrough
Ultrasound is sound with a frequency higher than the human ear can hear, above about 20 000 Hz. It can be used for cleaning, as stated in the question, and also for medical imaging.
Prenatal scanning uses ultrasound to produce images of a developing baby inside the mother. The ultrasound waves are sent into the body, reflected at boundaries between different tissues, and the reflected waves are used to build up an image. This is a well-known use of ultrasound, so option B is correct.
The other options are not uses of ultrasound:
- Optical fibre communication uses light travelling through thin glass fibres by total internal reflection.
- Photography uses light to form an image on a sensor or film.
- Telephone communications use electrical signals, and often light or radio waves, not sound waves.
So the correct answer is B.
Key Takeaways
- Ultrasound is sound, not an electromagnetic wave.
- Ultrasound has many uses, including cleaning, medical scanning, and sonar.
- Prenatal scanning is a medical use of ultrasound.
- Light-based technologies such as optical fibres and photography are not uses of ultrasound.
Common Mistakes
- Choosing optical fibre communication because it also involves waves. Optical fibres use light, not ultrasound.
- Thinking that any wave technology must be ultrasound. Ultrasound is specifically sound above the audible range.
Things to Be Careful About
- Remember that ultrasound needs a medium to travel through, whereas light and radio waves do not.
- In questions about uses of waves, check whether the wave is sound or electromagnetic before choosing an answer.
A ship that is stationary on the surface of the sea sends pulses of sound vertically downwards towards the sea bed.
Each pulse that reflects from the sea bed is received after it is sent out.
A whale swims under the boat and a pulse is received after it is sent out.
The speed of sound in sea water is .
What is the distance of the whale above the sea bed?
Options
A
B
C
D
Working
Time for a pulse to travel to the sea bed and back , so the one-way time is
Depth of the sea:
Time for a pulse to travel to the whale and back , so the one-way time is .
Depth of the whale below the surface:
Distance of the whale above the sea bed:
Answer
A
A
Walkthrough
The pulse of sound travels downwards, reflects from a surface, and travels back up. So the time given is the time for the sound to go there and come back — twice the distance we want.
For the sea bed, the round-trip time is , so the one-way time is . Using
with gives
So the sea is deep.
For the whale, the round-trip time is , so the one-way time is . The whale is therefore at a depth of
below the surface.
The whale is between the surface and the sea bed, so its distance above the sea bed is
This is option A.
Key Takeaways
- In echo and sonar questions, the given time is always the round-trip time. Halve it before calculating distance.
- Use with consistent units: speed in , time in , distance in .
- Read the question carefully: it asks for the distance of the whale above the sea bed, not the depth of the whale below the surface.
Common Mistakes
- Using the full round-trip times without halving them. That would give and , which are not the correct depths.
- Choosing (option B). This is the whale's depth below the surface, not its distance above the sea bed.
- Choosing (option D). This is the depth of the sea, not the distance asked for.
- Forgetting to subtract the whale's depth from the sea depth.
Things to Be Careful About
- The pulse reflects, so the time measured is for the sound to travel down and back up.
- Keep the units consistent: and times in seconds give distances in metres.
- Distinguish clearly between "below the surface" and "above the sea bed". The whale is closer to the surface than the sea bed, so its distance above the sea bed is smaller than the sea depth.
Which row describes ultrasound waves?
Options
| type of wave | frequency | |
|---|---|---|
| A | longitudinal | smaller than |
| B | longitudinal | greater than |
| C | transverse | smaller than |
| D | transverse | greater than |
Working
Ultrasound is the name for sound waves with frequencies above the audible range, which is about . Sound waves are longitudinal waves because the particles vibrate parallel to the direction of energy transfer.
Answer
B
B
Walkthrough
Ultrasound is simply sound that is too high-pitched for humans to hear. The normal audible range for a healthy young person is roughly to , so any sound with a frequency greater than is called ultrasound.
Sound waves are longitudinal waves: the particles of the medium vibrate backwards and forwards along the same line as the direction in which the wave travels. Transverse waves, such as light waves, vibrate at right angles to the direction of travel. So the correct row must say both that ultrasound is longitudinal and that its frequency is greater than . That is row B.
Key Takeaways
- Ultrasound is sound with a frequency greater than , above the human audible range.
- Sound waves, including ultrasound, are longitudinal waves.
- The audible range is approximately to .
Common Mistakes
- Choosing C or A because the frequency is remembered but the wave type is wrong. Sound is never transverse.
- Confusing the upper limit of the audible range with the threshold for ultrasound. Ultrasound is above , not below it.
- Mixing up the frequencies: audible sound is usually between and , so ultrasound must be greater than .
Things to Be Careful About
- The unit means thousands of hertz, so .
- Remember the direction of vibration for longitudinal waves: particles move parallel to the direction of energy transfer.
A quantity is defined as the work done by a source in moving unit charge around a complete circuit.
What is the quantity and what is its unit?
Options
| quantity | unit | |
|---|---|---|
| A | electromotive force | |
| B | electromotive force | |
| C | potential difference | |
| D | potential difference |
Working
The quantity defined as "the work done by a source in moving unit charge around a complete circuit" is the electromotive force (e.m.f.) of the source. Its unit is the volt (V). A newton (N) is the unit of force, not of e.m.f., and potential difference is the work done per unit charge between two points, not around a complete circuit.
Answer
B
B
Walkthrough
The question gives a definition and asks for the quantity and its unit. Read the definition carefully: "work done by a source in moving unit charge around a complete circuit." This is exactly the definition of electromotive force (e.m.f.) of a source such as a cell or battery. The e.m.f. is the total energy supplied per unit charge as the charge goes all the way around the circuit from one terminal of the source back to the other.
A source with an e.m.f. of 1 V gives each coulomb of charge 1 J of energy. So the unit is the volt (V), which is the same as one joule per coulomb (J/C).
Potential difference (p.d.) is a different quantity: it is the work done per unit charge between two points in a circuit, for example across a component such as a lamp or resistor. The definition in the question says "around a complete circuit", which points to e.m.f., not p.d. Also, a newton (N) is a unit of force and would never be used for either e.m.f. or p.d. Therefore option B is correct.
Key Takeaways
- e.m.f. = the energy given to each unit of charge by a source as it moves around a complete circuit.
- p.d. = the energy transferred per unit charge between two points in a circuit.
- Both e.m.f. and p.d. are measured in volts (V), so the distinguishing feature is the phrase "around a complete circuit" for e.m.f. versus "between two points" for p.d.
- A newton (N) measures force, not electrical energy per unit charge.
Common Mistakes
- Choosing D (potential difference, V): this confuses p.d. with e.m.f. The definition "around a complete circuit" is the key phrase that identifies e.m.f.
- Choosing A or C with unit N: a newton is a unit of force (from ), not of e.m.f. or p.d. The volt is the only correct unit here.
- Thinking e.m.f. and p.d. are the same thing: they have the same unit but different meanings. e.m.f. is the energy supplied per unit charge by a source; p.d. is the energy transferred per unit charge between two points.
Things to Be Careful About
- Always match both columns: the quantity and its unit must both be correct. Options A and C are wrong on the unit alone, even though the quantity in A is right.
- Remember the definition of e.m.f. uses the phrase "around a complete circuit" — this is the standard 5054 wording. If the definition says "between two points", it is p.d.
- The unit of e.m.f. is the volt; you do not need to quote J/C, although it is equivalent.
A student connects the circuit shown.
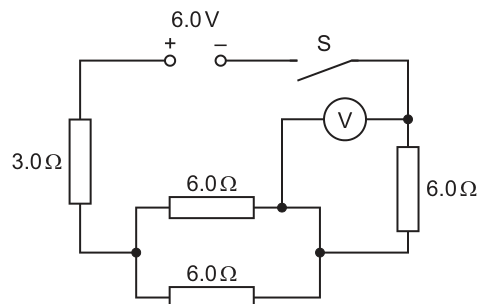
The switch S is closed.
What is the reading on the voltmeter?
Options
A
B
C
D
Working
The circuit consists of a resistor, a parallel combination of two resistors, and another resistor, all connected in series with the supply.
First, find the equivalent resistance of the two parallel resistors:
Next, find the total resistance of the circuit by adding the series resistances:
Calculate the total current flowing from the supply using Ohm's law ():
The voltmeter is connected in parallel with the rightmost resistor, so it measures the potential difference across it. Since this resistor is in the main series path, the full current of flows through it.
Answer
B
B
Walkthrough
- Identify the circuit structure: The circuit has a d.c. supply. Starting from the positive terminal, the current flows through a resistor. Then it splits into two parallel branches, each containing a resistor. These branches recombine, and the current then flows through a third resistor (the one on the right vertical branch) before returning to the negative terminal via the switch. The voltmeter is connected across this rightmost resistor.
- Calculate equivalent resistance of the parallel section: Two resistors in parallel give:
- Calculate total resistance: The resistor, the parallel equivalent, and the rightmost resistor are all in series:
- Calculate total current: Using the supply voltage and total resistance:
- Find the voltmeter reading: The voltmeter is in parallel with the rightmost resistor. The full total current () passes through this resistor. Using :
Key Takeaways
- When combining resistors, simplify parallel sections first before adding series resistances.
- In a series circuit, the current is the same through all components, so the total current flows through any single series resistor.
- A voltmeter measures the potential difference across the component it is connected in parallel with.
Common Mistakes
- Ignoring the parallel combination: Treating all resistors as being in series or calculating the parallel resistance incorrectly (e.g., instead of ).
- Misreading the voltmeter connection: Thinking the voltmeter is in series with a resistor or measuring the total supply voltage. The voltmeter is clearly in parallel with only the rightmost resistor.
- Calculating current through the wrong branch: Dividing the current by 2 for the parallel branches is unnecessary here because the voltmeter is across a resistor in the main series path, not one of the parallel branches.
Things to Be Careful About
- Always simplify the circuit diagram step-by-step: parallel parts first, then series parts.
- Check exactly what the voltmeter is connected across. In this case, it is across a single resistor that carries the full circuit current, not across the parallel combination.
- Units: ensure voltage is in volts, resistance in ohms, and current in amperes to get the correct result.
Two resistors connected in series act as a potential divider as shown.
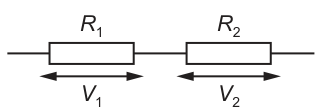
The resistors have resistances and and the potential differences across them are and respectively.
Which expression is equal to ?
Options
A
B
C
D
Working
In a series circuit, the current is the same through both resistors.
Using Ohm's law, :
Dividing the two equations:
This matches option A.
Answer
A
A
Walkthrough
- Identify the circuit type: The diagram shows two resistors and connected in series.
- Recall the series circuit rule: In a series circuit, there is only one path for the current, so the current is the same through every component.
- Apply Ohm's law: For each resistor, the potential difference is given by . Therefore, and .
- Form the ratio: To find , divide the first equation by the second:
The current cancels out, leaving:
This corresponds to option A.
Key Takeaways
- In a series circuit, the current is constant throughout.
- The potential difference across a resistor is directly proportional to its resistance when the current is constant.
- A potential divider splits the total voltage in the exact ratio of the resistances: .
Common Mistakes
- Confusing series and parallel rules: Assuming the voltage is the same across both resistors (which is true for parallel circuits, not series) or that the current is different.
- Inverting the ratio: Writing instead of .
- Unnecessary squaring: Choosing an option with a squared ratio without any physical justification.
Things to Be Careful About
- Always check whether components are in series or parallel before applying rules about current and voltage.
- In series: current is the same, voltage splits.
- In parallel: voltage is the same, current splits.
- The potential divider rule is a direct consequence of Ohm's law and the series current rule; it does not require squaring or inverting.
There is an electric current of in a resistor.
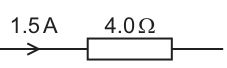
How much energy is transferred electrically to thermal energy in ?
Options
A
B
C
D
Working
Given:
- Current,
- Resistance,
- Time,
Calculate the power dissipated by the resistor:
Calculate the energy transferred:
Alternatively, using the combined formula:
Answer
C
C
Walkthrough
- Identify the given values: The problem provides the current , the resistance , and the time duration .
- Convert time to SI units: Energy in joules requires time in seconds. Convert to .
- Calculate power: The electrical power dissipated as thermal energy in a resistor is given by . Substituting the values: .
- Calculate energy: The total energy transferred is power multiplied by time: . Substituting the values: .
- Match with options: The calculated value is , which corresponds to option C.
Key Takeaways
- The energy transferred electrically to thermal energy in a resistor is given by or (where ).
- Time must always be converted to seconds when calculating energy in joules.
- Electrical power can be calculated using , , or .
Common Mistakes
- Forgetting to convert time: Using instead of leads to incorrect results (e.g., , matching option A).
- Incorrect formula application: Using instead of gives (matching option B).
- Squaring the wrong variable: Using gives (matching option D).
Things to Be Careful About
- Always ensure time is in seconds for energy calculations in joules.
- Remember that requires the potential difference , which must be found first using Ohm's law if not given directly. Here, , and .
- Check significant figures; the answer is consistent with the 2 significant figures given in the question data (, , ).
A square coil is placed in a horizontal uniform magnetic field. The plane of the coil is perpendicular to the magnetic field.
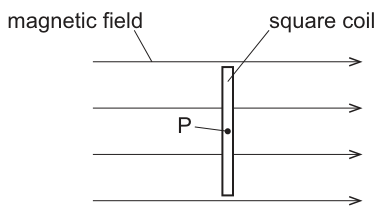
The coil is now rotated about an axis through P at a steady rate. The coil rotates through .
Which diagram shows how the electromotive force (e.m.f.) induced in the coil varies as it rotates through ?
Options
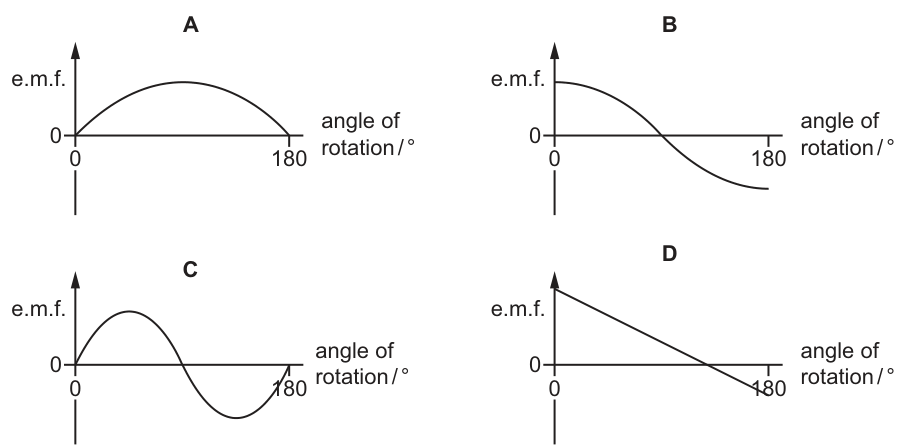
Working
The induced electromotive force (e.m.f.) is proportional to the rate of change of magnetic flux linkage, not the flux itself.
- At 0° (start): The plane of the coil is perpendicular to the magnetic field. The magnetic flux through the coil is at its maximum. However, because the flux is at a maximum, its rate of change is zero. Therefore, the initial induced e.m.f. is 0.
- At 90°: The coil has rotated so that its plane is parallel to the magnetic field. The magnetic flux through the coil is zero, but it is changing most rapidly at this instant. Therefore, the induced e.m.f. is at its maximum.
- At 180°: The coil has rotated a further 90°, so its plane is once again perpendicular to the magnetic field. The flux is at a maximum (in the opposite direction), and its rate of change is zero again. Therefore, the induced e.m.f. returns to 0.
The e.m.f. varies sinusoidally with the angle of rotation. Over the first 180°, the graph must start at 0, reach a positive peak at 90°, and return to 0 at 180°. This forms a positive half-sine wave.
This matches Graph A.
Answer
A
A
Walkthrough
- Identify the initial orientation: The problem states the plane of the coil is initially perpendicular to the horizontal magnetic field. This means the magnetic flux passing through the area of the coil is at its maximum value ().
- Recall Faraday's law: The induced e.m.f. is proportional to the rate of change of magnetic flux linkage (), not the amount of flux itself. When a quantity is at a maximum or minimum, its rate of change is zero. Since the flux is at a maximum at 0°, the rate of change of flux is zero, and the initial e.m.f. is 0.
- Analyze the 90° position: After rotating through 90°, the plane of the coil is parallel to the magnetic field lines. The flux through the coil is now zero. However, the coil is cutting the field lines at the maximum rate, meaning the flux is changing most rapidly. Thus, the induced e.m.f. is at its maximum.
- Analyze the 180° position: After a further 90° rotation (180° total), the plane of the coil is once again perpendicular to the field. The flux is at a maximum again (though in the opposite direction, ). At this turning point, the rate of change of flux is zero, so the e.m.f. is 0.
- Determine the shape: The variation of e.m.f. with angle for a coil rotating in a uniform field is sinusoidal (). From 0° to 180°, is positive, producing a single positive half-wave. Graph A correctly shows this: starting at 0, peaking at 90°, and ending at 0 at 180°.
Key Takeaways
- The induced e.m.f. depends on the rate of change of magnetic flux, not the flux itself.
- When a coil's plane is perpendicular to a magnetic field, the flux is maximum but the induced e.m.f. is zero.
- When a coil's plane is parallel to a magnetic field, the flux is zero but the induced e.m.f. is maximum.
- A full cycle of alternating e.m.f. requires a 360° rotation; a 180° rotation produces only a half-cycle (one half-sine wave).
Common Mistakes
- Confusing flux with rate of change of flux: Students often think maximum flux means maximum e.m.f., leading them to incorrectly choose Graph B (a cosine curve starting at a maximum).
- Assuming a linear relationship: Choosing Graph D, which incorrectly assumes the e.m.f. decreases linearly with the angle.
- Drawing a full wave for a half-turn: Choosing Graph C, which shows a full sine wave. A full sine wave requires a 360° rotation, not 180°.
Things to Be Careful About
- Read the initial orientation carefully: If the question had stated the coil started with its plane parallel to the field, the flux would be zero and the rate of change maximum, giving an initial maximum e.m.f. (Graph B). Always check the starting position.
- Pay attention to the angle range: The rotation is only through 180°. A full alternating current cycle takes 360°, so the graph must only show half a cycle.
- Sign of the e.m.f.: Throughout the first 180°, the flux changes from to . The rate of change of flux is continuously negative, so by Faraday's law (), the induced e.m.f. remains continuously positive. It does not cross the axis to become negative until after 180°.
Three pieces of equipment made of magnetic materials are listed.
- the core of a transformer
- the needle of a compass
- iron filings used to show a magnetic field pattern
Which pieces of equipment act as temporary magnets when in use?
Options
A 1, 2 and 3
B 1 and 2 only
C 1 and 3 only
D 2 and 3 only
Working
A temporary magnet is a piece of magnetic material that is magnetised only while it is in a magnetic field, and loses its magnetism when the field is removed.
- The core of a transformer is made of soft iron. While in use, the alternating current repeatedly magnetises and demagnetises it, so it acts as a temporary magnet. Correct.
- The needle of a compass is a small permanent magnet. It does not act as a temporary magnet. Incorrect.
- Iron filings become induced magnets when placed in a magnetic field, which is why they line up along the field lines. When the field is removed they lose their magnetism. Correct.
Only 1 and 3 act as temporary magnets.
Answer
C
C
Walkthrough
A permanent magnet keeps its magnetism after the magnetising field is removed. A temporary magnet is magnetised only while it is in a magnetic field and loses most or all of its magnetism when the field is removed.
Consider each piece of equipment:
- Transformer core: it is made of soft iron, which is easy to magnetise and easy to demagnetise. In use, the alternating current keeps changing direction, so the core is repeatedly magnetised and demagnetised. The core must behave as a temporary magnet so that it can respond quickly to the changing current.
- Compass needle: this must keep its magnetism so that it can continue to point north when the Earth’s field acts on it. It is therefore a permanent magnet, not a temporary magnet.
- Iron filings: when scattered near a magnet, each filing becomes magnetised by induction. The filings act as tiny temporary magnets and line up along the magnetic field lines. When the magnet is removed, the filings lose their magnetism.
So the correct combination is 1 and 3 only, which is option C.
Key Takeaways
- Temporary magnets are magnetised only while in a magnetic field.
- Permanent magnets retain their magnetism after the magnetising field is removed.
- Soft iron is easily magnetised and demagnetised, so it is used for temporary magnets such as transformer cores.
- Iron filings become induced temporary magnets and are used to show the shape of a magnetic field.
Common Mistakes
- Choosing option D (2 and 3 only) because a compass needle is a magnet, forgetting that it is a permanent magnet, not a temporary one.
- Thinking the transformer core must be a permanent magnet; in fact it must be a temporary magnet so it can respond to the changing current.
- Confusing 'made of magnetic material' with 'is a permanent magnet'.
Things to Be Careful About
- Read 'when in use' carefully: the transformer core is temporary while the current flows, but the compass needle is permanent even when it is being used.
- Iron filings are magnetic only because they are in the field of another magnet; they do not keep their magnetism afterwards.
- The key distinction is whether the magnetism is retained after the external field is removed.
Students are asked to suggest factors that affect the speed of rotation of a direct current (d.c.) motor.
Three of their suggestions are listed.
- the strength of the magnetic field
- the current
- the number of turns on the coil
Which suggestions are correct?
Options
A 1, 2 and 3
B 1 and 2 only
C 1 and 3 only
D 2 and 3 only
Working
The speed of rotation of a d.c. motor depends on the size of the turning effect on the coil. This turning effect is increased by:
- a stronger magnetic field,
- a larger current in the coil,
- more turns on the coil.
All three suggestions are correct.
Answer
A
A
Walkthrough
A d.c. motor turns because a current-carrying coil in a magnetic field experiences a force. The size of this force, and therefore the turning effect on the coil, depends on three things:
- the strength of the magnetic field: a stronger field gives a larger force on the coil;
- the current in the coil: a larger current gives a larger force;
- the number of turns on the coil: more turns means more lengths of wire in the field, so the total force is larger.
A larger turning effect makes the coil rotate faster, so all three suggestions are correct. The option that includes all three is A.
Key Takeaways
- The turning effect on a motor coil increases with magnetic field strength, current and number of turns.
- More turns means more wire in the magnetic field, so a larger total force.
- In a "which statements are correct" question, test each statement separately before choosing the option.
Common Mistakes
- Choosing B or D by forgetting that the number of turns on the coil also affects the force.
- Thinking that only the magnetic field and current matter; the number of turns matters because each turn contributes to the force.
- Confusing speed of rotation with direction of rotation. Direction depends on the direction of the current, not on these factors.
Things to Be Careful About
- Read all three statements before choosing an option.
- The question asks about speed, not direction; all three listed factors increase the turning effect and hence the speed.
- No calculation is needed here; this is qualitative recall of how a d.c. motor works.
A transformer is used to power a lamp.
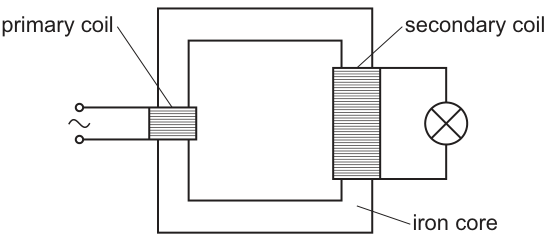
There are more turns on the secondary coil than on the primary coil.
Which statement is correct?
Options
A There is an alternating current (a.c.) in the primary coil and a direct current (d.c.) in the secondary coil.
B There is a larger current in the secondary coil than in the primary coil.
C There is a changing magnetic field in the iron core.
D In the iron core there is an alternating current from the primary coil to the secondary coil.
Working
A is incorrect: Transformers only work with a changing magnetic field, so the induced e.m.f. in the secondary coil is alternating. A direct current (d.c.) would not be induced continuously.
B is incorrect: With more turns on the secondary coil, this is a step-up transformer, so the secondary voltage is larger than the primary voltage (). By conservation of energy, . Since , the secondary current must be smaller than the primary current ().
C is correct: The alternating current in the primary coil produces a constantly changing magnetic field in the iron core. This changing magnetic field is what induces the e.m.f. in the secondary coil.
D is incorrect: The iron core conducts magnetic flux, not electric current. There is no electrical connection between the primary and secondary coils through the core.
Answer
C
C
Walkthrough
- Option A: A transformer requires a changing magnetic field to induce an e.m.f. in the secondary coil. If the secondary had a d.c. current, it would imply a steady magnetic field, which cannot induce a continuous e.m.f. In reality, the secondary e.m.f. is alternating, driving an a.c. current through the lamp. So A is false.
- Option B: The number of turns on the secondary coil () is greater than on the primary coil (). This makes it a step-up transformer, so the secondary voltage is greater than the primary voltage (). For an ideal transformer, power in equals power out: . Because , it must be that . The current in the secondary is actually smaller, not larger. So B is false.
- Option C: The primary coil is connected to an a.c. supply, meaning the current is constantly changing in magnitude and direction. This produces a constantly changing magnetic field in the iron core. This changing magnetic field is the essential mechanism that links the primary and secondary coils to induce an e.m.f. So C is true.
- Option D: The iron core is used to channel magnetic flux from the primary to the secondary coil. It is not an electrical connection; current does not flow through the core from one coil to the other. So D is false.
Key Takeaways
- Transformers only work with alternating current (a.c.) because they require a changing magnetic field to induce an e.m.f. in the secondary coil.
- In a step-up transformer (), the voltage increases but the current decreases, assuming an ideal transformer where .
- The iron core of a transformer carries magnetic flux, not electric current. The primary and secondary circuits are electrically isolated from each other.
Common Mistakes
- Thinking current flows through the core (Option D): Students sometimes picture the core as a wire connecting the two coils. Remember, the core is a magnetic conductor, not an electrical one.
- Confusing voltage and current relationships (Option B): It is easy to assume that because the voltage is higher in the secondary, the current must also be higher. Conservation of energy dictates that if voltage goes up, current must go down.
- Thinking transformers can output d.c. (Option A): A steady d.c. in the primary would only create a brief induced e.m.f. when switched on or off. Continuous induction requires a continuously changing magnetic field, which means the secondary must also be a.c.
Things to Be Careful About
- Always check whether a statement describes magnetic flux or electric current. The iron core carries magnetic flux; the coils carry electric current.
- Remember the power equation for an ideal transformer: , which gives . If , then and .
- Transformers fundamentally rely on electromagnetic induction, which requires a changing magnetic field. Direct current (d.c.) produces a steady magnetic field and therefore cannot be transformed continuously.
In an electric field, a beta ()-particle follows the path shown.
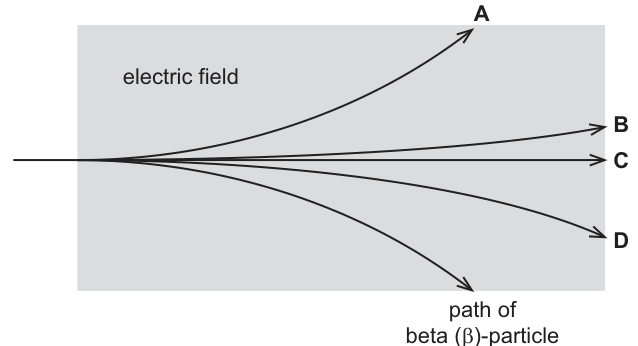
Which path does an alpha ()-particle travelling at the same speed follow?
Options
A A
B B
C C
D D
Answer
The beta () particle is negatively charged and curves downwards, meaning the electric force on it is downwards and the electric field is directed upwards.
The alpha () particle is positively charged, so it experiences an upward force and curves upwards, eliminating paths C and D.
The alpha particle has a much greater mass (approximately 7300 times that of a beta particle) and twice the charge magnitude. Its acceleration is therefore much smaller than that of the beta particle, so it is deflected much less.
Path A curves steeply upwards, while path B curves slightly upwards. The alpha particle follows path B.
Answer
B
B
Walkthrough
The diagram shows a beta () particle entering an electric field and curving downwards. A beta particle is a high-speed electron with a negative charge (). Because the force on a negative charge is opposite to the direction of the electric field, the downward curve tells us the electric field is directed upwards.
An alpha () particle is a helium nucleus with a positive charge (). In an upward electric field, a positive charge experiences an upward force. Therefore, the alpha particle will curve upwards, which immediately eliminates paths C (no deflection) and D (downward deflection).
Now we must decide between path A (steep upward curve) and path B (slight upward curve). The sideways deflection of a particle entering a uniform field at speed is proportional to its acceleration . Using Newton's second law:
For the beta particle: .
For the alpha particle: .
The mass of an alpha particle is about 7300 times the mass of a beta particle (). Substituting this in:
The alpha particle's acceleration is roughly 3650 times smaller than the beta particle's. Even though the alpha particle has twice the charge, its enormous mass means it is deflected much less. Path A shows a large deflection similar to the beta particle, while path B shows a slight upward curve. Thus, the alpha particle follows path B.
Key Takeaways
- Alpha particles are positively charged () and beta particles are negatively charged (), so they deflect in opposite directions in an electric field.
- The alpha particle is much more massive than the beta particle (about 7300 times more massive), so despite having twice the charge magnitude, its acceleration and deflection are much smaller.
- The direction of deflection reveals the sign of the charge; the amount of deflection reveals the charge-to-mass ratio.
Common Mistakes
- Forgetting the charge signs: Assuming both particles deflect in the same direction because they are both 'radiation'. Alpha is positive, beta is negative; they must deflect oppositely.
- Overestimating alpha deflection: Thinking that because the alpha particle has a larger charge ( vs ), it will experience a larger force and therefore deflect more. This ignores the fact that its mass is thousands of times larger, making its acceleration much smaller.
- Confusing electric and magnetic field deflection: The logic for direction is the same, but the force in a magnetic field is perpendicular to velocity (causing circular arcs), whereas in a uniform electric field it is constant (causing parabolic paths). Here the paths are parabolic.
Things to Be Careful About
- Read the diagram carefully: The beta particle curves downwards. Do not assume the field direction without deducing it from the beta particle's known negative charge.
- Same speed vs same kinetic energy: The question specifies 'travelling at the same speed'. If they had the same kinetic energy, the alpha particle would be moving much slower, and the deflection comparison would be even more extreme. With the same speed, the time spent in the field is identical, so sideways displacement is directly proportional to acceleration .
- Path C is for gamma: A gamma ray has no charge and no mass, so it is unaffected by the electric field and would follow the straight horizontal path C.
Which row gives the sign of the charge on the nucleus of an atom and the sign of the charge of an electron?
Options
| charge on nucleus | charge on electron | |
|---|---|---|
| A | negative | positive |
| B | neutral | negative |
| C | neutral | positive |
| D | positive | negative |
Working
The nucleus contains protons, which are positively charged, and neutrons, which are neutral. So the nucleus has a positive charge. Electrons are negatively charged. Row D gives positive for the nucleus and negative for the electron.
Answer
D
D
Walkthrough
The question asks for the sign of the charge on the nucleus of an atom and the sign of the charge of an electron. Recall the basic structure of an atom: protons and neutrons are in the nucleus, and electrons orbit around it. Protons carry a positive charge, neutrons carry no charge, and electrons carry a negative charge. Therefore the nucleus is positive overall, and an electron is negative. Looking at the rows, only row D matches these signs.
Key Takeaways
- The nucleus contains protons and neutrons.
- Protons are positively charged.
- Neutrons are neutral.
- Electrons are negatively charged.
- An atom is normally neutral because it has equal numbers of protons and electrons.
Common Mistakes
- Choosing A: this reverses the signs, saying the nucleus is negative and the electron is positive.
- Choosing B or C: these say the nucleus is neutral. The nucleus is not neutral because it contains positively charged protons.
- Thinking that because an atom is neutral, the nucleus must also be neutral. The nucleus is positive; the electrons balance it overall.
Things to Be Careful About
- The question asks for the sign of the charge, not the amount of charge.
- "Neutral" is not a sign; it means no overall charge.
- Remember that the positive charge of the nucleus comes from protons, not from neutrons.
An isotope has a half-life of 6000 years.
How much time passes before the count rate due to emissions from a sample of the isotope decreases to of the initial value?
Options
A 6000 years
B 18 000 years
C 24 000 years
D 96 000 years
Working
So the count rate falls to of its initial value after 4 half-lives.
Answer
C
C
Walkthrough
The half-life is the time taken for the count rate (or activity) of a radioactive sample to fall to half its initial value. Each half-life halves the count rate again.
We need the count rate to fall to of its initial value. Since
four half-lives must pass. Each half-life is 6000 years, so the total time is
which is option C.
Option A (6000 years) is just one half-life, giving of the initial count rate. Option B (18 000 years) is three half-lives, giving . Option D (96 000 years) is 16 half-lives, giving — far too long.
Key Takeaways
- The half-life is the time for the count rate to halve.
- After half-lives the count rate is of the initial value.
- To find the time for a given fraction, express the fraction as a power of and multiply the number of half-lives by the half-life duration.
Common Mistakes
- Confusing the number of half-lives with the time: 4 half-lives is not 4 years, it is years.
- Misidentifying as 3 half-lives () or 2 half-lives ().
- Choosing option D (96 000 years) by multiplying 16 by 6000 instead of recognising that 16 is the denominator of the fraction, not the number of half-lives.
Things to Be Careful About
- , not .
- The count rate halves each half-life, so the fraction is a power of , not a multiple of .
- Always multiply the number of half-lives by the half-life duration to get the total time.
What is the approximate time taken by light from the Sun to travel to the Earth?
Options
A
B
C
D
Working
The distance from the Sun to the Earth is about and the speed of light is .
This is about 8 minutes. The correct option is D.
Answer
D
D
Walkthrough
This question asks for the approximate time for light to travel from the Sun to the Earth. You need two facts: the average Sun–Earth distance is about (150 million km), and light travels at . Using , rearrange to . Substituting gives , which is about 8 minutes. Option D is the only one of the right order of magnitude.
Key Takeaways
- Light travels at in a vacuum.
- The Sun–Earth distance is about .
- Time = distance / speed can be used for any wave or object moving at constant speed.
- A light-year is the distance light travels in one year; this question uses the same idea on a smaller scale.
Common Mistakes
- Using the distance in km without converting to metres: would give a time of , which is option A.
- Confusing the Sun–Earth distance with the Moon–Earth distance (about ), which would give about .
- Forgetting to divide by the speed of light and simply recalling a wrong value.
Things to Be Careful About
- Keep units consistent: distance in metres and speed in m/s.
- The answer is approximate, so any value close to 500 s is acceptable; the options are separated by factors of 10.
- 500 s is about 8.3 minutes, a useful fact to remember.
Where in the Solar System is the asteroid belt?
Options
A between the Sun and Mercury
B between Venus and the Earth
C between Mars and Jupiter
D between Uranus and Neptune
Answer
C
C
Walkthrough
The asteroid belt is a region of the Solar System located between the orbits of Mars and Jupiter. It contains many irregularly shaped rocky bodies called asteroids. The question asks for its location, and the correct option is C.
Key Takeaways
- The asteroid belt lies between the orbits of Mars and Jupiter.
- It is a region of rocky bodies, distinct from the gas giants beyond Jupiter.
- Knowing the order of the planets from the Sun helps locate it: Mercury, Venus, Earth, Mars, (asteroid belt), Jupiter, Saturn, Uranus, Neptune.
Common Mistakes
- Choosing A or B confuses the asteroid belt with the inner rocky planets. The belt is not near the Sun's immediate vicinity.
- Choosing D places it between the gas giants, which is incorrect; the belt is well inside the orbit of Jupiter.
Things to Be Careful About
- The asteroid belt is between Mars and Jupiter, not between any other pair of planets.
- Remember the order of the planets and that the belt sits between the inner rocky planets and the outer gas giants.
Your score so far
Answer a question to start scoring
Your marks add up here as you work through the paper.