Physics 5054/11 — May/June 2025
Cambridge O-Level · Multiple Choice · answer key with instant marking and worked solutions
Topics Thermal Properties of Matter · Forces · Reflection and Refraction of Light · Sound · Current, Voltage and Resistance · Radioactivity · +15 more
Tap an option under each question to check it — your score builds as you go.
Which quantity has both magnitude and direction, and is it a scalar quantity or a vector quantity?
Options
| quantity with magnitude and direction | scalar quantity or vector quantity | |
|---|---|---|
| A | mass | scalar |
| B | mass | vector |
| C | weight | scalar |
| D | weight | vector |
Working
A vector quantity has both magnitude and direction. Mass has only magnitude, so it is a scalar. Weight is a force, so it has both magnitude and direction (towards the centre of the Earth), making it a vector.
Answer
D
D
Walkthrough
A scalar quantity is described only by its size (magnitude), for example mass, speed, distance or energy. A vector quantity is described by both its size and its direction, for example weight, velocity, force or momentum.
Mass is the amount of matter in an object. It does not have a direction, so it is a scalar. Weight is the gravitational force acting on an object. It has a magnitude (how big the force is) and a direction (towards the centre of the Earth), so it is a vector.
The question asks for a quantity that has both magnitude and direction, and then asks whether it is scalar or vector. Weight is the only option that has both magnitude and direction, and it is a vector. Therefore the correct answer is D.
Key Takeaways
- Scalar quantities have magnitude only.
- Vector quantities have magnitude and direction.
- Mass is a scalar; weight is a vector.
- Weight is a force, so it must be a vector.
Common Mistakes
- Choosing mass as having direction: mass has no direction, so options A and B are wrong.
- Calling weight a scalar: weight is a force and always has a direction, so option C is wrong.
- Confusing mass and weight: mass is measured in kilograms, weight is a force measured in newtons.
Things to Be Careful About
- Remember that weight always acts towards the centre of the Earth, so it has a clear direction.
- Do not mix up the words "mass" and "weight".
- In questions like this, first decide whether the quantity has a direction, then decide whether it is scalar or vector.
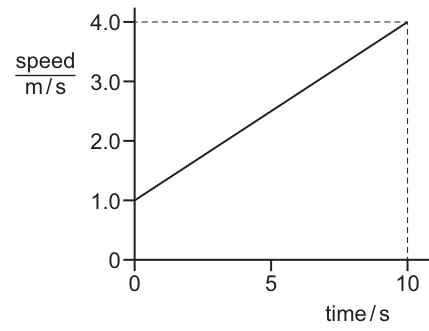
The speed–time graph shows part of the journey of a bicycle for a time of 10 s.
What is the distance that the bicycle travels in the 10 s?
Options
A 20 m
B 25 m
C 30 m
D 40 m
Working
The distance travelled is equal to the area under the speed–time graph.
The graph is a trapezium with parallel sides of length 1.0 m/s and 4.0 m/s, and a width of 10 s.
Answer
B
B
Walkthrough
The distance travelled by an object is given by the area under its speed–time graph. In this question, the graph is a straight line from (0 s, 1.0 m/s) to (10 s, 4.0 m/s), forming a trapezium with the time axis. The two parallel vertical sides are the initial speed (1.0 m/s) and the final speed (4.0 m/s), and the width of the trapezium is the time interval (10 s). Using the formula for the area of a trapezium, , we get m. Alternatively, the area can be split into a rectangle of m and a triangle of m, giving a total of 25 m. This matches option B.
Key Takeaways
- The area under a speed–time graph represents the distance travelled.
- Areas can be calculated by splitting composite shapes into simple rectangles and triangles, or by using the trapezium formula.
Common Mistakes
- Reading the gradient of the graph instead of the area (the gradient gives acceleration, which is 0.3 m/s² here, not distance).
- Assuming the graph starts at the origin (0, 0) and calculating the area as a triangle ( m), which corresponds to option A.
- Forgetting to include the unit of distance (m) when checking against the options.
Things to Be Careful About
- Always identify the correct axis: speed is on the vertical axis, time on the horizontal. The area is , not .
- Ensure the units are consistent: speed in m/s and time in s gives distance in m directly.
Which statement explains why a heavy coin that falls through a short distance towards the ground does not reach terminal velocity?
Options
A The coin has not hit the ground.
B The weight of the coin equals the air resistance.
C The weight of the coin increases as the air resistance increases.
D The weight of the coin is always more than the air resistance.
Working
A falling coin has two vertical forces acting on it: its weight downwards and air resistance upwards. Terminal velocity is reached when these two forces are equal, so the resultant force is zero and the coin stops accelerating.
The coin has not reached terminal velocity, so the air resistance must still be smaller than the weight. The resultant force is still downwards and the coin is still accelerating. Therefore the weight is always more than the air resistance.
Option D is correct.
Option A is not an explanation of the force balance. Option B describes terminal velocity, not the motion before it. Option C is wrong because the weight of the coin does not increase as air resistance increases.
D
Walkthrough
A falling coin experiences two forces: its weight pulling it downwards and air resistance pushing upwards. Air resistance increases as the speed of the coin increases.
If the coin reached terminal velocity, the air resistance would have grown until it exactly equals the weight. Then the resultant force would be zero, so the coin would stop accelerating and fall at a constant speed.
The question says the coin has not reached terminal velocity. This means the air resistance has not yet grown enough to balance the weight. So the weight is still greater than the air resistance, the resultant force is still downwards, and the coin is still accelerating. This is exactly what option D says.
Option A is irrelevant: whether the coin has hit the ground does not explain the force balance while it is falling. Option B would mean the coin has reached terminal velocity, which contradicts the question. Option C is wrong because the weight of the coin is constant; it does not increase as air resistance increases.
Key Takeaways
- Terminal velocity is reached when the weight equals the air resistance, so the resultant force is zero.
- Before terminal velocity, the air resistance is less than the weight, so the coin is still accelerating downwards.
- The weight of an object is constant; air resistance changes with speed.
Common Mistakes
- Choosing B: this describes the condition for terminal velocity, not the reason the coin has not reached it.
- Choosing C: the weight of the coin does not increase; it is a constant force.
- Thinking that "the coin has not hit the ground" explains the motion: this does not address the forces involved.
Things to Be Careful About
- Distinguish between "air resistance equals weight" (terminal velocity) and "air resistance is less than weight" (still accelerating).
- Remember that weight is a force due to gravity and does not change as the coin falls.
- Terminal velocity is about the resultant force being zero, not about the distance fallen.
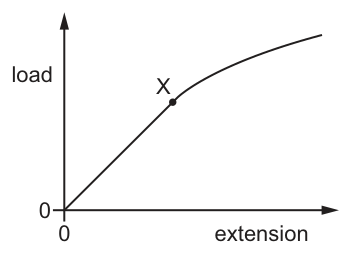
The diagram shows the load–extension graph for a spring.
What is the name given to point X on the graph?
Options
A limit of force
B limit of proportionality
C limit of the extension
D limit of the spring
Answer
B limit of proportionality
The straight-line portion of the load–extension graph shows that the extension is directly proportional to the load (Hooke's law). Point X marks the end of this straight-line region, which is called the limit of proportionality. Beyond X, the graph curves, meaning Hooke's law no longer applies.
B
Walkthrough
A load–extension graph for a spring typically starts with a straight line from the origin. In this linear region, the extension is directly proportional to the applied load, which is Hooke's law. Point X on the graph is located exactly at the end of this straight-line section, just before the graph begins to curve. This specific point is defined as the limit of proportionality. Beyond this point, the relationship between load and extension is no longer linear, and Hooke's law is no longer valid.
Key Takeaways
- On a load–extension graph, the straight-line section from the origin represents the region where Hooke's law applies.
- The point where this straight line ends is the limit of proportionality.
- Beyond the limit of proportionality, the graph curves, indicating that the extension is no longer directly proportional to the load.
Common Mistakes
- Confusing the limit of proportionality with the elastic limit. The elastic limit is the point beyond which the spring will not return to its original length when the load is removed. On many simplified graphs, these two points are very close together, but the limit of proportionality is strictly defined by the end of the straight line.
- Choosing options like 'limit of force' or 'limit of the spring', which are not standard physics terms for features on this graph.
Things to Be Careful About
- Always look at the shape of the graph. The limit of proportionality is where the straight line ends. If the graph shows a clear curve starting at X, X is the limit of proportionality.
- Remember that Hooke's law only applies up to the limit of proportionality.
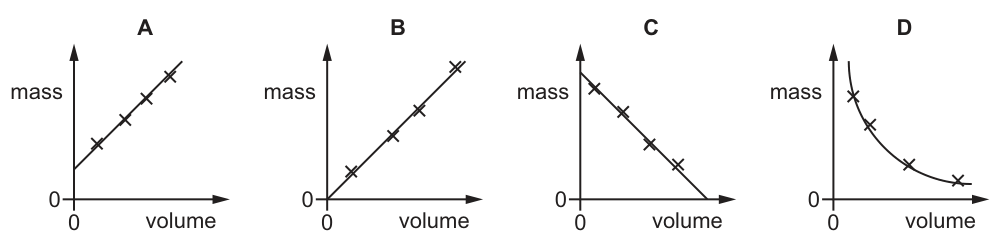
Some students measure the masses and the volumes of differently sized samples of a type of wood.
Which graph shows their results?
Options
Answer
For a given type of wood (assuming it is uniform), the density is constant. Density is defined as mass per unit volume:
Rearranging for mass gives:
Since is constant, mass is directly proportional to volume . A graph of a directly proportional relationship () is a straight line passing through the origin . This is because a sample of wood with zero volume must have zero mass.
- Graph A: Straight line, but has a positive intercept on the mass axis. This implies mass exists even when volume is zero, which is incorrect.
- Graph B: Straight line passing through the origin. This correctly shows direct proportionality.
- Graph C: Straight line with a negative slope. This implies mass decreases as volume increases, which is incorrect.
- Graph D: A curve. This implies the relationship is not proportional (density is not constant), which is incorrect for a uniform type of wood.
The correct graph is B.
B
Walkthrough
- Identify the physical relationship: The question asks for the relationship between mass and volume for samples of the same type of wood. The defining property linking these two quantities is density ().
- Apply the formula: Density is mass divided by volume (). For a uniform material, density is constant regardless of the size of the sample.
- Rearrange the formula: To plot mass on the y-axis and volume on the x-axis, we rearrange to . This is the equation of a straight line (using for gradient here, but in physics ), passing through the origin, where the gradient is the density .
- Evaluate the graphs:
- Graph A: Shows a linear relationship but with a y-intercept. This would mean that even if you had no wood (volume = 0), you still had some mass. This is physically impossible for the wood itself.
- Graph B: Shows a straight line through the origin. As volume increases, mass increases proportionally. This matches .
- Graph C: Shows mass decreasing as volume increases. This is the opposite of reality.
- Graph D: Shows a curve (likely an inverse relationship). This would mean density changes drastically with volume, which is not true for a uniform solid like wood.
Key Takeaways
- Density is constant: For a uniform substance, density does not change with the size of the sample.
- Direct proportionality: Mass is directly proportional to volume for a given material ().
- Graph interpretation: A graph of directly proportional quantities is always a straight line passing through the origin .
Common Mistakes
- Choosing Graph A: Students might think of a graph where a container (like a beaker) is being filled. In that case, there is mass when volume of liquid is zero (the mass of the beaker). However, this question is about samples of wood; zero volume of wood means zero mass.
- Choosing Graph D: Confusing the relationship with or thinking that larger pieces of wood have lower density.
- Axis confusion: Ensuring mass is on the vertical axis and volume on the horizontal. If swapped, the gradient is (specific volume), but the line still passes through the origin.
Things to Be Careful About
- Origin: Always check if the line passes through . In physics, if a quantity is zero, the dependent quantity must also be zero (zero volume of material = zero mass of material).
- Uniformity: The question states "a type of wood", implying a uniform material with constant density. If the wood were hollow or had air pockets varying in size, the graph might not be a straight line, but for standard O Level problems, assume uniform density.
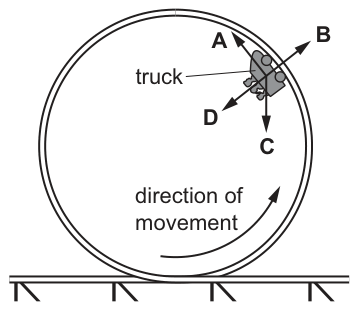
The diagram shows a section of a roller coaster ride that is a circle arranged vertically.
The truck is moving at constant speed at the position shown.
Which arrow shows the direction of the resultant force acting on the truck?
Options
Working
The truck moves at constant speed in a circular path. Its direction is continuously changing, so its velocity is changing and it is accelerating towards the centre of the circle (centripetal acceleration). By Newton's second law (), the resultant force must be in the same direction as the acceleration, i.e., towards the centre of the circle. Arrow D points radially inward toward the centre.
Answer
D
D
Walkthrough
The question states the truck is moving at constant speed along a circular track. Velocity is a vector quantity, meaning it has both speed and direction. Even though the speed is constant, the direction of motion is continuously changing as the truck follows the curve of the track. A change in velocity means the truck is accelerating. For an object moving at constant speed in a circle, this acceleration is always directed towards the centre of the circle and is called centripetal acceleration.
Newton's second law states that , meaning the resultant (net) force acting on an object is always in the same direction as its acceleration. Therefore, the resultant force on the truck must point towards the centre of the circular track.
Looking at the options:
- Arrow A points tangentially forward along the track. A force in this direction would increase the truck's speed, but the speed is constant.
- Arrow B points radially outward. There is no real outward force; this is a common misconception (centrifugal force).
- Arrow C points vertically downwards. This represents the weight of the truck, but weight is only one of the forces acting on it. The resultant force is the vector sum of all forces (weight, normal reaction from the track, etc.).
- Arrow D points radially inward toward the centre of the circle. This matches the required direction of the centripetal resultant force.
Thus, arrow D is correct.
Key Takeaways
- An object moving at constant speed in a circular path is accelerating because its direction is changing.
- The acceleration in uniform circular motion is directed towards the centre of the circle (centripetal).
- The resultant force is always in the direction of the acceleration, so it points towards the centre.
- Weight acts vertically downwards, but it is not necessarily the resultant force; the resultant force is the vector sum of all forces acting on the object.
Common Mistakes
- Choosing arrow A: thinking the resultant force must be in the direction of motion. Force is not needed to maintain constant speed; it is needed to change direction.
- Choosing arrow C: confusing the weight of the truck (which acts vertically downwards) with the resultant force. The weight is just one of the forces acting on the truck.
- Choosing arrow B: thinking there is a centrifugal force pushing the truck outward. Centrifugal force is a fictitious force; the actual resultant force is inward.
Things to Be Careful About
- Constant speed does not mean constant velocity. Velocity is changing, so there is acceleration.
- The resultant force is the vector sum of all forces acting on the truck. At this position on the track, the weight acts downwards and the track exerts a normal reaction force (and possibly friction) on the truck. Their vector sum must point exactly towards the centre of the circle to provide the centripetal acceleration. Do not assume the resultant force is just the weight.
What is a unit for momentum?
Options
A
B
C
D
Working
Momentum is the product of mass and velocity:
Mass is measured in and velocity in , so the unit of momentum is .
Answer
A
A
Walkthrough
Momentum is defined as the product of an object's mass and its velocity:
The unit of mass is the kilogram () and the unit of velocity is metres per second (). Multiplying these gives the unit of momentum as .
Look at the options:
- A — this is correct.
- B — this is the unit of force (the newton), not momentum.
- C — this is the unit of work or energy, not momentum.
- D — this is the unit of pressure, not momentum.
So the correct option is A.
Key Takeaways
- Momentum is a vector quantity: it has both magnitude and direction.
- Its unit comes directly from the definition .
- Remember that is equivalent to , but the standard unit shown in the options is .
Common Mistakes
- Choosing B because it looks similar to the unit of force. Force is mass times acceleration, so its unit is , not momentum.
- Confusing momentum with energy or pressure. Energy has unit (or joule), and pressure has unit (or pascal).
Things to Be Careful About
- Momentum uses velocity, not speed, so direction matters in calculations, but for the unit only the magnitude is needed.
- Do not use weight instead of mass; weight is a force and has unit newton.
- The unit is sometimes written as ; both are correct, but the option given here is .
In a safety test, a car collides with a concrete block.
The impulse exerted by the block on the car is .
The collision with the block lasts for .
What is the force exerted on the car?
Options
A
B
C
D
Working
The impulse is the product of the force and the time for which it acts:
Convert the time to seconds:
Answer
C
C
Walkthrough
The impulse exerted on the car is given by
where is the force and is the time for which it acts. We are told the impulse is and the collision lasts .
First convert the time into seconds, because the impulse is in N s and we want the force in N:
Now rearrange the equation to find the force:
So the correct option is C.
The other options come from common slips:
- A is obtained if the time is left as instead of .
- B is just the impulse itself, not the force.
- D comes from multiplying by instead of dividing.
Key Takeaways
- Impulse is the product of force and time: .
- The unit of impulse is the newton-second (N s).
- To find force from impulse and time, use .
- Always convert milliseconds to seconds before substituting into the equation.
Common Mistakes
- Forgetting to convert ms to s. Using instead of gives , which is option A.
- Confusing impulse with force. The impulse is not the force; it is force multiplied by time.
- Multiplying instead of dividing. , which is option D.
- Omitting the unit. The force must be given in newtons (N).
Things to Be Careful About
- is , not and not .
- The newton-second (N s) is equivalent to kg m/s, but for this question we only need to use N s directly.
- The answer should be quoted as , which is in standard form.
An object pulled along horizontal ground accelerates to the right.
The diagram shows the directions of the forces acting on the object.
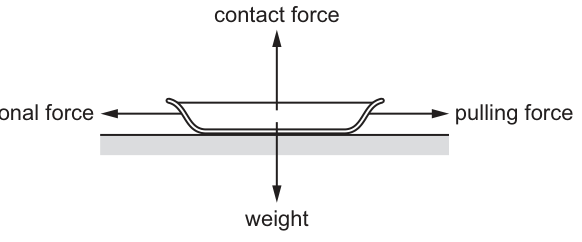
Which force is multiplied by the distance moved to calculate the work done to increase the kinetic energy store?
Options
A contact force
B frictional force
C pulling force
D weight
Answer
C
C
Walkthrough
The question asks which force is multiplied by the distance moved to calculate the work done. In physics, work done is defined as the force multiplied by the distance moved in the direction of the force ().
The object moves horizontally to the right. We evaluate each force:
- The contact force and weight act vertically (upwards and downwards respectively). Since they are perpendicular to the direction of motion, they do no work.
- The frictional force acts horizontally to the left, opposite to the direction of motion. It does negative work, removing energy from the system (transferring it to the thermal energy store via heating).
- The pulling force acts horizontally to the right, in the same direction as the motion. Multiplying the pulling force by the distance moved gives the total work done on the object. This work is the energy input that increases the kinetic energy store (and overcomes friction).
Thus, the pulling force is the correct answer.
Key Takeaways
- Work done is only done by forces acting in the direction of motion (or at an angle to it). The formula is .
- Forces perpendicular to the displacement do zero work.
- The work done by the applied force represents the total energy transferred to the object's stores.
Common Mistakes
- Choosing frictional force: friction opposes motion and does negative work; it does not provide the energy to increase kinetic energy.
- Choosing weight or contact force: these are perpendicular to the motion and do no work. Students sometimes forget that work requires a displacement component in the direction of the force.
Things to Be Careful About
- Always check the direction of the force relative to the direction of motion. Work is a scalar, but it depends on the component of force parallel to the displacement.
- At O Level, you do not need to calculate the net work (resultant force distance) to answer this specific question; the question asks for the force whose work represents the energy input to the system, which is the pulling force.
The mass of object P is greater than the mass of object Q.
The objects contain different amounts of matter and have a different resistance to change of motion.
Which row is correct?
Options
| greater amount of matter | greater resistance to change of motion | |
|---|---|---|
| A | P | P |
| B | P | Q |
| C | Q | P |
| D | Q | Q |
Working
Mass is the amount of matter in an object. A greater mass also means a greater inertia, so the object has a greater resistance to a change of motion.
Object P has the greater mass, so P has both the greater amount of matter and the greater resistance to change of motion.
Answer
A
A
Walkthrough
The question states that the mass of object P is greater than the mass of object Q. Mass is the quantity of matter in an object, so P contains more matter. Mass is also a measure of inertia, which is the resistance of an object to a change in its motion. A larger mass means a larger inertia, so P also has the greater resistance to change of motion. Therefore both entries in the table should be P, which is row A.
Key Takeaways
- Mass measures the amount of matter in an object.
- Mass is also a measure of inertia: the greater the mass, the harder it is to change the object's motion.
- This question links two ideas that both depend on mass, so the same object, P, is correct for both columns.
Common Mistakes
- Choosing B or C by thinking that a greater amount of matter and a greater resistance to motion could belong to different objects. Both properties are directly linked to mass.
- Confusing mass with weight. Weight is the force of gravity on an object and is not being asked about here.
Things to Be Careful About
- Read the table carefully: the question asks which object has the greater amount of matter and which has the greater resistance to change of motion.
- Remember that inertia is not a force; it is the property of matter that resists a change of motion.
A builder leaves two identical, heavy, stone tiles resting on soft earth. One is vertical and the other is horizontal.
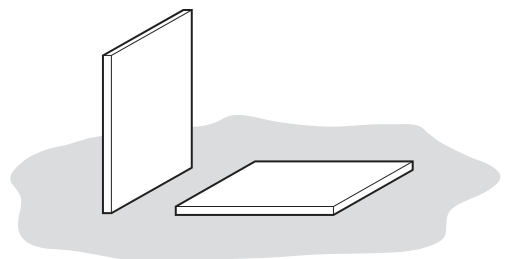
After a few hours, the vertical tile has started to sink into the soft earth. The horizontal one has not started to sink.
Which row correctly compares the forces and the pressures that the tiles exert on the earth?
Options
| forces | pressures | |
|---|---|---|
| A | different | different |
| B | different | same |
| C | same | different |
| D | same | same |
Working
The tiles are identical, so they have the same mass and therefore the same weight. The force each tile exerts on the earth is its weight, so the forces are the same.
Pressure is defined as force divided by area: . The vertical tile rests on its narrow end, so it has a much smaller contact area with the earth than the horizontal tile, which rests on its broad face. Since the forces are the same but the areas are different, the pressures are different.
Answer
C
C
Walkthrough
- Identify the force each tile exerts on the earth. Both tiles are identical, meaning they have the same mass. The force they exert on the horizontal ground is their weight (). Since their masses are equal, their weights are equal, so the forces they exert on the earth are the same.
- Identify the pressure each tile exerts. Pressure is given by the equation , where is the force and is the contact area.
- Compare the contact areas. The horizontal tile rests on its broad face, presenting a large contact area to the earth. The vertical tile rests on its narrow end edge, presenting a much smaller contact area.
- Conclude about the pressures. Since the forces are the same but the contact areas are different, the pressures must be different. Specifically, the vertical tile exerts a much larger pressure (), which is why it sinks into the soft earth while the horizontal one does not.
- Match with the options. Forces: same. Pressures: different. This corresponds to row C.
Key Takeaways
- The force an object exerts on a horizontal surface is its weight. Identical objects have the same weight and therefore exert the same force.
- Pressure depends on both force and contact area (). Changing the orientation of an object changes its contact area, which changes the pressure even if the force remains constant.
- A larger pressure causes a greater effect on soft surfaces, such as sinking.
Common Mistakes
- Confusing force with pressure: thinking that because one tile sinks and the other doesn't, the forces must be different. The force is the same (weight); it is the pressure that differs.
- Assuming the vertical tile has less weight or force because it is "standing up". Weight acts downwards regardless of orientation.
- Forgetting that pressure is inversely proportional to area.
Things to Be Careful About
- Distinguish clearly between force (weight, in newtons) and pressure (in pascals).
- Ensure the contact area is measured correctly: for the vertical tile, it is the small rectangular end face, not the large side face.
- The question asks to compare the forces and pressures; read the table carefully to match "same" and "different" to the correct columns.
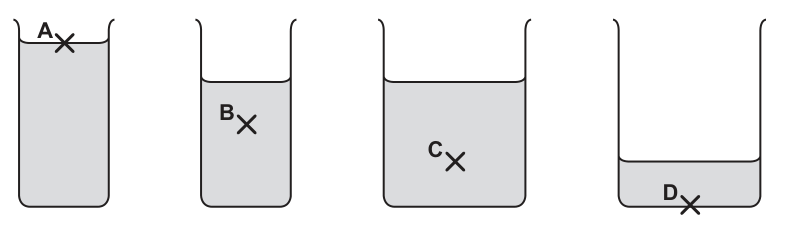
Four beakers contain the same liquid.
At which point is the pressure the greatest?
Options
Working
The pressure in a liquid is given by the equation:
where:
- is the density of the liquid (same for all beakers)
- is the gravitational field strength (constant)
- is the depth below the surface of the liquid
Since and are constant, the pressure is directly proportional to the depth . The greater the depth below the surface, the greater the pressure.
Examining the four beakers:
- Point A is near the surface, so its depth is small.
- Point B is below the surface, but not as deep as C.
- Point C is near the bottom of a medium-height column, giving it the greatest depth below the liquid surface.
- Point D is near the bottom of a shallow column, so its depth is small.
Point C has the greatest depth below the liquid surface, so the pressure is greatest at C.
Answer
C
C
Walkthrough
- Recall the formula for pressure in a liquid: .
- Identify the variables: is density, is gravitational field strength, is depth below the surface.
- Note that the liquid is the same in all four beakers, so is constant. is also constant.
- Therefore, pressure depends only on the depth . The greater the depth, the greater the pressure.
- Examine each point to determine its depth (the vertical distance from the liquid surface down to the point):
- A: small depth (near the surface).
- B: moderate depth.
- C: large depth (near the bottom of a relatively deep column of liquid).
- D: small depth (near the bottom of a shallow column of liquid).
- Point C has the largest value of , so it experiences the greatest pressure.
Key Takeaways
- Pressure in a liquid increases with depth below the surface.
- The formula is used, where is the vertical depth from the free surface, not the height from the bottom or the total volume of liquid.
Common Mistakes
- Confusing depth below the surface with height from the bottom or the total amount of liquid in the beaker. Pressure depends only on the depth below the surface (), not on the total volume or the shape of the container.
- Thinking that a taller beaker always means greater pressure at the bottom, without considering where the point is marked relative to the liquid surface.
Things to Be Careful About
- Ensure is measured vertically downwards from the free surface of the liquid to the point in question.
- The liquid is stated to be the "same liquid", so density is constant. If different liquids were used, density would also need to be considered.
The strength of the forces between the particles of a solid determines how much the solid expands when heated.
Which statement about these forces is correct?
Options
A The forces are strong so solids expand less than liquids and gases.
B The forces are strong so solids expand more than liquids and gases.
C The forces are weak so solids expand less than liquids and gases.
D The forces are weak so solids expand more than liquids and gases.
Working
Particles in a solid are held together by strong forces. When the solid is heated, the particles vibrate more, but the strong forces keep them close together, so the solid expands only a little. In liquids and gases the forces are weaker, so the particles can move apart more and the expansion is larger.
Therefore, solids expand less than liquids and gases because the forces between their particles are strong.
Answer
A
A
Walkthrough
This question is about the particle model of matter and thermal expansion.
In a solid, the particles are packed closely and are held in fixed positions by strong forces. When the solid is heated, the particles gain energy and vibrate more, but the strong forces prevent them from moving far apart. As a result, a solid expands only a little.
In a liquid, the particles have weaker forces between them and can move more freely, so a liquid expands more than a solid when heated. In a gas, the forces between particles are very weak, so the particles can spread out much more and a gas expands the most.
So the correct statement is A: the forces are strong, so solids expand less than liquids and gases.
Key Takeaways
- The strength of the forces between particles controls how much a material expands when heated.
- Strong forces keep particles closer together, so expansion is smaller.
- The usual order of expansion is gases expand most, liquids less, and solids least.
Common Mistakes
- Choosing B: strong forces do not make solids expand more; they restrict the movement of particles, so expansion is less.
- Choosing C: weak forces would allow more expansion, not less.
- Choosing D: it correctly says weak forces cause more expansion, but solids do not have weak forces.
Things to Be Careful About
- Do not confuse the strength of the forces with the amount of expansion. Stronger forces mean less expansion, not more.
- Remember that when a material is heated, its particles gain energy and move more, but the effect of heating depends on how strongly the particles are held together.
- The question is about solids compared with liquids and gases, so keep the three states in mind when deciding the correct statement.
Air is heated in a sealed container with constant volume.
Why does the air pressure increase when the temperature increases?
Options
A The air molecules expand.
B The air molecules bounce off each other more frequently.
C The air molecules bounce off the walls more frequently.
D The number of air molecules increases.
Working
When the air is heated, the molecules gain kinetic energy and move faster. In a sealed container of constant volume, the number of molecules and the container volume stay the same. The faster molecules collide with the container walls more frequently, so the force per unit area on the walls increases. This is the pressure increase.
- A is incorrect: molecules do not expand.
- B is incorrect: collisions between molecules do not create pressure on the walls.
- D is incorrect: the container is sealed, so the number of molecules does not increase.
Answer
C
C
Walkthrough
Heating a gas makes its molecules move faster because temperature is a measure of the average kinetic energy of the particles. In a sealed container with constant volume, the gas cannot expand and no extra gas can enter, so the number of molecules stays the same.
Gas pressure is caused by gas molecules hitting the walls of the container. When the molecules move faster, they hit the walls more often and with more force. More frequent and harder collisions mean a larger force on the same area of wall, so the pressure increases.
Option C is correct because it identifies the key idea: the molecules bounce off the walls more frequently.
Option A is wrong because molecules themselves do not expand. A gas expands only if it is allowed to take up more volume, but here the volume is fixed.
Option B is wrong because collisions between molecules do not push on the container walls. Pressure on the container is caused by collisions with the walls, not by molecule-molecule collisions.
Option D is wrong because the container is sealed, so no molecules can enter or leave. The number of molecules is constant.
Key Takeaways
- Gas pressure is caused by collisions of gas molecules with the walls of the container.
- Increasing temperature increases the average speed of the molecules.
- Faster molecules collide with the walls more frequently and with greater force, so pressure increases.
- In a sealed container, the number of molecules and the volume are constant.
Common Mistakes
- Choosing B because it mentions "more frequent collisions", but pressure is caused by collisions with the walls, not by molecules bouncing off each other.
- Thinking that the air molecules themselves expand when heated. Molecules do not expand; the gas as a whole would expand only if the volume were not fixed.
- Thinking that heating creates more molecules. A sealed container has a fixed number of molecules.
Things to Be Careful About
- Note the phrase "sealed container with constant volume": it tells you that the number of molecules and the volume do not change.
- Pressure is force per unit area on the walls, so only collisions with the walls matter.
- Temperature increase means the molecules have more kinetic energy and move faster, not that they get bigger.
A student determines the specific heat capacity of a metal by carrying out an experiment.
The list shows the apparatus that the student has available.
- electronic balance
- ruler
- thermometer
- heater operating at a power of 50 W
- stopwatch
- ammeter
- voltmeter
Which apparatus does the student use?
Options
A 1, 3, 4 and 5
B 1, 3, 6 and 7
C 2, 3, 4 and 6
D 3, 4, 5, 6 and 7
Working
The specific heat capacity is found from
where is the thermal energy supplied, is the mass and is the temperature rise.
- Mass is measured with the electronic balance (1).
- Temperature rise is measured with the thermometer (3).
- Energy supplied is , so the 50 W heater (4) and the stopwatch (5) are needed.
The ruler is not needed, and the ammeter and voltmeter are not needed because the heater power is already given as 50 W.
Answer
A
A
Walkthrough
The experiment is to determine the specific heat capacity of a metal. The key equation is
where is the specific heat capacity, is the thermal energy supplied to the metal, is the mass of the metal and is its temperature rise.
So the student needs to measure three things:
- Mass – using the electronic balance (1).
- Temperature rise – using the thermometer (3).
- Thermal energy supplied – the heater has a known power of 50 W, so the energy is . This needs the heater (4) and the stopwatch (5) to measure the time for which the heater is switched on.
That gives apparatus 1, 3, 4 and 5, which is option A.
The ruler is not needed because no length or volume measurement is required. The ammeter and voltmeter are not needed because the power of the heater is already stated as 50 W, so the student does not need to measure current and voltage.
Key Takeaways
- To find specific heat capacity you need the energy supplied, the mass and the temperature change.
- If the power of a heater is known, the energy supplied is found from , so a stopwatch is needed to measure the heating time.
- An ammeter and voltmeter are only needed if the electrical power has to be measured from .
Common Mistakes
- Choosing D because it includes the ammeter and voltmeter. This is wrong because the heater power is already given as 50 W, so there is no need to measure current and voltage.
- Choosing B because it includes the balance, thermometer, ammeter and voltmeter, but it misses the heater and stopwatch, without which the energy cannot be found.
- Choosing C because it includes a ruler, but the ruler is irrelevant here; no length or volume is needed for this method.
Things to Be Careful About
- Read the question carefully: the heater is stated to operate at 50 W, so electrical measuring instruments are unnecessary.
- Remember that the stopwatch measures the time the heater is on, which is needed to calculate .
- The electronic balance measures mass in kg (or g, which must be converted to kg when using the formula).
- The thermometer measures temperature rise in °C, which is the same size as a kelvin change, so no conversion is needed for .
When a liquid evaporates, molecules escape from its surface.
Which molecules escape, and what happens to the average kinetic energy of the molecules remaining in the liquid?
Options
A The less energetic molecules escape and the average kinetic energy decreases.
B The less energetic molecules escape and the average kinetic energy increases.
C The more energetic molecules escape and the average kinetic energy decreases.
D The more energetic molecules escape and the average kinetic energy increases.
Working
Evaporation happens when the most energetic molecules at the surface escape from the liquid. These molecules carry away energy. The remaining molecules have a lower average kinetic energy, so the liquid cools.
Answer
C
C
Walkthrough
Evaporation is a cooling process that happens at the surface of a liquid. The molecules in the liquid are moving with a range of speeds. Some molecules have more kinetic energy than others. The fastest-moving molecules near the surface have enough energy to overcome the forces holding them in the liquid, so they escape. These are the more energetic molecules.
When these energetic molecules leave, they take their kinetic energy with them. The molecules that stay behind have, on average, less kinetic energy. Since temperature is a measure of the average kinetic energy of the particles, the temperature of the remaining liquid falls. This is why evaporation causes cooling.
Therefore, the more energetic molecules escape and the average kinetic energy of the remaining liquid decreases. This is option C.
Key Takeaways
- Evaporation occurs at the surface of a liquid.
- The most energetic molecules escape.
- The average kinetic energy of the remaining liquid decreases.
- Lower average kinetic energy means a lower temperature, which is why evaporation cools the liquid.
Common Mistakes
- Choosing A or B: these say the less energetic molecules escape. This is wrong because less energetic molecules do not have enough energy to leave the liquid.
- Choosing D: this correctly says the more energetic molecules escape but then incorrectly says the average kinetic energy increases. Escaping molecules remove energy, so the average kinetic energy of those left behind decreases.
Things to Be Careful About
- Distinguish between the kinetic energy of individual molecules and the average kinetic energy of all the molecules in the liquid.
- Remember that temperature is related to the average kinetic energy, not the total energy of the liquid.
- This question is about evaporation, not boiling. Boiling occurs throughout the liquid, whereas evaporation happens only at the surface.
A sample of water in a beaker is at a temperature .
The surface area of the water is and an electric fan blows air across the top of the beaker at a speed .
For which values of , and does the water evaporate the most rapidly?
Options
| A | 18 | 45 | 0.1 |
| B | 24 | 50 | 1.9 |
| C | 38 | 70 | 5.0 |
| D | 38 | 45 | 4.7 |
Working
Evaporation is faster at a higher temperature , with a larger surface area , and with faster air movement across the surface.
Option C has the highest temperature (38 °C), the largest surface area (70 cm²), and the greatest air speed (5.0 m/s).
Answer
C
C
Walkthrough
Evaporation is the slow escape of fast-moving particles from the surface of a liquid. Its rate is increased by:
- Higher temperature () — more particles have enough energy to escape.
- Larger surface area () — more particles are at the surface and able to escape at once.
- Faster air movement () — the faster air removes the particles that have just evaporated, so they do not condense back.
We need the option that maximises all three. Comparing the rows, option C has the highest temperature (38 °C), the largest surface area (70 cm²), and the greatest air speed (5.0 m/s). So C is correct.
Key Takeaways
- Evaporation rate increases with temperature, surface area, and air movement.
- This question tests the recall of these three factors and the ability to read a table.
Common Mistakes
- Choosing D because it has the same temperature as C but a smaller surface area — check every column.
- Thinking that a larger temperature always dominates; here C dominates on all three.
Things to Be Careful About
- The unit of speed is given as m/s; it does not need converting for this comparison.
- The question asks for the most rapid evaporation — all three factors must be maximised.
Thermal energy passes quickly from hot regions of a metal to cold regions of the metal.
Why are metals good conductors of thermal energy?
Options
A Electrons in the metal vibrate about fixed points and quickly pass energy from one electron to the next.
B Electrons move quickly from ions in hot regions to ions in cold regions.
C Protons in the metal are close together and move quickly from hot to cold regions.
D Small ions of the metal move quickly from hot to cold regions through spaces in the metal lattice.
Working
Metals contain free (delocalised) electrons that can move through the metal lattice. When a metal is heated, the free electrons in the hot region gain kinetic energy and move quickly towards the cold region, carrying thermal energy with them. This makes metals good conductors.
Option A describes electrons vibrating about fixed points, which is the lattice vibration mechanism, not the main reason metals are good conductors. Option C is wrong because protons are in the nucleus and do not move through the lattice. Option D is wrong because the metal ions are fixed in the lattice and do not move from hot to cold regions.
Answer
B
B
Walkthrough
Metals have a lattice of positive ions surrounded by a sea of free electrons. When one end of a metal is heated, the free electrons in that region gain kinetic energy and move rapidly through the lattice. As they move, they collide with ions and other electrons, transferring thermal energy to cooler regions. This is why metals are good conductors of thermal energy.
Now look at each option:
- A says electrons vibrate about fixed points and pass energy from one electron to the next. This describes lattice vibration, not the free movement of electrons. It is not the main reason metals are good conductors.
- B says electrons move quickly from ions in hot regions to ions in cold regions. This matches the free-electron explanation and is correct.
- C says protons move from hot to cold regions. Protons are in the nucleus and do not move through the metal lattice, so this is wrong.
- D says small ions move from hot to cold regions. In a solid metal, ions are fixed in the lattice and do not move through the metal, so this is wrong.
Key Takeaways
- Metals conduct thermal energy mainly because of free electrons that can move through the lattice.
- The free electrons carry kinetic energy from hot regions to cold regions.
- Lattice vibrations also contribute to conduction, but the free-electron movement is the key reason metals are good conductors.
Common Mistakes
- Choosing A because it mentions electrons, but it describes vibration rather than movement.
- Thinking that ions move through the metal; they are fixed in the lattice.
- Confusing protons with electrons; protons are in the nucleus and do not move freely.
Things to Be Careful About
- The question asks specifically why metals are good conductors, so the answer must focus on free electrons.
- Option B says electrons move from ions in hot regions to ions in cold regions. It is the electrons that move, not the ions.
- Do not confuse thermal conduction in metals with the vibration of particles in non-metals.
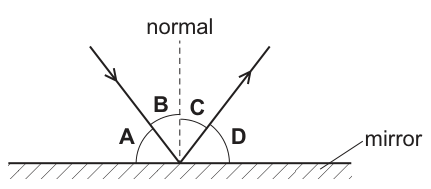
The diagram shows light striking a plane mirror and reflecting.
Which angle is the angle of incidence?
Options
Answer
B
B
Walkthrough
The angle of incidence is defined as the angle between the incident ray and the normal to the surface at the point of incidence. In the diagram, the normal is the dashed line perpendicular to the mirror. Angle B is the angle between the incident ray (the ray striking the mirror) and the normal. Therefore, B is the angle of incidence. Angle C is the angle of reflection (between the normal and the reflected ray). Angles A and D are the glancing angles between the rays and the mirror surface.
Key Takeaways
- The angle of incidence and the angle of reflection are always measured from the normal, not from the mirror surface.
- The normal is an imaginary line drawn perpendicular to the reflecting surface at the point where the light ray hits it.
Common Mistakes
- Choosing angle A or D: these are the angles between the rays and the mirror surface, not the normal. The mark scheme specifically rejects measuring from the mirror.
- Confusing the angle of incidence with the angle of reflection (angle C).
Things to Be Careful About
- Always look for the normal line in reflection diagrams. It is usually shown as a dashed line perpendicular to the surface.
- The law of reflection states that the angle of incidence equals the angle of reflection, but they are measured from the normal.
A shoe shop puts a mirror on the wall so that customers can look at their shoes.
The length of the mirror is 50 cm. A customer has eyes 150 cm above ground level.
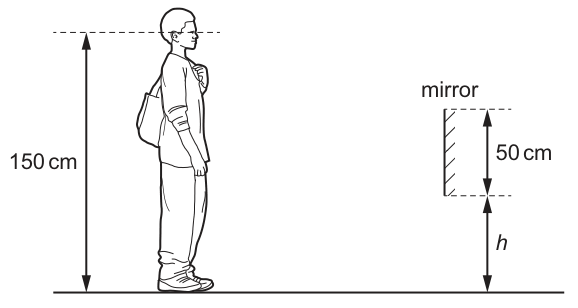
The bottom of the mirror is at height above the ground.
What is the smallest value of that allows the customer to see an image of his shoes in the mirror?
Options
A 0
B 25 cm
C 50 cm
D 75 cm
Working
To see the shoes (at ground level, 0 cm) in the mirror, a light ray from the shoes must reflect off the mirror and reach the eyes (at 150 cm).
By the law of reflection, the point on the mirror where this reflection occurs is exactly halfway between the height of the object and the height of the observer.
For this ray to hit the mirror, the top of the mirror must be at least at 75 cm above the ground.
The mirror is 50 cm long, and its bottom is at height . Therefore, the top of the mirror is at height .
The smallest value of that allows the customer to see his shoes is 25 cm.
Answer
B
B
Walkthrough
- Identify the heights involved: the shoes are at 0 cm (ground level) and the eyes are at 150 cm.
- Apply the law of reflection for a plane mirror. The ray from the shoes that reaches the eyes reflects off the mirror at a point exactly halfway between the vertical positions of the shoes and the eyes. This is because the angle of incidence equals the angle of reflection, making the two right-angled triangles formed by the ray, the mirror, and the horizontal distances congruent.
- Calculate the height of this reflection point: cm above the ground.
- The mirror must cover this reflection point for the ray to reach the eyes. Since the mirror has a length of 50 cm and its bottom is at height , its top is at height .
- For the top of the mirror to be at or above 75 cm, we need , which simplifies to cm.
- The smallest possible value for is therefore 25 cm. (If were any smaller, say 0 cm, the top of the mirror would only reach 50 cm, missing the 75 cm reflection point entirely.)
Key Takeaways
- To see a part of your body in a vertical plane mirror, the mirror must extend at least to the midpoint between the height of that body part and the height of your eyes.
- The required mirror position and size depend only on the vertical heights of the object and the observer, not on the horizontal distance from the mirror.
Common Mistakes
- Assuming the mirror must be at ground level () to see the shoes. This is incorrect because the mirror is only 50 cm long; if , the top is at 50 cm, which is below the required 75 cm reflection point.
- Forgetting that the mirror has a finite length and only calculating the reflection point without checking if it falls within the mirror's bounds.
Things to Be Careful About
- The question asks for the smallest value of , not the largest. The valid range for is 25 cm to 75 cm; any value in this range works, but 25 cm is the minimum.
- Ensure you are reading the diagram correctly: is the height of the bottom of the mirror, not the top.
Which description of a dull black surface is correct?
Options
A good emitter, good absorber and good reflector of radiation
B good emitter, poor absorber and poor reflector of radiation
C good emitter, good absorber and poor reflector of radiation
D poor emitter, poor absorber and poor reflector of radiation
Working
A dull black surface is a good emitter and a good absorber of infrared radiation, but a poor reflector.
- A is incorrect because it says a dull black surface is a good reflector.
- B is incorrect because it says a dull black surface is a poor absorber.
- D is incorrect because it says a dull black surface is a poor emitter and a poor absorber.
Answer
C
C
Walkthrough
This question tests the radiation properties of surfaces. A dull black surface is the best emitter and the best absorber of infrared radiation. It is also a poor reflector, which is why it appears black — most radiation falling on it is absorbed rather than reflected.
Look at each option:
- A says good emitter, good absorber and good reflector. The first two are correct, but a dull black surface is a poor reflector, so this option is wrong.
- B says good emitter, poor absorber and poor reflector. A dull black surface is a good absorber, so this option is wrong.
- C says good emitter, good absorber and poor reflector. This matches the correct properties, so it is the answer.
- D says poor emitter, poor absorber and poor reflector. A dull black surface is a good emitter and a good absorber, so this option is wrong.
Key Takeaways
- Dull black surfaces are good emitters and good absorbers of infrared radiation.
- Dull black surfaces are poor reflectors of radiation.
- Shiny, light-coloured surfaces are the opposite: poor emitters, poor absorbers and good reflectors.
Common Mistakes
- Choosing A because the first two properties are correct, without checking that a dull black surface is a poor reflector.
- Confusing the properties of dull black surfaces with those of shiny white or silver surfaces.
Things to Be Careful About
- Read all three properties in each option before choosing.
- The question is about radiation, not about conduction or convection.
- Remember that "dull black" means good absorption and good emission, but poor reflection.
The rays of light from a ray-box pass through three lenses placed at positions 1, 2 and 3.
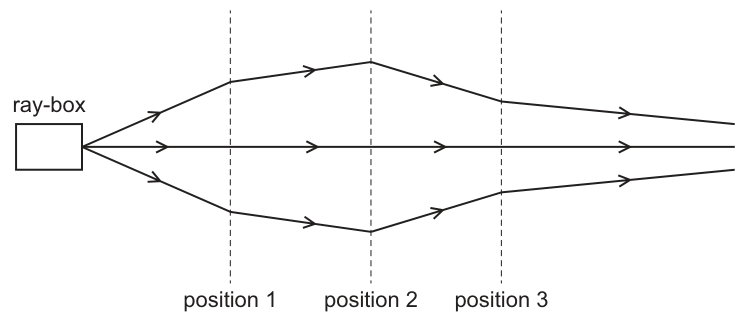
Which type of lens is used at each position?
Options
| position 1 | position 2 | position 3 | |
|---|---|---|---|
| A | converging | converging | converging |
| B | converging | converging | diverging |
| C | diverging | converging | diverging |
| D | diverging | diverging | converging |
Working
At position 1, the diverging rays from the ray-box are made parallel. A lens that makes diverging rays parallel is a converging lens (this occurs when the source is at its principal focus).
At position 2, the parallel rays are brought together (converged) towards each other. A lens that converges parallel rays is a converging lens.
At position 3, the rays that were previously converging are made parallel again. To do this, the rays must bend outwards (away from the principal axis). A lens that bends rays outwards is a diverging lens (specifically, the rays are converging towards the principal focus on the opposite side of the diverging lens).
The sequence of lenses is: converging, converging, diverging.
Answer
B
B
Walkthrough
- Position 1: The rays emerge diverging from the ray-box. After passing through the lens at position 1, they travel parallel to the principal axis. A lens that transforms diverging rays into parallel rays is a converging lens. This happens when the light source is placed at the principal focus of the converging lens.
- Position 2: The parallel rays enter the lens at position 2 and bend inwards, converging towards a point. A lens that brings parallel rays to a focus is a converging lens.
- Position 3: The rays entering this lens are converging (moving inwards towards the principal axis). After passing through the lens, they become parallel (moving straight, no longer inwards). This means the lens bent the rays outwards, away from the principal axis. A lens that bends rays outwards is a diverging lens. (Physically, the converging rays are directed towards the principal focus on the opposite side of the diverging lens, causing them to emerge parallel).
Matching this sequence (converging, converging, diverging) to the given options gives B.
Key Takeaways
- A converging lens bends light rays towards the principal axis. It can make diverging rays parallel (if from the focus) and parallel rays converge to a focal point.
- A diverging lens bends light rays away from the principal axis. It can make parallel rays diverge, or converging rays parallel (if they are converging towards the virtual principal focus on the opposite side).
- When analyzing a sequence of lenses, always compare the direction of the rays immediately before and immediately after each lens to determine the lens type.
Common Mistakes
- Confusing the overall path with the lens action: Seeing that the final rays are parallel and assuming the last lens is converging, without noticing that the rays were converging before it and had to be bent outwards to become parallel.
- Misidentifying diverging lens effects: Forgetting that a diverging lens can make converging rays parallel if they are directed towards its principal focus on the opposite side. Students often only remember that diverging lenses make parallel rays diverge.
Things to Be Careful About
- Ray bending direction: When identifying lens type, look at how the rays bend at the lens relative to their path before the lens. If rays bend inwards (towards the central axis), it is converging. If they bend outwards (away from the central axis), it is diverging.
- Converging rays at position 3: The top ray was traveling down and to the right. After position 3, it travels straight to the right. This is an upward bend (outwards). The bottom ray was traveling up and to the right, and after position 3 travels straight right. This is a downward bend (outwards). Outward bending confirms a diverging lens.
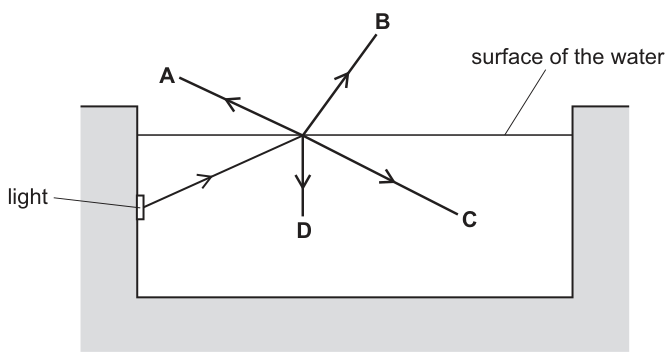
A swimming pool is lit by an underwater light.
A ray of light is incident on the surface of the water.
What is the path for the ray of light?
Options
Answer
C
The ray is travelling from water (optically denser) to air (optically less dense). For total internal reflection to occur, the angle of incidence must be greater than the critical angle. The critical angle for water is approximately 49°. From the diagram, the angle of incidence (angle between the incident ray and the vertical normal) is approximately 60°, which is greater than 49°. Therefore, total internal reflection occurs. The ray reflects back into the water. By the law of reflection, the angle of reflection equals the angle of incidence. Path C shows the ray reflecting back into the water at the correct angle. Path A is incorrect (wrong direction for reflection). Path B shows refraction into air, which does not happen when total internal reflection occurs. Path D is incorrect (light does not pass straight through without bending or reflect).
C
Walkthrough
- Identify the media: The light source is underwater, so the ray is travelling from water (denser medium, higher refractive index) towards air (less dense medium, lower refractive index).
- Recall refraction rules: When light travels from a denser to a less dense medium, it bends away from the normal. However, this only happens if the angle of incidence is less than the critical angle. If the angle of incidence exceeds the critical angle, total internal reflection (TIR) occurs.
- Recall the critical angle: The critical angle for the water-air boundary is approximately 49°.
- Estimate the angle of incidence: Look at the diagram. The normal is a vertical line at the point where the ray hits the surface. The incident ray comes from the bottom-left. The angle between the incident ray and the vertical normal appears to be roughly 60° (it is clearly greater than 45°).
- Apply the TIR condition: Since 60° > 49°, total internal reflection occurs. This means no light is refracted into the air. Path B (refraction into air) is incorrect.
- Determine the reflected path: The law of reflection states that the angle of incidence equals the angle of reflection. The incident ray comes from the bottom-left and hits the surface. It must reflect back into the water, towards the bottom-right. Path C matches this description. Path A reflects towards the top-left, which is geometrically incorrect for a horizontal surface reflection of a ray coming from bottom-left (that would require a vertical mirror).
- Conclusion: The correct path is C.
Key Takeaways
- Light travelling from a denser medium to a less dense medium can undergo total internal reflection.
- The critical angle for water is about 49°. If the angle of incidence is greater than this, all light is reflected back into the water.
- In total internal reflection, the law of reflection () still applies.
Common Mistakes
- Choosing B: Assuming the ray always refracts into the air. Candidates must check if the angle of incidence exceeds the critical angle.
- Choosing A: Misapplying the law of reflection. Path A looks like a reflection, but it's the wrong side. If a ray comes from bottom-left to a horizontal surface, it reflects to bottom-right, not top-left.
- Choosing D: Assuming light travels straight through. Light only travels straight if it hits the boundary at 0° (along the normal), which is not the case here.
Things to Be Careful About
- Angle measurement: Always measure the angle of incidence from the normal (the vertical line perpendicular to the surface), not from the surface itself.
- Critical angle values: Remember approximate critical angles for common materials: water ~49°, glass ~42°. If the diagram shows a shallow angle to the surface (steep angle to normal), TIR is likely.
- Direction of arrows: Ensure the arrows on the paths indicate the correct direction of travel. Path C has an arrow pointing away from the surface into the water, consistent with reflection.
When a converging lens is used as a magnifying glass, what is the nature of the image?
Options
A real and inverted
B real and upright
C virtual and inverted
D virtual and upright
Working
When an object is placed between a converging lens and its principal focus, the rays emerging from the lens diverge. The eye traces these rays back and sees an image on the same side as the object. This image cannot be formed on a screen, so it is virtual, and it has the same orientation as the object, so it is upright.
Answer
D
D
Walkthrough
A converging lens can form different types of image depending on where the object is placed. When the object is beyond the principal focus, the lens forms a real, inverted image. But when the object is placed between the lens and the principal focus, the rays leaving the lens spread out as if they came from a point behind the object. The eye sees a virtual image that is upright and larger than the object. This is exactly how a magnifying glass works. Therefore the correct option is D: virtual and upright.
Key Takeaways
- A converging lens does not always produce a real image; the image depends on the object distance.
- A magnifying glass is used with the object inside the focal length.
- A virtual image cannot be formed on a screen; a real image can.
- The image formed by a magnifying glass is upright, not inverted.
Common Mistakes
- Choosing A because a converging lens can form a real image, forgetting that this only happens when the object is beyond the principal focus.
- Confusing "virtual" with "inverted". Virtual and upright usually go together for a magnifying glass.
- Thinking the image must be real because it appears enlarged; enlargement does not mean the image is real.
Things to Be Careful About
- Remember the object must be inside the focal length for the magnifying glass effect.
- A real image can be projected onto a screen; a virtual image cannot.
- "Upright" means the image has the same orientation as the object, not that it is necessarily smaller or larger.
A sound wave consists of compressions and rarefactions.
Which type of wave is sound and how does the pressure in a rarefaction compare with the pressure in a compression?
Options
| type of wave | pressure in a rarefaction | |
|---|---|---|
| A | longitudinal | smaller |
| B | longitudinal | greater |
| C | transverse | smaller |
| D | transverse | greater |
Working
Sound is a longitudinal wave: the particles vibrate parallel to the direction of energy transfer. A rarefaction is a region where the particles are spread further apart, so its pressure is smaller than the pressure in a compression.
Answer
A
A
Walkthrough
Sound travels as a series of compressions and rarefactions. In a compression, the particles are pushed close together, so the pressure is higher than normal. In a rarefaction, the particles are spread further apart, so the pressure is lower than normal.
Sound is a longitudinal wave because the particles of the medium vibrate backwards and forwards along the same direction as the wave travels. This is different from a transverse wave, where the vibrations are at right angles to the direction of travel.
Looking at the options:
- A says longitudinal and smaller pressure in a rarefaction. This is correct.
- B says longitudinal but greater pressure in a rarefaction. The pressure in a rarefaction is smaller, not greater.
- C says transverse, which is wrong for sound.
- D says transverse and greater pressure, so both parts are wrong.
Key Takeaways
- Sound is a longitudinal wave.
- A sound wave consists of compressions (higher pressure) and rarefactions (lower pressure).
- The pressure difference between compressions and rarefactions is what allows sound to be detected by the ear.
Common Mistakes
- Thinking sound is a transverse wave because it can travel through solids and liquids as well as gases.
- Thinking a rarefaction has greater pressure because the particles are moving faster. In fact, the particles are more spread out, so the pressure is lower.
- Confusing the direction of vibration with the direction of energy transfer: in a longitudinal wave they are parallel, not perpendicular.
Things to Be Careful About
- Read the table carefully: the question asks for both the type of wave and the pressure comparison.
- Remember that "rarefaction" means a region of lower pressure, and "compression" means a region of higher pressure.
- Sound cannot travel through a vacuum because there are no particles to vibrate, but this question is only about the type of wave and pressure, not about the medium.
What happens to a sound wave when the note heard gets louder?
Options
A Its amplitude increases.
B Its frequency increases.
C Its speed increases.
D Its wavelength increases.
Working
Loudness of a sound is determined by the amplitude of the sound wave. A louder note has a larger amplitude. Frequency determines pitch, not loudness. Speed depends on the medium, and wavelength is linked to frequency and speed, neither of which changes with loudness.
Answer
A
A
Walkthrough
This question tests your understanding of the properties of sound waves. Loudness is determined by the amplitude of the sound wave. When a note gets louder, its amplitude increases. Frequency determines pitch, not loudness. The speed of sound depends on the medium it travels through, not how loud it is. Wavelength is related to frequency and speed, so it doesn't change just because the note gets louder.
Key Takeaways
- Amplitude determines loudness.
- Frequency determines pitch.
- Speed of sound depends on the medium.
- Wavelength is related to frequency and speed.
Common Mistakes
- Confusing loudness with pitch: loudness is about amplitude, pitch is about frequency.
- Thinking speed changes with loudness: speed depends on the medium.
Things to Be Careful About
- Remember that loudness is linked to amplitude, not frequency or speed.
A pulse of ultrasound from a sensor is reflected back to the sensor by a crack in a piece of metal and by the bottom surface of the metal.
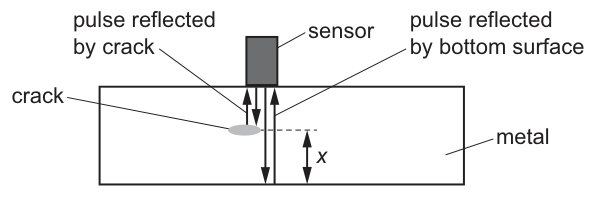
The reflection from the crack is received back at the sensor after the pulse is sent out.
The reflection from the bottom surface is received back at the sensor after the pulse is sent out.
The speed of ultrasound in the metal is .
What is the distance between the crack and the bottom surface of the metal?
Options
A 0.013 m
B 0.026 m
C 0.052 m
D 0.078 m
Working
The time difference between the two reflections is:
This is the extra time the pulse takes to travel to the bottom surface and back, compared to the crack and back. The extra distance travelled is .
Alternatively, calculate the depth to each surface:
Depth to crack
Depth to bottom
Answer
A
A
Walkthrough
The ultrasound pulse travels from the sensor to the crack and back in , and to the bottom surface and back in . The difference in these round-trip times, , is the extra time taken to travel from the crack to the bottom surface and back. Since the pulse covers a distance of in this extra time, we use to find . Substituting the values gives , so .
Key Takeaways
- Ultrasound pulses used in inspection travel to a reflector and back, so the total distance travelled is twice the depth.
- The difference in round-trip times between two reflectors gives the extra distance travelled between them.
Common Mistakes
- Forgetting to divide by 2 because the pulse travels to the surface and back. This leads to an answer of (Option B).
- Adding the two times instead of finding the difference, or using the total time to the bottom surface to find directly without subtracting the crack depth.
Things to Be Careful About
- The times given are round-trip times. Always divide by 2 when converting to a one-way depth.
- Pay attention to the powers of ten in the time values to avoid arithmetic errors.
A 12 V battery is connected to a resistor of resistance .
How much charge passes through the resistor in 30 minutes?
Options
A 3.6 C
B 220 C
C 250 C
D
Working
The current through the resistor is found using Ohm's law:
Convert the time to seconds:
The charge is current multiplied by time:
This is closest to option B, 220 C.
Answer
B
B
Walkthrough
The battery provides a p.d. of 12 V across a 100 Ω resistor. Ohm's law says , so the current is . This is the rate at which charge flows.
Next, the time must be in seconds because the unit of charge, the coulomb, is defined using seconds. 30 minutes is s.
Current is the charge passing per second, . Rearranging gives . Substituting: C. The options round this to 220 C, so B is correct.
Option A would result from using 30 s instead of 1800 s. The other options do not follow from the correct equations.
Key Takeaways
- Ohm's law lets you find the current from the p.d. and resistance.
- Charge is current multiplied by time: .
- Current must be in amperes and time in seconds to get charge in coulombs.
- In multiple-choice questions, the calculated value may be rounded to one of the options.
Common Mistakes
- Using 30 minutes as 30 seconds. This gives C, which is option A.
- Confusing current and charge: current is the rate of flow of charge, not the total charge itself.
- Forgetting to divide the p.d. by the resistance, or using the voltage as the current.
- Not including units, or mixing seconds and minutes.
Things to Be Careful About
- Always convert minutes to seconds before using .
- The current here is 0.12 A, not 12 A.
- The final charge is 216 C; the closest option is 220 C, so do not expect an exact match.
- The 12 V is the p.d. across the resistor, so it is the correct voltage to use in Ohm's law.
A circuit consists of a resistor connected between the positive terminal and the negative terminal of a power supply.
Which row describes the direction of conventional current and the direction of flow of free electrons in the resistor?
Options
| direction of conventional current | direction of flow of free electrons | |
|---|---|---|
| A | from negative to positive | from negative to positive |
| B | from negative to positive | from positive to negative |
| C | from positive to negative | from negative to positive |
| D | from positive to negative | from positive to negative |
Working
Conventional current is defined as the flow of positive charge, so in the external circuit it goes from the positive terminal to the negative terminal.
Free electrons are negatively charged, so they move in the opposite direction to conventional current: from the negative terminal to the positive terminal.
Row C gives conventional current from positive to negative and free electrons from negative to positive.
Answer
C
C
Walkthrough
This question tests a basic convention in electric circuits. Conventional current was defined before the discovery of electrons, so it is taken as the direction in which positive charge would flow. In the external circuit of a power supply, positive charge flows out of the positive terminal and returns to the negative terminal.
In a metal wire, the moving charges are free electrons, which are negatively charged. Opposite charges attract, so electrons are pulled toward the positive terminal and pushed away from the negative terminal. Therefore the free electrons flow from the negative terminal to the positive terminal, which is opposite to the direction of conventional current.
Check each row:
- Row A: conventional current from negative to positive is wrong; electron flow from negative to positive is also wrong.
- Row B: conventional current from negative to positive is wrong; electron flow from positive to negative is wrong.
- Row C: conventional current from positive to negative is correct; electron flow from negative to positive is correct.
- Row D: conventional current is correct, but electron flow from positive to negative is wrong.
So the correct option is C.
Key Takeaways
- Conventional current always flows from positive to negative in the external circuit.
- Free electrons in a metal flow from negative to positive, opposite to conventional current.
- The two directions are opposite because electrons are negatively charged.
Common Mistakes
- Choosing D: this gets the conventional current right but forgets that electrons flow in the opposite direction.
- Choosing A or B: these get the conventional current direction wrong.
- Thinking that electrons are positive charges and therefore flow in the same direction as conventional current.
Things to Be Careful About
- The question asks for two separate directions; both must match the correct convention.
- In a metal, current is carried by free electrons, but the conventional current direction is still taken as positive to negative.
- This is a convention, not a physical flow of positive charge in a metal wire.
The graph shows how the resistance of a thermistor varies with temperature.
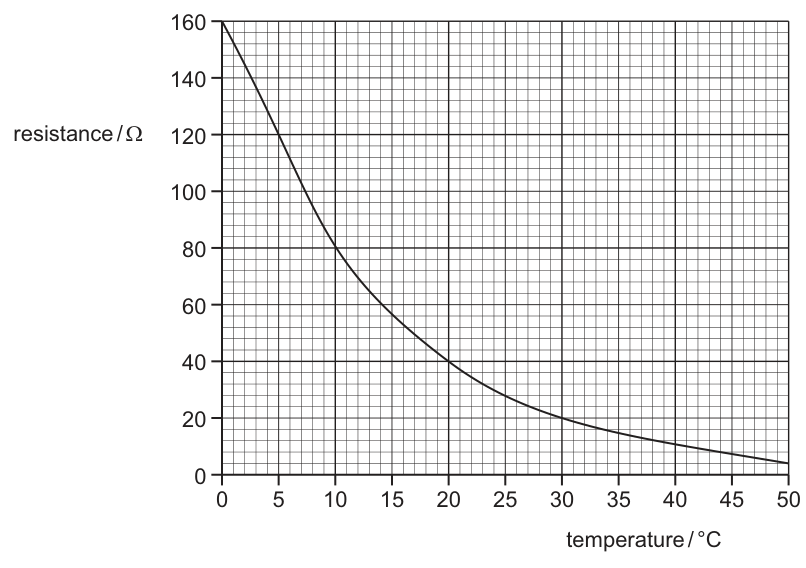
The thermistor is at a temperature of and is connected in series with a fixed resistor of resistance .
What is the combined resistance of both components?
Options
A
B
C
D
Working
From the graph, the resistance of the thermistor at is .
The thermistor and the fixed resistor are in series, so their resistances add:
Answer
D
D
Walkthrough
- The question asks for the combined resistance of a thermistor and a fixed resistor connected in series.
- First, read the resistance of the thermistor at from the provided graph. Locate on the horizontal axis, move up to the curve, and read across to the vertical axis. The value is .
- Next, apply the rule for resistors in series: the total resistance is the sum of the individual resistances.
- .
- This matches option D.
Key Takeaways
- Thermistors have a resistance that changes with temperature; their characteristic curve must be read directly from a graph.
- Resistors in series always add together:
Common Mistakes
- Reading the wrong value from the graph (e.g. reading 100 or 160 instead of 80).
- Forgetting to add the fixed resistor's resistance and just giving the thermistor's resistance (80 , option C).
- Subtracting the resistances instead of adding them.
- Confusing series with parallel and using the parallel formula.
Things to Be Careful About
- Ensure you are reading the graph at the correct temperature (, not or another value).
- The graph axes are linear, so reading is straightforward, but always check the scale (each major division is 20 , each small division is 4 ). At 10 C, the curve is exactly on the 80 line.
- The components are in series, so simple addition is used. If they were in parallel, the combined resistance would be less than the smallest individual resistance.
Each of the resistors in the circuit shown has a resistance of .
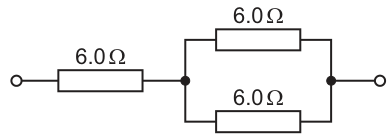
What is the total resistance of the circuit?
Options
A
B
C
D
Working
The two resistors on the right are connected in parallel. Their combined resistance is found using:
Alternatively, for two equal resistors in parallel, the equivalent resistance is , so .
This parallel combination is connected in series with the first resistor. The total resistance is the sum:
Answer
C
C
Walkthrough
The circuit in Fig. 9 consists of three resistors, each with resistance . To find the total resistance, we simplify the circuit step by step from the inside out.
First, look at the right-hand side of the circuit. Two resistors are connected in parallel. For resistors in parallel, the reciprocal of the total resistance is the sum of the reciprocals of the individual resistances:
Substituting the values:
Inverting gives . A useful shortcut for two equal resistors in parallel is that the equivalent resistance is half the value of one resistor ().
Next, this equivalent resistance is in series with the first resistor on the left. For resistors in series, the total resistance is simply the sum of the individual resistances:
This matches option C.
Key Takeaways
- Parallel resistors: The total resistance is always less than the smallest individual resistance. For two equal resistors in parallel, .
- Series resistors: The total resistance is the sum of the individual resistances ().
- Circuit simplification: Work from the inside out. Identify parallel blocks first, replace them with their equivalent resistance, then combine with series components.
Common Mistakes
- Adding all resistances in series: If a candidate ignores the parallel structure and adds all three (), they get (Option D). This is wrong because the right-hand resistors are clearly in parallel.
- Adding all resistances in parallel: If a candidate treats the entire circuit as parallel (), they get Option A. This is wrong because the first resistor is in series with the parallel pair.
- Wrong grouping: If a candidate adds the first two resistors in series () and then puts that in parallel with the third (), they get Option B. This misreads the circuit diagram; the first resistor is in series with the combination, not in series with just one of the parallel resistors.
- Unit errors: Forgetting to include the unit in the final answer or intermediate steps.
Things to Be Careful About
- Read the circuit diagram carefully: Distinguish between series connections (end-to-end, same current) and parallel connections (side-by-side, same voltage across the branch). In Fig. 9, the current splits after the first resistor, going through the two right-hand resistors separately.
- Significant figures: The question gives values to 2 significant figures (). The answer is also to 2 significant figures. Option D is given as (2 sig figs), but the correct answer is .
- Order of operations in calculation: Always simplify parallel parts first before adding series parts. The formula should be used correctly.
An alternating current (a.c.) generator is connected to an oscilloscope.
The diagram shows the trace produced on the oscilloscope screen.
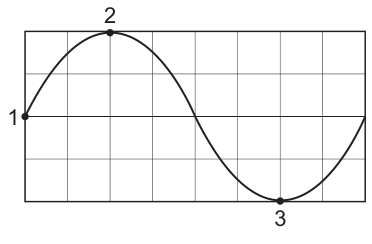
What are possible angles between the plane of the coil and the magnetic field direction at the times represented by points 1, 2 and 3?
Options
| 1 | 2 | 3 | |
|---|---|---|---|
| A | |||
| B | |||
| C | |||
| D |
Working
The induced e.m.f. (voltage) in an a.c. generator depends on the rate at which the coil cuts magnetic field lines.
- Zero voltage: Occurs when the plane of the coil is perpendicular to the magnetic field (the neutral plane). Here, the flux linkage is maximum, but the rate of change of flux is zero. The angle between the plane of the coil and the field is .
- Maximum voltage (peak or trough): Occurs when the plane of the coil is parallel to the magnetic field. Here, the flux linkage is zero, but the rate of cutting field lines is maximum. The angle between the plane of the coil and the field is or .
Analyzing the points on the trace:
- Point 1: The voltage is zero. The coil must be perpendicular to the field. Angle = .
- Point 2: The voltage is at a positive maximum. The coil must be parallel to the field. Angle = or .
- Point 3: The voltage is at a negative maximum (trough). The coil must be parallel to the field (on the opposite side of the rotation). Angle = or .
Checking the options:
- A & B: Incorrect because Point 1 is listed as (which would give max voltage, not zero).
- C: Point 1 = (correct, ). Point 2 = (correct, parallel, max voltage). Point 3 = (correct, parallel, max voltage in opposite direction).
- D: Point 2 = (incorrect, this would give zero voltage like ).
Thus, C is the correct set of angles.
Answer
C
C
Walkthrough
The question asks for the angle between the plane of the coil and the magnetic field direction at three specific points on an a.c. generator's output trace.
-
Understand the relationship between coil orientation and induced e.m.f.:
- When the plane of the coil is perpendicular to the magnetic field lines, the magnetic flux through the coil is at its maximum. However, the sides of the coil are moving parallel to the field lines at this instant, so they are not cutting them. The rate of change of flux linkage is zero, and the induced e.m.f. is zero. This position is called the neutral plane. The angle between the plane and the field is .
- When the plane of the coil is parallel to the magnetic field lines, the magnetic flux through the coil is zero. However, the sides of the coil are moving perpendicular to the field lines, cutting them at the maximum rate. The rate of change of flux linkage is maximum, and the induced e.m.f. is at a maximum (positive or negative peak). The angle between the plane and the field is or .
-
Analyze Point 1:
- The trace shows the voltage is zero at Point 1.
- Therefore, the coil is in the neutral plane.
- Angle between plane and field = .
- This eliminates options A and B immediately.
-
Analyze Point 2:
- The trace shows a positive maximum voltage (peak).
- Therefore, the coil is parallel to the field.
- Angle between plane and field = or .
- Option C suggests . Option D suggests . Since is perpendicular (like ), it would give zero voltage. So D is incorrect. C is consistent.
-
Analyze Point 3:
- The trace shows a negative maximum voltage (trough).
- Therefore, the coil is parallel to the field again, but rotating in the opposite sense relative to the circuit connections (or simply on the other side of the parallel position).
- Angle between plane and field = or .
- Option C suggests . This is consistent.
-
Conclusion:
- Point 1: (zero e.m.f.)
- Point 2: (positive max e.m.f., coil parallel)
- Point 3: (negative max e.m.f., coil parallel)
- This matches Option C.
Key Takeaways
- Zero e.m.f. occurs when the coil plane is perpendicular to the magnetic field (). This is the neutral plane.
- Maximum e.m.f. (peak or trough) occurs when the coil plane is parallel to the magnetic field ( or ).
- The induced e.m.f. is proportional to the rate of change of flux linkage, not the flux linkage itself. Maximum flux gives zero e.m.f.; zero flux gives maximum e.m.f.
Common Mistakes
- Confusing flux with e.m.f.: Thinking that maximum flux (perpendicular coil) gives maximum e.m.f. Remember: e.m.f. depends on the rate of change of flux.
- Misinterpreting the angle: Confusing the angle between the normal to the coil and the field with the angle between the plane of the coil and the field. The question specifies the angle between the plane and the field. If the angle was between the normal and the field, would be perpendicular (zero e.m.f.) and would be parallel (max e.m.f.).
- Ignoring the sign: Not realizing that both peaks (positive and negative) correspond to the coil being parallel to the field ( or ), just on opposite sides of the rotation.
Things to Be Careful About
- Read the angle definition carefully: The question asks for the angle between the plane of the coil and the field. Many textbooks define the angle in as the angle between the normal to the coil and the field. Be careful not to mix these up. If , the plane is perpendicular ( to field) and e.m.f. is zero. If the question asks for angle of the plane, use for zero e.m.f.
- Graph interpretation: Point 2 is a positive peak and Point 3 is a negative trough. Both represent maximum magnitude of e.m.f., so the coil must be parallel to the field in both cases ( or ). Option D incorrectly assigns to Point 2, which is a perpendicular position (zero e.m.f.).
A beam of beta particles travelling vertically downwards enters the magnetic field between two magnetic poles.
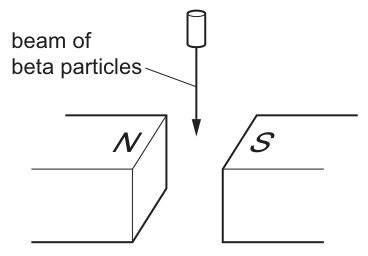
The beta particles experience a force due to the magnetic field.
What is the direction of the force on a beta particle as it enters the magnetic field?
Options
A towards the top of the page
B towards the bottom of the page
C into the page
D out of the page
Working
Beta particles are high-speed electrons, which carry a negative charge. They are moving vertically downwards, so the conventional current is vertically upwards.
The magnetic field lines run from the North pole to the South pole, which is from left to right in the diagram.
Applying Fleming's left-hand rule:
- First finger (magnetic field) points to the right.
- Second finger (conventional current) points upwards.
- The thumb (force) points into the page.
Therefore, the force on the beta particles is into the page.
Answer
C
C
Walkthrough
- Identify the nature of beta particles: Beta particles are electrons, which have a negative charge. This is a crucial piece of knowledge that is easy to forget.
- Determine the direction of conventional current: Conventional current is defined as the flow of positive charge. Since negative beta particles are moving vertically downwards, the conventional current is in the opposite direction, i.e., vertically upwards.
- Determine the direction of the magnetic field: Magnetic field lines always point from the North pole to the South pole. In the diagram, the North pole is on the left and the South pole is on the right, so the magnetic field is directed horizontally from left to right.
- Apply Fleming's left-hand rule: This rule gives the direction of the force on a current-carrying conductor or a moving charge in a magnetic field.
- Point the first finger in the direction of the magnetic field (to the right).
- Point the second finger in the direction of the conventional current (upwards).
- Your thumb will point in the direction of the force. In this configuration, the thumb points away from you, into the page.
Key Takeaways
- Beta particles are negatively charged electrons. Alpha particles are positively charged helium nuclei. Gamma rays are uncharged electromagnetic waves.
- Conventional current is always opposite to the direction of electron flow.
- Fleming's left-hand rule is used to find the direction of force (motor effect): First finger = Field, Second finger = Current, Thumb = Thrust (Force).
Common Mistakes
- Using the wrong current direction: A common mistake is to point the second finger downwards (the direction of the beta particles). Because beta particles are negative, the conventional current is upwards. If you do this, you will incorrectly conclude the force is out of the page (Option D).
- Confusing left and right hand rules: Fleming's right-hand rule is for generators (induced current). This question is about the motor effect (force on a current/charge), so the left hand must be used.
Things to Be Careful About
- Always check the charge of the particle. Beta particles are negative, so the conventional current is opposite to their velocity. If the question asked about alpha particles (positive), the current would be in the same direction as their motion.
- Ensure the magnetic field direction is correctly identified as North to South, not South to North.
A step-up transformer is connected between a power station and a long-distance electricity transmission cable.
What is the purpose of the step-up transformer, and does it operate using alternating current (a.c.) or using direct current (d.c.)?
Options
| purpose of a step-up transformer | current used | |
|---|---|---|
| A | to decrease the current in the cable | d.c. |
| B | to decrease the current in the cable | a.c. |
| C | to increase the current in the cable | d.c. |
| D | to increase the current in the cable | a.c. |
Working
A step-up transformer increases the voltage. For a fixed power, , so a higher voltage means a smaller current. The purpose is to decrease the current in the cable, which reduces the power loss in the transmission lines.
A transformer works by electromagnetic induction: the alternating current in the primary coil produces a changing magnetic field, which induces an e.m.f. in the secondary coil. A direct current produces a steady magnetic field, so no e.m.f. is induced. Therefore the transformer must use a.c.
- A — correct purpose, but wrong current (d.c.).
- B — correct purpose and correct current. ✔
- C — wrong purpose and wrong current.
- D — wrong purpose, correct current.
Answer
B
B
Walkthrough
The question asks two things: the purpose of a step-up transformer in power transmission, and whether it operates on a.c. or d.c.
Purpose. A step-up transformer raises the voltage (e.g. from 25 kV to 400 kV). Since the power being transmitted is roughly fixed, tells us that if goes up, must go down. The transmission cable has resistance , so it loses power at a rate . Lowering the current therefore greatly reduces the wasted energy in the cable. So the purpose is to decrease the current in the cable — not to increase it.
Current type. A transformer has two coils linked by an iron core. For an e.m.f. to be induced in the secondary coil, the magnetic field in the core must be changing. An alternating current gives a continuously changing field, so induction happens. A direct current gives a steady field, so once the field is established there is no change and no induced e.m.f. — the transformer would simply not work. Hence it must use a.c.
Only option B combines both correct statements.
Key Takeaways
- A step-up transformer increases voltage and therefore decreases current for the same power.
- The reason for using high voltage in transmission is to reduce the current and so reduce power losses in the cables.
- Transformers rely on electromagnetic induction, which needs a changing magnetic field, so they only work with alternating current.
Common Mistakes
- Choosing C or D: thinking the transformer "increases the current". A step-up transformer increases voltage, not current — the current actually falls.
- Choosing A: knowing the correct purpose but forgetting that a transformer cannot work on d.c. Direct current produces a steady magnetic field, so no e.m.f. is induced.
- Writing "the transformer increases the power" — transformers (ideally) keep power the same; they change voltage and current.
Things to Be Careful About
- Remember : for fixed power, voltage and current are inversely related.
- The power loss in a cable is , so halving the current quarters the loss — this is why step-up transformers are used.
- A transformer needs a changing magnetic field; that is the physical reason d.c. cannot be used.
Each diagram shows the nucleus of an atom.

Which diagrams show isotopes of the same element?
Options
A 1 and 2
B 1 and 4
C 2 and 3
D 3 and 4
Working
Isotopes of the same element have the same number of protons (same atomic/proton number) but a different number of neutrons (different nucleon/mass number).
Using the key (shaded circle = proton, unshaded circle = neutron):
- Nucleus 1: and
- Nucleus 2: and
- Nucleus 3: and
- Nucleus 4: and
Nuclei 1 and 4 both have but have different numbers of neutrons ( and ), so they are isotopes of the same element.
Answer
B
B
Walkthrough
- Define isotopes: Isotopes are atoms of the same chemical element that have the same number of protons (same proton number ) but different numbers of neutrons (and therefore different nucleon numbers ).
- Count the particles in each nucleus:
- In the key, shaded circles represent protons and unshaded circles represent neutrons.
- Diagram 1: Contains shaded circles (protons) and unshaded circles (neutrons).
- Diagram 2: Contains shaded circles (protons) and unshaded circles (neutrons).
- Diagram 3: Contains shaded circles (protons) and unshaded circles (neutrons).
- Diagram 4: Contains shaded circles (protons) and unshaded circles (neutrons).
- Compare the nuclei:
- Diagram 1 and Diagram 4 each contain exactly protons, which means they belong to the same element (, lithium).
- Because Diagram 1 has neutrons and Diagram 4 has neutrons, their nucleon numbers differ, making them isotopes of one another.
Therefore, the correct pair is 1 and 4 (Option B).
Key Takeaways
- The identity of an element is determined exclusively by its proton number (atomic number).
- Isotopes share identical proton numbers but have different numbers of neutrons.
Common Mistakes
- Confusing the key by swapping protons (shaded) and neutrons (unshaded).
- Confusing isotopes (same number of protons) with isobars (same total nucleon number) or isotones (same number of neutrons).
Things to Be Careful About
- Count carefully across all rows in tightly packed particle models to avoid miscounting overlapping circles.
A radioactive nucleus X decays to another radioactive nucleus. After a number of decays, a stable nucleus Q is produced.
The proton number (atomic number) of X is equal to that of Q. The nucleon number (mass number) of X is four more than that of Q.
Which radiations are emitted to produce Q?
Options
A two alpha-particles
B one alpha-particle and one beta-particle
C two alpha-particles and one beta-particle
D one alpha-particle and two beta-particles
Working
An alpha-particle removes 4 from the nucleon number and 2 from the proton number: , .
A beta-particle leaves the nucleon number unchanged and adds 1 to the proton number: , .
The overall change from X to Q is and .
One alpha-particle gives , . Two beta-particles then give , restoring the proton number to its original value.
So the emissions are one alpha-particle and two beta-particles.
Answer
D
D
Walkthrough
The question tells us two things about the overall change from X to Q:
- the proton number (atomic number) of X equals that of Q, so ;
- the nucleon number (mass number) of X is four more than that of Q, so .
Now recall what each emission does to the nucleus:
- An alpha-particle is a helium nucleus . When it is emitted, the parent nucleus loses 4 from its nucleon number and 2 from its proton number.
- A beta-particle is a fast electron . When it is emitted, a neutron changes into a proton, so the proton number increases by 1 while the nucleon number stays the same.
We need a combination that gives and .
One alpha-particle gives and . That fixes the nucleon number change, but the proton number is now 2 too low. Two beta-particles each add 1 to the proton number, giving and restoring it to the original value. So the answer is one alpha-particle and two beta-particles — option D.
Checking the others: two alphas change by , not ; one alpha and one beta leaves ; two alphas and one beta gives and . None match the required net change.
Key Takeaways
- An alpha emission changes both the nucleon number (by ) and the proton number (by ).
- A beta emission changes only the proton number (by ); the nucleon number is unchanged.
- To find what radiations were emitted, work out the net change in and and match it to the effects of each radiation.
Common Mistakes
- Forgetting that a beta-particle increases the proton number by 1 (a neutron becomes a proton), and instead thinking it decreases it.
- Counting only the nucleon number change and ignoring the proton number, which would wrongly select option B.
- Confusing the effect of an alpha-particle with that of a beta-particle.
Things to Be Careful About
- Use nuclide notation: for alpha and for beta, and check both the top (nucleon) and bottom (proton) numbers balance.
- The proton number of X equals that of Q — this is the key clue that the number of beta emissions must exactly cancel the proton loss from the alpha emission(s).
The graph shows the results of an experiment to measure the count rate of a radioactive isotope.
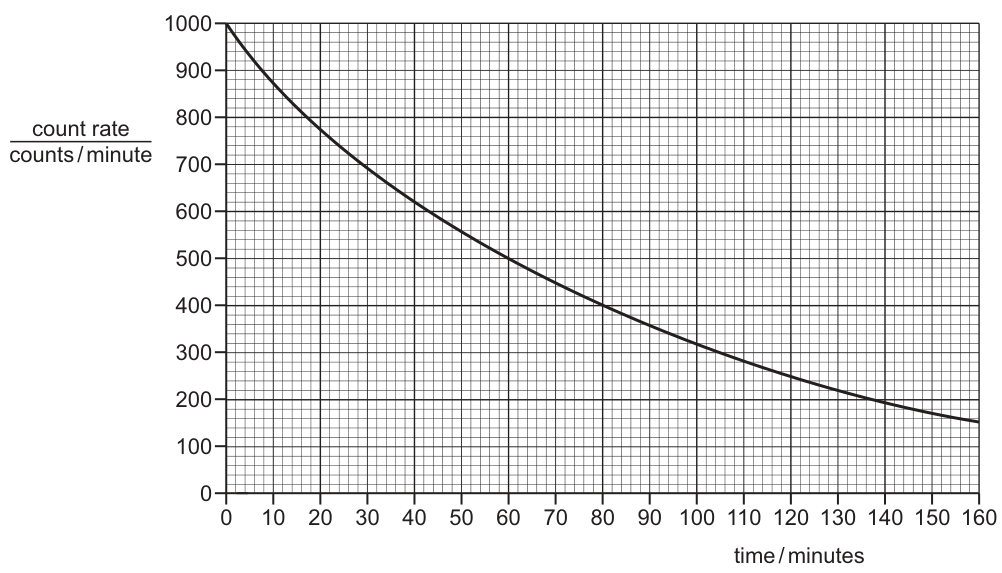
What is the half-life of the isotope?
Options
A 60 minutes
B 80 minutes
C 100 minutes
D 160 minutes
Working
The half-life is the time taken for the count rate to fall to half its initial value.
- Initial count rate: At time , the count rate is counts/minute.
- Half the initial value: counts/minute.
- Read the time: On the graph, a count rate of corresponds to a time of minutes.
- Verification: Half of is . The graph shows a count rate of at minutes. The time difference is minutes, confirming the half-life is constant.
The half-life is minutes.
Answer
A
A
Walkthrough
To find the half-life from a decay curve, follow these steps:
- Identify the starting point: Look at the graph at time . The curve starts at a count rate of counts/minute. This is the initial activity (proportional to the number of undecayed nuclei).
- Calculate half the initial value: The half-life is defined as the time taken for the count rate to halve. Half of is counts/minute.
- Read the time from the graph: Locate on the vertical axis (count rate). Move horizontally to the right until you hit the curve. From that point on the curve, move vertically down to the horizontal axis (time). You read minutes. This means it took minutes for the count rate to drop from to . Therefore, the half-life is minutes.
- Check with a second half-life: To be sure, find the time it takes to halve again. Half of is . Locate on the vertical axis, move to the curve, and read the time on the horizontal axis. It is minutes. The time taken for this second halving is minutes. Since the half-life is constant, this confirms the answer.
Key Takeaways
- The half-life is the time taken for the count rate (or activity) to decrease to half of its current value.
- On a graph of count rate against time, you can determine the half-life by picking any starting count rate, finding half that value, and measuring the time difference between the two points on the curve.
- Radioactive decay is exponential; the half-life is constant regardless of which part of the curve you measure.
Common Mistakes
- Reading the wrong axis: Confusing the time axis with the count rate axis. Always ensure time is on the horizontal axis and count rate is on the vertical axis.
- Forgetting to subtract time: When checking the second half-life (from to ), a student might read the time minutes and think the half-life is minutes. They must calculate the difference: minutes.
- Assuming the curve reaches zero: The count rate approaches zero asymptotically but never truly reaches it in a simple model. The half-life is measured by halving, not by finding when the graph hits the x-axis.
Things to Be Careful About
- Precision in reading graphs: Ensure you read the values to the correct number of decimal places or grid divisions. In this graph, the major grid lines on the x-axis are every minutes, and on the y-axis every counts/minute. The values and fall clearly on grid intersections or midpoints.
- Background radiation: In real experiments, the count rate includes background radiation. The graph would flatten out at a non-zero value (the background count rate). Here, the graph continues to drop significantly, so we assume background radiation is negligible or has been subtracted. If background radiation were significant (e.g., counts/min), you would halve to get , add back to get , and find the time for that. Since this is a simplified exam question, no background subtraction is needed.
During fission, a nucleus of uranium-235 (U-235) absorbs one neutron to produce two daughter nuclei and three neutrons.
Krypton-92 (Kr-92) is one of the daughter nuclei and it contains 92 nucleons.
How many nucleons does the other daughter nucleus contain?
Options
A 92
B 141
C 144
D 327
Working
The total number of nucleons is conserved during fission.
Before fission, the uranium-235 nucleus plus the absorbed neutron gives:
After fission, the products are Kr-92, the unknown daughter nucleus, and three neutrons:
So
Answer
The other daughter nucleus contains 141 nucleons, so the correct option is B.
B
Walkthrough
This question is about conservation of nucleons during nuclear fission. A nucleon is either a proton or a neutron, so the nucleon number is the total number of protons and neutrons in a nucleus. The number written after the element name, U-235 or Kr-92, is the nucleon number.
Before fission, a uranium-235 nucleus has 235 nucleons. It absorbs one neutron, which adds one more nucleon. So the total number of nucleons before fission is:
After fission, the products are:
- Kr-92, with 92 nucleons;
- the other daughter nucleus, with an unknown number of nucleons, call it ;
- three neutrons, each contributing 1 nucleon, so 3 nucleons in total.
Nucleons are conserved, so the total after fission must also be 236:
Solving this gives:
So the other daughter nucleus contains 141 nucleons, which is option B.
Key Takeaways
- The number in a nuclear symbol such as U-235 or Kr-92 is the nucleon number.
- In any nuclear reaction, the total number of nucleons is conserved: total before equals total after.
- A neutron counts as one nucleon.
- Fission splits a heavy nucleus into two smaller daughter nuclei, usually with extra neutrons released.
Common Mistakes
- Forgetting the absorbed neutron: using 235 as the total before fission instead of 236.
- Forgetting the three released neutrons: , which is option C.
- Simply adding 235 and 92 to get 327, option D, which ignores the fission process.
- Assuming the two daughter nuclei must contain the same number of nucleons.
Things to Be Careful About
- U-235 means 235 nucleons, not 235 grams or 235 protons.
- The proton number is not needed to answer this question.
- Count the absorbed neutron as an extra nucleon before fission, and count each released neutron as one nucleon after fission.
- The question asks for the number of nucleons, not the mass in kilograms or the number of protons.
The orbital speed of a planet around the Sun is and its orbital period is .
Jupiter is further from the Sun than the Earth.
Which planet has the greater value for and which planet has the greater value for ?
Options
| greater orbital speed | greater orbital period | |
|---|---|---|
| A | Earth | Earth |
| B | Earth | Jupiter |
| C | Jupiter | Jupiter |
| D | Jupiter | Earth |
Working
A planet closer to the Sun travels faster in its orbit, so Earth has the greater orbital speed . A planet further from the Sun takes longer to complete one orbit, so Jupiter has the greater orbital period .
Answer
B
B
Walkthrough
The question asks which planet has the greater orbital speed and which has the greater orbital period , given that Jupiter is further from the Sun than Earth.
For planets orbiting the Sun, the closer the planet, the stronger the Sun's gravity, so the planet must move faster to stay in orbit. Therefore Earth, being closer, has the greater orbital speed .
The orbital period is the time taken to complete one full orbit. A planet further out has a much larger orbit to travel, and it moves more slowly, so its period is longer. Therefore Jupiter has the greater orbital period .
This matches option B.
Key Takeaways
- A planet closer to the Sun moves faster in its orbit.
- A planet further from the Sun takes longer to complete one orbit.
- Orbital speed and orbital period are linked: a larger orbit and slower speed both make the period longer.
Common Mistakes
- Choosing option C (Jupiter for both) — thinking a larger orbit means a faster speed, which is wrong because the planet must move slower to stay in a wider orbit.
- Choosing option A (Earth for both) — forgetting that the longer path and slower speed give Jupiter a longer period.
- Confusing orbital speed with orbital period — they are different quantities.
Things to Be Careful About
- Read the table columns carefully: the first column is orbital speed, the second is orbital period.
- Remember the physics: closer planet → faster speed; further planet → longer period.
What is the Earth’s position in the order of planets from the Sun?
Options
A closest planet to the Sun
B second closest planet to the Sun
C third closest planet to the Sun
D fourth closest planet to the Sun
Working
The order of the planets from the Sun is:
Mercury, Venus, Earth, Mars, Jupiter, Saturn, Uranus, Neptune.
Earth is therefore the third closest planet to the Sun.
Answer
C
C
Walkthrough
The question asks for Earth's position in the order of planets from the Sun. You need to recall the standard order of the eight planets, starting from the Sun:
Mercury, Venus, Earth, Mars, Jupiter, Saturn, Uranus, Neptune.
Earth comes after Mercury and Venus, so it is the third planet from the Sun. Therefore the correct option is C.
Key Takeaways
- The order of the planets from the Sun is a basic fact in the Earth and Solar System topic.
- Earth is the third planet from the Sun.
- The first four planets are Mercury, Venus, Earth and Mars.
Common Mistakes
- Choosing A: Mercury is the closest planet to the Sun, not Earth.
- Choosing B: Venus is the second closest planet to the Sun, not Earth.
- Choosing D: Mars is the fourth closest planet to the Sun, not Earth.
Things to Be Careful About
- Make sure you count from the Sun, not from the outside of the Solar System.
- The order is about distance from the Sun, not about planet size or mass.
- In the current syllabus, there are eight planets; Pluto is not counted as a planet.
Your score so far
Answer a question to start scoring
Your marks add up here as you work through the paper.