Physics 5054/21 — October/November 2024
Cambridge O-Level · Theory · worked solutions for every part, with the mark scheme
Topics Forces · Energy, Work and Power · Thermal Properties of Matter · General Properties of Waves · Mass, Weight and Density · Transfer of Thermal Energy · +11 more
A trolley of mass 0.20 kg is at rest on a frictionless surface.
A block of wood is attached to the trolley.
The volume of the block of wood is , and the density of the wood is .
Working
Answer
0.98
0.98
Walkthrough
- The mass of the wood block is found using the density formula rearranged as . Substituting the given values gives .
- The combined mass is the sum of the trolley's mass and the wood's mass: .
Key Takeaways
- Density is mass per unit volume, so mass can be calculated as .
- The total mass of a system is the sum of the masses of its individual parts.
Common Mistakes
- Forgetting to add the mass of the trolley to the mass of the wood block.
- Using the wrong formula for density (e.g., ).
Things to Be Careful About
- The volume is given in and density in , so the calculated mass is directly in kg. No unit conversion is needed here.
Fig. 1.1 shows that a student attaches a spring of spring constant to the front of the trolley.
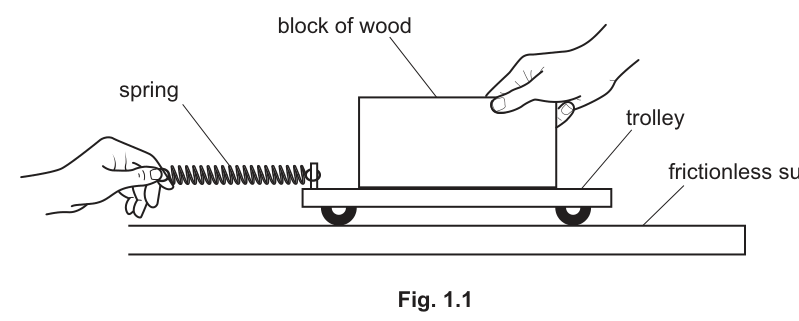
The student holds the trolley and block and stretches the spring. He releases the trolley and block. The trolley and block accelerate from rest.
As the trolley and block accelerate, the student keeps the extension of the spring at 0.035 m.
Working
Answer
0.49
0.49
Walkthrough
- The force exerted by a spring within its limit of proportionality is given by Hooke's law: .
- Substitute the spring constant and the extension .
- .
Key Takeaways
- Hooke's law states that the force exerted by a spring is directly proportional to its extension ().
- The spring constant is in and extension must be in metres for the force to be in Newtons.
Common Mistakes
- Using an incorrect formula, such as .
- Confusing extension with the total length of the spring.
Things to Be Careful About
- The extension is already given in metres (), so no conversion is required. The force is constant because the extension is kept constant.
The trolley and block are pulled a distance of 0.86 m by the spring.
Calculate the work done on the trolley.
work done = ______ J
Working
Answer
0.42
0.42
Walkthrough
- Work done is defined as force multiplied by the distance moved in the direction of the force: .
- Use the constant force from part (i): .
- The distance moved is .
- . Rounding to two significant figures gives .
Key Takeaways
- Work done (in joules) equals force (in newtons) times distance (in metres).
- When a constant force is applied over a distance, the work done is simply the product of the two.
Common Mistakes
- Using the wrong formula for work done, such as .
- Carrying forward an incorrect force value from part (i) without recalculating.
Things to Be Careful About
- The force is constant because the extension is kept constant at . This justifies using directly. Round the final answer to an appropriate number of significant figures (two, matching the given data).
Explain why the power transferred to the trolley and block increases as the speed increases.
Answer
As the speed increases, the distance moved in a given time (or one second) increases.
Since the force is constant, the work done in that time increases.
Power is the work done per unit time, so the power transferred increases.
The distance moved in a given time increases, so the work done in that time increases, meaning the work done per unit time (power) increases.
Walkthrough
- Power is defined as the rate of doing work, or work done per unit time: .
- As the trolley accelerates, its speed increases.
- Because the speed is higher, the distance moved in any given time interval (such as one second) is greater.
- Since the force is constant and the distance moved in that time is greater, the work done in that time interval increases.
- Therefore, the work done per unit time (power) increases.
Key Takeaways
- Power is the rate of energy transfer or work done: .
- An increase in speed means more distance is covered in the same amount of time, leading to more work done per second.
Common Mistakes
- Stating "power increases because speed increases" without explaining the link to work done or distance.
- Confusing power with force or work done.
Things to Be Careful About
- The mark scheme specifically looks for the link between speed, distance moved in a given time, and work done in that time. Ensure all three steps are clearly stated.
A student makes a ball from modelling clay. The ball has a mass of 0.20 kg.
She drops the ball from a height of 40 m above the ground.
Calculate the initial gravitational potential energy of the ball.
gravitational potential energy = ______ J
Working
Taking the ground as the zero level of gravitational potential energy:
Answer
78.4 J
78.4 J
Walkthrough
The ball is 40 m above the ground, so it has gravitational potential energy because of its position in the Earth's gravitational field. The equation is
where is the mass in kg, is the gravitational field strength and is the height in m. Substituting the values gives
The ground is taken as the zero level of gravitational potential energy, so this is the initial GPE of the ball.
Key Takeaways
- Gravitational potential energy is stored energy due to height in a gravitational field.
- The formula uses mass in kg, height in m and in N/kg.
- The unit of energy is the joule (J).
Common Mistakes
- Using the weight ( N) as the energy instead of multiplying by the height.
- Forgetting to multiply by .
- Using the height in cm without converting to m.
Things to Be Careful About
- Use as used in the mark scheme.
- The unit is joules, not newtons.
- The answer 78.4 J is acceptable; the mark scheme also accepts 78 J.
Calculate the speed of the ball immediately before the ball hits the ground.
Ignore the effect of air resistance.
speed = ______ m / s
Working
Ignoring air resistance, all the initial gravitational potential energy becomes kinetic energy just before impact:
Answer
28 m/s
28 m/s
Walkthrough
Air resistance is ignored, so no energy is lost to the surroundings. The initial gravitational potential energy is all converted to kinetic energy just before the ball hits the ground:
So
The mass cancels, giving
This is the speed immediately before impact.
Key Takeaways
- Energy is conserved when there is no friction or air resistance.
- The kinetic energy just before impact equals the initial gravitational potential energy.
- Because the mass cancels, the impact speed does not depend on the mass of the ball.
Common Mistakes
- Forgetting to take the square root, giving 784 m/s.
- Using instead of .
- Thinking the mass must be known to find the speed.
Things to Be Careful About
- The question says 'ignore air resistance'; if air resistance were included, the speed would be lower.
- Speed is a scalar, so no direction is needed.
- The answer is 28 m/s.
When the ball hits the ground, it stops moving.
The kinetic energy of the ball is transferred to internal energy.
The temperature of the ball increases.
The specific heat capacity of modelling clay is .
Calculate the maximum possible temperature increase of the ball. Show your working.
temperature increase = ______
Working
The maximum temperature rise uses all the kinetic energy (78.4 J) to warm the ball:
Answer
0.28 °C
0.28 °C
Walkthrough
When the ball stops, its kinetic energy is transferred to internal energy of the ball. The maximum temperature rise happens if all 78.4 J of kinetic energy is used to warm the ball. The specific heat capacity equation is
where is the thermal energy supplied, is the mass, is the specific heat capacity and is the temperature rise. Rearranging gives
This is the maximum possible temperature increase because it assumes no energy is transferred elsewhere.
Key Takeaways
- Specific heat capacity tells how much energy is needed to raise the temperature of 1 kg of a substance by 1 °C.
- The equation links thermal energy, mass, specific heat capacity and temperature change.
- 'Maximum' means all the kinetic energy goes into warming the ball.
Common Mistakes
- Using the mass incorrectly (e.g. dividing by 0.20 instead of multiplying).
- Forgetting to use the energy from part (a)(i).
- Giving the answer without units or with wrong units.
Things to Be Careful About
- Use from part (a)(i).
- The unit of specific heat capacity is , so the temperature rise comes out in °C.
- Show the substitution clearly to earn the method mark.
Suggest one reason why the actual temperature increase of the ball may be smaller than the value calculated in (b)(i).
Answer
Some of the kinetic energy is transferred to the ground (or used to deform the clay), so less is available to increase the temperature of the ball.
Some kinetic energy is transferred to the ground, so less is available to warm the ball.
Walkthrough
The calculated value in (b)(i) assumes all the kinetic energy becomes internal energy of the ball. In reality, some energy is transferred to the ground when the ball hits it, and some may be used to deform the modelling clay. So less energy is available to raise the ball's temperature, and the actual rise is smaller. Any one valid reason is enough.
Key Takeaways
- Energy is never destroyed; it is transferred between stores.
- 'Maximum possible' means assuming no losses.
- The temperature rise is smaller when some energy goes to the surroundings or is used to change the shape of the ball.
Common Mistakes
- Saying 'energy is lost' without saying where it goes.
- Saying 'heat escapes' without identifying the transfer.
- Giving a reason that contradicts the assumption in part (a)(ii), unless it is clearly about the real situation.
Things to Be Careful About
- The mark scheme accepts: energy transferred to the ground, work done deforming the clay, or air resistance reducing the kinetic energy.
- Use 'thermal energy' rather than 'heat' for precision.
- Only one reason is needed for the mark.
Fig. 3.1 shows gas at room temperature. The gas is trapped in a metal cylinder by a metal piston fixed in position.
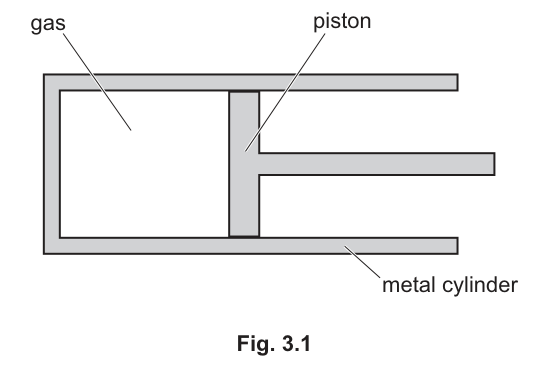
The metal cylinder is immersed in boiling water and the temperature of the trapped gas increases.
Explain, in terms of electrons and the atoms of the metal, how thermal energy is transferred through the walls of the metal cylinder.
Answer
- The vibrating atoms in the metal collide with the free electrons.
- The free electrons move (a long distance) through the metal.
- The moving electrons collide with (or transfer energy to) distant atoms.
The vibrating atoms collide with electrons, which move through the metal and collide with distant atoms, transferring energy.
Walkthrough
The question asks for the mechanism of thermal conduction through a solid metal cylinder. In metals, thermal energy is transferred primarily by free electrons. First, the atoms at the hot end vibrate more vigorously and collide with the free electrons. Second, these electrons gain kinetic energy and move rapidly (a long distance) through the metal lattice. Third, the moving electrons collide with atoms at the cooler end, transferring energy and causing those atoms to vibrate more. Note that the mark scheme explicitly says to ignore electrons in the first and third points (i.e. do not say 'electrons collide with electrons').
Key Takeaways
- Metals conduct heat well because they have free electrons that can move long distances.
- Conduction in metals is an electron-driven process, not just atomic vibration.
Common Mistakes
- Saying 'electrons collide with electrons' in the first or third point (the scheme ignores this).
- Using the word 'heat' instead of 'thermal energy' or 'energy'.
Things to Be Careful About
- The question specifically asks to explain in terms of electrons and atoms. Do not give a generic conduction explanation that omits electrons.
The piston is fixed in position so the pressure of the gas increases as the temperature of the gas increases.
State what happens to the motion of the particles of the gas as the temperature increases.
Answer
The (average) speed of the particles increases.
The (average) speed of the particles increases.
Walkthrough
Temperature is a measure of the average kinetic energy of the particles in a substance. As the temperature of the gas increases, the average kinetic energy of the gas particles increases. Since kinetic energy is proportional to the square of the speed (), an increase in average kinetic energy means an increase in the average speed of the particles.
Key Takeaways
- Temperature is directly related to the average kinetic energy of particles.
- Higher temperature means higher average particle speed.
Common Mistakes
- Saying 'particles get bigger' or 'particles move further apart' as the temperature increases (these describe volume expansion, not the direct effect on particle motion at constant volume).
- Forgetting the word 'average' when describing particle speed, as individual particle speeds vary widely.
Things to Be Careful About
- The question asks to 'state', so only one concise sentence is needed. Do not over-explain.
Explain, in terms of the particles of the gas, why the pressure the gas exerts on the walls of the metal cylinder increases as the temperature increases.
Answer
- The particles collide with the walls of the cylinder.
- Each collision exerts a greater impulse (or force) on the wall.
- The particles collide more often and/or harder with the walls.
See working
Walkthrough
Pressure is the force exerted per unit area on the walls of a container. In a gas, this force arises from particles colliding with the walls. As the temperature increases, the average speed of the particles increases (from part (b)(i)). This has two effects:
- Each particle hits the wall with a greater speed, so it undergoes a greater change in momentum (greater impulse) per collision, exerting a greater force.
- The particles are moving faster, so they travel to the walls and back more quickly, meaning they collide with the walls more frequently.
Both effects combine to increase the total force on the walls, and thus the pressure.
Key Takeaways
- Gas pressure is caused by particle collisions with the container walls.
- Increasing temperature increases both the force per collision and the frequency of collisions.
Common Mistakes
- Saying 'particles get bigger' or 'particles expand'.
- Not mentioning that the particles collide with the walls at all.
- Saying 'particles push on the walls' without referring to collisions or momentum change.
Things to Be Careful About
- The question asks to explain 'in terms of the particles', so you must refer to particle motion and collisions.
- All three points (collision, greater force/impulse, more often/harder) are needed for full marks.
The gas in the cylinder reaches a temperature of .
The piston is released and moves to the right. The temperature remains at .
The pressure of the gas now decreases.
Explain, in terms of the particles of the gas, why the pressure of the gas now decreases.
Answer
The particles are further apart, so they collide less frequently with the walls (fewer collisions per unit time).
See working
Walkthrough
The piston is released and moves to the right, increasing the volume of the gas. The temperature is kept constant at , so the average speed of the particles remains the same. Because the gas now occupies a larger volume, the particles are more spread out (further apart). This means it takes longer for a particle to travel from one side of the cylinder to the other, so the particles collide with the walls less frequently. Fewer collisions per unit time means a smaller total force on the walls, and thus a lower pressure.
Key Takeaways
- At constant temperature, increasing volume decreases pressure because collision frequency with the walls decreases.
- Particle speed (and thus force per collision) remains unchanged if temperature is constant.
Common Mistakes
- Saying 'particles move slower' (temperature is constant, so average speed is constant).
- Saying 'particles are further apart so they don't hit the walls' (they still hit, just less often).
Things to Be Careful About
- The question asks to explain in terms of the particles, so refer to particle spacing and collision frequency.
- Only one mark is awarded here, so a single clear statement is sufficient.
Answer
- The pressure of the gas becomes equal to the atmospheric pressure outside.
- There is no resultant force on the piston (the force from the gas to the right equals the force from the atmosphere to the left).
See working
Walkthrough
The piston moves to the right because initially the pressure of the hot gas inside is greater than the atmospheric pressure outside, creating a resultant force to the right. As the piston moves, the volume increases and the gas pressure decreases (from part (c)(i)). The piston will continue to move until the gas pressure inside equals the atmospheric pressure outside. At this point, the force exerted by the gas on the right face of the piston equals the force exerted by the atmosphere on the left face. With no resultant force acting on the piston, it stops moving (Newton's first law).
Key Takeaways
- An object stops accelerating when the resultant force on it is zero.
- For a piston in a cylinder open to the atmosphere, equilibrium is reached when internal gas pressure equals external atmospheric pressure.
Common Mistakes
- Saying 'the pressure runs out' or 'the gas stops expanding'.
- Not mentioning that the pressures become equal or that the forces balance.
- Saying 'friction stops it' without acknowledging the pressure balance (though friction/air resistance is an acceptable alternative for the second mark if pressures are not equal, the primary expected answer is pressure equality).
Things to Be Careful About
- Two marks are available: one for the pressure equality, one for the resultant force being zero (or an alternative like friction). Ensure both concepts are covered clearly.
A student directs a beam of white light from a filament lamp towards a glass prism in a dark room.
Fig. 4.1 shows the beam of white light incident on the left-hand side of the glass prism.
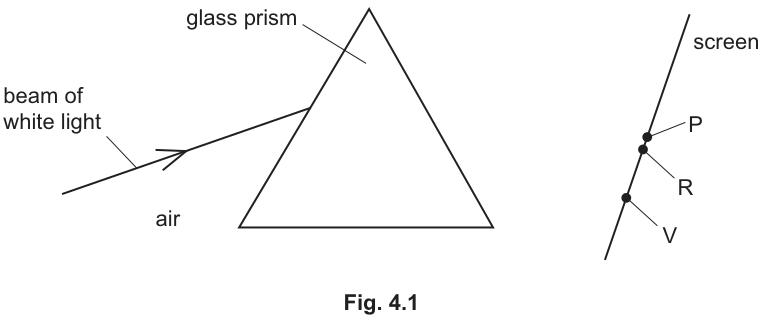
A screen is placed to the right of the glass prism. Red light is observed at point R on the screen and violet light is observed at point V.
Draw on Fig. 4.1 to show the paths of the red light and the violet light between the left-hand side of the prism and the screen at point R and point V.
Answer
Ray diagram: red ray less deviated, ending at R; violet ray more deviated, ending at V
Walkthrough
When white light enters the glass prism from the air, it slows down and refracts towards the normal at the left-hand face. Because different colours of light have different wavelengths, they slow down by different amounts and therefore refract by different angles. Violet light slows down more than red light, so it bends more. Inside the prism, the light splits into a spectrum. When the rays exit the right-hand face of the prism back into the air, they speed up and refract away from the normal. The violet ray, having been bent more on entry, is bent more on exit and ends up at the lower point V on the screen. The red ray is bent less and ends up at the higher point R. Only these two rays need to be drawn, entering from the left, splitting inside the glass, and terminating at R and V respectively.
Key Takeaways
- White light is dispersed into a spectrum when it passes through a prism.
- Violet light is refracted more than red light because it has a higher refractive index in glass.
- Refraction occurs at both air-glass interfaces: towards the normal on entry, away from the normal on exit.
Common Mistakes
- Drawing only one ray inside the prism instead of splitting it into at least two.
- Forgetting to show refraction at the second face (the right-hand side of the prism).
- Drawing the violet ray less deviated than the red ray (reversing the order).
- Drawing rays that do not connect to the correct points R and V on the screen.
Things to Be Careful About
- Ensure arrows are drawn on all rays to show the direction of travel (left to right).
- The rays must be straight lines inside the glass and in the air; they only change direction at the boundaries.
- Do not draw extra incorrect rays, as the mark scheme explicitly rejects them.
State what these observations show about the change in speed of red light and change in speed of violet light as each enters the glass from the air.
Answer
Both red and violet light travel more slowly in glass than in air.
Red light travels more quickly than violet light in glass.
Both travel more slowly in glass than in air; red light travels more quickly than violet light in glass
Walkthrough
Refraction occurs because light changes speed when it moves from one medium to another. When light enters a denser medium like glass from air, it slows down. Since both red and violet light are entering glass from air, both must travel more slowly in the glass. The fact that violet light is refracted more than red light means it experiences a greater change in speed; therefore, violet light slows down more, meaning red light travels more quickly than violet light within the glass.
Key Takeaways
- Light slows down when entering a denser medium (glass from air).
- Different colours of light travel at different speeds in glass, which causes dispersion.
- Red light travels faster in glass than violet light.
Common Mistakes
- Saying light 'slows down' without specifying that it is slower in glass than in air.
- Stating that red light is 'slower' than violet light (the opposite is true).
- Using the word 'heat' or 'temperature' instead of 'speed'.
Things to Be Careful About
- The question asks for the change in speed as each enters the glass from the air, so the comparison must be between glass and air, not just between the two colours.
Five other colours of light appear on the screen between the red light at point R and the violet light at point V.
State the names of the five colours and list them in the correct order from red to violet.
red ______ violet
Answer
red, orange, yellow, green, blue, indigo, violet
red, orange, yellow, green, blue, indigo, violet
Walkthrough
When white light is dispersed by a prism, it separates into the colours of the visible spectrum. The standard sequence from the least deviated (red) to the most deviated (violet) is red, orange, yellow, green, blue, indigo, and violet. The question asks for the five colours between red and violet, which are orange, yellow, green, blue, and indigo. Listing all seven in order from red to violet fully satisfies the requirement.
Key Takeaways
- The visible spectrum consists of seven colours: red, orange, yellow, green, blue, indigo, violet.
- Red is at the long-wavelength end (least refracted) and violet is at the short-wavelength end (most refracted).
Common Mistakes
- Forgetting 'indigo' or mixing up the order of blue and indigo.
- Listing the colours in reverse order (violet to red) when the question specifies red to violet.
Things to Be Careful About
- Ensure the list is in the correct order from red to violet as requested. Any four in order, or all five in any order, will score, but providing the full seven in order is the safest approach.
State how the frequency and the wavelength of the coloured light change going from red light to violet light.
frequency ______
wavelength ______
Answer
frequency increases
wavelength decreases
frequency increases, wavelength decreases
Walkthrough
As you move from red light to violet light in the visible spectrum, the wavelength gets shorter. Since the speed of light in a vacuum (or air) is constant for all electromagnetic waves, the wave equation means that as wavelength decreases, frequency must increase. Therefore, going from red to violet, the frequency increases and the wavelength decreases.
Key Takeaways
- Red light has the longest wavelength and lowest frequency in the visible spectrum.
- Violet light has the shortest wavelength and highest frequency in the visible spectrum.
- Frequency and wavelength are inversely proportional for waves traveling at the same speed.
Common Mistakes
- Stating that frequency decreases or wavelength increases (the opposite of the truth).
- Confusing the trend with amplitude or loudness/brightness.
Things to Be Careful About
- The question asks for the change 'going from red light to violet light', so the direction of the change must be clearly stated (increases/decreases), not just the relative values.
On Fig. 4.1, point P is shown immediately next to point R.
No light is observed at point P, but a detector at point P registers radiation reaching the detector.
State which region of the electromagnetic spectrum is detected at point P.
Answer
infrared
infrared
Walkthrough
Point P is located just above point R (red light) on the screen. The region of the electromagnetic spectrum that lies just beyond the red end of the visible spectrum is infrared radiation. Infrared radiation is not visible to the human eye, which is why no light is observed at P, but it can be detected by a suitable detector. It is also emitted as thermal radiation and is commonly felt as heat.
Key Takeaways
- The electromagnetic spectrum order from long wavelength to short wavelength is: radio, microwave, infrared, visible light, ultraviolet, X-ray, gamma ray.
- Infrared is just beyond the red end of the visible spectrum.
- Ultraviolet is just beyond the violet end.
Common Mistakes
- Answering 'ultraviolet' (this would be below point V, near the violet end).
- Answering 'heat' or 'thermal radiation' instead of the specific region name 'infrared'.
Things to Be Careful About
- The question asks for the 'region of the electromagnetic spectrum', so the answer must be 'infrared' or 'infrared radiation', not a property like 'heat' or 'thermal energy'.
Ultrasound is a longitudinal wave which cannot be heard by humans as the frequency of ultrasound is too high.
Answer
Ultrasound (like all sound) is transmitted by vibrating particles of matter. There is no matter (no medium) in a vacuum, so the wave cannot travel through it.
Sound/ultrasound needs vibrating particles to travel; there are no particles in a vacuum
Walkthrough
Ultrasound is a sound wave — a longitudinal wave that needs a medium (solid, liquid or gas) to travel. In the medium, particles vibrate and pass the disturbance on to neighbouring particles. A vacuum contains no particles at all, so there is nothing to vibrate and nothing to transmit the wave. Both B1 marks come from these two distinct ideas: (1) sound/ultrasound is transmitted by vibrating matter, and (2) a vacuum has no matter/particles/medium.
Key Takeaways
Sound and ultrasound are mechanical waves — they need a medium.
A vacuum has no particles, so no sound (including ultrasound) can travel through it.
Common Mistakes
Writing only 'there is no air in a vacuum' — the mark scheme accepts 'no medium', 'no particles' or 'no matter', but 'no air' may be credited if it is clear the air is the medium.
Writing 'sound is a wave' without mentioning particles — the first B1 needs the idea of vibrating matter.
Things to Be Careful About
Do not confuse a vacuum with empty space in the sense of 'no sound because nothing to carry it' — the exam wants the particle/medium reason explicitly.
Ultrasound is sound, so the same rule applies as for audible sound.
Answer
In a longitudinal wave, the vibration of the particles is parallel to the direction in which the wave travels.
In a transverse wave, the vibration of the particles is perpendicular to the direction in which the wave travels.
Longitudinal: vibration parallel to propagation; transverse: vibration perpendicular to propagation
Walkthrough
The key difference between the two wave types is the direction of vibration relative to the direction of energy transfer (the propagation direction). In a longitudinal wave (for example sound), the particles vibrate back and forth along the same line as the wave travels — parallel. In a transverse wave (for example light or a wave on a string), the particles vibrate at right angles to the direction of travel — perpendicular. State both comparisons clearly to earn the two B1 marks.
Key Takeaways
Longitudinal waves: vibration parallel to direction of travel.
Transverse waves: vibration perpendicular to direction of travel.
Common Mistakes
Saying 'the wave moves up and down' without specifying the particle vibration — the mark needs the comparison of vibration and propagation directions.
Mixing the two up — a common slip is writing 'parallel' for transverse and 'perpendicular' for longitudinal.
Things to Be Careful About
Use the words 'parallel' and 'perpendicular' — the mark scheme requires exactly those comparisons.
Do not just name examples (sound, light); the question asks how the waves differ, so state the directional relationship.
An ultrasound transmitter used for a medical scan produces an ultrasound wave of frequency 8.4 MHz.
In soft human tissue, ultrasound travels at .
Calculate the wavelength of this ultrasound wave in soft human tissue.
wavelength = ______ m
Working
The wave equation is
so
Convert the frequency to hertz:
Answer
wavelength =
1.8 x 10^-4 m
Walkthrough
- Recall the wave equation , where is the wave speed, is the frequency and is the wavelength.
- Rearrange to make the subject: .
- The frequency is given in MHz — convert to Hz: .
- Substitute the speed and the frequency: .
- Calculate: , which rounds to .
The C1 mark is for writing the correct equation or the substitution; a second C1 is for the correct order of magnitude (); the A1 is for the final value.
Key Takeaways
The wave equation links speed, frequency and wavelength.
Always convert megahertz (MHz) to hertz (Hz) before substituting.
Small wavelengths like this are the reason ultrasound can resolve fine detail in medical imaging.
Common Mistakes
Forgetting to convert MHz to Hz — using 8.4 directly gives , which is physically absurd for ultrasound in tissue.
Using instead of .
Quoting the answer without the unit — the answer blank requires 'm'.
Things to Be Careful About
The speed is in m/s and the frequency in Hz, so the wavelength automatically comes out in metres.
Write the answer in standard form as — a decimal like 0.00018 m is correct but less tidy; the mark scheme expects the standard form.
The ultrasound wave passes from the soft tissue into bone where the speed of the ultrasound wave is greater than .
State what happens to the frequency and to the wavelength of the ultrasound wave as it passes into the bone.
frequency ______
wavelength ______
Answer
frequency: does not change
wavelength: increases
Frequency: does not change; wavelength: increases
Walkthrough
When a wave crosses a boundary into a different medium, its frequency is fixed by the source — the transmitter keeps emitting at 8.4 MHz, so the frequency cannot change. This is the key physical idea and earns the first B1.
The wave equation then tells you what happens to the wavelength: if increases and stays the same, then must increase. The wave is travelling faster in bone, so its wavelength is longer. This earns the second B1.
Key Takeaways
Frequency is set by the source and never changes when a wave moves between media.
Speed and wavelength change together according to ; a greater speed with constant frequency means a longer wavelength.
Common Mistakes
Saying 'frequency increases' because the speed increased — a classic error; frequency is source-determined.
Saying 'wavelength decreases' — that is what would happen if the wave slowed down, not if it speeded up.
Answering in terms of sound changing pitch — the frequency here is fixed.
Things to Be Careful About
The question states the speed in bone is 'greater than 1500 m/s', so the wavelength must increase.
The word 'state' means a short decision is enough — no calculation or explanation is required for the marks, but the reasoning above is what justifies the answers.
A bar magnet can rotate freely around a thin rod through its centre.
The bar magnet is at rest on a frictionless horizontal surface in a laboratory which is shielded from the Earth's magnetic field.
Answer
steel
steel
Walkthrough
A bar magnet is a permanent magnet. Permanent magnets are typically made from ferromagnetic materials that can be magnetised and retain their magnetism. Common examples include steel, alnico, and certain rare-earth alloys. Iron is ferromagnetic but is a soft magnetic material, meaning it loses its magnetism easily and is not suitable for a permanent bar magnet. Steel, being a hard magnetic material, retains its magnetism and is the standard answer for this question.
Key Takeaways
Permanent magnets are made from hard ferromagnetic materials like steel. Soft magnetic materials like iron are used for temporary magnets (e.g., electromagnet cores) because they lose their magnetism when the external field is removed.
Common Mistakes
Writing 'iron' or 'magnetite' as the material. Iron is a soft magnetic material and would not make a good permanent bar magnet. Writing 'magnetic metal' is too vague; a specific substance name is required.
Things to Be Careful About
Ensure the substance name is specific. 'Steel' is the expected answer. Avoid 'magnet' itself as the answer, since the question asks for the substance the magnet is made from.
The thin rod is perpendicular to the top and bottom surfaces of the bar magnet.
Fig. 6.1 shows a view from above of the bar magnet with the N pole, the S pole and the thin rod labelled.
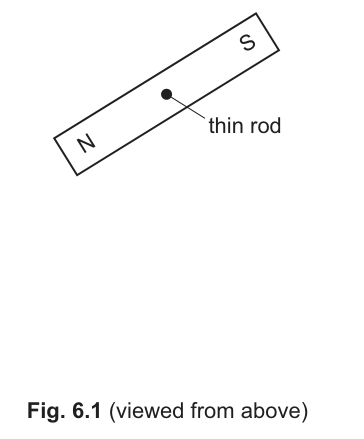
Draw on Fig. 6.1 to show the pattern and the direction of the magnetic field around the bar magnet.
Answer
Magnetic field lines drawn emerging from the N pole, curving around to enter the S pole, with arrowheads pointing from N to S.
Walkthrough
Magnetic field lines outside a magnet always run from the North pole to the South pole. To draw the pattern around a bar magnet:
- Draw smooth curved lines emerging from the N pole and entering the S pole.
- Ensure there are at least two complete field lines on each side of the magnet (above and below, and to the left and right in this top-down view).
- Include at least one field line that begins and ends on the short side or corner of the magnet.
- Place arrowheads on all lines pointing from the N pole towards the S pole.
- The lines should be closer together near the poles (indicating a stronger field) and spread out further away.
Key Takeaways
The magnetic field pattern of a bar magnet consists of continuous, smooth curves from N to S. The density of the lines indicates the field strength, being greatest at the poles.
Common Mistakes
Drawing lines that cross each other. Forgetting the arrowheads or drawing them in the wrong direction (S to N). Drawing lines that do not connect the poles (e.g., lines that just curve away and don't enter the S pole).
Things to Be Careful About
The question asks for the pattern 'around' the magnet, so lines must be drawn in the empty space surrounding the bar magnet, not inside it. Ensure the lines are smooth curves and not jagged. The view is from above, so the field lines lie in the horizontal plane of the page.
An electromagnet is switched on and a strong magnetic field is created around the bar magnet.
Fig. 6.2 shows that the direction of the strong magnetic field due to the electromagnet is from left to right across the page.
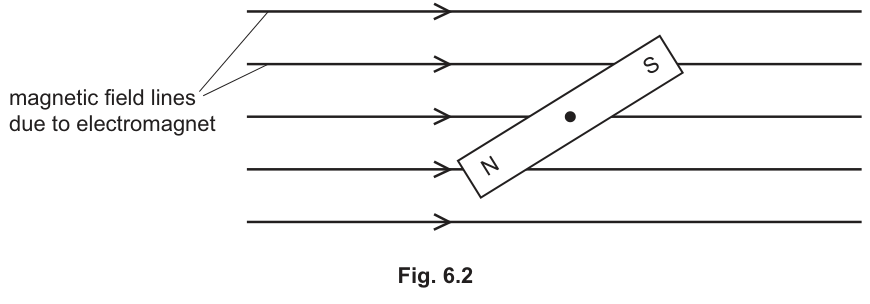
Draw arrows on Fig. 6.2 to show the direction of the horizontal forces that act on the poles of the bar magnet.
Answer
A horizontal arrow pointing right at the N pole and a horizontal arrow pointing left at the S pole.
Walkthrough
When a magnet is placed in an external magnetic field, its poles experience forces. The North pole of a magnet is always pulled in the direction of the external magnetic field lines. The South pole is always pulled in the opposite direction to the external magnetic field lines.
In Fig. 6.2, the external magnetic field due to the electromagnet is directed from left to right. Therefore:
- The N pole (bottom-left) experiences a horizontal force to the right.
- The S pole (top-right) experiences a horizontal force to the left.
Draw a horizontal arrow pointing right at the N pole and a horizontal arrow pointing left at the S pole. Both arrows should be parallel to the field lines.
Key Takeaways
In a uniform external magnetic field, the N pole of a magnet is pushed along the field lines and the S pole is pushed against them. This creates a turning effect (couple) if the magnet is not already aligned with the field.
Common Mistakes
Drawing the force on the N pole to the left or the S pole to the right. Drawing the forces at an angle instead of horizontally parallel to the field lines. Drawing forces of different lengths (they should be equal in magnitude for a uniform field).
Things to Be Careful About
The forces are horizontal and parallel to the electromagnet's field lines, not along the length of the bar magnet. The question asks for horizontal forces, so ensure the arrows are strictly left/right.
Describe and explain what happens to the bar magnet when the electromagnet is switched on.
Answer
The two equal and opposite forces on the poles do not act along the same line, so they produce a moment (or turning effect / couple / torque). This causes the magnet to rotate. It will rotate anticlockwise until it is parallel to the magnetic field lines (i.e., horizontal), at which point the forces act along the same line and the resultant moment is zero.
The forces produce a couple (turning effect) which causes the magnet to rotate anticlockwise until it is parallel to the magnetic field lines.
Walkthrough
- Forces produce a turning effect: From part (c)(i), there is a force to the right on the N pole and a force to the left on the S pole. These forces are equal in magnitude (uniform field) and opposite in direction, but they do not act along the same line of action because the magnet is tilted. Two equal and opposite forces whose lines of action do not coincide form a couple. A couple produces a pure turning effect (or moment / torque).
- Direction of rotation: The N pole is pulled to the right and the S pole is pulled to the left. Looking at the diagram, this will cause the magnet to rotate anticlockwise.
- Final position: The magnet will continue to rotate until it aligns with the external magnetic field. When the magnet is horizontal (parallel to the field lines), the force on the N pole (right) and the force on the S pole (left) will act along the same line through the pivot. At this point, the turning effect is zero, and the magnet is in equilibrium.
Key Takeaways
A magnet in an external magnetic field experiences a couple if it is not aligned with the field. This couple rotates the magnet until it is parallel to the field lines, where the forces act along the same line and the net moment is zero.
Common Mistakes
Saying the magnet 'moves to the right' or 'translates'. The resultant force is zero (equal and opposite forces), so there is no translation, only rotation. Forgetting to mention that the forces form a couple or produce a moment. Not stating the final position (parallel to the field lines). Giving the wrong direction of rotation (clockwise instead of anticlockwise).
Things to Be Careful About
Use precise physics terminology: 'couple', 'moment', 'turning effect', or 'torque'. Explain why there is a turning effect (forces are not along the same line). Describe the motion ('rotates anticlockwise') and the final state ('parallel to the field lines').
A filament lamp connected to a 12 V power supply transfers 24 W of power.
Calculate:
Working
Answer
2.0 A
2.0 A
Walkthrough
The question provides the power transferred by the lamp () and the voltage across it (). The relevant equation linking these to current is . Rearranging for current gives . Substituting the given values yields . The mark scheme awards one mark for the correct equation or substitution ( or ) and one mark for the final numerical answer with the correct unit (A).
Key Takeaways
The electrical power dissipated or transferred by a component is the product of the current through it and the potential difference across it (). If any two of these three quantities are known, the third can be calculated directly.
Common Mistakes
Candidates sometimes try to find resistance first using an incorrect formula, or they forget to include the unit 'A' in the final answer. The mark scheme explicitly requires the unit for the answer mark.
Things to Be Careful About
Always check that units are consistent: power in watts (W) and voltage in volts (V) will naturally yield current in amperes (A). Do not drop the trailing zero if it is significant to the precision of the data, though '2 A' is often accepted, '2.0 A' matches the mark scheme's '2.0 (A)'.
Working
Answer
6.0 Ω
6.0 Ω
Walkthrough
Now that the current is known to be and the voltage is , use Ohm's law to find the resistance: . Substituting the values gives . The mark scheme awards one mark for the correct equation or substitution ( or ) and one mark for the final answer with the correct unit (Ω).
Key Takeaways
Ohm's law states that resistance is the ratio of potential difference to current (). This can be used to find the resistance of a component at a specific operating point.
Common Mistakes
Using the wrong rearrangement, such as or . Forgetting the unit 'Ω' is a common error that costs the answer mark.
Things to Be Careful About
Use the current value calculated in part (i). If a candidate made an error in part (i) but used their incorrect current value correctly here, they would still earn the method and answer marks (error carried forward). Ensure the unit is written as 'Ω' or 'ohms'.
A student has a battery of electromotive force (e.m.f.) 12 V.
The student uses the battery in a circuit with the 12 V filament lamp to obtain a range of suitable readings and plots the current–voltage graph for the lamp.
Fig. 7.1 shows the battery and the filament lamp.
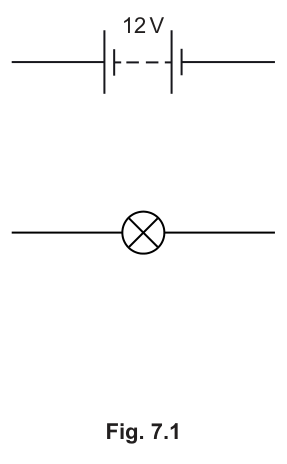
On Fig. 7.1, complete the circuit diagram of a suitable circuit.
You will need to add additional components.
Answer
The circuit must include a variable resistor (rheostat) in series with the battery and the lamp to vary the voltage across the lamp. An ammeter must be placed in series with the battery and lamp to measure the current. A voltmeter must be connected in parallel (across) the filament lamp to measure the potential difference.
Variable resistor in series; ammeter in series; voltmeter in parallel across the lamp
Walkthrough
To obtain a range of current and voltage readings for the lamp, the voltage across it must be varied. This is achieved by adding a variable resistor in series with the battery and the lamp. Alternatively, a potential divider circuit could be used. To measure the electrical characteristics, an ammeter is placed in series with the circuit to measure the current flowing through the lamp, and a voltmeter is placed in parallel (across) the lamp to measure the potential difference directly across it.
Key Takeaways
When measuring the I-V characteristics of a component, a variable resistor is used in series to change the current and voltage. The ammeter always goes in series with the component, and the voltmeter always goes in parallel across the component.
Common Mistakes
Placing the voltmeter in series (which would block the current due to its high resistance) or placing the ammeter in parallel (which would short-circuit the component). Forgetting to include a variable resistor or potential divider means the voltage cannot be varied to give a range of readings.
Things to Be Careful About
The mark scheme accepts either a variable resistor in series or a correctly connected potential divider. Ensure the ammeter and voltmeter symbols are correct (circle with 'A' or 'V'). The voltmeter must be connected across the lamp only, not across the whole circuit.
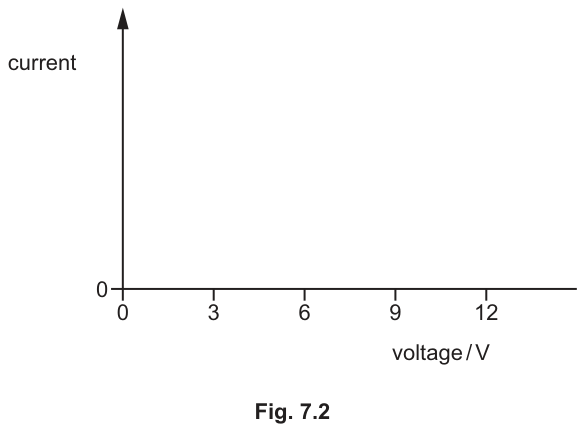
Answer
A curve starting at the origin (0, 0) with a positive but decreasing gradient (bending towards the voltage axis), passing through approximately (12 V, 2.0 A).
Curve from origin with decreasing gradient (bending towards voltage axis)
Walkthrough
A filament lamp is a non-ohmic conductor. As the voltage increases, the current increases, but not in a directly proportional way. The graph of current against voltage starts at the origin. Initially, the gradient is steep (low resistance), but as the voltage and current increase, the filament heats up and its resistance increases. This means the current increases more slowly for each additional volt, so the gradient of the curve decreases. The curve bends towards the voltage axis (it is concave down).
Key Takeaways
The I-V graph for a filament lamp is a curve, not a straight line, because its resistance changes with temperature. The decreasing gradient on an I-V graph indicates increasing resistance.
Common Mistakes
Drawing a straight line through the origin (which represents an ohmic conductor like a fixed resistor at constant temperature). Drawing a curve that bends the other way (towards the current axis), which would imply decreasing resistance. Starting the curve away from the origin.
Things to Be Careful About
The gradient of an I-V graph is . A decreasing gradient means is decreasing, so is increasing. Ensure the curve starts exactly at (0,0) and that the gradient is always positive (current never decreases as voltage increases). The curve should pass through or near the point (12, 2.0) based on the data in part (a).
State what happens to the resistance of a filament lamp as the applied voltage increases and explain one reason for this happening.
Answer
Resistance increases.
The temperature of the filament increases (or the filament gets hot), causing the particles/ions in the metal lattice to vibrate more vigorously, which impedes the flow of electrons.
Resistance increases; temperature increases causing particles to vibrate more and impede electron flow
Walkthrough
From the current-voltage graph, the gradient decreases as voltage increases. Since resistance (the reciprocal of the gradient on an I-V graph), a decreasing gradient means the resistance is increasing. The physical reason for this is that as current flows through the filament, electrical energy is converted into thermal energy, heating the filament. At the particle level, the metal ions in the lattice vibrate more vigorously as their thermal energy increases. These more vigorous vibrations cause the moving electrons to collide more frequently with the lattice ions, impeding their flow and thus increasing the resistance.
Key Takeaways
The resistance of a metal conductor increases with temperature. At the microscopic level, this is due to increased thermal vibrations of the positive ions in the lattice, which scatter the conduction electrons more effectively.
Common Mistakes
Saying 'resistance increases because voltage increases' (this is circular and doesn't explain the mechanism). Saying 'electrons slow down' (current is the rate of flow of charge; the drift velocity might change, but the fundamental reason is increased collisions). Using the word 'heat' instead of 'thermal energy' or 'temperature' in some contexts, though 'filament gets hot' is generally acceptable.
Things to Be Careful About
The mark scheme requires two distinct points: the statement that resistance increases, and the explanation involving temperature and particle vibration. Both must be present to earn full marks. Ensure the explanation links the increased temperature to increased vibration and then to the impediment of electron flow.
The nuclide notation for the radioactive isotope hydrogen-3 is .
Answer
A hydrogen-3 nucleus contains only three nucleons, but an alpha particle contains four nucleons (two protons and two neutrons), so hydrogen-3 cannot emit an alpha particle.
A hydrogen-3 nucleus has only three nucleons, so it cannot emit an alpha particle, which contains four nucleons.
Walkthrough
Hydrogen-3 has a nucleon number (the top number) of 3, meaning its nucleus contains three particles in total. An alpha particle is a helium-4 nucleus, so it contains four nucleons: two protons and two neutrons. A nucleus with only three nucleons cannot emit a particle made of four nucleons. The mark is earned by making this comparison directly.
Key Takeaways
- The nucleon number tells you the total number of protons and neutrons in a nucleus.
- An alpha particle is the nucleus of a helium atom, written .
- A nucleus can only emit a particle if it contains enough nucleons to make that particle.
Common Mistakes
- Saying only that hydrogen-3 is 'too small' or 'not heavy enough' without mentioning nucleons.
- Confusing alpha decay with beta decay; a beta particle is an electron and has no nucleons.
Things to Be Careful About
- Use the words 'nucleons' or 'protons and neutrons'.
- Make the reason explicit: the alpha particle needs four nucleons but hydrogen-3 has only three.
Hydrogen-3 decays by the emission of beta particles to an isotope of a different element. This element is represented in the equation by Q.
Answer
The beta particle is and Q is .
β: 0 above -1 below; Q: 3 above 2 below.
Walkthrough
The equation must conserve both the total nucleon number (top number) and the total proton number (bottom number).
On the left, hydrogen-3 has a nucleon number of 3 and a proton number of 1.
A beta particle is an electron emitted from the nucleus. It is written as : it contains no nucleons and its charge is .
For Q, the top number must be . The bottom number must satisfy , so . Therefore Q is .
There are three separate marks: one for the beta particle, one for the top number of Q, and one for the bottom number of Q.
Key Takeaways
- In any radioactive decay equation, the total top numbers must balance and the total bottom numbers must balance.
- A beta particle has nucleon number 0 and proton number .
- The bottom number is the proton number, which identifies the element.
Common Mistakes
- Writing the beta particle as or .
- Forgetting that the bottom number of the beta particle is .
- Putting 3 and 1 on Q without correcting for the beta particle's charge.
Things to Be Careful About
- Use conservation of numbers, not memory, to fill each blank.
- The top number of Q stays 3 because the beta particle contributes 0 nucleons.
- The bottom number of Q becomes 2, which will be used in the next part.
Answer
helium
helium
Walkthrough
From the balanced equation, Q has a proton number of 2. Every atom with 2 protons is an atom of the element helium. Its nucleon number is 3, so Q is the isotope helium-3.
Key Takeaways
- The proton number defines the element.
- A nucleus with 2 protons must be helium, whichever isotope it is.
Common Mistakes
- Saying hydrogen because the original nucleus was hydrogen; beta decay changes the proton number.
- Giving the nuclide notation instead of the element name.
Things to Be Careful About
- Make sure you have the correct proton number from part b(i) before naming the element.
- Write 'helium', not 'Q'. Q is only a symbol used in the equation.
The half-life of hydrogen-3 is 12 years.
Answer
The time taken for the number of radioactive nuclei in a sample (or the corrected count rate) to halve.
The time taken for the number of radioactive nuclei in a sample (or the corrected count rate) to halve.
Walkthrough
Half-life is a time. The definition needs two ideas: first, that it is the time taken for something to halve; second, that the 'something' is the number of radioactive nuclei or the corrected count rate. Corrected count rate means the measured count rate with background radiation subtracted.
The mark scheme gives one mark for the general idea of 'time for something to halve' and one mark for specifying the number of nuclei or corrected count rate.
Key Takeaways
- Half-life is a time, measured in seconds, hours or years.
- It can be defined using the number of radioactive nuclei or the corrected count rate.
- It does not depend on the initial amount of the sample.
Common Mistakes
- Saying 'time for the mass to halve'; the mass of the sample is not the quantity used in the definition.
- Omitting the time part and only saying 'the count rate halves'.
Things to Be Careful About
- If using count rate, say 'corrected count rate' to show you are allowing for background radiation.
- Include both the 'time' and the 'halving' idea to score both marks.
A sample of hydrogen-3 is placed on a laboratory bench next to a Geiger-Müller tube and counter.
The count rate is recorded at the same time on four successive days.
Table 8.1 shows the count rates obtained.
Table 8.1
| day | 1 | 2 | 3 | 4 |
|---|---|---|---|---|
| count rate counts / s | 98 | 89 | 93 | 85 |
State why the count rate decreases and increases.
Answer
Radioactive decay is random and spontaneous, so the number of decays in equal time intervals fluctuates; therefore the count rate can rise or fall from day to day.
Radioactive decay is random and spontaneous, so the count rate fluctuates.
Walkthrough
The count rates in the table go down, up, then down again: 98, 89, 93, 85. This is not a steady fall, so it cannot be explained simply by the sample running out.
Radioactive decay is random and spontaneous. We cannot predict which nucleus will decay next, and each nucleus decays independently. In one day a larger number of nuclei may happen to decay, and the next day a smaller number may happen to decay. This causes the count rate to fluctuate, increasing on some days and decreasing on others.
Key Takeaways
- Radioactive decay is random and spontaneous.
- Count rates from a radioactive source are not smooth; they fluctuate.
- A single measurement of count rate is not a precise value.
Common Mistakes
- Saying the count rate decreases because the sample is running out; this would only explain a steady decrease, not an increase.
- Blaming background radiation alone; the credited idea here is the random nature of the decay.
Things to Be Careful About
- Use the word 'random' or 'spontaneous' to score the mark.
- Explain that the number of decays in successive equal time intervals is not exactly the same.
A stable star in a distant galaxy has a mass that is more than 15 times the mass of the Sun.
State the name of the nuclear reaction that occurs at the centre of the star and describe this nuclear reaction.
Answer
(nuclear) fusion. Hydrogen nuclei join / fuse together to produce helium (nuclei).
Nuclear fusion — hydrogen nuclei fuse together to form helium
Walkthrough
The question asks for two things: the name of the nuclear reaction powering a star, and a description of what happens during it. Inside the core of a main-sequence star, conditions are extremely hot and dense. Hydrogen nuclei (protons) collide at high speed and fuse (join) together to form helium nuclei. This process is called nuclear fusion.
The mark scheme gives one mark for the name “fusion”, one for saying that hydrogen nuclei join/fuse, and one for saying that helium is produced. A full answer therefore is: “Nuclear fusion — hydrogen nuclei fuse together to produce helium.”
Key Takeaways
- A stable star produces its energy by nuclear fusion in its core.
- Fusion joins small nuclei (hydrogen) into a bigger nucleus (helium).
Common Mistakes
- Writing “nuclear fission” — this is the splitting of heavy nuclei and is wrong here.
- Naming the reaction but not describing it — the description carries two of the three marks.
- Forgetting to say that helium is the product.
Things to Be Careful About
- Say “fusion” and then cover both halves of the description: hydrogen nuclei join, and they produce helium. Each half is a separate mark.
Answer
The reaction transfers energy thermally. The high temperature produces a high pressure / an outward force. This balances the inward gravitational force, so further gravitational collapse is prevented.
Fusion releases energy, producing high pressure / an outward force that balances the inward gravitational force and prevents gravitational collapse
Walkthrough
This is an “explain” question, and the mark scheme wants three linked physical ideas, each worth one mark:
- The fusion reaction transfers energy thermally — it releases energy as heat. (B1)
- Because the core is so hot, it produces a high pressure / outward force that pushes outwards. (B1)
- This outward pressure balances the inward gravitational force, preventing the star from collapsing under its own gravity. (B1)
The full chain is: fusion → energy → heat → high outward pressure → gravity pulling in → balanced → no collapse. A star is stable precisely because these two forces balance.
Key Takeaways
- A star is stable when the outward pressure from fusion energy exactly balances the inward pull of gravity.
- This is an equilibrium — both forces must be mentioned to show the balance.
Common Mistakes
- Only saying “the star gets hot” without linking temperature to pressure.
- Only mentioning gravity without the balancing outward force.
- Saying “gravity prevents collapse” on its own, without stating that the outward pressure balances it.
Things to Be Careful About
- The mark scheme wants the word “pressure” or “outward force” from the high temperature, and the word “balanced” for the gravitational force.
- Keep the chain in order: energy → pressure → balance.
As a massive star approaches the end of its life, it stops being stable and becomes a red supergiant.
Answer
There is not enough hydrogen (left) / the star runs out of hydrogen.
not enough hydrogen (left) / the hydrogen runs out
Walkthrough
A red supergiant has run out of hydrogen fuel in its core. Without hydrogen, fusion cannot continue, so no more energy is released and the outward pressure drops. The star can no longer hold itself up against gravity. The mark scheme simply wants the reason: not enough hydrogen (left) / runs out of hydrogen.
Key Takeaways
- Fusion needs hydrogen fuel; when the fuel runs out, the balancing outward pressure stops too.
Common Mistakes
- Giving a vague answer like “fusion stops” without saying why — the hydrogen has run out.
Things to Be Careful About
- This is a one-mark question: say clearly that the hydrogen fuel has run out.
Answer
Any three from: it explodes / turns into a supernova; it produces heavy elements; it forms a nebula; it leaves behind a neutron star or a black hole.
It explodes as a supernova, producing heavy elements and forming a nebula, leaving behind a neutron star or a black hole
Walkthrough
When a red supergiant can no longer support itself, it collapses and then explodes in a supernova. This colossal explosion:
- produces heavy elements (elements heavier than iron are made in supernovae),
- throws out material that forms a nebula (a cloud of gas and dust),
- and leaves behind a neutron star or a black hole in the centre.
Any three of the five listed points earn the three marks. A full answer: “It explodes as a supernova, producing heavy elements and forming a nebula, leaving behind a neutron star or a black hole.”
Key Takeaways
- Massive stars end their lives in a supernova explosion.
- The leftovers are a neutron star (for lighter massive stars) or a black hole (for heavier ones).
Common Mistakes
- Giving the low-mass star ending (white dwarf — the Sun’s fate), which is wrong for a massive star.
- Listing only two points when three are needed for the three marks.
Things to Be Careful About
- Pick three of the five points exactly as in the scheme: explodes, supernova, heavy elements, nebula, neutron star / black hole.
- Either “neutron star” or “black hole” is acceptable as the remnant — the scheme allows both.