Physics 5054/11 — October/November 2024
Cambridge O-Level · Multiple Choice · answer key with instant marking and worked solutions
Topics Energy, Work and Power · Forces · Kinematics · Kinetic Particle Model of Matter · Mass, Weight and Density · Turning Effect of Forces · +17 more
Tap an option under each question to check it — your score builds as you go.
A crane lifts a heavy load at a steady rate.
Which unit is suitable for the output power of the crane's motor?
Options
A
B
C
D
Working
Power is the rate at which energy is transferred or work is done, so it is measured in watts (). For a motor, the suitable unit is the kilowatt ().
- A is a unit of force, not power.
- B is a unit of power. ✓
- C is not a standard unit of power.
- D is a unit of energy, not power.
Answer
B
B
Walkthrough
Power tells us how quickly energy is transferred or work is done. The SI unit of power is the watt (), which is one joule per second. For a large motor such as a crane's motor, the power is usually given in kilowatts ().
Look at each option:
- A is a kilonewton, a unit of force. A crane does exert forces, but the question asks for power, not force.
- B is a kilowatt, a unit of power. This is the correct choice.
- C is not a unit of power. It mixes force and time, but power is energy per second, not force per second.
- D is a kilowatt-hour, a unit of energy. It is the energy used by a 1 kW appliance in 1 hour, not the rate of doing work.
So the correct answer is B.
Key Takeaways
- Power is the rate of transferring energy or doing work.
- The unit of power is the watt (), and .
- Do not confuse force (), power ( or ) and energy ( or ).
Common Mistakes
- Choosing A because contains "k" and sounds large, but it is a force unit.
- Choosing D because contains "kW", but it is an energy unit.
- Thinking could be a power unit; power is energy per second, not force per second.
Things to Be Careful About
- Read the question carefully: it asks for a unit of power, not a unit of force or energy.
- Remember that is power, while is energy.
- Always match the unit to the physical quantity being asked about.
Which statement about mass is correct?
Options
A Mass is a scalar and its unit is the kilogram.
B Mass is a scalar and its unit is the newton.
C Mass is a vector and its unit is the kilogram.
D Mass is a vector and its unit is the newton.
Working
Mass is a scalar quantity because it has magnitude but no direction. Its SI unit is the kilogram (kg).
- A Correct: mass is a scalar, unit is the kilogram.
- B Incorrect: the newton is the unit of force, not mass.
- C Incorrect: mass is not a vector.
- D Incorrect: mass is not a vector, and the newton is not its unit.
Answer
A
A
Walkthrough
This question tests your understanding of what mass is and its unit.
- What is mass? Mass is a measure of the amount of matter in an object. It is a scalar quantity, meaning it has magnitude (a size) but no direction. For example, a mass of 5 kg is just 5 kg — there is no direction associated with it.
- What is the unit of mass? The SI unit of mass is the kilogram (kg). Other units like grams (g) or tonnes (t) are also used, but the base unit is the kilogram.
- Now look at the options:
- A says mass is a scalar and its unit is the kilogram — this is correct.
- B says the unit is the newton. The newton (N) is the unit of force, not mass, so this is wrong.
- C says mass is a vector. A vector quantity has both magnitude and direction (like velocity or force). Mass has no direction, so this is wrong.
- D combines the two errors — it is wrong for both reasons.
Key Takeaways
- Mass is a scalar quantity — it has magnitude only.
- The SI unit of mass is the kilogram (kg).
- The newton (N) is the unit of force, not mass.
- Being able to sort quantities into scalars (magnitude only) and vectors (magnitude and direction) is a key skill in physics.
Common Mistakes
- Confusing mass with weight. Weight is a force (measured in newtons) and is a vector; mass is a scalar measured in kilograms.
- Forgetting that the newton is a unit of force. If you see 'newton' in a question about mass, it is almost certainly a distractor.
Things to Be Careful About
- Always associate mass with the kilogram and weight with the newton.
- Remember that scalars have no direction; if a quantity is described as a vector, it must have both magnitude and direction.
The bob of a simple pendulum is pulled horizontally by a force that is equal to weight of the bob.
Which diagram shows the angle between the pendulum thread and the vertical?
Options
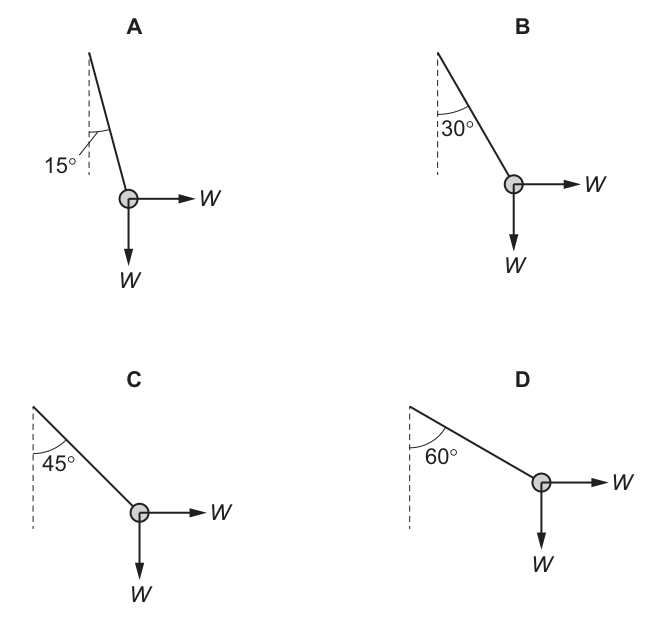
Working
The bob is in equilibrium, so the resultant force is zero. The forces acting on the bob are its weight (downwards), the horizontal pulling force (sideways), and the tension in the thread (at angle to the vertical).
Resolving horizontally:
Resolving vertically:
Dividing the horizontal equation by the vertical equation:
Answer
C
C
Walkthrough
The pendulum bob is held stationary, so it is in equilibrium. This means the resultant force acting on it is zero. There are three forces acting on the bob:
- The weight acting vertically downwards.
- The horizontal pulling force, which is given as equal to .
- The tension in the thread, acting along the thread at an angle to the vertical.
For the resultant force to be zero, the horizontal and vertical components of the tension must exactly balance the other two forces.
Horizontally, the tension's component is , and it must balance the horizontal pull :
Vertically, the tension's component is , and it must balance the weight :
To find the angle , divide the horizontal equation by the vertical equation:
The angle whose tangent is 1 is . Therefore, the thread must be at to the vertical, which matches diagram C.
Key Takeaways
- An object in equilibrium has a resultant force of zero.
- Forces can be resolved into perpendicular components (horizontal and vertical) to find unknown angles or magnitudes.
- When two perpendicular forces are equal in magnitude, the resultant force acts at to each, and the balancing force (tension) must also act at .
Common Mistakes
- Assuming the angle is or because of the common -- triangle, without checking which side is opposite which force.
- Forgetting that both the horizontal pull and the weight have the same magnitude , so their components must be equal.
- Confusing the angle with the horizontal instead of the vertical.
Things to Be Careful About
- The angle is measured from the vertical, so is the horizontal component and is the vertical component.
- Ensure that the forces being resolved are correctly matched to their directions: horizontal pull balances , weight balances .
A student takes 20 minutes to walk from X to Y at a speed of .
She turns at Y and walks at a speed of for 15 minutes to reach Z.
What is her average speed from X to Z?
Options
A
B
C
D
Working
Distance from X to Y:
Distance from Y to Z:
Total distance = 2.0 km.
Total time = 20 + 15 = 35 min = .
Average speed:
Answer
B
B
Walkthrough
Average speed is defined as
It is not the average of the two speeds, because the student spends different times at the two speeds.
First convert each time from minutes to hours:
- 20 minutes = hour
- 15 minutes = hour
Now find the distance on each part using distance = speed × time:
- XY: km
- YZ: km
Total distance = 1.0 + 1.0 = 2.0 km.
Total time = 20 + 15 = 35 minutes = hour.
Therefore
This rounds to 3.4 km/h, so the correct option is B.
The fact that she turns 90° at Y is not needed for average speed, because average speed depends only on total distance along the path, not on the direction of travel.
Key Takeaways
- Average speed is the total distance travelled divided by the total time taken.
- Speeds must be weighted by the time spent at each speed; simply averaging 3.0 and 4.0 gives the wrong answer.
- Always convert minutes to hours before using speeds given in km/h.
- The 90° turn is irrelevant to average speed, but it would matter if the question asked for average velocity or displacement.
Common Mistakes
- Choosing C, 3.5 km/h: this is just the average of 3.0 and 4.0, ignoring the different times spent at each speed.
- Choosing D, 5.0 km/h: this is the resultant speed if the two velocities were combined as perpendicular vectors. It is not the average speed.
- Choosing A, 2.4 km/h: this comes from dividing the straight-line displacement by the total time. Average speed uses the full distance walked, not the displacement.
- Forgetting that 20 minutes is one third of an hour, not 0.2 hours.
Things to Be Careful About
- The units are km/h, so minutes must be written as fractions of an hour.
- Average speed is a scalar, so direction and the right-angle turn do not enter the calculation.
- Rounding: , which is 3.4 to two significant figures, matching option B.
- If the question had asked for average velocity, you would need displacement and direction, not total distance.
A car is at rest by a red traffic light. When the light changes to green, the car starts moving. The graph represents the motion of the car.
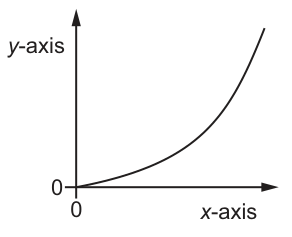
The car has a constant acceleration.
Which quantity is plotted on the x-axis and which quantity is plotted on the y-axis?
Options
| x-axis | y-axis | |
|---|---|---|
| A | distance | time |
| B | speed | time |
| C | time | distance |
| D | time | speed |
Answer
C
C
Walkthrough
The car starts from rest, so its initial speed is zero. It has a constant acceleration, which means its speed increases at a steady rate.
- If the graph plotted speed against time, it would be a straight line through the origin with a constant gradient (since ). Option D is incorrect.
- If the graph plotted distance against time, the distance is given by . This is a quadratic relationship, so the graph is a curve starting from the origin with an increasing gradient (a parabola). This matches the graph in Fig. 1. Thus, the x-axis is time and the y-axis is distance. Option C is correct.
- If the x-axis were distance and y-axis time (Option A), the gradient (1/speed) would decrease as speed increases, giving a curve with a decreasing gradient. Option A is incorrect.
- Option B (x-axis = speed, y-axis = time) would also give a straight line since . Option B is incorrect.
Key Takeaways
- For constant acceleration from rest, a speed-time graph is a straight line through the origin.
- A distance-time graph for constant acceleration from rest is a curve with an increasing gradient (parabolic).
Common Mistakes
- Confusing the shapes of distance-time and speed-time graphs for accelerated motion.
- Thinking that any curve starting from the origin must be a speed-time graph.
Things to Be Careful About
- Always check the gradient of the curve. An increasing gradient on a distance-time graph means speed is increasing (acceleration). An increasing gradient on a speed-time graph means acceleration is increasing (jerk), which is not the case here.
- Read the options carefully to match x-axis and y-axis correctly.
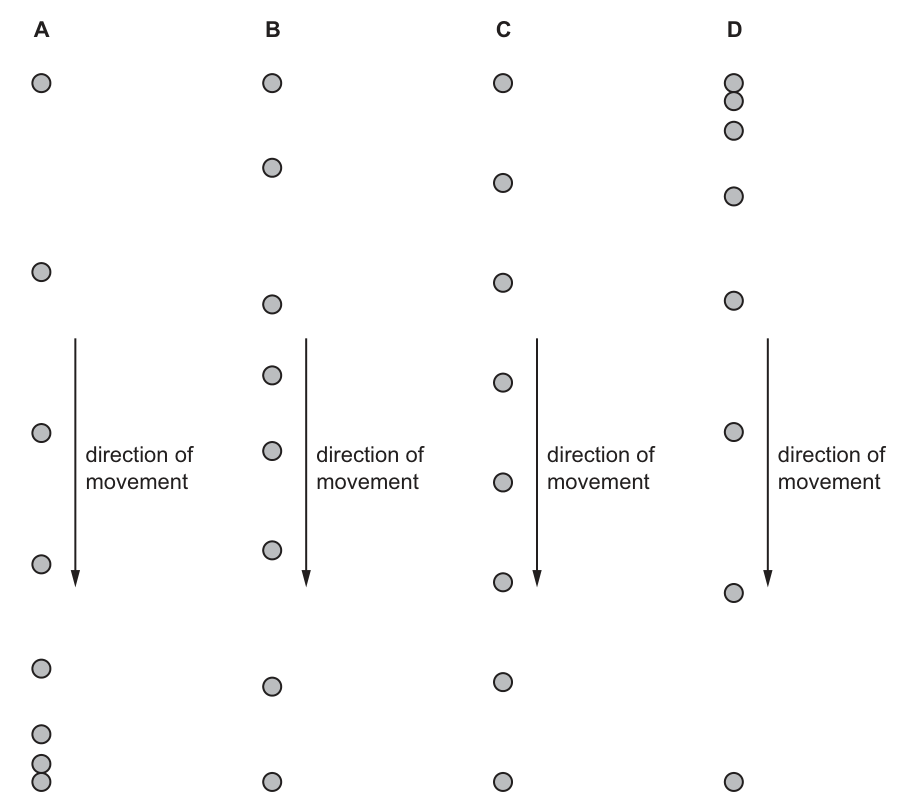
An object falls without air resistance. Its position at equal time intervals is shown by a sequence of dots.
Which sequence of dots is correct?
Options
Working
The object falls without air resistance, so it is in free fall and experiences a constant acceleration due to gravity ().
Its speed increases as it falls.
Since the dots represent the position at equal time intervals, the distance between consecutive dots must increase as the speed increases.
Sequence D shows dots that are closely spaced at the top (low speed) and become progressively further apart towards the bottom (high speed), which matches an accelerating object.
Answer
D
D
Walkthrough
An object falling without air resistance is in free fall. The only force acting on it is its weight, so it experiences a constant acceleration downwards (the acceleration of free fall, ).
Because the acceleration is constant and downwards, the object's speed increases continuously as it falls.
The sequence of dots shows the position of the object at equal time intervals. If the speed is constant, the dots would be equally spaced (Option C). If the object were slowing down, the dots would get closer together (Option A). Since the object is speeding up, it covers more distance in each successive equal time interval. Therefore, the gaps between the dots must increase as the object moves downwards.
Looking at the options:
- A shows decreasing gaps (deceleration).
- B shows irregular spacing.
- C shows equal gaps (constant speed / terminal velocity).
- D shows increasing gaps (acceleration).
Thus, D is the correct sequence.
Key Takeaways
- Free fall is motion under constant acceleration due to gravity.
- For an accelerating object, the distance covered in equal time intervals increases.
- A dot diagram with equal time intervals shows acceleration if the spacing between dots increases in the direction of motion.
Common Mistakes
- Choosing C: assuming the object falls at a constant speed. This would only be true if air resistance balanced the weight (terminal velocity), but the question states 'without air resistance'.
- Choosing A: confusing the direction of acceleration or thinking falling objects slow down.
- Forgetting that the time intervals between dots are equal; the spacing directly reflects the speed at that part of the journey.
Things to Be Careful About
- Read the phrase 'without air resistance' carefully. If air resistance were included, the object would eventually reach terminal velocity, and the bottom dots would be equally spaced.
- Ensure you read the direction of movement (downwards) and match the increasing spacing to the direction of motion.
Some gas trapped in a container is compressed at constant temperature by a piston.
Which property of the gas does not change?
Options
A pressure
B mass
C frequency of particle collision
D density
Working
Compressing the gas at constant temperature reduces its volume. This increases the pressure, the density (mass/volume) and the frequency of particle collisions with the container walls. The mass of the gas is unchanged because no gas escapes and no gas is added.
Answer
B
B
Walkthrough
When the piston compresses the gas, the same number of gas particles is squeezed into a smaller volume. The kinetic model of gases says the pressure comes from the particles colliding with the container walls. With a smaller volume, the particles collide with the walls more often, so the pressure rises and the frequency of collisions increases. Density is mass divided by volume, so with the same mass in a smaller volume, the density also rises. The only quantity that does not change is the mass itself, because no particles enter or leave the container. So the answer is B.
Key Takeaways
- Compressing a gas at constant temperature increases pressure, collision frequency and density.
- Mass is a measure of the amount of matter and is conserved unless gas enters or leaves the container.
- Density depends on both mass and volume, so it changes when the volume changes.
Common Mistakes
- Choosing C (frequency of particle collision) — this does increase, because the particles have less distance to travel between the walls.
- Choosing D (density) — density is mass over volume; since the volume decreases, the density increases.
- Confusing the constancy of mass with the constancy of density.
Things to Be Careful About
- The question asks which property does not change. Read the negative phrasing carefully.
- Remember that temperature is constant here, so the average kinetic energy of the particles stays the same — this is why only the collision frequency, not the particle speed, changes.
- Do not confuse the number of particles (constant) with the density (which changes because the volume changes).
A car has a weight of .
What is the mass of the car?
Options
A
B
C
D
Working
Answer
B
B
Walkthrough
The question gives the car's weight as and asks for its mass. Weight and mass are different quantities: weight is the force of gravity on an object, measured in newtons, while mass is the amount of matter in the object, measured in kilograms. They are linked by the equation
where is the weight in newtons, is the mass in kilograms, and is the gravitational field strength, which is on Earth's surface.
To find the mass, rearrange the equation to make the subject:
This rounds to , which is option B.
Looking at the other options: A () is the value you would get if you divided by or made a rounding error. C () is just the weight with the wrong unit — confusing newtons with kilograms. D () comes from multiplying by instead of dividing.
Key Takeaways
- Weight is a force (), measured in newtons; mass is a measure of the amount of matter, measured in kilograms.
- To find mass from weight, divide by the gravitational field strength: .
- The gravitational field strength on Earth is approximately .
Common Mistakes
- Confusing mass and weight — the most common error here is picking C, which gives the weight a mass unit.
- Multiplying instead of dividing: , which is option D.
- Using the wrong value of — the question does not give , so you must recall it is on Earth.
Things to Be Careful About
- Always check the units: weight in newtons, mass in kilograms, gravitational field strength in N/kg.
- Rounding: rounds to , matching option B exactly.
A lorry is travelling along a straight, horizontal road. The constant driving force on the lorry is and the total resistive force is .
Which row describes the motion of the lorry and gives the resultant force acting on it?
Options
| motion of lorry | resultant force / | |
|---|---|---|
| A | acceleration | 60 |
| B | acceleration | 100 |
| C | deceleration | 60 |
| D | deceleration | 100 |
Working
The driving force and resistive force act in opposite directions, so the resultant force is
in the forward direction, i.e. in the direction of motion.
A resultant force in the direction of motion causes the lorry to accelerate.
Answer
A
A
Walkthrough
The lorry experiences two horizontal forces: the driving force of forwards and the total resistive force of backwards. Since these act along the same straight line in opposite directions, the resultant (net) force is found by subtracting the smaller from the larger:
This resultant force points in the direction of the larger force, which is forwards, i.e. in the same direction as the lorry is moving. A resultant force in the direction of motion causes the lorry to speed up, so the motion is an acceleration.
Thus the correct row is A.
Key Takeaways
- When forces act along the same line, find the resultant by vector addition, treating one direction as positive.
- The direction of the resultant force determines whether the object accelerates or decelerates: if the resultant is in the direction of motion, the object accelerates; if opposite, it decelerates.
- Units must be consistent; here both forces are already in , so no conversion is needed.
Common Mistakes
- Adding the forces to get instead of subtracting: the two forces act in opposite directions, so they must be subtracted.
- Confusing the direction of the resultant with the direction of motion: the resultant is forward, so the lorry accelerates, not decelerates.
- Thinking that a large resistive force always means deceleration; it is the direction of the resultant force that matters.
Things to Be Careful About
- Always state the direction of a vector quantity. Here the resultant is forwards.
- If the driving force were smaller than the resistive force, the resultant would be backward and the lorry would decelerate.
- The question asks for both the motion and the resultant force; make sure both parts of the answer are correct.
As a cyclist uses the brakes on a bicycle, energy is transferred from the kinetic store to the thermal store.
What causes the transfer of energy?
Options
A friction
B mass
C thrust
D weight
Working
When the brakes are applied, the brake blocks press against the wheel and friction acts between them. Friction does work against the motion, so kinetic energy is transferred to the thermal store and the brakes warm up.
Mass, thrust and weight do not transfer energy from the kinetic store to the thermal store when braking.
Answer
A
A
Walkthrough
This question asks for the cause of the energy transfer when a cyclist brakes. The cyclist is moving, so the bicycle has energy in its kinetic store. To slow down, the brakes must remove this kinetic energy. The brake blocks press on the wheel rims and friction acts between them. Friction opposes the motion and does work, so kinetic energy is transferred to the thermal store — the brakes and wheel become warm.
Now look at the options:
- A friction — correct, because friction is the force that does work against the motion and transfers the energy.
- B mass — mass is a property of the cyclist and bicycle; it does not cause an energy transfer by itself.
- C thrust — thrust is a forward driving force; it would increase the kinetic store, not transfer energy to the thermal store when braking.
- D weight — weight is the gravitational force pulling downwards; it does not cause the braking energy transfer.
So the answer is A.
Key Takeaways
- Friction is a contact force that opposes relative motion between two surfaces.
- When friction acts, it does work and transfers energy from the kinetic store to the thermal store.
- Energy is not destroyed when braking: it is transferred from one store to another.
Common Mistakes
- Choosing weight because it is a force: weight acts vertically downwards and is not the force causing the braking energy transfer.
- Choosing thrust because the cyclist is moving: thrust is a driving force, not the braking force.
- Confusing the property mass with a force or cause of energy transfer.
Things to Be Careful About
- The question asks for the cause of the transfer, not the store that energy is transferred to.
- Use the correct energy-store language: kinetic store and thermal store, not "heat energy" as a store.
- Friction always transfers energy to the thermal store when it does work against motion.
The extension of a spring is measured as the load stretching it is increased. The graph shows the results.
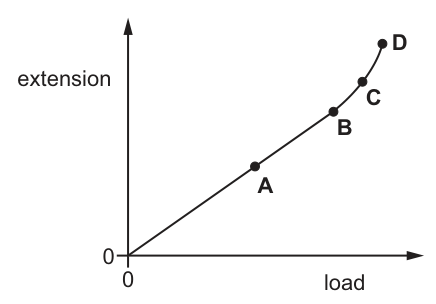
Which point is the spring's limit of proportionality?
Options
A A
B B
C C
D D
Answer
Hooke's Law states that the extension of a spring is proportional to the load applied, provided the limit of proportionality is not exceeded. On a graph of extension against load, this proportional relationship is shown by a straight line passing through the origin.
Looking at Fig. 1:
- The graph is a straight line from the origin (0, 0) through point A up to point B.
- At point B, the graph begins to curve, indicating that extension is no longer proportional to load.
Therefore, point B is the limit of proportionality.
Answer
B
B
Walkthrough
- Recall Hooke's Law: Hooke's Law states that the extension of an elastic object is directly proportional to the force (load) applied to it, as long as the limit of proportionality is not exceeded. Mathematically, or .
- Interpret the graph axes: The vertical axis is extension and the horizontal axis is load. A proportional relationship () appears as a straight line through the origin on a graph.
- Locate the linear region: In Fig. 1, the line is straight from the origin (0,0) through point A and continues straight up to point B.
- Identify the limit of proportionality: The limit of proportionality is the point beyond which the graph is no longer a straight line. At point B, the line starts to curve upwards (towards C and D). This means that for loads greater than the load at B, the extension is no longer proportional to the load.
- Conclusion: Point B marks the end of the straight-line section, so B is the limit of proportionality.
Note: Point C is often close to the elastic limit (the point beyond which the spring does not return to its original length when the load is removed), but strictly speaking, the limit of proportionality is where the linearity ends, which is B.
Key Takeaways
- Hooke's Law: Extension Load up to the limit of proportionality.
- Graph shape: A load-extension graph is a straight line through the origin up to the limit of proportionality. Beyond that, it curves.
- Key points: Origin (0,0), Limit of proportionality (end of straight line), Elastic limit (end of elastic deformation, often very close to limit of proportionality), Yield point (where large extension occurs with little extra load), Fracture point.
Common Mistakes
- Confusing limit of proportionality with elastic limit: Students often pick the point where the curve gets steep (like C) or where it breaks. The limit of proportionality is specifically where the straight line ends.
- Reading the axes wrong: If axes were swapped (load on y, extension on x), the straight line would still indicate proportionality, but the gradient would be the spring constant . Here, gradient is .
- Choosing A: Point A is just a point on the linear section, not the limit.
Things to Be Careful About
- Definition: Ensure you know the definition: limit of proportionality is the point up to which Hooke's Law is obeyed (straight line graph).
- Graph reading: Look carefully at where the straight line stops. In this diagram, the straight line clearly ends at B.
- Units: Not applicable here as it is a conceptual identification question.
A satellite orbits the Earth.
What is the direction of the force on the satellite causing this circular motion?
Options
A away from the centre of the Earth
B in the direction of motion of the satellite
C in the opposite direction to the motion of the satellite
D towards the centre of the Earth
Answer
D
D
Walkthrough
A satellite moving in a circular orbit is constantly changing direction. A force is needed to change direction, and for circular motion this force acts towards the centre of the circle. Here, the centre of the circle is the centre of the Earth, so the force on the satellite is towards the centre of the Earth. This force is the gravitational pull of the Earth on the satellite.
Key Takeaways
- An object moving in a circle is accelerating because its direction is changing.
- The force causing circular motion always points towards the centre of the circle.
- For a satellite, this force is the Earth's gravitational attraction.
Common Mistakes
- Choosing B: thinking the force is in the direction of motion. A force in the direction of motion would speed the satellite up, not make it turn.
- Choosing A: thinking the force is away from the centre. This is the fictitious 'centrifugal' feeling, not a real force acting on the satellite.
- Choosing C: thinking the force opposes motion. That would slow the satellite down, not keep it in orbit.
Things to Be Careful About
- The satellite is not moving away from the Earth even though it is moving sideways: the force towards the centre continuously changes its direction.
- 'Centripetal' means towards the centre. There is no outward force acting on the satellite.
A uniform beam is pivoted at its centre and balanced by three weights as shown.
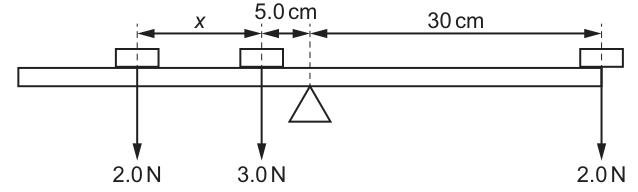
What is distance ?
Options
A
B
C
D
Working
The beam is uniform and pivoted at its centre, so the weight of the beam acts through the pivot and produces no moment.
By the principle of moments, for the beam to be balanced:
Clockwise moment (right side):
Anticlockwise moments (left side):
- Moment from 3.0 N weight:
- Moment from 2.0 N weight: The distance from the pivot is cm. So,
Equation:
Answer
A
A
Walkthrough
- Identify the pivot and the condition for balance: The beam is pivoted at its centre. Since it is uniform, its own weight acts downwards through the pivot point. The perpendicular distance from the pivot to the line of action of the beam's weight is zero, so the beam's weight creates no moment. We only need to consider the three hanging weights.
- Apply the principle of moments: For an object to be in rotational equilibrium (balanced), the total clockwise moment about the pivot must equal the total anticlockwise moment about the pivot. Moment = Force × perpendicular distance from pivot.
- Calculate the clockwise moment: On the right side, there is a 2.0 N weight at a distance of 30 cm from the pivot.
- Calculate the anticlockwise moments: On the left side, there are two weights.
- A 3.0 N weight at 5.0 cm from the pivot. Moment = .
- A 2.0 N weight. The diagram shows it is at a distance from the 3.0 N weight. Since the 3.0 N weight is 5.0 cm from the pivot, the total distance of the 2.0 N weight from the pivot is cm. Moment = .
- Set up the equation and solve: Expand the bracket: Subtract 25 from both sides: Divide by 2:
Key Takeaways
- Principle of Moments: for a balanced object.
- Distance from pivot: Moments are calculated using the perpendicular distance from the pivot, not from another object. If a distance is given between two objects, you must add the distance of the first object from the pivot to find the total distance.
- Uniform beam at centre pivot: The weight of a uniform beam pivoted at its centre of gravity produces no turning effect (moment = 0).
Common Mistakes
- Using as the distance from the pivot: A common error is to calculate the moment of the leftmost 2.0 N weight as . The distance is between the two left weights, so the distance from the pivot is .
- Including the beam's weight: Students sometimes try to include the weight of the beam in the calculation. Since the beam is uniform and pivoted at its centre, its weight acts through the pivot and creates no moment.
- Unit errors: While it is good practice to convert to metres and Newton-metres (Nm), using cm and N (N cm) is perfectly valid here as long as units are consistent on both sides of the equation. Converting unnecessarily can introduce arithmetic errors.
Things to Be Careful About
- Read the diagram carefully: Ensure you identify which distance is from the pivot and which is between weights. In this case, 30 cm and 5.0 cm are from the pivot, but is between the 3.0 N and 2.0 N weights on the left.
- Signs and directions: Clockwise is right-side-down (or left-side-up), anticlockwise is left-side-down (or right-side-up). Here, right-side weights cause clockwise rotation, left-side weights cause anticlockwise rotation.
- Significant figures: The data is given to 2 significant figures (2.0, 30, 5.0, 3.0). The answer 17.5 is exact from the calculation, but 18 cm (2 s.f.) would also be acceptable in some contexts, though 17.5 matches the option exactly.
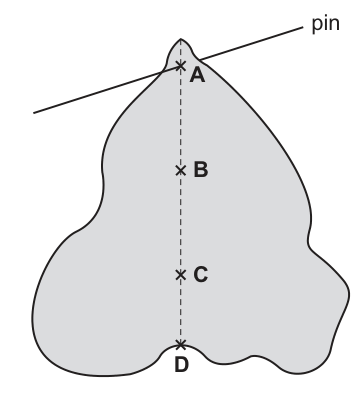
A piece of card of uniform thickness and density is suspended freely from a horizontal pin. The diagram shows the card at rest.
Which cross is the centre of gravity of the card?
Options
Answer
C
C
Walkthrough
- Identify the key principle: When a body is suspended freely and is at rest, the only two forces acting on it are its weight (acting downwards through the centre of gravity) and the reaction force at the pivot (acting upwards through the pivot). For the body to be in equilibrium, these forces must be equal, opposite, and collinear. Therefore, the centre of gravity must lie on the vertical line passing directly below the point of suspension.
- Analyze the given diagram: The vertical dashed line is the plumb line. All four crosses (A, B, C, D) lie on or near this line. This confirms they are all candidates based on the suspension principle alone.
- Distinguish between the candidates: Since the card is uniform in thickness and density, its centre of gravity is the centroid of its area. The card is irregular, being narrower at the top and wider at the bottom. This means more mass is distributed in the lower half. Consequently, the centre of gravity must be located in the lower half of the card, below the geometric midpoint.
- Evaluate the points:
- A is near the pin, too high.
- B is in the upper half, above the bulk of the mass.
- D is at the bottom edge; the centre of gravity must be inside the body, balancing the mass above and below it.
- C is in the lower middle, correctly positioned to balance the greater mass at the bottom.
- Conclude that C is the centre of gravity.
Key Takeaways
- A freely suspended object at rest has its centre of gravity directly below the point of suspension, on the vertical plumb line.
- For a uniform object, the centre of gravity is the centroid, which shifts towards regions of greater mass or width.
Common Mistakes
- Choosing A or B by assuming the centre of gravity is near the top or at the geometric centre of the bounding shape, ignoring the actual mass distribution.
- Choosing D by placing the centre of gravity at the lowest edge of the object; the centre of gravity must lie within the body where the mass is balanced above and below.
Things to Be Careful About
- Remember that a single plumb line only tells you the centre of gravity lies somewhere on that line. To find it exactly for an irregular object, you would need to suspend it from a second point and draw another plumb line; the intersection of the two lines is the exact centre of gravity. Here, the correct point must be estimated from the mass distribution.
Trolley X of mass is moving to the right at .
Trolley Y of mass is moving to the left at .
The trolleys collide and stick together.
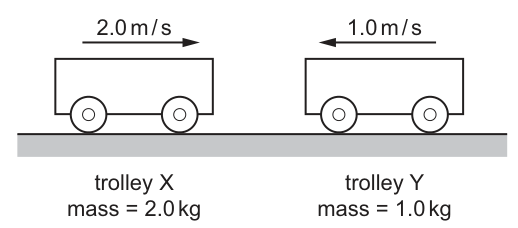
The collision takes a total time of .
What is the average force acting on trolley X during the collision?
Options
A
B
C
D
Working
Taking the right direction as positive:
By conservation of momentum:
Change in momentum of trolley X:
Average force on trolley X:
Answer
B
B
Walkthrough
The two trolleys collide and stick together, which is a perfectly inelastic collision. We must first find the velocity of the combined mass after the collision using the principle of conservation of momentum.
Step 1: Find the final velocity.
Define the right direction as positive. Then and . The total initial momentum is:
After the collision, the trolleys move together with a combined mass of . Let be their common final velocity:
Equating initial and final momentum gives , so to the right.
Step 2: Find the change in momentum of trolley X.
Trolley X starts at and ends at . Its change in momentum is:
The magnitude of the change in momentum is .
Step 3: Calculate the average force.
Force is the rate of change of momentum. Over the collision time of , the average force on trolley X is:
Key Takeaways
- In a collision where objects stick together, use conservation of momentum with the combined mass to find the final velocity.
- Always assign a positive direction and use negative signs for velocities in the opposite direction.
- The average force on an object during a collision is its change in momentum divided by the collision time ().
Common Mistakes
- Ignoring the direction of velocity: Treating both velocities as positive gives a total initial momentum of , leading to a final velocity of and a wrong force of (Option A).
- Using the total change in momentum instead of the change for one trolley: Taking the change in momentum of the whole system (which is zero) or incorrectly summing the momentum changes gives incorrect forces like or .
- Forgetting to add the masses: Using the initial mass of X alone for the final momentum calculation instead of the combined mass .
Things to Be Careful About
- Sign conventions: Momentum is a vector. You must define a positive direction (e.g., right is positive) and apply it consistently to all velocities. Trolley Y moving left has a negative velocity.
- Sticking together: The phrase "stick together" means the final mass is the sum of both masses (), and they share a single final velocity.
- Force on X vs. Force on Y: By Newton's third law, the force on Y is equal and opposite to the force on X. Both have a magnitude of , but the force on X is directed to the left (negative), slowing it down from to .
An object of mass is moving at a constant speed. It has of kinetic energy.
What is the speed of the object?
Options
A
B
C
D
Working
The kinetic energy of an object is given by
Rearrange to make the subject:
Substitute and :
Answer
C:
C
Walkthrough
The object's mass and kinetic energy are given, and its speed is required. Kinetic energy is the energy an object has because it is moving. For an object of mass moving at speed ,
Here and , so we need to rearrange the equation to make the subject.
Multiply both sides by 2:
Divide both sides by :
Then take the square root:
Substitute the values:
This gives option C.
The other options are too small or too large: would give , not . Only gives kinetic energy .
Key Takeaways
- The kinetic energy of a moving object is .
- To find speed from kinetic energy and mass, use .
- Always work in SI units: energy in joules, mass in kilograms, speed in m/s.
- Speed is a scalar quantity, so it has no direction.
Common Mistakes
- Forgetting the factor in the kinetic energy equation.
- Forgetting to take the square root after finding .
- Mixing up mass and weight: here the mass is , not a force.
- Quoting the answer without a unit; the unit m/s is required.
Things to Be Careful About
- Make sure the energy is in joules and the mass is in kilograms before substituting.
- The answer should be given to an appropriate number of significant figures; is suitable.
- In a multiple-choice question, check that your final value appears as an option before selecting the letter. Here the correct option is C.
A wind-up radio is used in areas where mains electricity is not available.
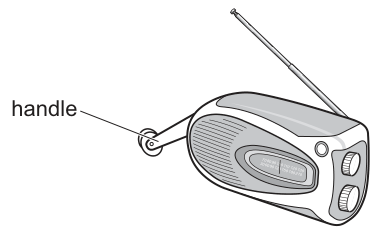
A person winds a spring in the radio using the handle. When the spring unwinds, it makes a small coil rotate in a magnetic field.
Which energy transfer is not useful for this radio?
Options
A elastic potential energy kinetic energy
B kinetic energy thermal energy
C chemical energy elastic potential energy
D kinetic energy sound energy
Answer
The energy transfers in a wind-up radio are:
- Chemical energy (in the person) elastic potential energy (in the wound spring): useful input and storage.
- Elastic potential energy kinetic energy (spring unwinding to rotate the coil): useful.
- Kinetic energy electrical energy (generator action): useful.
- Electrical energy sound energy (speaker): useful output.
- Kinetic energy thermal energy: this occurs due to friction in the moving parts and resistance in the circuit. This energy is wasted as heat and is not useful for the radio's operation.
Therefore, the energy transfer that is not useful is kinetic energy thermal energy.
Answer
B
B
Walkthrough
A wind-up radio requires a person to do work to wind the handle. This transfers energy from the person's chemical energy store (from food) into the elastic potential energy store of the wound spring. This storage step is intentional and useful, making option C a useful transfer in the overall process.
When the radio is turned on, the spring unwinds. The elastic potential energy is transferred into kinetic energy as the spring drives the coil to rotate. This is the mechanical input to the generator, so option A is useful.
The rotating coil moves through a magnetic field, which induces an electrical current via electromagnetic induction. The kinetic energy is thus transferred into electrical energy. This electrical energy is then sent to the speaker. The speaker converts the electrical energy into sound energy (the useful output) and some thermal energy (waste). The speaker's diaphragm vibrates (kinetic energy) to produce the sound waves, so the final stage involves a transfer to sound energy, making option D a useful part of the output chain.
Throughout the device, moving parts experience friction and the electrical circuit has resistance. These factors cause some of the kinetic and electrical energy to be transferred into thermal energy stores in the surroundings. This heating effect is wasted energy that does not contribute to producing sound or storing energy, so option B is not useful.
Key Takeaways
- Every energy transfer chain in a device has a useful path (input storage conversion useful output) and a wasteful path (usually to thermal energy stores via friction or resistance).
- Identifying which transfer is 'not useful' means spotting the waste energy pathway, which is almost always the generation of thermal energy.
- Chemical energy from food is the ultimate source of energy for a wind-up radio, transferred first into elastic potential energy.
Common Mistakes
- Confusing the input energy source: some candidates think the radio has no useful input because it doesn't use mains electricity, forgetting that the person's chemical energy is the intended input.
- Misidentifying the speaker's action: thinking that kinetic energy is not involved in sound production, whereas the speaker cone's vibration (kinetic) is what directly creates the sound waves.
- Assuming all thermal energy is useful: while some devices (like electric heaters) use thermal energy as their useful output, in a radio it is purely waste.
Things to Be Careful About
- Read the question carefully: it asks for the transfer that is not useful, not the one that is useful.
- Remember that 'useful' means contributing to the primary function of the device (producing sound from a stored charge). Any energy that ends up as waste heat is not useful for this purpose.
- In energy transfer questions, thermal energy is almost always the waste output unless the device is specifically designed to heat something (e.g., a toaster, an electric heater).
Energy is transferred in a filament lamp at a rate of . The lamp wastes energy at a rate of .
Which ratio is used to calculate the efficiency of the lamp?
Options
A
B
C
D
Working
Efficiency is the useful power output divided by the total power input.
The lamp is rated at , which is the total power input. It wastes , so the useful power output is
Answer
B
B
Walkthrough
Step 1: Identify the total power input. The lamp is rated at . This is the total power it draws from the supply, so it is the denominator of the efficiency ratio.
Step 2: Identify the wasted power. The lamp wastes . This is the power that does not produce light.
Step 3: Find the useful power output. The useful power is the part of the input that is not wasted:
Step 4: Apply the efficiency formula. Efficiency is always useful output divided by total input:
This matches option B.
Key Takeaways
- Efficiency is a ratio of useful output to total input, never the other way round.
- In this question the total power is given directly (60 W), so the useful power has to be found by subtracting the wasted power from it.
- The units (watts) cancel in the ratio, so efficiency is a dimensionless number, often expressed as a fraction, decimal, or percentage.
Common Mistakes
- Using the wasted power as the useful output — option D uses , which is the fraction of power wasted, not the efficiency.
- Adding the powers — option A uses in the denominator, which has no physical meaning here.
- Reversing the ratio — option C uses , which is the ratio of useful to wasted power, not the efficiency.
Things to Be Careful About
- Always make sure the numerator is the useful output and the denominator is the total input.
- The efficiency is less than 1 because some energy is always wasted as heat.
- No unit conversion is needed here since both powers are already in watts.
A liquid is held in a cylindrical container.
The diameter of the base of the cylinder is .
The mass of the liquid is and its depth is .
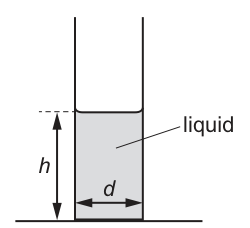
Which expression gives the pressure due to the liquid on the bottom of the cylinder?
Options
A
B
C
D
Working
The pressure on the bottom of the cylinder is defined as force per unit area:
The force on the base is the weight of the liquid:
The area of the circular base with diameter is:
Substituting and into the pressure equation gives:
This matches option C.
Answer
C
C
Walkthrough
The question asks for the pressure exerted by a liquid on the bottom of a cylindrical container. Pressure is defined as the force applied perpendicular to a surface per unit area, given by the equation .
First, identify the force acting on the base. For a liquid in a cylindrical container with vertical walls, the force on the base is simply the total weight of the liquid. Since the mass of the liquid is , the weight is .
Next, determine the area of the base. The base is a circle with diameter . The radius is half the diameter, so . The area of a circle is . Substituting gives:
Now substitute and into the pressure formula:
Dividing by a fraction is the same as multiplying by its reciprocal, so:
This matches option C.
Alternatively, you can use the liquid pressure formula . First find the density :
Then substitute into :
Both methods yield the same result.
Key Takeaways
- Pressure is force per unit area: .
- For a liquid in a cylindrical container, the force on the base is the weight of the liquid ().
- The area of a circle can be expressed in terms of its diameter as .
- When given mass instead of density, you can either use directly or find the density first and use .
Common Mistakes
- Forgetting the factor of 4: Using instead of leads to option A. This happens when a candidate confuses diameter with radius in the area formula.
- Including unnecessarily: Option D includes in the numerator. A candidate might mistakenly combine and without cancelling , or think that depth always appears in the pressure formula regardless of whether mass is given.
- Confusing mass and density: Option B uses in the numerator, which is not a standard pressure expression. It likely comes from misremembering and substituting for .
Things to Be Careful About
- Always check whether the given dimension is the radius or the diameter. The formula requires the radius, so if the diameter is given, you must substitute and square the entire fraction, yielding .
- When dividing by a fraction, remember to multiply by the reciprocal. becomes , not .
- The depth is not needed in the final expression when the total mass is already known, because the weight already accounts for the total mass acting on the base.
The diagram shows an instrument that is used to measure the atmospheric pressure.
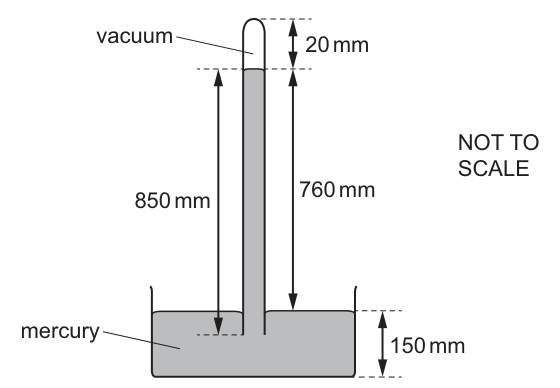
The density of mercury is .
What is the atmospheric pressure?
Options
A
B
C
D
Working
The atmospheric pressure is equal to the pressure exerted by the column of mercury above the level of the mercury in the reservoir.
From the diagram, the correct vertical height of the mercury column is the distance from the reservoir surface to the top of the column:
The other heights given (150 mm, 850 mm, 20 mm) are distractors:
- 20 mm is the vacuum space.
- 150 mm is the depth of mercury in the reservoir.
- 850 mm is the total height of the tube from the bottom.
Using the formula for pressure in a liquid:
Where:
- (density of mercury)
- (gravitational field strength)
Substitute the values:
Answer
C
C
Walkthrough
-
Identify the principle: A mercury barometer measures atmospheric pressure by balancing it against the pressure exerted by a column of mercury. The pressure at the level of the mercury surface in the reservoir (inside the tube) is equal to the atmospheric pressure acting on the surface of the mercury in the reservoir (outside the tube).
-
Select the correct height (): The pressure depends only on the vertical height of the liquid column above the free surface of the liquid in the reservoir. Looking at the diagram:
- The height from the reservoir surface to the top of the mercury column is explicitly labelled as 760 mm.
- Convert this to metres: .
- The other dimensions are distractors:
- 20 mm is the height of the vacuum space above the column.
- 150 mm is the depth of the mercury in the reservoir.
- 850 mm is the total height from the bottom of the reservoir to the top of the tube.
-
Apply the formula: The pressure exerted by a liquid column is given by .
- Density .
- Gravitational field strength (using 9.8 gives the exact match to the options; using 10 gives ~106 kPa, which is close but 9.8 is standard for precise barometer calculations).
- Height .
-
Calculate:
Convert to kPa: .
-
Check distractors (optional but good for verification):
- Option A (2.7 kPa): Uses . . Incorrect height.
- Option B (21 kPa): Uses . . Incorrect height.
- Option D (117 kPa): Uses . . Incorrect height.
Key Takeaways
- In a barometer, the atmospheric pressure is supported by the column of liquid above the reservoir level, not the total height of the tube or the depth of the reservoir.
- The formula applies to the pressure difference between two points in a fluid; here, the difference is between the top of the column (zero pressure, vacuum) and the reservoir surface (atmospheric pressure).
- Always convert units to SI (mm to m) before calculating pressure in Pascals.
Common Mistakes
- Using the wrong height: Candidates often pick a number from the diagram without understanding what it represents. Using the total tube height (850 mm) gives 117 kPa (Option D). Using the vacuum space (20 mm) gives 2.7 kPa (Option A). Using the reservoir depth (150 mm) gives 21 kPa (Option B).
- Forgetting to convert mm to m: If is used directly, the result is in the thousands, leading to a wrong order of magnitude.
- Confusing mass and weight: Not applicable here directly, but ensuring is in kg/m³ is crucial.
Things to Be Careful About
- Diagram interpretation: The diagram is marked 'NOT TO SCALE'. Do not estimate lengths from the drawing; use the labelled values. The key is to identify which labelled dimension represents the height of the liquid column above the free surface.
- Value of : The mark scheme implies to get exactly 104 kPa. If you use , you get , which is closest to C but slightly off. Always check if the options require a specific precision or value of .
- Units: The density is given as (standard form). Ensure calculation handles the power of 10 correctly. .
- Final unit: The options are in kPa. Remember that .
Air at atmospheric pressure and room temperature is trapped in an insulated container by a frictionless piston of negligible weight. The air can be compressed by placing masses on top of the piston.
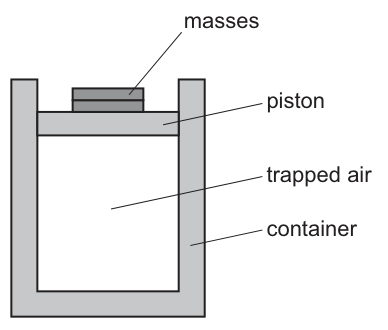
A mass of is placed on the piston and the volume of the trapped air decreases from to .
Which statement is correct?
Options
A Adding another mass decreases the volume of the air by less than .
B Adding an additional mass reduces the volume of the air to zero.
C The pressure of the trapped air is less than atmospheric pressure when its volume is .
D The temperature of the air decreases as the mass is added.
Working
Initial state: , .
After adding : , .
Using Boyle's law () assuming temperature returns to room temperature:
Adding another increases the pressure by another , so .
The new volume is:
The decrease in volume is , which is less than . Statement A is correct.
- B is incorrect: gas particles have volume and repel each other when very close; volume cannot be reduced to zero.
- C is incorrect: the added mass pushes down on the piston, so the gas pressure must be greater than atmospheric pressure to balance it.
- D is incorrect: compressing the gas does work on it. In an insulated container, this increases the internal energy and thus the temperature.
Answer
A
A
Walkthrough
The question describes a gas being compressed by adding mass to a piston. We evaluate each statement in turn.
Statement C: The piston is in equilibrium. The downward forces are atmospheric pressure on top of the piston plus the weight of the mass. The upward force is the pressure of the trapped air. Since there is an extra downward force from the mass, the trapped air pressure must be greater than atmospheric pressure to balance it. Thus, C is false.
Statement D: The container is insulated, meaning no heat can escape. When the mass is placed on the piston, the gas is compressed. Work is done on the gas by the piston. This work increases the internal energy of the gas, which means its temperature increases, not decreases. Thus, D is false.
Statements A and B: These require looking at the pressure-volume relationship. Assuming the gas eventually returns to room temperature (or using Boyle's law as a guide for the relationship), we can find the pressure increment caused by the mass.
Let and . After adding the mass, and .
Adding another adds another to the pressure, so .
Using Boyle's law again to find the new volume :
The volume decreases from to , a change of . This is less than , so A is correct.
For B, adding more mass (total ) would increase the pressure by , giving a total pressure of . The volume would be , not zero. Gases cannot be compressed to zero volume because the particles themselves occupy space and repel each other at short distances. Thus, B is false.
Key Takeaways
- Gas pressure inside a container with a movable piston must balance the external atmospheric pressure plus any additional pressure from masses on the piston.
- Compressing a gas in an insulated container does work on the gas, increasing its temperature.
- For a gas at constant temperature, pressure and volume are inversely proportional (). Equal increments in pressure produce progressively smaller decrements in volume.
- Gases cannot be compressed to zero volume.
Common Mistakes
- Assuming the pressure of the trapped air is less than atmospheric pressure because the volume decreased (confusing cause and effect; the added mass increases the pressure, which causes the volume to decrease).
- Thinking the temperature decreases during compression (forgetting that work done on the gas increases its internal energy, especially in an insulated system).
- Assuming a linear relationship between mass added and volume decreased (e.g., thinking gives decrease, so gives decrease to zero volume). Gas laws are non-linear ().
Things to Be Careful About
- The container is insulated, which is a key detail for evaluating statement D. If it were not insulated, the temperature might return to room temperature, but it would never decrease below room temperature during compression.
- When using , remember that is the total absolute pressure (atmospheric + pressure from the mass), not just the pressure from the mass. Atmospheric pressure is approximately , which is much larger than the pressure from a mass on a small piston, making the fractional pressure change small and the volume change non-linear.
- Always check the physical limits: volume cannot be negative or zero for a real gas.
A substance has a melting temperature of and a boiling temperature of .
In which state does the substance exist at and at ?
Options
| at | at | |
|---|---|---|
| A | solid | liquid |
| B | solid | gas |
| C | liquid | liquid |
| D | liquid | gas |
Working
Below the melting point () the substance is solid.
Between the melting point and the boiling point () it is liquid.
Above the boiling point it is gas.
At : is above and below , so the substance is liquid.
At : is also above and below , so the substance is liquid.
Only option C states liquid at both temperatures.
Answer
C
C
Walkthrough
The melting point is the temperature at which a solid changes into a liquid. The boiling point is the temperature at which a liquid changes into a gas.
Here the melting point is and the boiling point is . This tells us:
- below : solid
- between and : liquid
- above : gas
Now check each temperature:
- At , the temperature is above but below , so the state is liquid.
- At , the temperature is also above and below , so the state is liquid.
Therefore the correct option is C.
Key Takeaways
- The state of a substance depends on where its temperature lies relative to its melting and boiling points.
- A substance is solid below its melting point, liquid between its melting and boiling points, and gas above its boiling point.
- No calculation is needed here, only careful comparison of temperatures.
Common Mistakes
- Choosing A because seems "cold". Cold alone does not mean solid; compare the temperature with the melting point.
- Choosing B or D because seems "hot". The substance has not reached its boiling point, so it is still liquid, not gas.
- Confusing the melting point and boiling point. Melting is the lower boundary; boiling is the upper boundary.
Things to Be Careful About
- Negative temperatures: is greater than , so it is above the melting point.
- Check both columns before choosing an option. Both temperatures must match one row in the table.
- At exactly the melting point, solid and liquid can exist together; at exactly the boiling point, liquid and gas can exist together. Those boundary cases are not being tested here.
Thermal energy is supplied at a constant rate to a fixed mass of a substance that is initially solid.
The graph shows how the temperature of the fixed mass of the substance varies with time.
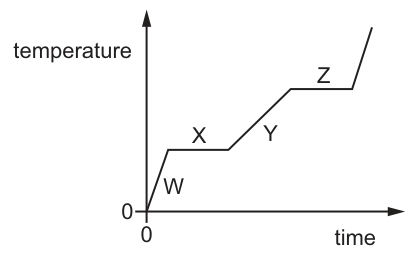
In which sections of the graph does the substance absorb latent heat?
Options
A W and X
B W and Y
C X and Z
D Y and Z
Answer
C
C
Walkthrough
A heating curve plots temperature against time as a substance is heated at a constant rate. The graph has sloping sections where the temperature rises and flat sections where the temperature remains constant.
- W and Y (sloping sections): The temperature is rising, which means the thermal energy supplied is increasing the kinetic energy of the particles. The substance is warming up in a single state (solid in W, liquid in Y). This is sensible heat.
- X and Z (flat sections): The temperature is constant despite heat being supplied. This occurs during a change of state. In section X, the solid is melting into a liquid. In section Z, the liquid is boiling into a gas. During these changes, the thermal energy is used to overcome the forces between particles rather than increase their kinetic energy. This energy is latent heat.
Therefore, the substance absorbs latent heat in sections X and Z. This matches option C.
Key Takeaways
- On a temperature-time heating curve, sloping sections represent a single state warming up (sensible heat), while flat horizontal sections represent a change of state (latent heat).
- Melting and boiling both require the absorption of latent heat, appearing as two separate flat sections on the curve.
Common Mistakes
- Choosing W and Y: These are the sections where the substance is warming up in a single state. The energy here is sensible heat, not latent heat.
- Choosing only one flat section: There are two changes of state in a full heating curve from solid to gas (melting and boiling), so there are two sections (X and Z) where latent heat is absorbed.
Things to Be Careful About
- Ensure you distinguish between temperature rising (sensible heat) and temperature constant (latent heat).
- The flat sections are at constant temperature, not zero temperature. The temperature is simply not changing while the state changes.
A piece of paper torn out of an exercise book is shown.
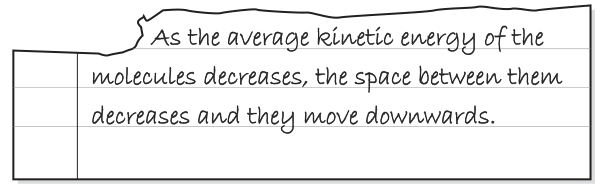
Which process is being described?
Options
A conduction
B convection
C evaporation
D radiation
Answer
B
B
Walkthrough
The text on the paper describes three linked observations:
- "the average kinetic energy of the molecules decreases" — this means the temperature of the substance is falling.
- "the space between them decreases" — as the molecules lose kinetic energy, they move closer together, so the fluid contracts and becomes denser.
- "they move downwards" — the cooler, denser fluid sinks under the influence of gravity.
This bulk movement of a fluid (liquid or gas) caused by density differences arising from temperature changes is the definition of convection. The warmer, less dense fluid rises and the cooler, denser fluid sinks, setting up a convection current.
Let us check the other options:
- Conduction is the transfer of thermal energy through a substance by vibration of molecules passing kinetic energy to their neighbours. There is no bulk movement of the molecules themselves, so they would not "move downwards".
- Evaporation is the process by which molecules at the surface of a liquid gain enough energy to escape into the air. This does not match the description of molecules moving downwards as a group.
- Radiation is the transfer of thermal energy by electromagnetic waves (infrared). It does not require a medium and does not involve the physical movement of molecules downwards.
Therefore, the process being described is convection, option B.
Key Takeaways
- Convection occurs in fluids (liquids and gases) and involves the bulk movement of the fluid itself.
- When a fluid cools, its molecules lose kinetic energy, move closer together, and the fluid becomes denser. The denser, cooler fluid then sinks while the warmer, less dense fluid rises.
- Conduction involves vibration and energy transfer between neighbouring molecules without bulk movement.
Common Mistakes
- Choosing conduction because the question mentions molecules and kinetic energy. In conduction, molecules vibrate about fixed positions and pass energy on; they do not flow or move downwards as a bulk mass.
- Choosing evaporation because it involves molecules and kinetic energy. Evaporation is a surface phenomenon where individual molecules escape, not a bulk downward movement of the fluid.
Things to Be Careful About
- Look for the key phrase "move downwards" (or "rise"). This indicates bulk fluid movement, which is the hallmark of convection currents. If the question had said "vibrate and pass energy to neighbouring molecules", the answer would be conduction.
A ray of light passes from glass to air.
Which arrow shows the direction of the ray in air?
Options
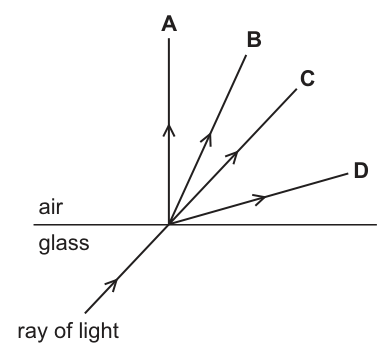
Answer
D
D
Walkthrough
The question asks for the direction of a light ray after it passes from glass into air. Glass is optically denser than air. According to the laws of refraction, when a light ray passes from a denser medium to a less dense medium, it increases in speed and bends away from the normal.
Looking at the options provided in the diagram:
- Arrow A travels along the normal.
- Arrow C continues in a straight line, which would only happen if there was no change in optical density.
- Arrow B is bent closer to the normal than the straight-line continuation, which is the direction light would bend if it were entering a denser medium (e.g., air to glass).
- Arrow D is bent further away from the normal, towards the boundary, making the angle of refraction greater than the angle of incidence. This matches the expected behaviour for light passing from glass to air.
Therefore, arrow D correctly shows the direction of the refracted ray.
Key Takeaways
- Light bends away from the normal when passing from a more optically dense medium (like glass or water) to a less optically dense medium (like air).
- Light bends towards the normal when passing from a less optically dense medium to a more optically dense medium.
- The normal is the reference line (perpendicular to the boundary) used to measure angles of incidence and refraction.
Common Mistakes
- Choosing arrow C and forgetting that refraction always occurs at a boundary between media of different optical densities.
- Choosing arrow B and confusing the direction of bending (bending towards the normal instead of away from it). This is a common error when students memorise 'bends towards' without checking which medium is denser.
Things to Be Careful About
- Always identify which medium is optically denser. Glass is denser than air.
- The normal is the dashed line perpendicular to the boundary, not the boundary itself. Angles are measured from the normal.
- 'Away from the normal' means the angle of refraction is larger than the angle of incidence, so the ray bends closer to the boundary surface.
A short-sighted student looks at a distant object.
Which row shows the position of an image in a short-sighted eye and the type of lens used to correct short-sightedness?
Options
| position of image in short-sighted eye | lens used to correct short-sightedness | |
|---|---|---|
| A | in front of retina | diverging |
| B | behind retina | converging |
| C | on retina | converging |
| D | behind retina | diverging |
Working
A short-sighted eye brings light from a distant object to a focus before it reaches the retina. The image is therefore formed in front of the retina. To correct this, a diverging lens is used so that the rays are spread out slightly and the image moves back onto the retina.
The only row that gives both of these correctly is row A.
Answer
A
A
Walkthrough
Short sight, also called myopia, happens when the eye focuses light from a distant object too strongly, or when the eyeball is too long. The rays converge before they reach the retina, so the image forms in front of the retina and the object looks blurred.
To correct this, a diverging lens is placed in front of the eye. A diverging lens spreads the rays out slightly before they enter the eye, so that the eye lens can then focus them exactly on the retina.
Long sight is the opposite: the image forms behind the retina, and a converging lens is used to bring the rays together earlier. So row B and row D are wrong because they say the image is behind the retina for short sight, and row C is wrong because it says the image is on the retina and uses a converging lens.
Key Takeaways
- A short-sighted eye focuses the image in front of the retina.
- Short sight is corrected with a diverging lens.
- A long-sighted eye focuses the image behind the retina and is corrected with a converging lens.
Common Mistakes
- Choosing a converging lens for short sight: this is the correction for long sight, not short sight.
- Saying the image forms on the retina in a short-sighted eye: this would mean the eye is normal, not short-sighted.
- Confusing 'in front of the retina' with 'behind the retina'.
Things to Be Careful About
- The retina is at the back of the eye, so 'in front of the retina' means the image forms before the light reaches the retina.
- A diverging lens is also called a concave lens, and a converging lens is also called a convex lens.
- Remember the pair: short sight → diverging; long sight → converging.
A student makes four statements about infrared waves.
- They can be seen by the human eye.
- They travel at in air.
- They are transverse waves.
- They are used by intruder alarms.
Which statements are correct for infrared waves?
Options
A 1 and 3
B 2, 3 and 4
C 2 only
D 3 and 4 only
Working
Statement 1: Infrared waves are not visible to the human eye. Incorrect.
Statement 2: All electromagnetic waves travel at in air. is the speed of sound. Incorrect.
Statement 3: All electromagnetic waves are transverse waves. Correct.
Statement 4: Infrared sensors detect the infrared radiation emitted by a warm human body. Correct.
Answer
D
D
Walkthrough
This question tests knowledge of the electromagnetic spectrum, specifically the properties and uses of infrared radiation. Let's go through each statement in turn.
Statement 1 claims infrared can be seen by the human eye. The human eye is only sensitive to visible light, which is a small part of the electromagnetic spectrum. Infrared has a longer wavelength than red light and is invisible to us — we detect it as heat. So this statement is false.
Statement 2 claims infrared travels at 330 m/s in air. The value 330 m/s is the speed of sound in air. Infrared is an electromagnetic wave, and all electromagnetic waves travel at the speed of light, approximately in a vacuum (and practically the same in air). So this statement is false.
Statement 3 says infrared waves are transverse. All electromagnetic waves are transverse waves, meaning the oscillations are perpendicular to the direction of energy transfer. Infrared is part of the electromagnetic spectrum, so this statement is true.
Statement 4 says they are used by intruder alarms. Passive infrared (PIR) sensors detect the infrared radiation emitted by warm bodies (like a human) and trigger the alarm. This is a standard application. So this statement is true.
Statements 3 and 4 are correct, so the answer is D.
Key Takeaways
- All electromagnetic waves travel at the speed of light () in a vacuum.
- All electromagnetic waves are transverse waves.
- Infrared is invisible to the human eye and is detected as heat.
- Infrared has many practical applications, including intruder alarms, remote controls, and thermal imaging.
Common Mistakes
- Confusing the speed of sound (330 m/s) with the speed of light ().
- Thinking infrared can be seen because we can 'feel' it — feeling heat is not seeing.
- Assuming that because infrared is used in remote controls, it must be visible — it is not.
Things to Be Careful About
- Remember that 'light' in physics usually means visible light only, and infrared is just below red in the visible spectrum — it is NOT visible.
- The speed of sound (330 m/s) is a common distractor for the speed of light.
- In multiple-choice questions like this, it helps to eliminate options. Since statement 1 is false, any option containing statement 1 is wrong. Since statement 2 is false, any option containing statement 2 is wrong. This leaves only D.
Which waves are longitudinal?
Options
A sound waves in water
B ultraviolet waves in air
C waves on the surface of water
D X-rays in a vacuum
Working
Sound waves are longitudinal because the particles of the medium vibrate parallel to the direction of energy transfer. Ultraviolet and X-rays are electromagnetic waves, which are transverse. Waves on the surface of water are a combination of transverse and longitudinal motion, but in this context, they are not purely longitudinal.
Answer
A
A
Walkthrough
This question tests your knowledge of the two types of wave: transverse and longitudinal.
- Transverse waves: The particles of the medium vibrate at right angles (perpendicular) to the direction of energy transfer. Examples include all electromagnetic waves (light, ultraviolet, X-rays) and waves on a string.
- Longitudinal waves: The particles of the medium vibrate parallel to the direction of energy transfer. The only example you need to know at this level is sound.
Let's look at each option:
- A: sound waves in water – Sound is always a longitudinal wave, regardless of the medium (solid, liquid, or gas). This is the correct answer.
- B: ultraviolet waves in air – Ultraviolet is part of the electromagnetic spectrum. All electromagnetic waves are transverse.
- C: waves on the surface of water – Water surface waves are a combination of both transverse and longitudinal motion, but they are often classified as transverse for simplicity. They are not purely longitudinal.
- D: X-rays in a vacuum – X-rays are also electromagnetic waves, so they are transverse.
Key Takeaways
- Sound is longitudinal; light is transverse.
- All electromagnetic waves are transverse.
- Know the difference between the two types of wave motion.
Common Mistakes
- Thinking sound cannot travel through water. It can, and it is still longitudinal.
- Confusing electromagnetic waves with mechanical waves. Ultraviolet and X-rays are electromagnetic, hence transverse.
- Forgetting that water surface waves are not a pure example of either type.
Things to Be Careful About
- The medium (water, air, vacuum) does not change the type of wave. Sound is always longitudinal; electromagnetic waves are always transverse.
A person hears an echo after a sound hits a solid cliff face.
What causes the echo?
Options
A absorption
B dispersion
C reflection
D refraction
Working
An echo is a sound heard after the original sound, caused by sound waves bouncing off a hard surface such as a cliff face. Bouncing off a surface is reflection.
- absorption would remove the sound energy, not return it.
- dispersion would spread the sound out.
- refraction would bend the sound as it passes into a different medium.
Answer
C
C
Walkthrough
An echo happens when sound waves travel from the source, hit a large hard surface such as a cliff face, and bounce back to the listener. The bouncing of a wave off a surface is called reflection. The cliff face does not absorb the sound completely, nor does it spread it out or bend it into another medium, so the correct answer is C.
Key Takeaways
- An echo is caused by the reflection of sound waves.
- Reflection is the wave behaviour in which a wave bounces off a surface and changes direction.
- Absorption, dispersion and refraction are different wave behaviours and do not produce an echo.
Common Mistakes
- Choosing absorption: absorption would take energy from the sound, so no echo would be heard.
- Choosing refraction: refraction is the bending of a wave when it passes from one medium into another, not bouncing off a surface.
- Choosing dispersion: dispersion spreads a wave out, it does not return it as an echo.
Things to Be Careful About
- The question asks what causes the echo, not what happens to the sound after it is reflected.
- A clear echo needs a large, hard surface and enough distance for the reflected sound to be heard separately from the original sound.
A plastic strip is rubbed with a cloth and the plastic becomes negatively charged.
Which statement explains this?
Options
A Electrons are transferred from earth to the plastic.
B Electrons are transferred from the cloth to the plastic.
C Electrons move from one side of the plastic to the other side of the plastic.
D Protons are transferred from the plastic to the cloth.
Working
Rubbing transfers electrons, not protons. The plastic becomes negatively charged, so it must have gained electrons. These electrons are transferred from the cloth to the plastic.
Answer
B
B
Walkthrough
When two different materials are rubbed together, electrons can be transferred from one material to the other. Protons do not move during rubbing because they are held tightly inside the nucleus.
A negative charge means the object has more electrons than protons. Since the plastic becomes negatively charged, it must have gained electrons. The only source of those electrons is the cloth, so electrons move from the cloth to the plastic.
Option A is wrong because there is no mention of the earth being involved in simple charging by friction. Option C is wrong because moving electrons from one side of the plastic to the other would not give the whole strip a net negative charge. Option D is wrong because protons are not transferred when objects are charged by rubbing.
Key Takeaways
- Charging by friction involves the transfer of electrons only.
- An object becomes negatively charged when it gains electrons.
- An object becomes positively charged when it loses electrons.
- Protons do not move during charging by friction.
Common Mistakes
- Saying that protons are transferred: this is incorrect because protons are fixed in the nucleus and do not move during rubbing.
- Saying electrons come from the earth: charging by friction only involves the two objects being rubbed.
- Thinking that electrons moving within the plastic would make it negatively charged: the whole strip must gain a net surplus of electrons.
Things to Be Careful About
- The sign of the charge tells you the direction of electron transfer: negative means gained electrons, positive means lost electrons.
- The cloth becomes positively charged because it loses electrons, even though the question only asks about the plastic.
- Remember that only electrons are transferred, never protons, in this type of charging.
Two parallel, conducting plates are charged. The charge on the upper plate is positive. The charge on the lower plate is equal in size but negative.
Which diagram shows the pattern and the direction of the electric field between the two plates?
Options
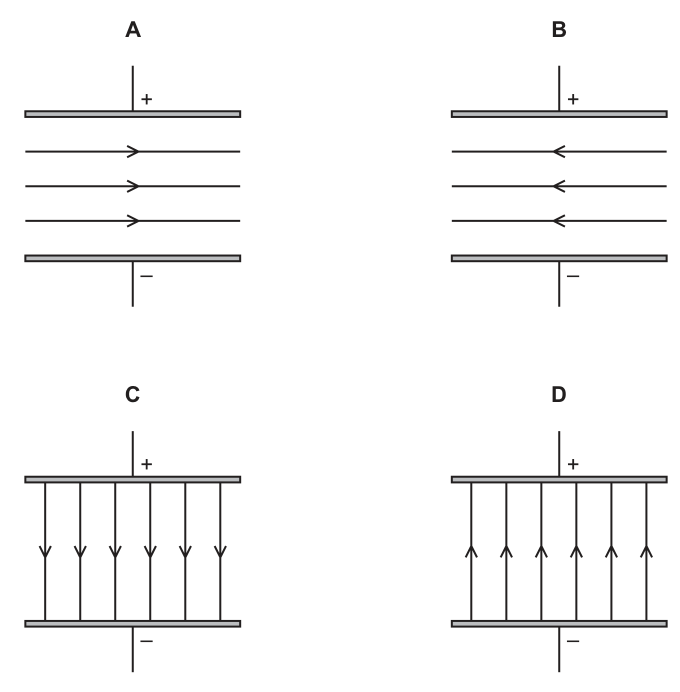
Answer
C
C
Walkthrough
- The question describes a parallel-plate capacitor with the upper plate positive and the lower plate negative.
- Between two parallel oppositely charged plates, the electric field is uniform. This means the field lines are straight, parallel, and equally spaced. This eliminates any option with curved or non-parallel lines (though all options here show parallel lines, A and B are horizontal, C and D are vertical).
- The direction of an electric field is defined as the direction of the force that a positive test charge would experience. Therefore, electric field lines always point away from positive charges and towards negative charges.
- Since the top plate is positive and the bottom plate is negative, the field lines must point downwards, from the top plate to the bottom plate.
- Diagram C shows vertical, parallel, equally spaced field lines pointing downwards. This is the correct pattern and direction.
Key Takeaways
- The electric field between two parallel oppositely charged plates is uniform (straight, parallel, equally spaced lines).
- Electric field lines always point from the positive plate to the negative plate.
Common Mistakes
- Choosing a diagram with horizontal lines (A or B) because the plates are drawn horizontally; the field lines must be perpendicular to the plates, pointing from positive to negative.
- Choosing diagram D and getting the direction wrong; field lines point towards negative charges, not away from them.
Things to Be Careful About
- Remember that electric field lines show the direction of force on a positive charge. A positive charge would be repelled by the positive plate and attracted to the negative plate, so the force (and field direction) is downwards.
- Ensure the lines are perpendicular to the plates; parallel plates produce a uniform field with lines crossing the gap directly between them.
Which quantity is defined as the electrical work done by a source in moving a unit charge around a complete circuit?
Options
A power
B potential difference
C electromotive force
D energy
Working
The quantity described is the work done by a source per unit charge around a complete circuit. This is the definition of electromotive force (e.m.f.).
- A is wrong: power is the rate of transfer of energy.
- B is wrong: potential difference is the work done per unit charge between two points, not by the source around the whole circuit.
- D is wrong: energy is the capacity to do work, not the work done per unit charge.
Answer
C
C
Walkthrough
This question asks for the exact definition of a quantity. The phrase “work done per unit charge” is the key: any quantity defined this way is measured in joules per coulomb, which is the volt. When a source pushes charge around a complete circuit, the work it does per unit charge is called its electromotive force, or e.m.f.
Potential difference is similar, but it refers to the energy transferred per unit charge between two points in a circuit, not the total work done by the source around the entire circuit. Power is the rate at which energy is transferred, so it is energy per second, not energy per unit charge. Energy alone is simply the ability to do work or the total amount of work transferred, so it is not a “per unit charge” quantity. Therefore the correct option is C.
Key Takeaways
- Electromotive force (e.m.f.) is the work done by a source in moving a unit charge around a complete circuit.
- Both e.m.f. and potential difference are measured in volts, but they are defined slightly differently.
- Power is the rate of transfer of energy, measured in watts (joules per second).
- “Per unit charge” means per coulomb of charge moved.
Common Mistakes
- Confusing e.m.f. with potential difference. Both have the same unit, but e.m.f. describes the source driving charge around the whole circuit, while p.d. is the energy transferred between two points.
- Choosing “energy” because e.m.f. involves work done. Energy by itself is not defined per unit charge.
- Choosing “power” because electrical sources do work. Power is energy per second, not energy per unit charge.
Things to Be Careful About
- The phrase “around a complete circuit” is the clue that points to e.m.f. rather than potential difference.
- “Unit charge” is important: it means the definition is about work per coulomb.
- Do not think e.m.f. is a force. It is measured in volts, not newtons.
Four cells are connected in a circuit as shown.
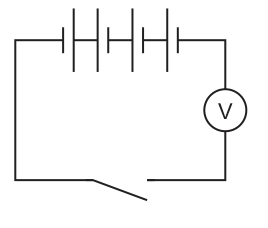
The switch is closed.
What is the reading on the voltmeter?
Options
A
B
C
D
Working
The circuit contains four cells connected in series. Three cells are oriented in the same direction, contributing a total emf of . The fourth cell is connected in reverse, opposing the other three with an emf of . The net emf of the battery is:
The voltmeter is connected in series with the cells. Since a voltmeter has very high resistance, the current in the circuit is effectively zero. Therefore, there is no potential difference dropped across the internal resistances of the cells, and the voltmeter reads the net emf of the cells.
Reading on voltmeter = .
Answer
C
C
Walkthrough
- Analyze the cell connections: The diagram shows four cells in series. The first three cells have their positive terminals (long lines) facing the same direction, so their emfs add up: .
- Identify the reversed cell: The fourth cell is oriented with its positive terminal facing the opposite direction. This means its emf opposes the other three cells.
- Calculate net emf: Subtract the opposing emf from the total: .
- Voltmeter reading: The voltmeter is placed in series with the cells. Because a voltmeter has very high resistance, almost no current flows through the circuit. With zero current, there is no voltage drop across the internal resistance of the cells. Thus, the voltmeter simply measures the net electromotive force (emf) of the cell combination, which is .
Key Takeaways
- When cells are connected in series, their emfs add if they are oriented in the same direction, or subtract if one is reversed.
- A voltmeter has very high resistance; when connected in series with a source, it reads the net emf of the source because no current flows to cause an internal voltage drop.
Common Mistakes
- Assuming all four cells add up to and missing that one is reversed.
- Thinking the voltmeter reads zero because it is in series (confusing it with an ammeter, which would read zero current, but a voltmeter reads the potential difference across its terminals).
- Adding the reversed cell's voltage instead of subtracting it.
Things to Be Careful About
- Always check the orientation of each cell symbol: the longer line is the positive terminal, the shorter thicker line is the negative terminal.
- Remember that a voltmeter in series does not short-circuit the cells; it simply measures the open-circuit voltage (net emf) due to its high resistance.
- Do not confuse the voltmeter reading with the current; the current is effectively zero, but the voltage reading is the net emf.
Two resistors are connected in series with a battery, as shown. The readings on three voltmeters , and and the currents , and are also shown.
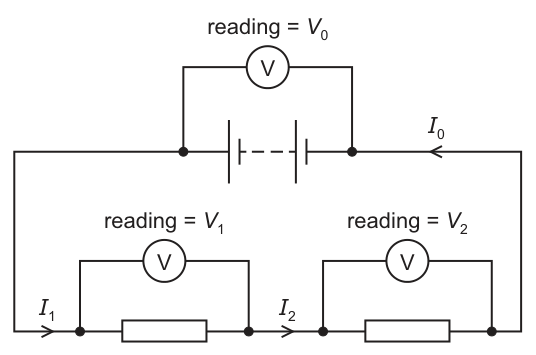
Which row gives values for the current and the potential difference ?
Options
| is equal to | is equal to | |
|---|---|---|
| A | ||
| B | the sum of and | |
| C | the sum of and | |
| D | the sum of and | the sum of and |
Working
In a series circuit, there is only one path for the current to flow, so the current is the same at every point. Therefore, the total current is equal to the current through each resistor: . In particular, .
The total potential difference supplied by the battery is shared between the components in the series circuit. The sum of the potential differences across each component equals the total potential difference. Therefore, .
Looking at the options:
- Option B states and , which matches both rules.
Answer
B
B
Walkthrough
The circuit in Fig. 1 shows a battery connected in series with two resistors. We need to determine the relationship between the total current and the currents and through the resistors, and between the total potential difference and the potential differences and across the resistors.
- Current in a series circuit: In a series circuit, there is only one path for the current to flow. Charge cannot build up or be lost, so the current is the same at every point in the circuit. This means . The total current is equal to and also equal to . It is NOT the sum (that would be the rule for a parallel circuit).
- Potential difference in a series circuit: The total potential difference supplied by the battery is shared between the components in the series circuit. By conservation of energy, the sum of the potential differences across each component equals the total potential difference supplied. Therefore, .
- Comparing with the options: Option B correctly states that is equal to (since all currents in series are equal) and is equal to the sum of and . Option A has the wrong p.d. relationship. Options C and D incorrectly add the currents as if they were in parallel branches.
Key Takeaways
- In a series circuit, the current is the same everywhere:
- In a series circuit, the total potential difference is the sum of the potential differences across each component:
- These rules do not apply to parallel circuits, where the p.d. is the same across each branch and the total current is the sum of the branch currents.
Common Mistakes
- Confusing series and parallel rules: In a parallel circuit, the total current IS the sum of the branch currents () and the p.d. is the same across each branch (). Option D is the classic trap for students who mix up series and parallel rules.
- Thinking current gets "used up": Some students assume the current is larger before the first resistor than after it, leading them to incorrectly add currents or think .
Things to Be Careful About
- Always check whether the components are connected in series or parallel before applying the rules. In series, current is constant and p.d. adds up. In parallel, p.d. is constant and current adds up.
- Make sure you are reading the voltmeter and ammeter labels correctly from the diagram. is across the battery (total p.d.), and is the total current leaving the battery. Do not confuse the total values with the individual component values.
The current in a home computer varies between and when the computer is connected to the mains supply.
What is the rating of the most suitable fuse to use to protect the computer?
Options
A
B
C
D
Working
The fuse must not melt while the computer works normally, so its rating must be greater than the maximum normal current of . It should also be as close to that value as possible so it protects the computer effectively.
- is too low — it would blow during normal use.
- is not greater than the maximum current — it might blow.
- is just above — suitable.
- is far too high — it would not protect the computer.
Answer
C
C
Walkthrough
A fuse is a safety device. It contains a thin wire that melts (blows) when the current through it is too large, breaking the circuit and protecting the appliance. For a fuse to work properly, its rating must be chosen correctly:
- The fuse rating must be higher than the normal current. If the fuse rating were lower than the current the computer draws, the fuse would melt even when everything is working fine. The computer's current varies between and , so the highest normal current is .
- The fuse rating should be as low as possible above that value. If the fuse is too large (like ), a fault could draw a dangerously large current without melting the fuse, so the computer would not be protected.
Now check each option:
- A, : This is below the maximum normal current of . The fuse would blow during normal operation — not suitable.
- B, : This equals the maximum current. In practice the fuse could blow whenever the computer runs at its top current, so it is not safe to use a fuse rated exactly at the maximum.
- C, : This is just above , so it carries the normal current without blowing, but will melt if the current rises much higher due to a fault. This is the most suitable.
- D, : This is a standard mains fuse rating but far too high for a computer drawing only at most. It would not protect the computer.
So the correct option is C.
Key Takeaways
- A fuse rating must be greater than the maximum normal current of the appliance.
- The rating should be the smallest standard value that is still above that maximum current.
- A fuse that is too small blows during normal use; a fuse that is too large fails to protect the appliance.
Common Mistakes
- Choosing (option B) because it equals the maximum current — a fuse rated exactly at the maximum can blow during normal operation, so it must be greater than the maximum.
- Choosing (option D) because it is a common mains fuse — a fuse far above the normal current gives no protection.
- Choosing (option A) because it is the smallest — it is below the normal current and would blow immediately.
Things to Be Careful About
- The fuse rating must be compared with the maximum normal current (), not the minimum () or the average.
- Standard fuse ratings are fixed values (e.g. , , , , , ); the correct choice is the smallest standard rating above the normal current.
- The question asks for the most suitable fuse, so both conditions (above normal current, and as small as possible) must be satisfied together.
Students are asked to draw the pattern and direction of the magnetic field due to a direct current (d.c.) in a straight wire.
Diagrams 1, 2 and 3 are three of their answers.
The students do not know the direction of the current in the wire.
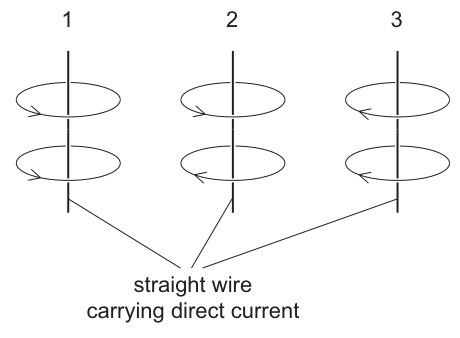
Which diagrams show possible patterns and directions for the magnetic field due to the current in the wire?
Options
A 1, 2 and 3
B 1 and 3 only
C 1 only
D 2 only
Answer
The magnetic field around a straight current-carrying wire consists of concentric circles in planes perpendicular to the wire. The direction of the field is given by the right-hand grip rule: point the thumb of the right hand in the direction of the current, and the fingers curl in the direction of the magnetic field lines.
This means the field lines must circle the wire in the same rotational direction (e.g., all clockwise or all anti-clockwise when viewed from above) for all loops above and below the wire.
- Diagram 1: Both loops have arrows pointing in the same circular direction. This is a possible pattern if the current is flowing downwards.
- Diagram 2: The top loop has arrows in one direction and the bottom loop in the opposite direction. This is incorrect; the direction of the magnetic field does not reverse as you move along a straight wire.
- Diagram 3: Both loops have arrows pointing in the same circular direction. This is a possible pattern if the current is flowing upwards.
Diagrams 1 and 3 show possible patterns and directions.
B
B
Walkthrough
The question asks to identify possible magnetic field patterns for a direct current in a straight wire. The direction of the current is unknown, so we must consider both possibilities (current up or current down).
- Pattern: The magnetic field lines around a long straight wire are concentric circles in planes perpendicular to the wire. All three diagrams show this basic circular pattern.
- Direction (Right-Hand Grip Rule): To find the direction, point the thumb of your right hand in the direction of the conventional current. Your fingers curl in the direction of the magnetic field lines.
- If the current flows upwards, the field lines circle anti-clockwise when viewed from above (Diagram 3).
- If the current flows downwards, the field lines circle clockwise when viewed from above (Diagram 1).
- Consistency: Crucially, the direction of circulation must be the same at all heights along the wire. You cannot have the field rotating clockwise above the wire and anti-clockwise below it. Diagram 2 shows opposite directions for the top and bottom loops, which is physically impossible for a straight wire carrying a steady current.
Since the students do not know the current direction, both Diagram 1 (current down) and Diagram 3 (current up) are possible correct answers. Diagram 2 is always wrong.
Key Takeaways
- The magnetic field around a straight current-carrying wire is a pattern of concentric circles.
- The right-hand grip rule determines the direction: thumb = current, curled fingers = field.
- The sense of rotation (clockwise or anti-clockwise) is constant along the length of the wire; it does not reverse above and below the wire.
Common Mistakes
- Confusing with a bar magnet: Students might think the field lines must loop around like a bar magnet (going out one side and in the other), leading them to choose Diagram 2. Remember, for a straight wire, the field lines are closed circles around the wire, not loops from north to south poles.
- Forgetting the right-hand rule direction: Not realising that both diagrams 1 and 3 are valid because the current direction is unknown. The question asks for possible patterns, so both clockwise and anti-clockwise fields are acceptable.
Things to Be Careful About
- Viewpoint: When describing the direction (clockwise/anti-clockwise), always specify the viewpoint (e.g., "when viewed from above").
- Straight wire vs. Solenoid: Do not confuse the field of a straight wire (concentric circles) with the field of a solenoid (similar to a bar magnet, uniform inside, looping outside). The pattern in Diagram 2 might look like the field inside/outside a solenoid or a dipole, but it is wrong for a straight wire.
Which row identifies the positive and negative particles in the atom?
Options
| positive particle | negative particle | |
|---|---|---|
| A | proton | electron |
| B | electron | proton |
| C | proton | neutron |
| D | neutron | proton |
Working
In the atom:
- a proton carries a positive charge,
- an electron carries a negative charge,
- a neutron is neutral.
So the correct row is the one with proton as positive and electron as negative.
Answer
A
A
Walkthrough
The atom is made of three main subatomic particles: protons, neutrons and electrons. The proton is found in the nucleus and has a positive charge. The electron is found in the shells around the nucleus and has a negative charge. The neutron is also in the nucleus but has no charge, so it is neutral. The question asks for the row that correctly identifies the positive and negative particles. Row A says positive particle = proton and negative particle = electron, which matches the known charges. The other rows either swap the charges or include a neutron, which is not charged.
Key Takeaways
- Protons are positively charged.
- Electrons are negatively charged.
- Neutrons are neutral.
- In a neutral atom, the number of protons equals the number of electrons.
Common Mistakes
- Choosing B, which swaps electron and proton. This often happens if a student confuses the names of the particles.
- Choosing C or D because they include a neutron. Neutrons have no charge, so they cannot be the negative particle.
Things to Be Careful About
- Read the column headings carefully: the first column is for the positive particle and the second for the negative particle.
- Remember that the neutron is neutral, not negative. This is a common point of confusion when learning about the atom.
The nuclide notation of a certain isotope of element Q is .
What is the total number of protons, neutrons and electrons in a neutral atom of this isotope?
Options
A
B
C
D
Working
In , the subscript is the proton number and the superscript is the nucleon number.
For a neutral atom:
- protons =
- electrons =
- neutrons =
Total number of particles:
Answer
C
C
Walkthrough
The nuclide notation tells us two numbers about the nucleus:
- is the proton number (atomic number), the number of protons.
- is the nucleon number (mass number), the total number of protons and neutrons together.
So the number of neutrons is the difference between these:
A neutral atom has the same number of electrons as protons, so:
Now add all three kinds of particle:
This matches option C.
Key Takeaways
- In nuclide notation, the bottom number is the proton number and the top number is the nucleon number.
- Neutrons = nucleon number − proton number.
- In a neutral atom, electrons = protons.
- The total number of protons, neutrons and electrons in a neutral atom is .
Common Mistakes
- Choosing A () counts only the protons, forgetting neutrons and electrons.
- Choosing B () counts only the nucleons, forgetting electrons.
- Choosing D () incorrectly counts electrons as or misreads the neutron count.
Things to Be Careful About
- Read the notation carefully: is the nucleon number, not the neutron number.
- The word neutral is important: it tells you that electrons = protons.
- The answer is a total number of particles, so it has no unit.
Which list shows the planets in order of increasing distance from the Sun?
Options
A Venus, Mercury, Earth, Mars, Saturn, Jupiter, Uranus, Neptune
B Mercury, Mars, Earth, Venus, Jupiter, Saturn, Uranus, Neptune
C Mercury, Venus, Earth, Mars, Jupiter, Saturn, Uranus, Neptune
D Mercury, Mars, Earth, Venus, Uranus, Saturn, Jupiter, Neptune
Working
The planets in increasing distance from the Sun are:
Mercury, Venus, Earth, Mars, Jupiter, Saturn, Uranus, Neptune.
Option A is wrong because it starts with Venus instead of Mercury. Option B is wrong because it places Mars before Earth. Option D is wrong because it places Uranus before Saturn and Jupiter. Only option C gives the correct order.
Answer
C
C
Walkthrough
The question asks for the planets in order of increasing distance from the Sun. The correct order is:
Mercury, Venus, Earth, Mars, Jupiter, Saturn, Uranus, Neptune.
Mercury is the closest planet to the Sun, and Neptune is the farthest. The first four are the smaller rocky planets: Mercury, Venus, Earth and Mars. Then come the four giant planets: Jupiter, Saturn, Uranus and Neptune.
Option A is wrong because it puts Venus before Mercury. Option B is wrong because it puts Mars before Earth. Option D is wrong because it puts Uranus before Saturn and Jupiter. Option C matches the correct order exactly.
Key Takeaways
- The planets orbit the Sun at different distances.
- The order from closest to farthest is: Mercury, Venus, Earth, Mars, Jupiter, Saturn, Uranus, Neptune.
- A useful mnemonic is: “My Very Educated Mother Just Served Us Noodles”.
Common Mistakes
- Choosing an order based on planet size rather than distance from the Sun.
- Swapping Venus and Earth.
- Placing Mars before Earth.
- Forgetting that Neptune is the most distant planet.
Things to Be Careful About
- Read the question carefully: it asks for increasing distance, not decreasing distance.
- The current syllabus includes eight planets, not Pluto.
- Check every option before choosing, because several options contain the correct planets in the wrong order.
A student spills ink on the page in a textbook that defines redshift. The ink covers the three important words 1, 2 and 3.
Redshift is ______(1) in the observed ______(2) of electromagnetic radiation emitted from ______(3) stars and galaxies.
What are words 1, 2 and 3?
Options
| 1 | 2 | 3 | |
|---|---|---|---|
| A | an increase | frequency | receding |
| B | a decrease | frequency | approaching |
| C | an increase | wavelength | receding |
| D | an increase | wavelength | approaching |
Working
Redshift is the increase in the observed wavelength of electromagnetic radiation emitted from receding stars and galaxies. As a source moves away from the observer, the waves are stretched, so the wavelength becomes longer. This is called redshift.
- Word 1: an increase
- Word 2: wavelength
- Word 3: receding
Option A uses frequency instead of wavelength, option B says decrease and approaching, and option D says approaching. Only option C has all three correct words.
Answer
C
C
Walkthrough
In astronomy, light from distant stars and galaxies is observed to be shifted towards longer wavelengths. This is called redshift. When a source of light is moving away from an observer, the waves are stretched, so their wavelength increases. This is exactly what the missing words in the sentence describe.
Word 1 must be “an increase”, because redshift means the wavelength becomes longer. Word 2 must be “wavelength”, not frequency, because redshift is defined in terms of wavelength. Word 3 must be “receding”, because the source is moving away from the observer. Approaching sources would cause blueshift, where the wavelength decreases.
So the correct option is C.
Key Takeaways
- Redshift is an increase in the observed wavelength of electromagnetic radiation.
- It is caused by the source moving away from the observer.
- Redshift is important evidence for the expansion of the Universe and the Big Bang theory.
- If a source is approaching, the wavelength decreases, which is called blueshift.
Common Mistakes
- Choosing an option with “frequency”: redshift is defined using wavelength, not frequency. When wavelength increases, frequency actually decreases.
- Choosing “approaching”: an approaching source would give a shorter wavelength, not redshift.
- Choosing “a decrease”: redshift means a longer wavelength, so the correct word is “an increase”.
Things to Be Careful About
Read the definition carefully: redshift is an increase in observed wavelength. The question is testing the exact meaning of the term, so the three missing words must all fit the standard definition. Do not confuse the wavelength change with the frequency change, since they are opposite effects.
Your score so far
Answer a question to start scoring
Your marks add up here as you work through the paper.