Physics 5054/12 — May/June 2024
Cambridge O-Level · Multiple Choice · answer key with instant marking and worked solutions
Topics Forces · Practical Electricity · Kinematics · Energy, Work and Power · Physical Quantities and Measurement · Mass, Weight and Density · +15 more
Tap an option under each question to check it — your score builds as you go.
What is measured using a micrometer?
Options
A area
B current
C length
D mass
Working
A micrometer is an instrument used to measure small lengths, such as the diameter of a wire or the thickness of a sheet.
Answer
C
C
Walkthrough
A micrometer is a measuring instrument with a calibrated screw or spindle. It is used to measure very small lengths accurately, for example the diameter of a thin wire or the thickness of a small object. It is not used to measure area, current or mass, so the correct option is C.
Key Takeaways
- A micrometer is a length-measuring instrument.
- It is useful for measuring small distances to a high degree of precision.
- Knowing the correct instrument for each physical quantity is a basic measurement skill.
Common Mistakes
- Choosing A (area): area is measured using a ruler or measuring tape and then calculated, not directly with a micrometer.
- Choosing B (current): current is measured with an ammeter.
- Choosing D (mass): mass is measured with a balance or scale.
Things to Be Careful About
Do not confuse the instrument called a micrometer with the unit called a micrometre. The unit micrometre is one millionth of a metre, but the micrometer is the device used to measure small lengths.
Two people pull on ropes to move a boat along a canal.
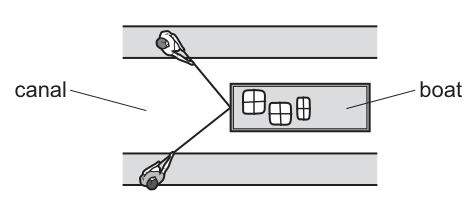
The boat moves at a constant velocity.
The vector diagram for the tension in the ropes is shown.
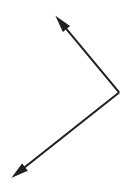
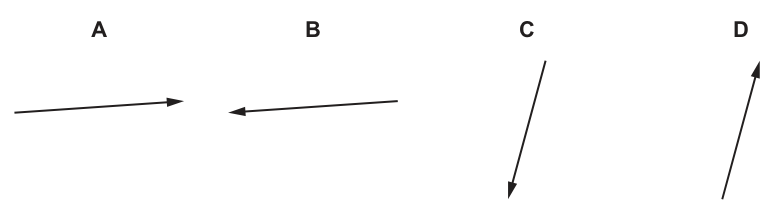
Which vector is the drag acting on the boat?
Options
Answer
A
A
Walkthrough
- Determine the direction of motion: Look at Fig. 1. The people are positioned on the left side of the boat, pulling on the ropes. This means the resultant of the tension forces pulls the boat to the left, so the boat is moving to the left along the canal.
- Analyse the forces using Newton's first law: The question states the boat moves at a constant velocity. According to Newton's first law, if an object moves at constant velocity, the resultant (net) force acting on it must be zero. This means all forces acting on the boat must be balanced.
- Identify the driving force and drag: The driving force is the horizontal resultant of the two tension forces in the ropes. Since the people are pulling to the left, this resultant force points to the left. To balance this and make the resultant force zero, the drag force (water resistance) acting on the boat must be equal in magnitude and opposite in direction to the resultant tension. Therefore, the drag force must point to the right.
- Match with the options: Look at the options in Fig. 3 (Options). Vector A points nearly horizontally to the right. This matches our deduction for the drag force.
Key Takeaways
- Constant velocity implies zero resultant force: Whenever a question states an object is moving at a constant velocity (or is stationary), you can immediately conclude that the resultant force is zero. All forward forces are balanced by backward forces.
- Vector diagrams for resultants: When adding vectors, placing them head-to-tail allows you to find the resultant by drawing a line from the tail of the first vector to the head of the last. The sideways (perpendicular) components of the two rope tensions cancel each other out, leaving a horizontal resultant along the canal.
- Drag opposes motion: Drag (or friction/resistance) always acts in the direction opposite to the motion of the object.
Common Mistakes
- Choosing B (drag to the left): A candidate might correctly identify that drag opposes motion but misread the direction of motion from Fig. 1, assuming the boat is moving to the right because the word "boat" is on the right side of the diagram. The people are clearly on the left, pulling leftwards.
- Choosing C or D (drag at an angle): A candidate might forget that the boat is constrained to move along the canal. The vertical components of the two rope tensions cancel each other out (one pulls up-left, the other down-left), so the resultant driving force is purely horizontal. Consequently, the balancing drag force must also be purely horizontal.
- Confusing tension with drag: Selecting a vector that represents the tension forces rather than the reaction drag force.
Things to Be Careful About
- Reading diagrams carefully: Always look at the labels and the position of the actors (the people) to determine the direction of motion. In Fig. 1, the "canal" label is on the left and the people are on the left, indicating leftward motion.
- Constant velocity vs. acceleration: If the boat were accelerating, the resultant force would be in the direction of motion (left), and the drag would be smaller than the resultant tension. Because the velocity is constant, they are exactly equal and opposite.
- Vector diagram interpretation: In Fig. 2, the two tension vectors are shown. Even if the exact drawing is slightly abstract, the physical constraint that the boat moves straight along the canal means the vertical components must cancel, leaving a horizontal resultant.
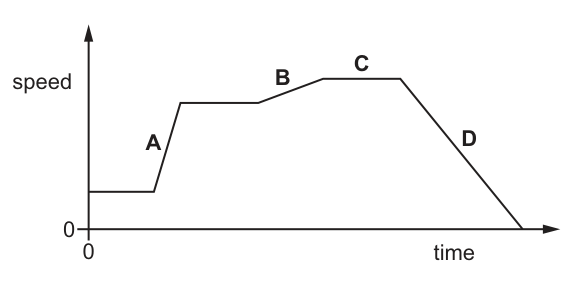
The graph shows how the speed of a car travelling in a straight line changes with time.
Which section shows the largest acceleration?
Options
A A
B B
C C
D D
Working
Acceleration is the rate of change of speed, which is represented by the gradient of a speed-time graph ().
- Section A: The line is steep and rising, indicating a large positive acceleration.
- Section B: The line is rising but less steep than A, indicating a smaller acceleration.
- Section C: The line is horizontal, indicating constant speed and zero acceleration.
- Section D: The line is falling, indicating deceleration (negative acceleration).
Comparing the gradients, section A has the steepest slope, so it shows the largest acceleration.
Answer
A
A
Walkthrough
The question asks for the section with the largest acceleration on a speed-time graph. We need to recall the relationship between the graph's features and physical quantities.
- Identify the physical quantity represented by the gradient: On a speed-time graph, the vertical axis is speed () and the horizontal axis is time (). The gradient (slope) is . This is the definition of acceleration.
- Analyze each section:
- Section A: The graph rises steeply. A steep positive gradient means a large positive acceleration.
- Section B: The graph rises gently. A gentle positive gradient means a small positive acceleration.
- Section C: The graph is horizontal. The gradient is zero, so the acceleration is zero (the car is moving at constant speed).
- Section D: The graph falls. The gradient is negative, which represents deceleration (slowing down).
- Compare: The question asks for the largest acceleration. This corresponds to the steepest positive slope. Section A is clearly steeper than section B. Section D represents a reduction in speed, not an increase (unless we are talking about magnitude of deceleration, but usually 'largest acceleration' in this context implies the greatest rate of speeding up, and visually A is steeper than D anyway).
Therefore, section A shows the largest acceleration.
Key Takeaways
- On a speed-time graph, the gradient represents acceleration.
- A steeper slope means a larger acceleration.
- A horizontal line means zero acceleration (constant speed).
- A falling slope means deceleration (negative acceleration).
Common Mistakes
- Confusing speed-time with distance-time: On a distance-time graph, the gradient is speed. On a speed-time graph, the gradient is acceleration.
- Confusing speed with acceleration: Section C has the highest speed, but the acceleration is zero because the speed is not changing.
- Ignoring the sign: Section D has a negative gradient (deceleration). While it has a large magnitude of change, 'acceleration' usually refers to speeding up in positive direction in simple contexts, or simply the steepest positive slope. Even if magnitude is considered, A is steeper than D.
Things to Be Careful About
- Always check the axis labels. Y-axis is 'speed', X-axis is 'time'.
- 'Largest acceleration' means the steepest positive slope. If the question asked for the largest deceleration, you would look for the steepest negative slope.
- Do not assume the section with the highest speed has the highest acceleration.
A man walks along a path from X to Y. The diagram shows the path from above.
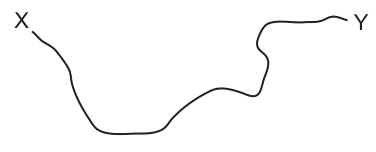
The man measures the distance he walks and the time taken.
Which quantity can be calculated using this data only?
Options
A acceleration
B average speed
C average velocity
D power
Working
Average speed is defined as the total distance travelled divided by the total time taken.
The man measures the distance he walks and the time taken, so he can directly calculate his average speed.
- Acceleration requires knowing how velocity changes over time.
- Average velocity requires displacement (the straight-line distance from X to Y with a direction). The diagram shows a curved path, so the distance walked is greater than the displacement. Since only distance is measured, displacement is unknown.
- Power requires knowing the work done or energy transferred over time.
Answer
B
B
Walkthrough
The question asks which quantity can be calculated using only distance and time.
- Average speed is a scalar quantity defined as total distance divided by total time. Since both distance and time are measured, average speed can be calculated directly.
- Average velocity is a vector quantity defined as displacement divided by time. Displacement is the straight-line distance from the starting point to the finishing point, in a specific direction. The diagram shows a curved path from X to Y, meaning the distance walked is longer than the straight-line displacement. Because the man only measures the distance along the path, he does not know the displacement, so average velocity cannot be calculated.
- Acceleration is the rate of change of velocity. Calculating it requires knowing the initial and final velocities or the change in velocity over time, which is not provided.
- Power is the rate of doing work or transferring energy. Calculating it requires knowing the work done (force times displacement) or energy used, neither of which is provided.
Therefore, only average speed can be calculated from the given data.
Key Takeaways
- Distance is a scalar (total path length); displacement is a vector (straight-line change in position with direction).
- Speed is a scalar (distance / time); velocity is a vector (displacement / time).
- You can only calculate a quantity if you have all the necessary variables. Missing a vector component (like direction or straight-line displacement) means you cannot calculate the corresponding vector quantity.
Common Mistakes
- Choosing average velocity because students confuse distance with displacement. Remember that velocity requires displacement, which is the shortest straight-line distance between two points with a direction. The curved path in the diagram is a hint that distance displacement.
- Choosing acceleration without realising it requires a change in velocity, not just distance and time.
Things to Be Careful About
- Always check whether the quantity asked for is a scalar or a vector. Distance and time are both scalars, so their ratio (average speed) is a scalar. Displacement is a vector, so its ratio with time (average velocity) is a vector.
- Read diagrams carefully: a curved or winding path means the distance travelled is strictly greater than the magnitude of the displacement.
Which property of an object determines its resistance to a change from its state of rest or motion?
Options
A its mass
B its shape
C its surface area
D its volume
Working
Inertia is the resistance of an object to a change in its state of rest or motion. Inertia depends only on the mass of the object: the greater the mass, the greater the inertia. Shape, surface area and volume do not determine inertia.
Answer
A
A
Walkthrough
The question asks which property determines an object's resistance to a change from its state of rest or motion. This resistance is called inertia. Inertia is a property of mass: a more massive object is harder to start moving, and once moving, harder to stop or change direction. For example, it is much harder to push a loaded lorry than an empty shopping trolley because the lorry has more mass and therefore more inertia. Shape, surface area and volume do not affect inertia.
Key Takeaways
- Inertia is the resistance of an object to a change in its state of rest or motion.
- Mass is the measure of inertia.
- The greater the mass, the greater the inertia, so a larger force is needed to produce the same acceleration.
Common Mistakes
- Choosing volume or surface area because larger objects seem harder to move. In physics, it is mass, not size or shape, that determines inertia.
- Confusing inertia with weight. Weight depends on gravity, but inertia depends only on mass.
Things to Be Careful About
- The word "resistance" here refers to inertia, not to friction or air resistance.
- Even in space where weight is zero, an object still has mass and therefore still has inertia.
The diagram shows a moon buggy used by astronauts.
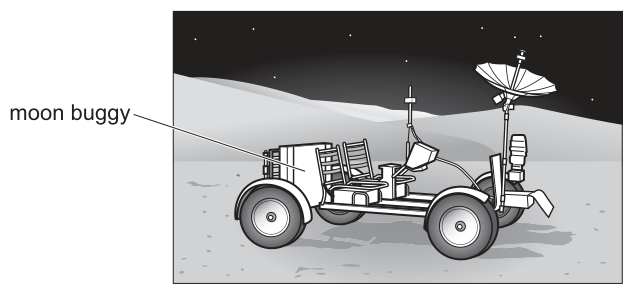
The mass of the moon buggy on the Earth is 210 kg. The gravitational field strength on the Moon is of that on the Earth.
What is the weight of the moon buggy on the Moon?
Options
A zero
B
C
D
Working
Mass is an intrinsic property and does not change with location, so the mass of the moon buggy on the Moon is kg.
Using N/kg for the Earth's gravitational field strength:
The weight on the Moon is of the weight on the Earth:
Rounding to 2 significant figures (consistent with the options), the weight is N.
Answer
D
D
Walkthrough
- Identify the constant quantity: Mass is a measure of the amount of matter in an object and does not change when the object moves from the Earth to the Moon. Therefore, the mass is kg on the Moon as well.
- Calculate weight on Earth: Weight is the force of gravity acting on a mass, given by . Using the standard value N/kg for Earth:
- Calculate weight on the Moon: The problem states the gravitational field strength on the Moon is of that on Earth. Since weight is directly proportional to gravitational field strength (), the weight on the Moon is of the weight on Earth:
- Match with options: N rounds to N (to 2 significant figures), which matches option D.
Key Takeaways
- Mass vs. Weight: Mass is constant everywhere; weight changes depending on the local gravitational field strength.
- Weight formula: , where is mass in kg and is gravitational field strength in N/kg.
- Proportionality: If changes by a factor, changes by the same factor.
Common Mistakes
- Choosing B (35 N): This is the result of dividing the mass by 6 () but forgetting to multiply by the gravitational field strength . The candidate calculated instead of .
- Choosing C (210 N): This is simply the numerical value of the mass, confusing mass (kg) with weight (N), or assuming weight equals mass numerically.
- Choosing A (zero): Assuming that because there is no atmosphere or it's a "moon", there is no gravity. The Moon has gravity, just less than Earth's.
Things to Be Careful About
- Units: Weight is a force measured in Newtons (N), not kilograms (kg). Always ensure the final answer has units of force.
- Value of g: Cambridge O Level Physics typically uses N/kg or N/kg. Here, using N/kg gives N, which rounds to the option N. Using N/kg gives N, which is not an option, confirming N/kg is the intended value.
- Significant figures: The options are given to 2 significant figures (, , ), so the final calculated value should be rounded appropriately.
A car travels along a road. The force on the car due to the engine is .
The motion of the car depends on the value of the total resistive force .
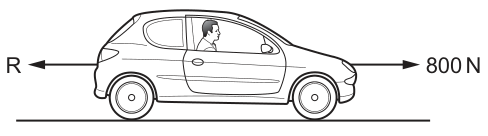
Which row shows the motion of the car for the given value of ?
Options
| value of resistive force | motion | |
|---|---|---|
| A | 500 | deceleration |
| B | 800 | acceleration |
| C | 900 | deceleration |
| D | 1000 | acceleration |
Working
The forward driving force is and the resistive force acts in the opposite direction. The resultant force is:
- If , the resultant force is forward, so the car accelerates.
- If , the resultant force is zero, so the car moves at constant velocity.
- If , the resultant force is backward, so the car decelerates.
Checking the options:
- A: . Resultant forward. The car accelerates. (Incorrect)
- B: . Resultant . The car moves at constant velocity. (Incorrect)
- C: . Resultant (backward). The car decelerates. (Correct)
- D: . Resultant (backward). The car decelerates. (Incorrect)
Answer
C
C
Walkthrough
The question gives a forward driving force of and a backward resistive force . The motion of the car depends on the resultant force, which is the difference between the forward and backward forces: .
- When , the resultant force is in the forward direction, causing the car to accelerate (Newton's second law).
- When , the forces are balanced, the resultant force is zero, and the car moves at a constant velocity (Newton's first law).
- When , the resultant force is in the backward direction, causing the car to decelerate.
We evaluate each row:
- Row A: . Since , the resultant force is forward, so the car accelerates. The row claims deceleration, so A is wrong.
- Row B: . The forces are balanced, resultant force is zero, so the car has constant velocity. The row claims acceleration, so B is wrong.
- Row C: . Since , the resultant force is backward, so the car decelerates. The row claims deceleration, so C is correct.
- Row D: . Since , the resultant force is backward, so the car decelerates. The row claims acceleration, so D is wrong.
Key Takeaways
- The resultant force determines the motion of an object: a forward resultant force means acceleration, a backward resultant force means deceleration, and a zero resultant force means constant velocity.
- Newton's first and second laws apply directly to situations with opposing forces like driving and resistive forces.
Common Mistakes
- Confusing the direction of the resultant force: forgetting that resistive forces oppose motion, so if , the resultant is backward, not forward.
- Thinking that any forward force always causes acceleration, without considering the resistive force.
- Assuming that if , the car must be accelerating because the engine is still providing force, forgetting that balanced forces mean constant velocity.
Things to Be Careful About
- Ensure the direction of the resultant force is correctly assigned: forward is positive (acceleration in the direction of motion), backward is negative (deceleration).
- Remember that "constant velocity" is not the same as "acceleration" or "deceleration"; it is the state when forces are balanced.
- Read the table carefully to match the calculated motion with the description given in the row.
Four of the gravitational forces that act between objects in the Solar System are listed.
P the force on the Moon due to the Earth
Q the force on the Earth due to the Sun
R the force on the Earth due to the Moon
S the force on the Moon due to the Sun
Which two forces are a Newton's third law pair?
Options
A P and Q
B P and R
C Q and S
D R and S
Working
Newton's third law states that if object A exerts a force on object B, then object B exerts an equal and opposite force on object A. The two forces must involve the same two objects.
P is the force on the Moon due to the Earth.
R is the force on the Earth due to the Moon.
These are the same pair of objects, Earth and Moon, with the forces acting on each other. Therefore P and R are a Newton's third law pair.
Answer
B
B
Walkthrough
The four forces listed are:
- P: force on the Moon due to the Earth
- Q: force on the Earth due to the Sun
- R: force on the Earth due to the Moon
- S: force on the Moon due to the Sun
Newton's third law says that if one object pulls on another, the second object pulls back on the first with an equal and opposite force. So the two forces in a pair must act between the same two objects.
P and R both involve the Earth and the Moon. P is the Earth pulling the Moon, and R is the Moon pulling the Earth. These are equal in size, opposite in direction, and act on different objects, so they form a Newton's third law pair.
The other options pair forces that involve different pairs of objects, so they cannot be a Newton's third law pair.
Key Takeaways
- A Newton's third law pair always involves the same two objects.
- The two forces act on different objects, so they do not cancel each other out.
- Gravitational forces always come in equal and opposite pairs.
Common Mistakes
- Choosing Q and S because both involve the Sun. Q is the force on the Earth due to the Sun, but S is the force on the Moon due to the Sun. They are not a pair because they do not involve the same two objects.
- Choosing P and Q because both involve Earth and Moon, but Q involves the Sun, not the Moon.
- Thinking the pair must be the same type of force. They are both gravitational, but that is not enough — the two objects must be the same pair.
Things to Be Careful About
- Read the phrases carefully: "force on X due to Y" identifies both the object feeling the force and the object causing it.
- The third-law partner of "force on X due to Y" is "force on Y due to X".
- Equal and opposite forces do not cancel because they act on different bodies.
A box is moved up a rough slope from X to Y.
The diagram shows four forces acting on the box.
Which force is the force due to friction on the box?
Options
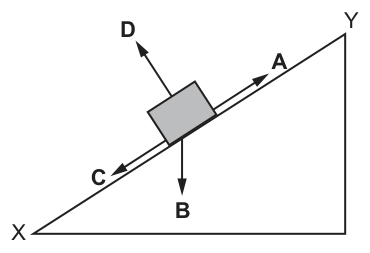
Friction is a resistive force that always acts in the direction opposite to the motion of the object. Since the box is being moved up the slope from X to Y, the friction force must act down the slope, towards X. Arrow C points down the slope towards X, so C is the force due to friction.
The other arrows represent different forces:
- Arrow A points up the slope towards Y; this is the applied force pulling or pushing the box up.
- Arrow B points vertically downwards; this is the weight of the box (the force due to gravity).
- Arrow D points perpendicular to the slope, away from it; this is the normal reaction force exerted by the slope on the box.
Answer
C
C
Walkthrough
The box is moving up the slope from X to Y. Friction is a resistive force that always acts in the direction opposite to the relative motion between two surfaces in contact. Because the box is moving up the slope, the friction force must act down the slope, towards X. Looking at the diagram, arrow C points down the slope towards X, so C is the friction force.
The other arrows represent different forces:
- Arrow A points up the slope towards Y; this is the applied force pulling or pushing the box up.
- Arrow B points vertically downwards; this is the weight of the box (the force due to gravity).
- Arrow D points perpendicular to the slope, away from it; this is the normal reaction force exerted by the slope on the box.
Key Takeaways
- Friction always opposes the direction of motion. If an object moves up a slope, friction acts down the slope.
- Weight always acts vertically downwards towards the centre of the Earth, regardless of the orientation of the surface.
- The normal reaction force always acts perpendicular to the surface in contact, pushing away from it.
Common Mistakes
- Choosing arrow A as friction: confusing the direction of motion with the direction of friction. Friction opposes motion, so it must point down the slope.
- Choosing arrow B as friction: confusing weight with friction. Weight acts vertically downwards, not along the slope.
- Choosing arrow D as friction: confusing normal reaction with friction. Normal reaction is perpendicular to the surface, while friction is parallel to it.
Things to Be Careful About
- Always determine the direction of motion first before deciding the direction of friction. Friction opposes motion, not necessarily the applied force (though in this simple case they are opposite).
- Remember that weight is always vertical, not perpendicular to the slope. The component of weight acting down the slope is not explicitly drawn here as a separate arrow, but friction is a separate force acting parallel to the surface.
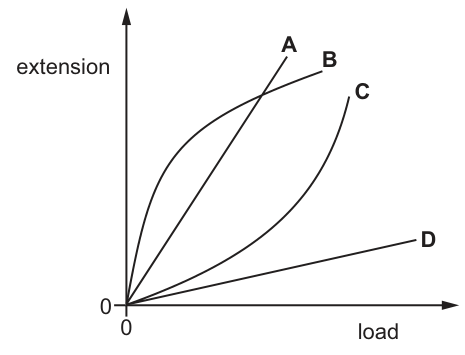
The graph shows how the extension of four different threads depends on the load attached.
Which thread is the most difficult to stretch over the range of loads shown?
Options
A A
B B
C C
D D
Working
The graph plots extension (vertical axis) against load (horizontal axis). To determine which thread is 'most difficult to stretch', we look for the thread that has the smallest extension for a given load. This corresponds to the curve with the shallowest gradient.
- Curves A and B show large extensions for relatively small loads, meaning they are easy to stretch.
- Curve C shows a small extension for small loads, but the extension increases rapidly for larger loads.
- Curve D shows a very small extension across the entire range of loads shown, meaning it requires a large load to produce a given extension.
Therefore, thread D is the most difficult to stretch over the range of loads shown.
Answer
D
D
Walkthrough
The question asks which thread is the most difficult to stretch. In terms of a load-extension graph, 'difficult to stretch' means that a large load is required to produce a small extension. Equivalently, for any given load on the horizontal axis, the extension on the vertical axis is the smallest.
Looking at the graph:
- Curve A is a straight line with a steep gradient. A small load produces a large extension, so it is easy to stretch.
- Curve B starts with a steep gradient and then curves over, but still shows a large extension for moderate loads.
- Curve C starts with a shallow gradient but curves upwards, meaning it becomes easier to stretch as the load increases. Over the full range, it does not have the smallest extension.
- Curve D has a very shallow gradient throughout the range shown. For any given load, the extension is the smallest of all four curves. This means it is the stiffest and most difficult to stretch.
Thus, the correct option is D.
Key Takeaways
- On an extension vs. load graph, a shallow gradient indicates a stiff material (hard to stretch, high spring constant), while a steep gradient indicates a flexible material (easy to stretch, low spring constant).
- Always read the axes carefully: extension is on the y-axis and load is on the x-axis here, so the gradient is extension per unit load (the inverse of stiffness).
Common Mistakes
- Confusing the axes: if a candidate reads load on the y-axis and extension on the x-axis, they would choose the curve with the steepest gradient. Always check which quantity is on which axis.
- Choosing C because it has a shallow gradient at the start: the question asks over the range of loads shown, and D has the smallest extension across the entire range.
- Thinking 'most difficult to stretch' means 'breaks first' or 'has the largest extension': 'difficult to stretch' refers to stiffness, not ultimate strength.
Things to Be Careful About
- The axes are extension (y) and load (x). The gradient of this graph is , which is the inverse of the spring constant (since ). A smaller gradient means a larger , hence a stiffer spring.
- Pay attention to the wording 'over the range of loads shown'. Curve C is shallow at first, but D is shallow throughout the whole range.
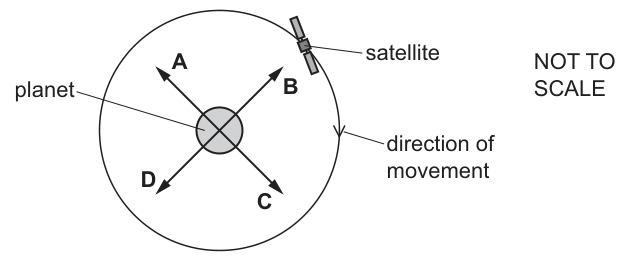
A satellite orbits a planet in a circular path as shown. It has constant speed.
There is a force on the satellite due to the planet.
In which direction is the force on the satellite when it is in the position shown?
Options
Answer
D
D
Walkthrough
The satellite is moving in a circular orbit around the planet. For any object to move in a circular path at constant speed, there must be a resultant force acting on it directed towards the centre of the circle. This is the centripetal force. In the case of a satellite orbiting a planet, this centripetal force is provided by the gravitational attraction between the planet and the satellite. Gravity is an attractive force, so it pulls the satellite towards the centre of the planet. Looking at the diagram, the satellite is at the top right and the planet is at the centre. The direction from the satellite towards the centre of the planet is downwards and to the left. Arrow D points in this direction. Therefore, the force on the satellite is in the direction D.
Key Takeaways
- An object moving in a circular path requires a resultant force directed towards the centre of the circle (centripetal force).
- For a satellite in orbit, this force is the gravitational pull of the planet it is orbiting, which is always attractive and acts along the line connecting the two bodies towards the centre of the planet.
Common Mistakes
- Confusing the direction of the force with the direction of motion (velocity). The velocity is tangential to the circle (in the direction of the arrow labelled 'direction of movement'), but the force is towards the centre.
- Choosing an arrow pointing away from the centre. Centrifugal force is not a real force in this inertial frame; the only force acting is the inward gravitational pull.
Things to Be Careful About
- Remember that the force causing circular motion is always directed towards the centre, not along the path of motion.
- Gravity is always an attractive force, so it can only pull objects together, never push them apart.
A crane has a counterweight positioned from the tower along a horizontal jib.
The centre of gravity P of the crane jib is marked.
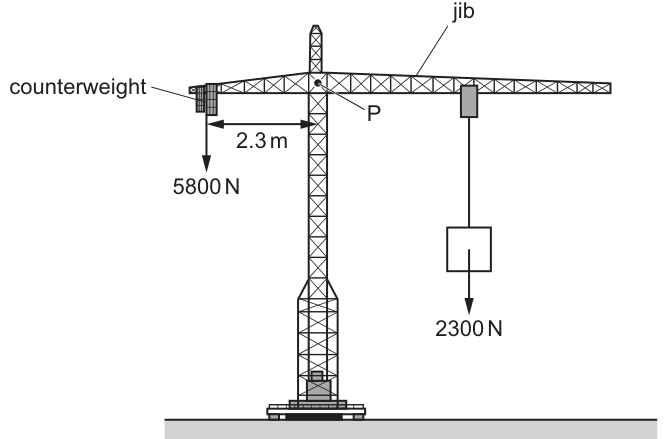
What is the horizontal distance between the load and P so that there is no moment about P?
Options
A
B
C
D
Working
For no moment about P, the clockwise moment must equal the anticlockwise moment (principle of moments).
Answer
C
C
Walkthrough
The question asks for the horizontal distance between the 2300 N load and the centre of gravity P such that there is no net moment about P. This means the crane jib is in rotational equilibrium about P, so we apply the principle of moments: the total clockwise moment about P equals the total anticlockwise moment about P.
The anticlockwise moment is produced by the 5800 N counterweight at a perpendicular distance of 2.3 m from P:
The clockwise moment is produced by the 2300 N load at an unknown distance from P:
Equating the two moments:
Solving for :
This matches option C.
Key Takeaways
- The principle of moments states that for an object in rotational equilibrium about a pivot, the sum of the clockwise moments equals the sum of the anticlockwise moments.
- The moment of a force is calculated as .
Common Mistakes
- Forgetting to equate clockwise and anticlockwise moments and instead adding them together.
- Using the wrong distance or force in the moment calculation (e.g., measuring distance from the tower instead of from the pivot P).
- Calculation errors when dividing 13 340 by 2300.
Things to Be Careful About
- Ensure all distances are measured from the pivot (point P), not from the ends of the jib or the tower base.
- The unit of moment is newton metres (N m), but since we are equating moments on both sides of the equation, the units cancel out when solving for distance, leaving metres (m) as the final unit for .
A car of mass travels at . It then accelerates to and travels a further .
What is the change in the momentum of the car due to acceleration?
Options
A
B
C
D
Working
Momentum is given by
The car's speed changes from to , so
Change in momentum:
The 400 m distance does not affect momentum.
Answer
A
A
Walkthrough
Momentum is the product of mass and velocity: . The question asks for the change in momentum during the acceleration, so only the change in velocity matters: the car speeds up from to , a change of . Multiply by the mass of the car:
The distance travelled (400 m before and after the acceleration) is not needed because momentum depends only on mass and velocity, not on distance. The correct option is A.
Key Takeaways
- Momentum is , and its unit is .
- The change in momentum is .
- Extra information in a question can be a distractor; identify which quantities actually matter.
Common Mistakes
- Using the final speed only: , which is not an option.
- Adding the speeds: , then (option C).
- Using the distance 400 m as if it were a speed.
- Forgetting the unit .
Things to Be Careful About
- The change in momentum uses the change in velocity, not the final velocity.
- Momentum is a vector, but here the car does not change direction, so the arithmetic difference is correct.
- The unit must be included: .
- The 400 m values are repeated distractors; do not let them affect the calculation.
A ball is dropped from rest at the top of a building. Air resistance is negligible.
The velocity of the ball is when it hits the ground.
What is the height of the building?
Options
A
B
C
D
Working
The ball is dropped from rest, so . Air resistance is negligible, so the acceleration is the free-fall acceleration, .
Use the constant-acceleration equation:
Substitute , and :
This is approximately .
Answer
B
B
Walkthrough
The ball starts from rest, so its initial velocity is . Since air resistance is negligible, the only acceleration is the acceleration of free fall, . The final velocity is given as , and the height of the building is the vertical distance the ball falls.
Because the acceleration is constant and the time is not given, use the equation that connects velocity, acceleration and displacement:
Here is the displacement, which is the height of the building. Substituting , and :
This rounds to , so the correct option is B.
Key Takeaways
- Free fall without air resistance is a constant-acceleration motion with acceleration .
- When the time is not given, use .
- The height of the building is the displacement of the ball, not its final velocity.
Common Mistakes
- Forgetting to square the velocity when substituting into .
- Using instead of ; this gives about , which is option C.
- Using ; this gives about , which is option D.
- Confusing the final velocity with the average velocity.
Things to Be Careful About
- Use unless the question states otherwise. Here both and lead to option B.
- Since the ball is dropped, ; do not treat the final velocity as the initial velocity.
- Always include the unit, , when giving the height.
- The phrase "air resistance is negligible" is important: it tells you the acceleration is constant and equal to .
Which energy source is available constantly over a 24-hour period?
Options
A natural gas
B solar cells
C tidal
D wind
Working
Natural gas can be supplied and burned whenever it is needed, so it is available constantly over a 24-hour period. Solar cells only work during daylight, wind turbines only when the wind is blowing, and tidal power only at certain times of the tide.
Answer
A
A
Walkthrough
The question asks which energy source is available constantly over a 24-hour period. This is about availability, not about whether the source is renewable.
- Natural gas is a fuel that can be stored and burned at any time of day or night, so it is available whenever it is needed.
- Solar cells only generate electricity when the Sun is shining, so they are not available at night or in cloudy weather.
- Tidal power only works when the tide is moving in or out, which happens at certain times of the day, not constantly.
- Wind power only works when the wind is blowing, and the wind is not always present.
Therefore the correct answer is A, natural gas.
Key Takeaways
- Some energy sources are intermittent (solar, wind, tidal) because they depend on conditions that are not always present.
- Other sources, such as natural gas, are continuously available because they can be stored and used when needed.
- The question is about availability over a 24-hour period, not about whether the source is renewable.
Common Mistakes
- Choosing solar cells because they are renewable, without noticing that they only work during daylight.
- Choosing wind because it is clean, without noticing that wind is not constant.
- Choosing tidal because it is predictable, but tidal power is not available all the time.
- Thinking that "natural gas" is wrong because it is a fossil fuel, but the question does not ask about renewable energy.
Things to Be Careful About
- Read the question carefully: it asks about availability over 24 hours, not about whether the source is renewable or environmentally friendly.
- Natural gas is a non-renewable source, but it can still be available constantly while the supply lasts.
- Solar, wind, and tidal are renewable but intermittent, so they do not satisfy the condition of being available constantly.
A lamp is turned on for 30 minutes. It wastes of energy.
What is the efficiency of the lamp?
Options
A 0.26
B 0.35
C 0.59
D 0.74
Working
The energy supplied to the lamp is
since 30 minutes = 1800 s.
The useful energy output is the energy supplied minus the energy wasted:
The efficiency is
Answer
D
D
Walkthrough
A 15 W lamp transfers 15 J of energy every second. It is turned on for 30 minutes, so first convert this to seconds:
The total energy supplied to the lamp is therefore
Of this total, 7000 J is wasted. So the useful energy output is
Efficiency is the fraction of the energy input that is converted into useful output:
As a percentage, this is 74%. The correct option is D.
Key Takeaways
- Power tells you the rate of energy use: 15 W means 15 J of energy each second.
- Total energy input is found from .
- Efficiency is always useful output divided by total input, never wasted energy divided by input.
- Efficiency has no unit because it is a ratio.
Common Mistakes
- Using 30 minutes instead of 1800 seconds. This would give , which is wrong.
- Dividing the wasted energy by the total input: , which is option A.
- Dividing the wasted energy by the useful energy: , which is option B.
- Forgetting that the useful energy must be found by subtracting the wasted energy from the total energy.
Things to Be Careful About
- Always convert minutes to seconds before using .
- Use useful output, not wasted energy, in the numerator of the efficiency.
- The answer is a decimal between 0 and 1, so no unit is needed.
- In multiple-choice questions, check that your final decimal matches one of the options exactly.
Which quantity is not measured in joules (J)?
Options
A gravitational potential energy
B latent heat
C power
D work
Working
Gravitational potential energy is a store of energy, latent heat is thermal energy, and work is energy transferred, so all three are measured in joules (J).
Power is the rate of energy transfer and is measured in watts (W), not joules.
Answer
C
C
Walkthrough
This question tests whether you know the units of common energy-related quantities.
- Gravitational potential energy is a form of energy, so it is measured in joules.
- Latent heat is the energy needed to change the state of a substance without changing its temperature, so it is also measured in joules.
- Work is the transfer of energy, so it is measured in joules.
- Power is not an amount of energy; it is the rate at which energy is transferred. Its unit is the watt (W), which is equal to one joule per second.
Therefore, the quantity that is not measured in joules is power.
Key Takeaways
- Energy, including gravitational potential energy and latent heat, is measured in joules (J).
- Work is energy transferred, so it is also measured in joules.
- Power is the rate of energy transfer and is measured in watts (W), where 1 W = 1 J/s.
Common Mistakes
- Choosing "work" because it seems different from energy, even though work is a measure of energy transfer and has the unit joule.
- Confusing power with energy. Power tells you how quickly energy is transferred, not how much energy is involved.
Things to Be Careful About
- Remember the definitions: energy and work are measured in joules; power is measured in watts.
- A watt is a joule per second, so power can also be expressed as J/s, but it is not simply a quantity of joules.
Which description of a liquid is correct?
Options
A fixed shape, fixed volume
B fixed shape, variable volume
C variable shape, fixed volume
D variable shape, variable volume
Working
A liquid takes the shape of the container it is in, so its shape is variable. Its particles are close together but can move past one another, so it keeps a fixed volume. Therefore the correct description is variable shape, fixed volume.
- A is a solid: fixed shape, fixed volume.
- B has fixed shape but variable volume, which is not a normal state.
- D is a gas: variable shape, variable volume.
Answer
C
C
Walkthrough
The question asks for the correct description of a liquid. In the kinetic particle model, a liquid has particles that are close together but not held in fixed positions. This means the particles can slide over each other, so the liquid does not have a fixed shape and takes the shape of its container. However, the particles cannot spread far apart, so the liquid keeps a fixed volume. Therefore the correct answer is C: variable shape, fixed volume.
Option A describes a solid, which has both fixed shape and fixed volume. Option B describes something with fixed shape but variable volume, which is not a normal state of matter. Option D describes a gas, which has both variable shape and variable volume.
Key Takeaways
The key idea is that each state of matter has a specific combination of shape and volume. Solids have fixed shape and fixed volume. Liquids have variable shape but fixed volume. Gases have variable shape and variable volume. These properties come from how the particles are arranged and how freely they move.
Common Mistakes
- Choosing A because a liquid seems to have a fixed volume, but A also says fixed shape, which is wrong for a liquid.
- Choosing D because a liquid can flow, but flowing means the shape changes, not the volume.
- Thinking that a liquid has variable volume because it can be poured into different containers. The volume stays the same; only the shape changes.
Things to Be Careful About
- Shape and volume are two separate properties. A liquid can change shape but its volume is fixed under normal conditions.
- The volume of a liquid can change slightly with temperature, but the question is asking about the usual description of a liquid.
- Do not confuse the description of a liquid with that of a gas: both have variable shape, but only a gas has variable volume.
A transparent box has a dividing wall in its middle. It contains two different gases, one in each half, as shown.
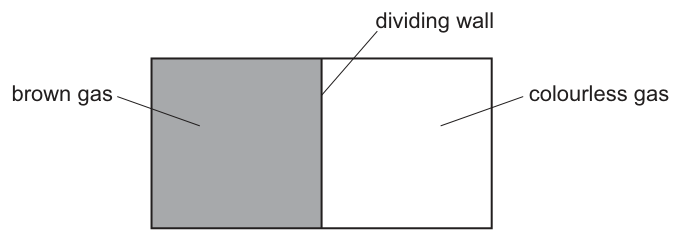
The dividing wall is removed. The box is left for a long time. The gases do not react.
What is then seen in the box?
Options
A brown gas on the right and colourless gas on the left
B pale brown gas throughout
C several distinct clouds of colourless and brown gas throughout
D colourless gas on the right and brown gas on the left
Answer
B
B
Walkthrough
Gas particles are in constant, random motion. When the dividing wall is removed, the particles of the brown gas move into the right-hand compartment and the particles of the colourless gas move into the left-hand compartment. Over a long time, the random motion causes the two gases to mix completely and uniformly throughout the entire box. Since the brown gas is now spread evenly through the larger volume, its colour is diluted, resulting in a pale brown gas throughout.
Key Takeaways
- Gas particles move randomly and continuously.
- Diffusion is the net movement of particles from a region of higher concentration to lower concentration until a uniform mixture is achieved.
- When two gases mix, the coloured gas will dilute to a pale colour throughout the available volume.
Common Mistakes
- Assuming the heavier brown gas will sink or stay on the left side. Gas particles move randomly in all directions, and diffusion dominates over any minor density effects in a small box over a long time.
- Thinking the gases will remain separate or form distinct clouds. Complete mixing occurs over a long time.
Things to Be Careful About
- The phrase left for a long time ensures that complete diffusion and mixing have occurred.
- The gases do not react, so they simply mix without forming a new substance.
A bottle containing a cold liquid is placed on a table on a warm day. Drops of water form on the outside of the bottle.
Which process causes the drops to form?
Options
A condensation
B conduction
C convection
D evaporation
Working
The cold liquid cools the air next to the bottle. Water vapour in the warm air is cooled and changes from a gas into liquid droplets on the outside of the bottle. This change of state is condensation.
Conduction and convection are heat transfer processes, not changes of state. Evaporation is a liquid changing into a gas, which is the opposite of what happens here.
Answer
A
A
Walkthrough
On a warm day, the air contains water vapour. The cold liquid in the bottle cools the air in contact with the outside of the bottle. When this air is cooled enough, the water vapour changes from a gas into tiny liquid droplets. This change of state is called condensation.
The other options are wrong. Conduction and convection are methods of transferring thermal energy, not changes of state. Evaporation is a liquid changing into a gas, which is the opposite of condensation.
Key Takeaways
Condensation is the change of state from gas to liquid. It happens when a gas is cooled enough, often by touching a cooler surface. Evaporation is the opposite change, from liquid to gas. Conduction and convection are heat transfer processes, not changes of state.
Common Mistakes
- Choosing evaporation because water droplets appear. Evaporation would make water disappear as a gas, not form drops.
- Choosing conduction or convection because the day is warm. These are heat transfer processes, but they do not turn water vapour into liquid.
- Thinking the drops leak from inside the bottle. The drops are on the outside, so they form from water vapour in the air.
Things to Be Careful About
The drops are outside the bottle, so they cannot come from the liquid inside. The cold surface cools the air around it, causing water vapour to condense. Condensation is a change of state, not a method of heat transfer. Also, do not confuse the words "condensation" and "convection" — they sound similar but have different meanings.
What is the specific heat capacity of a liquid?
Options
A the difference between the boiling temperature and the melting temperature of the liquid
B the energy required to change the state of of the liquid
C the energy required to heat of the liquid through
D the increase in temperature of the liquid when it is heated
Working
Specific heat capacity is the energy required to raise the temperature of of a substance by (or by ). Option C states this definition exactly.
A is a temperature range, not an energy per unit mass. B describes specific latent heat, which is the energy needed to change the state of of a substance. D describes a temperature rise, not an energy per unit mass per degree.
Answer
C
C
Walkthrough
The question asks for the definition of specific heat capacity. Specific heat capacity is a property of a material: it tells us how much energy is needed to raise the temperature of of that material by .
The defining equation is
where is the thermal energy transferred, is the mass and is the temperature change. Option C matches this definition exactly.
Option A is just the difference between two temperatures, so it is not an energy per unit mass. Option B describes specific latent heat, which is the energy needed to change state without changing temperature. Option D describes a temperature change, not the energy needed to produce it.
Key Takeaways
- Specific heat capacity is the energy needed to raise the temperature of of a substance by .
- It is measured in .
- It is different from specific latent heat, which is the energy needed to change state.
Common Mistakes
- Choosing B: B describes specific latent heat, not specific heat capacity.
- Choosing D: a temperature rise alone does not define specific heat capacity, because it does not mention mass or energy.
- Writing the unit as just : the unit must include mass and temperature change.
Things to Be Careful About
- A temperature change of is the same size as a change of , so either can be used in the definition.
- Specific heat capacity is per kilogram, so it does not depend on the total mass of the sample.
- Do not confuse specific heat capacity with heat capacity, which is the energy needed to warm a whole object by .
Which statement about infrared radiation is correct?
Options
A In a vacuum, infrared radiation travels at the speed of light.
B Infrared radiation is a longitudinal wave.
C Infrared radiation has a higher frequency than ultraviolet radiation.
D White surfaces are better emitters of infrared radiation than black surfaces.
Working
Infrared radiation is part of the electromagnetic spectrum.
- A is correct. All electromagnetic waves, including infrared, travel at the speed of light in a vacuum ().
- B is incorrect. Infrared is a transverse wave, like all electromagnetic waves.
- C is incorrect. Ultraviolet has a higher frequency than infrared. Along the spectrum, frequency increases from radio, microwave, infrared, visible, ultraviolet, X-ray to gamma.
- D is incorrect. Black (dull) surfaces are better emitters of infrared radiation than white (shiny) surfaces.
Answer
A
A
Walkthrough
This question tests four separate facts about infrared radiation, and you must judge each statement before picking the option.
Statement A — In a vacuum, infrared travels at the speed of light. All electromagnetic waves — radio, microwave, infrared, visible, ultraviolet, X-rays and gamma rays — are the same kind of wave, and they all travel at in a vacuum. So A is correct.
Statement B — Infrared is a longitudinal wave. All electromagnetic waves are transverse: the oscillations are perpendicular to the direction of travel. Longitudinal waves (like sound) oscillate along the direction of travel. So B is false.
Statement C — Infrared has a higher frequency than ultraviolet. The electromagnetic spectrum is ordered by frequency and wavelength. From lowest frequency to highest: radio, microwave, infrared, visible, ultraviolet, X-ray, gamma. Ultraviolet sits above infrared, so ultraviolet has the higher frequency. C is false.
Statement D — White surfaces are better emitters than black surfaces. The opposite is true: black (dull) surfaces are the best emitters and absorbers of infrared radiation, while white (shiny) surfaces reflect more and emit less. D is false.
Since only statement A is correct, the answer is A.
Key Takeaways
- All electromagnetic waves travel at the speed of light in a vacuum ().
- All electromagnetic waves are transverse waves.
- The electromagnetic spectrum in order of increasing frequency: radio, microwave, infrared, visible, ultraviolet, X-ray, gamma.
- Black (dull) surfaces are better emitters and absorbers of infrared radiation than white (shiny) surfaces.
Common Mistakes
- Confusing the order of the spectrum — thinking infrared has a higher frequency than ultraviolet. Remember infrared sits just below visible light and ultraviolet just above it.
- Thinking infrared is longitudinal because sound is longitudinal. All electromagnetic waves, including infrared, are transverse.
- Thinking white surfaces emit infrared better. Black surfaces are the best emitters and absorbers; white surfaces are better reflectors.
Things to Be Careful About
- Frequency and wavelength are inversely related: higher frequency means shorter wavelength. Ultraviolet has higher frequency and shorter wavelength than infrared.
- The speed of light in a vacuum is — recall this exact value.
- "Speed of light" applies to the whole electromagnetic spectrum, not just visible light.
- In the exam, read each option carefully — one wrong fact in an option makes the whole statement false.
The speed of sound in air is .
Which sound is classed as ultrasound?
Options
A a sound with a wavelength of
B a sound with a wavelength of
C a sound with a wavelength of
D none of the above
Working
For a sound wave,
so
Convert each wavelength to metres and calculate the frequency.
A:
B:
C:
The audible range for a human is about to . Ultrasound has a frequency greater than . All three frequencies are below , so none of these sounds is ultrasound.
Answer
D
D
Walkthrough
-
Recall what ultrasound means. Ultrasound is sound with a frequency higher than the upper limit of human hearing, about . So I must find the frequency of each sound and see whether any frequency is greater than .
-
Use the wave equation. For any wave, , where:
- is the wave speed, here ,
- is the frequency,
- is the wavelength.
To find frequency, rearrange: .
-
Convert all wavelengths to metres first. The speed is in metres per second, so the wavelength must also be in metres.
- ,
- ,
- .
-
Calculate each frequency.
- A: .
- B: .
- C: .
-
Compare with the ultrasound threshold. Ultrasound is greater than . Option C is the highest, but even it is only , which is still audible. None of the options gives a frequency above , so the correct answer is D.
Key Takeaways
- Ultrasound is sound with frequency above the upper limit of human hearing, about .
- To decide whether a sound is ultrasound, use to find its frequency.
- Always convert lengths to metres before substituting into the wave equation when the speed is given in metres per second.
- A long wavelength means a low frequency; a short wavelength means a high-frequency sound.
Common Mistakes
- Forgetting to convert centimetres to metres. For example, using directly gives a very large frequency and might lead to option C being chosen incorrectly.
- Confusing ultrasonics with "high pitch but still audible". A sound of is high-pitched but still within human hearing.
- Thinking that the correct option must be one of A, B, or C because the question lists three possible wavelengths. The option D exists because none may fit ultrasound.
Things to Be Careful About
- Use the exact threshold for ultrasound.
- Use the wave speed as , as stated in the question.
- Keep units consistent: .
- Even though option C gives the highest frequency, it is still below , so it is not ultrasound.
Which diagram shows how light from a distant object forms an image in a normal eye?
Options
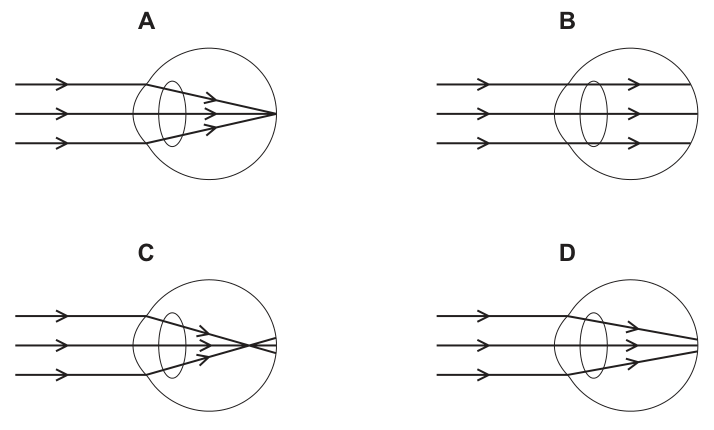
Working
Light from a distant object arrives at the eye as parallel rays. In a normal eye, the crystalline lens (a converging lens) refracts these rays so that they converge to a sharp focus precisely on the retina (the back surface of the eyeball).
- Diagram A: Parallel rays are converged by the lens and focus exactly on the retina. This is a normal eye.
- Diagram B: Parallel rays pass through without refraction. This does not represent a functioning eye.
- Diagram C: Rays converge in front of the retina. This represents myopia (short-sightedness), where the lens is too powerful or the eye is too long.
- Diagram D: Rays converge behind the retina. This represents hypermetropia (long-sightedness), where the lens is too weak or the eye is too short.
Answer
A
A
Walkthrough
The question asks for the ray diagram showing how light from a distant object forms an image in a normal eye. Light from a distant object arrives as parallel rays.
In a normal eye, the cornea and the crystalline lens act together as a converging lens system. They refract the incoming parallel rays so that they meet at a single point on the retina, which is the light-sensitive back surface of the eye. This produces a sharp, focused image.
Let us evaluate each option:
- Diagram A: The parallel rays are refracted by the lens and converge exactly on the retina. This is the correct diagram for a normal eye.
- Diagram B: The rays pass straight through the lens without bending. A normal eye must refract light to focus it; this diagram is incorrect.
- Diagram C: The rays cross and focus at a point inside the eyeball, in front of the retina. This is the characteristic diagram for myopia (short-sightedness). The image is blurred on the retina.
- Diagram D: The rays have not yet converged when they reach the retina; their focal point is behind the retina. This is the characteristic diagram for hypermetropia (long-sightedness).
Key Takeaways
- A normal eye focuses parallel rays (from a distant object) exactly on the retina.
- Myopia (short-sightedness): image forms in front of the retina. Corrected with a diverging lens.
- Hypermetropia (long-sightedness): image forms behind the retina. Corrected with a converging lens.
- Light from distant objects arrives as parallel rays; light from nearby objects arrives as diverging rays.
Common Mistakes
- Choosing Diagram C or Diagram D and forgetting which condition they represent. Remember: 'myopia' = 'my' (me) = in front; 'hyper' = over/behind. Or simply remember that a normal eye focuses on the retina, myopia before the retina, and hypermetropia behind the retina.
- Selecting Diagram B and thinking the lens has no effect. The eye's lens must refract light to form an image.
- Confusing the direction of the rays: rays from a distant object are parallel, not diverging from a point near the eye.
Things to Be Careful About
- Ensure you read the question carefully: it asks for a normal eye, not a short-sighted or long-sighted one. Diagrams C and D are very common distractors because they are frequently discussed in the context of correcting vision.
- In ray diagrams for the eye, the retina is always the back curved surface of the eyeball. The focal point must lie exactly on this surface for normal vision.
The colour of visible light is related to the wavelength of the light.
Which list of colours is in order of increasing wavelength?
Options
A blue green yellow red
B blue green red yellow
C green red yellow blue
D red yellow green blue
Working
Visible light is part of the electromagnetic spectrum. From the shortest wavelength to the longest wavelength, the colours are:
violet blue green yellow orange red
So the order of increasing wavelength is blue, then green, then yellow, then red.
- A blue green yellow red — correct.
- B puts red before yellow, but red has the longer wavelength — wrong.
- C starts with green and ends with blue, which is decreasing then wrong — wrong.
- D is the exact reverse (red has the longest wavelength, blue the shortest) — wrong.
Answer
A
A
Walkthrough
The question asks for the list of colours in order of increasing wavelength. In the visible spectrum, red light has the longest wavelength (about 700 nm) and violet light has the shortest (about 400 nm). The full order from shortest to longest wavelength is:
violet blue green yellow orange red
Check each option against this order:
- A blue green yellow red — each step moves to a longer wavelength, so this is correct.
- B blue green red yellow — red has a longer wavelength than yellow, so putting red before yellow breaks the increasing order.
- C green red yellow blue — this jumps around and ends on blue, the shortest wavelength, so it is not increasing.
- D red yellow green blue — this is the order of decreasing wavelength (red longest, blue shortest), the exact reverse of what is asked.
So the correct answer is A.
Key Takeaways
- The visible spectrum is a small part of the electromagnetic spectrum.
- Wavelength increases from violet to red: violet, blue, green, yellow, orange, red.
- Frequency is the opposite: red has the lowest frequency and violet the highest, since and all visible light travels at the same speed .
- A common memory aid is the order of colours in a rainbow: ROYGBIV (red, orange, yellow, green, blue, indigo, violet) — but that is decreasing wavelength, so read the question carefully.
Common Mistakes
- Confusing increasing and decreasing wavelength: option D is the famous rainbow order but is decreasing, so it is wrong here.
- Placing red before yellow (option B): red has a longer wavelength than yellow, not a shorter one.
- Forgetting that all electromagnetic waves, including all colours of light, travel at the same speed in a vacuum.
Things to Be Careful About
- Read whether the question wants increasing or decreasing wavelength — the same list can be correct or incorrect depending on the direction.
- Remember that wavelength and frequency are inversely related for light: longer wavelength means lower frequency.
- The visible spectrum spans roughly 400 nm (violet) to 700 nm (red); these values are useful context but not needed to answer this question.
A thin converging lens is used as a magnifying glass.
Which row gives the nature of the image produced and an expression that is the linear magnification?
Options
| nature of image | expression for linear magnification | |
|---|---|---|
| A | real | |
| B | real | |
| C | virtual | |
| D | virtual |
Answer
A magnifying glass is a converging lens used with the object inside the principal focus. The image produced is virtual (and upright and magnified).
Linear magnification is defined as
so the correct row is C.
C
Walkthrough
A thin converging lens acts as a magnifying glass when the object is placed between the lens and its principal focus. The rays of light emerging from the lens spread out, so they never actually meet on the far side of the lens. The image is formed where the backwards extensions of the rays meet on the same side as the object – this is a virtual image. It is upright and larger than the object.
Linear magnification tells you how many times bigger the image is than the object. Its definition is:
So the image here is virtual, and the expression for linear magnification is image length divided by object length. That matches row C.
Key Takeaways
- A converging lens used as a magnifying glass has the object inside the focal length.
- The image produced is virtual, upright and magnified.
- Linear magnification is a ratio: image length divided by object length. It has no unit.
- For the same lens, moving the object outside the focal length gives a real, inverted image instead.
Common Mistakes
- Choosing real: this is wrong because the image from a magnifying glass cannot be projected onto a screen; the rays only appear to come from the image.
- Inverting the ratio: rows B and D give object length over image length. Magnification is image over object, not object over image.
- Forgetting that the question asks for both the nature and the expression – both parts must match the same row.
Things to Be Careful About
- The phrase “magnifying glass” is a cue: object distance is less than the focal length .
- If the object is placed between and the lens, the image is virtual; if placed beyond , the image becomes real and inverted.
- Linear magnification can also be written as using image distance and object distance, but with lengths of object and image the expression is image length over object length.
Which application is not a use for ultrasound?
Options
A cleaning jewellery
B scanning an unborn baby
C sonar
D sterilising water
Working
Ultrasound is used for:
- cleaning jewellery (ultrasonic cleaning)
- scanning an unborn baby (medical ultrasound imaging)
- sonar (using reflected sound to detect objects underwater)
Sterilising water is not a standard use of ultrasound.
Answer
D. sterilising water
D
Walkthrough
Ultrasound is sound with a frequency higher than the human ear can hear, usually above about 20 000 Hz. It is useful because it can be directed, reflected and detected, and it can carry energy into materials.
Each option is a known application of ultrasound except one:
- Cleaning jewellery is a real use. Ultrasonic cleaners send high-frequency sound waves through a liquid, producing tiny bubbles that gently remove dirt from delicate objects.
- Scanning an unborn baby is a real use. Ultrasound waves are sent into the body and the reflected waves are used to build a picture of the baby.
- Sonar is a real use. Sound waves are sent through water and the time for the echo to return tells us the distance to an object, such as the sea floor or a submarine.
- Sterilising water is not a standard use of ultrasound. Sterilising water is usually done by boiling, chemicals, or ultraviolet radiation, not by ultrasound.
So the application that is not a use for ultrasound is D.
Key Takeaways
- Ultrasound is sound, not light or other radiation.
- Ultrasound can be used for imaging, cleaning, and echo-based detection.
- Common examples include medical scanning, sonar, and ultrasonic cleaning.
- To answer a “which is not” question, check each option against the known uses and reject the odd one.
Common Mistakes
- Choosing cleaning jewellery because you do not know that ultrasonic cleaners exist. It is a genuine use of ultrasound.
- Confusing ultrasound with ultraviolet. Ultraviolet radiation is used to sterilise some things, but ultrasound is not.
- Thinking that because ultrasound can clean, it can also sterilise. Cleaning removes dirt; sterilising removes microorganisms, and that is not a standard ultrasound application.
Things to Be Careful About
- Ultrasound is a sound wave, so it needs a medium, such as air, water, or body tissue, to travel through.
- The word “ultrasound” refers to high-frequency sound, not to electromagnetic waves.
- In a “which is not” question, read every option before choosing. The obvious one is not always the answer.
Which equation is correct for potential difference (p.d.)?
Options
A
B
C
D
Working
Potential difference is defined as the energy transferred (work done) per unit charge passing through a component:
where is the p.d., is the work done (or energy transferred) and is the charge.
Option A gives power, option B gives power, and option D is not the correct relation between current and resistance. Therefore the correct equation is C.
Answer
C
C
Walkthrough
The potential difference (p.d.) across a component is a measure of the energy transferred to or from each coulomb of charge as it passes through the component. So:
This is exactly option C. Work done and energy transferred are the same thing here, so p.d. is also energy transferred per unit charge.
Now check the other options. Option A, voltage × current, is power: . Option B, energy ÷ time, is also power: . Option D, current ÷ resistance, is not correct; the correct relation is Ohm's law, , which rearranges to . So only C is correct.
Key Takeaways
- Potential difference is work done per unit charge: .
- Power is energy per unit time: .
- Electrical power is also .
- Ohm's law relates current, p.d. and resistance: .
- The unit of p.d. is the volt, which is one joule per coulomb.
Common Mistakes
- Choosing A or B because they look like electrical equations; both are power, not p.d.
- Choosing D by misremembering Ohm's law; the correct form is , not .
- Writing p.d. as energy per second instead of energy per coulomb.
Things to Be Careful About
- p.d. is energy per unit charge, not energy per unit time.
- In calculations, work done must be in joules and charge in coulombs to get p.d. in volts.
- The terms voltage and potential difference are used interchangeably in 5054.
The diagrams show five electrical circuits. All of the resistors shown are identical.
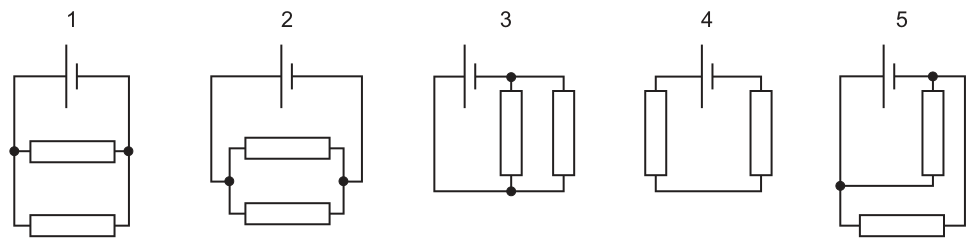
Which circuits have equal resistance?
Options
A 1, 2, 3 and 5
B 1, 2, 4 and 5
C 1, 3, 4 and 5
D 2, 3, 4 and 5
Working
Let be the resistance of each identical resistor.
- Circuit 1: The two resistors are connected in parallel (same potential difference across each). Equivalent resistance .
- Circuit 2: The resistors are connected in parallel (despite the zig-zag wiring, both connect across the same two nodes). Equivalent resistance .
- Circuit 3: The two resistors are connected in parallel (vertical orientation). Equivalent resistance .
- Circuit 4: The two resistors are connected in series (current flows through one then the other). Equivalent resistance .
- Circuit 5: The resistors are connected in parallel (each has its own branch across the cell). Equivalent resistance .
Circuits 1, 2, 3 and 5 all have an equivalent resistance of . Circuit 4 has a resistance of .
Therefore, circuits 1, 2, 3 and 5 have equal resistance.
Answer
A
A
Walkthrough
To solve this, we determine the total resistance of each circuit in terms of the resistance of a single resistor. We look at how the resistors are connected to the cell (battery).
- Circuit 1: The two resistors are arranged one above the other. The left ends are connected together to the negative terminal, and the right ends are connected together to the positive terminal. This is a parallel connection. For two identical resistors in parallel, the total resistance is .
- Circuit 2: The wiring is drawn in a zig-zag pattern, but tracing the nodes shows that the left ends of both resistors connect to one terminal of the cell, and the right ends connect to the other. This is still a parallel connection. Total resistance = .
- Circuit 3: The resistors are drawn vertically. The top ends are connected to the positive terminal and the bottom ends to the negative terminal. This is a parallel connection. Total resistance = .
- Circuit 4: The current leaves the cell, goes through the left resistor, along the bottom wire, through the right resistor, and back to the cell. There is only one path for the current. This is a series connection. For two identical resistors in series, the total resistance is .
- Circuit 5: One resistor is vertical and one is horizontal. Tracing the connections: the top of the vertical resistor and the right end of the horizontal resistor connect to the positive terminal. The bottom of the vertical resistor and the left end of the horizontal resistor connect to the negative terminal. Each resistor has its own branch across the cell. This is a parallel connection. Total resistance = .
Comparing the results: Circuits 1, 2, 3 and 5 have resistance , while Circuit 4 has resistance . The circuits with equal resistance are 1, 2, 3 and 5.
Key Takeaways
- Series vs Parallel: In a series circuit, there is only one path for current; resistances add up (). In a parallel circuit, there are multiple paths; the total resistance is less than any individual resistance ().
- Circuit Diagrams: Resistors can be drawn in any orientation (horizontal, vertical, zig-zag) or arranged in non-rectangular shapes. The electrical connection (which ends are joined together) determines if they are in series or parallel, not the visual shape.
- Identical Resistors: For identical resistors of resistance in parallel, the total resistance is . For in series, it is .
Common Mistakes
- Misinterpreting wiring: Students may look at Circuit 2 or 5 and assume they are series or a mix because the wires are drawn in a 'U' shape or zig-zag. Always trace the nodes (connection points) to determine the actual circuit topology.
- Confusing series and parallel resistance values: Remember that adding resistors in parallel decreases total resistance, while adding them in series increases it. Circuit 4 (series) will always have higher resistance than the parallel circuits (1, 2, 3, 5).
- Ignoring orientation: Assuming that because a resistor is drawn vertically it must be in series with a horizontal one. Check the nodes.
Things to Be Careful About
- Node identification: In diagrams like 5, look for the black dots (nodes). A dot indicates a junction where wires are connected. In Circuit 5, the top-right dot connects the positive terminal to the top of the right resistor and the wire leading to the right resistor of the bottom branch. The bottom-left dot connects the negative terminal to the left of the bottom resistor and the bottom of the right resistor. This confirms they are in parallel.
- Visual tricks: Examination boards often draw parallel circuits with 'staircase' or 'zig-zag' wires to test if students truly understand the concept or are just looking for a standard rectangular box shape.
Which electrical appliance uses the heating effect of electricity?
Options
A a cell phone (mobile phone)
B a fan
C a hairdryer
D a lawnmower
Working
A hairdryer contains a heating element that gets hot when an electric current passes through it, so it is designed to use the heating effect of electricity.
A cell phone, a fan and a lawnmower are not mainly designed to heat things. A fan and a lawnmower mainly transfer electrical energy to kinetic energy, and a cell phone mainly uses electrical energy for sound, screen and communication.
Answer
C
C
Walkthrough
The question asks which appliance uses the heating effect of electricity. The heating effect happens when an electric current flows through a material that has resistance, such as the thin wire in a heating element. The electrical energy is transferred into thermal energy, making the element hot.
A hairdryer contains such a heating element, so it is clearly designed to use the heating effect. A fan also contains an electric motor, which uses the magnetic effect of a current to turn the blades, not the heating effect. A lawnmower also uses an electric motor to turn its blade. A cell phone uses electricity for its screen, speaker and circuits, not mainly for heating.
Key Takeaways
- The heating effect of a current is used in appliances such as hairdryers, kettles, toasters and electric heaters.
- The heating effect happens because the resistance of a wire transfers electrical energy to thermal energy when a current flows through it.
- Different appliances use different effects of electricity: heating, magnetic and chemical effects.
Common Mistakes
- Choosing a fan because it might feel warm after long use. The question asks about the appliance that uses the heating effect as its main purpose, not one that becomes warm as a side effect.
- Choosing a cell phone because it can become warm when used for a long time. Its main purpose is not heating.
Things to Be Careful About
- Read the question carefully: it asks which appliance uses the heating effect of electricity, not which appliance gets warm.
- The hairdryer is the only option that contains a heating element designed to make heat as its main job.
How many kilowatt-hours of energy are used by a heater connected to a supply for 30 minutes?
Options
A
B
C
D
Working
The energy used is the power multiplied by the time it is on.
Convert the power to kilowatts:
Convert the time to hours:
Energy used:
The 230 V is not needed because the power is already given.
Answer
B
B
Walkthrough
This question asks for electrical energy in kilowatt-hours. A kilowatt-hour is the energy used by a power of 1 kilowatt running for 1 hour, so the easiest route is:
where is energy in kilowatt-hours, is power in kilowatts and is time in hours.
The heater uses , which is . The time is 30 minutes, which is . Multiplying gives:
So the correct option is B.
The 230 V supply is a distractor. The power is already given, so there is no need to use the voltage or to calculate the current.
Key Takeaways
- Electrical energy in kilowatt-hours is found from power in kilowatts multiplied by time in hours.
- Always convert watts to kilowatts and minutes to hours before using this method.
- The voltage is not needed when the power is already stated.
Common Mistakes
- Using 30 minutes as 0.3 h instead of 0.5 h, which gives 0.3 kWh and option A.
- Forgetting to convert 1000 W into 1 kW, then getting a very large number of kilowatt-hours.
- Using the 230 V supply to calculate current first, which is unnecessary and wastes time.
- Confusing kilowatt-hours (energy) with kilowatts (power).
Things to Be Careful About
- Always state the unit with a numerical answer.
- 30 minutes is half an hour, so the time in hours is 0.50, not 0.30.
- The answer in kilowatt-hours is small because the heater is only on for half an hour.
Which safety precautions must be taken when wiring an electrical kettle that has a stainless-steel outer casing?
Options
A It must be earthed and have a fuse in the live wire.
B It must be earthed and have a fuse in the neutral wire.
C It needs a fuse in the live wire but does not need to be earthed.
D It needs a fuse in the neutral wire but does not need to be earthed.
Working
A stainless-steel casing is a conductor, so if a live wire becomes loose and touches it, the casing becomes live. Earthing the casing provides a low-resistance path to earth, causing a large current to flow and blow the fuse. The fuse must be in the live wire so that when it blows, the appliance is disconnected from the live supply.
Answer
A
A
Walkthrough
An electric kettle has a metal (stainless-steel) outer casing. If the live wire becomes loose and touches the casing, the casing becomes live. If someone touches it, current could flow through them to earth, causing a severe electric shock. To prevent this, the casing is connected to the earth wire, which provides a low-resistance path to earth. The large current that flows when the casing becomes live blows the fuse, disconnecting the appliance. The fuse must be in the live wire so that when it blows, the appliance is disconnected from the live supply. A fuse in the neutral wire would not disconnect the live supply, leaving the appliance still dangerous.
Key Takeaways
- Metal-cased appliances must be earthed.
- The fuse must be in the live wire.
- Earthing works with the fuse to protect against electric shock.
Common Mistakes
- Thinking a fuse in the neutral wire is acceptable — it is not, because the live wire remains connected.
- Forgetting that a metal casing requires earthing even if a fuse is present.
Things to Be Careful About
- The earth wire is a safety wire, not part of the normal current path.
- The fuse rating should be slightly above the normal operating current.
- "Double insulation" is an alternative to earthing, but this kettle has a metal casing, so it must be earthed.
What is the purpose of the earth wire in a plug connected to an appliance?
Options
A to complete the circuit so that the appliance works
B to conduct thermal energy so that the appliance does not get too hot
C to prevent a person getting a shock
D to protect the appliance from a current that is too large
Answer
C
C
Walkthrough
The earth wire is a safety feature in a mains plug. Its job is to provide a low-resistance path for electric current to flow directly to the ground if the metal casing of an appliance becomes live (for example, because an internal wire has come loose and touched the case). When this happens, a very large current flows through the earth wire, which causes the fuse to blow or the circuit breaker to trip, cutting off the supply. This stops the casing from staying live, so a person touching it does not receive an electric shock.
Option C is therefore correct: the earth wire prevents a person getting a shock. Option A is wrong because the circuit is completed by the live and neutral wires, not the earth wire. Option B is wrong because the earth wire does not conduct thermal energy to cool the appliance. Option D is wrong because the earth wire does not protect the appliance from a large current; it protects people from a live casing.
Key Takeaways
The earth wire is a safety device that protects people from electric shock. It provides a low-resistance path for current to the ground if the metal casing becomes live, causing the fuse to blow or the circuit breaker to trip. The earth wire does not complete the circuit, does not cool the appliance, and does not protect the appliance itself.
Common Mistakes
- Choosing A: thinking the earth wire completes the circuit. It does not; the live and neutral wires do that.
- Choosing D: confusing earthing with fuse protection. The fuse protects the appliance from a large current, but the earth wire protects people from a live casing.
- Choosing B: thinking the earth wire conducts heat, which is not its purpose.
Things to Be Careful About
The earth wire is only present in appliances with metal casings. Double-insulated appliances have a plastic casing and do not need an earth wire. The key idea is that the earth wire creates a path for current to flow to the ground, which makes the fuse blow and prevents the casing from staying live.
The diagram shows a wire carrying a current in a magnetic field.
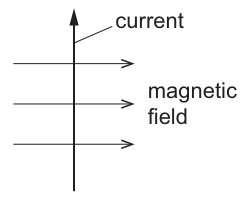
What is the direction of the force on the wire?
Options
A left to right
B right to left
C into the page
D out of the page
Working
Using Fleming's left-hand rule:
- Point the first finger in the direction of the magnetic field (to the right).
- Point the second finger in the direction of the current (upwards).
- The thumb then points into the page.
The force on the wire is into the page.
Answer
C
C
Walkthrough
The question asks for the direction of the force on a current-carrying wire placed in a magnetic field. This is determined using Fleming's left-hand rule.
- Identify the direction of the magnetic field: the field lines point from left to right, so the first finger points to the right.
- Identify the direction of the current: the arrow on the wire points upwards, so the second finger points upwards.
- Orient the left hand so that the first finger points right and the second finger points up. The thumb will naturally point into the page (away from the viewer).
- The thumb represents the direction of the force (or motion) on the conductor. Therefore, the force is into the page.
Key Takeaways
- Fleming's left-hand rule is used to find the direction of the force on a current-carrying conductor in a magnetic field.
- First finger = magnetic Field, Second finger = current (conventional), Thumb = Thrust (Force/motion).
- The three directions (force, field, current) are mutually perpendicular.
Common Mistakes
- Using the right hand instead of the left hand (which gives the direction of induced current in electromagnetic induction, not force on a conductor).
- Confusing conventional current (positive to negative) with electron flow (negative to positive); Fleming's left-hand rule uses conventional current.
- Misaligning the fingers: the first and second fingers must be at right angles to each other.
Things to Be Careful About
- Ensure you are using the LEFT hand for the motor effect (force on a conductor) and the RIGHT hand for the generator effect (induced current). A common mnemonic is "Left = Motor, Right = Generator".
- The current direction is the conventional current (positive to negative), as shown by the upward arrow in the diagram.
The diagram shows a simple d.c. motor.
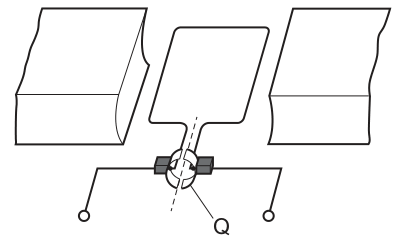
What is the part labelled Q?
Options
A a coil
B a magnet
C a slip ring
D a split-ring commutator
Answer
D
D
Walkthrough
The diagram shows a simple d.c. motor. The key components are the magnets (creating the magnetic field), the coil (carrying the current and experiencing a force), the brushes (making contact with the rotating part), and the split-ring commutator (reversing the current in the coil every half-turn to keep the coil rotating in the same direction). Part Q is the split circular ring that is cut into two halves, which is the split-ring commutator. A slip ring would be a complete, unbroken ring, used in an a.c. generator. Therefore, Q is a split-ring commutator.
Key Takeaways
- A simple d.c. motor uses a split-ring commutator to reverse the current in the coil every half-turn, ensuring continuous rotation in one direction.
- A slip ring (complete ring) is used in an a.c. generator to maintain continuous contact without reversing the current.
Common Mistakes
- Confusing a split-ring commutator with a slip ring. The split ring has a gap, making it two separate halves.
Things to Be Careful About
- Look closely at the ring: if it has a gap, it is a split-ring commutator (d.c. motor). If it is a complete continuous ring, it is a slip ring (a.c. generator).
The diagram shows a transformer.
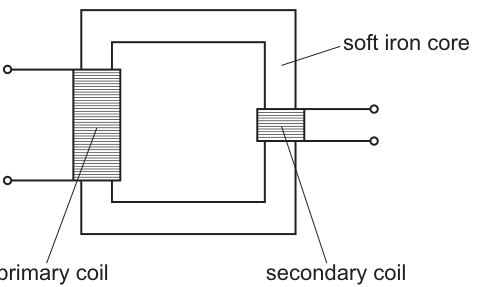
A student writes four statements about how the transformer works.
- An alternating voltage across the primary coil induces an unchanging voltage across the secondary coil.
- An alternating voltage across the primary coil produces a changing magnetic field in the iron core.
- A changing magnetic field in the iron core induces an alternating voltage across the secondary coil.
- An unchanging voltage across the primary coil produces a changing magnetic field across the secondary coil.
Which statements explain how the transformer works?
Options
A 1 and 2
B 1 and 4
C 2 and 3
D 3 and 4
Working
We evaluate each statement against the physics of how a transformer works:
- Statement 1: Incorrect. An alternating voltage across the primary coil induces an alternating voltage across the secondary coil, not an unchanging one.
- Statement 2: Correct. An alternating voltage across the primary coil causes an alternating current, which produces a changing magnetic field in the soft iron core.
- Statement 3: Correct. The changing magnetic field in the iron core links with the secondary coil, inducing an alternating voltage across it (electromagnetic induction).
- Statement 4: Incorrect. An unchanging (d.c.) voltage across the primary coil produces a steady (unchanging) magnetic field, which cannot induce a voltage. Additionally, the magnetic field is contained within the core, not "across the secondary coil".
Statements 2 and 3 are the correct explanations. This corresponds to option C.
Answer
C
C
Walkthrough
A transformer works on the principle of electromagnetic induction. For an e.m.f. to be induced in the secondary coil, the magnetic flux linking it must be changing.
- Primary coil action: When an alternating voltage (a.c.) is applied to the primary coil, an alternating current flows through it. This alternating current produces a magnetic field that is constantly changing in magnitude and direction. This changing magnetic field is concentrated in the soft iron core, which links the primary and secondary coils. This makes Statement 2 correct.
- Secondary coil action: The changing magnetic field in the core passes through the turns of the secondary coil. Because the magnetic field is changing, the flux linkage through the secondary coil is changing, which induces an e.m.f. (voltage) across it. Since the magnetic field is alternating, the induced e.m.f. is also alternating. This makes Statement 3 correct and Statement 1 incorrect.
- Why d.c. doesn't work: If an unchanging voltage (d.c.) were applied to the primary coil, it would produce a steady, unchanging magnetic field. A steady magnetic field does not cause a change in flux linkage, so no voltage would be induced in the secondary coil. This makes Statement 4 incorrect.
Since statements 2 and 3 are the correct descriptions of transformer operation, the correct option is C.
Key Takeaways
- A transformer requires an alternating current (a.c.) input to work. An unchanging (d.c.) voltage will not induce a voltage in the secondary coil.
- The core mechanism is that an alternating current in the primary coil produces a changing magnetic field in the iron core.
- This changing magnetic field induces an alternating voltage in the secondary coil via electromagnetic induction.
Common Mistakes
- Thinking transformers work with d.c.: Students often forget that a steady magnetic field cannot induce an e.m.f. An unchanging voltage across the primary produces no output.
- Confusing the induced voltage type: Assuming the output voltage is d.c. (unchanging) when the input is a.c. The induced voltage in the secondary is always alternating if the primary is alternating.
- Mislocating the magnetic field: Thinking the magnetic field is "across the secondary coil" rather than being contained within and linking through the iron core.
Things to Be Careful About
- Pay close attention to the words "alternating" and "unchanging". In the context of transformers, "unchanging voltage" implies d.c., which does not work.
- Remember that the iron core's purpose is to channel the changing magnetic field from the primary to the secondary coil. Without a changing field, there is no induction.
- The induced voltage is alternating because the rate of change of the magnetic flux is itself alternating (increasing, decreasing, reversing).
Which particle has the smallest mass?
Options
A alpha particle
B electron
C neutron
D proton
Working
The proton and the neutron each have a mass of about 1 atomic mass unit. An alpha particle is a helium nucleus, made of two protons and two neutrons, so its mass is about 4 atomic mass units. The electron has a mass of only about of a proton's mass, so it is the lightest particle listed.
Answer
B
B
Walkthrough
The question asks which particle has the smallest mass. The proton and neutron are nearly equal in mass, each about 1 atomic mass unit. An alpha particle is much heavier because it is a helium nucleus containing two protons and two neutrons, so its mass is about 4 atomic mass units. The electron is far lighter: its mass is about of a proton's mass. Therefore the electron is the smallest mass among the four options.
Key Takeaways
- Protons and neutrons have very similar masses, each about 1 atomic mass unit.
- An alpha particle is a helium nucleus, so it is about four times as massive as a proton.
- An electron is about 1836 times lighter than a proton, so it is by far the lightest of the particles listed.
- Mass and charge are separate properties: an electron has a negative charge, but that does not make it heavy.
Common Mistakes
- Choosing the alpha particle because it is "small" in size: an alpha particle is much more massive than an electron.
- Thinking the electron has zero mass because it is a charge carrier; it has a very small but nonzero mass.
- Confusing mass with charge magnitude. The neutron has no charge, but it is not the lightest particle here.
Things to Be Careful About
- Read the question carefully: it asks for the smallest mass, not the smallest charge or the smallest size.
- Remember that the electron is about of a proton's mass, so it is always the lightest of the common subatomic particles.
- An alpha particle is not a fundamental particle; it is a helium nucleus and therefore has a relatively large mass.
Which two atoms are isotopes of the same element?
| atom | number of neutrons | number of protons |
|---|---|---|
| 1 | 22 | 12 |
| 2 | 22 | 14 |
| 3 | 25 | 13 |
| 4 | 24 | 14 |
Options
A 1 and 2
B 1 and 4
C 2 and 4
D 3 and 4
Working
Isotopes are atoms of the same element, so they have the same number of protons but different numbers of neutrons.
- Atom 1 has 12 protons and atom 2 has 14 protons: different elements.
- Atom 3 has 13 protons and atom 4 has 14 protons: different elements.
- Atom 2 and atom 4 both have 14 protons, but 22 and 24 neutrons: same element, so they are isotopes.
Answer
C
C
Walkthrough
The element an atom belongs to is decided by its proton number, not by its mass or its number of neutrons. Two atoms are isotopes of the same element when they have the same number of protons but a different number of neutrons.
Look at the table:
- Atom 1 has 12 protons.
- Atom 2 has 14 protons.
- Atom 3 has 13 protons.
- Atom 4 has 14 protons.
Atoms 2 and 4 both have 14 protons, so they are both atoms of the same element. Their neutron numbers are different, 22 and 24, so they are isotopes of that element. The other pairs have different proton numbers, so they are atoms of different elements.
Key Takeaways
- The proton number identifies the element.
- Isotopes are atoms of the same element with the same number of protons but different numbers of neutrons.
- Neutron number does not change which element an atom is.
Common Mistakes
- Choosing atoms with the same number of neutrons: atoms 1 and 2 both have 22 neutrons, but they have different proton numbers, so they are not isotopes of the same element.
- Thinking that equal mass number makes isotopes: the mass number is protons plus neutrons, and the question gives neutrons and protons separately, so the key comparison is the proton number.
Things to Be Careful About
- Read the table columns carefully: the first column is neutrons and the second is protons.
- Check both rows in a pair before deciding.
- Isotopes must have the same proton number, not the same neutron number.
Four types of ionising radiation are listed.
- alpha particles
- beta particles
- X-rays
- gamma rays
Which types of radiation can be emitted from the unstable nuclei of a radioactive material?
Options
A alpha particles, beta particles and gamma rays
B alpha particles and beta particles only
C gamma rays only
D X-rays and gamma rays
Working
Alpha particles and beta particles are emitted from the nucleus during radioactive decay. Gamma rays are electromagnetic radiation emitted from the nucleus when it de-excites after a decay. X-rays are not emitted from nuclei — they are produced by electron transitions in atoms.
Therefore the types emitted from unstable nuclei are alpha particles, beta particles and gamma rays.
Answer
A
A
Walkthrough
The question asks which of the four listed radiations can be emitted from the unstable nuclei of a radioactive material. Recall what each radiation is:
- Alpha particles — helium nuclei (two protons and two neutrons) ejected from the nucleus during decay.
- Beta particles — fast electrons emitted from the nucleus when a neutron changes into a proton.
- Gamma rays — high-energy electromagnetic radiation emitted from the nucleus when it is left in an excited state after a decay.
- X-rays — electromagnetic radiation of similar nature to gamma rays, but produced by electron transitions in atoms, not by the nucleus.
So alpha, beta and gamma all come from the nucleus, while X-rays do not. That matches option A.
Key Takeaways
Radioactive decay emits alpha particles, beta particles and gamma rays from the nucleus. X-rays are not nuclear radiation — they come from atomic electron transitions.
Common Mistakes
- Choosing D (X-rays and gamma rays): confuses X-rays with nuclear gamma emission.
- Choosing B (alpha and beta only): forgets that gamma rays are also emitted when a nucleus de-excites.
- Choosing C (gamma only): forgets alpha and beta particles.
Things to Be Careful About
Gamma rays and X-rays are both electromagnetic radiation, but gamma rays come from the nucleus while X-rays come from electron transitions in atoms. The question specifically says "from the unstable nuclei", which excludes X-rays.
What is the nuclear reaction that powers the Sun?
Options
A the fission of hydrogen into helium
B the fission of helium into hydrogen
C the fusion of hydrogen into helium
D the fusion of helium into hydrogen
Working
The Sun is powered by nuclear fusion, in which hydrogen nuclei combine to form helium. This releases a huge amount of energy. Fission is the splitting of a large nucleus, which is not what happens in the Sun.
Answer
C
C
Walkthrough
The Sun's energy comes from nuclear fusion. In the Sun's core, hydrogen nuclei (protons) collide and fuse together to form helium nuclei, releasing a large amount of energy in the process. This is why the Sun shines. Option C correctly identifies this as the fusion of hydrogen into helium. Options A and B are incorrect because they mention fission, which is the splitting of a heavy nucleus into lighter ones—this is the process used in nuclear power stations, not the Sun. Option D is incorrect because the Sun fuses hydrogen into helium, not the other way around.
Key Takeaways
- The Sun is powered by nuclear fusion.
- Fusion combines light nuclei (hydrogen) into a heavier nucleus (helium).
- This is different from fission, which splits heavy nuclei.
Common Mistakes
- Confusing fusion (combining) with fission (splitting).
- Reversing the reactants and products (helium into hydrogen).
Things to Be Careful About
- Remember that fusion is the process that powers the Sun and other stars.
- Fission is used in nuclear reactors and atomic bombs; fusion is what happens in stars.
Your score so far
Answer a question to start scoring
Your marks add up here as you work through the paper.