Physics 5054/11 — May/June 2024
Cambridge O-Level · Multiple Choice · answer key with instant marking and worked solutions
Topics Energy, Work and Power · Forces · Kinetic Particle Model of Matter · Mass, Weight and Density · Turning Effect of Forces · Transfer of Thermal Energy · +19 more
Tap an option under each question to check it — your score builds as you go.
A measuring cylinder containing water is placed on a top-pan balance. An object is placed into the measuring cylinder.
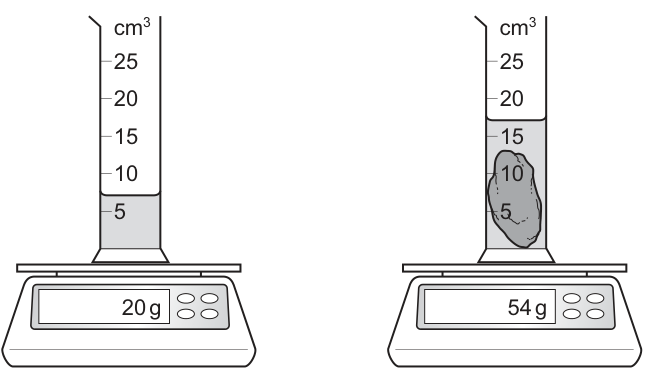
What is the mass and what is the volume of the object?
Options
| mass / | volume / | |
|---|---|---|
| A | 10 | 7 |
| B | 10 | 34 |
| C | 34 | 10 |
| D | 34 | 17 |
Working
Mass of object = final balance reading - initial balance reading
Mass = 54 g - 20 g = 34 g
Volume of object = final water level - initial water level
Volume = 17 cm³ - 7 cm³ = 10 cm³
Answer
C
C
Walkthrough
- The mass of the object is determined by the difference in the top-pan balance readings. The initial mass of the measuring cylinder and water is 20 g. The final mass after the object is submerged is 54 g. The mass of the object is therefore 54 g - 20 g = 34 g.
- The volume of the object is determined by the difference in the water levels in the measuring cylinder. The initial water level is 7 cm³. The final water level after the object is submerged is 17 cm³. The volume of the object is therefore 17 cm³ - 7 cm³ = 10 cm³.
- Comparing the calculated mass (34 g) and volume (10 cm³) with the given options, the correct choice is C.
Key Takeaways
- Mass can be measured by finding the difference in readings on a top-pan balance before and after adding the object.
- The volume of an irregular solid can be found by water displacement in a measuring cylinder, subtracting the initial volume from the final volume.
Common Mistakes
- Reading the final mass or volume directly from the second setup instead of finding the difference.
- Confusing the mass and volume values when selecting the option.
Things to Be Careful About
- Always ensure the units match the options (g for mass, cm³ for volume).
- When reading a measuring cylinder, always read at the bottom of the meniscus at eye level to avoid parallax error.
Which quantity is a vector?
Options
A distance
B force
C mass
D speed
Working
A vector quantity has both magnitude and direction. A scalar quantity has magnitude only.
- distance: scalar
- force: vector
- mass: scalar
- speed: scalar
Only force is a vector.
Answer
B
B
Walkthrough
A vector is a quantity that needs a direction as well as a size to be fully described. Force is the only option with a direction: a force always acts in a particular direction, such as upwards or to the left. Distance, mass and speed all have a size but no direction, so they are scalars.
Key Takeaways
- Scalar quantities have magnitude only, for example distance, mass, speed, energy and time.
- Vector quantities have magnitude and direction, for example force, velocity, acceleration and momentum.
- Speed is scalar; velocity is vector.
Common Mistakes
- Confusing speed with velocity. Speed is scalar, but velocity has a direction and is a vector.
- Thinking mass is a vector because it is a force-like idea. Mass is scalar; weight is the force and is a vector.
Things to Be Careful About
- Read the options carefully: distance and speed are both scalars, so only force is left as the vector.
- Remember that a quantity is a vector only if its direction matters for its complete description.
The table shows the distance travelled by a car in each time interval during a period of its journey.
| time interval / | 0–2 | 2–4 | 4–6 | 6–8 | 8–10 | 10–12 |
|---|---|---|---|---|---|---|
| distance travelled in time interval / | 10 | 10 | 11 | 13 | 16 | 23 |
Which statement describes the motion of the car?
Options
A moving with constant speed from 0–4 s, followed by non-uniform acceleration
B moving with constant speed from 0–4 s, then uniform acceleration
C at rest from 0–4 s, then non-uniform acceleration
D at rest from 0–4 s, then uniform acceleration
Working
In each equal 2-second interval the car travels:
- 0–2 s: 10 m
- 2–4 s: 10 m
- 4–6 s: 11 m
- 6–8 s: 13 m
- 8–10 s: 16 m
- 10–12 s: 23 m
The first two intervals have the same distance, so the car is moving at constant speed from 0–4 s. After 4 s, the distance in each equal interval increases, and the increases are 1 m, 2 m, 3 m and 7 m. These increases are not equal, so the acceleration is non-uniform.
Answer
A
A
Walkthrough
The table shows the distance travelled in each separate 2-second interval. For a constant speed, the car covers the same distance in every equal time interval. The first two intervals both show 10 m, so the car is moving at constant speed from 0–4 s.
After 4 s, the distances are 11 m, 13 m, 16 m and 23 m. The car is covering more distance in each interval, so it is speeding up. To decide whether the acceleration is uniform, compare the increases in distance:
- 11 – 10 = 1 m
- 13 – 11 = 2 m
- 16 – 13 = 3 m
- 23 – 16 = 7 m
These increases are not equal, so the acceleration is not uniform. The car therefore has constant speed from 0–4 s and then non-uniform acceleration. This matches option A.
Key Takeaways
- Equal distances in equal time intervals mean constant speed.
- Increasing distances in equal time intervals mean the object is accelerating.
- If the increases in distance are not equal, the acceleration is non-uniform.
Common Mistakes
- Choosing C or D: the car is not at rest from 0–4 s; it is moving 10 m in each of those intervals.
- Choosing B: uniform acceleration would produce equal increases in the distances travelled in each equal interval, but the increases here are 1 m, 2 m, 3 m and 7 m.
- Thinking that any increase in distance means uniform acceleration: you must check whether the increases themselves are equal.
Things to Be Careful About
- All the time intervals are the same length, so comparing distances directly is valid.
- "At rest" would mean zero distance travelled in each interval, which is not the case here.
- Non-uniform acceleration means the acceleration is changing, not merely that the car is speeding up.
Two cubes, X and Y, have the same mass, but the length of a side of X is twice that of Y.
What is the value of the ratio ?
Options
A 0.125
B 1.0
C 4.0
D 8.0
Working
Let the side length of Y be . Then the side length of X is .
Since the cubes have the same mass :
This is option A.
Answer
A
A
Walkthrough
Density is mass per unit volume:
Let the side length of cube Y be . Cube X has twice that side length, so its side length is .
A cube's volume is side length cubed, so:
Both cubes have the same mass, so the mass cancels when finding the density ratio:
This matches option A.
Option B would mean the densities are equal, ignoring the volume difference. Option C comes from treating the volume ratio as 4 instead of 8. Option D treats density as if it increases with volume, but density is mass divided by volume, so a larger volume gives a smaller density when mass is fixed.
Key Takeaways
- Density is mass divided by volume: .
- For a cube, volume = (side length).
- When the mass is the same, density is inversely proportional to volume.
- Ratio questions often only need the ratio of volumes, not the actual masses or volumes.
Common Mistakes
- Using the side-length ratio directly: a side ratio of 2 gives a volume ratio of .
- Reversing the ratio: the larger cube has the smaller density, so the density ratio must be less than 1.
- Choosing 8.0 by thinking that density is proportional to volume, rather than inversely proportional.
- Forgetting that the masses are equal, which is why the mass cancels out.
Things to Be Careful About
- The ratio of densities has no units, because the units cancel.
- A doubling of side length means an eightfold increase in volume.
- Since density is mass divided by volume, a larger volume gives a smaller density when the mass is unchanged.
- Always check whether the question asks for density of X over density of Y, not the other way round.
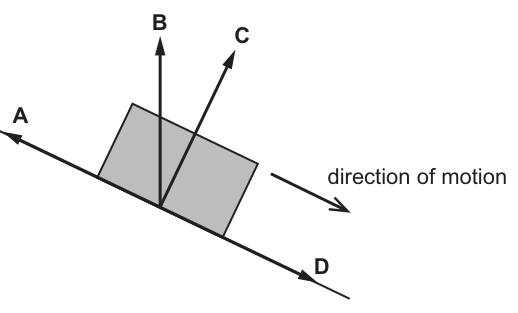
An object slides down a frictionless slope as shown.
As the object presses on the surface, the surface pushes back on the object.
In which direction does the surface push back on the object?
Options
Working
The surface pushes back on the object with a normal contact force. By definition, the normal contact force always acts perpendicular (normal) to the surface and away from it. Looking at the options provided in the diagram:
- A points up along the slope.
- B points vertically upwards.
- C points perpendicular to the slope and away from it.
- D points down along the slope.
Therefore, arrow C represents the direction of the force the surface exerts on the object.
Answer
C
C
Walkthrough
When an object is in contact with a surface, it presses against it. According to Newton's third law, the surface exerts an equal and opposite reaction force on the object. This reaction force is called the normal contact force. The key property of the normal contact force is that it always acts perpendicular (at 90 degrees) to the surface of contact, pointing away from the surface.
In the given diagram, the surface is the inclined plane (slope).
- Arrow A points up the slope. This would be the direction of friction if the surface were rough (opposing motion), but the question specifies a frictionless slope. It is not the normal force.
- Arrow B points vertically upwards. This is opposite to the direction of weight (gravity), but the normal force is only opposite to weight if the surface is horizontal. On a slope, the normal force is not vertical.
- Arrow C points perpendicular to the slope and away from it. This matches the definition of the normal contact force.
- Arrow D points down the slope, in the direction of motion.
Thus, C is the correct direction.
Key Takeaways
- The normal contact force between two surfaces is always perpendicular to the surfaces in contact.
- On an inclined plane, the normal force is not vertical; it is perpendicular to the slope.
- Weight acts vertically downwards, but the normal force is not necessarily its exact opposite (unless the surface is horizontal).
Common Mistakes
- Choosing B (vertically upwards): Candidates often confuse the normal force with the force that balances weight. While the normal force balances the perpendicular component of weight, the normal force itself is perpendicular to the slope, not vertical. On a slope, the normal force is less than the total weight.
- Choosing A (up the slope): Candidates might think the surface pushes back against the motion. If there were friction, friction would act up the slope (opposing motion), but the question asks for the force due to pressing on the surface (the normal force), and explicitly states the slope is frictionless.
Things to Be Careful About
- Distinguish between the normal contact force (perpendicular to surface) and friction (parallel to surface, opposing motion).
- Remember that "normal" in physics means perpendicular.
- Weight always acts vertically downwards towards the centre of the Earth, regardless of the orientation of the surface. Do not assume the reaction force is always vertical.
A car, travelling on a straight road, brakes and comes to a stop.
Which row gives the expression for calculating the thinking distance and gives a variable that affects thinking distance?
Options
| expression for calculating thinking distance | variable that affects thinking distance | |
|---|---|---|
| A | braking distance + stopping distance | load carried |
| B | braking distance + stopping distance | speed of car |
| C | stopping distance – braking distance | load carried |
| D | stopping distance – braking distance | speed of car |
Working
Stopping distance = thinking distance + braking distance.
Therefore:
thinking distance = stopping distance – braking distance.
Thinking distance is the distance covered while the driver is still reacting, so it depends on the speed of the car.
Answer
D
D
Walkthrough
The total distance a car needs to stop is called the stopping distance. It is made up of two parts: the thinking distance, which is the distance travelled while the driver reacts before pressing the brake, and the braking distance, which is the distance travelled while the brakes are slowing the car down.
So:
stopping distance = thinking distance + braking distance.
To find the thinking distance, subtract the braking distance from the stopping distance:
thinking distance = stopping distance – braking distance.
This eliminates options A and B.
The thinking distance depends on how fast the car is moving and how long the driver takes to react. The speed of the car is therefore the correct variable. The load carried affects braking distance, not thinking distance. So the correct row is D.
Key Takeaways
The key idea is that stopping distance is the total of thinking distance and braking distance. Thinking distance is the distance travelled during the driver's reaction time, while braking distance is the distance travelled once the brakes are applied. The main variables are speed and reaction time for thinking distance, and speed, road conditions, and braking force for braking distance.
Common Mistakes
A common mistake is to think that thinking distance is braking distance plus stopping distance. This is wrong because stopping distance is already the total of the other two. Another common mistake is choosing load carried as the variable affecting thinking distance. Load affects braking distance, not the distance travelled during the driver's reaction time.
Things to Be Careful About
Read the table carefully: options A and B give braking distance + stopping distance, while C and D give stopping distance – braking distance. Only C and D are possible, and the correct variable is speed. The thinking distance is the distance covered before the brakes are applied, so it is directly related to how fast the car is going.
An unstretched spring of length stretches by when a mass of weight is suspended from it. The spring does not exceed the limit of proportionality.
What is the total length of the spring when the weight of the suspended mass is ?
Options
A
B
C
D
Working
Within the limit of proportionality, extension is proportional to load.
The load is halved from to , so the extension is also halved:
Total length = original length + extension:
Answer
D
D
Walkthrough
The spring obeys Hooke's law because it does not exceed the limit of proportionality. This means that the extension of the spring is directly proportional to the weight hanging on it: doubling the weight doubles the extension, and halving the weight halves the extension.
Here the weight is reduced from to , which is half the original weight. So the extension is also half of :
The question asks for the total length of the spring, not just the extension. The spring was originally long, so:
Therefore the correct option is D.
Key Takeaways
- Within the limit of proportionality, spring extension is proportional to the applied force.
- Halving the load halves the extension.
- Always read carefully whether the question asks for the extension or the total length of the spring.
Common Mistakes
- Choosing A, : this is the extension only, not the total length.
- Choosing B, : this is half the original length, which has no direct link to the extension.
- Choosing C, : this might come from subtracting the extension from the original length instead of adding it.
Things to Be Careful About
- Keep the unit as ; no conversion is needed here.
- Do not confuse the natural (unstretched) length with the stretched length.
- The phrase “limit of proportionality” tells you that the straight-line relationship applies, so a simple ratio is valid.
Which statements describing the moment of a force about a pivot are correct?
- The moment of a force is a measure of the turning effect of the force.
- The moment of a force is equal to the .
- The moment of a force is equal to the .
Options
A 1 and 2
B 1 and 3
C 2 only
D 3 only
Working
Statement 1 is correct: a moment is a measure of the turning effect of a force about a pivot.
Statement 2 is correct: .
Statement 3 is incorrect: pressure on the pivot is not involved in the definition of a moment.
Answer
A
A
Walkthrough
A moment is the turning effect of a force about a pivot. The size of the moment depends on the size of the force and on the perpendicular distance from the pivot to the line of action of the force. Therefore statement 1 is correct and statement 2 is correct. Statement 3 says the moment is force multiplied by pressure on the pivot. That is wrong: pressure is force per unit area, not a distance, and it does not describe a turning effect. Since only statements 1 and 2 are correct, the answer is A.
Key Takeaways
- The moment of a force is a measure of its turning effect.
- .
- The distance used must be perpendicular to the line of action of the force.
- Pressure is not part of the definition of a moment.
Common Mistakes
- Choosing an option that includes statement 3 because it sounds plausible, even though pressure is not involved in the turning effect.
- Forgetting that the distance must be the perpendicular distance, not just any distance from the pivot.
- Thinking that a larger force always gives a larger moment without considering the distance from the pivot.
Things to Be Careful About
- The unit of moment is the newton metre, N m, not N/m.
- The perpendicular distance is the shortest distance from the pivot to the line of action of the force.
- Read the stem carefully: the options are combinations of the numbered statements, so each statement must be judged separately.
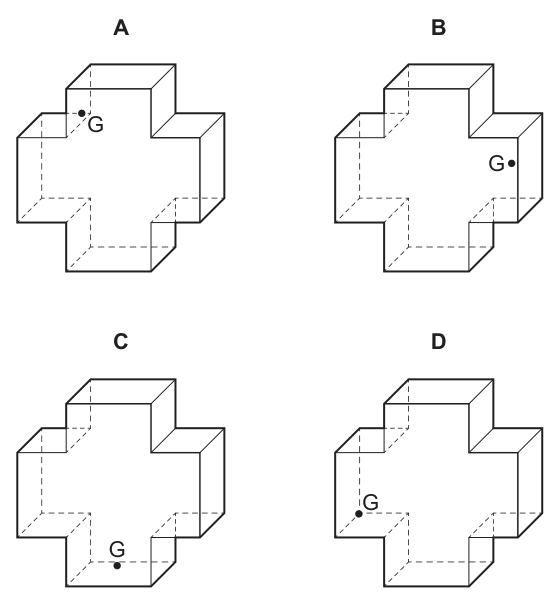
Four objects have identical shapes but different distributions of mass.
The centre of gravity of each object is shown by the dot marked G.
Which object is the most stable?
Options
Answer
C
An object is more stable when its centre of gravity is lower and closer to the centre of its base. All four objects have the same shape and therefore the same base. Object C has its centre of gravity (G) the lowest and most centrally located above the base, making it the most stable.
C
Walkthrough
- Recall the two main factors that determine the stability of an object: the height of its centre of gravity and the width of its base. A lower centre of gravity and a wider base make an object more stable.
- Observe that all four objects (A, B, C, D) have identical shapes, meaning they all have the same base area and dimensions.
- Compare the positions of the centre of gravity (marked G) in each object:
- In A, G is high up and off to the left.
- In B, G is at mid-height and far to the right.
- In C, G is low down and near the centre of the base.
- In D, G is low down but off to the left.
- Object C has the lowest centre of gravity and is most centrally located above its base. This means it has the greatest resistance to tipping over.
- Conclude that C is the most stable object.
Key Takeaways
- An object's stability increases as its centre of gravity is lowered and as the width of its base increases.
- When comparing objects with the same base, the one with the lowest centre of gravity is the most stable.
- A centre of gravity located outside the base will cause the object to tip over immediately.
Common Mistakes
- Thinking that the object with the largest mass is the most stable (the question states they have identical shapes but different mass distributions, so mass does not change the relative stability in terms of tipping; only the position of G matters).
- Confusing stability with the size of the base (all bases are identical here).
- Forgetting that the horizontal position of G relative to the base edges matters; G must be within the base for the object to stand upright.
Things to Be Careful About
- Ensure you are looking at the vertical height of G as well as its horizontal position. D has a low G, but it is off to the side, making it less stable than C, which is low and central.
- Remember that "stable" means resisting tipping over when tilted slightly. The lower the G and the closer it is to the centre of the base, the larger the angle of tilt required to move G outside the base.
An object of mass is pushed up a slope at a steady speed of .
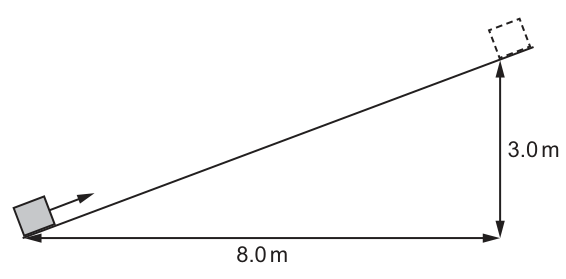
Which calculation gives the change in gravitational potential energy from the bottom to the top?
Options
A
B
C
D
Working
The change in gravitational potential energy is given by the equation:
where:
- kg (mass)
- N/kg (gravitational field strength, taken from the options)
- m (vertical height from Fig. 1)
Note that the horizontal distance (8.0 m) and the steady speed (2.0 m/s) are not needed for this calculation. The steady speed means the kinetic energy is constant, so there is no change in kinetic energy.
Substituting the values into the equation:
This matches option B.
Answer
B
B
Walkthrough
The question asks for the calculation that gives the change in gravitational potential energy () as the object moves from the bottom to the top of the slope.
- Recall the formula: The change in gravitational potential energy is calculated using . Here, is the mass, is the gravitational field strength, and is the change in vertical height.
- Identify the values from the text and diagram:
- Mass kg.
- From Fig. 1, the vertical height gained is m. The horizontal length is 8.0 m, but gravitational potential energy depends only on the vertical change in position.
- The options use N/kg.
- Substitute into the formula: . This corresponds to option B.
- Analyze the distractors:
- Option A (): This is an incorrect formula, possibly a mangled attempt at kinetic energy or work done.
- Option C (): This is the formula for kinetic energy, . Since the object moves at a steady speed, its kinetic energy does not change (). This is a distractor for students who might confuse potential and kinetic energy or calculate the energy the object has rather than the change in potential energy.
- Option D (): This uses the horizontal distance (8.0 m) instead of the vertical height (3.0 m). Work done against gravity (and thus change in GPE) depends on the vertical height, not the distance along the slope or the horizontal run.
Key Takeaways
- The change in gravitational potential energy depends only on the vertical height difference (), not the distance traveled along a slope or path.
- If an object moves at a steady (constant) speed, its kinetic energy is constant, so there is no change in kinetic energy.
- Always read the vertical dimension from a diagram when calculating gravitational potential energy or work done against gravity.
Common Mistakes
- Using the wrong distance: Students often use the length of the slope or the horizontal distance (8.0 m in option D) instead of the vertical height (3.0 m). Gravity acts vertically, so only the vertical displacement matters for GPE.
- Calculating Kinetic Energy instead: Option C is the kinetic energy formula. Students might select this if they misread the question or fail to notice that "steady speed" implies zero change in kinetic energy.
- Ignoring : Forgetting to include the gravitational field strength ( or ) in the calculation.
Things to Be Careful About
- Diagram reading: Fig. 1 provides both a horizontal length (8.0 m) and a vertical height (3.0 m). You must pick the vertical height () for the formula.
- Steady speed: The phrase "steady speed of 2.0 m/s" is extra information (a distractor) for this specific question about potential energy. It tells you that kinetic energy is constant, but the value is not used in the calculation.
- Unit consistency: Ensure mass is in kg and height in metres, which they are here ( kg and m).
A student of mass climbs some steps. He travels a horizontal distance of and a vertical distance of .
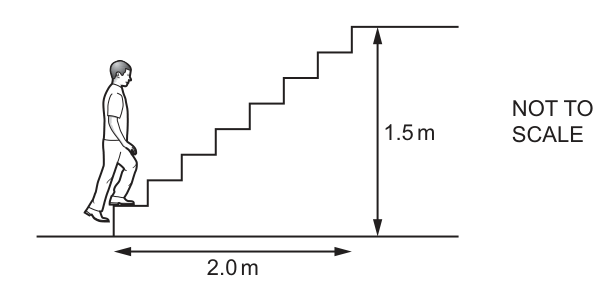
What is the work done against the force of gravity?
Options
A
B
C
D
Working
Work done against gravity equals the gain in gravitational potential energy:
Gravity acts vertically, so only the vertical height matters. The horizontal distance of 2.0 m is irrelevant.
Substituting , , :
Rounding to two significant figures (to match the precision of the given data) gives 880 J.
Answer
C
C
Walkthrough
The question asks for the work done against the force of gravity. Work done against gravity equals the gain in gravitational potential energy, given by , where is the vertical height gained. The student's mass is , the vertical distance is , and we use (as the answer options indicate, since does not match any option closely, whereas rounds to 880 J).
Substituting:
Rounding to two significant figures gives 880 J, which matches option C.
The horizontal distance of 2.0 m is a distractor. Gravity acts vertically, so moving horizontally does no work against gravity. The work done depends only on the vertical displacement.
Key Takeaways
- Work done against gravity depends only on the vertical height, not on the path taken or any horizontal distance covered.
- gives both the work done against gravity and the gain in gravitational potential energy.
- Always check which distance is relevant to the force in question — if the force is vertical, only vertical displacement counts.
Common Mistakes
- Including the horizontal distance in the calculation, for example or — this is wrong because gravity acts vertically, and the horizontal component of displacement is perpendicular to the force.
- Using and getting , then being unable to find a matching option. The answer options are calibrated to .
- Confusing mass with weight and forgetting to multiply by , giving (close to option A, 88 J, which is a trap).
- Multiplying all three numbers together incorrectly: , which is not among the options.
Things to Be Careful About
- The horizontal distance of 2.0 m is deliberately given to tempt candidates into using it. Work done against a force only counts the displacement in the direction of that force. Since gravity is vertical, only the vertical height of 1.5 m is used.
- Use here, as the answer 880 J matches rounded to 2 s.f. If is used, the result 900 J does not match any option exactly.
- Give the answer to the correct number of significant figures. The data (60, 2.0, 1.5) are given to 2 s.f., so 880 J (2 s.f.) is appropriate. Option C is written as 880 J, which is 2 s.f. (the trailing zero is not significant here without a decimal point, but it matches the rounding of 882 to 2 s.f.).
Which method of producing electricity does not involve a turbine?
Options
A hydroelectric power station
B nuclear power station
C solar cells
D wind generator
Working
Hydroelectric power uses falling water to turn a turbine.
Nuclear power uses heat to boil water into steam, which turns a turbine.
Wind generators use the wind to turn a turbine.
Solar cells convert light energy directly into electrical energy, so they do not involve a turbine.
Answer
C
C
Walkthrough
This question asks you to identify the method of producing electricity that does not use a turbine. A turbine is a rotating machine that is turned by a moving fluid or gas, and it drives a generator to produce electricity.
- Hydroelectric power station: falling water turns a water turbine, which drives a generator. So it involves a turbine.
- nuclear power station: the nuclear reactor releases thermal energy, which boils water into steam. The steam then turns a steam turbine. So it involves a turbine.
- wind generator: the wind turns the blades, which are part of a wind turbine. So it involves a turbine.
- solar cells: these are photovoltaic cells that convert light energy directly into electrical energy. There are no moving parts and no turbine.
Therefore the correct answer is C, solar cells.
Key Takeaways
- Most large-scale electricity generation methods use a turbine to drive a generator.
- Solar cells are different because they convert light energy directly into electrical energy, without a turbine.
- Recognising the difference between turbine-driven generation and direct conversion is useful for questions about energy sources.
Common Mistakes
- Choosing wind generator because it does not use steam. However, a wind generator still uses a turbine: the wind turns the turbine blades.
- Confusing solar cells with a solar thermal power station, which uses heat to make steam and can involve a turbine.
- Thinking that nuclear power does not use a turbine because the energy source is a reactor. In practice, nuclear power uses a steam turbine.
Things to Be Careful About
- Read the question carefully: it asks which method does not involve a turbine.
- Hydroelectric power is turbine-driven, even though no fuel is burned.
- Solar cells are direct converters, so they are the odd one out among these options.
The input power to a lamp is . The lamp wastes of energy in .
What is the efficiency of the lamp?
Options
A 0.15
B 0.45
C 0.55
D 0.85
Working
The lamp receives an input power of for , so the input energy is
The useful energy output is the input energy minus the wasted energy:
Efficiency is useful energy output divided by total energy input:
Option B is the wasted energy divided by the input power, and option A is the wasted power divided by the input power.
Answer
D
D
Walkthrough
The lamp is supplied with of power. Power is the rate of transferring energy, so in the total energy supplied is
Of this, is wasted, so the useful energy output is
Efficiency compares the useful output with the total input:
So the correct option is D.
The same answer can be found using power. The wasted power is
so the useful power is , and
Either route gives the same answer because the time interval is the same for the input energy and the wasted energy.
Key Takeaways
- Input energy is found from input power and time: .
- Useful energy output is the input energy minus the wasted energy.
- Efficiency is a ratio: useful energy output divided by total energy input.
- Efficiency has no unit; it can be written as a fraction or a percentage, so is the same as .
Common Mistakes
- Using the wasted energy as if it were the useful output. The useful output is the input energy minus the wasted energy.
- Dividing the wasted energy by the input power directly: . This is wrong because is an energy and is a power, so the units do not match.
- Forgetting to multiply the input power by the time to get the input energy.
- Choosing option C, , which is and treats the wasted energy as a fraction of the input power rather than of the input energy.
Things to Be Careful About
- Make sure both energies are for the same time interval. Here both the input energy and the wasted energy are for , so the ratio is valid.
- Remember that power in watts means joules per second: .
- Efficiency is a ratio, so it has no unit. If the question asks for a percentage, write ; if it asks for a fraction, write .
A camera is taken under water and left at a depth of .
What is the total pressure acting on the camera?
Options
A
B
C
D
Working
The pressure due to the water is
This is about . The total pressure is the water pressure plus the atmospheric pressure acting on the surface:
So the correct option is D.
Answer
D
D
Walkthrough
The pressure on the camera has two parts. The water above the camera presses down because of its weight: the deeper the camera is, the greater the water pressure. This pressure is given by
where is the depth, is the density of water, and is the gravitational field strength. Substituting gives
which is about . The atmosphere also presses on the surface of the water, and that pressure is transmitted through the water to the camera. So the total pressure is
This matches option D.
Key Takeaways
- Pressure in a liquid increases with depth: .
- The total pressure at depth is the liquid pressure plus any pressure on the surface, such as atmospheric pressure.
- Units must be consistent: depth in m, density in kg/m, and gravitational field strength in N/kg, giving pressure in Pa.
Common Mistakes
- Forgetting to add atmospheric pressure, giving and leading to option B.
- Using instead of would give , which is not one of the options. The options imply .
- Confusing gauge pressure with total pressure: the water pressure alone is not the total pressure acting on the camera.
Things to Be Careful About
- The pressure due to the water is the gauge pressure; the total pressure on the camera includes the atmospheric pressure.
- Read the options carefully: is the sum of the atmospheric pressure and the water pressure.
- Since the question does not state , use the value consistent with the answer options, .
- Always include the unit, Pa, when giving pressure.
In which example are the particles in fixed positions?
Options
A ice in an ice cube
B water in a lake
C air in an air bubble
D water vapour in the atmosphere
Working
Ice is a solid. In a solid, the particles are held in fixed positions and only vibrate about those positions.
Water is a liquid, and air and water vapour are gases. In liquids and gases the particles are not in fixed positions.
Answer
A
A
Walkthrough
The question asks for the example in which the particles are in fixed positions. This is a description of a solid. In the kinetic particle model:
- Solids have particles packed closely together in fixed positions, vibrating about those positions.
- Liquids have particles close together but able to move past each other, so they are not in fixed positions.
- Gases have particles far apart and moving freely, so they are certainly not in fixed positions.
Ice is solid water, so its particles are in fixed positions. Water in a lake is a liquid, air is a gas, and water vapour is a gas. Therefore the correct option is A.
Key Takeaways
- The three states of matter have different particle arrangements and motions.
- "Fixed positions" is a key phrase that identifies a solid.
- Ice, liquid water and water vapour are all forms of water, but they are in different states.
Common Mistakes
- Choosing water because water is made of particles. The question is about the arrangement of the particles, not the substance itself.
- Thinking water vapour is made of small water droplets. Water vapour is a gas, so its particles are not in fixed positions.
- Confusing air with something that has a fixed shape. Air is a gas and its particles move freely.
Things to Be Careful About
- "Fixed positions" does not mean the particles are completely still; in a solid they vibrate about fixed positions.
- Recognise the state of each substance: ice = solid, water = liquid, air = gas, water vapour = gas.
- This is a recall question, so answer directly without overcomplicating it.
A gas expands slowly and its temperature remains constant.
What happens to the gas particles?
Options
A They move further apart and their average speed decreases.
B They move further apart and their average speed increases.
C They move further apart and their average speed remains unchanged.
D They stay the same distance apart and their average speed decreases.
Working
As the gas expands, the same number of particles occupy a larger volume, so they move further apart. Their average speed is fixed by the temperature. Since the temperature stays constant, the average speed of the particles remains unchanged.
- A and B are wrong because constant temperature means no change in average speed.
- D is wrong because an expanding gas has particles that move further apart.
Answer
C
C
Walkthrough
When a gas expands, its volume increases. For the same number of particles, an increase in volume means the particles must be further apart from one another.
Temperature is a measure of the average kinetic energy of the particles. If the temperature remains constant, the average kinetic energy of the particles remains constant. Since the gas particles are the same particles with the same mass, constant average kinetic energy means constant average speed.
So the correct combination is: the particles move further apart and their average speed remains unchanged.
This is option C.
Option A says their average speed decreases, which would need the temperature to fall. Option B says their average speed increases, which would need the temperature to rise. Option D says the particles stay the same distance apart, which contradicts the fact that the gas expands and fills a larger volume.
Key Takeaways
- A gas always fills its container, so when the volume increases, the particles become more spread out.
- Temperature measures the average kinetic energy of the particles.
- If the temperature is constant, the average speed of the particles is constant, whatever happens to the volume or pressure.
Common Mistakes
- Choosing A or B by thinking that an expanding gas must automatically cool or warm. The question explicitly says the temperature remains constant, so the average speed does not change.
- Choosing D by focusing only on temperature and forgetting that the gas expands, so the particles must be further apart.
- Confusing average particle speed with the speed at which the gas expands. They are not the same quantity.
Things to Be Careful About
- The word "slowly" means the gas has time to exchange thermal energy with its surroundings, allowing the temperature to stay constant during the expansion.
- Not all particles travel at the same speed; temperature determines their average speed. Some are faster and some are slower, but the average remains unchanged at constant temperature.
The air in each of four syringes is slowly compressed so that the temperature of the air stays constant. The volumes before and after compression for each syringe are given in the table.
The air in all four syringes is initially at the same pressure.
Which syringe shows the smallest pressure change?
Options
| volume before compression / | volume after compression / | |
|---|---|---|
| A | 50 | 10 |
| B | 100 | 50 |
| C | 400 | 25 |
| D | 400 | 100 |
Working
Since the temperature is constant, Boyle's law applies:
For each syringe,
The pressure change is
Since is the same for all four syringes, the smallest pressure change is the one with the smallest ratio .
| Syringe | |
|---|---|
| A | |
| B | |
| C | |
| D |
The smallest ratio is for syringe B.
Answer
B
B
Walkthrough
The phrase “the temperature of the air stays constant” tells you that this is a Boyle's law situation. For a fixed mass of gas at constant temperature, pressure is inversely proportional to volume:
All four syringes start at the same pressure, so we only need to compare how many times the pressure increases. If a syringe is compressed from volume to volume , the new pressure is
The pressure change is therefore
Because is the same for every syringe, the syringe with the smallest ratio has the smallest pressure change.
Check each option:
- A: , so the pressure becomes 5 times larger.
- B: , so the pressure becomes 2 times larger.
- C: , so the pressure becomes 16 times larger.
- D: , so the pressure becomes 4 times larger.
The smallest pressure change is for B.
Key Takeaways
- When temperature is constant, use Boyle's law: .
- Pressure change depends on the ratio of volumes, not the actual difference in volume.
- If the initial pressure is the same for all cases, comparing is enough.
Common Mistakes
- Comparing volume differences instead of volume ratios. Syringe D has the smallest volume difference (300 cm³), but its pressure change is not the smallest.
- Reversing the ratio and using . This would incorrectly suggest that the largest final volume gives the smallest pressure change.
- Forgetting that the initial pressure is the same for all four syringes. Because it is, the ratio comparison is valid.
Things to Be Careful About
- The units of volume do not matter here because they cancel in the ratio .
- The condition “temperature stays constant” is the signal to use Boyle's law.
- The pressure change is , not just . Since is the same everywhere, the comparison is still just based on .
The temperature of a substance is measured with a liquid-in-glass thermometer.
Which physical property changes so that the temperature can be measured?
Options
A length of the thermometer
B mass of the liquid
C specific heat capacity of the liquid
D volume of the liquid
Working
A liquid-in-glass thermometer works because the liquid inside expands when it is heated. The physical property that changes is therefore the volume of the liquid.
- The length of the thermometer is the length of the glass tube; it does not change in a way that measures temperature.
- The mass of the liquid does not change when it is warmed.
- The specific heat capacity of the liquid is a property of the material; it is not the property used to indicate temperature.
The liquid rises in the capillary tube because its volume increases.
Answer
D
D
Walkthrough
A liquid-in-glass thermometer contains a liquid, such as mercury or alcohol, in a bulb with a narrow capillary tube. When the thermometer is warmed, the liquid expands. Because the liquid expands more than the glass around it, the liquid level rises in the tube. The height of the liquid column is then a measure of temperature.
So the physical property that changes is the volume of the liquid. The expanding liquid has more volume, and this pushes the liquid column higher.
Now look at the other options:
- A — The length of the thermometer means the length of the whole glass instrument. This does not significantly change with temperature, and it is not what is measured.
- B — Heating does not change the mass of the liquid. Mass is conserved; the liquid simply expands and becomes less dense.
- C — Specific heat capacity is the energy needed to raise the temperature of 1 kg of a substance by 1 °C. It is a property of the substance, not a quantity that changes to show the temperature.
Therefore D is the only correct answer.
Key Takeaways
- A thermometric property is a physical property that changes measurably with temperature, such as the volume of a liquid, the length of a metal strip, or the resistance of a wire.
- In a liquid-in-glass thermometer, the volume of the liquid increases as temperature increases.
- Mass does not change on heating; expansion changes the volume and density, not the amount of substance.
Common Mistakes
- Choosing A because the liquid column appears to get longer. The column rises, but the physical property causing this is the expansion (volume change) of the liquid, not a change in the length of the thermometer itself.
- Choosing B because of confusion between mass and density. The mass stays constant when a substance is heated; it is the density that decreases.
- Choosing C because specific heat capacity is connected with temperature changes. It determines how much energy is needed to warm a substance, but it is not the property that changes so a temperature can be read.
Things to Be Careful About
- Clearly distinguish between the length of the liquid column (the effect used for reading) and the volume of the liquid (the physical property that changes).
- Remember that expansion happens in solids, liquids and gases, but the question specifically asks about a liquid-in-glass thermometer, so the liquid volume is the relevant property.
- Do not bring in density unless needed; the question asks which property changes, and the answer is volume.
Boiling and evaporation are different processes.
Which statement is correct?
Options
A Boiling only occurs at the surface of a liquid.
B Evaporation only occurs when the temperature of the liquid is high enough.
C Evaporation does not change the temperature of a liquid.
D When a boiling liquid is heated its temperature remains constant.
Working
A is false: boiling occurs throughout the liquid, not only at the surface.
B is false: evaporation can happen at any temperature, not only when the liquid is hot enough.
C is false: evaporation cools the liquid, so it can change the temperature.
D is true: while a liquid is boiling, the energy supplied is used to break the bonds between particles, so the temperature remains constant.
Answer
D
D
Walkthrough
The question asks for the one correct statement about boiling and evaporation. Test each option in turn.
A says that boiling only occurs at the surface of a liquid. This is wrong: boiling happens throughout the whole liquid, with bubbles forming in the body of the liquid, not just at its surface.
B says that evaporation only occurs when the temperature of the liquid is high enough. This is also wrong: evaporation can happen at any temperature, because some particles at the surface may have enough energy to escape even when the liquid is cold.
C says that evaporation does not change the temperature of a liquid. This is false: evaporation cools the liquid. The fastest-moving particles escape from the surface, so the average kinetic energy of the particles left behind is lower, which means the temperature falls.
D says that when a boiling liquid is heated its temperature remains constant. This is correct. While the liquid is boiling, the heat energy is used to break the bonds between particles and change the liquid into a gas, rather than to raise the temperature. So the temperature stays at the boiling point until all the liquid has boiled away.
Key Takeaways
- Boiling occurs throughout the liquid at the boiling point.
- Evaporation occurs only at the surface and can happen at any temperature.
- Evaporation cools the liquid.
- During boiling, the temperature remains constant because the energy is used for the change of state.
Common Mistakes
- Choosing A: boiling is not just a surface process; it happens throughout the liquid.
- Choosing B: evaporation does not need a high temperature.
- Choosing C: evaporation does change the temperature by cooling the liquid.
Things to Be Careful About
- The temperature of a boiling liquid stays constant as long as it is boiling.
- Evaporation is a surface effect, while boiling is a bulk effect.
- The energy supplied during boiling is used to overcome the forces between particles, not to increase the temperature.
A glass beaker contains water. When the centre of the base of the beaker is heated, a convection current is set up.
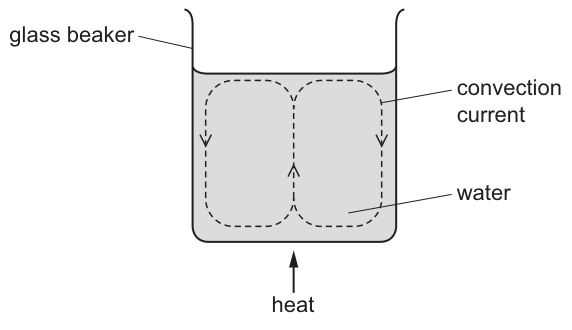
Which statement explains this?
Options
A The evaporation of water causes water molecules to rise to the surface.
B The expansion of water molecules causes them to rise to the surface.
C The water above the heat source rises because it becomes less dense.
D The water at the side falls because it becomes less dense.
Working
When the water at the bottom of the beaker is heated, the water molecules gain kinetic energy and move further apart. This causes the water to expand (its volume increases) while its mass remains constant. Since density is mass per unit volume (), the density of the heated water decreases. The less dense, warmer water rises from the centre. The cooler, denser water at the sides sinks to replace it, setting up a convection current loop.
- Option A is incorrect because evaporation occurs at the surface and is not the mechanism driving the bulk fluid motion inside the beaker.
- Option B is incorrect because the water molecules themselves do not expand; the space between the molecules increases (thermal expansion of the liquid).
- Option D is incorrect because the water at the side falls because it is cooler and therefore more dense, not less dense.
Answer
C
C
Walkthrough
- Identify the process: The question describes a convection current in a liquid (water) heated from below. Convection only occurs in fluids (liquids and gases) because the particles are free to move.
- Explain the mechanism: When the water at the bottom is heated, the particles gain kinetic energy and vibrate/move more vigorously. This causes them to move further apart, leading to an increase in the volume of the water. This is thermal expansion.
- Relate density to motion: Density is defined as mass divided by volume (). Since the mass of the water remains the same but its volume increases, the density of the heated water decreases. Less dense fluids rise above denser fluids due to buoyancy. Therefore, the warm, less dense water in the centre rises.
- Complete the cycle: As the warm water rises, cooler water from the sides (which is at a lower temperature and thus has a higher density) moves in to take its place at the bottom. This cooler water is then heated, becomes less dense, and rises, while the cooler water at the top sinks. This continuous loop is the convection current.
Evaluating the options:
- A (Evaporation): Evaporation is a surface phenomenon where liquid molecules escape into the air as gas. It does not cause the bulk movement of water upwards from the bottom of the beaker.
- B (Expansion of molecules): This is a common misconception. The water as a substance expands (the total volume increases), but the individual water molecules () do not change size. The distance between the molecules increases.
- C (Rising due to lower density): This is the correct explanation. Heating causes expansion, which lowers density, causing the fluid to rise.
- D (Falling due to lower density): The water at the side falls because it is cooler. Cooler water is more dense (particles are closer together), not less dense. It sinks because it is heavier than the warmer water next to it.
Key Takeaways
- Convection currents are driven by differences in density within a fluid.
- Heating a fluid causes it to expand, increasing its volume and decreasing its density.
- Less dense (warmer) fluid rises; more dense (cooler) fluid sinks.
- Particles themselves do not expand during thermal expansion; the space between them increases.
Common Mistakes
- Confusing substance expansion with molecular expansion: Students often think the molecules themselves get bigger. Remember, molecules stay the same size; the gaps between them grow.
- Confusing convection with evaporation: Evaporation happens at the surface and involves a change of state. Convection is the movement of the fluid itself.
- Incorrect density-direction link: Thinking that falling fluid is less dense. In reality, denser (heavier) fluid sinks, and less dense (lighter) fluid rises.
Things to Be Careful About
- Ensure you distinguish between the expansion of the material (macroscopic volume increase) and the expansion of molecules (which don't expand).
- In convection questions, always link temperature -> volume/density -> up/down movement. Hot = less dense = rises. Cold = more dense = falls.
A hot meal is supplied in a container made of shiny metal foil.
Why does the container help to keep the food hot?
Options
A The container traps air which increases convection.
B The foil is a poor thermal conductor.
C Shiny metal foil is a good absorber of infrared radiation.
D Shiny metal foil is a poor emitter of infrared radiation.
Working
Hot food loses thermal energy to the surroundings mainly by radiation. A shiny metal foil is a poor emitter of infrared radiation, so it reduces the amount of thermal energy radiated away and helps keep the food hot.
Option A is wrong: trapped air reduces convection, it does not increase it. Option B is wrong: metal foil is a good thermal conductor. Option C is wrong: shiny metal foil is a poor absorber of infrared radiation, not a good absorber.
Answer
D
D
Walkthrough
Hot food is warmer than its surroundings, so thermal energy flows from the food to the cooler air. There are three main ways this can happen: conduction, convection and radiation.
Conduction through the metal foil would actually be quite fast, because metals are good thermal conductors. So option B is not the reason the container keeps food hot. Convection happens when warm air rises and cooler air takes its place, but the container does not increase convection; if anything, it traps air and reduces it. So option A is also wrong.
Radiation is the main way a hot object loses energy to its surroundings without needing a medium. The rate at which an object radiates infrared depends on its surface. Dull, dark surfaces are good emitters, while shiny, light-coloured surfaces are poor emitters. The shiny metal foil therefore emits less infrared radiation than a dull or dark container would, so less thermal energy is lost and the food stays hot for longer.
Option C is the opposite of the correct idea: shiny surfaces are poor absorbers of infrared radiation, not good absorbers. Therefore the correct answer is D.
Key Takeaways
- Hot objects lose thermal energy mainly by radiation if the surroundings are cooler.
- Shiny metal surfaces are poor emitters of infrared radiation, so they reduce heat loss.
- Dull and dark surfaces are good emitters and good absorbers of infrared radiation.
- The container helps keep food hot by reducing the amount of infrared radiation emitted to the surroundings.
Common Mistakes
- Choosing A because it mentions trapped air: trapped air reduces convection, it does not increase it.
- Choosing B because metal foil feels thin: metal is a good conductor, not a poor conductor.
- Choosing C because shiny surfaces are often associated with reflecting radiation: shiny surfaces are poor absorbers, not good absorbers.
- Confusing emitter and absorber: the question asks why the container keeps food hot, so the important point is that it emits less infrared radiation.
Things to Be Careful About
- The word "shiny" is a clue: shiny surfaces are poor emitters and poor absorbers of infrared radiation.
- Use the term "thermal energy" rather than "heat" when explaining the transfer.
- Radiation does not need a medium, so it can transfer energy across the air gap between the food and the container.
- A container might also reduce convection and conduction, but the reason given in the correct option is specifically about emission of infrared radiation.
Which quantity is defined as the number of wavelengths passing a point per second?
Options
A amplitude
B frequency
C speed
D wavelength
Working
Frequency is defined as the number of complete waves (wavelengths) passing a point per second. Amplitude is the maximum displacement of the wave, speed is the distance the wave travels per second, and wavelength is the length of one complete wave.
Answer
B
B
Walkthrough
The question asks for the quantity defined as the number of wavelengths passing a point per second. This is exactly the definition of frequency. Each second, a certain number of complete wave cycles pass a fixed point, and that count is called the frequency. The unit of frequency is the hertz (Hz), where 1 Hz means one wave per second.
Amplitude is not correct because it measures the size of the wave disturbance, not how often waves pass. Speed is not correct because it measures how fast the wave travels, not how many waves pass. Wavelength is not correct because it measures the distance between corresponding points on neighbouring waves, not a rate of passing.
Key Takeaways
- Frequency is the number of complete waves passing a point per second.
- Frequency is measured in hertz (Hz).
- Amplitude, wavelength and speed are different wave properties and should not be confused with frequency.
Common Mistakes
- Choosing speed because both involve "per second". Speed is distance per second, not number of waves per second.
- Choosing wavelength because it is related to the wave pattern, but it is a distance, not a count.
- Choosing amplitude because it is a well-known wave term, but it describes the size of the wave, not how often waves pass.
Things to Be Careful About
- Frequency counts complete waves, so one full wavelength must pass to count as one wave.
- The unit of frequency is hertz (Hz), not waves per second written as a plain number.
- Read the question carefully: it asks for the quantity, not for the unit or an example of a wave property.
A plane mirror forms the image of an object.
What are characteristics of the image formed?
Options
| size | type | |
|---|---|---|
| A | same as object | real |
| B | same as object | virtual |
| C | smaller than object | real |
| D | smaller than object | virtual |
Working
A plane mirror forms an image that is:
- the same size as the object
- virtual — the reflected rays appear to come from behind the mirror, so the image cannot be formed on a screen
Options C and D give "smaller than object", which is wrong. Only option B gives both "same as object" and "virtual".
Answer
B
B
Walkthrough
Think about looking at yourself in a flat bathroom mirror. The image you see looks exactly the same size as you are — it does not shrink or magnify. So the size is "same as object".
Now ask whether that image is real or virtual. A real image can be projected onto a screen because the light rays actually meet at the image position. A virtual image cannot be caught on a screen — the rays only look as though they come from behind the mirror. If you put a screen behind a plane mirror, you find nothing there, because the light never actually passes through that point. So the image is virtual.
The only option combining "same as object" with "virtual" is B.
Two other properties worth remembering: the image is upright (not inverted) and laterally inverted (left and right are swapped).
Key Takeaways
- A plane mirror always produces an image that is the same size as the object, virtual, upright, and laterally inverted.
- "Virtual" means the rays only appear to diverge from the image point; the image cannot be projected onto a screen.
- "Real" would mean the rays actually converge at the image position, which happens with a concave mirror or a converging lens, not a plane mirror.
Common Mistakes
- Choosing A (real): a plane mirror never forms a real image — the image is always virtual because light does not actually pass through the image position.
- Choosing C or D (smaller than object): a plane mirror does not change the size of the image; only curved mirrors (convex shrink, concave magnify) change size.
- Confusing "virtual" with "not visible" — the virtual image is perfectly visible; it just cannot be projected onto a screen.
Things to Be Careful About
- The image in a plane mirror is laterally inverted (left appears as right), but this is not asked in this question — be ready to quote it if asked elsewhere.
- "Same size as object" refers to the linear size, not the distance from the mirror. The image is as far behind the mirror as the object is in front of it.
- A real image is always inverted (upside down) unless additional optics are involved, while a plane mirror image is upright. This can be a useful check when choosing between options.
A ray of light strikes the surface of a glass block at an angle of incidence of .
The refractive index of the glass is 1.8.
What is the angle of refraction inside the block?
Options
A
B
C
D
Working
The ray is travelling from air into glass, so:
where and .
Rearrange:
The angle of refraction is , so the correct option is A.
Answer
A
A
Walkthrough
The ray is travelling from air into glass, so the refractive index is given by
where is the angle of incidence and is the angle of refraction. Here and .
Rearrange to find :
Since , this gives
Then take the inverse sine to find the angle:
The angle of refraction is smaller than the angle of incidence because light is passing into a denser medium and bends towards the normal.
Key Takeaways
- The refractive index links the angles of incidence and refraction: .
- When light enters a denser medium, it bends towards the normal, so .
- To find an angle from a sine ratio, use the inverse sine function.
Common Mistakes
- Reversing the equation as , which gives the wrong angle.
- Forgetting to take the inverse sine after calculating .
- Thinking the angle stays at ; that would be true for reflection, not refraction.
Things to Be Careful About
- Make sure the calculator is in degree mode, not radians.
- Angles in refraction are measured from the normal, not from the surface.
- Use accurately enough to identify rather than .
Which diagram shows rays of light passing through a converging lens?
Options
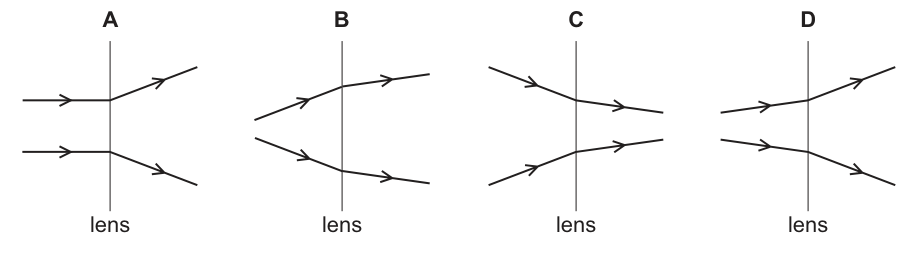
Working
A converging lens (convex lens) bends light rays inwards towards the principal axis.
- Diagram A: parallel incident rays diverge after the lens. This is the behaviour of a diverging (concave) lens.
- Diagram B: incident rays diverging from a point are bent inwards towards the principal axis. This shows the converging action of a convex lens.
- Diagram C: incident rays converging towards the lens are bent outwards, becoming less convergent. This is a diverging lens.
- Diagram D: incident rays converging towards the lens are bent outwards to diverge. This is also a diverging lens.
Only diagram B shows rays being brought closer together by the lens.
Answer
B
B
Walkthrough
A converging lens is thicker in the middle than at the edges (a convex lens). Its defining optical property is that it bends light rays inwards, towards the principal axis. We can evaluate each diagram based on this principle:
- Diagram A: Parallel rays entering the lens are spread apart (diverge) after passing through. This is the characteristic behaviour of a diverging (concave) lens.
- Diagram B: Rays entering the lens that are already diverging from a point on the left are bent inwards towards the principal axis. This inward bending is the converging action of a convex lens, so B is correct.
- Diagram C: Rays entering the lens that are converging towards the right are bent outwards (or become less convergent) after passing through. A converging lens would bend them even more inwards; this outward bending indicates a diverging lens.
- Diagram D: Rays converging towards the lens are bent outwards to diverge after passing through. This is also the behaviour of a diverging lens.
Only diagram B demonstrates the inward bending of light rays that defines a converging lens.
Key Takeaways
- A converging (convex) lens bends light rays inwards towards the principal axis, bringing them closer together.
- A diverging (concave) lens bends light rays outwards, spreading them apart.
- You can identify the type of lens by observing whether the rays after the lens are closer to the principal axis (converging) or further from it (diverging) compared to their path before the lens.
Common Mistakes
- Confusing the direction of bending: students sometimes think that if rays are already converging, any bending means the lens is converging. Remember, a converging lens must bend rays more inwards, not outwards.
- Assuming parallel rays are required: a converging lens converges rays from any source position (except rays passing through the optical centre), not just parallel rays.
Things to Be Careful About
- Always look at the change in the ray direction at the lens, not just the final direction of the rays. A lens is converging if it bends the rays inwards relative to their original path.
- Remember that a converging lens is physically thicker in the middle than at the edges (convex), while a diverging lens is thinner in the middle (concave).
A beam of white light is incident on a glass prism.
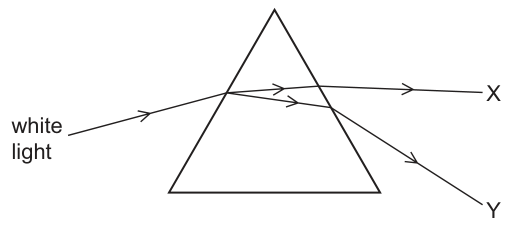
X and Y are the two ends of the visible spectrum.
Which statement is correct?
Options
A All the light travels at the same speed in the prism.
B The light at X has a lower frequency than the light at Y.
C The light at X refracts more as it leaves the prism than the light at Y.
D The white light refracts away from the normal as it enters the prism.
Working
- A is incorrect. The refractive index of glass varies with the frequency of light. Since , different frequencies travel at different speeds in the prism.
- B is correct. Light at Y is refracted more than light at X, meaning Y has a higher refractive index and is therefore violet light (higher frequency, shorter wavelength). Light at X is less refracted, meaning it is red light (lower frequency, longer wavelength). Thus, the light at X has a lower frequency than the light at Y.
- C is incorrect. The light at Y is refracted more than the light at X, both on entering and leaving the prism.
- D is incorrect. When light enters a denser medium (glass) from a less dense medium (air), it refracts towards the normal, not away from it.
Answer
B
B
Walkthrough
This question tests the understanding of dispersion of white light by a glass prism and the properties of the visible spectrum.
- Option A: In a vacuum, all electromagnetic waves travel at the same speed . However, in a medium like glass, the speed of light is , where is the refractive index. The refractive index of glass is not constant; it is slightly higher for violet light than for red light. Therefore, different colours (frequencies) travel at different speeds inside the prism. Statement A is false.
- Option B: Dispersion occurs because the refractive index depends on frequency. Violet light has a higher frequency and shorter wavelength, so it experiences a greater refractive index and is bent (refracted) more. Red light has a lower frequency and longer wavelength, so it is bent less. In the diagram, ray Y is more refracted than ray X, so Y represents violet light and X represents red light. Therefore, the light at X (red) has a lower frequency than the light at Y (violet). Statement B is true.
- Option C: Since Y is more refracted than X at the first boundary, it will also be more refracted at the second boundary as it leaves the prism. Statement C is false.
- Option D: When light travels from a less dense medium (air) into a denser medium (glass), it slows down and bends towards the normal. Statement D is false.
Key Takeaways
- White light is dispersed by a prism because different frequencies of light travel at different speeds in glass, causing them to refract by different amounts.
- Violet light (higher frequency, shorter wavelength) is refracted more than red light (lower frequency, longer wavelength).
- Light entering a denser medium from a less dense medium always refracts towards the normal.
Common Mistakes
- Assuming all colours of light travel at the same speed in a medium. (They only travel at the same speed in a vacuum.)
- Confusing the direction of refraction at an air-to-glass boundary. Light bends towards the normal when entering glass, not away from it.
- Misidentifying which end of the spectrum is red and which is violet based on the diagram. The more refracted ray (bottom, Y) is violet; the less refracted ray (top, X) is red.
Things to Be Careful About
- Remember that frequency and wavelength are inversely related (). Violet light has a higher frequency but a shorter wavelength than red light.
- The degree of refraction at the second boundary (leaving the prism) is consistent with the first boundary; the ray that is bent more on entry is bent more on exit.
Which components of the electromagnetic spectrum are used to communicate from a remote controller to a television set and from the Earth to a satellite?
Options
| remote controller to TV set | the Earth to a satellite | |
|---|---|---|
| A | infrared | microwave |
| B | infrared | ultraviolet |
| C | light | microwave |
| D | light | ultraviolet |
Working
A remote controller sends signals to a television set using infrared radiation. Communication between the Earth and a satellite uses microwaves, which can pass through the atmosphere.
Ultraviolet is not used for communication, and visible light is not the usual signal from a remote controller to a TV.
Answer
A
A
Walkthrough
This question asks you to match each communication link with the correct part of the electromagnetic spectrum.
- Remote controller to TV set — Remote controllers for televisions and other devices normally use infrared radiation. Infrared is invisible, easy to produce with an LED, and does not interfere with visible light.
- Earth to a satellite — Satellite communication uses microwaves. Microwaves can travel through the atmosphere and are used for sending signals to and from satellites.
- Now look at the options. Only option A gives infrared for the remote controller and microwaves for the Earth-to-satellite link. Options B and D include ultraviolet, which is not used for these communication links. Option C uses light for the remote controller, but visible light is not the usual choice for a TV remote.
So the correct answer is A.
Key Takeaways
- Different parts of the electromagnetic spectrum have different practical uses.
- Infrared is commonly used in remote controllers and short-range communication.
- Microwaves are used for satellite communication and mobile phone links.
- Ultraviolet is not used for communication; it is used for sterilisation, detecting forged banknotes and similar applications.
Common Mistakes
- Choosing B or D because ultraviolet is a familiar part of the spectrum, but it is not used for these communication links.
- Choosing C because visible light is used in some optical communication, but a TV remote controller normally uses infrared, not visible light.
Things to Be Careful About
- Read the table carefully: the first column is the remote controller to TV, and the second column is Earth to a satellite.
- Remember that infrared and microwaves are both invisible electromagnetic waves, but they are used in different situations.
A student claps his hands in front of a wall and hears the echoes. He claps at the same moment as he hears the echo of the previous clap.
Another student starts a stop-watch on the first clap and stops it on the eleventh clap. The reading on the stop-watch is and the speed of sound is .
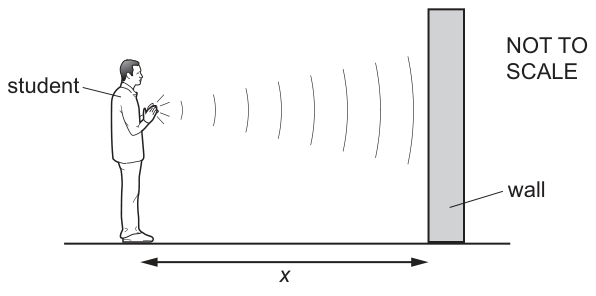
What is the distance between the student and the wall?
Options
A
B
C
D
Working
Number of intervals between the 1st and 11th clap = 11 - 1 = 10.
Time for one interval (time for the sound to travel to the wall and back) = .
The sound travels a total distance of (to the wall and back) in this time.
Rounding to the nearest option, .
Answer
B
B
Walkthrough
The student claps at the exact moment he hears the echo of the previous clap. This means the time between consecutive claps is exactly equal to the time it takes for the sound to travel to the wall and back (the round-trip time).
Another student times from the 1st clap to the 11th clap. The number of intervals between 11 claps is . The total time for these 10 intervals is .
The time for one interval (the round-trip time for the sound) is:
During this time, the sound travels from the student to the wall and back, covering a total distance of . Using the speed equation :
Solving for :
This matches option B ().
Key Takeaways
- When timing between events that occur at the same rate, the number of intervals is one less than the number of events (e.g., 11 claps mean 10 intervals).
- An echo involves a round trip, so the total distance travelled by the sound is twice the distance to the reflecting surface.
- The speed equation can be rearranged to to find distance when speed and time are known.
Common Mistakes
- Counting claps instead of intervals: Using 11 intervals instead of 10, which gives and (close to option A, ).
- Forgetting the round trip: Using and choosing option D () without dividing by 2.
- Using the wrong time: Taking as the time for one echo, which gives and , not an option but a common error if the interval concept is missed.
Things to Be Careful About
- Always count the number of intervals between events, not the number of events themselves. The number of intervals is for events.
- Echoes always involve a round trip (to the reflector and back), so the distance travelled by the wave is the distance to the reflector.
- The final answer should be rounded to match the precision of the options, which is 2 significant figures ().
A compass is placed close to a strong bar magnet and pivots to the position shown.
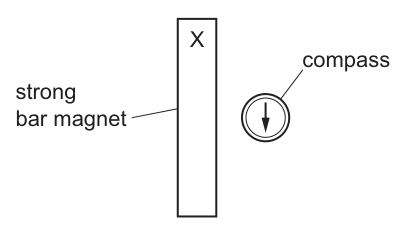
Which type of magnet is a compass needle and what is pole X?
Options
A The needle is an induced magnet and X is a north magnetic pole.
B The needle is an induced magnet and X is a south magnetic pole.
C The needle is a permanent magnet and X is a north magnetic pole.
D The needle is a permanent magnet and X is a south magnetic pole.
Answer
A compass needle is a small permanent magnet that is free to pivot.
Magnetic field lines outside a magnet point from the North pole to the South pole.
The north pole of a compass needle (the arrowed end) points in the direction of the magnetic field at that location.
In the diagram, the compass needle points downwards, away from pole X. This indicates that the magnetic field is directed downwards, meaning field lines are leaving pole X.
Since magnetic field lines leave the north pole of a magnet, pole X must be a north magnetic pole.
Therefore, the needle is a permanent magnet and X is a north magnetic pole.
C
Walkthrough
- Nature of the compass needle: A compass needle is a small, lightweight magnet that is permanently magnetized (a permanent magnet) so that it can align itself with external magnetic fields. It is not an induced magnet, as it retains its magnetism and works even when far from the bar magnet.
- Direction of magnetic field lines: Outside a magnet, magnetic field lines always point from the North pole to the South pole.
- Compass alignment: A compass needle aligns with the local magnetic field. The north-seeking pole of the compass needle (typically the arrowed or painted end) points in the direction of the magnetic field lines.
- Applying to the diagram: The compass is placed to the right of the bar magnet. The needle (arrow) points downwards. This means the magnetic field at the compass's location is directed downwards, from the top of the magnet towards the bottom.
- Identifying pole X: Since the field lines are directed away from the top end (pole X) and towards the bottom end, pole X must be the source of the field lines. Field lines exit the North pole. Therefore, X is a north magnetic pole.
Key Takeaways
- A compass needle is a permanent magnet, not an induced one.
- Magnetic field lines outside a bar magnet run from the North pole to the South pole.
- The north pole (arrowed end) of a compass needle points in the direction of the magnetic field.
Common Mistakes
- Confusing induced and permanent magnets: Students may think the compass needle is induced because it reacts to the bar magnet. However, a compass must be a permanent magnet to function as a directional indicator in the Earth's magnetic field and near other magnets.
- Reversing field direction: Remembering that field lines go from North to South is crucial. If a student thinks lines go South to North, they will incorrectly identify X as a south pole.
- Misinterpreting the compass arrow: The arrow on the compass represents the North pole of the needle. It points towards the South pole of the bar magnet (attracted to it) and away from the North pole (repelled by it). Since it points away from X, X is a North pole.
Things to Be Careful About
- Always identify the arrowed end of the compass needle as its North pole.
- Recall that magnetic field lines form continuous loops: they go from North to South outside the magnet, and South to North inside the magnet. For this question, only the external field direction matters.
- The question is a single-step application of two facts: compass = permanent magnet, field lines exit North pole.
Plastic and wool are insulating materials.
Samples of plastic and wool are rubbed together. This causes a transfer of electrons.
Which row shows the direction of electron transfer and the final charge on both materials?
Options
| plastic | wool | final charge on plastic | final charge on wool | |
|---|---|---|---|---|
| A | gains electrons | loses electrons | neutral | positive |
| B | gains electrons | loses electrons | negative | positive |
| C | loses electrons | gains electrons | negative | positive |
| D | loses electrons | gains electrons | positive | neutral |
Working
When plastic and wool are rubbed together, electrons are transferred from the wool to the plastic.
The plastic gains electrons, so it has more electrons than protons and becomes negatively charged.
The wool loses electrons, so it has fewer electrons than protons and becomes positively charged.
Row B is the only row that gives both the correct direction of electron transfer and the correct final charges.
Answer
B
B
Walkthrough
When two insulating materials are rubbed together, electrons are transferred from one material to the other. The material that gains electrons becomes negatively charged, because it now has more electrons than protons. The material that loses electrons becomes positively charged, because it now has fewer electrons than protons.
In this example, the plastic gains electrons from the wool. So the plastic becomes negative and the wool becomes positive.
Check each row:
- Row A: plastic gains electrons and wool loses electrons, but plastic is called neutral. This is wrong, because gaining electrons makes plastic negative.
- Row B: plastic gains electrons and wool loses electrons, with final charges negative and positive. This is correct.
- Row C: plastic loses electrons but is called negative. This is wrong, because losing electrons makes plastic positive.
- Row D: plastic loses electrons and is called positive, but wool is called neutral after gaining electrons. This is wrong, because gaining electrons makes wool negative.
So the correct row is B.
Key Takeaways
- Rubbing insulators together can transfer electrons from one material to the other.
- The object that gains electrons becomes negatively charged.
- The object that loses electrons becomes positively charged.
- The total charge is conserved: the negative charge on one object is balanced by the positive charge on the other.
Common Mistakes
- Choosing row A because plastic gains electrons, but forgetting that gaining electrons makes plastic negative, not neutral.
- Choosing row C because the final charges are negative and positive, but the direction of electron transfer is reversed.
- Thinking that positive charges move. In this type of charging, only electrons move.
- Assuming that both materials can remain neutral after a transfer. A transfer of electrons always leaves one material negative and the other positive.
Things to Be Careful About
- The final charge always depends on whether the material gains or loses electrons.
- "Gains electrons" means negative; "loses electrons" means positive.
- The total charge before and after rubbing remains the same, because the charges produced are equal and opposite.
- The materials are insulators, so the charge stays where the rubbing happened and does not flow away.
Which circuit contains a heater and a fuse?
Options
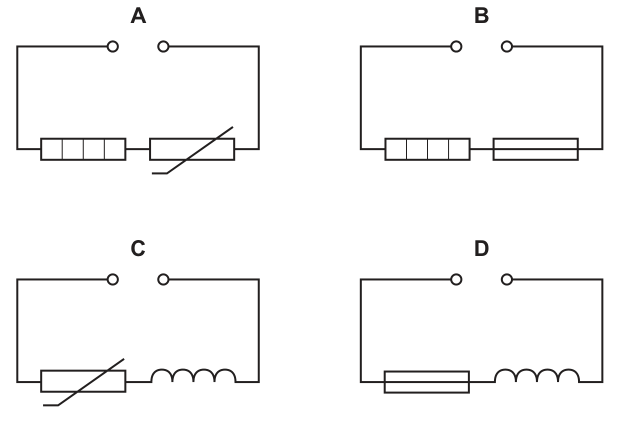
Working
- The standard circuit symbol for a heater is a rectangle divided into several segments by vertical lines (or a rectangle with vertical lines inside).
- The standard circuit symbol for a fuse is a rectangle with a continuous straight line passing horizontally straight through the middle of it.
Looking at the options:
- Circuit A contains a heater and a thermistor.
- Circuit B contains a heater (the segmented rectangle on the left) and a fuse (the rectangle with a line passing horizontally through it on the right).
- Circuit C contains a thermistor and an inductor / coil.
- Circuit D contains a fuse and an inductor / coil.
Therefore, circuit B contains a heater and a fuse.
Answer
B
B
Walkthrough
To identify which circuit diagram contains both a heater and a fuse, recall the standard circuit symbols defined by Cambridge O Level Physics:
- Heater: Represented by a rectangle with vertical partitioning lines (resembling heating elements).
- Fuse: Represented by a rectangular box with a central connecting line running continuously through its entire length.
- Thermistor: Represented by a rectangle with a diagonal line through it that has a horizontal flat foot at the lower left.
- Inductor / Coil: Represented by a series of connected curved loops or semicircles.
Evaluating the components present in each diagram:
- A: Contains a heater and a thermistor.
- B: Contains a heater and a fuse.
- C: Contains a thermistor and a coil.
- D: Contains a fuse and a coil.
Circuit B correctly contains both a heater and a fuse.
Key Takeaways
- Be familiar with all standard circuit symbols required by the syllabus, including fixed resistors, variable resistors, thermistors, LDRs, diodes, LEDs, fuses, heaters, and inductors.
Common Mistakes
- Confusing the symbol for a fuse (line passing completely through a rectangle) with a resistor (an empty rectangle) or a heater (a rectangle with internal vertical strips).
- Confusing a thermistor (diagonal line with a stepped base) with a variable resistor (arrow passing diagonally across a rectangle).
Things to Be Careful About
- Ensure you carefully observe the orientation and internal lines inside rectangular symbols; subtle differences distinguish resistors, fuses, heaters, and thermistors.
A light-dependent resistor (LDR) is to be used as an input sensor for an intruder alarm circuit.
When there is no light on the LDR, the lamp switches on.
The resistance of the fixed resistor is less than that of the lamp.
Which diagram shows the circuit?
Options
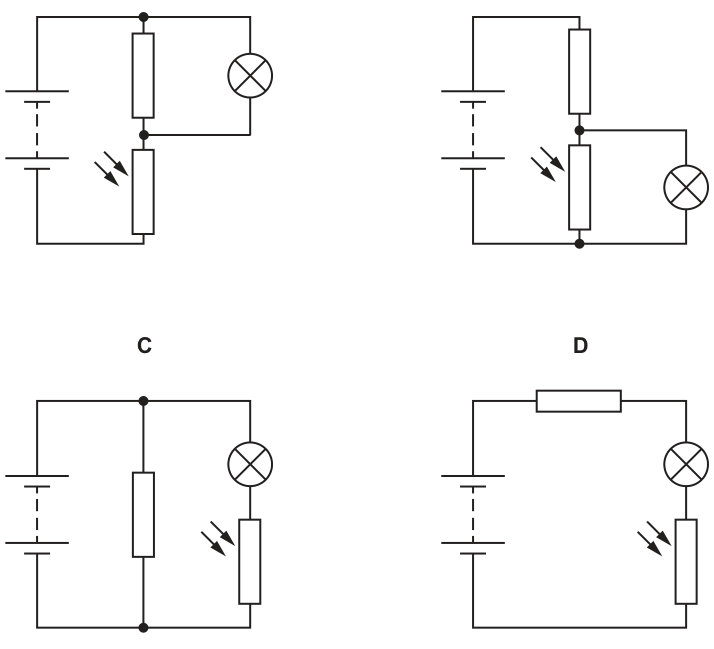
Working
An LDR has high resistance in the dark and low resistance in the light. For the lamp to switch on in the dark, it must have a large potential difference across it when the LDR is in the dark.
In diagram B, the fixed resistor and LDR form a potential divider, with the lamp connected in parallel with the LDR. When there is no light, the LDR has a high resistance and takes the larger share of the supply p.d. The lamp therefore has a large p.d. across it and switches on. When light falls on the LDR, its resistance drops, the p.d. across it (and the lamp) falls, and the lamp switches off.
Diagram A has the lamp across the fixed resistor, so it would be on in the light. Diagram C has the lamp in a separate parallel branch, so it would always have the full supply p.d. and not switch off. Diagram D is a series circuit; the high resistance of the LDR in the dark would limit the current and keep the lamp off.
Answer
B
B
Walkthrough
- Recall the property of an LDR: its resistance is high in the dark (no light) and low in bright light.
- The alarm must switch the lamp ON when there is no light, meaning the lamp needs a large potential difference (p.d.) across it when the LDR is in the dark.
- Evaluate diagram B: It is a potential divider with a fixed resistor and an LDR in series. The lamp is connected in parallel with the LDR. When it is dark, the LDR has a high resistance, so it takes the larger share of the supply p.d. The lamp, being in parallel with the LDR, also has a large p.d. across it and switches on. When light falls on the LDR, its resistance drops, the p.d. across it falls, and the lamp switches off. This matches the requirement.
- Evaluate diagram A: The lamp is in parallel with the fixed resistor. In the dark, the LDR has high resistance, so the p.d. across the fixed resistor is small. The lamp would be off in the dark.
- Evaluate diagram C: The lamp is in a parallel branch with the LDR. The p.d. across this branch is always equal to the supply p.d., so the lamp would not switch off properly when light falls on the LDR.
- Evaluate diagram D: All components are in series. In the dark, the high resistance of the LDR limits the current, so the lamp would be off.
Key Takeaways
- An LDR's resistance decreases as light intensity increases.
- A potential divider can be used to create a voltage that changes with light intensity.
- To switch a load on when a sensor has high resistance, the load should be connected in parallel with the sensor (or the other component should have the high resistance).
Common Mistakes
- Assuming the LDR resistance increases in the dark (it is the opposite).
- Placing the lamp across the wrong component in the potential divider, which would make the lamp switch on in the light instead of the dark.
- Choosing a series circuit where the high resistance of the LDR in the dark reduces the current and keeps the lamp off.
Things to Be Careful About
- Remember that "no light" means high resistance for an LDR.
- In a potential divider, the component with the larger resistance has the larger p.d. across it.
- A lamp in parallel with a component shares the same p.d. as that component.
A potential difference of produces a current of in a resistor.
How much energy is transferred to thermal energy during ?
Options
A
B
C
D
Working
The energy transferred to thermal energy in the resistor is the electrical energy used:
This is option D. The other options each use only two of the three quantities: A gives the power , B gives , and C gives .
Answer
D
D
Walkthrough
When a current flows through a resistor, electrical energy is transferred to thermal energy. The electrical energy transferred is the potential difference multiplied by the current multiplied by the time for which the current flows:
Here , and , so
which is option D.
Checking the other options tells you what each one has forgotten: 12 J is just , which is the power (joules per second), not the total energy; 30 J is (missing the potential difference); 40 J is (missing the current). Only the product of all three quantities gives the energy transferred over the full 10 s.
Key Takeaways
- The electrical energy transferred is : voltage tells you the energy given to each coulomb of charge, current tells you how many coulombs flow per second, and the time tells you for how long.
- Power is energy per second, . So energy is also — here , and over 10 s that is .
- In a resistor, this electrical energy appears entirely as thermal energy.
Common Mistakes
- Choosing 12 J (option A): this is the power , which is the energy transferred per second, not over 10 s. Forgetting the factor of time is the most common error here.
- Choosing 30 J or 40 J: these miss one of the three quantities entirely, so check that all of , and have been used.
Things to Be Careful About
- The time must be in seconds; here it already is, so no conversion is needed.
- Units: volts amps seconds gives joules, since and .
- The word "how much energy is transferred" asks for the total over 10 s, not the rate — that is the clue that you multiply by the time.
The diagram shows a generator.
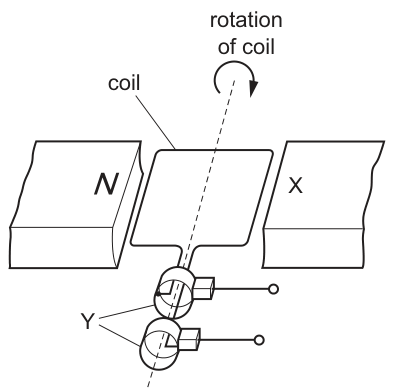
What are X and Y?
Options
| X | Y | |
|---|---|---|
| A | N pole | split-ring commutator |
| B | N pole | slip rings |
| C | S pole | split-ring commutator |
| D | S pole | slip rings |
Magnetic field lines travel from the North pole to the South pole. Since the left pole is N, the right pole X must be the S pole.
The coil connects to two separate, complete rings (Y). These are slip rings, which allow the induced current to alternate as the coil rotates, producing an a.c. output. A split-ring commutator (a single ring with a gap) is used for d.c. motors and d.c. generators.
Therefore, X is the S pole and Y is slip rings.
Answer
D
D
Walkthrough
To identify X and Y, we look at the standard features of an a.c. generator diagram.
Identifying X (the magnetic pole):
Magnetic field lines always point from the North pole to the South pole. In the diagram, the left magnet is labeled N (North). For the field to pass through the coil from left to right, the right magnet (labeled X) must be the South pole (S). This eliminates options A and B.
Identifying Y (the rings):
The diagram shows the ends of the coil connecting to two separate, complete circular rings. These are called slip rings. As the coil rotates, each slip ring maintains contact with its carbon brush throughout the full rotation, allowing the induced current to flow in alternating directions, producing an alternating current (a.c.).
A split-ring commutator is a single ring split into two halves with a gap between them. It is used in d.c. motors and d.c. generators to reverse the connection every half-turn, producing a unidirectional (pulsating d.c.) output. Since the diagram shows two distinct rings, Y must be slip rings. This eliminates option C.
Combining these findings: X is the S pole and Y is slip rings. This matches option D.
Key Takeaways
- In a magnetic field, field lines go from North to South. If one pole is N, the opposite pole facing it must be S.
- Slip rings (two separate complete rings) are used in a.c. generators to produce alternating current.
- A split-ring commutator (one ring split in two) is used in d.c. motors and d.c. generators to produce direct current.
Common Mistakes
- Confusing the pole labels: Forgetting that field lines go N to S and assuming X is N because it's on the right. Remember, opposite poles attract and field lines go from N to S.
- Confusing slip rings with a split-ring commutator: Looking at the rings and not noticing there are two separate rings (slip rings) instead of one ring with a gap (split-ring commutator). If the output was meant to be d.c., a split-ring commutator would be shown.
- Assuming all generators are d.c.: The presence of two slip rings is the key indicator that this is an a.c. generator.
Things to Be Careful About
- Look closely at the rings: In diagrams, slip rings are drawn as two concentric or side-by-side complete circles. A split-ring commutator is drawn as a single cylinder split down the middle with a visible gap. Here, Y points to two separate rings.
- Field direction: Always check the labeled pole. The field must go from N to S across the gap where the coil is rotating.
The diagram shows a loudspeaker that is producing a sound.
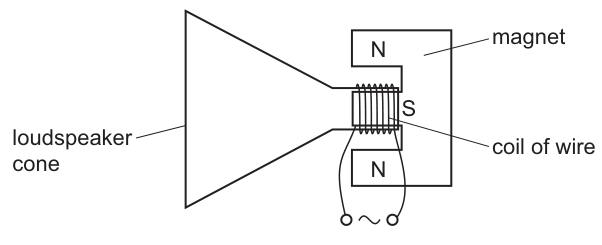
A student writes four sentences about the loudspeaker.
- There is a direct current in the coil of wire.
- The current in the coil produces a changing magnetic field.
- A force is produced on the coil of wire attached to the cone.
- The cone spins around due to the force.
Which sentences are correct?
Options
A 1 and 2
B 1 and 4
C 2 and 3
D 3 and 4
Working
Evaluate each statement:
-
Statement 1: The diagram shows an a.c. signal generator (symbol
~) connected to the coil. A loudspeaker requires alternating current so that the force on the coil alternates direction, causing the cone to vibrate and produce sound waves. Direct current would push the cone in one direction and hold it there. False. -
Statement 2: The alternating current in the coil produces a magnetic field that changes in direction and magnitude. This changing magnetic field interacts with the fixed magnetic field of the permanent magnet. True.
-
Statement 3: The coil of wire is situated in a magnetic field and carries a current. By the motor effect, a force is produced on the coil. Because the current is alternating, this force alternates in direction, making the coil and cone vibrate. True.
-
Statement 4: The cone vibrates back and forth (oscillates) to produce sound waves; it does not spin around. Spinning is characteristic of a d.c. motor, not a loudspeaker. False.
Statements 2 and 3 are correct.
Answer
C
C
Walkthrough
A moving-coil loudspeaker converts electrical energy into sound energy using the motor effect. Let us analyse each of the student's sentences:
-
Sentence 1: Look at the symbol connected to the coil in Fig. 1. It is a circle with a sine wave inside (
~), which is the standard symbol for an alternating current (a.c.) source, such as an a.c. signal generator. A loudspeaker needs a.c. because the current must constantly change direction to make the cone vibrate back and forth. If a direct current (d.c.) were used, the coil would be pushed in one direction and stay there, producing no sound. Therefore, sentence 1 is incorrect. -
Sentence 2: When current flows through the coil of wire, it produces its own magnetic field. Because the current is alternating, the magnetic field produced by the coil also alternates in direction and strength. This changing magnetic field interacts with the permanent magnetic field of the surrounding magnet. Therefore, sentence 2 is correct.
-
Sentence 3: The coil is placed in the magnetic field of the permanent magnet and carries an electric current. According to the motor effect, a current-carrying conductor in a magnetic field experiences a force. Since the current is alternating, the direction of the force on the coil also alternates, causing the coil (and the attached cone) to vibrate. Therefore, sentence 3 is correct.
-
Sentence 4: The purpose of the loudspeaker is to produce sound waves, which are longitudinal waves created by vibrations. The cone vibrates back and forth (oscillates) at the same frequency as the a.c. signal; it does not spin around. Spinning is characteristic of a d.c. motor, not a loudspeaker. Therefore, sentence 4 is incorrect.
Only sentences 2 and 3 are correct, which corresponds to option C.
Key Takeaways
- A loudspeaker uses the motor effect: a current-carrying coil in a magnetic field experiences a force.
- Loudspeakers require alternating current (a.c.) so that the force on the coil alternates direction, causing the cone to vibrate and produce sound waves.
- A d.c. motor produces continuous rotation, whereas a loudspeaker produces vibration (oscillation).
- Recognise the standard circuit symbol for an a.c. source (a circle with a sine wave
~) versus a d.c. source (a battery symbol or circle with+and-).
Common Mistakes
- Confusing a loudspeaker with a d.c. motor: Students often think the cone 'spins' because they associate the motor effect with rotation. Remember, a loudspeaker cone vibrates back and forth to create sound waves; it does not rotate.
- Misreading the power source symbol: The symbol
~denotes alternating current. Assuming it is direct current leads to rejecting statement 1 incorrectly. - Using the word 'heat' instead of 'thermal energy': Not applicable here, but a common general mistake in thermal questions. Here, the mistake is saying 'the coil gets hot' as the primary reason for movement, rather than the magnetic force.
- Saying 'the magnetic field changes' without context: The permanent magnet's field is fixed. It is the coil's magnetic field (or the current direction) that changes, leading to a changing force.
Things to Be Careful About
- Motion type: Always distinguish between vibration/oscillation (loudspeakers, tuning forks) and rotation (d.c. motors, fans). The mark scheme specifically rejects 'spins' for a loudspeaker.
- Current type: A loudspeaker must have an a.c. input. If the question showed a battery, the setup would be incorrect for producing sound (the cone would just click to one side and stay there).
- Symbol recognition: Be familiar with the a.c. symbol (sine wave in a circle) as it is frequently used in loudspeaker and generator diagrams.
- Motor effect wording: When explaining why a force is produced, use the precise phrase 'current-carrying conductor in a magnetic field experiences a force' or 'the motor effect'. Do not just say 'magnets attract the coil'.
A step-down transformer changes to There are 600 turns on the primary coil.
How many turns are on the secondary coil?
Options
A 20
B 30
C 600
D 12 000
Working
For a transformer,
Substitute the values:
Answer
B
B
Walkthrough
A transformer changes the voltage using two coils with different numbers of turns. The relationship is
where and are the primary and secondary voltages, and and are the turns on the primary and secondary coils.
Here the primary voltage is , the secondary voltage is , and the primary has 600 turns. The voltage ratio is
So the secondary coil has 20 times fewer turns than the primary:
The correct option is therefore B.
Key Takeaways
- The turns ratio of a transformer is equal to the voltage ratio:
- A step-down transformer has a smaller secondary voltage and therefore fewer turns on the secondary coil than on the primary coil.
- It is important to identify which voltage is primary and which is secondary before substituting into the equation.
Common Mistakes
- Reversing the ratio: some candidates write and then use the wrong pair of values. Keep the primary and secondary on the same sides of the equation.
- Choosing D (12 000) by multiplying 600 by 20 instead of dividing. A step-down transformer must have fewer secondary turns, so 12 000 cannot be correct.
- Choosing A (20) by confusing the voltage ratio with the number of turns. 20 is the ratio, not the secondary turns.
Things to Be Careful About
- Check whether the transformer is step-up or step-down. Here the secondary voltage is lower, so the secondary coil must have fewer turns than the primary.
- Substitute carefully: , not .
- The answer is a number of turns, so no unit is needed, though the value must be exact.
Alpha particles are directed at a thin gold foil.
Only a very small proportion of the alpha particles are deflected through very large angles.
Which fact about the nuclei of the gold atoms is not a conclusion of this experiment?
Options
A They are surrounded by mostly empty space.
B They are very small.
C They contain most of the mass of the atom.
D They contain protons and neutrons.
Working
The alpha-particle scattering experiment shows that most alpha particles pass straight through the gold foil, so the atom is mostly empty space. The few that are deflected through very large angles must have met a very small, massive, positively charged nucleus. This supports options A, B and C.
The experiment does not show what the nucleus is made of, so it does not conclude that the nucleus contains protons and neutrons.
Answer
D
D
Walkthrough
In the alpha-particle scattering experiment, alpha particles are fired at a thin gold foil. Most pass straight through, which shows that the atom is mostly empty space. A very small proportion are deflected through very large angles. Such a large deflection can only happen when an alpha particle comes very close to a tiny, massive, positively charged centre, because the alpha particle is also positive and is repelled by positive charge. This centre is the nucleus.
So the experiment supports these conclusions:
- the atom is mostly empty space;
- the nucleus is very small;
- the nucleus contains most of the mass of the atom.
The experiment does not tell us about the particles inside the nucleus. The discovery that the nucleus contains protons and neutrons came from later work, not from this experiment. Therefore the correct answer is D.
Key Takeaways
- The alpha-particle scattering experiment shows that the atom is mostly empty space.
- The nucleus is very small, positively charged, and contains most of the mass of the atom.
- The experiment does not reveal the detailed particles inside the nucleus.
- When a question asks for the statement that is NOT a conclusion, check each option against the conclusions actually supported by the experiment.
Common Mistakes
- Choosing A, B or C because they are genuine conclusions of the experiment, even though the question asks for the one that is not.
- Thinking the experiment proved that the nucleus contains protons and neutrons. It only showed that the nucleus is small, positive and massive.
- Confusing the alpha particle with a proton. The alpha particle is a helium nucleus, and it is repelled by the positive nucleus.
Things to Be Careful About
- The phrase "surrounded by mostly empty space" refers to the atom as a whole, not to the nucleus itself.
- Only a very small proportion of alpha particles are deflected through very large angles. This is the key evidence that the nucleus is very small.
- D is not a conclusion of the experiment, because the experiment does not identify the particles inside the nucleus.
A radioactive source emitting only gamma radiation is placed in front of a radiation detector which measures the count rate.
What must cause the count rate to increase?
Options
A a thick sheet of lead placed between the source and the detector
B a strong magnetic field placed between the source and the detector
C the radioactive source moved closer to the detector
D the detector moved further away from the radioactive source
Working
Gamma radiation is electromagnetic radiation, not a stream of charged particles, so a strong magnetic field does not deflect it and cannot increase the count rate. A thick sheet of lead absorbs gamma radiation, so it would reduce the count rate. Moving the detector further away would also reduce the count rate.
Moving the radioactive source closer to the detector means more gamma radiation reaches the detector each second, so the count rate increases.
Answer
C
C
Walkthrough
The count rate is the number of radiation particles, or photons, detected per second. The closer the source is to the detector, the more radiation reaches the detector, so the count rate increases. Moving the source away has the opposite effect.
Look at each option:
- A: a thick sheet of lead absorbs gamma radiation, so it would reduce the count rate, not increase it.
- B: a strong magnetic field does not deflect gamma radiation, because gamma is electromagnetic radiation and has no charge.
- C: moving the source closer to the detector increases the count rate because more radiation arrives per second.
- D: moving the detector further away decreases the count rate.
So the correct answer is C.
Key Takeaways
- The count rate depends on how much radiation reaches the detector, and this depends on the distance from the source.
- Gamma radiation is very penetrating and is not deflected by magnetic or electric fields.
- A thick absorber such as lead reduces the count rate.
Common Mistakes
- Choosing B: gamma is not a charged particle, so a magnetic field cannot deflect it.
- Choosing A or D: both of these reduce the amount of radiation reaching the detector, so they decrease the count rate.
Things to Be Careful About
The question asks what must cause the count rate to increase. Only moving the source closer to the detector increases the count rate. The other options either reduce it or have no effect.
Nuclear fusion is one source of energy.
What is nuclear fusion?
Options
A the decay of a radioactive nucleus
B the joining together of two nuclei to make a larger nucleus
C the melting of an unstable nucleus
D the splitting of a nucleus into two lighter nuclei
Working
Nuclear fusion is the joining together of two light nuclei to form a larger nucleus, releasing energy.
- Option A describes radioactive decay.
- Option C is not a real nuclear process.
- Option D describes nuclear fission, not fusion.
Answer
B
B
Walkthrough
Nuclear fusion is the process in which two small nuclei join together to make a larger nucleus. This process releases a large amount of energy and is the main source of energy in the Sun and other stars.
Look at each option:
- A says the decay of a radioactive nucleus. This is radioactive decay, not fusion.
- B says the joining together of two nuclei to make a larger nucleus. This is exactly the definition of nuclear fusion.
- C says the melting of an unstable nucleus. Nuclei do not "melt" in this way, so this is not correct.
- D says the splitting of a nucleus into two lighter nuclei. This is nuclear fission, the opposite of fusion.
So the correct answer is B.
Key Takeaways
- Nuclear fusion = joining small nuclei together to form a larger nucleus.
- Nuclear fission = splitting a large nucleus into smaller nuclei.
- Both fusion and fission can release energy, but they are opposite processes.
Common Mistakes
- Confusing fusion with fission. Fusion is joining, fission is splitting.
- Choosing D because it sounds like a nuclear process. D describes fission, not fusion.
- Thinking that "melting" has anything to do with nuclear reactions. Melting is a physical change, not a nuclear process.
Things to Be Careful About
- Read the wording carefully: look for the key word "joining" in the correct definition.
- Remember that fusion happens naturally in stars, including the Sun.
- Do not choose an option just because it sounds scientific; check that it matches the exact meaning of fusion.
Which statement is correct?
Options
A The orbital speed of the Earth around the Sun is: .
B The orbit of the Earth around the Sun is an ellipse.
C The Moon takes approximately one month to orbit the Sun.
D Light from the Sun takes 5.0 minutes to reach the Earth.
Working
A is false. The orbital speed of the Earth is the orbital distance divided by the orbital period. The orbital distance is the circumference of the orbit, which is or , not .
B is correct. The Earth moves around the Sun in an elliptical orbit.
C is false. The Moon orbits the Earth in about one month. The Earth and Moon together take one year to orbit the Sun.
D is false. Light from the Sun takes about 8 minutes to reach the Earth, not 5.0 minutes.
Answer
B
B
Walkthrough
This question asks you to identify the one correct statement about the Earth, the Moon and the Sun.
-
Statement A gives a formula for the Earth's orbital speed. Orbital speed is the distance travelled in one orbit divided by the time taken. The distance travelled in one full orbit is the circumference of the orbit, , where is the average orbital radius. Since the diameter , the circumference is also . The statement says , which is twice the correct circumference. So A is wrong.
-
Statement B says the Earth's orbit is an ellipse. This is correct. The planets move around the Sun in elliptical orbits, with the Sun near one focus.
-
Statement C says the Moon takes approximately one month to orbit the Sun. The Moon orbits the Earth in about one month, but it does not orbit the Sun separately. The Moon travels around the Sun only because it travels with the Earth, and that journey takes one year. So C is wrong.
-
Statement D says light from the Sun takes 5.0 minutes to reach the Earth. The Sun is about 150 million km from the Earth, and light travels at about 300,000 km/s. The time is therefore approximately
so D is wrong.
Therefore the only correct statement is B.
Key Takeaways
- The Earth's orbit around the Sun is elliptical, not circular.
- Orbital speed is the orbital distance divided by the orbital period.
- The Moon orbits the Earth in about one month, but it does not orbit the Sun on its own.
- Light from the Sun takes about 8 minutes to reach the Earth.
Common Mistakes
- Confusing the diameter with the radius when calculating the circumference of an orbit. The circumference is , so it is , not .
- Thinking the Moon orbits the Sun directly. In fact, the Moon orbits the Earth, and the Earth-Moon system orbits the Sun.
- Recalling the Sunlight travel time as 5 minutes. The correct value is about 8 minutes.
Things to Be Careful About
- Read the formula in statement A carefully: it says "average diameter" but the correct formula uses the circumference, which is or .
- Remember that one month is the Moon's orbital period around the Earth, whereas one year is the Earth's orbital period around the Sun.
Your score so far
Answer a question to start scoring
Your marks add up here as you work through the paper.