Physics 5054/31 — October/November 2018
Cambridge O-Level · Practical Test · worked solutions for every part, with the mark scheme
Topics Experimental Contexts · Use of Techniques, Apparatus and Materials · Analysis, Conclusions and Evaluation · Observations and Measurements
In this experiment, you will determine the power developed when unpeeling a piece of adhesive tape from a surface.
You are provided with:
- exhibit A
- a loop of string attached to a short spring
- a 30 cm ruler
- a stopwatch
- a sheet of graph paper
- adhesive tape
- scissors to cut the adhesive tape.
To set up the experiment:
- look at exhibit A – do not use, this is only for reference.
Make your own version of exhibit A:
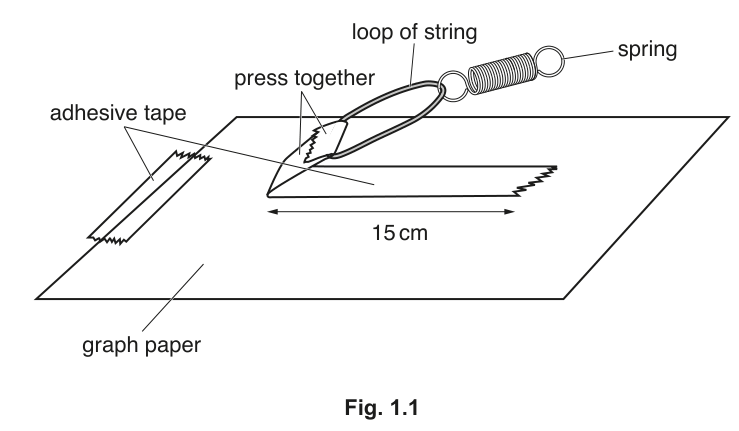
- Cut a piece of adhesive tape 20 cm long.
- Stick 15 cm of this length of tape on to the graph paper.
- Fold the other 5 cm of tape around the end of the loop of string opposite the spring.
- Press the end of the tape around the loop to seal the loop inside, as shown in Fig. 1.1.
- Use another piece of tape to fix the left-hand edge of the paper to the bench.
Answer
Follow the instructions in part (a) to assemble the apparatus:
- Cut a 20 cm piece of adhesive tape and stick 15 cm to the graph paper.
- Fold the remaining 5 cm around the loop of string and press together to seal it.
- Fix the left-hand edge of the graph paper to the bench with another piece of tape.
Assemble the apparatus as shown in Fig. 1.1, with 15 cm of tape stuck to the paper and the loop sealed around the string.
Walkthrough
The candidate must physically construct the apparatus described in the question. This involves cutting the tape to the correct length (20 cm total, with 15 cm adhered to the paper and 5 cm folded over the string loop), sealing the loop, and fixing the paper to the bench. This part is not separately marked; it is the setup for the subsequent measurements.
Key Takeaways
Practical questions often begin with a setup phase. Candidates must follow instructions precisely to ensure the apparatus is correctly constructed before taking any readings.
Common Mistakes
- Using the wrong length of tape (e.g., sticking the full 20 cm to the paper).
- Not sealing the loop properly, which could cause the tape to detach prematurely.
- Forgetting to fix the graph paper to the bench, which would allow the whole setup to slide.
Things to Be Careful About
Ensure the 15 cm length is measured accurately from the edge of the paper. The 5 cm folded section must be long enough to completely encircle the string loop and be pressed firmly to seal it.
For the spring provided, measure the unstretched length of the coiled part of the spring, as shown in Fig. 1.2.
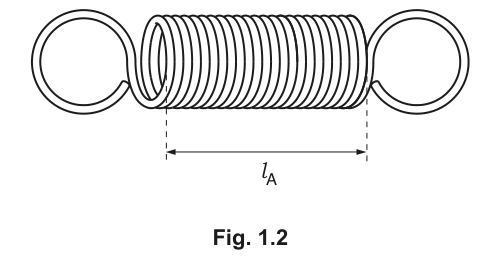
= ______
Answer
= 2.0 cm
(Note: The candidate should read the unstretched length of the coiled part of the spring from their apparatus. Acceptable values are in the range 1.8 to 2.2 cm, read to the precision of the ruler, e.g., 1 d.p.)
2.0 cm
Walkthrough
The candidate must measure the unstretched length of the coiled part of the spring. This is the length of the spring when it is not being pulled, measured between the points where the coils begin and end (excluding the loops at either end). The reading should be taken to the nearest millimetre (0.1 cm) using the 30 cm ruler provided.
Key Takeaways
When measuring lengths in practical experiments, always read to the precision allowed by the instrument. For a standard 30 cm ruler with millimetre graduations, readings should be given to 1 decimal place in cm (e.g., 2.0 cm, not 2 cm).
Common Mistakes
- Measuring the total length of the spring including the loops at either end. The marking scheme specifies the 'coiled part'.
- Not reading to the correct precision (e.g., writing 2 cm instead of 2.0 cm).
- Parallax error: not viewing the ruler markings at eye level and perpendicular to the scale.
Things to Be Careful About
The value must be in the range 1.8 to 2.2 cm. Ensure the spring is resting naturally on the bench without any tension before taking the reading. Include the unit 'cm' in the answer.
Pull the spring carefully and slowly to the right, as shown in Fig. 1.3.
As you pull, keep the spring very close to the bench, but not touching it.
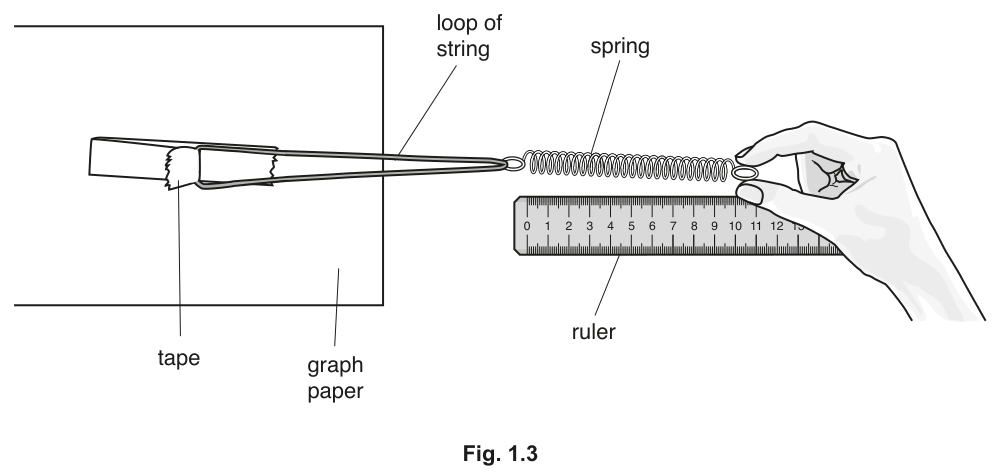
The spring stretches. At some point the adhesive tape will just begin to peel away from the paper.
Answer
Pull the spring slowly and steadily to the right, keeping it close to but not touching the bench. Stop pulling when the adhesive tape just begins to peel away from the graph paper.
Pull the spring until the tape just begins to peel away from the paper.
Walkthrough
The candidate must pull the spring to increase the tension until it matches the maximum static friction (adhesive force) between the tape and the paper. Pulling slowly and keeping the spring close to the bench ensures the force is applied horizontally and minimises any vertical component that might lift the tape.
Key Takeaways
In experiments involving springs, the extension is proportional to the applied force (Hooke's Law, up to the limit of proportionality). The point where the tape begins to peel corresponds to the maximum adhesive force.
Common Mistakes
- Pulling too quickly, which could cause a jerky motion and an inaccurate reading.
- Pulling at an angle, which would mean only a component of the spring force is peeling the tape horizontally.
Things to Be Careful About
Do not use exhibit A; it is only for reference. The candidate must use their own assembled apparatus.
Hold the spring steady in this position.
Measure the stretched length of the coiled part of the spring.
= ______
Use the equation to calculate the extension of the spring.
= ______
Working
Read the stretched length from the ruler while holding the spring steady.
Example reading: = 7.0 cm
Calculate the extension :
Answer
= 7.0 cm
= 5.0 cm
(Note: must be in the range 4.0 to 11.0 cm. The extension is calculated as using the candidate's own value for .)
l_B = 7.0 cm, e = 5.0 cm
Walkthrough
Once the tape is just beginning to peel, the spring is held steady. The candidate reads the new length of the coiled part of the spring. The extension is the difference between the stretched length and the original unstretched length: . This extension is used to calculate the force applied by the spring.
Key Takeaways
The extension of a spring is not its total length, but the increase in length from its natural, unstretched state. Always subtract the original length to find the extension.
Common Mistakes
- Calculating the extension as just (forgetting to subtract ).
- Using a value for from a different spring or a memorised value instead of their own reading from part (b).
Things to Be Careful About
Hold the spring steady and read the ruler at eye level to avoid parallax error. The value of must be between 4.0 cm and 11.0 cm. Ensure the extension is calculated using the candidate's own value for (error carried forward is allowed).
Use the equation to calculate the force applied by the spring, where .
Give the unit of your answer.
= ______ unit ______
Working
Use the equation , where and (from part (c)(ii)).
Answer
= 1.25 unit N
1.25 N
Walkthrough
The force applied by the spring is calculated using Hooke's Law: . The spring constant is given as . The extension is in cm, so the units are consistent and the force will be in newtons (N). Substitute the candidate's value for from part (c)(ii).
Key Takeaways
Hooke's Law states that the force applied to a spring is proportional to its extension, . Always check that the units of and are compatible before calculating.
Common Mistakes
- Forgetting to include the unit 'N' in the answer. The question explicitly asks for the unit.
- Using the wrong value for (e.g., using instead of the calculated extension).
Things to Be Careful About
The unit must be stated explicitly as 'N'. The calculation uses the candidate's own value for (error carried forward from part (c)(ii) is allowed). Give the answer to a sensible number of significant figures (e.g., 1.25 or 1.3).
Repeat c(i).
As soon as the adhesive tape begins to peel away from the paper, start the stopwatch.
Continue pulling and maintain a constant extension of the spring until 3.0 cm of the tape has been peeled away from the paper.
Stop the stopwatch.
Record the time taken to peel 3.0 cm of the tape away from the paper.
= ______
Answer
= 12.0 s
(Note: The candidate should time how long it takes to peel 3.0 cm of tape while maintaining the constant extension found in part (c). Acceptable values are between 2 s and 50 s, read to 1 decimal place.)
12.0 s
Walkthrough
Once the tape is peeling at a constant extension (and thus constant force), the candidate starts the stopwatch as soon as peeling begins. They continue pulling to maintain that extension until exactly 3.0 cm of tape has peeled away, then stop the stopwatch. The time is recorded.
Key Takeaways
Power is the rate of doing work. By measuring the time to peel a fixed distance (3.0 cm = 0.030 m) at a constant force, the average power can be calculated.
Common Mistakes
- Not starting the stopwatch at the exact moment the tape begins to peel.
- Not stopping the stopwatch at exactly 3.0 cm of peeled tape.
- Not reading the stopwatch to the correct precision (1 decimal place, e.g., 12.0 s, not 12 s).
Things to Be Careful About
The time must be between 2 s and 50 s. Read the stopwatch to 1 decimal place. Maintain the extension as constant as possible during the timing; if the spring compresses or stretches further, the force changes and the power is no longer constant.
Use the equation
to calculate the power developed.
= ______
Working
Use the equation , where (from part (c)(iii)) and (from part (d)).
Rounding to 2 significant figures:
Answer
= 0.0031 W
0.0031 W
Walkthrough
The power developed is the rate at which work is done. The equation is given. The distance peeled is 3.0 cm = 0.030 m. The work done is . Power is . Substitute the candidate's values for and .
Key Takeaways
Power is work done per unit time. In this experiment, the work done is the force multiplied by the distance the tape is peeled (0.030 m). The equation simplifies this to .
Common Mistakes
- Forgetting to convert 3.0 cm to 0.030 m in the numerator (though the equation already has 0.030, so this is handled if using the given formula directly).
- Using the wrong values for or (e.g., using instead of ).
- Not giving the answer in watts (W).
Things to Be Careful About
The calculation uses the candidate's own values for and (error carried forward from previous parts is allowed). Give the answer to 2 or 3 significant figures. The unit 'W' is required in the answer line.
The rest of this paper
3 more questions- Q2Experimental Contexts · Analysis, Conclusions and Evaluation5M
- Q3Experimental Contexts · Observations and Measurements · Use of Techniques, Apparatus and Materials · Analysis, Conclusions and Evaluation5M
- Q4Observations and Measurements · Experimental Contexts · Use of Techniques, Apparatus and Materials · Analysis, Conclusions and Evaluation15M