Physics 5054/42 — October/November 2014
Cambridge O-Level · Alternative to Practical · worked solutions for every part, with the mark scheme
Topics Experimental Contexts · Use of Techniques, Apparatus and Materials · Analysis, Conclusions and Evaluation · Observations and Measurements · Planning Experiments and Investigations
A student uses a small plotting compass to investigate the magnetic field due to a bar magnet.
The student places a piece of thin card over one end of the magnet, as shown in Fig. 1.1a.
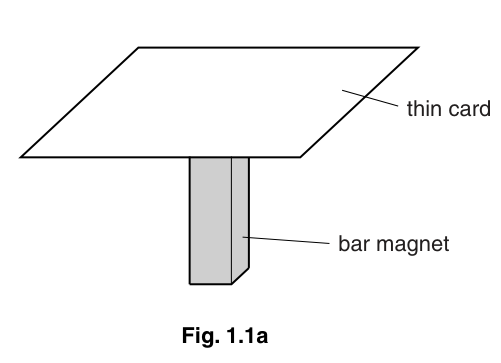
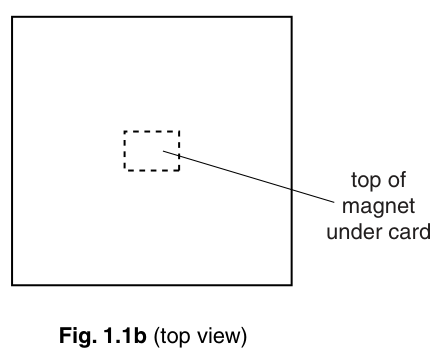
Describe how the student can use the small plotting compass to plot the shape of the magnetic field on the card.
You may draw on Fig. 1.1b if you wish.
Answer
- Place the plotting compass on the card near the magnet and mark a dot at one end of the needle.
- Move the compass so that the opposite end of the needle is placed on the dot just marked, then mark a new dot at the first end.
- Repeat this process along the line and join the dots with a smooth curve.
- Repeat the procedure starting from different positions around the magnet to draw more field lines.
Mark a dot at one end of the compass needle, move the compass so the other end is on the dot, mark a new dot, repeat to form a line and join the dots, then repeat from different starting positions.
Walkthrough
To plot a magnetic field line using a plotting compass, the student must trace the direction of the magnetic field at a series of points. First, the compass is placed on the card and a dot is marked at one end of the needle (usually the north-seeking end, which points in the direction of the field). Second, the compass is moved so that its opposite end is placed exactly on the dot just marked; a new dot is then marked at the first end. This gives two points defining the direction of the field. Third, the process is repeated along the same line, and once enough dots are marked, they are joined with a smooth curve to form one field line. Fourth, to get a full picture of the field pattern, the student must repeat the entire process starting from different initial positions around the magnet, producing a set of field lines that show the overall shape of the field.
Key Takeaways
- A plotting compass aligns with the local magnetic field direction.
- Field lines are traced point-by-point by moving the compass so its tail is on the previous mark.
- Multiple lines are needed to show the full field pattern.
Common Mistakes
- Marking dots at both ends of the needle and getting confused about which way is which; marking only one end is sufficient and clearer.
- Forgetting to join the dots with a smooth curve.
- Only drawing one line; the question asks to plot the shape of the field, which requires multiple lines from different starting points.
Things to Be Careful About
- The mark scheme awards one mark for each of the four distinct steps: marking the first dot, moving and marking the second, joining and repeating along one line, and repeating from different start points. Ensure all four are stated clearly.
Explain why the plotting compass must be small.
Answer
A small plotting compass allows the student to take more closely spaced measurements, which produces a smoother and more accurate representation of the field lines. Additionally, the magnetic field produced by the compass needle itself is small, so it does not significantly distort the field of the bar magnet being investigated.
A small compass allows dots to be placed closer together for smoother lines, and its own magnetic field is small so it does not distort the bar magnet's field.
Walkthrough
The plotting compass is a small magnet itself, and its needle creates a small local magnetic field. If the compass is large, its own field could slightly alter the field of the bar magnet being studied. More importantly, the physical size of the compass limits how closely the student can space the marks on the card. A large compass means the student has to jump a large distance between each dot, resulting in a jagged, poorly resolved line. A small compass allows the dots to be placed closer together, yielding a smoother, more accurate curve that better represents the true field shape.
Key Takeaways
- The apparatus used must not significantly disturb the phenomenon being measured.
- Smaller apparatus allows for higher resolution data collection.
Common Mistakes
- Saying "it is easier to move" or "it fits on the card"; these do not address the physics or data quality.
- Forgetting to mention that the compass's own magnetic field could distort the result if it were large.
Things to Be Careful About
- Only one valid reason is required for the single mark. Either the resolution argument (closer dots/smooth lines) or the distortion argument (compass field is small) will score.
Apart from the shape, state what else can be deduced about the magnetic field with this apparatus.
Answer
The direction of the magnetic field can be deduced from the orientation of the compass needle (the north-seeking end points in the direction of the field). The relative strength of the field can also be deduced: where the field lines are drawn closer together, the field is stronger (typically near the poles of the magnet). This also allows the student to identify which end of the magnet is the north pole and which is the south pole.
The direction and relative strength of the magnetic field, and the location of the north and south poles of the magnet.
Walkthrough
Magnetic field lines are not just geometric shapes; they carry physical information. The direction of the field at any point is tangent to the field line, and specifically points from the north pole to the south pole outside the magnet. The plotting compass needle aligns with this direction, with its north-seeking end pointing along the field. Furthermore, the density of the field lines indicates the strength of the field: lines are drawn closer together where the field is stronger (near the poles) and further apart where it is weaker. By observing where the lines converge or diverge, the student can deduce the locations of the magnet's poles and the regions of strongest and weakest field.
Key Takeaways
- Field lines indicate both direction (tangent to the line) and strength (line density).
- The north-seeking end of a compass points in the direction of the magnetic field.
- Field line patterns reveal the locations of magnetic poles.
Common Mistakes
- Saying "the force on a pole"; the question asks what can be deduced about the field, not the force.
- Forgetting that line density relates to field strength.
Things to Be Careful About
- The mark scheme accepts any one of: direction/strength of field, which end is N/S, or where the field is stronger. Any of these is sufficient for the single mark.
The rest of this paper
3 more questions- Q2Experimental Contexts · Use of Techniques, Apparatus and Materials · Observations and Measurements · Analysis, Conclusions and Evaluation12M
- Q3Experimental Contexts · Use of Techniques, Apparatus and Materials6M
- Q4Experimental Contexts · Planning Experiments and Investigations · Observations and Measurements6M