Additional Mathematics 4037/12 — May/June 2026
Cambridge O-Level · Non-calculator · worked solutions for every part, with the mark scheme
Topics Calculus · Logarithmic and exponential functions · Trigonometry · Series · Straight-line graphs · Factors of polynomials · +3 more
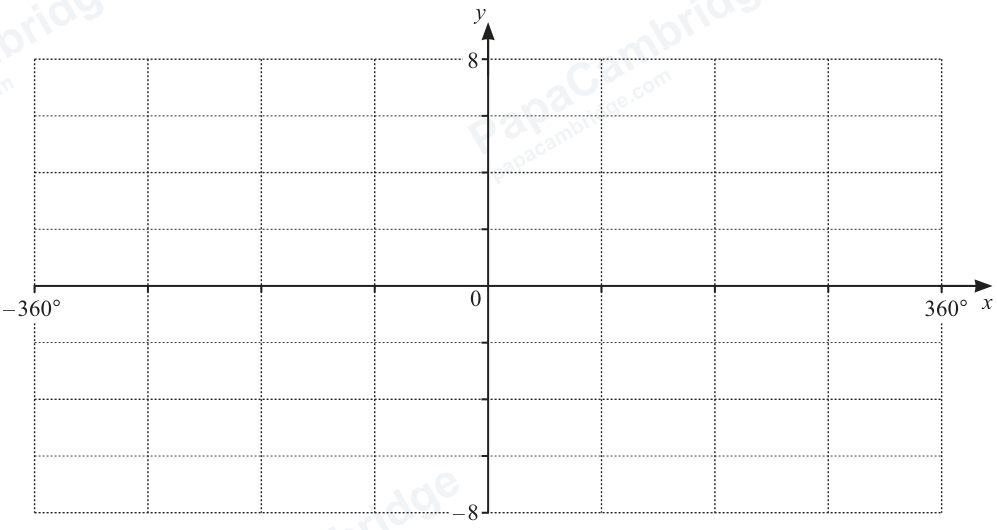
Approach
The graph of is the ordinary cosine wave stretched vertically by a factor of and then translated units down. So it oscillates between and about the line , and over it completes two full cycles.
Working
Maximum where : , at .
Minimum where : , at .
Midline crossings where : , at .
Axis intercepts where : , at .
Draw a smooth continuous cosine-shaped curve through these points, showing two complete cycles across the interval.
Answer
A cosine wave oscillating between a maximum of (at ) and a minimum of (at ), crossing the midline at and crossing the -axis at and , drawn as two full continuous cycles.
Cosine curve with maximum 2 at x = -360, 0 and 360, minimum -6 at x = +/-180, passing through (-270, -2), (-90, -2), (90, -2), (270, -2), two full cycles over -360 to 360
Walkthrough
The base cosine curve runs between and . Multiplying by stretches it so it runs between and . Subtracting slides the whole wave down by , giving a range from to with midline . The period is unchanged (), so on an interval of width we see exactly two full cycles. The key plotted points are the maxima at (value ), the minima at (value ), and the four midline crossings at (value ). Joining these smoothly gives the required sketch.
Key Takeaways
- For : amplitude is , midline is , range is to .
- Vertical stretch and translation do not change the period.
- A sketch must show correct shape, correct amplitude and the correct number of cycles for the interval.
Common Mistakes
- Drawing only one cycle instead of two across to .
- Plotting the wave about instead of the shifted midline (i.e. forgetting the translation).
- Using amplitude or drawing the wave between and by misreading the transformation order.
- Breaking the curve into separate pieces rather than one continuous smooth line — the mark scheme requires continuity and correct curvature at the end points.
- Marking the midline crossings at wrong angles; they occur every starting at .
Things to Be Careful About
- The mark scheme awards B2 only if the shape, both cycles, and the amplitude (or the four points , , , ) are all correct; otherwise a maximum of B1.
- The curve must be continuous with correct curvature at the end points — no flat or kinked joins.
- Values must be exact: maxima , minima , midline value .
Approach
For the amplitude is , the size of the oscillation about the midline.
Working
Here , so the wave rises above and falls below the midline .
Answer
4
Walkthrough
The amplitude measures how far the wave swings either side of its midline. In the coefficient of is , so the wave goes from up to : a swing of each way. The only moves the midline and does not affect the amplitude.
Key Takeaways
- Amplitude of is , independent of the vertical shift.
Common Mistakes
- Giving the range endpoints ( and ) or half the total height instead of the amplitude.
- Including the vertical shift in the amplitude calculation.
Things to Be Careful About
- This is a B1 write-down mark: the answer must appear exactly.
Approach
Multiplying the output by and subtracting changes neither the horizontal scale nor the position pattern, so the period stays that of .
Working
The period of is ; there is no coefficient inside the argument (, not ).
Answer
360 degrees
Walkthrough
The period is the horizontal length of one complete cycle. Since the argument of the cosine is just (no multiplier like ), the cycle length is unchanged from the basic cosine graph: . This matches part (a), where two cycles fit into the -wide interval.
Key Takeaways
- For , the period is ; here .
- Vertical transformations never alter the period.
Common Mistakes
- Halving or doubling the period because of the amplitude change.
- Confusing the interval width with the period.
Things to Be Careful About
- The mark scheme allows , or radians — any equivalent form is accepted.
Write down the set of values of the constant for which the equation has at least two solutions.
Approach
Solutions of correspond to intersections of the sketched curve with the horizontal line . Over the curve has two cycles, so any horizontal line meeting the curve cuts it at least twice — provided lies within the range of the function.
Working
From part (a) the curve takes all values between its minimum and its maximum . For any with
the line meets the curve, and since the curve completes two full cycles on the interval, it meets it at least twice. Outside this range the line misses the curve entirely.
Answer
-6 <= k <= 2
Walkthrough
Each solution of is an -value where the curve reaches height , i.e. a point where the horizontal line crosses the sketch. Because the sketch shows two full cycles, any height actually attained by the curve is attained at least twice (at least once per cycle). The heights attained run from the minimum up to the maximum , so the equation has at least two solutions precisely when . At the extreme values and the line touches the minima/maxima, which occur twice each (at and respectively), so the endpoints are included.
Key Takeaways
- The number of solutions of equals the number of intersections of with .
- Over two full cycles, every value in the range is hit at least twice.
Common Mistakes
- Writing or (which allows all real numbers) instead of and — the mark scheme explicitly rejects 'or'.
- Excluding the endpoints and , even though the tangent lines still give solutions.
- Giving the range of itself () without applying the stretch and shift.
Things to Be Careful About
- Follow-through is allowed on their graph provided part (a) earned at least B1, but the printed answer is .
- Both inequalities must hold simultaneously ('and'), not alternatively ('or').
Points and have coordinates and .
Approach
Find the midpoint of and the gradient of ; the perpendicular bisector passes through that midpoint with the negative reciprocal gradient. Substitute to get .
Working
Midpoint of and :
Gradient of :
Gradient of the perpendicular bisector:
Equation through :
At (the point ):
Answer
c = -5
Walkthrough
The perpendicular bisector of is the line through the midpoint of at right angles to . So we need two ingredients: the midpoint and the perpendicular gradient.
The midpoint averages the coordinates: .
The gradient of is the change in over the change in : . Perpendicular lines have gradients whose product is , so the perpendicular gradient is the negative reciprocal: .
The bisector therefore has equation . Point lies on it with , so .
Key Takeaways
- Midpoint formula: average the -coordinates and average the -coordinates.
- Perpendicular gradients multiply to : flip the fraction and change the sign.
- A point on the -axis has ; substituting gives the intercept directly.
Common Mistakes
- Using instead of (forgetting to flip as well as change sign).
- Taking the gradient of itself rather than its negative reciprocal.
- Sign slips in — the double negative in the denominator must become .
- Using the midpoint of the wrong pair of coordinates.
Things to Be Careful About
- The mark scheme allows the answer embedded in the full line equation or as the point , but the working must be shown — the gradient and midpoint each earn a mark.
- The final answer is exact; no rounding is involved.
The point has coordinates .
The lengths of and are such that where is an integer.
Find the value of .
Approach
Compute and with the distance formula, then substitute into and solve for .
Working
Substituting into :
Answer
n = 5
Walkthrough
The distance between two points is .
For to : the -difference is and the -difference is , so .
For to : the -difference is and the -difference is , so .
The relation gives . Rearranging: . Since , we get , so .
Key Takeaways
- The distance formula is the 2-D version of Pythagoras; square the differences, add, then take the root.
- Ratios of square roots can be handled by dividing under a single root: .
- Simplify fractions under the root before squaring to keep the arithmetic clean.
Common Mistakes
- Sign slips in the differences, e.g. writing instead of — squaring hides some errors but not all.
- Forgetting to square the differences before adding.
- Mishandling the factor of 2: , not .
- Giving as the answer instead of .
Things to Be Careful About
- The mark scheme accepts and as equivalents, so squared lengths are fine — but both lengths must be found for their marks.
- The relation may be used in squared form: gives directly, which is a clean alternative.
- must be an integer, as stated; the exact value is required, not a decimal.
The polynomial is given by .
Approach
By the remainder theorem, the remainder when is divided by is .
Working
Answer
-40
Walkthrough
The remainder theorem says that dividing by leaves remainder . Here the divisor is , so . Substituting into gives .
Key Takeaways
- The remainder on division by is simply — no long division needed.
- Careful sign handling when substituting negative values.
Common Mistakes
- Sign slips with or : note that , not .
- Using instead of because the divisor is written as .
Things to Be Careful About
- The answer is exact and cao (correct answer only): , not .
Approach
Find one linear factor by testing small integer values, divide the cubic by it to get a quadratic, then factorise the quadratic.
Working
Test :
So is a factor. Dividing:
Factorising the quadratic by splitting the middle term (): we need two numbers multiplying to and adding to : these are and .
Therefore
Answer
(x + 1)(3x - 2)(2x - 1)
Walkthrough
To write a cubic as a product of linear factors, first find one root by trial: substituting small integers, , so is a factor. Dividing the cubic by (by long division or synthetic division) gives the quadratic . This quadratic does not factorise over integers directly as a product of simple brackets, so split the middle term: find two numbers multiplying to and summing to , namely and , giving . The full factorisation is .
Key Takeaways
- Trial values often reveal an integer root quickly.
- Polynomial (or synthetic) division reduces a cubic to a quadratic once one factor is known.
- Splitting the middle term handles quadratics whose leading coefficient exceeds 1.
Common Mistakes
- Arithmetic errors in the division step producing a wrong quadratic coefficient.
- Stopping at without completing the factorisation into linear factors.
- Sign errors when splitting the middle term.
Things to Be Careful About
- The mark scheme requires the final product of three LINEAR factors for full credit; leaving a quadratic factor scores only part marks.
- Factors spotted purely by inspection must still be written as a product to earn all marks.
Approach
Substitute so the equation becomes ; use the factors from part (b), then take square roots.
Working
Using part (b):
From :
From :
(The factor has no real solutions.)
Answer
u = +/-sqrt(2/3), u = +/-sqrt(1/2)
Walkthrough
The equation in is exactly , since replacing by turns into . So we can reuse the factorisation from part (b): . Setting each factor to zero: gives no real solutions; gives ; gives .
Key Takeaways
- Recognising a disguised polynomial: substituting links the new equation back to the earlier factorisation.
- Solving yields TWO solutions, .
Common Mistakes
- Giving only the positive square roots and forgetting the negative ones.
- Solving from scratch instead of using the 'Hence' link to part (b).
- Including spurious solutions from (these are condoned but should not be presented as real answers).
Things to Be Careful About
- All four solutions are required; the mark scheme awards B1FT for any two correct solutions built on the part (b) factors and full credit for all four.
- Later mis-simplification is ignored (isw), but the surd forms shown are the expected exact answers.
An arithmetic progression has first term and common difference .
Approach
Use the th term formula for an arithmetic progression, , with and , for and .
Working
Answer
240 and 202
Walkthrough
The th term of an arithmetic progression is found by starting at the first term and adding the common difference times. With and , each step subtracts 2.
For the 81st term we add eighty times:
For the 100th term we add ninety-nine times:
Key Takeaways
- The formula counts steps correctly: the multiplier is , not .
- A negative common difference means the terms decrease steadily.
Common Mistakes
- Using instead of as the multiplier, giving and instead of and .
- Sign slips when multiplying by the negative common difference.
Things to Be Careful About
- Both answers are exact integers here; no rounding issues arise. Each B1 in the mark scheme is awarded for one correct term.
Approach
The terms from to form an arithmetic series of terms whose first term is and last term is . Use .
Working
Number of terms: .
(An equivalent route is , since the required sum is the total of the first 100 terms minus the total of the first 80.)
Answer
4420
Walkthrough
The sum asked for runs from the 81st term to the 100th term inclusive. Counting inclusively gives terms — forgetting the would give only 19. The first term of this block is and the last is , both found in part (a).
The sum formula using first and last terms is
so
An equally valid method is to compute and separately and subtract: and , giving again.
Key Takeaways
- The number of terms from position to position inclusive is .
- The formula is efficient when both end terms are known.
- A partial run of terms can also be found as a difference of two full sums, .
Common Mistakes
- Taking the number of terms as or instead of (the mark scheme allows follow-through on 19 or 21 but the correct count is 20).
- Using instead of when subtracting sums, which drops the 81st term.
- Adding instead of averaging inside the bracket, i.e. omitting the division by 2.
Things to Be Careful About
- The answer must be exactly ; the mark scheme awards the final A1 for this value reached from correct working. Listing and adding all twenty individual terms also earns full credit (SC B3), but is far slower.
Find, in exact form, the equation of the tangent to the curve at the point where .
Approach
Differentiate using the chain rule, evaluate the gradient at , find the exact -coordinate there, then use .
Working
Using the chain rule:
Cancelling :
At :
The -coordinate when :
Tangent through with gradient :
Equivalently:
Answer
y - ln 32 = 5(x - 3), i.e. y = 5x - 15 + ln 32
Walkthrough
The curve is , a composition of functions: an inner linear function , raised to the fifth power, inside a logarithm. To differentiate it we apply the chain rule from the outside in. Writing , we have , so , while . Multiplying gives .
This simplifies neatly: cancelling leaves , which further reduces to . (Alternatively, using the law first gives , so — the same result.)
A tangent needs both a gradient and a point. The gradient at is . The point itself comes from substituting into the original curve: , which is also — kept in exact form since this is a non-calculator paper.
Finally, the equation of a straight line through with gradient is , giving , or rearranged, .
Key Takeaways
- The chain rule handles any nesting depth: differentiate the outer function, multiply by the derivative of the inner function.
- Logarithm laws () can simplify differentiation before you start — often the fastest route.
- A tangent requires two ingredients: the gradient (from the derivative at the point) and the coordinates of the point (from the original curve, not the derivative).
- Keep answers in exact form when asked: stays as (or ), never a decimal.
Common Mistakes
- Forgetting the inner factor of from differentiating , giving instead of — this loses the B1 for the derivative.
- Reading the point's -value off the derivative rather than the original curve — the mark scheme awards a separate B1 for found from the curve.
- Giving a decimal approximation for ; the question demands exact form, and the A1 is for the exact printed form.
- Sign slips when expanding if rearranging to : it is , not .
- Substituting into incorrectly (e.g. writing correctly but then misusing it as the intercept).
Things to Be Careful About
- This is a non-calculator paper: all values must be exact — (or equivalently ) must appear in the answer; a decimal like scores nothing for the final A1.
- The mark scheme accepts equivalent forms ('oe'): , , or are all fine.
- Show the unsimplified derivative before cancelling — the B1 is awarded for a correct application of the chain rule, so the intermediate step should be visible.
- 'nfww' applies: the final answer must come from correct working; a correct-looking line from a wrong derivative does not score.
In this question lengths are in centimetres.
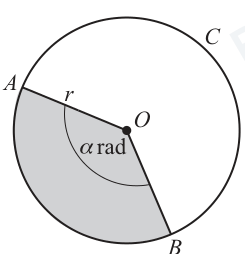
The diagram shows a circle with centre and radius .
Points , and are on the circumference of the circle.
Angle radians.
The perimeter of the shaded sector is equal to the length of the major arc, .
Find the exact value of .
Approach
The perimeter of the shaded sector consists of two radii plus its arc. The major arc subtends the reflex angle at the centre. Equate the two lengths and solve for .
Working
Perimeter of shaded sector:
Length of major arc (angle radians):
Equating:
Divide by :
Answer
alpha = pi - 1
Walkthrough
The sector's boundary is made of two straight radii (total ) and the minor arc. Since the angle at the centre is radians, the minor arc length is , so the perimeter is . The rest of the circle's circumference is the major arc , which subtends the remaining angle radians, so its length is . Setting these equal and cancelling the common factor gives a simple linear equation: , so and .
Key Takeaways
- Arc length is only when is in radians.
- The two arcs of a circle correspond to angles and .
- Perimeter of a sector includes both radii, not just the arc.
Common Mistakes
- Using degrees instead of radians — the mark scheme insists angles must be in radians.
- Forgetting to include the two radii () in the sector's perimeter.
- Writing the major arc length as or another wrong reflex angle.
- Dividing by incorrectly or losing a factor of 2 when solving.
Things to Be Careful About
- The answer must be exact: , not a decimal approximation.
- The equation must be formed from arc lengths (not areas) for the method mark.
- Consistent use of instead of is condoned, but the working must be in radians throughout.
Approach
Use the sector area formula with from part (a), set it equal to , and solve for , simplifying with the difference of two squares.
Working
Using the area of the shaded sector:
Solve for :
Factorise using :
Take the positive square root:
Answer
r = 6√(π + 1)
Walkthrough
The area of a sector with radius and angle radians is . From part (a), , so we write and multiply both sides by 2 to get . Dividing by gives . The key simplification is recognising as a difference of two squares: . Cancelling leaves , so , taking the positive root since is a length.
Key Takeaways
- Sector area is with in radians.
- Difference of two squares, , often simplifies fractions involving .
- Lengths require the positive square root.
Common Mistakes
- Using with in degrees.
- Forgetting the factor in the sector area formula.
- Leaving the answer as without taking out the factor 6 — the question says "Simplify your answer".
- Giving a negative root alongside or instead of the positive one.
- Not carrying forward the value of from part (a).
Things to Be Careful About
- The final answer must be the fully simplified exact form ; unsimplified forms score the method mark but not the final accuracy mark.
- This is a calculator-permitted paper, but the answer is still required exactly, not as a decimal.
- The method mark for taking the square root depends on having correctly reached first.
Show that can be written as .
Approach
Rewrite as , combine over a common denominator, use , and finish by writing .
Working
Combine over the common denominator :
Using the identity , so that :
Split and convert to cotangent:
This is exactly the required form, so as required.
Answer
Shown: cosec x - sin x = cos x / tan x
Walkthrough
The proof starts from the left-hand side. The first move is to express everything in terms of sine and cosine only: since is defined as , the expression becomes . Putting both terms over the common denominator gives . The Pythagorean identity rearranges to , so the numerator becomes , giving . The mark scheme insists on one more step after this: split the fraction as , recognise as , and then use so that — exactly the printed target, reached forward from the left-hand side.
Key Takeaways
- Convert every trig function back to sines and cosines as the standard opening move of any identity proof.
- The Pythagorean identity is the bridge between expressions like and .
- For "show that" questions you must derive forward to the exact printed form; an extra simplifying step (here, converting to ) is often explicitly required rather than stopping at an intermediate fraction.
Common Mistakes
- Stopping at : the mark scheme requires an additional justified step before the given answer, so this scores the final A1 only if converted further.
- Omitting the argument consistently — the scheme withholds the last A mark for consistent omission of .
- Cancelling incorrectly or claiming it equals instead of handling the split correctly.
- Starting from the right-hand side is allowed, but working backwards from the target without justifying each line loses marks.
Things to Be Careful About
- This is an AG (Answer Given) part: every algebraic line between the start and must be shown — insufficient detail forfeits the accuracy marks.
- Keep the variable on every trig function throughout; dropping it costs the final A mark.
- The final step must be fully justified: show and explicitly.
Variables and are related by the equation
Using calculus, find the approximate change in when increases from 4 by the small amount .
Approach
First find the value of at which . Then differentiate with respect to using the quotient rule, evaluate the derivative at that point, and use the small-increment relation .
Working
When :
Differentiate using the quotient rule with and :
At :
Since increases by the small amount , the corresponding change in is
Answer
-11h
Walkthrough
The question gives the change in (an increase of from 4) and asks for the corresponding change in , so we need the rate of change of with respect to at the point where .
First, we must locate the point. Setting in and cross-multiplying gives , so . This step is essential: the derivative must be evaluated at the right point.
Next we differentiate with the quotient rule, taking and :
At this equals .
Finally, the small-change approximation: since , rearranging gives . The negative sign is meaningful: as increases, decreases.
(Equivalently, one may invert the relation to and differentiate directly, then multiply by at — the mark scheme accepts this route too.)
Key Takeaways
- The small-increment approximation works in both directions; when the change in the dependent variable is given, rearrange to .
- The quotient rule requires the correct structure ; the denominator must be .
- Before evaluating a derivative, always find the exact point of evaluation — here it had to be recovered from the given -value.
Common Mistakes
- Evaluating the derivative at instead of first solving for the -value where (the mark scheme explicitly disallows this).
- Getting the quotient rule numerator backwards in a way that changes the sign, or omitting the square in the denominator .
- Forgetting the negative sign: , not — as increases, must decrease here.
- Confusing the direction of the approximation and writing but then dividing incorrectly.
- Sign slips when simplifying .
Things to Be Careful About
- The answer must be given in terms of : , an exact symbolic answer, not a number.
- The mark scheme awards the M1 for only when evaluated at the correct point ( or a correct follow-through value), and it depends on the derivative being attempted.
- The quotient rule mark requires the correct structure with the correct and ; minor errors in or may still earn it, but the denominator must be .
- Keep the negative sign through to the end; the final answer is negative because increases as decreases near this point.
Approach
Use the change-of-base result , then combine the two natural logarithms with the quotient law.
Working
By the change of base rule,
So the expression becomes
and by the quotient law of logarithms,
Answer
ln(x / (x - 1))
Walkthrough
The key fact is that means 'the power to which must be raised to give '. By the change-of-base formula, , since . Its reciprocal is therefore just .
Once the first term has become , the whole expression is , and subtracting logarithms corresponds to dividing their arguments: . This gives the single logarithm .
Key Takeaways
- The reciprocal identity , and in particular .
- The quotient law: .
Common Mistakes
- Writing incorrectly as itself — the reciprocal relation must be used.
- Trying to combine into : the quotient law applies to the arguments, not to the logarithms themselves.
- Forgetting that the answer must be a single logarithm to base (i.e. a ), not base or base 10.
Things to Be Careful About
- The mark scheme awards B1 for seeing (or equivalent), so this step must be visible even if it feels obvious.
- The final answer must be exactly one logarithm: ; leaving does not answer the question.
Approach
Rewrite both sides as single logarithms to base 5: use the power law on the left and write on the right. Then equate the arguments and solve the resulting quadratic, discarding any solution that makes a logarithm undefined.
Working
Using the power law :
Also write the constant as a logarithm:
So the equation becomes
Equating the arguments:
Factorising:
Check validity: for , and ; for , and . Both are valid.
Answer
x = 5/4, x = 10
Walkthrough
The equation mixes a multiple of a logarithm with a constant plus another logarithm. The strategy is always the same: get everything into the form 'single log = single log', then drop the logs.
First, the left side becomes by the power law. Second, the constant on the right is written as , so the right side is by the product law.
Now both sides are single logarithms to the same base, so their arguments must be equal: . Expanding gives , i.e. , which factorises as , giving or .
Finally each candidate must be checked against the domains of the original logarithms: we need and . Both candidates satisfy these, so both are accepted.
Key Takeaways
- Power law: ; product law: .
- Any constant can be written as to match bases.
- If then — but only after both sides are genuine single logarithms.
- Logarithm arguments must be positive, so solutions must be checked against the original equation's domain.
Common Mistakes
- The mark scheme explicitly flags M0 XP for writing — treating addition of logarithms as multiplication of logarithms. Addition inside logs means multiplying the arguments.
- Rejecting one of the two valid solutions: the mark scheme awards A0 if either solution is rejected. Both and satisfy the domain conditions here.
- Forgetting to square the whole of : , not .
- Sign slips forming from .
- Accepting a solution without checking and — in general such checks can remove extraneous roots.
Things to Be Careful About
- The mark scheme requires 'no other solutions' and rejects answers where either root is discarded (A0 if either solution is rejected).
- The quadratic must be solved correctly from the candidate's own three-term quadratic (follow-through allowed via factorising, the formula, or completing the square), but the final values must be exact: and .
- Missing brackets around before squaring changes the equation entirely; the scheme allows recovery of missing brackets but the correct form earns the marks.
It is given that a geometric progression has the following terms.
Approach
In a geometric progression each term is obtained by multiplying by the common ratio , so the ratio of consecutive terms is constant:
Substitute the given expressions in , solve for using , then read off and find the first term .
Working
Cross-multiplying and expanding both sides:
Dividing by 2:
Factorising:
so or . Since :
Then the terms are: 2nd term , 3rd term , 4th term . Hence
The first term satisfies , so
Answer
common ratio = 1/4, first term = 128
Walkthrough
A geometric progression has a constant ratio between consecutive terms, so the ratio of the 3rd term to the 2nd must equal the ratio of the 4th term to the 3rd. Writing this single equation in gives . Cross-multiplying produces a quadratic: expanding and , then collecting everything onto one side gives , which halves to . This factorises as , giving roots and ; the condition selects . Substituting back gives the actual terms 32, 8, 2, so the common ratio is . Since the 2nd term is , the first term is .
Key Takeaways
- The defining property of a GP — equal ratios of consecutive terms — turns unknown-term problems into equations.
- Conditions such as are there to discard extraneous roots; always check which root survives.
- Once the terms are known numerically, follows directly and follows from any known term via .
Common Mistakes
- Expanding incorrectly (sign slips give or similar); the mark scheme allows one expansion error but not more.
- Keeping both roots and reporting or from , ignoring the given .
- Dividing the equation by at some stage and losing a root.
- Finding correctly but computing as instead of .
- The mark scheme notes scores only 'nfww' — no marks if reached from wrong working.
Things to Be Careful About
- Show every algebraic line: the scheme awards M1 for the correct set-up, A1 for the simplified quadratic, A1 for the correct root, and A1 for both and together — both values are needed for that final mark.
- The second solution method (writing terms as , , ) is also accepted, but follow one route fully rather than mixing them.
- Answers should be exact fractions here (), not decimals.
Approach
Use the sum-to-infinity formula with the values and carried forward from part (a), then compare with .
Working
Since , the sum to infinity exists:
Comparing with :
Answer
512
Walkthrough
This part is a direct application of the sum-to-infinity formula, which applies because the common ratio satisfies . Carrying forward and from part (a), we compute . The question states this equals with an integer, so comparing denominators gives .
Key Takeaways
- is valid only when — always check this before applying it.
- Multi-part GP questions thread results forward: part (b) depends entirely on the and found in part (a).
Common Mistakes
- Using instead of in the denominator, giving instead of .
- Forgetting to divide by correctly — dividing by a fraction means multiplying by its reciprocal.
- Reporting as the answer when the question asks specifically for the integer .
- Using values of or inconsistent with part (a); the mark scheme allows follow-through only on numeric values with .
Things to Be Careful About
- The M1 depends on having earned at least one method mark in part (a), so part (a)'s working must be shown properly.
- Give the exact value ; no rounding is involved here.
The position vectors of points and relative to an origin are
The point lies on and is such that .
The point lies on such that and .
Approach
First find from the two position vectors. Since , point is of the way along , so . Then , and finally .
Working
Since :
Then:
Since :
Answer
(3, -1.5)
Walkthrough
The key idea in vector geometry questions like this is that every displacement can be written as the difference of two position vectors. We start by computing , which tells us how to travel from to . The ratio means divides the segment into four equal parts, taking three of them from , so . Adding this to gives the position vector of . Finally, we are told ; rearranging gives , which evaluates directly.
Key Takeaways
- A displacement vector between two points is found by subtracting their position vectors component by component.
- A ratio on a line segment means the fraction of the whole segment from the first point.
- Vector equations such as let you hop between known and unknown points.
Common Mistakes
- Subtracting in the wrong order when finding (it must be , giving , not ).
- Using or instead of as the fraction of for .
- Writing instead of adding — check the direction of each arrow carefully.
- Giving coordinates instead of a column vector: the mark scheme states the final answer must be a vector.
Things to Be Careful About
- The final answer must be presented as a column vector — the scheme marks the final answer only if it is a vector.
- Keep components exact; is exact here so no rounding issues arise.
- The scheme allows equivalent routes (e.g. via ), but every route must show the intermediate vectors.
Approach
Using the result from part (a), compare component by component.
Working
From part (a):
Using the first component:
Check with the second component: ✓
Answer
0.75
Walkthrough
Part (a) gave us , and the question defines by . Two vectors are equal only when all matching components are equal, so equating the top components gives , hence . The bottom components confirm this: , exactly as required.
Key Takeaways
- Equality of vectors means equality of every component, giving one equation per component.
- A scalar multiple scales both components of by the same factor, so either component can be used to find .
Common Mistakes
- Dividing the wrong way round ( instead of ).
- Not checking the second component, which would catch an arithmetic slip in part (a).
Things to Be Careful About
- The mark scheme requires full marks in part (a) for this B1 — an error in costs this mark too, since depends on it.
- Both and are accepted forms.
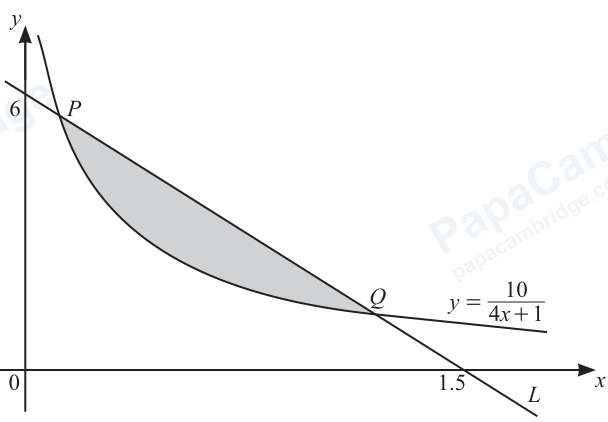
The diagram shows part of the curve and the line .
passes through the points and .
The curve and intersect at the points and .
Find the exact area of the shaded region.
Approach
The shaded region lies between the line (above) and the curve (below), between their intersection points and . Find the equation of , solve for the intersection -coordinates, then compute (area under line) − (area under curve).
Working
Equation of . Through and :
Intersection points. Set curve equal to line:
Corresponding -values: at , ; at , . So , .
Area under the line (trapezium with parallel sides and , width ):
(Equivalently, .)
Area under the curve:
Evaluating between the limits:
Shaded area:
Answer
21/8 − (5/2)ln(5/2)
Walkthrough
The shaded region is bounded above by the straight line and below by the curve , so its area is the integral of (line − curve) between the two intersection points.
First we need the equation of . It passes through and , so its gradient is , giving .
Next, find where the line meets the curve by solving . Multiplying both sides by gives a quadratic: , which rearranges to . This factorises as , so or . Substituting back into the line gives and : these are points and .
The area under the line between these -values is a trapezium with parallel sides of lengths and and width , so its area is .
The area under the curve needs integration of a reciprocal function. Using the standard result , we get . Evaluating from to gives .
Subtracting, the shaded area is , using the log law .
Key Takeaways
- The area between a curve and a line equals the integral of (upper function − lower function) over the interval between their intersections.
- Intersections are found by equating the two expressions and solving — here producing a quadratic that factorises nicely.
- ; when evaluating a definite integral of this form, the constant of integration cancels.
- Log laws allow to be combined into for a compact exact answer.
- When one boundary is a straight line, its 'area' can be found by trapezium geometry instead of integration.
Common Mistakes
- Subtracting the areas the wrong way round: the mark scheme explicitly awards A0 if the subtraction is done incorrectly — the line is above the curve on this interval, so it must be trapezium minus curve integral.
- Forgetting to divide by when integrating ; writing just loses the accuracy mark.
- Sign errors when expanding or rearranging into standard quadratic form.
- Discarding one root of the quadratic or misidentifying which point is and which is — both roots are needed as limits.
- Rounding the final answer to a decimal; the question demands the exact form involving .
- Omitting the constant of integration in the indefinite integral (harmless here once limits are applied, but bad practice if limits are substituted late).
Things to Be Careful About
- The final answer must be exact: (equivalently ). Do not evaluate numerically.
- The substitution of limits into the form depends on all earlier method marks being correct ('dep' marking), so keep every step visible.
- Transcription errors in copying values forward are allowed ('allow transcription error'), but wrong-way-round subtraction is not.
- Check the direction of subtraction by testing a point inside the interval: at , the line gives while the curve gives , confirming the line is above.
Show that, for all values of , .
Approach
Write each combination in factorial form, cancel the factorials down to a product of three factors, expand both quadratics, then take out the common factor and simplify to reach .
Working
Cancelling the factorials:
Expanding both numerators:
So
as required, for all values of (so that all factorials are defined).
Answer
Shown: (n+2)C3 - nC3 = n^2
Walkthrough
The identity must be proved by starting from the left-hand side. The first step is to convert each binomial coefficient into its factorial definition: . This gives and — this conversion is what earns the method mark.
Next, cancel the factorials. Since , dividing by leaves just the product of three consecutive factors; similarly . With this gives two fractions over 6.
Expanding the brackets: and , so each numerator is times one of these quadratics. Taking out the common factor leaves the difference of the two quadratics, which is . Finally , matching the right-hand side exactly.
Key Takeaways
- The factorial form of a binomial coefficient works even when the top entry is an expression like : .
- Factorials telescope: is just the product of the three factors from to .
- Proving an identity means working from one side to the other without ever assuming the result.
Common Mistakes
- Writing as incorrectly, e.g. using with the wrong or forgetting the denominator entirely.
- Sign slips when subtracting: the whole quadratic must be negated, giving , not .
- Expanding wrongly (a common error is ).
- Starting from and working backwards — the scheme requires working from the left-hand side to obtain the right-hand side.
- Cancelling factorials incorrectly, e.g. claiming or leaving unmatched factors.
Things to Be Careful About
- The condition matters because must be defined; mention it in the conclusion if asked "for all values of ".
- The mark scheme allows to be left unexpanded instead of writing 6.
- The final line must read exactly — the answer is given (AG), so every intermediate line of correct algebra must be shown; insufficient detail loses marks.
- Keep the subtraction bracketed until the expansion is complete to avoid sign errors.