Additional Mathematics 4037/23 — October/November 2025
Cambridge O-Level · Calculator · worked solutions for every part, with the mark scheme
Topics Trigonometry · Logarithmic and exponential functions · Equations, inequalities and graphs · Calculus · Straight-line graphs · Factors of polynomials · +6 more
It is given that , where and are constants.
is a factor of .
When is divided by the remainder is .
Find the values of and .
Approach
Since is a factor, the factor theorem gives . Since division by leaves remainder , the remainder theorem gives . These two equations are linear in and ; solve them simultaneously.
Working
By the factor theorem:
By the remainder theorem:
Eliminate : multiply the second equation by :
Add to :
Substitute into :
Answer
a = 2, b = 0
Walkthrough
The polynomial is with two unknown constants. Each piece of information about factors and remainders converts into an equation.
First, the factor theorem: if is a factor of , then substituting must give zero. Substituting gives , which simplifies to . This is the first linear equation in and .
Second, the remainder theorem: when a polynomial is divided by , the remainder equals the value of the polynomial at (the root of the divisor). So , giving , i.e. . This is the second equation.
Now solve simultaneously. Multiplying the second equation by makes the coefficient of equal to , matching the first equation's , so adding eliminates : , hence . Back-substituting into gives , so .
Key Takeaways
- The factor theorem: is a factor of exactly when .
- The remainder theorem: dividing by leaves remainder — note that for divisor you substitute , not .
- Two independent conditions on two unknowns produce a pair of simultaneous linear equations solvable by elimination or substitution.
Common Mistakes
- Substituting instead of for the divisor — the remainder theorem uses the root of the divisor, so the sign flips.
- Sign slips when expanding and , or with the term becoming at .
- Arithmetic errors in simplifying the constants (; , so ).
- The mark scheme awards "nfww" (no follow-through from wrong working): correct-looking answers reached via incorrect equations score nothing, so every substitution line must be shown correctly.
Things to Be Careful About
- Both equations must be formed before solving; the M1 for elimination is only awarded when both equations are genuinely linear in and .
- Show the substituted expressions (e.g. ) explicitly — these carry the B1 marks, not just the simplified forms.
- Check the final answer: with , , , and indeed and . A quick verification guards against sign errors.
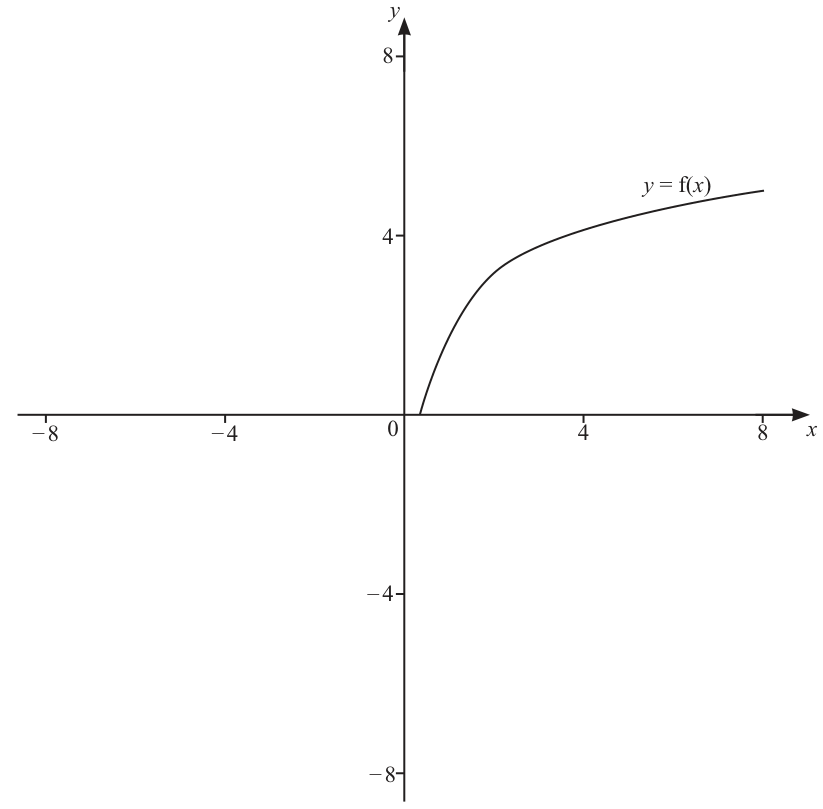
Approach
The graph of is the mirror image of the graph of in the line . Every point on the original curve becomes the point on the inverse curve.
Working
The given curve starts at and rises smoothly through the first quadrant, flattening as it goes (it passes near and reaches about at ).
Reflecting each point in the line :
so the inverse curve also starts at the origin and passes through .
The inverse has the reflected shape: it rises steeply at first (near the -axis it climbs quickly, since the original was flat there) and then becomes steeper again for large , because the original was steep near . Its domain is the range of and its range is the domain of , so it occupies the same first-quadrant region.
Answer
Draw the mirror image of the given curve in the line : a curve starting at , passing through approximately where it crosses the original curve, rising steeply close to the -axis and then bending upward more sharply than the original for large , defined over the same first-quadrant region.
Inverse curve drawn as the reflection of y = f(x) in the line y = x, starting at (0, 0), crossing f(x) again at about (4, 4)
Walkthrough
An inverse function undoes the original function: if sends an input to the output , then sends back to . On a graph this means every point on reappears as on — the coordinates are swapped. Swapping coordinates is exactly what reflecting in the line does, so the whole inverse curve is obtained by folding the diagram along that diagonal line.
Here the original curve starts at , which lies on the mirror line itself, so the inverse must also start at . The curves cross wherever a point satisfies , i.e. on the line ; from the sketch the second crossing is at roughly , which the mark scheme expects to be shown. The shape matters too: the original is steep near and flat for large , so the inverse is flat near the origin's neighbourhood along the other axis and steep for large — the mark scheme pays for the correct shape over the correct domain and range, not just any curve through two points.
Key Takeaways
- The graph of is always the reflection of the graph of in the line .
- Points on the line are fixed by the reflection, so and intersect only on .
- The domain of equals the range of , and vice versa.
Common Mistakes
- Reflecting in the -axis or the -axis instead of the line .
- Drawing the inverse with the same shape as the original rather than the mirrored shape (steep/flat behaviour swapped).
- Omitting the second intersection point near , which the mark scheme explicitly looks for.
- Extending the inverse into regions where the original function was never defined.
Things to Be Careful About
This is a B1 drawing mark: the scheme requires the correct shape over the correct domain and range, so a rough freehand curve through two points is not enough. Make sure the reflected curve visibly bends the opposite way to the original between the origin and .
Approach
State the standard geometric relationship between a function and its inverse.
Working
Each point on corresponds to the point on , which is precisely a reflection in the line .
Answer
Reflection in the line y = x
Walkthrough
Swapping the coordinates of every point, , is exactly the transformation 'reflect in the line ', since that line consists of all points whose two coordinates are equal. So the one-line description required here is simply that the two graphs are mirror images in .
Key Takeaways
- Function and inverse graphs are reflections of each other in the line ; this is the graphical counterpart of swapping and algebraically.
Common Mistakes
- Saying 'reflection in the origin' or 'rotation' instead of reflection in the specific line .
- Writing 'reflection in ' ambiguously — the accepted form is the line (or equivalent wording).
Things to Be Careful About
This is a B1 for 'reflection in or equivalent'; any clear equivalent statement (e.g. 'mirror image in the diagonal line ') earns the mark, but a vague answer like 'they look similar' does not.
A function is defined by for .
Approach
Write , take natural logs of both sides to undo the exponential, make the subject, then swap and to obtain .
Working
Let
Take natural logarithms of both sides:
Square both sides:
Make the subject:
Swap the variables to obtain the inverse function:
Answer
(ln x)^2 + 2
Walkthrough
To find an inverse function we start from and solve for in terms of . The obstacle is the exponential : the operation that undoes an exponential is the natural logarithm, since . Taking of both sides strips away the exponential and leaves . Squaring removes the square root, giving . Finally, because the inverse function takes inputs named , we swap the letters: . The swap can be done at the start () or at the end — the mark scheme accepts either, awarding M2 for the complete method including the change of subject and the swap of variables at some point.
Key Takeaways
- To find : write , rearrange to get alone, then interchange and .
- is the inverse operation of exponentiating base , so it is the tool for undoing .
- Undo operations happen in reverse order: the outermost operation (the exponential) is removed first, then the square root, then the subtraction of 2.
Common Mistakes
- Forgetting to swap variables at some stage, leaving the answer as .
- Writing or instead of — squaring the logarithm is not the same as squaring its argument.
- Taking log base 10 instead of natural log, giving .
- Mishandling the order: trying to remove the '' before dealing with the exponential.
Things to Be Careful About
The mark scheme awards M1 specifically for seeing (or ), so that line must appear explicitly. The final A1 is for the exact form ; keep the square on the whole logarithm and the outside it.
Approach
The range of is the domain of , which is given in the question.
Working
Since is defined for , the outputs of satisfy
(Check: for all valid , so , consistent.)
Answer
g^-1(x) >= 2
Walkthrough
Domain and range swap places under inversion: the inputs of are the outputs of , and the outputs of are the inputs of . Since is defined only for , every output of must be at least 2. This agrees with the formula found in part (i): a square is never negative, so .
Key Takeaways
- Range of = domain of ; this is often a 'write down' mark worth spotting immediately.
Common Mistakes
- Giving the range of (i.e. or similar) instead of the range of .
- Writing instead of — the endpoint 2 is included because is defined at .
Things to Be Careful About
Use , not : the strictness comes directly from the given condition for .
Approach
Substitute into : replace in by , then simplify.
Working
Simplify inside the square root:
Therefore
Answer
e^(1/x)
Walkthrough
The composite means apply first, then apply to the result: . Substituting into gives . The and cancel, leaving (valid because , so no modulus sign is needed). Hence . The mark scheme's B1 is for reaching , showing the substitution has been made correctly before simplifying.
Key Takeaways
- : the function written next to acts first.
- Simplify inside radicals before evaluating; , which equals only when .
Common Mistakes
- Computing instead of — composition order matters.
- Leaving the answer as without simplifying, losing the final B1.
- Writing or forgetting the cancellation of .
Things to Be Careful About
Both marks are accuracy marks (B2 for the fully simplified ); the intermediate form scores B1 only, so carry the simplification through. The condition from 's domain is what makes legitimate without absolute values.
Approach
Complete the square on : take half the coefficient of , square it, and adjust by the constant.
Working
Half of is , so
Therefore
Answer
(x - 1/2)^2 - 25/4
Walkthrough
Completing the square rewrites a quadratic so the squared term is isolated. For , the coefficient of is ; half of it is , giving . But , which is a quarter too big, so we must subtract . Then the original constant is carried along: .
Key Takeaways
- Completing the square: take half the coefficient of , square it, subtract the same amount to compensate.
- The result is the vertex form, which immediately reveals the turning point.
Common Mistakes
- Forgetting to subtract the squared half-coefficient, giving instead of .
- Sign slips: the bracket is , not , since the coefficient of is negative.
- Writing is fine ("oe"), but leaving as loses the mark.
Things to Be Careful About
- The mark scheme accepts equivalent forms ("oe") and ignores later mis-simplification ("isw"), but the completed-square form must be exact — fractions, not decimals.
- Partial credit (B1) is given for either the correct bracket alone or the correct constant alone, so show both clearly.
Approach
Use the completed-square form from part (i). Since , the minimum occurs when the bracket is zero.
Working
From part (i),
The minimum value occurs when , i.e. .
Answer
The stationary point is
(1/2, -25/4)
Walkthrough
In the form , the squared bracket can never be negative, so the smallest value of is , achieved when the bracket is zero, i.e. at . This is exactly why completing the square was done in part (i) — the vertex can be read straight off.
Key Takeaways
- For , the vertex is at .
- "Hence" means the previous answer must be used, not the curve re-differentiated.
Common Mistakes
- Sign error in the -coordinate: the vertex of is at , not .
- Giving the -coordinate as instead of .
Things to Be Careful About
- The mark scheme is STRICT follow-through from part (i): the coordinates must be , so an error in part (i) carries through — accuracy in part (i) protects both marks here.
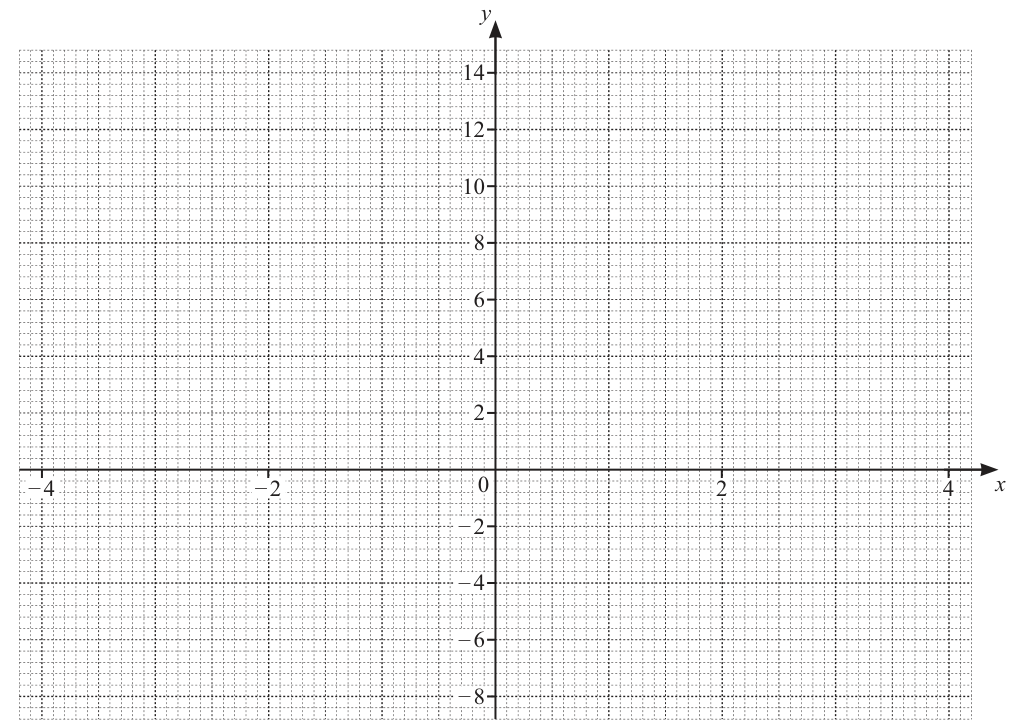
Approach
The curve is the parabola with every negative part reflected in the -axis. Find where the parabola is negative, its intercepts, and its vertex, then sketch.
Working
The parabola crosses the -axis at and , and is negative between these roots.
Key points:
- -intercept: , so .
- Cusps on the -axis at and , where the reflection happens.
- Vertex of the parabola from part (a)(ii): , which reflects to a local maximum at .
- Endpoints: at , ; at , .
The sketch is a W-shaped curve: falling from to the cusp at , rising to the maximum through , falling to the cusp at , then rising to .
Answer
A W-shaped modulus curve with cusps at and , -intercept , local maximum , passing through and .
W-shaped modulus curve with cusps at (-2, 0) and (3, 0), y-intercept (0, 6), local maximum (0.5, 6.25), through (-4, 14) and (4, 6)
Walkthrough
The modulus leaves unchanged where and reflects it where . Since is negative only between and , that middle piece of the parabola is flipped above the axis, creating sharp cusps at and . The parabola's minimum at becomes a local maximum there, and the -intercept becomes . Evaluating at the interval ends gives and to anchor the outer arms.
Key Takeaways
- reflects only the below-axis parts of the graph of .
- Reflection points occur at the roots of , producing cusps there.
- A reflected minimum becomes a local maximum of the modulus curve.
Common Mistakes
- Drawing smooth minima at and instead of sharp cusps — the mark scheme explicitly penalises this (B1 only for "correct shape with no cusps").
- Reflecting the whole curve or getting intercepts wrong: the scheme requires intercepts at , and for full credit.
- Plotting the unreflected parabola dipping below the axis.
Things to Be Careful About
- The mark scheme awards B3 only for the fully correct graph; B2 requires correct shape with cusps AND correct intercepts AND the maximum in the first quadrant. Make the cusps visibly sharp and label the intercepts.
- Keep the curve within as instructed.
Approach
Draw the line on the graph from part (b) and read off the -values where the modulus curve lies below it.
Working
Solve to locate the crossings. For the outer (positive) branches:
giving and . For the middle (reflected) branch:
giving and .
The curve is below between and , and between and .
Answer
-2.7 < x < -1 or 2 < x < 3.7
Walkthrough
The inequality asks where the modulus curve sits below the horizontal line . Drawing that line on the graph from part (b), it cuts the curve four times: twice on the left outer arm and reflected hump, twice on the right. The crossings on the reflected middle branch come from , which factorises neatly as , giving and . The outer crossings come from , i.e. , whose roots are approximately and . The curve is below the line in the two intervals between consecutive crossings: and .
Key Takeaways
- A modulus inequality is solved graphically by intersecting with a horizontal line and reading intervals where the curve is below (or above) it.
- splits into and .
Common Mistakes
- Giving only one of the two intervals — the mark scheme awards one mark per interval (STRICT FTB1 for either one).
- Reading the outer crossing values inaccurately from the graph; they are and to 2 significant figures.
- Including the endpoints with : the inequality is strict, so the crossing values themselves are excluded.
Things to Be Careful About
- The marks are STRICT follow-through from the candidate's own graph, and depend on part (b) earning at least B1 with correct intercepts and the curve crossing four times — an inaccurate graph in (b) costs marks here too.
- State the answer as a pair of inequalities on , not as -values.
Integrate the following with respect to .
Approach
The integral of is ; here , so divide by .
Working
Answer
(1/5)e^(5x-2) + c
Walkthrough
The derivative of is by the chain rule, so to integrate we must undo that factor of : the antiderivative is . The constant of integration is added since this is an indefinite integral.
Key Takeaways
- Integrating gives .
- Always include the constant of integration in an indefinite integral.
Common Mistakes
- Forgetting to divide by the coefficient (writing just ).
- Omitting the constant of integration.
Things to Be Careful About
- The mark scheme awards B1 for any non-zero constant multiple of , so the factor is the key step; the final answer must be exactly .
Approach
The integral of is . Here , so divide by ; since , the quantity is positive and may be written without modulus.
Working
Answer
-(1/3)ln(4 - 3x) + c
Walkthrough
We use the standard result . Differentiating gives , so to obtain just we must multiply by . The condition guarantees , so the logarithm is defined and no modulus sign is needed.
Key Takeaways
- , and the sign of matters.
- A given domain condition can justify dropping the modulus.
Common Mistakes
- Writing and missing the minus sign from the coefficient .
- Writing (misreading the argument of the logarithm).
- Omitting the constant of integration.
Things to Be Careful About
- The mark scheme gives B1 for or with non-zero, so the sign and the factor are both essential; the final answer must be .
Approach
Integrate : since , the antiderivative is . Then evaluate at the limits using exact values and .
Working
Evaluate from to :
Using and :
This is exactly the required result.
Answer
2(1 - √3/3), as required
Walkthrough
This is a "show that" question, so we must derive the printed answer from scratch. First find the antiderivative: we know , but the argument here is , so the chain rule in reverse means we divide by the inner derivative , giving . Next we apply the limits: at the argument is , where ; at the argument is , where . Subtracting lower from upper gives , which factors as — exactly the printed target, so the result is established.
Key Takeaways
- .
- Exact values: , .
- Definite integrals are evaluated as antiderivative at upper limit minus antiderivative at lower limit.
Common Mistakes
- Writing without the factor (forgetting to divide by the inner derivative ).
- Subtracting the limits the wrong way round, giving .
- Leaving as without converting to the printed form , so the completion to the given answer is not fully justified.
- Working in degrees instead of radians.
Things to Be Careful About
- The mark scheme awards M1 for with non-zero and M2 for the correct , then A1 for a fully justified completion to — every line between the antiderivative and the printed answer must be shown, including the exact values of the tangents. Since this is an AG (answer given) part, the derivation must run forward to exactly the printed form.
Six different digits are chosen from the nine digits .
These digits are used to form a 6-digit number.
Find how many 6-digit numbers can be formed in the following cases.
Approach
Choosing and arranging 6 different digits from 9 is an ordered selection, so the number of arrangements is .
Working
Answer
60480
Walkthrough
We must pick 6 of the 9 digits and place them in order to make a 6-digit number. Since the order matters (different orders give different numbers), this is a permutation: the first position can be filled in 9 ways, the second in 8 ways, and so on down to 4 ways for the sixth position.
Key Takeaways
- When digits are all different and each is used at most once, counting arrangements is a straightforward product of decreasing factors, i.e. a permutation.
- Recognise when to use versus combinations: here order matters, so permutations.
Common Mistakes
- Using instead of — that would ignore the ordering of the digits.
- Arithmetic slips in the product; the answer is exact and 'cao' applies.
Things to Be Careful About
- The final answer must be exactly ; there is only one mark, so any slip loses it.
Approach
A number greater than must start with 7, 8 or 9. For each choice of first digit, arrange 5 of the remaining 8 digits.
Working
First digit: 3 choices (, or ). Remaining 5 places filled from the other 8 digits:
(Equivalently, since exactly one third of all numbers start with 7, 8 or 9: .)
Answer
20160
Walkthrough
For the number to exceed , its first digit must be 7, 8 or 9 — three choices. Once the first digit is fixed, the remaining five positions are filled with an ordered arrangement of 5 digits chosen from the 8 that are left:
Multiplying by the three choices of leading digit gives . A neat check: by symmetry, exactly one third of all unrestricted numbers start with 7, 8 or 9, giving .
Key Takeaways
- Inequality conditions on large numbers usually constrain the leading digit(s); fix those first, then permute the rest.
- Symmetry arguments (each digit equally likely to lead) provide quick alternative counts.
Common Mistakes
- Counting only numbers starting with 7, forgetting 8 and 9 also work.
- Using without multiplying by 3.
- Reusing the leading digit among the remaining five (must be 5 digits from the remaining 8).
Things to Be Careful About
- The M1 requires seeing the structure (or equivalent); show this line explicitly before evaluating.
Approach
Numbers greater than either start with 8 or 9 (any arrangement), or start with 7 followed by a second digit of 5, 6, 8 or 9. Alternatively, take the answer to (b) and remove those starting , , or .
Working
Case 1: starts with 8 or 9:
Case 2: starts with 7, then second digit is 5, 6, 8 or 9 (4 choices), then 4 remaining digits arranged in the last 4 places:
Total:
(Alternative using part (b): , where counts numbers starting 7 then 1, 2, 3 or 4.)
Answer
16800
Walkthrough
The condition 'greater than ' now constrains the first two digits, so we split into disjoint cases.
Case 1: if the number starts with 8 or 9, it automatically exceeds . That gives numbers.
Case 2: if it starts with 7, the second digit must be 5, 6, 8 or 9 — four choices (note 7 itself is used, so it cannot be the second digit). After fixing these two digits, the last four places hold an arrangement of 4 digits from the remaining 7: .
Adding the disjoint cases: .
A slicker route reuses part (b): from the numbers above , remove those starting 7 followed by 1, 2, 3 or 4, which count , leaving .
Key Takeaways
- When a threshold fixes more than one leading digit, split into cases where the constraint is automatic versus where further digits matter.
- 'Hence'-style reuse: earlier answers can be adjusted by subtracting a counted sub-case.
- Cases must be disjoint so their counts can simply be added.
Common Mistakes
- Allowing the second digit after 7 to be 7 again (digit already used), or forgetting 8 and 9 as valid second digits.
- Subtracting the wrong sub-case in the alternative method (must be 7 followed by 1–4, not 5–9).
- Double-counting: including numbers starting 75, 76, 78, 79 within the 'starts with 8 or 9' case.
Things to Be Careful About
- The mark scheme awards separate M1s for the case starting 7 then 5/6/8/9 () and the case starting 8 or 9 () — show both counts explicitly. If using the subtraction route, the value must appear.
The line meets the curve at two points and .
Find the equation of the perpendicular bisector of , giving your answer in the form , where , and are integers.
Approach
Find and by equating the line and the curve. Then find the midpoint of and the gradient perpendicular to , and write the equation of the perpendicular bisector through that midpoint.
Working
Set the equations equal:
Factorise:
On the line :
So and .
Midpoint of :
Gradient of is , so the perpendicular gradient is .
Equation of the perpendicular bisector:
Multiply through by :
Divide by :
Answer
2x + 6y + 1 = 0
Walkthrough
The points where a line meets a curve are found by setting their -values equal — this eliminates one variable and gives a single equation in . Here rearranges to , which factorises as , giving or . Substituting each back into the simpler equation (the line) gives the full coordinates and .
The perpendicular bisector must pass through the midpoint of : averaging the coordinates gives . The gradient of is (it is the given line), so the perpendicular gradient is the negative reciprocal, .
Using point–slope form with the midpoint and the perpendicular gradient:
Clearing fractions by multiplying by gives , i.e. , which simplifies to in the required form with integer coefficients.
Key Takeaways
- Intersections of a line and curve are found by equating the expressions and solving the resulting polynomial.
- A perpendicular bisector needs exactly two ingredients: the midpoint of the segment and the negative reciprocal of its gradient.
- Point–slope form plus clearing denominators converts any line into with integers.
Common Mistakes
- Substituting the -values back into the curve instead of the line — both work, but arithmetic slips are more likely in the curve; either is accepted if correct.
- Forgetting to take the negative reciprocal, giving a parallel line rather than a perpendicular one.
- Using one endpoint instead of the midpoint when forming the equation.
- Leaving fractional coefficients () — the question demands integers, so clear the fractions at the end.
- Sign errors when rearranging into form.
Things to Be Careful About
- The final answer must be in the exact form with , , integers — equivalent forms like score only partial credit per the mark scheme's "A1 for correct equation in a different form" note.
- Follow-through applies to the midpoint and perpendicular gradient steps, but only from correctly found intersection points.
- Keep fractions exact throughout; decimals like are acceptable but make the final integer conversion harder.
Solve the equation
for .
Approach
Use the identity to rewrite the whole equation in terms of only, solve the resulting quadratic, then find every angle in the interval.
Working
Using :
Factorising:
So or .
For , we need . Since has period , each value gives two angles in this range.
For : principal value , and :
For : reference angle , so angles in the second and third quadrants:
Answer
x = 15, 38.9, 75, 98.9 (degrees)
Walkthrough
The equation mixes and . The identity converts the secant term into tangent terms, giving a quadratic in : . This factorises as , so or .
Because the argument is , the interval becomes , which is one full turn — so each tangent value yields two angles (tangent repeats every ).
For : the acute solution is , and adding gives . Dividing by 3 gives and .
For : the reference angle is . Tangent is negative in the second and third quadrants, so and . Dividing by 3 gives and , i.e. and to 1 decimal place.
All four values lie inside , and there are no extras.
Key Takeaways
- The identity turns mixed sec/tan equations into quadratics in .
- When the unknown appears as , multiply the given interval by before listing angles, then divide the angles by at the end.
- Tangent has period , so each value of produces two solutions over a full range of .
- For negative tangent values, use the second and third quadrants via the reference angle.
Common Mistakes
- Forgetting to scale the interval: solving only for loses half the answers.
- Taking only the principal value of each arctan and missing the second angle from the periodicity.
- Using the wrong quadrants for (tangent is positive in the first and third quadrants, negative in the second and third).
- Dividing by 3 before finding both angles, or rounding before dividing (rounding too early changes the final answer).
- Sign errors when factorising or expanding .
- Including extra angles outside — the mark scheme penalises extras in range.
Things to Be Careful About
- The mark scheme awards A2 for all four correct angles with no extras in range, and A1 for any two correct angles ignoring extras — so completeness matters, but so does not inventing extra roots.
- Angles are required to 1 decimal place (, ); keep full accuracy on until the division by 3 is done.
- Check that every answer satisfies : here is valid but anything beyond must be rejected.
In this question the units are metres.
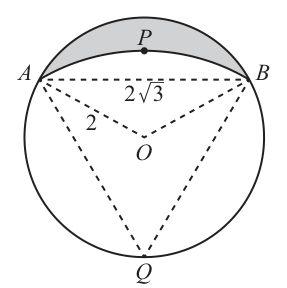
The diagram shows a circle, centre and radius 2.
The chord has length .
The point lies on the circle such that .
The arc is part of a circle, centre .
Approach
Let be the midpoint of . Since , the line bisects angle , and . Find half of angle from the right triangle , then double it.
Working
Since lies on the circle with , the points and both lie on the perpendicular bisector of . In triangle , , so it is isosceles and
By symmetry about ,
Answer
pi/3 radians
Walkthrough
The chord has length in a circle of radius . Dropping a perpendicular from the centre to the chord splits the chord into two equal halves of length and splits the angle at into two equal parts. In the resulting right triangle, of the half-angle equals opposite over hypotenuse, i.e. , which is the exact value of , so the full angle is .
To get angle , note that is on the circle and equidistant from and , so sits on the same perpendicular bisector as . Triangle has two sides equal to the radius (), so its base angles are equal, and since the angle at in this triangle is , each base angle is . The line is an axis of symmetry for the whole figure, so angle is twice , giving .
Key Takeaways
- A perpendicular from the centre to a chord bisects both the chord and the subtended angle.
- Special-angle values () let you read off angles exactly in radians.
- Isosceles triangles formed by two radii have equal base angles.
Common Mistakes
- Giving the half-angle as the final answer instead of doubling to for , or confusing with the required .
- Working in degrees when the question demands radians — the mark scheme only accepts the exact radian form (a decimal scores only SC1).
- Assuming triangle is equilateral without justifying it via the symmetry/isosceles argument.
Things to Be Careful About
- The answer must be the exact value ; the decimal earns only a special-case mark.
- Keep track of which angle is asked for: , not .
- All reasoning here uses exact surd values, so no calculator rounding should appear.
Approach
The shaded region is the segment of the circle centre cut off by chord , minus the segment of the circle centre cut off by the same chord. Each segment is (sector) (triangle), using and with the exact angles and from part (a).
Working
The radius of the circle centre is (found from the right triangle with legs and : ).
Segment of circle centre :
Segment of circle centre :
Shaded area:
Answer
2√3 − 2π/3
Walkthrough
The shaded sliver sits between the arc of the original circle (centre ) and the arc of the circle centred at , both spanning the same chord . So its area is simply the -circle segment above the chord minus the -circle segment above the chord.
Each segment is found as sector minus triangle. For the -circle, the radius is and the angle is carried forward from part (a): the sector is and the triangle is , giving segment .
For the -circle we need its radius . The midpoint of satisfies and , so , and , i.e. . With angle from part (a), the sector is and the triangle is , giving segment .
Subtracting and collecting terms gives , exactly as required in terms of .
Key Takeaways
- Area of a sector: with in radians; area of a triangle: .
- A circular segment = sector triangle.
- Overlapping figures sharing a common chord can be handled by subtracting one segment from another.
- "Hence" means the angles from part (a) must be reused, not recomputed.
Common Mistakes
- Using degree-mode values or leaving in degrees inside .
- Subtracting the segments the wrong way round, obtaining a negative area.
- Taking the radius of the -circle as instead of .
- Forgetting the triangle term and using whole sectors instead of segments.
- Giving a decimal answer — the question explicitly requires the answer in terms of , and the mark scheme flags the result "nfww" (nothing for wrong working).
Things to Be Careful About
- The final answer must be the exact form (equivalently ); decimals score nothing here.
- Every mark-scheme route requires all four areas (two sectors, two triangles) computed correctly, so show each one explicitly.
- Keep and surds separate until the final collection of terms to avoid sign slips.
- This part depends on part (a): use and directly.
Two variables, and , are related by an equation of the form , where and are constants.
The following pairs of values of and are given.
| 0.61 | 4.48 | 12.18 | 33.1 | |
|---|---|---|---|---|
| 1.65 | 4.47 | 7.39 | 12.17 |
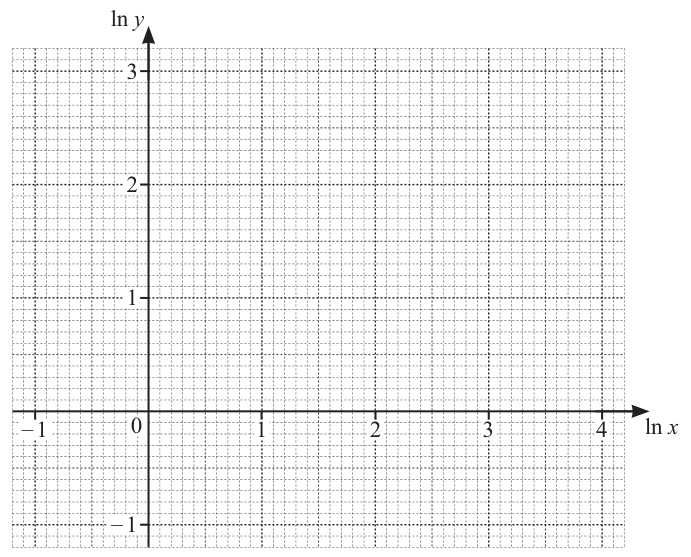
Approach
Taking natural logs of gives , so plotting against gives a straight line. Compute and for each pair, plot the points, and draw a single ruled line of best fit.
Working
For example, , , , , , , , .
Plot the four points , , , on the grid and draw a single straight ruled line of best fit through them.
Answer
The four points are plotted at , , and , with a single ruled straight line of best fit drawn through them.
Points plotted at (-0.5, 0.5), (1.5, 1.5), (2.5, 2.0) and (3.5, 2.5) with a single ruled straight line of best fit
Walkthrough
The equation is a power law, which is curved on ordinary axes. Taking natural logarithms of both sides gives — a straight-line form in the variables and . So for each data pair we compute the natural log of the value and the natural log of the value, plot these transformed points on the given grid, and draw one straight line of best fit. The points come out at , , and , which lie very close to a straight line, confirming the model.
Key Takeaways
A power law linearises under logarithms: plotting against gives a straight line whose gradient is and whose intercept on the -axis is .
Common Mistakes
Using instead of (the axes are labelled and ); plotting the raw and values instead of their logarithms; joining the points dot-to-dot instead of drawing one straight line of best fit; misreading the grid scales.
Things to Be Careful About
The mark scheme gives B2 for all four points correctly plotted (soi) with a single ruled line of best fit, and B1 for at least three correctly plotted points. The line must be ruled and straight — a freehand curve scores nothing. Values may be read to the nearest half-unit as shown.
Approach
From , the gradient of the line of best fit is and the intercept on the -axis is . Read two points off the line, find the gradient, then find the intercept and exponentiate.
Working
Using the end points of the line, and :
For the intercept, substitute one point into :
Answer
b = 0.5, A = 2.12
Walkthrough
Since is a straight line in and , the gradient equals . Using the two end points of the line of best fit, and , the gradient is , so . The intercept is found by substituting a point on the line: gives , so . The original relationship is therefore .
Key Takeaways
For a log-log plot of : gradient , vertical intercept , and . Always undo the logarithm at the end — is not itself the value of .
Common Mistakes
Reporting as the value of instead of exponentiating; using the gradient of the raw data instead of the transformed points; reading the intercept off a mis-scaled axis; using instead of (the logs are natural); rounding too early.
Things to Be Careful About
The mark scheme accepts (awrt) via the gradient or by eliminating from two simultaneous equations, and accepts , i.e. to , with later mis-simplification ignored (isw). Answers must come from the graph — values obtained directly from the exponential equation only earn the SC1 fallback. Give to 3 significant figures: .
In this question the units are metres and seconds.
A particle moves along a straight line through a point .
Its displacement, , from at time is given by
The diagram shows the displacement–time graph for the first 30 seconds of the motion.
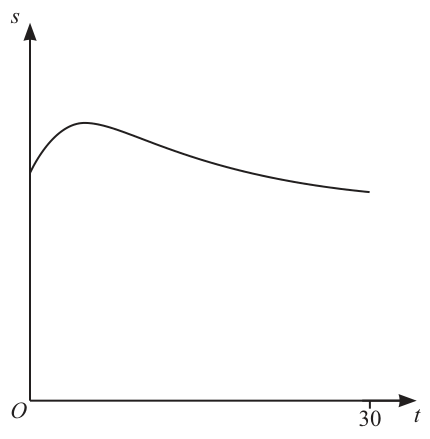
Approach
Differentiate using the quotient rule, set and solve for .
Working
First differentiate the inner square root by the chain rule:
By the quotient rule:
At the maximum, , so the numerator is zero:
Answer
t = 5
Walkthrough
The displacement is a quotient, so the quotient rule is the natural tool. Before applying it we need the derivative of the denominator: writing as and using the chain rule gives . Substituting this into the quotient rule gives the full expression for . A maximum of occurs where the gradient is zero, so we set the numerator equal to zero (the denominator is never zero). Multiplying through by clears the fractional powers and leaves the linear equation , giving seconds.
Key Takeaways
- The quotient rule combined with the chain rule handles quotients involving square roots.
- Setting a numerator to zero is valid when the denominator cannot vanish.
- Stationary points of a displacement–time graph correspond to zero velocity.
Common Mistakes
- Forgetting the factor from the chain rule when differentiating .
- Writing the quotient rule with the terms in the wrong order or omitting the squared denominator.
- Squaring incorrectly when clearing the root: the correct step is multiplying by , since .
- The answer must come from correct working ('nfww') — an unsupported scores nothing.
Things to Be Careful About
- Show every intermediate line: the scheme awards B2 for the chain-rule derivative, M1 for the quotient/product structure, A1 for the correct derivative, M1 for equating to zero, and A1 for supported by e.g. .
- 'isw' applies after the correct derivative, so later mis-simplification is ignored there, but the final value is cao.
The particle passes through its starting point again at time .
Find the total distance travelled by the particle during the first seconds of its motion.
Approach
From part (a), is a maximum at . Evaluate at and ; the particle moves out to the maximum and returns, so the total distance is twice the gain in displacement.
Working
At :
At :
Distance travelled out:
Total distance (out and back):
Answer
4.49 m (exactly 2(√150 − 10))
Walkthrough
The particle starts at displacement (putting into the formula gives ). It moves away from that starting point until the maximum at , where . The distance covered on the way out is the change in displacement, . Since it then returns to its starting point, the same distance is covered on the way back, so the total distance is twice the outward distance: m.
Key Takeaways
- Total distance is the integral of speed, which here reduces to twice the outward excursion because the motion reverses at the maximum.
- Evaluating at key times ( and the turning time) is enough; no integration is needed.
Common Mistakes
- Giving just , forgetting the return journey.
- Confusing displacement change with total distance when the particle reverses direction.
- Arithmetic slips such as taking as or mis-evaluating at as instead of .
Things to Be Careful About
- The B1 requires both and (or or ) to be seen.
- The final answer is B2: exact form , or the decimal (or to ); 'isw' allows later mis-simplification to be ignored.
Approach
The starting displacement is (from part (b)(i)). Set the formula equal to and solve for algebraically.
Working
Square both sides:
Since (and ):
Answer
T = 20
Walkthrough
From part (b)(i) the starting displacement is . Passing through the starting point again means setting the displacement formula equal to : . Squaring both sides removes the surd and gives . Expanding: , so , i.e. . The solution is the original start, so the second passage is at seconds.
Key Takeaways
- 'Passes through its starting point again' translates into setting the displacement equal to its initial value.
- Squaring both sides is a standard way to clear a square-root denominator.
- Reject the trivial root corresponding to the initial instant.
Common Mistakes
- Using the wrong starting value of (it is , not ).
- Expanding incorrectly, e.g. missing the middle term .
- Keeping as an answer instead of rejecting it as the initial time.
Things to Be Careful About
- The M1 requires the equation with their value of (which must be positive and greater than their answer to part (a)); the second M1 is the squaring step, dependent on the first; the A1 is exactly.
A circle has equation .
A second circle has the same radius as the first circle, and the coordinates of its centre are both positive.
The two circles intersect at the points and .
The line has length 6 and is parallel to the line .
Find the equation of the second circle in the form , where , and are constants.
Approach
The common chord of two equal circles is their line of symmetry, so it lies midway between the two centres. From the chord length and radius , find how far sits from each centre; this gives the distance between the centres, and since is parallel to the line joining the centres runs in the direction . Both coordinates of the new centre are positive, fixing its position.
Working
The first circle is
centre and radius , so .
For the common chord : the half-chord is , so by Pythagoras the distance from each centre to the line is
Hence the distance between the two centres is .
Since is parallel to , the line through the centres is perpendicular to it, i.e. in the direction . The second centre therefore has equal positive coordinates with
So the second centre is .
With the same radius :
Expanding:
Answer
x^2 + y^2 - 8√2 x - 8√2 y + 39 = 0
Walkthrough
First read off what the given equation tells us: is a circle centred at the origin with , so the radius is . This earns the B1 for the radius.
The key geometric fact is that when two circles of equal radius intersect, their common chord is the perpendicular bisector of the segment joining the centres — the chord sits exactly halfway between them. So if we can find the distance from one centre to the chord, doubling it gives the distance between the centres.
To find that distance, drop a perpendicular from the origin to the chord. This splits the chord of length into two halves of length , forming right-angled triangles with hypotenuse (the radius). Pythagoras gives the perpendicular distance as . So the centres are apart — this is the alternative B1 route in the mark scheme.
Now place the second centre. A line parallel to has gradient , so any perpendicular to it has gradient , i.e. lies along . The second centre must lie on the line through the origin in the direction , at distance , so it has the form with (both coordinates are stated to be positive). Then , giving .
Finally write the circle with centre and radius in standard form and expand: becomes , i.e. .
Key Takeaways
- For two equal circles, the common chord is the perpendicular bisector of the line joining the centres.
- Half-chord, perpendicular distance from centre, and radius always satisfy Pythagoras' theorem: .
- Perpendicular lines have gradients whose product is : perpendicular to means direction .
- Converting between standard form and general form requires expanding carefully, keeping surds exact.
Common Mistakes
- Using the full chord length instead of the half-chord in Pythagoras, giving a wrong centre distance ( fails, or students fudge it).
- Taking the distance between centres as instead of (forgetting the chord is midway between the centres).
- Placing the centre in the wrong quadrant — the question states both coordinates are positive, which rules out .
- Writing but leaving it unsimplified or decimalising it; the mark scheme demands the exact form and the final answer "Must be exact".
- Sign errors when expanding : the linear term is , not .
- Arithmetic slip in the constant: , not miscomputed as something else, or forgetting to subtract the .
Things to Be Careful About
- The final answer must be exact — decimals such as may earn the intermediate B1 for the centre but the final equation must use exactly.
- The mark scheme allows follow-through only for a centre of the form with non-zero ; a centre not on scores no M1 for the equation.
- Show the substitution into the standard circle form before expanding so the method mark is visible.
- Check the constant term: it comes from .