Additional Mathematics 4037/22 — October/November 2025
Cambridge O-Level · Calculator · worked solutions for every part, with the mark scheme
Topics Logarithmic and exponential functions · Straight-line graphs · Trigonometry · Series · Calculus · Simultaneous equations · +5 more
The line meets the curve at the points and .
Approach
At the intersection points and the -values of the line and the curve are equal, so set and solve for , then substitute back to get .
Working
Rearranging:
Factorising:
Substituting into :
Answer
A(-1.5, -9) and B(2, 5)
Walkthrough
The points where a line meets a curve are found by making the two expressions for equal — at an intersection point both equations give the same pair. Setting eliminates and leaves one quadratic in . Moving everything to one side gives , which factorises as , so or . Each is substituted into the simpler equation to recover the matching : when , and when . Substituting into either equation works because the point lies on both.
Key Takeaways
- Intersection of a line and a curve: equate the two expressions for .
- Always substitute back into the simpler equation to find .
- Check factorisation by expanding: .
Common Mistakes
- Sign slips when rearranging: must become , not .
- Forgetting to find the -coordinates — coordinates require both values.
- Factorising incorrectly or dropping a root of the quadratic.
Things to Be Careful About
- The mark scheme awards M1 for eliminating one unknown, A1 for the correct three-term quadratic, M1 for solving/factorising, and A1 for both coordinate pairs — so every step must be visible.
- Give exact fractions (); decimals such as are accepted here but exact form is safer.
- Both points must be correct for the final accuracy mark.
The perpendicular bisector of the line cuts the coordinate axes at the points and .
Given that is the origin, find the area of the triangle .
Approach
Find the midpoint of and the gradient of ; the perpendicular bisector passes through the midpoint with the negative reciprocal gradient. Then read off its intercepts on the axes and use .
Working
Midpoint of and :
Gradient of :
Perpendicular gradient:
Equation of the perpendicular bisector through :
Intercepts: on the -axis, gives , so . On the -axis, gives
Area of triangle :
Answer
961/128 (approximately 7.51)
Walkthrough
The perpendicular bisector of must pass through the midpoint of and be at right angles to it. The midpoint averages the coordinates: . The gradient of is , so the perpendicular gradient is the negative reciprocal, . Using the point–slope form through gives , which simplifies to . Setting gives the -intercept ; setting gives the -intercept . Since is the origin, the triangle is right-angled at with legs along the axes of lengths and , so its area is .
Key Takeaways
- Perpendicular gradients multiply to : if is the gradient, the perpendicular gradient is .
- The perpendicular bisector always goes through the midpoint of the segment.
- Axis intercepts come from setting and respectively.
- A triangle formed by two axis intercepts and the origin has area .
Common Mistakes
- Using the gradient of itself instead of the negative reciprocal for the bisector.
- Sign errors in the midpoint (forgetting that ).
- Arithmetic slips converting into slope–intercept form — note , then .
- Taking the area as without the factor .
- Dropping the minus signs on the intercepts; the lengths used in the area are positive magnitudes.
Things to Be Careful About
- The scheme gives M3 for the bisector equation (with follow-through on the candidate's midpoint and perpendicular gradient), then A2 for the area , accepting to or — but 'cao' means the final value must be correct and 'nfww' means the intercepts score nothing from wrong working.
- Keep fractions exact throughout; premature rounding before the final answer risks losing the accuracy marks.
- The alternative route via equal distances () earns the same marks, but whichever route you take, all working must be shown.
- The final answer may be left as the exact fraction or given to 3 significant figures as .
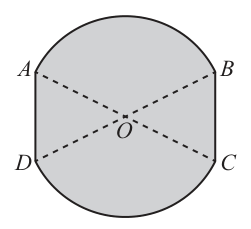
The diagram shows the shaded region .
The lines and each have a length of .
The lines and bisect each other at the point .
The lines and are parallel and each have a length of .
The arcs and are part of a circle centre .
Approach
Since and bisect each other at and have length cm, cm — all four points lie on a circle of radius centred at . Chord cm. Find angle (or ) from the isosceles triangle , then use angles on a straight line / round point to get the obtuse angle .
Working
In triangle : , . By the cosine rule:
By symmetry rad, so
(Equivalently, halving the isosceles triangle gives , so .)
Answer
2.46 rad
Walkthrough
The diagonals and are both cm long and bisect each other at , so each half is cm: . This means , , , all sit on a circle of radius centred at , which matches the statement that arcs and belong to that circle.
To get angle , first find one of the other angles at . Triangle has sides and , so the cosine rule gives , i.e. rad. The same holds for by symmetry. The four angles around add to , and opposite pairs are equal, so rad.
Key Takeaways
- Bisecting diagonals of equal length mean all four vertices lie on a circle centred at the intersection.
- The cosine rule finds an angle of a triangle from three sides.
- Angles around a point sum to ; here symmetry halves the work.
Common Mistakes
- Using degrees instead of radians — the question demands radians, and later parts need the radian value for arc length and sector area.
- Finding the acute angle and forgetting to convert it into the obtuse angle by subtracting from .
- Sign slips in the cosine rule numerator (, not ).
- Rounding too early: keep unrounded until the final subtraction.
Things to Be Careful About
- The answer must be given to 3 significant figures: rad (accept –).
- The mark scheme awards M2 for a complete correct method such as or ; a partial route (e.g. only finding ) earns M1.
- Later parts follow through on your value of , but it must be less than .
Use your answer to part (a) to find
Approach
The perimeter consists of the two arcs and (each subtending rad at radius ) plus the two straight sides and (each cm).
Working
Arc length :
Both arcs together:
Adding the two straight sides:
Answer
37.5 cm
Walkthrough
Each arc has length with and rad, giving about cm per arc. The shaded region's boundary is made of these two arcs plus the two parallel straight lines and , each cm. So the perimeter is cm.
Key Takeaways
- Arc length formula requires the angle in radians.
- Perimeter means tracing the whole boundary: curved pieces and straight pieces.
Common Mistakes
- Forgetting to double the arc (there are two arcs, top and bottom).
- Omitting the two straight sides of length cm.
- Using the angle in degrees in .
Things to Be Careful About
- Follow-through applies: your value of the angle from part (a) may be used provided it is less than .
- Answer to 3 significant figures: cm (accept –).
Approach
Split the region into two sectors and (angle rad each) plus two triangles and (angle rad each, included between two radii of length ).
Working
Sector area: .
Triangle area: with and :
Total area:
Answer
111 cm^2
Walkthrough
The shaded region splits naturally along the dashed lines into four pieces around : two large sectors and with angle rad, and two narrow triangles and with angle rad squeezed between radii of length .
Each sector contributes cm², so cm² for both. Each triangle contributes cm², so cm² for both. Adding gives cm².
An equivalent route is two segments plus the rectangle between them, or the whole circle minus two segments cut off by and — all give the same total.
Key Takeaways
- Sector area (radians).
- Triangle area handles non-right-angled triangles between two radii.
- Composite regions should be decomposed into standard shapes whose formulas you know.
Common Mistakes
- Using instead of for sector area.
- Using the wrong angle for the triangles (must be rad, not ).
- Forgetting there are two of each shape.
- Subtracting when addition is needed, or mixing up segment and sector formulas.
Things to Be Careful About
- The mark scheme requires a correct plan (M1 for the sector term, dependent M1 for the correct decomposition) before the final answer.
- Follow-through on your part (a) angle is allowed if it is less than .
- Final answer to 3 significant figures: cm² (accept –).
Find the exact value of the term independent of in the expansion of .
Approach
Expand each factor far enough to capture all powers of that can cancel: the first factor gives powers , , , and the second gives , , . The term independent of comes from matching with , with , and with .
Working
Using the binomial theorem on the first three terms of :
Expanding the second factor:
The constant term is the sum of the products of matching powers:
Answer
1537024
Walkthrough
The expression is a product of two powers, so the term independent of is not simply the product of the two constant terms — negative powers from the first factor can be cancelled by positive powers from the second.
First, expand using the binomial theorem. Only the first three terms are needed, because the second factor contains powers up to , so only , and from the first factor can pair with something:
Next, expand the square directly:
Now match powers of whose exponents add to zero:
- (constant with constant),
- , giving ,
- , giving .
Adding these:
Key Takeaways
- The binomial theorem gives coefficients for each term of .
- When a binomial contains , its expansion has negative powers of .
- In a product of two expansions, the term independent of comes from every pair of terms whose powers of sum to zero — not just the two constant terms.
- is best expanded directly rather than with the binomial theorem.
Common Mistakes
- Taking only as the answer, forgetting the cross terms and .
- Sign errors: the middle term of is , so the second contribution is negative (); dropping the minus sign gives a wrong total.
- Arithmetic slips in , , , or in .
- Expanding too few terms of the first factor — three terms are needed because the second factor reaches .
- The mark scheme awards the accuracy mark only for the correct value reached from correct working (nfww), so a lucky correct total from wrong coefficients scores A0.
Things to Be Careful About
- The answer must be exact: , an integer, with no rounding.
- The mark scheme gives B3 for both expansions (B2 for the three-term binomial expansion, B1 for ), M2 for combining the three matching products, and A1 for the final value — so every expansion term and every product must be visible.
- Check each power pairing carefully: pairs with , and pairs with ; pairing the wrong powers gives a term that still contains .
- Keep the negative sign on the term throughout the multiplication.
Variables and are such that when is plotted against , a straight-line graph is obtained.
This line passes through the points and .
Approach
Since plotting against gives a straight line, write where is the gradient and is the intercept. Find and from the two given points, then take natural logs.
Working
The line has equation
Gradient using the points and :
Intercept, substituting :
So
Taking natural logarithms of both sides:
Answer
y = ln(15.5 - 2x^3)
Walkthrough
The statement that plotting against gives a straight line means there are constants and with . The coordinates of the plotted points give values of (horizontal axis) and (vertical axis), so we can find the gradient in the usual way:
Then substitute one point to get the intercept: at , , so , giving . Hence . To express itself we invert the exponential by taking natural logarithms: .
Key Takeaways
- A straight-line plot of transformed variables corresponds to an equation of the form (vertical variable) = (horizontal variable) + .
- Gradient and intercept come from the plotted points exactly as for any straight line.
- Taking undoes : if then .
Common Mistakes
- Using the raw instead of as the horizontal coordinate — the plotted points are pairs.
- Sign errors in the gradient calculation; here the gradient is negative because the second point has a smaller vertical value.
- Forgetting to take logarithms at the end, leaving the answer as .
- Using log base 10 instead of the natural logarithm.
Things to Be Careful About
- The mark scheme requires the final answer in the form ; intermediate values and must be shown for the method marks.
- Keep exact values (, ) throughout rather than rounding.
- The logarithm is only defined where , which part (b) addresses.
Approach
The logarithm is only defined when its argument is positive, so require and solve for .
Working
Numerically, .
Answer
x < cube root of 7.75 (approximately 1.98)
Walkthrough
An equation like only makes sense where the inside of the logarithm is positive. So we solve : rearranging gives , and taking cube roots (which preserves the direction of the inequality since cubing is increasing) gives . This is the set of -values over which the straight-line model was valid.
Key Takeaways
- The domain of is where .
- Cube-root inequalities keep their direction because the cube function is strictly increasing.
Common Mistakes
- Solving incorrectly, e.g. writing after dividing by without flipping the inequality sign correctly.
- Giving only the decimal without showing the inequality step, or rounding before stating the condition.
- Forgetting that the answer must follow from correct working — the mark scheme states nfww (no follow-through from wrong working).
Things to Be Careful About
- The mark scheme awards M1 for setting up (or equivalent) and the accuracy marks for ; the exact form should be shown alongside the decimal approximation.
- Follow-through is allowed from part (a)'s equation in the form , but the working must be correct.
A 6-character password is to be formed from the following characters.
| Letters | b | f | g | k | m |
|---|---|---|---|---|---|
| Numbers | 3 | 5 | 7 | 9 | |
| Symbols | * | ! | @ |
Each character can be used at most once in any 6-character password.
Find the number of 6-character passwords that can be formed if there are no further restrictions.
Approach
There are characters in total, and a password is an ordered arrangement of 6 distinct characters, so multiply the shrinking choices.
Working
Answer
665280
Walkthrough
The pool of available characters is 5 letters + 4 numbers + 3 symbols = 12 characters. Since each character may be used at most once and the order of the 6 positions matters, this is a permutation: 12 choices for the first position, then 11 for the second, and so on down to 7 for the sixth.
Key Takeaways
- When order matters and no repetition is allowed, the count is the falling product .
- Always add the category sizes first to find the total pool.
Common Mistakes
- Using combinations instead of permutations — order matters in a password.
- Using , which wrongly allows repetition.
- Miscounting the pool (e.g. forgetting one of the three categories).
Things to Be Careful About
- The answer is exact: (B1, cao). No partial credit is given for a wrong product.
Find the number of 6-character passwords that can be formed if the password starts and ends with a symbol.
Approach
The first and last positions must be symbols (3 available). Fill those first, then the four middle positions from the remaining 10 characters.
Working
First position: symbol choices. Last position: remaining symbols.
Middle four positions: from the remaining 10 characters.
Answer
30240
Walkthrough
Deal with the restricted positions first. There are 3 symbols, so the first character can be chosen in 3 ways and the last character in 2 ways (one symbol is used up). That leaves characters for the four unrestricted middle positions, giving ways. Multiply everything together.
Key Takeaways
- Fill restricted positions before unrestricted ones.
- The product rule multiplies independent position-by-position choices.
Common Mistakes
- Using for the ends but then for the middle (forgetting the two symbols are used).
- Treating the ends as unordered (dividing by 2) — position 1 and position 6 are distinct.
Things to Be Careful About
- The M1 is for the structure (oe); the final answer must be exactly .
Find the number of 6-character passwords that can be formed if the password:
- starts with either a symbol and then a number, or a number and then a symbol and
- ends with 2 letters.
Approach
The first two positions are either (symbol, number) or (number, symbol) — 2 cases. The last two positions must be letters. The middle two positions take any remaining characters.
Working
First two positions: (2 orders, then 3 symbols and 4 numbers).
Last two positions: letters.
Middle two positions: from the remaining 8 characters.
Answer
26880
Walkthrough
The start condition has two cases: symbol-then-number or number-then-symbol. Each case gives choices, so together . The end condition fixes the last two positions as letters: ways. Four characters are now used, leaving 8, so the middle two positions give ways. Multiplying: .
Key Takeaways
- "Either ... or ..." at a position pair introduces a factor of 2 for the two orders.
- Restricted groups (both ends here) are counted independently and multiplied.
- After fixing positions, the pool for free positions shrinks by the number used.
Common Mistakes
- Forgetting the factor of 2 for the two possible orders at the start (this gives , which earns B1 only).
- Using for the last two letters (allowing repetition of a letter).
- Not reducing the middle pool from 12 to 8 after using 4 characters.
Things to Be Careful About
- A final answer of (missing the order factor) scores B1 only; the full requires the M1 structure (oe).
In this question lengths are in centimetres and time, , is in seconds.
A particle is moving in a straight line with a speed of in the direction of the vector .
Find the velocity vector of .
Approach
The velocity vector is the speed multiplied by the unit vector in the given direction, so first find the magnitude of .
Working
The unit vector is , so the velocity is
Answer
(10, -24) cm/s
Walkthrough
A velocity vector combines a speed (a scalar) with a direction. The direction is given by the vector , but this vector has length 13, not 1. So we first compute its magnitude using Pythagoras: . Dividing by 13 gives the unit direction vector, and multiplying by the speed 26 gives the velocity: , so the velocity is .
Key Takeaways
- Velocity vector = speed × unit direction vector.
- Magnitude of is ; the triple is worth recognising instantly.
Common Mistakes
- Multiplying the direction vector by the speed directly without first dividing by its magnitude (this gives a speed of ).
- Writing the answer as — the mark scheme warns this mixed form does not earn full marks unless the correct column-vector form is recovered.
Things to Be Careful About
- Keep the sign of the -component negative: the direction is , not .
- The answer is a vector, so it must be presented in column-vector (or clearly equivalent) form.
When , passes through a point which has position vector .
Write down the position vector of at time .
Approach
The position at time is the starting position plus velocity × time.
Working
Answer
(3 + 10t, 6 - 24t)
Walkthrough
Since moves with constant velocity, its position at time is its starting position (given at ) plus the displacement travelled, which is velocity × time: . Adding component-wise gives .
Key Takeaways
- For constant velocity, .
Common Mistakes
- Using a wrong velocity vector from part (a) — the mark is follow-through on the candidate's velocity.
- Adding the vectors incorrectly or forgetting the factor .
Things to Be Careful About
- The mark scheme allows equivalent forms but the answer must be a proper vector expression, not a scalar.
At the same time that passes through , a particle passes through a point .
The position vector of at time is given by .
The distance between and at time is .
Show that , where , and are integers to be found.
Approach
Find the vector from to by subtracting position vectors, then square and add its components to get .
Working
The position vector of is from part (b). The displacement from to is
Then
Answer
d^2 = 5t^2 + 40t + 80
Walkthrough
To find the distance between two moving points, first find the vector joining them: subtract one position vector from the other. Using 's position from part (b) and 's given position , the difference is (subtracting in the other order just changes both signs and gives the same ). The squared distance is the sum of the squares of the components: . Expanding each bracket carefully — and — and collecting like terms gives , with integer coefficients as required.
Key Takeaways
- Distance between points with position vectors and is ; squaring avoids the square root.
- — expand, don't forget the middle term.
Common Mistakes
- Sign errors when subtracting the components of (note the and ).
- Omitting the middle term when squaring a binomial.
- Using instead of and leaving a square root in the answer.
Things to Be Careful About
- The question asks for , so no square root should be taken at the end.
- The mark scheme accepts either order of subtraction, since is unchanged.
Approach
A collision means . Factorise from part (c) and find when it is zero, then check whether that time is allowed.
Working
Using from part (c):
So only when . But time must satisfy , so for all permitted ; in fact when .
Answer
Since only at , which is not an allowed time (), and never meet and do not collide.
d = 0 only at t = -4, but t >= 0, so P and Q do not collide
Walkthrough
A collision would mean the two particles are at the same point at the same time, i.e. the distance between them is zero. From part (c), , which factorises as — a perfect square. So only when , giving only at . But time in this model starts at , so negative times are not valid. Hence for every allowed value of , and the particles never occupy the same point: no collision.
Key Takeaways
- Collision ⟺ distance between particles is 0 at a valid time.
- A quadratic in that is a perfect square, like , touches zero at exactly one value of .
Common Mistakes
- Solving but forgetting to state the condition — the mark scheme requires the argument to include and the time condition.
- Setting and checking positions instead of examining when .
Things to Be Careful About
- This part depends on part (c) being correct — the mark is dependent on the earlier result.
- The argument must mention explicitly (e.g. " at , but "), not just quote the quadratic.
Approach
is a product, so differentiate it with the product rule; the derivative of needs the chain rule.
Working
Using the chain rule, , so
Answer
dy/dx = cos 2x - 2x sin 2x
Walkthrough
The function is a product of two factors: and . The product rule says the derivative of a product is . Here gives , and needs the chain rule: differentiating the outer cosine gives , then multiplying by the derivative of the inner function , which is , giving . Combining these gives .
Key Takeaways
- The product rule: .
- Chain rule for trig functions of a multiple angle: .
Common Mistakes
- Forgetting the factor of from the chain rule and writing instead of (the mark scheme explicitly awards M1 for this inner derivative).
- Dropping one term of the product rule, e.g. writing only .
- Sign errors on the cosine derivative.
Things to Be Careful About
- The mark scheme notes "isw" — later incorrect simplification is ignored once the correct form appears — but "nfww": no marks if reached from wrong working.
- Keep the answer in terms of both and ; part (b) depends on it.
Approach
"Hence" means use part (a). Since , rearranging isolates , and integrating both sides gives the required integral.
Working
From part (a),
Rearranging,
Now , so
Dividing by :
Answer
-1/2 x cos 2x + 1/4 sin 2x + c
Walkthrough
The word "Hence" tells us to build on part (a). We know that differentiating produces exactly the expression . Writing that statement in reverse — as an integral equation — lets us solve algebraically for the unknown integral : integrate both sides of the derivative result, move the known integral across, and divide by . The remaining integral is a standard one, giving (the half comes from dividing by the inner coefficient ). Finally divide everything by and add the constant of integration , since this is an indefinite integral. This route is equivalent to integration by parts with , .
Key Takeaways
- A "Hence" question expects you to reuse the previous result, not start afresh.
- Reversing a product rule gives integration by parts: .
- Integrating gives — always divide by the inner coefficient.
- An indefinite integral must include .
Common Mistakes
- Omitting the constant of integration .
- Getting the sign wrong when moving across the equation, leading to instead of .
- Forgetting to halve when integrating , writing instead of .
- Dividing incorrectly at the end, e.g. leaving without the final factor of .
- Ignoring the "Hence" instruction and attempting integration by parts from scratch — allowed by the mark scheme's alternative routes but more error-prone.
Things to Be Careful About
- The mark scheme awards M3 for reaching (or the equivalent rearranged forms shown), so every intermediate line matters; "nfww" applies — no marks from wrong working.
- The final answer must be exact, with present; "isw" means later slips in simplification are forgiven but the printed form is the target.
- Check your answer by differentiating it: you should recover .
An arithmetic progression has first term and common difference .
The 4th, 8th and 20th terms of this arithmetic progression form the 1st, 2nd and 3rd terms of a geometric progression.
Approach
The 4th, 8th and 20th terms of the AP are , and . Since these form a GP, the square of the middle term equals the product of the outer terms (equivalently the two ratios are equal). Solve for .
Working
The three AP terms are:
Since they form a GP, the common ratio is the same for both pairs:
Cross-multiplying and expanding both sides:
Cancelling from both sides:
Answer
-1.5
Walkthrough
An arithmetic progression with first term and common difference has nth term . With , the 4th term uses differences, giving ; the 8th term uses differences, giving ; the 20th term uses differences, giving . These three numbers must behave like a geometric progression.
In a GP, each term divided by the previous one is the same constant , so we can write one equation by equating the two ratios:
This is exactly the condition that the middle term squared equals the product of the outer terms. Cross-multiplying removes the fractions, and expanding both sides gives quadratics in . The key observation is that the terms cancel — the same thing happens on either side because both sides have leading coefficient — leaving a simple linear equation:
Rearranging gives , so . A quick check: the three GP terms become , , , which indeed have common ratio .
Key Takeaways
- The nth term of an AP is ; count the number of differences carefully (, not ).
- Three consecutive GP terms satisfy "middle squared equals product of outers", which lets you turn a GP condition into a single equation.
- When unknowns appear on both sides of a fraction equation, cross-multiplication clears the denominators cleanly.
Common Mistakes
- Using instead of when writing the 4th, 8th and 20th terms — this shifts every term by and produces a wrong value of .
- Expanding incorrectly, e.g. forgetting the middle term .
- Sign slips when rearranging after cancelling : it should be , not .
- The mark scheme awards the final mark only if is the sole answer reached from correct working (nfww), so arithmetic errors earlier lose everything at the end.
Things to Be Careful About
- The final answer must be exact: (or ), with no other values offered.
- The mark scheme requires the expansion step to be seen explicitly — do not jump straight to the answer.
- Check your result by substituting back: with the terms are , confirming a valid GP.
Approach
Substitute from part (a) into the three GP terms and divide any term by the one before it.
Working
With the three terms are:
The common ratio is:
Answer
3
Walkthrough
Part (b) builds directly on part (a): once is known, the three terms of the geometric progression become concrete numbers. Substituting gives , and . The common ratio of a GP is any term divided by the preceding term, so . Checking with the next pair, as well, confirming consistency.
Key Takeaways
- In a GP, the common ratio is found by dividing any term by the one before it.
- Multi-part questions often feed forward: the value established in an earlier part is meant to be used here.
Common Mistakes
- Dividing in the wrong order, e.g. , which gives instead of .
- Recomputing instead of carrying forward the value from part (a), wasting time and risking inconsistency.
- Giving additional values — the mark scheme accepts only .
Things to Be Careful About
- The answer must be exactly, obtained from correct working (nfww); a wrong carried through scores only the method mark.
- Verify with a second pair of terms to guard against a slip in one of the substitutions.
It is given that for , where is a constant.
Approach
The logarithm is defined only when its argument is strictly positive, so the least allowed is where .
Working
So the least possible value of is where the argument vanishes.
Answer
-5/2
Walkthrough
A natural logarithm can only be taken of a positive number. Since the argument of is , we need , i.e. . The constant marks the start of the domain, so the smallest value it can take is exactly the point where the argument becomes zero: .
Key Takeaways
- The domain of requires the expression to be strictly greater than zero.
- The boundary value comes from setting the argument equal to zero.
Common Mistakes
- Writing : the logarithm of zero is undefined, so the inequality must be strict.
- Solving incorrectly and getting by mishandling the sign.
Things to Be Careful About
- The answer is exact, ; an equivalent form (e.g. ) is accepted (oe), but keep the fraction as the primary form.
Approach
With , the domain of is , so the argument runs over all positive values. The logarithm of values covering covers every real number.
Working
As runs from just above to infinity, runs from just above to infinity, and therefore runs from to .
Answer
f(x) is any real number (f in R)
Walkthrough
Once the domain starts at , the quantity inside the logarithm, , takes every positive value. Since sweeps from up to as goes from to , the outputs of cover all real numbers. Hence the range is .
Key Takeaways
- has range whenever its argument ranges over all positive reals.
- Range questions follow directly from how the input interval maps through the function.
Common Mistakes
- Claiming the range is : that is the range of , not of .
- Giving only part of the range because the domain was misread in part (a).
Things to Be Careful About
- Any equivalent statement ('all real values', ) earns the mark (oe).
It is also given that for .
Using your value of , solve the equation .
Give your answers in exact form.
Approach
Form the composite , set it equal to , then exponentiate both sides to remove the logarithm and solve the resulting quadratic in .
Working
Setting this equal to :
Exponentiating both sides:
Solving for :
Both roots are valid since each satisfies (the negative root is approximately , which exceeds ).
Answer
x = +/- sqrt((e^4 - 7)/2)
Walkthrough
The composite means apply first, then : substitute into , giving . Setting this equal to gives a logarithmic equation. To undo a natural logarithm we exponentiate both sides with base , turning into . This is now a simple quadratic-type equation in : subtract , divide by , then take square roots — remembering both signs. Both roots lie in the domain , so both are valid answers, left in exact form.
Key Takeaways
- means — inner function first.
- Exponentiating removes a natural log: .
- Equations quadratic in yield two roots, .
Common Mistakes
- Computing instead of .
- Forgetting the when taking the square root, losing one solution.
- Giving a decimal answer instead of the exact form required by the question.
- Discarding the negative root without checking whether it lies in the domain .
Things to Be Careful About
- The question demands exact form: leave the answer as rather than evaluating . An equivalent exact rearrangement (e.g. via solving first) also scores. Check both roots against the domain before accepting them.
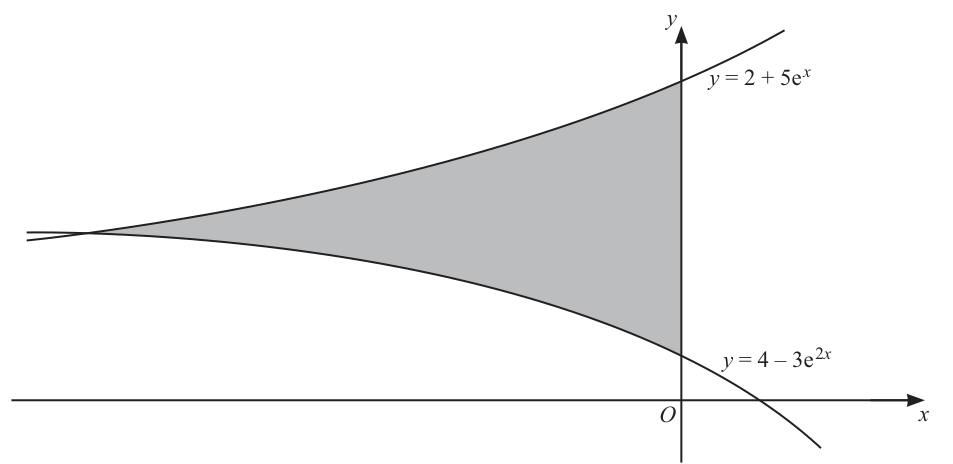
The diagram shows parts of the graphs of and .
Find the area of the shaded region.
Give your answer in the form , where and are exact constants.
Approach
The shaded region lies between the two curves from their intersection point (in the second quadrant) to the -axis. First find the intersection by equating the two curves, which gives a quadratic in . Then integrate (top curve) (bottom curve) between that -value and .
Working
Intersection. Set the curves equal:
Factorise:
Since , only is valid, so
Area. For the curve is above , so the area is
Integrate:
Evaluate between the limits:
Using and :
Answer
14/3 - 2 ln 3
Walkthrough
The shaded region is bounded left by the intersection of the two curves and right by the -axis, so its area is the integral of (upper curve) (lower curve) between those two -values.
First, find where the curves meet. Setting and rearranging gives . This is a quadratic in disguise: writing gives , which factorises as . So or . Since is always positive, is rejected, leaving , i.e. .
Next, check which curve is on top: at the first curve gives and the second gives , so is the upper curve throughout the region. The area is therefore
Integrating term by term: (divide by the coefficient of in the exponent), , and .
Evaluating at the limits: at the antiderivative is . At , we use and , giving .
Subtracting: , which is in the required form with and .
Key Takeaways
- Intersections of exponential curves are found by equating them and treating the equation as a quadratic in ; always reject negative roots since .
- The area between two curves is ; identifying which curve is on top (e.g. by testing ) prevents a sign error.
- Integrating divides by : .
- Key logarithm facts used in exact evaluation: , , and .
Common Mistakes
- Accepting and trying to take its logarithm — this root must be rejected since always.
- Reversing the subtraction of the curves, which gives (negative); the scheme requires the correct plan with the correct integrand.
- Forgetting to divide by 2 when integrating , writing instead of .
- Mishandling : since , the term becomes when substituted at the lower limit, and it is then subtracted — sign slips here are the most common error (the scheme allows only one sign or arithmetic slip in the M1).
- Giving a decimal answer: the scheme demands the exact value (a decimal may be stated in addition but the exact form is required).
Things to Be Careful About
- The lower limit must come from solving — the mark for the plan depends on this; using any other limit scores nothing.
- The final answer is 'dep on all previous marks awarded': every earlier step (quadratic, root, plan, integration, substitution) must be correct.
- Leave the answer in the exact form ; 'nfww' applies to the step, so the value must come from correct working.
- Check the substitution carefully: , not or .
Approach
The equation is a quadratic in . Factorise it into two linear factors, solve and separately for , then halve each angle.
Working
Factorise:
Case 1: . With we need , so
Case 2: . The principal value is
and the second solution in range is obtained by adding :
Halving:
Answer
x = 0, 38.0, 90, 128.0, 180 degrees
Walkthrough
The equation looks like a quadratic because it has a term in and a term in . Taking out the common factor gives two separate equations: and . Never divide by — that would destroy the whole first family of solutions.
Because runs from to , the angle runs from to , so we must find all tangent solutions in that full doubled range before halving at the end.
For : the tangent is zero at , and within the range, giving , , .
For : the calculator gives the principal value . Since the tangent repeats every , the only other solution with is . Halving gives and (to 1 decimal place, as required for angles in degrees).
Key Takeaways
- A trigonometric equation quadratic in form should be solved by factorising, not by dividing through.
- When the argument is , work in the doubled interval and halve the answers at the end.
- The tangent function has period , so the second solution is found by adding to the principal value.
Common Mistakes
- Dividing by and losing the solutions , , entirely.
- Solving only in and missing the branch.
- Forgetting to halve, or reporting values as the answer.
- Adding extra spurious values from outside the range — the mark scheme penalises extras ('no extras').
- Rounding to 3 significant figures instead of 1 decimal place for degree angles.
Things to Be Careful About
- Angles in degrees are given to 1 decimal place: and .
- The mark scheme says 'nfww' (no follow-through from wrong working) on the family, so those three values must come from correct working.
- 'isw' applies to later mis-simplification of and , but the values themselves must be correct.
- Check the endpoint behaviour: and are included since the inequality is .
Approach
Rewrite cosec as , so . Since , the angle lies in . Find every value of in that window where the sine equals , then subtract .
Working
Taking reciprocals:
The principal value is
The other positive-radian solution uses the symmetry :
Going below zero, the next occurrence of the same sine value is one full period earlier than :
All three lie inside . Subtracting from each:
Answer
y = -4.59, -0.947, 1.69
Walkthrough
Cosecant is the reciprocal of sine, so means .
Before hunting for angles, translate the interval: if , then adding throughout gives . This tells us how many turns of the sine graph we must inspect.
The calculator's inverse sine gives the principal value rad. The sine graph's symmetry about gives a second solution rad. Both fit inside the window.
Below zero, the sine reaches again one full period () below the point: rad, which still lies above , so it counts. Any further copies would fall below , so there are exactly three solutions.
Finally subtract the shift from each angle to return to : giving , and (3 significant figures).
Key Takeaways
- converts a reciprocal-trig equation into a standard sine equation.
- Always shift the given interval to match the compound argument before counting solutions.
- Sine solutions repeat with period and pair up via and ; going below zero means subtracting from an upper-branch solution.
- Undo a shift like by subtracting the constant at the very end.
Common Mistakes
- Forgetting the third solution by only looking at to .
- Using style reasoning incorrectly, or taking which gives , not .
- Not shifting the interval, so solutions just outside after subtracting slip in or valid ones get dropped.
- Leaving answers as values instead of subtracting .
- Working in degrees instead of radians.
- Including extra solutions outside the range — the mark scheme awards 'no others in range'.
Things to Be Careful About
- Answers are in radians to 3 significant figures: , , .
- The mark scheme gives M2 for two correct values (M1 for one), then A3 for the final values with penalties for extras — check the boundary carefully; is safely inside.
- Keep full calculator precision until the final subtraction, then round once.