Additional Mathematics 4037/22 — October/November 2024
Cambridge O-Level · Calculator · worked solutions for every part, with the mark scheme
Topics Calculus · Trigonometry · Simultaneous equations · Factors of polynomials · Equations, inequalities and graphs · Logarithmic and exponential functions · +4 more
Solve the following simultaneous equations.
Approach
From the first equation express in terms of , substitute into the second equation so that only remains, then solve.
Working
From :
Substituting into :
Multiplying both sides by :
Then
Answer
x = 3, y = 9/2
Walkthrough
The first equation is linear in form: dividing by gives , so . This is the natural substitution to make, because it removes entirely from the second equation.
Substituting into gives . Raising the fraction to the fourth power gives , so the left-hand side becomes — the powers of cancel to leave a single in the denominator.
Setting and multiplying through by gives , so . Back-substituting into gives .
Key Takeaways
- With simultaneous equations where one is a simple ratio, express one variable in terms of the other and substitute.
- Simplify powers carefully: , and .
- Always back-substitute to find the second variable.
Common Mistakes
- Mishandling the fourth power of the fraction, e.g. writing or .
- Cancelling with the wrong way round, leaving in the numerator instead of the denominator.
- Forgetting to back-substitute and giving only (this loses an accuracy mark — the scheme awards A1 for one value, A2 for both).
- Giving extra spurious solutions; the scheme requires exactly and with no others.
Things to Be Careful About
- Both values are required for full marks; one correct value alone earns only A1.
- The answer may be given in equivalent forms ("oe"), e.g. , but no other solutions are accepted.
- Show the elimination step explicitly — the M1 is for a correct elimination of one unknown such as .
Variables and are related by the equation .
Approach
Write and differentiate using the product rule, with the chain rule for the square-root factor.
Working
By the product rule:
Combining over a common denominator:
Answer
(1 + 3x)/sqrt(1 + 2x)
Walkthrough
The function is a product of and , so the product rule applies: differentiate one factor at a time while the other stays unchanged, then add. The square root is rewritten as a power, , and differentiated by the chain rule: bring down the , reduce the power by one, then multiply by the derivative of the bracket, which is . The two s cancel, leaving . Combining the two product-rule terms over the common denominator gives the compact form , which is used in the later parts.
Key Takeaways
- The product rule: .
- The chain rule for : multiply by the derivative of the inner bracket.
- Writing a derivative as a single fraction often makes later substitution and equation-solving much easier.
Common Mistakes
- Forgetting the factor of from the chain rule when differentiating .
- Dropping the second term of the product rule (treating it as a chain-rule problem only).
- Sign or power slips when writing the square root as a negative half power.
Things to Be Careful About
- The mark scheme awards B2 for the correct derivative of and B1 for the completed product rule, so both stages must be visible.
- The simplified single-fraction form is not required, but it is the most convenient form for parts (b) and (c); later simplification errors are ignored (isw) once the derivative is correct.
It is given that when , . Find the approximate change in when increases from 12 by the small amount 0.06.
Approach
Use the small-change relation with the derivative from part (a) evaluated at .
Working
At :
Using with :
Answer
0.0138
Walkthrough
The derivative measures how fast changes per unit change in , so a small increase in corresponds to a small change given by . Substituting into the derivative from part (a) gives , since . Setting and rearranging gives . Since increases, also increases, so the change is positive.
Key Takeaways
- The small-change approximation links tiny changes in related variables.
- The derivative must be evaluated at the given point before the approximation is applied.
Common Mistakes
- Substituting instead of into the derivative.
- Inverting the relation and computing instead of dividing.
- Giving a negative answer, forgetting that an increase in gives an increase in here.
Things to Be Careful About
- The answer is marked nfww, so the correct method must be visible; a bare correct number from wrong working scores nothing.
- Give the answer to 3 significant figures: (the exact value is ).
Approach
At a stationary point . Set the derivative from part (a) equal to zero and solve.
Working
A fraction is zero when its numerator is zero:
Answer
x = -1/3
Walkthrough
A stationary point occurs where the gradient is zero, so the derivative from part (a) is set equal to zero. Writing the derivative as the single fraction makes this immediate: a fraction can only be zero when its numerator is zero, giving and hence . The denominator is positive at this value (), so the point is valid.
Key Takeaways
- Stationary points satisfy .
- A fraction equals zero exactly when its numerator equals zero (provided the denominator is non-zero).
Common Mistakes
- Setting the denominator to zero instead of the numerator.
- Sign errors giving instead of .
Things to Be Careful About
- The mark scheme allows follow-through on a derivative of the form , but the final value must be exactly (or an equivalent exact form) for the A1.
- The question asks only for the -coordinate, so no -value is needed.
DO NOT USE A CALCULATOR IN THIS QUESTION.
The polynomial is defined by , where and are constants.
Approach
Since and are roots of , the factor theorem gives and . Substituting each root produces two linear equations in and , which are then solved simultaneously.
Working
Substituting :
so
Substituting :
so
Substituting into :
Answer
a = 2, b = 2
Walkthrough
The factor theorem says that if is a root of , then . We are told both and are roots, so evaluating the polynomial at each of these values must give zero.
At : , so .
At : , so .
Solving these together: putting into the first equation gives , hence and .
Key Takeaways
- The factor theorem converts information about roots directly into equations on the coefficients.
- Two unknown constants require two independent conditions — here the two given roots supply exactly those.
- Solving simultaneous linear equations is often the final step of such problems.
Common Mistakes
- Arithmetic slips when substituting: forgetting that or that .
- Sign errors collecting the constant terms (, not ).
- Stopping after writing the two equations without actually solving them.
Things to Be Careful About
- The mark scheme awards one mark per correct equation and one for the pair , — so both substituted equations must be shown explicitly.
- No calculator is allowed here; all arithmetic is simple integer work.
Approach
Carry forward from part (a): , and since and are roots, and are factors. The cubic must factorise as for some constant ; comparing coefficients finds , giving the third root.
Working
With :
Write
Comparing the coefficient of : expanding , so
Matching gives , hence the third factor is :
Setting each factor to zero:
Answer
x = 2, 1/2, -1
Walkthrough
From part (a) we know and that and are roots, so and are factors. A cubic has three linear factors, and since the leading coefficient is , the third factor must be of the form .
Expanding and multiplying by , the coefficient is . Setting this equal to gives , so the full factorisation is .
Each factor set to zero gives a root: , , and .
(Equivalently, the sum of the roots equals , so gives directly.)
Key Takeaways
- Known roots give known factors immediately via the factor theorem.
- Comparing coefficients (or using the sum/product of roots of a cubic) recovers an unknown factor quickly.
- A fully factorised cubic yields all its roots at once by setting each factor to zero.
Common Mistakes
- Forgetting the leading coefficient and writing the third factor as instead of .
- Sign errors when matching the coefficient.
- Giving only the two roots already found in part (a) and missing the new root .
- Writing as from misreading .
Things to Be Careful About
- This part says "Solve", so all three roots are required, including the repeated-use roots from part (a).
- No calculator is needed: the factorisation and root-finding are exact integer/fraction work.
- The mark scheme accepts several routes (full factorisation, quadratic division, or sum/product of roots), but the final set must be complete.
Use a graphical method to solve the inequality .
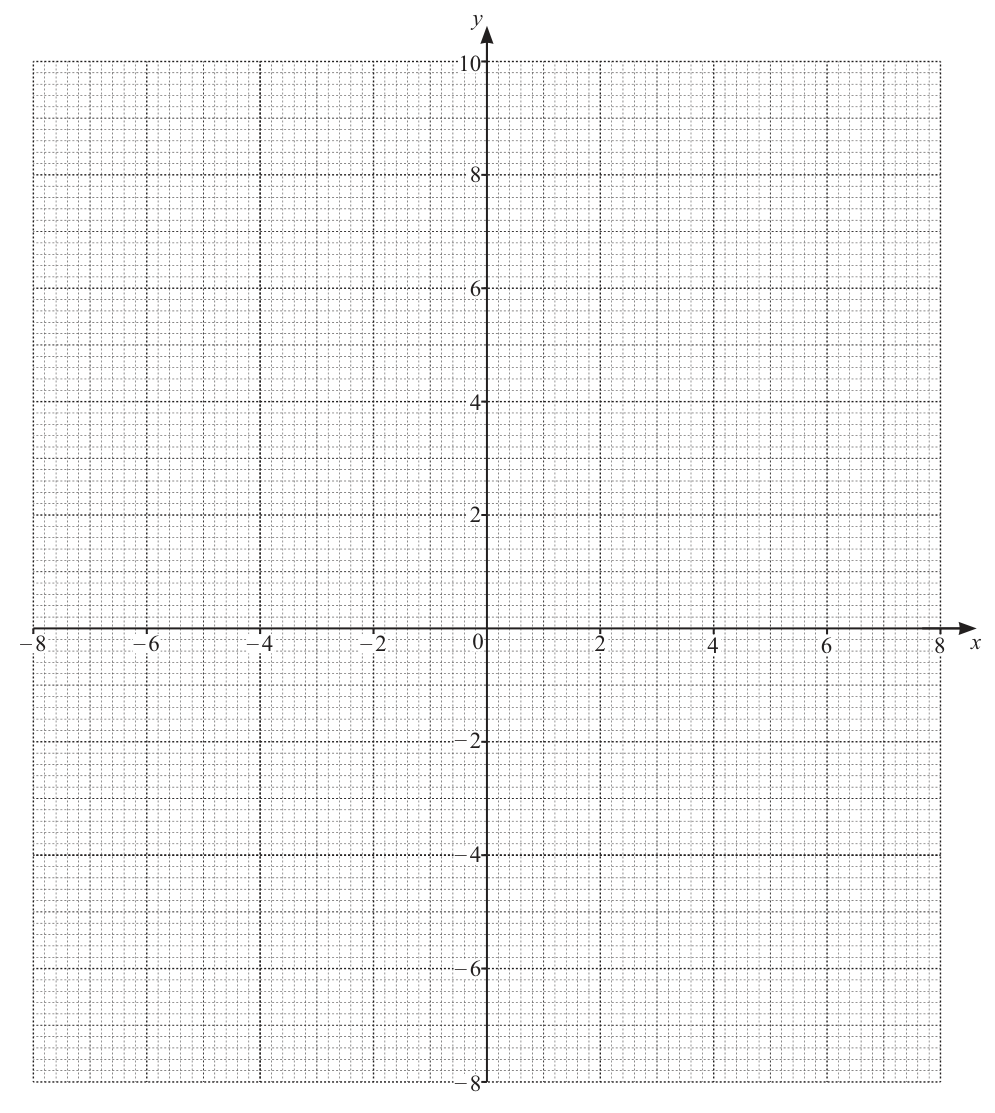
Approach
Draw as a V-shaped graph on the given grid, draw the line , and read off where the V lies above the line.
Working
The vertex of is where , i.e. at .
For : , giving , and on this branch when extended to via .
So plot the two straight sections:
Draw the horizontal line . It meets the V-shaped graph where
giving intersections at and — these are the critical values.
holds where the V-graph is above the line , which is to the left of and to the right of .
Answer
x < 2 or x > 6
Walkthrough
To solve graphically, we compare two graphs: the modulus function and the constant line . The inequality asks for the -values where the first graph sits strictly above the second.
First find the shape of . The expression inside the modulus is zero when , so ; the vertex of the V is therefore at . To the left of the graph is the line (passing through ), and to the right it is (passing through ). Drawing these two straight sections gives the characteristic V-shape.
Next draw the horizontal line . It cuts the V at exactly two points. Algebraically these satisfy , so giving , or giving . These are the critical values: and .
Between and the V dips below the line, so there the modulus is less than 4. Outside that interval — to the left of and to the right of — the V is above the line, which is precisely where .
Key Takeaways
- A modulus graph is always a V with vertex where ; plotting the vertex plus one point on each branch fixes the sketch.
- Solving graphically means finding where the modulus curve lies above the line ; the intersection -values are the critical values.
- Strict inequalities () give strict answer intervals: the boundary values themselves are excluded.
Common Mistakes
- Drawing only one branch of the V, or placing the vertex anywhere other than — the mark scheme requires both sections through – and –, or at least a correct V with vertex .
- Forgetting to draw the line (a separate B1 mark).
- Giving the answer as — that is where the graph is below the line, the opposite region.
- Writing , with equality signs; the inequality is strict, so the critical values are not included.
- Reading the critical values off inaccurately from the grid instead of checking them against .
Things to Be Careful About
- The final A1 depends on the three earlier marks (correct V-graph, correct line, correct critical values from the intersecting graphs), so an accurate drawing is essential — the final answer scores nothing if reached from wrong working.
- Both branches must be shown over the drawn range; the scheme credits 'at least one side accurate' only at M1 level, full accuracy is needed for A1.
- State the answer as two separate regions joined by 'or': or .
Solve the following equations.
Approach
Both logarithms can be written in base : use , and . Then solve for .
Working
So the equation becomes
Converting to index form:
Answer
x = 256
Walkthrough
The equation mixes base 2 and base 16, so the first job is to put everything in one base. Since , the change-of-base law gives . The power law turns into (valid because , so no sign issue arises). The whole equation is then just a linear equation in the single unknown : collecting terms gives , so . Finally, 'the power of 2 that gives is 8' means .
Key Takeaways
- Change of base: ; when , this simplifies to .
- Power law: .
- Once all logs share a base, treat as one unknown and solve linearly, then undo with index form.
Common Mistakes
- Writing instead of — the power law multiplies the log, it does not square it.
- Forgetting that and treating it as equal to .
- Giving (forgetting to convert back through the index form).
- The mark scheme awards A1 only 'nfww' — the answer must come from correct working, not luck.
Things to Be Careful About
- The answer must be exactly ; the scheme also accepts equivalent routes such as leading to .
- Show every log-law step: the M3 is awarded for correctly reaching an equation free of logarithms, so intermediate lines must be visible.
- Check the solution satisfies the domain of the original equation () — does.
Approach
Multiply the whole equation by to remove the negative exponent, then recognise a quadratic in .
Working
Multiplying both sides by :
Factorising:
Since always, only is valid. Taking natural logarithms:
Answer
x = (-1 + ln 5)/2 = 0.305
Walkthrough
The term is the reciprocal of , which hints at a hidden quadratic. Multiplying the entire equation by clears the fraction: , giving a standard three-term quadratic in : . This factorises as . The root must be rejected because an exponential is always positive, leaving . Taking of both sides gives , so .
Key Takeaways
- Equations mixing and become quadratics after multiplying by .
- Exponential functions are strictly positive, so negative roots for the exponential must be discarded.
- Undoing an exponential requires natural logarithms: .
Common Mistakes
- Forgetting to multiply EVERY term by (e.g. missing the or the ).
- Keeping the invalid root and trying to take its logarithm — the scheme explicitly requires 'no other solution'.
- Sign slips when rearranging: gives , not .
- Writing as something other than .
Things to Be Careful About
- The exact form is accepted, as is the decimal (or ); later mis-simplification is ignored (isw).
- Only ONE solution exists — the negative root of the quadratic must be rejected because for all real .
- Show the quadratic stage explicitly () before factorising ().
DO NOT USE A CALCULATOR IN THIS QUESTION.
Write in the form , where and are constants.
Approach
Rewrite the negative power as a fraction, expand , then rationalise the denominator by multiplying top and bottom by its conjugate.
Working
Expand the denominator:
Rationalise by multiplying numerator and denominator by :
Expand the numerator and use the difference of two squares on the denominator:
Divide each term by 16:
Answer
13/4 - (7/4)√3
Walkthrough
The negative index means we take a reciprocal, so the expression becomes a fraction with in the denominator. Expanding that square gives , and since , the denominator is .
To remove the surd from the denominator we multiply top and bottom by the conjugate . The denominator then becomes a difference of two squares: . The numerator expands to .
Finally, dividing both terms of the numerator by 16 gives , which is exactly the form with and .
Key Takeaways
- A negative index turns an expression into a reciprocal — always rewrite it as a fraction first.
- ; simplify the inner surd before proceeding.
- Multiplying by the conjugate over itself removes surds from a denominator via the difference of two squares.
- Answers must be collected into the exact requested form, here .
Common Mistakes
- Writing as or failing to simplify it to .
- Sign slips when multiplying out — all four products must appear.
- Computing as instead of .
- Stopping at instead of simplifying to the required form.
- The mark scheme awards the final accuracy mark only if reached from correct working (nfww).
Things to Be Careful About
- This is a no-calculator question: every step must be exact, with fractions and surds kept in exact form throughout.
- Show every line of expansion — the scheme pays separate marks for rewriting as a fraction, for the expanded denominator, for the conjugate multiplication, and for the expanded numerator over the difference-of-squares denominator.
- The final answer must be fully simplified: (or equivalent), not an unsimplified fraction.
A class of 10 students includes Abby and Ben.
A group of 5 students is to be selected from the class. Find the number of possible groups in the following cases.
Approach
Choosing 5 students from 10 with no restrictions is an unordered selection, so use combinations.
Working
Answer
252
Walkthrough
A group is unordered — the order in which students are picked does not matter — so this is a combination. The number of ways to choose 5 students out of 10 is .
Key Takeaways
- "Group" or "selection" language signals combinations; "arrangement" or "line" signals permutations.
- Know how to evaluate by cancelling factorials rather than computing large factorials.
Common Mistakes
- Using permutations instead of combinations (giving ), which scores nothing here.
- Arithmetic slips when cancelling the factorials.
Things to Be Careful About
- This part carries only 1 mark: the answer must be exactly correct (cao) — no working marks are available.
Approach
If both Abby and Ben must be in the group, they are already fixed, so only the remaining 3 places need to be filled from the other 8 students.
Working
Answer
56
Walkthrough
Since Abby and Ben are definitely included, they take up 2 of the 5 places automatically. That leaves places to fill from the remaining students. The number of ways is
No extra factor is needed because Abby and Ben contribute exactly one fixed choice each.
Key Takeaways
- When specific people must be included, remove them from both the pool and the count, then choose the rest.
- Do not multiply by anything for the fixed members — their inclusion is forced, not chosen.
Common Mistakes
- Multiplying by 2 or by some factorial for Abby and Ben as if they were being arranged.
- Choosing 3 from 10 instead of 3 from 8.
Things to Be Careful About
- B1 is awarded for seeing (or equivalent); the final answer must be exactly 56.
Approach
"Either Abby or Ben, but not both" splits into two disjoint cases: Abby in without Ben, or Ben in without Abby. Count each and add.
Working
Case 1 — Abby in, Ben out: choose the other 4 from the remaining 8:
Case 2 — Ben in, Abby out: again choose 4 from 8:
Total:
(Equivalently, .)
Answer
140
Walkthrough
The condition excludes two situations: groups containing neither, and groups containing both. The cleanest route is to split into two disjoint cases:
- Abby in, Ben out: Abby fills one place, so choose the remaining 4 from the other 8 students: .
- Ben in, Abby out: by symmetry, also .
Adding the disjoint cases gives . An equally valid check is subtraction: all groups () minus those with both () minus those with neither () equals .
Key Takeaways
- "Either ... but not both" means multiply the single-inclusion count by 2 when the two people are symmetric.
- Complementary counting (total minus forbidden cases) is often quicker than direct casework.
Common Mistakes
- Forgetting the factor of 2 and answering 70.
- Subtracting only one of the forbidden counts in the complementary method.
- Including groups with both Abby and Ben by mistake.
Things to Be Careful About
- B1 is given for either accepted route ( or the subtraction form); the final answer must be exactly 140.
All 10 students are arranged in a line. How many arrangements are possible if there are exactly three students between Abby and Ben?
Approach
Treat Abby and Ben as a pair with exactly three students between them. First count where such a pair can sit in the line of 10, then arrange the other 8 students, and multiply.
Working
If Abby sits in position , Ben must sit in position (three students between them). The possible values of run from 1 to 6, giving 6 placements for the ordered pair (Abby before Ben).
The same 6 placements exist with Ben before Abby, so there are ways to place the pair.
The remaining 8 students can be arranged in the remaining 8 positions in
ways. Total arrangements:
Answer
483840
Walkthrough
We need lines of all 10 students in which exactly three students separate Abby and Ben.
Step 1 — position the pair. If Abby occupies position , Ben must occupy position , since positions , , hold the three students between them. Position must exist within the line of 10, so can be — that is 6 placements with Abby on the left. Repeating with Ben on the left doubles this: ways to place the pair.
Step 2 — arrange everyone else. Once the pair's positions are fixed, the other 8 students fill the remaining 8 slots in any order:
Step 3 — multiply. The placement of the pair and the arrangement of the rest are independent:
Key Takeaways
- "Exactly between A and B" means their positions differ by .
- Count valid starting positions systematically, remember the pair can occur in either order, then multiply by the factorial of the remaining people.
Common Mistakes
- Forgetting the factor of 2 for the order of Abby and Ben (giving ).
- Miscounting the number of valid gaps (using 5 or 7 instead of 6).
- Treating it as a simple arrangement or using combinations instead of permutations.
Things to Be Careful About
- The mark scheme awards B1 for alone, B2 for or , and full marks only for the complete product — every factor must appear.
Solve the equation for .
Approach
Use the identity to rewrite the equation as a quadratic in , solve it, then convert each root back to angles.
Working
Using :
Factorise:
So , giving ; or , giving .
Since , we need .
For :
For :
All four values lie in range and there are no others.
Answer
θ = 15°, 75°, -5.77°, -84.2°
Walkthrough
The equation mixes and . The identity (the Pythagorean identity divided by ) converts everything into one function, . Substituting and collecting terms gives the quadratic , which factorises neatly as .
Each root is converted via : so or .
Because the argument is the double angle , the interval doubles to . For the solutions are and , giving and . For the principal value is , and the second solution in the interval comes from the symmetry : , giving and .
Key Takeaways
- The identity turns mixed cot/cosec equations into quadratics in one function.
- A quadratic in a reciprocal trig function must be converted back through before finding angles.
- With a double angle, always double the given interval before listing solutions, then halve at the end.
- The sine graph's symmetries (, ) generate all solutions in an interval.
Common Mistakes
- Forgetting to double the interval: solving only for in loses the and solutions (the scheme penalises extras and missing values — "no other angles in range").
- Stopping at without halving to get .
- Discarding because it looks awkward — it yields two valid answers.
- Sign slips when forming the quadratic: becomes after moving the 9 across.
- Rounding too early: keep unrounded until halving, then give angles to 1 decimal place ( may be quoted as ).
- Dividing by instead of using the identity would lose solutions.
Things to Be Careful About
- The mark scheme awards B2 for the correct single-function quadratic, M1 for solving/factorising it, and A3 for all four angles with no extras — "nfww" means no marks from wrong working.
- Angles in degrees are required to 1 decimal place where not exact: and exact, the others (or ) and .
- Check every candidate angle lies in after halving; here all four do, but e.g. would be rejected.
In this question time is measured in seconds.
A particle is moving in a straight line with constant velocity of . At time , it passes a fixed point . At time it suddenly changes direction and moves with a different constant velocity along the same straight line. It passes the point again at time . Sketch the velocity–time graph for the motion.
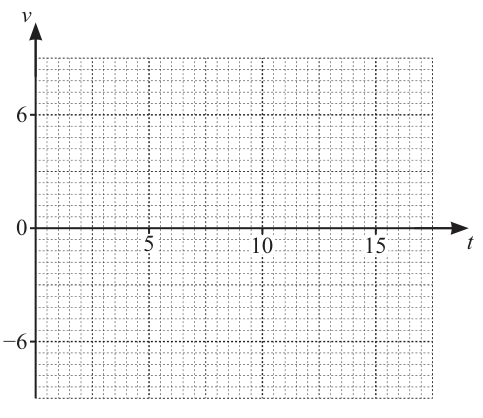
Approach
For constant velocity, displacement is given by . The particle travels away from point for at , and then returns to during the interval to () with a new constant velocity . Find so that the net displacement over is zero, and sketch the two horizontal segments on the velocity–time graph.
Working
First stage of motion ():
Second stage of motion (, duration ):
To return to , the displacement must be :
Setting :
The graph consists of two horizontal straight-line segments:
- for
- for
Answer
Horizontal line at from to , and horizontal line at from to .
Horizontal line at v = 6 for 0 <= t <= 5, and horizontal line at v = -3 for 5 <= t <= 15
Walkthrough
- For the first seconds, the particle moves at a constant velocity of . The displacement during this stage is the area under the velocity–time graph:
-
At , the particle is away from . It returns to at , which means it travels for an additional () with constant velocity .
-
To return to , the displacement in the second stage must cancel the first stage:
- On the grid, sketch a horizontal line at from to , and a horizontal line at from to .
Key Takeaways
- On a velocity–time graph, constant velocity is represented by a horizontal straight line.
- Displacement is the signed area between the velocity–time graph and the time axis (areas above the axis represent positive displacement, while areas below represent negative displacement).
- Returning to the starting point means total displacement is zero, so the positive and negative areas must be equal in magnitude.
Common Mistakes
- Plotting a positive return velocity () instead of , forgetting that returning requires opposite direction.
- Connecting to with a sloped line instead of recognising that the velocity changes suddenly, meaning two separate horizontal segments are drawn.
- Dividing by instead of the duration of the second stage ().
Things to Be Careful About
- Ensure the time interval for the second segment is accurately drawn from to .
- The grid has major markings at and ; is exactly halfway between and .
Another particle is moving in a straight line with constant acceleration. At time it passes a fixed point with velocity . It passes the point again at time . Sketch the velocity–time graph for the motion.
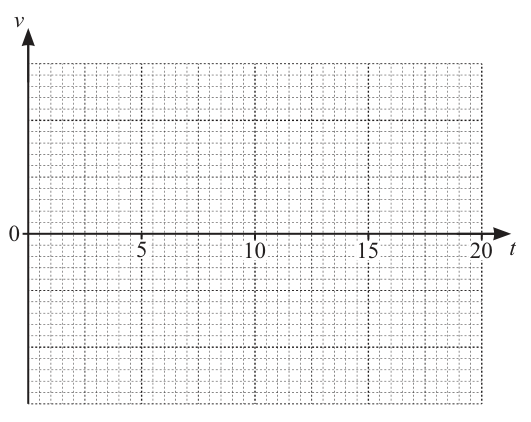
Approach
For motion with constant acceleration, the velocity–time graph is a single straight line of equation . The particle starts at with and returns to at , meaning the total displacement at is . Use the constant acceleration formula to find the acceleration , determine the velocity at and the time when , then sketch the line.
Working
Using with , , and :
Find the key points on the velocity–time graph :
- At :
- When :
- At :
Draw a single straight line passing through , , and .
Answer
A single straight line with positive gradient starting at , crossing the -axis at , and ending at .
Single straight line passing through (0, -8), (10, 0) and (20, 8)
Walkthrough
- Constant acceleration implies that the velocity–time graph is a single straight line.
- The initial velocity is at , giving the initial point .
- Returning to point at means the total displacement over the interval is zero ().
- Using :
- Alternatively, by symmetry of constant acceleration, if net displacement is zero over , the triangular area below the -axis must equal the triangular area above the -axis. Thus, the line must cross the -axis halfway through the motion at , and the final velocity must be equal in magnitude but opposite in sign to the initial velocity, giving .
- Draw a single straight line from through up to .
Key Takeaways
- Constant acceleration corresponds to a straight line with constant gradient on a velocity–time graph.
- Zero net displacement over an interval for constant acceleration means the graph is symmetric about , so the -intercept is and the final velocity is .
Common Mistakes
- Drawing two separate line segments (e.g., a V-shape) instead of a single continuous straight line for constant acceleration.
- Drawing a line with negative gradient starting at and ending at .
- Misidentifying the -intercept (not at ).
Things to Be Careful About
- Ensure the line is drawn straight with a ruler across the whole range .
- Clearly mark the key coordinates , , and on the grid.
The diagram shows part of the curve and the line . The curve and the line intersect at the point .
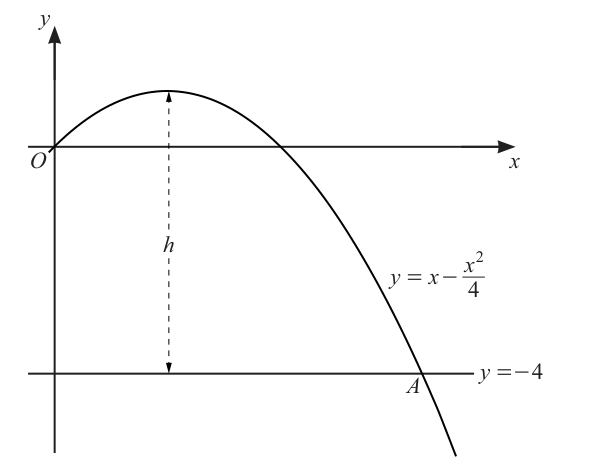
The maximum point on the curve is at a perpendicular distance from the line .
Find the value of .
Approach
Complete the square on to find the maximum point, then find the vertical distance from that point down to the line .
Working
Complete the square:
The maximum occurs at , where , so the maximum point is .
The perpendicular distance between this point and the line is the difference in -values:
Answer
5
Walkthrough
The curve is a downward-opening parabola, so its maximum can be found by completing the square. Writing and completing the square inside the bracket gives . Since , the largest value of is , occurring when : the maximum point is . The line is horizontal, so the perpendicular distance from any point to it is simply the vertical gap: .
Key Takeaways
- Completing the square immediately reveals the vertex (maximum or minimum) of a parabola.
- For a horizontal line , the perpendicular distance from a point is just the difference in -coordinates.
Common Mistakes
- Sign slips when completing the square (forgetting the factor outside).
- Computing as instead of taking the positive distance .
- Finding only the -coordinate of the maximum () without evaluating — the scheme awards B2 for this but not full marks.
- Using the wrong root of the factorised form ; the roots and locate the axis of symmetry by symmetry, not the maximum itself.
Things to Be Careful About
- The mark scheme says "nfww": scores nothing from wrong working, so the method for finding the maximum must be shown.
- The answer must be positive — is a distance.
Approach
At the intersection point the curve and the line have the same coordinates, so set and solve the resulting quadratic. From the diagram, lies in the fourth quadrant, so take the larger root.
Working
Set the curve equal to the line:
Multiply through by and rearrange into standard form:
Solve using the quadratic formula:
Since is in the fourth quadrant (positive ), take the positive root:
Answer
2 + 2√5
Walkthrough
Point lies on both the curve and the line, so its coordinates satisfy both equations simultaneously. Setting and multiplying by gives the three-term quadratic . This does not factorise over the integers, so the quadratic formula is used: the discriminant is , giving and hence . The diagram shows in the fourth quadrant with a positive -coordinate, so the answer is .
Key Takeaways
- Intersections are found by equating the two expressions for .
- When a quadratic has no rational factors, use the formula and simplify the surd exactly.
- A sketch tells you which root to keep.
Common Mistakes
- Taking the negative root , which contradicts the position of shown in the figure.
- Sign errors forming the quadratic: forgetting to move everything to one side before applying the formula.
- Leaving the answer as instead of simplifying to .
- Rounding to a decimal when an exact surd is demanded.
Things to Be Careful About
- The question asks for the exact -coordinate, so the surd form is required; a decimal such as would not earn the final accuracy mark.
- The mark scheme also accepts completing the square: leads to the same result.
Approach
Differentiate the curve to obtain the gradient function, evaluate it at to get the tangent's gradient, then use since the line is horizontal.
Working
Differentiate:
Substitute :
The line is horizontal, so the acute angle between the tangent and the line satisfies:
Answer
65.9 degrees
Walkthrough
The gradient of the tangent at any point comes from the derivative: differentiating gives . Substituting the -coordinate of found in part (b), , gives . Because the line is horizontal, the angle between the tangent and the line equals the angle the tangent makes with the horizontal direction, whose tangent is the magnitude of the gradient: , so .
Key Takeaways
- The derivative evaluated at a point gives the gradient of the tangent there.
- A gradient corresponds to an angle with the horizontal; a negative gradient means the tangent slopes downwards, so the acute angle uses the modulus.
- Results from earlier parts are carried forward — here the exact -coordinate from part (b).
Common Mistakes
- Dropping the minus sign and reporting instead of the acute angle .
- Arithmetic slips substituting the surd: simplifies cleanly to , not or similar.
- Giving the answer in radians () when the question context expects degrees, or rounding incorrectly.
- Using the gradient at (the maximum, where the gradient is ) instead of at .
Things to Be Careful About
- Angles in degrees should be given to 1 decimal place: (the radian equivalent is accepted by the scheme if radians were used consistently).
- The question asks for the acute angle, so the magnitude of the gradient must be used.
- The final M1 depends on having both the correct derivative and the correct -coordinate of , so part (b) must be right (or correctly followed through).
In this question is a unit vector in the positive -direction and is a unit vector in the positive -direction. Time is in seconds and distances are in metres.
The diagram shows the initial positions and velocities of two particles, and , that move in the - plane.
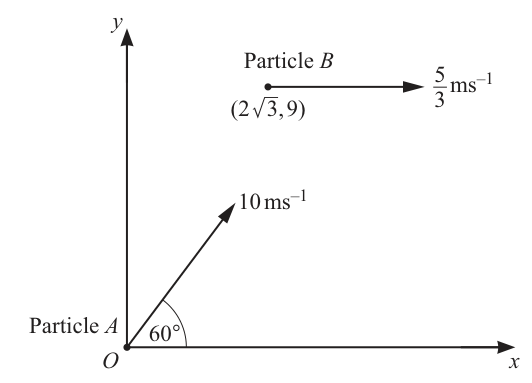
Particle starts from the origin at time . It moves with constant speed in the direction above the -axis.
Find the exact values of the components of the velocity of particle in the -direction and the -direction.
Approach
Resolve the speed at above the -axis into components using cosine for the -component and sine for the -component.
Working
Answer
The velocity of is .
x-component 5 ms^-1, y-component 5√3 ms^-1
Walkthrough
Particle moves at constant speed in a direction making with the positive -axis. To split any vector of magnitude at angle to the -axis, the horizontal component is (the adjacent side) and the vertical component is (the opposite side). Using the exact special-angle values and gives the components and exactly — no calculator needed.
Key Takeaways
- Resolving a vector: -component , -component when is measured from the positive -axis.
- Special angles (, , ) should give exact surd answers.
Common Mistakes
- Swapping sine and cosine, giving horizontally and vertically.
- Giving decimal approximations instead of the exact form .
Things to Be Careful About
- The mark scheme awards B2 for both correct, B1 for either one correct — so even if unsure of one, state the other.
- The question says "exact values", so leave as a surd; do not round.
Approach
Since starts at the origin, its position vector is simply its velocity multiplied by .
Working
Answer
(5t) i + (5√3 t) j
Walkthrough
For motion with constant velocity, displacement equals velocity times time. Particle starts at the origin, so its initial position vector is , and adding gives its position at time . This result is carried forward into part (d), where it must be compared with 's position.
Key Takeaways
- Position vector at time : for constant velocity.
Common Mistakes
- Forgetting that the answer must be in terms of — writing only the velocity vector.
- Sign or component errors carried over from part (a).
Things to Be Careful About
- The mark scheme allows follow-through on your part (a) components, but they must include and have at least one non-zero component.
Particle starts from the point at time . It moves with constant speed parallel to the positive -axis.
Find, in terms of , the position vector of particle at time .
Approach
starts at and moves parallel to the positive -axis at , so its velocity is .
Working
Answer
(2√3 + (5/3)t) i + 9 j
Walkthrough
Unlike particle , particle does not start at the origin: its initial position vector is . Its velocity is entirely horizontal because it moves parallel to the positive -axis, so the velocity vector is — the -component is zero, meaning stays on the line forever. Adding velocity times time to the initial position gives the position vector at time . This expression is needed in part (d).
Key Takeaways
- A general position vector has the form where is the start point and the velocity.
- Motion parallel to an axis means the perpendicular component of velocity is zero.
Common Mistakes
- Omitting the initial position and writing only the velocity part.
- Putting a non-zero -component in the velocity.
Things to Be Careful About
- The mark scheme gives B1 for either the -component or the -component seen, so partial credit exists — but the full B2 needs the complete correct vector including .
Approach
Using the results of parts (b) and (c), set the position vectors equal. If the same value of satisfies both the -equation and the -equation, the particles are at the same point at the same time — they collide.
Working
Carrying forward:
-components equal:
-components equal:
Both equations give the same time , so the particles occupy the same position at the same instant.
(At this time both particles are at .)
Answer
Both component equations yield , so the particles collide.
The particles collide at t = 3√3/5 s
Walkthrough
Two moving objects collide if there is a single time at which their position vectors are identical. Since we already have both position vectors in terms of , we equate them component by component. Equating -components gives , which solves to ; rationalising by multiplying numerator and denominator by gives . Equating -components gives ; collecting the -terms gives , so . Because both independent equations produce the same time, there really is an instant when the particles share a position — that is the collision. As a check, substituting back shows both are then at .
Key Takeaways
- Collision means equal position vectors at the same — you must check both components give the same time, not just one.
- Rationalising denominators converts into the cleaner .
Common Mistakes
- Solving only one component equation and claiming a collision without checking the other.
- Setting the two position vectors' magnitudes equal instead of equating components.
- Arithmetic slips when collecting .
- Leaving unrationalised — acceptable as "oe" but the tidy form is safer.
Things to Be Careful About
- The word "Hence" requires you to use the position vectors from parts (b) and (c); re-deriving them from scratch risks losing method credit.
- The mark scheme's M1 requires both position vectors in terms of , with at least one of the standard form .
- The A2 requires showing the exact times from both equations are the same (or showing both particles at the same point at that time) — one equation alone scores only partially.
A metal tank is in the shape of a cuboid with a square base of side and an open top. The tank has a volume of . Given that can vary, and that the area of the metal used to make the tank is a minimum, find the dimensions of the tank.
Approach
The tank is an open cuboid with square base of side m and height m. Use the volume to eliminate , write the metal area (base plus four sides) in terms of alone, differentiate, set to zero and solve.
Working
Volume constraint:
Surface area (base plus four sides each ):
Differentiate:
Set equal to zero and solve:
Then
Answer
Square base side x = 2.15 m, height h = 1.08 m
Walkthrough
The tank has no lid, so the metal used is the square base plus four rectangular sides. With base side and height , that area is . The volume condition lets us write , so the area becomes a function of alone: . Differentiating gives ; setting this to zero finds the stationary point. Solving gives , and substituting back into gives . Since at this point, it is indeed a minimum.
Key Takeaways
- Optimisation problems with two variables need a constraint equation to reduce to one variable before differentiating.
- An open-top box's surface area is base plus four sides — do not include a top.
- Setting a derivative to zero locates stationary points; checking the second derivative confirms minimum versus maximum.
Common Mistakes
- Including a top face ( or ) — the tank is open.
- Forgetting to substitute correctly, giving a wrong surface-area expression.
- Sign slips when differentiating , which gives .
- Stopping after finding without computing — both dimensions are required.
- Rounding too early: keep exact values until the final answers , (nfww applies).
Things to Be Careful About
- The mark scheme requires the constraint to be seen (M1), then the surface area of form (B1), its derivative of form (B1), equating to zero and solving (M1), and both final values correct from correct working (A1, dependent on all previous marks). Wrong working scores nothing for the final answer.
- Give answers to 3 significant figures: , .