Mathematics (Syllabus D) 4024/12 — October/November 2025
Cambridge O-Level · Non-calculator · worked solutions for every part, with the mark scheme
Topics Number · Algebra and Graphs · Geometry · Transformations and Vectors · Statistics · Coordinate Geometry · +3 more
Ruth records the colour of each of 24 cars.
| Red | Blue | Silver | Blue | Silver | Silver | White | Silver |
| Red | Silver | Silver | Blue | Grey | Grey | Silver | Red |
| White | Red | Blue | Grey | Blue | Silver | Red | Red |
Complete the frequency table.
You may use the tally column to help you.
| Colour | Tally | Frequency |
|---|---|---|
| Blue | ||
| Grey | ||
| Red | ||
| Silver | ||
| White |
Approach
Count the number of times each car colour appears in the given list of 24 cars, then fill in the frequency table.
Working
Counting each colour from the data:
- Blue: appears 5 times
- Grey: appears 3 times
- Red: appears 6 times
- Silver: appears 8 times
- White: appears 2 times
Check: , which matches the total number of cars.
Answer
| Colour | Frequency |
|---|---|
| Blue | 5 |
| Grey | 3 |
| Red | 6 |
| Silver | 8 |
| White | 2 |
Blue: 5, Grey: 3, Red: 6, Silver: 8, White: 2
Walkthrough
The question provides a list of 24 car colours and asks for a frequency table. The first step is to go through the list systematically and count how many times each colour appears. We can use tally marks to keep track to avoid missing any. After counting, we verify that the sum of all frequencies equals the total number of cars (24). This ensures no data was missed or double-counted.
Key Takeaways
Frequency tables summarise categorical data by counting occurrences. Always check that the total frequency matches the total number of data points given in the problem.
Common Mistakes
- Missing a category or double-counting a colour.
- Forgetting to check that the frequencies sum to the total number of items (24 in this case).
Things to Be Careful About
Ensure each frequency is correctly associated with its colour. The mark scheme awards marks for correct frequencies associated with correct colours, so matching the numbers to the right labels is essential.
Draw a bar chart to show the information in the table.
Complete the scale on the frequency axis.
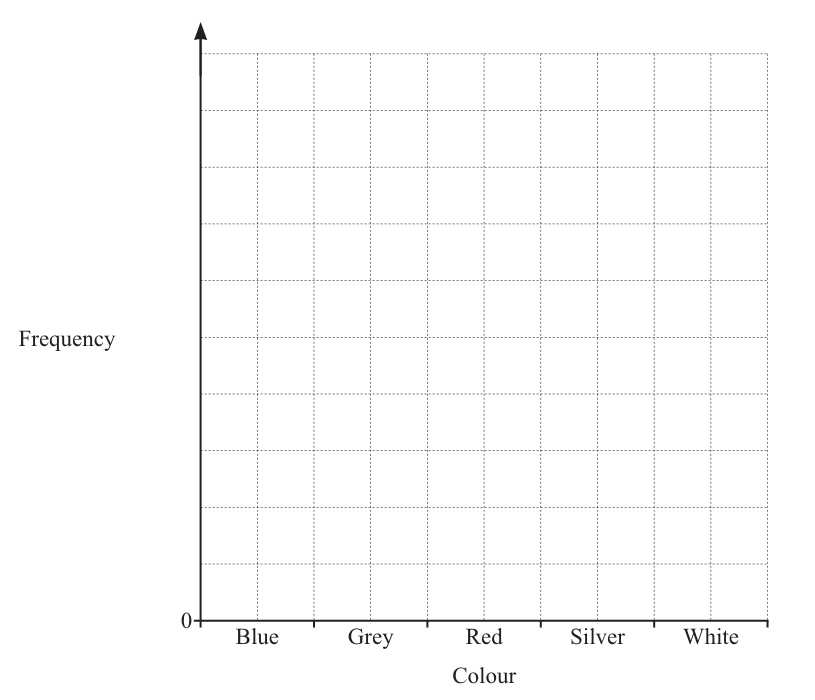
Approach
Use the frequencies from part (a) to draw a bar chart. Choose a linear scale on the vertical axis that accommodates the maximum frequency (8) and starts at 0. Draw five bars of equal width with heights corresponding to the frequencies.
Working
The maximum frequency is 8 (Silver). A convenient linear scale is to mark every 2 units on the frequency axis: .
Draw the bars as follows:
- Blue: height (halfway between 4 and 6)
- Grey: height (halfway between 2 and 4)
- Red: height (on the line for 6)
- Silver: height (on the line for 8)
- White: height (on the line for 2)
Ensure all bars have equal width and leave gaps between them.
Answer
Bar chart with frequencies Blue = 5, Grey = 3, Red = 6, Silver = 8, White = 2 on a linear scale starting at 0.
Bar chart with Blue=5, Grey=3, Red=6, Silver=8, White=2 on a linear scale starting at 0
Walkthrough
To draw the bar chart, first determine a suitable scale for the frequency axis. The highest frequency is 8, so a scale up to 10 with markings every 2 units () works well and allows easy reading of odd numbers like 3 and 5. Next, draw five vertical bars above each colour label on the horizontal axis. The bars must have equal width and be separated by small gaps. The height of each bar must match its frequency exactly. Finally, label the vertical axis with the scale values starting from 0 at the origin.
Key Takeaways
Bar charts for categorical data require bars of equal width with gaps between them. The vertical axis must have a linear scale starting from 0 to accurately represent the frequencies.
Common Mistakes
- Drawing bars that touch each other (this is for histograms, not bar charts for categorical data).
- Forgetting to start the frequency axis at 0, which distorts the visual representation.
- Using unequal widths for the bars or uneven gaps between them.
- Reading the scale incorrectly (e.g., marking every 3 units instead of 2).
Things to Be Careful About
The mark scheme gives follow-through marks for their frequency table, so if part (a) was incorrect but the chart is drawn correctly based on those incorrect frequencies, method marks can still be awarded. However, the scale must start at 0 and be linear. Ensure the bars are drawn to the correct height on the chosen scale.
Work out.
Approach
Align the decimal points and subtract the digits in each column.
Working
Write and with the same number of decimal places:
Subtract column by column:
- Hundredths:
- Tenths:
- Units:
Answer
0.58
Walkthrough
To subtract decimals, it is essential to line up the decimal points. This ensures that we are subtracting digits of the same place value (tenths from tenths, hundredths from hundredths, etc.). The number has only one decimal place, while has two. We can add a placeholder zero to to make it . This does not change its value but makes the subtraction visually clearer and less prone to error.
Once aligned:
We simply perform the subtraction digit by digit from right to left. The result retains the decimal point in the same vertical position.
Key Takeaways
Always align decimal points when adding or subtracting decimals. Use trailing zeros as placeholders if necessary to ensure all numbers have the same number of decimal places.
Common Mistakes
- Misaligning the decimal points (e.g., treating as or subtracting incorrectly across the boundary).
- Forgetting to include the leading zero in the answer (writing instead of , though usually accepted, is standard).
- Incorrectly carrying over or borrowing.
Things to Be Careful About
Ensure you do not confuse subtraction with multiplication or division rules regarding decimal placement. In subtraction, the decimal point stays in the same column; it does not move based on the number of decimal places in the operands.
Approach
Apply the rule for multiplying signed numbers: a negative number multiplied by a negative number gives a positive result. Then multiply the absolute values.
Working
Step 1: Determine the sign.
Since both numbers are negative (), the product will be positive ().
Step 2: Multiply the magnitudes.
So,
Answer
40
Walkthrough
This question tests the basic rule of signs for multiplication. When multiplying two integers:
- Positive Positive = Positive
- Negative Negative = Positive
- Positive Negative = Negative
- Negative Positive = Negative
Here we have two negative numbers: and . Because there are two negatives, the result is positive. We then calculate the product of their absolute values: . Thus, the answer is or simply .
Key Takeaways
Remember the 'two negatives make a positive' rule for multiplication and division. For addition and subtraction, the rules are different (e.g., ).
Common Mistakes
- Thinking the answer is negative because both numbers are negative (confusing with addition rules like ).
- Multiplying the numbers correctly but forgetting the sign entirely or getting the sign wrong.
- Confusing this with addition: would be , but multiplication yields .
Things to Be Careful About
Be careful not to confuse the operation. Subtraction of a negative is different from multiplication of a negative. Also, ensure you don't drop the sign if the result were negative (though here it is positive).
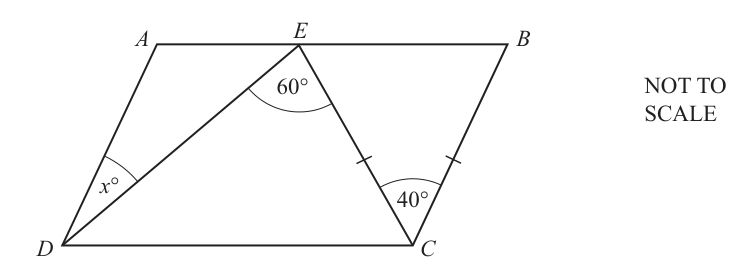
is a parallelogram.
is a point on and .
Angle and angle .
Find the value of .
Approach
Identify the isosceles triangle to find its base angles. Then use the properties of a parallelogram (consecutive angles are supplementary, opposite angles are equal) to find angles in . Finally, use the angle sum of a triangle or angles on a straight line to determine .
Working
In , , so the triangle is isosceles and its base angles are equal:
Since is a parallelogram, consecutive angles are supplementary. With :
Angles on the straight line at point sum to :
In , the sum of the interior angles is :
Answer
20
Walkthrough
First, look at triangle . We are given that , which means is an isosceles triangle with the apex at . The angle at the apex is . The base angles and must be equal, and since the angles in a triangle sum to , each base angle is .
Next, use the properties of the parallelogram . In a parallelogram, consecutive angles (angles that share a side) are supplementary, meaning they add up to . Since , the adjacent angle must be .
Now focus on point on the straight line . The angles , , and lie on this straight line, so they must add up to . We know and , so .
Finally, look at triangle . We now know two of its angles: (which is ) and . The third angle, , is found by subtracting the other two from : .
An alternative route is to use opposite angles in the parallelogram. and . Then . In , . Finally, . Both routes give the same result.
Key Takeaways
- Isosceles triangles have equal base angles; use the angle sum of a triangle to find them when the apex angle is known.
- Parallelograms have supplementary consecutive angles and equal opposite angles.
- Angles on a straight line sum to ; this is useful when a point lies on a side of a polygon.
- The angle sum of any triangle is always .
Common Mistakes
- Forgetting that the base angles of an isosceles triangle are equal and incorrectly assigning to or .
- Using the wrong parallelogram property, such as assuming consecutive angles are equal instead of supplementary.
- Forgetting to subtract from when finding angles on a straight line or in a triangle.
- Not showing working (the mark scheme requires "nfww" — no follow-through working is allowed, so all steps must be clearly shown).
Things to Be Careful About
- The diagram is marked "NOT TO SCALE", so do not measure angles with a protractor; rely entirely on the given values and geometric properties.
- Ensure all angle calculations are shown explicitly to earn the method marks (B1s) in the marking scheme.
- The final answer is a pure number (), not , since is defined as the value in .
Petra thinks of a number.
The number is a multiple of 7.
Petra says:
When I write my number correct to the nearest ten it is 30.
Find the number that Petra thinks of.
______
Approach
First, interpret the statement "correct to the nearest ten it is 30" to find the possible integer range for Petra's number. Then, list the multiples of 7 and identify which one falls within this range.
Working
When a number is rounded to the nearest 10 and gives 30, the original number must be:
- Greater than or equal to the midpoint between 20 and 30, which is .
- Less than the midpoint between 30 and 40, which is .
So, let be Petra's number. The condition is:
We are also told that is a multiple of 7. Let's list the positive multiples of 7:
Now we check which of these multiples lie in the interval :
- is less than .
- satisfies .
- is not strictly less than (if we round 35 to the nearest 10, standard convention usually rounds up to 40, or even if it were included, the mark scheme specifies the range 25 to 35). The mark scheme explicitly awards marks for an answer in the range 25 to 35.
The only multiple of 7 in this range is 28.
Answer
28
Walkthrough
The problem asks us to find a specific number based on two clues: it is a multiple of 7, and when rounded to the nearest 10, it becomes 30.
Step 1: Determine the range of numbers that round to 30.
Rounding to the nearest 10 means looking at the units digit. If the units digit is 0, 1, 2, 3, or 4, you round down. If it is 5, 6, 7, 8, or 9, you round up.
For a number to round to 30:
- It must be at least halfway between 20 and 30. Halfway is 25. So the number must be .
- It must be less than halfway between 30 and 40. Halfway is 35. So the number must be .
Thus, the possible integers are .
Step 2: Apply the second clue.
The number must be a multiple of 7. We list multiples of 7 near this range:
Comparing these to our range :
- 21 is too small.
- 28 is inside the range ().
- 35 is outside the range (it rounds to 40).
Therefore, the only possible number is 28.
Key Takeaways
- Understanding rounding intervals is crucial. Rounding to the nearest 10 creates boundaries at x.5.
- "Multiple of n" means the number can be divided by n without a remainder.
- Combining constraints (range + divisibility) often leads to a unique solution.
Common Mistakes
- Listing multiples of 7 without checking the rounding constraint (e.g., answering 21 or 35).
- Misunderstanding the lower bound of rounding. Thinking the range starts at 26 instead of 25. Note that 25 rounds to 30.
- Misunderstanding the upper bound. Thinking 35 rounds to 30. In standard rounding, 35 rounds to 40.
Things to Be Careful About
- The boundary value 25: Ensure you include 25 in your possible range. rounded to the nearest 10 is .
- The boundary value 35: Ensure you exclude 35. rounded to the nearest 10 is typically .
- The question implies a single integer answer. Always verify the result against all conditions given.
Write these numbers in order of size, starting with the smallest.
______ , ______ , ______ , ______
smallest
Approach
To compare these numbers, we convert each one to its decimal equivalent. This allows us to look at the digits in the same place-value columns.
Working
First, convert :
Next, convert :
Then, convert :
The fourth number is already in decimal form:
Now we have the four values:
Comparing them digit by digit:
- The tenths digit is for , and for the other three. So is the smallest.
- For the remaining three (), we compare the hundredths digits: (from ), , and . So is next.
- Between and , we compare the thousandths digits: vs (from ). Since , is smaller than .
Thus, the order from smallest to largest is:
Answer
7/9, 0.8, 84.5%, 17/20
Walkthrough
When asked to order numbers given in mixed formats (fractions, decimals, and percentages), the most reliable method is to convert everything to the same format. Decimals are usually the easiest because our place-value system makes comparison straightforward.
-
Convert : Dividing by gives . We can write this as . Knowing that this is roughly helps, but keeping it precise is better.
-
Convert : Instead of long division, we can scale the denominator to . Multiplying top and bottom by gives , which is exactly .
-
Convert : A percentage is simply divided by . Moving the decimal point two places to the left turns into .
-
Compare:
- has a in the tenths column.
- has an in the tenths column.
- has an in the tenths column.
- has an in the tenths column.
Clearly, is the smallest. Now look at the three starting with . To compare them easily, imagine they all have three decimal places:
Looking at the hundredths column: . Therefore, the order is , then , then .
Substituting the original forms back in, we get: .
Key Takeaways
- Always convert mixed number formats (fractions, percents, decimals) to one common format before ordering.
- Be careful when comparing decimals like and ; is larger because it has hundredths, while only has hundredths.
- Converting fractions to percentages or decimals is often faster than converting percentages to fractions.
Common Mistakes
- Assuming more digits means a larger number: Students might think is smaller than because looks bigger than , or confuse with .
- Incorrect fraction conversion: Calculating incorrectly or failing to recognize the recurring nature.
- Percentage error: Forgetting to move the decimal point or moving it in the wrong direction.
- Ordering backwards: Writing largest to smallest instead of smallest to largest.
Things to Be Careful About
- Ensure you show your working clearly. In exams, marks are often awarded for correct conversions even if the final ordering has a small slip.
- When writing the final answer, use the original forms given in the question (e.g., write , not ).
- Double-check the direction of the order ('starting with the smallest').
Solve.
= ______
Approach
To solve the equation , we need to isolate on one side of the equation. We can do this by collecting all terms containing on the left-hand side and all constant numbers on the right-hand side.
Working
Start with the given equation:
Subtract from both sides to move the terms to the left:
Add to both sides to move the constants to the right:
Simplify both sides:
Divide both sides by to find the value of :
Answer
6
Walkthrough
The goal is to find the value of that makes the equation true. The equation has terms on both sides ( and ) and constant numbers on both sides ( and ).
First, we group the terms together. We subtract from both sides. This gives , which simplifies to . The equation becomes .
Next, we group the constant numbers together. We add to both sides to cancel out the on the left. This gives , which is . The equation becomes .
Finally, to get by itself, we divide both sides by the coefficient of , which is . So, .
Key Takeaways
When solving linear equations, always try to keep the terms on one side and the numbers on the other. Whatever operation you perform on one side of the equals sign, you must also perform on the other side to maintain balance.
Common Mistakes
- Sign errors: Forgetting that subtracting a positive number changes the sign (e.g., writing instead of ).
- Incorrect subtraction: Subtracting coefficients incorrectly (e.g., instead of ).
- Forgetting to operate on both sides: Only adding or subtracting from one side.
Things to Be Careful About
Ensure you subtract from correctly and add to correctly. Double-check your final answer by substituting back into the original equation: and . Since both sides are equal, the answer is correct.

Approach
Read the number line to determine the boundary value and the direction of the inequality. An open circle indicates the boundary value is not included.
Working
The number line shows an open circle at , meaning . The arrow points to the right, towards larger values, meaning .
Answer
x > 3
Walkthrough
The number line in Fig. 3 has a horizontal axis with an arrow pointing to the right, indicating the positive direction. An open circle is placed at the value . In inequality notation, an open circle means the value itself is not included (strict inequality). The arrow extends to the right from , covering all numbers greater than . Therefore, the inequality represented is .
Key Takeaways
- An open circle on a number line represents a strict inequality ( or ).
- A closed (filled) circle represents an inclusive inequality ( or ).
- An arrow pointing to the right indicates 'greater than', while an arrow pointing to the left indicates 'less than'.
Common Mistakes
- Writing instead of by misinterpreting the open circle as a closed circle.
- Writing by reading the arrow direction incorrectly.
Things to Be Careful About
- Always check whether the circle is open or closed. Open circle = strict inequality ( or ), closed circle = inclusive inequality ( or ).
- Ensure the inequality sign matches the direction of the arrow (right = , left = ).
Approach
Isolate by adding to both sides of the inequality.
Working
Add to both sides:
Answer
x < 9
Walkthrough
The goal is to solve for . The inequality is . To isolate , we perform the inverse operation of subtracting , which is adding . We add to both sides of the inequality to maintain the balance. , so the solution is .
Key Takeaways
- When solving inequalities, the same algebraic operations used for equations apply.
- Adding or subtracting the same value from both sides does not change the direction of the inequality sign.
Common Mistakes
- Forgetting to add to both sides, only adding to one side.
- Incorrect arithmetic when adding the constants.
Things to Be Careful About
- Remember that multiplying or dividing both sides of an inequality by a negative number would reverse the inequality sign, though this is not needed here.
- The final answer should be in the form or .
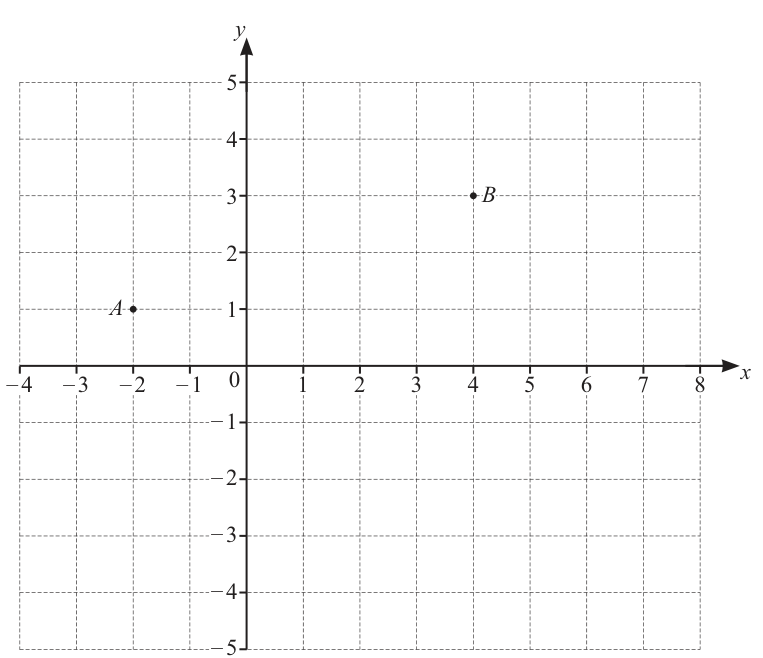
Point and point are plotted on the grid.
Approach
Read the coordinates of point directly from the provided grid in Fig. 4.
Working
Locate point on the grid. Following the grid lines to the axes:
- The -coordinate is .
- The -coordinate is .
Answer
(-2, 1)
Walkthrough
The question asks for the coordinates of point . By observing the grid in Fig. 4, we can trace vertically from to the -axis to find , and horizontally to the -axis to find . Thus, the coordinates are .
Key Takeaways
Coordinates are written as , where is the horizontal distance from the origin and is the vertical distance.
Common Mistakes
- Writing the coordinates in the wrong order .
- Misreading negative values on the axes (e.g., reading instead of ).
Things to Be Careful About
Ensure the answer is in the format as requested. Negative coordinates must include the minus sign.
The coordinates of point are .
The gradient of the line is .
Find the value of .
= ______
Approach
Use the gradient formula for the line , substitute the known coordinates and the given gradient, then solve for .
Working
The coordinates of are and are . The gradient of is given as .
Substitute the values:
Multiply both sides by :
Divide by :
Answer
6
Walkthrough
We are given the gradient of the line passing through and . The gradient formula calculates the change in divided by the change in . Setting this equal to gives an equation with as the unknown. Solving involves cross-multiplying to get , which simplifies to , yielding .
Key Takeaways
The gradient formula can be used to find a missing coordinate if the gradient and the other coordinate are known.
Common Mistakes
- Forgetting to subtract in the correct order (e.g., instead of ), which would give the wrong sign.
- Algebraic errors when solving the fraction equation, such as forgetting to multiply the constant term on the right side.
Things to Be Careful About
The gradient is negative, so ensure signs are handled correctly during the algebraic manipulation. The answer must be an exact value.
and are two sides of the parallelogram .
Find the coordinates of point .
( ______ , ______ )
Approach
In parallelogram , the side is parallel and equal in length to . This means the vector displacement from to is the same as the displacement from to .
Working
From part (b), the coordinates of are . The coordinates of are .
Calculate the displacement from to :
Since is a parallelogram, . Let . The coordinates of are .
Alternatively, using gradients:
- Gradient of is . Since , gradient of is .
- Line passes through : .
- Gradient of is . Since , gradient of is .
- Line passes through : .
- Intersection of and :
Answer
(0, -3)
Walkthrough
A parallelogram has opposite sides that are equal and parallel. Since and are adjacent sides, must be parallel and equal to . We can find the change in coordinates from to ( in , in ) and apply that same change to point to find . Starting at , adding to gives , and subtracting from gives . Thus is at .
Key Takeaways
In a parallelogram , the vector is equal to (and ). This allows finding a missing vertex by applying a coordinate shift.
Common Mistakes
- Assuming the order of vertices is different (e.g., instead of ), which would lead to the wrong displacement.
- Calculating the midpoint incorrectly or using the wrong pair of vertices for the midpoint formula.
Things to Be Careful About
The vertices of a parallelogram are usually listed in order around the perimeter (). Ensure you use the correct corresponding sides ( parallel to ). The coordinates must be exact integers in this case.
Diagram Description
Cartesian axes with x from -4 to 8 and y from -5 to 5, gridlines at every integer. Points A(-2, 1), B(4, 3), and C(6, -1) are plotted and labelled. Point D(0, -3) is plotted and labelled. The parallelogram ABCD is drawn with solid lines connecting A-B, B-C, C-D, and D-A. Dashed lines may show the coordinate shifts from B to C and A to D to illustrate the translation vector (2, -4).
Sara has a bag containing 60 red counters, 72 blue counters and 36 green counters.
Find the ratio of red counters : blue counters : green counters in the bag.
Write the ratio in its simplest form.
______ : ______ : ______
Approach
To write the ratio in its simplest form, we must find the Highest Common Factor (HCF) of the three quantities (60, 72, and 36) and divide each quantity by this number.
Working
The initial ratio of red : blue : green counters is:
Find the HCF of 60, 72, and 36:
The HCF is 12. Divide each part of the ratio by 12:
Calculating the values:
Check if it can be simplified further: The only common factor of 5, 6, and 3 is 1, so this is the simplest form.
Answer
5 : 6 : 3
Walkthrough
A ratio compares quantities relative to one another. To simplify a ratio like , we look for the largest number that divides evenly into all three parts. This is the Highest Common Factor (HCF).
Once we identify the HCF (which is 12 here), we divide every term in the ratio by it. This reduces the numbers while keeping their proportional relationship exactly the same. Just like simplifying fractions, we stop when there is no common factor greater than 1 shared by all terms.
Key Takeaways
- Simplifying a ratio works exactly like simplifying a fraction: you divide all terms by their common factor.
- For multi-part ratios (), ensure the chosen factor divides all parts, not just two of them.
Common Mistakes
- Dividing by a common factor that isn't the highest (e.g., dividing by 6 instead of 12). While this gives a correct ratio (), it is not in its simplest form and may lose marks depending on the specific instruction 'simplest form'.
- Only simplifying two parts of the ratio and ignoring the third.
Things to Be Careful About
- Always check your final answer to ensure no common factor exists among all three numbers. For instance, since 5 is prime and does not divide 6 or 3, we know is fully simplified.
Sunil has a bag containing yellow counters and white counters.
The ratio of yellow counters to white counters is .
There are 18 more white counters than yellow counters.
Work out the number of yellow counters and the number of white counters.
Yellow counters = ______
White counters = ______
Approach
We are given the ratio of yellow to white counters as . We can represent the actual number of counters using a multiplier variable, say . Then, we use the information about the difference in their counts to solve for .
Working
Let the number of yellow counters be .
Let the number of white counters be .
We are told there are 18 more white counters than yellow counters. We can write this as an equation:
Simplify the left side:
Solve for :
Now calculate the actual number of counters:
Yellow counters
White counters
Check: Difference is . This matches the problem statement.
Answer
Yellow counters = 30, White counters = 48
Walkthrough
When dealing with ratios where the total amount is unknown but the difference between amounts is known, the 'unitary method' or algebraic substitution is effective.
- Assign variables to the ratio parts: If the ratio is , let the quantities be and . Here, represents the size of one 'share' or 'unit'.
- Form an equation based on the difference: The problem states there are 18 more white counters than yellow ones. In terms of our units, the difference is . Therefore, .
- Solve for : Divide the difference (18) by the difference in units (3) to find the value of one unit ().
- Calculate final answers: Multiply the original ratio numbers (5 and 8) by the value of to get the actual counts.
Key Takeaways
- Ratios describe relationships, not absolute values. You need an extra piece of information (like a total or a difference) to find the specific numbers.
- The difference in the ratio units corresponds directly to the difference in the actual quantities.
Common Mistakes
- Adding the difference instead of subtracting: Writing confuses the difference with the total.
- Forgetting to multiply back: Finding is only finding the value of one part of the ratio. Students often forget to multiply by 5 and 8 to get the final answer.
- Swapping the answers: Assigning 30 to white and 48 to yellow despite the ratio being Yellow:White .
Things to Be Careful About
- Ensure the order of subtraction in the equation matches the word description ('more white than yellow' means White - Yellow = positive difference).
- Verify your answer by checking if the calculated numbers maintain the original ratio ( simplifies to ) and satisfy the difference condition ().
Work out.
Give your answer as a mixed number in its simplest form.
______
Approach
To divide by a fraction, we convert any mixed numbers into improper fractions. Then we multiply the first fraction by the reciprocal (inverse) of the second fraction. Finally, we simplify the result and convert it back to a mixed number if required.
Working
First, convert the mixed number to an improper fraction:
Now substitute this back into the original expression:
To divide by a fraction, multiply by its reciprocal. The reciprocal of is :
Multiply the numerators together and the denominators together:
Simplify before multiplying by cancelling common factors. The in the numerator and the in the denominator share a factor of (, ):
Convert the improper fraction back to a mixed number. divided by is with a remainder of :
Answer
4 2/3
Walkthrough
This question tests the ability to perform arithmetic with fractions, specifically division involving mixed numbers.
Step 1: Convert Mixed Numbers
The expression starts with a mixed number, . It is much easier to work with fractions when they are all improper fractions (where the numerator is larger than the denominator). To convert , we multiply the whole number part () by the denominator () and add the numerator (). This gives us , which becomes the new numerator over the original denominator: .
Step 2: Division Rule
We are now dividing two fractions: . The golden rule for dividing fractions is "keep-change-flip" or "invert and multiply". We keep the first fraction (), change the division sign to multiplication, and flip the second fraction upside down (find its reciprocal). So, becomes .
Step 3: Multiplication and Simplification
Now we have . When multiplying fractions, we multiply straight across: top times top, bottom times bottom. However, it is often cleaner to simplify (cancel) before multiplying. Notice that divides evenly into . If we divide both by , the becomes and the becomes . The calculation becomes , which is simply .
Step 4: Final Form
The question asks for a mixed number in simplest form. We must turn our improper fraction back. We ask: how many times does go into ? It goes times (), leaving a remainder of (). The whole number answer is , and the remainder stays on top of the denominator . Thus, .
Key Takeaways
- Always convert mixed numbers to improper fractions before performing multiplication or division.
- Dividing by a fraction is equivalent to multiplying by its reciprocal.
- Simplifying fractions by cancelling common factors before multiplying reduces the size of the numbers you are working with.
- Check the final requirement of the question; if it asks for a mixed number, do not leave your answer as an improper fraction.
Common Mistakes
- Forgetting to convert: Trying to divide the whole parts and fractional parts separately (e.g., and ), which is incorrect.
- Multiplying instead of dividing: Simply multiplying the two fractions () without flipping the second one.
- Flipping the wrong fraction: Flipping the first fraction () instead of the second.
- Incorrect simplification: Failing to reduce the final fraction or failing to convert back to a mixed number when requested.
Things to Be Careful About
- Accuracy: Ensure the mixed number conversion is correct (, not just ).
- Simplification: Make sure the fractional part of the final mixed number () cannot be simplified further. In this case, and have no common factors, so it is in simplest form.
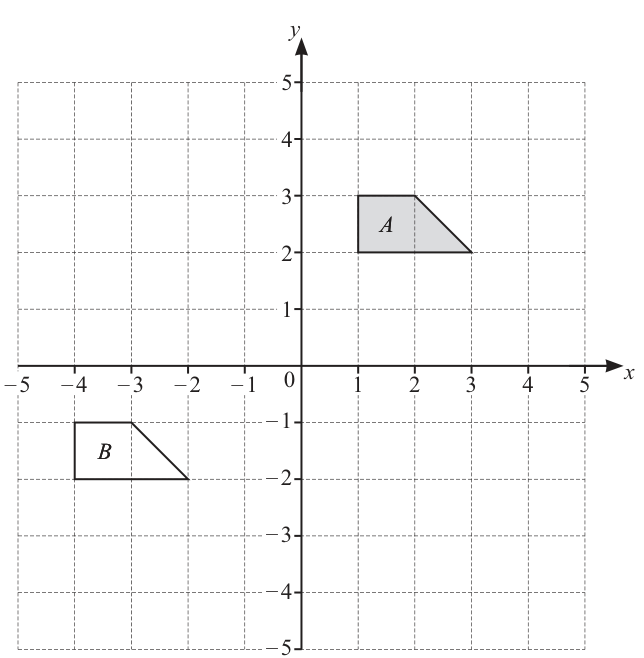
Shape and shape are drawn on the grid.
Approach
To describe the single transformation mapping shape onto shape , we compare the coordinates of corresponding vertices. Since the shapes have the same orientation and size, the transformation is a translation. We find the column vector by subtracting the coordinates of a vertex on from the corresponding vertex on .
Working
Pick a vertex on shape , for example the top-left corner at . The corresponding top-left vertex on shape is at .
Calculate the horizontal displacement (-component):
Calculate the vertical displacement (-component):
Verify with another pair of corresponding vertices, such as the bottom-right corners: on maps to on .
The translation is consistent for all vertices.
Answer
Translation by vector (-5, -4)
Walkthrough
A transformation that moves a shape without rotating or resizing it is a translation. To describe it fully, we need a column vector showing how far each point moves right/left and up/down.
We pick a clear vertex on shape , like the top-left corner at . Looking at shape , the matching top-left corner is at . To get from to , we move units (5 units left). To get from to , we move units (4 units down). This gives the vector .
We check this with another vertex, say the bottom-right corner at . Adding the vector: , which is indeed the bottom-right corner of shape . Since every vertex shifts by the same amount, the single transformation is fully described by this translation vector.
Key Takeaways
- A translation is described by a column vector where is the horizontal shift and is the vertical shift.
- To find the vector, subtract the original coordinates from the image coordinates: .
- Always verify with at least two pairs of corresponding vertices to ensure the transformation is consistent.
Common Mistakes
- Writing the vector in the wrong order (e.g., instead of ). Remember the top entry is always the -direction (horizontal) and the bottom is the -direction (vertical).
- Subtracting in the wrong order (original minus image instead of image minus original), which would give , the translation from to .
- Forgetting to write the answer as a column vector; the mark scheme requires .
Things to Be Careful About
- The question asks to describe the transformation that maps onto , so the direction is from to .
- A full description of a translation requires the column vector; writing just "5 left and 4 down" may not earn full marks depending on the examiner's strictness, but the vector form is the standard and safest.
- Ensure the vector is written vertically as a column vector, not as a row vector or an ordered pair , as the mark scheme specifically awards marks for the column vector format.
Approach
To rotate shape by clockwise about the origin, we apply the coordinate rule to each vertex of shape , then plot the new vertices and draw the shape.
Working
The vertices of shape are , , , and .
Apply the rotation rule :
The image of shape is a trapezium with vertices at , , , and .
Answer
The rotated shape has vertices at , , , and .
Vertices at (2, -1), (3, -1), (3, -2), (2, -3)
Walkthrough
Rotation of clockwise about the origin transforms any point to . This is a standard rule that can be memorized or derived by thinking about how the axes swap and change sign.
We take each vertex of shape and apply this rule:
- The bottom-left vertex becomes .
- The bottom-right vertex becomes .
- The top-right vertex becomes .
- The top-left vertex becomes .
Plotting these four points gives a trapezium in the fourth quadrant. We then join them in order to draw the shape. The shape must have the same size and orientation relative to its own vertices as the original, just rotated.
Key Takeaways
- The rule for a clockwise rotation about the origin is .
- For a anticlockwise rotation, the rule is .
- Always plot the new vertices and connect them in the same order as the original shape to maintain correct orientation.
Common Mistakes
- Using the wrong rotation rule (e.g., using anticlockwise instead of clockwise). The mark scheme gives a SC1 (special case 1) for a correct anticlockwise rotation, but it is not the full answer.
- Forgetting to negate the correct coordinate. For clockwise, the new is the negative of the original , not the original .
- Drawing the shape with the wrong orientation or size. The mark scheme awards B1 for correct size and orientation even if the position is wrong, so ensure the shape is congruent to .
Things to Be Careful About
- This is a drawing question. The answer is the drawn shape itself. Ensure the vertices are plotted accurately on the grid and the shape is closed and labelled if required.
- The mark scheme notes "B1 for correct size and orientation but wrong position". This means if you rotate about the wrong point (e.g., the origin instead of a vertex), you may still get partial credit if the shape itself is correct. Always double-check the centre of rotation is .
- When plotting, remember that the fourth quadrant has positive and negative . Points like are 2 units right and 3 units down.
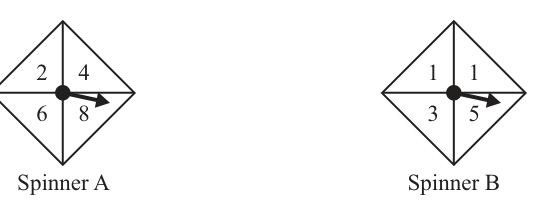
Luca has these two fair spinners.
Luca spins both spinners and adds the two numbers to find his score.
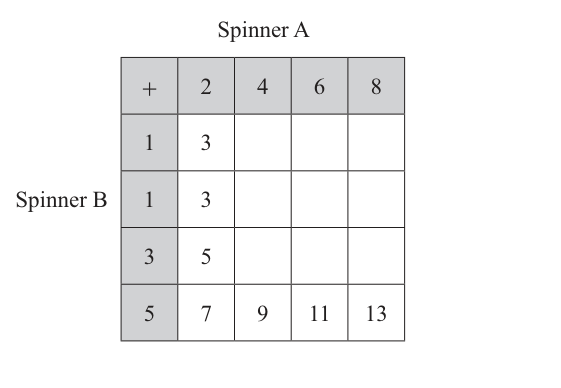
Approach
Fill in the blank cells in the sample space grid by adding the value from Spinner A (column header) to the value from Spinner B (row header).
Working
The given values are:
- Row 1 (Spinner B = 1): (given)
- Row 2 (Spinner B = 1): (given)
- Row 3 (Spinner B = 3): (given)
- Row 4 (Spinner B = 5): , , , (all given)
The missing cells are calculated as follows:
- Row 1 (Spinner B = 1): , ,
- Row 2 (Spinner B = 1): , ,
- Row 3 (Spinner B = 3): , ,
The completed grid is:
Answer
Grid completed with row 1: 5, 7, 9; row 2: 5, 7, 9; row 3: 7, 9, 11
Walkthrough
A sample space diagram for two discrete events lists every possible combination of outcomes. Here, the columns represent the four possible results from Spinner A (2, 4, 6, 8) and the rows represent the four possible results from Spinner B (1, 1, 3, 5). Each cell shows the sum of the column value and the row value.
We are given some cells already filled in. To complete the grid, we simply add the row header to the column header for each blank cell:
- For the first row (Spinner B = 1), the missing sums are , , and .
- For the second row (Spinner B = 1), the values are identical to the first row because the row header is the same: .
- For the third row (Spinner B = 3), the missing sums are , , and .
Key Takeaways
- A sample space diagram systematically lists all possible outcomes for two combined events.
- For an addition sample space, each cell is the sum of its corresponding row and column headers.
- Identical row or column headers (like the two 1s on Spinner B) will produce identical rows or columns in the grid.
Common Mistakes
- Forgetting that Spinner B has two 1s, which means there are 16 total outcomes, not 12. Students sometimes treat the unique values (1, 3, 5) as the only rows.
- Arithmetic errors when adding the row and column headers.
- Leaving cells blank or copying values from the wrong row/column.
Things to Be Careful About
- The grid must have 4 rows and 4 columns because each spinner has 4 sections, even though Spinner B has repeated numbers. The total number of outcomes is .
- The mark scheme accepts the completed grid as a 1-mark answer; no working is required for this part.
Approach
Identify the cells in the completed sample space diagram where the score is strictly greater than 10, count them, and divide by the total number of possible outcomes.
Working
From the completed grid in part (a)(i):
- Row 1 (Spinner B = 1): scores are 3, 5, 7, 9 (none greater than 10)
- Row 2 (Spinner B = 1): scores are 3, 5, 7, 9 (none greater than 10)
- Row 3 (Spinner B = 3): scores are 5, 7, 9, 11 (one score greater than 10: 11)
- Row 4 (Spinner B = 5): scores are 7, 9, 11, 13 (two scores greater than 10: 11, 13)
Total number of outcomes greater than 10: .
Total number of possible outcomes in the sample space: .
Answer
3/16
Walkthrough
Probability is calculated as the number of favorable outcomes divided by the total number of possible outcomes. From the sample space diagram completed in part (a)(i), we can see all 16 possible scores.
We need to find the probability that the score is greater than 10. Looking at the grid:
- The scores in the first two rows (where Spinner B = 1) are at most 9, so none qualify.
- In the third row (Spinner B = 3), the scores are 5, 7, 9, 11. Only 11 is greater than 10.
- In the fourth row (Spinner B = 5), the scores are 7, 9, 11, 13. Both 11 and 13 are greater than 10.
This gives us 3 favorable outcomes: the scores 11 (from 8+3), 11 (from 6+5), and 13 (from 8+5).
The total number of outcomes is the total number of cells in the grid, which is 16.
Key Takeaways
- The sample space diagram provides a complete list of all possible outcomes, making it easy to count favorable events.
- Probability is always a fraction with the total number of outcomes as the denominator.
- 'Greater than 10' means strictly greater than 10, so a score of exactly 10 would not be counted (though there is no 10 in this grid).
Common Mistakes
- Counting the unique scores greater than 10 (11 and 13) as only 2 outcomes, forgetting that 11 can occur in two different ways (8+3 and 6+5).
- Using 12 as the denominator instead of 16, by treating the two 1s on Spinner B as a single outcome.
- Including 10 in the favorable outcomes if it were present.
Things to Be Careful About
- The mark scheme gives follow-through (FT) for using their table from part (a)(i), so if a student made an error in filling the grid but correctly counted the outcomes > 10 from their grid, they can still earn method marks.
- The answer must be given as a fraction. The mark scheme accepts equivalent forms (oe), but is the simplest form and cannot be reduced further.
Luca spins spinner A twice.
He now multiplies the two numbers to find his score.
Find the probability that his score is greater than 30.
______
Approach
Luca now spins Spinner A twice and multiplies the results. We must construct a new sample space diagram using multiplication instead of addition, then count the outcomes greater than 30.
Working
Spinner A has values 2, 4, 6, 8. Spinning it twice gives possible outcomes.
The multiplication sample space diagram is:
We need scores greater than 30. Looking at the grid:
- Row 1 (first spin = 2): maximum score is 16 (none > 30)
- Row 2 (first spin = 4): maximum score is 32 (one score > 30: 32)
- Row 3 (first spin = 6): scores are 12, 24, 36, 48 (two scores > 30: 36, 48)
- Row 4 (first spin = 8): scores are 16, 32, 48, 64 (three scores > 30: 32, 48, 64)
Total number of favorable outcomes: .
Answer
3/8
Walkthrough
In part (a), Luca added the results of two different spinners. In part (b), he spins the same spinner (Spinner A) twice and multiplies the results. This requires a new sample space diagram, this time using multiplication.
Spinner A has four sections: 2, 4, 6, 8. Spinning it twice means we have a grid of possible products.
We calculate each product by multiplying the row header by the column header:
- Row 1 (first spin = 2): , , ,
- Row 2 (first spin = 4): , , ,
- Row 3 (first spin = 6): , , ,
- Row 4 (first spin = 8): , , ,
Now we count the outcomes that are strictly greater than 30:
- From Row 2: 32 (1 outcome)
- From Row 3: 36, 48 (2 outcomes)
- From Row 4: 32, 48, 64 (3 outcomes)
Total favorable outcomes = .
The total number of outcomes is 16.
Key Takeaways
- When the same event is repeated, the sample space diagram still has cells, where is the number of outcomes for a single event.
- The operation changes (multiplication instead of addition), so the values in the grid change accordingly.
- Always count the number of ways each favorable outcome can occur, not just the number of unique favorable values.
Common Mistakes
- Forgetting that spinning the same spinner twice still gives 16 total outcomes (some students divide by 12 or 10, treating repeated values as identical outcomes).
- Counting unique scores > 30 (32, 36, 48, 64) as only 4 outcomes, missing that 32 and 48 each occur twice.
- Using addition instead of multiplication when constructing the grid.
- Including 30 in the favorable outcomes (the question says 'greater than 30', not 'greater than or equal to').
Things to Be Careful About
- The mark scheme accepts or equivalent (oe), so is correct.
- The mark scheme awards a method mark (M1) for constructing a correct sample space diagram, listing all six correct combinations, or simply identifying that there are six successful outcomes. Showing the diagram or listing the combinations is recommended to secure the method mark.
- This is a non-calculator paper, so all arithmetic must be done by hand. The multiplication table is straightforward, but students should double-check their products.
Thomas works in a shop.
He is paid $12 for each hour he works.
He is also paid a bonus of 5% of the value of the items he sells.
One day, Thomas works for 5 hours.
He is paid a total of $82 including his bonus.
Work out the value of the items Thomas sells on this day.
$ ______
Approach
First, determine how much Thomas earned from his hourly wages alone. Subtract this amount from his total daily pay to find the exact dollar value of his bonus. Finally, use the fact that this bonus represents of the sales value to calculate the total value of the items sold.
Working
Thomas worked for hours at a rate of $12 per hour. His hourly wage is:
So, he earned $60 from his hours worked.
His total pay was $82. The difference between his total pay and his hourly wage is his bonus:
He received a $22 bonus.
We are told that the bonus is of the value of the items he sells. Let be the value of the items sold. Then:
Convert to a decimal () or fraction ():
Solve for by dividing by :
To make the division easier, multiply the numerator and denominator by :
Calculate the final value:
Answer
The value of the items Thomas sells is $440.
440
Walkthrough
-
Calculate Hourly Wage: Thomas's pay consists of a fixed part (hourly wage) and a variable part (bonus). We start by calculating the fixed part. Since he works hours at $12 per hour, we multiply these numbers: . This means he earned $60 just for showing up and working.
-
Isolate the Bonus: The problem states his total pay was $82. This total includes both the $60 wage and the bonus. To find out how much the bonus was worth, we subtract the wage from the total: . So, the bonus he received was $22.
-
Reverse Percentage: The problem tells us that this $22 bonus is equal to of the total value of the items sold. In mathematical terms, if we let be the total value, then . To find , we need to "undo" the percentage. We do this by dividing the bonus amount () by the percentage expressed as a decimal ().
Dividing by is the same as multiplying by (since ), or simply shifting the decimal point two places to the right in the numerator and dividing by : .
Key Takeaways
- Total Pay Composition: Always separate fixed earnings (like hourly wages or salaries) from variable earnings (like commissions or bonuses) when solving word problems about income.
- Reverse Percentages: When you know a percentage of a number and need to find the original number, divide the known amount by the percentage (in decimal form). Do not multiply; multiplying would give you a portion of the answer, not the whole.
Common Mistakes
- Subtracting incorrectly: Failing to subtract the hourly wage from the total before dealing with the percentage. If you try to take of , you will get the wrong bonus value.
- Multiplying instead of dividing: A common error in reverse percentages is to multiply by . Remember, is only a small slice () of the pie, so the whole pie () must be much larger than . Therefore, you must divide.
- Ignoring the base rate: Some students might try to apply the percentage directly to the hours worked or ignore the $12/hour rate entirely.
Things to Be Careful About
- Units: Ensure you keep track of the dollar sign ($). The question asks for the value in dollars.
- Arithmetic: While the numbers here are simple, ensure your subtraction () and division () are accurate. A quick check is to see if of equals . of is , so is half of that, which is . The check confirms the answer.
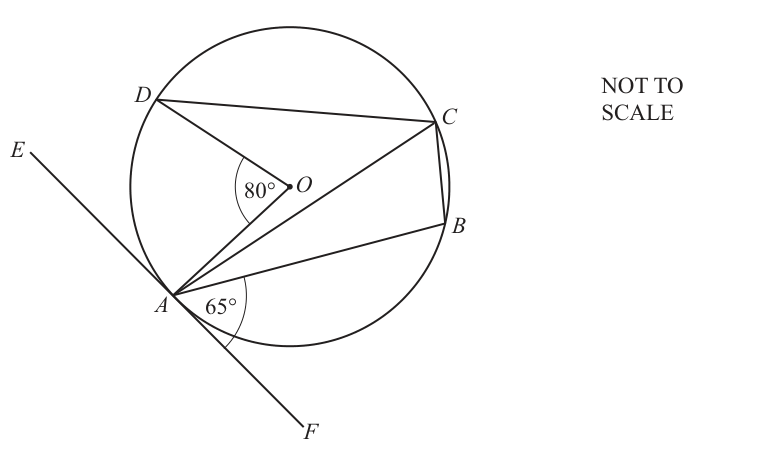
and are points on a circle, centre .
is a tangent to the circle at .
Angle and angle .
Find angle .
Give a geometrical property to explain each step of your working.
Angle = ______
Approach
Angle is split into two parts by the diagonal : angle and angle . Each can be found using a different circle theorem — the alternate segment theorem for angle , and the angle-at-centre theorem for angle . Then add the two parts.
Working
Step 1: Find angle .
The line is a tangent to the circle at , and is a chord from the point of tangency. By the alternate segment theorem, the angle between the tangent and the chord at the point of contact equals the angle subtended by the chord in the alternate segment. Here is the angle between tangent and chord , and is the angle in the alternate segment:
Reason: alternate segment theorem.
Step 2: Find angle .
Angle is the angle at the centre subtended by arc . Angle is the angle at the circumference subtended by the same arc . The angle at the centre is twice the angle at the circumference on the same arc:
Reason: angle at the centre is twice the angle at the circumference on the same arc.
Step 3: Find angle .
Angle is the sum of angles and :
Answer
105°
Walkthrough
The question asks for angle , which is the angle at vertex in the cyclic quadrilateral . The diagonal splits this angle into two smaller angles: (between and ) and (between and ). We find each of these separately using circle theorems, then add them.
For : The line is a tangent to the circle at , and is a chord from the point of tangency. The alternate segment theorem states that the angle between a tangent and a chord at the point of contact equals the angle subtended by that chord in the alternate segment. Here, is the angle between tangent and chord , and is the angle in the alternate segment (on the opposite side of chord from the tangent direction ). Therefore .
For : Both and subtend the same arc . is the angle at the centre, and is the angle at the circumference. The angle at the centre is always twice the angle at the circumference on the same arc, so .
Finally, .
Key Takeaways
- The alternate segment theorem links an angle between a tangent and a chord to an angle in the alternate segment of the circle.
- The angle at the centre is twice the angle at the circumference when both subtend the same arc.
- When an angle at a point on the circumference is split by a diagonal, find each part separately and add them.
- Always state the geometric property (theorem name) used for each step, as marks are awarded for this in 4024.
Common Mistakes
- Forgetting to state the geometric property (theorem name) for each step — the mark scheme awards a mark for naming the theorem.
- Using the wrong segment in the alternate segment theorem (e.g., taking instead of ).
- Adding the angles instead of halving when applying the angle-at-centre theorem (writing ).
- Not drawing or recognising the diagonal to split into two manageable parts.
- Giving the answer without units or with incorrect degree notation.
Things to Be Careful About
- Always name the circle theorem used; a bare numerical answer without justification loses marks.
- The alternate segment theorem: the angle in the alternate segment is on the opposite side of the chord from the tangent direction. Here, is on the -side of chord , so the alternate segment is the one containing , giving .
- The angle-at-centre theorem applies only when both angles subtend the same arc and the centre angle is the one given. Here arc subtends at the centre and at the circumference.
- The diagram is labelled NOT TO SCALE, so do not estimate angles visually — rely only on the given values and theorems.
- The final answer must be given in degrees with the degree symbol, as an exact value (no rounding needed here).
Approach
Substitute into the given equation and calculate the value of .
Working
Answer
12
Walkthrough
The question asks for the value of when . We substitute for every in the expression . First, calculate and . Then multiply . Finally, compute , which leaves .
Key Takeaways
Substitution into algebraic expressions requires careful handling of indices and order of operations. Always calculate powers before multiplication and addition/subtraction.
Common Mistakes
- Forgetting to square the before multiplying by (i.e. calculating as ).
- Sign errors with negative numbers (not an issue here since is positive, but common in this table).
- Arithmetic errors in .
Things to Be Careful About
Ensure you follow the order of operations: indices first ( and ), then multiplication (), then addition/subtraction from left to right.
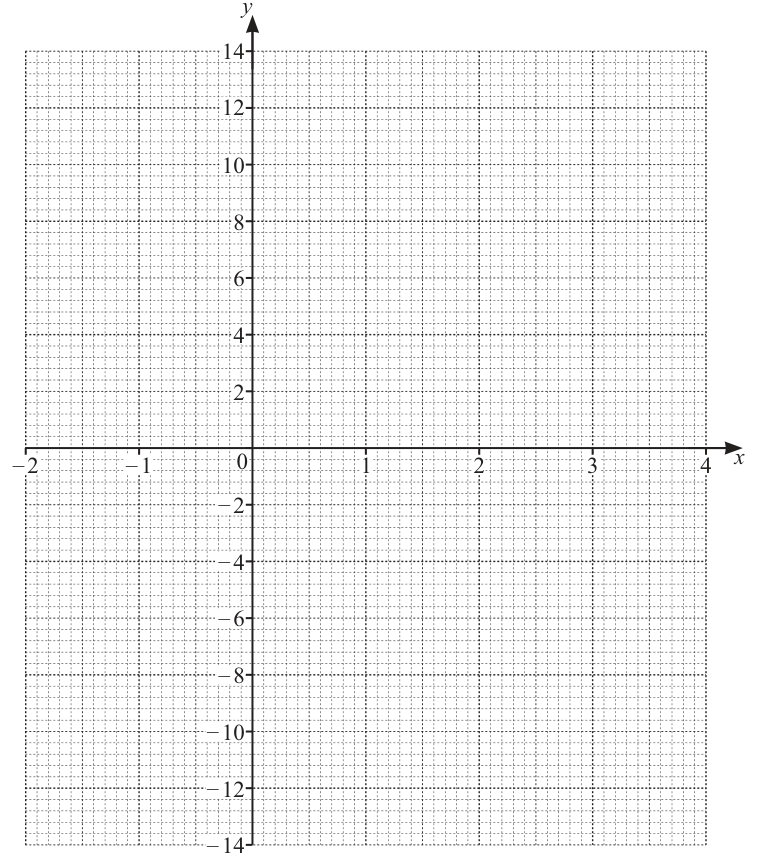
Approach
Plot the seven points from the table (including the value found in part (a)) on the provided grid. Then join them with a smooth curve, noting the shape of a cubic function.
Working
The points to plot are:
Answer
Graph plotted with points and a smooth curve passing through them.
Graph with points (-2, -12), (-1, 7), (0, 12), (1, 9), (2, 4), (3, 3), (4, 12) and a smooth curve
Walkthrough
First, complete the table by calculating for (as done in part (a)). Now we have a set of coordinate pairs: . Plot these on the grid provided in Fig. 9. The x-axis goes from -2 to 4, and the y-axis from -14 to 14. Notice the curve rises steeply from , reaches a local maximum near , dips down to a local minimum near (around at ), and then rises again to . Draw a smooth freehand curve through these points. Do not use a ruler to join them; it must be a curve.
Key Takeaways
When drawing graphs from a table, accuracy in plotting is crucial. For cubic graphs, expect an 'S' shape or a curve with a turning point. The curve should be smooth, not jagged.
Common Mistakes
- Plotting points incorrectly (e.g., plotting as ).
- Drawing a straight line graph or a polygon instead of a smooth curve.
- Not extending the curve smoothly beyond the last point if necessary (though here we stop at ).
- Missing the turning point between and ; the curve goes down from to then up to , so there is a minimum around .
Things to Be Careful About
The grid has major lines every 1 unit on x-axis and every 2 units on y-axis. Ensure you read the y-axis correctly (e.g., is halfway between 6 and 8). The mark scheme awards marks for plotted points (B marks) and the final smooth curve (B mark).
Approach
The equation corresponds to the points where the graph of crosses the x-axis (where ). Look at the graph drawn in part (b) and find the x-value where the curve intersects the x-axis.
Working
From the table, at and at . The curve crosses the x-axis between and .
Looking at the graph (or interpolating):
At , .
At , .
The crossing is between -1.5 and -1.4. Reading from the graph, the value is approximately .
The mark scheme accepts a range from to .
Answer
(Accept any value between and )
-1.5 (accept -1.7 to -1.3)
Walkthrough
To solve using the graph, we look for the x-intercept, i.e., where the graph crosses the horizontal axis (). From the table, we see changes from negative ( at ) to positive ( at ). So the root is between and . By looking closely at the drawn graph in part (b), the curve crosses the x-axis at approximately . The mark scheme allows a tolerance range of to to account for reading errors from hand-drawn graphs.
Key Takeaways
Solving an equation graphically means finding the x-coordinates of the points where the graph of intersects the x-axis.
Common Mistakes
- Reading the y-value instead of the x-value at the intercept.
- Not looking carefully enough; the intercept is not an integer.
- Assuming the root is exactly -1.5 without checking the graph's precision.
Things to Be Careful About
The answer must be read from the graph. Since it's a hand-drawn graph, a range of values is accepted. Do not try to calculate the exact root algebraically here as the instruction says 'Use your graph'.
By drawing a suitable line on the grid, find the roots of the equation .
= ______ or = ______ or = ______
Approach
We need to solve . We already have the graph of . We can rearrange the new equation to match this expression on one side.
So, we draw the line (or ) on the same grid and find where it intersects the curve from part (b).
Working
Step 1: Draw the line
Find two points for the line:
- If . Point .
- If . Point .
- If . Point .
Draw a straight ruled line through these points.
Step 2: Find intersections
The line intersects the curve at three points. Read the x-coordinates of these intersections from the graph.
- Intersection 1: Between and . Looking at the graph, .
- Intersection 2: Between and . Looking at the graph, .
- Intersection 3: Between and . Looking at the graph, .
The mark scheme accepts ranges: to , to , to .
Answer
(Accept values within the ranges to , to , to )
-0.8, 1.5, 3.3 (accept ranges -0.9 to -0.7, 1.4 to 1.6, 3.2 to 3.5)
Walkthrough
The equation to solve is . We cannot solve this directly with the graph of unless we manipulate the equation.
Rearrange terms to isolate the cubic expression:
Add 12 to both sides to match our graph's equation :
Now, let (the curve we already drew) and (a straight line we need to draw).
The solutions to the original equation are the x-coordinates where the curve and the line intersect.
Draw the line . It passes through and . Draw this as a straight ruled line.
Look for where this line crosses the cubic curve:
- Left intersection: Near . The line is at when , the curve is at . At , line is , curve is . They cross between and . Reading the graph gives approx .
- Middle intersection: Near . At , line is , curve is . At , line is , curve is . They cross between and . Reading gives approx .
- Right intersection: Near . At , line is , curve is . At , line is , curve is . They cross between and . Reading gives approx .
Key Takeaways
When asked to solve an equation using an existing graph, try to rearrange the equation into the form , where is the function already graphed and is a simple function (usually a straight line ) that is easy to draw.
Common Mistakes
- Trying to solve the cubic equation algebraically (too hard for this level/method).
- Drawing the wrong line (e.g., or ). The rearrangement must be correct: .
- Not using a ruler for the straight line (mark scheme requires a 'ruled line').
- Reading the intersections inaccurately. Three significant figures or 1 decimal place is usually expected, but the mark scheme gives wide ranges.
Things to Be Careful About
- The line must be ruled with a ruler.
- Ensure the rearrangement is correct: .
- There are three roots; make sure to find all three intersection points.
Approach
Expand each term in the first bracket by each term in the second bracket, then simplify the products involving and collect like terms.
Working
Expand the brackets:
Simplify each product:
Since :
Collect like terms:
Answer
11 + 13√2
Walkthrough
Treat the surd bracket exactly like an ordinary algebraic expansion: multiply each term in the first bracket by each term in the second bracket. The only new idea is that , so the last product becomes a whole number. Once all four products are written out, the terms containing are collected, and the whole numbers are collected separately.
Key Takeaways
- Expanding two surd brackets uses the same distributive law as expanding two algebraic brackets.
- for a positive value of .
- Surds can be added only when the surd part is identical, for example .
Common Mistakes
- Forgetting that , not or .
- Missing one of the four products when expanding.
- Adding and incorrectly.
- Not simplifying to the final form; the mark scheme requires .
Things to Be Careful About
- This is the non-calculator component, so leave the answer in exact surd form and do not convert to a decimal.
- The mark scheme awards B1 for the expanded expression or better, and B1 for the final simplified answer. Show the expansion line to make the method clear.
Approach
Multiply the numerator and denominator by the conjugate . This removes the surd from the denominator because .
Working
Multiply by :
Use the difference of two squares:
So:
Answer
(-1 + √7)/6
Walkthrough
To rationalise a denominator of the form , multiply by the conjugate . The product is a difference of two squares, so the surd disappears. Here the conjugate is . Multiplying top and bottom by it gives a denominator of , and the negative sign is moved into the numerator to write the answer in the standard form .
Key Takeaways
- The conjugate of is .
- , which is rational.
- Multiplying by the conjugate over itself is multiplying by , so the value of the expression is unchanged.
Common Mistakes
- Forgetting to multiply the numerator as well as the denominator.
- Sign errors in the difference of squares: , not .
- Leaving the answer as ; the mark scheme expects the negative sign in the numerator, or an equivalent form such as .
- Using the wrong conjugate , which would not remove the surd.
Things to Be Careful About
- The denominator must end up rational; write the final answer as .
- This is the non-calculator component: show the multiplication by the conjugate and simplify by hand.
- The mark scheme awards M1 for multiplying by or , and A1 for the final simplified fraction.
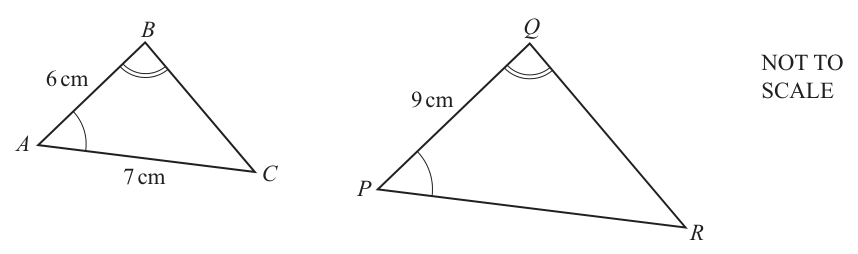
Triangle is similar to triangle .
Approach
Identify corresponding sides from the angle markings, then set up a proportion to find .
Working
From the diagram, (single arc) and (double arc). This means the triangles correspond as , , .
Therefore, side corresponds to side , and side corresponds to side .
Substitute the known values:
Cross-multiply to solve for :
Answer
10.5
Walkthrough
The problem states that triangle is similar to triangle . The angle markings in the diagram tell us which vertices correspond to each other: the single arc at matches the single arc at , and the double arc at matches the double arc at . This fixes the correspondence as , , and .
Because of this correspondence, side (between the single and double arcs) corresponds to side , and side (between the single arc and the unmarked angle ) corresponds to side . We can set up a ratio of corresponding sides: , or equivalently .
Cross-multiplying gives , so .
Key Takeaways
- Angle markings in similar triangles identify corresponding vertices and sides.
- Corresponding sides are proportional: .
Common Mistakes
- Matching the wrong sides (e.g., setting by ignoring the angle markings).
- Forgetting that the diagram is NOT TO SCALE, so side lengths cannot be measured directly.
Things to Be Careful About
- The diagram is explicitly marked NOT TO SCALE; always rely on the given numbers and angle markings.
- Both exact fractions (like ) and decimals (like ) are accepted for this answer.
Approach
Find the linear scale factor from the corresponding sides, square it to get the area scale factor, and multiply the area of triangle by this factor.
Working
The linear scale factor (LSF) from triangle to triangle using corresponding sides and is:
For similar shapes, the ratio of their areas is the square of the linear scale factor:
Given the area of triangle is , the area of triangle is:
Alternatively, using the result from part (a):
Answer
36
Walkthrough
When two shapes are similar, their lengths are in the ratio of the linear scale factor (LSF), but their areas are in the ratio of the square of the LSF ().
First, calculate the LSF using the known corresponding sides and :
Next, square this to find the area scale factor:
Finally, multiply the given area of triangle () by the area scale factor:
Key Takeaways
- The area ratio of similar shapes is the square of the length ratio.
- Always square the scale factor when moving from lengths to areas.
Common Mistakes
- Forgetting to square the scale factor (e.g., calculating instead of ).
- Using the wrong area or confusing the scale factor direction (multiplying by instead of ).
Things to Be Careful About
- The answer must be in , not cm.
- Working must be shown (nfww) to earn method marks; simply writing '36' scores no marks.
The diagram shows a solid cylinder and a solid hemisphere.

The radius of the cylinder is equal to the radius of the hemisphere.
The volume of the cylinder is equal to the volume of the hemisphere.
The height of the cylinder is .
Calculate the total surface area of the hemisphere.
Give your answer in terms of .
______
Approach
Use the given conditions to find the radius by equating the volume of the cylinder to the volume of the hemisphere. Then compute the total surface area of the hemisphere (curved surface plus flat circular base).
Working
The volume of the cylinder with radius and height is:
The volume of the hemisphere with radius is half the volume of a full sphere:
Equating the two volumes:
Dividing both sides by (valid since ):
Solving for :
The total surface area of a solid hemisphere consists of the curved surface area plus the flat circular base:
Substituting :
Answer
243π cm^2
Walkthrough
The question gives us three key facts: the cylinder and hemisphere share the same radius , their volumes are equal, and the cylinder's height is . We need to find the total surface area of the hemisphere.
Step 1: Write the volume of the cylinder.
The formula for the volume of a cylinder is . Substituting :
This earns the M1 mark for writing .
Step 2: Write the volume of the hemisphere.
The volume of a full sphere is , so a hemisphere is half of that:
This earns the M1 mark for writing .
Step 3: Equate and solve for .
Divide both sides by :
So . This earns M2 for setting up the equation correctly.
Step 4: Compute the total surface area of the hemisphere.
The total surface area of a solid hemisphere is the curved surface () plus the flat circular base ():
Substituting :
This earns the final M1 for using with their .
Key Takeaways
- The volume of a hemisphere is , which is half the volume of a full sphere.
- The total surface area of a solid hemisphere is , combining the curved surface () and the flat circular base (). A common error is using only , which gives and scores at most B3.
- When equating two volume expressions sharing the variable , cancel common factors like to simplify the equation quickly.
Common Mistakes
- Forgetting the flat base: Using instead of gives , which the mark scheme awards B3 for. The question asks for the total surface area of a solid hemisphere, so the circular base must be included.
- Not cancelling correctly: Students may expand incorrectly or fail to divide both sides by , leaving a quadratic instead of a linear equation.
- Using the wrong volume formula: Confusing the hemisphere volume with the full sphere volume .
- Arithmetic errors in the final multiplication: , and ; miscomputing these loses marks.
Things to Be Careful About
- The answer must be given in terms of , so leave in the final answer rather than multiplying it out to a decimal.
- The question specifies a solid hemisphere, which means the flat circular base is part of the surface. Always check whether "surface area" refers to curved surface only or total surface area.
- When cancelling from both sides of , remember this assumes , which is physically valid here.
- The diagram is marked NOT TO SCALE, so do not measure lengths from the diagram; use only the given numerical value of .
- The mark scheme awards follow-through on the surface area calculation using the candidate's value of , so even if is found incorrectly, the surface area formula step can still earn marks.
Approach
To evaluate , we first express the base as a power of a smaller integer (specifically ). Then we apply the law to simplify the exponent. Finally, we use the negative index law to write the answer as a fraction.
Working
Substitute this into the expression:
Multiply the exponents ():
Apply the negative index law:
Evaluate the denominator:
Answer
1/8
Walkthrough
The expression involves a number that is not a prime base () raised to a complex exponent (). The key to solving this is simplifying the base first. We recognize that is a power of , specifically .
Once rewritten as , we use the index law which states that when raising a power to another power, we multiply the exponents: . This reduces the problem to evaluating .
A negative exponent indicates a reciprocal. Therefore, is equal to . Calculating gives , so the final result is . Alternatively, one could interpret the fractional exponent as taking the fourth root first () and then cubing it (), before handling the negative sign by taking the reciprocal.
Key Takeaways
- Always look to rewrite composite bases (like ) as powers of their prime factors ().
- The law allows you to combine exponents.
- A negative exponent means "take the reciprocal": .
- A fractional exponent means take the -th root and raise to the -th power: .
Common Mistakes
- Multiplying the base by the numerator instead of taking the root (e.g., calculating ).
- Forgetting to take the reciprocal for the negative sign, answering or instead of .
- Applying the exponent only to part of the base if it were written differently (though here it's clear).
Things to Be Careful About
- Ensure you handle the order of operations correctly with indices. It is usually safer to simplify the base first.
- The mark scheme awards credit for intermediate forms like or , but the final answer must be simplified to .
Approach
The question asks for a single power of . Both terms in the product, and , can be expressed with a base of . We rewrite as , expand the square, and then use the multiplication law for indices () to combine them.
Working
First, express as a power of :
Substitute this into the first term :
Apply the power-of-a-power law ():
Now substitute this back into the original expression:
When multiplying terms with the same base, add the exponents:
Calculate the sum of the exponents:
So the expression becomes:
Answer
3^(7/2)
Walkthrough
To combine these terms into a single power, they must share the same base. The target base is given as . The second term, , already has the base . The first term, , has a base of . Since , we can rewrite as . Using the index law , this becomes .
Now the expression is . When multiplying numbers with the same base, we add their exponents. So we calculate . To do this, convert to a fraction with a denominator of : . Then subtract to get . The final answer is raised to the power of .
Key Takeaways
- Convert all bases to the required common base before performing operations.
- Remember that .
- Remember that .
- Be careful with adding fractions involving integers and negatives.
Common Mistakes
- Multiplying the exponents instead of adding them when multiplying like bases (resulting in ).
- Incorrectly expanding as (this is actually correct, but students sometimes think it becomes or ).
- Arithmetic errors when adding and .
Things to Be Careful About
- The mark scheme explicitly looks for the form or equivalent. Writing it as is mathematically correct but might not match the specific "single power" format requested unless simplified further, though typically fractional indices are preferred in this context. The marking scheme note mentions oe, implying the decimal form of the exponent is accepted, but the primary expectation is the fractional index form.
Approach
To find the inverse of , write , rearrange to make the subject, then swap the variable names.
Working
Let
Subtract from both sides:
Divide both sides by :
So the inverse function is
Answer
f^{-1}(x) = (x - 3)/a
Walkthrough
To find the inverse of a function, we reverse the operation. Write . The aim is to get alone on one side. Subtract from both sides to get , then divide by to get . Finally, replace by because the inverse function is written in terms of . This gives .
Key Takeaways
The inverse function swaps the roles of input and output. For a linear function , the inverse is found by rearranging for and then renaming the variable. This is a core skill for function notation.
Common Mistakes
- A common error is to write and then stop; you must solve for in terms of .
- Another common error is a sign slip: instead of .
- Dividing only the constant term by , for example writing instead of .
Things to Be Careful About
The final answer should be written in terms of . The mark scheme accepts equivalent forms such as . On the non-calculator component, show the rearrangement steps; the mark scheme gives M1 for or or .
Approach
First form the composite by substituting into . Then compare the resulting quadratic with the given perfect square .
Working
Since ,
The given expression is a perfect square:
Therefore
Because and are positive, the linear expressions are equal:
Comparing coefficients:
So
Answer
a = 3, b = 1
Walkthrough
Read as of : first apply , then apply . Since , replace the input of by . This gives . The right-hand side is a perfect square: . Therefore the two squared linear expressions must be equal. Because and are positive, we take the positive square roots and compare with . The coefficient of gives , and the constant term gives , so .
Key Takeaways
Composite functions require careful ordering: means apply first, then . Recognising a perfect square trinomial lets you compare linear expressions directly. Comparing coefficients is a powerful algebraic technique.
Common Mistakes
- Reversing the order and computing instead of .
- Expanding and trying to compare coefficients without first recognising it as .
- Choosing because ; the condition that is positive rules this out.
- Choosing because ; the condition that is positive rules this out.
Things to Be Careful About
The mark scheme awards B1 for and B2 for , or M1 for writing , for , or for writing . Show the composite step and the perfect square to earn the method mark. Since this is the non-calculator component, no calculator is needed; the work is algebraic recognition and comparison.
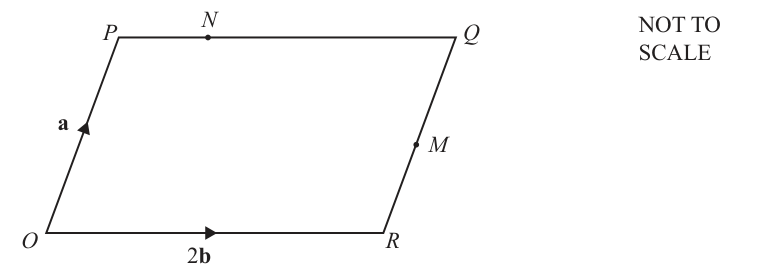
is a parallelogram.
and .
is the midpoint of .
is a point on and .
Find, as simply as possible, in terms of and/or
Approach
In parallelogram , opposite sides are equal and parallel, so . Since is the midpoint of , the vector is half of .
Working
Answer
1/2 a
Walkthrough
In any parallelogram, opposite sides are equal in length and parallel, meaning the vectors along them are equal. Here, and go in the same direction and have the same length, so . Point is the midpoint of , which means it splits the segment into two equal halves. The vector from to is exactly half the vector from to . Therefore, .
Key Takeaways
Opposite sides of a parallelogram give equal vectors when traversed in the same rotational direction (e.g., ). A midpoint divides a vector into two equal halves.
Common Mistakes
- Taking instead of . The direction matters: goes up-left, so also goes up-left. goes up-left, so it is positive .
- Writing . Remember is in the same direction as , not .
Things to Be Careful About
Always check the direction of the arrow. points from to . The parallel side is , but points from to (down-right), so . The vector points from to (up-left), matching the direction of .
Approach
To find , choose a path from to along the sides of the parallelogram, such as . We need and .
Working
Since , the point divides in the ratio , so:
From part (a)(i), , so:
Now add along the path :
Answer
3/2 b - 1/2 a
Walkthrough
We want the vector from to . A clear path is . First, find . Since is parallel and equal to , we have . The ratio means is of the total length . So . Next, find . From part (a)(i), , which means . Adding these gives .
Key Takeaways
When a point divides a segment in a ratio, use that ratio to find the sub-vectors. Vector addition along a path () is a reliable method for finding vectors between arbitrary points.
Common Mistakes
- Using the ratio as instead of for . The ratio means 4 parts total, so is of .
- Adding instead of . The path goes from to , so we need .
- Writing the answer as without checking direction. has a negative component because it goes from left to right relative to the direction.
Things to Be Careful About
Always verify the direction of each vector in the path. The mark scheme accepts or as a method mark, showing that finding either sub-vector correctly is sufficient progress.
Approach
Point lies on the line extended, so its position vector is a scalar multiple of : let . Since , , and are collinear, the vector must be parallel to . We express both in terms of and and equate coefficients.
Working
Express :
Express in terms of :
Since is a straight line, is parallel to . So:
Equate the coefficients of :
Equate the coefficients of :
So .
Answer
7/6 a
Walkthrough
We need the position vector of . Since is on the line extended, must be a multiple of . Let . We know from the previous parts. The vector . Because , , are collinear, must be parallel to . Setting and comparing the coefficients gives . Substituting this into the coefficient equation gives , so . Thus .
Key Takeaways
When three points are collinear, the vector between two of them is a scalar multiple of the vector between the other two. Expressing all vectors in terms of a basis (here and ) and equating coefficients is a robust method for finding unknown scalars.
Common Mistakes
- Assuming and trying to find directly without a systematic equation. The scalar multiple method is cleaner.
- Forgetting that and are independent vectors. You cannot simply add or subtract them; you must equate their coefficients separately.
- Making a sign error when computing . Remember vector subtraction: .
Things to Be Careful About
The mark scheme awards a method mark for finding (since ) or for using similar triangles ( with scale factor ). Both are valid routes. Ensure the final answer is the position vector , not just .
Ade and Maha make cards.
One day they each work for 4 hours making cards.
Ade takes minutes to make one card.
Approach
To find the number of cards Ade makes, we divide the total time worked by the time it takes to make one card. Since is in minutes, we must first convert the working time from hours to minutes.
Working
Ade works for 4 hours. Converting this to minutes:
The time taken to make one card is minutes. The number of cards made is the total time divided by the time per card:
This matches the required expression.
Answer
240/x
Walkthrough
First, identify the units given. The question states that Ade and Maha work for 4 hours, but the rate at which they make cards ( minutes) is given in minutes. To use these values together, the units must match. We convert the 4 hours into minutes by multiplying by 60 (since there are 60 minutes in an hour):
Next, we apply the relationship: Total Items = Total Time / Time per Item. Here, the total time is 240 minutes and the time per item is minutes. Therefore, the number of cards is .
Key Takeaways
Always check that your units are consistent before performing calculations. If a rate is in minutes, ensure all time durations are also converted to minutes.
Common Mistakes
- Forgetting to convert hours to minutes and using 4 instead of 240.
- Multiplying 240 by instead of dividing.
Things to Be Careful About
Ensure you write the final expression exactly as requested. In this case, is the required form.
Maha takes 2 minutes less than Ade to make one card.
Maha and Ade make a total of 70 cards in 4 hours.
Form an equation and show that it simplifies to .
Approach
We know the number of cards Ade makes is . We need to express the number of cards Maha makes in terms of , then set their sum equal to 70. Finally, we manipulate the equation to reach the target quadratic.
Working
Maha takes 2 minutes less than Ade to make one card. Since Ade takes minutes, Maha takes minutes.
The number of cards Maha makes in 4 hours (240 minutes) is:
Together, they make a total of 70 cards. So, we add Ade's cards and Maha's cards:
To solve for and eliminate the fractions, we multiply every term by the common denominator :
Distributing on the left side:
Expand the brackets on both sides:
Combine like terms on the left side:
Move all terms to one side to form a quadratic equation equal to zero. Subtract and add to both sides:
Divide the entire equation by the common factor 10 to simplify:
This matches the required simplified form.
Answer
7x^2 - 62x + 48 = 0
Walkthrough
First, determine Maha's rate. Ade takes minutes per card. Maha takes 2 minutes less, so her time is minutes per card. Consequently, in 240 minutes, she makes cards.
The total number of cards is the sum of what Ade makes and what Maha makes, which equals 70:
To remove the fractions, multiply the entire equation by , which is the least common multiple of the denominators. This results in:
Expanding the brackets gives:
Combining the terms on the left gives . Rearranging everything to one side yields . Dividing by 10 gives the final answer .
Key Takeaways
When dealing with rates expressed as fractions, adding them requires a common denominator or cross-multiplication. Simplifying the resulting equation often involves factoring out a common numerical coefficient.
Common Mistakes
- Incorrectly expanding as . The constant term must be multiplied by as well ().
- Sign errors when moving terms across the equals sign.
- Failing to divide by the common factor (10) at the end.
Things to Be Careful About
The question asks to show the equation simplifies to a specific form. You must arrive at exactly . If you stop at , you have not completed the instruction.
Approach
We need to factorise the quadratic expression . Since the coefficient of is 7 (a prime number), the factors will take the form . We need to find integers and such that and .
Working
Since the middle term is negative and the constant term is positive, both and must be negative.
Let's test factor pairs of 48:
This pair works! So and .
The factorised form is:
Set each factor to zero to find the solutions:
Answer
6/7 or 8
Walkthrough
To factorise , look for two numbers that multiply to give and add to give . Alternatively, since 7 is prime, assume the form . Then and the outer/inner products sum to , meaning .
Testing factors of 48, we find that and work because and .
Thus, the factors are and . Setting these to zero gives and .
Key Takeaways
When the leading coefficient is prime, the structure of the factors is restricted, making trial and error more efficient. Always check your expansion: .
Common Mistakes
- Choosing positive factors when the middle term is negative.
- Arithmetic errors when calculating .
- Forgetting to divide by the coefficient of when solving .
Things to Be Careful About
represents time in minutes. While is a valid mathematical root, physically it means Ade takes less than a minute per card. means he takes 8 minutes. Both are mathematically correct answers to part (c). Part (d) will decide which is relevant.
Approach
From part (c), we have two possible values for : and . We must determine which value is appropriate for the context, calculate Maha's time per card, and then find how many cards she makes in 1 hour.
Working
Recall that Maha takes minutes to make one card.
If , then Maha's time would be minutes. Time cannot be negative, so is invalid in this context.
Therefore, we must use .
If Ade takes 8 minutes per card, Maha takes:
We need to find the number of cards Maha makes in 1 hour (60 minutes). Using the rate formula:
Answer
10
Walkthrough
First, evaluate the validity of the two roots found in part (c). The variable is Ade's time per card. Maha's time is . If , Maha's time is negative, which is impossible. Thus, must be 8.
With , Ade takes 8 minutes. Maha takes minutes per card.
The question asks for the number of cards Maha makes in 1 hour. Since 1 hour is 60 minutes, we divide 60 by her time per card (6 minutes):
Key Takeaways
Always check the physical reality of your answers in word problems. Mathematical solutions may include extraneous roots that do not make sense in the real-world context (e.g., negative time).
Common Mistakes
- Using the wrong value for (using ).
- Calculating Ade's cards instead of Maha's.
- Forgetting to convert the final answer to "per hour" if the question asked for something else, though here it asks specifically for 1 hour.
Things to Be Careful About
Note that the mark scheme awards a follow-through mark (SC1) for the answer 40. This would happen if a student used but forgot to subtract 2 for Maha's faster time, calculating wait, actually . The SC1 answer of 40 likely comes from assuming Maha's time was just (ignoring the 2 mins difference) or perhaps calculating total cards incorrectly. Let's re-read the mark scheme note: "If 0 scored, SC1 for answer 40". If a student thought Ade took 8 mins and Maha took 8 mins (ignoring the diff), total time 60, cards = 60/8... no. If they thought Maha took 1.5 mins? No. If they calculated Ade's output in 4 hours: 240/8 = 30. Maha's output: 240/6 = 40. Ah, 40 is the number of cards Maha makes in 4 hours. A common mistake is answering for the wrong time period (4 hours vs 1 hour). Or perhaps calculating correctly is 10. What leads to 40? . So the SC1 is for calculating the number of cards in the full 4-hour shift instead of 1 hour. Be careful to read "in 1 hour".
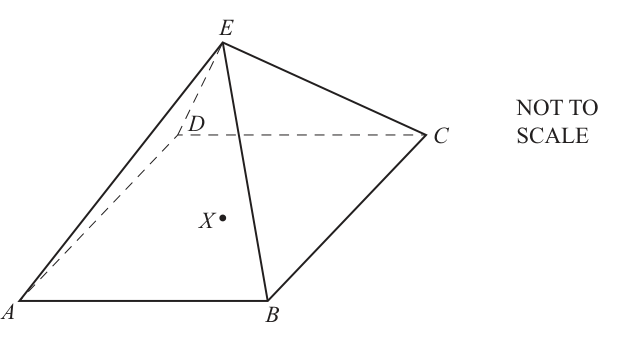
The diagram shows a square-based pyramid.
is the centre of the square base.
Vertex is vertically above and .
The perpendicular height of triangle is .
Work out the length of the base of the pyramid.
Give your answer as a surd in its simplest form.
______
Approach
Let be the midpoint of the base edge . Triangle is a right-angled triangle at inside the pyramid, where:
- is the vertical height of the pyramid.
- is the perpendicular height (slant height) of triangle .
- is the horizontal distance from the centre of the square base to the midpoint of an edge, which equals half the base side length.
Apply Pythagoras' theorem in to find , multiply by to find the total base length, and simplify the surd into simplest form.
Working
In the right-angled triangle :
Since is the centre of the square base , the side length of the square base is :
Simplify the surd:
Answer
Walkthrough
-
Identify the right-angled triangle inside the pyramid:
The apex is vertically above the centre of the base , so line segment is perpendicular to the base plane .
Let be the midpoint of side . The line segment is perpendicular to , making the slant height of the face .
The line segment connects the centre of the square to the midpoint of one of its sides. Therefore, angle . -
Calculate the length using Pythagoras' theorem:
- Determine the total side length of the base:
Because is the centre of a square, the distance from to the midpoint of any edge is equal to half the length of that edge:
- Simplify the surd to its simplest form:
Find the largest square factor of , which is :
Key Takeaways
- In a regular right pyramid, the triangle formed by the vertical height, the slant height of a triangular face, and the line from the base centre to the midpoint of an edge is right-angled.
- For a square of side length , the perpendicular distance from the centre to any side is .
- A surd is in its simplest form when no square factors remain inside the radical (i.e., ).\n
Common Mistakes
- Confusing the slant height of the face with the edge length: is the perpendicular height of (), not the length of the lateral edge or .
- Forgetting to double : Writing or as the final answer instead of multiplying by to get the full side length of the base.
- Incomplete surd simplification: Leaving the answer as or rather than extracting the largest possible square factor to obtain .
- Converting to a decimal: Giving a rounded decimal (e.g. ) when the question explicitly specifies "as a surd in its simplest form".
Things to Be Careful About
- The question requires the exact surd form. On Paper 1 (Non-calculator), marks are strictly reserved for exact simplified forms; approximations are not accepted.
- Ensure arithmetic for is done carefully without calculation slips.