Mathematics (Syllabus D) 4024/23 — May/June 2025
Cambridge O-Level · Calculator · worked solutions for every part, with the mark scheme
Topics Number · Algebra and Graphs · Geometry · Mensuration · Probability · Trigonometry · +2 more
Approach
To round to 2 decimal places, we look at the third decimal digit (the thousandths place) to decide how to treat the second decimal digit (the hundredths place).
Working
The digits are:
- Tenths:
- Hundredths:
- Thousandths:
Since the thousandths digit is , we round the hundredths digit up.
So, becomes .
Answer
4.24
Walkthrough
We want to round the number to 2 decimal places. This means we need to keep two digits after the decimal point. The first two digits are and . To know if the last kept digit () should stay as or increase to , we look at the very next digit to the right, which is the third decimal place. That digit is . Since is greater than or equal to , we round up. Therefore, becomes .
Key Takeaways
- Rounding to decimal places involves looking at the -th decimal digit.
- If that digit is or , leave the -th digit unchanged.
- If that digit is or , increase the -th digit by .
Common Mistakes
- Incorrect rounding direction: Thinking that rounds down or stays the same.
- Truncating: Simply cutting off the rest of the number without adjusting the previous digit.
- Confusing decimal places with significant figures: Counting from the wrong position.
Things to Be Careful About
- Ensure you count correctly from the decimal point for decimal places. For whole numbers, count from the left for significant figures.
- The mark scheme specifies "cao" (correct answer only), so no working needs to be shown, but the logic must be sound.
Approach
To round to 2 significant figures, we identify the first two non-zero digits and look at the third digit to determine rounding.
Working
The number is .
- The first significant figure is .
- The second significant figure is .
- The third significant figure is .
Since the third digit () is less than , we do not round up the second digit. We keep and replace the following digits with zeros to maintain the magnitude of the number.
So, becomes .
Answer
34 000
Walkthrough
We need to round to 2 significant figures. Significant figures start counting from the first non-zero digit on the left.
- The first significant digit is .
- The second significant digit is .
- The next digit (the one that decides whether to round up) is .
Because , we round down, meaning the second digit () remains unchanged. All digits after the second significant figure are replaced by zeros to keep the number's scale correct. Thus, becomes .
Key Takeaways
- Significant figures count from the first non-zero digit.
- Zeros between non-zero digits are significant.
- When rounding to fewer significant figures than the total digits, trailing zeros are placeholders.
Common Mistakes
- Starting from the wrong end: Counting from the right instead of the left.
- Ignoring the placeholder zeros: Writing instead of .
- Rounding incorrectly: Seeing the and thinking it rounds up because of the subsequent and (rounding is determined solely by the immediate next digit).
Things to Be Careful About
- Distinguish clearly between decimal places (counting from the decimal point) and significant figures (counting from the first non-zero digit).
- The mark scheme expects cao.
A rectangle has dimensions by .
The rectangle is enlarged by a scale factor of .
Work out the dimensions of the enlarged rectangle.
______ by ______
Approach
To find the dimensions of an enlarged shape, multiply each original dimension by the scale factor. The problem states the rectangle is enlarged by a scale factor of .
Working
The original dimensions are and . The scale factor is .
Calculate the first new dimension:
Break this down for clarity (or use calculator):
So the first dimension is .
Calculate the second new dimension:
Break this down:
So the second dimension is .
Alternatively, using fractions:
Answer
7.8 cm by 18.2 cm
Walkthrough
An enlargement changes the size of a shape while keeping its angles the same. The ratio of any length in the new shape to the corresponding length in the original shape is the scale factor.
Here, we are given:
- Original width =
- Original length =
- Scale factor =
To get the new dimensions, we simply multiply each original dimension by the scale factor.
First dimension: . Since is the same as (or ), we can think of this as finding three times and adding one quarter of .
Second dimension: . Similarly, take three times and add one quarter of .
The order does not matter; the rectangle is by .
Key Takeaways
- In an enlargement with scale factor , every linear dimension is multiplied by .
- Area scales by and volume by , but here we only need lengths.
- Decimal multiplication can be simplified by breaking the multiplier into integer and fractional parts (e.g., is ).
Common Mistakes
- Forgetting to multiply both dimensions (only multiplying one side).
- Multiplying by the wrong number (e.g., adding instead of multiplying).
- Calculation errors with decimals.
Things to Be Careful About
- Ensure you include the units () in your final answer if required by the context or blanks provided.
- Check that the new dimensions are larger than the original ones since the scale factor is greater than .
Ang and Bou share $104 in the ratio .
Calculate the amount they each receive.
Ang $ ______
Bou $ ______
Approach
Add the two parts of the ratio to find the total number of parts. Divide the total amount by this sum to find the value of one part, then multiply by each person's ratio number.
Working
The ratio has parts.
So one part is worth $8.
Ang receives parts:
Bou receives parts:
Check: .
Answer
Ang receives $56 and Bou receives $48.
Ang receives $56, Bou receives $48
Walkthrough
The ratio means the $104 is split into equal parts. Ang takes 7 of those parts and Bou takes 6. So first find the value of one part by dividing the total by 13. Then multiply by 7 and 6. This is the standard method for sharing in a ratio.
Key Takeaways
- A ratio divides a total into equal parts.
- The value of one part is the total divided by the sum of the ratio parts.
- Multiply the value of one part by each ratio number to find each share.
- Check by adding the shares back to the total.
Common Mistakes
- Adding the ratio parts incorrectly, for example using .
- Swapping the amounts: Ang should get the larger share because .
- Dividing by only one of the ratio numbers instead of by the sum .
- Forgetting to show the method: the mark scheme awards M1 for where , or . Unsupported answers may not receive full credit.
Things to Be Careful About
- The total is $104, not $13 or $7.
- The answer must include both amounts, with units.
- Since this is a calculator paper, decimal division is acceptable, but here is exact.
- The ratio order matters: Ang's share uses 7, Bou's share uses 6.
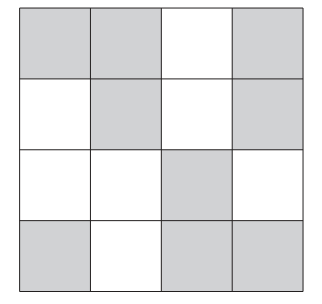
Approach
Rotational symmetry of order 2 means the shape looks the same after a 180-degree rotation. For a 4x4 grid, the centre of rotation is the central point where the four middle squares meet. We can map each shaded square to its 180-degree rotated position using the rule: a square at row , column maps to row , column .
Working
List the currently shaded cells (row, column):
Find the 180-degree rotation of each shaded cell:
- — both shaded
- — both shaded
- — both shaded
- — both shaded
- — is shaded, but is white
- — both shaded
- — both shaded
- — both shaded
- — both shaded
The only shaded cell without a matching partner is . Its rotational partner is , which is currently unshaded. Shading cell completes the rotational symmetry of order 2.
Answer
Shade the square in row 3, column 1.
Row 3, column 1
Walkthrough
Rotational symmetry of order 2 means that if you rotate the diagram 180 degrees around its centre, it looks exactly the same. For a 4x4 grid, the centre is the point where the four central squares meet. To check for this symmetry, we can pair up squares that are opposite each other through the centre. The rule for a 4x4 grid is that a square at position maps to .
We list all the shaded squares in Fig. 4a and find their partners:
- and are both shaded.
- and are both shaded.
- and are both shaded.
- and are both shaded.
- is shaded, but its partner is white.
Since only one square can be shaded, we must shade to match . This gives the completed diagram shown in .
Key Takeaways
- Rotational symmetry of order 2 is equivalent to 180-degree rotational symmetry.
- For an even-sized square grid, the centre of rotation is the central intersection point, not a square itself.
- You can systematically check symmetry by mapping each element to its rotated position using coordinate rules.
Common Mistakes
- Choosing a square that creates reflectional symmetry instead of rotational symmetry.
- Miscounting the rows or columns, leading to the wrong partner cell.
- Forgetting that the centre of rotation for a 4x4 grid is between squares, not on a square.
Things to Be Careful About
- The question asks for rotational symmetry of order 2, not reflectional symmetry or rotational symmetry of order 4.
- Only one square may be shaded; ensure no other cells are altered.
- Coordinate mapping must be precise: row maps to row , and column maps to column .
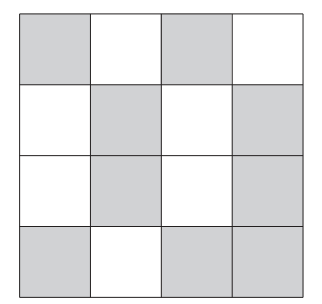
Approach
We need to shade exactly one square so that the resulting diagram has exactly one line of symmetry. We test the possible lines of symmetry for a 4x4 grid: vertical, horizontal, and the two diagonals.
Working
The shaded cells in Fig. 4b are:
Test the main diagonal (top-left to bottom-right), where :
- ✓
- ✗
- ✓
- ✗
- ✗
- ✓
- ✗
- ✓
- ✓
Multiple cells are missing, so the main diagonal won't work with just one shading.
Test the anti-diagonal (top-right to bottom-left), where :
- ✓
- ✓
- ✗
- ✓
- ✓
- ✗
- ✓
- ✗
- ✓
Three cells are missing: , , . Not one cell.
Test the vertical line between columns 2 and 3, where :
- ✗
Multiple missing.
Test the horizontal line between rows 2 and 3, where :
- ✓
- ✓
- — if we shade :
- ✓
- ✓
- ✓
- ✓
- ✓
- ✓
- ✓
- ✓
Shading cell completes the horizontal line of symmetry between rows 2 and 3. Checking other lines: the vertical and diagonal symmetries are not present, so there is exactly one line of symmetry.
Answer
Shade the square in row 1, column 4.
Row 1, column 4
Walkthrough
We need to add exactly one shaded square to Fig. 4b to create a diagram with exactly one line of symmetry. We systematically test the possible lines of symmetry for a square grid.
The shaded cells are at: .
Testing the horizontal line between rows 2 and 3 (reflection maps row to row ):
- Row 1 and Row 4: , . Row 4 has but Row 1 is missing .
- Row 2 and Row 3: , . These pairs match perfectly.
By shading , the top row becomes a mirror of the bottom row. The completed diagram is shown in .
We verify no other lines of symmetry exist: the vertical line fails because has no partner until we shade it, but then needs which is not shaded. The diagonals require multiple additional shadings. Thus, exactly one line of symmetry is achieved.
Key Takeaways
- Testing lines of symmetry systematically is key: vertical, horizontal, and both diagonals.
- When reflecting across a horizontal line in a 4-row grid, row maps to row .
- Ensure the final diagram has exactly the required number of symmetries, not more.
Common Mistakes
- Shading a cell that creates multiple lines of symmetry when only one is required.
- Misidentifying the reflection rule (e.g., using for a horizontal line).
- Assuming the diagonal will work without checking all pairs.
Things to Be Careful About
- The question asks for exactly 1 line of symmetry. Adding a cell that creates rotational symmetry or additional reflectional lines will lose marks.
- Only one square may be shaded.
- Coordinate mapping must be precise: for horizontal reflection, row maps to row ; for vertical, column maps to column .
Approach
To convert a length from centimetres () to metres (), divide the value in centimetres by , since there are centimetres in metre.
Working
Answer
63
Walkthrough
The question asks us to change the units of a measurement from centimetres to metres. We know that metre is equal to centimetres. Therefore, to go from the smaller unit (cm) to the larger unit (m), we divide by . Dividing by moves the decimal point two places to the left: becomes , which is simply .
Key Takeaways
- Know the relationship between metric units of length: .
- To convert from a smaller unit to a larger unit, divide.
Common Mistakes
- Multiplying instead of dividing (getting ).
- Moving the decimal point the wrong number of places.
Things to Be Careful About
- Ensure you are converting to the correct target unit. Here it is metres, not millimetres or kilometres.
Approach
To convert a volume from cubic centimetres () to litres, divide the value in by , since is equivalent to litre.
Working
Answer
0.45
Walkthrough
We need to convert volume from cubic centimetres to litres. The conversion factor is . Since we are converting from a smaller unit () to a larger unit (litres), we divide by . Dividing by moves the decimal point three places to the left: becomes , which simplifies to .
Key Takeaways
- Remember the key volume conversion: .
- Converting from a smaller unit to a larger unit requires division.
Common Mistakes
- Multiplying by instead of dividing.
- Confusing this with linear conversions (where cm = m).
Things to Be Careful About
- This is a volume conversion, not a length conversion. Do not use the factor ; use .
Simplify.
Approach
To simplify the expression , we group the terms containing the same variable (like terms) together and then add or subtract their coefficients.
Working
Group the terms:
Group the terms:
Combine the results:
Answer
7a - 4b
Walkthrough
The goal is to simplify the expression by collecting like terms. Like terms are terms that have the exact same variable part (e.g., both contain '' or both contain ''). Constants can also be combined with other constants.
- Identify the 'a' terms: We have and . Adding these coefficients gives , so we get .
- Identify the 'b' terms: We have and . Subtracting the coefficients gives , so we get .
- Combine: The simplified expression is the sum of these parts: .
Key Takeaways
- Only terms with the same variable can be added or subtracted.
- Be careful with signs: is not , but .
Common Mistakes
- Combining unlike terms (e.g., adding and to get ). This is incorrect; and represent different quantities.
- Sign errors when subtracting negative numbers or mixing up the order of subtraction.
Things to Be Careful About
- Ensure you include the sign (+ or -) attached to each term when grouping. For example, the term is effectively and .
Approach
Use the index law for division which states that when dividing powers with the same base, you subtract the exponents: .
Working
Here, the base is , the numerator exponent is , and the denominator exponent is .
Calculate the difference:
So,
Answer
c^8
Walkthrough
This question asks us to simplify a division of powers with the same base (). The relevant rule is the quotient rule of indices: .
- Identify the base: It is .
- Identify the exponents: The top number (numerator) has exponent , and the bottom number (denominator) has exponent .
- Apply the rule: Subtract the bottom exponent from the top exponent: .
- Write the result: Keep the base and write the new exponent, giving .
Key Takeaways
- When multiplying indices with the same base, ADD the powers ().
- When dividing indices with the same base, SUBTRACT the powers ().
Common Mistakes
- Adding the exponents instead of subtracting them (getting ).
- Subtracting the base from the exponent.
- Forgetting to keep the base variable.
Things to Be Careful About
- Make sure the bases are the same before applying this rule. If they were different (e.g., ), this simplification would not be possible.
Write down all the integer values of that satisfy the inequality.
______
Approach
Interpret the inequality symbols to determine the allowable range, then list all integers that fall strictly within or on the boundaries of this range.
Working
The inequality is given as:
This compound inequality combines two conditions:
- : The value of can be equal to because of the symbol.
- : The value of must be strictly less than because of the symbol.
We list the integers starting from and counting upwards, stopping immediately before reaching :
Answer
-3, -2, -1, 0
Walkthrough
The problem asks for all integer values of that satisfy . First, examine the left-hand boundary: . The symbol means 'less than or equal to', which explicitly includes in the solution set. Next, examine the right-hand boundary: . The symbol means 'strictly less than', which explicitly excludes . Since we are looking for integers (whole numbers), we simply count up by ones from the lower bound until we reach the upper bound, writing down every whole number we encounter. This yields and .
Key Takeaways
Understanding the distinction between strict inequalities ( and ) and inclusive inequalities ( and ) is essential for correctly handling boundary values. When a question specifies 'integer values', only whole numbers are accepted; decimals and fractions must be excluded even if they lie within the range.
Common Mistakes
Including the upper bound () when the inequality is strict (), or incorrectly excluding the lower bound () when it is inclusive (). Listing non-integers such as or . Forgetting negative integers altogether or miscounting the sequence.
Things to Be Careful About
Always verify the direction and type of each inequality sign before listing values. Mark schemes often award partial credit (e.g., B1 for 3 correct integers without extras, or 4 correct with one extra), so precision matters. Ensure your final answer clearly separates each integer with commas or spaces, and double-check that no decimal approximations have been written.
A bag contains 4 black tiles and 6 white tiles.
A tile is chosen at random from the bag and is then replaced.
A second tile is then chosen at random.
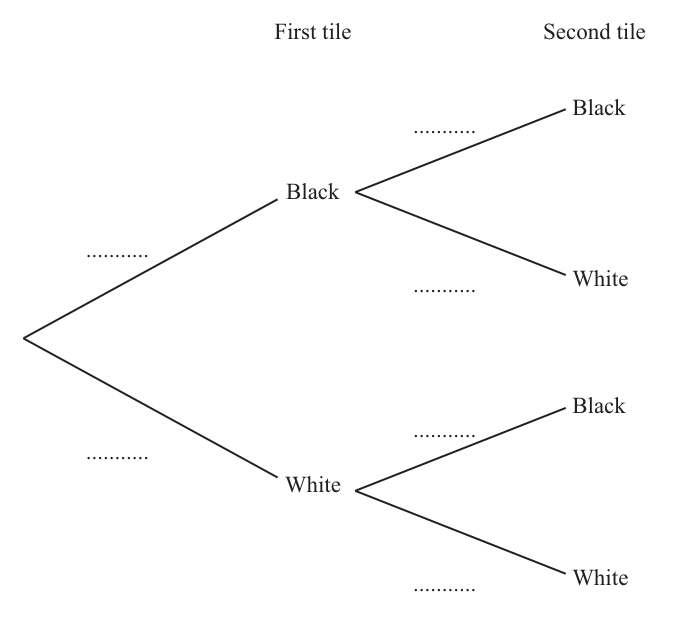
Approach
Calculate the probability of selecting a black tile and a white tile from the bag. Since the tile is replaced, the probabilities for the second selection are identical to the first.
Working
Total number of tiles = .
Probability of selecting a black tile:
Probability of selecting a white tile:
Because the tile is replaced, the probabilities for the second selection remain the same:
- After Black: ,
- After White: ,
The completed tree diagram has (or ) on the Black branches and (or ) on the White branches.
Answer
Tree diagram filled with (or ) for Black and (or ) for White on all relevant branches.
Tree diagram with 2/5 (or 4/10) for Black and 3/5 (or 6/10) for White on all branches
Walkthrough
First, find the total number of tiles in the bag: 4 black + 6 white = 10 tiles.
The probability of picking a black tile is the number of black tiles divided by the total: , which simplifies to .
The probability of picking a white tile is , which simplifies to .
The problem states the tile is "replaced", meaning it is put back into the bag before the second draw. This is crucial because it means the total number of tiles and the number of each colour remain the same for the second selection.
Therefore, every branch on the tree diagram gets the same probability values: (or ) for Black and (or ) for White.
Key Takeaways
- Probability of an event = number of favourable outcomes / total number of outcomes.
- "With replacement" means the probabilities do not change between selections.
- A probability tree diagram must have probabilities on every branch, and the branches from any single node must sum to 1.
Common Mistakes
- Forgetting that the probabilities sum to 1 on each branch (e.g., writing and ).
- Changing the probabilities for the second set of branches (calculating without replacement instead of with replacement).
- Not simplifying fractions (though and are usually accepted as per the mark scheme "oe").
Things to Be Careful About
- Check whether the question says "replaced" or "not replaced". Here, "replaced" means independent events with constant probabilities.
- The mark scheme accepts unsimplified fractions like and ("oe").
Approach
Use the probability tree diagram from part (a). To find the probability that both tiles are white, multiply the probability of selecting a white tile on the first draw by the probability of selecting a white tile on the second draw.
Working
From part (a), .
Since the tile is replaced, the events are independent:
This can be simplified to , but is accepted.
Answer
36/100 (or 9/25)
Walkthrough
The question asks for the probability that both tiles are white. On the tree diagram, this corresponds to the path: First tile is White AND Second tile is White.
To find the probability of both events happening, we multiply the probabilities along that path.
From part (a), the probability of the first tile being white is .
Because the tile is replaced, the probability of the second tile being white is also .
Multiply these two probabilities: .
Key Takeaways
- To find the probability of combined events along a path in a tree diagram, multiply the probabilities of the individual branches.
- for independent events.
Common Mistakes
- Adding the probabilities instead of multiplying them ().
- Using the wrong probabilities from the tree diagram (e.g., using the probability for Black instead of White).
- Forgetting to simplify the final fraction (though unsimplified answers are often accepted if correct).
Things to Be Careful About
- Ensure you are multiplying the correct branches: White then White, not Black then White or any other combination.
- The mark scheme accepts as an answer ("oe"), so simplification to is not strictly required but good practice.
Ameerah invests $480 in a savings account.
The account pays simple interest at a rate of per year.
Calculate the value of the investment at the end of 5 years.
$ ______
Approach
Simple interest is paid only on the original $480, so the interest is the same each year. First find the interest for one year by taking of $480, multiply by 5, then add that total interest to the original amount.
Working
Interest for one year:
Interest for 5 years:
Value of the investment after 5 years:
Answer
The value of the investment is $566.40.
$566.40
Walkthrough
Since the account pays simple interest, interest is calculated only on the original $480 each year. Convert to a decimal: . The interest for one year is therefore . Because simple interest gives the same amount every year, the total interest over 5 years is . The final value of the investment is the original amount plus the interest, so .
Key Takeaways
- Simple interest is calculated on the initial principal only.
- The annual interest can be found by multiplying the principal by the decimal version of the percentage rate.
- To find the total value, always add the total interest to the original principal.
Common Mistakes
- Writing $86.40 as the final answer instead of $566.40. The question asks for the value of the investment, which includes the original $480.
- Using a compound interest method when the question clearly says simple interest.
- Converting incorrectly to rather than .
Things to Be Careful About
- The rate is , not , so the decimal must be .
- The final answer is a currency value, so it should be written to 2 decimal places: $566.40.
- The mark scheme gives partial credit for the interest step, but the final answer must include the addition of the original $480.
Ben invests $600 in a different savings account.
The account pays compound interest at a rate of per year.
Calculate the total amount of interest paid to Ben at the end of 4 years.
$ ______
Approach
Compound interest means the balance is multiplied by at the end of each year. After 4 years the amount is . To find the interest, subtract the original $600 from this amount.
Working
The compound growth factor is
Amount after 4 years:
Total interest paid:
Answer
The total amount of interest paid to Ben is $67.47.
$67.47
Walkthrough
For compound interest, the balance is multiplied by the same growth factor at the end of each year. Since the account earns per year, the factor is . After 4 years, the balance is . Multiplying gives to 2 decimal places. This is the total amount in the account, not the interest. To find the amount of interest actually paid, subtract the original $600: .
Key Takeaways
- For compound interest, use the multiplier , where is the percentage rate.
- The multiplier is used as many times as there are years.
- When asked for interest, sub-the original amount after finding the final balance.
Common Mistakes
- Writing $667.47 as the final answer. That is the balance, but the question asks for interest only.
- Using simple interest: , which is incorrect.
- Rounding too early, e.g. using , and then getting an inaccurate final answer.
- Forgetting to subtract the original $600 from the balance.
Things to Be Careful About
- The rate is , so the growth factor is , not .
- The period is 4 years, so the exponent is 4.
- The final answer is a monetary amount, so write it as $67.47.
- The mark scheme gives full credit for the correctly evaluated compound amount minus the principal, so clearly show the subtraction step in your working.
Approach
Substitute into the definition of .
Working
Given:
Substitute :
Answer
1
Walkthrough
The question asks for the value of the function when the input is . The function is defined as multiplying the input by and then subtracting . So we replace every instance of in the expression with , calculate , and then subtract to get .
Key Takeaways
- Function notation means "the rule applied to ". To evaluate it, simply plug the number into the formula.
Common Mistakes
- Multiplying by instead of subtracting .
- Arithmetic errors like .
Things to Be Careful About
- Ensure you substitute the correct sign. If the input were negative, brackets would be essential (e.g., ). Here the input is positive, so it is straightforward.
Approach
Set the expression for equal to and solve the resulting linear equation for .
Working
Given , we set:
Subtract from both sides to isolate the term with :
Divide both sides by :
Simplify the fraction by dividing numerator and denominator by their greatest common divisor ():
Answer
-8/3
Walkthrough
We are given the output of the function is . The rule for is "subtract times the input from ". We write this as the equation . To find , we first move the constant to the other side by subtracting from both sides, giving . Then we divide by the coefficient of , which is , to get . Finally, we simplify the fraction to its lowest terms.
Key Takeaways
- Solving involves forming an equation where the function's expression equals .
- When the variable has a negative coefficient, remember that dividing by a negative number flips the sign of the result.
Common Mistakes
- Adding instead of subtracting (sign error).
- Forgetting to change the sign of the final answer when dividing by .
- Failing to simplify the fraction to .
Things to Be Careful About
- The mark scheme accepts equivalent forms (oe), such as or , but improper fractions are usually preferred unless specified otherwise.
Approach
Find by first evaluating the inner function , and then substituting that result into the outer function .
Working
First, find :
Now substitute this result into :
Answer
-71
Walkthrough
The notation means . This is a two-step process. First, we apply the rule for to the number . . Second, we take this result, , and apply the rule for to it. .
Alternatively, one could find the general formula for by substiting into : . Then . Both methods yield the same result.
Key Takeaways
- Composite functions are evaluated from the inside out.
- is not the same as ; order matters.
Common Mistakes
- Evaluating first and then putting that into (calculating instead).
- Arithmetic errors with negative numbers (e.g., , then forgetting to subtract again).
Things to Be Careful About
- Watch the signs carefully. Subtracting from a large negative number makes it more negative.
Approach
Start with the given domain inequality for and manipulate it algebraically to form the expression for . The resulting inequality will define the range.
Working
Given the domain:
The function is . We need to transform into an inequality involving .
Step 1: Multiply by . Remember that multiplying an inequality by a negative number reverses the direction of the inequality sign.
Step 2: Add to all parts of the inequality.
Since , we have:
Answer
g(x) < 50
Walkthrough
The domain tells us what values can take (). The range is the set of output values . Since is a linear function with a negative gradient (), it is strictly decreasing. As increases, decreases. Therefore, the boundary at will give the upper bound for the range.
Algebraically, we start with . To get , we multiply by . Crucially, because we multiplied by a negative number, the sign flips to , giving . Then we add to both sides to match the structure of , resulting in . Thus, .
Key Takeaways
- When manipulating inequalities, multiplying or dividing by a negative number reverses the inequality symbol.
- The range of a linear function over an open interval is also an open interval.
Common Mistakes
- Forgetting to reverse the inequality sign when multiplying by .
- Calculating the value at the boundary () but writing it as an equality () instead of an inequality ().
Things to Be Careful About
- The domain is strict (), so the range must also be strict (). Do not include equality.
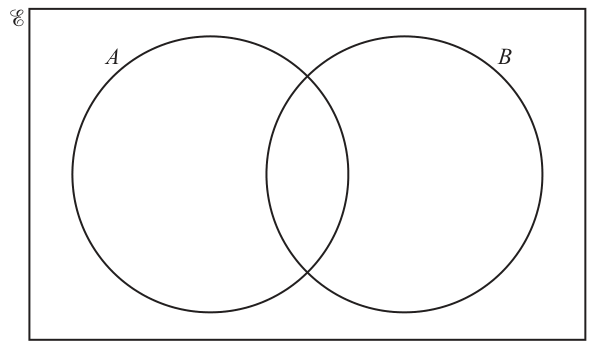
Approach
List the elements of sets and from the universal set , then place them into the appropriate regions of the Venn diagram: only, , only, and outside both.
Working
The universal set is:
Set contains the prime numbers in :
Set contains the factors of that are in . Since , its factors are . The ones in are:
Find the intersection (elements in both and ):
Find elements in only ():
Find elements in only ():
Find elements in but not in (outside both sets):
Answer
Venn diagram with containing ; intersection containing ; containing ; outside containing .
Venn diagram with A containing 5, 7, 11; intersection containing 2, 3; B containing 4, 6, 9, 12; outside containing 8, 10
Walkthrough
First, determine the explicit elements of sets and by checking each number in the universal set . For , identify which numbers are prime: . For , identify which numbers divide without remainder: (note that and are not in ). Next, find the intersection by looking for numbers common to both lists, which are and . Place these in the overlapping region. Then place the remaining primes () in the part of that does not overlap , and the remaining factors () in the part of that does not overlap . Finally, any numbers in that are neither in nor ( and ) go outside both circles but inside the universal set box.
Key Takeaways
When completing a Venn diagram from set definitions, always start by listing the explicit elements of each set within the universal set. Find the intersection first, then distribute the remaining elements to their respective unique regions, and finally place any leftover universal set elements outside the defined sets.
Common Mistakes
- Forgetting that is not a prime number (so is not in , though it is not in anyway).
- Forgetting that is not a prime number (so is not in , though it is not in anyway).
- Including numbers like or in set even if they are not in the universal set .
- Placing elements in the wrong region, such as putting in because it is even, or forgetting to put and outside both sets.
- Listing elements in the wrong order or missing elements in part (b).
Things to Be Careful About
- Always check that every element in the universal set is placed somewhere in the Venn diagram. None should be left out.
- Remember that is not prime and is not prime.
- In part (b), the complement includes everything outside , which means elements in only and elements outside both sets.
- Elements must be listed in ascending order and separated by commas.
Approach
Find the complement of (elements in not in ), then find the union of and by combining their elements.
Working
From part (a), . The complement contains all elements in that are not in :
Set . The union contains all elements that are in or in (or both):
Alternatively, from the Venn diagram, consists of all elements in (the left circle) plus all elements outside (everything except the right circle). This gives .
Answer
2, 3, 5, 7, 8, 10, 11
Walkthrough
The complement is the set of all elements in the universal set that are not in . From the universal set and , removing the elements of leaves . The union is the set of all elements that belong to or to (or both). Combining and gives . Listing them in ascending order gives the final answer.
Key Takeaways
The complement includes everything outside set , which means elements in only and elements outside both sets. The union combines all elements from both sets, removing duplicates.
Common Mistakes
- Forgetting that elements in only are also part of , so they must be included in .
- Missing elements like or which are outside both and but inside , so they are in and thus in .
- Listing elements out of order or with missing commas.
Things to Be Careful About
- Ensure all elements are listed in ascending order.
- Do not include elements that are in (such as ) unless they are also in , but here none are.
- Follow-through marks are awarded for using their own Venn diagram from part (a), so consistency is key.
Approach
Find the set (elements in but not in ), then count the number of elements in this set.
Working
From part (a), the elements in only (which is ) are:
The number of elements in this set is:
Alternatively, using the Venn diagram from part (a), corresponds to the region inside but outside , which contains . There are elements.
Answer
3
Walkthrough
The notation means the intersection of set and the complement of set . This is equivalent to , the set of elements that are in but not in . From the Venn diagram in part (a), this is the region inside circle but outside circle , which contains the numbers . Counting these elements gives .
Key Takeaways
is the set of elements in only. The notation asks for the count (cardinality) of the elements in that set.
Common Mistakes
- Confusing with (which would give ).
- Counting the elements in only as by mistake.
- Forgetting that means the number of elements, not the elements themselves.
Things to Be Careful About
- Ensure you are looking at the correct region: inside , outside .
- The answer is a single number, not a list of elements.
These are the first four terms of a sequence.
Approach
Identify the pattern between consecutive terms to find the common difference, then apply it to the last given term.
Working
The given terms are:
Calculate the difference between consecutive terms:
The sequence is arithmetic with a common difference of . To find the next term, subtract 3 from the last known term (7):
Answer
4
Walkthrough
The problem asks for the next term in the sequence . By observing the numbers, we can see they are getting smaller. We check the difference between each pair of adjacent terms: minus is , minus is , and so on. Since the difference is constant (), this is an arithmetic sequence. The rule is "subtract 3". Therefore, the next term after is simply .
Key Takeaways
- An arithmetic sequence has a constant difference between consecutive terms.
- Identifying whether the sequence is increasing or decreasing helps determine the sign of the difference.
Common Mistakes
- Adding 3 instead of subtracting 3 because one only looks at the magnitude of the change () without considering the direction.
- Arithmetic errors when subtracting single-digit numbers.
Things to Be Careful About
- Ensure you check at least two intervals to confirm the difference is constant before assuming it is an arithmetic sequence.
Approach
For an arithmetic sequence, the th term is given by the form , where is the common difference and is determined using the first term.
Working
From part (a), we know the common difference is . This means the coefficient of is . So the expression starts as:
We need to find the constant term such that gives the correct values. Let's test for (the first term):
Add 3 to both sides:
So the expression is or .
Let's verify with the second term ():
This matches the given sequence. Let's verify with the fourth term ():
This also matches.
Thus, the expression for the th term is .
Answer
19 - 3n
Walkthrough
To find the th term of an arithmetic sequence, we use the linear formula , where is the common difference.
Step 1: Identify the common difference (). From part (a), the difference is . This becomes the number multiplying . So we have .
Step 2: Find the constant (). We compare to the actual sequence terms.
For , . The actual first term is . To get from to , we must add . Therefore, the constant is .
Alternatively, you can think of the "zeroth term" (term 0). If the first term is and we go back by , the term at position would be . Thus the formula is .
Step 3: Write the final expression. Combining these parts gives .
Key Takeaways
- The coefficient of in the th term formula is always equal to the common difference of the arithmetic sequence.
- The constant term adjusts the scaled value to match the starting point of the sequence.
Common Mistakes
- Using the positive value of the difference () instead of the negative one ().
- Forgetting to add the constant adjustment (e.g., writing just ).
- Confusing the position with the term value itself.
Things to Be Careful About
- The mark scheme accepts equivalent forms like . Both are correct.
- Always check your answer against at least two terms in the original sequence to ensure accuracy.
Approach
To convert to an ordinary number, we evaluate the power of ten and multiply it by . A negative exponent indicates that the decimal point moves to the left.
Working
The exponent is , so we move the decimal point in four places to the left:
Alternatively, using fraction notation:
Answer
0.000123
Walkthrough
Standard form (or scientific notation) expresses numbers as , where and is an integer. To reverse this process and find the ordinary number, we simply calculate the value of and multiply it by .
In this case, . A negative power means the number is less than 1. Specifically, is equal to . Multiplying by shifts the decimal point 4 places to the left. Starting at , one place left is , two places is , three places is , and four places is .
Key Takeaways
- Positive powers of 10 () shift the decimal point to the right, making the number larger.
- Negative powers of 10 () shift the decimal point to the left, making the number smaller.
- The magnitude of the exponent tells you exactly how many places to move the decimal point.
Common Mistakes
- Moving the decimal point in the wrong direction (right instead of left for negative exponents).
- Miscounting the number of zeros or places to shift.
- Forgetting to add leading zeros before the first non-zero digit when shifting past the start of the number.
Things to Be Careful About
- Ensure the final answer is written in standard decimal notation, not in standard form. The mark scheme accepts 'cao' (correct answer only), meaning any equivalent correct decimal representation is fine, but itself is not the final answer.
Approach
The equation involves adding two numbers in standard form. To add them directly, they must have the same power of 10. We can either convert everything to ordinary numbers, or convert both terms to the same power of 10 (e.g., ) before adding. Once added, we compare the result to to identify and .
Working
Given:
Let's convert the known terms to ordinary numbers to see the total sum clearly:
So the equation becomes:
Subtract from both sides to isolate the second term:
Now we need to express in the form , where typically for standard form.
Convert to standard form:
Move the decimal point 5 places to the left to get a number between 1 and 10:
Comparing this to :
Answer
x = 8.28, y = 5
Walkthrough
When adding or subtracting numbers in standard form, the powers of 10 must match. You cannot simply add the coefficients if the exponents are different.
Method 1: Convert to Ordinary Numbers
This is often the safest way to avoid errors. Convert to and to . Subtract from to find the missing value: . Finally, convert back into standard form . Since there are 6 digits, the power is , leaving as the coefficient.
Method 2: Match Powers of 10
Rewrite to have a power of . To increase the exponent by 1, divide the coefficient by 10:
Now the equation is:
Assuming (since the result is and the other term was adjusted to ), we can add the coefficients:
Thus and .
Both methods yield the same result. The mark scheme explicitly accepts and , or the intermediate ordinary number .
Key Takeaways
- Standard form requires the coefficient to be between 1 and 10.
- Addition/Subtraction: Align powers of 10 first, then operate on coefficients.
- Conversion: Moving the decimal point left increases the positive exponent; moving right decreases it (or increases the negative exponent).
Common Mistakes
- Adding coefficients directly without matching powers (), which is incorrect because .
- Incorrectly counting the number of places to move the decimal point when converting back to standard form.
- Confusing and . Remember is the coefficient and is the exponent.
- Arithmetic errors in subtraction ().
Things to Be Careful About
- The question asks for and . Ensure you provide both values.
- Check if the resulting needs to be in a specific form. Here, is the natural standard form coefficient. The mark scheme allows or as evidence, but and are distinct variables.
Factorise.
Approach
Identify the Highest Common Factor (HCF) of the terms and , then divide each term by this HCF to find the remaining expression inside the brackets.
Working
The two terms are and .
First, look at the numbers: and . The HCF is .
Next, look at the variables: and . The HCF is .
Therefore, the overall HCF is .
Divide each term by :
Write the HCF outside the bracket and the results inside:
Check by expanding: and .
Answer
5x(x + 3y)
Walkthrough
To factorise an algebraic expression means to write it as a product of brackets. We start by finding the largest factor that divides into every term in the expression.
- Numbers: The coefficients are and . Since goes into both ( and ), we take out.
- Variables: The first term has (which is ) and the second has (which is ). Both contain at least one , so we take out.
- Combine: The total factor to pull out is .
- Simplify: Divide the original terms by to see what remains inside the brackets. and . This gives .
Key Takeaways
Always check for a common numerical factor AND a common variable factor. The final answer must expand back exactly to the original expression.
Common Mistakes
- Forgetting the variable part of the HCF (e.g., writing ). The mark scheme awards partial credit (B1) for this, but full marks require the full HCF .
- Dividing incorrectly (e.g., thinking ).
Things to Be Careful About
Make sure you don't leave a '1' behind if the entire term was factored out (not applicable here, but common in other questions like ). Ensure all terms are accounted for inside the bracket.
Approach
This expression has four terms. We use the method of grouping: split the expression into two pairs, factorise each pair separately, and then look for a common bracket.
Working
Expression:
Step 1: Group the terms.
Group the first two terms and the last two terms:
Note: When grouping the negative terms, be careful with signs. It is often easier to factor out a positive number from the second group by keeping track of the minus sign outside.
Alternatively, just factorise normally:
From the first group , the common factor is :
From the second group , the common factor is :
Step 2: Combine the groups.
Now we have:
Step 3: Factorise the whole expression.
Both parts contain the same bracket . Pull this out:
Check by expanding: . This matches the original.
Answer
(2x - 3y)(a + 2b)
Walkthrough
When there are four terms, 'grouping' is the standard technique.
- Pair them up: Look at the first two terms ( and ) and the last two ( and ).
- Factorise Pair 1: What do and share? They share and . So, .
- Factorise Pair 2: What do and share? They share and . Because they are both negative, we factor out to make the inside positive. .
Alternative: You could factor out to get or keep the minus inside . The key is that the content inside the bracket must match the other pair. - Spot the Match: Both lines now end with . This is the common binomial factor.
- Final Bracket: Write once, and put whatever is left ( and ) in the second bracket: .
Key Takeaways
Factorising by grouping relies on the 'hidden' common bracket appearing after the first step. Always verify your answer by expanding it fully to ensure it equals the original question.
Common Mistakes
- Sign errors: When factoring the second group, forgetting that the terms were negative leads to which expands to (wrong signs).
- Mismatched brackets: If the brackets don't match, the grouping order might be wrong (e.g., pairing with ). Try different pairings if the first attempt fails.
Things to Be Careful About
The mark scheme accepts equivalent forms such as . However, the standard positive form is safest. Ensure you distribute the negative sign correctly when factoring out from .
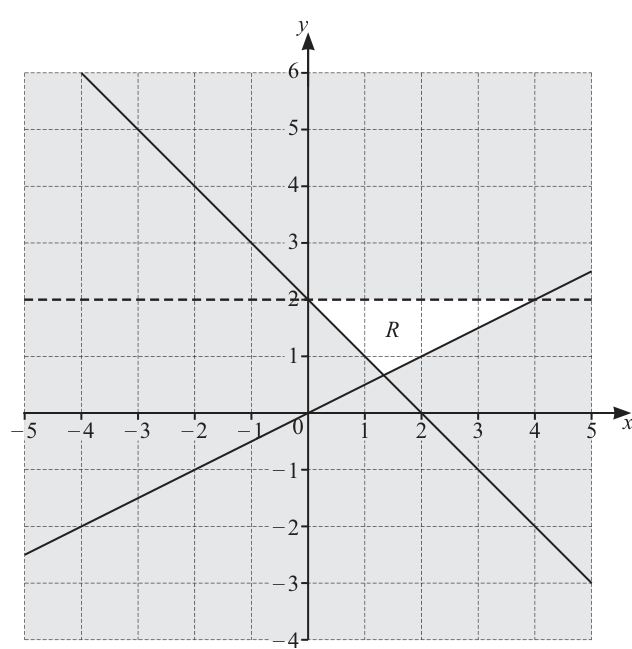
Find the three inequalities that define the unshaded region, .
______
______
______
Approach
Identify the equation of each of the three boundary lines bounding region . Then determine whether lies above or below each line, and use the line style (solid or dashed) to decide whether the inequality is strict or non-strict.
Working
The region is bounded by three lines:
- A horizontal dashed line passing through .
The equation is . Since the line is dashed and the region lies below it, the inequality is:
- A solid line passing through and .
The gradient is and the y-intercept is .
The equation is . Since the line is solid and the region lies above it, the inequality is:
- A solid line passing through and .
The gradient is and the y-intercept is .
The equation is . Since the line is solid and the region lies above it, the inequality is:
We can verify with a test point inside , such as :
- (true)
- (true)
- (true)
Answer
y < 2, y >= 1/2 x, y >= 2 - x
Walkthrough
The question asks for three inequalities that define the unshaded triangular region . We do this by finding the equation of each boundary line and then deciding which side of the line contains .
Step 1: The horizontal boundary.
The top boundary is a dashed horizontal line crossing the y-axis at . Its equation is simply . Because the line is dashed, the boundary is not included in the region, meaning we use a strict inequality ( or ). Since is below this line, the y-values in are less than , giving .
Step 2: The line with positive gradient.
The bottom-right boundary is a solid line passing through the origin and the point . We calculate its gradient: . With a y-intercept of , the equation is . Because the line is solid, the boundary is included, so we use or . Region lies above this line (for a given , the y-values in are greater than those on the line), giving .
Step 3: The line with negative gradient.
The bottom-left boundary is a solid line passing through and . We calculate its gradient: . With a y-intercept of , the equation is . Because the line is solid, we use or . Region lies above this line, giving .
Verification:
We can confirm by picking a point clearly inside , like , and checking it against all three inequalities. All three hold true, confirming our directions are correct.
Key Takeaways
- To represent a region with inequalities, find the equation of each boundary line in the form .
- A dashed boundary line means the region does not include the line itself, requiring a strict inequality ( or ).
- A solid boundary line means the region includes the line, requiring a non-strict inequality ( or ).
- Use a test point inside the region to verify the correct inequality direction.
Common Mistakes
- Using instead of or for the dashed line (e.g., writing instead of ).
- Confusing the direction of the inequality (e.g., writing when the region is above the line).
- Failing to notice that one line is dashed while the others are solid, leading to incorrect inequality symbols.
- Writing the equations of the lines incorrectly, such as misreading the y-intercept or gradient from the grid.
Things to Be Careful About
- Always check the line style: dashed means strict inequality ( or ), solid means non-strict ( or ).
- Ensure the inequality symbols are correct for the region's position relative to each line. A quick test point inside the region can prevent sign errors.
- The mark scheme accepts equivalent forms, such as or , but the standard form is expected.
- Do not include the shaded regions in your final answer; only the three inequalities defining are required.
The table gives information about the ages of the 80 members of a gym.
| Age ( years) | ||||
|---|---|---|---|---|
| Frequency | 5 | 31 | 19 | 25 |
Approach
To estimate the mean from a grouped frequency table where classes have different widths, we assume that all values within a class are concentrated at the class midpoint (). We calculate for each row, sum these products (), and divide by the total frequency ().
Working
Step 1: Find the midpoints () for each age group.
The midpoint is calculated as .
- For :
- For :
- For :
- For :
Step 2: Calculate the product for each row.
Multiply the frequency () by the midpoint ().
Step 3: Sum the frequencies and the values.
Total Frequency ():
Sum of Products ():
Step 4: Calculate the estimated mean.
Answer
38.675
Walkthrough
When data is presented in groups (intervals) rather than as individual numbers, we cannot find the exact mean. Instead, we estimate it by assuming every person's age falls exactly on the middle of their age group (the midpoint).
- Find Midpoints: For each column, add the lower and upper age limits and divide by 2. Note that for the last group (), the midpoint is . This assumes the distribution is roughly even across that wide range.
- Weighted Values: Multiply the number of people in each group (frequency) by that group's representative age (midpoint). This gives the estimated total age contribution of that group.
- Group 1: 5 people aged approx 17 85 years total.
- Group 2: 31 people aged approx 21 651 years total.
- Group 3: 19 people aged approx 32 608 years total.
- Group 4: 25 people aged approx 70 1750 years total.
- Total Sum: Add up all the estimated total ages () and divide by the total number of gym members ().
Key Takeaways
- The formula for the estimated mean of grouped data is .
- The variable represents the class midpoint.
- Class midpoints must be calculated carefully, especially for non-uniform class widths.
Common Mistakes
- Using the lower or upper bound instead of the midpoint for .
- Failing to multiply the frequency by the midpoint (calculating just ).
- Incorrectly calculating the midpoint for the final interval ( to ).
- Arithmetic errors when summing large numbers like .
Things to Be Careful About
- Ensure you use the correct boundaries. The notation means the continuous interval runs from 16 to 18.
- The question asks for an estimate, so using the midpoint is the standard accepted method (M1 for correct midpoints soi).
- Check your division; results in a terminating decimal here.
Work out the percentage of the members of the gym who are more than 24 years old.
______
Approach
We need to find the proportion of members who are strictly older than 24 years and express this as a percentage of the total membership.
Working
Step 1: Identify the relevant groups.
The condition is "more than 24 years old" ().
Looking at the table:
- : No (all are )
- : No (all are )
- : Yes (all are )
- : Yes (all are )
So we sum the frequencies for these two groups:
Step 2: Calculate the percentage.
The total number of members is .
Simplifying the fraction:
Converting to percentage:
Answer
55
Walkthrough
First, look at the age intervals to see which ones contain only ages greater than 24. The interval includes people who are exactly 24, so they do not count as "more than 24". The next interval starts with , meaning everyone in that group and the one after is strictly older than 24.
Add the frequencies for the groups (19 members) and (25 members) to get 44 members.
Finally, divide this count by the total number of members (80) and multiply by 100 to get the percentage.
Key Takeaways
- Pay attention to inequality symbols. "" means 24 is included in that group, so those people are not "more than 24".
- A percentage is simply a fraction out of 100.
Common Mistakes
- Including the group in the count (getting ).
- Calculating the percentage of the wrong base (e.g., dividing by 100 instead of 80).
- Arithmetic errors in the final division/multiplication.
Things to Be Careful About
- The phrase "more than 24" excludes 24 itself. If the question said "24 or older", the second group would be included.
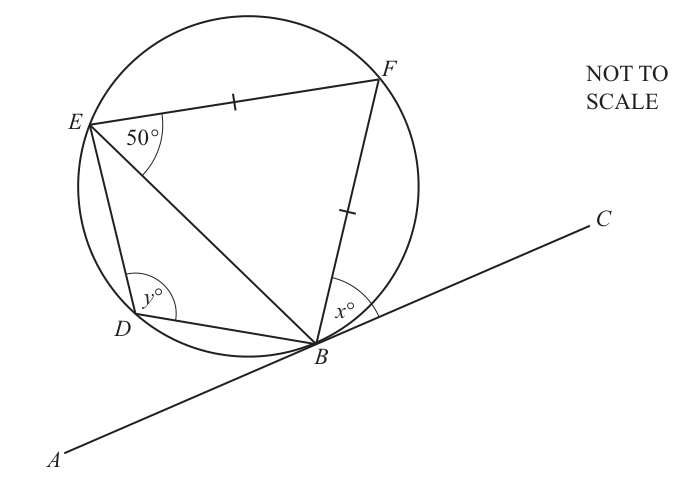
Points , , and lie on a circle.
is a tangent to the circle at .
Angle and .
Approach
The angle between a tangent and a chord through the point of contact is equal to the angle in the alternate segment. Apply this theorem directly to find .
Working
is a tangent to the circle at , and is a chord. The angle between the tangent and the chord is (i.e., ). The angle subtended by chord in the alternate segment is .
Given that :
Answer
because alternate segment theorem.
x = 50
Walkthrough
The alternate segment theorem states that the angle between a tangent to a circle and a chord drawn from the point of contact is equal to the angle subtended by that chord in the alternate segment of the circle. Here, is the tangent at , and is the chord. The angle between them is . The angle in the alternate segment (the segment on the other side of from ) is , which is given as . Therefore, is immediately .
Key Takeaways
The alternate segment theorem is a powerful tool for finding angles involving tangents and chords. Always identify the tangent, the chord, and the angle in the alternate segment clearly.
Common Mistakes
- Confusing which angle is in the alternate segment. The alternate segment is the one on the opposite side of the chord from the angle between the tangent and chord.
- Forgetting to state the theorem clearly as the geometrical reason; simply writing "alternate segment" is sufficient, but vague reasons like "circle theorem" may not score.
Things to Be Careful About
The mark scheme awards one mark for the correct value () and one mark for the reason. The reason must specifically name the "alternate segment theorem". Do not write unsupported answers or vague circle theorems.
Approach
To find , first use the fact that is isosceles to find . Then, use the property that opposite angles in a cyclic quadrilateral sum to to find .
Working
In , we are given . This means is an isosceles triangle, so the base angles are equal:
The sum of angles in a triangle is , so we can find :
Points , , , and lie on the circle, forming a cyclic quadrilateral . A key property of cyclic quadrilaterals is that opposite angles sum to . The angle opposite to is (which is ):
Answer
.
y = 100
Walkthrough
The question asks for , which is the angle at vertex in the cyclic quadrilateral . To find this, we first need the opposite angle .
Step 1: Look at . We are told , which makes it an isosceles triangle. The angles opposite the equal sides are equal, so . Using the triangle angle sum (), we calculate the remaining angle: .
Step 2: Now consider the cyclic quadrilateral . The vertices all lie on the circle. Opposite angles in a cyclic quadrilateral always add up to . The angle opposite is (labeled in the diagram). Therefore, , giving .
Key Takeaways
- Isosceles triangles have two equal base angles. Always use this when two sides of a triangle are marked equal.
- Opposite angles in a cyclic quadrilateral sum to . Identify the four points on the circle and match up the correct opposite pairs.
Common Mistakes
- associating the reasons with the wrong angles. The mark scheme explicitly states: "Reasons must not be associated with an incorrect angle". For example, claiming or misidentifying which angles are opposite in the cyclic quadrilateral.
- forgetting to calculate first and trying to jump straight to .
- not showing the intermediate step for ; the marks are awarded for the correct reasons applied to the correct angles.
Things to Be Careful About
- The mark scheme awards 1 mark for the final answer () and 1 mark each for two correct reasons (isosceles triangle, opposite angles of cyclic quadrilateral sum to ). Max 2 marks if the answer is not fully correct, meaning working must be shown and reasons must be valid.
- Ensure you write not just when stating the circle theorem reason, as precision matters in geometry proofs.
The diagram shows a cuboid.
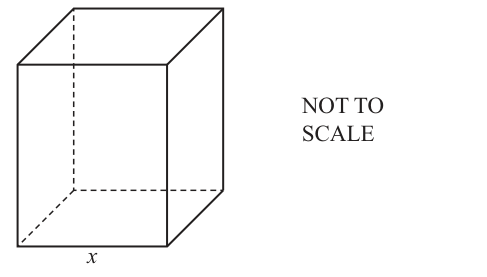
The length of the cuboid is .
The height of the cuboid is 3 times its length.
The width of the cuboid is less than its length.
Write down expressions, in terms of , for the height of the cuboid and the width of the cuboid.
Approach
Translate the word descriptions for height and width directly into algebraic expressions in terms of .
Working
The height is given as 3 times the length :
The width is 4 cm less than the length :
Answer
height = 3x, width = x - 4
Walkthrough
The question provides the length as cm and gives two simple worded rules for the other dimensions. The height is '3 times its length', which translates immediately to . The width is '4 cm less than its length', which translates to . These are direct substitutions with no calculation required.
Key Takeaways
Translating simple worded relationships into algebraic expressions is a foundational skill. Always identify the variable (here ) and apply the operations described (multiply by 3, subtract 4).
Common Mistakes
- Writing the width as instead of . 'Less than' means you subtract the amount from the base quantity.
- Forgetting units or writing expressions that do not simplify to a single term in .
Things to Be Careful About
Ensure the expressions are exactly in terms of as requested. The mark scheme awards B1 for each correct expression, so both must be clearly stated.
The surface area of the cuboid is .
Form an equation in and show that it simplifies to .
Approach
The surface area of a cuboid is the sum of the areas of its six rectangular faces. Write this sum using the expressions for length, height, and width from part (a), set it equal to 200, and simplify to the required quadratic equation.
Working
The three pairs of opposite faces have areas , , and . The total surface area is:
Expand each bracket:
Combine like terms on the left side:
Subtract 200 from both sides to form a quadratic equation equal to zero:
Divide the entire equation by 2:
This matches the required form.
Answer
7x^2 - 16x - 100 = 0
Walkthrough
A cuboid has three pairs of identical rectangular faces. The dimensions are length , height , and width . The areas of the three distinct faces are , , and . Multiplying each by 2 for the pairs gives , , and . Adding these together gives . Setting this equal to the given surface area of 200 cm yields . Rearranging gives , and dividing by 2 simplifies it to .
Key Takeaways
The surface area of a cuboid with dimensions , , is . When dimensions are algebraic expressions, careful expansion and collecting of like terms is required. Always check that the final equation matches the required form exactly.
Common Mistakes
- Forgetting to multiply by 2 for the pairs of faces.
- Expansion errors, such as (missing the 8x) or (missing the 12x).
- Failing to divide by 2 at the end, leaving instead of the required .
- Not setting the equation equal to zero.
Things to Be Careful About
The mark scheme requires 'no errors or omissions' for the final A1 mark. Show all expansion steps clearly. The final answer must be exactly . Remember that 'show that' questions require starting from the given information and working towards the target, not the other way around.
Solve the equation .
You must show all your working and give your answers correct to 2 decimal places.
= ______ or = ______
Approach
Use the quadratic formula with , , and to find the roots.
Working
Substitute the values into the quadratic formula:
Simplify the numerator and denominator:
Calculate :
Find the two values:
Round to 2 decimal places:
Answer
x = 5.09 or x = -2.81
Walkthrough
The equation is . Identify , , . The quadratic formula is . Substituting gives . The discriminant is . The square root of 3056 is approximately 55.2811. Adding and subtracting this from 16 and dividing by 14 gives the two roots: and . Both must be rounded to 2 decimal places as instructed.
Key Takeaways
The quadratic formula is a reliable method for solving any quadratic equation that does not factorise easily. Always double-check the signs of , , and , especially when is negative, as becomes positive.
Common Mistakes
- Sign errors in the discriminant, such as calculating instead of .
- Forgetting the symbol and only giving one answer.
- Rounding incorrectly (e.g., rounds to , not ).
- Not showing the substitution into the formula, which loses method marks.
Things to Be Careful About
The question explicitly asks for answers 'correct to 2 decimal places'. Do not give more or fewer decimal places. The mark scheme awards B1 for the final answers, so both must be correct and properly rounded. Showing the quadratic formula substitution is essential for the B2 mark.
Approach
The height of the cuboid is given by the expression from part (a). Substitute the positive value of found in part (c) to calculate the height.
Working
From part (c), the positive root is (use the unrounded value for accuracy).
Height :
Round to 3 significant figures (or 1 decimal place, as the mark scheme accepts 15.27 to 15.3):
Answer
15.3
Walkthrough
Part (a) established that the height is cm. Part (c) gave two values for : and . Since represents a physical length, it must be positive, so we use (using more decimal places from the calculator to avoid rounding errors). Multiplying by 3 gives cm. The mark scheme accepts any answer from 15.27 to 15.3, so 15.3 cm is appropriate.
Key Takeaways
When a physical quantity like length must be positive, discard negative roots. Always use the unrounded value from the previous step in calculations to avoid compounding rounding errors.
Common Mistakes
- Using the rounded value exactly: , which is acceptable, but using gives , which rounds to . Both are typically accepted, but carrying more decimals is safer.
- Forgetting that length cannot be negative and attempting to use .
- Not including the unit 'cm' in the final answer if required (though the blank has 'cm' next to it, it's good practice to be aware).
Things to Be Careful About
The mark scheme states 'FT their positive root from (c)'. This means if a candidate made an error in (c) but correctly substituted their (incorrect) positive root into , they would still get the mark for (d). Always use the positive root for physical dimensions.
The diagram shows triangle and triangle .
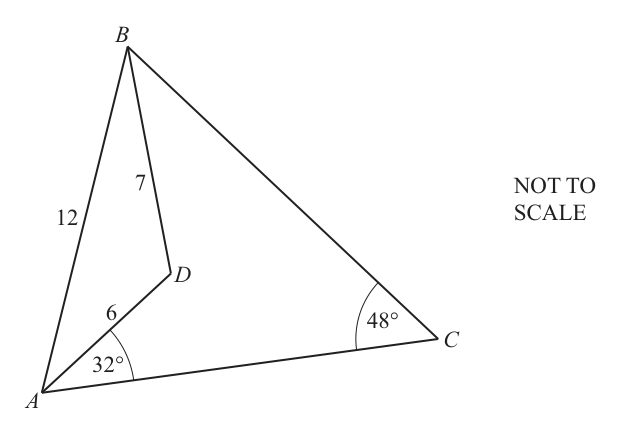
, and .
Angle and angle .
Approach
In triangle ABD, all three side lengths are known (AB = 12, AD = 6, BD = 7). Use the cosine rule to find the angle opposite to BD, which is angle BAD.
Working
Now find the angle:
Answer
24.5
Walkthrough
We are given the three side lengths of triangle ABD: AB = 12, AD = 6, and BD = 7. To find angle BAD, we use the cosine rule, which relates the sides of a triangle to the cosine of one of its angles. The form used is , adapted here as . Substituting the values gives , which simplifies to . Taking the inverse cosine yields approximately , which rounds to to three significant figures.
Key Takeaways
The cosine rule can be used to find an angle when all three sides of a triangle are known. Always ensure the correct side is squared on the left-hand side (the side opposite the angle you want to find).
Common Mistakes
- Forgetting to square the side lengths before substituting into the cosine rule.
- Mixing up the sides in the formula ; the two sides forming the angle must be used here (AB and AD), not the side opposite (BD).
- Rounding the angle to fewer than three significant figures when not specified.
Things to Be Careful About
- The diagram is marked NOT TO SCALE, so do not attempt to measure angles or lengths with a ruler.
- Keep extra decimal places during intermediate calculations (e.g., use rather than ) to avoid rounding errors in part (b).
- The final answer should be given to three significant figures as is standard for 4024 unless otherwise stated.
Approach
First, find angle BAC by adding angle BAD (from part a) and angle DAC (given). Then use the angle sum of triangle ABC to find angle ABC. Finally, apply the sine rule to find AC.
Working
Angle BAC is the sum of angle BAD and angle DAC:
In triangle ABC, the angles sum to . We can find angle ABC:
Alternatively, note that .
Now apply the sine rule in triangle ABC to find AC:
Answer
15.6
Walkthrough
To find AC, we work in the larger triangle ABC. We already know AB = 12 and angle BCA = 48°. We need one more angle. Angle BAC is made up of angle BAD (found in part a as ) and angle DAC (given as ), so angle BAC = . The sum of angles in triangle ABC is , so angle ABC = . With two angles and a side opposite one of them, we use the sine rule: . Substituting the values gives cm.
Key Takeaways
When a triangle is split into smaller triangles, angles can be combined. The sine rule is useful when you know a side and its opposite angle, plus another angle or side.
Common Mistakes
- Using angle BAD directly in the sine rule for triangle ABC instead of angle BAC.
- Forgetting to add angle DAC to angle BAD to get the full angle BAC.
- Rounding angle ABC too early (e.g., using instead of ) can lead to a slightly incorrect final answer.
- Inverting the sine rule fraction (e.g., ).
Things to Be Careful About
- Always use unrounded intermediate values (like ) in subsequent parts to avoid compounding rounding errors.
- The sine rule requires matching each side with the sine of its opposite angle: AC is opposite angle ABC, and AB is opposite angle BCA.
Solve.
= ______
Approach
The equation contains two rational expressions with different denominators. We combine them over a common denominator, clear the fractions by multiplying both sides by that denominator, and then solve the resulting linear equation.
Working
Given:
Find a common denominator, which is :
Combine the numerators:
Multiply both sides by to clear the fraction:
Expand all brackets:
Left Hand Side (LHS):
Right Hand Side (RHS):
Set LHS equal to RHS:
Subtract from both sides:
Rearrange to solve for . Subtract from both sides and add to both sides:
Divide by 7:
Check validity: The original denominators are and . If , neither denominator is zero ( and ). Thus, the solution is valid.
Answer
-2/7
Walkthrough
The problem asks us to solve an equation involving algebraic fractions. The key strategy is to eliminate the denominators so we can work with a standard polynomial equation.
-
Combine Fractions: The two terms on the left have denominators and . To add them, we need a common denominator, which is the product . We multiply the numerator and denominator of the first term by and the second term by . This gives us a single fraction: .
-
Clear Denominators: Since the entire left side equals 3, we can multiply both sides of the equation by the common denominator . This removes the fraction entirely. Note: We must assume and for the original expression to be defined. The final answer should be checked against these restrictions.
-
Expand and Simplify: Expand the brackets on both sides.
On the left: .
On the right: .
Equating them: . -
Solve Linear Equation: Notice that the terms appear on both sides. Subtracting cancels them out, leaving a simple linear equation: . Rearranging terms to isolate gives , so .
-
Check Restrictions: The values and would make the original denominators zero. Our result is neither of these, so it is a valid solution.
Key Takeaways
- When solving equations with algebraic fractions, finding a common denominator or multiplying through by the least common multiple of the denominators is the most efficient method.
- Be careful when expanding brackets, especially with negative signs (e.g., becomes ).
- Quadratic terms often cancel out in these types of problems, reducing the complexity to a linear equation.
- Always check that the solution does not violate any domain restrictions (denominators cannot be zero).
Common Mistakes
- Incorrect Expansion: Failing to expand correctly as or missing the constant term in . The mark scheme awards M1 for correct expansion of all brackets.
- Sign Errors: When moving terms across the equals sign, students often forget to change the sign. For example, turning into .
- Ignoring Restrictions: Not checking if the solution makes a denominator zero. While rare in such problems, it's a critical step.
- Algebraic Manipulation Errors: Making arithmetic errors when combining like terms (e.g., ).
Things to Be Careful About
- The mark scheme accepts 'oe' (or equivalent), so simplified forms like are required. Do not leave it as without noting equivalence, though usually simplest form is expected.
- Ensure you show the expansion step clearly, as marks are allocated for it (M1 for correct expansion).
- Remember that 'caution' applies to the domain: . Although this specific question doesn't yield those values, it's good practice to verify.
- In the final answer, write the fraction clearly. Decimal approximations might not be accepted unless specified, and exact form is preferred in algebra.
The width of a rectangle is , correct to the nearest .
Approach
The width is given as , correct to the nearest . The upper bound is found by adding half of the degree of accuracy () to the measured value.
Working
Degree of accuracy = .
Half of the degree of accuracy = .
Answer
5.45
Walkthrough
The measurement is rounded to one decimal place (nearest ). To find the upper bound of a number rounded to a certain degree of accuracy, you add half of that degree of accuracy to the given value. Here, half of is . Adding this to gives .
Key Takeaways
- Upper Bound = Measured Value + Degree of Accuracy.
- Lower Bound = Measured Value - Degree of Accuracy.
Common Mistakes
- Forgetting to divide the degree of accuracy by 2.
- Rounding the final answer incorrectly.
Things to Be Careful About
- Ensure the units are consistent. The question asks for the answer in cm, which matches the input unit.
The perimeter of the rectangle is , correct to the nearest .
Calculate the lower bound of the length of the rectangle.
______
Approach
To find the lower bound of the length, we must use the lower bound of the perimeter and the upper bound of the width. The perimeter of a rectangle is given by . We need to rearrange this to solve for length: . To minimize the length, we use the smallest possible perimeter (lower bound) and subtract the largest possible width (upper bound).
Working
First, find the lower bound of the perimeter.
The perimeter is , correct to the nearest .
From part (a), the upper bound of the width is .
Using the perimeter formula:
Substitute the lower bound of and the upper bound of :
Answer
7.725
Walkthrough
The problem asks for the lower bound of the length of a rectangle. We know the dimensions are constrained by their rounding.
- Understand the relationship: Perimeter , so .
- Determine bounds for knowns:
- The perimeter is cm (nearest ). Its lower bound is cm.
- The width is cm (nearest ). From part (a), its upper bound is cm.
- Apply logic for extremes: To get the smallest possible length (), we need the smallest total perimeter () and we must subtract the largest possible width (). If we used the minimum width, the calculated length would be larger than necessary. If we used the maximum perimeter, the length would also be larger. So, .
- Calculate:
Key Takeaways
- When calculating bounds of derived quantities, choose the combination of bounds that pushes the result in the desired direction (minimum or maximum).
- For subtraction (), the minimum result comes from the minimum of A minus the maximum of B.
Common Mistakes
- Using the lower bound of the width instead of the upper bound. This is incorrect because subtracting a smaller number yields a larger result.
- Using the upper bound of the perimeter. This would yield the upper bound of the length, not the lower bound.
- Arithmetic errors when dividing by or subtracting .
Things to Be Careful About
- Pay close attention to whether the question asks for the upper or lower bound. The choice of inputs ( vs , vs ) changes accordingly.
- Ensure exact values are used in intermediate steps to avoid rounding errors before the final answer.
The diagram shows a pyramid .
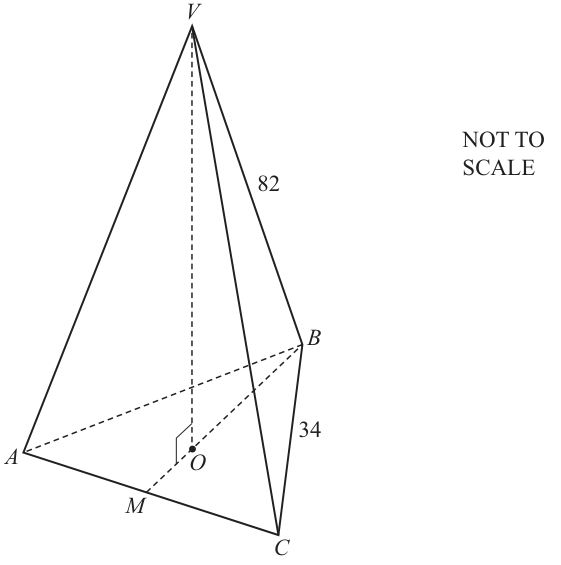
The base of the pyramid is an equilateral triangle, , with sides of length .
The height is perpendicular to the base of the pyramid.
.
Approach
A regular right pyramid whose base is an equilateral triangle has planes of symmetry passing through the top vertex and each of the three lines of symmetry of the equilateral base .
Working
An equilateral triangle has lines of symmetry (the perpendicular bisectors/medians through each vertex). Each line of symmetry together with the apex defines a vertical plane of symmetry for the pyramid.
Answer
3
Walkthrough
The pyramid has an equilateral triangle as its base and equal slant edges (), with the height dropping perpendicularly to the centroid of the base.
A plane of symmetry divides the solid into two mirror-image halves. Each plane of symmetry must pass through the apex and one of the lines of symmetry of the base triangle . Since an equilateral triangle has lines of symmetry (from each vertex to the midpoint of the opposite side), there are exactly corresponding planes of symmetry.
Key Takeaways
- A right pyramid with a regular -sided polygon base has planes of symmetry.
- For an equilateral triangular base, , giving planes of symmetry.
Common Mistakes
- Confusing lines of symmetry of a 2D shape with planes of symmetry of a 3D solid, though numerically they match here.
- Guessing or instead of .
Things to Be Careful About
- Ensure the count accounts for all three vertices of the base connecting to the apex.
is the midpoint of .
The ratio is .
Approach
First calculate the length of the altitude of the equilateral triangle using Pythagoras' theorem in the right-angled triangle . Then use the ratio to find the length of .
Working
Since is the midpoint of and :
In the right-angled triangle , by Pythagoras' theorem:
Given the ratio , the total number of parts along is . Therefore, represents of the total length :
Rounding to decimal place:
Answer
19.6 cm
Walkthrough
- The base is an equilateral triangle with side length . The line segment connects vertex to the midpoint of the opposite side , making perpendicular to .
- In right-angled triangle , the hypotenuse is and the base is . Using Pythagoras' theorem gives .
- The point divides in the ratio . Thus, is of the entire length .
- Multiplying gives , which rounds to correct to decimal place.
Key Takeaways
- In an equilateral triangle of side , the altitude is .
- The centroid divides each median in a ratio from the base to the vertex.
Common Mistakes
- Using instead of for the ratio fraction.
- Using the entire side length instead of half () for .
- Rounding prematurely before multiplying by .
Things to Be Careful About
- For a 'Show that' question, you must show the unrounded value (e.g. ) before stating the final rounded value .
Approach
The angle between the edge and the base of the pyramid is the angle between and its projection onto the base, which is the line segment . Since is perpendicular to the base, triangle is right-angled at .
Working
In the right-angled triangle :
Substitute (or ) and :
Rounding to decimal place (or significant figures):
Answer
76.2°
Walkthrough
- The angle between a line and a plane is defined as the angle between the line and its orthogonal projection on that plane.
- Since is perpendicular to the base, the projection of onto the base is the segment .
- Therefore, the required angle is in the right-angled triangle where .
- In triangle , the hypotenuse is and the adjacent side is .
- Applying the cosine ratio: .
- Taking the inverse cosine gives , which rounds to (or if using the rounded value ).
Key Takeaways
- In 3D trigonometry, always locate the right angle where the perpendicular height meets the base plane.
- Choose the correct trigonometric ratio based on the known sides (adjacent and hypotenuse cosine).
Common Mistakes
- Using or instead of .
- Choosing the wrong angle, such as at the apex rather than at the base.
Things to Be Careful About
- Retain accuracy by using the more precise value of from part (b)(i) to avoid rounding discrepancies.
Approach
- Find the perpendicular height of the pyramid using Pythagoras' theorem in the right-angled triangle .
- Find the area of the equilateral triangle base .
- Calculate the volume of the pyramid using the formula .
Working
First, find the height from triangle :
Next, calculate the area of the base equilateral triangle :
Now calculate the volume of the pyramid:
Rounding to significant figures:
Answer
13300 cm^3
Walkthrough
- Find the vertical height : In the vertical right-angled triangle , the hypotenuse is and the base is . Using Pythagoras' theorem:
- Find the area of the equilateral base : Using the triangle area formula with and :
- Calculate the volume: Apply the formula for the volume of any pyramid, : Rounding to significant figures yields .
Key Takeaways
- The volume of a pyramid is always .
- The perpendicular height is found from the vertical right-angled triangle formed by the apex, the centre of the base, and a base vertex.
Common Mistakes
- Forgetting the factor in the pyramid volume formula.
- Using the slant height () instead of the perpendicular height ().
- Using an incorrect formula for the area of an equilateral triangle.
Things to Be Careful About
- Intermediate rounding: carrying full precision throughout ensures the final answer falls cleanly into the accepted range ( to , or to s.f.).
A box contains 13 pencils.
There are 4 red pencils, 7 green pencils and 2 yellow pencils in the box.
Two pencils are chosen at random from the box without replacement.
Work out the probability that the two pencils are different colours.
______
Approach
There are two main methods to solve this: finding the probability of each specific case where the colours differ and adding them, or finding the probability that they are the same colour and subtracting from 1. We will use the direct method.
The total number of pencils is . There are red (), green (), and yellow ().
Since the pencils are chosen without replacement, the total number of pencils decreases by one after the first pick.
The possible combinations for different colours are:
- Red then Green
- Green then Red
- Red then Yellow
- Yellow then Red
- Green then Yellow
- Yellow then Green
Alternatively, we can group these into three pairs based on the two colours involved:
- One Red and one Green (in either order)
- One Red and one Yellow (in either order)
- One Green and one Yellow (in either order)
We will calculate the probability for each pair.
Working
Case 1: One Red and one Green
This can happen as Red then Green () or Green then Red ().
Total probability for Red and Green:
Case 2: One Red and one Yellow
This can happen as Red then Yellow () or Yellow then Red ().
Total probability for Red and Yellow:
Case 3: One Green and one Yellow
This can happen as Green then Yellow () or Yellow then Green ().
Total probability for Green and Yellow:
Total Probability
Add the probabilities from all three cases:
Simplification
Both numerator and denominator are divisible by 4:
Answer
25/39
Walkthrough
The problem asks for the probability of choosing two pencils of different colours from a box containing 13 pencils (4 Red, 7 Green, 2 Yellow) without replacement. "Without replacement" means that after the first pencil is picked, there are only 12 pencils left in the box.
There are two primary ways to approach this:
Method 1: Direct Calculation (Summing Mutually Exclusive Cases)
The event "different colours" covers three scenarios involving pairs of colours:
-
Red and Green: The first could be Red and the second Green, OR the first Green and the second Red.
- Sum =
-
Red and Yellow: Similar logic applies.
- Sum =
-
Green and Yellow:
- Sum =
Finally, add these sums together: . Simplify by dividing top and bottom by 4 to get .
Method 2: Complement (Subtracting Same Colours from 1)
It is often easier to calculate the probability of the opposite event (picking two pencils of the same colour) and subtracting that from 1.
- Total
Then:
Simplify to .
Key Takeaways
- When dealing with "without replacement", always remember the denominator decreases by 1 for the second event.
- For "different" conditions, it is often safer to list all mutually exclusive outcomes (RR, GG, YY for same; RG, GR, RY, YR, GY, YG for different) rather than guessing.
- Using the complement () is usually faster because there are fewer terms to add (3 terms vs 6 terms). Both methods must yield the same result.
- Always simplify your final fraction.
Common Mistakes
- Ignoring "without replacement": Students often write instead of . This leads to the incorrect answer (which gets SC1).
- Order errors: Calculating only and forgetting , effectively halving the probability for that pair.
- Arithmetic errors: Adding fractions incorrectly or failing to simplify correctly.
- Misinterpreting the question: Calculating the probability of picking specific colours (e.g., just Red and Green) instead of any two different colours.
Things to Be Careful About
- Ensure you simplify the final fraction. The mark scheme accepts equivalent forms like but standard practice requires simplest form ().
- Watch out for the "SC1" trap: if you treat the picks as independent (replacement), you get denominators of . The question explicitly states "without replacement", so the denominator must be .