Mathematics (Syllabus D) 4024/22 — May/June 2025
Cambridge O-Level · Calculator · worked solutions for every part, with the mark scheme
Topics Number · Algebra and Graphs · Geometry · Mensuration · Probability · Statistics · +1 more
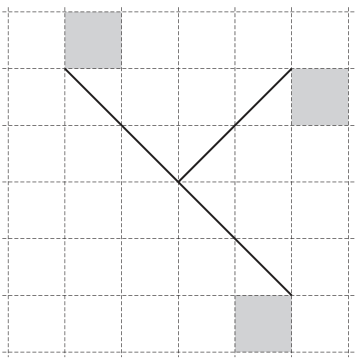
The diagram shows part of a pattern with rotational symmetry of order 4.
Complete the diagram.
Approach
The diagram must have rotational symmetry of order 4 about the centre of the 6 by 6 grid. The centre of a 6 by 6 grid is the intersection of the grid lines at coordinates if we use with as the column from the left and as the row from the top. To complete the pattern, we rotate every existing shaded square and line segment by clockwise (and consequently and ) about this centre.
Working
1. Identify the centre of rotation:
The grid is . The centre is at .
2. Rotate the shaded squares:
-
Square 1: Top-left at , bottom-right at .
Rotating clockwise about :
, .
New position: .
This corresponds to the square at row 5, column 2.
Rotating again gives the square at row 5, column 5 (bottom-right).
Rotating again gives the square at row 2, column 5 (top-right, already present). -
Square 2: Top-left at .
Rotating clockwise gives the square at row 3, column 5.
Rotating again gives the square at row 5, column 4 (bottom-right, already present).
Rotating again gives the square at row 4, column 2.
3. Rotate the line segments:
The existing lines form a partial zig-zag from through to and . Rotating these by , , and about completes the four-fold symmetric pattern, connecting the newly shaded squares in a similar zig-zag fashion around the centre.
Answer
The completed diagram has four shaded squares at , , , and (using column, row from top-left), plus their and rotations, with line segments connecting their corners to form a fully symmetric pattern about the grid centre .
Grid completed with 8 shaded squares and connecting lines forming 4-fold rotational symmetry about the centre (3.5, 3.5).
Walkthrough
The question asks to complete a pattern with rotational symmetry of order 4. Order 4 means the pattern looks the same after rotations of , , , and .
- Find the centre: For a grid, the centre of rotation is the exact middle, which is the grid intersection at .
- Rotate the elements: Take each shaded square and line segment. Rotate them clockwise around the centre. For example, the top-left shaded square at column 2, row 1 rotates to column 2, row 5. Repeat this to get the and positions.
- Draw the lines: Connect the corners of the newly shaded squares in the same zig-zag pattern relative to the centre as the original lines.
Key Takeaways
- Rotational symmetry of order means the pattern repeats times around a central point, with each repetition separated by .
- For order 4, the angle of rotation is .
- The centre of rotation for a square grid is its geometric centre.
Common Mistakes
- Using the wrong centre of rotation (e.g., a corner or edge midpoint instead of the grid centre).
- Confusing rotational symmetry with line (reflection) symmetry.
- Failing to rotate all elements (both shaded squares and line segments).
- Drawing the pattern with order 2 symmetry instead of order 4 (as seen in the mismatched marking scheme text provided).
Things to Be Careful About
- Ensure the grid is read correctly ( in the question image, though the provided marking scheme text describes a grid with order 2 symmetry; the solution follows the question text and image which specify order 4 and a grid).
- The final answer must be a completed diagram; no numerical calculation is required other than identifying the correct positions for the rotated elements.
- All four quadrants must be identical under rotation.
Approach
Identify the thousands part and the units part from the text description.
Working
"Eighteen thousand" corresponds to .
"And twelve" corresponds to .
Combining these gives:
Answer
18012
Walkthrough
The phrase "eighteen thousand and twelve" is broken down by place value. The word "thousand" indicates the magnitude of the first number group: eighteen thousands is written as . The word "and" connects the thousands to the remaining units. "Twelve" is written as . Adding them together () fills in the hundreds and tens places with zeros, resulting in .
Key Takeaways
Understanding place value is essential for converting large numbers between words and figures. Specifically, recognizing that "thousands" implies three zeros following the digit group (unless modified by hundreds/tens/units) is key.
Common Mistakes
Writing (missing the zeros for the thousands), or writing (misinterpreting the separation).
Things to Be Careful About
Ensure you do not confuse "twelve" with "two hundred" or other similar sounding numbers. The final answer must be exactly .
Approach
List the integers between and and test each for primality (divisible only by and itself).
Working
The integers strictly between and are: .
- is divisible by and .
- is divisible by and .
- has no divisors other than and . It is prime.
- is divisible by .
- is divisible by .
- is divisible by and .
- is divisible by and .
- is divisible by .
- has no divisors other than and . It is prime.
Both and are valid answers.
Answer
23
Walkthrough
A prime number is an integer greater than that has no positive divisors other than and itself. To find one between and , we check the odd numbers (since even numbers greater than are composite):
- : (Composite)
- : Prime
- : (Composite)
- : (Composite)
- : Prime
Key Takeaways
Memorizing the first few prime numbers (up to or ) helps speed up this type of question. The primes under are: .
Common Mistakes
Selecting or because they look "odd" and hard to divide, or selecting because it ends in . Remember is . Also, and themselves are not usually considered "between" unless specified inclusive, but neither is prime anyway.
Things to Be Careful About
The mark scheme accepts either or . Writing both is usually fine, but if asked for "a" prime number, providing one correct example is sufficient.
Approach
The reciprocal of a number is . For a fraction , the reciprocal is found by swapping the numerator and denominator, i.e., .
Working
The given fraction is .
To find the reciprocal, swap and :
Simplifying this gives:
Alternatively:
Answer
9
Walkthrough
The reciprocal (also known as the multiplicative inverse) of a number is what you multiply it by to get . Since , the reciprocal of is . A quick method for fractions is to simply flip the fraction upside down.
Key Takeaways
Know the definition of a reciprocal. For any non-zero fraction , its reciprocal is . For an integer , the reciprocal is .
Common Mistakes
Confusing reciprocal with opposite (negation, which would be ) or with the fraction itself. Another common error is thinking the reciprocal of is again.
Things to Be Careful About
The answer should be an integer , not the fraction , although both are mathematically equivalent. The simplest form is preferred.
Approach
Convert both quantities to the same unit, then simplify the ratio by dividing both terms by their highest common factor.
Working
So the ratio is
Divide both terms by :
Therefore
Answer
7 : 100
Walkthrough
A ratio compares quantities in the same unit, so before simplifying we must convert both to millilitres. Since litre ml, litres ml. The ratio is therefore . To simplify, divide both terms by their highest common factor. and are both divisible by : and . No further common factor remains, so the simplest form is .
Key Takeaways
- A ratio is only meaningful when both quantities are in the same unit.
- Simplifying a ratio means dividing both terms by the same factor until no common factor remains.
- litre ml, so litres are converted to millilitres by multiplying by .
Common Mistakes
- Simplifying without converting, which incorrectly gives .
- Dividing only one term of the ratio by .
- Reversing the order and writing instead of .
- The mark scheme accepts only as the final answer (cao), but gives M1 for the converted form or .
Things to Be Careful About
- The two quantities are in different units: ml and litres, so the conversion must be done first.
- The final ratio has no units.
- is not the final answer because it is not in simplest form.
Dan, Erika and Fatik share $540 in the ratio .
Find the amount that Erika receives.
$ ______
Approach
Add the three parts of the ratio to find the total number of parts, divide the shared amount by that total, then multiply by Erika's share.
Working
Total number of parts:
Value of one part:
Erika's share:
Answer
Erika receives $225.
225
Walkthrough
The ratio means that the $540 is split into equal parts. Each part is worth . Erika is represented by the middle number, , so she receives . The ratio only gives the relative sizes of the shares, so the total amount must be divided by the total number of parts first.
Key Takeaways
- The sum of the parts of a ratio tells you how many equal parts the total is split into.
- To find the value of one part, divide the total by the sum of the parts.
- To find a particular person's share, multiply the value of one part by that person's number of parts.
Common Mistakes
- Using the wrong part number: Dan gets parts and Fatik gets , but Erika gets .
- Stopping after finding the value of one part and giving instead of .
- Forgetting to divide the total by the sum of the parts before multiplying.
- The mark scheme gives M1 for where or , and A1 for (cao).
Things to Be Careful About
- Identify which number in the ratio corresponds to Erika before multiplying.
- The answer is a money amount, so the final answer should be dollars.
- The final answer must be exactly (cao); no other form is accepted.
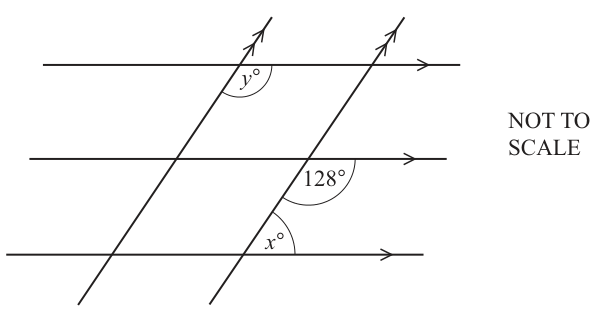
Find the value of and the value of .
= ______
= ______
Approach
Identify the relationships between the angles using the properties of parallel lines. The three horizontal lines are parallel to each other, and the two transversal lines are parallel to each other. Use co-interior angles to find and corresponding angles to find .
Working
To find :
The angle and angle are co-interior (same-side interior) angles between the parallel horizontal lines, formed by the right transversal. Co-interior angles sum to .
To find :
The angle is below the top horizontal line and to the right of the left transversal. Because the two transversal lines are parallel, the angle below the top horizontal line and to the right of the right transversal is equal to (corresponding angles). Let us call this angle , so .
Now, because the top and middle horizontal lines are parallel and cut by the right transversal, angle (below the top horizontal line, right of right transversal) and the angle (below the middle horizontal line, right of right transversal) are corresponding angles. Corresponding angles are equal.
Answer
x = 52, y = 128
Walkthrough
The diagram contains two sets of parallel lines: three horizontal lines and two transversal lines. We need to find and by applying angle properties.
Finding :
Look at the right transversal intersecting the middle and bottom horizontal lines. The angle marked is below the middle horizontal line and to the right of the transversal. The angle is above the bottom horizontal line and to the right of the transversal. These two angles are on the same side of the transversal and between the parallel horizontal lines, making them co-interior angles (also called same-side interior angles). Co-interior angles always add up to .
Subtracting from gives .
Finding :
Look at the top horizontal line intersecting the two parallel transversals. The angle is below the top horizontal line and to the right of the left transversal. Because the two transversals are parallel, the angle in the same relative position on the right transversal (below the top horizontal line, to the right of the right transversal) must be equal to . This is the corresponding angles property.
Now consider the top and middle horizontal lines, which are parallel, cut by the right transversal. The angle we just identified (below the top horizontal line, right of the right transversal) and the angle (below the middle horizontal line, right of the right transversal) are in the same relative position at each intersection. These are corresponding angles, so they are equal.
Therefore, .
Key Takeaways
- Co-interior angles between parallel lines sum to .
- Corresponding angles are equal when parallel lines are cut by a transversal.
- When two sets of parallel lines intersect, you can chain corresponding angle arguments across one set of parallels to relate angles on the other set.
Common Mistakes
- Assuming and are corresponding angles and setting . They are co-interior, so they must sum to .
- Forgetting that both the horizontal lines AND the transversals are parallel. If a student only uses the horizontal parallels, they might struggle to link to without using the transversal parallel property first.
- Giving as by incorrectly applying co-interior angles to the wrong pair of lines.
Things to Be Careful About
- Always check which lines are marked as parallel (arrows indicate this). Here, both the horizontal lines and the transversals have parallel markings.
- Co-interior angles are sometimes confused with alternate interior angles (which are equal). Co-interior angles are on the same side of the transversal and sum to .
- The diagram is marked NOT TO SCALE, so do not estimate angles visually; rely only on the parallel line properties and the given .
- Final answers must be exact integer values as derived from the angle sum properties.
Convert to .
______
Approach
To convert an area from square metres () to square centimetres (), we must use the relationship between the linear units. Since , squaring both sides gives the conversion factor for area.
Working
The relationship between metres and centimetres is:
To find the conversion for area (square units), we square this relationship:
Now, multiply the given value in by to get the value in :
Performing the multiplication:
Answer
61000
Walkthrough
This question requires converting a measurement of area from one unit to another. The key step is determining the correct conversion factor.
- Identify the linear conversion: We know that there are centimetres in metre ().
- Determine the area conversion: Area is measured in square units. To convert square metres to square centimetres, we must square the linear conversion factor. This means multiplying by itself: . Therefore, .
- Calculate the final value: Multiply the given number of square metres () by the conversion factor (). Moving the decimal point four places to the right converts into .
Key Takeaways
- Always distinguish between linear conversions (length) and area conversions. For length, . For area, you must square the factor: .
- A common error is to simply multiply by when dealing with squares or cubes; remember that the exponent on the unit dictates the power to which the conversion factor must be raised.
Common Mistakes
- Multiplying by instead of . This happens if the student treats the area conversion like a linear length conversion.
- Dropping zeros incorrectly during multiplication.
Things to Be Careful About
- Ensure you read the units correctly. The question asks for , not . If it asked for , the factor would be ().
In a survey, students are asked to choose their favourite type of movie.
The table shows the results.
| Type of movie | Romance | Thriller | Science Fiction | Other |
|---|---|---|---|---|
| Relative frequency | 0.1 | 0.35 | 0.3 |
Approach
The sum of all relative frequencies in a complete distribution must equal 1. We can find the missing relative frequency for Thriller by subtracting the known relative frequencies from 1.
Working
Let be Romance, be Thriller, be Science Fiction, and be Other.
We are given:
The sum of relative frequencies is:
Substitute the known values:
Sum the known values:
Solve for :
Answer
0.25
Walkthrough
Relative frequency represents the proportion of times an outcome occurs out of the total number of observations. Since every student must choose exactly one category (Romance, Thriller, Science Fiction, or Other), the sum of the relative frequencies for all categories must add up to 1 (representing 100% of the students).
To find the missing value for Thriller, we first add up the relative frequencies we already know: Romance (), Science Fiction (), and Other ().
Since the total must be 1, we subtract this sum from 1 to find the remaining portion assigned to Thriller:
This means the relative frequency for Thriller is . This can also be written as the fraction or the percentage .
Key Takeaways
- The sum of all relative frequencies (or probabilities) in a sample space is always 1.
- If you have a table of relative frequencies with one missing entry, you can find it by subtracting the sum of the others from 1.
Common Mistakes
- Adding the numbers instead of subtracting them from 1.
- Miscalculating the sum of the known frequencies (e.g., adding incorrectly).
- Forgetting that relative frequencies are proportions between 0 and 1.
Things to Be Careful About
- Ensure you include all given categories in your sum before subtracting from 1.
- The answer can be expressed as a decimal, fraction, or percentage unless specified otherwise. , , and are all correct.
500 students take part in the survey.
Calculate the number of students who choose Science Fiction.
______
Approach
To find the number of students who chose a specific movie type, multiply the total number of students by the relative frequency for that type.
Working
Total number of students =
Relative frequency for Science Fiction =
Number of students choosing Science Fiction:
Calculate the product:
Answer
175
Walkthrough
Relative frequency tells us the proportion of the total group that falls into a certain category. Here, we know that of all students chose Science Fiction. To find the actual number of students, we multiply this proportion by the total number of students surveyed.
Calculation:
An easy way to do this is to think of as . One percent of is , so is .
Alternatively, .
Key Takeaways
- Expected frequency = Total number of trials (or sample size) Relative frequency (or Probability).
- Multiplying by a decimal like is equivalent to finding of the total.
Common Mistakes
- Dividing by instead of multiplying.
- Using the wrong relative frequency (e.g., using the Thriller frequency if they had calculated part (a)).
- Calculation errors when multiplying large numbers by decimals.
Things to Be Careful About
- The question asks for the number of students, which must be an integer. In this case, the result is exactly , so no rounding is needed. If it weren't exact, you would typically round to the nearest whole person.
Chris wants to exchange $350 for euros (€) at the bank.
The bank only gives euros in multiples of €5.
The exchange rate is $1 = €0.92.
Calculate the number of euros he receives and his change from $350.
Chris receives € ______
His change is $ ______
Approach
Convert the dollars to euros using the exchange rate, then round down to the nearest €5 because the bank only issues multiples of €5. Work out the dollar value of the euros actually received, and subtract from $350 to find the change.
Working
Convert $350 to euros:
So the full conversion gives €322. The bank only gives multiples of €5, so the largest multiple of €5 not exceeding 322 is:
Chris receives €320.
Now find the dollar value of €320:
His change is therefore:
Rounded to 2 decimal places:
Alternatively, using the mark scheme expression:
Answer
Chris receives €320 and his change is $2.17.
Chris receives €320 and his change is $2.17
Walkthrough
Start by converting the $350 into euros. Since each dollar is worth €0.92, multiply:
So without any restriction Chris would receive €322. However, the bank only gives euros in multiples of €5, so he cannot receive €322. The largest multiple of €5 that is not more than 322 is €320, so that is what he receives.
To find his change in dollars, work out how many dollars €320 is worth. Because €0.92 = $1, divide by 0.92:
This means the €320 he receives is worth about $347.83. He paid $350, so his change is:
Rounded to 2 decimal places, this is $2.17.
Key Takeaways
- To convert from dollars to euros, multiply by the exchange rate.
- To convert from euros back to dollars, divide by the exchange rate.
- When a bank only gives notes in certain multiples, round the converted amount down to the largest allowed multiple.
- Change is the original amount paid minus the value of what was received.
Common Mistakes
- Giving €322 as the answer and forgetting that the bank only gives multiples of €5.
- Subtracting €320 directly from $350 to get $30; this mixes different currencies and is wrong.
- Rounding €322 up to €325 instead of down to €320.
- Giving the change as €2 instead of $2.17, or failing to round to 2 decimal places.
Things to Be Careful About
- Keep the units separate: dollars and euros are not interchangeable.
- The exchange rate direction matters. €0.92 per dollar means multiply dollars by 0.92 to get euros, and divide euros by 0.92 to get dollars.
- The mark scheme accepts the expression as a single method mark, so showing the conversion and the change calculation clearly is important.
- This is a calculator paper, so decimal values such as 347.826... are acceptable, but the final money answer should be given to 2 decimal places.
Calculate the interior angle of a regular octagon.
______
Approach
To find the interior angle of a regular octagon, we can use two common methods: either finding the exterior angle first or using the sum of interior angles. Both lead to the same result.
Working
Method 1: Using the Exterior Angle
The sum of the exterior angles of any convex polygon is always .
An octagon has sides (and therefore vertices).
Since the octagon is regular, all its exterior angles are equal.
The interior angle and exterior angle at each vertex lie on a straight line, so they add up to .
Method 2: Using the Sum of Interior Angles
The sum of the interior angles of an -sided polygon is given by:
For an octagon, :
Since the octagon is regular, all interior angles are equal. We divide the total sum by :
Answer
135°
Walkthrough
The problem asks for the measure of one interior angle of a regular octagon. A regular polygon has equal sides and equal interior angles. An octagon is defined as having 8 sides.
There are two standard ways to solve this:
-
Exterior Angle Method: It is a fundamental property that the sum of the exterior angles of any convex polygon is . By dividing this sum by the number of sides (), we find the size of one exterior angle. Since the interior and exterior angles form a linear pair (they add up to ), subtracting the exterior angle from gives the interior angle.
-
Interior Sum Method: The sum of the interior angles of an -sided polygon is calculated using the formula . For an octagon, this is . Because the polygon is regular, we divide this total sum by the number of angles () to get the individual angle size.
Both methods are mathematically equivalent and yield .
Key Takeaways
- The sum of exterior angles of any polygon is always .
- The sum of interior angles of an -sided polygon is .
- For a regular polygon, divide the respective sum by the number of sides/angles to find the individual angle measure.
- Interior and exterior angles at a vertex are supplementary (add to ).
Common Mistakes
- Forgetting that the polygon must be regular to simply divide the sum; if it were irregular, the angles could vary.
- Confusing the formula for the sum of interior angles with the formula for the exterior angle sum ().
- Arithmetic errors when calculating or .
- Providing the answer without the degree symbol () where appropriate, though sometimes accepted depending on specific mark scheme leniency, it is best practice to include units.
Things to Be Careful About
- Ensure you identify the number of sides correctly: an octagon has 8, not 6 (hexagon) or 10 (decagon).
- Remember to subtract from 180 if using the exterior angle method.
- On calculator papers, ensure the final division is performed accurately. exactly.
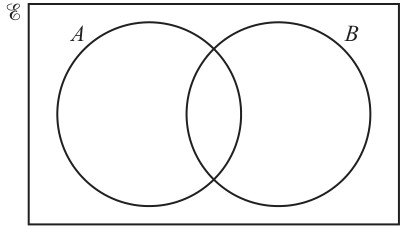
Approach
The notation represents the complement of the intersection of sets and . The intersection is the region where the two circles overlap. The complement means we shade everything EXCEPT that overlapping region.
Working
- Identify the intersection : This is the central lens-shaped region where circle and circle overlap.
- Identify the complement : This is the entire universal set minus the intersection.
- Shade the regions: Shade the part of that does not overlap with , the part of that does not overlap with , and the region outside both circles but inside the rectangle .
- Leave unshaded: Only the central overlapping region remains white.
Answer
All regions shaded except the central intersection .
Shade all regions except the intersection
Walkthrough
The symbol denotes intersection, which is the set of elements belonging to both and . On a Venn diagram, this is the overlapping area of the two circles. The apostrophe denotes the complement, meaning everything in the universal set that is NOT in the specified set. Therefore, includes everything outside the intersection: the part of only, the part of only, and the region outside both circles. We shade all these three regions and leave only the intersection unshaded.
Key Takeaways
- is the overlap between two sets.
- The complement means everything in the universal set except .
- is shaded everywhere except the central overlap.
Common Mistakes
- Shading only the region outside both circles (this is , not ).
- Shading the intersection instead of leaving it unshaded.
- Forgetting to shade the region outside the circles but inside the universal set rectangle.
Things to Be Careful About
- Ensure the shading is solid and clearly covers all three required regions.
- The intersection must be completely white (unshaded).
- The universal set boundary (the rectangle) must be respected; do not shade outside it.
In a class of 22 students:
- 12 play the piano
- 9 play the guitar
- 6 do not play the piano or the guitar.
Find the number of students who play both the piano and the guitar.
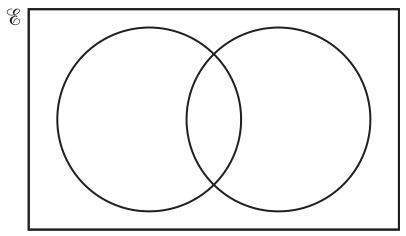
You may use the Venn diagram to help you.
______
Approach
Let be the number of students who play both the piano and the guitar. We can express the number of students in each disjoint region of the Venn diagram in terms of and the given totals, then use the overall total to form an equation.
Working
Let be the number of students who play both instruments ().
- Students who play only the piano:
- Students who play only the guitar:
- Students who play neither:
The sum of all disjoint regions equals the total number of students:
Simplify the left side:
Solve for :
Alternatively, using the union formula:
Number who play at least one instrument = .
Answer
5
Walkthrough
We are given the total number of students (22), the number who play piano (12), the number who play guitar (9), and the number who play neither (6). We need to find the number who play both.
First, find the number of students who play at least one instrument. Since 6 play neither, this is .
Let be the number who play both. Then:
- Piano only =
- Guitar only =
The total who play at least one is the sum of these three disjoint groups:
Simplify:
So 5 students play both instruments.
Key Takeaways
- The total number of elements is the sum of all disjoint regions in a Venn diagram.
- If and are given, the intersection can be found using .
- Always verify that calculated regions are non-negative.
Common Mistakes
- Adding and forgetting to subtract the total to find the overlap.
- Setting up the equation incorrectly, such as , which double-counts the intersection.
- Forgetting that the 6 students who play neither are outside both circles.
Things to Be Careful About
- Ensure all calculated regions (only piano, only guitar, both, neither) are non-negative.
- The final answer is just the number, no units required unless specified.
- Working must be shown to earn method marks.
Simplify.
______
Approach
To simplify the fraction , we apply the quotient rule for indices: . We handle the constant, the terms, and the terms separately.
Working
Step 1: Separate the components.
Step 2: Simplify the terms.
The variable appears as in the numerator and in the denominator. Subtracting the powers:
Alternatively, cancelling two 's from top and bottom leaves one in the denominator.
Step 3: Simplify the terms.
The variable appears as in the numerator and in the denominator. Subtracting the powers:
Step 4: Combine all parts.
Combine the constant , the simplified part (), and the simplified part ():
Answer
7y^3/x
Walkthrough
The problem asks us to simplify an algebraic fraction. The key rule here is the quotient rule of indices, which states that when you divide two terms with the same base, you subtract their exponents: .
- Identify the bases: We have three 'bases' here: the number , the letter , and the letter .
- Handle the numbers: The number is only in the numerator, so it remains .
- Handle the 's: We have on top and on the bottom. Since the larger power is at the bottom, the result will have in the denominator. Specifically, , which is equivalent to . Alternatively, think of it as cancelling out two 's from both top and bottom, leaving one left over at the bottom.
- Handle the 's: We have on top and on the bottom. Since the larger power is on top, the result has in the numerator. Specifically, .
- Final Assembly: Put these pieces together: times divided by .
Key Takeaways
- Quotient Rule: Always subtract the exponent of the denominator from the exponent of the numerator ().
- Negative Indices: A negative exponent indicates the term belongs in the opposite part of the fraction (numerator becomes denominator, or vice versa). For example, .
- Simplicity: The standard simplified form usually prefers positive indices and places variables in the numerator where possible.
Common Mistakes
- Adding instead of subtracting: Students often add the exponents (e.g., ) instead of subtracting them. This is the rule for multiplication, not division.
- Incorrect cancellation: Cancelling variables incorrectly (e.g., cancelling and to get or without tracking which side they remain on).
- Handling constants: Sometimes students try to cancel the with nothing, or forget it entirely.
Things to Be Careful About
- Order of subtraction: Ensure you subtract the bottom power from the top power (). If the result is negative, move the variable to the other side of the fraction line to make the exponent positive.
- Final Form: The mark scheme accepts or . However, is the most conventional simplified form.
Zaya invests $4500 in a savings account.
The account pays simple interest at a rate of 3.2% per year.
Calculate the value of the investment at the end of 5 years.
$ ______
Approach
To calculate the total value of the investment, first find the simple interest earned over years using the formula , where is the principal, is the annual interest rate, and is the time in years. Then, add the interest to the original principal to find the final amount.
Working
Calculate the simple interest earned:
Calculate the total value of the investment:
Answer
5220
Walkthrough
-
Identify the given values for simple interest:
- Principal () = $4500
- Rate () =
- Time () = years
-
Compute the simple interest earned over the -year period using the formula:
- The question asks for the value of the investment at the end of years, which means the total balance in the account (principal plus interest), not just the interest earned:
Key Takeaways
- Simple interest is calculated only on the initial principal amount.
- Distinguish carefully between the "interest earned" and the "total value of the investment" (total amount = principal + interest).
Common Mistakes
- Stopping after calculating the interest ($720) and forgetting to add the original principal ($4500).
- Confusing simple interest with compound interest.
Things to Be Careful About
- Ensure all arithmetic is checked carefully.
- The currency symbol $ is already provided outside the answer line, so only the numerical value is required.
Aisha invests $2750 in a different savings account.
This account pays compound interest at a rate of 2.1% per year.
Calculate the total amount of interest she receives at the end of 3 years.
$ ______
Approach
Use the compound interest formula to find the total amount in the account at the end of years. Then, subtract the initial principal from this total amount to find the total interest earned.
Working
Calculate the total amount in the account after years:
Calculate the total interest received by subtracting the principal:
Rounding to decimal places for currency:
Answer
176.91
Walkthrough
-
Identify the given values for compound interest:
- Principal () = $2750
- Annual rate () =
- Time () = years
-
The formula for the total accrued amount under compound interest is:
- Evaluate this expression:
- The question specifically asks for the total amount of interest received, not the total investment value. Therefore, subtract the principal from the total amount:
- Since monetary amounts are given to decimal places (cents), the answer is .
Key Takeaways
- Compound interest formula calculates the total value, not the interest.
- To find the compound interest alone: .
Common Mistakes
- Giving the total final amount () instead of just the interest earned ().
- Incorrectly rounding intermediate values during computation rather than rounding the final answer to decimal places.
- Using the simple interest formula instead of the compound interest formula.
Things to Be Careful About
- Keep full calculator precision until the final step to avoid rounding errors.
- Pay close attention to what is asked: part (a) asked for the total value, while part (b) asked for the interest.
Factorise.
______
Approach
Group the four terms into two pairs so that each pair has a common factor. Factor each pair, then factor out the common binomial factor that appears.
Working
Group the terms with common factors:
Factor the first pair:
Factor the second pair, taking care with the sign:
So the whole expression becomes:
Factor out the common binomial :
Answer
An equivalent accepted form is .
(7x - 2y)(h - 3f)
Walkthrough
We have four terms and no factor is common to all of them, so we factor by grouping. Look for pairs of terms that share a factor: and both contain ; and both contain . Factor these pairs to get and . Since is the negative of , rewrite the second as . Now both terms have the binomial factor , so take it out: .
Key Takeaways
- Four-term expressions with no common factor can often be factorised by grouping into pairs.
- After factoring each pair, look for a common binomial factor.
- A difference such as can be written as ; this is essential for matching signs.
- The order of factors does not matter, so and are the same.
Common Mistakes
- Stopping after the first grouping: is not fully factorised.
- Sign errors when rewriting as ; forgetting the negative sign gives the wrong final factor.
- Mixing up which variable goes with which factor, e.g. writing instead of keeping and with the first bracket and and with the second.
- The mark scheme gives M1 for a correct grouped form such as ; a final answer must be a product of two binomials.
Things to Be Careful About
- Ensure the factorisation is complete: no common factor remains inside either bracket.
- Both and are accepted as final answers.
- If you use the alternative grouping , you must factor out with the correct sign: .
- This is a purely algebraic factorisation, so no calculator is needed.
A bag contains 9 red counters and 3 green counters.
Lee takes two counters from the bag at random without replacement.
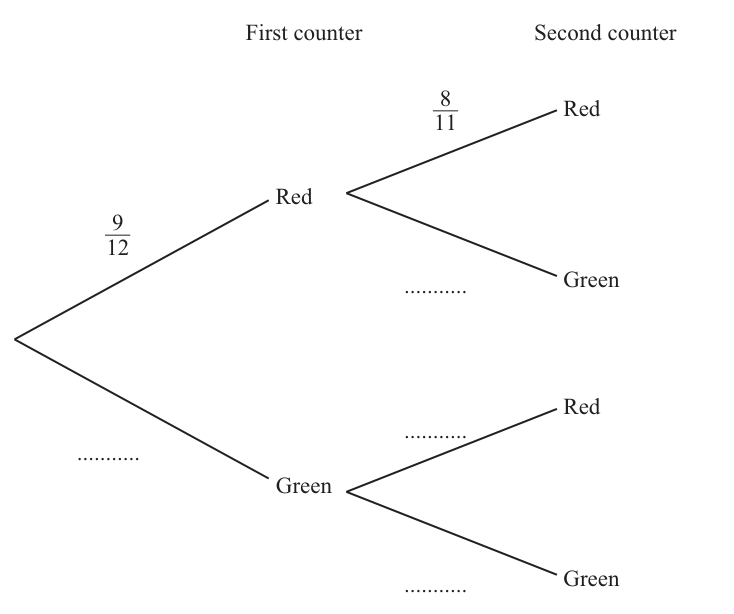
Approach
The bag contains 9 red and 3 green counters, making 12 in total. For the first draw, the probability of green is . After the first draw, one counter is removed, leaving 11 counters for the second draw. The conditional probabilities depend on the outcome of the first draw.
Working
First draw:
Total counters = .
Second draw after Red:
Remaining counters: 8 red, 3 green (total 11).
Second draw after Green:
Remaining counters: 9 red, 2 green (total 11).
Answer
The completed tree diagram has the following probabilities:
- First branch Green:
- Second branch Green (from Red):
- Second branch Red (from Green):
- Second branch Green (from Green):
First branch Green: 3/12; Second branch Green (from Red): 3/11; Second branch Red (from Green): 9/11; Second branch Green (from Green): 2/11
Walkthrough
The problem involves taking two counters without replacement from a bag of 12 (9 red, 3 green). A tree diagram models the sequence of events.
Step 1: First draw probabilities.
There are 12 counters in total. The probability of drawing a green counter on the first draw is the number of green counters divided by the total: . This fills the blank on the first lower branch.
Step 2: Second draw probabilities after Red.
If the first counter was red, there are now 8 red and 3 green counters left, making 11 in total. The probability of drawing a green counter next is . This fills the blank on the branch from 'Red' to 'Green'.
Step 3: Second draw probabilities after Green.
If the first counter was green, there are now 9 red and 2 green counters left, making 11 in total. The probability of drawing a red counter next is , and the probability of drawing a green counter next is . These fill the blanks on the branches from 'Green'.
Key Takeaways
- When sampling without replacement, the total number of items decreases by 1 for each subsequent draw.
- The numerator for the probability of a specific colour changes based on how many of that colour have already been removed.
- A probability tree diagram must have all branches from a single node sum to 1.
Common Mistakes
- Forgetting that the total number of counters decreases to 11 for the second draw.
- Using the original counts (9 and 3) for the second draw instead of the updated counts (8 and 3, or 9 and 2).
- Not simplifying fractions (though unsimplified correct fractions are usually accepted in tree diagrams unless stated otherwise).
Things to Be Careful About
- Ensure the probabilities on branches originating from the same node sum to 1 (e.g., and ).
- Position the fractions correctly next to their corresponding branches.
Approach
To find the probability that both counters are red, multiply the probabilities along the 'Red -> Red' path of the tree diagram.
Working
Simplify the fraction by dividing the numerator and denominator by their highest common factor, 12:
Answer
6/11
Walkthrough
The question asks for the probability of both counters being red. This corresponds to the path 'Red' on the first draw and 'Red' on the second draw.
Step 1: Identify the probabilities.
From the tree diagram, the probability of the first counter being red is . Given that the first counter is red, the probability of the second counter being red is .
Step 2: Multiply the probabilities.
For combined events in a sequence (AND condition), multiply the probabilities along the path:
Step 3: Simplify.
Divide both numerator and denominator by 12 to get the simplest form:
Key Takeaways
- The probability of a sequence of events (AND) is found by multiplying the probabilities along the corresponding branches of a tree diagram.
- Always simplify the final fraction to its lowest terms unless the mark scheme specifies otherwise.
Common Mistakes
- Adding the probabilities instead of multiplying them.
- Forgetting to simplify the final fraction (e.g., leaving it as ).
- Using the wrong conditional probability for the second draw (e.g., using instead of ).
Things to Be Careful About
- Ensure you are multiplying the correct branch probabilities: (first Red) and (second Red given first Red).
- The answer must be in the form of a simplified fraction.
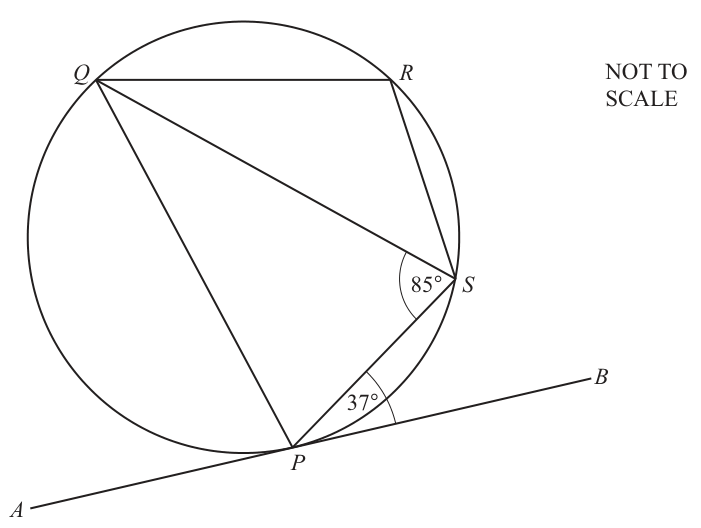
is a cyclic quadrilateral.
is a tangent to the circle at .
Angle and angle .
Approach
Use the alternate segment theorem, which states that the angle between a tangent and a chord equals the angle in the alternate segment.
Working
The angle between tangent and chord is . The angle in the alternate segment subtended by chord is .
Answer
37°
Walkthrough
The alternate segment theorem tells us that the angle formed between a tangent to a circle and a chord drawn from the point of contact is equal to the angle subtended by that chord in the alternate segment. Here, the tangent is and the chord is . The angle between them is . The angle in the alternate segment is , which is the angle subtended by chord at point on the circumference. Therefore, .
Key Takeaways
The alternate segment theorem is a powerful tool for linking tangent-chord angles to angles inside the circle. It is often the first step in cyclic quadrilateral problems involving a tangent.
Common Mistakes
- Applying the theorem to the wrong chord or wrong segment. Always identify the chord that forms the angle with the tangent (here, , not ).
- Confusing the angle in the alternate segment with the angle in the same segment.
Things to Be Careful About
Ensure you correctly identify the chord that creates the given angle with the tangent. The angle is between the tangent and , so it equals the angle subtended by in the alternate segment, which is , not .
Approach
Find using the angle sum of triangle , then use the property that opposite angles in a cyclic quadrilateral are supplementary to find .
Working
In , the angles sum to :
Since is a cyclic quadrilateral, opposite angles sum to :
Answer
122°
Walkthrough
First, consider triangle . We now know from part (a), and we are given . The sum of angles in any triangle is , so we can find the third angle :
Next, use the property of cyclic quadrilaterals: opposite angles are supplementary (sum to ). The angles and are opposite angles in the cyclic quadrilateral , so:
Key Takeaways
When a tangent is involved in a cyclic quadrilateral problem, the alternate segment theorem often provides one angle of a triangle formed by the diagonals. Combining this with the triangle angle sum and the cyclic quadrilateral opposite angles property completes the solution.
Common Mistakes
- Forgetting to use the triangle angle sum and trying to find directly without finding first.
- Misidentifying which angles are opposite in the cyclic quadrilateral. The vertices in order around the circle are , so the opposite pairs are and , and and .
Things to Be Careful About
Make sure to use the correct value of obtained from the triangle. If part (a) was answered incorrectly, follow-through marks may apply, but ensure the arithmetic is correct. Also, remember that the answer must be in degrees and use the correct degree symbol.
These are the first four patterns in a sequence made from black beads and from white beads.
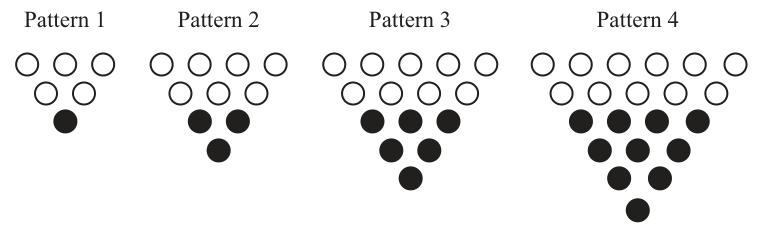
Complete the table for Pattern 5.
| Pattern number | 1 | 2 | 3 | 4 | 5 |
|---|---|---|---|---|---|
| Number of white beads | 5 | 7 | 9 | 11 | |
| Total number of beads | 6 | 10 | 15 | 21 |
Approach
The white beads increase by 2 each time, giving an arithmetic sequence. The black beads form the triangular numbers (1, 3, 6, 10, ...). Find the Pattern 5 values and fill the table.
Working
White beads: The sequence is with common difference .
Black beads: The sequence is These are triangular numbers where the th term is .
Total beads for Pattern 5:
Answer
| Pattern number | 1 | 2 | 3 | 4 | 5 |
|---|---|---|---|---|---|
| Number of white beads | 5 | 7 | 9 | 11 | 13 |
| Total number of beads | 6 | 10 | 15 | 21 | 28 |
White beads: 13, Total: 28
Walkthrough
Look at the white bead counts: 5, 7, 9, 11. Each step adds 2, so the next value (Pattern 5) is 13. Look at the black bead counts: 1, 3, 6, 10. The differences between consecutive terms are 2, 3, 4, so the next difference is 5, giving 10 + 5 = 15 black beads. These are the triangular numbers, which count dots arranged in a triangle. The total for Pattern 5 is simply 13 + 15 = 28.
Key Takeaways
Recognising arithmetic sequences (constant difference) and triangular numbers (second difference constant at 2) from a table of values. The total in a composite pattern is the sum of its parts.
Common Mistakes
- Forgetting to add the black beads when computing the total, giving 13 instead of 28.
- Miscounting the black beads by continuing the arithmetic pattern (e.g. 10 + 2 = 12) instead of recognising the triangular number pattern.
Things to Be Careful About
The table asks for two separate values. Ensure both are filled in. The black beads follow a quadratic pattern, not an arithmetic one — check by computing first and second differences.
Find an expression for
Approach
The white beads in Patterns 1, 2, 3, 4 are . This is an arithmetic sequence with first term and common difference . Use the formula .
Working
Answer
2n + 3
Walkthrough
The white bead counts are 5, 7, 9, 11. Since each term increases by the same amount (2), this is an arithmetic sequence. The formula for the nth term of an arithmetic sequence is , where is the first term and is the common difference. Here and , so the nth term is . You can verify: for , ✓; for , ✓.
Key Takeaways
The nth term of an arithmetic sequence is found using . Always verify by substituting small values of .
Common Mistakes
- Writing instead of (forgetting to subtract the first term adjustment).
- Using instead of in the formula.
Things to Be Careful About
The expression must be in terms of . The mark scheme accepts or any equivalent form. Do not write a numerical value — this is a general expression.
Approach
Total beads = white beads + black beads. White beads = . Black beads are which are triangular numbers with nth term . Add the two expressions.
Working
Black beads (triangular numbers):
Total beads:
Put over a common denominator of :
Rewrite as:
Check: For : ✓
Answer
(1/2)n^2 + (5/2)n + 3
Walkthrough
The black beads are 1, 3, 6, 10. Compute first differences: 2, 3, 4. Compute second differences: 1, 1. Since the second difference is constant and equal to 1, the sequence is quadratic with leading coefficient . The black beads are the triangular numbers, which have the well-known formula . Adding this to the white bead expression and simplifying over a common denominator gives .
Key Takeaways
Triangular numbers have the formula . When a sequence has a constant second difference , the leading coefficient of the quadratic nth term is . Always verify by substituting known values.
Common Mistakes
- Writing the black bead expression as or instead of .
- Forgetting to combine over a common denominator when adding the linear and quadratic parts.
- Not simplifying the final expression into the standard form.
Things to Be Careful About
The mark scheme accepts or any equivalent form. The expression must be in terms of . Verify by checking against the given table values.
Bill has only 88 white beads but lots of black beads.
Pattern is the largest possible pattern he can make using these beads.
Work out the value of .
= ______
Approach
Bill has 88 white beads. The number of white beads in Pattern is . We need and find the largest integer .
Working
Set up the inequality:
Subtract 3 from both sides:
Divide by 2:
Since must be a whole number (pattern numbers are positive integers), the largest possible value is:
Check: At , white beads needed = ✓
At , white beads needed = ✗
Answer
42
Walkthrough
From part (b)(i), the number of white beads in Pattern is . Bill has 88 white beads, so we need . Solving: , so . Since pattern numbers must be whole numbers, the largest valid is 42. At , Bill uses 87 white beads (leaving 1 unused). At , he would need 89 white beads, which exceeds his supply.
Key Takeaways
When a quantity must not exceed a limit and the variable must be a whole number, solve the inequality and round down. Always verify both the chosen value and the next integer to confirm the boundary.
Common Mistakes
- Setting exactly, giving , and then rounding to 43 instead of rounding down to 42.
- Forgetting that pattern numbers must be positive integers.
- Using the total bead expression instead of the white bead expression.
Things to Be Careful About
The question says Bill has only 88 white beads, so this is an inequality (), not an equation (). The answer must be a whole number. The mark scheme awards method marks for setting up (or ) and solving, then correctly concluding .
The population of Kenya is people.
The area of Kenya is .
The population density is the number of people per .
Calculate the population density of Kenya.
______
Approach
Population density is defined as the number of people divided by the area. We are given both quantities in standard form (). To divide these, we separate the coefficients (the parts) and the powers of 10, then simplify.
Working
The formula for population density is:
Substitute the given values into the formula:
Group the coefficients and the powers of 10 separately:
Calculate the coefficient part:
Calculate the power of 10 part using index laws ():
Combine the results:
Round to a reasonable degree of accuracy (3 significant figures or nearest whole number):
Answer
95.2
Walkthrough
First, identify the relationship between the quantities. The problem states that "population density is the number of people per km²". This means we must divide the population count by the land area.
We have:
- Population =
- Area =
Both numbers are written in standard form (scientific notation), which looks like , where . When dividing two numbers in standard form, it is easiest to split the calculation into two parts: the non-exponential numbers (coefficients) and the powers of 10.
Step 1: Divide the coefficients.
This equals approximately
Step 2: Divide the powers of 10.
Using the law of indices for division ():
is equal to 100.
Step 3: Multiply the results together.
Finally, round the answer. The question does not specify rounding, but standard practice is to use 3 significant figures or match the precision of the data. is an appropriate answer. The mark scheme also accepts 95 or 95.17.
Key Takeaways
- Formula: Density = Quantity / Volume or Density = Quantity / Area depending on context.
- Standard Form Division: Treat the mantissa (coefficient) and the exponent separately. .
- Calculator Use: On a calculator component, you can often type the expression directly, but understanding how to separate the parts helps check if your answer makes sense.
Common Mistakes
- Subtracting instead of dividing: Students sometimes subtract the areas or populations rather than finding the ratio.
- Index errors: Subtracting the exponents incorrectly (e.g., ) or forgetting to apply the result of the exponent division to the coefficient.
- Decimal placement: Dividing by gives , not . If you forget to multiply by the () at the end, your answer will be off by a factor of 100.
Things to Be Careful About
- Units: Ensure the final answer includes the units requested ().
- Accuracy: If using a calculator, ensure you do not round intermediate steps too early. Keep the full value of until the final multiplication by 100.
Approach
Substitute into the expression for and simplify.
Working
Answer
6
Walkthrough
We are told and asked for . This means replace every in the formula with . Since subtracting is the same as adding , the numerator becomes . Dividing by gives .
Key Takeaways
Evaluating a function at a number is just substitution into its formula. Be careful with negative signs: is not .
Common Mistakes
- Writing as , i.e. treating it as . The double negative must become addition.
- Forgetting to divide by after simplifying the numerator.
Things to Be Careful About
The value is exact, so no rounding is needed. The working is simple enough to be done by hand; show the fraction before simplifying.
Approach
Write , interchange and , then rearrange to make the subject. The result is the inverse function.
Working
Let
Interchange and :
Subtract from both sides:
Divide both sides by :
So
Answer
(x - 3)/4
Walkthrough
To find the inverse of , start by writing the function as . The inverse function undoes the operation of , so we swap the roles of and , giving . Then solve for : subtract to get , then divide by to get . Replacing with gives the inverse.
Key Takeaways
The inverse of a function is found by swapping and and rearranging. It "undoes" the original function: applying after returns the original input. Equivalent forms such as are accepted.
Common Mistakes
- Stopping at without solving for ; this only earns the method mark, not the final answer.
- Swapping variables but not rearranging, e.g. writing .
- Dividing only one term by , e.g. writing instead of .
Things to Be Careful About
The final answer must have as the subject. The mark scheme allows any equivalent form, e.g. , so either is fine. Show the rearrangement step to secure the method mark. No calculator is needed.
300 students take part in a competition.
The table shows information about their scores.
| Score () | |||||
|---|---|---|---|---|---|
| Frequency | 24 | 70 | 88 | 76 | 42 |
Approach
Find the midpoint of each score interval, multiply by the frequency to get , then divide by the total number of students (300).
Working
Midpoints ():
Calculate :
Calculate the mean:
Answer
52.4
Walkthrough
To estimate the mean from grouped data, we assume all values in a class interval are concentrated at the midpoint of that interval. First, we find the midpoint of each score range by averaging the lower and upper bounds. Next, we multiply each midpoint by its corresponding frequency to get , which represents the estimated total score for that group. Summing these products gives . Finally, we divide this total by the overall number of students, , to find the estimated mean score of .
Key Takeaways
- The estimated mean of grouped data is calculated using , where is the class midpoint.
- Always verify that the sum of the frequencies equals the total number of observations given in the problem.
Common Mistakes
- Using the class boundary or the upper limit instead of the midpoint for .
- Forgetting to divide by the total frequency (300) and just reporting .
- Arithmetic errors when multiplying large numbers like or .
Things to Be Careful About
- The mark scheme accepts as an equivalent exact form, but is the standard decimal representation.
- Ensure the midpoints are correct: for , the midpoint is , not .
- The total frequency must be exactly 300; if it isn't, there is a data entry error.
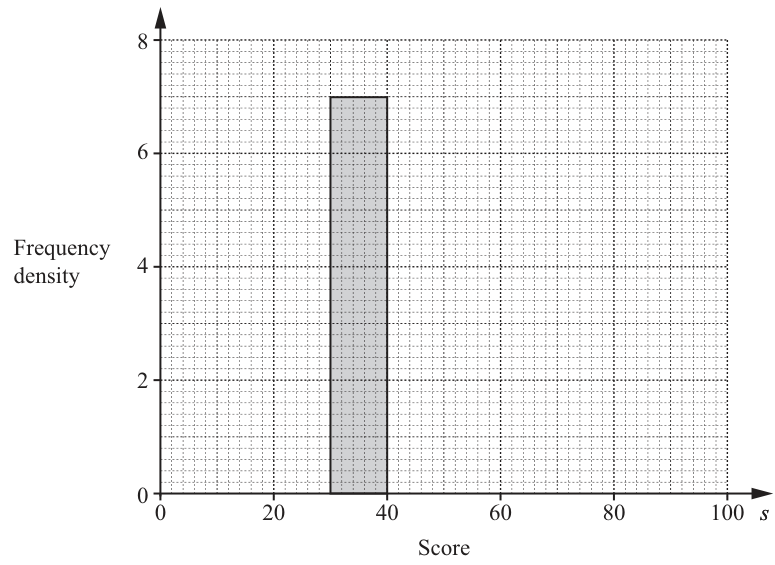
Approach
Frequency density is calculated as . Calculate this for each interval, then draw bars on the grid with the appropriate widths and heights.
Working
For : class width , frequency . Frequency density .
For : class width , frequency . Frequency density .
For : class width , frequency . Frequency density .
For : class width , frequency . Frequency density .
The bar for is already drawn with frequency density .
Answer
Bars to draw: with height ; with height ; with height ; with height .
Bars at 0-30 (height 0.8), 40-60 (height 4.4), 60-70 (height 7.6), 70-100 (height 1.4)
Walkthrough
A histogram with unequal class widths requires the vertical axis to represent frequency density, not frequency, to ensure the area of each bar is proportional to the frequency. Frequency density is defined as . We calculate this for each interval:
- :
- :
- :
- :
We then draw rectangular bars spanning the correct intervals on the horizontal axis with heights matching these density values. The bar for is already provided as a reference.
Key Takeaways
- In a histogram with unequal class widths, the y-axis must be frequency density.
- Area of bar frequency. Always check that .
Common Mistakes
- Using frequency directly as the height of the bars (e.g., drawing a bar of height 88 for the interval).
- Miscalculating the class width (e.g., using 30 for the interval is correct, but sometimes students use 100).
- Drawing bars that do not touch each other (histogram bars for continuous data must be adjacent with no gaps).
Things to Be Careful About
- The grid's vertical axis only goes up to 8, so the tallest bar () will be near the top but still visible.
- Ensure bars are drawn exactly between the correct class boundaries (e.g., the bar must span from to , not to ).
- The mark scheme awards 2 marks for 3 correct bars and 1 mark for 2 correct bars, so accuracy in drawing is key.
Approach
Substitute into the expression and evaluate using the order of operations.
Working
Answer
-8
Walkthrough
The table is missing the value of when . We substitute into the formula . First we compute the cube: . Then we compute . Finally we add: .
Key Takeaways
Substituting a value into an algebraic expression requires careful handling of signs, especially when a negative number is raised to an odd power or multiplied by a negative coefficient.
Common Mistakes
- Forgetting that , not . An even power would give a positive result, but an odd power preserves the negative sign.
- Writing as instead of . Two negatives make a positive.
- Adding the constants in the wrong order and making an arithmetic error.
Things to Be Careful About
Always evaluate powers before multiplication before addition/subtraction. Watch the sign of carefully — it is negative. Also check that the other table entries are consistent: for example, gives , which matches the table.
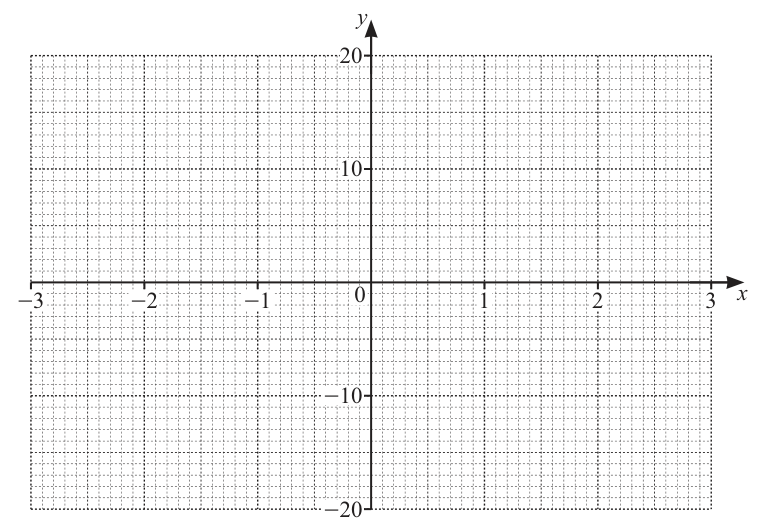
Approach
Plot all seven points from the table of values on the given grid, then join them with a smooth curve that reflects the shape of a cubic function.
Working
The table of values is:
Answer
A smooth cubic curve passing through the points , , , , , , with a local maximum near and a local minimum near .
Smooth cubic curve through (-3,-8), (-2,6), (-1,8), (0,4), (1,0), (2,2), (3,16)
Walkthrough
Part (a) gives us the complete table of values. We plot each point on the grid: , , , , , , . Then we join them with a smooth curve. Since this is a cubic with a positive leading coefficient, the curve rises from the bottom-left, reaches a local maximum around , dips to a local minimum around , then rises steeply to the top-right. The curve must pass through all seven points smoothly.
Key Takeaways
When drawing a graph from a table of values, plot every point accurately and join them with a smooth curve appropriate to the function type. For cubics, expect one local maximum and one local minimum within the range.
Common Mistakes
- Plotting incorrectly, for example as by forgetting the negative sign from part (a).
- Joining the points with straight line segments instead of a smooth curve.
- Not extending the curve smoothly past the first and last points — the curve should continue naturally beyond and .
- Drawing the curve to pass through points that aren't on it, such as making it go through instead of .
Things to Be Careful About
The grid has from to and from to , so each major grid square on the -axis represents units. Ensure points are plotted at the correct -values. The mark scheme awards follow-through marks for correctly plotted points (B3FT for 6 points, B2FT for 4, B1FT for 2), so accuracy in plotting is critical. The curve must be smooth — no sharp corners at the plotted points.
By drawing a suitable straight line on the grid, find the solutions of the equation .
= ______ , = ______ , = ______
Approach
We need to solve . Since the graph drawn in part (b) is , we rewrite the equation to match this form by adding to both sides:
So we draw the horizontal line on the graph and read off the -coordinates where it intersects the curve.
Working
The equation can be rewritten as:
This means we need the -values where on the graph of .
Looking at the graph:
- Between () and (), the curve crosses at approximately .
- Between () and (), the curve crosses at approximately .
- Between () and (), the curve crosses at approximately .
Answer
(Acceptable range: to , to , to )
x ≈ -1.8, x ≈ -0.7, x ≈ 2.5
Walkthrough
We want to solve . The graph we already drew is . We need to express our equation in terms of this . Rearranging: , so . Therefore . We draw the horizontal line on the graph and find where it meets the curve.
From the table, lies between (at ) and (at ), so there is an intersection in that interval. The curve also descends from at to at , crossing again. Finally, the curve rises from at to at , crossing a third time.
Reading off the graph, the three solutions are approximately , , and .
Key Takeaways
To solve an equation graphically using a previously drawn graph, rewrite the equation so one side matches the function already plotted. The other side becomes the equation of a straight line (often horizontal) to draw. The solutions are the -coordinates of the intersection points.
Common Mistakes
- Drawing the wrong line. For example, drawing or instead of . The key step is correctly rewriting as .
- Reading the -coordinate instead of the -coordinate at the intersection.
- Only finding two intersections when there are three, missing the one between and .
- Not drawing the line across the full width of the graph so all intersections are visible.
Things to Be Careful About
The mark scheme accepts answers in the ranges to , to , and to . Readings must be from the drawn graph, so slight variations are expected. The line must be clearly ruled on the grid. If the line is not drawn (M0), full credit (SC1) is still awarded if all three solutions are stated correctly. The equation must be shown as the reason for drawing .
and are rectangles.
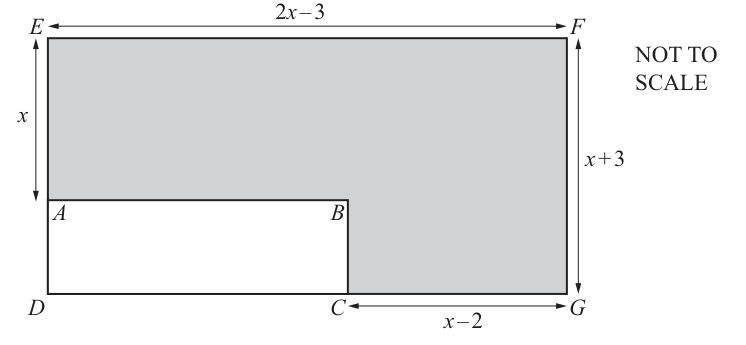
Approach
Since is a rectangle, its opposite sides are equal. The bottom side equals the top side . The point lies on , so . We can find by subtracting from .
Working
Answer
x - 1
Walkthrough
The large shape is a rectangle, which means its opposite sides are equal in length. The top side is given as , so the bottom side must also be . The bottom side is split into two segments by point : and . We are given . To find , we subtract from the total length :
Distributing the negative sign gives . Combining like terms ( and ) yields .
Key Takeaways
In any rectangle, opposite sides are equal. If a side is split into segments, the whole length is the sum of the parts. Algebraic subtraction must handle signs carefully, especially when subtracting a binomial.
Common Mistakes
- Forgetting to bracket when subtracting, leading to instead of . This is a very common error.
- Assuming directly without noticing the diagram labels; the diagram labels and , which seems contradictory but is resolved by understanding is the inner rectangle and the height of the large rectangle is while (so ).
Things to Be Careful About
Always use brackets when subtracting a quantity that contains a variable and a constant. The mark scheme awards the mark for the correct simplification with no errors seen.
The area of rectangle is of the area of rectangle .
Form an equation in and show that it simplifies to .
Approach
The area of a rectangle is length width. We write the area of and the area of in terms of , then use the given relationship (area of is of area of ) to form an equation. Finally, we expand and simplify to reach the target form .
Working
Area of rectangle :
Area of rectangle :
The problem states:
Substituting the expressions:
Multiply both sides by to clear the fraction:
Expand the left side:
Expand the right side:
So the equation is:
Rearrange all terms to one side (subtract and add to both sides):
Divide the entire equation by :
Answer
x^2 - 6x + 3 = 0
Walkthrough
First, we need the dimensions of both rectangles. For , we found in part (a)(i). The marking scheme uses , which is the height of the small rectangle. (This comes from the geometry: is the total height, and the diagram implies so that , though this is implicitly given by the area formula in the mark scheme). So area of .
For , the dimensions are and . So area of .
The condition is: . Writing this out:
Multiply by 5:
Expand both sides:
Bring everything to the right side:
Divide by 2:
This matches the required form.
Key Takeaways
When forming equations from geometry problems, always write out the area formulas first. Clearing fractions early makes the expansion and simplification easier. Always double-check your expansion of binomials, especially the middle term.
Common Mistakes
- Forgetting to multiply the entire right side by 5, leading to without the factor of 5 on the right.
- Sign errors when expanding : writing instead of .
- Sign errors when rearranging: . Forgetting to change the sign of or is common.
- Forgetting to divide by 2 at the end, leaving instead of the required .
Things to Be Careful About
The mark scheme requires "no errors or omissions at any stage in the working" for the final A1 mark. Show every step: the initial equation, the clearing of the fraction, the expansion, the rearrangement, and the division by 2. The final answer must be exactly .
Use the quadratic formula to solve the equation .
You must show all your working and give your answers correct to 2 decimal places.
= ______ or = ______
Approach
The equation is . This is a quadratic in the form with , , . We apply the quadratic formula:
Working
Substitute , , :
Calculate :
Find the two values:
Answer
5.45 or 0.55
Walkthrough
The equation has coefficients , , . The quadratic formula is .
Substituting:
Using a calculator, .
First solution (using +):
Second solution (using -):
Both answers are given to 2 decimal places as required.
Key Takeaways
The quadratic formula works for any quadratic equation . Always show the substitution step clearly. When using a calculator, keep full precision in the calculator and only round at the very end to avoid rounding errors.
Common Mistakes
- Forgetting the sign and only giving one answer.
- Rounding too early (e.g., using ) which gives and anyway here, but could cause errors in other questions.
- Sign errors in : since , , not .
- Arithmetic errors in : , not .
Things to Be Careful About
The question asks for answers correct to 2 decimal places. Do not round intermediate values. The mark scheme accepts and . Show the full formula substitution to earn the B2 mark.
Approach
The shaded area is the area of the large rectangle minus the area of the small rectangle . We must first decide which value of to use. Since is a length, it must be positive, so . This means we must use (discarding ). Then we substitute this value into the area formula.
Working
The shaded area is:
We need because . From part (b)(i), the solutions are and . Since , we reject and use .
Substitute :
Rounding to a reasonable number of decimal places (the mark scheme accepts 53.4 to 53.41):
(Note: using the exact value gives , which rounds to .)
Answer
53.4
Walkthrough
The shaded region is the large rectangle with the small rectangle removed from it. So:
We have two possible values for : and . We must check which one is physically valid. The length must be positive (a length cannot be negative or zero in this context). If , then , which is impossible. So we must use .
Substitute into the area expression:
Large rectangle:
Small rectangle:
Shaded area:
The mark scheme accepts or to . Using the exact value gives , which rounds to .
Key Takeaways
When solving geometry problems with quadratic equations, always check your roots against the physical constraints of the problem (lengths must be positive, areas must be positive). Discard any root that makes a given length negative or zero.
Common Mistakes
- Using without checking validity. This gives , which is impossible.
- Calculating the area of only one rectangle instead of the shaded region (difference).
- Arithmetic errors in the final multiplication and subtraction.
- Not showing the substitution of their value into the correct area formula.
Things to Be Careful About
The mark scheme awards M1 for substituting their value into the correct area formula where . This means even if a student used the wrong value but showed the correct method, they might get partial credit depending on the scheme, but here is geometrically invalid so it must be rejected. The final answer should be given to an appropriate number of significant figures or decimal places; 53.4 is acceptable.
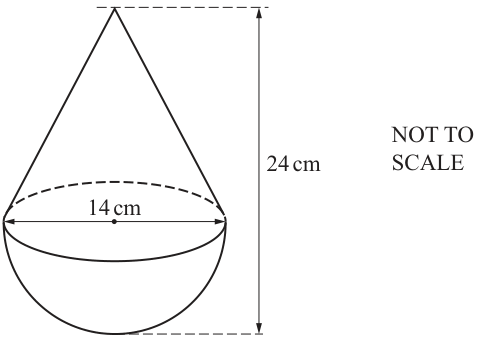
The diagram shows a solid formed by joining a cone to a hemisphere.
The diameter of the cone is and the diameter of the hemisphere is .
The total height of the solid is .
Approach
The solid is a composite of a hemisphere at the bottom and a cone on top. The total volume is the sum of the volume of the hemisphere and the volume of the cone. We first find the radius and the individual heights of each part.
Working
The diameter of both the cone and the hemisphere is , so the radius is:
The height of the hemisphere is equal to its radius, so . The total height of the solid is , so the height of the cone is:
Volume of the hemisphere:
Volume of the cone:
Total volume of the solid:
Rounding to the nearest integer gives (accepting if is used).
Answer
1591
Walkthrough
The solid is made of two standard shapes: a hemisphere and a cone. To find the total volume, we calculate the volume of each part and add them. First, we find the radius from the given diameter ( cm). The hemisphere's height is simply its radius ( cm). Since the total height is cm, the cone's height is the remainder ( cm). We then apply the hemisphere volume formula () and the cone volume formula (), sum the results, and round to the nearest whole number.
Key Takeaways
- Composite solids have volumes that are the sum of their individual parts.
- The height of a hemisphere is equal to its radius.
- When a total height is given for a composite solid, subtract the known part's height to find the unknown part's height.
Common Mistakes
- Forgetting to halve the diameter to get the radius.
- Using the total height ( cm) as the height of the cone instead of subtracting the hemisphere's height ( cm).
- Including the area of the circular base in the surface area calculation (though this is for part b, it's a related error to remember).
- Rounding intermediate values too early, which can lead to instead of .
Things to Be Careful About
- Ensure you use the correct height for the cone ( cm, not cm).
- Keep in your calculator's memory or use a precise value to avoid rounding errors. Using gives , while the exact value gives ; both are typically accepted in this syllabus, but the exact value rounds to .
- The question asks for the volume of the solid, so do not subtract the volumes.
Approach
The total surface area of the solid consists of the curved surface area of the hemisphere and the curved surface area of the cone. The flat circular face where they join is internal and is not included. We calculate each curved surface area and add them together.
Working
Curved surface area of the hemisphere:
To find the curved surface area of the cone, we first need its slant height . Using Pythagoras' theorem with the cone's height () and radius ():
Curved surface area of the cone:
Total surface area:
Rounding to the nearest integer:
This matches the required value.
Answer
712
Walkthrough
The total surface area only includes the outer curved surfaces. The flat circular base of the cone and the flat circular base of the hemisphere are joined together, so they are inside the solid and do not contribute to the surface area. We calculate the curved surface area of the hemisphere using . For the cone, we need the slant height , which is the hypotenuse of a right-angled triangle with legs equal to the cone's height ( cm) and radius ( cm). Using Pythagoras, . The curved surface area of the cone is . Adding the two curved surface areas gives approximately , which rounds to .
Key Takeaways
- For composite solids, internal faces are not part of the total surface area.
- The curved surface area of a hemisphere is (half of a full sphere's surface area ).
- The slant height of a cone is found using Pythagoras' theorem: .
- The curved surface area of a cone is .
Common Mistakes
- Including the area of the circular base () in the total surface area calculation.
- Using the total height ( cm) instead of the cone's height ( cm) when calculating the slant height.
- Forgetting to take the square root when calculating the slant height.
- Rounding intermediate values (like or ) too early, which can lead to a final answer slightly off from .
Things to Be Careful About
- The question asks to show the area is correct to the nearest integer. Your working must clearly show the sum of the two curved surface areas before rounding.
- Ensure you use the correct formula for the curved surface area of a hemisphere (), not the full sphere ().
A smaller solid is mathematically similar to this solid.
The total surface area of the smaller solid is .
Calculate the total height of the smaller solid.
______
Approach
For mathematically similar solids, the ratio of their surface areas is equal to the square of the ratio of their corresponding lengths (the linear scale factor). We use the given surface areas to find the length scale factor, then apply it to the total height of the original solid.
Working
Let and be the surface area and height of the original solid.
Let and be the surface area and height of the smaller solid.
The ratio of the surface areas is:
The linear scale factor (from the original to the smaller solid) is the square root of the area ratio:
The total height of the smaller solid is:
Rounding to one decimal place (or the nearest integer as appropriate for the context), the height is .
Answer
14.0
Walkthrough
When two solids are mathematically similar, the ratio of their surface areas is the square of the ratio of their corresponding lengths. We are given the surface areas ( and ) and the height of the original solid (). First, we find the area ratio (). Then, we take the square root of this ratio to find the linear scale factor. Finally, we multiply the original height by this linear scale factor to find the height of the smaller solid.
Key Takeaways
- For similar shapes/solids, Area Ratio = (Length Ratio).
- Length Ratio = .
- To find a length in the smaller shape, multiply the corresponding length in the larger shape by the length scale factor.
Common Mistakes
- Using the area ratio directly as the length scale factor (forgetting to take the square root).
- Using the wrong height (e.g., using the cone's height or the hemisphere's height instead of the total height).
- Calculating the scale factor from smaller to larger instead of larger to smaller, leading to a height greater than .
Things to Be Careful About
- The mark scheme accepts . Using the exact surface area from part (b) () instead of will give , which still rounds to .
- Ensure the final answer is given to an appropriate number of significant figures or decimal places. or is acceptable.
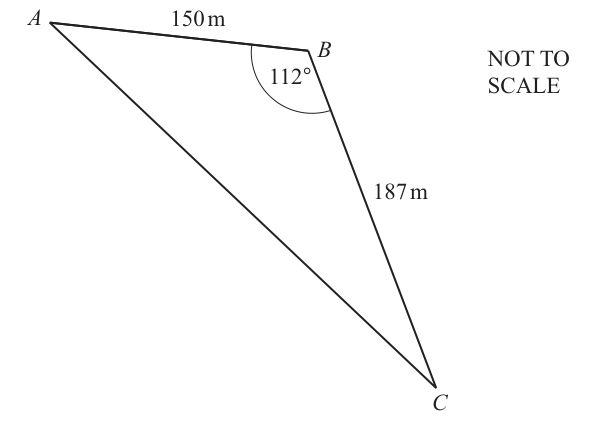
The diagram shows a triangular field .
, and angle .
Fencing is needed for the perimeter of the field.
Fencing is sold in rolls of length .
Calculate the number of rolls of fencing needed.
______
Approach
To find the number of rolls of fencing, we first need the perimeter of the triangular field. We are given two sides and the included angle, so we use the Cosine Rule to find the third side . Then we sum the three sides to get the perimeter and divide by the length of one roll (20 m). Since we cannot buy a fraction of a roll, we round up to the next whole number.
Working
Using the Cosine Rule to find :
Taking the square root:
Calculate the perimeter of the field:
Calculate the number of rolls needed:
Since fencing is sold in whole rolls, we must round up to the next integer:
Answer
31
Walkthrough
The problem asks for the number of 20 m rolls of fencing needed to enclose a triangular field. First, we need the total perimeter. Two sides ( m, m) and the included angle () are given. This is the classic setup for the Cosine Rule to find the third side .
The Cosine Rule states . Substituting the known values:
Calculating the squares and the product: . Since is negative (angle is obtuse), the last term becomes positive, giving . Taking the square root yields m.
Next, add all three sides to get the perimeter: m.
Finally, divide the perimeter by the length of one roll: . Because you cannot purchase a partial roll of fencing, you must round up to 31 rolls to cover the entire perimeter.
Key Takeaways
- The Cosine Rule is used when two sides and the included angle of a triangle are known.
- Perimeter is the sum of all side lengths.
- In real-world problems involving discrete items (like rolls of fencing or buses), always round up (ceiling function) when the result is not a whole number.
Common Mistakes
- Forgetting that is negative, which leads to subtracting a negative number (i.e., adding) instead of subtracting.
- Rounding down to rolls, which would leave a gap in the fencing.
- Using the wrong angle or mixing up the sides in the Cosine Rule formula.
- Rounding the intermediate value of too early (e.g., to m), which can cause the final answer to be slightly off and potentially lose method marks.
Things to Be Careful About
- Ensure the calculator is in degree mode when evaluating .
- Keep full precision in the calculator for when calculating the perimeter and the division; do not round to m prematurely.
- The mark scheme accepts answers like or to as evidence of correct working before rounding to the final integer .
- Always state the final answer as a whole number of rolls, as fractional rolls are physically impossible.
Approach
The shortest distance from a point to a line is the perpendicular distance. Here, we need the height from vertex perpendicular to side . We can find the area of triangle using the sine area formula with the known sides , and included angle . Equating this to the standard area formula (using as the base) allows us to solve for .
Working
Calculate the area of triangle using the sine formula:
Let be the shortest distance from to . The area can also be written as:
Substitute the area and the value of m from part (a):
Solve for :
Alternatively, using the direct formula:
Rounding to 3 significant figures:
Answer
92.8
Walkthrough
The shortest distance from a point to a line segment is the length of the perpendicular dropped from the point to the line. In triangle , this is the height from to the base .
We can find the area of the triangle in two ways. First, using the two known sides and the included angle:
This gives .
Second, using the base and the unknown height :
Equating the two expressions for area and solving for :
Rounding to 3 significant figures (as is standard for calculator component questions unless otherwise specified), we get m.
Key Takeaways
- The shortest distance from a point to a line is the perpendicular height.
- The sine area formula is a powerful tool when two sides and the included angle are known.
- Equating two different expressions for the area of the same triangle is a standard technique to find an unknown height or side.
Common Mistakes
- Trying to use the sine or cosine rule directly to find the height without first finding the area or another angle. (While possible using or , it requires extra steps and is more prone to error).
- Forgetting to multiply by 2 when rearranging .
- Using the wrong base (e.g., using or as the base with the wrong height).
- Not carrying forward the unrounded value of from part (a), which leads to a slightly incorrect height.
Things to Be Careful About
- The question asks for the shortest distance, which is the perpendicular height, not the length of or .
- Ensure calculator is in degree mode.
- The mark scheme accepts to , so keeping full calculator precision for is essential to land in this range.
- Final answer should be given to 3 significant figures as per standard calculator component instructions, yielding .
Zara cycles a distance of 500 metres, correct to the nearest 5 metres.
This takes 24.7 seconds, correct to the nearest 0.1 seconds.
Calculate the lower bound of her average speed.
______
Approach
A distance given to the nearest 5 metres can be as small as m and as large as m. A time given to the nearest 0.1 seconds has lower bound s and upper bound s.
Since
the lower bound of the speed is the lower bound of the distance divided by the upper bound of the time.
Working
Writing both numbers as fractions:
Answer
The lower bound of her average speed is m/s, which is m/s to 3 significant figures.
20.1 m/s (3 s.f.)
Walkthrough
The distance is stated as 500 m to the nearest 5 m. This means the true distance was rounded to a multiple of 5 m, so it could differ by at most half of 5 m, which is 2.5 m. Therefore the smallest possible distance is m. The largest possible distance is m, but we will not need it.
The time is stated as 24.7 s to the nearest 0.1 s. Half of 0.1 s is 0.05 s, so the true time lies between s and s.
Average speed is distance divided by time. To make a quotient as small as possible, put the smallest possible numerator and the largest possible denominator. Thus the lower bound of the speed is
Evaluating this gives m/s, which is m/s to 3 significant figures.
Key Takeaways
Bounds come from rounding errors: for a value correct to the nearest , the actual value can be anywhere from to . When a result is a quotient, the lower bound uses the lower bound of the numerator and the upper bound of the denominator; the upper bound uses the upper bound numerator and lower bound denominator.
Common Mistakes
- Using and directly gives m/s, but that is not the lower bound.
- Using the upper distance divided by the lower time gives the upper bound of speed, not the lower bound.
- Subtracting the full rounding precision, e.g. for the lower distance, instead of subtracting half of it ().
- Taking the time bounds as and instead of and .
- Rounding the intermediate values before dividing, which can change the final answer.
Things to Be Careful About
- The lower bound of a quotient is not just the lower bound of each quantity; you must divide the smallest numerator by the largest denominator.
- Keep the units in mind: distance in m and time in s give speed in m/s.
- The mark scheme awards M1 for identifying or or or , and M2 for the correct fraction . Show the fraction clearly so those method marks are not lost.
- On this calculator component, the decimal m/s may be given; if rounding, give at least m/s (3 significant figures). The exact form m/s is also acceptable.
Express as a single fraction in its simplest form.
______
Approach
To subtract these algebraic fractions, we need a common denominator. Since the denominators and share no common factors, the lowest common denominator (LCD) is their product: .
We then rewrite each fraction with this common denominator by multiplying the numerator of each by the factor that was missing from its original denominator, before combining them into a single fraction.
Working
The expression is:
The common denominator is .
For the first term , multiply the numerator and denominator by :
For the second term , multiply the numerator and denominator by :
Now combine the numerators over the single denominator:
Expand the brackets in the numerator:
Combine these results:
So the combined fraction is:
We can leave the denominator in factored form or expand it:
Thus, the final simplified single fraction is:
(Note: The numerator cannot be simplified further as there are no common factors between , , and the denominator.)
Answer
(16x - 17) / (8x^2 - 2x - 3)
Walkthrough
When adding or subtracting algebraic fractions, the first step is always to identify a common denominator. Because the denominators here are simple linear binomials and that do not factor further or share terms, the most straightforward common denominator is simply their product.
Think of it like adding numbers: to add , you must convert them so they have the same bottom part. We turn into an equivalent fraction by multiplying top and bottom by . Similarly, we turn into an equivalent fraction by multiplying top and bottom by .
Once the denominators match, we only operate on the numerators. A crucial detail is the minus sign between the fractions. It applies to the entire second numerator. So when we write , we must distribute the negative sign when expanding the second part: becomes and becomes . This is a very common place for sign errors.
After expanding both parts ( and ), we group the like terms ('s together and constants together) to get . The denominator can be left as a product or expanded; both forms are correct unless specified otherwise.
Key Takeaways
- Common Denominator: For fractions and , the sum/difference is .
- Brackets and Signs: When subtracting fractions, put the entire numerator of the second fraction in brackets and ensure you distribute the negative sign correctly across every term inside.
- Simplification: Always check if the resulting numerator and denominator share any common factors that could cancel out.
Common Mistakes
- Sign Errors: Failing to distribute the minus sign to the constant term in the second bracket (e.g., writing as instead of ).
- Incomplete Expansion: Only multiplying one term in the numerator by the new factor.
- Combining unlike terms: Adding terms to constant terms (e.g., becoming something else entirely).
- Leaving unexpanded denominators: While is mathematically correct, examiners often expect the denominator expanded into standard quadratic form for the "simplest form" answer, though the mark scheme accepts both.
Things to Be Careful About
- Order of Operations: Remember that the division implied by the fraction bar acts as a grouping symbol for the numerator. When substituting expressions, use brackets.
- Factoring Check: Before finishing, verify that the numerator cannot be factored. If it could, check if any factors cancel with the denominator. Here, is irreducible over integers.
- Final Form: Ensure the final answer is a single fraction, not two separate ones.