Mathematics (Syllabus D) 4024/13 — May/June 2025
Cambridge O-Level · Non-calculator · worked solutions for every part, with the mark scheme
Topics Number · Algebra and Graphs · Transformations and Vectors · Statistics · Coordinate Geometry · Mensuration · +3 more
Approach
To convert a decimal to a fraction, write the decimal as a number over a power of 10 corresponding to the number of decimal places. Then simplify if possible.
Working
The decimal is . This has two decimal places (hundredths).
The fraction cannot be simplified further because 7 is prime and does not divide 100.
Answer
7/100
Walkthrough
The question asks us to write the decimal as a fraction.
- Identify the place value of the last digit. The '7' is in the hundredths place (two digits after the decimal point).
- Therefore, the denominator is 100.
- The numerator is the number formed by the digits after the decimal point, which is 7.
- Combine them to get .
- Check for simplification: 7 is a prime number and is not a factor of 100, so the fraction is already in its simplest form.
Key Takeaways
- A decimal with decimal places corresponds to a denominator of .
- Always check if the resulting fraction can be simplified.
Common Mistakes
- Writing instead of (confusing tenths with hundredths).
- Writing or without simplifying (though might be accepted depending on specific examiners' discretion, is the standard simplified answer).
Things to Be Careful About
- Ensure you count the number of zeros in the denominator correctly based on the number of decimal places.
Approach
To convert a fraction to a decimal, you can either divide the numerator by the denominator or multiply the numerator and denominator by a number that makes the denominator a power of 10 ().
Working
The fraction is .
We want to change the denominator 25 into a power of 10. Since , we multiply both the numerator and the denominator by 4.
Calculate the numerator:
Calculate the denominator:
So,
Convert the fraction to a decimal by placing the decimal point two places from the right:
Answer
0.64
Walkthrough
The question asks us to write the fraction as a decimal.
- Look at the denominator, 25. We know that multiplying 25 by 4 gives 100, which is a power of 10. This is easier than performing long division ().
- Multiply both the top (numerator) and bottom (denominator) of the fraction by 4 to keep the value equivalent.
- Now, convert to a decimal. Dividing by 100 moves the decimal point two places to the left.
Key Takeaways
- Fractions with denominators of 2, 4, 5, 8, 10, 20, 25, 50, etc., can often be easily converted to decimals by scaling the denominator to a power of 10.
- Specifically, turns 25 into 100; turns 5 into 10; turns 8 into 1000.
Common Mistakes
- Multiplying only the numerator or only the denominator.
- Incorrect multiplication (e.g., calculated as 54 or 66).
- Misplacing the decimal point.
Things to Be Careful About
- Ensure the final answer is in decimal form, not fraction form.
The favourite ice cream flavours of 20 children are shown.
| Vanilla | Vanilla | Strawberry | Chocolate | Chocolate |
| Strawberry | Chocolate | Chocolate | Vanilla | Strawberry |
| Chocolate | Vanilla | Vanilla | Strawberry | Chocolate |
| Strawberry | Chocolate | Vanilla | Chocolate | Vanilla |
Complete the frequency table.
| Flavour | Tally | Frequency |
|---|---|---|
| Vanilla | ||
| Strawberry | ||
| Chocolate |
Approach
The question provides a list of 20 ice cream flavours. We need to count how many times each specific flavour appears in the list to complete the frequency table.
Working
We go through the grid row by row and tally each flavour:
Vanilla:
- Row 1: Vanilla (2nd), Vanilla (5th)
- Row 2: Vanilla (4th)
- Row 3: Vanilla (2nd), Vanilla (3rd)
- Row 4: Vanilla (3rd), Vanilla (5th)
Total Vanilla =
Strawberry:
- Row 1: Strawberry (3rd)
- Row 2: Strawberry (1st), Strawberry (5th)
- Row 3: Strawberry (4th)
- Row 4: Strawberry (1st)
Total Strawberry =
Chocolate:
- Row 1: Chocolate (4th), Chocolate (5th)
- Row 2: Chocolate (2nd), Chocolate (3rd)
- Row 3: Chocolate (1st), Chocolate (5th)
- Row 4: Chocolate (2nd), Chocolate (4th)
Total Chocolate =
Check: Total children = . This matches the number of children mentioned in the question.
Answer
Vanilla: 7, Strawberry: 5, Chocolate: 8
Walkthrough
To solve this problem, we must process the raw data provided in the text description of the grid. The grid lists the favourite ice cream flavour for each of the 20 children. The goal is to convert this unstructured list into a structured frequency table.
- Identify the categories: The flavours listed are Vanilla, Strawberry, and Chocolate.
- Tally the data: Systematically scan the list (row by row or column by column) and mark a tally for each occurrence of a flavour.
- For Vanilla, we find it appears 7 times.
- For Strawberry, we find it appears 5 times.
- For Chocolate, we find it appears 8 times.
- Verify: Sum the frequencies () to ensure they equal the total number of children (20). If they match, the counting is likely correct.
- Complete the table: Write the final counts in the 'Frequency' column.
Key Takeaways
- Tallying is an efficient way to count occurrences in a large set of data.
- A frequency table summarizes categorical data by showing how often each category occurs.
- Always check that the sum of frequencies equals the total sample size.
Common Mistakes
- Miscounting due to skipping an item or double-counting one.
- Incorrectly adding the final numbers (e.g., getting a total other than 20).
- Leaving the 'Tally' column blank if required (though marks are usually for frequency).
Things to Be Careful About
- Ensure you read all rows and columns carefully; missing a single entry changes the answer.
- The mark scheme awards partial credit (B1) for getting two out of three frequencies correct, so accuracy in each count is important.
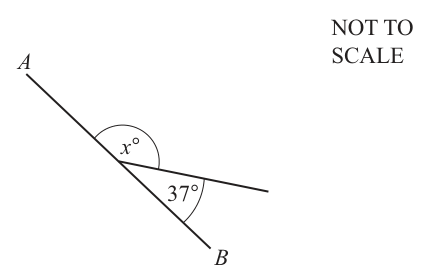
Approach
Angles on a straight line add up to . We use this property to find the missing angle .
Working
Subtract from both sides:
Answer
143
Walkthrough
The diagram shows a straight line AB with a ray extending from it, creating two adjacent angles: and . Because these angles lie on a straight line, they are supplementary and must add up to . We set up the equation and solve for by subtracting from , which gives .
Key Takeaways
Angles on a straight line always sum to . This is a fundamental property used in almost all angle-finding questions and is often the first step in more complex geometry problems.
Common Mistakes
- Forgetting that angles on a straight line sum to instead of (angles on a perpendicular) or (angles around a point).
- Adding the given angle to instead of subtracting it.
- Forgetting to write the final answer as a plain number without the degree symbol, as the question already provides the in the diagram.
Things to Be Careful About
The diagram is marked NOT TO SCALE, so do not estimate angles by eye or assume it looks like a right angle. Always rely on the given values and geometric properties. The answer is a simple integer, so no rounding is needed.
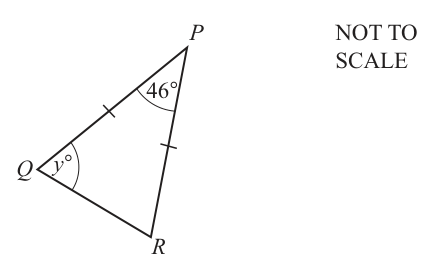
Approach
In an isosceles triangle, the angles opposite the equal sides (the base angles) are equal. The sum of all angles in any triangle is . We use these two properties to find .
Working
Since , the base angles are equal:
The sum of angles in triangle is :
Subtract from both sides:
Divide by :
Answer
67
Walkthrough
The diagram shows an isosceles triangle where the sides and are marked as equal with tick marks. A key property of isosceles triangles is that the angles opposite the equal sides (the base angles) are equal. Therefore, . The sum of all interior angles in any triangle is always . We can write the equation . Solving this gives , so . Alternatively, you can subtract the vertex angle from and divide by directly: .
Key Takeaways
Isosceles triangles have two equal sides and two equal base angles. The sum of angles in a triangle is always . Combining these two facts allows you to find unknown angles quickly and efficiently.
Common Mistakes
- Assuming all three angles are equal (that would be an equilateral triangle, which requires all three sides to be equal).
- Forgetting to divide the remaining angle sum by to find a single base angle, giving as the answer instead of .
- Adding to instead of subtracting it.
- Matching the wrong angles to the equal sides; the angles opposite and are at and respectively, not at .
Things to Be Careful About
The tick marks on and indicate they are equal, which means the angles opposite them (at and ) are equal, NOT the angle at . Always match the equal sides to the opposite base angles. The diagram is NOT TO SCALE, so do not estimate angles by eye. The mark scheme accepts the direct calculation as a valid method.
Find the value of when and .
______
Approach
Substitute the given values and into the expression and evaluate.
Working
Replace with and with :
Perform the multiplications. Remember that multiplying a positive number by a negative number gives a negative result:
Simplify the addition:
Calculate the final result:
Answer
14
Walkthrough
The problem asks for the numerical value of the expression when specific numbers are assigned to the variables and .
First, we substitute the value of , which is , into the term . This becomes . Next, we substitute the value of , which is , into the term . It is crucial to use brackets here to handle the negative sign correctly: .
Next, we perform the arithmetic operations. Multiplication comes before addition in the order of operations (BODMAS/PEMDAS).
.
.
Finally, we add these two results together: , which is equivalent to . The result is .
Key Takeaways
- Substitution: Always replace the variable with its value, using brackets if the value is negative.
- Order of Operations: Perform multiplication before addition/subtraction.
- Signed Numbers: Be careful with signs. A positive times a negative is negative ().
Common Mistakes
- Sign Errors: Forgetting that is negative, leading to calculation of instead of .
- Order of Operations: Adding and first (getting ), then multiplying by or similar incorrect groupings.
- Arithmetic: Simple multiplication errors like or .
Things to Be Careful About
- Ensure you write or rather than just . The coefficient is , not .
- Double-check the final subtraction step.
Write down
Approach
To find the reciprocal of a number, divide 1 by that number. For an integer , the reciprocal is .
Working
The number given is .
The reciprocal of is:
Answer
1/7
Walkthrough
The reciprocal (or multiplicative inverse) of a number is what you multiply it by to get 1. To find the reciprocal of any non-zero number, you simply put 1 over that number as a fraction. Since the question asks for the reciprocal of 7, we write 1 in the numerator and 7 in the denominator.
Key Takeaways
- The reciprocal of is .
- The product of a number and its reciprocal is always 1 (e.g., ).
Common Mistakes
- Writing the negative of the number () instead of the reciprocal.
- Writing the reciprocal of the reciprocal () by mistake.
- Not writing the answer as a fraction if required.
Things to Be Careful About
- Ensure the answer is in the exact form rather than a decimal approximation unless specified otherwise.
Approach
An irrational number is a number that cannot be expressed as a simple fraction where and are integers. These numbers have non-terminating, non-repeating decimal expansions. Common examples include mathematical constants like and square roots of non-perfect squares.
Working
There are many correct answers. Two common examples are:
- (Pi)
- (Square root of 2)
- (Square root of 3)
- (Euler's number)
Any one of these is a valid answer. We will provide .
Answer
sqrt(2)
Walkthrough
To identify an irrational number, look for numbers that do not end and do not repeat in their decimal form. The most famous example is (approximately 3.14159...). Another very common type is the square root of an integer that is not a perfect square (like 2, 3, 5, 6, 7). Perfect squares like 4, 9, 16 have rational square roots (2, 3, 4), so they are not the answer here. is approximately 1.41421..., which never repeats.
Key Takeaways
- Rational numbers can be written as fractions; irrational numbers cannot.
- Common irrational numbers: , , , .
- A surd (square root of a non-square integer) is always irrational.
Common Mistakes
- Giving a rational number like (which is repeating) or .
- Giving a rounded value like (which is rational because it is a terminating decimal).
- Giving the square root of a perfect square, such as .
Things to Be Careful About
- The question asks for "an" irrational number, so any valid example is accepted. Do not feel compelled to calculate a decimal expansion; leaving it as or is the best way to ensure accuracy.
Point , point and point are plotted on the grid.
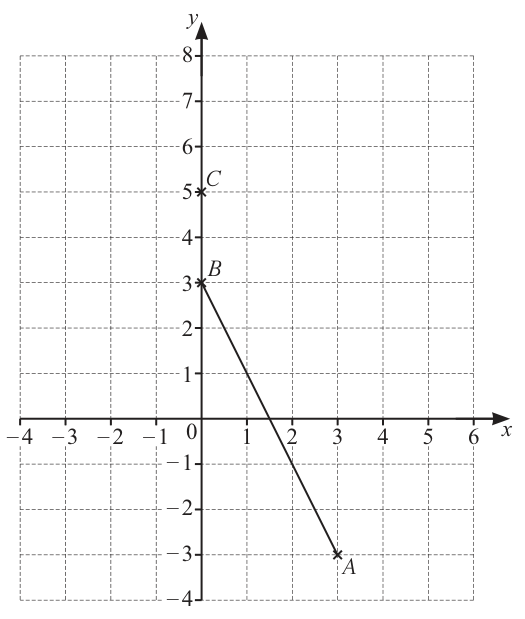
Approach
To plot point , start at the origin , move units to the right along the -axis, then move units up parallel to the -axis. Mark the point and label it .
Working
Answer
Point is plotted at .
Point D plotted at (3, 6)
Walkthrough
The coordinates tell us that point is units along the -axis and units along the -axis. Starting from the origin, move right grid squares to , then move up grid squares to . Place a cross at this position and write the label next to it.
Key Takeaways
- The first number in a coordinate pair is the -value (horizontal position) and the second is the -value (vertical position).
- Plotting a point is a direct reading from the grid with no calculation.
Common Mistakes
- Plotting instead of by swapping the and coordinates.
- Forgetting to label the point with the letter .
Things to Be Careful About
- Always read coordinates in the order , not .
- The grid in this question has from to and from to , so is well within the grid and easy to plot.
Find the equation of the line
Approach
Points and both have an -coordinate of , so they lie on the -axis. The -axis is a vertical line with the equation .
Working
and both have .
The line through them is the -axis.
Answer
x = 0
Walkthrough
Look at the coordinates of and : is at and is at . Both points have , meaning they both lie on the -axis. A vertical line has a constant -value, so the equation of the line through any two points with is simply . There is no need to calculate a gradient here because a vertical line has an undefined gradient and cannot be written in the form .
Key Takeaways
- A vertical line has the equation where is the constant -value.
- The -axis itself has the equation .
- Vertical lines cannot be written in slope-intercept form .
Common Mistakes
- Trying to calculate a gradient for a vertical line and getting division by zero.
- Writing instead of (that is the equation of the -axis).
Things to Be Careful About
- The equation of a vertical line is , not .
- No working needs to be shown for this part; the mark is awarded for the correct equation.
Approach
Find the gradient of line using the coordinates of and , then use the -intercept (where the line crosses the -axis) to write the equation in the form .
Working
The gradient of line is:
The line passes through , which is on the -axis, so the -intercept is .
Substituting and into :
This can also be written as .
Answer
y = 3 - 2x
Walkthrough
Step 1: Calculate the gradient. The gradient formula is . Using and :
This tells us the line falls units for every unit it moves to the right.
Step 2: Find the -intercept. The -intercept is where the line crosses the -axis, i.e., where . Point is at , which is on the -axis, so the -intercept is .
Step 3: Write the equation. Using with and :
This is equivalent to , both of which are accepted.
Key Takeaways
- The gradient formula can be applied in either order of the two points.
- If one of the given points lies on the -axis (i.e., has ), that point directly gives the -intercept.
- The equation is the standard form for a non-vertical straight line.
Common Mistakes
- Calculating the gradient as (getting the sign wrong) — this happens when the numerator is computed as instead of while keeping the denominator as .
- Forgetting that the -intercept is the -value when , not just any -value on the line.
- Writing the equation as by swapping and .
Things to Be Careful About
- The mark scheme accepts as an equivalent form to .
- Working must be shown (marked as "www" in the scheme) to earn the method mark for the gradient calculation.
- The gradient must be computed correctly: .
Asif is making a rectangular lawn by .
He uses grass seed to make the lawn.
The grass seed costs $0.34 for .
By writing each number correct to 1 significant figure, estimate the cost of seed needed.
$ ______
Approach
To estimate the cost, we first round each number involved in the calculation (, , and ) to one significant figure. Then, we calculate the area using the rounded dimensions and multiply by the rounded cost per square metre.
Working
The dimensions of the lawn are and . The cost is $0.34 per .
Step 1: Round each number to 1 significant figure (1 s.f.)
- : The first digit is . The next digit is , which is less than , so we round down.
- : The first digit is . The next digit is , which is or more, so we round up.
- : The first significant digit is . The next digit is , which is less than , so we round down.
Step 2: Calculate the estimated cost
The cost is given by:
Calculate the product:
So the estimated cost is $60.
Answer
60
Walkthrough
The question asks for an estimate of the cost of grass seed. To do this efficiently without a calculator, we use the method of estimation by rounding.
- Identify the numbers: We have two lengths ( and ) and a unit price ().
- Round to 1 significant figure: This simplifies the arithmetic significantly.
- For , the leading digit is . Since the following digit () is small, rounds to .
- For , the leading digit is . Since the following digit () is large, rounds up to .
- For , the leading non-zero digit is . Since the following digit () is small, rounds to .
- Perform the calculation: Multiply the rounded numbers together.
- Area .
- Cost .
This gives a quick approximation of the total cost.
Key Takeaways
- Rounding to 1 significant figure is the standard technique for quick estimation in Cambridge O Level Mathematics.
- Remember that for numbers like , rounding to 1 s.f. moves it to the next multiple of ten (), not just truncating it.
- For decimals like , the leading zeros are not significant. The first significant digit is the first non-zero digit ().
Common Mistakes
- Rounding to (rounding to nearest 5 instead of 1 s.f.).
- Rounding to (incorrectly rounding up when the next digit is 4).
- Forgetting to round all three numbers before multiplying.
- Calculating the exact answer first and then rounding the final result, which defeats the purpose of the estimation exercise and may not follow the mark scheme's requirement for "rounded values seen".
Things to Be Careful About
- Ensure you round to one significant figure, not two or to the nearest whole number.
- When rounding to , keep the decimal place correct. It becomes , not .
- The mark scheme awards marks for seeing the rounded values () and the final product. Make sure your working shows these intermediate rounded values clearly.
Approach
Isolate by first adding 7 to both sides, then dividing by 4.
Working
Add 7 to both sides:
Divide by 4:
Answer
4
Walkthrough
The goal is to find the value of . The term with is currently being multiplied by 4 and has 7 subtracted from it. To isolate , we reverse these operations in the opposite order. First, we undo the subtraction of 7 by adding 7 to both sides of the equation. This gives us . Next, we undo the multiplication by 4 by dividing both sides by 4. This leaves alone on one side, giving .
Key Takeaways
When solving simple linear equations, perform inverse operations to isolate the variable. Always apply the same operation to both sides of the equation to maintain equality.
Common Mistakes
- Forgetting to add 7 to the right-hand side (e.g., writing ).
- Dividing by 7 instead of 4 at the final step.
- Arithmetic errors in or .
Things to Be Careful About
Ensure you show the intermediate step () as required for the method mark. The answer must be an exact integer here.
Approach
We have two simultaneous equations:
Notice that the coefficient of in equation (2) is , while in equation (1) it is . We can eliminate by multiplying equation (2) by 4 so that the terms become and . Then we add the two equations.
Working
Multiply equation (2) by 4:
Now add Equation (1) and Equation (3):
Solve for :
Substitute into Equation (2) to find :
Subtract 9 from both sides:
Divide by 2:
Answer
x = 2.5, y = 3
Walkthrough
To solve simultaneous equations by elimination, we want to remove one variable. Looking at the coefficients of ( and ), we see that if we multiply the second equation by 4, the term becomes . Adding this to the first equation (which has ) will cancel out completely.
After eliminating , we are left with an equation in terms of only: . Dividing by 17 gives .
Once we have the value of , we substitute it back into one of the original equations (the simpler one, usually) to find . Substituting into gives . Solving this simple linear equation yields , so or .
Key Takeaways
- Look for coefficients that are multiples of each other to make elimination easy.
- When adding/subtracting equations, ensure signs are handled correctly.
- Always check your solution by substituting values into the other original equation if time permits.
Common Mistakes
- Incorrectly multiplying all terms in the equation by the scaling factor (e.g., forgetting to multiply the constant term 14 by 4).
- Sign errors when adding the equations (e.g., subtracting instead of adding, leading to which is also valid but requires care).
- Arithmetic errors in division ().
- Substitution errors when finding (e.g., using the wrong value for ).
- Failing to convert improper fractions to mixed numbers or decimals if preferred, though both are accepted (oe).
Things to Be Careful About
The question asks to "show all your working". You must demonstrate the elimination step clearly. The mark scheme awards A1 for either correct value, so getting one right partially helps, but full marks require both. The answer for can be given as a fraction (), mixed number (), or decimal ().
Work out.
Approach
To divide by a decimal, we can convert the divisor into a whole number. This is done by multiplying both the dividend and the divisor by the same power of 10.
Working
We are calculating .
Multiply both numbers by 10 to shift the decimal point one place to the right:
The calculation becomes:
Alternatively, note that dividing by (which is ) is the same as multiplying by its reciprocal, :
Answer
80
Walkthrough
Dividing by is equivalent to asking "how many tenths are in 8?". Since there are 10 tenths in every whole unit, there are tenths in 8. Mathematically, dividing by is the same operation as multiplying by 10.
Key Takeaways
- Dividing a number by increases its value by a factor of 10.
- Dividing by a fraction is the same as multiplying by .
Common Mistakes
- Dividing by 10 instead of multiplying by 10 (getting 0.8).
- Misplacing the decimal point during long division.
Things to Be Careful About
- Ensure you do not confuse division by with multiplication by . Division makes the number larger; multiplication by a proper fraction makes it smaller.
Approach
Follow the order of operations (BODMAS/PEMDAS). Multiplication comes before subtraction. First, multiply by . Then, subtract this result from by finding a common denominator.
Working
Step 1: Perform the multiplication.
Now substitute this back into the expression:
Step 2: Find a common denominator for 5 and 8. The lowest common multiple (LCM) of 5 and 8 is 40.
Convert each fraction:
Step 3: Subtract the numerators.
Answer
17/40
Walkthrough
This problem tests the ability to handle mixed operations with fractions. The critical first step is recognizing that multiplication must be performed before subtraction. If you subtracted first (), you would get the wrong answer. After getting , you are left with . To subtract these, you need a common denominator. Since 5 and 8 share no factors, their least common multiple is . You scale the top and bottom of each fraction appropriately ( for the first, for the second) so they have the same denominator, allowing you to simply subtract the numerators: .
Key Takeaways
- Order of Operations: Multiplication and division happen before addition and subtraction.
- Fraction Subtraction: Requires a common denominator (lowest common multiple of the denominators).
- Scaling Fractions: Multiply numerator and denominator by the same number to create an equivalent fraction.
Common Mistakes
- Subtracting numerators and denominators directly (e.g., ). This is incorrect.
- Forgetting to perform the multiplication first.
- Using the wrong common denominator or making arithmetic errors when scaling the numerators ( vs ).
Things to Be Careful About
- Check if the final fraction can be simplified. In this case, 17 is prime and does not divide 40, so is in its simplest form.
- Ensure you copy the question correctly; mixing up the signs (+ vs -) changes the entire problem.
A spinner can land on red, green, yellow or blue.
The table shows the probability of each outcome.
| Colour | Red | Green | Yellow | Blue |
|---|---|---|---|---|
| Probability | 0.35 | 0.2 | 0.15 | 0.4 |
Approach
The sum of the probabilities of all possible mutually exclusive outcomes in a sample space must equal 1. We add the four values given in the table to check this condition.
Working
Sum the probabilities:
Grouping for easier addition:
The total is , which is greater than .
Answer
The probabilities add up to more than 1 (or ).
The probabilities add up to more than 1.
Walkthrough
In any probability experiment where the listed outcomes cover every possible result (mutually exclusive and exhaustive), the sum of their probabilities must be exactly .
Here, we simply add the four numbers provided:
- Red:
- Green:
- Yellow:
- Blue:
Calculation:
Since , it is impossible for these probabilities to be correct simultaneously. Therefore, at least one value in the table is incorrect.
Key Takeaways
Always verify that the sum of probabilities in a complete distribution equals . If it does not, there is an error in the data or calculation.
Common Mistakes
- Forgetting to include all outcomes when checking the sum.
- Arithmetic errors when adding decimals (e.g., misaligning decimal points).
- Not stating clearly that the sum exceeds .
Things to Be Careful About
Ensure you interpret "explain how you know" as requiring the calculation of the sum, not just a statement that "one is wrong." The mark scheme requires showing the sum is .
The probability of the spinner landing on blue is incorrect.
Work out the correct probability of the spinner landing on blue.
______
Approach
We are told the blue probability () is the incorrect one. The probabilities for Red, Green, and Yellow are assumed correct. Since the total probability must be , we can find the correct Blue probability by subtracting the sum of the other three from .
Working
First, sum the correct probabilities:
Now, subtract this sum from to find :
Answer
0.3
Walkthrough
Part (a) established that the total was , meaning the probabilities were too high. Part (b) specifies that the error lies specifically with the 'Blue' entry (). This implies the entries for Red (), Green (), and Yellow () are correct.
The fundamental rule is:
Substituting the known correct values:
Solving for :
Key Takeaways
If one probability in a complete set is unknown or identified as erroneous, it can be found by subtracting the sum of the others from .
Common Mistakes
- Subtracting the incorrect value () from something, rather than using the correct values.
- Failing to realize that the total MUST be .
- Calculation errors in the subtraction .
Things to Be Careful About
Read the question carefully: it explicitly states WHICH probability is incorrect. Do not try to guess which one is wrong; use the ones stated to be correct. Ensure the final answer is in decimal form consistent with the question (, not unless asked, though both are mathematically equivalent, the context uses decimals).
A green light flashes every 12 minutes.
A red light flashes every 45 minutes.
The two lights flash together at 9 am.
Find the next time when the two lights will flash together.
______
Approach
The lights flash together again after a time that is a common multiple of both flashing intervals. The first such time is the lowest common multiple (LCM) of 12 minutes and 45 minutes. Find the LCM by prime factorisation, convert it to hours, then add it to 9 am.
Working
Prime factorise each interval:
Take the highest power of each prime factor:
So the lights flash together every 180 minutes. Convert to hours:
Add this to the starting time:
Answer
12:00 (12 pm)
Walkthrough
The two lights flash together at 9 am. For them to flash together again, the number of minutes that has passed must be divisible by both 12 and 45. The smallest positive number divisible by both is the lowest common multiple (LCM).
To find the LCM, write each interval as a product of prime factors:
For each prime that appears, take the highest power that appears in either factorisation: , and . Multiplying these gives:
So the lights coincide every 180 minutes. Since 180 minutes is exactly 3 hours, adding 3 hours to 9 am gives 12 pm, written as 12:00.
Key Takeaways
This question tests finding the LCM using prime factorisation and then applying it to a real-life time problem. The key skill is recognising that 'flash together again' means a common multiple of the two intervals, and that the next time uses the smallest such multiple.
Common Mistakes
A common error is to add the two intervals and use 57 minutes; this is not a common multiple of 12 and 45. Another mistake is to use the HCF (3) instead of the LCM. Some students also convert 180 minutes incorrectly, or write the final time as 12 am instead of 12 pm.
Things to Be Careful About
The answer must be the next time, so use the LCM, not just any common multiple. 180 minutes is exactly 3 hours, so the time is 12 noon. The mark scheme accepts 12:00 or 12 pm. If using 24-hour time, 12:00 also means noon, but the question gives 9 am, so 12 pm is clearest.
Approach
We are given the displacement vector and the position vector of point (). We need to find the position vector of point ().
The relationship between these vectors is:
Rearranging this formula to solve for :
Working
Substitute the given vectors into the equation. Let and .
Perform the subtraction component-wise (top minus top, bottom minus bottom):
Top component:
Bottom component:
So,
Answer
(-2, 7)
Walkthrough
To find the position vector of , we must understand how position vectors relate to the vector connecting two points. The vector tells us how to get from to . Mathematically, this is defined as the position of minus the position of :
Since we want to find , we rearrange the equation by adding to both sides and subtracting from both sides:
Now we substitute the numbers given in the question. Remember that subtracting a negative number is the same as adding a positive one. So, becomes .
Key Takeaways
- Position Vector Rule: To go from point A to point B, you subtract the position vector of A from the position vector of B ().
- Vector Subtraction: Subtract the corresponding components individually. Be careful with signs, especially when subtracting a negative value.
Common Mistakes
- Adding instead of subtracting: Calculating gives the wrong result.
- Sign errors: Forgetting that subtracting means adding (e.g., calculating ).
- Reversing the order: Calculating .
Things to Be Careful About
- Ensure you identify which vector is the "from" vector and which is the "to" vector in your head. starts at and ends at . Therefore is the starting point (position vector being subtracted) and is the ending point (position vector being kept).
Approach
The magnitude (or length) of a column vector is given by the formula:
We are given and asked to express its magnitude in the form .
Working
Identify the components of :
Substitute these values into the magnitude formula:
Calculate the squares:
Add the results together:
Comparing this to the required form , we can see that:
Answer
20
Walkthrough
The magnitude of a vector represents its length. Geometrically, if you draw the vector on a grid, it forms the hypotenuse of a right-angled triangle where the horizontal side is the x-component and the vertical side is the y-component. By Pythagoras' theorem, the length squared is equal to the sum of the squares of the components. Thus, Length = .
Here, the x-component is 4 and the y-component is -2. Squaring them removes any negative signs (). Adding gives 20. The question asks for the answer in the form , so we leave the 20 inside the square root rather than simplifying it to or approximating it.
Key Takeaways
- Magnitude Formula: Always square both components, add them, and then take the square root.
- Squaring Negatives: Remember that squaring a negative number yields a positive result.
Common Mistakes
- Forgetting to square the components (e.g., ).
- Adding the absolute values without squaring first.
- Simplifying the surd unnecessarily (the question specifically asks for , so the final answer for 'a' is just the number under the root).
Things to Be Careful About
- Check the question format carefully. It asks for the value of where the magnitude is . Do not write as the final answer; write .
The diagram shows a trapezium with lengths in centimetres.
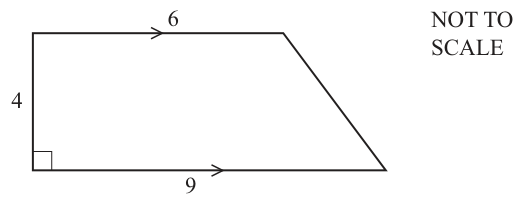
Approach
The area of a trapezium is given by the formula , where and are the lengths of the parallel sides and is the perpendicular height between them.
Working
Answer
30
Walkthrough
The trapezium has two parallel sides of lengths and , and the perpendicular height between them is . We substitute these values directly into the standard area formula for a trapezium: .
Key Takeaways
The area of a trapezium is half the sum of the parallel sides multiplied by the perpendicular height. Always ensure you use the perpendicular height, not the length of the slanted side.
Common Mistakes
- Using the slanted side length instead of the perpendicular height in the area formula.
- Forgetting the factor in the formula.
- Adding the parallel sides and then multiplying by the height without halving the sum first.
Things to Be Careful About
Ensure the height used is the perpendicular distance between the parallel sides, which is given as due to the right-angle symbol. The answer should be in .
Approach
To find the perimeter, we need the lengths of all four sides. Three are given (, , and ). The fourth is the slanted right side. We can find it by dropping a perpendicular from the top-right vertex to the bottom side, creating a right-angled triangle.
Working
The horizontal base of this right-angled triangle is the difference between the bottom and top parallel sides:
The vertical height is . By Pythagoras' theorem, the length of the slanted side is:
The perimeter is the sum of all four side lengths:
Answer
24
Walkthrough
To calculate the perimeter, we must add the lengths of all four sides of the trapezium. We are given the top side (), the bottom side (), and the perpendicular left side (). The right side is slanted, so we need to find its length.
By dropping an imaginary perpendicular line from the top-right vertex down to the bottom side, we form a right-angled triangle on the right side of the trapezium. The vertical side of this triangle is the same as the left side of the trapezium, which is . The horizontal base of this triangle is the difference between the bottom and top parallel sides: .
Using Pythagoras' theorem on this right-angled triangle:
Taking the square root gives . Finally, we add all four sides together to find the perimeter: .
Key Takeaways
When a trapezium has a slanted side, you can often find its length by constructing a right-angled triangle using the difference between the parallel sides and the perpendicular height. Pythagoras' theorem is then used to find the hypotenuse.
Common Mistakes
- Forgetting to subtract the top side length from the bottom side length to find the base of the right-angled triangle (using instead of ).
- Using the wrong sides in Pythagoras' theorem (e.g., adding and instead of and ).
- Forgetting to include all four sides when calculating the perimeter.
- Rounding errors if using a calculator for the square root, though is exact here.
Things to Be Careful About
The diagram is marked NOT TO SCALE, so do not estimate lengths visually. Always use the given numerical values. The right-angle symbol at the bottom-left confirms that the left side is the perpendicular height, making the construction of the auxiliary right-angled triangle valid. Ensure the final answer is in .
Approach
Calculate the value of raised to the power of , which means multiplying by itself three times.
Working
First, calculate . Then multiply by again:
Answer
27
Walkthrough
The expression means '3 cubed' or '3 to the power of 3'. The exponent tells us how many times to use the base number as a factor. So we write it out as multiplication: . Multiplying step-by-step gives , which equals .
Key Takeaways
- An exponent indicates repeated multiplication of the base.
- means multiplying by itself times.
Common Mistakes
- Multiplying instead of repeating (e.g., calculating and stopping).
- Adding instead of multiplying (e.g., ).
Things to Be Careful About
- Ensure you count the correct number of factors. The power means three s, not two.
Approach
Find the exponent such that raised to the power equals . This involves listing powers of until we reach .
Working
List the first few powers of :
Since , the value of must be .
Answer
5
Walkthrough
We are given the equation . We need to find the power to which must be raised to get . By calculating successive powers of (), we can see that the fifth power is . Therefore, .
Key Takeaways
- Powers of small integers like and are common benchmarks in exams.
- If , you can often find by trial with known powers or by prime factorisation.
Common Mistakes
- Miscounting the number of multiplications (e.g., thinking ).
- Confusing the base and the exponent.
Things to Be Careful About
- Memorising powers of up to at least () is very helpful for this type of question.
Approach
To simplify the expression , we group the numerical coefficients together and the variable terms together, then apply the rules of indices.
Working
Group the numbers and the variables:
Multiply the coefficients:
For the variables, recall that is the same as . When multiplying terms with the same base, add the exponents:
Combine these results:
The mark scheme also accepts the answer with a positive index. A negative exponent indicates a reciprocal:
Answer
18/a^2
Walkthrough
The expression is a product of two algebraic terms: and .
- Coefficients: Multiply the numbers and to get .
- Variables: Multiply by . Since there is no visible exponent on the second , it is understood to be . The law of indices states that . So, we add the exponents: . This gives .
- Final Form: The simplified term is . It is standard practice to write answers with positive indices if possible. Using the rule , we move to the denominator to get .
Key Takeaways
- Always multiply coefficients separately from variables.
- Remember that a variable written alone has an implicit exponent of (e.g., ).
- Negative indices can be converted to positive indices by taking the reciprocal.
Common Mistakes
- Adding the coefficients instead of multiplying them ().
- Subtracting exponents instead of adding them when multiplying.
- Forgetting that has an exponent of (treating it as or just dropping it).
- Leaving the answer with a negative index when a positive one is preferred or required by specific instructions (though here both forms are accepted).
Things to Be Careful About
- Check the sign of the resulting exponent carefully. is , not or .
Approach
To find of , we convert the percentage to a fraction or decimal and multiply it by .
Working
Multiply this fraction by :
Cancel the zero in the denominator with one zero in :
Calculate the product:
Answer
84
Walkthrough
The question asks for of . The word 'of' in mathematics usually means multiplication. First, we change the percentage into a more workable form. We can write as the fraction or simplify it to . Multiplying by is the same as multiplying by and then dividing by . Alternatively, multiplying by is the same as finding th of (which is ) and then multiplying that result by . .
Key Takeaways
- 'Of' means multiply.
- To find a percentage of a number, convert the percentage to a fraction () or decimal () first.
Common Mistakes
- Multiplying by instead of or , which gives an answer times too large.
- Forgetting to divide by after multiplying by .
Things to Be Careful About
- Ensure you are calculating the percentage of the total, not the percentage itself as a raw number.
Approach
To express as a percentage of , we write it as a fraction and then convert that fraction to a percentage by multiplying by .
Working
Divide by :
Multiply the numerator by this result:
So, the percentage is .
Answer
32%
Walkthrough
We want to find what percentage is of . This is set up as the division . In fraction form, this is . To turn any fraction into a percentage, we multiply it by . So we calculate . It is easier to divide by the denominator () first: . Then we multiply the numerator () by this result: . Thus, is of .
Key Takeaways
- A percentage is essentially a fraction with a denominator of .
- To find 'A as a percentage of B', calculate .
Common Mistakes
- Dividing the larger number by the smaller number (), which gives or , meaning is of .
- Forgetting to multiply by at the end.
Things to Be Careful About
- Check if your answer makes sense: since is less than half of , the percentage must be less than .
In a sale, the original price of a jacket is reduced by 12%.
The sale price of the jacket is $66.
Calculate the original price of the jacket.
$ ______
Approach
Let the original price be . The jacket was reduced by , so the sale price represents of the original price. We can set up an equation where of equals the sale price of $66, and solve for .
Working
Original price
Percentage reduction
Percentage of original price paid
Convert to a fraction:
Set up the equation using the sale price of $66:
To isolate , multiply both sides by and divide by :
Simplify the fraction . Both numbers are divisible by :
So,
Divide by :
Multiply by :
Answer
75
Walkthrough
This is a reverse percentage problem. We know the final price after a discount, but we need to find the starting price.
Step 1: Understand the percentages. The original price is always . Since there was a reduction, the customer paid of the original price.
Step 2: Relate the percentage to the money. We know that this corresponds to $66. Therefore, of the Original Price .
Step 3: Solve for the Original Price. We can write this algebraically as or . To find , we divide by (or multiply by ).
Using fractions is often safer for non-calculator exams. . We can simplify by dividing top and bottom by their highest common factor, which is . This leaves . So .
Key Takeaways
- In a discount/sale problem, the sale price is of the original price.
- To find the original price from a discounted price, divide the sale price by the remaining percentage (as a decimal or fraction).
Common Mistakes
- Subtracting of from . This is incorrect because the reduction was taken from the original price, not the sale price.
- Adding to . This assumes the sale price was of the original, which is wrong.
- Calculating correctly but making arithmetic errors when multiplying by .
Things to Be Careful About
- Always identify which value represents . Here, the unknown original price is , not the $66.
- Show working clearly. The mark scheme requires seeing the logic of equating the reduced percentage to the sale price.
The cumulative frequency diagram gives information about the marks scored by 80 students in an exam.
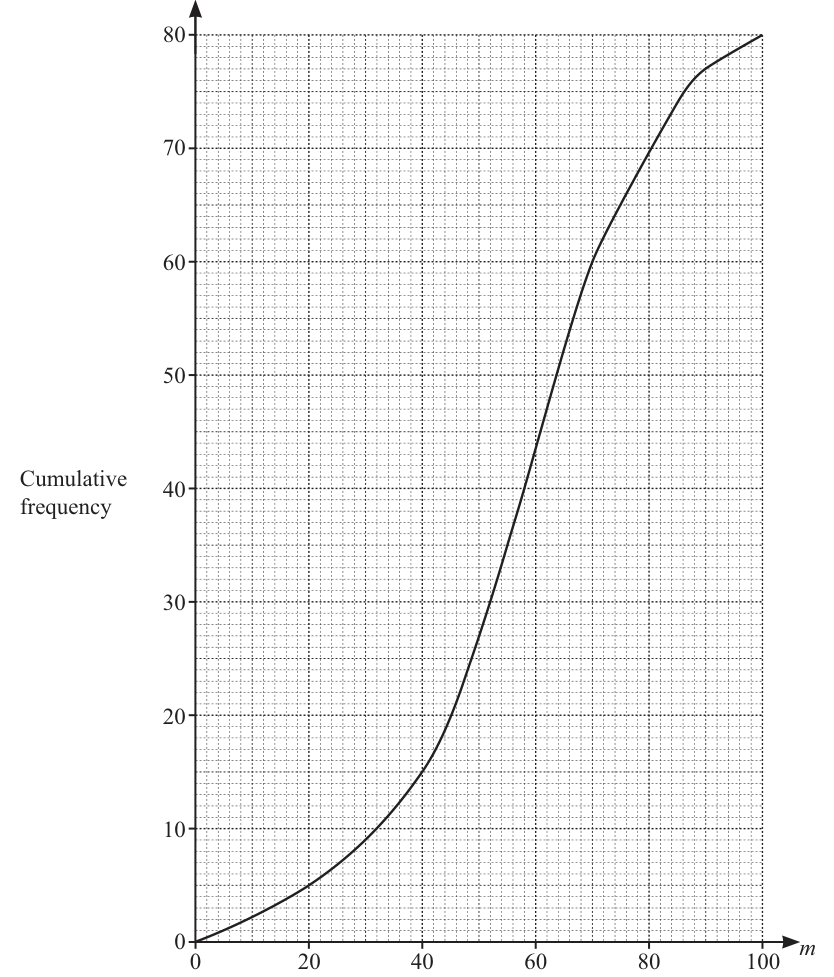
Use the cumulative frequency diagram to complete the frequency table.
The first two frequencies have been completed for you.
| Mark () | ||||||
|---|---|---|---|---|---|---|
| Frequency | 5 | 10 |
Approach
Read the cumulative frequency at each class boundary from the diagram, then find each frequency by subtracting consecutive cumulative frequencies.
Working
From the diagram, read the cumulative frequency at each upper class boundary:
Each frequency is the difference between consecutive cumulative frequencies:
Answer
The four missing frequencies are , , , .
20, 25, 17, 3
Walkthrough
A cumulative frequency diagram plots the running total of frequencies against the upper boundary of each class. To recover the individual frequency for a class, we read the cumulative frequency at its upper boundary and subtract the cumulative frequency at its lower boundary.
First, read the cumulative frequency at each class boundary from the graph:
- At , (matches the given frequency of 5 for the first class).
- At , (matches for the first two classes).
- At , .
- At , .
- At , .
- At , (matches the total number of students).
Then compute each missing frequency:
- For : .
- For : .
- For : .
- For : .
Check: ✓
Key Takeaways
- The cumulative frequency at a class boundary is the sum of all frequencies up to and including that class.
- Individual frequency = cumulative frequency at upper boundary minus cumulative frequency at lower boundary.
- The final cumulative frequency must equal the total number of data points.
Common Mistakes
- Reading the wrong axis or misreading grid values (the graph has fine gridlines; read carefully).
- Subtracting in the wrong order (lower from upper, not upper from lower).
- Forgetting that the first two frequencies are already given and should be verified against the graph.
Things to Be Careful About
- Read cumulative frequency values to the nearest gridline. Values like require careful interpolation between gridlines.
- The class boundaries are not evenly spaced (, , ), so read the graph at the exact -values given.
- Always verify the total frequency equals .
Use the cumulative frequency diagram to find an estimate of
Approach
The median is the value at position in the ordered data. For , this is the 40th value. Find the mark on the diagram where the cumulative frequency equals 40.
Working
Draw a horizontal line from cumulative frequency to the curve, then drop a vertical line to the horizontal axis.
From the diagram, the mark corresponding to cumulative frequency is approximately .
Answer
58
Walkthrough
The median of 80 values is the average of the 40th and 41st values. For a cumulative frequency diagram, we read the value at cumulative frequency 40, which gives an estimate of the median.
Locate 40 on the vertical (cumulative frequency) axis. Move horizontally to the curve, then vertically down to the horizontal (mark) axis. The value read is approximately 58.
Key Takeaways
- Median position = for cumulative frequency diagrams.
- Read horizontally from the cumulative frequency axis to the curve, then vertically down to the data axis.
Common Mistakes
- Using or other incorrect position formulas for cumulative frequency diagrams.
- Reading the axes in the wrong direction (from the mark axis to the curve instead of from cumulative frequency).
Things to Be Careful About
- The answer must be read from the graph, so allow a reasonable tolerance (typically ±2 marks). The mark scheme accepts 58.
Approach
The 30th percentile is the value at position in the ordered data. Calculate this position, then read the corresponding mark from the diagram.
Working
Draw a horizontal line from cumulative frequency to the curve, then drop a vertical line to the horizontal axis.
From the diagram, the mark corresponding to cumulative frequency is approximately .
Answer
48
Walkthrough
The 30th percentile means 30% of the data lies below this value. With 80 students, 30% of 80 is 24, so we need the mark at which the cumulative frequency reaches 24.
Calculate: . Locate 24 on the vertical axis, move horizontally to the curve, then vertically down to read the mark, which is approximately 48.
Key Takeaways
- Percentile position = (percentile/100) × total frequency.
- The calculation of the position is essential and earns a method mark even if the final reading is slightly off.
Common Mistakes
- Forgetting to calculate the percentile position and reading directly from the wrong cumulative frequency.
- Using the wrong percentage (e.g., 30 instead of 0.30).
Things to Be Careful About
- Show the calculation as the mark scheme awards a mark for seeing 24. The final answer of 48 is read from the graph.
Approach
Find the cumulative frequency at (the number of students who scored less than 76), then subtract from the total of 80 to find how many scored 76 or more.
Working
Locate on the horizontal axis. Move vertically up to the curve, then horizontally to the cumulative frequency axis.
From the diagram, the cumulative frequency at is approximately .
Answer
14
Walkthrough
The cumulative frequency at tells us how many students scored less than 76. To find how many scored 76 or more, subtract this from the total number of students (80).
Read the graph at : move up from 76 on the horizontal axis to the curve, then across to the vertical axis. The cumulative frequency is approximately 66. Then .
Key Takeaways
- Cumulative frequency gives the count below a value; subtract from total to get the count above.
- Always show the intermediate reading (CF at 76 = 66) as it earns a method mark.
Common Mistakes
- Subtracting from the wrong total or using the frequency instead of cumulative frequency.
- Reading the graph inaccurately (values of 13 or 15 may be accepted as a single compensating mark if the working shows 66).
Things to Be Careful About
- Show the working so the method mark is visible. The mark scheme requires seeing 66 in the working. Reading errors on the graph are tolerated within a small range.
Rearrange the formula to make the subject.
= ______
Approach
To make the subject, we must first eliminate the fraction, then collect all terms involving on one side of the equation, factorise , and finally divide to isolate .
Working
Start with the given equation:
Multiply both sides by 5 to remove the denominator (M1):
Simplify the left side:
Subtract from both sides to group the terms together (M1FT):
Factorise the left side by taking out the common factor (M1FT):
Divide both sides by to make the subject:
Answer
2/(5a-3)
Walkthrough
The goal is to rearrange the formula so that stands alone on one side.
- Clear the fraction: The right-hand side has a denominator of 5. To get rid of it, multiply every term in the equation by 5. On the right, the 5 cancels with the denominator, leaving just . On the left, becomes . This gives us .
- Group the terms: We want all parts of the equation containing on one side. Currently, we have on the left and on the right. Subtract from both sides. This moves the to the left side, resulting in . The constant term remains on the right.
- Factorise: Now we have two terms on the left, and , that share a common factor of . We can write this as multiplied by what remains: . So the equation is .
- Isolate : To leave by itself, we need to remove the multiplying it. We do this by dividing both sides by . This yields .
Key Takeaways
- When the subject appears in multiple terms, you cannot simply divide or subtract to isolate it; you must factorise first.
- Clearing fractions early often simplifies the algebra significantly.
- Be careful with signs when moving terms across the equals sign (e.g., becomes ).
Common Mistakes
- Incorrect grouping: Students might try to combine and into or similar errors. Remember, you can only combine 'like terms' (terms with exactly the same variable factors). Here, the variables are effectively different until factored.
- Sign errors: Forgetting to change the sign of when moving it to the other side, leading to .
- Order of operations: Attempting to subtract 3 before clearing the fraction, which leads to messy fractional coefficients.
Things to Be Careful About
- Final Form: Ensure the answer is explicitly in the form . Do not leave it as .
- Variable vs Constant: Treat as a constant coefficient. It stays with during the subtraction step but becomes part of the divisor in the final step.
- Accuracy: As per the mark scheme, an incorrect final answer after correct method steps will limit marks to M1/M2 only (Max 2 marks). Precision in the final division is key.
The diagram shows the speed–time graph for part of a car’s journey.
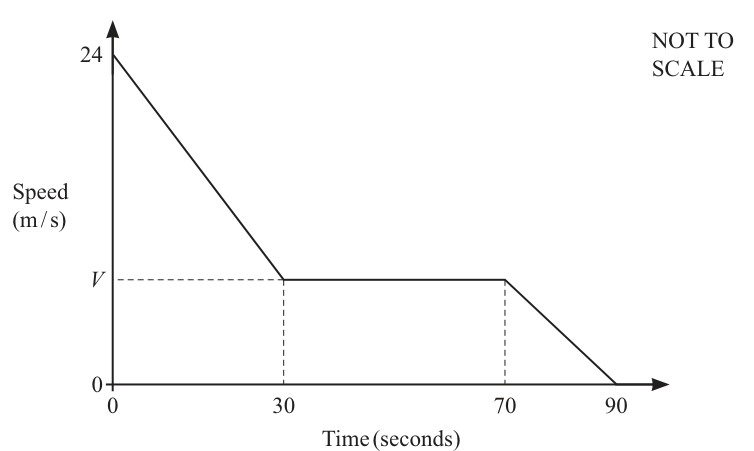
The car travels a total distance of in the 90 seconds.
Calculate the value of .
= ______
Approach
The distance travelled by the car is equal to the area under the speed-time graph. We are given the total distance as , which must be converted to metres () to match the speed units (). The area under the graph can be split into three geometric shapes: a trapezium from to , a rectangle from to , and a triangle from to . We sum these areas, set the total equal to , and solve for .
Working
Convert the total distance to metres:
Calculate the area under the graph in terms of :
- Area from to (trapezium with parallel sides and , width ):
- Area from to (rectangle with width and height ):
- Area from to (triangle with base and height ):
Total area under the graph:
Set the total area equal to the total distance in metres:
Solve for :
Answer
10
Walkthrough
The problem gives a speed-time graph and asks for the value of an unknown constant speed . The key principle here is that the distance travelled is the area under the speed-time graph.
First, we must ensure units are consistent. The speed is in and time is in seconds, so distance must be in metres. We convert to .
Next, we calculate the area under the graph by splitting it into simple shapes:
- From to , the graph is a straight line from to . This forms a trapezium with parallel vertical sides of length and , and a horizontal width of . The area is .
- From to , the speed is constant at . This forms a rectangle with width and height . The area is .
- From to , the graph is a straight line from to . This forms a right-angled triangle with base and height . The area is .
Adding these areas together gives the total distance: .
We set this equal to the given total distance of : . Subtracting from both sides gives , and dividing by yields .
Key Takeaways
- The area under a speed-time graph represents the distance travelled.
- Always check that units are consistent before setting up equations (e.g., convert km to m when speed is in m/s).
- Complex shapes under graphs can be split into simpler geometric figures (trapeziums, rectangles, triangles) to calculate the total area.
Common Mistakes
- Forgetting to convert the distance from kilometres to metres, leading to setting the area equal to instead of .
- Miscalculating the area of the trapezium by using the wrong formula or misidentifying the parallel sides.
- Using the wrong width for the rectangular section (e.g., using instead of ).
Things to Be Careful About
- The question specifies the distance in km (), but the graph axes use m/s and seconds. Converting to is essential.
- The answer must be given as a number; is exact and requires no rounding.
- When calculating areas, ensure you use the correct dimensions from the graph (e.g., the width of the last triangle is , not ).
Approach
Deceleration is the rate at which speed decreases. On a speed-time graph, the acceleration (or deceleration) is given by the gradient of the line. For the last seconds (from to ), the speed drops from to . We use the value of found in part (a) to calculate this gradient.
Working
From part (a), .
The car's speed changes from at to at .
The change in speed is:
The time interval is:
The acceleration is:
Since the question asks for deceleration, we take the magnitude of the negative acceleration:
Answer
0.5
Walkthrough
Part (b) asks for the deceleration during the last seconds of the journey. On a speed-time graph, the gradient of the line represents the acceleration. A negative gradient indicates deceleration.
We focus on the time interval from to . At , the speed is , which we found to be in part (a). At , the speed is .
The change in speed is . The time taken for this change is .
Acceleration is calculated as . The negative sign indicates the car is slowing down. Deceleration is the positive value of this rate, so the deceleration is .
Key Takeaways
- The gradient of a speed-time graph gives the acceleration.
- Deceleration is simply the magnitude of negative acceleration.
- Always use the correct value from previous parts (here, ) when calculating subsequent quantities.
Common Mistakes
- Forgetting to use the value of from part (a) and trying to calculate the gradient without it.
- Calculating the gradient as and then incorrectly stating the acceleration is without recognizing it as deceleration (though the question asks for deceleration, so the positive value is correct, the reasoning must be sound).
- Using the wrong time interval (e.g., using instead of ).
Things to Be Careful About
- The question asks for deceleration, which is a positive quantity representing the rate of slowing down. Ensure the final answer is positive.
- Units are already provided in the question (), so only the numerical value is needed in the answer box.
- Follow-through from part (a) is expected; using an incorrect value of will lead to an incorrect deceleration.
The diagram shows triangle and triangle .
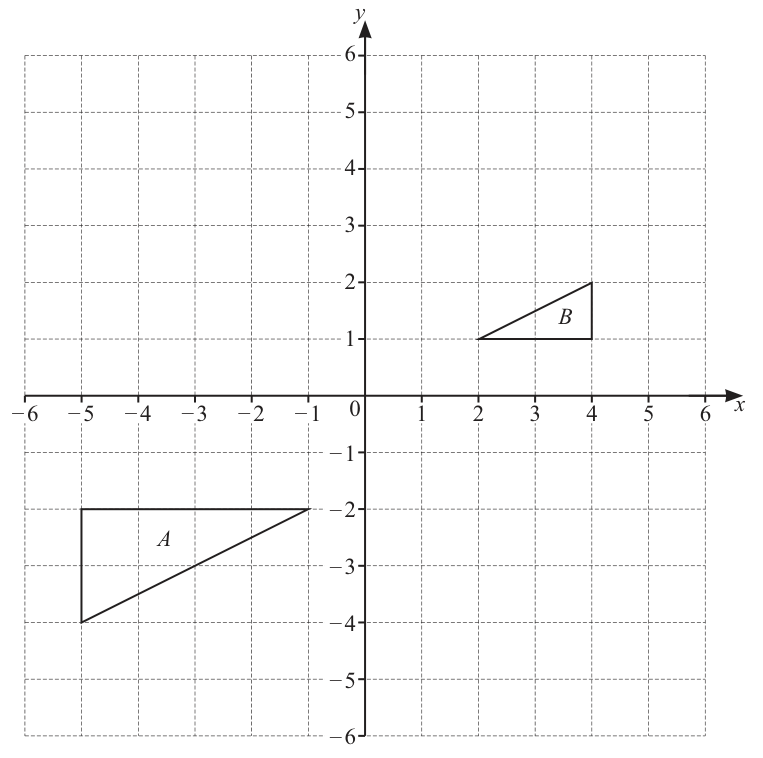
Describe fully the single transformation that maps triangle onto triangle .
______
Approach
Join corresponding vertices of the two triangles. The lines intersect at the centre of enlargement. The scale factor is found by comparing the lengths of corresponding sides or the distances of corresponding vertices from the centre.
Working
Lines through corresponding vertices:
Vertex of maps to of .
Vertex of maps to of .
Vertex of maps to of .
Equation of line through and :
Equation of line through and :
Finding the intersection (centre of enlargement):
Subtracting the second equation from the first:
Substituting into :
The centre of enlargement is .
Finding the scale factor:
The length of the horizontal side of from to is units.
The corresponding horizontal side of from to is units.
Since the triangles are on opposite sides of the centre (the image is inverted), the scale factor is negative.
Answer
Enlargement with centre and scale factor .
Enlargement, centre (1, 0), scale factor -1/2
Walkthrough
To describe the transformation mapping triangle to triangle , we first observe that the triangles are similar but oriented in opposite directions. This indicates an enlargement with a negative scale factor.
We find the centre of enlargement by drawing lines through corresponding vertices of the two triangles. The vertex on maps to on . The line through these points has gradient and equation . The vertex on maps to on . The line through these points has gradient and equation . Solving these two equations simultaneously gives the intersection point , which is the centre of enlargement.
To find the scale factor, we compare the lengths of corresponding sides. The horizontal side of has length , and the corresponding horizontal side of has length . The ratio of the image length to the original length is . Because the image is inverted relative to the centre, the scale factor is negative, giving .
Key Takeaways
- An enlargement with a negative scale factor produces an image on the opposite side of the centre and inverted.
- The centre of enlargement is the fixed point where lines joining corresponding vertices of the original and image shapes intersect.
- The scale factor is the ratio of a length in the image to the corresponding length in the original shape, with a negative sign if the image is inverted.
Common Mistakes
- Forgetting to state the type of transformation (enlargement) or giving an incomplete description (must include type, centre, and scale factor for full marks).
- Giving a positive scale factor when the image is inverted; forgetting the negative sign for enlargements with the image on the opposite side of the centre.
- Reading the centre coordinates incorrectly from the grid.
- Describing the transformation as a rotation or reflection; the change in size (from side length 4 to side length 2) confirms it is an enlargement.
Things to Be Careful About
- A full description of an enlargement requires all three elements: the type of transformation, the centre coordinates, and the scale factor. Missing any one of these costs a mark.
- Ensure coordinates are read accurately from the grid axes.
- The scale factor must include the negative sign when the image is on the opposite side of the centre of enlargement.
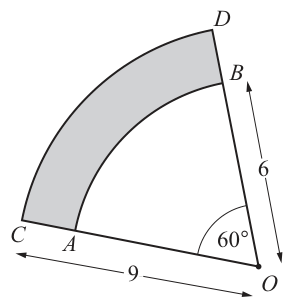
and are sectors of circles, each with centre and angle .
Sector has radius .
Sector has radius .
The perimeter of the shaded region is .
Find the value of and the value of .
= ______
= ______
Approach
The perimeter of the shaded region consists of two arc lengths (arc CD and arc AB) and two straight line segments (AC and BD). Calculate each arc length using the formula , and find the straight lengths by subtracting the inner radius from the outer radius.
Working
The angle at the centre is .
Length of arc CD:
Length of arc AB:
Length of AC:
Length of BD:
Perimeter of shaded region:
Comparing with , we have and .
Answer
a = 5, b = 6
Walkthrough
The perimeter of the shaded region is the total length of its boundary. This boundary is made up of four pieces: the outer arc CD, the inner arc AB, and the two straight line segments AC and BD that connect the ends of the arcs.
First, we calculate the length of arc CD. The formula for arc length is , where is the angle at the centre and is the radius. For arc CD, and , giving cm.
Next, we calculate the length of arc AB using the same formula with , giving cm.
The straight segments AC and BD are parts of the radii. Since and , the length cm. Similarly, cm.
Adding all four pieces together gives the total perimeter: cm. Matching this to the form gives and .
Key Takeaways
- The perimeter of a shaded region bounded by arcs and straight lines is the sum of the lengths of all those boundary pieces.
- Arc length is found using .
- Straight segments connecting concentric arcs are found by subtracting the inner radius from the outer radius.
Common Mistakes
- Forgetting to include the two straight line segments (AC and BD) in the perimeter calculation.
- Using the full circle circumference instead of the arc length formula .
- Adding the radii together instead of subtracting to find the length of AC and BD.
Things to Be Careful About
- Ensure the angle is in degrees when using the formula.
- The answer must be in the exact form ; do not convert to a decimal.
- Keep track of which radius corresponds to which arc (9 cm for the outer arc, 6 cm for the inner arc).
Calculate the area of the shaded region.
Give your answer in its simplest form in terms of .
______
Approach
The area of the shaded region is the area of the larger sector OCD minus the area of the smaller sector OAB. Use the formula for each sector.
Working
Area of sector OCD:
Area of sector OAB:
Area of shaded region:
This can also be written as .
Answer
15pi/2
Walkthrough
The shaded region is the area between two concentric sectors with the same central angle. To find its area, we calculate the area of the larger sector (OCD) and subtract the area of the smaller sector (OAB).
The formula for the area of a sector is . For sector OCD, and , so the area is cm.
For sector OAB, and , so the area is cm.
Subtracting the smaller area from the larger area gives . To subtract, we write as , resulting in cm. The question asks for the simplest form in terms of , so (or ) is the final answer.
Key Takeaways
- The area of a shaded region between two concentric sectors is the difference of their individual areas.
- Sector area is found using .
- When subtracting fractions involving , find a common denominator before combining.
Common Mistakes
- Using the circumference formula instead of the area formula .
- Forgetting to square the radius in the area formula.
- Subtracting the areas incorrectly or failing to find a common denominator when combining the terms.
- Giving a decimal approximation for when the question asks for the answer in terms of .
Things to Be Careful About
- The question requires the answer in its simplest form in terms of . Do not evaluate as 3.14159... or leave it as an unsimplified fraction like .
- Ensure the final answer is in cm, not cm.
- and are both acceptable final forms.
Line has equation .
Find the equation of the line perpendicular to which passes through the point .
______
Approach
First, determine the gradient of the given line by rearranging its equation into the form . Then, calculate the gradient of the required perpendicular line using the negative reciprocal property. Finally, substitute the coordinates of the given point into the equation of the perpendicular line to find the y-intercept (or use the point-slope form) and write the final equation.
Working
Step 1: Find the gradient of line
The equation of line is:
Rearrange to make the subject:
The gradient () is the coefficient of :
Step 2: Find the gradient of the perpendicular line
Let be the gradient of the line perpendicular to . The product of the gradients of two perpendicular lines is :
Substituting :
Step 3: Find the equation of the perpendicular line
The equation of the perpendicular line is of the form:
This line passes through the point . Substitute and into the equation:
Solve for :
So the equation in slope-intercept form is:
Alternatively, this can be written in general form by multiplying the entire equation by 5:
Answer
The equation of the line is:
or equivalently,
y = -2/5 x + 22/5
Walkthrough
The problem asks for the equation of a line that satisfies two conditions: it is perpendicular to a given line , and it passes through a specific point .
-
Identify the gradient of the original line: The given equation is . To find the gradient easily, we rearrange this into the slope-intercept form , where is the gradient. Dividing both sides by 2 gives . Thus, the gradient of line is . This corresponds to the first method mark (M1) in the scheme.
-
Determine the perpendicular gradient: Two lines are perpendicular if the product of their gradients is . If the gradient of one line is , the gradient of the perpendicular line is (the negative reciprocal). Therefore, the gradient of our new line is the negative reciprocal of , which is . This corresponds to the second method mark (M1FT).
-
Find the specific equation: We now know the gradient of the new line is , so its equation looks like . Since the line passes through the point , these coordinates must satisfy the equation. Substituting and gives . Solving for : add to both sides to get . This substitution step earns the third method mark (M1FT).
-
Final Form: The equation is . It is often acceptable to present the answer in integer form by clearing the denominator. Multiplying by 5 yields , or . Both forms are correct.
Key Takeaways
- Gradient from Equation: Always rearrange linear equations to to quickly identify the gradient .
- Perpendicular Gradients: Remember the rule . The gradient of a perpendicular line is the negative reciprocal ().
- Finding the Intercept: Once you have the gradient, use a known point on the line to solve for the y-intercept .
Common Mistakes
- Incorrect Perpendicular Gradient: Students often forget the negative sign (giving instead of ) or only take the reciprocal without negating it.
- Algebraic Errors: When solving , students might subtract instead of adding it, leading to an incorrect intercept.
- Formatting: Failing to simplify the fraction or leaving the answer in an unsimplified fractional form when an integer form is preferred (though usually both are accepted unless specified).
Things to Be Careful About
- Sign Errors: Be very careful with negative signs when dealing with reciprocals and subtraction of fractions.
- Fraction Arithmetic: Adding integers and fractions requires converting the integer to a fraction with a common denominator (e.g., ).
- Method Marks: Ensure you show the rearrangement of the original line and the calculation of the negative reciprocal clearly, as these are key steps for earning method marks.
Simplify.
______
Approach
To simplify the algebraic fraction , we must factorise both the numerator and the denominator completely. Once factorised, we cancel any common binomial factors.
Working
Step 1: Factorise the numerator.
The numerator is . This is a difference of two perfect squares ():
(B1 mark awarded for seeing this correct factorisation)
Step 2: Factorise the denominator.
The denominator is . We look for two numbers that multiply to and add to . These numbers are and .
We split the middle term:
Group terms:
Extract the common bracket:
(B2 mark awarded for seeing this full factorisation, or B1 for partial progress like the grouped form above)
Step 3: Simplify the fraction.
Rewrite the original expression with the factorised forms:
Cancel the common factor from the top and bottom:
Answer
(x + 3)/(5x + 4)
Walkthrough
The goal is to reduce an algebraic fraction to its simplest form. This involves two main tasks: factorising the numerator and factorising the denominator.
First, look at the numerator . This fits the pattern of the difference of two squares, which states that . Here, and , so it becomes . This is a straightforward recall fact.
Next, look at the denominator . This is a non-monic quadratic (the coefficient of is not 1). The most reliable method is to find two numbers that multiply to give () and add to give (). The pair and works because and . We use these to rewrite the middle term: . Then we factorise by grouping: take out from the first two terms to get , and take out from the last two to get . Since is now a common factor, we pull it out to get .
Finally, we write the fraction as . We can see that appears in both the numerator and the denominator, so they cancel each other out, leaving the final simplified answer .
Key Takeaways
- Always check for special products like the difference of two squares before attempting more complex methods.
- For quadratics where the leading coefficient is not 1, splitting the middle term (using the product-sum method) is a robust technique.
- Simplifying fractions requires identifying and removing common factors across the entire numerator and denominator.
Common Mistakes
- Incorrect factorisation: Getting the signs wrong in the denominator (e.g., writing ) results in losing the B2 mark. Note that expands to , which has the wrong sign for the middle term.
- Incomplete cancellation: Canceling only parts of terms, such as canceling the 's or the 's individually without treating as a single unit.
- Failing to factorise: Leaving the answer as the original unsimplified fraction.
Things to Be Careful About
- Check your work: Expand your factors back out to ensure they match the original expressions. For the denominator, . If this doesn't match, the factorisation is wrong.
- Domain restrictions: While usually not required for simple simplification questions at this level, note that the original expression is undefined for and . The simplified form removes the hole at but does not change the domain restriction implicitly. However, for 'Simplify' questions, just providing the reduced algebraic form is sufficient.
Approach
Expand two of the brackets first to obtain a quadratic, then multiply the quadratic by the third bracket and collect like terms.
Working
First, expand :
Now multiply this result by :
Answer
2x^3 + 3x^2 - 17x - 30
Walkthrough
To expand three linear factors, we multiply them in pairs. First, we expand by multiplying each term in the first bracket by each term in the second: , , , and . Combining the like terms and gives . Next, we multiply this quadratic by the remaining factor , distributing each term: , , , , , and . Finally, we collect like terms: and , yielding the simplified expression .
Key Takeaways
When expanding three or more linear factors, expand them sequentially in pairs. Always collect like terms carefully at each stage to avoid sign errors.
Common Mistakes
- Forgetting to multiply every term in one bracket by every term in the other (e.g. missing the term).
- Sign errors when combining negative and positive like terms, such as writing instead of .
- Not simplifying the final answer to a four-term expression as required.
Things to Be Careful About
- Ensure all intermediate multiplication steps are shown clearly, as partial marks are awarded for correct unsimplified expressions or for having three out of four terms correct.
- Keep track of negative signs throughout the expansion; a single sign error will cascade and invalidate the final answer.
Sketch the graph of .
On the sketch, label the values where the graph crosses the axes.
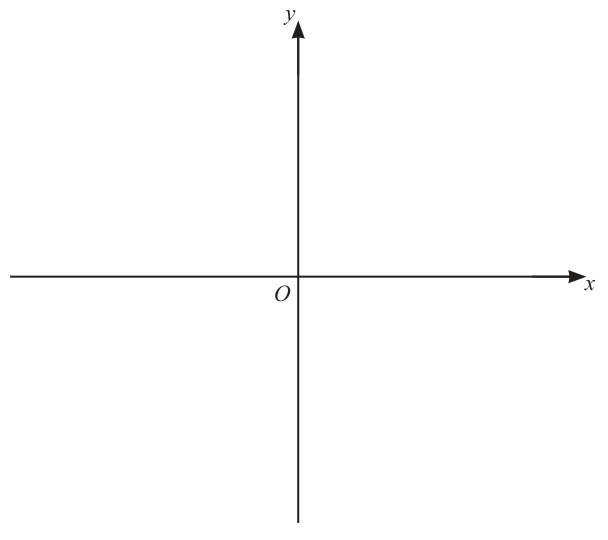
Approach
Find the x-intercepts by setting each factor equal to zero, find the y-intercept by substituting , and use the leading term to determine the end behaviour of the cubic curve.
Working
The x-intercepts occur where :
Setting each factor to zero:
The y-intercept occurs where :
The leading term of the expanded expression is . Since the coefficient is positive, the graph starts in the bottom-left (as , ) and ends in the top-right (as , ).
Answer
Sketch a positive cubic curve crossing the x-axis at , , and , and crossing the y-axis at .
Positive cubic curve crossing the x-axis at -2.5, -2, and 3, and the y-axis at -30.
Walkthrough
To sketch the graph, we first identify the key points where the curve crosses the axes. The x-intercepts are found by setting , which means at least one of the factors , , or must be zero. Solving each gives , , and . The y-intercept is found by substituting into the equation, giving . Next, we determine the shape of the curve. The expanded form is , and the leading term is . Because the coefficient of is positive, the curve has the standard positive cubic shape: it comes from the bottom-left quadrant, crosses the x-axis at , rises to a local maximum between and , crosses the x-axis again at , falls to cross the y-axis at (which is the local minimum), and then rises to cross the x-axis a third time at before continuing to the top-right.
Key Takeaways
For polynomial graphs given in factored form, the x-intercepts are directly readable from the factors. The y-intercept is found by evaluating the function at . The leading term determines the end behaviour (top-right to bottom-left for negative odd powers, bottom-left to top-right for positive odd powers).
Common Mistakes
- Forgetting to solve correctly and writing instead of .
- Drawing a negative cubic curve (top-left to bottom-right) by ignoring the positive leading coefficient .
- Drawing a straight line or a quadratic shape instead of a cubic curve with the appropriate turning points.
- Labeling the y-intercept as instead of , or drawing a horizontal line at instead of a single intercept point.
Things to Be Careful About
- The sketch does not require a scale, but the relative positions of the intercepts and the overall cubic shape must be correct.
- All three x-intercepts and the y-intercept must be labelled with their exact values; partial marks are awarded for fewer correctly labelled intercepts.
- Ensure the curve is smooth and passes through all four labelled points without sharp corners.
The diagram shows the quadrilateral .
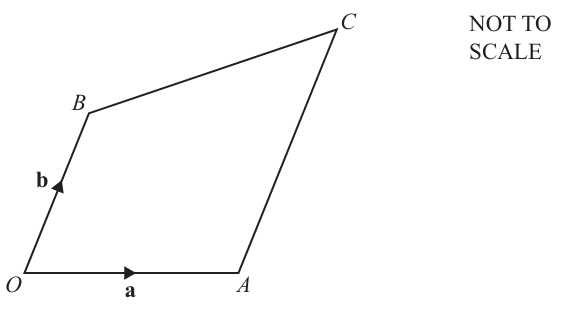
and .
is parallel to and .
Find, in its simplest form, in terms of and
Approach
To find , express the vector as a route via the origin :
Since and , substitute these vectors and simplify.
Working
Answer
b - a
Walkthrough
To travel from point to point using known vectors, we go from to the origin , and then from to .
- Travelling from to is the opposite direction of , which gives .
- Travelling from to follows .
- Combining these paths gives .
Key Takeaways
- Vector paths can always be expressed by routing through intermediate points: .
- Reversing direction negates the vector: .
Common Mistakes
- Writing instead of by getting the direction of the vector backwards.
- Forgetting that is the negative of .
Things to Be Careful About
- Check the start and end letters carefully: vector starts at and ends at .
Approach
To find , use the route from to , and then from to :
We are given that is parallel to in the same direction, and . Therefore, .
Working
Answer
a + 2b
Walkthrough
- First, find vector . We are told that is parallel to and has twice the length (). Looking at the diagram, both vectors point in the same general upwards direction, so .
- Next, set up the vector route to go from to : start at , go along to , and then along to .
- Add the two vectors: .
Key Takeaways
- If two line segments are parallel and in the same direction, one vector is a scalar multiple of the other.
- Any position vector can be found by traversing along known connected vector segments.
Common Mistakes
- Forgetting to multiply by , writing .
- Using subtraction instead of addition for the route .
Things to Be Careful About
- Ensure the direction of parallel vectors is preserved correctly.
is the point on such that .
Find .
Give your answer in its simplest form in terms of and .
= ______
Approach
Find the position of point on using the ratio , then write a vector path for and simplify in terms of and .
Working
Since , the total number of parts along is .
Therefore:
Now find by choosing the path via :
Answer
4/5a + 3/5b
Walkthrough
- Point lies on the line segment dividing it in the ratio . The total parts are , which means is of the entire length .
- Express in vector form: .
- To find , choose a convenient path from to . A direct path is from to , and then from to :
- Substitute the expression for into the path equation and collect like terms:
Alternatively, this can be written with a single denominator as .
Key Takeaways
- When a line is divided in ratio , the fraction from the start to the division point is .
- Follow a clear path using known vectors: .
- Simplify vector components by grouping like vectors and .
Common Mistakes
- Using or instead of for the fraction representing .
- Using instead of for .
- Miscalculating the fraction arithmetic: .
Things to Be Careful About
- Ensure the final answer is simplified and clearly expressed in terms of and . Both and are acceptable forms.
Approach
Write each surd as a multiple of by extracting the largest square factor, then subtract the like surds.
Working
Answer
6√3
Walkthrough
Start by simplifying each surd separately. Since and is a square, . Similarly, , so . Now both terms are multiples of , so subtract the coefficients: .
Key Takeaways
The key skill is simplifying surds by taking out the largest square factor, then combining like surds exactly as you would combine like terms in algebra.
Common Mistakes
- Stopping at : this is equivalent to but is not fully simplified, so it does not earn the final mark.
- Trying to subtract the original surds directly without first writing both in terms of .
- Forgetting that and when extracting factors.
Things to Be Careful About
The final answer must be (cao). Show the intermediate forms and , because the mark scheme awards B1 if one of these is seen. This is a non-calculator question, so all working must be by hand.
Approach
Multiply the fraction by the conjugate of the denominator, , over itself. This removes the surd from the denominator, then simplify the resulting fraction.
Working
Expand the denominator using the difference of two squares:
So the fraction becomes:
Answer
2√7 - 4
Walkthrough
To rationalise the denominator, multiply by the conjugate because is a difference of two squares: , a rational number. Multiplying the numerator by the same factor gives . Dividing by simplifies the fraction to , which can also be written as .
Key Takeaways
Rationalising a denominator with a binomial surd uses the conjugate. The difference-of-two-squares identity turns the denominator into an integer, and then the fraction is simplified.
Common Mistakes
- Multiplying only the denominator by the conjugate and not the numerator.
- Using as the multiplier, which does not remove the surd.
- Forgetting to divide by , leaving as the final answer.
- Sign errors when expanding .
Things to Be Careful About
The final answer must be in simplest form; either or is accepted. The mark scheme gives M1 for multiplying by and B1 for the expanded denominator or better, so show the multiplication and expansion clearly. This is a non-calculator question, so no decimal approximation is needed or expected.