Mathematics (Syllabus D) 4024/21 — October/November 2024
Cambridge O-Level · Calculator · worked solutions for every part, with the mark scheme
Topics Number · Algebra and Graphs · Geometry · Trigonometry · Statistics · Mensuration · +3 more
Basma owns a toy shop.
The sign shows the opening hours for the shop.
| Saturday to Wednesday | 1030 to 1800 |
|---|---|
| Thursday and Friday | 1000 to 1930 |
Work out the length of time the shop is open in one week.
______
Approach
Read the table in two groups. Convert each opening interval to hours, multiply by the number of days in that group, then add the two totals.
Working
Saturday to Wednesday is 5 days.
Each day from 1030 to 1800 is 7.5 hours.
Thursday and Friday is 2 days.
Each day from 1000 to 1930 is 9.5 hours.
Total for one week:
Answer
The shop is open for 56.5 hours each week.
56.5 hours
Walkthrough
The table shows the opening hours in two groups. The first group is Saturday to Wednesday, which includes Saturday, Sunday, Monday, Tuesday and Wednesday. That is 5 days.
Each of those days the shop is open from 1030 to 1800. From 10:30 to 18:00 is 7 hours 30 minutes, so write that as 7.5 hours.
Five of these days give:
The second group is Thursday and Friday, 2 days. From 1000 to 1930 is 9 hours 30 minutes, or 9.5 hours.
Two of these days give:
The total weekly opening time is:
Key Takeaways
- A gap on a clock is found by counting hours and minutes, not by treating times as decimal numbers.
- A range such as "Saturday to Wednesday" is inclusive, so Saturday and Wednesday are both counted.
- Half an hour written as a decimal is 0.5 hours.
Common Mistakes
- Counting Saturday to Wednesday as 6 days instead of 5.
- Converting 1030 to 10.3 instead of 10.5, so 18.0 - 10.3 = 7.7, which is wrong.
- Forgetting to multiply 7.5 by 5 or 9.5 by 2.
Things to Be Careful About
The answer must be in hours. The mark scheme accepts 56.5 as the correct equivalent; 56 hours 30 minutes is the same length of time and is also acceptable.
Basma employs 5 sales assistants and 2 supervisors.
On one particular week, the 5 sales assistants each work for 30 hours and the 2 supervisors each work for 38 hours.
For that week, the total amount Basma pays these 7 employees is $3324.70 .
Basma pays each sales assistant $13.45 per hour.
Calculate the amount Basma pays each supervisor per hour.
$ ______
Approach
Find the total pay of the 5 sales assistants. Subtract that from the total paid to all 7 employees to find the total supervisor pay, then divide by the total number of supervisor hours.
Working
Total sales-assistant pay:
Total supervisor pay:
Total supervisor hours:
Hourly supervisor rate:
Answer
Each supervisor is paid 17.20 dollars per hour ($17.20 per hour).
17.20 dollars per hour
Walkthrough
The total payroll of 3324.70 dollars includes both the sales assistants and the supervisors.
First calculate how much the 5 sales assistants receive. Each works 30 hours, so they work hours altogether. At 13.45 dollars per hour, their total is:
So the total supervisor pay is:
The two supervisors each work 38 hours, so their combined hours are:
Because rate is total pay divided by total hours:
Key Takeaways
- Total pay is hours multiplied by the hourly rate.
- When one part of a total is known, subtract it to find the other part.
- An hourly rate is the total amount paid divided by the number of hours.
Common Mistakes
- Using 3324.70 as if it were the supervisors' total without first subtracting the sales assistants' pay.
- Forgetting that there are 2 supervisors, each working 38 hours, so the total is 76 hours.
- Multiplying 5 by 13.45 but not by the 30 hours.
Things to Be Careful About
The final answer is a rate in dollars per hour. The mark scheme gives the answer as 17.2[0], so both 17.2 and 17.20 are accepted. Show the subtract and division steps because the marks are awarded for the method as well as the final answer.
The exchange rate between dollars ($) and pounds (£) is $1 = £0.77 .
Basma buys 50 identical games for a total of £245.
She makes a profit of 39% when she sells each game.
Calculate the selling price of one game in dollars.
Give your answer correct to the nearest cent.
$ ______
Approach
Find the cost of one game in pounds. Add 39% profit by multiplying by 1.39 to get the selling price in pounds. Then convert pounds to dollars using the exchange rate $1 = £0.77.
Working
Cost of one game in pounds:
Add the 39% profit:
Convert to dollars:
Rounded to the nearest cent:
Answer
The selling price is 8.85 dollars ($8.85).
8.85 dollars
Walkthrough
Basma bought 50 games for 245 pounds, so the cost of each game is:
She makes 39% profit when she sells a game. That means the selling price is the cost plus 39% of the cost, i.e. 139% of the cost. Using a percentage multiplier:
Now convert that selling price from pounds to dollars. The rate says $1 = £0.77, so every 0.77 of a pound equals 1 dollar. Therefore divide the price in pounds by 0.77:
Finally, to the nearest cent, this is 8.85 dollars.
Key Takeaways
- A 39% profit is obtained by multiplying the cost by 1.39, not by 0.39.
- When the exchange rate is $1 = £0.77, pounds are converted to dollars by dividing by 0.77.
- Worth while to keep the intermediate unrounded value before the nearest-cent rounding.
Common Mistakes
- Multiplying 6.811 by 0.77 instead of dividing by 0.77, which gives the wrong currency direction.
- Using 0.39 instead of 1.39, forgetting to add the profit.
- Not dividing 245 by 50 first, so the profit is applied to the whole batch instead of one game.
- Rounding 8.845 prematurely to 8.8 rather than 8.85.
Things to Be Careful
When rounding to the nearest cent, the answer requires two decimal places. The mark scheme also shows the combined form:
But showing each intermediate step clearly makes it much easier to secure the method marks.
Basma invests $12000 in an account paying compound interest at a rate of 1.5% per year.
At the end of year 1, she invests another $12000 in the same account.
At the end of year 4, she takes $20000 out of the account.
Calculate the amount of money remaining in the account at the end of year 4.
Give your answer correct to the nearest cent.
$ ______
Approach
Deposit 1 earns interest for the whole 4 years. Deposit 2 is added at the beginning of year 1, so it added nothing for year 1; it receives interest for 3 years. Use a compound interest in both, add the two final balances, then subtract the $20000 withdrawal.
Working
First deposit after 4 years:
Second deposit after 3 years:
Total before withdrawal:
After withdrawing $20000:
Answer
The amount remaining at the end of year 4 is 5284.50 dollars ($5284.50).
5284.50 dollars
Walkthrough
The two deposits start at different times, so they earn interest over different numbers of years.
- The first $12000 is invested at the start of year 1. It earns interest in years 1, 2, 3 and 4, so it is compounded 4 times.
- At the end of year 1, a second $12000 is added. It earns interest only in years 2, 3 and 4, so it is compounded 3 times.
The annual multiplier for 1.5% is .
So the balance is:
Using calculator value:
Total before withdrawal:
Finally subtract the withdrawal of $20000:
Key Takeaways
- Compound interest uses an exponent, because each year interest is added to the balance before the next year.
- Every new deposit must be compounded for the number of complete years it remains in the account.
- Withdrawals are subtracted after all interest for that part of the problem has been applied.
Common Mistakes
- Forgetting that the second deposit starts one year later and therefore only has 3 compound periods.
- Using in the multiplier instead of , which treats interest as going down by 1.5%.
- Adding the second deposit at the start of year 3 or giving it a full 4 years.
- Rounding the factor before finishing the calculation.
Things to Be Careful About
The question asks for the answer to the nearest cent, so the final balance is 5284.50 dollars. The compound interest formula must be used here, not simple interest. The mark scheme also accepts the combined form:
Actually the standard accepted calculation is:
Keep the full unrounded values shown in the Working before making the final 5284.50.
In a traffic survey, information about the vehicles passing a checkpoint is recorded.
160 vehicles pass the checkpoint in the morning.
The table shows the number of people in each of these vehicles.
| Number of people | Frequency | Pie chart angle |
|---|---|---|
| 1 | 72 | |
| 2 | 48 | |
| 3 or more | 40 |
Approach
The total angle in a pie chart is . The angle for each category is proportional to its frequency. We use the total frequency of and the total angle to find the missing angles.
Working
For 1 person (frequency ):
For 2 people (frequency ):
Alternatively, using the given angle for "3 or more" ():
Answer
The missing angles are and .
162, 108
Walkthrough
A pie chart represents a whole as . To find the angle for a category, we take the fraction of the total frequency that the category represents and multiply by . For the "1 person" category, the fraction is . Multiplying by gives . For the "2 people" category, the fraction is . Multiplying by gives . We can verify this by adding all three angles: .
Key Takeaways
Pie chart angles are calculated using the formula: .
Common Mistakes
- Forgetting to multiply by and just writing the fraction.
- Using the wrong total frequency.
- Not ensuring the angles add up to .
Things to Be Careful About
- Always check that the angles sum to .
- The question asks to complete the table, so both numerical answers must be provided.
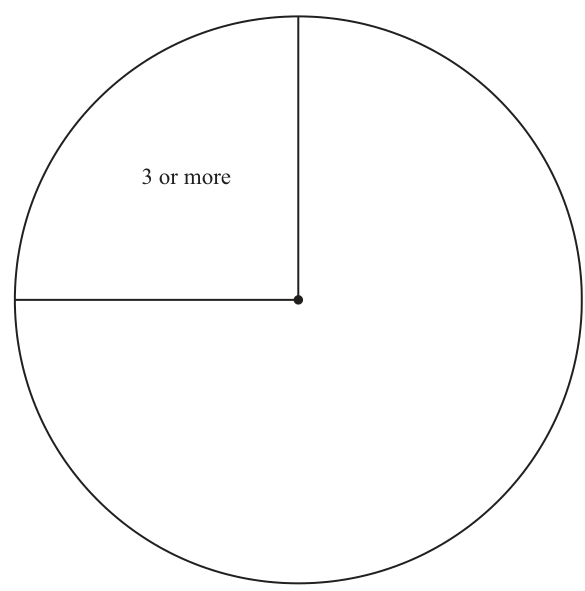
Approach
Draw the missing sectors in the pie chart using the angles calculated in part (a)(i). The sector for "3 or more" is already drawn with .
Working
- Draw a sector for "1 person" with an angle of . This is slightly less than a semicircle ().
- Draw a sector for "2 people" with an angle of . This is slightly more than a right angle ().
- Label each sector clearly.
Answer
Pie chart completed with sectors: "1" at , "2" at , "3 or more" at .
Pie chart with sectors 162° for '1', 108° for '2', 90° for '3 or more'
Walkthrough
The pie chart must be divided into three sectors corresponding to the three categories. The "3 or more" sector is already given as (a quarter of the circle). From part (a)(i), we know the "1 person" sector is and the "2 people" sector is . We draw these sectors starting from the existing boundaries and label them appropriately.
Key Takeaways
When completing a pie chart, ensure all sectors are drawn to scale and clearly labeled with the category names.
Common Mistakes
- Drawing sectors that do not add up to .
- Forgetting to label the sectors.
- Not using a protractor to draw accurate angles (though in an exam setting, approximate accuracy is often accepted if the angles are reasonable).
Things to Be Careful About
- The angles must add up to exactly .
- Labels must be clear and correspond to the correct frequencies.
The histogram shows the speeds of vehicles passing the checkpoint in the afternoon.
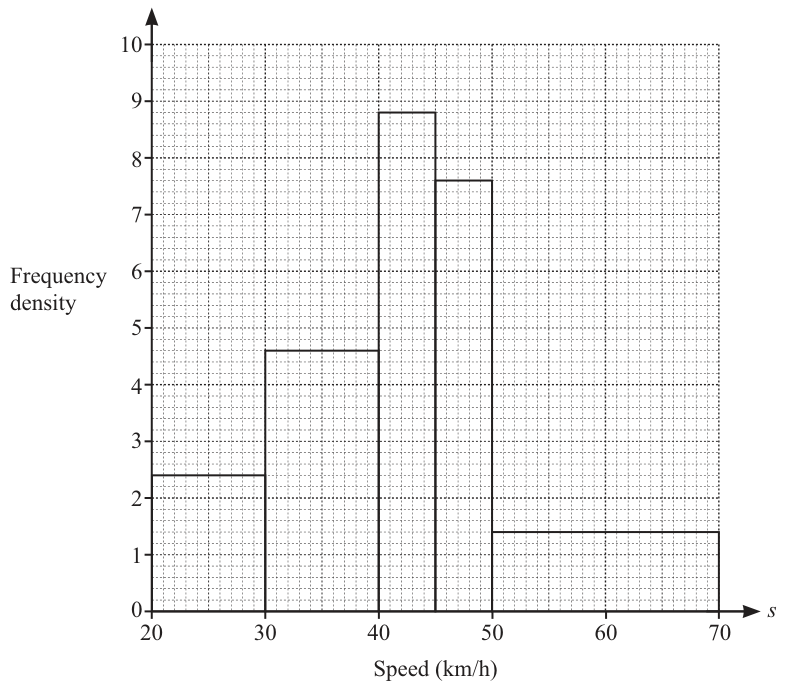
Sanjay says the histogram shows that the range of the speeds is .
Explain why he may not be correct.
______ because ______
Approach
Sanjay calculates the range as . However, the data is grouped into class intervals, so the exact minimum and maximum values are not known.
Working
The histogram shows frequency density against speed class intervals. The exact minimum and maximum speeds of individual vehicles are not known. For example, the lowest speed could be km/h and the highest km/h, giving a range of km/h. The range is therefore an estimate, not an exact value.
Answer
Data is grouped so individual speeds are not known.
Data is grouped so individual speeds are not known
Walkthrough
The range is defined as the difference between the maximum and minimum values in a dataset. Sanjay assumes the minimum is and the maximum is , giving a range of km/h. However, the data is grouped into class intervals (e.g., ). This means the actual minimum speed could be any value just above (e.g., ) and the actual maximum could be any value just below or equal to (e.g., ). Therefore, the true range is not necessarily km/h, and Sanjay's statement may not be correct.
Key Takeaways
When data is grouped, the range cannot be calculated exactly; it can only be estimated based on the class boundaries.
Common Mistakes
- Assuming the class boundaries are the exact minimum and maximum values.
- Not recognising that grouped data hides individual values.
Things to Be Careful About
- Always consider whether data is grouped or individual when calculating or estimating the range.
Approach
The frequency in a histogram is calculated using the formula: . We calculate this for each interval.
Working
For :
Class width . Frequency density .
For :
Class width . Frequency density .
For :
Class width . Frequency density .
For :
Class width . Frequency density .
Answer
| Speed ( km/h) | |||||
|---|---|---|---|---|---|
| Frequency | 24 | 46 | 44 | 38 | 28 |
46, 44, 38, 28
Walkthrough
In a histogram with unequal class widths, the area of each bar represents the frequency. Since , and is the frequency density, we have . We apply this formula to each interval to find the missing frequencies.
For : width is , FD is , so frequency is .
For : width is , FD is , so frequency is .
For : width is , FD is , so frequency is .
For : width is , FD is , so frequency is .
Key Takeaways
Always remember that frequency equals frequency density multiplied by the class width in a histogram.
Common Mistakes
- Forgetting to multiply by the class width and just using the frequency density as the frequency.
- Calculating the class width incorrectly, especially for the last interval ( to has width , not or ).
Things to Be Careful About
- Pay attention to the class widths, which are not all equal in this histogram.
- Ensure the calculations are accurate.
Approach
Substitute the missing -values ( and ) into the formula to find the corresponding -values.
Working
For :
For :
Answer
The completed table has for both and .
y = -2 for x = -2 and y = -2 for x = 6
Walkthrough
The question provides a table of and values for the quadratic function and asks to fill in the missing entries. The missing -values are and .
To find when , substitute into the formula:
Calculate each term: , and , so . Adding these together gives .
To find when , substitute into the formula:
Calculate each term: , and , so . Adding these together gives .
Both missing values are , which also confirms the symmetry of the parabola around its axis.
Key Takeaways
- Substitution into algebraic expressions is a fundamental skill for completing tables of values.
- Careful attention to signs and order of operations (especially squaring negative numbers) is required.
Common Mistakes
- Forgetting that , not , which would incorrectly give .
- Arithmetic errors when combining positive and negative integers, such as .
Things to Be Careful About
- Always square the entire negative number: . If you write , it means , which is incorrect here.
- Follow the order of operations: exponents first, then multiplication, then addition and subtraction.
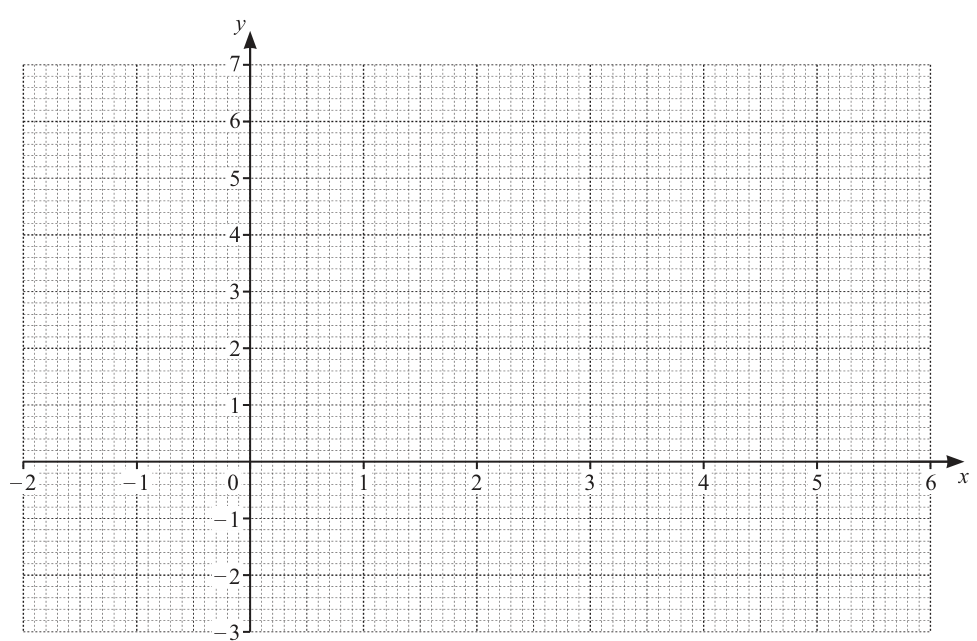
Approach
Plot the points from the completed table on the given Cartesian grid. Since the function is quadratic ( term is present), the graph is a parabola, so connect the points with a smooth U-shaped curve rather than straight lines.
Working
The points to plot are:
Answer
A smooth parabola passing through all nine points, with its maximum (vertex) at .
| Point | Coordinates |
|---|---|
| 1 | |
| 2 | |
| 3 | |
| 4 | |
| 5 | |
| 6 | |
| 7 | |
| 8 | |
| 9 |
A smooth downward-opening parabola with vertex at (2, 6) passing through (-2, -2) and (6, -2)
Walkthrough
The task is to draw the graph of for . We already have all nine coordinate pairs from part (a) and the given table.
- Set up the grid: The -axis runs from to and the -axis from to , with gridlines at every units.
- Plot each point from the table: , , , , , , , , and .
- Draw a smooth curve through these points. Because the highest power of is , the graph is a parabola. It opens downwards (since the coefficient of is negative, ), with the turning point (maximum) at .
Key Takeaways
- A table of values gives discrete points; for a quadratic function, these must be joined by a smooth curve, not straight line segments.
- The vertex of a downward-opening parabola is its highest point.
Common Mistakes
- Joining the points with straight line segments, which gives a polygonal shape instead of a parabola.
- Misreading the grid: the gridlines are at units, so is three small squares above the -axis, and is three small squares below .
- Plotting as instead of , leading to an incorrect point at .
Things to Be Careful About
- The mark scheme awards follow-through marks based on the number of correctly plotted points (B2FT for 8 or 9 points, B1FT for 6 or 7 points). Accuracy in plotting is critical.
- Ensure the curve is smooth and does not have sharp corners at the plotted points.
- The graph should only be drawn for the range ; do not extend it beyond these -values.
Approach
The graph is a parabola, so its line of symmetry passes through the vertex (turning point). This can be found by observing the symmetry in the table of values or by using the formula for .
Working
Method 1: From the table
Notice that the -values are symmetric around :
- and both give
- and both give
- and both give
- and both give
The axis of symmetry is exactly halfway between these pairs, which is .
Method 2: Using the formula
Rewrite the equation in standard form :
Here and . The axis of symmetry is:
Answer
x = 2
Walkthrough
The line of symmetry of a parabola is the vertical line that passes through its vertex, dividing the graph into two mirror-image halves.
From the table in part (a), we can see that for every -value less than , there is a corresponding -value greater than that gives the same -value. For example, at both and . The midpoint between and is . Similarly, the midpoint between and is . This confirms the axis of symmetry is .
Alternatively, using the formula for the quadratic , we get .
Key Takeaways
- The axis of symmetry of a parabola is always .
- You can also find it by looking for equal -values in a table of values and taking the average of the corresponding -values.
Common Mistakes
- Writing instead of . The line of symmetry is a vertical line, so it must be in the form .
- Calculating the vertex -coordinate instead of the axis of symmetry.
Things to Be Careful About
- The answer must be an equation of a vertical line, so it must start with .
- No working is required for this 1-mark question, but ensuring accuracy is important.
Approach
Rearrange the equation into the form to easily find coordinates. Then plot at least two points and draw a straight ruled line through them across the grid.
Working
Rearrange :
Find coordinates by substituting convenient -values:
- When :
- When :
- When :
- When :
Plot these points on the grid and draw a straight ruled line through them from to .
Answer
A straight ruled line passing through , , and with gradient .
A straight line passing through (0, 2), (3, 3), and (6, 4)
Walkthrough
The question asks to draw the line on the same grid used for the parabola.
First, rearrange the equation to make the subject:
This tells us the line has a -intercept of and a gradient of . This means for every units moved to the right, the line goes up unit.
Choose easy -values to find exact coordinates:
- At , . Point: .
- At , . Point: .
- At , . Point: .
Plot these points on the grid. Use a ruler to draw a straight line through them, extending from to .
Key Takeaways
- Rearranging equations into form makes it easy to identify the -intercept and gradient.
- Always use a ruler for straight lines in graphical questions.
Common Mistakes
- Forgetting to divide the entire right-hand side by when rearranging, e.g., writing instead of .
- Plotting the -intercept incorrectly as instead of .
- Drawing a curved line or not extending the line across the full required range.
Things to Be Careful About
- The mark scheme accepts a short or unruled line, or two correct coordinates, or a line with positive gradient through , or gradient . However, a fully ruled line is best.
- Ensure the line is drawn for as specified.
Write down the -coordinates of the points of intersection of the graphs of and .
= ______ and = ______
Approach
The points of intersection of the two graphs are where they cross each other. Read the -coordinates of these crossing points directly from the grid.
Working
Looking at the graph drawn in parts (b) and (d), the parabola and the straight line cross at two points.
By examining the grid carefully at the intersection points:
- The left intersection is slightly to the right of . Reading from the grid, .
- The right intersection is between and , closer to . Reading from the grid, .
(Note: The exact algebraic solutions are and . Graphical reading typically accepts values within of these.)
Answer
(Acceptable range: to and to )
x = -0.9 and x = 4.3
Walkthrough
The question asks for the -coordinates of the points where the parabola and the line intersect. Since this is a graphical question, we read the values from the graph we drew.
Locate the two points where the curve and the straight line cross:
-
Left intersection: Between and . The line is at and the curve is at at . They cross slightly to the right of . Reading from the grid, this is approximately .
-
Right intersection: Between and . At , the curve is at and the line is at . At , the curve is at and the line is at . They cross between these, closer to . Reading from the grid, this is approximately .
The mark scheme states STRICT FT, meaning the marks depend on the accuracy of the graphs drawn in parts (b) and (d). If a student's graphs are slightly off, their intersection readings will be adjusted accordingly within a reasonable tolerance.
Key Takeaways
- Graphical solutions to simultaneous equations involve reading intersection points from the graph.
- When exact solutions are irrational, graphical estimation is the intended method.
- Always state the tolerance or range if the exact value cannot be read precisely.
Common Mistakes
- Reading the -coordinates instead of the -coordinates. The question specifically asks for -coordinates.
- Reading the intersection at or (common grid points) where the graphs do not actually cross.
- Not allowing for the tolerance in graphical reading; giving answers to too many decimal places.
Things to Be Careful About
- The mark scheme is STRICT FT on the graphs from parts (b) and (d). If the curves are drawn incorrectly, the intersection points will be wrong, and marks will be lost.
- Give answers to 1 decimal place or as a simple fraction that can be read from the grid.
- The exact algebraic solutions are , which are approximately and . Values in the range to and to are typically accepted.
Approach
List all integers from 1 to 15 that are multiples of 3.
Working
Answer
3, 6, 9, 12, 15
Walkthrough
The universal set contains integers from 1 to 15. We need to find , which is the set of multiples of 3 in this range. Multiplying 3 by 1, 2, 3, 4, and 5 gives 3, 6, 9, 12, and 15. The next multiple, 18, is outside the range.
Key Takeaways
A multiple of a number is obtained by multiplying by an integer. When listing elements of a set defined by a condition, always check the boundaries of the universal set.
Common Mistakes
Forgetting to include 15 or 3, or including numbers like 18 that exceed the upper bound of the universal set.
Things to Be Careful About
Ensure the answer is written as a list of elements as requested, and that all elements fall within the universal set .
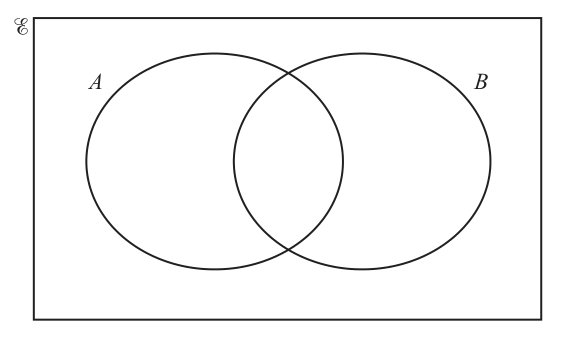
Approach
Determine which elements of belong to , , both, or neither, then place them in the appropriate regions of the Venn diagram.
Working
First, list the elements of , the factors of 30 between 1 and 15:
The intersection contains elements in both sets:
The elements in but not in () are:
The elements in but not in () are:
The elements in but not in () are the remaining integers:
Answer
Place 9, 12 in circle only; 3, 6, 15 in the intersection; 1, 2, 5, 10 in circle only; and 4, 7, 8, 11, 13, 14 outside both circles but inside .
Venn diagram: A only contains 9, 12; intersection contains 3, 6, 15; B only contains 1, 2, 5, 10; outside contains 4, 7, 8, 11, 13, 14.
Walkthrough
To complete the Venn diagram, we must place each integer from 1 to 15 into exactly one of the four regions. We start with the intersection , which contains numbers that are both multiples of 3 and factors of 30. These are 3, 6, and 15. Next, we find numbers in but not (multiples of 3 that are not factors of 30): 9 and 12. Then, numbers in but not (factors of 30 that are not multiples of 3): 1, 2, 5, and 10. Finally, any number from 1 to 15 not yet placed goes outside the circles: 4, 7, 8, 11, 13, and 14.
Key Takeaways
A Venn diagram partitions the universal set into regions based on set membership. The intersection contains elements satisfying both conditions, the exclusive regions contain elements satisfying only one, and the exterior contains elements satisfying neither.
Common Mistakes
Placing 30 in the diagram (it is outside the universal set). Forgetting that 1 is a factor of every number. Misclassifying 9 or 12 as factors of 30 (they are not, since 30 divided by 9 or 12 is not an integer).
Things to Be Careful About
Every element of the universal set must be placed exactly once. Do not leave any numbers out, and do not repeat any numbers. The diagram must be fully populated to earn full marks.
Approach
Identify the elements in the complement of and find the smallest one.
Working
From the Venn diagram, the region contains the elements outside both circles:
The smallest value in this set is 4.
Answer
4
Walkthrough
The notation means the complement of the union of and , which is the set of all elements in the universal set that are not in and not in . Looking at our completed Venn diagram, these elements are 4, 7, 8, 11, 13, and 14. The question asks for the smallest value, which is clearly 4.
Key Takeaways
The complement of a union is equivalent to the intersection of the complements by De Morgan's laws. It represents everything outside the combined regions of the sets.
Common Mistakes
Reading the smallest element from inside one of the circles instead of outside. Confusing with .
Things to Be Careful About
Ensure you are looking at the region outside both circles, not just outside one. The value must be an element of the universal set.
Approach
Identify the region and count the number of elements in it.
Working
The notation means the set of elements that are in and not in . This is the region inside circle but outside circle .
From the Venn diagram, these elements are:
The number of elements in this set is:
Answer
2
Walkthrough
The expression asks for elements belonging to and simultaneously belonging to the complement of (i.e., not in ). This corresponds exactly to the part of circle that does not overlap with circle . We already identified these elements as 9 and 12. Counting them gives 2.
Key Takeaways
is the set difference . The notation asks for the cardinality (number of elements) of the set, not the elements themselves.
Common Mistakes
Counting the elements in the intersection instead. Forgetting that asks for a count, not a list of elements.
Things to Be Careful About
Ensure you are counting the elements in the correct region. means everything outside , so is strictly the -only region.
Solve.
Approach
To solve , undo the division by by multiplying both sides by .
Working
Multiply both sides by :
Answer
32
Walkthrough
The equation says that divided by gives . To undo the division by , multiply both sides of the equation by . The left side becomes and the right side becomes .
Key Takeaways
This question tests the basic skill of solving a one-step linear equation by using the inverse operation. Multiplying or dividing both sides of an equation keeps it balanced.
Common Mistakes
- Dividing by instead of multiplying.
- Forgetting to multiply the right-hand side by .
- Writing rather than .
Things to Be Careful About
This is a one-mark question, so the final answer alone is enough, but showing the multiplication makes the answer clear. The answer must be the exact value , not .
Approach
Collect the terms onto one side and the constants onto the other, then divide to find .
Working
Add to both sides and subtract from both sides:
Simplify:
Divide both sides by :
Answer
-3/2
Walkthrough
The equation has terms on both sides. To solve it, collect the terms on one side and the constant terms on the other. Adding to both sides moves to the right, and subtracting from both sides moves to the left, giving . Simplifying gives , and dividing by gives .
Key Takeaways
Linear equations can be solved by keeping the equation balanced: whatever you do to one side you do to the other. Collecting like terms is essential.
Common Mistakes
- Making a sign error when moving terms; for example, moving to the right as but forgetting to change the sign on the left.
- Dividing incorrectly, such as writing .
- Not simplifying the fraction to lowest terms.
Things to Be Careful About
The mark scheme gives M1 for a correct rearrangement such as , so show that intermediate line. The final answer may be written as or (oe), but an exact fraction is preferred on this paper.
Approach
Substitute and into , noting that subtracting a negative becomes addition.
Working
Answer
41.8
Walkthrough
Replace by and by in the formula . The term becomes , so the expression is . Multiplying first gives .
Key Takeaways
Substitution into a formula requires replacing each letter with its given value, then applying the correct order of operations. Subtracting a negative is the same as adding the positive.
Common Mistakes
- Forgetting that is negative and writing .
- Treating as but then forgetting the minus sign in front of the term, giving not .
- Evaluating multiplication and subtraction in the wrong order.
Things to Be Careful About
A method mark (M1) is awarded for the correct substituted expression , so write this line. The final answer is ; no rounding is needed because the values are exact.
Approach
Rearrange the formula by adding to both sides, then dividing both sides by so is alone on one side.
Working
Add to both sides:
Divide both sides by :
Answer
(w + 6y)/5
Walkthrough
To make the subject of , undo the operations around . First add to both sides so the on the right is removed, giving . Then divide both sides by to leave alone: .
Key Takeaways
Changing the subject of a formula uses the same inverse operations as solving an equation. Work backwards through the operations that act on .
Common Mistakes
- Dividing only the term by and leaving unchanged, e.g. writing .
- Making a sign error when moving , e.g. writing .
- Forgetting to put parentheses around before dividing.
Things to Be Careful About
The mark scheme gives M1 for reaching or an equivalent rearrangement, so show that line. The final answer can be ; other equivalent forms are accepted, but the fraction form with dividing the whole numerator is clearest.
Approach
Group the terms so that each group has a common factor, then factor out the common binomial.
Working
Group terms:
Factor each group:
Factor out :
Answer
(5 - x)(3y + x)
Walkthrough
Factorise by grouping terms that have common factors. Group and . The first group factors to and the second to . Both groups contain , so factor it out to get .
Key Takeaways
Factorisation by grouping works when four terms can be split into two pairs, each with a common factor, and the two resulting brackets are identical.
Common Mistakes
- Grouping the wrong pairs, e.g. and , which do not give a common binomial.
- Sign errors: note must be consistent in both groups, not in one and in the other.
- Expanding to check incorrectly, or mixing up the order of factors.
Things to Be Careful About
The mark scheme gives one mark (B1) for a correct partial factorisation, so an intermediate line such as is enough to score. The answer may also be written , since .
Approach
Write each term over the common denominator , combine the numerators, then expand and simplify.
Working
Use the common denominator :
Combine numerators:
Expand the numerator:
Simplify:
Therefore:
Answer
(x^2 - 2x + 9)/(x^2 - 9)
Walkthrough
The expression has two fractions and a whole number . To combine them, use the common denominator . Rewrite each fraction over this denominator: the first becomes , the second becomes , and becomes . Combine the numerators: . Expand to , which simplifies to . Thus the result is or equivalently .
Key Takeaways
To add or subtract algebraic fractions, first find a common denominator, then combine numerators. A whole number is treated as a fraction over the common denominator. Expanding and simplifying gives the final fraction.
Common Mistakes
- Forgetting to include the as a fraction; only combining the first two fractions.
- Incorrect expansion of as is fine, but sign errors in or are common.
- Writing instead of .
- Leaving the denominator as but not simplifying the numerator, or vice versa.
Things to Be Careful About
This is a 4-mark question. The mark scheme awards B2 for a correct expanded numerator, B1 for the common denominator , and B1 for the final simplified fraction; if the final answer is correct you score full marks. Intermediate lines must show the expanded numerator to earn partial credit. The denominator may be left as or expanded to ; both are accepted. Make sure the fraction is in its simplest form, so the numerator is collected as .
[Volume of sphere = ]
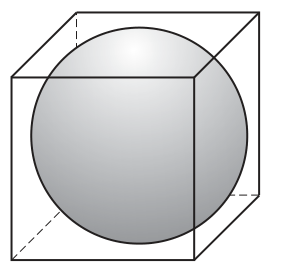
The diagram shows a sphere inside a cube.
The sphere touches all 6 faces of the cube.
The volume of the cube is .
Calculate the volume of the sphere.
______
Approach
Find the side length of the cube from its volume. Since the sphere is inscribed and touches all six faces, its diameter equals the side length of the cube, giving the radius. Substitute this radius into the given sphere volume formula.
Working
The volume of the cube is , so its side length is:
The sphere touches all 6 faces of the cube, so its diameter is equal to the side length of the cube:
Using the formula for the volume of a sphere:
Answer
180
Walkthrough
First, we find the side length of the cube by taking the cube root of its volume: . Because the sphere is perfectly inscribed and touches all six faces, its diameter must be exactly the side length of the cube. Therefore, the radius is half of 7, which is . We then substitute this radius into the volume formula . Calculating gives , and multiplying by yields approximately . Rounding to 3 significant figures gives .
Key Takeaways
- The side length of a cube is the cube root of its volume.
- An inscribed sphere has a diameter equal to the side length of the enclosing cube.
- Always use the exact radius in the volume formula before rounding the final answer.
Common Mistakes
- Forgetting to halve the side length to get the radius (using 7 instead of 3.5).
- Rounding intermediate values too early, which can lead to an answer like or instead of the correct to 3 s.f.
- Using the area formula instead of the volume formula .
Things to Be Careful About
- The question is on the calculator component, so 3 significant figures is the standard accuracy unless stated otherwise. Both and are accepted by the mark scheme, but is the proper 3 s.f. answer.
- Ensure your calculator is in radian mode if using trigonometric functions later, though not needed here. Just use the button for accuracy.
Solid is mathematically similar to solid .
The volume of solid is and its height is .
The volume of solid is .
Calculate the height of solid .
______
Approach
For mathematically similar solids, the ratio of their volumes is the cube of the linear scale factor. Find the volume scale factor, take its cube root to get the linear scale factor, and multiply the height of solid A by this factor to find the height of solid B.
Working
The volume scale factor (V.S.F.) from A to B is:
The linear scale factor (L.S.F.) is the cube root of the volume scale factor:
The height of solid B is:
Answer
20
Walkthrough
Similar solids have proportional linear dimensions, areas, and volumes. The volume ratio is the cube of the linear ratio. Here, the volume ratio is , which simplifies to . Taking the cube root gives the linear scale factor . Multiplying the height of solid A () by gives the height of solid B as .
Key Takeaways
- Volume scale factor = (linear scale factor).
- Linear scale factor = .
- Always apply the linear scale factor to linear dimensions like height, not the volume scale factor.
Common Mistakes
- Using the volume scale factor directly on the height instead of taking the cube root first.
- Reversing the ratio (calculating and multiplying by 15), which would give the wrong direction of scaling.
Things to Be Careful About
- Ensure the ratio is set up correctly: height of B = height of A raised to the power.
[Curved surface area of a cone = ]
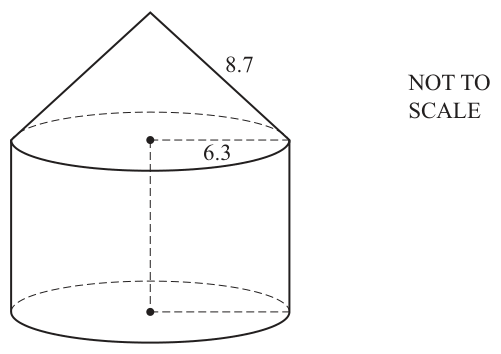
The diagram shows a solid formed by joining a cone to a cylinder.
The cone and the cylinder each have radius .
The slant height of the cone is .
The ratio height of cone : height of cylinder = .
Calculate the total surface area of the solid.
______
Approach
The solid is a cone on top of a cylinder. The total surface area consists of the curved surface of the cone, the curved surface of the cylinder, and the circular base of the cylinder (the top of the cylinder is hidden by the cone). Find the height of the cone using Pythagoras' theorem, then use the ratio to find the height of the cylinder. Sum the relevant surface areas.
Working
1. Height of the cone:
Using Pythagoras' theorem with radius and slant height :
2. Height of the cylinder:
The ratio of height of cone to height of cylinder is :
3. Curved surface area of the cone:
4. Curved surface area of the cylinder:
5. Area of the circular base:
6. Total surface area:
Answer
653
Walkthrough
The total surface area of the composite solid includes three parts: the curved surface of the cone, the curved surface of the cylinder, and the flat circular base at the bottom. The internal circle where the cone meets the cylinder is not part of the surface area.
First, find the height of the cone. We have a right-angled triangle formed by the radius (), the height (), and the slant height (). Using Pythagoras: .
Next, use the ratio for cone height to cylinder height. Since the cone height is 6, the cylinder height is .
Calculate the curved surface area of the cone: .
Calculate the curved surface area of the cylinder: .
Calculate the base area: .
Add them together: . Rounding to 3 significant figures gives .
Key Takeaways
- For a compound shape, identify all exposed surfaces and sum their areas.
- The internal face where two shapes join is not included in the total surface area.
- Pythagoras' theorem is often needed to find missing dimensions like the height of a cone when the slant height and radius are given.
Common Mistakes
- Including the area of the top circle of the cylinder (where it joins the cone) in the total surface area.
- Forgetting to calculate the height of the cone using Pythagoras before applying the ratio.
- Using the wrong formula for the curved surface area of the cylinder (e.g., forgetting the 2 in ).
Things to Be Careful About
- The question provides the formula for the curved surface area of a cone () but not the cylinder; remember it is .
- Round only the final answer to 3 significant figures. Keep the answer in terms of during intermediate steps to avoid rounding errors.
- Ensure units are consistent; all dimensions are in cm, so the area will be in .
is a parallelogram with sides , , and .
is the point and is the point .
Approach
The vector gives the displacement from to . Since , we can find by adding the vector to .
Working
Answer
(-4, 1)
Walkthrough
The vector tells us how to get from to . Its first component, , means move unit in the negative -direction; its second component, , means move units in the negative -direction.
Since , we have . Starting at and adding gives .
Key Takeaways
A displacement vector can be added to a known point to obtain the new point. If , then .
Common Mistakes
- Adding the vector to instead of . The vector is from to , so the starting point must be .
- Forgetting that a negative component moves left or down.
Things to Be Careful About
Use the correct order of vertices. Do not substitute into an expression using in your head without first rearranging it as , otherwise a one-sign error will occur.
Approach
The magnitude of a column vector is .
Working
Answer
6.08
Walkthrough
The length of a vector is the square root of the sum of the squares of its components. Here the components are and .
Squaring them gives and . Adding gives . Finally taking the square root, , gives a decimal of approximately , which rounds to to 3 significant figures.
Key Takeaways
The magnitude formula comes from Pythagoras’ theorem. It is essential for lengths of vectors.
Common Mistakes
- Forgetting to square the signs: both and are positive.
- Taking the square root of before adding the squares.
- Rounding too early and writing instead of .
Things to be Careful
Unless a different accuracy is clearly requested, give the decimal to 3 significant figures. is accepted here; or are also accepted. Do not leave a random truncation such as if you already have the calculator value — it should be the correct 3 significant-figure value.
Approach
In parallelogram , the diagonal can be written as the sum of the two adjacent side vectors:
First find , then add .
Working
Therefore
Answer
(4, -8)
Walkthrough
To get from to in a parallelogram, you can go along two adjacent sides: from to , then from to . Since is parallel and equal to in a parallelogram, . Hence
We first find . Then we add component-wise: get .
Key Takeaways
In a parallelogram, the diagonal vector from one vertex to the opposite vertex equals the sum of the two adjacent side vectors. This vector property is often the cleanest way to find diagonal lengths or coordinates.
Common Mistakes
- Forgetting that , so the wrong vector is added.
- Using with an incorrect .
- Sign errors in component-wise addition, especially with negative components.
Things to be Careful About
The final answer must be given as a column vector here. If only one component is correct, the scheme may still give partial credit, but the complete vector is needed for full marks. Notice that or carry sign errors.
Line is the line perpendicular to that passes through point .
Find the equation of line .
______
Approach
Find the gradient of , take the negative reciprocal to obtain the gradient of the perpendicular line . Then substitute the known point into the equation of a line to find its -intercept.
Working
A line perpendicular to has gradient
Now use with :
Answer
y = (5/2)x + 11
Walkthrough
The gradient of , slope of line, is found by dividing the change in by the change in :
The perpendicular line has gradient satisfying
so
Then use and the form : substituting gives . Therefore .
Key Takeaways
- Gradient: .
- Perpendicular slopes multiply to .
- The equation of a line is determined by a slope and a point, using or .
Common Mistakes
- Forgetting to use the correct -difference , which gives 5, not 1.
- Taking the reciprocal but not changing the sign: the perpendicular slope should be positive , not ? Actually it must be .
- Using the wrong point for substitution; here it must be from part (a), not .
- Solving for incorrectly when substituting: , so , not .
Things to be Careful About
The question asks for the equation of line ; the final answer must include , not just the gradient or a single point. The answer is accepted in equivalent forms, e.g. , as long as it is clearly the equation of the line.
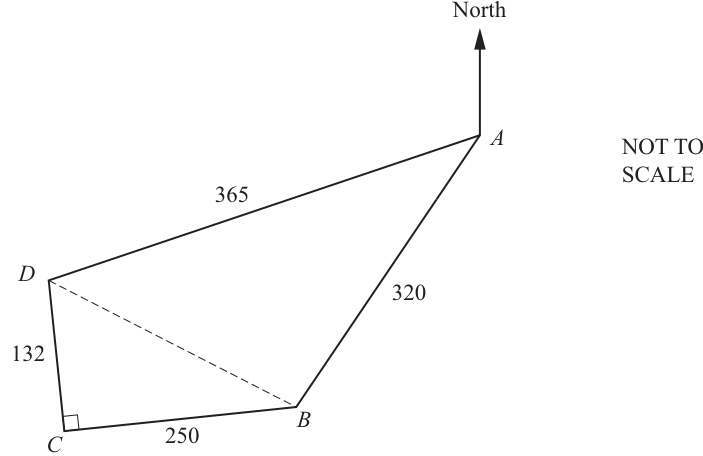
is a field.
, , and .
Angle .
Ray walks from to at an average speed of .
He then runs from to at an average speed of .
Calculate Ray's average speed from to to .
______
Approach
Average speed over a journey is the total distance travelled divided by the total time taken. Calculate the time for each leg using , then sum the distances and times.
Working
Total distance from to via :
Time from to :
Time from to :
Total time:
Average speed:
Answer
1.97
Walkthrough
The question asks for the average speed over the entire journey from to to . A common mistake is to average the two speeds directly; instead, we must use the definition: average speed = total distance / total time.
First, find the total distance: m.
Next, find the time for each leg. Time equals distance divided by speed. For to , seconds. For to , seconds.
Add the times to get the total journey time: seconds.
Finally, divide the total distance by the total time: m/s.
Key Takeaways
Average speed is never the arithmetic mean of the speeds unless the time spent at each speed is equal. Always compute total distance and total time separately.
Common Mistakes
- Averaging the two speeds: m/s. This is incorrect because Ray spends more time at the slower speed.
- Forgetting to convert or mixing up units (though here both speeds are in m/s and distances in m, so no conversion is needed).
- Rounding intermediate time values too early, which can lead to an answer like or instead of the correct .
Things to Be Careful About
- The mark scheme accepts , so give the answer to at least 3 significant figures.
- Show the full fraction in your working to secure the method marks.
- Keep exact fractions during calculation to avoid rounding errors.
Approach
The bearing of from is given as . To find the bearing of from , we need the angle between and . We can find this by first computing the length of diagonal using Pythagoras' theorem in the right-angled triangle , and then applying the cosine rule in triangle .
Working
Step 1: Find using Pythagoras' theorem in .
Since :
Step 2: Find using the cosine rule in .
Step 3: Calculate the bearing of from .
From the diagram, lies clockwise from when viewed from (i.e., is to the right of , meaning its bearing is smaller than ). Therefore:
Answer
195
Walkthrough
The problem requires finding the bearing of from , given the bearing of from and the side lengths of the quadrilateral.
First, we isolate triangle , which is right-angled at . We use Pythagoras' theorem to find the length of the diagonal : .
Next, we look at triangle , where we now know all three sides: , , and . We use the cosine rule to find the angle at , which is . The cosine rule rearranged for the angle is . Substituting the values gives . Taking the inverse cosine yields .
Finally, we use the bearing information. The bearing of from is . Looking at the diagram, is to the right of (closer to South), so its bearing is less than . We subtract from : , which rounds to .
Key Takeaways
- Diagonals can split quadrilaterals into triangles where standard rules (Pythagoras, cosine rule) apply.
- Bearings are measured clockwise from North. Subtracting an internal angle from a given bearing works when the target point lies clockwise from the reference line.
Common Mistakes
- Using the sine rule instead of the cosine rule when all three sides are known (or two sides and the included angle is unknown).
- Forgetting to square correctly in the cosine rule (using instead of ).
- Adding to instead of subtracting it, giving . Check the diagram: is to the right of , so its bearing must be smaller than .
- Rounding to too early and getting (which happens to be correct here, but could fail in other cases). Keep at least 4 significant figures during intermediate steps.
Things to Be Careful About
- The mark scheme accepts or to . Give the answer to 3 significant figures or as a whole number as appropriate for bearings.
- Bearings must be given as three figures (e.g., , not ). The mark scheme accepts .
- Show the substitution into the cosine rule clearly to earn the method marks: .
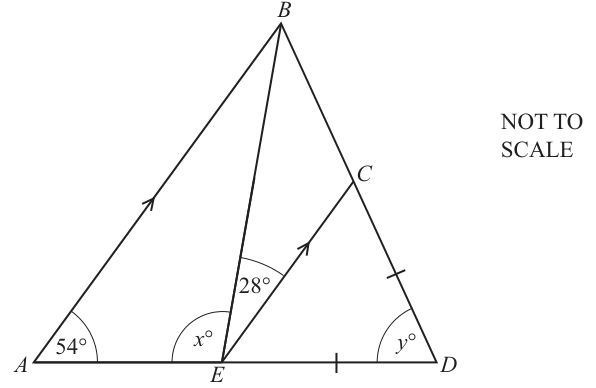
is a triangle.
is a point on and is a point on .
is parallel to and .
Find the value of and the value of .
= ______
= ______
Approach
Use the parallel lines to find alternate and corresponding angles. Then apply the angle sum property in to find , and use the isosceles triangle property in to find .
Working
Since and is a transversal, the alternate angles are equal:
In , the sum of angles is :
Since and is a transversal, the corresponding angles are equal:
In , we are given , so the triangle is isosceles. The angles opposite the equal sides are equal:
The sum of angles in is :
Answer
x = 98, y = 72
Walkthrough
First, we look at the parallel lines and . The line cuts across them, creating alternate interior angles. Therefore, must equal , which is given as . Now we focus on . We know two of its angles: and . Since a triangle's angles add up to , we can find the third angle (which is ) by subtracting the known angles from . This gives .
Next, we use the parallel lines again. The line acts as a transversal cutting and . The angles and are in the same relative position at each intersection, making them corresponding angles. Thus, . We are told that , which means is an isosceles triangle. In an isosceles triangle, the angles opposite the equal sides are equal, so . Finally, using the triangle angle sum property on , we find .
Key Takeaways
- Alternate angles are equal when a transversal crosses parallel lines.
- Corresponding angles are equal when a transversal crosses parallel lines.
- The interior angles of any triangle always sum to .
- In an isosceles triangle, the base angles (opposite the equal sides) are equal.
Common Mistakes
- Forgetting to identify the correct transversal line when using parallel line rules (e.g., using to find alternate angles instead of corresponding angles).
- Assuming is equilateral rather than just isosceles, or incorrectly assigning the equal angles.
- Rounding intermediate angle values if they were not exact (though here they are exact integers).
Things to Be Careful About
- Always explicitly state which geometric rule is being applied (alternate angles, corresponding angles, angle sum of a triangle, isosceles triangle properties) to secure method marks.
- Ensure that the angles you identify as equal actually correspond to the correct sides in the isosceles triangle.
- The question asks for the values of and ; make sure to provide both clearly.
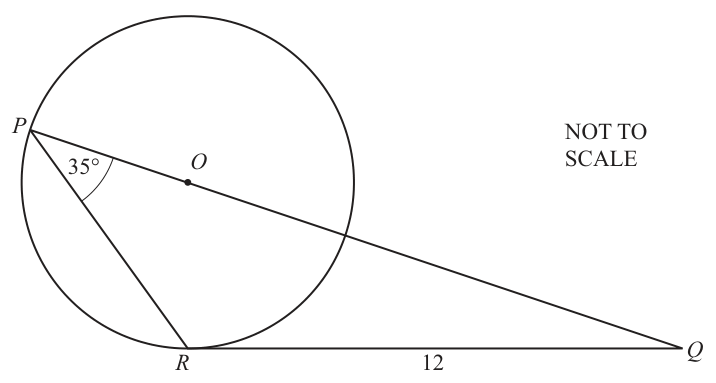
is a triangle.
and are points on a circle, centre .
is a point on .
is a tangent to the circle at .
and angle .
Calculate the area of triangle .
______
Approach
Use the tangent-radius theorem to establish a right angle at . Use the fact that (radii) to find angles in , then determine angles in right-angled . Calculate the radius and use trigonometry to find the area of .
Working
Since is tangent to the circle at and is a radius, the tangent is perpendicular to the radius:
In , (both are radii of the circle), so the triangle is isosceles:
The exterior angle of at is:
In right-angled :
Using the tangent ratio in :
The length is:
Since :
The total length is:
The area of can be found using the formula :
Rounding to 3 significant figures:
Answer
35.2
Walkthrough
First, we apply the tangent-radius theorem: a tangent to a circle is always perpendicular to the radius at the point of contact. This means , making a right-angled triangle.
Next, we look at . Since is the centre and are on the circle, and are both radii and therefore equal. This makes an isosceles triangle, so the base angles are equal: . The exterior angle at , , is the sum of the two opposite interior angles, giving .
Now in right-angled , we can find the remaining angle: . We know cm. Using the tangent ratio, , so the radius cm. We can also find cm.
Since are collinear, . Because is also a radius, cm, so cm.
Finally, we calculate the area of using the sine area formula: . Substituting the values gives cm. Rounded to 3 significant figures, this is cm.
Key Takeaways
- The tangent to a circle is perpendicular to the radius at the point of tangency.
- Radii of the same circle are equal, often creating isosceles triangles.
- The exterior angle of a triangle equals the sum of the two opposite interior angles.
- The area of a triangle can be calculated using when two sides and the included angle are known.
Common Mistakes
- Forgetting that and trying to use the sine rule directly on without establishing the right angle first.
- Incorrectly assuming is a right-angled triangle.
- Adding and incorrectly or forgetting that since lies on .
- Rounding intermediate values (like the radius or ) too early, which can lead to a final answer outside the acceptable range.
Things to Be Careful About
- The question asks for the area to 3 significant figures (standard for calculator papers unless stated otherwise). Ensure your final answer is .
- Keep full precision in your calculator for all intermediate steps. Use directly in the area formula rather than rounded decimals.
- Explicitly state using the tangent-radius theorem to secure method marks.
Bag contains red balls and green balls.
The total number of balls in the bag is .
The number of green balls in the bag is 6 more than the number of red balls.
Approach
Let be the number of red balls in bag . Since there are 6 more green balls than red balls, the total is . Solve this for , then divide by the total .
Working
Let be the number of red balls. Then the number of green balls is , so
Hence
Subtract 6 from both sides and divide by 2:
The fraction of balls that are red is the number of red balls divided by the total number of balls:
Answer
The fraction is , which matches the printed result.
(x - 6)/(2x)
Walkthrough
Let represent the number of red balls. There are then green balls, so the total number of balls is . Since this total is , we solve for . This gives . A fraction is found by dividing the part by the whole, so the fraction of red balls is , which simplifies to .
Key Takeaways
This part asks you to translate a worded relationship into an algebraic equation and then express one quantity as a fraction of a total. The phrase "6 more than" means add 6, and the fraction is always the chosen part divided by the whole.
Common Mistakes
- Rearranging incorrectly: is , not .
- Stopping at without dividing by the total .
- Mixing the numbers: green rods are 6 more than red rods, so green is , not .
Things to Be Careful About
For a "show that" part, every step of the algebra must be present. The final answer must come after the equation and its rearrangement; writing only the given fraction scores no marks because no reasoning is shown.
Bag also contains red balls and green balls.
The number of red balls in bag is .
The number of green balls in bag is 4 times the number of green balls in bag .
Show that the fraction of the balls in bag that are red is .
Approach
Use part (a) to find the number of green balls in bag . The number of green balls in bag is then 4 times that amount, while the number of red balls in bag is . Add these to obtain the total in and hence the fraction red.
Working
From part (a), the number of red balls is , so the number of green balls in bag is
In bag , the number of green balls is 4 times this:
Bag also contains red balls, so the total number of balls in bag is
Therefore the fraction that are red is
Answer
The fraction is , which matches the printed result.
x/(3x + 12)
Walkthrough
We first find the number of green balls in bag A. The red balls are , so the green balls are the remainder: . Bag B has 4 times as many green balls, so its green balls are . Since bag B has red balls, the total is . The red fraction is then red/total, or .
Key Takeaways
This continues the “forming expressions” idea: once you have the number of greens in one bag, scaling them and adding the reds gives the new total. The fraction is then part over total.
Common Mistakes
- Forgetting that the green balls in bag are the greens in bag , not the greens in plus the reds.
- Using the total of bag as the denominator for bag instead of the newly calculated bag total.
- Missing the division by 2 sign in .
The mark scheme requires the green balls in and the total in to be clearly found before the final fraction.
Approach
Start from the equality of the two fractions in parts (a) and (b). Cross-multiply to remove the denominators, then expand the product and rearrange all terms onto one side.
Working
The two fractions are equal, so
Cross-multiply:
so
Expand the left-hand side:
Simplify:
Thus the equation is
Subtract from both sides:
Answer
, which is the required result.
x^2 - 6x - 72 = 0
Walkthrough
You start with the equality of two fractions. Multiply both sides by both denominators to get rid of the fractions: this is called cross-multiplication. Then expand the product carefully, collecting like terms. The result is . Moving to the left gives .
Key Takeaways
This part shows how an equation with fractions can be cleared by cross-multiplication. After expanding and simplifying, it becomes a quadratic equation that can be solved in the next part.
Common Mistakes
- Expanding incorrectly: the constant term must be , not zero.
- Forgetting the middle term when multiplying: .
- Subtract only one of the terms, failing to get on the left.
The mark scheme has an A1 for the final correct equation; errors in earlier expansion prevent the mark.
Things to Be Careful
When subtracting from both sides, make sure you take it from to leave exactly . All terms must be placed on one side before writing the final zero after moving.
Approach
Factorise into two linear factors, then use the fact that if a product is zero one factor must be zero.
Working
We need two numbers that add to and multiply to . These numbers are and , so
Thus
So
Hence
Answer
or
x = 12 or x = -6
Walkthrough
You have the quadratic . To factorise it, look for two numbers with product and sum : these are and . Therefore . Since the product can only be zero if one of the factors is zero, or .
Key Takeaways
Solving a quadratic by factorisation requires rewriting the quadratic as a product of two linear brackets and then setting each bracket equal to zero. This gives the two roots.
Common Mistakes
- Using instead of ; that gives factors that multiply to , not .
- Correctly factorising but only giving one root, because one factor is not set equal to zero.
- Mixing up the signs when solving and .
The mark scheme awards a block mark for the factorisation and a second block mark for the two roots.
Things to Be Careful
The order of the answers is not important, but both values must be given. If you only write , the mark for the factorisation might be lost.
is the total number of balls in bag .
Use your answer to part (d) to find the number of green balls in bag .
______
Approach
Since is a number of balls, it must be positive. Therefore we use from part (d). Substitute this into the number of green balls in bag , which is .
Working
Bag has green balls equal to
Using :
Answer
There are green balls in bag .
9
Walkthrough
The two possible values from part (d) are and . Since is a total number of balls, it cannot be negative, so . Use the formula for green balls in bag from part (b): . Substituting gives .
Key Takeaways
This part shows how to decide between two roots of a quadratic in a real-life setting: reject the negative one. Then substitute the positive root into an expression to answer the actual question.
Common Mistakes
- Using to find green balls; a negative number of balls cannot happen.
- Using but substituting as instead of .
- Calculating the number of red balls instead of green balls.
The mark scheme follows through from the positive answer in part (d), but it must be used correctly.
Things to Be Careful
Always state that must be positive because it is a number of balls. Use the exact formula for green balls in , not the number of red balls.
Mia has 25 shapes.
She uses their properties to sort them into groups.
The table shows the number of shapes in each group.
| Triangle | Quadrilateral | |
|---|---|---|
| Line symmetry | 4 | 9 |
| No line symmetry | 5 | 7 |
Mia takes one of the triangles at random, notes its properties and replaces it.
Find the probability that it has line symmetry.
______
Approach
The question specifies that Mia takes one of the triangles at random. This restricts our sample space to only the shapes classified as triangles. We need to find the probability that this chosen triangle has line symmetry.
Working
First, determine the total number of triangles.
From the table, the columns under "Triangle" are:
- Triangles with line symmetry:
- Triangles with no line symmetry:
Total number of triangles = .
The number of favourable outcomes (triangles with line symmetry) is .
The probability is given by:
This fraction cannot be simplified further.
Answer
4/9
Walkthrough
The key to this part is identifying the correct group. The problem states Mia picks from the triangles, not from all 25 shapes. Therefore, we ignore the quadrilateral column entirely.
Looking at the "Triangle" column:
- There are triangles with line symmetry.
- There are triangles without line symmetry.
The total number of possible outcomes is the sum of these two groups: .
The number of successful outcomes is the count of triangles with line symmetry, which is .
So, the probability is .
Key Takeaways
Always check the condition specified in the question (e.g., "takes one of the triangles") to define your denominator correctly. Do not use the grand total () unless the question asks for a pick from the entire set.
Common Mistakes
- Using the total number of shapes () as the denominator instead of the total number of triangles ().
- Only counting the triangles with symmetry () but forgetting to add the ones without symmetry () to get the total sample size.
Things to Be Careful About
Ensure you are looking at the correct column (Triangle vs Quadrilateral). The mark scheme awards a B1 for seeing an unsimplified fraction like or intermediate forms if they were more complex, but here it is straightforward.
Mia takes one of the 25 shapes at random, notes its properties and replaces it.
She then takes a second shape at random, notes its properties and replaces it.
Find the probability that both shapes are quadrilaterals.
______
Approach
Mia picks two shapes with replacement. This means the two events are independent; the outcome of the first pick does not affect the probabilities for the second pick. We need the probability that both shapes are quadrilaterals.
Working
First, determine the total number of quadrilaterals.
From the table, the columns under "Quadrilateral" are:
- Quadrilaterals with line symmetry:
- Quadrilaterals with no line symmetry:
Total number of quadrilaterals = .
The total number of shapes available to pick from is .
The probability of picking a quadrilateral on the first draw is:
Since the shape is replaced, the total remains and the number of quadrilaterals remains . The probability of picking a quadrilateral on the second draw is:
Because the events are independent, we multiply the probabilities:
The fraction cannot be simplified further (as and , they share no common factors).
Answer
256/625
Walkthrough
The phrase "with replacement" is crucial. It tells us that after the first shape is picked and noted, it is put back into the pile. This resets the conditions for the second pick.
Step 1: Find the total number of quadrilaterals. Add the values in the Quadrilateral column: .
Step 2: Identify the total population. The problem states there are shapes in total.
Step 3: Calculate the probability of one event. The chance of picking a quadrilateral is .
Step 4: Combine the events. Since the picks are independent (due to replacement), we multiply the probability of the first event by the probability of the second event: .
Key Takeaways
- With replacement = Independent events. Multiply the same probability twice.
- Without replacement = Dependent events. The denominators decrease, and potentially the numerators too.
Common Mistakes
- Treating the events as dependent (without replacement) when the question says "with replacement".
- Adding the probabilities instead of multiplying them (a common error for students confusing "and" with "or").
- Miscalculating the total number of quadrilaterals.
Things to Be Careful About
Check if the resulting fraction can be simplified. In this case, is in its simplest form. The mark scheme accepts equivalent decimals if calculated, but fractions are preferred in exact form unless specified otherwise.
Mia takes three of the 25 shapes at random without replacement.
Find the probability that only one of the shapes is a triangle with line symmetry.
______
Approach
Mia picks three shapes without replacement. We want exactly one shape to be a "triangle with line symmetry" (let's call this type ) and the other two to be any shape that is NOT a .
There are three distinct orders in which this can happen:
- , Not , Not
- Not , , Not
- Not , Not ,
We will calculate the probability for one of these sequences and then multiply by , because the probabilities are identical for each permutation due to the commutative nature of multiplication (the denominators always go and the numerators are always in some order).
Working
Identify the counts:
- Total shapes:
- Shapes that are (Triangle with line symmetry):
- Shapes that are NOT :
Let's calculate the probability for the first sequence: , Not , Not .
-
First pick is : Probability is .
- Remaining shapes: .
- Remaining : .
- Remaining Not : .
-
Second pick is Not : Probability is .
- Remaining shapes: .
- Remaining : .
- Remaining Not : .
-
Third pick is Not : Probability is .
The probability of this specific sequence is:
Calculate the product:
Numerator:
Denominator:
Simplify the fraction:
Divide numerator and denominator by :
Divide by : , .
Since there are such mutually exclusive sequences (the single can be in position 1, 2, or 3), we multiply by :
Answer
42/115
Walkthrough
This is a multi-step problem involving dependent events.
First, understand the composition of the group. We are looking for exactly one specific type of shape: a Triangle with Line Symmetry. From the table, there are such shapes. The other shapes () do not fit this description.
Because the selection is without replacement, the probabilities change after each pick. We must consider all possible orders in which we could pick one "success" and two "failures":
- Success, Failure, Failure
- Failure, Success, Failure
- Failure, Failure, Success
Let's trace the first path: Success, Failure, Failure.
- Pick 1 (Success): There are successes out of total. Prob = .
- Pick 2 (Failure): There are still failures out of the remaining items. Prob = .
- Pick 3 (Failure): There are now failures left out of the remaining items. Prob = .
Multiply these together to get the probability of this specific order. Then, since the other two orders have the same mathematical structure (just different positions for the numbers), multiply the result by .
Calculation check:
.
Simplifying by dividing by gives .
Key Takeaways
- For "exactly one" problems with sampling without replacement, list the permutations or use combinations logic.
- Always update the numerator and denominator after each step in a without-replacement scenario.
- Multiplying by the number of permutations () accounts for the different ways the single success can occur.
Common Mistakes
- Forgetting to multiply by (only calculating one sequence).
- Using replacement probabilities (keeping the denominator at for all steps).
- Incorrectly subtracting from the wrong count (e.g., reducing the number of failures incorrectly).
Things to Be Careful About
The mark scheme allows for partial method marks for setting up the product . Ensure you explicitly state that there are combinations or show the summation of the three paths to secure full marks.