Mathematics (Syllabus D) 4024/11 — October/November 2024
Cambridge O-Level · Non-calculator · worked solutions for every part, with the mark scheme
Topics Algebra and Graphs · Number · Statistics · Geometry · Transformations and Vectors · Coordinate Geometry · +3 more
At midday the temperature is .
At 6pm the temperature is .
Approach
To find the difference between two temperatures, subtract the lower temperature from the higher temperature.
Working
Subtracting a negative is equivalent to adding a positive:
Answer
6
Walkthrough
We are given two temperatures: at midday and at 6pm. To find the difference, we calculate how much the temperature has risen or fallen by subtracting one value from the other. Since is greater than , we subtract from . Subtracting a negative number is the same as adding its positive counterpart, so becomes , which equals .
Key Takeaways
When finding the difference between two values (especially temperatures), always subtract the smaller value from the larger value to get a positive difference. Remember that subtracting a negative number is an addition operation.
Common Mistakes
A common mistake is to simply add the absolute values () without considering signs, or to incorrectly perform . Another error is forgetting that subtracting a negative turns into addition.
Things to Be Careful About
Ensure you are calculating the difference (magnitude of change) rather than just performing a random subtraction. The result should be the magnitude of the gap between the two points on the number line.
The temperature at midnight is lower than the temperature at midday.
Find the temperature at midnight.
______
Approach
The temperature at midnight is lower than the midday temperature. We need to subtract from the midday temperature of .
Working
Starting at on the number line and moving steps to the left (lower):
Answer
-11
Walkthrough
We start with the midday temperature of . The problem states the midnight temperature is lower. "Lower" means we must subtract. So we calculate . When subtracting a positive number from a negative number, the result becomes more negative. You can think of this as starting at and going down another units, landing at .
Key Takeaways
To decrease a value, subtract. If you subtract a positive number from a negative number, the result is always more negative (further from zero).
Common Mistakes
Students often mistakenly add the numbers () when they see different signs, confusing "lower" with a simple sum. Another error is thinking equals by ignoring the sign of the 9.
Things to Be Careful About
Pay attention to the word "lower". It indicates a subtraction operation. Also, remember that is not ; it is .
Amber and Pablo share $280 in the ratio .
Work out Pablo's share.
$ ______
Approach
To divide an amount in a given ratio, first calculate the total number of parts by adding the numbers in the ratio. Then, determine the value of a single part by dividing the total amount by the total number of parts. Finally, multiply the value of one part by the specific number of parts allocated to Pablo.
Working
The ratio of Amber's share to Pablo's share is .
First, find the total number of parts:
The total amount shared is $280. Calculate the value of one part:
Pablo's share corresponds to parts. Multiply the value of one part by :
Alternatively, using the fraction method directly:
Pablo receives of the total amount.
Answer
200
Walkthrough
The problem asks us to share a total sum of money ($280) between two people based on a specific ratio ().
-
Understand the Ratio: The ratio means that for every units Amber gets, Pablo gets units. Together, they share equal units (or parts) of the total amount.
-
Find the Value of One Unit: Since the total amount of $280 represents these equal units, we can find the value of just one unit by dividing the total amount by the total number of units:
Performing the division: . So, each part is worth $40.
-
Calculate Pablo's Share: The problem specifies that Pablo's share corresponds to parts of the ratio. Therefore, we multiply the value of one part by :
-
Verification: We can check our work by calculating Amber's share as well. Amber gets parts:
Adding both shares together should give the original total:
The calculation is correct.
Key Takeaways
- Total Parts: Always add the numbers in the ratio together to find how many equal parts the total quantity is divided into.
- Unitary Method: Divide the total quantity by the total number of parts to find the value of a single part. This is often the safest and most intuitive method.
- Fractional Method: You can also solve this by multiplying the total by the fraction representing the person's share (e.g., for Pablo).
Common Mistakes
- Multiplying instead of dividing: A common error is to multiply the total by the ratio numbers (e.g., ) without dividing by the total parts first. Remember that the ratio describes parts of the whole, not a multiplier of the whole.
- Ignoring the total parts: Simply taking or calculating directly misses the fact that the denominator must be the sum of the ratio terms ().
- Giving the wrong share: Calculating Amber's share () instead of Pablo's, or vice versa. Always double-check which number in the ratio belongs to whom.
Things to Be Careful About
- Units: Ensure the final answer includes the currency symbol if required by the context, although the blank line often implies just the number. Here, the question provides "$ _____", so the numerical value is sufficient.
- Exactness: In non-calculator papers, ensure your division is exact. If the result were a decimal, you might need to round to appropriate significant figures or decimal places, but with integers like and , the result is an integer.
Here are eight integers.
Find
Approach
Count the frequency of each integer in the given list to determine which one appears most often.
Working
The list of eight integers is:
Let's count the occurrences of each number:
- appears 3 times.
- appears 2 times.
- appears 1 time.
- appears 1 time.
- appears 1 time.
The number has the highest frequency (3). Therefore, the mode is .
Answer
-1
Walkthrough
The mode is defined as the value that appears most frequently in a data set. To find it, we simply tally how many times each distinct number occurs in the provided list.
The numbers are: .
By scanning through the list:
- We see at positions 1, 3, and 7. That is 3 times.
- We see at positions 4 and 5. That is 2 times.
- The others () appear only once.
Since , the most frequent value is .
Key Takeaways
- The mode is the 'most popular' number in a data set.
- A data set can have more than one mode (bimodal or multimodal) if multiple values share the highest frequency, or no mode if all values appear with the same frequency.
Common Mistakes
- Selecting the smallest or largest number instead of the most frequent one.
- Counting incorrectly due to the presence of negative signs.
Things to Be Careful About
- Ensure you count every occurrence. In this case, appears three times, not twice.
Approach
To find the median, first arrange the integers in ascending order (from smallest to largest). Then, identify the middle value(s).
Working
The original list is:
There are numbers in total (). Since is an even number, the median will be the average of the and values in the ordered list.
Step 1: Order the data.
The smallest number is . The next smallest is , followed by (twice), then (three times), and finally .
Ordered list:
Step 2: Locate the middle values.
The position of the median values is given by and .
For , we look for the and terms.
1st:
2nd:
3rd:
4th:
5th:
6th:
7th:
8th:
Step 3: Calculate the average of the two middle values.
Answer
-2
Walkthrough
The median is the middle value of a data set when it is arranged in numerical order.
First, we sort the eight integers: .
Sorting them from lowest to highest gives: .
Because there is an even number of items (), there is no single middle number. Instead, we take the two numbers in the exact center. These are the and numbers in the sorted sequence.
The number is .
The number is .
The median is the arithmetic mean (average) of these two values:
Key Takeaways
- Always order the data before finding the median.
- For an odd number of data points, the median is the single middle value.
- For an even number of data points, the median is the average of the two middle values.
Common Mistakes
- Failing to sort the data correctly, especially with negative numbers (e.g., thinking is smaller than ).
- Picking just one of the middle values instead of averaging them.
- Miscounting the positions of the middle values (e.g., picking the 3rd and 4th instead of the 4th and 5th).
Things to Be Careful About
- The mark scheme awards a B1 mark for providing the correct ordered list. While the final answer requires calculation, showing the ordered list helps verify your method.
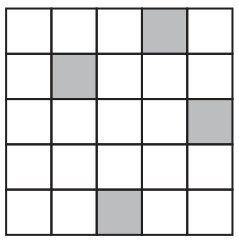
Approach
To create exactly one line of symmetry, we can use the main diagonal running from the top-left to the bottom-right of the 5 by 5 grid. We reflect each already-shaded square across this diagonal and shade any missing square that is required.
Working
The coordinates of the shaded squares are (row 1, col 4), (row 2, col 2), (row 3, col 5) and (row 5, col 3).
Reflecting across the main diagonal (where row number equals column number):
- (row 1, col 4) reflects to (row 4, col 1).
- (row 2, col 2) lies on the diagonal and is its own reflection.
- (row 3, col 5) reflects to (row 5, col 3), which is already shaded.
To complete the line of symmetry along the main diagonal, we must shade the square at (row 4, col 1). Checking other potential lines of symmetry (horizontal, vertical, or the other diagonal) shows that none of them can be completed with just one additional square. Thus, the main diagonal is the unique line of symmetry.
Answer
Shade the square in row 4, column 1.
Row 4, column 1
Walkthrough
The question asks to shade exactly one more square in a 5 by 5 grid so that the resulting diagram has exactly one line of symmetry. We test the possible lines of symmetry for a square grid: horizontal, vertical, and the two diagonals.
- Horizontal line (middle row): The shaded squares are in rows 1, 2, 3, and 5. Row 4 is empty. Reflecting across the horizontal midline would require adding squares in rows 4, 3, 2, and 1, which is more than one square.
- Vertical line (middle column): The shaded squares are in columns 2, 3, 4, and 5. Column 1 is empty. Reflecting across the vertical midline would require adding squares in columns 4, 3, 2, and 1, which is more than one square.
- Anti-diagonal (top-right to bottom-left): Reflecting (1, 4) gives (2, 5), which is not shaded. This would require multiple additions.
- Main diagonal (top-left to bottom-right): Reflection maps (row, col) to (col, row).
- (1, 4) maps to (4, 1). This square is unshaded.
- (2, 2) maps to (2, 2). It is on the line of symmetry.
- (3, 5) maps to (5, 3). This square is already shaded.
- (5, 3) maps to (3, 5). This square is already shaded.
Only one square, (4, 1), needs to be shaded to make the diagram symmetric about the main diagonal. No other lines of symmetry are present, satisfying the condition of having exactly one line of symmetry.
Key Takeaways
- A square grid has four possible lines of symmetry: horizontal, vertical, and two diagonals.
- To find the missing square for a given line of symmetry, reflect each existing shaded square across that line and identify which reflected position is not yet shaded.
- Always verify that the completed diagram does not accidentally gain additional lines of symmetry.
Common Mistakes
- Shading a square that creates a second line of symmetry (e.g., creating both diagonal symmetries).
- Miscounting rows and columns, especially when reflecting across a diagonal (mixing up row and column indices).
- Assuming the line of symmetry must be horizontal or vertical.
Things to Be Careful About
- The question specifies "one line of symmetry". Ensure the final shaded pattern does not possess rotational symmetry or additional reflectional symmetry that would introduce a second line.
- When shading on a grid, clearly define your coordinate system (e.g., row from top, column from left) to avoid off-by-one errors.
Here is a regular polygon.
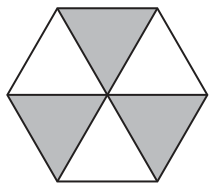
Complete the description of the rotational symmetry of this polygon.
The polygon has rotational symmetry of order ______
Approach
The rotational symmetry of a patterned shape is the number of times the pattern coincides with itself during one full 360-degree rotation. We examine the shaded sectors of the regular hexagon to find the repeating unit.
Working
The regular hexagon is divided into 6 equal equilateral triangles. Looking at Fig. 2, the triangles are shaded in an alternating pattern: shaded, unshaded, shaded, unshaded, shaded, unshaded.
The pattern repeats every 2 triangles. Since there are 6 triangles in total, the pattern repeats times in a full rotation.
Therefore, the polygon (with its shading) has rotational symmetry of order 3.
Answer
3
Walkthrough
Rotational symmetry of order means that a shape looks exactly the same times during a full rotation. For a regular polygon with a patterned interior, we must consider both the boundary of the polygon and the shading inside.
The regular hexagon has 6 equal triangular sectors. In Fig. 2, the sectors are shaded alternately: one shaded, one unshaded, one shaded, and so on. This means the pattern repeats every 2 sectors.
To find the order of rotational symmetry, we divide the total number of sectors by the number of sectors in one repeating unit:
If we rotate the hexagon by (which is ), the shaded sectors map onto shaded sectors and the unshaded sectors map onto unshaded sectors. The shape coincides with itself 3 times in a full rotation.
Key Takeaways
- The order of rotational symmetry is the number of times a shape coincides with itself in a rotation.
- When a regular polygon has internal shading, the rotational symmetry is determined by the repeating pattern of the shading, not just the polygon's boundary.
- For a regular -gon with alternating shaded sectors, the order of rotational symmetry is .
Common Mistakes
- Answering 6 (the rotational symmetry of the regular hexagon boundary alone) without considering the shading pattern.
- Answering 2 (the number of shaded sectors) instead of counting how many times the full pattern repeats.
- Forgetting that the order must be an integer that divides evenly into 360.
Things to Be Careful About
- Always consider the entire figure, including any internal lines or shading, when determining rotational symmetry.
- The order of rotational symmetry must be a whole number.
Approach
To simplify the expression , we need to collect all the 'like terms' together. Like terms are terms that have exactly the same variable part (in this case, terms with '' and terms with '').
Working
First, let's group the terms containing :
Now, combine these coefficients:
So, the combined term is:
Next, let's group the terms containing :
Combine these coefficients:
So, the combined term is:
Finally, put the two simplified parts together:
Answer
-3a + b
Walkthrough
The goal is to make the expression shorter and simpler. We can only add or subtract terms if they are 'like terms', meaning they share the exact same variables raised to the exact same powers. Here, we have '' terms and '' terms.
- Group the terms: The expression has and . Think of it as having 2 apples and taking away 5 apples, which leaves you with a debt of 3 apples ().
- Group the terms: The expression has and . Think of it as owing 3 pears but then receiving 4 pears. You pay off the debt and have 1 pear left ().
- Combine: Join the results: .
Key Takeaways
- Always look for variables first. Only combine numbers attached to the same variable.
- Be careful with negative signs. Subtracting a larger number from a smaller one (like ) results in a negative value.
- A coefficient of is usually written implicitly (e.g., becomes ).
Common Mistakes
- Combining different variables (e.g., writing ). This is incorrect because and are different quantities.
- Arithmetic errors with negatives (e.g., calculating instead of ).
- Forgetting to carry the sign of the first term when grouping.
Things to Be Careful About
- The mark scheme awards marks for seeing either or correctly, so double-check each individual combination before writing the final answer.
Approach
To expand , we use the distributive property. This means we must multiply the term outside the bracket () by every term inside the bracket.
Working
Multiply by the first term inside the bracket ():
Multiply by the second term inside the bracket ():
Answer
15x - 10
Walkthrough
Expanding brackets is about distributing the multiplier to everything inside. Imagine you have 5 bags, and inside each bag there are items and you remove items. How many items do you have in total?
- Multiply the outside number () by the first inner term (): , so we get .
- Multiply the outside number () by the second inner term (): .
- Write them together: .
Key Takeaways
- Every term inside the bracket gets multiplied by the term outside.
- Pay close attention to the signs. A positive times a negative results in a negative.
Common Mistakes
- Multiplying only the first term inside the bracket (writing ).
- Sign errors: forgetting that is negative.
Things to Be Careful About
- Ensure both terms inside the bracket are addressed. This is a common trap where students forget the constant term.
The table shows the time spent on a homework task and the number of errors made for some students in a class.
| Time (minutes) | 79 | 92 | 91 | 85 | 82 | 95 | 60 | 65 | 63 | 70 |
|---|---|---|---|---|---|---|---|---|---|---|
| Number of errors | 5 | 1 | 3 | 3 | 5 | 0 | 9 | 7 | 8 | 7 |
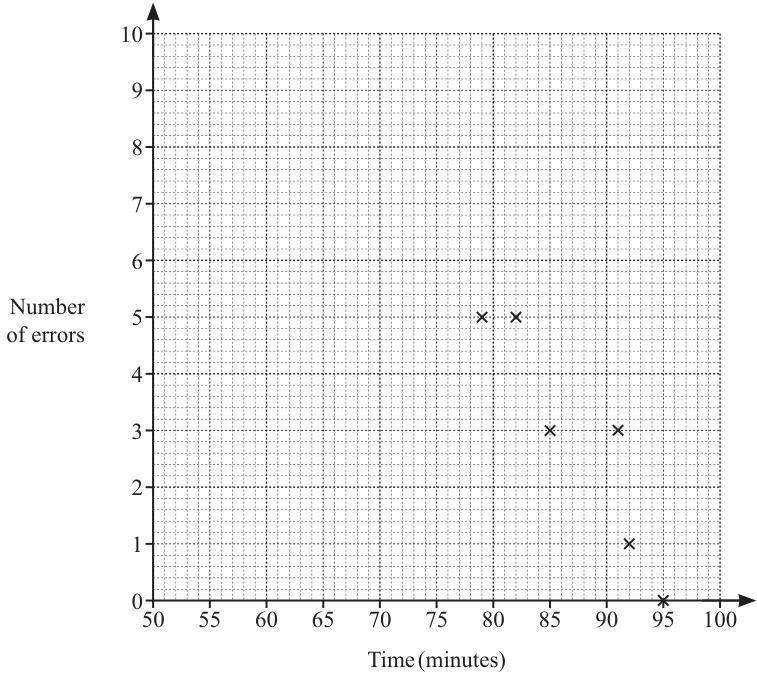
Approach
The scatter diagram already has six points plotted. We need to plot the remaining four points from the table.
Working
The remaining data pairs (Time, Number of errors) are:
Plot each of these four points on the scatter diagram as crosses at the corresponding coordinates.
Answer
Points plotted at (60, 9), (63, 8), (65, 7), and (70, 7).
Walkthrough
The question provides a table of 10 data points and a scatter diagram with 6 points already plotted. The first 6 points correspond to the first 6 columns of the table: (79, 5), (92, 1), (91, 3), (85, 3), (82, 5), and (95, 0). The remaining 4 points must be plotted to complete the diagram. These are (60, 9), (63, 8), (65, 7), and (70, 7). To plot them, locate the time value on the horizontal axis and the number of errors on the vertical axis, then mark the intersection with a cross. The mark scheme awards 1 mark for 2 or 3 correct plots and 1 mark for all 4 correct plots.
Key Takeaways
- A scatter diagram is used to show the relationship between two variables.
- Each point represents a single observation, with its x-coordinate from one variable and its y-coordinate from the other.
- All data points from the table must be plotted to fully complete the scatter diagram.
Common Mistakes
- Plotting the coordinates in the wrong order (e.g., plotting (9, 60) instead of (60, 9)). Always remember the horizontal axis is the first variable (Time) and the vertical axis is the second (Number of errors).
- Misreading the grid lines. The horizontal axis has major markings every 5 minutes and minor markings every 1 minute. The vertical axis has markings every 1 error.
Things to Be Careful About
- Ensure points are plotted as crosses (×) as shown in the existing diagram, not dots.
- Check that the x-axis is indeed Time (minutes) and not the other way around.
- The mark scheme allows partial credit (B1 for 2 or 3 correct plots), so accuracy on all 4 points is not strictly required for full marks, but all 4 should be attempted.
Approach
A line of best fit is a straight line that passes through the middle of the data points, balancing the number of points above and below it. The data shows a negative correlation (as time increases, errors decrease), so the line must slope downwards from left to right.
Working
Using a ruler, draw a straight line that passes as close as possible to all the plotted points. Ensure there are roughly equal numbers of points on either side of the line and that the line follows the general negative trend of the data.
Answer
A straight line with negative gradient passing through the middle of the points.
Walkthrough
The line of best fit summarises the relationship between the two variables. Because the number of errors decreases as time spent increases, there is a negative correlation. The line must therefore have a negative gradient (slope downwards from left to right). To draw it correctly, use a ruler to sketch a straight line that runs through the centre of the cloud of points. It should not necessarily pass through every point, nor does it need to pass through the origin. The goal is to have roughly equal numbers of points above and below the line, and to minimise the overall distance from the points to the line.
Key Takeaways
- A line of best fit is always a straight line in this context (linear relationship).
- It must reflect the direction of the correlation (negative gradient here).
- It does not need to pass through every point or the origin (0, 0).
Common Mistakes
- Drawing a curved line instead of a straight ruled line.
- Drawing a line with the wrong gradient (positive instead of negative).
- Forcing the line to pass through the origin (0, 0), which is not required unless the data clearly supports it.
- Not using a ruler, resulting in a wobbly or curved line.
Things to Be Careful About
- The mark scheme requires a 'ruled line', so use a ruler.
- The line must have a negative gradient; a positive gradient will score no marks.
- This part is a drawing task, so the exact position of the line will vary between candidates, which is acceptable as long as it is reasonable.
Another of the students in the class made 6 errors.
Use your line of best fit to estimate the time this student spent on the homework task.
______
Approach
To estimate the time for a student who made 6 errors, locate 6 on the vertical axis (Number of errors), move horizontally to the line of best fit, and then move vertically down to read the corresponding time on the horizontal axis.
Working
- Find on the vertical axis (Number of errors).
- Move horizontally to the right until you meet the line of best fit drawn in part (b).
- From that intersection point, move vertically down to the horizontal axis to read the time.
- Reading from a typical line of best fit for this data, the time is approximately minutes. (Acceptable range: to minutes depending on the exact line drawn in part (b).)
Answer
68
Walkthrough
This part asks for an estimation using the line of best fit, not the exact data. Since no student in the table made exactly 6 errors (the closest are 5 errors at 79 and 82 minutes, and 7 errors at 65 and 70 minutes), we must interpolate using our line from part (b).
To do this:
- Locate the value on the vertical axis (Number of errors).
- Draw a horizontal line from across to the right until it intersects your line of best fit.
- From that intersection point, draw a vertical line down to the horizontal axis (Time in minutes).
- Read the value on the horizontal axis. For a correctly drawn line of best fit, this value will be around minutes. Because the line is hand-drawn, answers in the range of to minutes are all acceptable, as long as they are consistent with the line drawn in part (b).
Key Takeaways
- Interpolation on a scatter diagram uses the line of best fit, not the nearest data point.
- The line of best fit smooths out variations in the data to provide a general estimate.
- Readings from hand-drawn lines allow for a range of acceptable answers.
Common Mistakes
- Reading the value from the nearest data point instead of the line of best fit (e.g., guessing 70 or 79 minutes based on the table).
- Reading the axes in the wrong direction (e.g., reading the y-value when looking for the x-value).
- Not aligning the horizontal and vertical reading lines properly with the grid.
Things to Be Careful About
- The answer must be a reading from the candidate's own line of best fit. If their line is unreasonable, the reading will be wrong, but the mark is still awarded for the correct reading method.
- The mark scheme states 'Dependent on negative gradient', meaning if the line in part (b) had a positive gradient, the reading would be incorrect and score no marks.
- Give the answer to the nearest minute or as a reasonable whole number, as the horizontal axis is marked in minutes.
By writing each number correct to 1 significant figure, calculate an estimate for the value of
______
Approach
Round each number in the expression to 1 significant figure. Then substitute these rounded values into the expression and calculate the result.
Working
The numbers are , , , and .
-
Round to 1 significant figure:
The first digit is . The next digit is , so we round down (keep as is).
-
Round to 1 significant figure:
The first digit is . The next digit is , so we round up.
-
Round to 1 significant figure:
The first digit is . The next digit is , so we round up.
-
Round to 1 significant figure:
The first digit is . The next digit is , so we round down.
Substitute these values back into the original expression:
Calculate the numerator:
Calculate the denominator:
Divide the numerator by the denominator:
Answer
18
Walkthrough
To estimate the value of the expression, we first simplify the numbers involved by rounding them to 1 significant figure. This makes mental calculation easier while keeping the answer reasonably close to the exact value.
- For , the first significant figure is . Since the following digit () is less than , it rounds to .
- For , the first significant figure is . The following digit () is or more, so we round up the to a and replace the rest with a zero, giving .
- For , the first significant figure is . The following digit () causes us to round up to .
- For , the first significant figure is . The following digit () means we round down to .
Now substitute these estimated values into the fraction:
Perform the multiplication in the numerator: .
Perform the subtraction in the denominator: .
Finally, divide: .
Key Takeaways
- Rounding to 1 significant figure looks at the first non-zero digit and the digit immediately following it.
- If the following digit is 5 or greater, round up; otherwise, round down.
- Estimation involves replacing complex numbers with simpler ones to make calculation manageable.
Common Mistakes
- Rounding to the nearest whole number instead of 1 significant figure (e.g., rounding to instead of ). Note that for single-digit integers like , they might be the same, but for two-digit numbers starting with 1-4, 1 s.f. changes the magnitude significantly (e.g., , not ).
- Arithmetic errors in the final calculation.
Things to Be Careful About
- Ensure you are rounding to significant figures, not decimal places. For , 1 s.f. is , whereas 1 d.p. would be (or 0 d.p. is ).
- The mark scheme awards B1 for seeing three of the correct rounded values (), so identifying these correctly is crucial even if the final calculation has a minor error.
These are the first four terms of a sequence.
Approach
Observe the differences between consecutive terms to determine if the sequence is arithmetic. If it is, add the common difference to the last given term.
Working
The first four terms are:
Calculate the difference between consecutive terms:
The sequence increases by each time. This is an arithmetic sequence with a common difference of .
To find the next number (the 5th term), add to the 4th term:
Answer
26
26
Walkthrough
First, we look at how the numbers change from one term to the next. We subtract each term from the one that follows it:
Since the difference is constant (), this is an arithmetic sequence. The rule for generating the next term is simply to add to the previous term. To find the next number after , we calculate .
Key Takeaways
- An arithmetic sequence has a constant difference between consecutive terms.
- To find the next term, identify this common difference and apply it to the last known term.
Common Mistakes
- Adding the wrong number (e.g., adding 5 or 7 instead of checking the actual difference).
- Multiplying instead of adding (e.g., seeing 2, 8 and thinking 'times 4' without checking subsequent terms).
Things to Be Careful About
- Always verify the difference across at least two intervals (e.g., check both and ) to ensure the pattern is consistent before assuming it's arithmetic.
Approach
For an arithmetic sequence, the th term is of the form , where is the common difference. Once is found, substitute a known term (e.g., ) to solve for .
Working
From part (a), we know the common difference . Therefore, the th term starts with:
Let the th term be . We can find by comparing to the actual terms.
For (the first term):
The actual first term is . So:
Solving for :
Thus, the expression for the th term is:
Check with the second term ():
Check with the fourth term ():
Answer
6n - 4
Walkthrough
An arithmetic sequence generates terms by adding a fixed amount each time. In algebraic terms, this fixed amount becomes the coefficient of . Since the common difference is , the core of our formula is .
However, does not give the correct terms directly. For example, when , , but the first term is . We need to adjust to match the sequence. The difference between what gives and what we actually want is the constant .
Using the first term ():
Desired value:
Value from :
Adjustment needed:
So we subtract from , giving the formula . It is good practice to check this formula against another term, such as the 3rd term (): , which matches the sequence.
Key Takeaways
- The coefficient of in the th term formula is always equal to the common difference of the arithmetic sequence.
- The constant term is determined by finding the "zeroth term" (the value before the first term) or by solving .
Common Mistakes
- Writing instead of (sign error when finding the adjustment).
- Assuming the constant is related to the first term directly without subtraction (e.g., writing ).
- Failing to simplify if the result was derived differently (though here it is simple).
Things to Be Careful About
- Ensure you use the correct value for . The first term corresponds to , not . If you used to find the constant, you would find the zeroth term is , leading to , which yields the same result but requires careful interpretation.
The grid shows triangle and triangle .
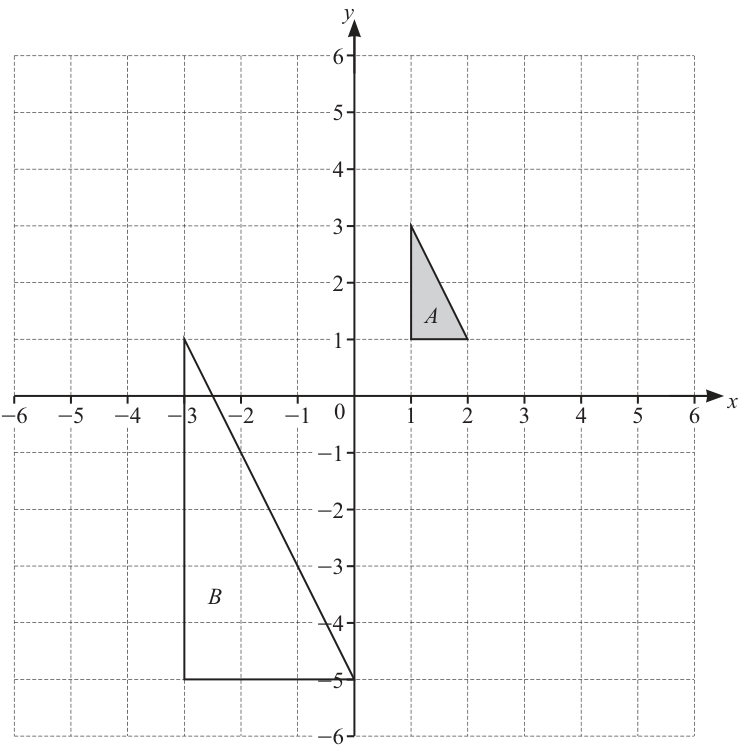
Approach
Compare the sizes and orientations of triangles and . Since triangle is larger than triangle and they have the same orientation (the right angle is at the bottom-left in both), the transformation is an enlargement. Find the scale factor by comparing corresponding side lengths, then find the centre of enlargement by drawing lines through corresponding vertices and finding their intersection.
Working
Step 1: Identify corresponding vertices.
Triangle has vertices , , . Triangle has vertices , , .
The right-angle vertex of is and the right-angle vertex of is . The vertex (bottom-right of ) corresponds to (bottom-right of ). The vertex (top of ) corresponds to (top of ).
Step 2: Calculate the scale factor.
The vertical side of from to has length . The corresponding vertical side of from to has length .
Step 3: Find the centre of enlargement.
Draw lines through corresponding vertices. The centre is where these lines meet.
Line through and :
Line through and :
Set equal to find intersection:
Substitute into :
The centre of enlargement is . Verify with the third pair: line through and has slope , giving . At , . ✓
Answer
Enlargement with scale factor and centre
Enlargement, scale factor 3, centre (3, 4)
Walkthrough
Step 1 — Identify the transformation type.
Triangle is clearly larger than triangle , so the transformation must involve a change in size. Both triangles have the same orientation: the right angle is at the bottom-left corner, the horizontal side runs to the right, and the vertical side runs upward. This rules out rotation or reflection (which would change orientation or flip the shape). A translation cannot change size. The only single transformation that changes size while preserving orientation is an enlargement.
Step 2 — Find the scale factor.
Pick any pair of corresponding sides and divide the length in by the length in . The vertical side of goes from to , length . The corresponding vertical side of goes from to , length . The scale factor is .
Step 3 — Find the centre of enlargement.
For an enlargement, every point maps to an image such that , , and the centre are collinear, with . Therefore, drawing a line through any pair of corresponding vertices will pass through the centre. Draw lines through and , and through and . Their intersection is the centre.
The line through and has slope and equation . The line through and has slope and equation . Setting them equal gives , . So the centre is .
Step 4 — Verify.
Check that the third pair of corresponding vertices also lies on a line through . The line through and has equation , and at gives . ✓
Key Takeaways
- An enlargement preserves orientation and changes size by a scale factor .
- The scale factor is found by dividing a length in the image by the corresponding length in the original.
- The centre of enlargement lies on the line joining every point to its image; intersecting two such lines gives the centre.
- Always verify the centre using a third pair of corresponding points.
Common Mistakes
- Stating "enlargement" without giving both the scale factor and the centre — all three pieces are required for full marks (B1 each).
- Getting the scale factor wrong by dividing in the wrong order (e.g. instead of ). Remember: image original.
- Reading the centre coordinates from the grid incorrectly — always verify by substituting back into the line equations.
- Forgetting that the centre of enlargement can lie outside the shape; is not inside either triangle.
Things to Be Careful About
- The answer must include all three elements: the type of transformation (enlargement), the scale factor (), and the centre coordinates (). Missing any one costs a mark.
- Coordinates must be given as an ordered pair , not as separate numbers.
- The scale factor is a pure number (no units).
- In the non-calculator component, show the line equations and the algebra that gives the intersection point — do not just state the centre.
Approach
A translation by vector moves every point 3 units left and 2 units up. Add the vector components to each vertex of triangle to find the vertices of triangle , then draw the triangle.
Working
Triangle has vertices , , .
Apply the translation to each vertex:
Triangle has vertices , , and .
Answer
Triangle with vertices at , , and
Triangle C with vertices at (-2, 3), (-1, 3), (-2, 5)
Walkthrough
A translation moves every point by the same amount in the same direction. The vector means: move 3 units in the negative -direction (left) and 2 units in the positive -direction (up). To find the image of each vertex, simply add the vector components to the coordinates.
Plot these three points and join them to draw triangle .
Key Takeaways
- A translation by adds to the -coordinate and to the -coordinate of every point.
- The shape, size, and orientation are all preserved under translation.
- Always apply the translation to each vertex individually.
Common Mistakes
- Subtracting instead of adding (or vice versa) — remember the vector components are added to the original coordinates.
- Mixing up the order: the top number is the -change, the bottom is the -change.
- Drawing the triangle from triangle instead of triangle — the question says triangle is mapped onto triangle .
Things to Be Careful About
- The answer is a drawing, so accuracy matters. Plot the vertices precisely on the grid and join them with straight lines.
- The mark scheme awards B1 for correct vertices and B1 for the triangle being drawn. If the triangle is wrong, check the SC1 alternative: translating shape by gives vertices , , , which would score 1 mark.
- Coordinates should be read correctly from the grid; double-check each vertex before drawing.
Solve the simultaneous equations.
Show your working.
= ______
= ______
Approach
We are given two linear equations in two variables, and . To solve them simultaneously, we will use the elimination method: scale one equation so that the coefficient of matches the other, then subtract to remove and solve for . Finally, substitute back into an original equation to find .
Working
Label the equations:
(1)
(2)
Multiply equation (1) by 3 so the terms match:
Subtract equation (2) from equation (3):
Divide by 7:
Substitute into equation (1):
Add 9 to both sides:
Check with equation (2): . The values satisfy both equations.
Answer
a = -3, b = 5
Walkthrough
We start with two equations that share the same unknowns, and . Because both equations must be true at the same time, we can combine them to cancel out one variable. Multiplying the first equation by 3 gives us , which exactly matches the in the second equation. When we subtract the second equation from this scaled version, the terms disappear, leaving a simple one-variable equation for . Solving it gives . With known, we plug it back into the first original equation to isolate , yielding . Substituting both values into the second equation confirms they work.
Key Takeaways
Elimination works best when you can easily make the coefficients of one variable identical (or opposite) across the two equations. Always show the scaling step explicitly to earn the method mark. After finding one variable, substitute immediately into an original equation rather than the scaled one to avoid carrying forward arithmetic errors.
Common Mistakes
- Failing to multiply every term in an equation when scaling it up (e.g., writing instead of ).
- Sign errors during subtraction, particularly being calculated as instead of .
- Providing only one variable's value, which limits the score to A1 according to the mark scheme.
- Skipping working entirely; without visible elimination steps, the M1 mark is lost (though SC1 may still apply if the answers are correct).
Things to Be Careful About
- Show every algebraic step clearly. The mark scheme awards M1 specifically for a correct elimination method, and A2 requires both correct values.
- Watch negative number arithmetic carefully throughout the process.
- Verify your final pair by substituting into the unused original equation before finishing.
- Write the final answer clearly with both variables stated, as requested by the question format.
Point is joined to point by a straight line.
Approach
The midpoint of a line segment with endpoints and is given by the average of the coordinates:
Working
Given points and , we substitute these values into the formula.
For the -coordinate of the midpoint:
For the -coordinate of the midpoint:
Thus, the midpoint is . The mark scheme accepts or its equivalent fraction .
Answer
(3.5, 1)
Walkthrough
To find the midpoint of a straight line joining two points, we need to find the point exactly halfway between them on both the horizontal () and vertical () axes.
- Identify the coordinates: Point is at and Point is at . So, , , , and .
- Apply the midpoint formula: The midpoint is the average of the -coordinates and the average of the -coordinates separately.
- For the -coordinate: Add the -values () and divide by 2. This gives (or ).
- For the -coordinate: Add the -values () and divide by 2. This gives .
- Combine: The final coordinate pair is .
Key Takeaways
- The midpoint formula is simply the arithmetic mean of the coordinates: .
- You can use decimals or fractions for the answer unless specified otherwise (here, is accepted).
Common Mistakes
- Adding the coordinates but forgetting to divide by 2 (e.g., answering ).
- Subtracting the coordinates instead of adding (e.g., ).
- Mixing up and values when substituting.
Things to Be Careful About
- Ensure you handle negative signs correctly in the addition (e.g., is not in terms of sign handling logic, though numerically it results in subtraction; keep track of the negative value clearly).
- The question asks for exact coordinates; do not round if the result is an exact decimal like 3.5.
Approach
The gradient of a straight line passing through two points and is calculated as the change in divided by the change in :
This is often described as "rise over run".
Working
Using the points and :
Let and .
Substitute these values into the gradient formula:
Calculate the numerator (change in ):
Calculate the denominator (change in ):
Divide the numerator by the denominator:
Note: The order of subtraction must be consistent. Using yields , which is also correct.
Answer
-2
Walkthrough
Gradient measures the steepness and direction of a line. It is defined as the vertical change divided by the horizontal change between any two points on the line.
- Formula: Use . It is crucial that you subtract the -coordinates together and the -coordinates together.
- Substitution:
- Change in : Take the -value of the second point () and subtract the -value of the first point (). Result: .
- Change in : Take the -value of the second point () and subtract the -value of the first point (). Result: .
- Calculation: Divide the change in by the change in : .
- Sign Check: Since the line goes down as you move from left to right (from to ), the gradient must be negative. Our result confirms this.
Key Takeaways
- Gradient is always .
- The order of points does not matter as long as you are consistent (i.e., if you do , you must do ).
- A negative gradient indicates a downward slope.
Common Mistakes
- Swapping the numerator and denominator (calculating ).
- Inconsistent subtraction order (e.g., but ), which flips the sign of the answer.
- Arithmetic errors with negative numbers (e.g., thinking or ).
Things to Be Careful About
- The mark scheme shows the method mark (M1) is awarded for the correct substitution expression like . Even if the final calculation is wrong, showing this step correctly earns partial credit.
- Do not simplify the fraction incorrectly. Here simplifies cleanly to .
Approach
Write as a number between 1 and 10 multiplied by a power of ten. The decimal point moves 4 places to the right to give , so the power of ten is .
Working
Answer
2.57 × 10^-4
Walkthrough
Standard form is written as where and is an integer. Starting from , move the decimal point to the right until only one non-zero digit is in front of it: . This is 4 places, so the original number is .
Key Takeaways
Standard form uses a coefficient between 1 and 10 and a power of ten. Moving the decimal point right gives a negative power; moving it left gives a positive power.
Common Mistakes
Writing or is mathematically equal but not standard form because the coefficient is not between 1 and 10. Also, miscounting the number of places moved gives the wrong power.
Things to Be Careful About
The mark scheme requires the exact answer (cao). Count the decimal places carefully: has four places before the digits begin, so the exponent is .
Approach
Divide the coefficients and subtract the power of ten in the denominator from the power in the numerator. Then adjust the result so the coefficient lies between 1 and 10.
Working
Since , multiply the powers of ten:
Answer
5 × 10^8
Walkthrough
Split the calculation into coefficients and powers of ten: divide by to get , and divide by by subtracting the exponents: . This gives , which is not standard form because . Rewrite as , so .
Key Takeaways
When dividing numbers in standard form, divide the coefficients and subtract the powers of ten. The final answer must have a coefficient between 1 and 10.
Common Mistakes
Leaving the answer as loses the final mark because is not between 1 and 10. Another common error is subtracting the powers incorrectly: , not or . Also, forgetting to divide the coefficients and only dividing the powers.
Things to Be Careful About
The mark scheme gives B1 for oe seen, or for an answer with . The final answer must be cao. On the non-calculator paper, show the exponent subtraction and the adjustment from to to make the method clear.
Work out .
Give your answer as a mixed number in its simplest form.
______
Approach
To divide by a fraction, we multiply by its reciprocal. First, convert the mixed number into an improper fraction. Then perform the multiplication.
Working
Convert the mixed number to an improper fraction:
Rewrite the division as multiplication by the reciprocal of :
Multiply the numerators together and the denominators together:
Convert the improper fraction back to a mixed number. We know that , so:
Check if can be simplified further. The factors of are . The factors of are . They share no common factors other than , so the fraction is in its simplest form.
Answer
2 14/15
Walkthrough
The problem asks us to divide a mixed number by a proper fraction: .
Step 1: Convert the mixed number.
Mixed numbers are difficult to work with directly in multiplication or division. It is much easier to convert them into improper fractions. To convert , we multiply the whole number part () by the denominator () and add the numerator (). This gives , which becomes the new numerator over the original denominator . So, .
Step 2: Change division to multiplication.
The rule for dividing by a fraction is to multiply by its reciprocal (flip the second fraction upside down). The reciprocal of is . Therefore, the operation becomes .
Step 3: Multiply the fractions.
To multiply two fractions, we multiply the top numbers (numerators) together and the bottom numbers (denominators) together.
Numerator:
Denominator:
This gives us the improper fraction .
Step 4: Convert back to a mixed number.
The question requires the answer as a mixed number. We need to find how many times goes into .
(this is too big)
So, goes into exactly times.
Now we find the remainder: .
The remainder () becomes the new numerator, while the denominator stays .
The result is .
Step 5: Check for simplification.
The fraction part is . We check if they share any common factors. and . There are no common factors, so the fraction cannot be simplified further.
Key Takeaways
- Always convert mixed numbers to improper fractions before performing multiplication or division.
- Dividing by a fraction is equivalent to multiplying by its reciprocal.
- When the final answer must be a mixed number, convert the improper fraction back using integer division to find the whole number part and the remainder.
Common Mistakes
- Forgetting to invert the second fraction (e.g., multiplying straight across to get ).
- Incorrectly converting mixed numbers (e.g., calculating as instead of ).
- Leaving the answer as an improper fraction when a mixed number is requested.
- Failing to simplify the fractional part of the mixed number if it is possible (though not applicable here, it is a frequent error).
Things to Be Careful About
- Ensure the final answer is in its simplest form. In this case, is irreducible. If the answer had been , it would be invalid because the fraction part must be less than .
- On the non-calculator component, all steps must be shown clearly to earn method marks.
Approach
We decompose 360 by dividing by the smallest prime numbers successively until we reach 1. We then group identical factors to write the answer in index form.
Working
First, divide 360 by 2:
Divide 180 by 2:
Divide 90 by 2:
Now 45 is odd, so we try the next smallest prime, which is 3:
Divide 15 by 3:
Finally, 5 is prime:
The prime factors are and . Grouping them gives:
Answer
2^3 x 3^2 x 5
Walkthrough
To find the prime factorization of 360, we use repeated division. We start with the smallest prime number, 2. Since 360 is even, it is divisible by 2. We keep dividing by 2 as long as the result remains even: . At this point, we have used the factor 2 three times (). The remaining number is 45, which is not divisible by 2. We move to the next prime number, 3. Since the sum of digits of 45 (4+5=9) is divisible by 3, 45 is divisible by 3. Dividing gives 15, and dividing again gives 5. This accounts for two factors of 3 (). The final number is 5, which is itself a prime number. Thus, the complete list of prime factors is . Writing these in index notation gives .
Key Takeaways
- Prime factorization breaks any integer down into a unique product of prime numbers.
- Index notation provides a compact way to write repeated multiplication of the same factor.
- Always check divisibility by small primes (2, 3, 5, etc.) in order.
Common Mistakes
- Forgetting that 1 is not a prime number.
- Stopping the factorization too early (e.g., stopping at 9 instead of breaking it down to ).
- Incorrectly counting the powers when writing the final answer.
Things to Be Careful About
- Ensure you write the final answer in the requested format (index notation vs. product of primes). Both and are generally accepted unless specified otherwise.
Approach
A number is a perfect cube if all the exponents in its prime factorization are multiples of 3. We examine the factors found in part (a) and determine what additional factors are needed to raise each exponent to the next multiple of 3.
Working
From part (a), the prime factorization of 360 is:
For to be a cube number, every prime factor's exponent must be a multiple of 3.
- For the base 2: The exponent is already 3, which is a multiple of 3. No additional 2s are needed.
- For the base 3: The exponent is 2. The next multiple of 3 is 3. We need one more factor of 3 ().
- For the base 5: The exponent is 1. The next multiple of 3 is 3. We need two more factors of 5 ().
Therefore, must provide these missing factors:
Calculate the value of :
Check: . Since , the result is correct.
Answer
75
Walkthrough
We established in part (a) that . A perfect cube has prime factors where every exponent is divisible by 3.
Looking at the term : The exponent 3 is already a multiple of 3. So, does not need to contain any factor of 2.
Looking at the term : The exponent 2 is not a multiple of 3. To make it a cube, we need to reach an exponent of 3 (the next multiple of 3). This means we need to multiply by .
Looking at the term : The exponent 1 is not a multiple of 3. To make it a cube, we need to reach an exponent of 3. This means we need to multiply by .
So, the smallest positive integer is the product of these required missing factors: .
Key Takeaways
- A number is a perfect cube if and only if the exponent of every prime in its prime factorization is a multiple of 3.
- To find the smallest multiplier, identify how many more of each prime factor are needed to reach the next multiple of 3.
Common Mistakes
- Assuming must be a prime number.
- Multiplying the existing factors together instead of finding the missing ones.
- Misidentifying the target exponent (e.g., aiming for 4 or 5 instead of 3 or 6).
Things to Be Careful About
- Remember that is effectively . It is easy to forget that it needs two more factors of 5 to become .
A sector of a circle with angle has arc length .
Find the area of the sector.
Give your answer, as simply as possible, in terms of .
______
Approach
The sector angle is , which is of a full circle. Use the arc length formula to find the radius , then use the sector area formula.
Working
Arc length of a sector with angle is
Here and arc length , so
Simplify :
Divide both sides by :
Now the area of a sector is
Substitute :
Answer
24π cm^2
Walkthrough
The sector angle is of a full circle. Therefore both the arc length and the area of this sector are of the corresponding full-circle values.
The arc length of the whole circle is its circumference, . So the arc length of the sector is
We are told this equals , giving
Simplify the left-hand side:
Dividing both sides by gives , so . This radius is needed before the area can be found.
The area of a full circle is , so the sector area is
Key Takeaways
- A sector angle written as a fraction of gives the fraction of the circle used for both arc length and area.
- Arc length of a sector: .
- Area of a sector: .
- When a question asks for an answer in terms of , leave in the answer and do not convert to a decimal.
Common Mistakes
- Forgetting to multiply by the sector fraction .
- Using the arc length as if it were the radius.
- Finding the area of the full circle instead of the sector area.
- Writing a decimal approximation such as instead of .
Things to Be Careful About
- The mark scheme awards B2 for finding ; if you only set up the equation, you may earn M1.
- Working must be shown (nfww) to gain full marks; an unsupported final answer may not be accepted.
- Keep the answer exactly as ; do not round.
- On the non-calculator paper, all simplification must be done by hand, as shown in the working.
Approach
Multiply the first matrix by the scalar , then subtract the second matrix element by element.
Working
Now subtract:
Answer
[[5, -5], [6, 3]]
Walkthrough
The expression contains a scalar multiplication followed by a subtraction. First multiply every entry of the first matrix by , giving entries , , and . Then subtract the second matrix entry by entry: , , and . This produces the final matrix with entries , , and .
Key Takeaways
Matrix multiplication by a scalar is performed on every element. Matrix addition and subtraction are performed element by element, so the two matrices must have the same size. Since both matrices are , this subtraction is valid.
Common Mistakes
- Multiplying only some entries by the scalar.
- Subtracting incorrectly when the second matrix has a negative entry; is , not .
- Combining the matrices before carrying out the scalar multiplication.
- Writing only the intermediate scaled matrix as the final answer; this can earn partial credit but not full marks.
Things to Be Careful About
Work through the four entries systematically. The final matrix must be written as one matrix. Since the answer is exact, no rounding is needed.
The determinant of is .
Approach
For a matrix, the determinant is . Use the given determinant, , to form and solve an equation for .
Working
For , take , , and .
The determinant is , so
Answer
-3
Walkthrough
The determinant of a matrix is . Here , , and , so the determinant is . The question tells us this equals , giving . Subtract from both sides to get , then divide by to get .
Key Takeaways
This question tests the determinant formula for a matrix and the ability to solve a simple linear equation. It is important to substitute the entries into the formula in the correct positions.
Common Mistakes
- Using instead of .
- Swapping the positions of and when substituting.
- Making a sign error when solving .
- Dividing incorrectly, so that gives instead of .
Things to Be Careful About
The determinant is set equal to the given value . Work with exact arithmetic throughout; no rounding is involved.
Approach
Use the inverse formula for a matrix:
From part (i), and . Substitute , , and .
Working
Since , we have :
This can also be written as
Answer
1/10 [[1, 3], [-2, 4]]
Walkthrough
For a matrix , the inverse is . From part (i), the determinant is and . Substituting , , , gives the inverse as . Since , this becomes .
Key Takeaways
The inverse of a matrix is the reciprocal of the determinant multiplied by a rearranged matrix. This question also shows follow-through: once is found, it is substituted directly into the inverse formula.
Common Mistakes
- Forgetting to divide by the determinant.
- Using the wrong sign pattern: the top-right entry should be , and the bottom-left entry should be .
- Using instead of , or failing to simplify to .
- Leaving the scalar outside but then not applying it to every entry if the answer is written as individual fractions.
Things to Be Careful About
The answer may be left as or written with each entry divided by . The mark scheme allows follow-through from the value of found in part (i), so if a different was obtained, that value should be used in this part.
The diagram shows the lines and .
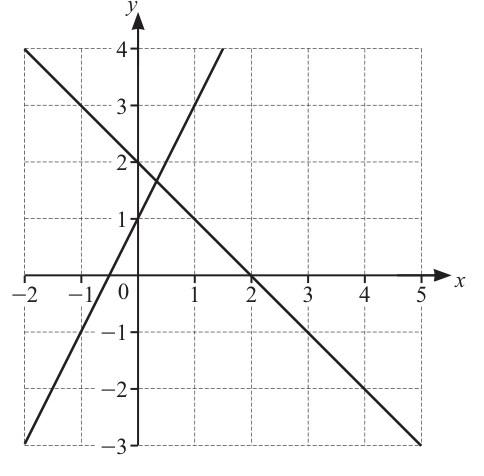
The region is defined by these three inequalities.
On the diagram, shade and label the region .
Approach
The region is bounded by three lines:
- (from )
- , i.e. (from )
- (from )
For each inequality, we shade the side that satisfies it, then the region is where all three shaded areas overlap.
Working
Boundary line 1:
The inequality means we shade the region below (or on) this line. The line passes through and as shown in the diagram.
Boundary line 2: , or
The inequality means we shade the region below (or on) this line. The line passes through and as shown in the diagram.
Boundary line 3:
The inequality means we shade the region above (or on) this horizontal line.
Finding the vertices of region :
Intersection of and :
Vertex:
Intersection of and :
Vertex:
Intersection of and :
Vertex:
The region is the triangle with vertices at , , and , shaded dark grey.
Answer
The region is the triangular area bounded by , , and , with vertices at , , and .
Shaded triangular region with vertices at (1/3, 5/3), (-3/2, -2), and (4, -2)
Walkthrough
The question asks us to shade the region satisfying three simultaneous inequalities. Each inequality defines a half-plane, and the region is the intersection of all three half-planes.
Step 1: Identify the three boundary lines.
- From , the boundary is . Since the inequality is , we shade below this line.
- From , the boundary is . Since the inequality is , we shade below this line.
- From , the boundary is . Since the inequality is , we shade above this line.
Step 2: Find the vertices of the region.
The vertices occur where pairs of boundary lines intersect. We solve each pair of equations simultaneously:
For and : setting gives , so and .
For and : setting gives , so .
For and : setting gives .
Step 3: Shade the region.
The region is the triangle enclosed by all three lines, shaded where all three conditions are met simultaneously.
Key Takeaways
- Each linear inequality or defines a half-plane below or above the boundary line.
- The solution to a system of inequalities is the region where all individual shaded areas overlap.
- Finding vertices of the solution region involves solving pairs of boundary equations simultaneously.
Common Mistakes
- Shading the wrong side of a boundary line (e.g., shading above instead of below).
- Forgetting to include the boundary line itself (the inequality is or , not or ).
- Drawing incorrectly or forgetting to shade above it.
- Not labelling the region on the diagram.
Things to Be Careful About
- The inequalities use and , so the boundary lines are included in the region (solid lines, not dashed).
- The region must satisfy ALL three inequalities simultaneously — shade carefully and find the overlap.
- Always label the shaded region with the letter given in the question ().
- The vertices may not be at integer coordinates, so check your intersection calculations carefully.
Approach
The point lies in region , so it must satisfy all three inequalities defining . Substitute and into each inequality and solve for .
Working
Inequality 1:
So .
Inequality 2:
Inequality 3:
Combining all three conditions:
The most restrictive conditions are and , giving:
Since is an integer, the possible values are:
Verification:
- : point . Check: ✓, ✓, ✓
- : point . Check: ✓, ✓, ✓
- : point . Check: ✓, ✓, ✓
Answer
0, 1, 2
Walkthrough
The point lies in region , meaning it must satisfy all three inequalities that define . We substitute and into each inequality and solve for .
Step 1: Apply .
Substituting gives . Rearranging: , so .
Step 2: Apply .
Substituting gives , which simplifies to , so .
Step 3: Apply .
Substituting gives , which simplifies to .
Step 4: Combine the conditions.
We need AND AND . The most restrictive lower bound is (since ), and the upper bound is . So .
Step 5: List integer values.
Since must be an integer, the possible values are .
Key Takeaways
- When a point with a parameter lies in a region defined by inequalities, substitute the coordinates into each inequality.
- Each inequality gives a constraint on the parameter; the valid range is the intersection of all constraints.
- Always check that the final answer satisfies the original conditions, especially when combining inequalities.
Common Mistakes
- Making sign errors when rearranging inequalities (e.g., forgetting to flip the sign when dividing by a negative — though not needed here).
- Forgetting that must be an integer and giving a continuous range like .
- Missing one of the three inequalities when substituting.
- Not verifying the answer by checking each value in the original inequalities.
Things to Be Careful About
- The question states is an integer, so the answer must be a list of discrete values, not an inequality.
- All three inequalities must be satisfied simultaneously — check each one.
- The point lies on the line , which is different from any of the boundary lines of region . Verify the point is actually inside the shaded region.
50 adults each take part in a quiz.
The cumulative frequency diagram shows their scores.
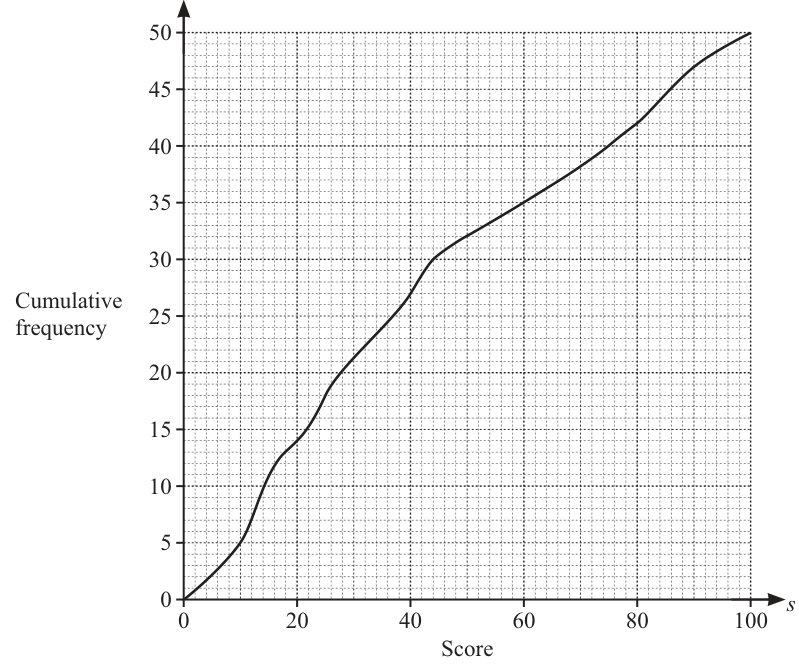
Approach
The interquartile range (IQR) is the difference between the upper quartile (UQ) and the lower quartile (LQ). For 50 data points, the LQ is at the th position and the UQ is at the th position. We read the corresponding scores from the cumulative frequency diagram.
Working
Total number of adults = .
Locate on the cumulative frequency axis, move horizontally to the curve, and then vertically down to the score axis. The score is approximately .
Locate on the cumulative frequency axis, move horizontally to the curve, and then vertically down to the score axis. The score is approximately .
(Any answer between and is accepted based on reading the graph.)
Answer
51
Walkthrough
The interquartile range is a measure of spread calculated as the upper quartile minus the lower quartile. With a total frequency of , the lower quartile is found at the th value and the upper quartile at the th value. On the cumulative frequency diagram, we find on the vertical axis, trace across to the curve, and read down to the horizontal axis to get the lower quartile score (around ). We repeat the process for to find the upper quartile score (around ). Subtracting the lower quartile from the upper quartile gives the interquartile range.
Key Takeaways
- The lower quartile is at of the total frequency, and the upper quartile is at .
- To read a value from a cumulative frequency diagram, always start on the vertical (cumulative frequency) axis, move horizontally to the curve, then vertically down to the horizontal axis.
- The interquartile range is simply .
Common Mistakes
- Starting on the horizontal axis instead of the vertical axis when reading the diagram.
- Using and of the horizontal axis range instead of the cumulative frequency.
- Forgetting to subtract the LQ from the UQ, and just giving one of the quartile values.
Things to Be Careful About
- Reading from a graph always involves estimation, so a range of acceptable answers is given. Ensure you read horizontally from the cumulative frequency axis and vertically down to the score axis.
- The question asks for an estimate, so small reading errors (e.g., reading or for the LQ) are accepted as long as the final IQR is consistent with the readings.
20% of the adults win a prize for getting a high score in the quiz.
Use the diagram to work out the minimum score needed to win a prize.
______
Approach
The top of adults win a prize. We first calculate how many adults this represents, then find the cumulative frequency that separates the top from the rest. Finally, we read the corresponding score from the diagram.
Working
Total number of adults = .
The top adults have the highest scores. Since there are adults in total, the top are those with scores above the th value ().
Locate on the cumulative frequency axis, move horizontally to the curve, and then vertically down to the score axis.
(Any answer between and is accepted.)
Answer
75
Walkthrough
The question asks for the minimum score to be in the top . First, find of the total number of adults: . This means the top people win. On a cumulative frequency diagram, the highest values are at the top right. To find the cutoff for the top , we subtract from the total frequency: . This means anyone with a cumulative frequency of or more is in the top . We find on the vertical axis, trace to the curve, and read the score on the horizontal axis, which is approximately .
Key Takeaways
- "Top " means you need to find the cumulative frequency that leaves at the upper end of the distribution.
- Subtract the top percentage count from the total frequency to find the correct cumulative frequency value to read from the graph.
Common Mistakes
- Reading the score corresponding to of the maximum score () instead of of the total frequency.
- Finding the score at CF = instead of CF = , which would give the bottom rather than the top .
Things to Be Careful About
- Always verify which end of the distribution the question is asking about. "High score" means the right side of the graph, so we work backwards from the maximum cumulative frequency ().
Approach
The frequency for each class is the difference between the cumulative frequency at the upper boundary of the class and the cumulative frequency at the lower boundary. We read the cumulative frequencies from the diagram at and subtract consecutive values.
Working
From the diagram:
- At , cumulative frequency =
- At , cumulative frequency =
- At , cumulative frequency =
- At , cumulative frequency =
- At , cumulative frequency = (given)
Calculate the frequency for each class:
Answer
| Score () | |||||
|---|---|---|---|---|---|
| Frequency |
The missing frequencies are .
14, 13, 8, 7
Walkthrough
A cumulative frequency diagram shows the running total of frequencies. To find the frequency for a specific class interval, we find the cumulative frequency at the upper end of the interval and subtract the cumulative frequency at the lower end. For the first class (), the cumulative frequency at is , and at it is , so the frequency is . For the next class (), the cumulative frequency at is , so the frequency is . We repeat this for the remaining classes: and .
Key Takeaways
- The frequency of a class is the difference between consecutive cumulative frequencies.
- Always read the cumulative frequency at the upper boundary of each class interval.
Common Mistakes
- Copying the cumulative frequency value directly as the frequency.
- Subtracting in the wrong order (e.g., lower minus upper).
Things to Be Careful About
- Ensure the class boundaries match the values on the horizontal axis of the diagram. The diagram gives cumulative frequencies at , which align perfectly with the table's class boundaries.
is inversely proportional to the square root of .
When , .
Find when .
= ______
Approach
Since is inversely proportional to the square root of , we write (or equivalently ). We substitute the given pair to find the constant . Then we use this and the new value to find the corresponding .
Working
The relationship is:
Substitute and :
Calculate :
So the equation becomes:
Solve for by multiplying both sides by 4:
Now use and the new value to find :
Rearrange to isolate :
Simplify the fraction:
Square both sides to find :
Answer
1/16
Walkthrough
-
Formulate the equation: The phrase " is inversely proportional to the square root of " translates directly into the algebraic formula , where is a constant. Alternatively, this can be written as .
-
Find the constant (): Use the specific values provided in the question to determine . We are told that when , . Substitute these into the equation:
Since , this simplifies to . Multiplying by 4 gives .
-
Solve for the unknown: Now that we have the constant , the specific relationship for this problem is . We need to find when . Substitute :
Rearranging to make the subject:
Simplifying the fraction gives . So:
Finally, square both sides to find :
Key Takeaways
- Inverse Proportion Language: "Inversely proportional to the square root of " always means dividing the constant by , not squaring it or anything else.
- Finding Constants: You always need one complete set of matching values ( and ) to find the constant before you can solve for any other unknown.
- Order of Operations: When solving , remember to isolate first, then square to get . Don't forget the final squaring step!
Common Mistakes
- Incorrect Formula: Writing or instead of .
- Calculation Errors: Forgetting that or making arithmetic mistakes when calculating .
- Premature Squaring: Squaring and incorrectly or forgetting to square the result at the end to find .
- Fraction Simplification: Failing to simplify to , which can lead to calculation errors if squaring unsimplified fractions.
Things to Be Careful About
- Exact Form: The answer should be left as an exact fraction (). Do not convert to a decimal unless asked.
- Working Shown: Ensure you show the substitution steps clearly to earn method marks, especially for finding and isolating .
Work out the value of and the value of .
= ______
= ______
Approach
Expand the left-hand side using the laws of indices: and . Then compare the numerical coefficient and the power of with the right-hand side to find and .
Working
Given:
First, apply the outer exponent to each factor inside the bracket:
Next, simplify the term using the rule :
Now equate the coefficients (the numbers) on both sides:
To solve for , raise both sides to the reciprocal power :
Then equate the exponents of on both sides:
Multiply both sides by 3:
Divide by 2:
Answer
a = 8, n = 15
Walkthrough
The problem gives an equation involving variables raised to fractional powers. To solve for the unknown constants and , we must first simplify the expression on the left-hand side so that it looks like the one on the right-hand side.
-
Expand the bracket: The expression is . We distribute the exponent to both and . This uses the law . So we get .
-
Simplify the variable part: For the term, we have a power raised to another power: . The rule here is to multiply the exponents: . The equation becomes .
-
Compare coefficients: Since the equation holds for all values of , the constant parts must be equal. Therefore, . To isolate , we raise both sides to the power of (the reciprocal of ). Note that . Thus, .
-
Compare exponents: Similarly, the exponents of the base must be equal. So, . Solving this linear equation involves multiplying by 3 to get , then dividing by 2 to get .
Key Takeaways
- Power of a Product Rule: . Every factor inside the brackets gets raised to the power outside.
- Power of a Power Rule: . Multiply the exponents together.
- Equating Components: In an identity like , you can set and separately to solve for unknowns.
Common Mistakes
- Forgetting to distribute the exponent to the coefficient . Writing instead of .
- Adding exponents instead of multiplying them when simplifying . Writing .
- Incorrectly solving . Trying to divide by instead of raising to the reciprocal power.
Things to Be Careful About
- When calculating , it is often easier to take the square root first () and then cube the result (), rather than cubing 4 first () and then taking the square root.
- Ensure working is shown clearly, as marks are awarded for the method of equating coefficients and powers.
The diagram shows the speed–time graph for a journey.
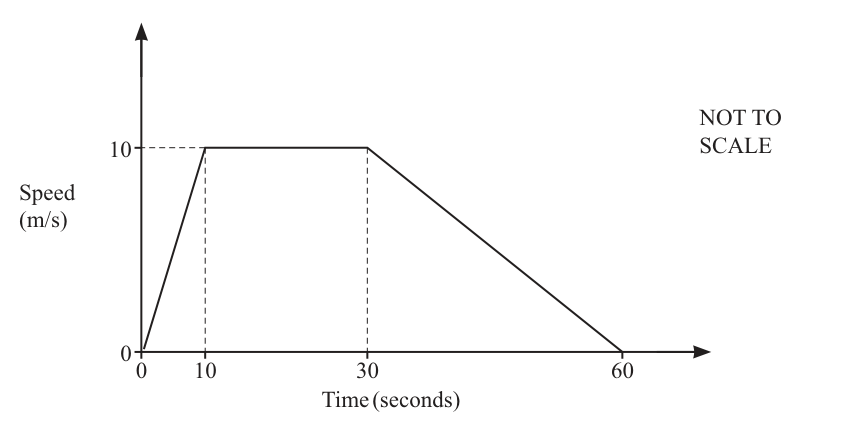
Calculate the total distance travelled.
______
Approach
The distance travelled is equal to the area under the speed–time graph. We can calculate this area using the formula for a trapezium or by splitting the shape into two triangles and a rectangle.
Working
Method 1: Trapezium formula
The region under the graph is a trapezium. The two parallel sides lie along the time axis and have lengths (from to ) and (from to ). The perpendicular height is m/s.
Method 2: Splitting into simpler shapes
Split the area under the graph into two triangles and a rectangle:
- First triangle (from to ):
- Rectangle (from to ):
- Second triangle (from to ):
Total distance:
Answer
400
Walkthrough
The problem asks for the total distance travelled given a speed–time graph. A fundamental principle in kinematics is that the distance travelled is equal to the area under the speed–time graph.
The graph forms a trapezium with vertices at , , , and . We can find the area of this trapezium directly using the formula , where and are the lengths of the parallel sides and is the perpendicular height. Here, the parallel sides are along the time axis: the bottom side has length , and the top side has length . The height is the maximum speed, . Substituting these values gives .
Alternatively, the area can be split into three simpler shapes: a right-angled triangle from to , a rectangle from to , and another right-angled triangle from to . Calculating the area of each and adding them together also gives .
Key Takeaways
- The distance travelled is always equal to the area under a speed–time graph.
- Areas under such graphs can be calculated using standard geometric formulas for trapeziums, rectangles, and triangles.
- Units of speed (m/s) multiplied by units of time (s) yield units of distance (m).
Common Mistakes
- Calculating the area using the wrong dimensions, such as using the time values on the vertical axis or speed values on the horizontal axis.
- Forgetting to subtract the start time from the end time when finding the length of the parallel sides (e.g., using instead of for the top parallel side).
- Adding the speeds or times directly instead of finding the area under the curve.
Things to Be Careful About
- Ensure the final answer is in the correct units (metres, as requested by the question).
- The diagram is marked 'NOT TO SCALE', so do not attempt to measure lengths with a ruler; always use the numerical values given on the axes.
- Both the trapezium method and the composite shape method are acceptable, but all working must be shown to earn the method mark (M1).
Approach
The function is defined as . To find , we substitute into the expression.
Working
First, calculate :
Now multiply by 3:
Finally, add 5:
Answer
8
Walkthrough
We are given the function definition . The notation asks us to evaluate this expression when the input variable takes the value . We replace every instance of in the formula with . Following the order of operations (BIDMAS/BODMAS), we handle the index first: . Then we perform the multiplication: . Finally, we complete the addition: .
Key Takeaways
- Function notation defines a rule for processing an input .
- When substituting negative numbers into squared terms, always use brackets: , not .
- Remember that a negative number squared becomes positive.
Common Mistakes
- Calculating as instead of . This is a very common error; remember that technically means , whereas means . In substitution, you must bracket the negative value.
- Forgetting to square the term and just multiplying .
Things to Be Careful About
- Ensure you square the entire negative value, including the minus sign. . If you write , the result is .
Approach
We are given . First, we determine the expression for by substituting for in the original function definition . Then we set this equal to 17 and solve the resulting quadratic equation for .
Working
Substitute into :
Expand :
So,
Set this expression equal to 17:
Subtract 5 from both sides:
Divide by 12:
Take the square root of both sides. Remember to consider both positive and negative roots:
Answer
x = 1 or x = -1
Walkthrough
The question gives us the output of the function when the input is . We start by finding what actually is. Since , replacing with gives . It is crucial to expand correctly as , not . Multiplying by 3 gives . So the expression is . We are told this equals 17, so we set up the equation . Subtracting 5 gives . Dividing by 12 isolates , giving . Taking the square root yields two solutions because both and equal 1.
Key Takeaways
- Substitution into functions: If the input is a compound term like , treat it as a single unit inside brackets: .
- Expanding squared binomials/terms: . Here .
- Solving quadratics: When solving , there are always two solutions ( and ) unless .
Common Mistakes
- Expanding as instead of . The coefficient must also be squared.
- Forgetting the negative root when solving . Students often write only .
- Arithmetic errors in rearranging the equation (e.g., adding 5 instead of subtracting).
Things to Be Careful About
- Always check if the mark scheme requires specific working marks (M1). Showing the expansion is typically required for method marks.
- Ensure the final answer lists both values clearly.
A rectangle has length and width .
Each measurement is given correct to the nearest centimetre.
Approach
The length is given as correct to the nearest centimetre. The upper bound is the smallest value that would still round up to . This is found by adding half of the unit of measure () to the given value.
Working
Answer
32.5
Walkthrough
When a measurement is given to the nearest whole number (nearest cm), the actual value could be slightly less than or slightly more than the stated value. The range of possible values is from inclusive to exclusive. The upper bound is the highest possible value in this range, which is . Any value equal to or greater than would round to or higher.
Key Takeaways
- For a measurement rounded to the nearest unit, the maximum error is units.
- Upper Bound = Given Value + 0.5 * Unit of Measure.
- Lower Bound = Given Value - 0.5 * Unit of Measure.
Common Mistakes
- Thinking the upper bound is (this would be the next integer, not the bound).
- Adding instead of .
- Confusing upper and lower bounds.
Things to Be Careful About
- Ensure you are calculating the bound for the correct dimension (length vs width).
- Remember that the upper bound itself is not included in the rounding range for the original value, but it is the boundary value used in calculations.
Approach
To find the upper bound of the difference between two quantities (), we must maximize the result. This happens when the first quantity (Length) is at its largest possible value (upper bound) and the second quantity (Width) is at its smallest possible value (lower bound).
Working
From part (a), the upper bound for the length () is .
The width () is correct to the nearest cm. Its lower bound is:
Now calculate the upper bound of the difference:
Answer
18
Walkthrough
We want to find the maximum possible difference between the length and the width. To make a subtraction result as large as possible, you need the biggest possible number being subtracted FROM and the smallest possible number doing the SUBTRACTING.
- Identify the Upper Bound of the Length: We already found this in part (a) to be .
- Identify the Lower Bound of the Width: The width is . The lowest value that rounds to is .
- Subtract the Lower Bound of the Width from the Upper Bound of the Length: .
Key Takeaways
- For sums and differences, bounds behave differently:
- Max Sum = Upper Bound(A) + Upper Bound(B)
- Max Difference = Upper Bound(A) - Lower Bound(B)
- Min Difference = Lower Bound(A) - Upper Bound(B)
- Always check if the question asks for the upper or lower bound of the final calculated value.
Common Mistakes
- Subtracting the upper bound of the width from the upper bound of the length (). This gives an intermediate value, not the maximum possible difference.
- Subtracting the lower bound of the length from the upper bound of the width (). This calculates the minimum difference.
- Rounding intermediate bounds too early or incorrectly.
Things to Be Careful About
- The phrase "difference between" usually implies a positive magnitude, but in bounds questions asking for the "upper bound of the difference", it specifically refers to maximizing the result of . If , the difference might be negative, but here so the max difference is positive.
- Units must be consistent (both in cm).
Simplify.
______
Approach
To simplify the algebraic fraction , we must factorise both the numerator and the denominator completely. Once factorised, any common factors can be cancelled.
Working
Step 1: Factorise the numerator
We look for two numbers that multiply to give and add to give . These numbers are and .
Split the middle term:
Group terms in pairs:
Factorise each group:
Extract the common bracket:
Step 2: Factorise the denominator
Identify the highest common factor of the two terms and , which is .
Extract the common factor:
Step 3: Simplify the fraction
Substitute the factorised forms back into the fraction:
Cancel the common factor :
Answer
The simplified expression is:
(2x - 1)/(2x)
Walkthrough
This question asks us to simplify an algebraic fraction. The key rule here is that we can only cancel factors (terms being multiplied), not individual parts of sums or differences. Therefore, the first step is always to try to write the top and bottom as products of brackets.
For the numerator (), this is a quadratic expression where the coefficient of is not 1. A reliable method is 'splitting the middle term'. We need two numbers that multiply to make the product of the first and last coefficients () and add to make the middle coefficient (). The numbers and fit this perfectly because and . We rewrite as , group the terms, and factorise to get .
For the denominator (), there is no constant term, so we simply look for the Highest Common Factor (HCF) between and . Both share a coefficient of and a variable of , so the HCF is . Factoring this out leaves inside the bracket.
Now the fraction looks like . Since appears in both the top and bottom as a factor, it cancels out, leaving the final answer .
Key Takeaways
- Factorise before simplifying: Never attempt to cancel terms in an algebraic fraction until you have fully factorised the numerator and denominator into products.
- Quadratic factorisation: When the leading coefficient is not 1, use the 'product-sum' method (find factors of that sum to ) or trial-and-error with bracket structures .
- Common factors: Always check for a simple numerical/variable HCF in all terms before attempting complex factorisation methods.
Common Mistakes
- Cancellation errors: Cancelling from and individually without factoring (e.g., thinking the answer is just ). This is invalid because cancellation is only allowed for factors.
- Incorrect quadratic splitting: Choosing numbers that multiply to (the constant) rather than (the product of coefficients).
- Sign errors: Forgetting the negative sign when splitting the middle term or extracting factors.
- Incomplete factorisation: Leaving the denominator as instead of .
Things to Be Careful About
- Final Form: Ensure the final answer has no common factors remaining. The mark scheme accepts . Do not expand the denominator back out (i.e., do not write unless specifically asked or if that is your preferred form, but the standard single-fraction form is safest).
- Working Shown: The mark scheme awards B1 marks for seeing the correct factorisations. Writing down these intermediate steps is crucial for partial credit even if the final cancellation is missed.
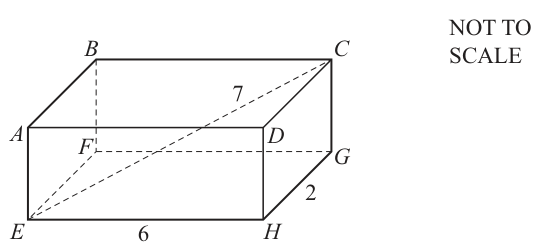
The diagram shows a cuboid.
, and .
Calculate .
= ______
Approach
Identify the right-angled triangles in the cuboid. First, find the diagonal of the base rectangle using Pythagoras' theorem. Then, use this diagonal and the space diagonal to find the vertical edge .
Working
In the base rectangle , triangle is right-angled at .
In triangle , the edge is perpendicular to the base plane, so it is perpendicular to . Thus, triangle is right-angled at .
Alternatively, using the 3D Pythagoras formula directly:
Answer
3
Walkthrough
The problem asks for the length of the vertical edge of a cuboid, given two edges of the base ( cm, cm) and the space diagonal ( cm).
To solve this, we use Pythagoras' theorem. First, consider the base rectangle . The diagonal of this base forms a right-angled triangle with sides and . We calculate .
Next, consider the triangle . Since the edge is vertical and perpendicular to the base, it is perpendicular to every line in the base passing through , including . Therefore, triangle is right-angled at . We apply Pythagoras' theorem again: , which gives , so and .
Alternatively, one can use the direct 3D Pythagoras formula , which yields the same result in a single equation.
Key Takeaways
- In a cuboid, the space diagonal relates to the three edge lengths by .
- Any vertical edge of a cuboid is perpendicular to the diagonal of the base at its foot, creating a right-angled triangle with the space diagonal.
- Pythagoras' theorem can be applied in two stages (base diagonal then space diagonal) or in one step using the 3D formula.
Common Mistakes
- Forgetting that the space diagonal is not the hypotenuse of a triangle formed by two edges of the base; it requires all three dimensions.
- Adding the squares instead of subtracting: instead of .
- Taking the square root of the wrong value or failing to simplify to .
- Confusing the face diagonal with the space diagonal (e.g., using as the square of ).
Things to Be Careful About
- Ensure the answer is given to the correct form; here, an exact integer is expected.
- Verify which diagonal is given: passes through the interior (space diagonal), not along a face.
- Remember that in a cuboid, all vertical edges are perpendicular to the base, which justifies the right angle at in triangle .
- The diagram is marked 'NOT TO SCALE', so do not estimate lengths visually; rely entirely on the given numerical values and geometric properties.
Solve.
= ______
Approach
To solve the equation involving algebraic fractions, we first eliminate the denominators by multiplying every term by the least common multiple (LCM) of and . This transforms the fractional equation into a polynomial equation (specifically, a quadratic). We then expand, simplify, and solve for .
Working
The given equation is:
Multiply both sides by to clear the denominators:
Expand the brackets on both sides.
LHS:
RHS:
So the equation becomes:
Subtract from both sides (the quadratic terms cancel out):
Add to both sides and subtract from both sides to isolate :
Check the solution in the original denominators: if , then and . The solution is valid.
Answer
2
Walkthrough
The problem asks us to find the value of that satisfies an equation containing algebraic fractions. The most efficient method is to remove the fractions entirely. We do this by multiplying every term in the equation by the product of the denominators, which is .
On the left-hand side, the first term multiplied by leaves because the cancels out. Similarly, the second term becomes . On the right-hand side, the number multiplied by simply becomes the expanded product .
Next, we expand all the brackets carefully. It is crucial not to miss any signs when expanding or the product on the right. After expansion, we notice that the term appears on both sides. Subtracting simplifies the quadratic equation down to a linear one, making it straightforward to solve. Finally, we verify that our answer does not make any original denominator zero (which would be undefined).
Key Takeaways
- When solving rational equations, multiply by the LCD (Least Common Denominator) to clear fractions early.
- Be extremely careful with signs when expanding brackets, especially when there is a negative coefficient outside (e.g., becomes ).
- Always check if the highest degree terms cancel out; a "quadratic" might just be linear in disguise.
Common Mistakes
- Sign Errors: Expanding as instead of . Or expanding incorrectly as .
- Incomplete Multiplication: Forgetting to multiply the RHS '1' by the full denominator product.
- Undefined Values: Not checking if the solution makes the denominator zero (though here is safe, or would be invalid).
- Algebraic Simplification: Failing to cancel the terms, leading to unnecessary complexity.
Things to Be Careful About
- Ensure you show working for the expansion (nfww - no marks for wrong answer without working). The mark scheme explicitly looks for the expanded forms like .
- Remember that cancelling terms is only valid if the term is non-zero. Here we assume and .