Mathematics (Syllabus D) 4024/22 — May/June 2024
Cambridge O-Level · Calculator · worked solutions for every part, with the mark scheme
Topics Number · Algebra and Graphs · Mensuration · Probability · Trigonometry · Transformations and Vectors · +3 more
Oranges cost $1.45 per kilogram.
Asher buys of oranges.
Find the change he receives from $10.
$ ______
Approach
Calculate the total cost of the oranges by multiplying the mass by the price per kilogram, then subtract this total from $10 to find the change.
Working
First, find the total cost of the oranges:
Now, calculate the change from $10:
Answer
8.26
Walkthrough
- Multiply the mass of oranges bought () by the cost per kilogram ($1.45) to determine the total price paid: , so the oranges cost $1.74.
- Subtract the total cost from the $10 note handed over: .
- Asher receives $8.26 in change.
Key Takeaways
- Total cost is calculated as .
- Change is given by .
Common Mistakes
- Arithmetic errors when multiplying decimals without checking the final decimal places.
- Forgetting to subtract from 10 and writing 1.74 as the final answer.
Things to Be Careful About
- Ensure correct placement of decimal points when working with currency.
Maria pays a fee to sell strawberries at a market.
Each day she pays $75 plus a payment for the mass of strawberries she sells.
The fee Maria pays per day is shown on the graph.
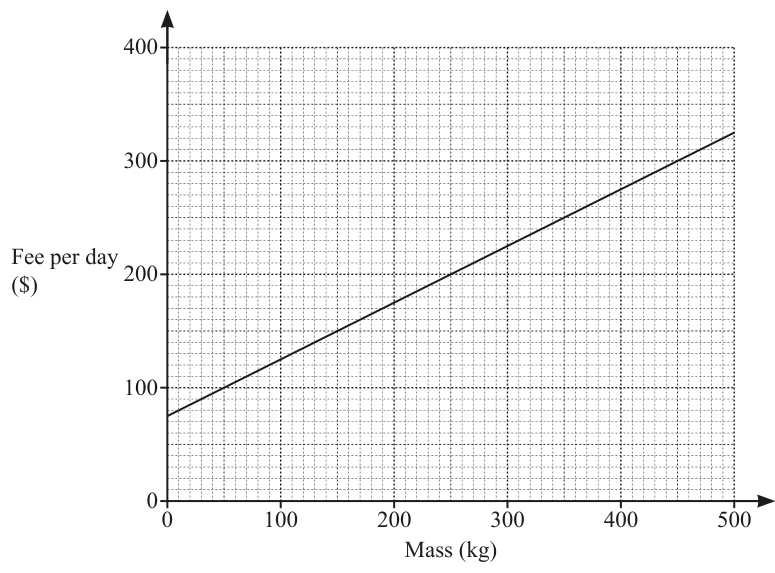
One day Maria’s fee is $240.
Use the graph to find the mass of strawberries she sells that day.
______
Approach
Locate $240 on the vertical axis (Fee per day) and read the corresponding value on the horizontal axis (Mass in ).
Working
On the vertical axis, each small square represents units ( or small squares per units, meaning each small square is ).
Finding the fee of $240 on the vertical axis and moving horizontally to the line, we read down to the horizontal axis:
Values in the range to are acceptable.
Answer
330
Walkthrough
- Identify the scale on the axes: the vertical axis has major gridlines every units, divided into small grid intervals, so small square units ($10). Similarly, on the horizontal axis, small square .
- Locate $240 on the vertical axis ( small squares above ).
- Move horizontally across to intersect the line on the graph.
- From the intersection point, read straight down to the horizontal axis to find the mass, which is at ( small squares past ).
Key Takeaways
- Always check the scale of both axes before reading values from a graph.
Common Mistakes
- Misreading the scale intervals (e.g., assuming small square or ).
Things to Be Careful About
- Use a straight edge or ruler to project lines accurately from the axis to the graph line and down.
On Saturday Maria sells of strawberries.
On Sunday she sells of strawberries.
Find the total fee she pays for these two days.
$ ______
Approach
Read the fee corresponding to a mass of and the fee corresponding to a mass of from the graph, then add the two fees together.
Working
From the graph:
- For Saturday ():
(Acceptable range: to )
- For Sunday ():
(Acceptable range: to )
Calculate the total fee:
Answer
395
Walkthrough
- Find the fee for Saturday: locate on the horizontal axis ( small squares after ). Follow the vertical line up to meet the graph, then read horizontally across to the vertical axis to get $210 (accepted range to ).
- Find the fee for Sunday: locate on the horizontal axis ( small squares after ). Follow the vertical line up to meet the graph, then read horizontally across to the vertical axis to get $185 (accepted range to ).
- Sum the two individual daily fees: .
Key Takeaways
- In multi-step graph reading problems, read each component carefully and keep intermediate values written down clearly to secure method marks.
Common Mistakes
- Adding the masses first () and reading the fee for once. Because there is a fixed daily fee of $75 per day, Maria pays the fixed fee twice (once per day), so reading the fee for the combined mass is incorrect.
Things to Be Careful About
- Maria pays the fee per day, meaning each day must be calculated separately.
The fee per day for Maria now increases.
Each day she now pays $90 plus a payment of $60 for every of strawberries she sells.
On the grid, draw a line to represent this new fee when she sells to of strawberries in a day.
Approach
Form the linear equation for the new daily fee in terms of mass, find the coordinates for the endpoints at and , and draw a ruled straight line connecting them.
Working
The fee formula is:
Find points to plot:
- When :
So plot the point .
- When :
So plot the point .
Draw a continuous ruled straight line from to .
Answer
Ruled straight line from to
Ruled line from (0, 90) to (500, 390)
Walkthrough
- Establish the relationship between mass and fee : the fixed charge is $90, and the variable charge is $60 per (which is $0.60 per ). Thus, .
- Determine two key points to accurately draw the straight line across the domain :
- At , , giving point .
- At , , giving point .
- Using a ruler, draw a single straight line starting at and terminating at .
Key Takeaways
- A linear model of the form can be plotted accurately by calculating the coordinates of its endpoints and joining them with a ruled line.
Common Mistakes
- Drawing a freehand or unruled line instead of using a ruler.
- Stopping the line short before reaching .
- Starting at or instead of the -intercept .
Things to Be Careful About
- Ensure the line is drawn cleanly from to on the horizontal axis.
Approach
Convert all quantities to the same unit (grams), then simplify the three-part ratio by dividing each part by their highest common factor.
Working
Convert kilograms to grams ():
Write the ratio in grams:
Divide all terms by :
Divide all terms by :
Answer
8 : 3 : 12
Walkthrough
- Before simplifying a ratio, all terms must have the same unit. Convert and to grams:
- Form the ratio: .
- Simplify the ratio by dividing each term by common factors:
- Divide by : .
- Divide by : .
- Since , the ratio is in its simplest form.
Key Takeaways
- Ratios do not include units, but all quantities must be expressed in identical units before forming and simplifying the ratio.
- To simplify a ratio, divide all parts by their greatest common divisor.
Common Mistakes
- Simplifying the numbers directly without converting units first (e.g., ).
- Converting incorrectly (e.g., multiplying or dividing by instead of ).
Things to Be Careful About
- Ensure all three parts are simplified simultaneously by dividing by common factors that divide into all three numbers.
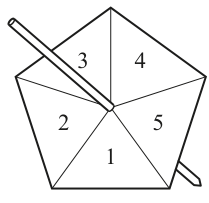
The diagram shows a fair spinner numbered from 1 to 5.
The score is the number the spinner lands on.
The spinner is spun once.
Find the probability that the score is
Approach
The spinner has 5 equal sections numbered 1 to 5. The probability of landing on a specific number is the number of favourable outcomes divided by the total number of outcomes.
Working
There is only one section numbered 3 out of 5 total sections.
Answer
1/5
Walkthrough
The spinner is fair and has 5 sections numbered 1, 2, 3, 4, 5. We want the probability that the score is 3. Since there is exactly one section with the number 3, there is 1 favourable outcome. The total number of possible outcomes is 5. Probability is calculated as favourable outcomes divided by total outcomes, giving .
Key Takeaways
For a fair spinner or die with equally likely outcomes, the probability of any single specific outcome is .
Common Mistakes
- Writing the probability as 3/5 (using the number on the spinner instead of the count of favourable outcomes).
- Forgetting to simplify the fraction (though is already simplified).
Things to Be Careful About
The answer must be in the form of a fraction. The question asks for '3', which is a single number, so there is only 1 way to get it.
Approach
We need to find the probability that the score is an even number. First, identify the even numbers on the spinner, then count them and divide by the total number of sections.
Working
The numbers on the spinner are 1, 2, 3, 4, 5.
The even numbers are 2 and 4.
Number of favourable outcomes (even scores) = 2.
Total number of possible outcomes = 5.
Answer
2/5
Walkthrough
The spinner has numbers 1, 2, 3, 4, 5. We are looking for the probability of getting an even score. The even numbers in this set are 2 and 4. There are 2 even numbers. Since there are 5 total numbers on the spinner, the probability is .
Key Takeaways
When calculating probability for a condition like 'even' or 'odd', list the outcomes that satisfy the condition and count them.
Common Mistakes
- Including 1 as even.
- Counting the total numbers incorrectly.
Things to Be Careful About
Ensure you correctly identify even numbers (divisible by 2 without remainder).
The spinner is spun twice.
The two scores are added together.
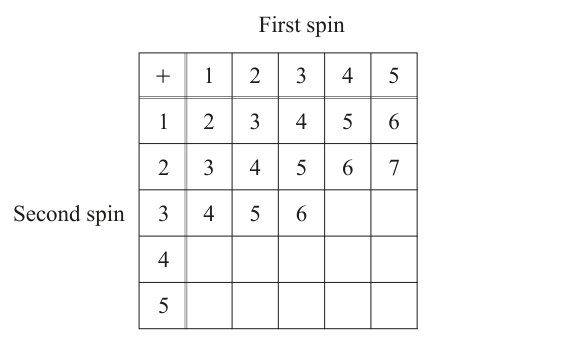
Approach
The spinner is spun twice. We create a possibility diagram (grid) where the columns represent the first spin and the rows represent the second spin. Each cell contains the sum of the two scores.
Working
The grid headers are:
- Columns (First spin): 1, 2, 3, 4, 5
- Rows (Second spin): 1, 2, 3, 4, 5
We calculate the sum for each cell (Row value + Column value):
- Row 1 (Second spin = 1): (Already given)
- Row 2 (Second spin = 2): (Already given)
- Row 3 (Second spin = 3): (Given). Missing: .
- Row 4 (Second spin = 4): .
- Row 5 (Second spin = 5): .
Answer
The completed grid values for the blank cells are:
- Row 3: 7, 8
- Row 4: 5, 6, 7, 8, 9
- Row 5: 6, 7, 8, 9, 10
Grid completed with sums: Row 3 ends with 7, 8; Row 4 is 5, 6, 7, 8, 9; Row 5 is 6, 7, 8, 9, 10
Walkthrough
We are adding two scores from a spinner numbered 1-5. We use a grid (possibility diagram) to list all 25 possible outcomes. The column headers are the first spin (1-5) and row headers are the second spin (1-5). Each cell is the sum of the row and column headers.
Given:
Row 1: 2, 3, 4, 5, 6
Row 2: 3, 4, 5, 6, 7
Row 3 starts with: 4, 5, 6. We need to add 3 to 4 and 5: .
Row 4 needs: .
Row 5 needs: .
Key Takeaways
A possibility diagram (grid) is a useful tool for visualizing all outcomes of two independent events. For addition, the value in each cell is the sum of the corresponding row and column headers.
Common Mistakes
- Adding the wrong numbers (e.g., row + row instead of row + column).
- Arithmetic errors in addition.
- Not filling in all cells (the mark scheme awards partial credit for at least 7 correct values).
Things to Be Careful About
The grid must be fully completed for subsequent parts to use follow-through marks. Ensure all 25 cells are filled.
Approach
We need to find the probability that the sum of the two scores is 4. We count the number of cells in the possibility diagram that contain the value 4 and divide by the total number of cells (25).
Working
From the completed grid:
- (Row 1, Col 3)
- (Row 2, Col 2)
- (Row 3, Col 1)
There are 3 outcomes where the sum is 4.
Total number of outcomes = .
Answer
3/25
Walkthrough
Look at the completed grid from part (b)(i). We are looking for cells with the number 4. Scanning the grid:
- Row 1, Column 3:
- Row 2, Column 2:
- Row 3, Column 1:
No other cells have 4 (Row 4 starts at 5, Row 5 starts at 6).
So there are 3 favourable outcomes. Total outcomes = 25. Probability = .
Key Takeaways
Probability = (Number of favourable outcomes) / (Total number of possible outcomes). The possibility diagram makes counting easy.
Common Mistakes
- Missing one of the combinations (e.g., forgetting ).
- Calculating the total outcomes as 10 (sum of 1 to 5) instead of 25.
Things to Be Careful About
The total number of outcomes is , not 10.
Approach
We need to find the probability that the sum is greater than 6. We count the number of cells in the grid with values 7, 8, 9, or 10 and divide by 25.
Working
From the grid, the values greater than 6 are:
- Row 2: 7 (1 value)
- Row 3: 7, 8 (2 values)
- Row 4: 7, 8, 9 (3 values)
- Row 5: 7, 8, 9, 10 (4 values)
Total number of outcomes :
Alternatively, listing them:
- Sum = 7: -> 4 outcomes
- Sum = 8: -> 3 outcomes
- Sum = 9: -> 2 outcomes
- Sum = 10: -> 1 outcome
Total = .
This can be simplified to , but is accepted.
Answer
10/25
Walkthrough
We look for sums strictly greater than 6 in the grid. These are 7, 8, 9, 10.
- Row 1 max is 6. (0 outcomes)
- Row 2: only 7 is > 6. (1 outcome: 2+5)
- Row 3: 7, 8 are > 6. (2 outcomes: 3+4, 3+5)
- Row 4: 7, 8, 9 are > 6. (3 outcomes: 4+3, 4+4, 4+5)
- Row 5: 7, 8, 9, 10 are > 6. (4 outcomes: 5+2, 5+3, 5+4, 5+5)
Total count = .
Probability = .
Key Takeaways
When counting outcomes satisfying a condition like , it's often easier to count from the diagonal or rows where the values exceed the threshold.
Common Mistakes
- Including 6 in the count (question says 'greater than 6', not '6 or more').
- Miscounting the number of cells (e.g., getting 8 or 12 instead of 10).
- Not simplifying the fraction (though is often accepted in 4024 unless simplification is asked for, the mark scheme says 'oe').
Things to Be Careful About
The mark scheme allows follow-through from an incorrect grid (if they counted correctly from their wrong grid). However, for the correct answer, ensure all cells are counted. is acceptable.
The exchange rate between dollars ($) and Malaysian Ringgits (MYR) is $1 = 4.19 MYR.
The exchange rate between dollars ($) and Pakistani Rupees (PKR) is $1 = 179.12 PKR.
Find the exchange rate between Malaysian Ringgits and Pakistani Rupees.
1 MYR = ______ PKR
Approach
The dollar connects the two other currencies. Since the same number of Malaysian Ringgits is equal to the same number of Pakistani Rupees, divide the PKR rate by the MYR rate to get the exchange rate from MYR to PKR.
Working
The two exchange rates both describe one dollar, so
Divide both sides by :
Evaluating the division gives
Answer
1 MYR = 42.75 PKR
42.75 PKR
Walkthrough
The two exchange rates tell us the value of one dollar in two different currencies. Therefore, the same dollar amount buys MYR and also buys PKR. This means those two amounts have equal value, so . To find how many PKR are equal to one MYR, divide the number of PKR by the number of MYR. So the required rate is , which works out to PKR per MYR.
Key Takeaways
- Currency conversions can be done by treating both currencies as linked through a common base currency.
- The order of the division determines the units of the answer.
- In this case, the answer must be in PKR per MYR, not MYR per PKR.
Common Mistakes
- Dividing by instead. This gives about MYR per PKR, which is not what the question asks for.
- Multiplying the two exchange rates together. Since one MYR is less than one dollar, the result must be smaller than PKR.
- Writing the answer with the units reversed, such as writing MYR instead of PKR.
Things to Be Careful About
- Make sure the factor placed in the denominator is the currency you are converting from: here it is MYR.
- On the calculator component, it is acceptable to evaluate the fraction on the calculator, but you should still write down the substituted expression first.
- Both given rates are to two decimal places, so the expected answer is also given to two decimal places: .
Farhad invests $1500 in an account paying compound interest at a rate of 4% per year.
Gulsan invests $1500 in an account paying simple interest at a rate of % per year.
Farhad and Gulsan have the same amount of money in their accounts at the end of 2 years.
Calculate the value of .
= ______
Approach
First find Gulsan's balance? No, first find Farhad's balance using compound interest, then use the simple interest formula for Gulsan, equate the two balances, and solve for .
Working
Farhad's balance after 2 years is
So the interest Farhad earns over the two years is
Gulsan receives simple interest for two years, so her simple interest is
Her balance at the end of two years is therefore
Since the balances are equal:
Subtract from both sides:
Divide by :
This is the same as the mark scheme formula:
Answer
4.08
Walkthrough
For Farhad, compound interest means the balance is multiplied by each year. After two years it is .
The interest Farhad has earned is the balance minus the original amount: .
For Gulsan, simple interest means interest is added in equal instalments. Each year she earns
so over two years she earns . Her total balance is the original amount plus the interest:
Since Farhad and Gulsan finish with equal balances, the equation is:
Solving this gives . The single mark-scheme formula does the same thing: it takes the interest earned by compound interest, divides by the product of the principal and the number of years, and multiplies by 100 to express the result as a percentage.
Key Takeaways
- Compound interest uses a growth factor of for each year.
- Simple interest is linear: the interest is the same each year.
- To compare two different interest schemes, set their final balances equal and solve.
- A compound interest rate can be converted to an equivalent simple interest rate for the same period.
Common Mistakes
- Using for Farhad's balance. This omits the principal and gives the wrong final amount.
- Wrongly using simple interest for Farhad too, for example . That would give , not .
- Forgetting to add the original to Gulsan's interest before setting up the equation.
- Omitting the factor of 100 in the final rate calculation, which would give instead of .
- Rounding intermediate values such as too early.
Things to Be Careful About
- The unknown is the percentage rate, so the final answer must be , not a decimal and not a percentage sign attached as if it were a multiplication.
- The time period for both investments is exactly 2 years, so the simple interest formula must use years.
- Keep all amounts in the same unit, here the same currency, so that they can be equated directly.
- This is a calculator component, but the substituted expressions must still be written out so each method step can be followed.
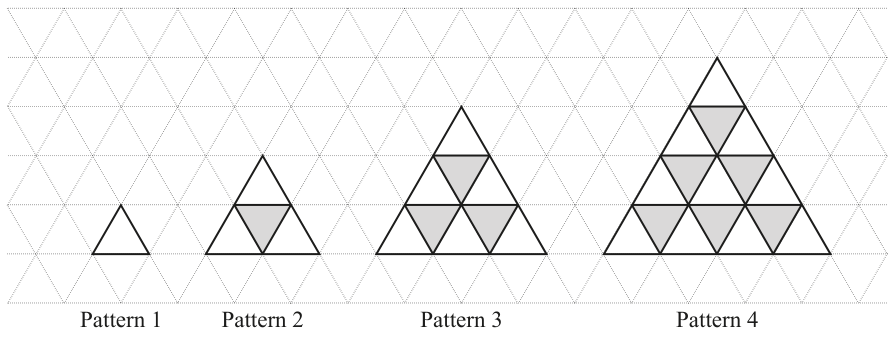
The diagrams show the first four patterns in a sequence.
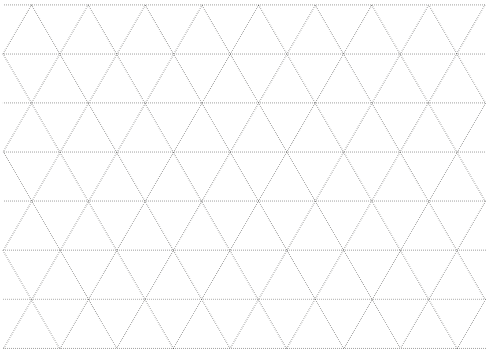
Approach
Pattern is a large equilateral triangle made of small triangles arranged in rows. The grey (shaded) triangles are the downward-pointing ones. In row (from the top), there are grey triangles and white triangles. For Pattern 5, there are 5 rows, giving small triangles in total, with 10 grey and 15 white.
Working
Answer
A large equilateral triangle composed of 25 small triangles in 5 rows, with the 10 downward-pointing triangles shaded grey and the 15 upward-pointing triangles left white.
Pattern 5 drawn: 5 rows, 25 small triangles, 10 grey (downward-pointing), 15 white (upward-pointing)
Walkthrough
Each pattern forms a large equilateral triangle with rows. Row 1 (top) has 1 triangle, row 2 has 3, row 3 has 5, and row has triangles. The total is . The grey triangles are always the downward-pointing ones. In row , there are downward-pointing triangles and upward-pointing triangles. For Pattern 5, row 1 has 1 white, row 2 has 1 grey and 2 white, row 3 has 2 grey and 3 white, row 4 has 3 grey and 4 white, and row 5 has 4 grey and 5 white. Summing these gives 10 grey and 15 white triangles.
Key Takeaways
In a triangular grid pattern, row contains small triangles. Downward-pointing triangles are grey, upward-pointing are white. The total number of triangles in pattern is .
Common Mistakes
- Counting the total number of small triangles incorrectly (e.g. counting only the upward-pointing ones).
- Shading the wrong triangles (shading upward-pointing instead of downward-pointing).
- Forgetting that row 1 has 0 grey triangles.
Things to Be Careful About
The answer is a drawing. Ensure the large triangle has exactly 5 rows and the correct number of shaded and unshaded small triangles. The grid provided is isometric, so the triangles must be drawn aligned with the grid lines.
Complete the table.
| Pattern () | 1 | 2 | 3 | 4 | 5 | 6 |
|---|---|---|---|---|---|---|
| Total number of triangles | 1 | 4 | 9 | 16 | ||
| Number of grey triangles | 0 | 1 | 3 | |||
| Number of white triangles | 1 | 3 | 6 |
Approach
The total number of triangles follows the sequence , which is . The grey and white triangle counts can be extended by finding the first differences of their respective sequences.
Working
Total number of triangles:
Number of grey triangles:
The sequence is . The first differences are . The next differences are and .
Number of white triangles:
The sequence is . The first differences are . The next differences are and .
Answer
| Pattern () | 1 | 2 | 3 | 4 | 5 | 6 |
|---|---|---|---|---|---|---|
| Total number of triangles | 1 | 4 | 9 | 16 | 25 | 36 |
| Number of grey triangles | 0 | 1 | 3 | 6 | 10 | 15 |
| Number of white triangles | 1 | 3 | 6 | 10 | 15 | 21 |
Total: 25, 36; Grey: 10, 15; White: 15, 21
Walkthrough
The total number of triangles is given by , so for it is and for it is . For the grey triangles, the sequence is . The differences between consecutive terms are , which increase by each time. The next differences are and , giving and . For the white triangles, the sequence is . The differences are , increasing by . The next differences are and , giving and .
Key Takeaways
When a sequence does not have a constant first difference, look at the second differences. If the second differences are constant, the sequence is quadratic, and the first differences increase linearly.
Common Mistakes
- Assuming the first differences are constant when they are not.
- Forgetting to add the difference to the correct previous term.
- Mixing up the grey and white triangle counts.
Things to Be Careful About
Ensure the table is completed for both and in all three rows. The marks are awarded for at least one correct row or column, but all should be filled.
Write an expression, in terms of , for the total number of triangles in Pattern .
______
Approach
The total number of triangles for patterns is . These are the perfect squares .
Working
For Pattern , the total number of triangles is .
Answer
n^2
Walkthrough
The total number of triangles in each pattern is . Recognising these as , the expression for the -th term is simply .
Key Takeaways
A sequence of perfect squares has the general term .
Common Mistakes
- Writing or other incorrect quadratic expressions.
- Forgetting to express the answer in terms of .
Things to Be Careful About
The answer must be an expression in terms of . is the exact form required.
Write an expression, in terms of , for the number of white triangles in Pattern .
______
Approach
The number of white triangles is . The first differences are and the second difference is constant at . This indicates a quadratic sequence of the form .
Working
The second difference is , so .
The expression is .
For :
For :
Subtracting the first equation from the second:
Substituting into :
So the expression is:
Alternatively, this is the sum of the first natural numbers: .
Answer
1/2 n^2 + 1/2 n
Walkthrough
The sequence of white triangles is . The first differences are and the second difference is . For a quadratic sequence , the second difference is , so . Substituting and into gives two equations: and . Solving these yields and . The expression is , which can also be written as .
Key Takeaways
For a quadratic sequence, the coefficient of is half the second difference. The sequence of triangular numbers has the formula .
Common Mistakes
- Forgetting to halve the second difference to find .
- Making arithmetic errors when solving the simultaneous equations for and .
- Writing or other incorrect constant terms.
Things to Be Careful About
The mark scheme accepts or equivalent forms like . Ensure the expression is in terms of .
The 3rd term of a linear sequence is 34.
The 8th term of the same linear sequence is 14.
Approach
Let the first term be and the common difference be . The -th term of a linear sequence is . We are given the 3rd term () and the 8th term ().
Working
Subtract the equation for the 3rd term from the equation for the 8th term:
Substitute into :
Answer
42
Walkthrough
The difference between the 8th term and the 3rd term is times the common difference . The difference in their values is . So , giving . The 3rd term is . Substituting gives , so .
Key Takeaways
For a linear sequence, the difference between the -th and -th terms is . Use this to find , then substitute back to find .
Common Mistakes
- Calculating the difference as and getting (wrong sign).
- Forgetting that the 3rd term is , not .
- Arithmetic errors when adding or subtracting.
Things to Be Careful About
The sequence is decreasing (). Ensure the sign of is correct when finding .
Approach
The general term is . We want the first negative term, so we solve .
Working
Since must be an integer, the smallest value is .
Find the 12th term:
Check the 11th term:
The first negative term is .
Answer
-2
Walkthrough
The general term is . For the term to be negative, , which gives . The first integer greater than is . The 12th term is . The 11th term is , which is positive. Thus, the first negative term is .
Key Takeaways
To find the first negative term in a linear sequence, set the general term less than zero and solve for . Round up to the next integer.
Common Mistakes
- Solving incorrectly (e.g., ).
- Forgetting to check the term just before the calculated to ensure it is positive.
- Calculating the term value incorrectly.
Things to Be Careful About
The question asks for the value of the first negative term, not the position (). The answer is , not .
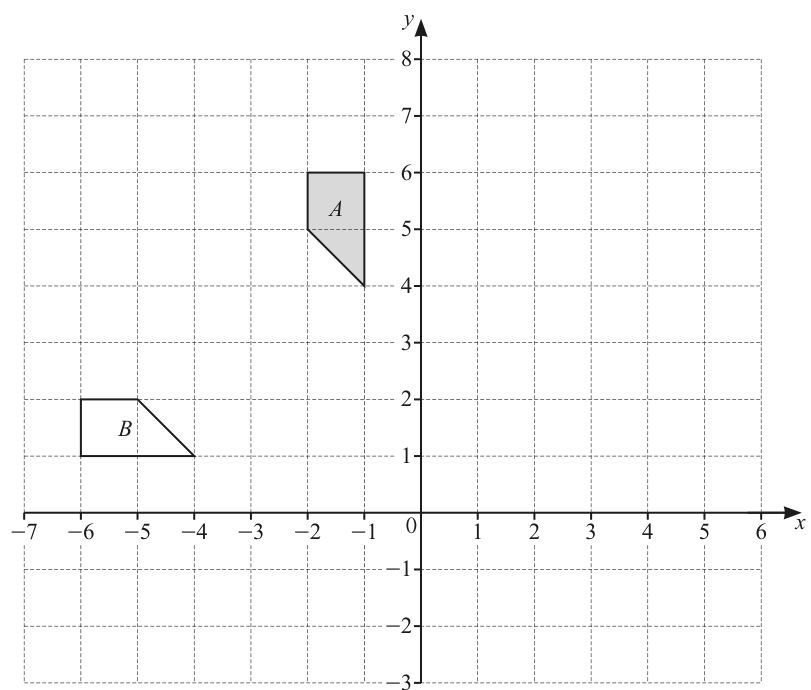
Approach
Compare the coordinates of corresponding vertices of shapes and to determine the transformation. A reflection in the line maps any point to .
Working
Map the vertices of shape using the rule :
These image coordinates match the vertices of shape (allowing for the standard grid interpretation of the trapezoid's vertices).
Answer
Reflection in the line
Reflection in the line y = -x
Walkthrough
To find the single transformation mapping shape onto shape , we compare their vertices. Shape has vertices at , , , and . Shape has vertices at , , , and . Notice that each -coordinate of becomes the negative of the -coordinate of , and each -coordinate of becomes the negative of the -coordinate of . This is exactly the rule for a reflection in the line , which maps to . Since the shapes are congruent and oriented in a way that requires a flip across this diagonal, the transformation is a reflection.
Key Takeaways
A reflection in the line swaps the coordinates and negates both: . Always verify by mapping at least two vertices to confirm the transformation.
Common Mistakes
- Stating only "reflection" without giving the equation of the mirror line; the mark scheme requires both.
- Confusing the line with (which maps ).
- Forgetting to negate both coordinates when reflecting in .
Things to Be Careful About
A full description of a transformation must include the type of transformation and the specific line, point, or vector involved. For reflections, this means stating the equation of the mirror line. Here, is the mirror line.
Shape is mapped onto shape by an enlargement of scale factor 3.
Two of the vertices of shape are and .
Approach
Let the centre of enlargement be . The formula for an enlargement with scale factor maps a point to . We use two known vertices of shape and their corresponding images in shape to find and .
Working
Shape has vertices including and . These map to and in shape respectively.
For the vertex :
Solving the -equation:
Solving the -equation:
The centre of enlargement is .
Answer
(-4, 5)
Walkthrough
We are given that shape is enlarged by a scale factor of to produce shape , and we know two corresponding vertices: maps to , and maps to . Let the centre of enlargement be . The general formula for the image of a point under an enlargement with centre and scale factor is . Substituting the known point and its image gives two equations: and . Solving these yields and . We can verify this with the second pair: , which matches.
Key Takeaways
The enlargement formula allows you to find the centre of enlargement if you know the scale factor and at least one pair of corresponding points.
Common Mistakes
- Assuming the centre is the origin or misreading the coordinates from the grid.
- Forgetting to subtract the centre coordinates before multiplying by the scale factor.
- Not verifying the answer with the second pair of vertices.
Things to Be Careful About
The scale factor is , not . Ensure you are solving for correctly and not confusing it with the image coordinates. The mark scheme accepts partial credit for identifying that the -coordinate is less than or the -coordinate is .
Approach
First, find the area of shape by counting grid squares or decomposing it into simpler shapes. Then, use the area scale factor, which is the square of the linear scale factor (), to find the area of shape .
Working
Shape has vertices at , , , and . It can be seen as a rectangle (area ) with a right-angled triangle of base and height (area ) removed from the top-left corner.
The linear scale factor is , so the area scale factor is .
Alternatively, using the trapezium formula on shape with parallel sides and and height :
Answer
13.5
Walkthrough
To find the area of shape , we first calculate the area of shape . Shape is a quadrilateral that can be viewed as a rectangle (from to and to ) minus a right-angled triangle in the top-left corner (vertices , , ). The rectangle has area , and the triangle has area . Thus, the area of is . Since shape is an enlargement of with a linear scale factor of , its area is multiplied by . Therefore, the area of is .
Key Takeaways
When a shape is enlarged by a linear scale factor , its area is multiplied by . Always calculate the original area first if it is not given.
Common Mistakes
- Forgetting to square the scale factor when finding the area scale factor (using instead of ).
- Miscalculating the area of the original shape by miscounting grid squares or misidentifying the decomposition.
- Rounding the answer unnecessarily; is exact.
Things to Be Careful About
The question asks for the area in . Ensure your final answer is in the correct form. The mark scheme accepts or . Working must be shown to earn method marks for the area calculation or the application of the scale factor.
Transformation T is represented by the matrix
Transformation T maps shape onto shape .
Approach
The transformation matrix maps a point to . Apply this to each vertex of shape to find the vertices of shape , then draw it on the grid.
Working
Vertices of shape : , , , .
The vertices of shape are , , , and .
Answer
Shape is drawn with vertices at , , , and .
Shape D with vertices at (-6, -1), (-4, -1), (-5, -2), (-4, -2)
Walkthrough
The matrix represents a standard rotation. To find the image of shape , we multiply this matrix by the column vector of each vertex. For a point , the product is . Applying this to the vertices of : , , , and . Plotting these points and joining them in order gives shape .
Key Takeaways
Matrix multiplication is used to find image coordinates. The matrix is a standard rotation matrix for anticlockwise about the origin.
Common Mistakes
- Making sign errors when multiplying the matrix (e.g., forgetting the negative sign on the -coordinate).
- Plotting the points incorrectly on the grid, especially in the third quadrant.
- Not joining the vertices in the correct order to form the shape.
Things to Be Careful About
The question asks to draw shape on the grid. Ensure the vertices are plotted accurately to within half a grid square. The mark scheme awards marks for at least three correct vertices or three correct pairs of coordinates.
Approach
The matrix is a standard rotation matrix. Recall that a rotation of anticlockwise about the origin is given by . Match the entries to find .
Working
This gives and , so .
Since the matrix is about the origin, the centre is .
Answer
Rotation of anticlockwise about
Rotation 90 degrees anticlockwise about (0, 0)
Walkthrough
The given matrix is . We compare this to the general rotation matrix . From the top-left and bottom-right entries, . From the bottom-left entry, . The angle that satisfies both is . Since the sine is positive and cosine is zero, the rotation is anticlockwise. The absence of translation terms in the matrix means the centre of rotation is the origin .
Key Takeaways
Standard rotation matrices are: anticlockwise: ; : ; clockwise: . Memorizing these saves time and reduces errors.
Common Mistakes
- Confusing anticlockwise with clockwise (the signs of the off-diagonal entries are swapped).
- Forgetting to state the centre of rotation; a full description requires the type, angle, direction, and centre.
- Stating "rotation about the origin" without specifying the angle and direction.
Things to Be Careful About
The mark scheme requires three specific pieces of information: "Rotation", " anticlockwise", and "". Missing any of these will cost a mark. Ensure you write "anticlockwise" and not just "counterclockwise" if the mark scheme is strict, though both are generally accepted. The angle must include the degree symbol.
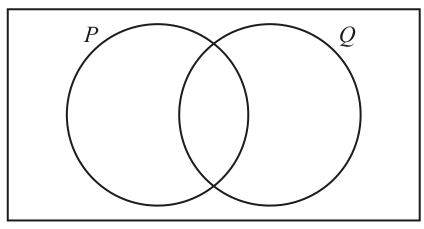
Approach
The union of two sets, , represents all elements that belong to set , set , or both sets.
Working
To shade :
- Shade all of circle .
- Shade all of circle .
- This covers both circles completely, including their overlap region.
Answer
Both circles and completely shaded.
Both circles P and Q fully shaded
Walkthrough
The symbol stands for the union of two sets. consists of all elements that are in , in , or in both. Therefore, on a Venn diagram, the region representing is formed by shading the entirety of both circles and .
Key Takeaways
- Union () includes everything inside either or both circles.
- Intersection () includes only the overlapping region common to both circles.
Common Mistakes
- Shading only the intersection () instead of the union.
- Shading only the parts outside the intersection.
Things to Be Careful About
- Ensure shading is clear and covers the entire area within the boundaries of circles and without shading the region outside the circles.
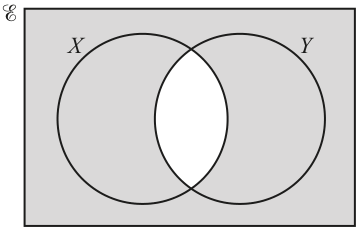
Approach
Identify the unshaded region and write the complement of that region, or express the union of the shaded regions using set notation.
Working
From the given Venn diagram, the only unshaded region is the intersection of sets and , which is denoted by:
Since everything in the universal set except this intersection is shaded, the region is the complement of the intersection:
Alternative equivalent forms include or .
Answer
(X ∩ Y)'
Walkthrough
Looking at the diagram, every region of the universal set is shaded except for the central overlapping region between and .
- The central overlapping region represents the intersection .
- The shaded region is everything outside this intersection, which is the complement of the intersection: .
- By De Morgan's laws, this is also equivalent to .
Key Takeaways
- The prime symbol () denotes the complement of a set (everything not in the set).
- When all parts except one specific region are shaded, expressing the answer as the complement of the unshaded region is often the simplest approach.
Common Mistakes
- Confusing union () and intersection (), writing which would only represent the region outside both circles.
- Forgetting brackets, e.g. writing which means and not .
Things to Be Careful About
- Ensure proper bracket placement: .
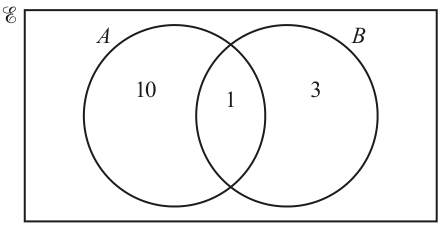
Approach
Determine the elements of sets and from the universal set , and place each element in the correct region of the Venn diagram.
Working
List the elements belonging to each definition within :
- Universal set:
- Factors of in :
- Odd numbers in :
Now distribute the elements into the four regions:
- Intersection (factors of 40 that are odd):
- only () (factors of 40 that are even):
- only () (odd numbers that are not factors of 40):
- Outside both circles () (numbers that are neither factors of 40 nor odd, i.e., even non-factors: ):
Note that checking gives outside both circles: .
Checking all 10 elements:
- Circle only:
- Intersection:
- Circle only:
- Outside both:
Answer
Venn diagram completed with: A only: 2, 4, 8, 10; Intersection: 1, 5; B only: 3, 7, 9; Outside: 6
Walkthrough
- Identify the universal set: integers from to .
- Identify elements of (factors of 40 in the range): .
- Identify elements of (odd numbers in the range): .
- Find the overlap : elements appearing in both lists are and .
- Place the remaining elements of () in the ' only' region (since is already printed, add ).
- Place the remaining elements of () in the ' only' region (since is already printed, add ).
- Place the remaining elements of that are in neither set () outside both circles.
Key Takeaways
- Every element of the universal set must appear exactly once in the Venn diagram.
- Identifying the intersection first makes placing the remaining elements straightforward.
Common Mistakes
- Forgetting numbers that belong outside both circles (e.g. omitting ).
- Misidentifying factors of (e.g. thinking is not a factor or including multiples instead).
Things to Be Careful About
- Ensure no elements from are omitted or repeated.
Approach
The set represents elements that are NOT in set AND are in set (i.e. the region belonging to only).
Working
From the Venn diagram, the elements inside circle but outside circle are:
Answer
3, 7, 9
Walkthrough
The expression means the intersection of the complement of with set .
- means all elements not in .
- means all elements in .
- The intersection of these two sets consists of elements that are strictly in and not in (' only').
Looking at the completed Venn diagram in circle excluding the overlap gives the numbers .
Key Takeaways
- is equivalent to ' only' or .
Common Mistakes
- Including elements from the intersection (e.g. including or ).
- Listing elements from that are outside both circles (e.g. including ).
Things to Be Careful About
- List only the elements separated by commas or spaces without extra set notation unless requested.
One element of is chosen at random.
Find the probability that this element is in .
______
Approach
Use the classical probability formula:
Working
- Total number of elements in the universal set :
- Number of elements in (which are ):
Therefore, the probability is:
Answer
2/10
Walkthrough
- Count the total number of outcomes in the sample space, which is the universal set . There are elements, so .
- Count the number of successful outcomes, which are the elements in . There are elements ( and ), so .
- The probability is the number of successful outcomes divided by the total number of outcomes:
This can also be written in simplified form as or as a decimal .
Key Takeaways
- For equally likely outcomes, .
Common Mistakes
- Dividing by the number of elements in or rather than the total number of elements in .
- Counting the values themselves (e.g. ) instead of the number of elements ().
Things to Be Careful About
- The mark scheme accepts unsimplified fractions like , simplified fractions , or decimals .
Approach
To isolate , multiply both sides of the equation by .
Working
Multiply both sides by :
Answer
21
Walkthrough
The equation is . This means divided by equals . To find , we perform the inverse operation of division, which is multiplication. We multiply both sides by to cancel the denominator on the left side.
Key Takeaways
Always apply the same operation to both sides of an equation to maintain equality. For fractions like , multiplying by isolates the variable.
Common Mistakes
Multiplying incorrectly or subtracting instead of multiplying (e.g., ). Confusing the direction of the inverse operation.
Things to Be Careful About
Ensure you calculate correctly. The answer must be an integer in this case.
Approach
First, expand the bracket on the right-hand side. Then, collect all terms on one side and constant terms on the other. Finally, divide to find .
Working
Given:
Expand the bracket:
Subtract from both sides to group terms:
Add to both sides to group constants:
Divide by :
Convert to a mixed number:
Answer
2 3/4
Walkthrough
The equation is .
- Expand: Multiply the term outside the bracket () by each term inside ( and ). This gives . The equation becomes .
- Collect x terms: Subtract from both sides. leaves on the left. The equation is now .
- Collect constants: Add to both sides. cancels out on the left, and becomes on the right. The equation is .
- Solve: Divide by . .
- Format: The mark scheme accepts improper fractions or mixed numbers. is with a remainder of , so .
Key Takeaways
When solving linear equations with brackets: expand first, then move variables to one side and numbers to the other. Always check signs when moving terms across the equals sign.
Common Mistakes
Forgetting to distribute the multiplier to both terms inside the bracket (e.g., writing ). Incorrectly combining negative and positive numbers (e.g., instead of adding to ).
Things to Be Careful About
The question asks for . Ensure the final answer is simplified. is preferred over if the mark scheme specifies 'oe' (otherwise equivalent), but is also correct. Note that is awarded for setting up .
Approach
We need to factorise . Since the coefficient of is (not ), we look for two binomials such that and the cross-terms sum to . Alternatively, use the 'splitting the middle term' method.
Working
Method: Splitting the middle term.
Find two numbers that multiply to and add to .
Factors of :
(sum )
(sum )
(sum )
(sum ) -> These are the numbers.
Rewrite as :
Group the terms:
Factor out the common bracket :
Answer
(3x + 4)(x - 2)
Walkthrough
To factorise , we look for factors of the form . Expanding this gives .
We need and .
Alternatively, using the product-sum method: multiply . Find factors of that add to . These are and .
Split the middle term: .
Factor by grouping: .
Result: .
Key Takeaways
For quadratics , find two numbers that multiply to and add to . Use these to split the middle term, then factor by grouping.
Common Mistakes
Choosing factors of directly without considering the coefficient . For example, trying which expands to , missing the term. Sign errors when splitting the middle term.
Things to Be Careful About
Check your answer by expanding it back out. . Correct. The mark scheme awards M1 for seeing the correct structure or partial factorisation.
Approach
Expand the left-hand side and compare the coefficients of the resulting terms with the right-hand side .
Working
Expand :
Equate this to :
Compare coefficients of corresponding powers of :
-
Coefficient of :
Since , we have . -
Coefficient of :
Substitute : -
Constant term:
Substitute :
Answer
a=2, b=-3, c=9
Walkthrough
The identity is .
First, expand the left side: .
Now match the coefficients with the right side .
- The term: . Since , .
- The term: . With , , so .
- The constant term: . With , .
Key Takeaways
When two polynomials are equal for all values of , their corresponding coefficients must be equal. Expanding a perfect square is a key skill.
Common Mistakes
Taking despite the condition . Calculating incorrectly from . Forgetting to square to find (e.g., saying ). Not squaring the negative sign for when finding .
Things to Be Careful About
Pay close attention to the condition . If were allowed to be negative, would change sign accordingly, but would remain the same. Ensure you follow the follow-through marks if an earlier value was wrong, but here we calculate exact values.
[Volume of a cone = ]
[Volume of a sphere = ]
[Curved surface area of cone = ]
[Surface area of a sphere = ]
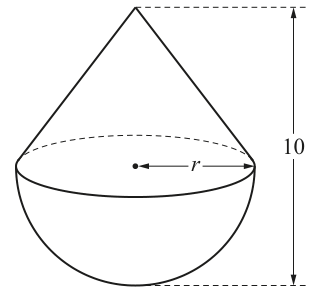
A solid is formed by placing a cone on top of a hemisphere.
The cone and the hemisphere each have radius .
The height of the solid is .
The curved surface area of the hemisphere is .
Approach
The curved surface area of a full sphere is , so the curved surface area of a hemisphere is . Set this equal to and solve for , showing intermediate decimal places before rounding.
Working
Rounding to decimal places:
Answer
4.80
Walkthrough
- The formula for the surface area of a sphere is . Since a hemisphere is half of a sphere, its curved surface area is .
- Set up the equation .
- Divide both sides by to find .
- Take the positive square root to find .
- Rounding to 2 decimal places yields , matching the required value.
Key Takeaways
- For "show that" questions, you must show unrounded intermediate values (at least 3 or 4 significant figures or decimal places) before stating the final rounded answer to prove you arrived at the result legitimately.
Common Mistakes
- Using (forgetting to divide the sphere's surface area by 2 for a hemisphere).
- Not showing the unrounded value (e.g. or ) before writing .
Things to Be Careful About
- Ensure you divide by the product on your calculator rather than dividing by and multiplying by .
Approach
The solid is composed of a cone on top of a hemisphere.
- Find the height of the cone, , by subtracting the radius of the hemisphere from the total height of .
- Calculate the volume of the cone using .
- Calculate the volume of the hemisphere using .
- Add the two volumes together to find the total volume.
Working
Height of the cone:
Volume of the cone:
Volume of the hemisphere:
Total volume:
Rounding to 3 significant figures gives (or if using more precise unrounded values of ).
Answer
357
Walkthrough
- The total height is . The hemisphere extends downward from the circular boundary by its radius, . Therefore, the vertical height of the cone is .
- The volume of a cone is .
- The volume of a hemisphere is half the volume of a sphere: .
- Summing both components gives .
Key Takeaways
- The height of a hemisphere from its flat circular base to its lowest point equals its radius .
- The total volume of a compound solid is found by summing the individual standard solid volumes.
Common Mistakes
- Using as the height of the cone instead of subtracting .
- Using the formula for a full sphere () instead of a hemisphere ().
Things to Be Careful About
- Ensure accurate intermediate values are carried through calculation to prevent premature rounding errors.
Approach
- Find the slant height of the cone using Pythagoras' theorem: .
- Compute the curved surface area of the cone using the formula .
Working
Slant height :
Curved surface area of the cone:
Rounding to 3 significant figures gives .
Answer
107
Walkthrough
- The formula for the curved surface area of a cone is , where is the slant height.
- The vertical height of the cone is and the base radius is .
- Using Pythagoras' theorem on the right-angled cross-section of the cone:
- Substituting and into the curved surface area formula:
- Rounded to 3 significant figures, this gives (or to 4 s.f.).
Key Takeaways
- The formula uses the slant height , not the perpendicular height .
- Slant height is found via .
Common Mistakes
- Using the perpendicular height directly in place of .
- Using the total solid height in Pythagoras' theorem instead of the cone's height .
Things to Be Careful About
- Retain sufficient decimal places for before multiplying by .
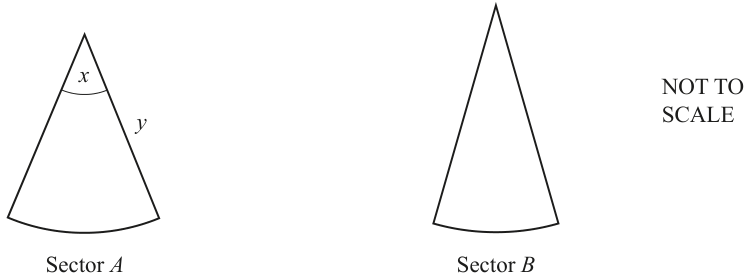
The diagram shows two sectors of circles.
Sector has angle and radius .
The angle of sector is 20% smaller than the angle of sector .
The radius of sector is 20% longer than the radius of sector .
Calculate the area of sector as a percentage of the area of sector .
______ %
Approach
- Express the angle and radius of sector in terms of and .
- Write down the area formulas for sector and sector .
- Compute the ratio .
Working
For sector :
- Angle
- Radius
For sector :
- Angle is smaller:
- Radius is longer:
Calculating as a percentage of :
Answer
115.2
Walkthrough
- The area of any sector with angle and radius is given by .
- For Sector , .
- Sector 's angle is reduced by , meaning it is of , or .
- Sector 's radius is increased by , meaning it is of , or .
- Substituting these into the sector area formula gives:
- As a percentage of , this is .
Key Takeaways
- Because the area of a sector is proportional to and to , changing the angle by factor and the radius by factor changes the area by factor .
- Percentage multipliers allow rapid scaling without needing specific numerical values for and .
Common Mistakes
- Forgetting to square the multiplier for the radius: writing ().
- Thinking the two changes cancel each other out to give .
- Adding/subtracting directly (e.g., ) instead of multiplying by percentage factors.
Things to Be Careful About
- Ensure you square to get before multiplying by .
A shop sells two varieties of apple tree.
The cumulative frequency diagram shows the heights, in metres, of 80 Variety trees.
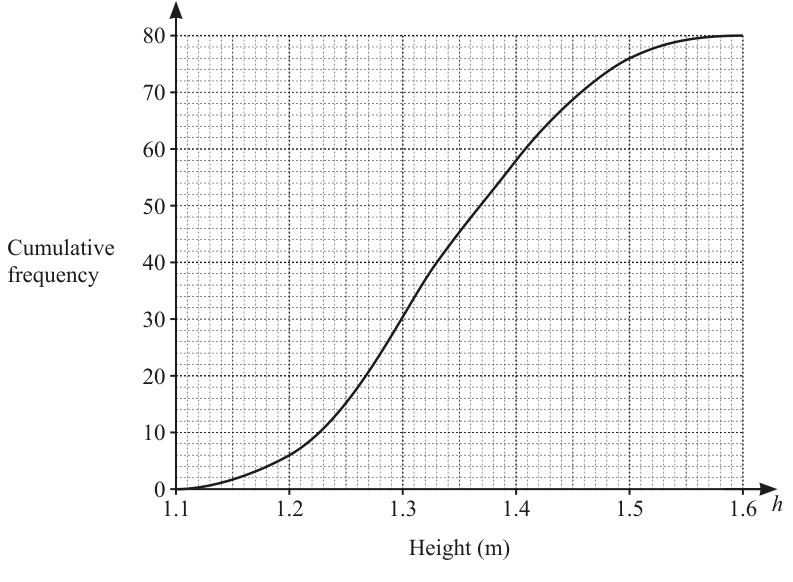
Use the diagram to estimate
Approach
The total frequency is . The median corresponds to a cumulative frequency of half the total frequency:
Read the height corresponding to a cumulative frequency of from the graph.
Working
Locate on the vertical cumulative frequency axis, move horizontally to intersect the curve, and then move vertically downwards to read the value on the horizontal axis ().
The reading is approximately .
Answer
1.33
Walkthrough
To find the median from a cumulative frequency diagram:
- Find the middle position of the data by dividing the total number of items by : .
- Locate on the vertical (cumulative frequency) axis.
- Move horizontally until meeting the cumulative frequency curve.
- Move straight down to read the corresponding height on the horizontal axis. Each small square on the horizontal axis represents . The line crosses at approximately small squares past , giving (accepted range is to ).
Key Takeaways
- For a cumulative frequency curve with total frequency , the median corresponds to the value at cumulative frequency .
Common Mistakes
- Reading from on the horizontal axis instead of the vertical axis.
- Misreading the grid scale on the horizontal axis.
Things to Be Careful About
- Ensure the scale of the horizontal axis is correctly understood before reading values.
Approach
Calculate of the total frequency () to find the cumulative frequency value, then read the corresponding height from the curve.
Working
Calculate the cumulative frequency corresponding to the 30th percentile:
Locate on the vertical cumulative frequency axis, move horizontally to the curve, and read down to the horizontal axis.
The reading on the horizontal axis is approximately .
Answer
1.28
Walkthrough
- Find the 30th percentile position: calculate of , which is .
- Locate on the vertical cumulative frequency axis (each small vertical grid square represents unit, so squares above ).
- Move horizontally to intersect the curve.
- Read down to the horizontal axis to find the corresponding height, which is (acceptable range: to ).
Key Takeaways
- The -th percentile corresponds to the cumulative frequency , where is the total frequency.
Common Mistakes
- Using as the cumulative frequency instead of calculating of .
Things to Be Careful About
- Keep track of the axis scale: each large division ( units) has small squares on the vertical axis, meaning each small square is unit.
Trees with a height greater than are graded Class I.
of the 80 trees are graded Class I.
Find the value of .
= ______
Approach
Trees with height greater than represent the top of the trees. Therefore, the number of trees with height less than or equal to is of the total.
Working
Calculate the number of trees with height :
Locate on the vertical cumulative frequency axis, move horizontally to the curve, and read the corresponding height on the horizontal axis.
The reading is (or in the range to ).
Answer
1.36
Walkthrough
- The question states that of the trees have height . This is trees.
- Since cumulative frequency represents trees with height , we subtract from the total: .
- Find on the vertical axis.
- Move horizontally to the curve and read down to find the height , which is (accepted range to ).
Key Takeaways
- Cumulative frequency graphs measure the number of items less than or equal to a given value. For conditions involving greater than, subtract the upper group count from the total frequency.
Common Mistakes
- Reading the graph directly at cumulative frequency instead of .
Things to Be Careful About
- Ensure you read at on the vertical axis, not .
Complete the frequency table for the heights of the Variety trees.
| Height () | |||||
|---|---|---|---|---|---|
| Frequency | 6 | 24 |
Approach
Read the cumulative frequency at each upper boundary and find each class frequency by subtracting consecutive cumulative frequencies.
Working
From the cumulative frequency curve, the cumulative frequencies at the boundaries are:
- At :
- At :
- At :
- At :
- At :
Calculating the frequencies:
- For : (given)
- For :
- For :
- For :
Answer
The completed frequency values for the remaining intervals are:
- :
- :
- :
28, 18, 4
Walkthrough
- A cumulative frequency curve plots the upper boundary of each class interval against the running total of frequencies.
- To find the frequency of an individual interval, find the cumulative frequency at the upper boundary and subtract the cumulative frequency at the lower boundary.
- For : .
- For : .
- For : .
Key Takeaways
- Frequency of an interval = Cumulative frequency at upper bound Cumulative frequency at lower bound.
Common Mistakes
- Writing the cumulative frequencies directly into the table rather than subtracting to find the individual interval frequencies.
Things to Be Careful About
- Check that the sum of all frequencies equals : .
The frequency table shows the heights of 50 Variety trees.
| Height () | ||||
|---|---|---|---|---|
| Frequency | 15 | 17 |
Using the midpoints of the intervals, the estimated mean height of these Variety trees is .
Calculate the value of and the value of .
= ______
= ______
Approach
First, find the midpoints of the class intervals. Then form two simultaneous equations: one using the total frequency (), and another using the formula for the estimated mean (). Solve the system for and .
Working
Find the midpoint () of each interval:
- For :
- For :
- For :
- For :
Equation 1 (Total frequency):
Equation 2 (Estimated mean):
Calculate the products:
Multiply both sides by :
Substitute into this equation:
Now find :
Answer
p = 10, q = 8
Walkthrough
- Identify the midpoints: For each grouped interval, calculate the midpoint . The midpoints are , , , and .
- Form the total frequency equation: The sum of all frequencies is , giving , which simplifies to .
- Form the estimated mean equation: The formula for the estimated mean is . Substituting the values gives:
- Simplifying gives .
- Solve simultaneously: Substitute into the mean equation to find , then obtain .
Key Takeaways
- Estimated mean of grouped data uses the formula , where represents the class midpoints.
- When two frequencies are unknown, setting up a system of two equations (one for total frequency and one for the mean) is the standard method.
Common Mistakes
- Calculating the wrong midpoints (e.g. using class widths instead of midpoints).
- Forgetting to multiply by the total frequency .
- Arithmetic errors when solving the simultaneous equations.
Things to Be Careful About
- The fourth interval has a width of , so its midpoint is , not or .
- Check that and are positive integers that sum to .
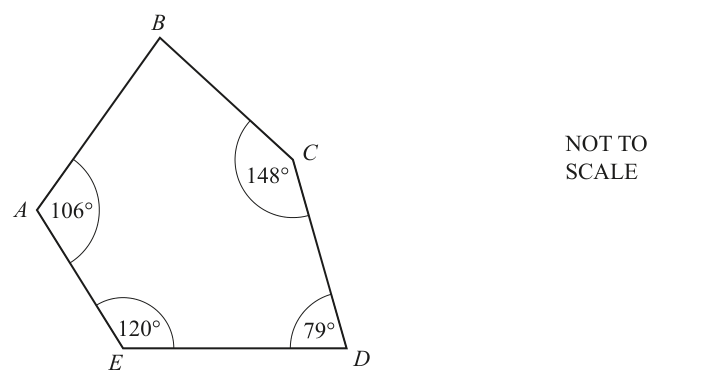
The diagram shows a pentagon.
Approach
The sum of the interior angles of a pentagon is . Add the four known angles and subtract from to find angle .
Working
Answer
87
Walkthrough
The sum of interior angles of an -sided polygon is . For a pentagon (), this is . We add the four given angles () and subtract from to find the missing angle , which is .
Key Takeaways
- The interior angle sum of a polygon depends only on the number of sides.
- Always verify that the sum of angles matches the expected total for the polygon.
Common Mistakes
- Using the wrong formula for the angle sum (e.g., instead of ).
- Arithmetic errors when adding the four given angles.
Things to Be Careful About
- The angle sum formula is , not .
- Ensure all angles are in degrees and the final answer is given without units if the question only asks for the number, though is acceptable.
In the pentagon, and .
Calculate the length .
Show your working and give your answer correct to 1 decimal place.
= ______
Approach
In triangle , we know two sides and , and the angle . Let . Apply the cosine rule to find , which will lead to a quadratic equation.
Working
By the cosine rule in :
Substitute the known values:
Since :
Rearrange into standard quadratic form:
Use the quadratic formula with , , :
Calculate the positive root (since length must be positive):
Round to 1 decimal place:
Answer
9.3
Walkthrough
We are looking at triangle within the pentagon. We know , , and . Let . Since we have two sides and a non-included angle, we could use the sine rule to find , but the cosine rule directly relates the three sides and the known angle (opposite to ). Applying the cosine rule gives . Simplifying this using yields the quadratic equation . Solving this with the quadratic formula gives . Taking the positive root gives , which rounds to to 1 decimal place.
Key Takeaways
- The cosine rule can be used when two sides and a non-included angle are known, resulting in a quadratic equation.
- Always check that the final length is positive and round to the required accuracy.
Common Mistakes
- Using the wrong angle in the cosine rule (e.g., using instead of ).
- Forgetting that is negative, leading to a sign error in the linear term.
- Accepting the negative root from the quadratic formula.
- Rounding too early in the calculation.
Things to Be Careful About
- The question asks for the answer correct to 1 decimal place, so do not round intermediate steps.
- Ensure the cosine rule is set up correctly: , where is the angle opposite side . Here, is opposite , so .
- Working must be shown (nfww) to earn the final mark.
is the point , is the point and is the point .
Approach
Use the distance formula for the length with coordinates and . Set this equal to 13 and solve the resulting equation for .
Working
The distance between and is given by:
Substitute the coordinates of and :
Simplify the term inside the square root:
Square both sides to remove the square root:
Subtract 144 from both sides:
Take the square root of both sides (remembering both positive and negative roots):
Case 1: Positive root
Case 2: Negative root
Alternatively, expanding gives , or . Factoring yields , giving or .
Answer
or
-6 or 4
Walkthrough
First, identify the coordinates of the two points involved in the distance. Point is and point is . The distance formula calculates the straight-line distance between any two points on a Cartesian plane. We set this distance equal to the given value of 13 units.
After substituting the coordinates into the formula , we get . It is crucial to handle the subtraction of negative numbers carefully; becomes .
Squaring both sides removes the radical: . Subtracting 144 leaves . To solve for , we take the square root of both sides. This step introduces ambiguity because both and equal 25. Therefore, we must consider two cases:
Both values are valid solutions as they result in a distance of 13.
Key Takeaways
- The distance formula is derived from Pythagoras' theorem and applies to any two points.
- When solving an equation of the form , always remember to take both the positive and negative square roots ().
- Be careful with signs when subtracting coordinates, especially when dealing with negative coordinates.
Common Mistakes
- Forgetting the sign when taking the square root, leading to only one answer being found.
- Arithmetic errors in calculating , such as getting 4 instead of 12.
- Errors in squaring binomials if expanding rather than using the square root method directly.
- Substituting the wrong coordinate differences (e.g., swapping x and y or signs incorrectly).
Things to Be Careful About
- Ensure you square the entire difference, e.g., , not just .
- Double-check that both final values of satisfy the original distance condition.
Approach
Points , , and lie on a straight line. We are given the ratio . This means the length of the vector is times the length of the vector . We can calculate and then scale it to find , finally adding this to to find .
Working
First, find the vector :
Since , the relationship between the vectors is:
Calculate :
Now, let have coordinates . Since :
Solve for :
Solve for :
So, the coordinates of are .
Answer
(9, -7)
Walkthrough
We are told that is a straight line and given the ratio of lengths . This ratio compares the shorter segment to the entire longer segment . Because they share the starting point and lie on the same line, their direction vectors are proportional.
The vector from to is found by subtracting the coordinates of from : .
The ratio tells us that the vector is times the vector . Multiplying the components of by gives .
To find the position of , we start at and add the displacement vector .
-coordinate:
-coordinate: .
Key Takeaways
- Vectors allow us to move between points efficiently. The vector .
- Ratios of segments on a straight line translate directly to scalar multiplication of their direction vectors.
- If divides in ratio , then . Here, corresponds to '2' parts of the total '5' parts.
Common Mistakes
- Confusing the ratio with . If it were , the multiplier would be .
- Arithmetic errors when multiplying fractions by integers.
- Subtracting coordinates in the wrong order (e.g., instead of ). Note that would be , but since we want which continues from through , we need the direction .
Things to Be Careful About
- Ensure the ratio applies to the correct segments. is the whole length from to , not just the extension .
- Check signs carefully when adding/subtracting negative coordinates.
Approach
The perpendicular bisector of a line segment passes through the midpoint of that segment and has a gradient that is the negative reciprocal of the segment's gradient. We will find these two properties using points and , then write the equation.
Note: Although part (a) had variable , part (c) refers to . In context of Cambridge papers, unless specified otherwise, we use the fixed coordinates given in the main stem for and . The variable was for point . Thus we use and .
Working
Step 1: Find the Midpoint of
Let be the midpoint.
Step 2: Find the Gradient of
Step 3: Find the Gradient of the Perpendicular Bisector
The product of gradients of perpendicular lines is . Let be the required gradient.
Step 4: Find the Equation of the Line
Use the point-slope form with point and gradient .
Expand and rearrange into the form :
Or in mixed number form:
Answer
y = 2/3x + 13/3
Walkthrough
A perpendicular bisector is a line that cuts a segment exactly in half at a 90-degree angle. To define a straight line, we need a point it passes through and its gradient (slope).
-
Midpoint: The bisector passes through the middle of . The average of the x-coordinates is . The average of the y-coordinates is . So the midpoint is .
-
Gradient of RS: Rise over run. Change in y is . Change in x is . Gradient is .
-
Perpendicular Gradient: Perpendicular lines have gradients that are negative reciprocals. Flip the fraction to get , then change the sign to get positive .
-
Equation: Using , substitute , , and :
.
So the equation is .
Key Takeaways
- The perpendicular bisector always passes through the midpoint.
- The gradient of a perpendicular line is .
- You can find the y-intercept by substituting the known point and gradient into .
Common Mistakes
- Calculating the gradient of incorrectly (swapping numerator/denominator or sign errors).
- Failing to take the negative reciprocal correctly (forgetting to flip OR forgetting to change sign).
- Arithmetic errors when finding the common denominator for the constant term ().
- Using the wrong point (e.g., using instead of the midpoint).
Things to Be Careful About
- The question asks for the equation of the bisector of . Do not confuse this with the bisector of or any other segment.
- Ensure the final equation is in a standard accepted form (usually or ).
- Simplify fractions where possible.